#wokwi simulation
Explore tagged Tumblr posts
Visit Tumblr Blog
Explore Tumblr blogs with no restrictions, modern design and the best experience.
Last Seen Tumblr Blogs


Fun Fact
Premium Tumblr themes are available from anywhere between $9 to $49.
Text
Robotocs
0 notes
Text
youtube
Wokwi Versus Reality
0 notes
Text
MicroPython mit ESP32: Schaltungen entwerfen und testen mit Wokwi

Im heutigen Beitrag möchte ich dir gerne zeigen, wie du eine Schaltung am für den ESP32 online erstellen und simulieren kannst. Das ist besonders vom Vorteil, wenn du noch nicht soviel Erfahrung oder einfach gerade benötigten Bauteile nicht zur Hand hast. https://youtu.be/THfZxJQZW9Y Für diese Simulation verwende ich Wokwi welches ich dir bereits für den Arduino im Beitrag Arduino & Raspberry Pi – Online Simulator für Schaltungen vorgestellt habe. Hier möchte ich speziell auf die Programmierung mit MicroPython eingehen und dir ein paar Schaltungen und Kniffe zeigen.
Was benötigt man für Wokwi?
Das Onlinetool Wokwi ist kostenfrei und benötigst auch keine Anmeldung. Wenn du jedoch deine Projekte dauerhaft speichern möchtest, dann musst du dich anmelden. Ansonsten benötigst du nur einen Browser wie dem Google Chrome oder Mozilla FireFox (für diesen Beitrag verwende ich den Chrome)

Du kannst dich via Google, GitHub oder mit deiner E-Mail & dem Passwort anmelden / registrieren. Der einfachste Weg ist über das Google-Konto, jedoch möchte die Seite so einige Berechtigungen verlangt, habe ich mich für GitHub und der 2Faktor Authentifizierung entschieden.
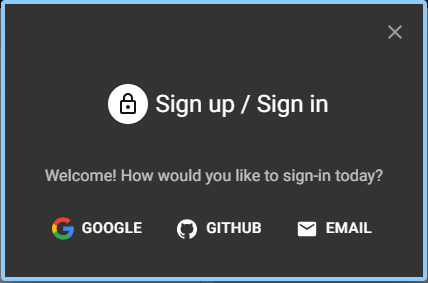
Anmeldung / Registrierung an Wokwi via Google, GitHub oder E-Mail Einen Mikrocontroller benötigst du nicht, da alles, was du machst, quasi online geschieht!
"Hello World!" auf dem ESP32 mit MicroPython in Wokwi
Starten wir mit einem kleinen Beispiel und geben den Text "Hello World!" auf der Kommandozeile aus. Dazu kannst du nachfolgenden Link verwenden https://wokwi.com/projects/401020964205534209.

Ausgabe von "Hello World!" in Wokwi mit MicroPython am ESP32 Die Ausgabe erfolgt, wenn du im Bereich "Schaltung" auf die Play-Taste drückst. Zusätzlich läuft oben rechts noch zusätzlich ein Timer, welcher die Zeit der Ausführung anzeigt. Das kleine Programm beendet sich sofort, jedoch läuft der Timer weiter, das ist zum Anfang meist verwirrend. Der Timer bezieht sich quasi auf die Ausführung der Simulation und nicht auf das Programm! # Gibt die Textzeile "Hello World!" # auf der Kommandozeile aus. print("Hello World!")
Aufbau und Simulation einer Schaltung in Wokwi für den ESP32
Du kannst, wenn du nicht aufpasst, deinen ESP32 zerstören, mit Wokwi kannst du deine Schaltung aufbauen, testen, ohne dass du ein Stück Hardware in die Hand nehmen musst. Fangen wir wieder mit einem einfachen Beispiel an und aktivieren / deaktivieren eine LED. https://wokwi.com/projects/401022295974890497
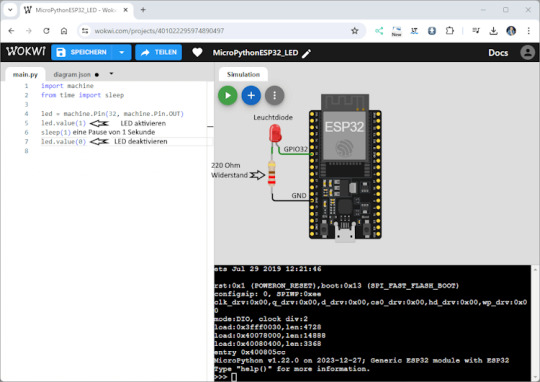
Schaltung - LED mit Vorwiderstand am ESP32 in Wokwi Den Code kennst du bestimmt schon aus dem Beitrag MicroPython mit ESP32: GPIO-Pins steuern – LEDs und Taster. # Modul zum ansteuern der GPIOs am # Mikrocontroller import machine # Modul zum einlegen einer kleinen # Pause im Code from time import sleep # LED mit dem GPIO 32 als Ausgang led = machine.Pin(32, machine.Pin.OUT) # LED aktivieren led.value(1) # einlegen einer Pause von 1 Sekunde sleep(1) # LED deaktivieren led.value(0)
Piezo Buzzer in Wokwi in MicroPython programmieren
Du kannst auch die bisher gezeigten Beispiele in Wokwi nachbauen, unter anderem die Schaltung mit dem Piezo Buzzer, dabei wird der Ton dann vom PC abgespielt. https://wokwi.com/projects/401024173753518081

Piezo Buzzer am ESP32 in einer Simulation in Wokwi # Modul zum ansteuern der GPIOs am # Mikrocontroller import machine # Modul zum einlegen einer kleinen # Pause im Code from time import sleep # Buzzer mit dem GPIO 25 als Ausgang buzzerPin = machine.Pin(25, machine.Pin.OUT) # erzeugen eines PWM Signals buzzer = machine.PWM(buzzerPin) # setzen der Duty auf 512 buzzer.duty(512) # Frequenz des Tones 1000 Hz buzzer.freq(1000) # eine Pause von 0,5 Sekunden sleep(0.5) # PWM Signal & Pin deinitialisieren # damit wird zusätzlich der Ton deaktiviert buzzer.deinit()
Ausblick
Im oben verlinkten YouTube Video zeige ich dir einige Schaltungen und erläutere dir, wie du diese Schaltungen Schritt-für-Schritt aufbaust. Im nächsten Beitrag möchte ich jedoch wieder zurück zum "echten" Mikrocontroller wechseln und die erläutern, wie du einen DHT11 Sensor mit MicroPython auslesen kannst. Read the full article
0 notes
Note
Hi! your project on Geekblr looked so cool!! I always wanted to use coding for making some embedded systems projects but the stuff I saw on your video I only ever saw on my ElectricalEngineering Labs. do you buy the stuff from amazon or??
I usually use Amazon or places like Pi Hut and Pimoroni which are rlly good for hobbyists
But I'm based in the UK so if you are somewhere else, you may have to find your own resources
(and I can never recommend wokwi enough, it's free and online and you can simulate all your microcontroller needs before spending money)
3 notes
·
View notes
Text
0 notes
Video
#Wokwi تعلم مع محاكاة مشروعات انترنت الأشياء بدون استخدام مكونات حقيقية https://youtu.be/DAhx6Jw5XrQ #Arduino #ESP32 #IoT #Simulation
0 notes
Text
Wokwi – Simulate IoT Projects in the Browser
https://wokwi.com/ Comments
0 notes
Photo

New top story on SPARTA NEWS: Wokwi – Simulate IoT Projects in the Browser https://ift.tt/AbkTlvw
0 notes
Text
Digging into an ATtiny Simulator Bug with GDB
Being able to track down a bug in a mountain of source code is a skill in its own right, and it’s a hard skill to learn from a book or online tutorial. Besides the trial-by-fire of learning while debugging your own project, the next best thing is to observe someone else’s process. [Uri Shaked] has given us a great opportunity to brush up on our debugging skills, as he demonstrates how to track down and squish a bug in the Wokwi Arduino simulator.
A user was kind enough to report the bug and include the offending Arduino sketch. [Uri]’s first step was to reduce the sketch to the smallest possible program that would still produce the bug.
Once a minimal program had been produced, it was time to check whether the problem was in one of the Arduino libraries or in the Wokwi simulator. [Uri] compiled the sketch, loaded it onto a ATtiny85, and compared the behavior of the simulator and the real thing. It turns out the code ran just fine on a physical ATtiny, so the problem must have been in the Arduino simulator itself.
To track down the bug in the simulator, [Uri] decided to break out the big gun—GDB. What follows is an excellent demonstration of how to use GDB to isolate a problem by examining the source code and using breakpoints and print statements. In the end, [Uri] managed to isolate the problem to a mis-placed bit in the simulation of the timer/counter interrupt flag register.
If you’d like to see more of [Uri]’s debugging prowess, check out his dive into an ATtiny’s write protection and configuration fuses. If you’ve been wowed by the power of GDB and want to learn more, check out this quick tutorial!
youtube
Digging into an ATtiny Simulator Bug with GDB was originally published on PlanetArduino
0 notes
Text
10 beautiful smartLED projects (addressable LEDs) using Arduino simulator on Wokwi | Arduino
https://koliasa.com/10-beautiful-smartled-projects-addressable-leds-using-arduino-simulator-on-wokwi-arduino/ 10 beautiful smartLED projects (addressable LEDs) using Arduino simulator on Wokwi | Arduino - ...
0 notes
Text
youtube
Arduino UNO CD74HC4067 Demultiplexer 4 Way 4 Phases Traffic Lights Programming Part 2
#programming#traffic light#simulator#wokwi#arduino uno#tutorials#arduino#how to#Demultiplexer#CD74HC4067#4 Way 4 Phases#Youtube
1 note
·
View note
Text
Arduino UNO CD74HC4067 Demultiplexer 4 Way 4 Phases Traffic Lights Programming Part 1
youtube
#programming#traffic light#tutorials#how to#wokwi#simulator#arduino#Arduino UNO#CD74HC4067#Demultiplexer#4 Way 4 Phases#Traffic Lights Programming#Youtube
1 note
·
View note
Text
youtube
Push Button Multi LEDs Controller - Switch Case Vs Array Arduino Programming for Beginners Online Arduino Simulator Virtual Breadboard basic sketch examples: Programming and write Arduino UNO sketch with ezButton Arduino library for controlling LEDs toggle switch ON/OFF with a push button.
#programming#how to#simulator#wokwi#arduino#tutorials#Push Button#LEDs Controller#Virtual Breadboard#Youtube
0 notes
Text
youtube
Push button Short press long press led controller basic io arduino uno programming tutorial for beginners
0 notes
Text
youtube
Binary Mapping Encode Decode Arduino UNO Seven Segment Programming for Beginners
https://wokwi.com/projects/396409264409008129
#programming#how to#tutorials#arduino#wokwi#simulator#Binary Mapping#Beginners#Seven Segment#Arduino UNO#Encode#Decode#Binary#Youtube
1 note
·
View note
Text
youtube
HX711 Tare Calibration Scaling - Simple basic usage Arduino UNO digital weighing scale simulate 5Kg load cells digital weighing scale hx711 hx710 datasheet programming reference on wokwi arduino uno online simulator. how to calibrate a hx711 load cell for 5kg load?
#HX711#programming#wokwi#hx710#Arduino UNO#load cells#online simulator#digital weighing scale#youtube#arduino#tutorials#how to#simulator#datasheet#Youtube
0 notes