#arduino uno
Explore tagged Tumblr posts
Visit Tumblr Blog
Explore Tumblr blogs with no restrictions, modern design and the best experience.
Last Seen Tumblr Blogs


Fun Fact
When “GIF” was named word of the year in 2012, Oxford Dictionaries U.S.A. credited Tumblr for pushing the word.
Text

я также начал работать с микроконтроллерами. сейчас я могу показать лишь шаговый двигатель подключенный к драйверу
3 notes
·
View notes
Text
The Rise of Arduino Compatible Boards - An Exploration of the Expanding Ecosystem
The Genesis of an Open Source Movement When Arduino was launched in 2005, it helped spawn the age of accessible, affordable microcontroller boards and platforms. By providing a common hardware and software standard that was simple to use but still powerful, Arduino opened the door for non-engineers and electronic hobbyists to easily create interactive projects and prototypes. This drastically lowered the barrier to entry for physical computing and embedded systems. Within a few years, the Arduino platform had grown into a thriving global community with developers of all skill levels sharing code, tutorials, and ideas. The Growing Demand Inspires New Options As Arduino gained popularity and demand increased, companies recognized an opportunity to expand the ecosystem. Rather than competing directly with Arduino, many started releasing boards that were compatible with the Arduino software and libraries. These clones and derivatives allowed users to benefit from Arduino's openness while also having alternative hardware options at lower price points or with additional features. Some boards were nearly identical clones while others incorporated unique enhancements. Regardless, their compatibility with the Arduino IDE gave users the flexibility to choose a board that best fit their specific needs and budgets. A Proliferation of Board Types and Form Factors Today, the variety of Arduino Compatible boards available is staggering. In addition to the classic Uno and Nano form factors, there are boards shaped as mini PCs, single-board computers, wearables, educational kits, drones, robots, and more. Each brings something new while still maintaining the foundational principles that make Arduino great. For example, some focus on size and portability while others emphasize power, connectivity, or cost. Educational boards make learning to code more interactive and hands-on. Industrial boards enable Arduino to be used in professional contexts that require certifications or rigorous testing. A World of Enhancements Beyond the Original Spec Many Arduino compatible boards one-up the original Arduino specs by including features like WiFi, Bluetooth, GPS, high-speed microprocessors, more memory and flash storage, additional input/output pins, and specialized sensors. Some push processing power to the level of Raspberry Pi while shrinking the board size. Others add compatibility for new languages beyond just C/C++. Interfaces like Ethernet, USB, and add-on shields expand what these boards can interface with. Many also supply dev kits with components, sensors, motors and displays to simplify prototyping of specific project types. Get more insights on Arduino Compatible
Unlock More Insights—Explore the Report in the Language You Prefer
French
German
Italian
Russian
Japanese
Chinese
Korean
Portuguese
Vaagisha brings over three years of expertise as a content editor in the market research domain. Originally a creative writer, she discovered her passion for editing, combining her flair for writing with a meticulous eye for detail. Her ability to craft and refine compelling content makes her an invaluable asset in delivering polished and engaging write-ups.
(LinkedIn: https://www.linkedin.com/in/vaagisha-singh-8080b91)

#Arduino Compatible#Microcontroller#Open-Source Hardware#Electronics#Prototyping#DIY#Hobbyist#Maker#Microcontroller Board#Arduino Uno
0 notes
Text
youtube
Wokwi Versus Reality
0 notes
Text
0 notes
Text
SOMEONE GIVE ME A BLOODY INTERNSHIP 😭
#upcoming electronics engineer#proficient in embedded system in c. c++. c. python. and dsa in c++. and programming micro controllers like arduino uno and stm32.#PLEASE HIRE ME PAID OR NOT.
2 notes
·
View notes
Text
FORGOT I HAD PROGRAMMER HOMEWORK. WOE.
3 notes
·
View notes
Text
Arduino UNO R3 Board ATmega328P DIY Kit | Diykit Solutions
Explore the Arduino UNO R3 Board ATmega328P DIY Kit from Diykit Solutions! Unleash your creativity in electronics and robotics with high-quality materials sourced from trusted suppliers.
Arduino UNO R3 Board ATmega328P DIY Kit
0 notes
Text
Arduino UNO R3 Based Advance Starter Kit
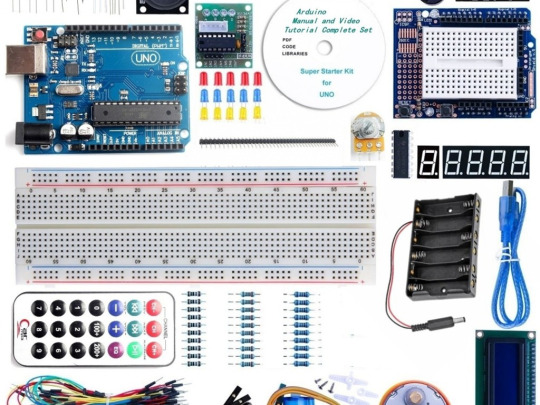
Regardless of your level of familiarity with Arduino, this Arduino UNO R3 Based Advance Starter Kit provides an enjoyable opportunity to broaden your understanding.
Constructing original and uncomplicated projects is an excellent method for gaining experience in coding and understanding basic electronic circuits.
This kit provides all the essential components for exploring electronics with an Arduino, plus additional items to advance your skills from a beginner to an enthusiast level. It contains all the essentials, including an UNO board, breadboard, cables, LEDs, resistors, and pushbutton switches.
An ideal choice for robot prototyping, as it comes with a variety of valuable components such as Servo motors, Ultrasonic sensors, Relays, and LCD modules. Additionally, it also includes several useful component kits like an RFID kit and a water sensor specifically designed for automating planting projects.
Included are the characteristics, qualities, and capabilities that this product has to offer.
Discover the convenience of an all-in-one kit that serves as an excellent introduction to coding.
Ideal for Beginners in Arduino Programming
This pack offers a range of components for experimenting with various projects.
#electronic components#sales in chennai#arduino#robotic kits#Arduino UNO R3 Based Advance Starter Kit
1 note
·
View note
Text
Arduino Uno R3 with Cable (Original Atmel MGA16u2) - is now at Dhaka Robotics.
আপনি কি আপনার DIY ইলেকট্রনিক্স প্রকল্পগু���ি প্রাণবন্ত করতে প্রস্তুত? Arduino Uno R3 নতুনদের জন্য নিখুঁত সূচনা পয়েন্ট এবং প্রোফেসনালদের জন্য এটি নির্ভরযোগ্য । Original Atmel MGA16u2 দ্বারা চালিত, এই মাইক্রোকন্ট্রোলার বোর্ডটি অতুলনীয় পারফরম্যান্স এবং সামঞ্জস্যতা সরবরাহ করে। আপনি রোবট, হোম অটোমেশন সিস্টেম তৈরি করছেন অথবা কেবল পরীক্ষা-নিরীক্ষাই করছেন , Arduino Uno R3 হল আপনার জন্য সঠিক সরঞ্জাম।
আপনি অনলাইনে আমাদের ওয়েবসাইটে ভিসিট করে সরাসরি অর্ডার করতে পারবেন।
পণ্য কেনার লিংক : https://dhakarobotics.com/.../1029-arduino-uno-r3-with.../
যেকোনো প্রোয়জনে কল করুন এই নম্বরে :
+8801740298319
Visit Our Website: https://dhakarobotics.com/

0 notes
Text

Estimates vary, but there are generally a few thousand stars bright enough to see in the sky on a clear, moonless, cloudless night away from city lights. You might be able to identify a couple of them, along with a handful of constellations. But what about the rest? If they intrigue you, you might want to build this Starmap designed by Shabaz over on element14.
Star charts aren’t anything new and astronomers (both amateur and professional) use them all the time. But we like the portable nature of Shabaz’s Starmap, which would be easy to carry along on a camping trip to a dark sky area. It doesn’t require any internet connectivity to work, so it is perfect for use in rural settings. And the round LCD display is pretty darn attractive.
That screen is a 1.28” GC9A01 round TFT LCD with a resolution of 240×240, intended for use in smartwatches. It receives its graphics from an Arduino UNO R4 Minima, modified for 3.3V logic levels to suit the display. Shabaz also added a flash memory chip large enough to contain the star chart data.
The stars visible in the night sky at any given time depend on where you are on the planet, so this uses a GPS receiver module to find the user’s coordinates. Its Arduino sketch then determines the positions of the visible stars and draws them to the display.
1 note
·
View note
Text
https://electronicsbuzz.in/arduino-shield-simplifies-use-of-fibre-optic-datalink-in-mpu-designs

#OMC#design#compatible with Arduino Uno#transmitter#receiver#drivers#industry#technology#powerelectronics#powersemicondutor#powermanagement
0 notes
Video
youtube
IOT Based Agriculture Monitoring and Controlling System using Arduino Unohttps://www.youtube.com/watch?v=t607LVFfZ4I
#youtube#IOT Based Agriculture Monitoring and Controlling System using Arduino Uno https://www.youtube.com/watch?v=t607LVFfZ4I
0 notes
Text
youtube
PJON Arduino UNO to LGT8F328P Quick BlinkTest Softwarebitbank Single Wire
1 note
·
View note
Text

Purchase high-quality components for your next project from the most affordable store in India.🔥
For more detail : www.sensorembedded.com
0 notes
Text
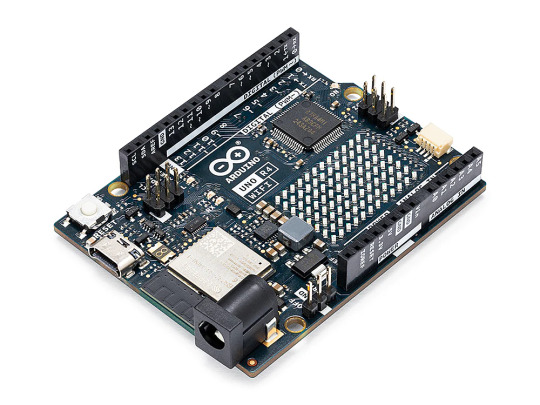
Arduino Uno R4 Board Combines CAN Bus Port with IoT Capabilities
The Arduino UNO R4 WiFi combines the RA4M1 microprocessor from Renesas with the ESP32-S3 from Espressif, forming an all-in-one tool for engineers with improved processing power and a diverse array of new peripherals. The board includes a CAN interface and an SPI port, enabling users to reduce wiring and perform parallel tasks by connecting multiple shields. The CAN interface does not provide a CAN transceiver.
0 notes
Text
Just finished making a circuit diagram in Fritzing and I don’t know if I’m doing it wrong or something because it was pretty annoying to put together.

This is the diagram that I made, really simple yet it took me a while. It wasn’t hard to find the parts that I wanted to add, but the controls for moving them around were simply annoying to use. Not to mention the weird zoom in/out controls. For some reason I couldn’t use the touchpad to zoom out? Only zoom in? Idk, I’ll make another post if it gets better with use.
If you want to see my circuits homework for whatever reason, it’s under the cut.
Here’s a video of the circuit in question working in real life. The goal is to make the light turn off for two seconds only after the button is released. LED is in series with a 100 ohm resistor just to make sure it doesn’t burn out (and to make it a little less painful on the eyes). Button is wired in a pulldown resistor setup (the detector is after the button) with a 10k resistor. This is so that when the button is pressed, the value reads as high.
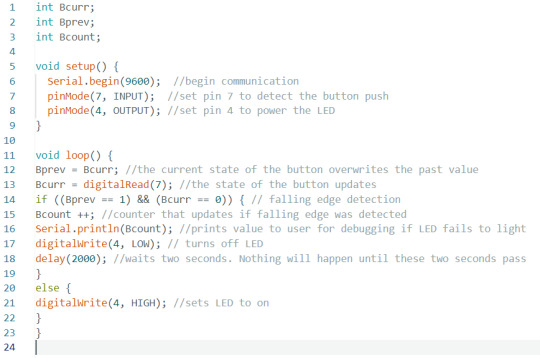
This is the C++ code that is running on the Arduino uno. It just uses an If else statement to control the state of the LED according to the button. Read the comments (grey text) for a short explanation of what each line does. If you want a more in depth explanation uhh message me I guess.
#pretty simple circuit but it touches on a lot of topics#idk it's simple to me#stemblr#arduino#electrical wiring#c++#c++ programming#fritzing#circuit diagram#unironically my homework#the documentation takes more time than anything else :/
9 notes
·
View notes