#wordpress current date shortcode
Explore tagged Tumblr posts
Visit Tumblr Blog
Explore Tumblr blogs with no restrictions, modern design and the best experience.
Last Seen Tumblr Blogs


Fun Fact
Tumblr Inc. is using 66 technologies for its website.
Text
Techcofinds.com: Your Ultimate Guide to Top SEO Tools for Superior Online Performance
Welcome to Techcofinds.com, your ultimate guide to the finest SEO tools that can significantly improve your online performance. In today's competitive digital landscape, search engine optimization (SEO) is crucial for businesses and marketers alike. With the right SEO tools at your disposal, you can optimize your website, boost search engine rankings, and attract organic traffic.

Keyword Research Tools
The foundation of any successful SEO strategy lies in keyword research. Techcofinds.com offers a handpicked selection of powerful keyword research tools to help you find the most relevant and high-potential keywords for your niche. "KeywordGenius Pro" is a standout tool that not only suggests keywords but also provides valuable insights into keyword difficulty and competitor analysis. Additionally, "RankTrackerX" allows you to track your keyword rankings over time and compare them with your competitors, giving you a competitive edge.
On-Page SEO Optimization Tools
Optimizing your website's on-page elements is vital for search engine friendliness. Techcofinds.com's on-page SEO tools are designed to ensure your website is well-structured and fully optimized. "SiteAuditor Pro" conducts comprehensive website audits, identifying and fixing technical issues that might hinder your site's performance. Meanwhile, "ContentOptimizerX" helps you create SEO-friendly content by analyzing keyword usage, readability, and relevance.

Backlink Analysis and Link Building Tools
Building a strong backlink profile is essential for improving your website's authority. Techcofinds.com provides a range of backlink analysis and link-building tools to help you establish a robust link profile. "LinkBuilderX" analyzes your competitors' backlinks, suggesting potential link targets for your website. Additionally, "LinkMonitor360" allows you to monitor the health and status of your existing backlinks to ensure their effectiveness.
Competitor Analysis Tools
Understanding your competitors' strategies is critical for refining your SEO approach. Techcofinds.com offers various competitor analysis tools to gain valuable insights. "CompetitorSpyX" allows you to analyze your competitors' organic search rankings, top-performing keywords, and traffic trends. Moreover, "SocialEngage360" tracks your competitors' social media engagement metrics, helping you identify successful social strategies.
Techcofinds.com is a treasure trove of the best SEO tools to enhance your online performance. By leveraging powerful keyword research, on-page optimization, backlink analysis, and competitor insights, you can boost your search engine rankings and attract organic traffic. Embrace the power of these SEO tools, and witness significant improvements in your online presence. Stay ahead of the competition with Techcofinds.com's curated selection of top-notch SEO tools tailored to elevate your website's performance. Enhance your digital journey today!
#best seo tools#wordpress current date shortcode#Error establishing a database connection#seo tools#wordpress current#database connection
0 notes
Text
Features and benefits of smart quiz builder
The most important features that SQB currently supports
The most feature-rich and quiz platform friendly to the user in the world is SQB. The smart quiz builder is the most powerful, and friendly to the user. It is a customizable quiz plugin for WordPress is Smart Quiz Builder (SQB). SQB has a lot of features that will help you get more leads and sell more products. These features cost between $39 and $99 per month on other comparable platforms. The features on this page show Smart Quiz Builder accomplishes a great deal more for a fraction of the cost! There is no fee. one-time fee only.
You can use SQB-powered quizzes to learn about your audience's challenges. This is where they are in their journey. The goal is to assign the right tags based on their answers. You can add them to the right follow-up sequence. You will send them to a personalized offer page. The Smart quiz builder addresses their specific challenges!
Question Types
Supported Personality Assessments
Scoring Survey Calculator
Form
Polls
Question Types
Supported Single Choice
Multiple Choice
Open-Ended
Text
Numerical Value Yes/No True/False
File
Upload
Fill-in-the-Blank
Rating Scale
Ranking/Choice
Matrix-Style
Slider
Dropdown Date
Complete the Sentences
Email Phone
Number
Integrations
ActiveCampaign
AcumbaMail
AWeber
Autonami ConvertKit
Drip
Encharge
You can get SQB to create a PDF report for your quiz takers. It is completely personalized and based on their results!
What's better?
This is automatic.
This is impossible on other quiz platforms!
Impressive Templates for Your Quizzes
These stunning templates will enable you to create quizzes that stand out! You can get tips on Features of smart quiz builder.
The Smart quiz builder has a beautiful design, simple to use, it is customizable, and friendly for mobile. Keep visitors on your site longer. Increase engagement and the rate at which quiz answers complete. Increase conversions. Personalized confetti and animations. There is a creation of Content and personalization is everything!
You will be able to show a personalized animated message (to congratulate users on passing, completing, or taking the quiz, for example). It is going to help you wow your students and looks amazing!
Certificates for Quizzes
The Smart quiz builder can design, personalize, and award certificates to students who complete your quiz! Name, quiz title, score, result, date, signature, and other information is on display. You can likewise grant declarations in view of the explicit score, reach or result in type. You can also completely personalize the contents of your certificate. It is by uploading your own background image.
Student Dashboard
You can create a stunning student-facing dashboard using Smart quiz builder. Your students can view their completed quizzes, check their results, and more. You can also display quizzes for which they have not yet registered.
Options for Customization SQB comes with a sophisticated customizer. In the backend, you have complete control over what your users see in the front end. Make it your own by incorporating your personal style and branding.
You will receive a shortcode for your quiz from SQB. You can distribute it on any WordPress page.
Image Questions and Responses
You can include images, GIFs, videos, and emojis in your questions. Images and GIFs can be in your responses.
Personalized Quizzes
You can personalize your quiz by asking for your first name. You are using it to customize the whole experience. It can be set up on the SQB >> Settings page.
With branching logic, you can use the visual funnel builder in Branching Logic SQB. The goal is to create smart quiz and survey funnels. The participants' responses to the previous question determine the next one.
Advanced Rules
You can get SQB to always send users to a particular outcome. This is on how they answered a particular question. The users select a specific answer. You can also get SQB to skip the remaining questions and direct them to the outcome screen or page.
Additionally, this depends on how they responded to a particular question. You can disable the opt-in display. Branching logic and advanced rules can be to create a powerful quiz funnel!
Weighted Questions
In a scoring quiz, you can give your answers positive or negative points! SQB will include the focuses in light of the chose answer decisions. The goal is to guide to the right result in view of the score. Based on the scoring range, you can send users to different outcome screens.
Display Results on the Opt-in Screen
You now have the option to display quiz results (by outcome type or score). It is on the Opt-in screen to pique respondents' interest. The goal is to increase their likelihood of opting in for a full breakdown of their results!
Redirect Outcomes
Get Rid of the Results Screen Depending on their results, you can send quiz takers to any page you want. There is mapping of different results for different pages on your website. It is even a third-party website.
Skip Start Screen
You can disable the display of the start screen in the SQB >> Display Settings page. You want SQB to skip the start screen (also known as the start button). You can display the first question wherever you publish the quiz.
Skip Opt-in
Don't want your contact information collected?
After a user has completed the final quiz question, SQB can direct them to the outcome screen. SQB will not display the opt-in screen if you disable it.
SQB's analytics and reports
This will give you all the information. You need to make educated decisions and expand your business!
It accompanies investigation/graphs that will show you the number of individuals. It picked a particular response decision. This is the most famous decision. There are possibilities couldn't care less about, and so forth.
The Smart Quiz Builder dashboard will allow you to check each quiz's performance. There are results to determine which ones perform best.
Manage Leads At the end of the quiz, a list of all users who opted it. Their scores, correct and incorrect answers, and other information can be here.
Social Share
Want your quiz to become shared? You can assist the sharing of results!
You need to put social share buttons on the screen. There are final results. The participants can share their score or result on social media with a single click.
Tag Choices for Answers and/or Outcomes Tag choices for answers.
Give the outcomes tags.
SQB will send the tag(s) that the respondents get to the associated email stage.
Label Content on the Result Screen
You can dole out answer-level labels. You can get SQB to show tag-put together satisfied to the result screen. It'll permit you to ultra customize the test insight for your respondents.
Notification by Email to Students and Administrators
You can send your students an email with the quiz's results. There are questions, answers, and other details. It can happen shortly after they have finished the quiz. Set up SQB so that when someone finishes the quiz, you, as the site owner, will receive an email. The benefits of Benefits of smart quiz builder are quite useful.
Calculations at the category level for quiz scoring
SQB supports both category-level calculations and question categories.
Each question on your quiz can have a category assigned to it by you. SQB will calculate and display category-level breakdown in the totals.
Using merge tags, you can show both the total points in each category. This is the total score on the final outcome screen.
Category Shortcode Show personalized messages for different categories based on score (range)!
You can display content tailored to this "category and scoring range" combination. The score in category=Math is between 0 and 50. The content will only be by SQB to those with scores between 0 and 50 in this category. You can explore the Benefits of smart quiz builder.
On the same outcome screen, you can add shortcodes. You can use the category shortcode to show different targeted messages. For example
Portable view Customizer
This is an ever-increasing number of individuals. They are involving their cell phones in everything. The advancing substance for mobile is significant! SQB includes a robust mobile view customizer! You can give your mobile customers a completely different look.
Support for GDPR You can get SQB to show users from GDPR countries the terms. SQB's Settings page, under the GDPR tab, is the first place to enable GDPR settings.
You can add GDPR terms to your opt-in form in the SQB >> Quiz >> Lead Generation screen after enabling GDPR. The terms are completely customizable. It will only display for GDPR-eligible users.
Clone Questions and Results In SQB, you can now clone your questions and results! Because you can clone your previous questions or results, it will save you a lot of time. You don't have to start from scratch to customize it.
Pre-built Quizzes Now Supported by SQB You don't have to create a quiz from scratch. Instead, you can change a quiz from our library.
Beautiful Templates SQB comes with attractive, contemporary templates. Pick a format and tweak the style utilizing SQB's high level customizer.
Matrix-Style Questions for Surveys and Quizzes SQB now supports matrix-style questions! You can also give each option in the matrix "points." SQB will add up the points based on the answers users. It will select and show an average of the points earned on the result screen! In the reports page, SQB will display the total number of responses. You will get each matrix option.
Ranking/Choice Questions
You can use the ranking/choice question type. You want to send a survey in which you want people to reorder the answers. The total number of responses for combination is on display. It is important to thank SQB:
Red, blue, or green, for example, 40%, red, blue, and green: 20%. You'll find comprehensive statistics. It will show you the total responses for each combination.
Embed Code Make use of SQB's embed code feature on any website, even if it isn't powered by WordPress. Install WordPress first, then create your quiz there. Then, in SQB, create an embed code for your quiz. Publish that code on ANY website, even one that isn't powered by WordPress! Even if you do not have SQB installed, the quiz will still be there!
HTML-Form Integration
SQB is compatible with the most popular marketing automation and email marketing platforms. The good news is that you can use the HTML-form integration. The goal is to integrate with any platform. It supports HTML code-based integration. This is your CRM or email platform that does not have a direct connection to SQB.
SQB supports a variety of animation effects that transition between screens. It's up to you whether you want to use a cool slide-down or slide-right animation effect.
Avoid Outcome Mapping In a personality test, you must map responses to results. You can set SQB to skip mapping for certain questions. They do not assist you in determining the final outcome.
Email Verification
Want to make sure that your customers don't sign up with fake email addresses? QuickEmailVerification.com offers free account signup. And on the SQB opt-in tab, enable email verification.
Options for Quiz Display
In the bottom right corner of your screen, you can display your quiz in a popup, on a page, or even as a popover. A time delay can be your popover quiz. SQB can also be set up to only show it to users if they haven't already seen it.
Timed Quiz Add a countdown timer to create a sense of urgency. SQB can be set up to either direct users to the outcome screen. There is a time expired message. It is at the top or to send them over the opt-in screen in the event that the timer runs out.
Retake Quiz Want to grant users the ability to retake the quiz after they have completed it? If so, "retake" can be at the quiz level. You can likewise set the top permitted retake limit.
Question/Answer Randomization
Do you want the questions and answers to be in a random order each time someone takes the quiz? This can be in SQB under Quiz Settings on the Settings page.
Your quiz can be in advance as you build it. Don't bother distributing the test to test it. In preview mode, the user views and tests the quiz.
Button Animation
To make your SQB buttons even more fun and engaging for your users, you can add a cool animation effect. When your users click the button to take the quiz, there is an application.
Five Kinds Of Popups Smart Quiz Builder is able to work with five different kinds of popups.
Button
Click Exit
Intent Time on Page
Percentage of Scrolled Page
Corner Popup
Having trouble expanding your email list?
That must change!
Smart Quiz Builder's stunning quizzes can now replace your drab, static plugins. This is perfect for form builders!
The quizzes have higher conversion rate than static opt-in forms. You can also learn about your prospects' goals, aspirations, and challenges. There are specific needs by the data. You can create content that addresses their specific issues.
You can use SQB to display quizzes on a specific page. The users exit your site (exit-intent). They scroll to a particular section of your page, or based on how much time they spend on your site.
Popups of five different kinds are now supported by SQB:
Button Click When a user clicks on a button on your website, this will appear.
The Exit Intent Popup will appear whenever a user leaves a particular page on your website.
Percentage of page scrolled (scroll-based popup)
This is a scroll-based popup where you can configure the percentage of page in scrolling. There is a quiz or survey will appear as a popup. Time on page in seconds This will appear after the specified amount of time (in seconds).
Corner Popup • SQB will provide you with a short code and embed code for each quiz. This is a popover quiz that will appear in the right corner of your page. The embed code is on any website, including non-WordPress websites.
• Your quiz can be using a shortcode on any WordPress page.
• Image/text questions and answers are both supported by SQB!
• You can try to keep the audience interested. They are adding a variety of animation transition effects between questions.
Calculators
Before the purchase, the consumers want to interact. They can engage with the brand, products, and services.
You can bring your static content to life. There are interactive elements to engage your audience. You can interact with your customers. You can add calculators, quizzes, surveys, and assessments to your website!
SQB can be used to create a variety of calculators, including ROI, pricing, growth, and so on.
Show Promotions between Questions
or then again After Unambiguous Responses
You can show promotions between questions. This can be for all or some of the questions. It is before the next question. There is a display after the users select an answer. You will find the advertisement.
This screen can show a special deal. It is a coupon, product recommendations, or more information about the question. In the backend, you can completely customize the ad screen's contents.
SQB can also be set up to show ads after a specific answer choice, like question ads do. You can use this to show extra data. It is about reply and suggested assets. This is in light of reply or a promotion about a unique proposition. You will be able to find Features of smart quiz builder.
Different Results Based on Answers
The image and content of the outcome screen can be customized. Based on the results, you can add customized content that speaks to your audience.
On each outcome screen, you can link a call to action button to any page. You can provide a more in-depth, individualized solution. The participants will also be able to share their results. It is on each quiz result screen thanks to its own social share buttons.
SQB can make interactive polls that look great. It helps you get more people to collect data, generate leads, and get immediate feedback!
You can use SQB's customizable templates to create stunning polls. You can prevent repeat voting. You can allow users to change their votes. You will display charts and view submissions. It will allow users to see results and total votes. You can use image responses. You will get users to opt-in (optional), and much more!
Integration with Google Sheets
Smart Quiz Builder is the only quiz or survey plugin. It supports direct integration with Google Sheets!
To add quiz results, user information, etc., you won't need an external platform like Zapier. to your document. In SQB, you can connect your quiz to your sheets.
SQB is compatible with the most prominent email marketing platforms. It includes AWeber, ActiveCampaign, ConvertKit, Drip, SendInBlue, and MailChimp. SQB also allows for "Webhook" notification and integration based on "HTML-form." Our roadmap page lists our upcoming integrations. There are features page lists of our current integrations.
By connecting SQB to Zapier, you can set up marketing automations. Webhook notification is also supported by SQB. The lead information and quiz results can be sent to your own script by SQB.
Lead Magnet Quiz Lead magnet quizzes typically have a 50 percent opt-in rate! Everyone has access to the same static content. It is in a conventional lead magnet, which asks for contact information first.
You can make lead magnet quizzes with SQB. You can ask a series of questions to learn more about your prospects. For your prospects to see the results, they must opt in. Your opt-in form can be completely personalized.
Impressive Templates for Your Quizzes
These stunning templates will enable you to create quizzes that stand out!
Beautiful design, simple to use and they are customizable. It is friendly for the mobile. It keeps visitors on your site. It can improve engagement and the rate of quiz responses. It improves conversion rates. If you want to know more about the Benefits of smart quiz builder, get in touch with us!
Conclusion
Smart Quiz Builder is a WordPress plugin that allows for personalized quizzes (SQB). SQB has many features that will increase your lead generation and product sales.
There are several features of Smart Quiz Builder. We provide a fantastic option if you're searching to buy it. You can invest in an Appclub membership. You can buy Smart Quiz Builder. More than 50 apps are available for the price of one when you use Appclub. Explore Appclub's price section to learn about all its benefits.
Have you used Smart Quiz Builder before? You might have discovered a software. Describe it to us by posting a comment below.
0 notes
Text
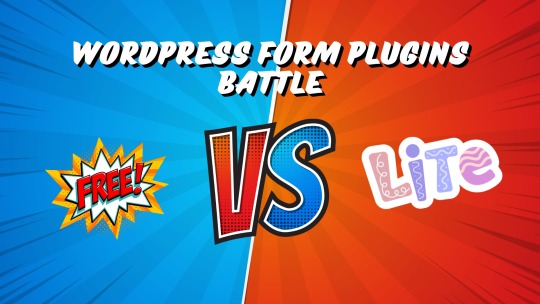
Let's find out the best FREE WordPress Form plugin
WordPress form plugins are no longer limited to just contact forms. Currently, you can use form plugins for booking, subscriptions, CRM integration, product sales, and more! If you want, you can even use the form plugin's API to create your own integrations.
Free or Lite?
There are many free form plugins for WordPress. But most are not free, rather lite versions. To be direct, the plugin available on WordPress.org is usually a limited feature lite version, where you won't get many things. You have to purchase the paid version to unlock all features.
Limited Fields
Even if the plugin name doesn't include "Lite", the following plugins don't allow all fields, settings or options such as form submission, reCaptcha, pre-made form templates, form submission export. Many basic fields are also locked. Only installing the pro version allows using all fields. - Bit Form (43 total fields, 7 locked fields) - Mollie, Advanced, Signature, PayPal, RazorPay, Stripe, Draft Button - Fluent Forms (48 total fields, 27 locked fields) - Image Upload, File Upload, Phone, reCaptcha, hCaptcha, Turnstile, Shortcode, Action Hook, Form Step, Ratings, Checkable Grid, Range Slider, Net Promoter Score, Chained Select, Color Picker, Repeat Field, Post/CPT Selection, Quiz Score, Rich Text Input, Save & Resume, Payment Item, Subscription, Custom Payment Amount, Item Quantity, Payment Method, Payment Summary, Coupon - Formidable Forms (42 total fields, 27 locked fields) - File Upload, Rich Text, Time, Star Rating, Toggle, Lookup, Section, Embed Form, NPS, Tags, Summary, AI, Ranking, Date, Scale, Slider, Dynamic, Repeater, Page Break, Likert Scale, Password, Address, Signature, Appointment, Product, Quantity, Total - Forminator Forms (29 total fields, 1 locked field) - eSignature - Ninja Forms (30 total fields, 2 locked fields) - File Upload, Save - weForms (31 total fields, 16 locked fields) - Repeat Field, Numeric Field, File Upload, Address Field, Country List, Google Map, Step Start, reCaptcha, Shortcode, HP Anti-Spam, Action Hooks, Terms and Conditions, Ratings, Linear Scale, Checkbox Grid, Multiple Choice Grid - WPForms Lite (40 total fields, 24 locked fields) - Phone, Date / Time, File Upload, Layout, Page Break, Rich Text, HTML, Rating, Custom Captcha, Likert Scale, Address, Website / URL, Password, Repeater, Section Divider, Content, Entry Preview, Hidden Field, Signature, Net Promoter Score, PayPal Commerce, Square, Authorize.net, Coupon - WS Form Lite (55 total fields, 35 unavailable fields)
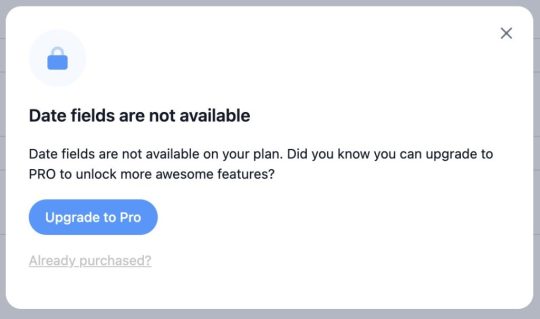
Formidable Forms Date field locked
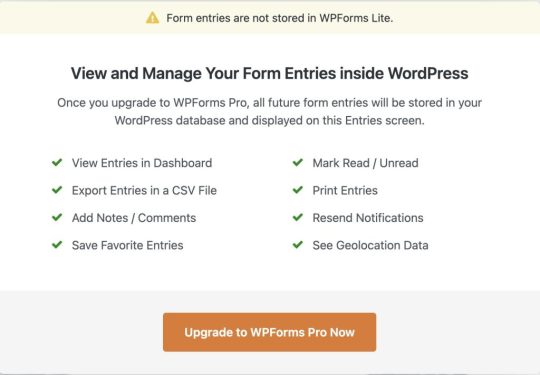
WPForms Entries locked
weForms locked some essential fields
Free Add-ons
How developer-friendly a form plugin is can be somewhat gauged by looking at community add-ons. Many form plugins have very rich documentation, but they don't provide developer licenses or any support for add-on development for third-party developers. On WordPress.org, you can find quite a few third-party plugins or add-ons for Fluent Forms, Formidable, Forminator, Ninja Forms, and WPForms plugins, which help extend the default features of the plugin.
Customer Support
Another important issue is plugin support. It turns out I got into trouble, but there's no chance of getting help. Free form plugins will only support you in the WordPress.org support forum, and that's always low priority. As a result, you often have to sit with an open ticket for a long time on urgent issues. Also, since WordPress forums have some specific rules, outside of which plugin companies can't offer support, you have many limitations in terms of getting support.
Comparison of Free Features
Plugin NameView EntriesExport EntriesEmbed EntriesImport/Export FormFree TemplatesForum SupportTicket SupportWPML SupportGutenberg BlockBit Form✅✅❌✅Limited✅❌❌✅Fluent Forms✅✅❌✅Limited✅❌❌✅Formidable Forms✅✅❌✅Limited✅❌✅✅Forminator Forms✅✅❌✅Limited✅❌❌✅Ninja Forms✅✅✅✅All✅✅✅✅weForms✅✅❌✅Limited✅❌❌✅WPForms Lite❌❌❌✅Limited✅❌✅✅WS Form Lite✅✅❌✅All✅❌❌✅ Plugin NameMath CalculationManage EntriesEmbed EntriesFree TemplatesInput MaskSupport ChannelWPML SupportBit Form✅✅❌Limited❌Forum❌Fluent Forms❌✅❌Limited✅Forum❌Formidable Forms❌✅❌Limited✅Forum✅Forminator Forms✅✅❌Limited❌Forum❌Ninja Forms✅✅✅All✅Forum & Ticket✅weForms❌✅❌Limited❌Forum❌WPForms Lite❌❌❌Limited✅Forum✅WS Form Lite✅✅❌All✅Forum❌
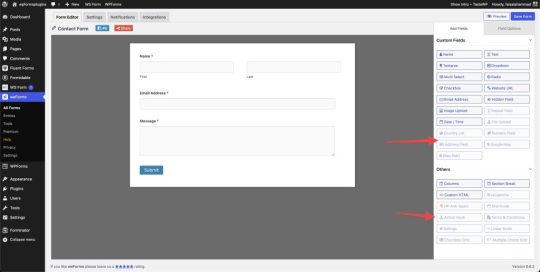
Form Selection
Considering all the above issues, the Ninja Forms plugin allows us to use all fields for free. You don't need a PRO version to access any features, and they don't sell a pro version either. You'll get everything from reCaptcha, form submission, and submission export to pre-made templates for free. You won't see any notice to upgrade to the pro version anywhere. And even if you're a free user, you'll get free support from their website along with the WordPress.org support forum. This means you won't have to sit with an open ticket for limited support on any urgent issue. Note: If any information above is incorrect, please let me know in the comments, I'll edit it. You can also inform me if any new features have been added to any form after I wrote my post. Thank you.30-09-2024 Read the full article
0 notes
Text
AAWP v4.0.0 Amazon Affiliate WordPress Plugin
https://themesfores.com/product/aawp-amazon-affiliate-wordpress-plugin/ In addition to individual product boxes and lists (bestseller/new release lists), an Amazon affiliate plugin must now offer much more so that it becomes profitable for the affiliate and can thereby generate revenue. The AAWP plugin with its numerous functions provides a good solution, where affiliates can look forward to easy integration of Amazon products. AAWP Amazon Affiliate WordPress Plugin AAWP Plugin Features: Up-to-date information – Affiliate links will be generated, and products, prices, and discounts refreshed automatically. You don’t have to take care of this! Flexible configuration – Functionality and output can be adjusted generally via the plugin settings or individually by enhancing the shortcodes. Design customizable – Choose between different designs, add custom styles, or create new templates in order to adapt the layout of your website. Text links – With text links, you can issue a specific product name inside your content. Here, the corresponding link and output name are generated automatically. The product name can be overwritten manually. Single (or multiple) product boxes – Do you want a specific Amazon product to be displayed in a single post or page? With one shortcode you can easily display one or more visually appealing product boxes. Features included in the product boxes are for example: title, description, current availability and prices, discounts and call-to-action buttons. Bestseller (lists) – With the bestseller lists, you can deliver a really strong selling reason to your visitors by listing the best-selling products to a specific product group or keyword. In addition, you have the ability to set the number of products individually: e.g. Top 3, Top 10 etc. New Releases (lists) – What about attracting your visitor’s attention towards the latest products within a specific product group? Just like the bestseller lists, you have the ability to set the number rankings of the products themselves. Data fields – By using the so-called “fields” you place individual product information (such as the title, description, current price or buy button) anywhere in your posts / pages. These can also be used directly inside your templates files via the provided PHP functions. Widgets – In order to integrate items into your sidebar, widgets are available to assist you. Here you can choose between the core functionality listed above. If you need more adjustments, you can alternatively place the shortcodes in a text widget (or Visual Composer) too. Please note that any digital products presented on this website do not contain malicious code, viruses or advertising. Refund Policy:- If the plugin or theme is not working properly and we also fail to help you then, in that case, you will get the money back. If the plugin and theme are working properly then you will not get the money back. How to fix “style.css missing” error while uploading themes? A common issue that can occur with users new to installing WordPress themes is a “Broken theme and/or stylesheets missing” error message being displayed when trying to upload or activate the theme. This is because the theme download package on ThemeForest includes additional files to the theme such as the documentation, license etc. To solve this simply unzip the theme package you downloaded from themesfores and upload the themename.zip file which is included (with the file being the name of the theme). https://themesfores.com/product/aawp-amazon-affiliate-wordpress-plugin/ #AffiliatePlugin #WordpressPlugins
0 notes
Text
Weather Wordpress Shortcode And Widget Simple Weather Plugin

Weather Wordpress Shortcode And Widget Simple Weather Plugin 4.4.4
The Weather WordPress Shortcode and Widget Simple Weather Plugin is a powerful utility designed specifically for WordPress websites. This versatile plugin allows you to effortlessly display weather information on your site using shortcode and widget functionality.With this plugin, you can easily integrate weather forecasts and conditions into your WordPress posts, pages, or sidebars, providing your visitors with up-to-date and accurate weather data. Whether you run a travel blog, an outdoor activities website, or simply want to keep your audience informed about the local weather, this plugin is a must-have tool.The shortcode feature enables you to insert weather information directly into your content by simply adding a shortcode to the desired location. This gives you the flexibility to display weather data in various formats, such as current temperature, humidity, wind speed, and more. You can customize the shortcode parameters to suit your specific needs and style preferences.Additionally, the widget functionality allows you to add a weather widget to your website's sidebar or any widget-ready area. This widget provides a compact and visually appealing display of weather information, giving your visitors quick access to the current conditions.The Weather WordPress Shortcode and Widget Simple Weather Plugin is user-friendly and highly customizable. It supports a wide range of locations worldwide, allowing you to retrieve weather data for virtually any place on the globe. The plugin utilizes reliable weather APIs to ensure accurate and real-time updates.Key Features:- Effortlessly display weather information on your WordPress website - Use shortcodes to insert weather data into posts, pages, or sidebars - Customize shortcode parameters for personalized weather displays - Add a weather widget to your sidebar or widget-ready areas - Compact and visually appealing widget design - Support for a wide range of global locations - Reliable weather APIs for accurate and real-time updatesWith the Weather WordPress Shortcode and Widget Simple Weather Plugin, you can enhance your website's functionality and provide valuable weather information to your audience. Stay ahead of the weather and make your WordPress site more engaging with this essential utility. Read the full article
0 notes
Text
Weather Wordpress Shortcode And Widget Simple Weather Plugin

Weather Wordpress Shortcode And Widget Simple Weather Plugin 4.4.4
The Weather WordPress Shortcode and Widget Simple Weather Plugin is a powerful utility designed to enhance your WordPress website with accurate and visually appealing weather information. This versatile plugin provides you with a shortcode and widget option, allowing you to easily display weather updates and forecasts on your website.With this plugin, you can effortlessly integrate weather functionality into your WordPress site, keeping your visitors informed about the current weather conditions in their location or any other desired location. Whether you run a travel blog, a local news website, or simply want to provide weather updates to your audience, this plugin is an ideal solution.The shortcode feature enables you to insert weather information anywhere within your website's content. You can customize the display to include temperature, humidity, wind speed, and other relevant data. Additionally, the plugin supports various weather metrics, such as Celsius and Fahrenheit, giving you the flexibility to cater to your audience's preferences.The widget option allows you to add a weather widget to your website's sidebar or any widget-ready area. This feature ensures that the weather information is prominently displayed and easily accessible to your visitors. The widget is fully customizable, enabling you to choose the size, color scheme, and layout that seamlessly blends with your website's design.The Weather WordPress Shortcode and Widget Simple Weather Plugin seamlessly integrates with popular weather data sources, ensuring accurate and up-to-date information for your website. The plugin also offers advanced caching options, reducing the load on your website and improving overall performance.Whether you are a WordPress beginner or an experienced developer, this plugin is user-friendly and straightforward to set up. It provides extensive documentation and excellent support, ensuring a smooth integration process and hassle-free experience.Enhance your WordPress website with the Weather WordPress Shortcode and Widget Simple Weather Plugin, and provide your visitors with a visually appealing and reliable weather experience. Stay ahead of the forecast and keep your audience engaged with this essential utility for your WordPress site. Read the full article
0 notes
Text
Best WordPress Calendar Plugin
Disclosure: This content is reader-supported, which means if you click on some of our links that we may earn a commission.
A calendar plugin for your WordPress site is a great way to ensure everyone is on the same page. If your business revolves around events, monthly announcements, or appointments, then you’ll want to manage it all with an easy calendar layout.
You’ll be well on your way to being more organized, productive, and transparent with your customers once you find a calendar plugin that works well with your current workflow.
There are tons of calendar plugins out there, making it hard to know where to begin when picking the best one. Well, you’re in luck. Below I discuss some of the very best WordPress calendars you can start using today as well as how much it’ll cost you to use each one. Let’s dive in.
#1 – Timetable Responsive Schedule — The Best For Displaying Daily And Weekly Time Schedules
With Timetable, you can display an array of event calendars, schedules, and availability information all in one easy to use plugin. The name pretty much gives away what they’re best at, which is ensuring that your customers know your schedule down to the hour.
With it, you can generate PDFs you or your customers can print for convenience. The events widget lets your customers know when, where, how, and what time your next event will be held.
Thankfully, Timetable doesn’t confine you to creating time blocked schedules and events. It also offers booking functionality. So you can book and fill your events accordingly.
Once you’ve downloaded the plugin, you can add a new event to your calendar, name it, adjust its settings, event hours, and event frequency, set dates, and publish. Once you’ve published it, copy the autogenerated shortcode and paste it anywhere you want to display it on your site.
The best features of Timetable include:
Free lifetime updates so that your plugin will always be up to date and compatible with the latest WordPress updates
Fully responsive
Custom CSS option to modify it to match your brand look
Shortcode generator for display on any site page or blog post
Event filtering to easily search for specific event listings
Lots of customizable color options for events, days, event text, and more
Timetable Responsive Schedule is $29 for a regular license, which comes with future updates and six months of support. Get started with Timetable here.
#2 – The Events Calendar — The Best For Multiple Calendar Views
The Events Calendar will fit like a glove if you want access to multiple calendar views with plenty of powerful events and scheduling features that keep your community and customers engaged.
Once you download The Events Calendar plugin and add all your event information, you can view your calendar in several different views, including monthly, daily, weekly, and more.
Here’s a quick rundown of how you can view it:
Month View: Classic calendar view where you can see all events at a glance for the entire month
List View: Have your audience or prospective customers view your events in a chronological list that can be filtered by month
Day View: Have events happening on the same day? You can configure your calendar to display day views so you can easily see which events are happening at what time on the same day without any confusion.
Week View: See upcoming events for a week at a glance.
Photo View: Create a grid of chronological events displayed primarily as images.
Map View: If your events are location-dependent, a map view can be a helpful visual aid.
A wide array of calendar views is only one standout feature of The Events Calendar plugin. Some of the top features of Events Calendar are:
Easily manage in-person and virtual events
Export and import other calendar events with a built-in CSV importer
Mindful of time zones, so all your customers are on the same page no matter where in the world they are
Plenty of event category and tagging functionality
Build community with an event calendar designed to bring groups and organizations together
Multiple calendar views for accessibility and ease of use
The ability to highlight specific events to draw more attention to them
Easy set-and-forget recurring events once you define event parameters
Shortcode feature to embed and display any calendar, schedule, or event on any page or blog post
Compatible with Google Maps and Google Calendar
The base calendar plugin is entirely free forever and comes with the month, list, and day views, has categories and tags, and is fully responsive. The Pro version with additional features, support, calendar views, recurring events, and advanced fields is $99 for one site, $149 for three websites, and starts at $299 for 10 or more sites.
Start using The Events Calendar today for a more engaged audience.
#3 – Simple Calendar — The Best For Use With Google Calendar
The perfect marriage between WordPress and Google Calendar is the Simple Calendar plugin. It’s no wonder it has been downloaded over one million times.
You can easily display your events, schedules, bookings, and availability with their straightforward calendar. As you might have guessed, there’s a reason why “simple” is in the name. Because it truly strives to be exactly that.
Simple Calendar lets you show monthly, weekly, or list views with the most important updates you can manage through Google Calendar. It also offers a widget view if you want to display your calendar in your site’s footer or sidebar.
If someone comes across your event and wants to add it to their own Google Calendar, Simple Calendar lets them do that with an “Add to GCal” link option. Because of Simple Calendar’s convenience and compatibility with Google Calendar, I recommend it as the best calendar plugin if you’re already using Google Calendar to manage your events. If you’re unsure about the plugin, you can always try their instant demo.
Some features of Simple Calendars include:
Fully mobile responsive
Color-code events to your taste
Manage events on Google Calendar and have them automatically displayed on your WordPress site
Integrates with Events Calendar Newsletter for sending event reminders
The pricing is straightforward and breaks down like this:
Personal — $49 for up to 1 site
Business — $79 for up to 5 sites
Agency — $149 for up to 25 sites
All plans come with one year of support and updates. Download and start using Simple Calendar today.
#4 – Events Schedule — The Best For Versatile Calendar Styles
Events Schedule is a solid WordPress calendar plugin in terms of versatility. They offer 12 customizable schedule styles, each with different features.
With list views, monthly views, and weekly views, you can ensure your audience has plenty of access and time to plan for future events. The advanced event filters also let your audience easily find the events they’re looking for without confusion or hassle.
Because of Events Schedule’s versatility and wide array of calendar types, it’s easily usable in just about any industry. You can use it to schedule fitness classes and events, publish theatre schedules, Museum timetables, arena events, or bar events, just to name a few.
Top features of Events Schedule:
Compatible with WooCommerce
Includes a booking system
Able to integrate with Google Maps
Easily schedule repetitive events
Countdown timer feature included
Intuitive visual schedule builder
SEO friendly code and display options optimized for speed
Shortcode generator option for simple plug and play
Custom call-to-action buttons feature
If you want to try Events Schedule before clicking the buy button, I recommend you take your time to look through their live demo, where you’ll get to see the look of each schedule, what industry it’s best for, and how to put it together and publish it on your WordPress site.
If you pair this plugin’s price point with the number of calendar options it offers, it makes for an impressive package worth diving into if you want to go beyond the basics of what a calendar plugin can do. A regular license costs $39 and includes six months of support and future updates.
#5 – EventON — The Best For Colorful And Dynamic Event Calendars
EventON is a powerful calendar plugin that stands out with dynamic and colorful calendar displays you can customize to your liking. As soon as you set eyes on any calendar created with the EventON plugin, it’s sure to be absolutely eye-catching.
With EventON, you can create colorful calendar bubbles that, when clicked, open up to display a calendar card with every event detail they need to know.
Event bubbles aren’t the only view available to you once you download their plugin. You can create tile calendar views with bigger calendar “tiles” that display each of your events with readily available details. Don’t worry, once you set up your calendar tiles, they’re designed to be fully responsive, so they’ll look good on any screen.
You can also display calendar events in a list view with thumbnails and add any number of event colors for each tile. Like other robust plugins, EventON isn’t a one-trick pony. There are plenty of useful features it offers to users, especially if you host lots of live events. Read on below to learn more about some of their very best features.
Some of the best features of EventOn are:
Generates shortcodes you can quickly grab and plug in with Gutenberg
Great for hosting virtual live events
Developer friendly for advanced feature altering capabilities
Expandable calendar details for each event
Add unlimited images to each event to better inform your audience
Has “add to Google Calendar” options for increased engagement
Easily filter and sort events with a few clicks
Add custom repeat events so you can set it and forget it
Easily change custom time formats to display according to your preferences
EventON costs $25 for a regular license, which includes future updates and six months of support. You can also get support extended to 12 months for an additional $7.50. Get started using EventOn’s colorful calendar features here.
What I Looked At To Find The Best WordPress Calendar Plugins
There are tons of calendar plugins available. But not all of them offer the same features, as some cater to different user needs better than others. Here are a few things I considered when researching the best WordPress calendar plugins and factors you should consider when deciding which is best for your business.
Visual Layout
To cover the basics, a solid WordPress calendar plugin is mobile responsive. It’ll always adjust to any screen it’s viewed on, no matter the size. They’re also easy on the eyes and accessible.
The last thing you want to do is use a calendar plugin that looks outdated, has limited functionality, or doesn’t play well with your website’s other plugins. The more you can create a visually appealing calendar easy for anyone to use, the more you’ll get out of it when using it as a business management tool.
Booking and Appointment Options
Some calendars are designed to be very simple so that you can display important dates and events. Others are created with bookings and appointments in mind.
This means you won’t only be able to display availability but that your customers can book appointments right on your calendar at any time. If you run a service-based business, this can be a great option to look into when choosing the right calendar plugin.
Simplicity
You want to find a plugin that falls in the sweet spot between simplicity and advanced features depending on your business needs. You don’t want to spend the money to buy a robust plugin with lots of heavier features if you won’t even use a third of them.
On the other hand, you don’t want to use a plugin that limits your capabilities when it comes to booking appointments, displaying dates, automating and marking holidays off, or even providing a useful legend.
Conclusion
A WordPress calendar plugin can prove useful in keeping your business productive, staying organized, and keeping your customers happy and informed.
Here’s a recap of the plugins I reviewed in this guide to help you make the best choice:
Timetable Responsive Schedule — The best for displaying daily and weekly time schedules
The Events Calendar — The best for multiple calendar views
Simple Calendar — The best for use with Google Calendar
Events Schedule — The best for versatile calendar styles
EventOn — The best for colorful and dynamic event calendars
Use this guide to choose the best WordPress calendar plugin according to your needs. Then come back and leave a comment below with any feedback on your favorite calendar features.
The post Best WordPress Calendar Plugin appeared first on Neil Patel.
1 note
·
View note
Text
Leading 10 Premium WordPress Magazine Themes
The thought of offering trending news is actually a main ideas for most new websites floating round the internet. We have now deviated from reading through the usual and serious news-fashion details towards a much more liquid and clean news usage. Attempting to find the shades and humor in whatever related news item we read through, we try to find the amusement of any magazine fashion e-zine in every stylish magazine site. Business gamers of the Magazine websites for example Forbes, TechCrunch, Mashable, Reuters, CNN these have employed the fully responsive and also the water model of a Magazine fashion design site. Following the style, are you currently searching for the ideal WordPress magazine themes for your internet site? We have fantastic selections of the top WordPress themes for news, magazine, posting or evaluation internet sites. So, in case you are either preparation to setup a fresh weblog/internet site or simply are merely rebranding your existing ‘Breaking-news' WordPress website we recommend you keep reading this web site submit. Newspapers The Local newspaper theme by tagDiv is the greatest owner WordPress magazine theme of all the instances, having a large number of around 93,000+ downloads. Greatly in tendency for being employed by news, magazine, and review sites, Newspapers is lighting, quickly, and simply spectacular in just about every creating factor. With free of charge life changes, you can never be apprehensive when you pay money for this theme, since it also provides outstanding support. Several of its characteristics are: Quickly, designed, and well coded. Gives 90+ distinctive total trial designs. The freedom to customize every little thing in the frontend with all the tagDiv Composer page contractor. Drag and Decrease Usefulness. Includes the tagDiv Cloud Collection and also over 1000 design and style templates for content articles and internet pages. Header and Footer Building contractor. Innovative options for inlaid and custom video clips or movie playlists. Makes use of the best Search engine optimisation methods. Incorporation for bbPress Forum, BuddyPress, Mate Click, and WooCommerce. Also, it supports reactive Yahoo and google Ads and Google adsense. Compatible with the WPML plug-in. NewsMag If you want to post content articles or current the newest news, NewsMag could possibly be the most affordable WordPress magazine theme to suit your needs. This is the very best-scored WordPress news theme. Created by tagDiv, the writer of Newspaper, these 2 themes are now the most notable WordPress magazine themes on ThemeForest. With 15,000 downloading, this WordPress theme provides awesome a single-click transfer demos. These sophisticated and brightly simple templates will satisfy your taste instantly. Fantastic layout designs for effective storytelling. You may modify points without having to delve into the codes a major plus for non-technical customers. A smart advertisement process that will help you monetize your site content. Beautiful grid and designs for the creative end-outcome. Also, the theme is powered by the frontend tagDiv Composer page builder. Translation completely ready, E-trade appropriate, and Yoast Search engine optimisation supported. PowerMag The ThemeForest page for PowerMag phone calls it one of the most muscle Magazine/Testimonials Theme. It is a receptive, retina-completely ready, and super-striking theme that makes your site stick out from the audience. A multilingual theme, PowerMag gives 40 elements, a built-in web template method, customized publish varieties and even more. The USP may be the theme's inbuilt Assessment system which comes with a proportion/celebrity position system which can be schema.org suitable. 7 slider combos for maximum artistic mobility Search engine optimisation optimized, RTL assist, unbranded admin solar panel plus much more. Gillion Since they consider it, Gillion will be your one particular-stop multi-idea theme for easily developing weblog/magazine/news/assessment internet site. With 4 header themes and 13 customized widgets, you cant ever be unoriginal or repeating. The lovely theme gives 7 demo layouts and different innovative sliders to pick from. Developed in the Visual composer, your site might be highly custom by using this theme. Endless shades have the fully sensitive design even better. A trending slider will emphasize the most up-to-date content. Strong admin user interface with no html coding essential for personalization. Soledad Soledad is the greatest-offering Blog site and Magazine WordPress theme for the year 2017. This simple fact just about sums within the awesomeness quotient with this gorgeous theme. It really is awesome in so many methods: 900+ Trial homepages and 300+ slider and blog mixtures. 3 sidebar styles, 5 write-up styles, 6 portfolio styles, and 2 super menus variations. WordPress are living customizer with 25+ options for imaginative modification. 9 presented slider types and customized fonts with 700+ yahoo fonts. Search engine marketing designed, WooCommerce appropriate, and specialized customer care. While it started off like a WordPress blog site theme, it's now among the finest WordPress magazine themes currently available with tons of features. SmartMag SmartMag is actually a responsive and retina ready WordPress magazine theme. By having an easily controllable back-finish, it will be possible to seamlessly handle the web site technicalities on this page. Offering a 1-click on demo set up, the theme has special demonstration styles. BbPress online community, interpretation suitable and E-trade completely ready. Search engine marketing works with Schema incorporated evaluation program. Will allow the creation of pages with 11 site-builder widgets and 6 obstruct variations. Special mega food list and numerous article formats. Tana Should you be looking for any theme that is area of interest distinct, Tana could possibly be the smart choice you may ever make. This highly imaginative theme is apt for your personal certain video, vacation, life-style, or design related magazine website. Depicting a ‘state-of-art' designing and format, this theme offers a distinctive idea. These principles are: Newspaper, Blog site, Video, Music, and Trend. 24 distinctive design elements, 5 footer types, and three press sidebar variations The Graphic Composer is now loaded for enhancement. Receptive expert slider, vast and encased layout, WPML preparedness and child theme compatibility. Bimber Bimber is definitely the no. 1 offering viral WordPress magazine theme. It requires under twenty four hours to launch a complete-fledged viral buzz-like internet site. With numerous features similar to a preferred trending collection, yahoo ads and a number of discussing buttons, all you have to do are to pick up your posts and spread it virally. RTS support. Also functions compatibility with caching plug-ins. Search engine optimization optimized and optimized for Yahoo Page speed. completely sensitive, Cross browser compatibility and Social sharing readiness. The most up-to-date update brought in 4 new Demos. WooCommerce, bbPress, and WPML incorporation. Persona quizzes and bogus counters. 15Zine 15 zine is an extremely-present day WordPress magazine theme because it features your latest content with apt appearance style and typography. It provides the pull and decrease tradesman for producing an amazing web site. Even someone who is really a naïve in WordPress can efficaciously deal with it. Endless browse and unlimited publish weight feature for stimulating the website visitors. Potent Ajax Megamenu System. Distinctive Woo Commerce Design and usefulness. WPML, RTL and SEO prepared. Receptive and retina all set. Youngster theme all set. Incorporates a trending menus. More than 13500 downloads. Sahifa Sahifa is probably the best WordPress magazine themes for news, magazine and website websites. This theme is consumer- friendly, custom, fast-launching, and gives a high-quality browsing encounter. This theme has sorted out re-sizing problems as it is receptive for both smartphones and pc just as. Suitable for WPML, bbPress, Friend Push, Woo Trade. Powerful Admin Board. Interpretation Loaded 1-just click demo importer and Pull and Fall Homepage tradesman. Infinite browse wordpress plugin, Built in assessment program, History appearance Advertising. Tacky Sidebars, Pagination Included, Picture Slider and 40+ Shortcodes.
1 note
·
View note
Text
Top Seven WordPress Plugins For Your Blog

Numerous bloggers are utilizing WordPress and in light of current circumstances. It is the most well known blogging programming being used today and perhaps the main motivation is the capacity to include usefulness using modules. Modules can transform your average blog into a powerful online apparatus equipped for carrying traffic and benefit to your webpage. Consider utilizing the top WordPress modules on your current WordPress blog or on a future blog. You won't be disillusioned. Upbeat Blogging. click site hide my wp admin
7. Page Pound
This is a basic WordPress page the board module. The Ajax interface enables you to move the pages into the request you like, change the page structure by hauling a page to turn into a kid or parent and flip the page to be escaped yield. You can likewise observe the id of the page which is frequently useful for topic engineers. In the event that you have a WordPress site with something beyond a bunch of pages, PageMash is amazingly useful.
6. Across the board Website optimization Pack
The Across the board Web optimization Pack module consequently enhances your Wordpress blog for Web crawler by enabling you to tweak things like your page title and meta labels. This module is incredibly simple to use as it works extraordinary straight out of the case. On the off chance that you are a propelled client, you can alter for all intents and purposes everything. What's more, in the event that you are a designer, this module has a Programming interface so your subjects can get to and expand the usefulness of the module.
5. Google XML Sitemaps
Maybe the most downloaded WordPress module, the Google XML Sitemaps module not just consequently makes a webpage map connecting to every one of your pages and posts, it additionally informs Google, Bing, Hurray, and Ask.com when you make changes to you website. In the event that you need to incorporate pages that are a piece of your site however not part of you WordPress oversaw content, you can do that to.
4. WP Super Store
On the off chance that you have a well known WordPress site you ought to genuinely consider running WordPress Super Store to improve the exhibition of your site. In the event that you are not reserving your pages, at that point each opportunity a guest goes to your site, WordPress needs to dismantle together different snippets of data out of a database to assemble your page. In the event that you have a high traffic site, this is can truly turn into an issue. WP Super Reserve will store a duplicate of every one of the pages on your site so that after the page has been amassed from the database once, WordPress can rest and simply continue serving the static html duplicate of the page. This may be a piece nerd, however the thought is you can significantly accelerate your site and decrease the heap on your server by utilizing WP Super Reserve. On the off chance that for no other explanation, utilize this module so you don't need to freeze when your companion says, "I just Dugg your site."
3. NextGEN Picture Exhibition
On the off chance that you need to show a photograph exhibition, show a progression of item pictures, or simply distribute a slide appear from your latest get-away, the NextGEN picture display is the module for you. NextGEN Exhibition is a full incorporated Picture Display module for WordPress with a Blaze slideshow alternative. Among the numerous highlights, NextGEN Exhibition incorporates a thumbnail generator, sortable collections, and a water mark work.
2. cformsII Structure Module
On the off chance that your searching for a free structure the executives module, cformsII is a very incredible module for setting up contact shapes on your WordPress site. You don't have to know any PHP or compose any code. You can outwardly manufacture shapes in the WordPress administrator board. At that point, explore to the page or post where you need to utilize the structure and there is a catch in the WYSIWYG supervisor that you click and up pops a rundown of structures that you have made. Essentially click on the one you need and your structure is embedded into your page. Update your page and you the structure is live. You can indicate required fields, default esteems, and there are a lot of styles to make your structure mix in splendidly with your site.
1. Gravity Structures
On the off chance that you need the best structures module WordPress brings to the table, you need Gravity Structures. Gravity Structures is an astounding module for overseeing on the web structures. A portion of the amazingly helpful highlights incorporate contingent structure fields which implies you can show or hide a field or whole segments of the structure dependent on a worth chose in another field. You can pre-populate structure fields utilizing querystring, shortcode, capacity or hooks.You can even calendar when structures are accessible by doling out a beginning date and end date for when your structure is live on your site. Assumed you need to run a challenge where the initial 50 individuals that round out the structure win a prize. Gravity Structures lets you set a point of confinement on the quantity of sections a structure can get. Basically anything you at any point needed a structure to do, Gravity Structures can do it.
1 note
·
View note
Photo
ADning Advertising: Create Adverts For Your WordPress Site
Advertising is one of the main ways that websites generate revenue.
Perhaps you created a blog specifically to drive people towards your website’s Store page, and want to give visitors that extra little push? Maybe you run several websites, and want to promote your biggest-earner across your entire portfolio? Or maybe you don’t have anything to promote, but wouldn’t mind generating some cash by selling advertising space to third parties?
Despite the money-making potential, WordPress doesn’t support advertisements out-of-the-box. Most WordPress themes don’t even have space where you can display ads!
Best WordPress Advertising Plugins of 2019
Creating a successful advertising campaign is a must in today's crowded eCommerce world. Once you have your website and products in place, you must have the...
Daniel Strongin
04 Apr 2019
WordPress Plugins
10 Best WordPress Slider & Carousel Plugins of 2019
Whether you want to show off customer testimonials, your latest blog posts, your best images, or just celebrate the members of your team, there is a...
Nona Blackman
19 Mar 2019
WordPress
8 Best WordPress Booking and Reservation Plugins
In the digital age, users are online 24/7. Everyone prefers to check availability and make appointments, reservations, or bookings online. They want to do...
Lorca Lokassa Sa
12 Apr 2019
WordPress
Best Affiliate WooCommerce Plugins Compared
WooCommerce is an excellent platform for selling digital and physical products. Adding an affiliate system is an excellent way to increase your reach around...
Lorca Lokassa Sa
26 Jun 2019
WordPress
If you dream of turning your website into an additional source of revenue, then you have two options: dig into your theme’s files and modify its code to support adverts,or let a plugin do all the hard work for you!
In this article, I’ll show you how to create a range of adverts and display them across your website, using the popular ADning Advertising plugin. To help ensure your ads generate as many click-throughs as possible, we’ll be using ADning to display customized ads based on factors such as the visitor’s geographical location, and the time of day. Finally, I’ll show how to monetize your website even if you don’t have anything to promote, by selling advertising space to third parties.
Getting Started With the ADning Advertising Plugin
The first step, is installing the ADning Advertising plugin:
If you haven’t already registered, create your free Envato Market account.
Head over to the CodeCanyon website, click the little Sign In button in the upper-right corner, and then enter your Envato account details.
Once you’re logged into your account, head over to the ADning Advertising listing, click Buy Now and then follow the onscreen instructions to complete your purchase.
When prompted, download the ADning plugin.
Unzip the downloaded file; the subsequent folder should contain several folders and files, including angwp.zip, which you’ll need to upload to WordPress.
Adding a Third Party Plugin to WordPress
Once you’ve downloaded the ADning Advertising plugin, you’ll need to upload it to your WordPress account:
Log into WordPress, if you haven’t already.
Select Plugins from WordPress’ left-hand menu, followed by Add New.
Select the Upload Plugin button.
Now scroll to the If you have a plugin in a .zip format section, and select Choose file.
Select your angwp.zip file and click Install Now.
ADning will now be uploaded to your WordPress account. After a few moments, a new ADning item should appear in WordPress’ left-hand menu.
Activating the ADning Advertising Plugin
Next, you’ll need to active ADning, by entering your license key:
Head over to the CodeCanyon website and log into your account.
Select your username in the upper-right corner, followed by Downloads.
Find the ADning Advertising item, and select its accompanying Download button.
Choose License certificate & purchase code from the dropdown menu.
Once your license has downloaded, open it and find your Item purchase code. You'll need to copy this information then, in your WordPress account, select ADning from the left-hand menu. Select the Product License tab and paste your purchase code into the Add your license key here field.
Finally, click Activate ADning. After a few moments, you should see a Plugin activated successfully message. Your plugin is now ready to use!
Placing Adverts on Your Website
In this section, we’ll be placing four different styles of adverts on our WordPress website:
A banner ad that’ll run along the top of the page.
An embedded banner that’ll be displayed inside the page’s content.
A popup ad.
An “injected” advert that’ll be displayed on a line specified by you.
To create these ads, I’ll be using a graphic that promotes Envato Elements, but you can use any graphic you want.
Creating Your First ADning Ad
To display an advert, we need to create:
A banner, which is essentially the graphic that we want to use.
A campaign, which sets a start and an end date for your advert.
An Ad Zone, which defines where your banner will appear on the page, and the kind of advert that’ll be displayed to the visitor, such as a popup or a vertical banner.
We then need to link these three components together, and insert the finished advert into our website using either shortcode or a widget.
While this may seem like a lot of setup just to display a single ad, you can re-use these elements multiple times, for example you may decide to run multiple adverts as part of the same campaign, or use the same Ad Zone for all your banners.
Turn Any Image Into a Banner
Let’s start by creating a banner, using a graphic of your choice. Note that depending on the dimensions of your chosen graphic, you may need to play around with the common advertisement settings in order to create an advert that looks good and functions correctly.
Select Banner from WordPress’ left-hand menu and click Add New Banner.
Under Title give this banner a descriptive name; I’m using Elements banner.
In Add a banner link, enter the URL that your banner should link to; I’m using the Elements website.
Now open Target and specify the window where the destination URL should load, for example in a new tab or inside the current advertising frame. If you’re linking to an external website, then you’ll typically load the URL in a new tab or window, because you don't want to encourage visitors to navigate away from your website.
Find the Select one of the common banner sizes section and open its accompanying dropdown. Here, you’ll find some of the most commonly used advertising styles and sizes, such as vertical banner, pop under and full banner. Select the banner style and sizing that best represents the advertisement you want to create, or select Custom and then specify an exact size in pixels. Note that this step may require some trial and error!
Select Click here or Drag file to upload and then choose the graphic that you want to use.
Find the Auto Positioning section and specify where your banner should appear on the page. Since I want to display this banner along the top of the screen, I’m selecting Above content.
Scroll to Alignment and then choose from left, right or center alignment; I’m using Center.
When you’re happy with the information you’ve entered, select Save Banner.
Create Your First Advertising Campaign
Next, we need to create a campaign. This campaign will dictate the date and time when the advertisement will first appear on your website, and when it’ll disappear:
Select Campaigns from WordPress’ left-hand menu, then select Add New Campaign.
Give this campaign a descriptive Title; I’m using Elements campaign.
In the Start Date section, enter the month, day, year and time when this campaign should start. To make it easier to test your advert, you should choose either the current date and time, or backdate the advert so it’ll appear on your website immediately.
Click to expand the End date section, and then choose the date and time when this campaign should end, at which point the associated advert(s) will disappear from your website.
When you’re happy with your changes, select Save Campaign.
Make Space for Your Advert: Creating an AD Zone
Finally, we need to create an AD Zone, which is the region of the page where we’ll display our advert. Once we’ve created an AD Zone, you can re-use that zone for subsequent adverts:
Select AD Zones from WordPress’ left-hand menu and click Add New AD Zone.
Give the AD Zone a descriptive Title; I’m using Elements AD Zone.
Find the Select one of the common banner sizes section, and open its accompanying dropdown. Here, you’ll find some common advertisement sizes, such as vertical banner, pop under and full banner. Select the option that best represents the banner you’re placing within this AD Zone. Alternatively, you can select Custom and then specify the exact dimensions.
Now, open the Linked banners dropdown and select the banner we created in the previous step.
Open the Campaign dropdown and select the campaign.��
Scroll to the Alignment section and choose how you want to position this AD Zone onscreen; I’m selecting Center.
Once you’re happy with the information you’ve entered, select Save AD Zone.
Connect Your Components
Now we've created all three components, we just need to link our banner to our campaign and AD Zone:
Select Banners from WordPress’ left-hand menu.
Find the banner that you previously created and click its accompanying Edit link.
Open the Campaigns dropdown and select your campaign.
Open Adzones and select the AD Zone you created in the previous step.
Select Save banner.
Displaying Your Advert
Now we have all three of our components, we’re ready to place the advert on our website using either an ADning widget or shortcode. Let’s explore both options:
1. Use a Widget
One option, is to place a widget on your website and then assign it an appropriate AD Zone and banner:
In WordPress’ left-hand menu, select Appearance > Widgets.
Click to expand the ADning ADS section and select Add widget.
Open the Select a banner dropdown and choose the banner that you want to display.
Open Select an Adzone and then select the AD Zone that we created earlier.
Click Save.
Now, load any WordPress page or post, and your banner should appear at the top of the screen.
Give this banner a click to make sure it links through to your chosen URL in either a new tab, window or within the current advertisement frame, depending on how you’ve configured your banner.
Note that at this point you may need to spend some time tweaking your banner style and sizing, depending on your original graphic, how you chose to position that graphic, and your website’s theme.
2. Copy and Paste the Shortcode
Alternatively, you can display the finished advert using shortcode. I'll use a shortcode to display the advert in a widget.
Select AD Zones from WordPress’ left-hand menu. Then find your AD Zone and click its accompanying Edit link.
Scroll to the Export section; this should contain a block of shortcode. Copy all of this code.
In WordPress’ left-hand menu, select Appearance > Widgets.
Click to expand the ADning ADS section.
Select Add widget.
Paste your shortcode into the Or add the adzone shortcode section.
When you're done, click Save.
Once again, load any page or post that makes up your website, and your banner should appear onscreen.
What Other Ad Styles Can I Use?
ADning Advertising supports a wide range of different advertising styles. In this section we’ll be exploring a few simple ways that you can modify our existing banner to create a completely different style of ad.
Creating Embedded Ads
Let’s start by moving our banner from the top of the page and embedding it within our webpage’s content.
Every time you create an embedded ad, you have the option to repeat this advertisement at regular intervals, for example once every five paragraphs.
If your website contains large amounts of text, then an occasional embedded advert can be more appealing than a solid wall of words—just don’t get carried away! Remember that some visitors may be viewing your website on the smaller screen of a smartphone or tablet, where each advert could potentially take up their entire screen, forcing them to scroll to find the content they’re actually interested in.
To turn our banner into an embedded ad:
Select ADning > Banners from WordPress’ left-hand menu.
Find the banner that you want to edit and select its accompanying Edit link.
Scroll to the Auto Positioning section and select the Inside content thumbnail, which will give you access to a new Custom Placement Settings section.
Specify where your advert should appear, using the After x paragraphs field.
Optionally, you can turn this advert into a repeating advert by clicking the Repeat slider so that it changes from No to Yes. If you select Yes, then your advert will repeat at the interval defined in the After x paragraphs field.
When you’re happy with your changes, click Save Banner.
Custom Classnames: Control Exactly Where You Ad Appears
Would you like more control over where each advert appears? Perhaps you want to position an advert next to a relevant paragraph, or maybe pick-and-choose which advert appears on each webpage?
You can control the page, paragraph, and even the line where your advert appears, by creating one or more custom classnames, and then assigning each classname to an advert. Then, you just need to insert the correct custom classname into your website’s HTML, and the associated advert will appear in that exact spot.
Using the Widget Options Plugin
You can create custom classnames quickly and easily using a dedicated plugin; I’m opting to use the free Widget Options plugin.
You can install this plugin from the WordPress plugin directory. To setup it up, just select Plugins > Add New from WordPress’ left-hand menu.
Search for Widget Options.
When the correct plugin appears, select Install Now.
Once the plugin has been installed, click Activate.
Creating Custom Classnames
Next, we need to create a custom classname. Depending on your setup, you might decide to create a single classname for a specific advert, a different classname for each advert, or a single classname that you’ll use across all of your adverts.
To help keep things simple, we’ll be creating a single classname:
In WordPress’ left-hand menu, select Settings > Widget Options.
Find the Classes & ID section and select Configure settings.
Select the Enable ID Field checkbox.
You can now use the Predefined Classes field to create a list of all the custom classnames that you want to use. Type each classname into the field and then press the + button.
When you’re happy with the information you’ve entered, click Save Settings.
Next, select Appearance > Widgets from WordPress’ left-hand menu.
Click to expand the Adning ADS section.
Select the little cog icon, which opens the Settings tab.
Select the Class & ID tab.
The Class & ID tab should contain a list of all the custom classnames that you can use with ADning; select the classname that you just created and click Save.
Assigning Custom Classnames
Next, we need to assign this custom classname to our advert:
Select ADning > Banners from WordPress’ left-hand menu.
Find our advert, and then select its accompanying Edit link.
Scroll to the Default AD placements section and select Inject before/after class.
In the Custom Placement Settings section, open the Where dropdown and specify whether your advert should be placed Before or After the point where you insert the classname into your HTML. Note that it may not be immediately clear which option will work best for your particular website, but you can always return to this page and modify the Before/After setting later.
In the Element field, type the classname that you want to associate with this advertisement and when you're done you can click Save Banner.
Editing Your Website's HTML
Now, we can place this advert anywhere on our website, by inserting the custom classname into our HTML:
Find the page or post where you want to display your advert, and open that item for editing.
Click to select the block where you want to place your ad; a little floating toolbar should appear.
Select the three-dotted icon, followed by Edit as HTML.
You can now add your custom classname to any of the page or post’s HTML tags. For example, imagine I’d created an elementsAd custom class and wanted to place my advert before the following block:
<p>Lorem ipsum dolor sit amet, consectetur adipiscing elit. Duis id tincidunt turpis. Pellentesque neque magna, egestas quis orci a, luctus pretium tellus. Donec egestas enim massa, sed pellentesque massa tempus in.</p>
In this scenario, I’d add class="elementsAd" to the opening <p> tag:
<p class="elementsAd">Lorem ipsum dolor sit amet, consectetur adipiscing elit. Duis id tincidunt turpis. Pellentesque neque magna, egestas quis orci a, luctus pretium tellus. Donec egestas enim massa, sed pellentesque massa tempus in.</p>
Insert the custom classname in your chosen location, then save your changes and navigate to the page or post in question. Your advert should have appeared, at the point where you inserted the custom classname.
Create a Popup Ad
ADning Advertising also supports popup advertisements, which by default appear every time a visitor navigates to a new page.
To convert our banner ad into a popup:
Select ADning > Banners from WordPress’ left-hand menu.
Find the banner that you want to modify and click its accompanying Edit link.
Scroll to the Auto positioning section, and then select Popup/Sticky.
In the Custom Placement Settings section, use the thumbnails to select where this popup should appear onscreen; I’m using Bottom/Center.
Click Save Banner.
Now, whenever you navigate to a new webpage, a popup advertisement will appear.
Immediately, this poses a problem: no-one wants to be confronted by a popup every single time they navigate to a new page! Conveniently, this leads us onto our next topic.
Control Where Your Ads Appear
If a visitor encounters the exact same ad on every single post and page across your site, then in the best case scenario that advert is quickly going to become invisible to them.
In the worst case scenario, the visitor will get so frustrated that they’ll navigate away from your website, especially if you’re using intrusive adverts such as popups.
Often, you’ll want to set some restrictions about where each advert can appear, and ADning gives you several options:
Select ADning > Banners from WordPress’ left-hand menu.
Find the banner ad that you want to edit, and then click its accompanying Edit link.
From here, you can set the following restrictions.
Ban This Advert From Your Home Page
Your home page is often a visitor’s first impression of your website, and a page full of adverts isn’t exactly a great first impression!
To prevent this advert from appearing on your home page, find the Home page section and click its accompanying Show/Hide button, so that it displays Hide.
Don’t Display This Ad on Smartphones or Tablets
The smaller screen of a smartphone or tablet can make a webpage feel much more ad-heavy than it actually is. Since mobile users typically have a much lower tolerance for ads, you may want to reduce the number of adverts that appear on mobile devices.
You can block this advert from smartphones or tablets, or both, using the Show/Hide toggles in the Device Filters section.
For example, if you wanted to prevent this advert from appearing on smartphones, then you’d find the Mobile section and toggle its accompanying button to read Hide.
Block This Ad From Specific Pages and Posts
You may want to ensure that a few webpages remain completely ad-free, for example if there’s a page where an ad would be inappropriate, or you simply want to give your visitors a break!
You can use ADning to name specific pages and posts where this advert should never appear:
Scroll to the For page section.
Click the Show/Hide button so that it reads Hide.
In the accompanying field, start typing the name of the page or post in question, and then select it from the dropdown menu when it appears.
Display This Ad on the Named Page Only
If you only want to display this advert on a small number of pages and posts, then it may be easier to simply name the webpages where this advert should appear:
In the For page section, click the Show/Hide button so that it reads Show.
Enter the name of the page or post where this advert should appear, and then select it from the dropdown menu.
You can repeat the final step, until you’ve named all the webpages where this ad should make an appearance.
Drive User Engagement With Customized Ads
You can encourage visitors to interact with your ads by delivering customized content. ADning gives you the option to tailor your ads based on the visitor’s geographical location, and the date and time when they’re viewing the advert.
Filter Content by Country
There’s lots of reasons why you might display different adverts, depending on the visitor’s location.
You may be able to encourage visitors to engage with your ads, by targeting their location, for example displaying ads that relate to national holidays such as Canada Day, Chinese New Year or St. Patrick’s Day. Since your website has the potential to reach a global audience, you should also consider that some of your ads may be deemed inappropriate, or even offensive in certain parts of the world.
To display ads based on the visitor’s location:
Select ADning > Banners from WordPress’ left-hand menu.
Find the banner that you want to edit, and then click its accompanying Edit link.
Scroll to the Country filters section.
From here, you can block this advert for specific countries:
Press the Show/Hide button so that it changes to Hide.
In the accompanying text field, enter the country, or countries where your advert shouldn’t be displayed.
Alternatively, if this ad is only relevant for a small number of countries, then it may be easier to simply name these locations:
Toggle the Show/Hide button so that it reads Show.
Specify every country where you want to display this ad.
Display Ads Based on Date and Time
Your visitors may be more likely to interact with an advert at a certain date or time. For example, you may have more success displaying entertainment-focused ads on a Friday afternoon, and job adverts on a Monday morning.
If you’re an organized person, then you could even schedule ads to go live months in advance, for example creating a campaign that’ll kick in at midnight on Black Friday.
To control the date and time when an advert is visible on your website, you’ll need to edit the campaign associated with that ad:
Select ADning > Campaigns from WordPress’ left-hand menu.
Find the campaign that you want to edit, and then click its accompanying Edit button.
Click to expand the Advanced date options.
In this expanded panel, you’ll have access to a range of different date and time settings, including the ability to display this advert on a specific day of the week, during the weekend only, or at a certain time.
How to Sell Ad Space to Third Parties
Just because you don’t have anything to advertise, doesn’t mean you can’t generate money from advertisements! Once you’ve created some advertising space on your website, you can use ADning to sell this space to third parties, who will then run their ads on your website.
If you’ve already setup the popular WooCommerce eCommerce plugin, then you can sell this space and receive payments via your existing WooCommerce checkout.
To take advantage of ADning’s WooCommerce integration, you’ll need to setup the ADning WooCommerce plugin, which is included as part of your ADning license.
To setup ADning WooCommerce, select ADning from WordPress’ left-hand menu.
Select the Add-ons tab. Adning WooCommerce will be listed under Included Add-Ons. Give this plugin a click, and it should be installed automatically.
Now select ADning > General Settings from WordPress’ left-hand menu and choose the Sell tab.
Click to expand the WooCommerce Settings section. Find the Create Adning Ads WooCommerce Product and give it a click. To start accepting payments via your WooCommerce checkout, select the Activate toggle so that it turns from No to Yes.
Click Save changes.
You should now be able to setup and manage all of your third party ads, via ADning’s Frontend AD Manager:
Navigate to the Sell screen, if you haven’t already (ADning > General Settings > Sell.)
Click to expand the Frontend AD Manager Settings section.
Click the Frontend AD Manager link, and the AD Manager should open in a new tab, ready for you to configure your third party ads.
Conclusion
In this article, I showed you how to setup and use the popular ADning Advertising plugin. If you’ve been following along, then you’ll have created a selection of ads, and then customized these ads in several different ways, including displaying different ads based on the visitor’s location, and the time of day. Finally, I showed how you to start selling advertising space to third parties, using the ADning WooCommerce plugin and AD Manager.
You can learn more about creating, displaying and managing WordPress ads, over at the official ADning website, or by taking a look at the plugin’s documentation.
WordPress Plugins
Best WordPress Advertising Plugins of 2019
Daniel Strongin
WordPress
10 Best WordPress Slider & Carousel Plugins of 2019
Nona Blackman
WordPress
8 Best WordPress Booking and Reservation Plugins
Lorca Lokassa Sa
by Jessica Thornsby via Envato Tuts+ Code https://ift.tt/2WFZWZr
1 note
·
View note
Text
Techcofinds.com: Your Ultimate Guide to the Best SEO Tools for Superior Online Performance

Techcofinds.com is a comprehensive website offering a curated collection of the best SEO tools available. From keyword research and competitor analysis to on-page optimization and backlink monitoring, Techcofinds.com provides valuable insights and recommendations for boosting search engine rankings and improving online visibility. Whether you're a digital marketer, SEO professional, or website owner, this platform serves as a go-to resource for discovering and utilizing top-notch SEO tools to enhance your online presence and drive organic traffic to your website. Stay ahead of the competition and optimize your online strategy with the help of Techcofinds.com's handpicked selection of the finest SEO tools in the industry.
1 note
·
View note
Text
Want Knowledgeable Recommendation On Wordpress? Read This Article
WordPress existed over the years and nourished many bloggers create their very own space. Still, you might be like or perhaps even who both do not know that kind of about WordPress or who aren't taking advantage of it. The next piece got to be provide useful advice to really individuals.
Always improve WordPress as little as possible. Hackers will target WordPress due to array of users. Updating WordPress as soon as updates are available could be on patients most beneficial safety tasks. The longer time spent that you wait to replace, the better alternative for hackers to have into your business.
Allow several types of avatars in your website. This can continue to keep web site very enjoyable and friendly regarding the customers who go to it. Also, it make it easier to get throughout your own character in a greater way. To search out this component, take into consideration dialogue area in your dashboard under settings.
Utilise your footers wisely. Folks often scroll to the underside will need web page to know the truth who runs the location, how to get hold of the customer and understand fresh the page content is based upon a copyright date. You're be able to use brief biography or any other data you feel is pertinent.
Make an agenda for your posts. Having an agenda will be helpful to you in locating your posts done on time. In fact, you have the option to write your entire posts in advance and schedule each of them and be printed at common intervals.
Go over other themes for your WordPress blog. Positive WordPress comes preinstalled generated a few excellent themes, however there are various more options out there. They can be free and then there will be premium themes as well. These premium themes are incredibly very easy and let you add top aspects to check out in basic terms, reminiscent of e-commerce plugins.
Many people are responding to video blogs, so consider this option. Video running a blog is not only something that is gaining popularity, it's also changing into much simpler to use. WordPress, inside a current version, makes the usage of video blogging easy. This will definitely increase traffic by drawing of those affected much less inclined to read.
If you need a focus on keep at the very top the page, there is no need to get it ready's date manner sooner or later any longer. As a substitute, click on the position and click on Edit underneath Visibility. Opt for the possibility which lets you to have the submit sticky and revel in!
When you add changes within your Wordpress web site, but they don't have the symptoms of taken effect, try to refresh from a clear cache. Hold shift which you click the reload icon within your browser, or maintain shift-ctrl-r at the same time. This will show you a fantastic wide variety of your site that needs to be updated.
Your WordPress is nothing with out plugins, and fortunate simpler for you, you come across lots to decide on from. Nevertheless, it is very valuable to use warning when installing plugins and remember that they are not disposable. You can uninstall them, however most of the time they are going to nonetheless have an effect on item and abandon shortcodes behind.
Have got an inner linking plugin to attach your posts collectively, giving the audience extra content material have on your site. A number of hyperlinks shall be added to the very end of each post. These hyperlinks shall be essential submit that they are linked to.
Keep in mind that interpersonal is integral a lot better success of each blogs and blog today, so it is best to install social networking plugins which allow you to share your product at your accounts. Facebook Join is their of a wonderful device to make use of to repost this product to your Fb account.
To maintain an eye on comments, it is not necessary visit every put up separately. As an alternative, improve dashboard's comments section to get what seemed to be posted recently. You must examine this info every day so you are aware what customers are saying and might reply if anyone requests details or asks a question.
Make sure to pay attention to critiques of plugins when planning to use them. Remember that anybody with coding means, well established or low, can make a plugin. Avoid using plugins which are extensively reported to be experiencing flaws and bugs. A plugin contains numerous downloads finest ratings can potentially be secure to use.
Attempt to administer your comments. No one needs to take a look at spam. Certainly do not the spam in your blog's comment sections topped hand. Strive to quit spam entirely or, at least, maintain it to a minimum. Install a plugin that can cut down on spam. Delete any spam that slips by means of in the comments.
WordPress has an amazing status for offering tools necessary to share good content material and set up great blogs. By just educating yourself a little on WordPress, you'll proceed with your service comparatively painlessly. The tips above will make is easier for anybody that wishes to shortly make an amazing blog--More on premium wordpress themes.
1 note
·
View note
Text

WordPress plugin flaws leveraged by novel Linux malware
Recently, a security alert revealed that WordPress websites on Linux were targeted by a previously unknown strain of Linux malware that exploits flaws in over two dozen plugins and themes to compromise vulnerable systems. The targeted websites were injected with malicious JavaScript retrieved from a remote server. As a result, when visitors click on any area of an infected page, they are redirected to another arbitrary website of the attacker’s choice.
The disclosure comes weeks after Fortinet FortiGuard Labs detailed another botnet called GoTrim that’s designed to brute-force self-hosted websites using the WordPress content management system (CMS) to seize control of targeted systems. In June 2022, the GoDaddy-owned website security company shared information about a traffic direction system (TDS) known as Parrot that has been observed targeting WordPress sites with rogue JavaScript that drops additional malware onto hacked systems. Last month, Sucuri noted that more than 15,000 WordPress sites had been breached as part of a malicious campaign to redirect visitors to bogus Q&A portals. The number of active infections currently stands at 9,314. January 03, 2023, Bleeping Computer reports thirty security vulnerabilities in numerous outdated WordPress plugins and themes are being leveraged by a novel Linux malware to facilitate malicious JavaScript injections. Dr. Web reported that malware compromised both 32- and 64-bit Linux systems, and uses a set of successively running hardcoded exploits to compromise WordPress sites.
Outdated and vulnerable plugins and themes
It involves weaponizing a list of known security vulnerabilities in 19 different plugins and themes that are likely installed on a WordPress site. These infected themes or plugins prompt the malware to retrieve malicious JavaScript from its command-and-control server prior to script injection. The hacker can deploy an implant to target specific websites to expand the network for phishing and malvertising campaigns, as well as malware distribution initiatives.
Doctor Web revealed the targeted plugins and themes –
WP Live Chat Support
Yuzo Related Posts
Yellow Pencil Visual CSS Style Editor
Easy WP SMTP
WP GDPR Compliance
Newspaper (CVE-2016-10972)
Thim Core
Smart Google Code Inserter (discontinued as of January 28, 2022)
Total Donations
Post Custom Templates Lite
WP Quick Booking Manager
Live Chat with Messenger Customer Chat by Zotabox
Blog Designer
WordPress Ultimate FAQ (CVE-2019-17232 and CVE-2019-17233)
WP-Matomo Integration (WP-Piwik)
ND Shortcodes
WP Live Chat
Coming Soon Page and Maintenance Mode
Hybrid
Brizy
FV Flowplayer Video Player
WooCommerce
Coming Soon Page & Maintenance Mode
Onetone
Simple Fields
Delucks SEO
Poll, Survey, Form & Quiz Maker by OpinionStage
Social Metrics Tracker
WPeMatico RSS Feed Fetcher, and
Rich Reviews
Technical experts always suggest keeping software (theme, plugins, third-party add-ons & WordPress Core) updated and up-to-date with the latest fixes. Always use strong and unique logins and passwords to secure accounts. Hence, it is always suggested to have managed WordPress Hosting, as the provider monitors website security, takes regular backup, and always keep them up.
The companies like WordPress.com have got the expertise to protect hosted websites from cyber attacks, breaches, hacking, Identity and access management (IAM), Malware and Vulnerabilities, and Phishing. They take care of updating WordPress core, themes, plugins, and PHP, disabling external URL requests, and implementing SSL. They keep regular backups which ensure business continuity. A secured website has a good online reputation, thus businesses prioritise security. Every eCommerce store and business website needs protection against cyberattacks, malware, & viruses. Businesses want to protect data as well as sensitive information and thus want to ensure website functionality and online reputation. Hence, asks for crucial security measures. Google penalises or blacklists malwarised or phishing websites.
0 notes
Text
DOWNLOAD FREE NULLED AMELIA V3.0.0 – ENTERPRISE-LEVEL APPOINTMENT BOOKING

Amelia is a next-generation Appointment Booking WordPress plugin built with the newest technology by an award-winning team. For all our users wondering about the high price, and for all users with expiring support: please reach out to us so we could provide you with detailed answers and information, and suggest currently available solutions and special offers. Amelia is your automated booking specialist, working 24/7 to make sure your customers can make appointments even while you sleep. It is a comprehensive booking software, supporting: - Create custom events (classes, conferences, meetings, etc) and allow your customers book their attendance through a nice&polished front-end event calendar. (New!) - Keep your customers and employees notified and reminded of their appointments in realtime with SMS notifications. (New!) - Multiple employees with custom working hours and days off. - Recurring Appointments. Make sure your customers become returning by letting them schedule recurring appointments and choose whether the appointment recurrence will happen daily, weekly, monthly or yearly. Keep your customers satisfied on a regular basis.(New!) - Event Calendar View. Show events in a sleek, modern, fully responsive calendar on the page of your website with a shortcode. By clicking on an event, pop up with the details, schedule and images will be shown, and they will be able to book instantly.(New!) - Employee Panel and Customer Panel. Let your employees and customers manage their bookings without access to WordPress Dashboard, straight from the front-end page of you your website. Employees and customers can log in and take control over their appointments and events, manage their schedule, working hours, days off, and special days. Employees can manage the price for their services, as well as the capacity. Customers can reschedule their appointments.(New!) - Native Zoom integration – In a few clicks, you can connect your Zoom account with Amelia. Now your customers can book online appointments and events, and get a link to access them in the notification. This integration will save you a ton of time and help reduce no-shows. (New!) - Special Days support – configure specific dates or date ranges with a different schedule. (New!) - 2-Way Google Calendar Integration for each employee. - WooCommerce integration. - Multiple services and service categories, Service Extras. - Multiple business locations. - Graphs and diagrams for business performance KPIs. - And many more (see feature list). Front-end demo | Back-end demo (admin/admin)


You can view the demo website of the plugin from here:

You can download the theme from here:

if download link 1 is not working try this:

Read the full article
0 notes
Text
Qibla - WordPress Listing Directory Theme
New Post has been published on https://click.atak.co/qibla-wordpress-listing-directory-theme/
Qibla - WordPress Listing Directory Theme
Welcome, this is Qibla
Qibla is the new listing directory for WordPress. Use Qibla if you want to start your Tripadvisor or Airbnb-like directory! Perfect for local businesses owners and promoters or any kind of web directory.
Our demo uses these additional plugins:
Please note: This sale is for Qibla WordPress theme only. Some premium plugins may require additional purchase.
WooCommerce (free) WordPress Sassy social share (free) WP opening hours (free) WooCommerce Bookings (premium) Reviewer WordPress Plugin (premium)
Qibla2Mobile (premium)
Update Logs
= 2.5.0 07/17/2018 =
Fix: suggestions, given the support when the slug of taxonomies is changed. Fix: Various arrangements and removal of dirty code. Fix: Related events order by date and time. Fix: Events shortcode add option for order by "Event Date". Fix: Undefined function getcurrentscreen in admin hook "qiblafwtermboxthumbnailscreen" Add: button for remove title group. Add: Support for Reviewer plugin. Add: option for set default address in google map. Add: Term color scoped style in listings card. Add: Geocoded add slug in nav suggestion data. Add: Term color scoped style in events card. Add: Support for WooCommerce 3.4.3
= 2.4.0 06/13/2018 =
Add: Font Awesome 5 icons divided into two types, solid and regular. Add: Events settings page in theme options. Add: activate select2 input search box. Add: new page template Events Search. Add: Short-code search events '[dlevsearch]'. Add: Short-code events map '[dlevmaps]'. Add: Short-code events term '[dlevterm]'. Add: Short-code events term locations '[dlevterm_locations]'. Add: added functionality to search for events, by date and / or category. Add: added ajax filtering for dates. Add: added in single events, socials, email, phone and site url. Add: add Hero Map. Add: added "tag groups" functionality in the taxonomy amenities. Fix: fixed slug value for autocomplete and geocoded search.
= 2.3.0 05/04/2018 =
* Add: Short-code listings, posts, maps and terms added layout option in visual composer. * Add: Integrated Opening Hours plugin (visible in the listings sidebar). * Add: Widget Area in Archive listings (visible before the listings). * Add: Counter for checked amenities. * Add: New Select2 theme. * Add: New design for listings filters. * Add: Events plugin. * Add: If it is not active woocommerce-bookings, add tab for inserting personalized content instead of the booking form. * Fix: Marker cluster in the same position. * Fix: Update googleapis version. * Fix: Search geocoded permalink. * Fix: Various fixes for IE11.
= 2.2.0 03/31/2018 =
* Add: New user registration, notification for password reset * Add: added filter 'qibla_sidebar_in_singular_post_type' in sidebar function. * Fix: Style for Homepage full width template. * Dev: added filters for the "screen" TermBox classes.
= 2.2.0 03/28/2018 =
* Add: Added Glyphs Icons. * Add: support for wpml to create a cache for suggestions based on the current language. * Add: Icon search feature for search icon by name. * Add: Support for WooCommerce 3.3.4 * Add: Added homepage boxed and full width template. * Fix: Invalid object type for subtitle for WP_User instance. * Fix: isListingsArchive and isListingsMainQuery functions for taxonomy archive. * Fix: Autocomplete suggestions based on the current language. * Fix: Invalid object type for subtitle for WP_User instance. * Fix: Search Geo fix default event in setValue function. * Dev: Added file for the definition of the listings types, used in the registration of the taxonomy "listings_address". * Tweak: Change placeholder for title and sub title, in add listings form.
2.1.0 – 02/12/2018
Add: Ability to customize the My Wishlist endpoint via settings. Add: introduced getArchiveDescription function for retrieved archive description. Add: include archive description in json data Add: Map Icons. Add: support for wpml to suggestions. Add: introduced new function isWpMlActive. Add: shortcode dl_maps to view a map, you can use one only per page. Add: Count result and ordering template in shop page. Add: shortcode dlrecentlyviewed to view recently viewed listings. Add: filter categories and locations in listings short-code. Add: Support for WooCommerce 3.3.1. Add: add filter qibla_search_json_encoder_factory for filter json encoder factory args. Add: added setCurrentLang function. Add: multiple relationship between categories and amenities. Fix: ListingsPost icon method check if $termIcon is empty. Fix: add 'updateoptionrewrite_rules' case in Autocomplete handler for update data. Fix: TermBox Store fix checkAdminReferer. Fix: WpMl support for redirect at checkout after package creation.
=2.0 – 12/18/2017=
* Add: Support for WooCommerce 3.2.6. * Add: Introducing Wishlist feature. * Add: Listings Categories. * Add: Amenties / Categories Listings Relation. You can now hide amenities based on Category context from within the edit term page. * Add: Term Meta can now be set when creating the term within the edit tags page. * Add: Introduce Drag&Drop for map pin. You can now adjust the position of the marker by dragging it when create or edit a listings. * Add: New Role 'manage_listings' for users that can manage the listings within the backend. * Add: Search now allow administrator to select one search, search + geocode and combo that include the search, geocode and listings categories. * Add: Introduce the package manager within the listings edit page for all listings even the ones created within the backend. * Add: Typography font variant and font weight for base font family in theme option. * Fix: Listing Location doesn't get update after ListingLocationStore has been introduced in 1.2.0 * Fix: Author Listings doesn't update in Quick edit. * Fix: Incompatibility with WooCommerce 3.2.x where isn't possible to assign the listing ID when create the post. Prevent to automatically publish the listings on order complete. * Fix: Product won't remove from the cart when a user delete an item not payed yet. * Fix: Author page doesn't show because of the FilterProductsQuery set the queried_object too early. * Fix: Material icons doesn't load due to missing rules in generated vendor.min.css. * Fix: Loop footer listings doesn't show full content if meta is empty. * Fix: Page not fully load when there are no posts in a listings archive. * Fix: Tinymce buttons overflow the container in small devices. * Fix: Quote and double quote may truncate the listing content when submit one. * Fix: Autocomplete appear twice when browser is set to use the auto fill forms. * Fix: Remove the search classes from body if the context is for listings type. * Fix: Updating a term in quick edit doesn't release the ajax spinner. * Fix: Capabilities logic, not work well. * Fix: Capabilities for Custom Post Type and Taxonomy Listings. * Fix: Listings container height on archive listings for No map archive. * Fix: Jumbotron defined in Framework hide archive titles like the author one. * Fix: Search Geocoded doesn't load the correct page if locations term titles use more than one word. * Fix: Archive Listings container collapse when images are not downloaded fast. * Fix: Pagination ajax not trigger if no filtering has been executed at least once when no map archive option is set. * Fix: Default archive descriptions giving support to the multi post type. * Fix: Ajax loader stuck on quick edit terms. * Fix: Search Submit label may disappear in some cases. * Fix: Listings archive list won't scroll when full screen map is closed after a filtering action. * Fix: Homepage template won't save meta options. * Fix: Color picker doesn't work as expected within post meta boxes when site is viewed in firefox. * Tweak: Improve search navigation responsiveness. * Tweak: Various Css issues. * Tweak: Improve typography settings load speed. * Refactor: New Listings Filtering logic. * Refactor: Move functions from `Front` and `Admin` namespace within the main one under the path `src/Functions`. * Remove: Post Formats support has been removed for Listings Post type. * Remove: Listings Format logic. Never used. * Dev: Allow `picture` and `source` in `ksesPost` function. * Dev: Introduce `before` and `after` actions in archive title template. * Dev: Add filter `qibla_discard_init_loader` to allow third party plugin or child themes to prevent the init of the theme and made their own. * Dev: Improve filter logic, the taxonomy redirect fragment now is dynamic, you can pass it as `data-taxonomy` to the input. * Dev: Introduce `qibla_fw_default_map_location` filter to allow to change the default google map. * Dev: Allow `picture` and `source` in `ksesPost` function. * Dev: Introduce SubTitle template and relative view with `before` and `after` hook. * Dev: Validate forms sometimes doesn't set the value of the inputs correctly. This happen when the submit page is different than the action page. * Dev: Fix Select input type when set the `selected` attribute. Values must be exactly the same, so compare lowercase characters. * Dev: Refactored the Autocomplete package, to allow to work with other post types of listings type. * Dev: Listings fetching events are now dispatcher to form element instead of window. * Dev: Fix propagation missed for events fired after the event pagination in archive listings is started. * Dev: Introduce filters to the form type output before return it. The filter take the form of `qibla_fw_type_type_slug_output`. * Dev: Introduce `QiblaFrameworkTemplateThumbnail` template class. * Dev: Introduce `QiblaFrameworkTemplateLoopTemplate` template class. * Dev: Introduce js-url (a JavaScript url parser) library. * Dev: Allow to create modals for login / register dynamically by every javascript file. Use DL.LoginRegisterFormFactory(triggerHTMLElement). * Dev: Introduce basic CRUD interface. * Dev: Introduce `UserFactory`. Move logic from `User` class. * Dev: Improve `codearea` field type by using the newly function `wp_enqueue_code_editor`. Old codemirror has been removed.
=1.7.1 – 10/21/2017=
Fix: Hero full height up to 1366px. Fix: Hero within singular listings height. Overwritten by the rule for the other pages. Fix: Listings Archive without the map has an additional margin between header and filters. Fix: Vertical align for Hero content when header is set as transparent and within the single post. Fix: Task for update listings geocode data must use ajaxurl because it is executed within the admin context. Fix: ScriptLoader doesn't recognize field slug in php < 7. Fix: Login/Register Modal doesn't open by default within the add listing submission page. Fix: Logout Url doesn't work within the my account page because of the wrong namespace in case sensitive Os. Fix: Logout url appear under every submenu items in main navigation when user is logged in and SignIn/SignUp is not the latest menu item. Fix: Some issues with the listings location meta updater when some listings cannot be updated correctly.
=1.7.0 – 18/10/2017=
Add: Introduce geolocalization feature for listings. Add: Support for WooCommerce 3.2.x. Add: Material Icons. Add: Search now can get google addresses and geolocate users. Add: Allow to set the listings archives without a map from theme option. Qibla > Theme Options > Listings. Add: Amenities within the single listings are now links to the respective archive pages. Add: New option to set geocode search input in Qibla > Theme Options > Search. Fix: A warning for WordPress Social Login when user is not logged in. Fix: Wrong logo image when header is set to sticky when the logo size is greater than the thumbnail image size. Fix: Google Analytics code strip tags. Switched to a text field to allow UA code. Fix: Select2 overlaps color picker within admin pages. Fix: Header Hero content not centered vertically if header is set as sticky. Fix: Prevent glitch on header hero content when page load because of the sticky header. Fix: Remove post type query arg from filter, cause context issues. Fix: Title doesn't appear in search page when framework is active. Fix: Wrong text domain in WooCommerce templates. Fix: Smooth scroll issue with hidden elements. Fix: All third menu level items get border radius. Fix: Escape html class attribute values in scopeClass. Fix: Hero content not centered within the homepage when header is set as sticky. Fix: Hero doesn't appear in search results page. Fix: Sidebar doesn't appear in search results page. Fix: Hero height different when header is set as sticky. Fix: WooCommerce Products list layout broken in widget when product has no price. Fix: Header extra horizontal padding between 1025 and 1080 viewport. Fix: Listings cannot submit via front-end when a term of a taxonomy is a numeric like value. Es. zip code. Fix: Missed to introduce Listing Package Shortcode within the Qibla Visual Composer category. Update: Allow CRUD package to work with new location data. Lat / Lng are now separated meta where address is a term. Remove: Removed locations taxonomy from the search suggestions. Remove: Static search navigation is now removed in favor of automatic suggestions based on listings categories. Tweak: Improve the navigation UX used in search. Refactor: Header search is now a generic search for listings and posts. Dev: Introduce filter named `qibla_listings_filter_form_output_before_close` to filter the listings form filter. Dev: Introduce Geo package, meta query args from bounding coords, latlng factory, Geolocation filtering. Dev: Introduce filter 'qibla_listings_allowed_taxonomies_filter' to modify the list of the allowed taxonomy form which retrieve the terms that goes into the search suggestions. Dev: Introduce Search field input type. Dev: Introduce filter `qibla_fw_prepare_json_builder` to insert extra data within the json send after listings filtering. Dev: Ajax filters can now be executed in both front-end and back-end context. Dev: SvgLoader is now included in back-end.
= 1.6.1 12/09/2017 =
Fix: Users when register must not obtain the Listings Author Role. Fix: Login register collapse issue in mobile devices after social login has been introduced. Fix: Unexpected scroll to top on anchors with '#' as fragment. Fix: Modal Login Register on small screens is cut off. Fix: Box model issue on small devices due to a Owl Carousel bug when used within a flexbox container. Fix: Rating on single listings doesn't get the hover state. Fix: Select input type z-index because of Visual Composer Panel. Fix: Missed social login support within the WooCommerce my account page. Fix: Extra space between header and main content when window is too small in desktop devices. Tweak: Social Login box model within WooCommerce my account page. Tweak: Modal, allow to close it by clicking outside of the modal itself. Remove: Remove Contact Form 7 from the list of the suggested plugins. Never used on theme.
1.6.0 – 06/09/2017
Fix: Remove the link from user within the comment form that point to the admin edit profile. Fix: Local video doesn't show up on homepage header. Fix: Encoding excaped quote when not needed. Fix: Notice when try to submit a review and Debug is enabled. Fix: Prevent issues on login register modal if no login/register element exists within the page. Fix: google map field type don't load time to time when loaded async. Fix: Use first and last name as user login if user provide both even if separated by space. Fix: Wrong namespace in case sensitive OS. props @Ilyo. Fix: Lost password form lost the submit button label after data has been submitted. Fix: wrong conditional statement when check for recipient type. Fix: strpos third parameter is the offset not a strictly comparison. Fix: Don't add `woocommerce` class to the body element in single listing if the product isn't related. Fix: Don't show the price element when isn't possible to retrieve the product price. Fix: Wrong text-domain for "Add your listing" page title. Add: Sticky Header Option. Add: Slider Revolution support. Add: Localization for it_IT. Add: Autocomplete and custom menu attributes to search form shortcode. Add: Support to WP Social Login plugin. Add: Allow Listing Author to reply to customer reviews. Add: Map Qibla shortcode's into Visual Composer. Add: Smooth scrolling for internal anchor links. Add: Localization for it_IT. Add: AddListingToCartOnBooking to allow us to add the listing post within the booking product cart item data. Add: Filter email recipient on new order and new booking. Add: Visual Composer integration for Shortcodes. Tweak: Align amenities icons within the single listing. Tweak: Reduce the font size for the listing package price, so high price value do not break the UI. Tweak: Improve Login/Register modal box model. Tweak: Set the phone anchors to be clickable. Tweak: Move the related post cta label as option under Theme Options > Listings to simplify a bulk edit. Tweak: Remove the constraints for memory_limit, time_limit and max_execution_time. Try to import whatever can be imported. Improve: Logo MV by introduce new hooks to perform actions before and after the logo markup is rendered. Also, the img now is wrapped in a `<picture>` element. Update: Demo content to include new content generated by visual composer. Dev: Fix Radio input type missed attributes values. Dev: Fix datetimepicker type doesn't load correctly on Firefox.
1.5.1 – 16/08/2017
Fix: Dropdown input is higher than than others. Fix: Don't use html markup within the translation text in review form. Fix: Quantity increment/decrement width within the cart. Fix: Login/Register modal doesn't have correct height on Safari. Fix: Rename languages/qibla-it_IT.mo/.po to languages/it_IT.mo/.po. Files within the theme doesn't need the textdomain prefix. Fix: Modal Contact Form on single listing cannot scroll the content correctly due to content alignment. Fix: Missed borders style for search navigation items. Fix: Search input height value is wrong on Safari. Fix: WooCommerce table links that are btn must not get the link-text style. Fix: Modal height in IE10, the modal get the whole height of the window. Fix: Alert within the contact form modal is cropped. Fix: Fatal Error caused when a product type element cannot be created but the product is associated to a listing. Generally because the product associated isn't of type of Booking. Fix: The Listing Visibility Duration must be within Qibla Listings plugin not into the framework. Fix: Error when an order is set as completed and there are no listings associated to that order. Fix: Don't show the My Listings page for non listings authors. Fix: Authors Dropdown list doesn't show listings author within the admin edit screen. Fix: Missed to load the plugin language textdomain. Fix: Listings Actions within the my listings page not work as expected if site is not localized in english. Fix: Administrators, Editor, Author and Subscriber cannot access to admin because of Listings Author roles. Fix: Don't show Admin Bar on frontend for Listings Author. Related with the issue of admin access. Fix: Error within My Listings page when package related to a listing no longer exists. Fix: Notice on listing form when trying to remove the breadcrumb. Fix: Check for 'edit_listings' instead of 'publish_listings' for the edit listings form. Fix: User not allowed to create listing posts if user all-ready exists when 'qibla-listings' plugin is activated. Fix: The Listing Visibility Duration must be within Qibla Listings plugin not into the framework. Fix: Wrong translation string for uploaded_to_this_item when registering post type. Fix: Get comment data doesn't need a translation string. There is only a string that contain a positional argument. Fix: iOS issue within single listing page: "This website has been blocked from automatically composing an email" during contact form modal preloading. Fix: Login/Register form show the "Create an account" even if registration are off due to wrong value type evaluation. Fix: Prevent javascript errors when listings archive doesn't contain any filter or toggler. Fix: Email not send when a new user is registered. Fix: Allow to load the plugin textdomain directly from the plugin. Fix: Reset Password is not send. Generate a fatal error in non network installations. Fix: Page still allow scrolling on listings archive page on iOS when map is opened. Fix: Remove the Header skin and subtitle from Listings Categories, Locations and Amenties term boxes. Listings Archives doesn't show any hero image nor subtitles. Fix: Function get_current_screen may not exists whithin the MetaboxStore context because the handler is attached to the "save_post" and not all of the posts are saved within the edit post screen context. Fix: Security vulnerability for internal Textarea input type. Data is not escaped. Fix: Codearea type append slashes to the submitted value. Make it unusable. Fix: No way to store dynamic Css from theme option if child theme is active. Fix: Modal doesn't open correctly in Edge and IE10 Browser. Fix: Shortcode Term warning when term doesn't exists in database. Fix: Phone number within the single listings meta doesn't work as expected. Make it clickable, so it's possible to make a call directly from the site. Fix: Unexpected end of JSON input when there isn't listings data to retrieve. This include listings posts, categories, amenities etc... Fix: Impossible to update the map togglers on resize. Map opening/closing must be triggered only by user. Fix: Missed google_analytics default option. Fix: Prevent optional options to be marked as invalid during import. Fix: Wrong google analytics option value in theme option. Update: Google Map version to 3.28. Update: Code Mirror: 5.27.4, Update: OwlCarousel: 2.2.0, Update: PhotoSwipe: 4.1.2 Remove: "Password will be emailed to you.". WordPress doesn't send any password via mail when a new user is registered. Tweak: Set the overflow for the modal to auto, don't show scroll bars if not necessary. Tweak: Alerts components in small devices. Remove icon and improve typography. Tweak: Flush rewrite rules on import completed. Tweak: Use translation context for default options strings. Tweak: Improve the username invalid description within the register form. Tweak: remove breadcrumb metabox field description. Tweak: Contextualize the settings translation strings. Tweak: Vertical center the loader within the archive listings map. Tweak: Add link to google developer site about how to create a map api key to Google Map Theme Option field. Tweak: Increase php ini variable before generate the dynamic.css file. Will prevent a time out issue in cheap hostings. Improve: Mobile Header. Improve: Promote users to listings author when try to create a listing. This allow registered users like subscribers to be listings authors. Improve: Empty the cart before perform redirect the user to the checkout after a listing has been create. Improve: Remove unnecessary WooCommerce Navigation items from my account for users that can manage listings. Improve: UX by don't allow google map scrollwheel for map within the add listing page. Refactor: Template for the Cart Counter is now a class. Dev: Move the qibla_did_init hook at the end, so other code may act with actions previously added. Dev: Introduce the TemplateInterface. Dev: Apply the 'qibla_kses_image_allowed_attrs' directly to the img list. Dev: Pass fields values and post as arguments to the listing form fields list. Dev: Separate the enqueue for style and script for Testimonial shortcode, so we can deregister the script without loose the style. Dev: Move 'widgets_init' within the filters list definition. Make the Init class coherent with other plugins. Dev: Localize the autocomplete arguments for the ajax call. See dlautocomplete localized script arguments. Dev: Introduce new filter named 'qibla_fw_insert_localized_script_item' to filter the localized script arguments before output. Dev: Introduce new parameter for DataCacheTransient to allow to work with different transients data. Dev: Introduce new filter within Template Engine named 'qibla_fw_template_path' allowing you to filter the file path before include it. Dev: Refactor GoogleMap by implementing Template Interface. Filter callback has been changed too. Dev: Improve Map Field type, now it is possible to pass google map options via php. Use 'map_options' as argument for the field type. Dev: Introduce two new filters to manipulate the base Dir for Scss files and for output dynamic's css. 'qibla_fw_settings_handler_scss_base_dir_path' and 'qibla_fw_settings_css_output_file_path' respectively. Dev: Introduce two new filters to change the 'All Categories' and 'All Locations' filter labels under the listings archive page. Filters are named respectively: 'qibla_listings_filter_category_all_options_label', 'qibla_listings_filter_locations_all_options_label'. Dev: Introduce new filter to change the value of the scss importer string passed as content to generate the dynamic.scss file. Filter named 'qibla_fw_settings_dynamic_css'. Allowing you to include extra css within the dynamic file. Dev: Always load the 'dl-utils' script.
1.5.0 – 02/07/2017
Add: Support for WooCommerce 3.1.0 Add: Ability to allow users to create listings by fee. Add: Login / Register. Allow users to login, register and get back password from front-end. Add: Required fields now have an asterisk associated to their labels. Add: Modal Contact Form within the single listing. Just click on email icon. Cf7 no longer needed. Add: Main Menu Item styles. Text or Button. Add: Custom user LoggedIn menu. Add: Required fields now have an asterisk associated to their labels. Add: Ability to change the post type and taxonomies base permalinks. Add: Contact Form within the singular Listings, allow to send email directly from the site instead of load OS application. Add: User logged in menu. A submenu within the main nav that allow to create the login/register action and menu. Add: Hide Breadcrumb within the singles and pages. Fix: Front page hero title doesn't resize like other pages. Create problems with long text in small devices. Fix: View Gallery label disappeared from the single listing page. Fix: Checkout review order table Total column shrink if the name of the product is to long. Fix: Incoherent style for quantity element within the single product on small devices. Fix: Reflect the search icon in search form. Make it ltr compliant. Fix: Sanitize Html Class attribute values when using the scopeClass function. Fix: Widget cart buttons no wrap text when button label is too long. Fix: Mini cart products number overflow. Fix: Icons in square article variant go under the article title when the title go in two lines. Fix: Some Hero options not works after parallax was introduced in 1.4.0. Fix: Use https://www.google.com/maps instead of the .it in single listing map link. Fix: Don't convert htmlentities for query arguments when used for google map url. Some character may be converted incorrectly. Fix: Checkbox toggler style doesn't work if previously wasn't included another type that enqueue the 'qibla-form-types' stylesheet. Fix: ClassList polyfill add/remove extra spaces combining the class attribute values into one class value. Fix: Notice when the current screen is not set during working with metaboxes. Fix: Sanitize Html Class attribute values within the scopeClass function. Fix: Hidden Form Fields cause Fatal Error when used as standard field. Fix: Undefined index $ID within archive post type page when try to retrieve the sidebar position but the archive have no page associated. Fix: Importer, previously listings were imported every time. Now you can re-run the importer again and again without duplicate any content. Improve: ksesPost function by including: select, option, optgroup tags. Improve: Typography smoothing. Improve: Buttons box model. Tweak: Add the global border radius to checkbox type, make it coherent with the theme style. Tweak: Enhance the radio button style. Tweak: Show the Comment closed text only within the 'post' post type. Not necessary within pages and other types. Tweak: UI, better highlight the checkbox and radio button when element has status of checked. Tweak: Add placeholder to map search input to better clarify how to get suggestions. Remove: Unnecessary features from the tinyMCE for the listings archive description. Dev: New css util class .u-highlight-text to allow text to have the same brand color. Dev: Filter for walker class name to main nav arguments. Filter is named "qibla_nav_main_walker". Dev: Introduce $responsive parameter to the btn mixin. Allow to include media query or not. Dev: Restructure how the --card and --overlay modifier apply their styles. Overlay is for article with thumbnails. Dev: ksesPost function by including select,option,optgroup and include extra attributes to the textarea tag. Dev: Wysiwyg Input class now take extra argument 'editor_settings' to able to edit the settings passed to wp_editor. Dev: Add new parameter $status to QiblaFramework\Functions\getPostByName(). Dev: Introduce new class to able to convert Form data to a data that can be passed to the wp_insert_post(). Dev: Introduce new function scopeID(). Dev: Introduce new argument for Field to allow to show the label before or after the input. Dev: Introduce new UpdatePostException class. Dev: Introduce new Utils class UtilsTimeZone to get the timezone according to the Wp options. Dev: Introduce new Utils class UtilsFormToPostDataConverter to convert data from a form to post arguments. Dev: Introduce new filter within the isJumbotronAllowed function named 'qibla_fw_is_jumbotron_allowed' before the value is returned. Dev: Introduce new filter after post meta storage named 'qibla_fw_metabox_after_store_meta'. Allow you to work with the new meta, value and post after meta has been saved. Dev: Introduce new type Password in Form library. Dev: Introduce new body class to know when a user is logged in or not. Dev: Introduce new template for Alert that use underscore template. Dev: Introduce new WooCommerceTemplate class to allow to override quickly the woocommerce templates. Dev: Introduce new function getPostThumbnailAndFallbackToJumbotronImage. Dev: Add "paste_as_text" option in wysiwyg editor when the editor is set to 'teeny' to strip markup characters. Dev: Allow markup within the fields description. Dev: Introduced a new filter 'qibla_fw_did_init' to allow other plugins to hook after the framework have did his stuffs. 1.4.0 - 2017/05/19 Add: Support for WooCommerce 3.0.7. Add: New attributes for sections shortcode. Now it is possibile to set two buttons and define a stile 'big' for the container. Add: Parallax to hero image and section shortcode. Add: Custom order attribute value 'listorder' to the list of 'orderby' values for dl_terms shortcodes. Allowing to order the list of the terms by the order defined in shortcode. Add: 'orderby' and 'order' attributes to the Post and Listings shortcodes, reflecting the orderby and order clausules of WP_Query. Update: Google map api key. Fix: Suggestions navigation is cut off the hero if theme use a video background in homepage. Fix: Font size increased within article boxes. Keep it only for singular post content paragraphs. Fix: Text selection colors are no applied correctly. Fix: Section Shortcode buttons are not styled properly when the background image is set. Fix: WooCommerce quantity incrementer show up even when the product is sold individually. Fix: Search navigation content is centered in IE10 when other browsers display the text left aligned. Fix: $data value in TemplateEngine is not filtered correctly. Fix: Box model for coupon form within the cart in small devices. Fix: Regenerate the dynamic.css file on theme upgrade. This ensure new styles are applied after the theme is updated. Fix: Wrong name for jumbotron.js file, will not be loaded under case sensitive filesystems. Fix: Header search closing on ESC keypress. Fix: Invalid arguments for autocomplete search when build the data. Some listings may not have terms assigned. Fix: Missed default option for posts_per_page when retrieving the theme option. Fix: Missed default icon for header search form. Caused blank screen if option is not set. Fix: Incorrect value number show on found posts within the archive listings when the option Listings per page is set to -1. Fix: Ajax pagination within the archive listings doesn't work as expected when click on next|prev link due to the icon. Fix: IconList type cannot be unset after the data is saved for the first time. Fix: Autocomplete cache not update when a post or terms are deleted. Fix: Don't show the close button for header search in IE10. The browser show his own close icon. Fix: $data value in TemplateEngine is not filtered correctly. Fix: Single Listing map marker. Cannot read property 'openedInfoWindows' of undefined. Fix: Wrong id attribute value for Review Metabox. Fix: Compatibility Qibla WooCommerce Listings plugin with php >= 5.3.x Fix: Prevent issues if the product has no name when try to retrieve it to decide to show or not the product fieldset. Tweak: Show a generic "Posts" title in jumbo-tron when the front page is the blog page too. Tweak: Box model for the search navigation items. Tweak: Comments box-model in small devices. Give more space for comment text. Tweak: Don't allow values less than -1 in Listings per page option. Tweak: Improve admin post listings table columns. Give more space for other plugins to add extra columns. Remove: Registry Class. Never used. Dev: BaseForm arguments are now optionals for constructor. Dev: Introduce two new formatting functions: stringToBool and boolToString. Dev: Remove localization for Exception/Error's text. Dev: Introduce new filter 'qibla_fw_metabox_arguments' to filter the metabox arguments when the instance is created. Dev: AbstractMetaboxFieldset::setFieldsets now allow to insert additional fieldsets to a current list of fields. Dev: Add new parameter to 'qibla_fw_scope_attribute' $modifier. Dev: Remove localization for Exception/Error's text. Dev: Booking tax query filter is now hooked in parse_tax_query. Allow to set multiple condition within different code context.
1.3.0 - 2017/05/02 Fix: WooCommerce single product thumbnail width. Fix: Theme Options json heading colors doesn't match the default headings. Fix: Hero shrink in homepage when the search input get focus on mobile devices. Fix: Google map element is duplicated on Firefox within the single listings when navigate through the history browser buttons. Add: Style for autocomplete feature. Add: Compatibility to WooCommerce 3.0.5. Add: Autocomplete and suggestions for search inputs within the header and homepage. Add: Custom navigation menu search in mobile devices. Add: Taxonomy names to the custom search navigation menu items. Tweak: Speed improvements by micro optimizations. Remove: QiblaFramework\Front\Functions\disableTermArchives function, no longer needed. Also removed the file src/Front/Functions/Term.php. Remove: Amenties column from listings table to prevent ugly table in small screens resolution. Dev: Add New Conditional functions to check for ajax requests. One for Autocomplete and one for listings filtering. The latter take the over for isAjaxRequest (now generic for ajax requests). Dev: Add New function to check and validate the referrer. getReferer() && isValidReferer(). Dev: Add new localized variable named site_url. Dev: Improve the search callbacks by using the instance directly instead of the shortcode. Dev: Update Modernizr with touchevents. Dev: Move postFoundTmpl, breadcrumbTmpl and archivePaginationTmpl outside of archive description. Removed filters too. Dev: Change priority for theArchiveDescription hooked in qibla_after_archive_listings_list from 20 to 30. Dev: Introduce new function listingsArchiveFooterTmpl to group Move postFoundTmpl, breadcrumbTmpl and archivePaginationTmpl. Dev: Remove the dllabels localized script. Never used. 1.2.1 - 2017/04/24 Fix: Wrong value for filter_input on listing's review submission. Fix: Missed reviews.min.js on production environment. Fix: Remove leading backslash from namespaced functions. It's not necessary and may create issues with some php configurations. Fix: Rating list doesn't show up within the admin comments edit form. Fix: Select style within the WooCommerce's checkout page is set to the default style after value is changed. Fix: Deprecated WC_Customer::get_country use WC()->customer->get_billing_country() instead. Tweak: Remove box-shadow from hamburger menu on focus state. Tweak: Add border radius on product price for listings post article to match the theme style. Tweak: Increase the overlay for color by .4 to .5 alpha. Tweak: Select2 borders bottom doesn't rounded when list is closed. 1.2.0 - 2017/04/20 Fix: The blog show the latest post title when the reading settings for front page is set to show the latest posts. Fix: Filter query booking products during 'pre_get_posts' doesn't works as expected in some cases. Fix: Wrong textdomain for 'all locations' string within the listings archive input select. Fix: Unmatched page slug doesn't show Theme Option within Admin if accessed by First Level admin menu item 'Qibla'. Add: Compatibility to WooCommerce 3.0.4 Add: Custom Header Theme Support. Video too. Yes! Add: Reviews for listings post type Improve: Set the script protocol url to relative for google fonts. Future thanks us. Improve: Comment reply form links style. Improve: Refactor comments css style after listing's Reviews have been introduced. Tweak: Reduce the height of the custom logo to match the css max-height property. Tweak: Add +.1rem to the singular content font-size property. Tweak: Don't use the brand color for author name in comment, it can be confused with links. Tweak: Vertical Spacing between elements in single listings header. Tweak: Lighten the Hero overlay color. Move: Gravatar and Rating filters from the default WooCommerce hooks. Now in review.php template. Add consistence after the listing's Reviews. Remove: Header Background functions and hooks. Theme never supported the custom-header. Remove: WooCommerce archive product page title. We don't use it. Remove: getProductGalleryIds function. No longer necessary after Wc 3.x support. Remove: Functions for backward compatibility with WordPress 3.4.x: sanitize_hex_color, sanitize_hex_color_no_hash, maybe_hash_hex_color. Dev: Deprecated getImageIdByUrl() in favor of attachment_url_to_postid(). Dev: Introduce new classes for custom post's Exceptions. Dev: Introduce two new filters within the post title template. 'qibla_before_post_title' and 'qibla_after_post_title'. Dev: Add Conditional function isHeaderVideoEligible to check if the video is set and is eligible to shown into current page.
1.1.0 – 2017/04/11
Fix: Missed mail to social meta icon in singular listings. Fix: Show Archive title for date archive pages. We don't use jumbotron there. Fix: Select2 style on open state borders. Fix: Post title doesn't appear for custom internal loop if the postTitleTmpl has been called with screen-reader-text argument. Fix: Split mark and selection pseudoclasses. mark must not share the properties with the selection or will not work on Firefox. Fix: Input with appearance none create issues in Firefox. Fix: Input text not showing correctly in winIE 10 UA. Fix: Main content doesn't stretch correctly in winIE 10. Fix: Adjacent posts navigation box model in winIE 10. Fix: Sidebar width in winIE 10. Fix: The search page of the theme loses jumbotron if the framework is active. Fix: Blur event on search navigation doesn't work for some items. Introduce a 300ms of delay after click. Fix: Missed social mail post meta within the singular listings. Fix: Admin locked avatar image size issue. Fix: Section Shortcode cta button href attribute is empty. Fix: Listings Search doesn't work as expected. Wrong sync between the listings posts and the map. Add: Moved some logic regarding Jumbotron (Hero Image) from Framework to theme. Add more internal consistence. Add: New conditional function isDateArchive to test if the current page is a date blog post archive. Add: Introduce new action "qibla_before_single_listing_loop_entry_content" in format standard before the main content. Add: New filters within the loopFooter View before and after the footer content. Add: New actions within the loopFooter.php view named respectively 'qibla_before_loop_footer' and 'qibla_after_loop_footer'. Add: qibla woocommerce listings plugin to the list of the plugins required by the theme. Add: New Listings table columns for listing categories and amenities. Add: Flag to the listings marked as featured on archive loop. Add: TripAdvisor listings social icon. The post meta. Add: Template Tags for scope class markup attribute. The same of the theme. Update: Requirements plugins versions for Framework and Importer to 1.1.0. Improve: Partial refactor the Jumbotron class to able to work with Shop page and add make it much coherent with Framework. Improve: Alerts styles. Make them much cleaner and scss scalable by introducing mixins. Remove: PhotoSwipe from theme. Use the one provided by the framework. The script was included for WooCommerce but it's no longer necessary. Remove: The Jumbotron (Hero) term box options from non blog and woocommerce terms archives.
BUY From ENVATO Marketplace
#airbnb#calendar#classified#directory#event#Event Directory#listing#listings#local#map#Marketplace#qibla#real estate#reservation#theme#tripadvisor#wordpress
1 note
·
View note
Photo

Show Course Schedules and Timetables With a WordPress Calendar Plugin
Websites often need to let users know about any upcoming events like movie shows, exhibitions and classes. Listing the schedule for upcoming events helps everyone save time and plan their activities. With a good event listing calendar, your users will be able to see upcoming events along with their timing, location, availability and pricing at a single place. This helps you avoid answering a lot of repetitive inquires, and makes users more likely to buy tickets for events.
20 Best WordPress Calendar Plugins and Widgets
Whether you need an event calendar plugin, a booking system with payments, or a Google Calendar widget, this list of plugins will have something to improve...
Esther Vaati
06 Sep 2019
WordPress
8 Best WordPress Booking and Reservation Plugins
In the digital age, users are online 24/7. Everyone prefers to check availability and make appointments, reservations, or bookings online. They want to do...
Lorca Lokassa Sa
12 Apr 2019
WordPress
Best Free WordPress Calendar Plugins
In this post, we will review some of the most popular free WordPress calendar plugins that you can start using in your projects.
Monty Shokeen
18 Jun 2019
WordPress
How to Add a Calendar to Your WordPress Site With the Events Schedule Plugin
Build a schedule for your website, complete with Google Maps integration, call to action buttons, and a complete automated booking and ticketing system for...
Jessica Thornsby
14 Mar 2019
WordPress
The usefulness of these event calendar and scheduling plugins makes them very popular among website owners. There are a lot of free and paid plugins out there which can help you create such schedules and post them on your website. One of the best is Timetable Responsive Schedule for WordPress, available from CodeCanyon. In this tutorial, I'll show you how to use Timetable Responsive Schedule to create a weekly schedule to list different courses and their details.
What We'll Be Building: a Course Timetable
The plugin offers a lot of nice features that we will be using when creating our own course schedule. The image below shows the final result that you will have at the end of this tutorial.
As suggested by the name of the plugin, the timetable that we create will be responsive and look great on all devices. The plugin also provides booking functionality out of the box. This means that users will be able to register for different courses by clicking a button in the schedule itself.
The Basics of Timetable Responsive Schedule
In this section, we will simply cover some of the basics that will help you understand how the plugin works.
After installing the plugin, you will notice that there are four new menu options in your WordPress admin dashboard: Timetable, Timetable Bookings, Timetable Columns, Events.
The Timetable Columns menu option is used to specify the content that goes in the head of our table. It can be anything that you like. For example, you could create columns for months, days, dates, or places.
The Events menu option contains different settings to help you set up and create events. There is an option to create different categories to group events together. Just like the timetable columns, the event categories can also have different values with any names you want. For example, if the events are happening at different places, you could categorize them with locations. If the schedule is for movies currently being shown in different movie theaters, the category could be the movie genre.
There is no right or wrong way to set timetable columns or event categories. The important thing is to group the events together in an organized manner that makes it easier for people to find quickly find information about events that they like.
Right now, we just need to know about these two menu options to create our events and categorize them. We will discuss the remaining options later.
Creating the Course Schedule
After getting familiar with the basics, we can now start creating our responsive schedule.
First, we will create seven columns—one for each day of the week. To do so, simply go to Timetable Columns > Add New. You will just have to fill in the title of the column and click Publish. This will add the weekday to the list of columns. Do this for all seven days of the week to get seven different columns.
Now it is time to define some categories for our courses. We will use the subjects and categories for our courses. For example, both Algebra and Statistics courses will fall under the category Mathematics. Similarly, French Revolution and World War 2 will fall under the category History in our schedule.
Remember that you can create your own categories depending on how you want to organize the courses. As I said earlier, there is no absolute right or wrong here. The aim is to make the information easier to find.
Finally, we can start creating the course schedule that will appear on the website. Just go to Events > Add New and start filling out all the details. Some information that you fill out is shown only when the users click on the event link to read about it in more detail. Other information will appear in the timetable itself.
You can begin by filling the title and description of the course. The title appears in a lot of places like the tooltip, the course schedule as well as on the course details page. Try to keep it short. The description will only appear on the details page.
There are a couple of options below the description like the Subtitle and the background and text colors. The subtitle only appears on the detail page and is located right below the title. In our case, we will use it to specify the name of the instructor who will teach that course.
If you don't want people to click on the event title and go to the details page, set the value of Disable timetable event URL to Yes. We will leave it as No for our tutorial.
Now, we will set some value for the fields in Event Hours section. Here, we simply provide the basic details of the event along with the exact time when it will take place.
Select one of the weekdays from the dropdown menu next to Timetable column. It will show all the columns that you created earlier. The Start hour and End hour values specify when the classes for the course begin and end. You have to specify them in 24 hour format without adding any AM and PM at the end. This means that 9:00 AM has to be specified as 09:00 and 2:00 PM has to be specified as 14:00. However, the final format in which the date appears in the timetable can still be set to display other formats.
You don't have to fill out both the description fields. The text inside Description 1 appears before the event title. The text inside Description 2 appears after the event title. The text inside Tooltip appears as a tooltip when users hover over the event.
Set the number of available slots to the maximum number of students who are allowed to take a class. Users will be able to register for a class as long as total registered students are below the specified limit.
Click on the Add button once you have filled out all the details. This will add the event to our schedule. Once you have added all the occurrences of the event, click on the Update button at the top.
Showing the Schedule on the Website
You need to use shortcodes to add the schedule to any page or post on your website. The shortcodes for adding the timetable can get pretty big and complicated when you configure a lot of options. To make sure that you don't make any mistakes, the plugin comes with a shortcode generator that you can access by going to Timetable > Shortcode Generator.
You need to create a unique identifier for each schedule that you create. In this case, we will enter course-schedule in the shortcode id field.
Under the Main Configuration tab, we can set different options to determine what appears inside our course schedule. In Events, select all the courses that you have created. In Event Categories, select all the categories whose events you want to show in the schedule. You can select specific days for which you want to show the schedule from Columns. I have selected all days of the week except Sunday.
We will allow our users to filter the courses so that they can just see the courses that they want to take. Set the Filter Style to Tabs to show the event categories as tabs at the top of the table. The text inside Filter Label determines what text should users be shown when they want to see unfiltered schedule table. We will set it to All Courses.
These are the most important options under the Main Configuration section. You can leave the rest of the fields to their default values. Now, click on the Save button on the Shortcode Generator page and copy the generated shortcode.
Paste the copied shortcode in any page or post where you want the schedule to appear. You should get a result similar to the image below.
Final Thoughts
In this tutorial, we learned how to use the Timetable Responsive Schedule plugin to create a course schedule. The plugin comes with a lot of features which make it a perfect scheduling solution for many projects. We used the plugin in this tutorial to create a course schedule but you can use it for many other things like scheduling and booking, movie tickets across different movie theaters, or showing the schedule of different exhibits around the city in a week.
You can read about all the features of the plugin on the description page. Buying the plugin will give you access to six months of free support and lifetime updates. How do you plan on using this plugin? Let us know in the comments below.
WordPress
20 Best WordPress Calendar Plugins and Widgets
Esther Vaati
WordPress
8 Best WordPress Booking and Reservation Plugins
Lorca Lokassa Sa
WordPress
Best Free WordPress Calendar Plugins
Monty Shokeen
WordPress
How to Add a Calendar to Your WordPress Site With the Events Schedule Plugin
Jessica Thornsby
by Monty Shokeen via Envato Tuts+ Code https://ift.tt/35OFeKM
1 note
·
View note