#wordpress directory plugin
Explore tagged Tumblr posts
Visit Tumblr Blog
Explore Tumblr blogs with no restrictions, modern design and the best experience.
Last Seen Tumblr Blogs


Fun Fact
If you dial 1-866-584-6757, you can leave an audio post for your followers.
Text
Comparing aDirectory with Popular Alternatives Like Directorist and GeoDirectory

Choosing the right WordPress plugin for your directory can feel like navigating a maze. With so many options, it's easy to feel overwhelmed. If you're looking for a comprehensive comparison of aDirectory, Directorist, and GeoDirectory, you've come to the right place! In this blog post, we'll break down the core features, strengths, and potential drawbacks of these Directory plugins, helping you decide which one aligns best with your needs.
Whether you're a business owner, a developer, or someone launching a new project, this guide is tailored for you. Let's dive in!
What Are Directory Plugins?
Directory plugins are tools designed to help users create and manage directories online. From local business listings to location-based directories, these tools simplify the process of organizing and displaying information in a structured way.
Platforms like aDirectory, Directorist, and GeoDirectory are leading the charge, offering unique functionalities that cater to different user needs. But how do they stack up against each other?
Why Comparing aDirectory, Directorist, and GeoDirectory Matters
Not all directory plugins are created equal. Each platform has unique features, pricing models, and target audiences. Here's a quick analogy: choosing the right directory plugin is like picking a car. While some prioritize luxury (customization), others focus on utility (core functionalities). Let's explore these plugins under the microscope.
Key Features of aDirectory, Directorist, and GeoDirectory
1. Listings Management
Managing listings is the backbone of any directory plugin.
aDirectory: Offers a user-friendly dashboard with drag-and-drop functionality. Categories, tags, and advanced filtering make organizing listings seamless.
Directorist: Excels in detailed filtering options but may feel overwhelming for beginners due to its complexity.
GeoDirectory: Designed for geo-location-based listings. Perfect for travel or city-based directories. However, customization options are slightly limited compared to aDirectory.
2. User Management
Efficient user management ensures smooth operations for admins and contributors.
aDirectory: Robust user management tools allow admins to assign roles, set permissions, and monitor activity. Ideal for businesses seeking scalability.
Directorist: Focused on granular control but may require additional plugins for full functionality.
GeoDirectory: Streamlined for location-based users, with moderate customization options for roles and permissions.
3. Search and Filtering Capabilities
Imagine trying to find a needle in a haystack without advanced search options!
aDirectory: Powerful real-time search with customizable filters. Users can narrow results based on tags, categories, or custom fields.
Directorist: Offers similar functionality but shines with its marketplace add-ons for specific industries.
GeoDirectory: Built for precision in geo-location searches, but the interface might feel dated to some.
4. Payment and Monetization
Monetization is crucial for many directory owners.
aDirectory: Supports multiple payment gateways, including Stripe and PayPal. Subscription-based pricing makes it accessible for small businesses.
Directorist: Freemium model with premium add-ons for payment integrations. It’s versatile but can become expensive.
GeoDirectory: Subscription plans tailored to larger directories, but the pricing may deter smaller startups.
5. SEO Optimization
If you want your directory to rank high on Google, SEO tools are a must.
aDirectory: SEO-friendly URLs, meta tags, and schema integration right out of the box.
Directorist: Offers decent SEO capabilities but relies heavily on third-party plugins.
GeoDirectory: Strong geo-location SEO tools make it a favorite for travel directories.
6. Customization and Flexibility
Every business is unique, so flexibility matters.
aDirectory: Modern design templates and intuitive customization options ensure that you don’t need a developer to make your site look stunning.
Directorist: Highly customizable, but advanced modifications may require technical expertise.
GeoDirectory: Customization is limited compared to competitors. Best suited for users who prioritize function over form.
Performance Metrics to Evaluate
1. Usability
How easy is it to use these plugins?
aDirectory: Beginner-friendly and intuitive.
Directorist: A learning curve exists, especially for non-technical users.
GeoDirectory: Designed for tech-savvy users.
2. Performance
Does the plugin run smoothly?
aDirectory: Optimized for speed and responsiveness.
Directorist: Performance may vary based on the number of add-ons used.
GeoDirectory: Built for scale but may lag with heavy customization.
3. Scalability
Will the plugin grow with your business?
aDirectory: Perfect for small and medium-sized businesses.
Directorist: Highly scalable with premium features.
GeoDirectory: Tailored for large-scale, location-driven projects.
Who Should Use Each Plugin?
aDirectory: Best for startups, small businesses, and developers seeking a modern, affordable solution.
Directorist: Ideal for users requiring advanced marketplace functionalities or those managing large-scale directories.
GeoDirectory: Suited for geo-location-heavy projects like travel guides or city directories.
Cost Comparison
Budget is often a deciding factor.
aDirectory: Transparent, subscription-based pricing with no hidden costs.
Directorist: Freemium model, but premium features can add up quickly.
GeoDirectory: Subscription pricing with tiers based on feature requirements.
What Sets aDirectory Apart?
aDirectory combines ease of use, modern design, and robust functionality at an affordable price. It's the best choice for those looking to build a directory without diving into complex technicalities.
For a deeper dive into its features, Click here.
FAQs
1. What is the best directory plugin for beginners?
aDirectory offers the most beginner-friendly interface with powerful tools that don’t require a technical background.
2. How does GeoDirectory handle geo-location-based searches?
GeoDirectory excels in this area, offering precise geo-location features that make it perfect for travel or location-specific directories.
3. Is Directorist suitable for e-commerce-like marketplaces?
Yes, Directorist shines in managing marketplace-style directories with its add-ons and premium features.
4. Can I migrate my existing directory to aDirectory?
Absolutely! aDirectory supports seamless migration tools to help you transition with ease.
5. How does pricing compare among these plugins?
aDirectory is the most affordable, with clear subscription pricing. Directorist can become expensive due to add-ons, while GeoDirectory's tiered pricing may suit larger projects.
Conclusion
Choosing between aDirectory, Directorist, and GeoDirectory boils down to your specific needs. If you value affordability, modern design, and ease of use, aDirectory is the clear winner. For those focused on geo-location or advanced marketplace features, GeoDirectory and Directorist are strong contenders.
Ultimately, the right choice depends on your goals, technical expertise, and budget. Take the time to explore your options and align them with your project's unique requirements.
#wordpress#directory submission#online business directory#wordpress plugins#website#web design#clissified website
0 notes
Text
How to organise images in WordPress media directory using Free Plugin [Easy Tutorial]
Discover the ultimate solution to your WordPress media management woes with our latest tutorial, "How to organise images in WordPress media directory using Free Plugin" If you've ever struggled with finding images in your WordPress media library, this video is a game-changer, guiding you through the process of efficiently organising your media files for easier access and management.
youtube
Subscribe for free access to 800+ Video Tutorials: https://www.youtube.com/dcpwebdesigners
Table of contents
00:00:00 Introduction 00:02:10 Install the FileBird WordPress plugin 00:03:00 Create a main image folder 00:03:35 Create a sub-image folder 00:04:08 Move a single image to an image folder 00:04:20 Move multiple images to an image folder
Managing a cluttered media directory can be a daunting task, especially as your website grows. With the plethora of images uploaded over time, locating specific files becomes increasingly challenging. However, with the right tools, you can transform your media library into a well-organised repository, saving you time and enhancing your workflow. This video introduces you to a powerful, free plugin that simplifies the process of categorising, tagging, and sorting your images within WordPress.
Throughout this detailed guide, we'll cover:
The importance of keeping your WordPress media directory organised.
A step-by-step walkthrough on how to install and set up the free plugin.
Tips on how to categorise and tag your images for optimal organisation.
Strategies for using the plugin's features to streamline your media management tasks.
By the end of this tutorial, you'll have mastered the art of media management within WordPress, making it easier to find and use your images whenever you need them.
Don't let a disorganised media library slow you down. Watch our tutorial, "Streamline Your Media: Organise WordPress Images with This Free Plugin," and take the first step towards a more organised, efficient WordPress website. Remember to like, share, and subscribe for more valuable WordPress tips and tricks!
Original Article Post: https://dcpweb.co.uk/blog/how-to-organise-images-in-wordpress-media-directory-using-free-plugin
#wordpress#dcpwebdesigners#webdevelopment#webdeveloper#WordPress media directory#Free Plugin#organise images in WordPress#Youtube
0 notes
Text
[solved] Wordpress plugin install: Could not create directory
[solved] Wordpress plugin install: Could not create directory
When installing a WordPress plugin, you may encounter the error message “Could not create directory” which can be frustrating and confusing. This issue usually occurs when WordPress is unable to create a new directory for the plugin due to permission issues or incorrect file path configurations. However, this error can be easily resolved by following a few simple troubleshooting steps. In this…
View On WordPress
0 notes
Text
#Wordpress SEO Plugin#Plugin SEO#Wordpress traffic#Wordpress Plugins for SEO#Linkbuilding in Wordpress#Backlinks in Wordpress#Backlink Directory#Karl-Johan Gyllenstorm#Luxembourg#Digital marketing#online marketing#email marketing#seo
0 notes
Text
"how do I keep my art from being scraped for AI from now on?"
if you post images online, there's no 100% guaranteed way to prevent this, and you can probably assume that there's no need to remove/edit existing content. you might contest this as a matter of data privacy and workers' rights, but you might also be looking for smaller, more immediate actions to take.
...so I made this list! I can't vouch for the effectiveness of all of these, but I wanted to compile as many options as possible so you can decide what's best for you.
Discouraging data scraping and "opting out"
robots.txt - This is a file placed in a website's home directory to "ask" web crawlers not to access certain parts of a site. If you have your own website, you can edit this yourself, or you can check which crawlers a site disallows by adding /robots.txt at the end of the URL. This article has instructions for blocking some bots that scrape data for AI.
HTML metadata - DeviantArt (i know) has proposed the "noai" and "noimageai" meta tags for opting images out of machine learning datasets, while Mojeek proposed "noml". To use all three, you'd put the following in your webpages' headers:
<meta name="robots" content="noai, noimageai, noml">
Have I Been Trained? - A tool by Spawning to search for images in the LAION-5B and LAION-400M datasets and opt your images and web domain out of future model training. Spawning claims that Stability AI and Hugging Face have agreed to respect these opt-outs. Try searching for usernames!
Kudurru - A tool by Spawning (currently a Wordpress plugin) in closed beta that purportedly blocks/redirects AI scrapers from your website. I don't know much about how this one works.
ai.txt - Similar to robots.txt. A new type of permissions file for AI training proposed by Spawning.
ArtShield Watermarker - Web-based tool to add Stable Diffusion's "invisible watermark" to images, which may cause an image to be recognized as AI-generated and excluded from data scraping and/or model training. Source available on GitHub. Doesn't seem to have updated/posted on social media since last year.
Image processing... things
these are popular now, but there seems to be some confusion regarding the goal of these tools; these aren't meant to "kill" AI art, and they won't affect existing models. they won't magically guarantee full protection, so you probably shouldn't loudly announce that you're using them to try to bait AI users into responding
Glaze - UChicago's tool to add "adversarial noise" to art to disrupt style mimicry. Devs recommend glazing pictures last. Runs on Windows and Mac (Nvidia GPU required)
WebGlaze - Free browser-based Glaze service for those who can't run Glaze locally. Request an invite by following their instructions.
Mist - Another adversarial noise tool, by Psyker Group. Runs on Windows and Linux (Nvidia GPU required) or on web with a Google Colab Notebook.
Nightshade - UChicago's tool to distort AI's recognition of features and "poison" datasets, with the goal of making it inconvenient to use images scraped without consent. The guide recommends that you do not disclose whether your art is nightshaded. Nightshade chooses a tag that's relevant to your image. You should use this word in the image's caption/alt text when you post the image online. This means the alt text will accurately describe what's in the image-- there is no reason to ever write false/mismatched alt text!!! Runs on Windows and Mac (Nvidia GPU required)
Sanative AI - Web-based "anti-AI watermark"-- maybe comparable to Glaze and Mist. I can't find much about this one except that they won a "Responsible AI Challenge" hosted by Mozilla last year.
Just Add A Regular Watermark - It doesn't take a lot of processing power to add a watermark, so why not? Try adding complexities like warping, changes in color/opacity, and blurring to make it more annoying for an AI (or human) to remove. You could even try testing your watermark against an AI watermark remover. (the privacy policy claims that they don't keep or otherwise use your images, but use your own judgment)
given that energy consumption was the focus of some AI art criticism, I'm not sure if the benefits of these GPU-intensive tools outweigh the cost, and I'd like to know more about that. in any case, I thought that people writing alt text/image descriptions more often would've been a neat side effect of Nightshade being used, so I hope to see more of that in the future, at least!
246 notes
·
View notes
Text
Automattic, the company that owns WordPress.com, is required to remove a controversial login checkbox from WordPress.org and let WP Engine back into its ecosystem after a judge granted WP Engine a preliminary injunction in its ongoing lawsuit. In addition to removing the checkbox—which requires users to denounce WP Engine before proceeding—the preliminary injunction orders that Automattic is enjoined from “blocking, disabling, or interfering with WP Engine’s and/or its employees’, users’, customers’, or partners’ access to wordpress.org” or “interfering with WP Engine’s control over, or access to, plugins or extensions (and their respective directory listings) hosted on wordpress.org that were developed, published, or maintained by WP Engine,” the order states. In the immediate aftermath of the decision, Automattic founder and CEO Matt Mullenweg asked for his account to be deleted from the Post Status Slack, which is a popular community for businesses and people who work on WordPress’s open-source tools.
“It's hard to imagine wanting to continue to working on WordPress after this,” he wrote in that Slack, according to a screenshot viewed by 404 Media. “I'm sick and disgusted to be legally compelled to provide free labor to an organization as parasitic and exploitive as WP Engine. I hope you all get what you and WP Engine wanted.” His username on that Slack has been changed to “gone 💀” Mullenweg began to publicly denounce WP Engine in September, calling the web hosting platform a “cancer” to the larger Wordpress open-source project and accusing it of improperly using the WordPress brand. He’s “at war” with WP Engine, in his own words. In October, Mullenweg added a required checkbox at login for WordPres.org, forcing users to agree that they are not affiliated with WP Engine. The checkbox asked users to confirm, “I am not affiliated with WP Engine in any way, financially or otherwise.” The checkbox was still present and required on the WordPress.org login page as of Wednesday morning. Automattic and Mullenweg have 72 hours from the order to take it down, according to the judge’s order. WP Engine sent a cease and desist demanding that he “stop making and retract false, harmful and disparaging statements against WP Engine,” the platform posted on X. Automattic sent back its own cease and desist, saying, “Your unauthorized use of our Client’s intellectual property has enabled WP Engine to compete with our Client unfairly, and has led to unjust enrichment and undue profits.” WP Engine filed a lawsuit against Automattic and Mullenweg, accusing them of extortion and abuse of power. In October, Mullenweg announced that he’d given Automattic employees a buyout package, and 159 employees, or roughly 8.4 percent of staff, took the offer. “I feel much lighter,” he wrote. But shortly after, he reportedly complained that the company was now “very short staffed.” All of this has created an environment of chaos and fear within Automattic and in the wider WordPress open-source community. Within 72 hours of the order, Automattic and Mullenweg are also required to remove the “purported” list of WP Engine customers contained in the ‘domains.csv’ file linked to Automattic’s website wordpressenginetracker.com, which Automattic launched in November and tracks sites that have left WP Engine. It’s also required to restore WP Engine’s access to WordPress.org, including reactivating and restoring all WP Engine employee login credentials to wordpress.org resources and “disable any technological blocking of WPEngine’s and Related Entities’ access to wordpress.org that occurred on or around September 25, 2024, including IP address blocking or other blocking mechanisms.” The judge also ordered Mullenweg to restore WP Engine’s access to its Advanced Custom Fields (“ACF”) plugin directory, which its team said was “unilaterally and forcibly taken away from its creator without consent” and called it a “new precedent” in betrayal of community access. “We are grateful that the court has granted our motion for a preliminary injunction,” a spokesperson for WP Engine told 404 Media. “The order will bring back much-needed stability to the WordPress ecosystem. WP Engine is focused on serving our partners and customers and working with the community to find ways to ensure a vigorous, and thriving WordPress community.” A spokesperson for Automattic told 404 Media: “Today’s ruling is a preliminary order designed to maintain the status quo. It was made without the benefit of discovery, our motion to dismiss, or the counterclaims we will be filing against WP Engine shortly. We look forward to prevailing at trial as we continue to protect the open source ecosystem during full-fact discovery and a full review of the merits.”
16 notes
·
View notes
Text
Top WordPress Plugins to Supercharge Your Website in 2024

Building and maintaining a WordPress site is both exciting and challenging. While the platform provides a robust foundation, the true power of WordPress lies in its plugins. From enhancing site functionality to improving user experience, WordPress plugins are indispensable tools for developers, businesses, and bloggers alike. In this blog, we’ll explore the best WordPress plugins that can transform your website into a highly functional, user-friendly, and SEO-optimized powerhouse.
What Are WordPress Plugins?
WordPress plugins are software add-ons designed to extend the functionality of your WordPress site. Whether you need to improve site speed, enhance SEO, secure your website, or add unique design features, there’s likely a plugin for that. Plugins allow both beginners and advanced users to customize their sites without coding expertise.
With over 60,000 plugins available on the WordPress Plugin Directory alone, the options can feel overwhelming. Choosing the right plugins for your website’s goals is critical for success. Below, we’ve rounded up some of the most essential WordPress plugins to consider.
Must-Have WordPress Plugins for Every Website
1. Yoast SEO
SEO is crucial for driving organic traffic to your site, and Yoast SEO is one of the best tools for optimizing your content. This plugin provides on-page optimization tips, readability analysis, and technical SEO tools to help your site rank higher on search engines.
2. Elementor
Looking to build a visually stunning website without hiring a designer? Elementor is a drag-and-drop page builder that makes designing websites easy. Its intuitive interface and vast array of widgets allow you to create professional-looking pages in minutes.
3. WPForms
For websites that rely on user interaction, a contact form is a must-have feature. WPForms allows you to create customizable, mobile-responsive forms effortlessly. Whether it’s contact forms, surveys, or payment forms, this plugin has you covered.
4. WooCommerce
If you’re running an online store, WooCommerce is the go-to plugin. It transforms your WordPress site into a fully functional e-commerce platform, complete with features for product listings, payment gateways, and inventory management.
5. Akismet Anti-Spam
Spam comments can clutter your website and ruin user experience. Akismet Anti-Spam automatically filters out spam comments, keeping your site clean and professional.
6. Jetpack
Created by Automattic, the team behind WordPress, Jetpack is a multipurpose plugin offering features like performance optimization, security, site analytics, and social media integration.
7. Rank Math
Another excellent SEO plugin, Rank Math provides advanced features like schema integration, keyword tracking, and detailed analytics. It’s an excellent alternative to Yoast SEO for more advanced users.
8. UpdraftPlus
Backup and restoration are critical for any website. UpdraftPlus allows you to schedule automatic backups and store them securely on cloud services like Google Drive or Dropbox.
9. Smush
Site speed plays a major role in user experience and search engine rankings. Smush compresses images without compromising quality, helping your site load faster.
10. MonsterInsights
Understanding how visitors interact with your site is essential. MonsterInsights integrates Google Analytics directly into your WordPress dashboard, offering real-time insights into traffic, user behavior, and more.
11. W3 Total Cache
Slow-loading websites lose visitors and revenue. W3 Total Cache improves website performance by caching static files and optimizing server resources.
12. Sucuri Security
Cybersecurity is non-negotiable in today’s digital landscape. Sucuri Security offers malware scanning, firewall protection, and blacklist monitoring to keep your site secure.
13. Social Snap
Boost social media engagement with Social Snap, a powerful social sharing plugin. It offers customizable sharing buttons and in-depth analytics to track your social media performance.
14. Litespeed Cache
For websites hosted on LiteSpeed servers, LiteSpeed Cache is a high-performance optimization plugin that enhances speed and reduces server load.
15. TablePress
If your site needs to display complex data, TablePress is a lifesaver. It lets you create and manage tables without requiring any coding knowledge.
Why Use WordPress Plugins?
Enhanced Functionality: WordPress plugins extend the capabilities of your site, making it easier to achieve your goals.
Ease of Use: Many plugins are beginner-friendly and require no technical expertise.
Scalability: Whether you’re running a blog, an e-commerce store, or a portfolio, plugins grow with your needs.
Cost-Effective: Most plugins offer free versions with premium features, making them accessible for all budgets.
Tips for Choosing the Right WordPress Plugins
Identify Your Needs: Start by determining what features your site requires.
Check Reviews and Ratings: Plugins with high ratings and positive reviews are generally more reliable.
Update Frequency: Look for plugins that are updated regularly to ensure compatibility with the latest WordPress version.
Avoid Overloading: Too many plugins can slow down your site. Stick to essential ones.
Final Thoughts
WordPress plugins are the backbone of a successful website. By selecting the right ones, you can enhance your site’s functionality, user experience, and performance. Whether you’re aiming to boost your SEO, secure your site, or create stunning designs, there’s a plugin tailored for your needs.
Experiment with the plugins mentioned above and watch your WordPress site thrive. Remember to regularly review your plugin list and update them to ensure optimal performance.
4 notes
·
View notes
Text
How to Enable Auto-Sync Photos from Dropbox to WordPress?
Managing media files and keeping them organized on your WordPress website can be a daunting task. Dropbox users can now simplify this process with the powerful File Manager for Dropbox (Integrate Dropbox plugin), which allows seamless auto-synchronization of your Dropbox folders with your WordPress site. Whether you're uploading photos, videos, or documents, this plugin ensures your content is always up-to-date and easily accessible. Here’s how you can get started:
What is Integrate Dropbox?

File Manager for Dropbox (Integrate Dropbox) is a WordPress plugin designed to sync your Dropbox content directly to your WordPress pages, posts, or media library. This plugin makes it easy to:
Upload images, videos, or files from Dropbox to your WordPress site.
Auto-sync shared folders for real-time updates.
Showcase Dropbox content on your website without the hassle of manual uploads.
By automating the synchronization process, Integrate Dropbox saves time and improves efficiency for bloggers, photographers, businesses, and anyone managing a WordPress site.
Who Benefits from the Integrate Dropbox Plugin?
Photographers: Automatically sync and display photo albums on your portfolio site.
Content Creators: Keep your website updated with the latest files, presentations, or videos.
Businesses: Share brochures, product catalogs, and documents seamlessly with your clients.
Using the Integrate Dropbox Plugin, you can seamlessly upload photos to your website in real time by creating a Dropbox folder and embedding it on your site using a shortcode. This functionality is perfect for events like photo booths at Christmas or New Year’s parties, where you want the latest uploads to be visible instantly.
How to Auto-Sync Photos from Dropbox to WordPress
youtube
Step 1: Install and Activate the Integrate Dropbox Plugin
Download and install the Integrate Dropbox Plugin from the WordPress Plugin Directory.
Activate the plugin from the Plugins section of your WordPress Dashboard.
youtube
Step 2: Connect Your Dropbox Account
Go to Settings > Integrate Dropbox in your WordPress admin panel.
Click Connect Dropbox Account.
Authorize the connection by logging in to Dropbox and allowing the app access.
Step 3: Create a Dropbox Folder for Uploads
Log in to your Dropbox account.
Create a new folder named, for example, Event Photos.
Share the folder with your event team or photographers, allowing them to upload photos in real time.
Step 4: Sync the Dropbox Folder with Your Website
In your WordPress dashboard, navigate to the Integrate Dropbox section.
Click Shortcode Builder and select Gallery or Slider Carousel module.
Choose the Dropbox folder (Event Photos) you created earlier.
Customize display settings like layout, style, and auto-refresh interval.
Copy the generated shortcode.
Why Use the File Manager for Dropbox Plugin?
Here are a few reasons why Dropbox users find this plugin invaluable
Effortless Media Management: Say goodbye to manually downloading files from Dropbox and re-uploading them to WordPress. With auto-sync, your Dropbox content is always mirrored on your site.
Real-Time Updates: Any changes made in your Dropbox folder are automatically reflected on your WordPress site. This feature is particularly useful for shared folders, ensuring collaboration is seamless.
Streamlined Image and Photo Uploads: Photographers and content creators can easily showcase their work by syncing their image folders directly to WordPress. No need for duplicate uploads or tedious file management.
Embed Dropbox Content: Display Dropbox files in a visually appealing format on your WordPress posts and pages, perfect for portfolios, galleries, or downloadable resources.
Customizable Settings: Configure folder synchronization, access permissions, and display preferences to meet your specific needs.
Wrapping Up
File Manager for Dropbox plugin simplifies your workflow and eliminates the hassle of manual uploads, making it the perfect solution for Dropbox users who rely on WordPress. To learn more about this plugin and its features, visit the plugin directory or explore the settings after installation.
Start syncing your Dropbox folders today and elevate your WordPress site to the next level!
5 notes
·
View notes
Text
youtube
How to STOP Search Engines for INDEXING WORDPRESS website ?
To STOP search engines from indexing your WordPress website before it’s properly optimized (especially in 2025 where SEO updates are stricter on site quality), you need to implement the following steps:
✅ 1. Enable "Discourage Search Engines" Option in WordPress
Steps:
Go to WordPress Dashboard → Settings → Reading
Check the box that says: “Discourage search engines from indexing this site”
Save changes.
📝 This adds a noindex directive in your site's header and tells bots not to index the site.
⚠️ Note: This is just a request, not a guarantee. Some bots may still crawl your site.
✅ 2. Add Noindex Meta Tag via SEO Plugin
Use Yoast SEO or RankMath plugin to manually set noindex on all pages.
Steps (Yoast Example):
Go to Yoast SEO → Search Appearance
Under each content type (Pages, Posts, etc.), set:
Show in search results? → No
For better control:
Go to each page/post
Scroll to Yoast SEO → Advanced
Set:
Allow search engines to show this Page in search results? → No
✅ 3. Use Robots.txt to Block Crawlers Temporarily
Edit your robots.txt file to block all search engines:
User-agent: * Disallow: /
🛑 This blocks all crawlers from accessing your entire site.
👉 You can edit robots.txt from:
Yoast SEO → Tools → File Editor
or upload manually to your root directory.
🔁 Later, when your site is optimized, replace it with:
User-agent: * Disallow:
0 notes
Text
youtube
#Geo marketing#geographical marketing#SEO Luxembourg#Digital marketing#online marketing#Karl-Johan Gyllenstorm#SEO Plugin for Wordpress#SEO Plugin#Joomla#online advertising#Backlink Directory#Youtube
0 notes
Text
WHMCS Nulled Script 1.72.0

Download WHMCS Nulled Script – Premium Management Solution for Free If you're looking for a powerful, cost-free way to manage your web hosting business efficiently, then WHMCS Nulled Script is exactly what you need. This all-in-one automated billing and client management platform gives you full control without the heavy price tag. With premium features unlocked, you can take your hosting business to the next level, completely free. What Is WHMCS Nulled Script? WHMCS Nulled Script is a cracked version of the original WHMCS software that enables users to access all premium features without paying for a license. It offers seamless automation of billing, provisioning, domain management, support, and more—all tailored for web hosting businesses. Ideal for startups and seasoned pros alike, this nulled script empowers users to launch or scale their hosting operations effectively. Why Choose WHMCS Nulled Script? Whether you're just starting or managing hundreds of clients, WHMCS Nulled Script simplifies your business operations by automating complex workflows. It comes with full admin access and unrestricted modules, so you can customize and expand your platform without limits. Best of all, it's free to download and install directly from our website. Technical Specifications Software Type: Web Hosting Automation Platform Version: Latest stable release (fully cracked) License: Nulled – No subscription or activation required Compatibility: PHP 7.x – 8.x, MySQL 5.6+ CMS Integration: Compatible with WordPress, Joomla, and more Key Features & Benefits Automated Billing: Easily generate invoices, manage subscriptions, and process payments with full automation. Client Management: Maintain a centralized database of all your clients with complete account history and preferences. Domain Management: Automate domain registrations, renewals, and transfers. Support Tools: Integrated ticketing system with email piping and knowledgebase options. Addon Modules: Access to a wide range of modules to enhance functionality. Security: Comes with advanced fraud protection and two-factor authentication support. Use Cases WHMCS Nulled Script is perfect for: Web Hosting Startups: Quickly launch your business with zero licensing cost. Freelancers: Offer hosting services to clients as a value-added solution. Agencies: Automate domain and hosting services under one platform. Developers: Customize and extend WHMCS functionality using available APIs and hooks. Installation Guide Setting up WHMCS Nulled Script is straightforward and quick: Download the latest version of the script from our website. Upload files to your hosting directory. Set up a new database and configure the database connection in configuration.php. Run the installation wizard by visiting your domain. Login using the default admin credentials and start customizing your platform. Frequently Asked Questions (FAQs) Is WHMCS Nulled Script safe to use? Yes, our nulled scripts are thoroughly tested and regularly updated to ensure security and stability. Do I need a license key? No. This version is fully nulled, meaning no license or activation is needed. Can I use WHMCS Nulled Script on multiple domains? Absolutely! You are free to install and use it on as many domains as you like without restrictions. Is it legal to use a nulled script? It depends on your jurisdiction. However, many users worldwide utilize nulled software for educational or testing purposes. Final Thoughts WHMCS is a game-changer for web hosting businesses looking to streamline operations without the hefty investment. Take control of your hosting enterprise with this premium solution—without spending a dime. Experience ultimate flexibility, automation, and performance now by downloading it from our platform. Also, check out other top-rated tools like Yoast seo nulled to enhance your WordPress site's SEO strategy. For more exclusive downloads, visit Nulled Plugin and explore a wide range of powerful tools at no cost.
0 notes
Text
Fixing WordPress Update Errors: A Simple Guide for Non-Tech Users

Keeping your WordPress website updated is essential for staying secure, fast, and compatible with the latest features. But when updates fail—especially if you’re not a tech expert—it can feel frustrating and even risky.
The good news? Most update failures are common, predictable, and fixable without needing advanced coding knowledge. This guide will walk you through the most frequent reasons WordPress updates fail and how to resolve them safely and confidently—even if you’re not “techy.”
Why WordPress Updates Sometimes Fail
Before diving into solutions, it helps to know why things go wrong. WordPress is made up of the core platform, plugins, and themes. When any part of that system is out of sync, updates can fail.
Here are the most common causes:
✅ Poor internet connection
✅ Plugin conflicts
✅ Incompatible themes
✅ Server resource limits (like low memory)
✅ Incorrect file permissions
✅ Corrupted or incomplete update files
Once you know the cause, you’re halfway to the solution.
How to Fix WordPress Update Failures – Step by Step
1. Always Start with a Backup
Even if nothing seems broken, backing up your site is the smartest first step. Use plugins like UpdraftPlus or BackupBuddy to save your full site (files + database). That way, you can restore everything if anything goes wrong during troubleshooting.
2. Clear Your Cache (Browser and WordPress)
Sometimes the update goes through—but your browser still shows the old version.
Here’s what to do:
Clear your browser cache.
If you use caching plugins (like WP Super Cache or W3 Total Cache), clear your site cache too.
Then try updating again.
3. Troubleshoot Plugin Conflicts with Safe Mode
Conflicting plugins are a common culprit. To test this safely:
Install the free Health Check & Troubleshooting plugin.
Enable “Troubleshooting Mode.” This temporarily disables all plugins for your session only.
Try updating again. If it works, re-enable plugins one at a time to find the one causing the issue.
This protects your live site while you debug.
4. Check Hosting Resource Limits
Some shared hosting plans have tight restrictions that block larger updates.
Check with your hosting provider:
Is your PHP memory limit too low? (It should be at least 256MB)
Is the maximum execution time too short?
Can they upgrade your hosting plan or adjust settings?
Your host can often resolve this quickly with a simple support request.
5. Manually Update WordPress (It’s Not as Hard as It Sounds)
If the automatic update isn’t working, do it manually:
Download the latest WordPress version from wordpress.org.
Unzip it on your computer.
Connect to your site using FTP (FileZilla is a good option).
Upload the new wp-admin and wp-includes folders, replacing the old ones.
Do NOT touch your wp-content folder (your themes/plugins are safe there).
Visit your site—WordPress may prompt you to update your database.
Follow each step carefully, and your site will be updated safely.
6. Check File Permissions
Wrong file permissions can block updates.
To fix:
Use the WP File Manager plugin or your hosting control panel.
Set folders to 755 and files to 644.
If you’re unsure, ask your host’s support team to help.
These settings ensure your site stays secure and functional.
7. Stuck in Maintenance Mode? Here’s How to Exit
If your site says “Briefly unavailable for scheduled maintenance,” the update process got interrupted.
Fix it like this:
Log into your hosting account (via cPanel or file manager).
Open your site’s root directory.
Delete the .maintenance file.
Refresh your site—it should be back to normal.
When You Should Ask for Help
Sometimes, even after trying all the steps, the issue persists. That’s okay.
You can contact:
Your hosting provider’s support team
A professional WordPress developer
A trusted WordPress maintenance company
If your website is important for your business, it’s worth having someone reliable to handle technical issues so you can stay focused on running your operations.
Conclusion: You’re Not Alone—Websenor is Here to Help
WordPress update failures can feel intimidating, but you don’t need to be a developer to fix them. With the right approach, tools, and guidance, most issues can be resolved quickly—no coding required.
Always start with a backup, clear your cache, check for plugin conflicts, and review your hosting environment. These simple steps can save you time, money, and stress.
If you're feeling stuck or don’t want to go it alone, Websenor is here for you. As a trusted WordPress development and maintenance company, we help non-tech users manage, protect, and grow their websites without the headaches.With Websenor by your side, WordPress becomes simpler—so you can focus on what really matters: growing your brand.
0 notes
Text
Super Store Finder nulled plugin 7.5

Unlock the full potential of your website with the Super Store Finder nulled plugin—a powerful, user-friendly store locator tool without the premium price tag. This nulled version delivers all the features of the original, including interactive Google Maps integration, responsive design, and customizable search options, making it perfect for businesses of any size. Whether you're managing multiple locations or just starting out, this plugin makes it easy for customers to find you quickly. Best of all, it's completely free and accessible, so you can enjoy top-tier functionality without breaking the bank. The Super Store Finder nulled plugin is ready to use out of the box, offering seamless installation and full compatibility with your WordPress site. Experience the same performance, flexibility, and reliability as the paid version—no restrictions, no hidden costs. Start building smarter, more connected store directories today!
0 notes
Text
Essential Grid Versus WP Grid Builder
When building a modern WordPress website, how you display your content can make or break your site's user experience. For portfolios, blogs, online shops, or directories, grid layouts are an attractive, organized way to present your posts, images, or products. Two top contenders in this space are Essential Grid Versus WP Grid Builder—both powerful plugins that serve different purposes.
If you're deciding between the two, this article breaks down their strengths, differences, and ideal use cases to help you choose the right tool for your project.
Also Read:- https://www.linkedin.com/pulse/essential-grid-versus-wp-builder-practical-guide-users-ashar-siddiqui-dr7yf
What Is Essential Grid?
Essential Grid is a premium WordPress plugin developed by ThemePunch, known for creating visually rich content layouts. It allows you to create stunning, customizable grids for any type of content, including blog posts, galleries, WooCommerce products, and even social media feeds.
Key Features:
Also Read:- https://substack.com/home/post/p-163374118
Drag-and-drop skin editor for detailed visual customization
Dozens of pre-designed templates
Supports images, videos, and audio content
Multiple layout styles (masonry, cobbles, grid)
Works with page builders like WPBakery and Elementor
Best for: Designers, photographers, and content creators who want full visual control and animation effects for creative portfolios or media-heavy sites.
What Is WP Grid Builder?
WP Grid Builder is a modern grid plugin that focuses on functionality, speed, and user interaction. It includes advanced faceted filtering that lets visitors filter grid items in real time, without page reloads. This makes it ideal for content-heavy sites, e-commerce stores, and directories.
Key Features:
Built-in Ajax filtering and search
Integration with Gutenberg, Elementor, and Bricks
Seamless compatibility with WooCommerce and ACF
Fast, responsive grid layouts
Developer-friendly with custom field and taxonomy support
Best for: Site owners who need interactive filtering for large product catalogs, blog archives, or directory-style websites.
Essential Grid vs. WP Grid Builder: A Feature Comparison
FeatureEssential GridWP Grid BuilderVisual CustomizationAdvanced (drag-and-drop skin editor)Basic styling, more layout focusedFilteringBasic filters and sortingAdvanced faceted Ajax filteringPerformanceHeavier due to visual featuresLightweight and optimized for speedPage Builder SupportWPBakery, ElementorElementor, Gutenberg, BricksWooCommerce SupportYesExcellent with advanced filteringEase of UseModerate learning curveUser-friendly and beginner accessible
Which One Should You Choose?
Choose Essential Grid if you want full design flexibility, animation-rich layouts, and beautiful visual presentation. It's ideal for artistic portfolios or high-impact galleries.
Choose WP Grid Builder if you need fast, scalable, and filterable grids for content-heavy or e-commerce websites. It's built for performance and functionality over form.
Final Thoughts
Both plugins are excellent in their own right, but they serve different needs. Essential Grid gives you creative freedom, while WP Grid Builder gives you functional power. Understanding your project goals—whether visual impact or usability—is the key to making the right choice.
0 notes
Text
6 Schema Markup Mistakes Hurting Your Local SEO (And How to Fix Them)
If you’re running a local business in Singapore: be it a hipster café in Tiong Bahru, a dental clinic in Bedok or a law firm in Raffles Place, your digital visibility isn’t just about having a website. It’s about getting found. That’s where Schema Markup (or structured data) becomes your secret SEO weapon.
But here’s the kicker: most SMEs in Singapore either don't use schema at all or they unknowingly implement it incorrectly. This means wasted SEO opportunities, less visibility on Google SERPs (Search Engine Results Pages) and ultimately, fewer customers walking through your doors.
Let’s break down the six most common schema markup mistakes that might be quietly sabotaging your local SEO in Singapore and how you can fix them fast.
1. Not Implementing Local Business Schema at All
This one’s a bit passe, but it happens more than you think.
Local Business schema tells Google key info about your business- name, address, phone number, opening hours and more. If you haven’t implemented it, you're essentially not telling Google who you are and what you do. That's a tall order SEO blunder in a local context like Singapore, where Google prioritises relevance and proximity.
Pro-Tip:
Use Google’s Structured Data Markup Helper to generate basic schema in JSON-LD format. Plug it into your <header> section or via Google Tag Manager.
2. Using the Wrong Schema Type
A local bubble tea shop using "Corporation" instead of "Local Business"? That's like listing your hawker stall as a multinational conglomerate- a major mismatch.
Singapore's business landscape is diverse. There are over 280 types of schema available. Choosing the wrong one affects how Google interprets your business and can hurt how you appear in relevant searches.
Here's a Quick Fact:
According to Moz, businesses that use specific schema types see up to 30% more rich results in SERPs compared to those using generic ones.
So here's what you need to do. Head over to schema.org and find the most accurate business type. Not sure which one to use? Go for “Local Business” and nest a more specific subtype inside.
3. Missing Key Fields in Your Schema
Many Singapore businesses include only the basics: Name, Address, Phone number (commonly called NAP). But to truly optimize for rich snippets, you need to flesh it out. Here's what we are talking about:
Opening hours
Service area
Ratings and reviews (even if you’ve just a few 4-star ones)
Geo coordinates (lat-long helps Google Maps)
Here's a key industry insight:

4. Inconsistent NAP Across Web and Schema
For instance, in Singapore, unit numbers and postal codes matter a lot. A missing "#05-12" or an outdated postal code can throw Google off.
If your schema says you're at “Orchard Road #03-09,” but your Facebook page says “Orchard Road #03-12,” Google flags it as inconsistent. This hurts your local rankings and confuses potential customers.
Here's how to fix it:
Ensure the NAP format is identical across your website, Google Business Profile and third-party listings like Street directory or SG YellowPages.
Use Singapore's standard address format, i.e. Block Number, Street Name, Unit Number, Postal Code.
5. Not Validating Your Schema Regularly
Even seasoned SEO specialists sometimes forget this: just because your schema is there, doesn’t mean it’s working.
In fact, your Schema can break during one or more of these instances:
CMS updates (hello, WordPress plugins!)
Theme changes
Manual edits to code
How to Fix It Like a Pro:
Validate your schema using Google’s Rich Results Test or Schema.org Validator. Set a monthly reminder to check it; it’s quick and prevents long-term damage.
6. Forgetting About Review Markup
Reviews are gold in Singapore’s kiasu culture. We all check Google ratings before buying or booking anything. Yet, many local businesses fail to add Review or Aggregate Rating Schema. This means they miss out on the juicy stars that appear in search results, which boosts CTR by up to 35%, according to Search Engine Journal.
Even if you only have a handful of legit reviews, it’s better than none. Embed them properly in your Schema using JSON-LD format. Avoid fake or auto-generated reviews, Google is smarter than that.
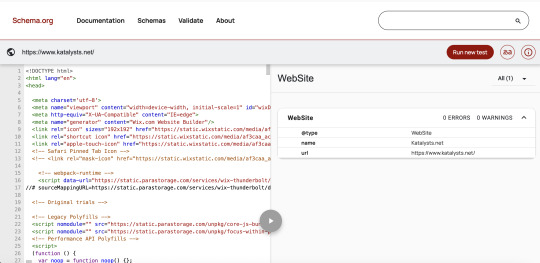
Technical Deep Dive: Implementing & Validating Local Business Schema in JSON-LD
If you're aiming to boost your local SEO performance in Singapore, correctly implementing Local Business Schema using JSON-LD is essential. Below is a ready-to-use example tailored for a digital marketing or SEO consultancy like Katalysts.
Step 1: Use the Right Schema Type
For Katalysts, the most suitable type is ProfessionalService under LocalBusiness.
{
"@context": "https://schema.org",
"@type": "ProfessionalService",
"name": "Katalysts",
"image": "https://www.katalysts.net/assets/logo.png",
"address": {
"@type": "PostalAddress",
"streetAddress": "329 River Valley Road",
"addressLocality": "Singapore",
"postalCode": "238361",
"addressCountry": "SG"
},
"geo": {
"@type": "GeoCoordinates",
"latitude": 1.2966,
"longitude": 103.8396
},
"url": "https://www.katalysts.net/",
"telephone": "+65 8096 3700",
"openingHours": "Mo-Fr 09:00-18:00",
"priceRange": "$$$",
"aggregateRating": {
"@type": "AggregateRating",
"ratingValue": "4.9",
"reviewCount": "102"
}
Step 2: Add JSON-LD to Your Website
Option 1: Insert directly into your site’s <head> section Option 2: Use Google Tag Manager for easier deployment and updates Option 3: If on WordPress, use a plugin like Rank Math or Yoast SEO Pro for built-in schema support.
Step 3: Validate Your Schema Markup
Use these free tools to test for errors or warnings:
Google Rich Results Test
Schema.org Validator
Merkle Schema Generator
Pro-Tip: Set a monthly reminder to revalidate your schema—especially after any CMS or plugin update.
Step 4: Keep Schema Up to Date
Schema isn’t static. Google's guidelines and search features evolve. Keep an eye on:
Google’s Structured Data Guidelines
Schema.org updates
Bonus: Schema isn’t a “Set and Forget”
Schema isn’t a one-time project; it’s like your kopi order and must be customized and adjusted over time.
Google updates its guidelines, new schema types get introduced, and your business evolves. Make schema audits part of your quarterly SEO housekeeping, just like checking your Google Analytics or updating product pages.
Here’s a quick relook at your Schema checklist:
Implement Local Business schema
Use the right schema type
Fill in all relevant fields
Ensure consistent NAP details
Validate schema regularly
Include reviews to earn those gold stars
Getting your structured data right isn’t just good SEO, it’s smart business. And in Singapore’s competitive local scene, it might be the difference between showing up first or getting buried under your competitors.
Want to optimize your schema for better local rankings?
Katalysts helps Singapore businesses unlock higher visibility with smart, structured data strategies. Reach out for a quick audit or consultation.
Source: This blog is first published on Katalysts.net
0 notes