
Statistics
We looked inside some of the posts by taylormadehome and here's what we found interesting.
Average Info
Notes Per Post
4
Likes Per Post
4
Reblog Per Post
0
Reply Per Post
0
Time Between Posts
2 days
Number of Posts By Type
Text
7
Last Seen Tumblr Blogs


Fun Fact
Tumblr is used by 21% of adults online aged 18-29 years.
Text
Hotel Taylor

At the end of a long day, you want your bedroom to feel like a soft place to land. (No pun intended!) It should help melt away the stresses of the outside world, and almost rock you to sleep. Now don’t get me wrong, just a few short days ago, my bedroom was nothing short of a disaster. Mismatched bedding, trash on the nightstands, clothes on the floor, you get the vibe. But as my husband and I started this whole decluttering journey in the apartment, I knew it was time to make our bedroom what I had always wanted, a hotel.
When you’re on vacation, there’s something about all white bedding that just feels luxe and visually calming. There’s no distracting pattern or texture to compete with the ultimate goal of slipping into the sheets, which is a good nights rest. Knowing that I wanted to emulate this concept in our master bedroom, and it just happened to be Prime Day, I headed to Amazon! I opted for cooling white cotton sheets and a seersucker white comforter set for our king size bed. When I tell you something this small has truly enriched my life, I’m not trying to be funny at all! It’s amazing the psychological effect that this bedding combo has had when I turn in for the night (of for an afternoon nap). I honestly feel like I’m on vacation, crashing after a day of sight seeing or beach excursions. All because I invested in all white bedding!
Now because I am an artist at heart, I could leave the bed JUST white, but I didn’t want anything loud to contrast the calm palette. I had already reupholstered our DIY headboard in a soft beige linen. Using the leftover fabric from that project and a cream velvety remnant, I got to sewing up some basic pillows for the bed. I feel like the all neutral color scheme give my eyes time to rest, perfect for a bedroom!
The artwork above the bed is pretty special to me. As we’ve been making over different spaces in the apartment, I’ve found many opportunities to paint over existing canvases and art pieces that no longer go with our style. For this space, I knew I was after a landscape painting with visual texture and movement. Instead of buying new from a chain store, I challenged myself to paint the type of scene I had in my head. The results are better than I could have imagined. The dreamy, misty quality of this mountain scene was exactly the feeling I was hoping to evoke. The darker colors contrasting the very light and airy bed offer so much balance, which is always a pillar of design that I focus on.
Whether you actually ARE on a tropical vacay or not, everyone deserves to have a cozy place to relax. I know that this bedroom makeover has made a huge difference in the way I view the ideas of rest and sleep, and I hope it inspires you to reevaluate the effect your own bedroom could have with just some minor updates. Sweet dreams!
XO Maddie
0 notes
Text
Thrift Flip: Cane Chair
I believe there are two types of people in the world. Those who take things at face value, and those who see what could be. Of course I’m not trying to get too deep and philosophical, I’m only talking about home decor! While browsing a local Habitat for Humanity Restore, I came across a cane back arm chair. Now this guy had seen better days, but I couldn’t help imagining what a coat of paint and some new upholstery could do for him. Of course there was no price on the chair, just my luck, so I had to track down an employee. Knowing I was planning to make it over, I wasn’t really in the market to spend much on it. When the owner said he’d give it to me for $5, I didn’t hesitate!
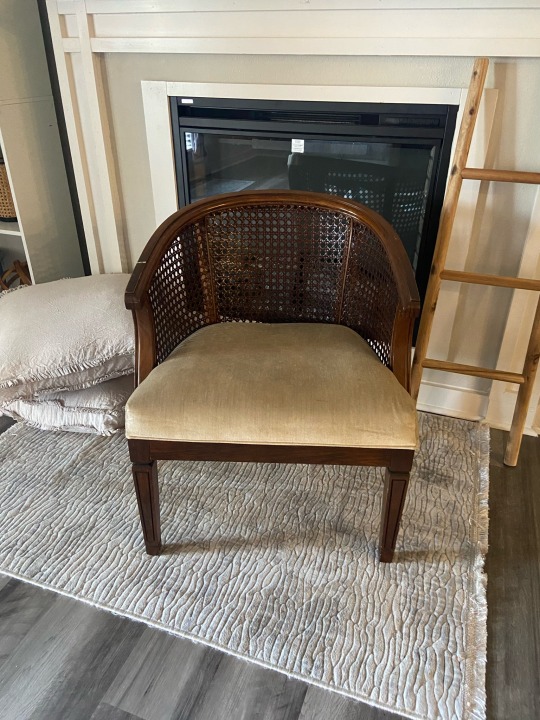
As you can tell, the wood was pretty banged up and the velvet upholstery was outdated. I started off by unscrewing the seat from the frame of the chair. I have the entire chair including the cane a coat of Waverly chalk paint in the color ink, which is a matte black. While that dried, I got to work uncovering and then recovering the seat. I chose a neutral linen like fabric for the seat as a way to contrast the dark frame of the chair. I could not be happier with the results!
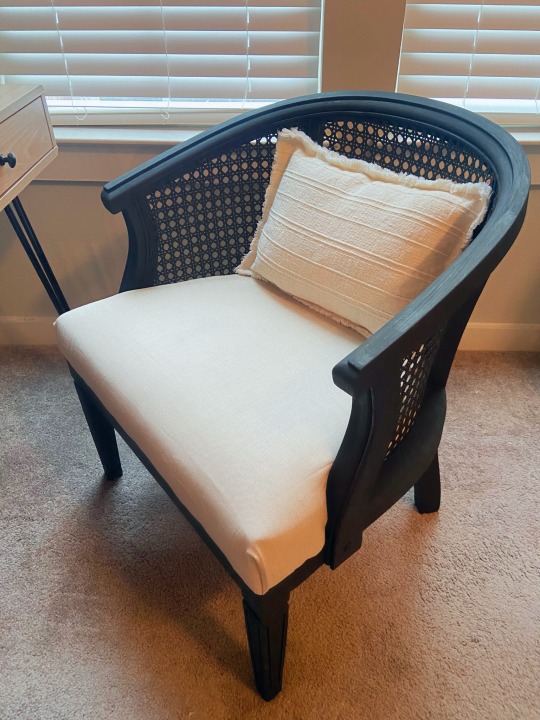
This may be one of my absolute favorite thrifted projects I’ve ever done! Just a few simple steps completely transformed this piece, and I am certain I will have it in my home for many years to come.
XO Maddie
#cane#canechair#chair#furniture#furnitureflip#makeover#thrift#thrifted#thriftflip#furniture makeover#thriftmakeover#homedecor#home#interiordesign#chalk paint#interiors#design#decor#house#apartment
2 notes
·
View notes
Text
Surroundings

I’ve always been a bit of a homebody. More of a family girl than a huge friend group girl. Growing up, I liked playing outside with neighbor kids, but as I’ve grown up, I have learned to value my time inside my home. With that being said, my surroundings have always been a big part of my life. Whether it was my lime green walls with bright pink bedding during my middle school years, or my current neutral cozy vintage vibe, I have always enjoyed having my spaces be “me”. Every stage of my life thus far, my room or home has been a reflection of me in some way. Now, getting married and meshing lives with someone has been an adjustment, but luckily I have a husband who lets me run wild with decor! He’s somewhat of a minimalist, and truly wants me to have fun dressing up our living spaces to my liking.
I think there is a lot of power in creating a pleasant environment. If you’re like me and you spend a majority of your time at home, a house becomes more than just floors and walls or a place to sleep. I believe a home should be a sanctuary, the place you can feel completely comfortable and let go of the stresses of the day. The world has become a very overwhelming and slightly scary place. Because of that, everyone deserves to fill their spaces with what makes them smile.
For example, I spend a lot of time facing our TV above the fireplace. On either side of the fireplace, we have tall bookshelves to mimic the look of built in shelving. These shelves serve zero purpose other than displaying whatever decor I’m loving at the moment. And that’s okay! Some may say a bookshelf is for storage, or for something crazy like.. books! But I like my decorating shelves. They make me happy, and that’s really the point.
I suppose I’m telling you all of this to really say: Surround yourself with your favorite things. Display your collected items. Showcase the pieces you’ve picked up traveling. Make it yours. You have my permission, ha!
XO Maddie
0 notes
Text

Dining room details. 🤍
#dining room#dining#home#homedecor#decor#decorating#house#apartment#art#painting#florals#vintage#thrifted
0 notes
Text
The Hallway Alcove

Since we moved into our apartment last March, we’ve had an old wooden bookcase tucked in this small alcove in the hallway. It honestly served as a storage shelf/dumping ground for items that otherwise had no home. Yes, it housed our books, but it also held games, candles, and a few scattered decor pieces. As our apartment color scheme is very gray and white, the tall dark bookcase was slightly harsh on the eyes.
While cleaning out my closet, I found that I had a completely empty small black bookshelf. I considered just taking it to Goodwill, but before doing so, I checked to see if it would fit in the alcove. When I realized it would be an almost perfect fit, it was time to declutter and consolidate the books on our current shelf and move that big boy out of the way!
Once the books were sorted, it was time for my favorite part, the styling! I knew I needed either a large piece of art or a mirror above the shelf. I have been on a kick of painting over canvases that night longer for with my design style, so I happened to have the perfect size canvas that I could makeover for free! Abstract art has been a huge inspiration for me during this whole apartment revamp, so I went with a charcoal gray, beige, and gold scheme for the framed painting. As far as the styling on roof of the shelf, I thought keeping it simple was the best option. I utilized one of my favorite wooden vases with some eucalyptus stems and an aged vessel with wooden beads spilling over the side.
This small, somewhat forgotten, area of our home has quickly become one of my favorite spaces. It’s quiet and simple, but makes me smile when I walk past it. That’s really the goal after all, to create spaces that brighten our days! I spend a lot of time at home, so being able to really enjoy the items I’ve collected by displaying them in a beautiful way is so important. I encourage you to try jazzing up a small space in your home that doesn’t serve a huge purpose. Just because it isn’t a main living area doesn’t mean it can’t be a special moment in your day.
XO Maddie
#art#home#home decor#decor#decorating#interiors#interiordesign#diy#painting#books#bookshelf#hallway#design#style#styling#apartment#house
1 note
·
View note
Text
A Vintage Cabinet Update

Towards the beginning of the year, I picked up a white cabinet from Facebook Marketplace to use as a china hutch in our dining room. At the time, I was going for much more of a rustic cottage look in our apartment. As I’ve started to incorporate more modern and classic pieces to my home decor collection, and reigned in the country cottage vibe, I felt the cabinet could use a little sprucing up. When I picked up the piece from its original owner, the open doors were lined with gathered turquoise fabric. I immediately ripped that out as soon as possible. For many months, the doors were left empty as a way to display decorative dishes and other collected decor. In an effort to visually simplify the dining room, I decided it was time to cover the doors. With what, I had no idea!
I love the look of cane webbing on cabinet doors, but I really wasn’t looking to spend an arm and a leg on a roll of cane for such a small project. While at the Goodwill Outlet (“The Bins”), I came across 3 bamboo/rattan placemats that I thought had potential. They had a hideous green leaf print on one side, but the backs were a natural light wood tone. So I risked the $1 it probably cost me and brought them home. Piecing the placemats together to fit the entirety of the open doors was quite the task, but with a little finagling, needle and thread, and my trusty staple gun, the doors were finished in probably 30 minutes.
As far as the knobs on the drawers, the original knobs were definitely not the worst match for the cabinet. They were a vintage style white and silver almost floral shaped knob. (I did keep these for a future project!) Because I’ve been infusing some modern pieces into my interior design, though, a flat gold circular knob is what I was after. I found a set of 6 wooden knobs from Big Lots for about $8 that I brushed with my favorite gold acrylic paint. Switching out knobs or handles on a furniture piece has such an amazing way of transforming the whole aesthetic. These gold knobs completely modernized and simplified an otherwise quite old fashioned cabinet.
Overall, this project was such a success! Not only was I able to update an existing piece in my home for under $10, but I now have some great closed storage space for my extra home decor. I absolutely encourage you to be resourceful when it comes to flipping furniture pieces. I easily could have paid way more and bought cane webbing and individual metal pulls to revamp this cabinet. But best believe, if there’s a thrifty way to do it, that’s the way I’m going! I hope you enjoyed hearing a little more about this cabinet makeover, and stay tuned for more diy content.
XO Maddie
0 notes
Text

Meet the Blogger
Hello friends! My name is Maddie Taylor and I am a 27 year old military wife living in sunny Florida. Over the past year and a half, my husband and I have enjoyed newlywed life, but are now facing his upcoming 6-month deployment. In preparation for this life change, we have been decluttering and organizing the entire apartment. I guess I’m telling you this to give you some context. During this purge of sorts, I decided to revamp the decor in our space. Now that all the clutter is gone, I’m able to really focus on surrounding myself with the items I love. Decorating a home has always been a dream of mine, and when we moved into our 3 bedroom apartment, I was so excited! My decorating style has gone through a few phases in just a short time, but I feel like I am finally finding MY look. That leads me to this blog, Taylormade Home. I wanted a place to share my diy projects, decor styling, and any home updates in between. I hope you will enjoy following along as I “Taylor” this home to our liking. (See what I did there?)
XO Maddie
#home#homedecor#decor#decorating#diy#interiors#interior design#design#apartment#furniture#thrifting#art#house
1 note
·
View note