
theartofasty
The Art of Asty
Mexican Dark Surrealist Illustrator.
Traditional media only.
He/Him Prints, Tips, Portfolio, Originals, Patreon: Here
279 posts
Don't wanna be here? Send us removal request.
Last Seen Blogs
k-ky
They Tell Me To Eat My Veggies
benaturalyou
Be Natural

dspill07
Canadian Bacon Trees

rocketshiplist
The Rocket Ship List

nostalgicountry
tell me i’m your baby
Text
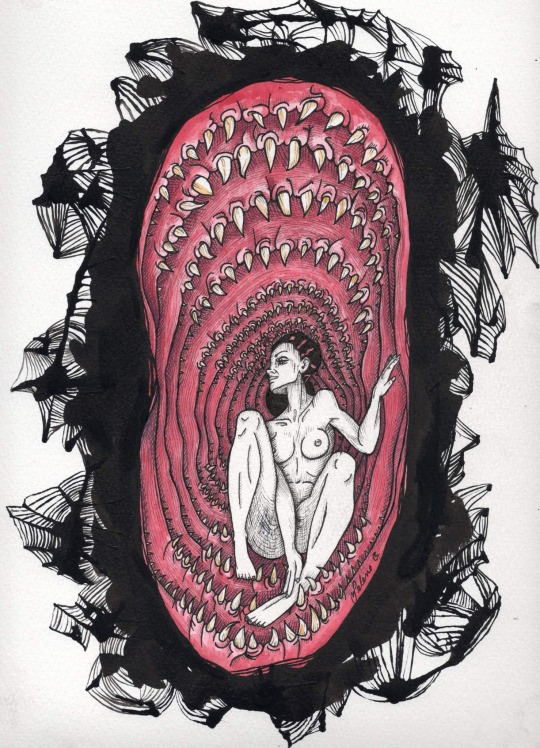
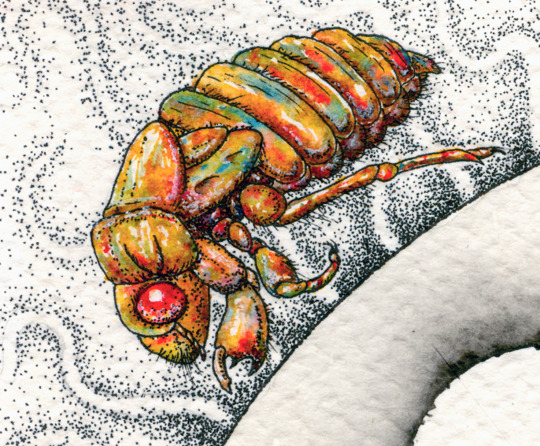
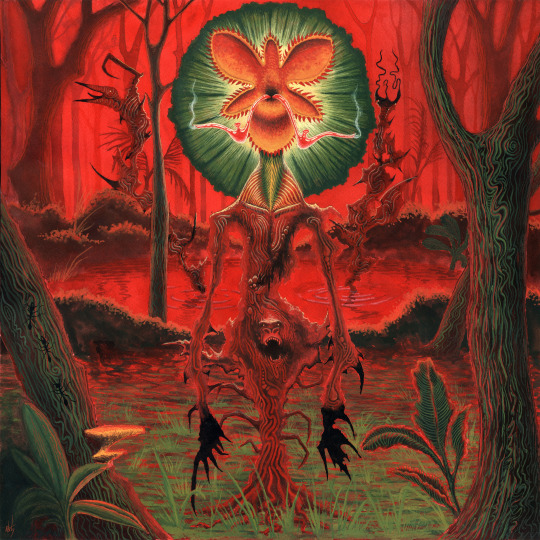
"An idol of untraceable origin, it is said that those who pray to it, while lost in the bowels of the earth, are granted the privilege of a peaceful death"
Saint of the Cave
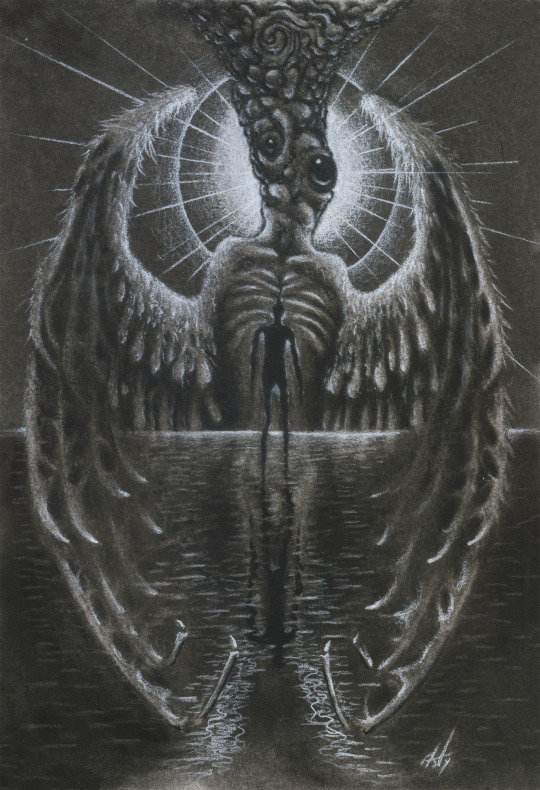
the process of this drawing was streamed live on my twitch channel
#asty art#artists on tumblr#traditional art#body horror#cosmic horror#dark art#horror art#traditional drawing#pencil drawing#charcoal#painting#traditional illustration#traditional painting#traditional sketch
299 notes
·
View notes
Text
first livestream, come hang out!
We are live!
https://twitch.tv/theartofasty

#asty art#artists on tumblr#traditional art#body horror#cosmic horror#dark art#horror art#livestream
21 notes
·
View notes
Text
Anyone here have experience buying used electronics from Amazon? I found a listing for the camera I'm looking for that's 200 usd cheaper than what I was expecting to pay, is it worth it? mostly worried about warranties and stuff
15 notes
·
View notes
Text
That's my weekend name

From now on you all must refer to me as Homoerectus Bosch
568 notes
·
View notes
Text
From now on you all must refer to me as Homoerectus Bosch
568 notes
·
View notes
Text
The comic shop my partner is part of is downsizing their crew due to low sales, and she is being let go. We could use some funds while waiting for unemployment approval, so please consider grabbing something from my shop, or sending a tip. Thank you!
87 notes
·
View notes
Text

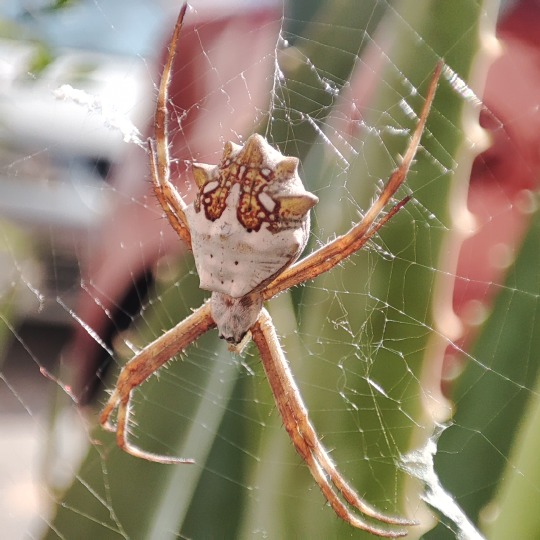
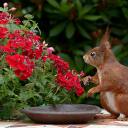
Found this absolutely gorgeous lady on my trip back from the hospital today, appears to be Argiope argentata
376 notes
·
View notes
Note
a post with a bunch of your art made its way onto my dash and i wanna say your use of color is immaculate
thank you <3 It's crazy to think once upon a time I used to hate using color on my drawings haha
20 notes
·
View notes
Note
Your art is beautiful
thank you <3
5 notes
·
View notes
Note
Good day
I have been trying to contact you for a while now , I have got clients who are willing to buy your art as nfts
With the rate am looking at your work it would cost $5k a pic please contact me asap
I'm almost not mad at this but scam attempt because the fucking AUDACITY to pull up to my askbox with this shit is edging on admirable lmao
30 notes
·
View notes

Text
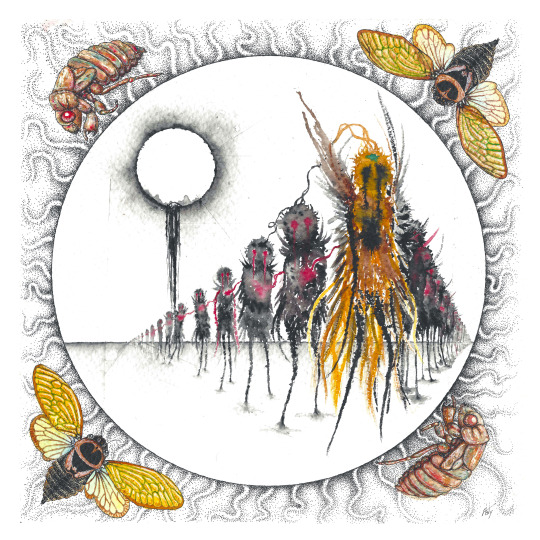
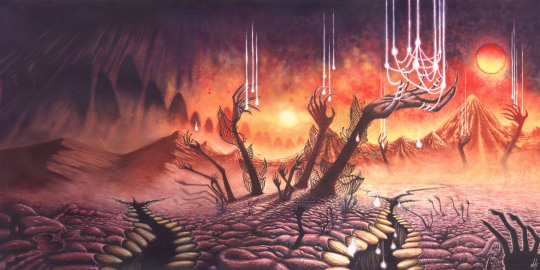
‘Mouth of Truth’
Soundtrack:
ink + watercolour
62 notes
·
View notes
Text
Every now and then I have to post pics like this to remind everyone all my art is traditional and that I look too much like a caveman to be doing digital art


#asty art#artists on tumblr#traditional art#body horror#cosmic horror#dark art#horror art#traditional painting#painting#gouache painting#drawing
10K notes
·
View notes
Note
happy birthday! your use of color and shapes is phenomenal, i love all the different ways you occupy the canvas and draw the eye through these complicated flowing figures. absolutely incredible
thank you! it took me a while to get there, for the longest time I was terrified of, well, filling out the canvas, "backgrounds" felt overwhelming or annoying, but when I started understanding that there's no point in separating "subject" and "background" as different subjects and instead learned to see the whole picture, it became not only easier, but more enjoyable to construct all these increasingly larger and more complicated compositions :)
25 notes
·
View notes
Note
How do you go about getting such high quality scans of your art?
ok bear with me cuz this is going to be a lengthy post since I see a lot of people struggle with this and I think I could help by detailing my process.
before anything else I have to remark, this whole process only works with paper, loose canvas and any other media that can at least bend and warp a little in order to properly fit into a flatbed scanner, if you're working on on hard/non-maleable surfaces like wood pannel or mounted canvas, I recommend these tutorials:
youtube
youtube
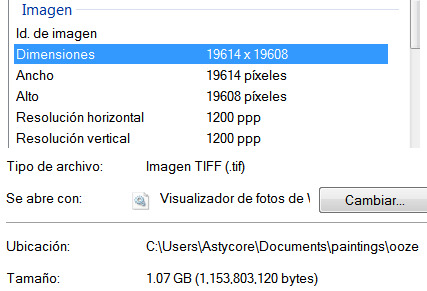
Now, the first step is the most crucial: USE A GOOD QUALITY SCANNER! a scanner that's capable of obtaining photographic quality images is crucial, as there's no amount of editing that can salvage an image that has been overexposed, burnt, and artifacted to hell and back, here's an example:
on the left, a scan of one of my paintings taken on the scanner of a cheap all-in-one printer.
on the right, the same painting, scanned on a dedicated HP Scanjet G4050 flatbed scanner, which is the scanner that I still use to this day.
The difference might seem minimal at first, but when you start getting up close, the differences become REALLY apparent, not only are the colors washed out and muddy on the all-in-one scanner; there's some heavy artifacting on its scan as well as random blurry spots that makes the image look much worse, and the overexposure has completely killed the paper grain which is much more visible on the flatbed scan.


it's worth pointing out that both images you see here are what they looked like /AFTER/ adjustments and corrections in photoshop; the first one, as bad as it looks, took me several hours to of tweaking to get to that point, while the latter took me about 10 minutes of saturation adjustments to make it look as close as possible to the original painting.
the reasons for this stark difference in quality are very simple: all-in-one printer-scanners ARE NOT made for scanning art, they're made for scanning documents, so the quality needed for that is much lower than the one needed for a painting or a photograph, so what you need instead is a dedicated, photographic quality flatbed scanner.
One that I could recommend, not from personal experience but from recommendation from my peers, is the Epson Perfection V550/V600 Photo Scanner,
BUT I don't want you to think from this that you NEED to shell out the big bucks into the most expensive and latest equipment in order to be able to get decent scans of your art, the previously mentioned scanner that I used is a lower-mid range device and is almost 10 years old, so if you ask me, it is perfectly acceptable to buy a pre-owned, used, refurbished photo scanner, as long as it's in decent shape and works as intended, you will be able to get what you need out of it.
(***EDIT*** Another tumblr user with experience in professional media scanning has pointed out that while these scanner models are great and very advanced, they are very expensive and most of that pricetag is related to photographic scanning features that are not useful for anything that isn't photo negatives or digitizing of documents, their suggested model instead is the Epson Perfection V19, because "it's running the same photo scanning firmware as the higher-end models, has the same bit depth and still scans up to 4800 dpi. They run ~$70 brand new, even cheaper if you find them on sale or used.")
Ok, I have the scanner, what now?
the first and most important thing to consider when you're going to scan your work is: SCAN AT THE HIGHEST POSSIBLE QUALITY THAT YOUR COMPUTER CAN HANDLE, most if not all scanners give you the option to select the dpi (dots per inch) measurements at which you want to scan. the standard for "decent" quality images is 300 dpi, but I personally find that extremely insufficient, yes, it will give you decent-ish images to post on social media, but if you want to do anything else with your images, like making high quality prints, posters, or high quality closeups of your work, those 300 dpi are going to fall really short and become extremely limiting.
personally, I scan ALL my work at 1200 dpi, I could go higher than that all the way to 2400 but honestly, I've yet to find a use for an image size that big, at 1200 you already have enough quality to print a house-sized poster with a pretty decent looking final product, so unless you plan on hanging copies of your work to the side of the Empire State building or if you're trying to scan EXTREMELY small pieces, 1200 dpi should be enough, the file sized you're going to get out of 1200 are already almost ridiculous (yes, this image is over 1 GB in size)

Next, to address the elephant in the room: What do I do if my painting is bigger than the flatbed of the scanner?
well, you're gonna have to learn to scan in parts like I do!
the trick to scanning in parts is that every section you scan needs to cover a little more area than it should so that when you start stitching the individual scans together in your preferred image editing software, you can erase the sections warped by the edges of the scanner bed and cover them over with the extra area scanned in the other images, for example, here's a little chart I made on how I scan a medium sized painting in 4 parts:
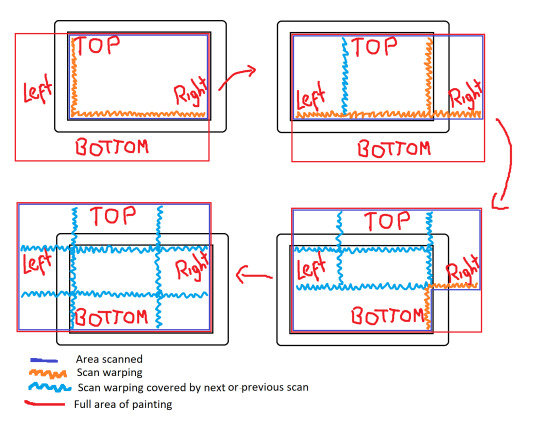
make sure to NOT rotate the painting while scanning it, simply slide it across the bed to match your desired section, always with the top, bottom, left, and right pointing always to the same directions, if you start rotating the painting you run the risk of warping the whole scan, or warp it in less predictable ways, and it's gonna be a bit of a nightmare to stitch together.
I also recommend to instead of closing the top of the scanner to make it flat against the scanner bed, keep it open and put a few books on top of the painting that are a 1 or 2 cm smaller than the scanner bed, the reason to do this is because closing the scanner cover and letting that flatten the painting, the fit between the top and the bed is so tight that you risk bending and damaging the paper/canvas when scanning, giving it some space at the edges when scanning lets the paper/canvas curl naturally with the material's own flexibility, so the risk of damage is much lower.
if your painting is bigger than that, you will essentially follow the exact same process but just divide the painting into more scans, personally I've done up to 9 scans per a single painting on my biggest pieces, any more than that can get a little toooo complicated to stitch together, but not necessarily impossible, especially considering that a lot of image editing softwares nowadays have automated stitching functions, which CAN get over the edge warping on their own, but I've personally found that you'll still get better results if you can eliminate that warping and let the AI work with the best sections of the scans only.
PERSONALLY I don't use the automated functions and prefer to do it completely by hand in Photoshop because I'm a neurotic perfectionist and I tend to zoom in into the paintings and notice every little microscopic smudging and bad overlap the AI does between the scans that 99% of people won't notice, but hey, that's just me, absolutely feel free to use the automated functions that the software gives, you don't need to be as extra as me!
I think that about covers most of my process there, remember this is a process that might take a little practice so don't give up if your first scans don't look that great or look wonky when stitched together, you have plenty of room to finetune and adjust everything to your liking.
If you have any more questions, feel free to ask and I'll try my best to answer.
Also if you found this small tutorial useful, maybe drop me a tip or checkout my patreon and store to support me ;)
***edit*** noticed someone added a flashing imagery CW so I modified the gif so that it blinks slowly and it's hopefully less hard on the eyes!
1K notes
·
View notes
Note
sometimes your art reminds me of Remedios Varo and i wish you two could have collaborated

believe me that is very much NOT a coincidence lol
58 notes
·
View notes
Text
Hi, today's my 28th birthday and to celebrate I would love if you could help me out with liking and sharing my art :3
Also if you're feeling generous and wanna get me a present, I accept tips on Ko-Fi, I'm currently gathering funds for a camera so I can start making videos of the process of my paintings!


#asty art#artists on tumblr#traditional art#body horror#cosmic horror#dark art#horror art#painting#psychedelic art#psychedlicart#portfolio day
3K notes
·
View notes