
Don't wanna be here? Send us removal request.
Statistics
We looked inside some of the posts by thisismyblogpost and here's what we found interesting.
Average Info
Notes Per Post
8
Likes Per Post
8
Reblog Per Post
0
Reply Per Post
0
Time Between Posts
26 days
Number of Posts By Type
Photo
16
Text
1
Last Seen Tumblr Blogs


Fun Fact
The KCSC sent more than 20K requests to delete posts related to prostitution and porn to Tumblr from January to June 2017.
Photo

Is this my last blog post? Maybe. Look at Tim, without his head. He was difficult to make. I used many different slabs and coils to build him up to the top. The top may seem like a weird design, but it is actually a placeholder for the head, which is already fired. Tim is a giraffe, and he is wearing a tie and a nice shirt. Hopefully Tim and Mike can be friends! He has a very long neck. This neck is stable, after lots of slipping and scoring. Originally I had a short neck, but then I had to make it longer. It is still very rough, so I will have to smooth it out. I will also have to make the shirt look better, so hopefully I can do all of that before I go intern! Anyways, Cinco de mayo!
0 notes
Photo

Hey, is this a computer? NO. It’s a phone and keyboard. You know, when some people need those keyboard add ons to type since they can’t type on a phone. Anyways, the keyboard says “evolution of technology” and has a picture of a phone and an old computer. During the firing process, the phone blended in with the glaze and part of the T in Technology also blended in. I should’ve carved out the glaze on the phone to make it stand out, and with the T I think I just didn’t clean out the letter fully. Although the keyboard has some flaws, it is still cool. What I really like is the iPhone. the iPhone turned out really well. Some things are not perfectly centered, but that is okay. The designs are easily identifiable on a normal phone, and I think that lots of them look cool. My favorite app design is the FaceTime app, since it is really smooth and I got the lines almost perfect. The process to make both of them was almost identical. The slab process was easy, since we have a fancy slab roller. Anyways, I love these and I can’t wait to take them home and throw away my current phone!
0 notes
Photo

Look at these squares! Or boxes! Or rats! You would be wrong if you thought it was any of those, since it is actually a keyboard and iPhone! It is almost finished, since it only needs to be fired now. Both of them turned out pretty good. I freehanded the letters on the keyboard, so it isn’t perfect. It is also somewhat unevenly placed, but I tried my best to fit it with the size I wanted. I could not fit “Technology” from left to right, so I did it diagonally and filled in some images in the empty space. For the iPhone, the apps were all done freehand, and I am pretty happy with how they turned out. My favorite one has to be messages or mail, since I think those look the best. This was supposed to be a computer, but it didn’t make sense to build a clay computer, since it would be hard to stand the screen up on its own. Therefore, this turned out good for the circumstances as I tried to outline the Evolution of Technology!
0 notes
Photo

WOAH. The keyboard is a different color than the iPhone! Want to know why? It’s SGRAFFITO! The best way to do your work. I did 3 coats on the keyboard, and next class I will do 3 coats on the iPhone. I will then carve in the letters, and I will make this a very stylish keyboard and iPhone. I did forget to put my name on the back, but I don’t think anyone else is making an iPhone at the same time as me! I did a pretty good job with the carving. On the iPhone, the top looks a little curved, so I will work on that before I sgraffito. These will turn out great. I didn’t have many problems, except for fitting the keys on the keyboard. It is going to say “Evolution of Technology.” Technology is a big word, so I did it diagonally. Hopefully I can take a selfie with the iPhone when I’m done!
0 notes
Photo

Here is an iPhone! Ha! Got ya! It’s actually clay. This wasn’t too hard to make. I just had to make a slab of clay and then smooth it out and carve into it. I think that this will turn out well when I smooth out the top a little more. I will end up glazing the design, since I still haven’t decided what I am going to put in the middle of the iPhone. I am also making a matching keyboard, and I will make a post about that when it is done. My work has slowly improved, so I am excited to see what I can make at the end of the year!
0 notes
Photo


Hola, Como are you? It’s Mike, Mike the Dinosaur. Basically, Mike was very cooperating with me when I attached his head and tail. It was easier than expected to attach them, but they are not symmetrical. The spine was also easy to attach. The one and only Mr. G Brown helped me attach them on the back. Thank goodness we had him, because I would not have finished the spine in the 80 minutes I had to end the semester(yes it was that long ago). Anyways, the glaze was awesome too. It was a nice color and it was easy to put on. The one problem was that it dried fast, so I only did one coat in a couple places when I should’ve done 3(just me not noticing that I didn’t do my second or third layer there). Anyways, Mike and me are going to go on an adventure to do some more ceramics, so until next time!
0 notes
Photo


“Hey Brandon. These slabs look really cool. There is no way you made them!” -anyone ever. Well surprise surprise... I made these! Don’t they look cool. Anyways, in the first photo you can see some melted stuff. One of those things is a slab fired at high fire. Since we know that it melts at that high temperature, we know that this type of clay is earthenware. It shrank .25 inches after firing. In making these, it was a little hard to make a perfect square because it kept drying out. It turned out pretty good though, considering the circumstances. Anyways, I’ll glaze these and get back to you on how it looks in January. Until then, Adios, Goodbye, and Holla.
1 note
·
View note
Photo

Look it’s a dinosaur! Maybe a Platapus. Actually it might be an alligator. Whatever it is, it is coming along! I need to attach a head onto the front and a tail onto the back. I then need to attach the teeth on the back(the spine thing that my dinosaur has). I want it to be a dinosaur, but in cerams, you never know what is going to happen! I am also going to make indents on the legs so that it looks like a balloon. All of this has to be done in 80 minutes... so as they say in France- “Good Luck.” Anyways, the legs keep falling off and that sucks so I’m going to try and make sure they don’t fall off. Lots of slipping and scoring... hopefully more scoring. The base got too dry so i had to spray it with LOTS LOTS LOTS of water. I got it wet enough to mold, and now the base is almost perfect. It is hollow inside, because it looks cooler that way. Anyways, please give me a 10/10 for my effort on this rat--- I mean dinosaur
0 notes
Photo

Woah! look at these really cool square slabs made out of clay! This is made with the clay that we made in my last post. 2 of them will be high fired, while the other 2 will be low fired. Two of them are designed to test warpage, while the other 2 are there to test shrinkage and color. The lines in the middle are measured to 10cm, but after drying 3 of them shrinked by .25 inches, while one shrinked by about half an inch. I cant wait to see how it will shrink later on! Again, these were difficult to make because the clay was dry and cracking. I was able to make these fairly well, and they are mostly even. The lines is what we are using for measurement, and each slab is the same thickness.
1 note
·
View note
Photo


Here is some clay! It doesn’t look like it, but this will soon be a beautiful pinch pot. It all started out years ago... with rocks! Then the rocks were found by our very own Mr. Brown! He brought the rocks here, told us they could be clay, and we believe him. We crushed the rocks into a powder kind of substance, and then we added water. We mixed the water with the powder until it became a smooth liquid substance. Then we put a cloth over an empty bucket and poured this liquid substance into the cloth. This made all the water and dirt pass through the cloth, leaving only clay! We were then able to mold things with this clay. We are doing tests with more pieces of clay to figure out the firing temperature among other things. Thank you for reading my super cool blog post!
1 note
·
View note
Photo
Look! It’s a late blog post! Hopefully this awesome post makes up for my inability to turn stuff in on time. This pot has come a long way. I had to restart my first one cause it got too hard and it went out too fast. This one is way cooler because it is better. Mr G Brown gave me some super cool tricks that I forgot about from Ceramics 1. It is a little rough still, and I am working on smoothing it out right now. I still need to add at least 3-4 more coils to make it close at the top. Hopefully I will be able to put all the coils on the pot before the end of the week we get back in school. This pot is definitely my best pot yet and I can’t wait to glaze it!
#this is late please dont mark me down#ceramics is cool#spencer seems mad at me#this is a cool pot#mr brown is the best teacher in the world#peter voulkos
2 notes
·
View notes
Photo


Another project, another blog post! this is the beginning of my pot. It is going to be after a Minoan pot. I wanted to do slabs at the beginning but then I decided that it was going to be difficult to continue to do slabs towards the end. Now I am doing coils. these coils are going to go outwards a little bit more, and I will probably also prop it up a little more. Then I will bring the coils back in, smooth everything out, and it will look like a Minoan pot! I am undecided about what my glaze design will be, but I will figure something out. I have been working on slipping and scoring throughout this whole piece. I think I need to be a little better about the size of the coils. I think that I made them a little too big when they were a little too soft. Next time I work on this, I will start by smoothing out the outsides and propping it up a little bit so it doesn’t fall apart.
2 notes
·
View notes
Photo


As you can see, this seed pot looks much different than my other one. I decided to go out of the box on this one. There is a hole behind the ball in the first photo. I like the dotted lines coming from the 5 different sides. I tried to make a realistic leaf, but it didn’t turn out that good. The last thing that is noticeable is the leaf integrated into the pot. I think this will turn out great in the kiln!
#seedpot#ceramics456 thislookscool#please give me an A#Spencer's really cool#this is another hashtag#lebron isnt good#hashtag#blog posts
1 note
·
View note
Photo


Hello Fellow Bloggers,
Its your favorite ceramic artist here, ThisIsMyBlogPost, coming at you with another Blog Post! This is my second seed pot, so the original base was easier to make. It is still bumpy, so I have to smooth that out. The difficult part is always trying to combine the pieces and making sure it doesn’t fold over itself. The next step is to figure out a cool design and start making the seeds!
0 notes
Photo

My giraffe head was difficult to make. The ears were hard to make because they weren’t equal at first. The horns were also difficult to make because I have to get the same height as it is on a regular giraffe compared to the ears. The eyes are almost done, and i think they look good right now. The nose was easy to make because I just had to make holes in the front of his face. The mouth was difficult because the mouth of a giraffe is on the bottom of the face, so I had to add clay on the bottom of the giraffe. The giraffe is not close to done, but I hope that I can finish it after spring break!
0 notes
Text

This is the start of my giraffe head. My giraffe idea came about because the basketball team went to the zoo. Iuli loves giraffes so he obsessed over them while we were there. I thought it would be a cool animal head to make. Hopefully when I finish the head it will look as close to a giraffe as I can get! Maybe iuli will enjoy the giraffe head! For the head, I am going to need to fill in some of the bottom so that I can make the mouth. The other half of the head will be empty in the middle. The giraffe eyes will be combined to the head using coils. The nose and mouth are in the same place so that will be a little difficult.
0 notes
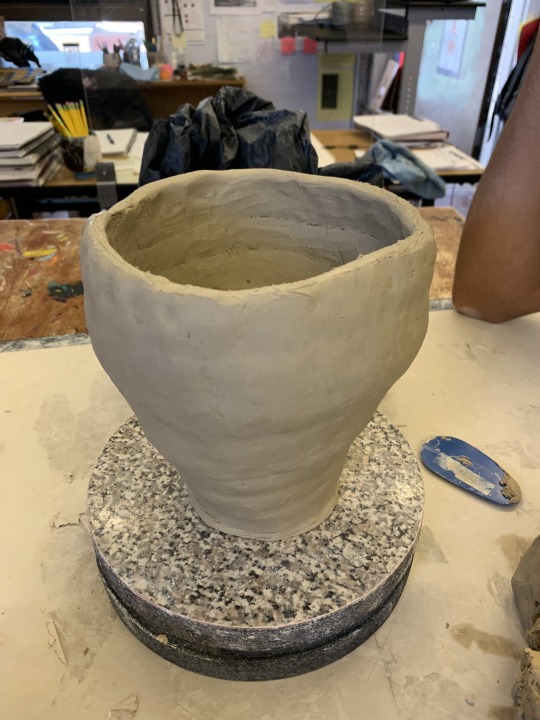
Photo

This is my jar before it goes into the kiln. For the top, I had to combine a bunch of triangles and then use coils to keep them together. I messed up a couple times because they were not even. The bottom was put together uses six pieces. I used coils on the bottom to make sure it could stand up straight. I observed and concluded that exact measurements are very important to the piece. I also had to cut a 45 degree angle inward so that the top would not fall off.
0 notes