
Statistics
We looked inside some of the posts by tigrensis and here's what we found interesting.
Average Info
Notes Per Post
318
Likes Per Post
243
Reblog Per Post
73
Reply Per Post
2
Time Between Posts
8 days
Number of Posts By Type
Text
17
Last Seen Tumblr Blogs


Fun Fact
Women make up for the other 50% of Tumblr’s audience.
Text
Still not finished but getting pretty close!!!


Just got the left sleeve to finish and a bit more length to add to the bottom before I can do the final embellishments adding strips of fabric, beads, shells, feathers and all sorts of other tat. I'll need to do a few more spray downs with diluted silk paints to darken down the colours but I like the idea of the lower pieces being slightly brighter to show that pieces have been added over time. When it's finished I'll do a full breakdown of the different places I got parts and materials. One of the main intentions of the costume is not spending any money on materials specifically for this project. Everything that has gone into this project has either been leftovers from previous projects or materials I have been given.
#larp#larp stuff#costume#costume design#larp costume#larp character#cosplay#wip#fibre arts#knitting#crochet#sewing#larp oc#queer artist#necromantic island turtles#'healers' in a half shell
7 notes
·
View notes
Text

Cannot overstate how good the noises from this thing are
#wip#larp#larp stuff#warskirtsmybeloved#costume#costume design#larp costume#leather#scale mail#armour#queer artist#larp character#cosplay#sewing#larp oc#oceanset
3 notes
·
View notes
Text

Feeling a bit draconic tonight
#larp#larp stuff#costume#costume design#larp costume#larp character#cosplay#queer artist#sewing#larp oc#leather#dragonborn
7 notes
·
View notes
Text

Back in the field tomorrow, just been doing a few adjustments
#larp#larp stuff#costume#commisioned work#larp costume#costume design#larp character#cosplay#sewing#larp oc#queer artist#embroidery#machine embroidery
29 notes
·
View notes
Text


Okay I like it better now that I've topstitched it and added a fastening. I'm still not convinced it suits my character but the colour scheme is right and it's fleece lined so I can't complain too much.
#larp#larp stuff#costume#costume design#larp costume#larp character#cosplay#sewing#larp oc#queer artist#broderie anglaise
9 notes
·
View notes
Text

Finally got to do some more ageing and distressing
#larp#larp stuff#costume#costume design#larp costume#larp character#cosplay#sewing#larp oc#queer artist#goblincore#decay#bog witch#quilting#skeleton
8 notes
·
View notes
Text
Important PSA: Support your local were-creatures today

Been practising digitisation and @eethok let me use some of her designs to practise on.
2 notes
·
View notes
Text

Upgrading my robe to be more mushroomy
#i need to make 30-40 of these in a month :///#larp#larp stuff#costume design#costume#larp costume#larp character#cosplay#larp oc#sewing#fibre arts#embroidery#queer artist
3 notes
·
View notes
Text


All set up and ready to go!!!
#larp#larp stuff#costume#costume design#larp costume#queer artist#larp character#cosplay#larp oc#sewing#larpcon
1 note
·
View note
Text

Gotta have somewhere to put the snacks
#larp#larp stuff#costume#costume design#larp costume#larp character#queer artist#cosplay#larp oc#sewing
9 notes
·
View notes
Text
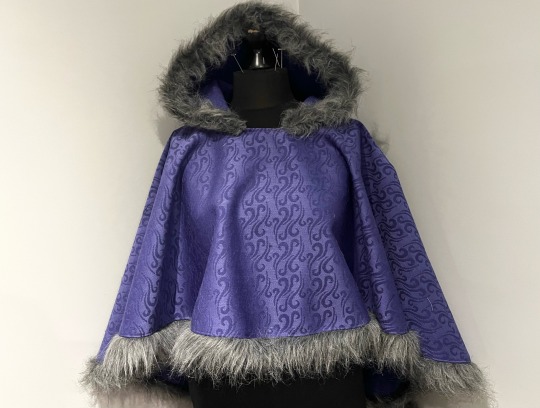
Sometimes I regret banning purple from my characters costume.
#ah well it serves the character and is a reflection of his choices#i really need to make myself one of these cloaks cause they are really comfy#although with the kilt i might end up looking like a bizzare christmas tree#larp#larp stuff#costume#costume design#larp costume#queer artist#larp character#cosplay#larp oc#sewing
5 notes
·
View notes
Text

One day I will be free of the purple wool. Today is not that day.
#larp#larp stuff#costume#costume design#larp costume#larp character#queer artist#cosplay#larp oc#sewing#machine embroidery#embroidery
20 notes
·
View notes
Text


Details from my ongoing crochet/knitting/chainmail/whatever coat project
#larp#larp stuff#costume#costume design#larp costume#larp character#sewing#fibre arts#fibre crafts#knitting#larp oc#cosplay#queer artist#necromantic island turtles#yarn crafts#crochet
187 notes
·
View notes
Text

A preview of the new embroidered dice bags that will be coming with me to LARPcon in March
20 notes
·
View notes
Text

2/3 inkcap capelets finished 🍄🍄🍄
#larp#larp stuff#costume#costume design#mushroom#larp costume#larp character#queer artist#cosplay#larp oc#sewing
4 notes
·
View notes
Text

Making more vests. Ilike this fabric but I've been fighting for my life on the embroidery machine with it.
#larp#larp stuff#costume#costume design#larp costume#queer artist#larp character#cosplay#sewing#larp oc
1 note
·
View note
Text

Some knitting that i've been putting off finishing for a while. Just need to block it and its done
#larp#larp stuff#costume#costume design#larp costume#larp character#queer artist#cosplay#larp oc#knitting#fibre arts
3 notes
·
View notes