
Don't wanna be here? Send us removal request.
Statistics
We looked inside some of the posts by tootdump and here's what we found interesting.
Average Info
Notes Per Post
111K
Likes Per Post
76K
Reblog Per Post
35K
Reply Per Post
63
Time Between Posts
25 days
Number of Posts By Type
Photo
10
Text
6
Note
1
Last Seen Tumblr Blogs


Fun Fact
BuzzFeed published a report claiming that Tumblr was utilized as a distribution channel for Russian agents to influence American voting habits during the 2016 presidential election in Feb 2018.
Photo


Get more writing practice and have fun doing it with ~the supplement~
This tutorial contains tips about writing for webcomics, with my caveat that I’m not formally trained in any of this stuff~~ This is all just my personal observations and tips from the past 10 years of putting comics online, but they’ve served me pretty well so far! For some examples of this info applied to my own work, feel free to check out my webcomics at The Meek and Mare Internum.
All of my tutorials are released in lower-res format to the public 6 months after publication at the Shingworks Patreon. You can access the full tutorial archive, as well as nearly 1.5 years worth of bonus content, by becoming a Patron :] I just wrapped up a two part tutorial about building and launching Patreons, good times.
and thanks in advance for not removing my text <3
22K notes
·
View notes
Photo
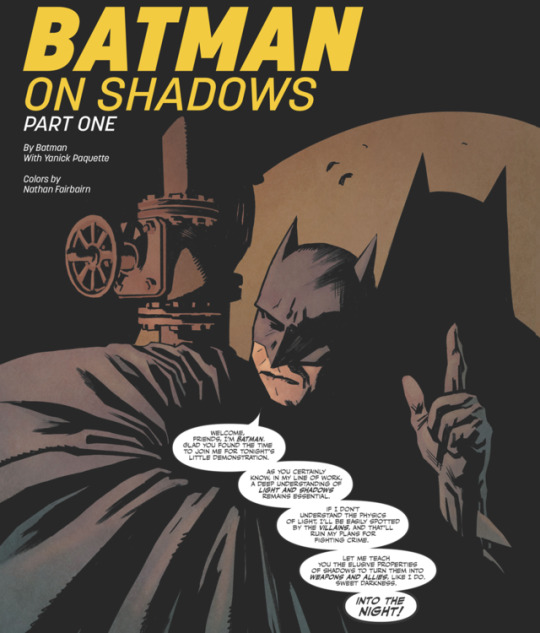
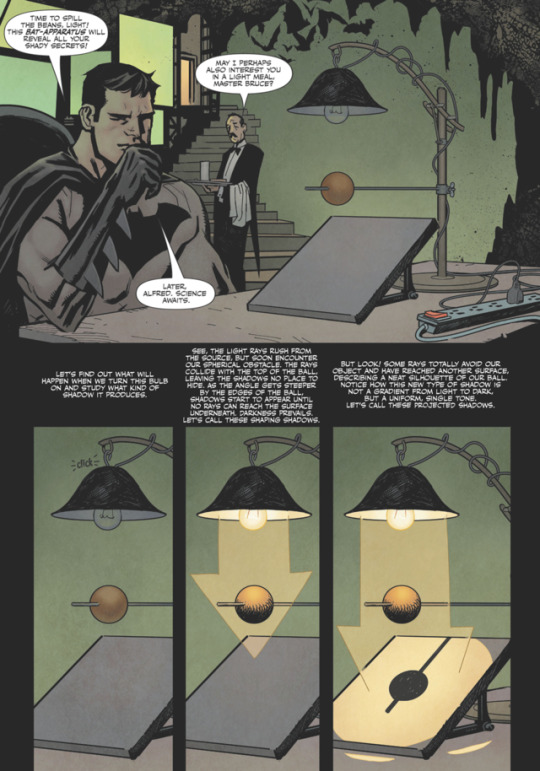
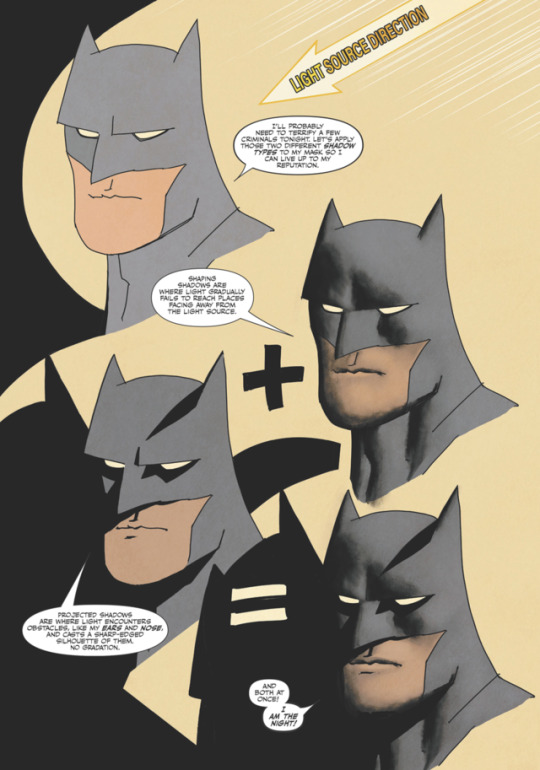
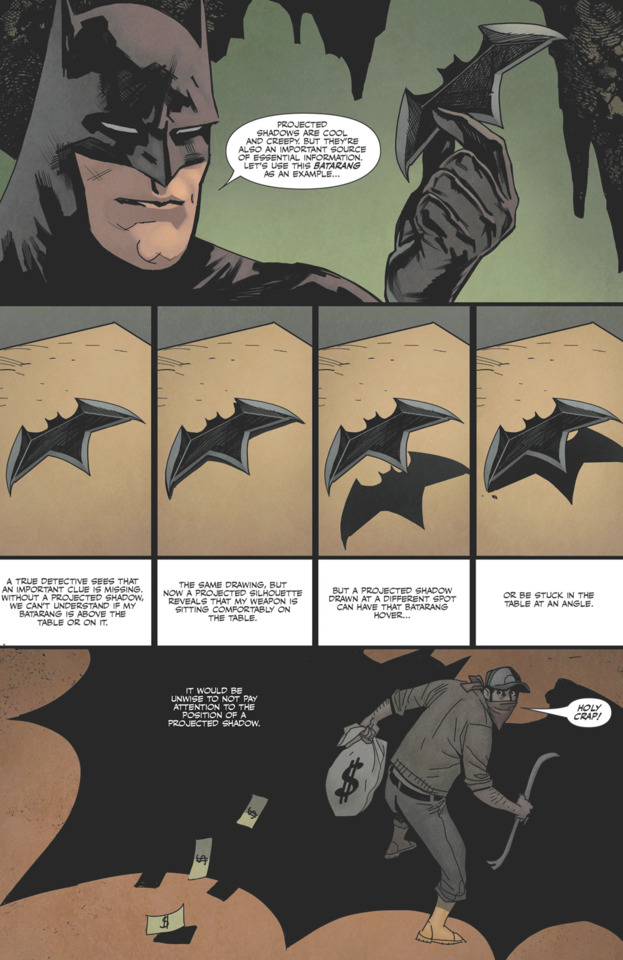
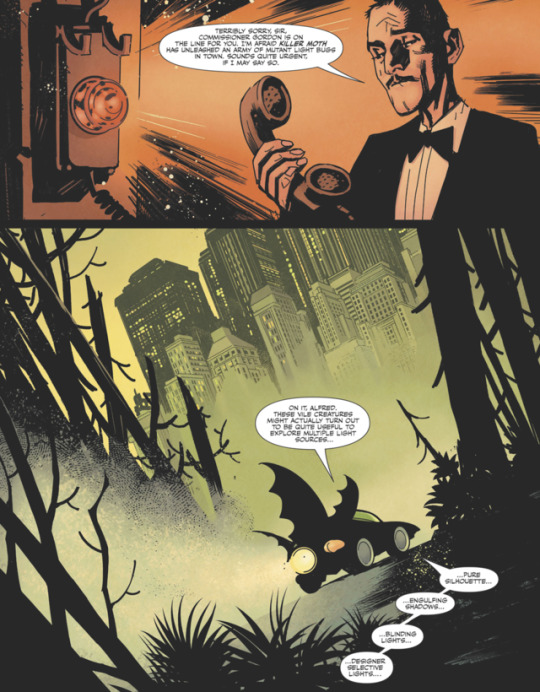
Batman on Shadows
by Batman, Yanick Paquette, & Nathan Fairbairn
511 notes
·
View notes
Photo
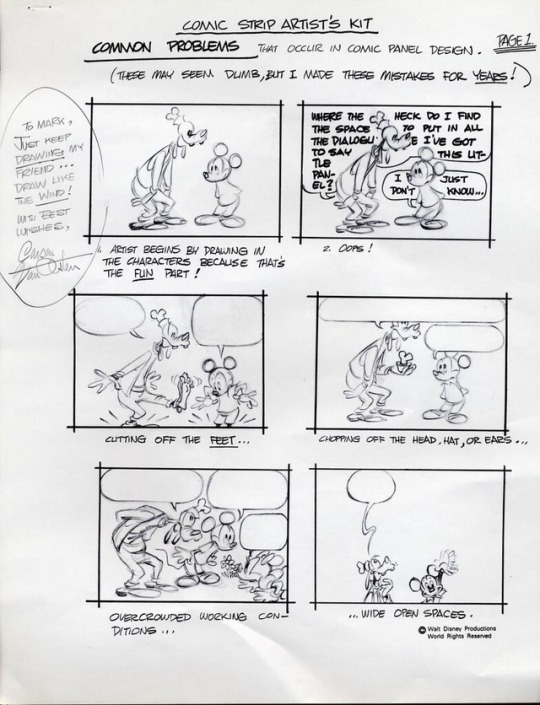

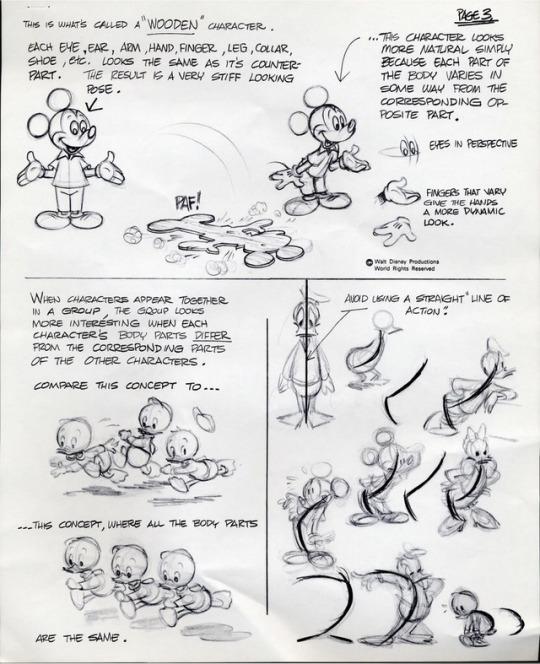
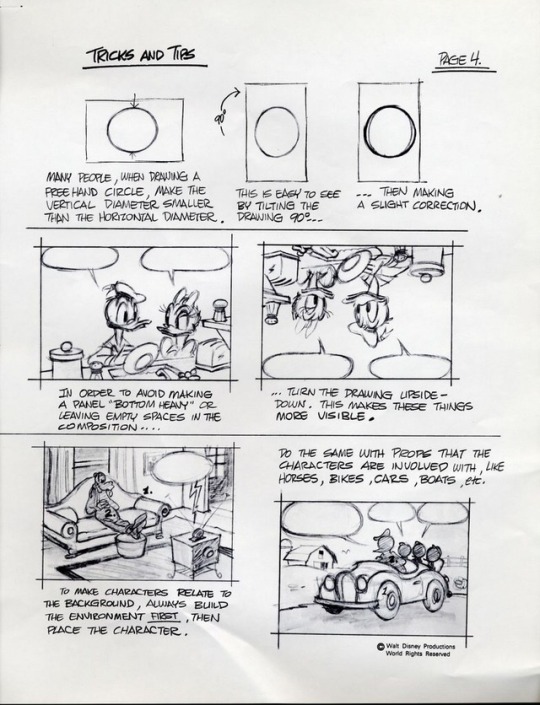

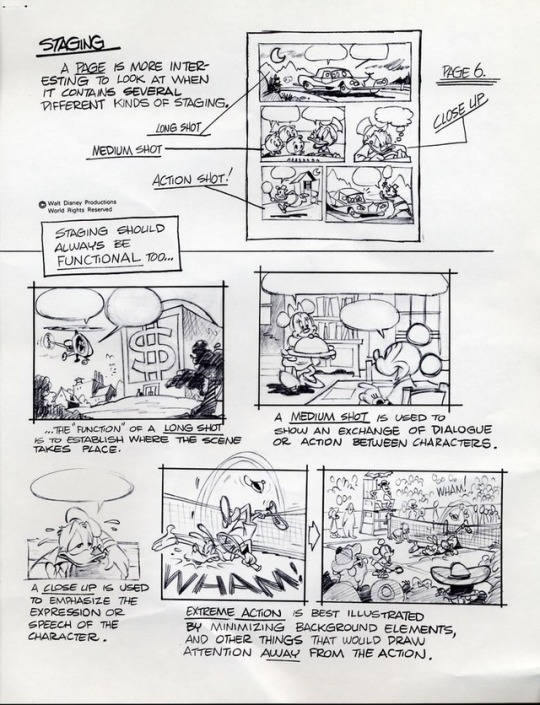
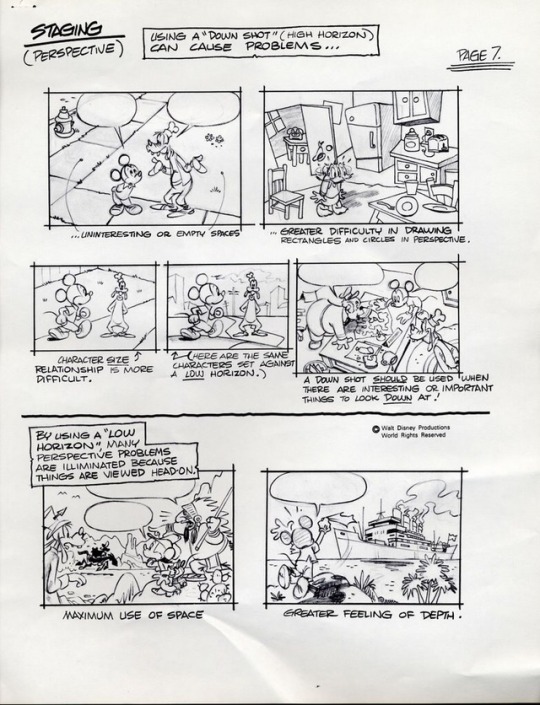
How to make a comic: these handouts by Disney artist Carson van Osten are chock-full of practical tips and suggestions regarding staging and storytelling. Save them, study them.
(These extra large scans are from the excellent blog, Temple of the Seven Golden Camels.)
More on how to make comics HERE.
3K notes
·
View notes
Photo
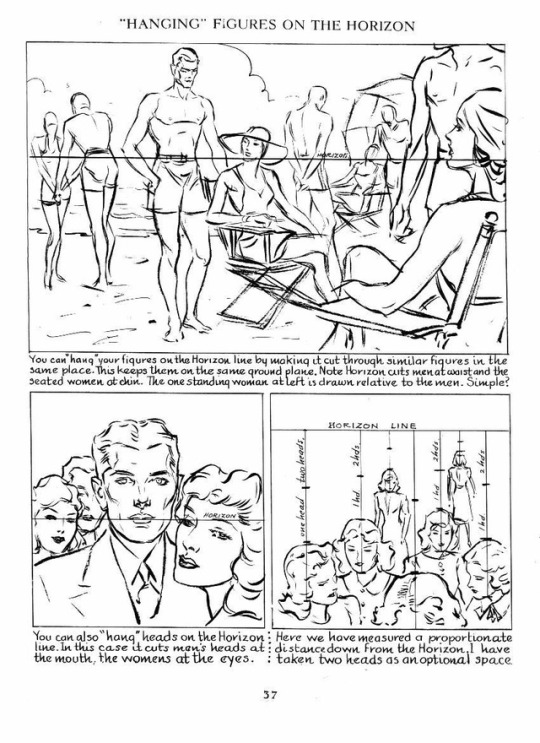
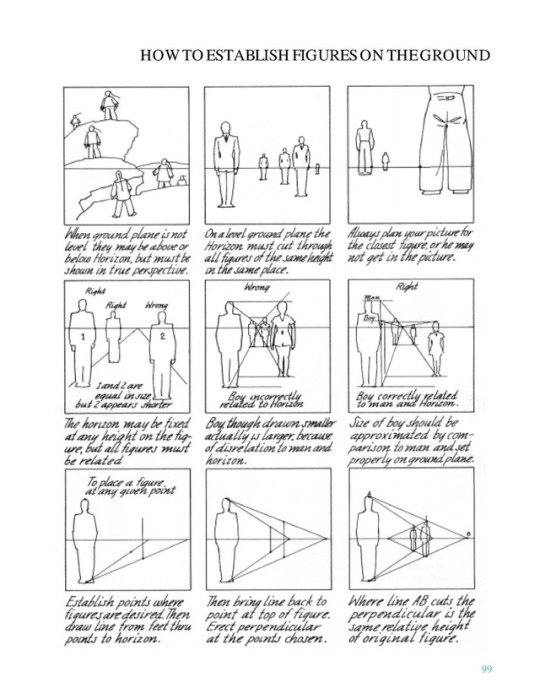
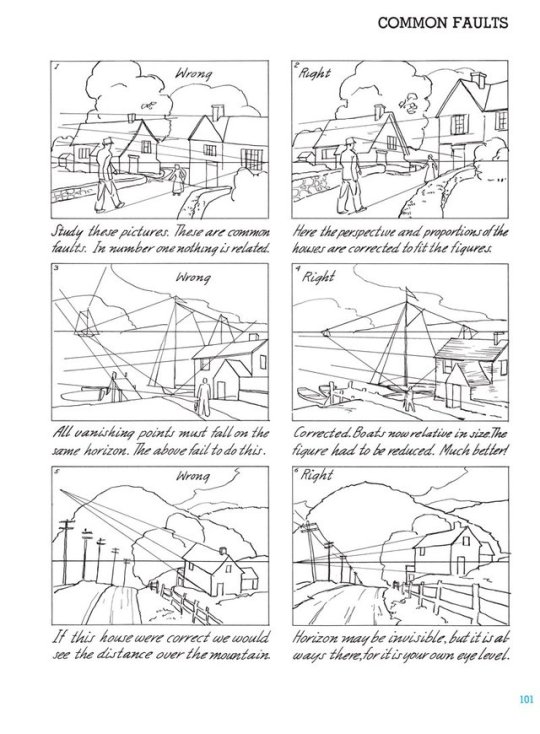


Some sample pages from Andrew Loomis’s series on how to draw comics, 1939-1961, concerning perspective and composition. (The changes in font and layout stem from the fact the pages come from different prints.)
I tried to collect the most useful pages, but of course I’m limited to only 10 images per post.
This is a follow-up of sorts of the Disney “how to draw comics” handouts I posted earlier, and which can be found HERE.
26K notes
·
View notes
Photo
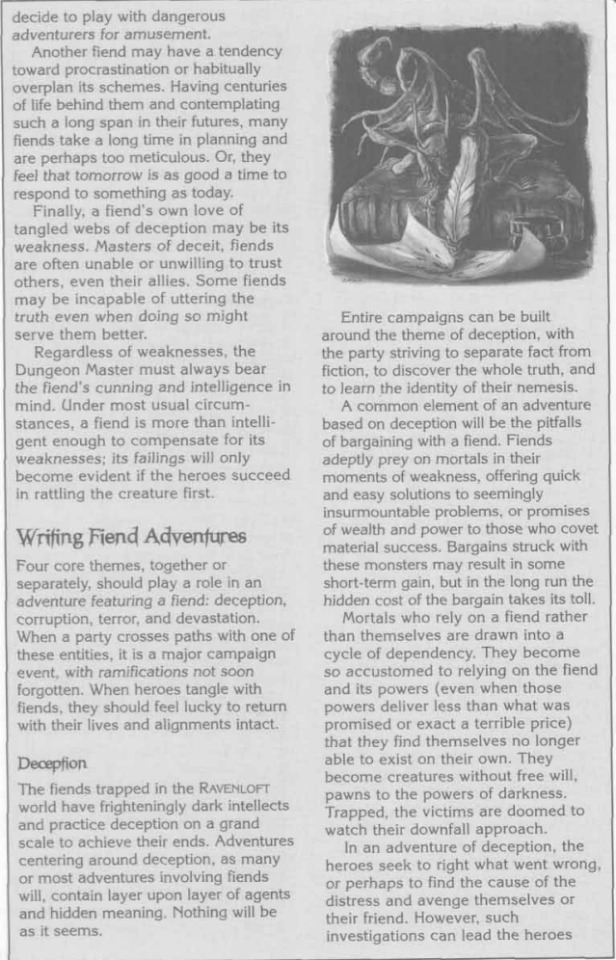
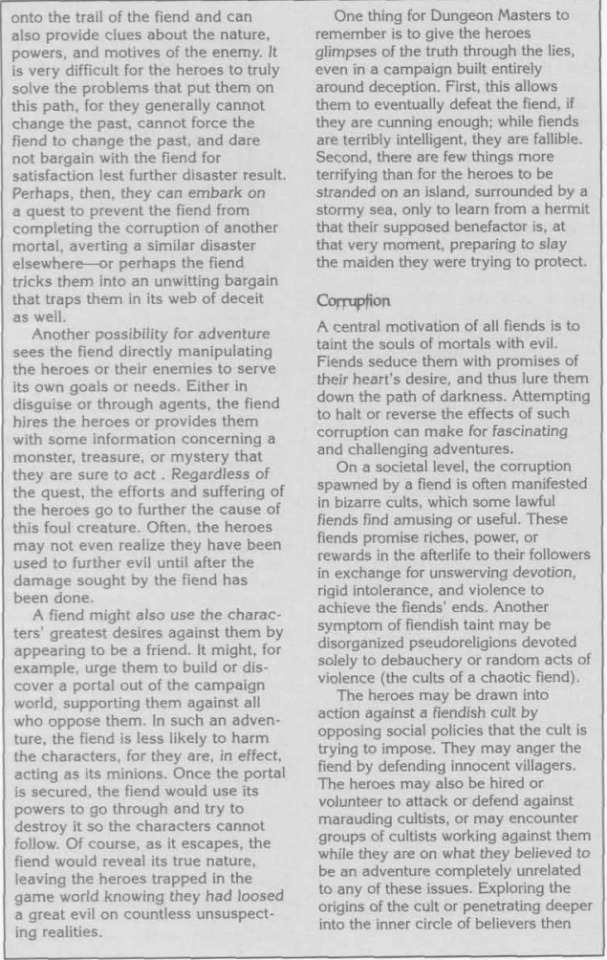
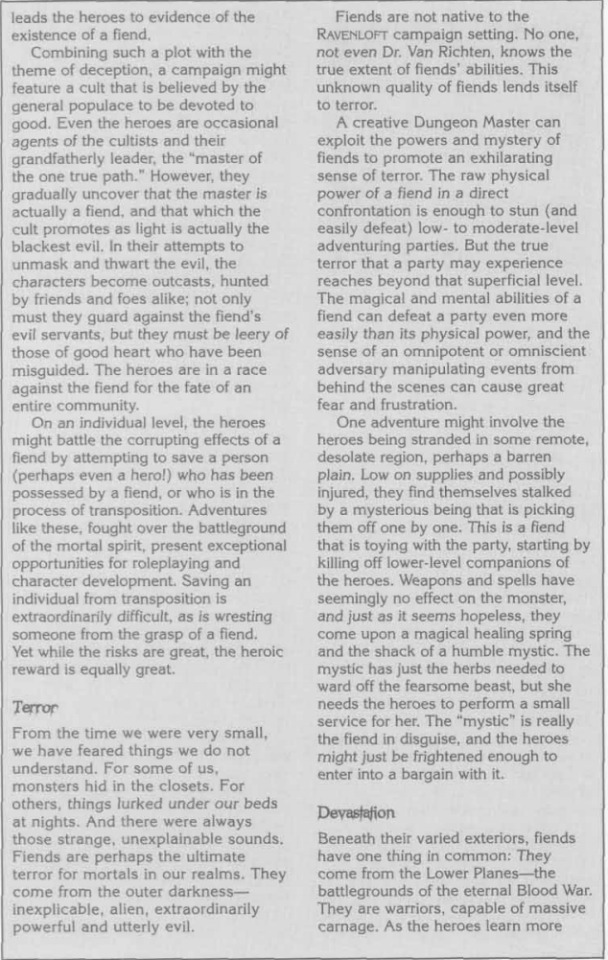
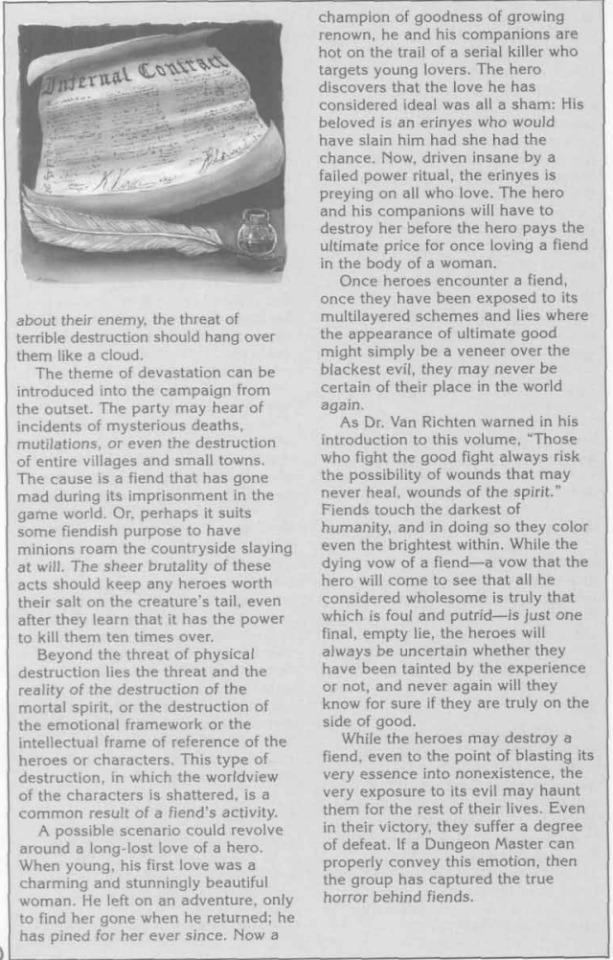
Writing Fiend Adventures
From Dungeons & Dragon’s Van Richten’s Monster Hunter’s Compendium
0 notes
Photo
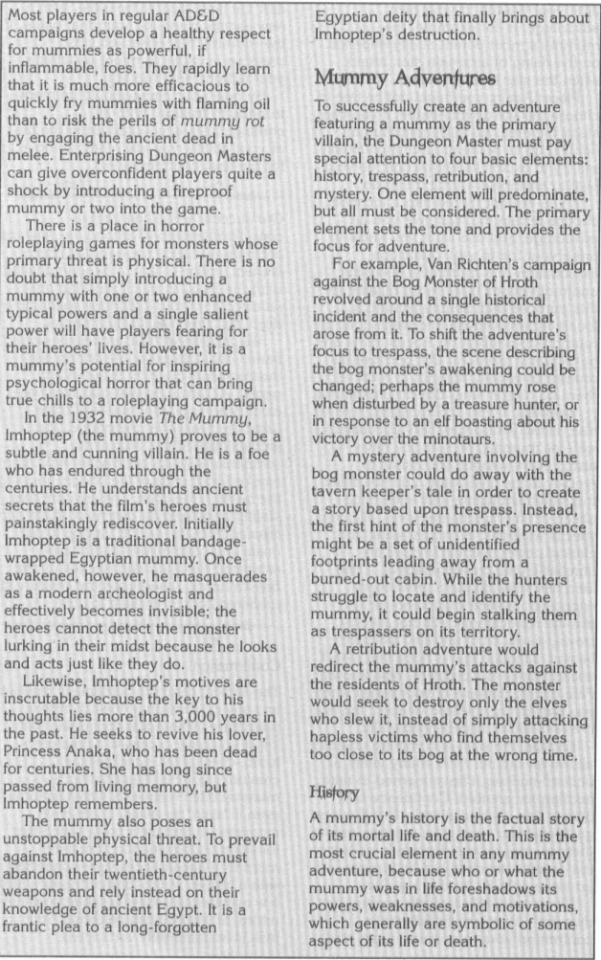
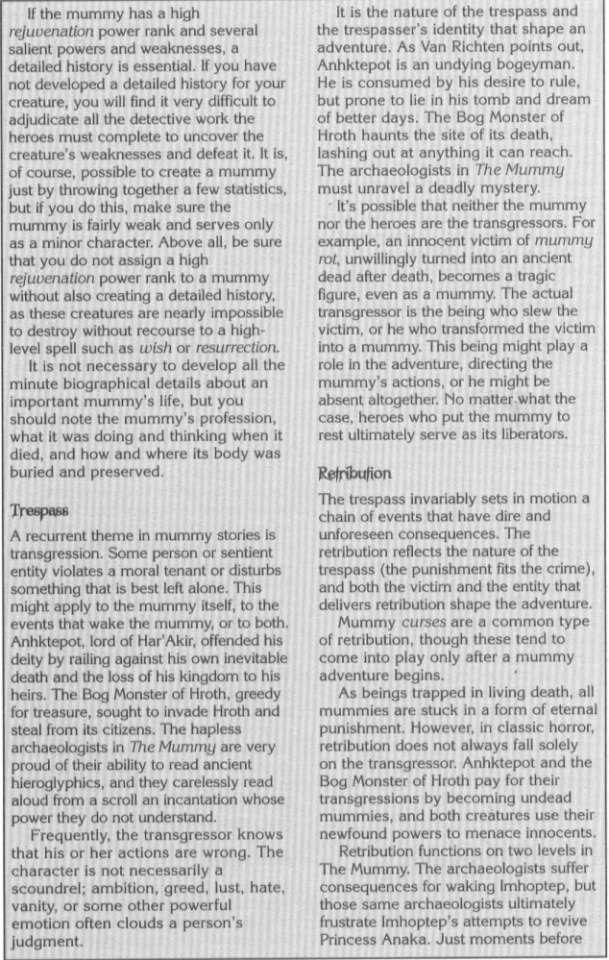
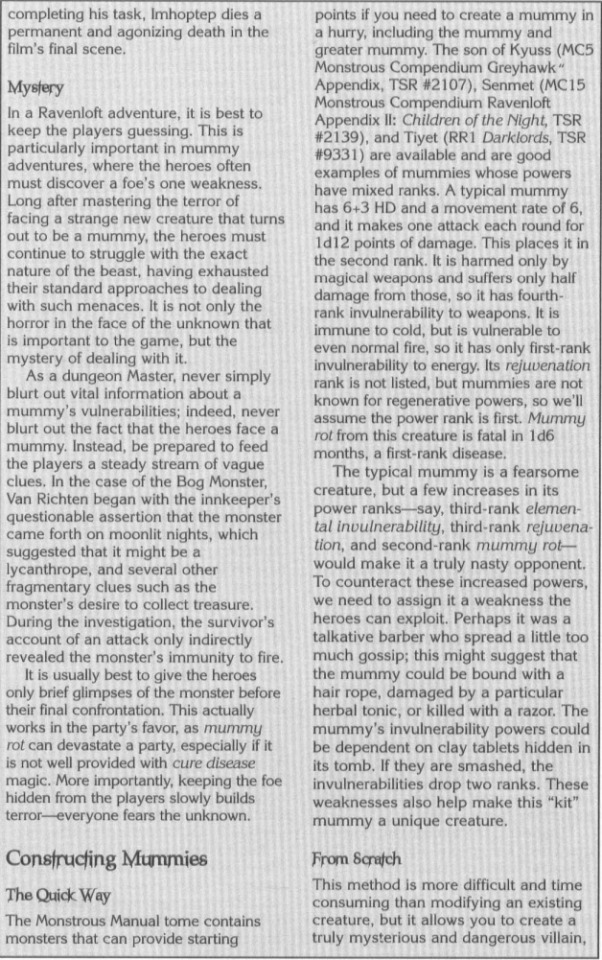
Writing Mummy Adventures
From Dungeons & Dragon’s Van Richten’s Monster Hunter’s Compendium
0 notes
Photo
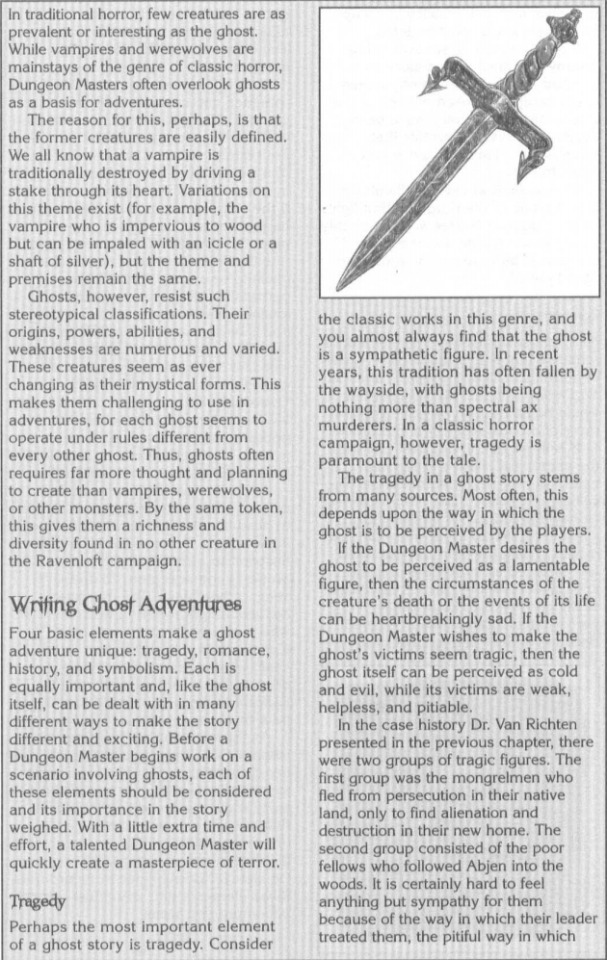
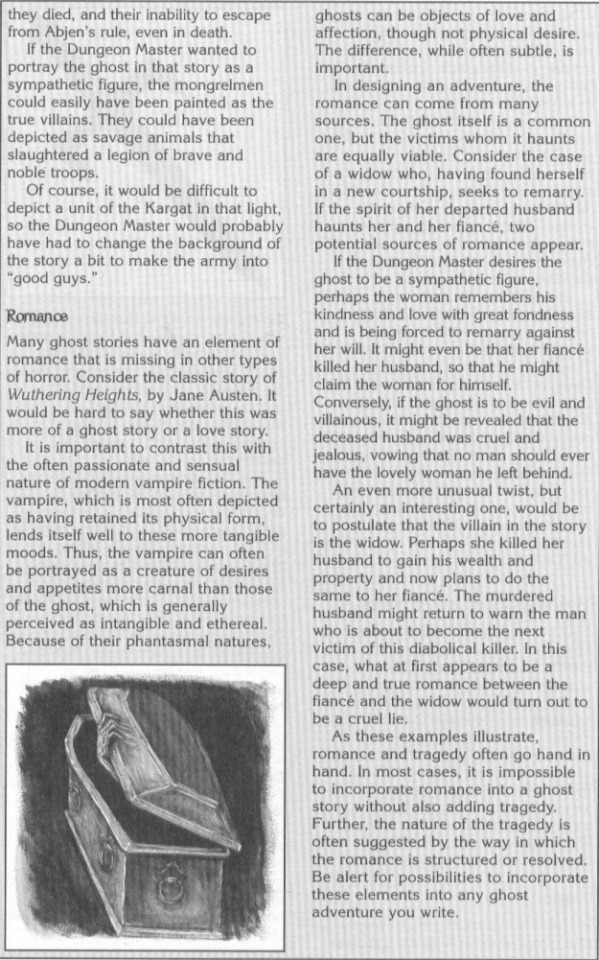

Writing Ghost Stories
From Dungeons & Dragon’s Van Richten’s Monster Hunter’s Compendium
0 notes
Photo
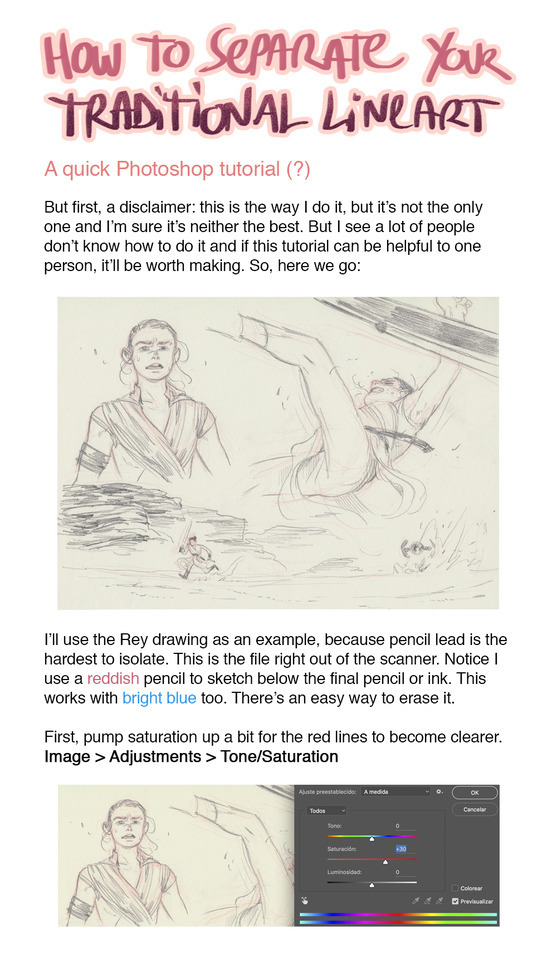
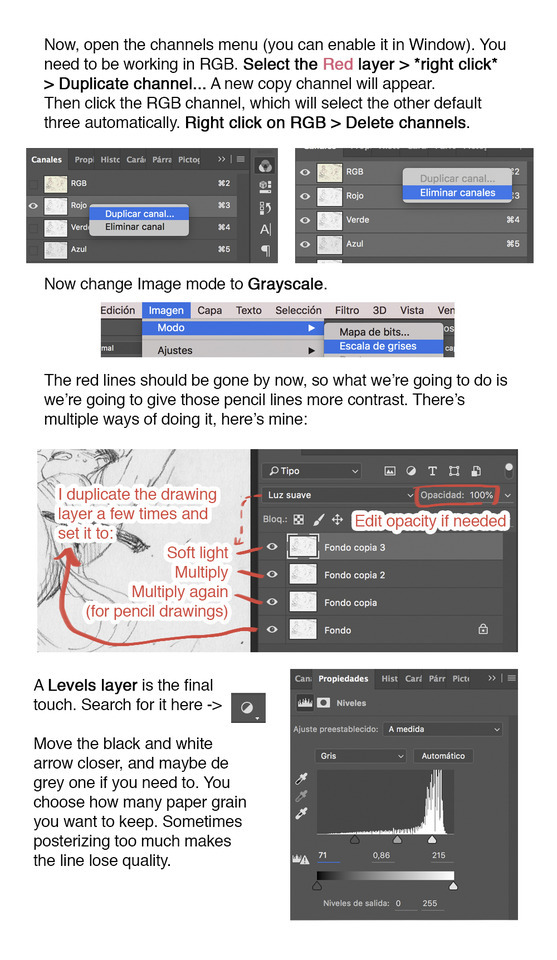

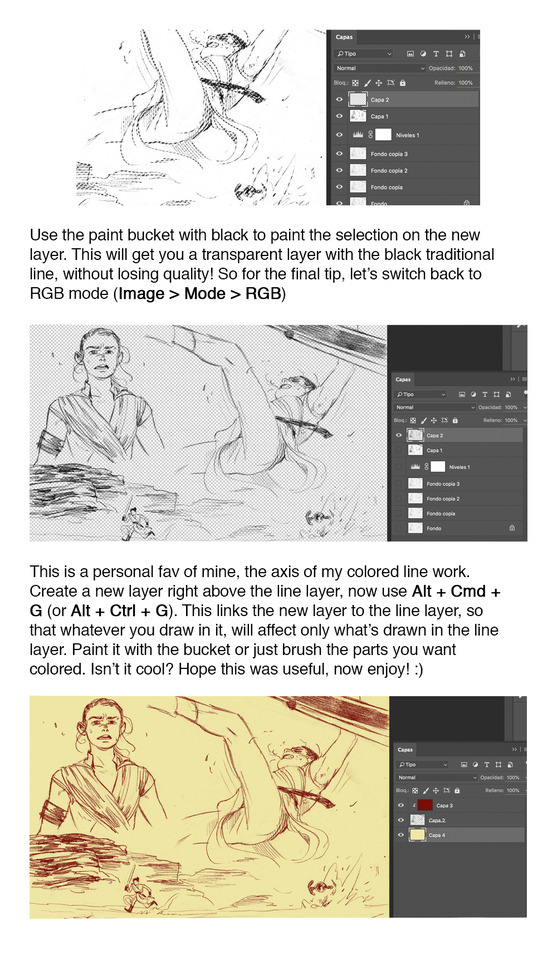
People keep asking about this from time to time, so here is this little tutorial. I explained the best I could :,) Keep in mind this is just one way of doing it, and maybe you can change some of the steps to find one that works better for you. Hope it’s useful to someone out there!
1K notes
·
View notes
Text
Lesson Plans from Schoolism
Gesture Drawing
Lesson 1 - Line of Action
The line of action is the foundation upon which you will build the rest of your drawing. It is analogous to the main idea or thesis in an essay paper. There is always a point to a well-written paper, and the same is true of a well-drawn drawing. For your first assignment, you will be distilling poses down to their bare essence - a single line of action.
Lesson 2 - Shape
Shape will help you determine the overall feel and dynamics of your drawing. It is another form of distillation, and the next step from your line of action. Your assignment this week will be to abstract poses into shapes.
Lesson 3 - Silhouette
Creating a strong silhouette will enhance your drawing's "readability". A strong drawing should be "readable" even when it is completely blacked out. This week, you will be drawing with the intention of creating strong silhouettes.
Lesson 4 - Space
Using space will help give your drawings depth, and make them feel grounded in a physical reality. Spatial depth will add dimension to your work and help pull your viewer into your drawing. For this assignment, you will focus on creating depth and space in your gesture drawings.
Lesson 5 - Exaggeration
Using exaggeration in drawings is analogous to using hyperbole in a rhetorical debate: you're pushing extreme examples in order to effectively communicate your ideas. In gesture drawing, we should aim for communicative accuracy over anatomical accuracy. For this week's assignment, you will focus on pushing and pulling aspects of the pose in order to effectively communicate your ideas.
Lesson 6 - Extrapolation
Extrapolation is the process by which you "read between the lines" and see beyond what is there. Through successful extrapolation, you will SEE a pose of limbs, muscle and bone, but FEEL an idea, emotion, or action. For your assignment, you will extract ideas you see in the pose, and instill them onto unrelated characters and objects.
Lesson 7 - Story
Story is the most important element in all of gesture drawing. All of the earlier topics we covered are meaningless unless they are used in the service of a greater good - telling a story. Your assignment this week will focus on drawing the pose in the context of a story.
Lesson 8 - Final Review
I will review the course topics, talk about how they fit into the final communication of your story, and offer you my final thoughts on gesture drawing and its importance on growing as an artist.
Characters for Animated Film
Lesson 1 - Shape Language
In my first lecture, we will talk about shape language and how it applies to character design. We will examine the silhouettes of iconic cartoon characters and talk about why they read well. We will further discuss the use of shapes in various cultures throughout history, and how shapes affect character.
Lesson 2 - What is Character?
In this class, we will tackle the quintessential question: what is "character"? We will look at the works of more great designers to try to find the answer. This is a class for character design for film and storytelling, not television or illustration; we will talk about what the differences are, look at examples of designs with and without "character", and discuss more about the importance of finding good reference before you even begin to design your characters.
Lesson 3 - Gesture and Mood
In telling an effective story, we need to understand lines of action and how to use them. We will break down shapes and talk about what to look for when drawing from life. I will help you create a clear silhouette and stage your characters so that their moods and gestures read clearly and easily.
Lesson 4 - Exaggeration
Exaggeration is a vital component to character design, but it must not be done at random. In this lesson, we'll examine intelligent and tasteful exaggeration -- how to identify the key defining features of a character and push them. We will also cover the importance of good drawing and staging.
Lesson 5 - Moments
In "Breaking Bad", when Jesse and Mr. White cook together for the first, these respective characters have cinematic moments that add "true" character to their designs. In this lecture, we will discuss how dynamic story moments (body language, acting, staging, emotion, attitude) add "true" character to character designs.
Lesson 6 - Expressions
Good expressive emotion means conveying clearly to your audience what your character is thinking or feeling through their expressions. In this lesson, I will do an expression drawing demo and talk again about the effective use of reference, including using a rough sculpt to help us draw expressions from multiple angles.
Lesson 7 - Caricature
The best caricature artists can often draw a person with a better likeness than taking a photo because they can take character into account. In this lecture, we will talk about how caricature applies to character design, look at examples from great caricature artists, and do a caricature demo.
Lesson 8 - Finishing Touches
Finishing touches are our last opportunity to eliminate generic qualities from our character designs. I will demonstrate how to use texture and value to simplify shapes and enhance visual interest in a character.
Lesson 9 - No Fear!
In my final lecture, I will do demos of characters successfully finished to a clean up. We will talk about overarching issues for character designers: the many ways in which we can finish a design, how to avoid getting stale or bored, how to avoid insecurity and lethargy in your designs, and more.
Expressive Characters
Lesson 1 - Proportions
In lesson one, you'll learn to apply one of the core fundamentals of character design, exaggeration. Exaggeration can be an incredibly useful element in your designs, and helps to communicate what your character is feeling, doing, or help describe their personality. You will gather your own photo reference, define your concept, emphasize the idea, and try to bring to life the idea you want to communicate through exaggeration.
Lesson 2 - Dimensionality
In your second week, you'll work on incorporating the illusion of dimensionality to your characters by using techniques such as perspective, foreshortening, overlap, and much more. 2D shapes often lay the groundwork for any expressive character design, and there are several ways to make your drawings appear more three dimensional, without losing what the initial shape exploration gave you.
Lesson 3 - Angles and Arrow-dynamics
As well as feeling and personality, exaggerating the character's force and movement is very important. In week three you'll learn about the line of action, lines and angle relationships, and arrow dynamics through observing, emphasizing, and again exaggerating the pose.
Lesson 4 - Weight
Giving your designs the feeling of weight and further exaggerating it gives a certain believability to your them. In lesson four you'll learn techniques in which to infuse more weight into your character's poses to create that realistic feeling.
Lesson 5 - Hair and Clothing
Hair and clothing are great ways to let your audience know when and where your characters are from, and help to describe personality and feeling. This lesson goes over creating gesture and form, considering the volume of the body, applying force and gravity to hair and clothing, as well as how different types of materials are affected.
Lesson 6 - Facial Expressions
Maintaining consistency with your characters is crucial, and learning to create a variety of facial expressions that fit into the realm of your character is a big part of this consistency. You'll learn about the volumes of the face, squash and stretch, arrow dynamics as it applies to the face, expressions, and treating the head and jaw and two separate parts.
Lesson 7 - Caricature
In week seven you'll start applying the techniques of caricature to your character designs. You'll start by gathering photo reference, finding the characteristics of the face that stand out, simplifying a few visual elements that best describe the face, exaggerating, and applying those properties to your own character design.
Lesson 8 - Acting
Exaggeration can also be applied to your character's acting in order to bring them to life on the page. To do this, you'll be finding reference of actor's to study body language and how they move and appropriate that knowledge so your character appears to act. This lesson goes over becoming your character, finding the pose, creating thumbnails, how to come up with ideas, and more.
Lesson 9 - Character Relationships
In the final lesson, you'll learn about character relationships, and how introducing one or more characters into the scene affects your initial character design. The techniques you'll learn in this last lesson include contrast (big vs small, thick vs thin, old vs. young), and coming up with character interactions that help support the personalities.
0 notes
Text
Compilation of Character Design Assignments
Twitter: shuppie_
had to design characters from the original star wars trilogy as if it was set in 1980s new york...
Twitter: GhostlyGhosti
I have to make an object character for one of my classes aka make a brave little toaster oc
Twitter: pepperpencil
second character design assignment of the semester! protagonist, comic relief, and antagonist!!!
Twitter: pkaykim
Character assignment to do a design based on a song
Twitter: elekilokal
We're doing an assignment rn where we have to design a character in the style of our favorite artist
Twitter: tornatics
character design assignment for one of my classes where we had to mash an object with an animal
Twitter: themsjolly
A fun assignment were I had to design a new character on a current cartoon show.
Twitter: alexa_doodles
We had to design a super villain for The Incredibles. I was trying to emulate the retro geometric style they used.
Twitter: julie__kwon
class assignment where we had to design characters of a cell, an antibody, a vaccine, germs, and a phagocyte
Twitter: Flannelson
Bill told us to design a Zootopia character that hasn't been designed yet.
0 notes
Text
Character Design Lesson
Assignments I’ve found online:
From Cedric’s Blog-O-Rama
Lesson 1: Fat Joe
You are to design a concept sketch of Fat Joe based on the play, The Long Voyage Home. Take it as far as you like. Description: SCENE—The bar of a low dive on the London water front—a squalid, dingy room dimly lighted by kerosene lamps placed in brackets on the walls At the far end of the bar stands Fat Joe, the proprietor, a gross bulk of a man with an enormous stomach. His face is red and bloated, his little piggish eyes being almost concealed by rolls of fat. The thick fingers of his big hands are loaded with cheap rings and a gold watch chain of cable-like proportions stretches across his checked waistcoat.
Lesson 2: Silhouettes
Our assignment was to take Dr. Jeckyll and Mr. Hyde, and fill a page with little thumbnail silhouettes. We were told to play with shapes, trying to find a simple and clear design for the character. The good thing about doing fast little thumbnails is it forces you to think in broad, general terms and not get hung up on the details. When you are just concerned with the overall shape, your thought process can flow and brainstorm. The goal isn’t to do terrific sketches, its to get a lot of ideas onto the paper so that later you can develop the best ones. It’s a great exercise and I highly recommend it. In the future I hope to make it part of my process when designing characters for clients projects.
Lesson 3: Portrait Study
We were given photos of four different men. First, we had to do a straight-forward sketch of the person, not really pushing the shapes or getting too cartoony. Just do a standard portrait. Then, after finishing the portrait sketch, immediately put it away and get rid of the photo. From memory, draw the person again using three different shapes: a circle, a square, and a triangle.
The goal was not to do a dead-on likeness and squeeze it into the shape, because that would be almost impossible. Rather, we were to take the features that defined that person (i.e. eyes wide apart, big chin, small pointy nose, whatever) and play with those features within the shapes to create three new characters.
Lesson 4: Jekyll and Hyde
Last week we were told to choose one of two stories (Dr. Jeckyll and Mr. Hyde, or Oliver Twist), and start thinking about designs for the main characters. Our first step was to fill up at least one page with thumbnail silhouettes of possible designs, thinking about what we could say about the character with just the overall shape. Stephen then critiqued our thumbnails and told us which ones were the strongest. As the course progresses, we will continue to develop our character(s).
Lesson 5: Hand-y Drawing Exercise
Part 1 was to sketch a page of hands.
Next to the face, the hands are the most expressive part of the body, and therefore one of the most important features in any drawing. Its easy to get lazy with the hands, because they can be so stinkin’ hard to draw. I think there are two reasons so many artists struggle:
1. Hands are incredibly complex. I think there’s something like 27 bones in the hand and 15 joints, not to mention all the little muscles, tendons, etc.
2. Hands are always moving, and they can move a zillion different ways. There is no “standard” hand pose.
Stephen spent a significant portion of his video lecture analyzing the hand and pointing out how to break it down into manageable parts to make it easier to draw. Then he told us to go draw a page of hands, using either our own hands or photos for reference.
Lesson 6: Jekyll and Hyde Clean-Up
Our assignment was to choose one design from our “Jeckyll and Hyde” work and ink it up. Inking is not my strong point, especially digital inking on the Cintiq. The Cintiq is superbly fabulous and awesome….except when it comes to inking. I just can’t seem to get the same line quality that I could on paper, which makes my lines look even more mediocre than they normally would be. Maybe I just need to practice it more.
As part of the class, Stephen gives each student one-on-one feedback on their assignments via internet video. Here’s some pointers he’s given me on my assignments, which I tried to incorporate into this final design:
• Watch out for “parallels” (lines and/or shapes in the design that run parallel to each other).
• Push your shapes more. Use more extreme angles, greater size contrasts, broader curves, etc.
• Work on thinking through the understructure of the drawing (especially in your legs and hands). Don’t just use blobby shapes, make sure there is a real skeleton with real muscles underneath.
• Keep your sizes/proportions consistent (i.e. both hands the same size, both arms the same length, etc.)
• Let your design “breathe”. Pull your arms and legs out and away from the body for clearer poses. Spread out your facial features more (I tend to bunch them up a bit).
Lesson 7: Turnarounds
This week’s assignment was to do rough turnarounds of our character.
In animation, once a character design is approved the next step is to create “turnaround” drawings. The purpose is to make sure the storybaord artists, animators, and/or computer modellers can re-create the character accurately. Turnarounds are a tedious but essential part of any character designer’s job. For major characters, there are generally four to five drawings that need to be done: Front View, 3/4 Front View, Side View, 3/4 Back View, and/or Back View. For minor characters, usually only a Front 3/4 View and a Back 3/4 View are needed.
Turnarounds can be quite challenging. It’s relatively easy to do just one drawing of a character. But drawing the same character from other angles can complicate things. The most common difficulty for the artist is making sure that the character looks appealing and consistent from all angles. Easier said than done.
Turnarounds will also reveal any flaws or weakneses in the design. You may sketch a character that looks great from the side view, but draw him again from the front view and he may suddenly flatten out and get boring.
A good designer must also think about functionality. In animation a character can have crazy proportions, but he/she must still be able to act expressively and perform common tasks. For example, did you know Charlie Brown can only touch his nose if you look at him from the front? If you look at him from the side, his arms are too short to reach around his big head.
The best way to do turnarounds is to start with a 3/4 view and then spin him around in your mind to get the other views.
Lesson 8: Attitudes and Expressions
This week’s lesson was all about model sheets, specifically attitudes and expressions.
A “model sheet” is a page of drawings that animators and storyboard artists will use as a guide when animating a character. A good model sheet will give a sense of both the personality of the character (i.e. how does he react to certain situations?) and the physicality of the character (i.e. how does he walk, move, etc.).
Our assignment was to create a model sheet for our character, consisting of two parts:
1. Six standard expressions (anger, surprise, sadness, happiness, fear, and disgust);
2. Two full-body attitude drawings, which could be whatever we wanted. The only rule was that they give a sense of the character’s personality and/or response to a given situation. I chose to depict Dr. Jeckyll before and after drinking the potion that transforms him into a big, ugly, hulking monster.
Lesson 9: The Importance of Sketchbooks
We had to go to a busy public place and fill a page with observational sketches. The Mall of America is near my house, so I went there to sketch the above page.
I can’t over-emphasize the importance of keeping a daily sketchbook. The only way to get better at drawing is to draw. As Stephen likes to say, “A page a day keeps the competition away”.
A sketchbook isn’t for polished drawings. Rather, it’s a private place where you can stay loose, experiment, stretch yourself, and make mistakes. Lots of them! (Mistakes are the best teachers). If you want to keep growing as an artist, the worst thing you can do is fill your sketchbook with things you already know how to draw.
Going to a busy place to draw real live people is something you should do regularly. (Stephen fills a page every day over his lunch hour). Most people don’t sit still for very long, so it forces you to stay loose, think fast and make bold decisions, which over time will increase your confidence. Don’t sweat the details; focus on the essence of a pose (which can usually be captured in just a few lines). Try to capture the overall physical attitude of the person, which is the foundation that breathes life into a drawing. You can always go back and flesh out the details later.
In his lecture, Stephen talked about what a character designer should focus on as he sketches the people around him (i.e. balance, gesture, line of action, negative space, rhythm, attitude, etc.) He also talked about not just seeing, but studying what you draw. Observe the different ways people walk, talk, and gesture. Notice body types, hairstyles, and clothing choices. Study how fabric clings and hangs around the body, how people position their legs when they sit, how they lean when they carry things, how their posture changes with their attitude (i.e. excited, bored, annoyed, etc.) These are the things that give your drawings personality and character.
Stephen also talked about “frankensteining”, that is, assembling parts of several people into one character. You might start to draw a man reading the paper, but as soon as you rough in his body pose he gets up to leave. Don’t abandon your drawing. Add the profile from another person, maybe the hair from a third person, etc. Frankensteining keeps you from getting frustrted when your models keep moving (or leaving) in mid-drawing, and you might be pleasantly surprised at the new character you’ve created.
The point is that you keep drawing, keep experimenting, keep learning.
Lesson 10: Memory Sketching
“Memory sketching” is an exercise designed to strengthen your observation muscles. It works like this:
Go to a place where there are a lot of people (i.e. a mall, airport, coffee shop, etc.). Choose someone in the crowd to draw. Before you pick up your pencil, spend a few moments studying everything about them (their clothing, their posture, their face, the way they do their hair, their height….everything). Don’t look at them for longer than one or two minutes. If they haven’t walked away by then, turn and face the other direction.
Now, close your eyes and continue to study them in your mind. Analyze as much as you can remember. What was that hairstyle again? How far apart were the eyes? What color were the shoes? What was with that funny walk? (Don’t peek. It will completely destroy the purpose of the exercise.)
Finally, when you’ve got your target burned into your brain and you’ve thought everything through, THEN pick up your pencil to draw. And again, no peeking.
Lesson 11: Fat Joe
Our very first assignment was to design a character based on Fat Joe from the play The Long Voyage Home. We were given this description:
SCENE—The bar of a low dive on the London water front—a squalid, dingy room dimly lighted by kerosene lamps placed in brackets on the walls At the far end of the bar stands Fat Joe, the proprietor, a gross bulk of a man with an enormous stomach. His face is red and bloated, his little piggish eyes being almost concealed by rolls of fat. The thick fingers of his big hands are loaded with cheap rings and a gold watch chain of cable-like proportions stretches across his checked waistcoat.
Now, nine weeks later, we were asked to return to that assignment and do it again, this time with clean-up and color. Since this was our last class, it was a chance to apply everything we’d learned.
0 notes
Text
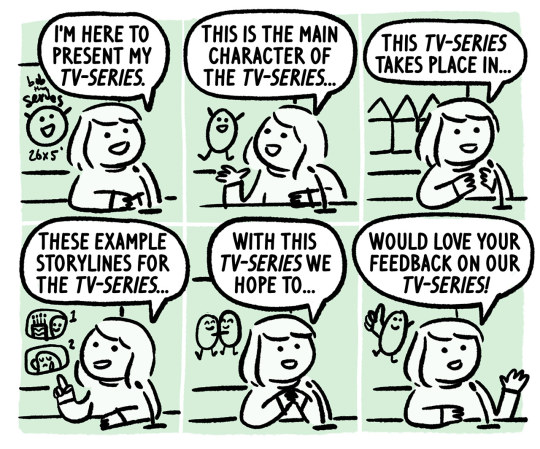
Cartoon Brew’s How to Pitch and Sell an Animated Series
PART 1: SETTING UP
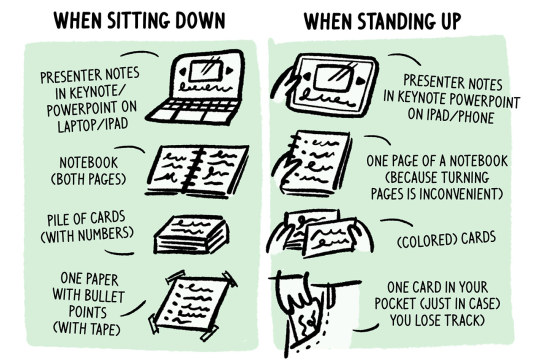
There are many different set-ups possible for your pitch. Figure out what works for you:
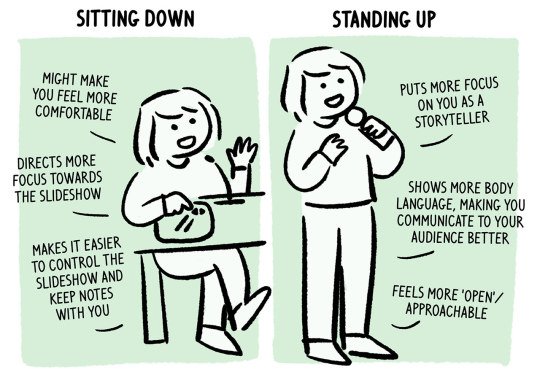
Having notes with you can help with jitters. There are several elegant ways to carry notes with you:
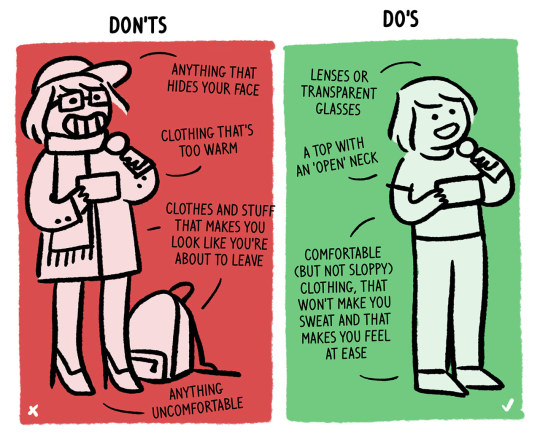
Pick your outfit
There are some basic do’s and don’ts for your outfit:
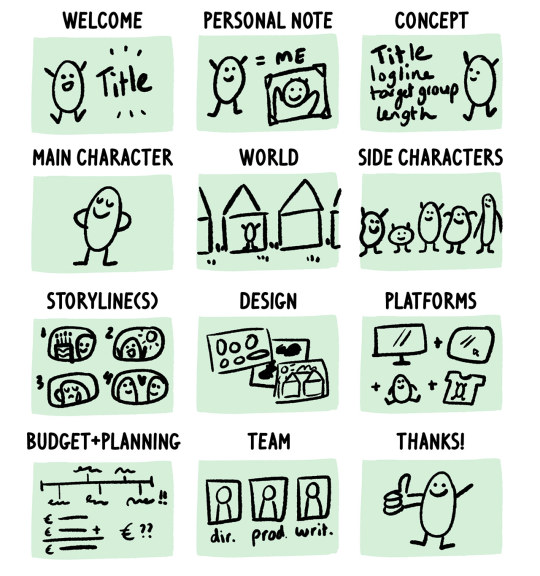
Create a rough index
There are some essential elements for a pitch. Here’s a basic index to work from:
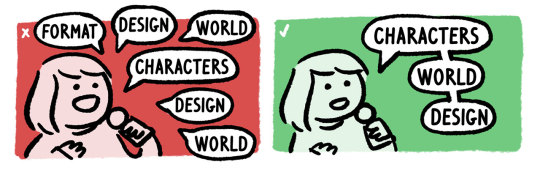
Use little to no text on your slides
Don’t put much (or any) text on the slides. The audience can not properly listen and read simultaneously.
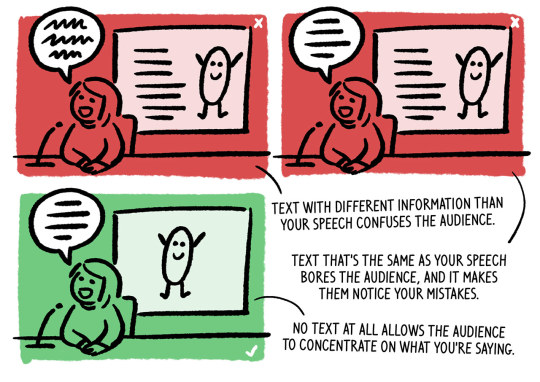
Use little to no lists/bullet points either
Using lists/bullet points often takes the soul/rhythm out of your pitch. Don’t use them to cram a story into something static.
Use lists/bullet points only to sum up things where appropriate, such as a few episode loglines, a budget, or a character’s personality traits – in other words, things that naturally lend themselves to being lists.
Design your slides (nicely)
The graphic design of your slides should be on point (or at least not horrible). There’s no excuses! We’re in a visual industry after all.
PART 2: BEING CLEAR
Keep it brief
Make your pitch as compact as possible. If you try to communicate too much at once, you’ll end up communicating nothing at all.
Stick to the program
When you have a lot to say about your project, pitching can easily become messy. Make sure that you stick to the program and are not all over the place.
If you pitch with several people, think about ways to divide the talking, like bouncing between each chapter.
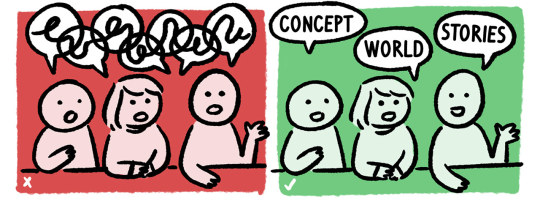
Use your slides to communicate
Make your slides support what you say. Thoughtful design choices can help the audience absorb information more easily.
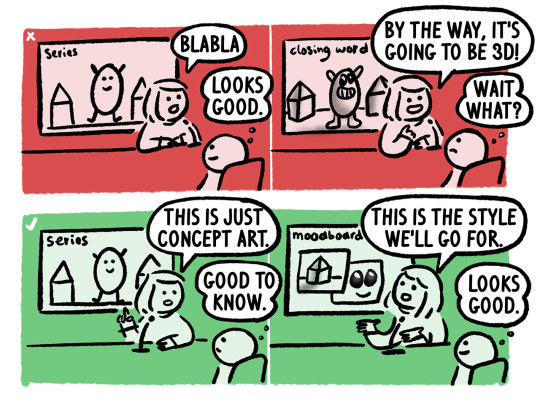
Explain if something is temp
Mention it when something you show is not indicative of the final product, like the visual style. Then explain what it is going to be like.
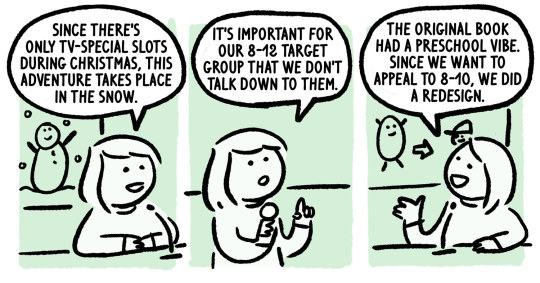
Make your designs fit your target group
Even if your visual materials are just temporary sketches, make sure they fit your target group.

Find the right tone
The tone of your pitch should correctly reflect the tone of your project.
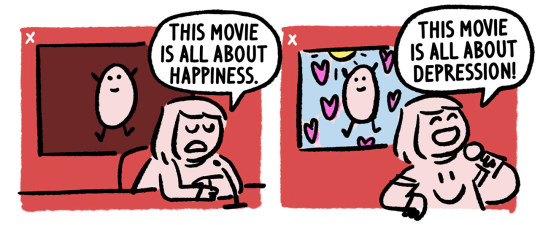
If you’re pitching a dark/gloomy/serious project, then lead towards the happier/lovely/beautiful side of it. Otherwise it can scare off the audience, especially when you’re doing a project for kids.
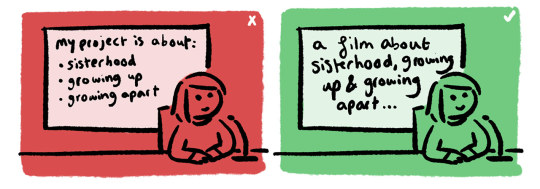
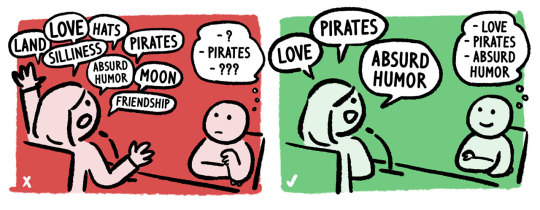
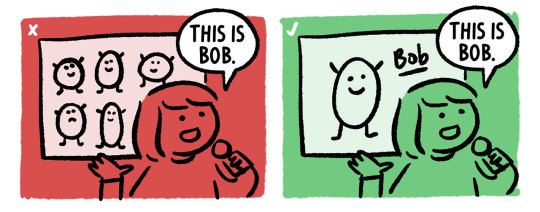
Choose your words carefully
The way you describe your project sets expectations, so choose your words carefully. Be especially careful with generic, subjective words (‘funny’ for example). Rather, use very specific words.

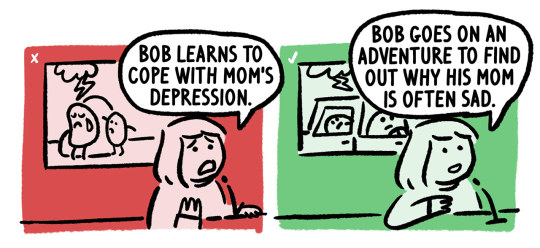
Share the ending
Tell your audience how your story ends. Keeping the ending a secret is not cool – it’s just inconvenient.

Keep repeating the format
Keep mentioning the format, at every chance you get. People tend to forget easily.
PART 3: BUILDING TRUST
Pitch with your team
While creators often pitch solo at American studios, at European pitching events it’s common practice to pitch as a team. It helps you with jitters, and moreover it makes your project feel more robust.
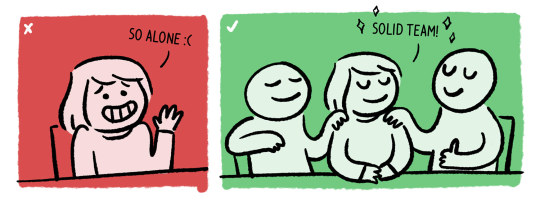
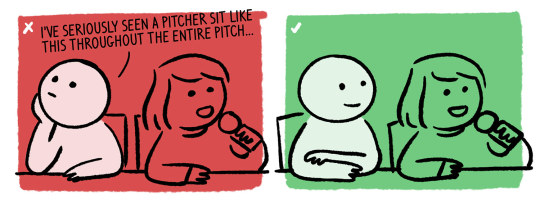
When you pitch with several people, make sure all of you look interested while the other person talks.
Mention stamps of approval
Be sure to mention anything that shows other parties have already put trust in you or your project.
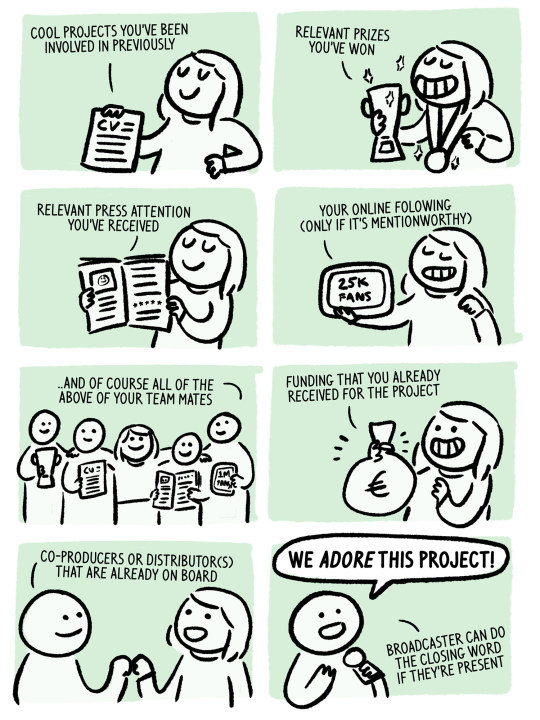
Flaunt your knowledge
Know what works for your market and target group, and flaunt that knowledge every chance you get.
Mention your why
Be sure to include a personal note in your pitch. It helps the audience understand why you want to make this project happen, and to be inspired by your enthusiasm.

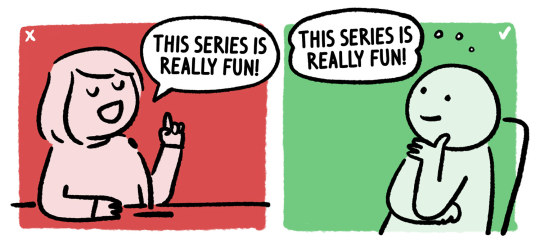
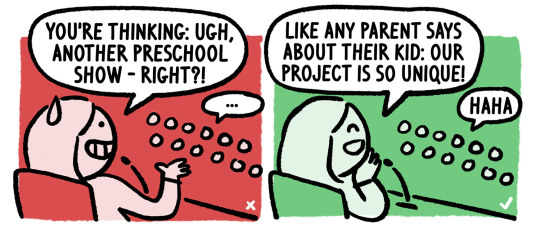
Don’t say it; imply it
Instead of you saying how fun/beautiful/special your project is, you should give your audience reasons to think it. Your project’s fun/beauty/uniqueness should be obvious from the content in your pitch.
Choose your jokes wisely
Including jokes in your pitch is a great way to lighten the mood and make yourself memorable. Choose your jokes carefully though; if you’re not 100 percent sure you can pull off the right timing and tone of voice, then don’t include it. Be especially careful with cheeky jokes that could come across as simply sarcastic/mean/cocky.
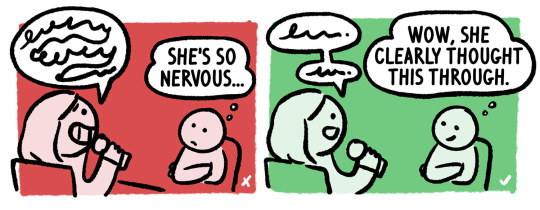
Remember to breathe
Don’t be afraid to pause and breathe every once in a while. You’ll become more calm, and it actually makes you look thoughtful.
PART 4: EARNING BONUS POINTS
Give a taste of your project
The absolute best thing is for your audience to feel like they’re watching an episode or scene for a while. There are endless opportunities to achieve this feeling.
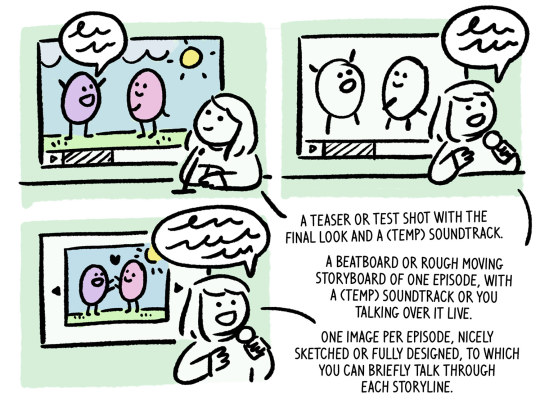
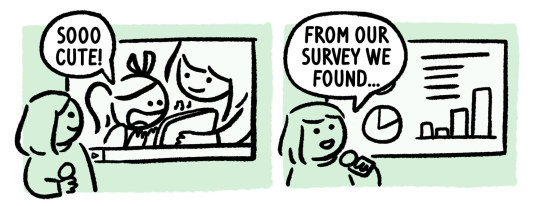
Test with your target audience
Do a test screening with your target audience, and share the reactions with your pitch audience. A quote from your niece is already a good start, but of course the bigger the test audience, the more convincing you’ll sound.
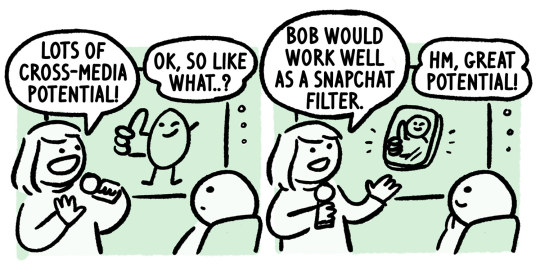
Mention cross-media potential
Cross-media opportunities are becoming increasingly important in the market. If your project has those opportunities, be sure to mention them. If you can’t name anything specific though, it’s better to not mention it at all.
Be remembered through a prop
Sporting a funny prop makes you easy to recognize. Don’t be afraid to get creative – just don’t overdo it to the point where they start confusing you for Carrot Top…

MISC
A quote from Mark Mayerson on the pitching process:
“Unfortunately, a pitch is a poor substitute for the finished product for a variety of reasons. The ability to pitch is a wholly separate skill from the creation of ideas. Extraverts have an advantage in pitching over introverts, but either type of person can have good ideas. Furthermore, there are so many variables between an idea and the finished product that a great idea can result in disappointment. Too much depends on the budget, the schedule, the crew, input from investors and chance. We are all familiar with movies that look like they will be great before they’re released but end up as failures.
There is another odd aspect to pitching. The person with the ideas doesn’t get paid to pitch, but the person without ideas gets paid to listen. Yet without people willing to pitch for free, the listener has no job. It’s sort of backwards.
Often, the people taking pitches have no history of creating anything. They have never written, drawn, performed or directed anything for an audience, yet they are the ones sitting in judgment of someone who most likely has. If the people taking pitches were genuinely creative, they would be creating their own projects for the company and would not have to listen to ideas from anyone else.”
0 notes
Note
Any writers room/storyboard meeting activities to get the creative juices flowing?
Exquisite corpse-ing an outline is fun (writing a beginning, passing it onto someone to write a middle, and then passing it onto someone else to write an ending) and usually results in super wild ideas that no one person could’ve come up with. It’s a good opportunity to get everyone’s input on one central idea!Often just suggesting ideas based on your own personal tastes also works great. Not everyone on a crew has the same sensibilities as you, so you could be thinking something that the rest of your team wouldn’t even have thought about.
25 notes
·
View notes
Text
How TV Cartoons Are Made - A (Mostly) Simplified Guide
When I was in school and wanted to work in animation, there was very little information about how cartoons are actually made. Even my professors at college knew very little about the industry as it is today. I’m sure it would’ve been better to study somewhere in California (like CalArts) to be better informed about this stuff, but I didn’t have that opportunity.
Nowadays, many kids in school have a dream career that they don’t really know much about. There’s a lot of missing bits of information and a lot of straight up lies that get circulated as fact as people try to scramble to put the pieces together on how cartoons for television are actually made.
I’ve been storyboarding for television for a while now, and there still aren’t clear resources for those wanting to get into the industry. I wanted to make the basics available to everyone, so here’s a quick rundown through the TV pipeline. Please note: all studios and productions are different. Even cartoons made within the same studio could have wildly different production guidelines. This is not a concrete explanation of how every cartoon is made; this is simply a generalized look at the “typical” television pipeline.
**DISCLAIMER** All images in this post have been sourced from blogs, twitters, scribd and flickr pages are publicly available, and no internal studio materials have been used that have not been already published publicly online. This post is influenced heavily by my own individual experience, as well as friends’.
With that said, this might be a lengthy read, so let’s go!
Keep reading
19K notes
·
View notes
Photo

I made a little tutorial for you, many asked me for the wind effect, so there you go! I hope it will help many of you considering those effects can be tricky. Details also on Patreon too, you can support me there!
Good luck and hope it will help you all!
39K notes
·
View notes
Photo
Hey folks! Paul here, with (for now) the final Tutor Tuesday PDF…
TUTOR TUESDAY COLLECTION: Animal Features!
Here’s the full list of all 15 collections:
TutorTues_PDF_01_Fundamentals1.pdf
TutorTues_PDF_02_Fundamentals2.pdf
TutorTues_PDF_03_Environments.pdf
TutorTues_PDF_04_Scenery_&_Props.pdf
TutorTues_PDF_05_Positivity.pdf
TutorTues_PDF_06_Color_Theory.pdf
TutorTues_PDF_07_Digital_Color.pdf
TutorTues_PDF_08_Digital_Tools.pdf
TutorTues_PDF_09_Human_Anatomy.pdf
TutorTues_PDF_10_Specific_Anatomy.pdf
TutorTues_PDF_11_Facial_Features.pdf
TutorTues_PDF_12_Faces_&_Expressions.pdf
TutorTues_PDF_13_Hair.pdf
TutorTues_PDF_14_Clothing_&_Accessories.pdf
TutorTues_PDF_15_Animal_Features
This is the last collection for now, but that doesn’t mean it’s the end of Tutor Tuesday. Meg and I both want to do more tutorials, but for now we need to focus on the upcoming book launch. Stay tuned for more news!
Feedback’s welcome as always, and Meg and I appreciate for your support! Thanks,
Paul
657 notes
·
View notes
Text
Tabata fitcross storyboard/writing training
I would like to share with you my last storyboard method I have founded on my french forum.
I m still learning myself, I do not pretend this is the final right truth right method, but I see too much bullshits on the internet about storyboarding so why not telling my own bullshits and maybe it can help some people :)
This is a method in a wonderful world were you start from a good script, which is very rare in real life. Let’s say, use this method on your own script first. But in real productions, not everything below is really possible..
Anyway…
it is a current work in progress method. it evolve all the time because I mistake and learn a lot all the time.. everybody has a different, you must find your own. These are tools, not rules. At the end I have added some cool exercises to train if you want.
1. Reading the script carefully. Trying to understand what is really going on behind the dialogs. What do characters really want, what do they really get at the end of the sequence?
2. Writing down beside the script, what is the most interesting point of view in the sequence.. it can jump from a character to another, depending of the dial. the most interesting point of view to show can change at any second, any dialog in the sequence. please refer to my article about the movie notorious where i analyze specificly this point.
3. Do not try to illustrate the script but try to improve it. Describe the psychology of the characters in the sequence. everything in storytelling, is starting from the characters. ask yourself what is the intention of this dialog, and ask yourself how to show it in the most interesting way to show it.How to create life from the script. How to create sequence where character really have a life and not just illustrate the sequence. In general a good tips would be to add a strong context in the sequence if there is not. Be specific and concret in your description of this context. So it will be credible.
example ; 2 guys talk to each others about dealing something, selling stuff, but for some reason you know they hate each other. the dialog will be normal but how will you show they hate each others? that’s your job. that is not explained in the script. you must think about it and write it down. And then you can add a context. Like they are in the subway or they are walking in a corridor in an airport before getting a flight. Of course you can context randomly, it depends on the whole movie you are doing, but try to discuss with the head of story if the context is not clear, to add a specific one eventually.
Use your own relationships to imagine the sequence, mix with the characters in the script your own relationships or the relationship you noticed in your life experience, with people you know. Don’t be explicit of course but the more your use your own experience about people who really exist, the more you will be credible in the sequence you will storyboard.
Also use your own personal souvenirs, to create concistant sequences, with concrete details and credible moment of life.
4. Think the sequence without any camera first . If it’s useful, don’t hesitate to draw a map of the sequence, about the background, create the background and in a narrative way please, and set up where the character are and where they walk why they walk there, what they are doing in the sequence. because characters are not only saying the dialogs, they live for real in the sequence.. without thinking about any camera, think in a theater way. think scenography/stagging/blocking. think from the character ; if there is a bad guy, how he is sitting, moving, walking, behaving with other guys. is he dominating? afraid? whatever. if you can not imagine him in one picture in your head, that means you are not ready to storyboard. to learn more about scenography go to see theatre play and watch “who’s afraid of Virginia Woolf” and read this in priority https://www.goodreads.com/book/show/371193.Lessons_With_Eisenstein
- Before drawing reminding that cinematography is a langage, words and grammar, that we can call “tools” and we must use all of the tools we can and not only a few, in order to write a rich meaningful story, there is visual tools like camera moves, background design, actors actings, special effects, colors, tones, shades, natural elements like rain or wind or whatever, there is also the no moves at all , the rythm of the shots. There is also auditives tools : sounds in the cinema : the sound design of what is happening in the movie, the choose to make them noisy or not, the choose to put sounds who are not show on the screen, there is the score, there is the voices, the nuances of the voice and the tone of the voice, the silence also is a tool. The best way to learn about it is to watch a ton on movies.
Never forget you must let the characters live their life. Follow who they are. Make them tell what they have to tell. So they will be concistants.Put yourself in their head, constantly. If you don’t see the character that means he is not developped enough yet so find something interesting in him, tell yourself his story. Then come back on your sequence.
You can only create emotion if it is a genuine one. So you really have to commit into the sequence, to visualize it in your head before drawing, to imagine if it works in real life, with real people. If not you will redo cliches. This is very very important and very hard to do.
5. Draw thumbnails very quick on a notebook. on paper. vertical storyboard, annotation beside, redo them as much as you need, keep it very very rough. imagine the intention of the shot but not necessary do it very specifically.
- Do the thumbnails in that way ; one shot = one panel. 3 panels if it is a long shot with important acting. do not develop animation, you are not an animator and yes it is fancy and trendy but it is also it is useless to do animation in storyboards.
- If you can not sell your shot in one panel, if you can not sell your posing in one panel, that means it is not well thought. it is not me who say that but brad bird.
You draw and decide the composition for the last frame of the shot. Not the first. Try to find clarity, we need to understand your shot in one frame.
- Ask yourself what and why is this shot you are doing? a close up? if close up, why? what do you want to show by it? the next shot is a wild shot? why? can you or can not you fusion the 2 shot together? why?I mean, what is your point of view? why and when to put a neutral point of view and when to do a character’s point of view? To answer these questions, you really must understand what is the intention in this sequence, what is the subtext of the sequence, what is really going on, what are the journey and plot of each character in this sequence. Every sequence has to have a meaning in the whole story, to move on the story. If you don’t feel so, find it, ask your head of story or if it’s your own script, ask yourself what’s the purpose of this sequence. You can not save really a sequence who has no purpose unless you go off from it.
- All of these questions can be answer only if you watch a ton of movies , and not useless tv show. I m talking about real masterpieces cinematographic movies. so educate your cinematographic language before anything else by watching movies.
To improve a lot your storyboard, try to ask yourself about every information you want to tell in every shots, how to reveal them in the most entertaining way. Study Brad Bird ‘s movies or Hitchcock movies or David Lean movies in that purpose.
- All of these questions can be answers if you have the right intention that I suggested you to get before drawing. what is the point of view is the most important. it will lead you to what do you want to show to the audience. storyboarding is about telling the best point of view at every moments of the sequence you are doing.
6. I re draw many many pass of my thumbnails. I do maybe 5 pass in total or more if need. All the time, rewatch your sequence, repitch it to your self, loudly, try to be your own audience. I think a lot and draw very limited. black and white no fancy brush. So I can add or remove very easly pannels.
7. I redraw everything on computer then, and pre-layout everything. I m aware it is a slow method but it oblige me to think more everypass but my goal is to think without drawing and to draw directly in photoshop the right pannel of course.
- By pre-layouting I mean I draw very carefully the characters in the space and again, when I do that I m still at one pannel a shot. So I can structure very carefully the composition, the scenography , the stagging. Of course if the lighting is a storytelling tool in a shot I draw the lighting.
8. I developp my shots only after the first review with the Head of Story and the director. In order to save mine and their energy. some notes I ve took :
- By developping the shots I mean being careful with the transitions. it must be motivated by something.
- Ask yourself when to show the information and how to show it. How to reveal the info is the key. You can learn that only by watching a ton of great movies.
- Be very careful with the space of the sequence. Having a great sense of the space of the sequence is the key to move the camera in the right way.
Avoid the cut as much as possible. Always asking myself if the 2 shots could be better in one?
Rythm : slow shot and quick shot. wild and close up shot. the rythm is visual in cinema and not only about music. Think like an editor, watch video about editing, you must understand your pannels in a video mode, not illustration. Especially if you are coming from comicbook like me…
180 degree is a TOOL not a RULE. If need, just forget about it. The most important is to not loose your audience. Try to make the audience look at the same area from the last frame of your shot to the next one. That;s the key especially if you are in a fast editing mode. like fights.
BASICS EXERCISES :
1. First watch 200 movies a year, read books, History, go to theatre, travel, study anything but cinema. oblige yourself to discover new movie, any kind, any country, any period, in any context, even 30 minutes of a movie one day and the rest the morning after. Just dive into cinema and not tv show, not pure animation. I love tv show I love manga but storyboarding is about making movie. Animation is cinema. If you watch Miyazaki movie you will just be limited because this guys has watch a ton of classic movies, and read a ton of books. Same for Spielberg, I love spielberg but how can you understand this great artist if you don’t study the same things he studied? Plus cinema is about the meaning first and then the form. If we do not educate ourselves , we can not tell anything interesting, no matter what we are talented.
2. Then read some books about scenario because you must understand some tools about the langage of scenario and scenography. My perosnal reference but there is many other great of course are Story from Mc Kee and Lesson of cinema by Eisenstein . for me they are basics, efficient.
3. Analyze a lot of movies like 10 or 12 a year like I did here . It helped me a lot believe me.
I recommand to study movies from Hitchcock, like Notorious, Vertigo, The Lodger, Stangers in a train , well, every of them… Also David Lean’s movies (brief encounter, Hobson’s choice, lawrence of arabia), also Jim Jarmush ‘s Strangers in paradise, Kieslowsky ‘ 3 colors blue and Dekalog, also every Kurosawa especially Rashomon, Bad Sleep well, Yojimbo, seven samourai, akahige) Every Kubrick, Spielberg (Munich, Shindler’s list, Indiana Jones, Jaws, E.T., Who’s afraid fo Virginia Woolf, The conformist, all that Jazz, Potemkin Battleship, Grapes of Wrath, Hud, Ben Hur, Midnight Cowboy, Amadeus …….
4. Having good skills in drawing facial acting, posing, but very important, pushing skills in layout : drawing characterss in space is the most important. having a great sense of perspective, lense, space is essential. So training in layout is a great great idea.
Don’t be lazy about learning cinematography or if you are, don’t pretend it is good enough.. don’t be self satisfied to draw funny cartoon. or if you are, that’s allright but don’t pretend you are doing cinema and you are humble. Cartoon and cinema are not the same level of standards. Learning the cinematography of japanese anime is a great essential key but not a goal, not enough, it is nothing compare to live action cinema. If you want to stay on league 3, that;s totally fine, but don’t pretend you are as good as league 1 please. I m still learning a lot everyday, I am not at all satisfied of my own level believe me. But I improve all the time because the more I learn about storytelling, the more I know that I know nothing. Watching a ton of old movies is the key, learning from the best directors is the key (Hitchcock, Kubrick, Lean, Spielberg, Kieslowsky, Wrong Kar Wai, Kurosawa..) . Cinema must be your hardcore drug addiction.
cool training exercise :
Introduction of a character.
3 weeks. 10h a day, 6 days per week.
Analyze, writing, storyboard, 25 shots maximum by sequence.
- First week : study 5 introduction of character in your favorite movies. Good or devil character. make the list of what is going on in the sequence : What his clothes tell about him. What about his physical acting? How he react in front of a difficult situation? How the others character behave and react from seeing or interracting with him?
Introduction fo character I recommand to study :
- Hud in the movie named HUD :)
- Shindler list (Shindler, the nazi chef too eventually)
- All that Jazz (the main character)
- Indiana Jones in the first one
- Terminator 2 (terminator, Sarah Connor, t300)
- Amadeus (Salieri)
- Midnight Cowboy (the heros and his budy Dustin Hoffman)
- Silence of the lambs ( Claris)
Don’t analyze the sequence like describing what you see, but try to understand what are the tools used in this sequence to tell the story. In other words, it is like telling the ingredients in the cake and not describing the appearance of the cake.Open the body. don’t look at the body.
By example : Pirat of Carabean : Jack Sparrow is proud of his shity boat falling appart into the sea, act like a captain no matter what, never panic, never feel ashamed, other character are surprised and don’t know what to say. He is wearing old pirat clothes, extravert style, . All of this details introduce an extravert guys, who does not care about what people think about him, who is free and confortable with himself no matter what. Every elements are used to introduce him. His behaviour from a difficult situation, the behavious of the others character seeing him, his clothes, his environment, his acting…
Two last weeks : storyboarding: only prelayout thubnails, no clean. Do two storyboard. one about the intro of a protagonist, one about the intro of an antagonist of a movie. design them draftly. One of the intro of the character must be made without the character itself at the beginning. like people are talking about him, or we can see news paper whatever. but the guy must appear at the end of the sequence. Find an interesting context for these intro. How a character react in a certain context is a way to introduce him. How he evolve with others is a context. How he looks like how he behave, his accessories, his hair, his clothes is a context too of course.
Another cool training exercise :
during 2 or 3 weeks: Imagin a sequence between two characters who meet after 6 month of not seeing each others. They used to love each other but did not talk about it 6 month ago. They missed the other. In the current time the meet again, put them in a context where they can not talk really deeply, only small talk, bullshit dialogs, like on of the other is a seller in a store (coffee shop), or they meet in a train station, or they meet in a loud big party with a ton of other people, or they meet while they both have a new girlfriend boyfriend, or only one of them has got one etc. So play with the bullshit dialogs, and show the subtext of this relationship, the reality of it, through the eyes , the tiny settle facial expressions. At the end they split again, but you must show their mixed feeling. Through their eyes, or through an action they do, through an iconic tool, a color, anything you want who can be a good symbol.
You can not do that kind of exercise if you don;t watch a ton of movie and study them first. I really do not recommand to do them without spendind a lot of time to study movies. I recommand to study movie full time during 1 month minimum. I suggest to read my study of Notorious.
Another cool exercise:
A man surviving in the hostile nature during 3 days. No dialogs at all. It can be a airplane crash, or he is lost any reasons. Ho he survive, show his life. The cold, the warm , the starving, how he gets the food but more than that, show his journey. What is his story. Why he is here, what does he miss? Is he lonely? is he afraid? is he focus on surviving? strong or weak? Tell the story you want but show something real.
youtube
360 notes
·
View notes