
Don't wanna be here? Send us removal request.
Statistics
We looked inside some of the posts by tutosandref and here's what we found interesting.
Average Info
Notes Per Post
541K
Likes Per Post
321K
Reblog Per Post
220K
Reply Per Post
98
Time Between Posts
1 month
Number of Posts By Type
Note
2
Photo
14
Text
1
Last Seen Tumblr Blogs


Fun Fact
Tumblr Inc. is using 66 technologies for its website.
Note
hello^^ i was wondering if you have any tips on drawing hair? i love your art style and you're always so creative with ideas!
Thank you♡
Sure , I’m going to try to make a hair tutorial and give you some tips ^-^
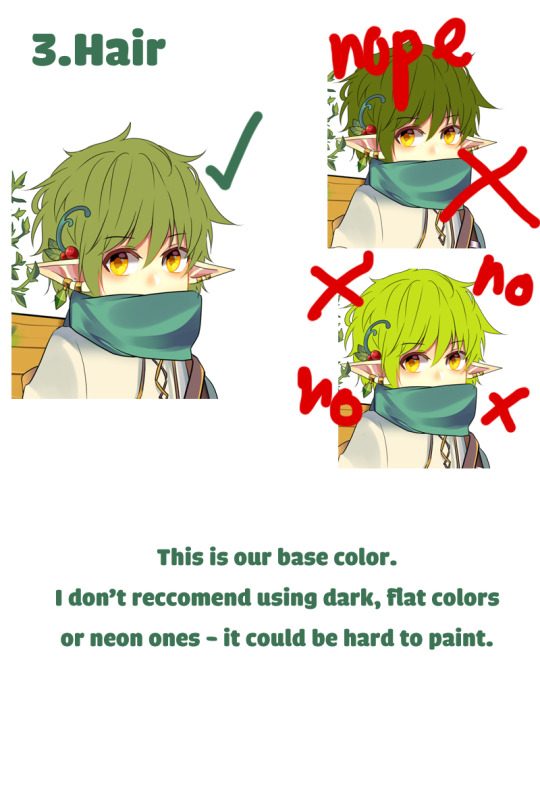
Hair tutorial


big size of both pics here
This time I take colours from ref pic. The most dark and the most light and then medium ones. I chose a “base colour”, a medium tone and I cover the surface but not until the “margin” (1)

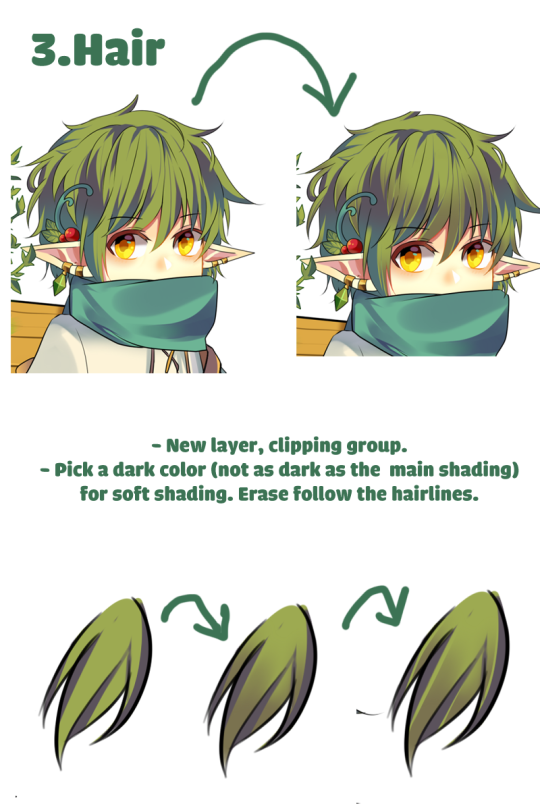
Then with the same colour and little size, I draw little lines arround where the hair ends, making the hair final form (2) I add dark colours but with a bigger brush and paint the roots (2-3) then a lighter colours (4-5-6) with a brush a bit smaller than before, and I start making more lines intensifying the colour (7-8) if the lines are too strong can blend a bit /not with blur tool ! using same colour but bigger size/ (9) and I keep adding ligh colour and make the highligh more strong (10-11) I continue mixing small lines with more bigger ones selecting diferent colours of the hair until I like the result (is a bit weird to explain. Don’t worry if it takes a mount of time, because actually does) (12-13-14) I prefer make this unperfect effect, but is optional. I draw random tiny lines and then I connect them to the rest of hair.
All this with 60-70% opacity exept at first (1) when I made the big colour area, in 100%
*the blue numbers in the hair pic��process are the colours I added in every step*
*some finished hair*


Some tips :

big size here
About brushes and how to use them, I don’t recomend you a strong round brush without opacity control (like first). When I draw hair I always have this option activated (the green circle) and most of times I decrease the opacity to 60-80 too. Also I like to use a soft-texturized brush (3) and then when I make the details-little lines I change to a hard brush (2) but with presure control.
The last thing I show in this pic, is how can make a brush more adaptable to presure (the brush is a basic hard one).
*the numbers are for identify the kind of brush *


About colours. I recommend you change a bit the tone (like in the pic of color pickers). I mean, if you want brown hair don’t select the light, medium and dark from the same exactly tone, move it a bit. This can add to the hair the effect of more natual. Also as in the other pic, I don’t recomend you use 100% black (except if it’s so dark and contrasted) for dark hair or black. If you try to add a bit of colour can make it look more real. If you want black hair, I recommend you more a blue subtone but also depends of the light etc.
Also is so important know where the point of light comes. The effect depends amount of the kind of light. Also ain’t the same wet hair than dry.
One more thing , always follow the direction of hair.
Probably I’m forgeting things, but hope can help (plus some of you also asked for a tutorial since time ago too :3)
558 notes
·
View notes
Photo

A lot of my friends asking me how to color hair, so I made this little tutorial. This is basically how i color hair. Hope this helps~ owo
111 notes
·
View notes
Note
How do you draw hair? And have you practice alot? You draw amazing😍
Hey!
Sorry I took so long to respond, but I included this short hair tutorial on how I tend to approach it. I’m an illustration student so I have no choice but to practice since most of my time is spent drawing. But I still don’t draw as much as I would like to. I get really lazy sometimes lol.
Also: THANK YOU!
Hearing you say that means a lot to me. More than you can probably know. Hope this helps!
~Elle


98 notes
·
View notes
Photo


’What is hair and how i can render it?’
I got this question and I really wanted to show on very simple examples how to render hair. Because it really is… simple! Following this guide you will be able to paint hair in few minutes.
This is called the ribbon technique.
It is used by many artists out there. I just wanted to show you a couple of examples. As you can see I picked Adam Hughes and J. C. Leyendecker. Look at it and see how they paint the hair. It doesn’t look like a mop. It looks more like big, overlapping shapes organized in some fashion.
Try to imagine a string of hair like a ribbon. Ribbon symbolize a large portion of hair. Don’t focus on every single hair string, instead of this imagine it as bigger shape. It will catch light in highest point and it will have core shadows.
Establish where light is hitting the hair and where it turns dark. Start with big shapes. big brushes to get the lights and volumes right. Then You can go into details and paint small brush strokes to add details like single hair strings.
I attached two examples. First is very simple where you can clearly see and understand the similarity between hair and ribbon. Second example is theory put into practice. But it’s basically doing the same things as shown in simple example.
Let me know what you think about this?
I based my knowledge on James Gurney blog (author of Dinotopia and Light and Color book)
And for the example I used Faestock (from deviantart) photo.
45K notes
·
View notes
Photo


My friends asked me for an tutorial
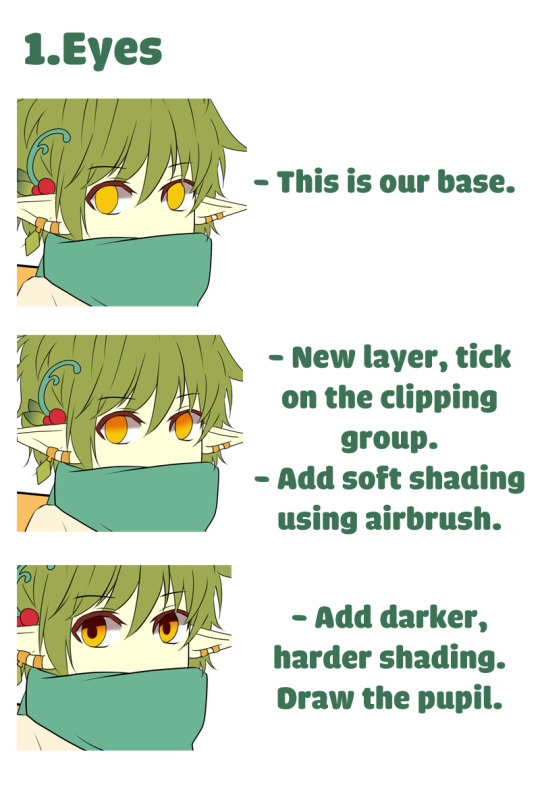
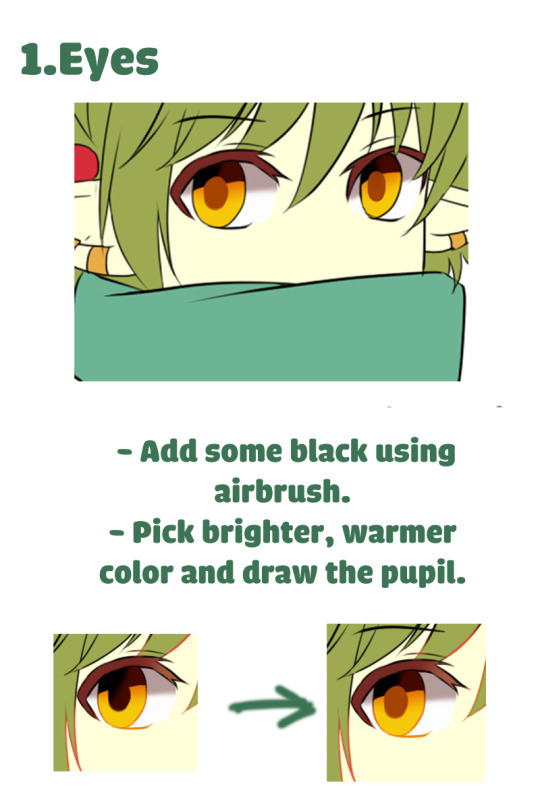
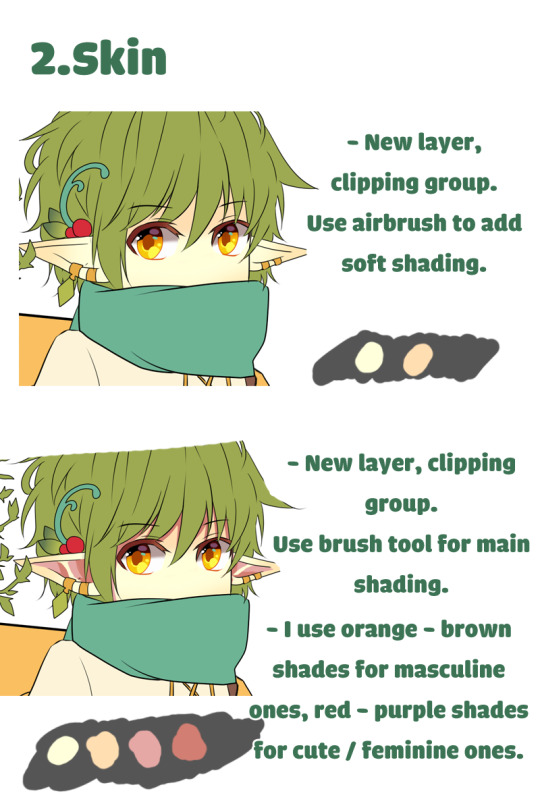
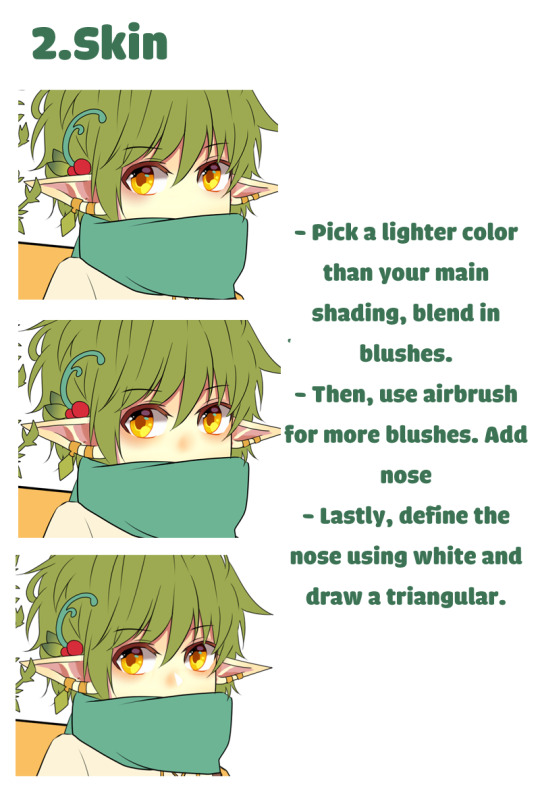
For Paint Tool Sai users. There should be plenty of guides on how clipper group, preverse opacity/opacity lock works so I won’t be adding them here.
Excuse my lame English, I’m not a native speaker.
26K notes
·
View notes

Photo

Norsemen in Miklagaard. This is relevant to my interests. Shuah
426 notes
·
View notes
Photo
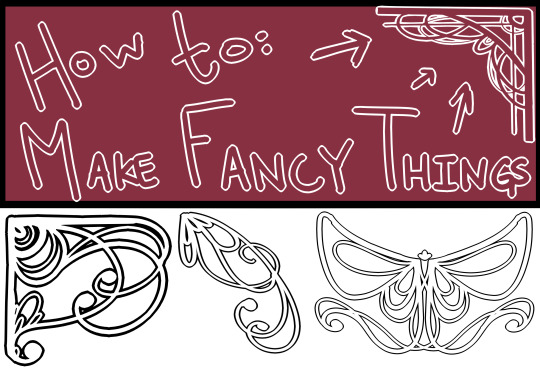

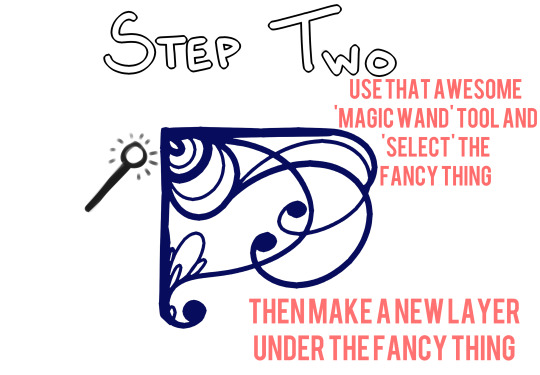


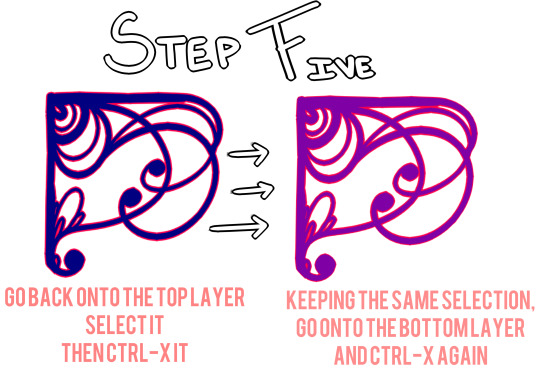


hi guys today I made a tutorial on how to make my favorite art nouveau-y embellishments! these are a super fun and easy way to add a little emphasis to a drawing and you can make all kinds of designs once you get the basic flow! If you have any questions feel free to ask and let me know if there’s any kind of tutorial you’d like for me to make in the future !!!
40K notes
·
View notes
Photo
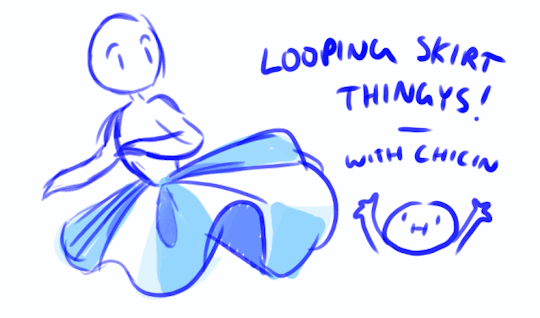

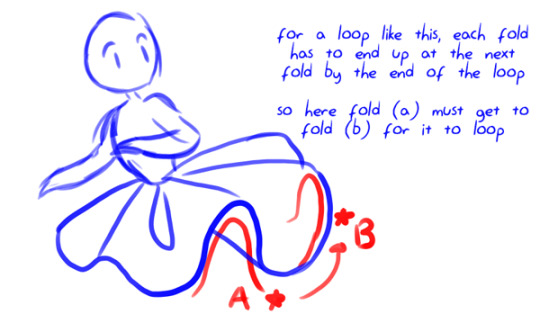

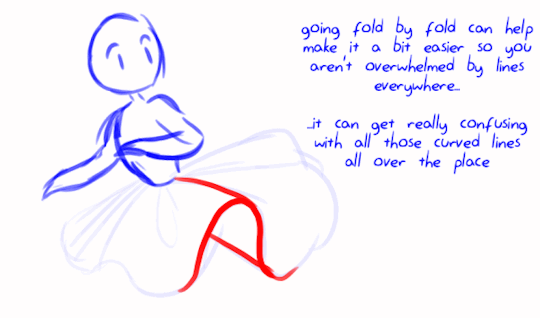
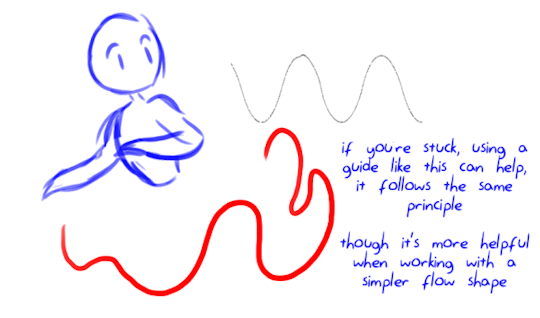
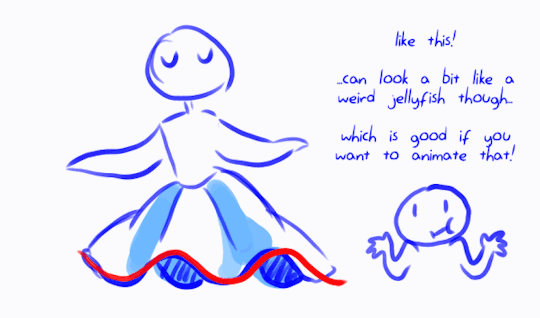
Sort of follow up from the hair tutorial yesterday, mixing in a bit of this quick tutorial too. Hopefully this is easy enough to understand ^^’ one of those things that can change a lot depending on the animation.
And if you’d like a little wave guide, I’ve got one here!
55K notes
·
View notes
Photo


Patreon TUTORIAL: Visual Novel Sprites 101: The Basics
This tutorial was made possible by my patrons. If you enjoyed this tutorial and would like to see more like it in the future, please consider supporting me on Patreon. Thanks for reading!
10K notes
·
View notes
Photo


Remember, there’s not one way to draw things! You don’t have to draw it exactly like this , but you can apply certain things from this. This is just a little process we hope that might be useful to others out there! More to come, y’all!
15K notes
·
View notes
Photo


SOME BRUSHES I USE U//3//U
they re trash
just like me
5K notes
·
View notes
Photo
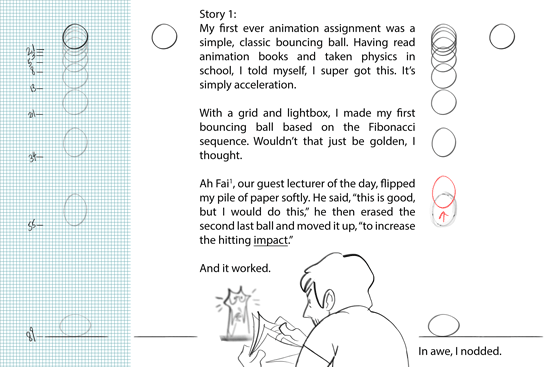


1. Ah Fai was a chief animator for McDull’s animated features. He’s super cool. Ultimate senpai.
2. Previous post on breakdowns right here
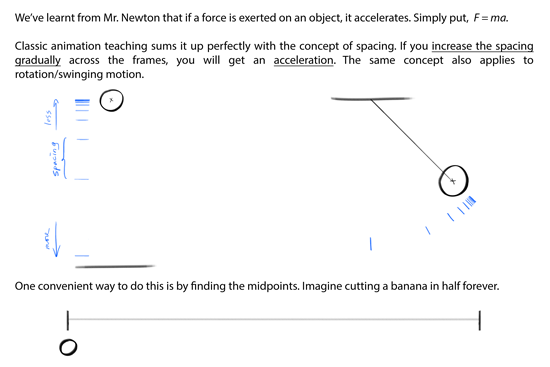
Some thoughts on acceleration and force
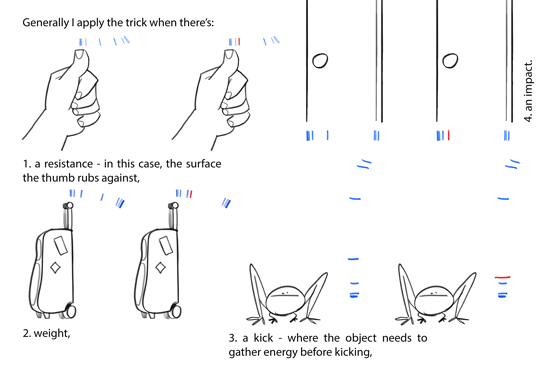
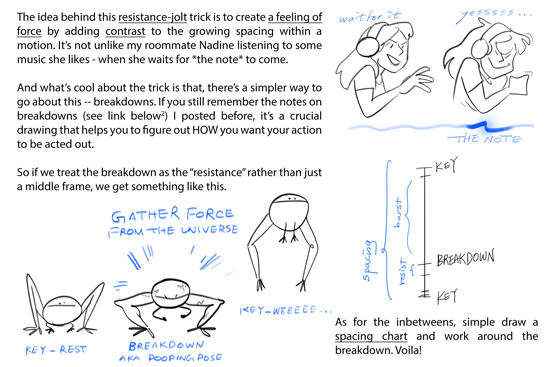
I presented this in the order of how I slowly understood the trick of delivering force - first an abstract concept of impact taught by Ah Fai, then a more complicated discovery on the acceleration pattern, last back to a more abstract concept of breakdowns.
Like I’ve previously stressed, 2D animation is everything but one single approach. There’s no one rule that rules them all, but interchangeable ideas with math, or physics, or music, etc. There’s no “perfect” animation either, but what is perceived as organic and dynamic. E.g., using the Fibonacci numbers to animate didn’t bring me a perfect animation! On the other hand, a tiny change in the pattern could already make the feeling of force so much more powerful.
Not so much of a tutorial than a personal experience. I hope you find this interesting hahaha
158K notes
·
View notes
Text
Fluid Motion in ABZÛ
My name is Max Kaufmann, Gameplay Engineer at Giant Squid. In designing the aquatic feel for ABZÛ, we endeavored to allow players to swim gesturally through full 3D environments.

Fluid control presents a challenge because smoothed movement introduces input lag. It’s frustrating when steering is not responsive: when players tilt the stick they expect the diver to move right away and when they let go they expect the diver to stop. However, that does not feel fluid. We’re trying to simulate swimming without “feeling swimmy.“
Additionally, as designers, we risk acclimating to slippery controls rather than fixing them. Several times our personal baselines diverged from the experience of new playtesters. We learned to rely on rules, not just our intuition, to rate the success of a particular game-feel tuning.
Our first rule: our controls succeed when the player intuits that the diver is going to drift a little bit after they release the thumbstick.
We began with the camera. We designed the camera yaw to be predictive. Like how bikers look into turns before entering an intersection, when the player steers we rotate the camera to extrapolate where the diver will be facing after drifting, rather than her current heading.

When a player releases the stick, the camera is already aligned correctly and the drift-direction is intuitive. Additive animations also turn her head and curve her body towards the direction of her drift to reinforce the hint.
On the downside, extrapolating camera yaw to match her predicted direction can swing wildly and induce simulation sickness when the diver is performing gestural moves, like loops and flips. Through playtesting, we identified these moves and added special detectors which hold the camera steady, dollying out to frame the acrobatics. This maintains the tranquil, underwater atmosphere.

Loops introduce another control issue: input reversing.
We apply steering and pitching in her local coordinate space and integrate with quaternions instead of euler angles. This allows the diver’s rotations to be freeform and not pitch-locked like flight sims and other underwater games.
This is problematic when the diver pitches upside down. In this belly-up orientation, steering reverses what players expect, and “left” becomes “right.” Through playtesting, we identified our next rule: ignore reversed input.
Instead of steering when the players rotate into this state, we apply a twisting-force to unroll her body and resume player steering when she is finishes the transition from belly-up to belly-down.

The twisting force is one of many corrective forces we apply to softly nudge the diver. We also slow down near sea creatures, steer away from geometry, and level the diver out or fix-up nearly-vertical headings when the player wants to ascend or descend.
We tried many ways to calculate these forces. For most smooth values, we use critically-damped springs, which advance a speed/value pair to a target set-point in a fixed amount of time without any discontinuities. It has a nice ease-in/ease-out character that keeps the response fluid.

The implementation of Critical Damping can be found in Game Programming Gems vol. 4.
However, critical damping doesn’t give us enough control over how we ease in the twisting force. We instead had the best results with a PID Controller. These are further generalized springs that incorporate set-point motion and lag compensation.

The constants stand for “Proportional, Integral, Derivative”
PID Controllers are frequently used in racing games to design the handling for different types of cars.
A negative derivative term, for instance, can make it feel “slippery”, and a high integral term can make it “push harder” over time. These gave us all the knobs we needed to “mix” her force, like a sound engineer mixing audio channels. When her correction forces harmonize, players hardly notice the adjustment at all.
Developing original controls is challenging but the result differentiates our game. We’re confident in the synchronicity between our fluid game feel, and the meditative themes of ABZÛ’s narrative world.
1K notes
·
View notes
Photo

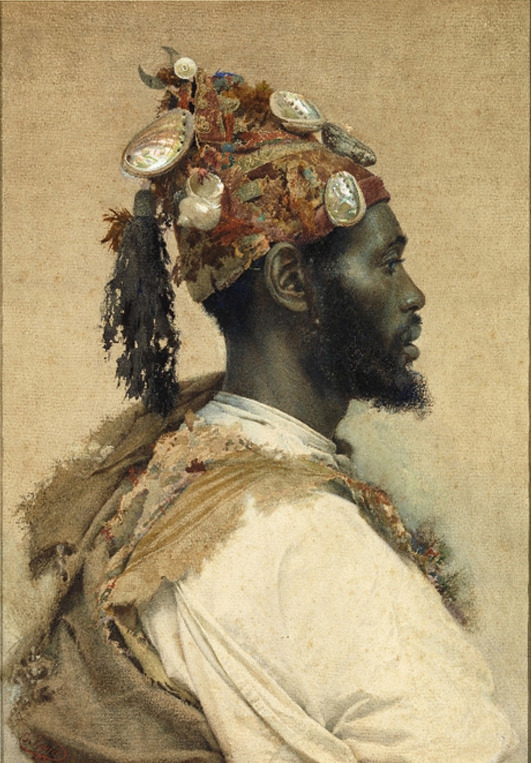
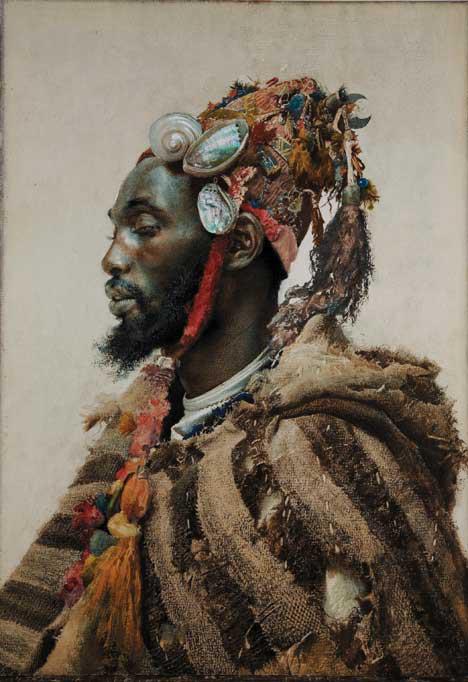
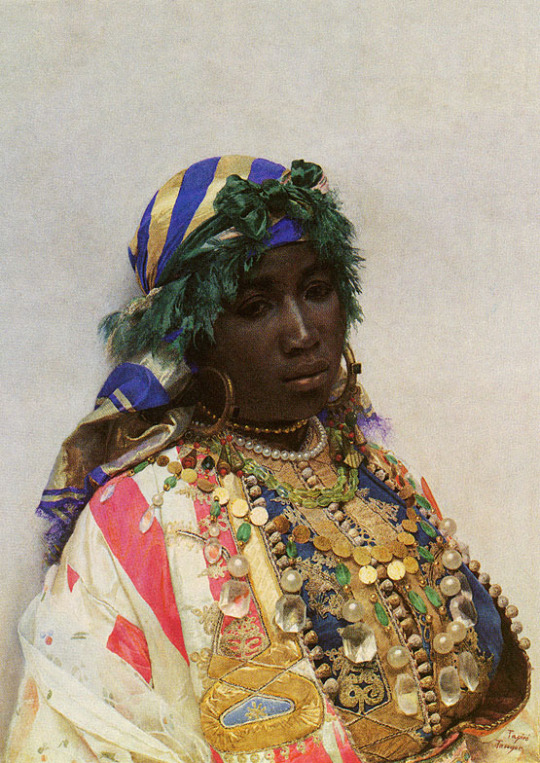


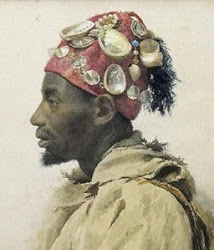

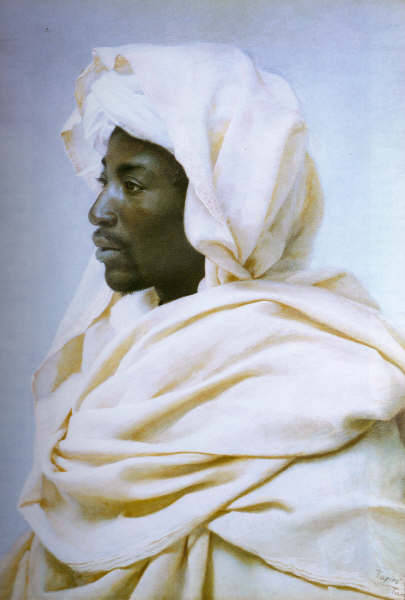
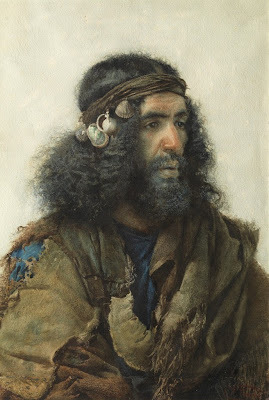
Portraits of Moroccans/North Africans by Spanish artist José Tapiro y Baro (1830-1913)
46K notes
·
View notes


Photo
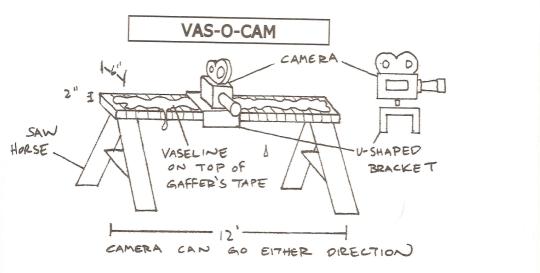
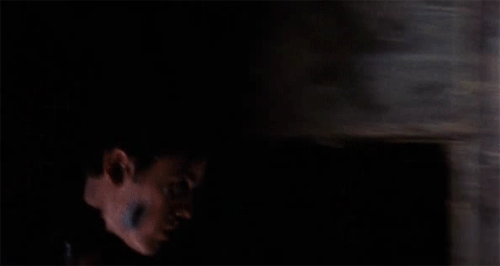
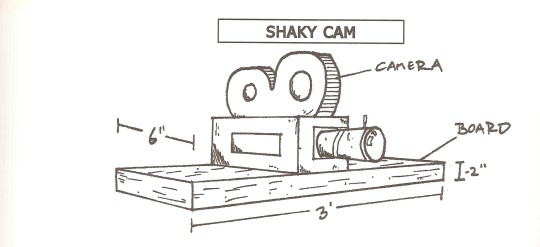
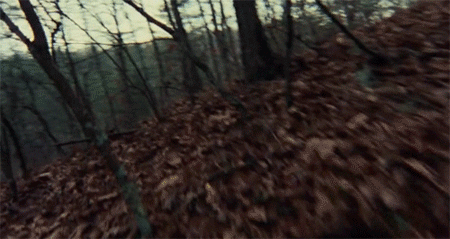
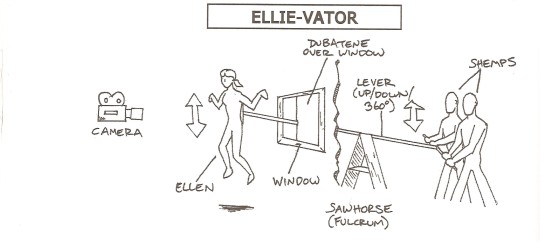
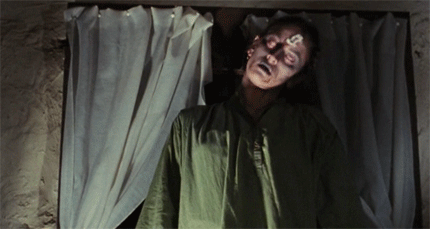
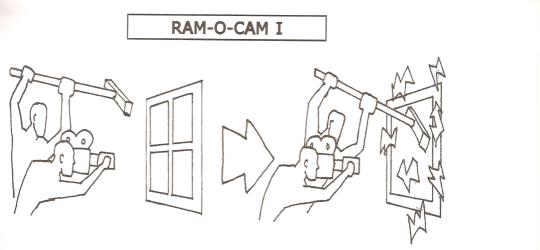
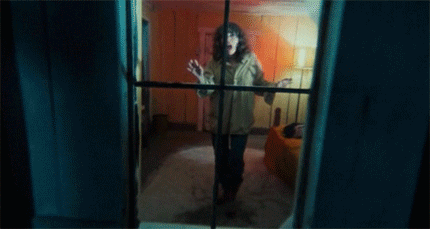
The Evil Dead - Sam Raimi’s low budget camera rigs
107K notes
·
View notes