
Hi I am Vella Smitham,35 years old from California,CA,USA,Working as Internal Home Decore from the last 5 years.Here I am Sharing tips about it. Our Website
Don't wanna be here? Send us removal request.
Statistics
We looked inside some of the posts by vellasmithamus and here's what we found interesting.
Average Info
Notes Per Post
0
Likes Per Post
0
Reblog Per Post
0
Reply Per Post
0
Time Between Posts
3 days
Number of Posts By Type
Text
17
Last Seen Tumblr Blogs


Fun Fact
The Tumblr office adopted Tommy, an 11-year-old Pomeranian.
Text
Teriyaki Steak Bowl
This dish comes together quickly for a satisfying meal when you donât have a lot of time to invest in cooking. This dish is great if you have leftover rice or random vegetables in your refrigerator that you need to get through. Modify the ingredients based on what you have on hand and youâll wonder why you donât make this more often every time you sit down and eat it.
Print
Teriyaki Steak Bowl
.wprm-recipe-rating .wprm-rating-star.wprm-rating-star-full svg * { fill: #343434; }
Course Main Course
Prep Time 10 minutes
Cook Time 10 minutes
Total Time 20 minutes
Servings 1 Bowl
Calories 600kcal
Ingredients
1 serving rice precooked
2 tsp olive oil
3 cloves garlic minced
1/2 oz shallots minced
2 oz yellow onions sliced
1/2 tsp crushed red pepper
4 oz mushrooms sliced
1/4 tsp salt
1/2 tsp pepper freshly ground
3 1/2 oz shaved steak
2 tbsp teriyaki sauce
Instructions
In a heated saute pan, add oil and let warm. Add onions, shallots, garlic, and crushed red pepper and cook on medium high heat until onions start to sweat. Add mushrooms, salt, and pepper and stir frequently. Once mushrooms are about halfway cooked (3-4 minutes), add shaved steak, stirring frequently so the meat does not clump together.
Cook until steak is cooked through, then add teriyaki sauce and prepared rice. Mix until rice is heated through and teriyaki sauce has just started to caramelize the rice.
Add salt and pepper to taste and enjoy!
Notes
For the rice I like to cook mine with crushed red pepper, salt, and pepper to add flavor to the dish. This is optional but I like the extra kick of heat it gives.
This recipe is for individual portions so increase the servings as necessary.
Nutrition
Serving: 1g | Calories: 600kcal | Carbohydrates: 66g | Protein: 31g | Fat: 24g | Saturated Fat: 7g | Cholesterol: 60mg | Sodium: 2042mg | Potassium: 928mg | Fiber: 3g | Sugar: 11g | Vitamin A: 5.9% | Vitamin C: 12.8% | Calcium: 3.9% | Iron: 17%
Via https://wickedhandy.net/teriyaki-steak-bowl/
source http://wickedhandy1.weebly.com/blog/teriyaki-steak-bowl
0 notes
Text
Tiramisu Cupcakes
I absolutely love coffee, it doesnât matter if itâs in the form of a beverage or ice cream, liquor or dessert. So naturally I would love the whole premise of tiramisu but how to make it a grab and go indulgence? This tiramisu cupcake solves that problem, allowing you to enjoy the delicious rich flavor of the espresso paired with the sweet mascarpone filling, all in a simple and easy to eat cupcake. Whatâs not to like?
Print
Tiramisu Cupcake
.wprm-recipe-rating .wprm-rating-star.wprm-rating-star-full svg * { fill: #343434; }
Course Dessert
Cuisine Italian
Prep Time 45 minutes
Cook Time 20 minutes
Total Time 1 hour 5 minutes
Servings 24 Cupcakes
Calories 397kcal
Ingredients
Cupcake
1 box White Cake Mix
1 tbsp Instant Espresso Powder
1/3 cup Vegetable Oil
3 Eggs
Coffee Syrup
1 tbsp Instant Espresso Powder
1 tbsp French Vanilla Kahlua
1 tbsp Condensed Milk
Cupcake Filling
8 oz Cool Whip thawed
3 tbsp French Vanilla Instant Pudding
3 tbsp French Vanilla Kahlua
1/4 cup Condensed Milk
1/2 tsp Vanilla Extract
8 oz Mascarpone Cheese room temperature
Frosting
16 oz Cream Cheese room temperature
1/2 cup Unsalted Butter softened
4 cup Powdered Sugar
2 tbsp French Vanilla Kahlua
2 tsp Vanilla Extract
Garnish
1 Dark Chocolate Bar
24 Chocolate Covered Espresso Beans
Instructions
Cupcakes:
Prepare cupcake mix per box instructions. If mix offers the option of whole eggs instead of just egg whites, use the whole egg. This will create a cupcake that is slightly denser which will hold together better when the cupcake filling is added.
Once cupcake batter is mixed, divide the batter in two. Add the espresso powder to one of the batters, mixing well. Wait 3-4 minutes and remix. This will ensure any undissolved espresso granules will be fully incorporated.
Line cupcake tin with cupcake liners. Add espresso batter first, then top with plain batter. Cook per box instructions then set aside to cool.
Coffee Syrup:
Mix espresso powder with 1/4 cup hot water. Once powder is dissolved, add condensed milk and Kahlua. Let cool.
Filling Instructions:
In a large bowl with a cover, gently fold french vanilla instant pudding with cool whip. Make sure cool whip has been thawed in the refrigerator and you are gently folding to combine, otherwise the cool whip could âmeltâ, leaving you with a much more liquid end product. Once well mixed put in the refrigerator.
Beat mascarpone cheese, Kahlua, condensed milk, and vanilla until well combined. Gently fold into cool whip mixture and put in the refrigerator.
Frosting:
Beat cream cheese and butter until well combined. Add powdered sugar 1 cup at a time until well incorporated, scraping bowl with each addition. Add Kahlua and vanilla, mixing well. Refrigerate until ready to use.
Assembly:
Make sure cupcakes are completely cooled before assembly.
With a fork, poke 3-4 sets of holes in the top of the cupcake. Brush top of cupcakes with coffee syrup, allowing it to soak into the cupcakes (a pastry brush works best for this). Repeat with all cupcakes.
Fill a pastry bag with filling and insert into cupcake and add filling. You will know you added enough when cupcake slightly expands and you see a small amount coming from the pastry tip hole. Repeat with all cupcakes.
In a different pastry bag, add frosting and pipe on all cupcakes. Garnish with grated chocolate and a chocolate covered espresso bean. Enjoy!
Notes
Depending on what brand of white cake you choose, the quantity of oil and egg may vary slightly. Follow boxed instructions for best results.
Nutrition
Serving: 1Cupcake | Calories: 397kcal | Carbohydrates: 48g | Protein: 4g | Fat: 20g | Saturated Fat: 12g | Cholesterol: 63mg | Sodium: 248mg | Potassium: 100mg | Sugar: 37g | Vitamin A: 11.2% | Vitamin C: 0.1% | Calcium: 10.7% | Iron: 4.4%
Via https://wickedhandy.net/tiramisu-cupcakes/
source http://wickedhandy1.weebly.com/blog/tiramisu-cupcakes
0 notes
Text
Penne & White Bean Sauce
Penne & white bean sauce is one of my favorite dishes. This dish is very inexpensive to make, comes together quickly, and makes an abundant amount of food. This was my go to dish in college for these reasons and now that Iâm older I find it to be my favorite summer time recipe because of the fresh ingredients I can take from my garden to make this dish.
Print
Penne & White Bean Sauce
.wprm-recipe-rating .wprm-rating-star.wprm-rating-star-full svg * { fill: #343434; }
Prep Time 15 minutes
Cook Time 25 minutes
Total Time 40 minutes
Servings 8 Portions
Calories 411kcal
Ingredients
1 box penne
2 small yellow onions
1 stalk celery
4 medium vine tomatoes
12 cloves garlic minced
2 tbsp olive oil
1 1/4 tsp salt
1 1/2 tsp black pepper freshly ground
2 tsp crushed red pepper
2 15.5 oz cans cannellini beans
1 cup fresh basil (about 2 handfuls) cut chiffonade
4 oz Parmesan cheese freshly grated
Instructions
Cook pasta according to box directions. Make sure pasta is al dente when finished so that it does not get mushy when added to the white bean sauce later on. Once pasta is done, rinse with cold water to remove excess starch and to stop the cooking process, set aside.
While pasta is cooking, chop onion, celery, and tomato roughly the same size as the cannellini beans.
Add olive oil to heat pan, warming oil over medium high heat. Once hot, saute onions for 1-2 minutes. Add garlic and crushed red pepper, stir frequently to prevent burning. Once onions start to turn translucent, add celery, salt, and pepper. Cook for 8-10 minutes or until the celery starts to get soft on the outside but still retain a crunch on the inside.
Add both cans of cannellini beans, liquid included. Let simmer for 7 minutes, until the beans are heated through and starting to slightly fall apart. Add tomatoes and basil and simmer for an additional 5 minutes. Tomatoes should be releasing their juices.
Add pasta to sauce and heat through. When serving, garnish with a tbsp of freshly grated Parmesan cheese and enjoy!
Notes
This recipe is also delicious with dried basil when fresh is not available. Just substitute with 3 TBS dried basil.
Want a healthier alternative? This recipe is also delicious when you substitute zucchini spirals instead of the penne. It will save you almost 200 calories and 42 carbs per serving and you wonât be sacrificing taste. I do recommend cooking the zucchini for the meal you are eating and it does not reheat well.
Nutrition
Serving: 2cups | Calories: 411kcal | Carbohydrates: 53g | Protein: 15g | Fat: 8g | Saturated Fat: 3g | Cholesterol: 9mg | Sodium: 678mg | Potassium: 431mg | Fiber: 4g | Sugar: 4g | Vitamin A: 19% | Vitamin C: 14.3% | Calcium: 22.9% | Iron: 11.2%
Via https://wickedhandy.net/penne-white-bean-sauce/
source http://wickedhandy1.weebly.com/blog/penne-white-bean-sauce
0 notes
Text
Shepherds Pie
Shepherdâs pie is one of those comfort dishes that comes together easily and is great from scratch or just for using leftovers in the refrigerator. In this recipe Iâm only using corn as the vegetable, but this recipe is so adaptable that you could add any spare vegetables that you have so they donât go to waste. The other benefit to this delicious meal? It reheats well, making it the perfect dish to prepare for a few meals in a row if you have a busy week coming up.
Print
Shepherdâs Pie
.wprm-recipe-rating .wprm-rating-star.wprm-rating-star-full svg * { fill: #343434; }
Course Main Course
Cuisine Irish
Prep Time 10 minutes
Cook Time 45 minutes
Total Time 55 minutes
Servings 4 Portions
Calories 692kcal
Ingredients
Corn Filling
2 ears corn shucked
1/4 tsp cayenne pepper
1/4 tsp salt
1/4 tsp pepper freshly ground
cooking spray or 1 tsp olive oil
Potatoes
2 lbs Russet potatoes (about 3 medium potatoes)
1 1/2 tsp salt
4 oz milk or cream
2 tbsp unsalted butter
1/2 tsp pepper freshly ground
4 dashes Tabasco
Ground Beef Filling
1 1/2 lb 90% lean ground beef
1 tbsp olive oil
4 cloves garlic finely chopped
1/2 med yellow onion finely chopped
2 tbsp shallots finely chopped
1 1/2 tsp crushed red pepper
1 tsp salt
1 1/2 tsp pepper freshly ground
3 tsp fresh rosemary finely chopped
4 tsp fresh sage (about 5 leaves) finely chopped
3 springs fresh thyme
2 tbsp all purpose flour
1 tsp Worcester sauce
1 beef bouillon cube
1/2 cup water
Instructions
Corn Filling
Preheat oven to 425°F. Place corn on a small sheet of aluminum foil, spraying each side of the corn with enough cooking spray that the spices will stick to it (you can also use a small amount of olive oil for this step). Sprinkle each piece of corn with the cayenne pepper, salt, and pepper. Wrap the corn in the foil and place in the oven for 15 minutes.
Remove corn from the oven and let cool. Once it is cool enough to handle, cut corn off the cob and set aside. You should have about 1 cup of corn.
Potatoes
While the corn is cooking, clean and peel the potatoes. Cut into evenly sized cubes, about 1/2 inch in size. Thoroughly rinse potatoes to remove any excess starch. Add to medium sized pot or saucepan and add water until potatoes are covered in about 1-1 1/2 inches of water (approximately 5 cups of water). Add one tsp salt and 3 crushed garlic cloves to the water.
On medium-high heat, bring potatoes to a boil. Once boiling, reduce to a simmer and cook for 12-14 minutes, until potatoes are tender and a fork will easily pierce through the potatoes. While potatoes are cooking stir every 5 minutes or so to make sure they donât stick to the bottom of the pot.
Once potatoes are cooked through, drain and return to pot or to a medium sized mixing bowl. Add milk or cream, butter, remaining salt, pepper, and Tabasco and mash well with a potato masher.
Ground Beef Filling
Add oil to large saute pan on med-high heat. Let oil heat through, then add garlic, onion, shallots, and crushed red pepper. Let cook for 2-3 minutes, until onions start to become slightly translucent. Add ground beef, salt, pepper, rosemary, sage, and thyme (thyme should still be the whole springs, you will remove once cooked).
Once meat is almost cooked completely, drain any excess fat in the pan, then add 2 tbsp flour to the meat and mix well for 1-2 minutes, allowing the flour to be cooked slightly. Add bouillon cube and 1/2 water and let simmer 2-3 minutes. Remove any thyme springs.
Assembling the Shepherdâs Pie
Preheat oven to 400°F. In 8Ã8â³ glass baking dish, add meat mixture to the bottom of the pan. Add corn and lay evenly over the meat mixture, then top with the potatoes. Add a little freshly ground pepper on top and put in the oven for 20 minutes, until the potatoes start to brown. Let cool for a few minutes and enjoy!
Nutrition
Serving: 2cups | Calories: 692kcal | Carbohydrates: 50g | Protein: 41g | Fat: 27g | Saturated Fat: 11g | Cholesterol: 128mg | Sodium: 2008mg | Potassium: 1614mg | Fiber: 4g | Sugar: 4g | Vitamin A: 10.9% | Vitamin C: 20% | Calcium: 9.7% | Iron: 35.9%
Via https://wickedhandy.net/shepherds-pie/
source http://wickedhandy1.weebly.com/blog/shepherds-pie
0 notes
Text
Roasted Garlic Mashed Potatoes
Mashed potatoes are always a fan favorite, complimenting almost any meal. Whatâs not to love about it? It comes together quickly with little maintenance, freeing you up to focus on the other aspects of your meal, and itâs inexpensive and filling. The best part? It holds up well in the refrigerator and reheats well, so leftovers for tomorrowâs dinner or lunch at work are always welcomed! Try this easy roasted garlic mashed potato recipe today.
Print
Roasted Garlic Mashed Potatoes
.wprm-recipe-rating .wprm-rating-star.wprm-rating-star-full svg * { fill: #343434; }
Course Side Dish
Prep Time 10 minutes
Cook Time 25 minutes
Total Time 35 minutes
Servings 4 Portions
Calories 210kcal
Ingredients
2 lbs Potatoes
1 tsp Salt
1 head Roasted Garlic Cloves
4 oz Milk
2 tbsp Unsalted Butter
1/2 tsp Salt
1/2 tsp Pepper Freshly Ground
4 Dashes Tabasco
Instructions
Clean and peel potatoes. Cut into evenly sized cubes, about 1/2 inch in size. Thoroughly rinse potatoes to remove any excess starch. Add to medium sized pot or saucepan and add water until potatoes are covered in about 1-1 1/2 inches of water (approximately 5 cups of water) and add 1 tsp salt.
On medium-high heat, bring potatoes to a boil. Once boiling, reduce to a simmer and cook for 12-14 minutes, until potatoes are tender and a fork will easily pierce through the potatoes. While potatoes are cooking stir every 5 minutes or so to make sure they donât stick to the bottom of the pot.
Once potatoes are cooked through, drain and return to pot or to a medium sized mixing bowl. Add garlic cloves, milk, butter, salt, pepper, and Tabasco and mash well with a potato masher. Enjoy!
Nutrition
Serving: 6oz | Calories: 210kcal | Carbohydrates: 32g | Protein: 7g | Fat: 6g | Saturated Fat: 4g | Cholesterol: 18mg | Sodium: 911mg | Potassium: 1002mg | Fiber: 5g | Sugar: 1g | Vitamin A: 4.5% | Vitamin C: 34% | Calcium: 11.3% | Iron: 41.5%
Recommended Pairings:
Mashed potatoes are amazing with any main dish, making them a quick and easy way to complete any meal. We recommend enjoying these mashed potatoes with a Cajun ribeye or spicy BBQ pork chop. You can even use this recipe for topping off a Shepherdâs pie.
Via https://wickedhandy.net/roasted-garlic-mashed-potatoes/
source http://wickedhandy1.weebly.com/blog/roasted-garlic-mashed-potatoes
0 notes
Text
Onion Hamburger Patties
Who can resist a delicious, juicy hamburger during cookout season? These hamburger patties hold their moisture with the dehydrated onions in the patties, locking in the juices that would normally run off during cooking. A slight hint of heat from the crushed red pepper and cayenne gives it just the right amount of flavor to compliment any topping you choose.
Print
Onion Hamburger Patties
.wprm-recipe-rating .wprm-rating-star.wprm-rating-star-full svg * { fill: #343434; }
Course Main Course
Cuisine American
Prep Time 5 minutes
Cook Time 15 minutes
Total Time 20 minutes
Servings 8 Burgers
Calories 209kcal
Ingredients
2 lb 90% lean ground beef
3/4 tsp salt
1 tsp pepper freshly ground
1 1/2 tbsp dehydrated onion
2 1/2 tsp crushed red pepper
1 tbs granulated garlic
1 tsp cayenne pepper
Instructions
Add all ingredients in bowl and mix well.
Let sit in refrigerator overnight for full flavor of seasonings to incorporate into the meat (optional).
Portion into 4 ounce patties. Cook on grill or in grill pan, and enjoy with your favorite toppings.
Notes
This recipe freezes well for up to 4 months. Simply make individual patties and pull the day you plan to prepare for a quick and easy meal!
While most hamburger recipes recommend 80-85% lean ground beef because this will add flavor and moisture, I chose a leaner ground beef because the seasonings and dehydrated onion compensate for the leaner beef. I prefer to try to make my recipes on the healthier side when possible without sacrificing the flavor of the food. In this instance the leaner beef helps reduce the fat and calories in the hamburger patties.
Nutrition
Serving: 4oz | Calories: 209kcal | Carbohydrates: 2g | Protein: 23g | Fat: 11g | Saturated Fat: 4g | Cholesterol: 73mg | Sodium: 304mg | Potassium: 407mg | Vitamin A: 5.6% | Vitamin C: 1.1% | Calcium: 1.8% | Iron: 15.2%
Recommended Pairings:
While this onion hamburger patty is great as is, we highly recommend trying it with our Cajun seasoning sprinkled on the patty right before grilling. Top with a slice of sharp cheddar cheese and an over easy egg for a delicious and filling cheeseburger that everyone will be raving about!
Via https://wickedhandy.net/onion-hamburger-patties/
source http://wickedhandy1.weebly.com/blog/onion-hamburger-patties
0 notes
Text
Roasted Garlic and Herb Butter
This easy and quick roasted garlic and herb butter will not only impress your guests, but can elevate any of your dishes from good to great. The best part is you can change out the herbs and experiment based on what is in season or growing in your garden. This also holds up well in the freezer, allowing you to have it on hand when you have unexpected company, making you look like a culinary genius. If you donât have any roasted garlic on hand, we recommend using this quick and easy recipe.
Print
Roasted Garlic and Herb Butter
.wprm-recipe-rating .wprm-rating-star.wprm-rating-star-full svg * { fill: #343434; }
Course Miscellaneous
Prep Time 5 minutes
Total Time 5 minutes
Servings 4 Tablespoons
Calories 104kcal
Ingredients
1/2 stick Unsalted Butter Softened
1/8 tsp Sea Salt
1/8 tsp White Pepper
1/4 tsp Crushed Red Pepper
1 tsp Thyme Fresh
1 tsp Rosemary Fresh
5 cloves Roasted Garlic
Instructions
Crush roasted garlic in small mixing bowl.
Finely chop thyme and rosemary, add to the small mixing bowl.
Add the rest of the ingredients and mix well.
Store in an airtight container (I like using small mason jars). Can be stored for 5 days in the refrigerator and up to 6 months in the freezer.
Notes
If freezing the butter, it can be rolled on wax or parchment paper into a log, then tightly wrapped in plastic wrap for easy cutting later on. You can also prepare in small balls with a melon baller for easy individual portions.
You can use dried herbs in this recipe if you like or donât have fresh available. I would recommend letting the butter sit in the refrigerator for at least a few hours before serving if using dried herbs to allow for full flavor. To convert fresh herbs to dry herbs, just divide the amount by three. For this recipe, use 1/3 tsp of thyme and rosemary.
Nutrition
Serving: 1tbsp | Calories: 104kcal | Fat: 11g | Saturated Fat: 7g | Cholesterol: 30mg | Sodium: 76mg | Vitamin A: 7.8% | Vitamin C: 0.9% | Calcium: 0.7% | Iron: 0.5%
Recommended Pairings:
This recipe is amazing on almost anything so itâs worth making it in bulk if you have the freezer space. We recommend trying it on any grilled items, especially with our grilled potato, asparagus, or corn recipes. Itâs also amazing on steaks, pork chops, and fish to add a little extra finishing flair. For a great crowd favorite, you can slice french bread, brush on a little olive oil, sprinkle with salt and pepper, grill lightly on each side, and top with this amazing butter.
Via https://wickedhandy.net/roasted-garlic-and-herb-butter/
source http://wickedhandy1.weebly.com/blog/roasted-garlic-and-herb-butter
0 notes
Text
Orange Honey Butter
This orange honey butter is the perfect balance between the fresh orange flavor and the sweetness of the honey. This butter is perfect on pancakes, biscuits, rolls, waffles, and so much more! It only takes minutes to make but the sophisticated flavor will have everyone thinking that you are a culinary genius.
Print
Orange Honey Butter
.wprm-recipe-rating .wprm-rating-star.wprm-rating-star-full svg * { fill: #343434; }
Course Miscellaneous
Prep Time 5 minutes
Total Time 5 minutes
Servings 4 Tablespoons
Calories 111kcal
Ingredients
1/2 stick Unsalted Butter Softened
1/8 tsp Orange Extract
1/4 individual Orange Zest
2 tsp Honey
Instructions
Zest 1/4 orange with fine grater or use a vegetable peeler and chop zest finely.
Mix orange zest, softened butter, orange extract, and honey together.
Store in an airtight container (I like using small mason jars). Can be stored for 5 days in the refrigerator and up to 6 months in the freezer.
Notes
If freezing the butter, it can be rolled on wax or parchment paper into a log, then tightly wrapped in plastic wrap for easy cutting later on. You can also prepare in small balls with a melon baller for easy individual portions.
Nutrition
Serving: 1tbsp | Calories: 111kcal | Carbohydrates: 2g | Fat: 11g | Saturated Fat: 7g | Cholesterol: 30mg | Sodium: 1mg | Sugar: 2g | Vitamin A: 7.1% | Calcium: 0.3%
Recommended Pairings:
This orange honey butter can be used on dozens of items, only limited by your imagination. We recommend trying it on most breakfast items like pancakes, waffles, muffins, scones, and even french toast. This can be added to desserts like bread pudding or served at dinner time with dinner rolls.
Via https://wickedhandy.net/orange-honey-butter/
source http://wickedhandy1.weebly.com/blog/orange-honey-butter
0 notes
Text
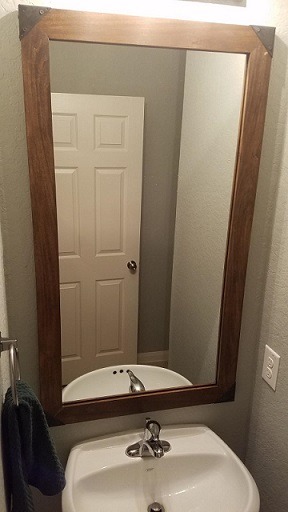
Industrial Mirror Upgrade
Does your home or apartment still have builder grade mirrors in your bathroom? Looking to add a little personality and interest to them without spending a fortune on a new mirror? This quick and easy mirror upgrade can be done in a day (plus a little drying time) and anyone can do it with a few simple tools and supplies.
Materials:
42″ x 22″ Plain Mirror (avoid beveled edges)
(2) 1″ x 3″ x 8′ Poplar Boards
(4) 3″ Corner Bracers
Casey Super Blue Liquid Gun Blue
000 Steel Wool Pad
Q-Tips
(3) Small Foam Brushes
Rags
Wood Glue
Painter’s Tape
Rust-Oleum Spray Lacquer
Minwax Coffee Gel Stain
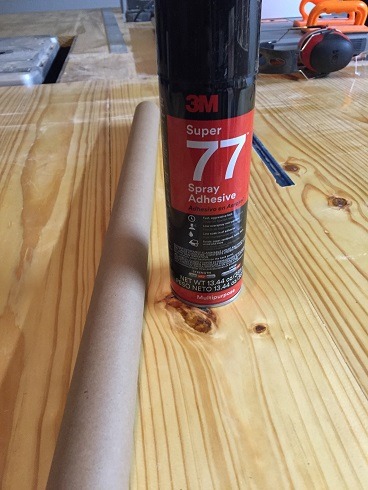
Super 77 Spray Adhesive
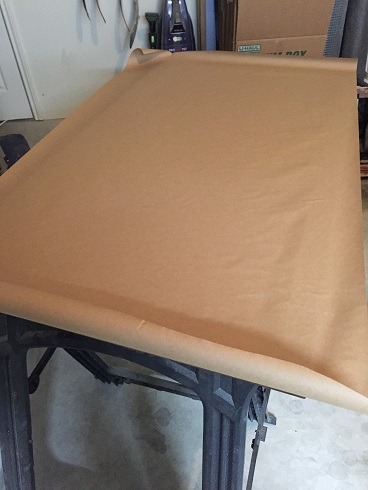
Kraft Paper (26″ or wider)
Razor or sharp knife
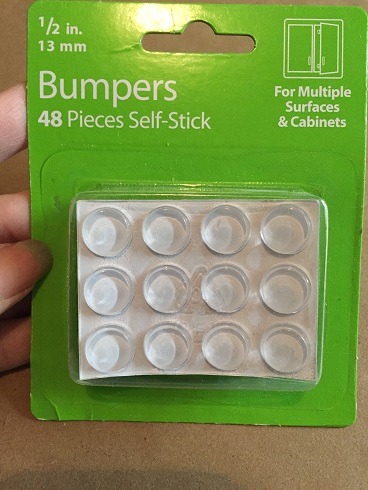
1/2″ Self Stick Bumpers
(2) Heavy Duty Large D-Ring Picture Hangers
Tools:
Table Saw
Sander
Router (Optional)
Miter Saw (Optional)
4 Way Corner Clamp
Protective Gloves
All applicable safety equipment per manufacturer recommendations
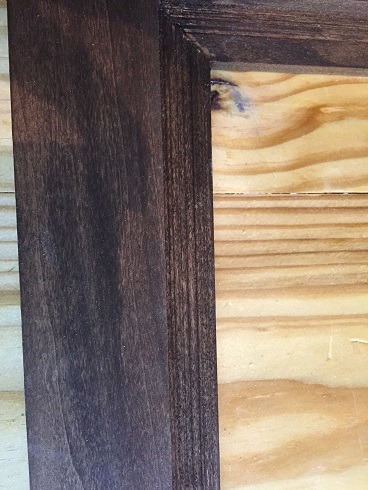
Start by taking your boards and cutting (2) 46″ and (2) 26″ pieces. Once you have those pieces, cut a 1/4″ deep and 1/2″ wide rabbet into the length of each board. This will be what holds the mirror in place in the frame. Make sure to measure the thickness of your mirror before adding the rabbet as you want to have at least the thickness of your mirror plus 1/8″ for the nails that will secure the mirror at the end.
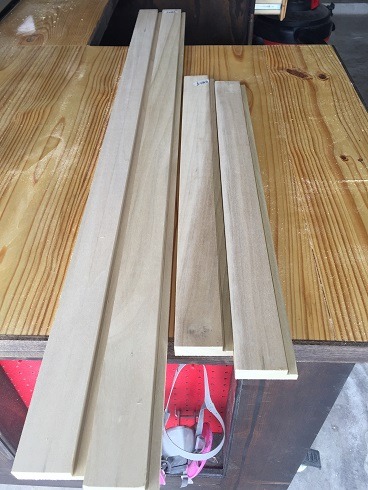
The easiest way to make the rabbet cut is to use a router with a 1/2″ rabbet bit but you can easily do this on a table saw if you don’t have a router. Simply adjust your table saw to the depth that you want and run the board through the saw in small width increments until you have 1/2″ width. This is a little more time consuming but it gets the job done.
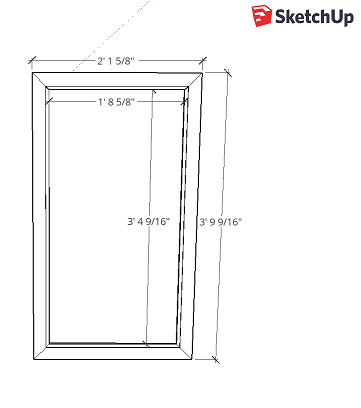
Once all the rabbets have been cut you want to add the 45° cut into the corners, with the rabbit facing in. For this size mirror you want to cut down your boards to be 45 9/16″ and 25 5/8″ on the longest side (opposite of the rabbit). For this step it is really important to make sure to measure very accurately. You want the top of the inside rabbet joint to be the same measurement as the mirror’s side plus 1/8″. This will allow the wood a little room to expand and contract without risking the mirror being damaged and keeps the mirror secure. I would highly recommend if you are unsure about this step to cut the wood on the longer side and slowly cut it down until it is the right size.
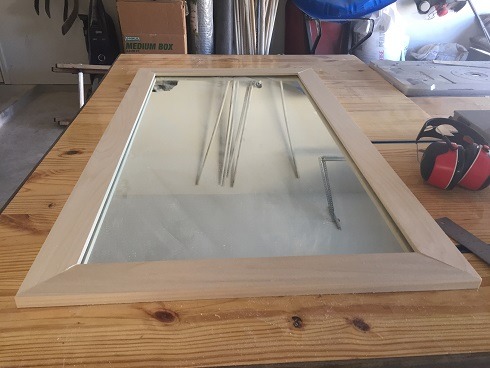
The exciting part of this step is this is by far the most difficult part of the whole project. So now you want to test the mirror in the frame to make sure the inset fits the mirror correctly and all your angles line up. Once this has been confirmed, you can now glue the boards together.
To glue the boards together I like lying down a piece of scrap plywood to keep my workbench clean. Then I take a brush (I like foam the best) and apply glue to the corners of both boards. I then tape the boards together with painter’s tape to keep them secure. Repeat this for all 4 sides.
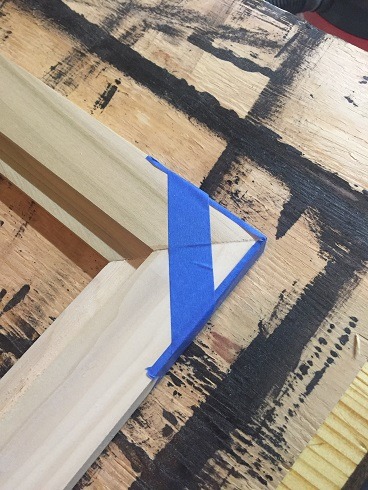
To make sure the corners are firmly in place, I add a 4 way corner clamp to the whole frame and tighten. You can use regular clamps but it won’t be as effective as a 4 way corner clamp because the pressure could cause the corner’s to slide if unevenly applied. If you are planning on doing any projects with 4 corners (such as mirrors, boxes, or picture frames), I would highly recommend investing in this kind of clamp. They are inexpensive and very handy in the workshop.
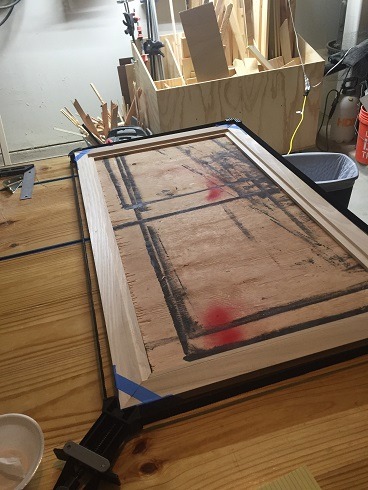
While your frame is drying, it’s time to take your shiny corner braces and add a little aged industrial feel to them. If you like the braces as they are, feel free to skip this step. I personally love the look of aged metal.
The first thing you will need is a small bottle of Super Blue. For this step make sure to read the instruction on the bottle on how to use this product and wear any needed protective equipment.
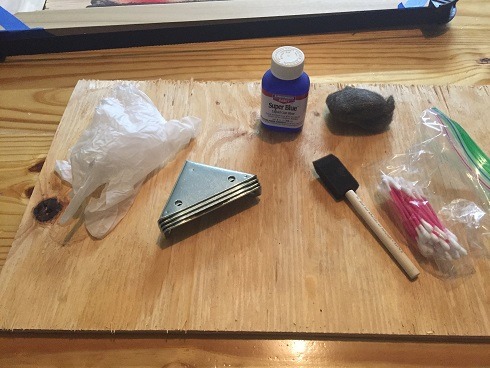
Now you want to take your bracers and make sure they are clean. Take a small amount of super blue and brush onto the bracers (I found in the small indents in the bracers and the screw holes that Q-tips worked really well to apply the super blue). Wipe clean, rinse with cold water, then dry the bracers. Lightly scrub bracers with steel wool to give it a more aged, scuffed look and polish with rag. You can repeat this process until the bracers look how you want them, I only did the process once and liked how they looked.
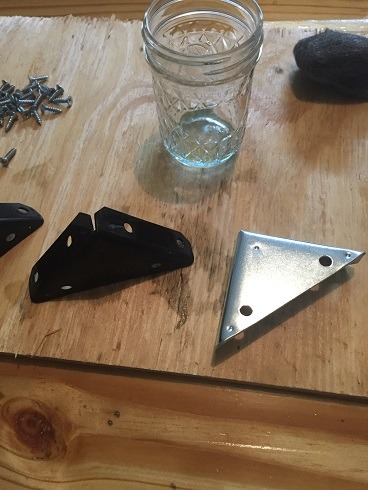
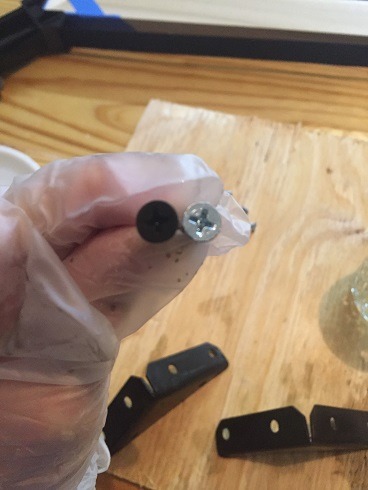
Make sure to repeat the process with the screws to match.
Once the glue on your frame is dry, sand the frame with any 100 to 180 grit sandpaper. Once it is sanded to your liking, it’s time to start staining! For this project I have chosen Minwax Coffee Gel Stain because I love the way the stain looks with the metal bracers.
Make sure to apply the stain evenly and let it sit for the same amount of time for the whole frame or you will get some uneven coloring. It is also very important to stain the rabbet portion of the frame. Once the mirror is inserted into the frame, it will reflect a small portion of the inset and you don’t want it showing unfinished wood.
Once the stain is dry, apply a few lights coat of Rust-Oleum Spray Lacquer. I love this product because it’s easy to apply and dries quickly.
Now that your frame has fully dried, it’s time to add the mirror and secure it to the frame. Make sure to fully clean your mirror before you secure it to the frame.
For securing the frame I used 1″ standard nails, hammering them in 1/2″. I had these nails on hand from other projects but in retrospect if I were to do this project over I would have gotten 1″ nails that had a smaller head. This would have helped speed up the process because the heads would have a smaller chance to scuff up the mirror.
To add the nails I used a wood shim to lay down on the mirror and hammered the nail in. This helps protect the mirror from any damage if the hammer slips and helps make the nail go in at the right angle. Once the nail is in half way, I lightly hammer the head of the nail down to make sure it is secure against the mirror. Now, make sure to be careful not to damage the mirror, this step is a little time consuming but it will make sure that mirror is not going anywhere.
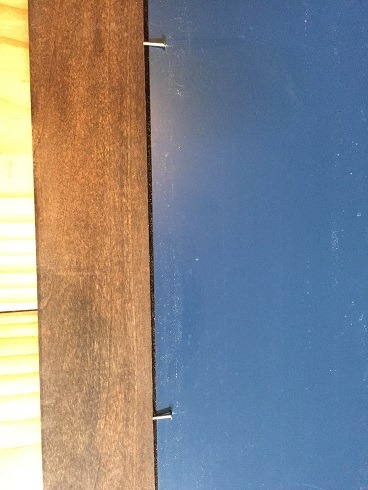
I added a nail about every 8 inches and made sure the corners had nail about 1.5-2″ out.
Once the mirror is secured, simply add the brackets to the corners and secure with the nails.

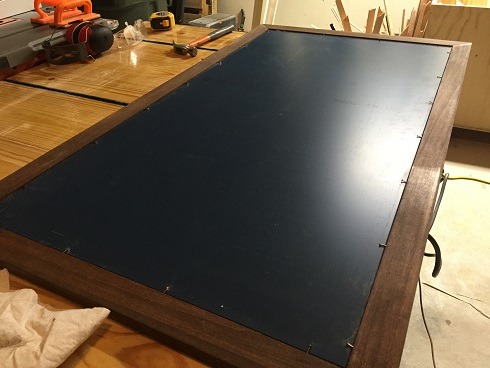
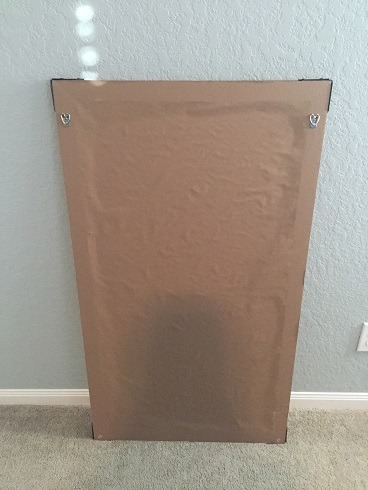
Almost done! Now, this step is optional but I like my projects to have a finished look all the way around. On the back of mirror I like to add a dust cover just like you would for a picture frame. For this simple evenly spray Super 77 Adhesive to back of the frame and lay the Kraft paper on top.
Make sure to apply pressure all the way around the frame to get the paper really secure and trim any excess.
Now add the D-Ring Hangers to the back of the frame. Just make sure to get them lined up evenly on each side of your going to have to work a little harder to hang it later on.

Add a bumper on the bottom corners of the frame so it will sit evenly on the wall.
All Done! The back of your frame should look like this. You are now ready to hang your mirror.
For only a couple of hours of active woodworking and a few dollars, you have now upgraded your plain mirror into something special that will transform any bathroom.
Disclaimer: Please make sure with all your projects that you have read your equipment’s safety manual and are following the recommended safety precautions. We are not responsible for the results of your DIY projects as results can vary based on skill level, materials, and equipment.
Via https://wickedhandy.net/industrial-mirror-upgrade/
source http://wickedhandy1.weebly.com/blog/industrial-mirror-upgrade
0 notes
Text
Easy Roasted Garlic
Looking for an easy way to elevate your savory dishes? Adding a little roasted garlic creates a delicious twist on your favorites. The creamy texture of the garlic after itâs been roasted is perfect on toast or mixed into anything from butter to mashed potatoes. The possibilities are endless and with how simple it is to make, you can experiment on anything!
Print
Roasted Garlic
.wprm-recipe-rating .wprm-rating-star.wprm-rating-star-full svg * { fill: #343434; }
Course Miscellaneous
Prep Time 5 minutes
Cook Time 40 minutes
Cooling Time 10 minutes
Total Time 45 minutes
Servings 1 Head
Calories 121kcal
Ingredients
1 Head Garlic
2 tsp Olive Oil
Pepper Freshly Ground
Salt
Instructions
Preheat oven to 350°F.
Cut top off of garlic, about 1/4 inch deep to expose garlic cloves. Remove any loose paper skins. Donât worry if a few cloves slip out, just place them back where they belong and set aside.
On a sheet of aluminum foil large enough to wrap the garlic in (I use precut 8â³x 8â³ sheets and they work perfectly for this), drizzle oil in the center of the sheet.
On garlic clove, sprinkle salt and pepper and place cut side down on the oiled portion of the aluminum foil. Gently move garlic around the oil to help it get evenly coated.
Wrap garlic in foil and put in oven for 40 minutes, or until the garlic is soft.
Let cool until it is easy to handle (about 10 minutes) and enjoy!
Notes
Roasted Garlic can be stored in the refrigerator for up to 2 weeks if stored in an airtight container completely submerged in good olive oil. You can use the garlic infused oil in salads or with cooking to give your food extra flavor.
Nutrition
Calories: 121kcal | Carbohydrates: 9g | Protein: 1g | Fat: 9g | Saturated Fat: 1g | Sodium: 4mg | Potassium: 112mg | Vitamin C: 10.6% | Calcium: 5.1% | Iron: 2.6%
Via https://wickedhandy.net/roasted-garlic/
source http://wickedhandy1.weebly.com/blog/easy-roasted-garlic
0 notes
Text
Corner Floating Shelves

Looking to add a little personality to an empty corner of your room? These floating shelves are a great weekend project that will upgrade the look of any room. And the best part? They cost under $15 in wood each to make!
I made these floating shelves for a corner in my open dining room that just seemed out of place and needed a little definition to pull it together with the rest of the space. Since there was nothing in the area, I decided to make the shelves wider to not only help fill up the space, but also add character to the shelves. If you are working with a smaller space or you want the shelves to blend in more to the area, you can easily modify the instructions to make thinner shelves to fit your needs. You can also change out the wood you are using. For this project I used Whitewood common boards since I was staining the shelves. If you are going with a natural, unfinished look you might want to upgrade your wood choice.
Corner Floating Shelves
Materials (for a pair of floating shelves):
1â³ x 10â³ x 8â² Whitewood Common Board 16.07
1â³ x 4â³ x 12â² Whitewood Common Board 9.85
2â³ x 4â³ x 8â² Board (this is going to be used for the wall bracer so a simple 2â³ x 4â³ is all you need) 3.67
1â³ 18 Gauge Brad Nails
1.5â³ 18 Gauge Brad Nails
Rust-oleum Dark Walnut Wood Stain
Minwax One Coat Polyurethane
Elmerâs Wood Filler
Tack Cloth (optional)
#9 2.5â³ Construction Screws
Wall Anchors (as needed for hanging)
Equipment:
Table Saw
Sander
Miter Saw
Corner Clamp (optional)
Nail Gun
Hand Drill
Countersink Drill Bits
All applicable safety equipment per manufacturer recommendations
Making the Brackets:
Once you have decided where you want your shelves, itâs time to get started with this cheap and easy corner floating shelf build. The first thing you are going to want to do is make the wall bracket that will hold up the shelves.

For the brackets you are going to want to take your 2â³ x 4â³ and cut:
(8) 5.5â³ long blocks
(2) 31â³ x 1.5â³ x 1.5â³
(2) 20â³ x 1.5â³ x 1.5â³
For the 1.5â³ x 1.5â³ strips, I cut the 2â³ x 4â³ to length then cut the board in half lengthwise after trimming .25â³ off each side (to help square up the wood from the rounded edges). You could also buy 1.5â³ pre-cut boards but I wanted to use what I had on hand.
Next you are going to want to assemble the bracket. To put the pieces together I countersunk and predrilled two holes per support and corner piece. Once all my holes were predrilled, I just added a little glue and drilled 2.5â³ #9 construction screws into the boards.
Floating shelf bracket
While I donât always countersink my screws, I thought it was important to make sure the wood didnât split and that the screws would be flush against the wall once it was hung.

Making the Shelves:
Now that the brackets are made itâs time to make the shelves that will fit over them. Since there was nothing in the space where I am putting the shelves, I wanted them to be a little thicker to help fill the space and make a statement. Therefore I am making them 3.5â³ thick. You can modify this as you need for your space, just remember it has to be at least fit over the bracket you made.
The sides of the shelves are going to be made from the 1â³ x 4â³ board. Since itâs already the width that I wanted, Iâm just cutting it to the length that I want. For these cuts, one side needs to be cut at a 45° so the sides fit together without having the ends of the boards exposed. If you are painting your shelves instead of staining, the ends of the boards being exposed wont be a problem so you could skip the 45° cuts to make this project a little easier. For the listed cut dimensions, the length is going to be from the longest side of the board with the 45° cut. So you will need to make the following cuts:
(4) 8 1/16â³
(2) 15 5/8â³
(2) 2â² 3/8â³

To put the pieces together I used 1Ⳡ18 gauge brad nails and wood glue. Make sure all your angles are 90° or you will have trouble attaching the top and bottom of the shelves. To do this I used a corner clamp but you can use an angle square to hold the wood firmly in place before securing with the nail gun. For the inside corner piece I used 1 1/2Ⳡbrad nails to make sure the nails were long enough to secure the wood.


Once the glue dried I double checked that the shelf would fit around the bracket. Iâve learned the hard way that it pays to triple check everything even if youâve measured carefully. I left a little room between the bracket and the shelf on purpose so donât be alarmed if it is not a snug fit.

Now itâs time for the top and bottom of the shelves. For this you are going to want to take your 1â³ x 10â³ x 8â² Board and cut:
(4) 7 5/16â³ x 22 15/16â³
(4) 7 5/16â³ x 23 5/8â³

Once the pieces were, cut I glued the pieces together to make the (4) top and bottom shelves for the floating shelves.

After the glue had dried, I glued and nailed the top and bottom shelves to the side pieces.

When the top and bottom were secure and dry, I added wood filler to any area that needed it. I like to use the Elmer color change wood filler so I donât waste any time waiting for the wood filler to dry, with this I can tell immediately when it is ready to sand, plus itâs really easy to apply.

Once the wood filler dried, I sanded the whole piece down with 120 grit and 220 grit sand paper. When the piece was sanded to my liking, I wiped it down with a tack cloth, but you can wipe it down with whatever you have on hand. Just make sure itâs free of dust.

Now it is time to stain! I used Rust-oleum Dark Walnut Wood Stain, then finished the shelves with Minwax One Coat Polyurethane. I like this polyurethane because it gives it a slight gloss and a little texture to the wood. Once it is dry you can hang it!
To hang I pre-drilled 4 holes into the bracket, 2 on each side and anchored the brackets to the wall. I also used a (2) 1.5â³ wood screws to secure the under side of the shelf to the bracket.

Disclaimer: Please make sure with all your projects that you have read your equipmentâs safety manual and are following the recommended safety precautions. We are not responsible for the results of your DIY projects as results can vary based on skill level, materials, and equipment.
Via https://wickedhandy.net/corner-floating-shelves/
source http://wickedhandy1.weebly.com/blog/corner-floating-shelves
0 notes
Text
Bacon Parmesan Spaghetti Squash
Looking for a delicious side dish to any meal that is not only easy but good for you? Spaghetti squash is an extremely versatile vegetable that is low in carbohydrates and calories, contains no fat or cholesterol, and is packed with vitamins and minerals! This makes it the perfect food if you are trying to maintain a healthy lifestyle. Honestly though, while I love that spaghetti squash is good for you, I look forward to it because of how amazing it tastes.
Donât get discouraged by the extensive cooking time for this recipe, it really is one of the easiest side dishes to make. The majority of the cooking time is in the oven so once that step is done the dish comes together quickly. If you want you can bake the squash ahead of time and reheat it when you are ready to make this dish, just add 3-4 minutes to the saute time to make sure your squash is heated through.
Print
Parmesan Bacon Spaghetti Squash
.wprm-recipe-rating .wprm-rating-star.wprm-rating-star-full svg * { fill: #343434; }
Course Side Dish
Prep Time 10 minutes
Cook Time 1 hour
Cooling Time 15 minutes
Total Time 1 hour 25 minutes
Servings 4
Calories 168kcal
Ingredients
1 Each Spaghetti Squash Medium
1 Cooking Spray
1/4 Tsp Salt
1/4 Tsp Pepper Freshly Ground
1/4 Tsp Garlic Powder
1/8 Tsp Cayenne Pepper
4 Ounces Bacon Finely Chopped
4 Cloves Garlic Finely Chopped
1 Each Shallot Finely Chopped
4 Springs Thyme Fresh
1/8 Tsp Crushed Red Pepper
2 Tbsp Parmesan Cheese Grated
Instructions
Preheat oven to 375°F.
Cut 2 small slits on each side of the spaghetti squash. Microwave for 4 minutes. Let cool until the squash is easy to handle.
Cut spaghetti squash in half and scoop out all the seeds. Place on a baking sheet skin side down.
Lightly spray each half with cooking spray. Evenly spread half of the salt and pepper and all of the cayenne and garlic powder to the squash. Add 1 spring of thyme to each half and bake for 35-45 minutes. You will know when the squash is done when you can poke the inside with a fork and the strands will pull easily but are still firm in shape.
While the spaghetti squash is cooling, add bacon to a deep saute pan and cook until brown. Remove the bacon and place on a paper towel to absorb excess grease but leave as much of the drippings in the pan as you can.
While bacon is cooking, gently use a fork and scrap out the insides of the spaghetti squash. Set aside.
Add garlic, shallots, remaining thyme, and crushed red pepper to the pan. Cook for 4-5 minutes on medium heat until the garlic and shallots are translucent. Add spaghetti squash, salt, and pepper. Cook for 5 minutes, mixing well.
Once spaghetti squash is heated through it is ready to eat. Top with bacon and grated Parmesan cheese. Enjoy!
Notes
Typically I prefer shredded Parmesan cheese over grated but for this recipe the grated makes a big difference in the taste of the dish.
This dish makes wonderful leftovers. Simply microwave or reheat in a pan the next day. I would recommend keeping the bacon separate until you are ready to eat because it will get soggy if premixed with the squash.
If you donât have fresh thyme you can substitute with 1/4 tsp dried thyme during the baking process and just skip the thyme during the saute steps. You can also experiment based on what you have on hand. I get a lot of fresh herbs from my garden and Iâve loved this recipe with thyme, oregano, and rosemary.
Looking to make this vegetarian? No problem! Just omit the bacon and use either olive oil to saute or a little vegetable stock for a low fat/calorie option.
Nutrition
Serving: 4Portions | Calories: 168kcal | Carbohydrates: 2g | Protein: 4g | Fat: 12g | Saturated Fat: 4g | Cholesterol: 20mg | Sodium: 375mg | Potassium: 68mg | Vitamin A: 2.2% | Vitamin C: 3.1% | Calcium: 3.9% | Iron: 1.9%
Via https://wickedhandy.net/bacon-parmesan-spaghetti-squash/
source http://wickedhandy1.weebly.com/blog/bacon-parmesan-spaghetti-squash
0 notes
Text
Walnut Banana Bread Muffins
Looking for an easy but absolutely delicious banana bread recipe? This recipe makes banana bread that is full of flavor but still light and moist on the inside. This recipe can be used to make banana bread loaves, muffins, or mini muffins.
Print
Walnut Banana Bread Muffins
.wprm-recipe-rating .wprm-rating-star.wprm-rating-star-full svg * { fill: #343434; }
Course Breakfast
Prep Time 15 minutes
Cook Time 20 minutes
Cooling Time 10 minutes
Total Time 35 minutes
Servings 12 Muffins
Calories 259kcal
Ingredients
Banana Bread â Dry Ingredients
1 cup all purpose flour
1/2 cup whole wheat flour
1 tsp baking powder
1 tsp salt
1/2 tsp cinnamon
1/4 tsp nutmeg
1 cup walnuts chopped
Banana Bread â Wet Ingredients
2 large bananas mashed
1/2 cup brown sugar
1 egg lightly beaten
1/2 tsp vanilla
1/3 cup unsalted butter melted
Topping
2 tbs all purpose flour
1/3 cup brown sugar
1/4 tsp cinnamon
1/8 tsp nutmeg
1 tbs unsalted butter melted
Instructions
Preheat oven to 375°F. Lightly grease muffin tin or line with muffin liners.
In a large bowl, mix all banana bread dry ingredients (except walnuts). In another bowl, mix all banana bread wet ingredients together.
Slowly mix wet ingredient mixture into dry ingredient mixture until well combined. Add walnuts in mixture.
Add batter to muffin tins until 3/4 full as the batter will rise while it is cooking. I find that a cookie scoop works well for this since the batter is on the thick and sticky side.
In a different bowl mix all topping ingredients together and sprinkle on top of the muffins.
Bake for 18-20 minutes. You will know when the muffins are done when you can insert a toothpick in the center of one and it will come out clean. Enjoy!
Notes
For a banana bread loaf, add batter into a lightly greased loaf pan and cook for 45-50 minutes at 375°F. This recipe will make 1 loaf.
For a banana bread mini muffins, add batter into a lightly greased mini muffin pan or add muffin liners and cook for 12-14 minutes at 375°F. This recipe will make 24 mini muffins.
All purpose flour can be used instead of whole wheat flour. I think the whole wheat flour adds a heartier flavor that compliments the banana but this recipe is still delicious without it.
Nutrition
Serving: 1each | Calories: 259kcal | Carbohydrates: 33g | Protein: 4g | Fat: 13g | Saturated Fat: 4g | Cholesterol: 29mg | Sodium: 205mg | Potassium: 210mg | Fiber: 2g | Sugar: 17g | Vitamin A: 4.4% | Vitamin C: 2.2% | Calcium: 4.9% | Iron: 7%
Via https://wickedhandy.net/walnut-banana-bread-muffins/
source http://wickedhandy1.weebly.com/blog/walnut-banana-bread-muffins
0 notes
Text
Spicy Grilled Asparagus
Looking for a delicious way to eat asparagus that isnât steamed? This grilled asparagus is not only easy to make, but adds a whole new flavor to asparagus that youâll love. This is the perfect side dish to your meal!
Print
Spicy Grilled Asparagus
Course Side Dish
Cuisine American
Prep Time 5 minutes
Cook Time 15 minutes
Total Time 20 minutes
Servings 1 each
Calories 41kcal
Ingredients
6 ounces asparagus cleaned
1/8 tsp pepper freshly ground
1/8 tsp salt
1/8 tsp cayenne pepper
1/8 tsp garlic powder
2 sprays cooking spray
Instructions
Preheat grill to 400°F.
Clean asparagus and remove tough ends. The best way to do this is to take the top and bottom of the asparagus and gently bend until the asparagus breaks. Reserve the top portion of the asparagus and throw out bottom stem.
Spray grilling pan with cooking spray. Make sure grilling pan is large enough to accommodate all the asparagus so that it is only 1-2 layers deep for even cooking.
Add asparagus to grilling pan and lightly coat with cooking spray or olive oil. Add pepper, salt, cayenne pepper, and garlic powder and mix well.
Grill for 12-15 minutes, until asparagus is tender. Cooking times may vary based on the thickness of your asparagus.
Enjoy as is or garnish with a little grated Parmesan cheese (Parmesan is not included in nutritional information).
Notes
This recipe is based on one serving so please scale up as needed.
Have leftovers? This is great in a simple egg and asparagus omelet with a little bit of Parmesan cheese!
Nutritional information is based on 4 ounces of asparagus per person after asparagus ends have been removed.
Nutrition
Serving: 4oz | Calories: 41kcal | Carbohydrates: 5g | Protein: 2g | Fat: 1g | Sodium: 294mg | Potassium: 229mg | Fiber: 2g | Sugar: 2g | Vitamin A: 19% | Vitamin C: 7.7% | Calcium: 2.7% | Iron: 13.5%
Via https://wickedhandy.net/spicy-grilled-asparagus/
source http://wickedhandy1.weebly.com/blog/spicy-grilled-asparagus
0 notes
Text
Spicy Grilled Potato
Looking for a simple yet delicious grilled potato recipe? This Spicy Grilled Potato Recipe will give you the perfect side to your meal, with a potato that is not only full of flavor, but also has that amazing crispy potato skin. Try it today!
Spicy Grilled Potato
Print
Grilled Spicy Potato
Course Side Dish
Cuisine American
Prep Time 5 minutes
Cook Time 20 minutes
Resting Time 10 minutes
Total Time 25 minutes
Servings 2 Halves
Calories 90kcal
Ingredients
1 10-12 ounce Russet Potato Cleaned
1/4 tsp Cayenne Pepper
1/4 tsp Salt
1/4 tsp Pepper Freshly Ground
1/4 tsp Granulated Garlic
8 Spray Cooking Spray
Instructions
Preheat Grill on Med-Low Heat (about 380°F-400°F)
Cut two small slits on each side of the potato. Microwave for 5 minutes, flipping half way through. If you have a larger potato (more than 16 ounces, add 1 additional minute).
Let cool for 10-15 minutes. This will not only make handling the potato easier, but it will help keep the inside of the potato from falling apart during preparation and grilling.
Cut potato in half and place skin side up.
Spray potato with cooking spray. Sprinkle half of the cayenne pepper, salt, pepper, and granulated garlic evenly on the potato skins. Lightly spray potato skins with cooking spray. This will help keep the spices in place and make the potato skin crispy when it cooks.
Flip potato over and repeat step 5.
Grill potato for 20 minutes, flipping half way through. Add butter and enjoy!
Nutrition
Serving: 1Half | Calories: 90kcal | Carbohydrates: 19g | Protein: 2g | Sodium: 296mg | Potassium: 444mg | Fiber: 1g | Vitamin A: 1.9% | Vitamin C: 10% | Calcium: 1% | Iron: 4.5%
Via https://wickedhandy.net/spicy-grilled-potato/
source http://wickedhandy1.weebly.com/blog/spicy-grilled-potato
0 notes
Text
Easy Spicy Grilled Corn
Looking for an easy but crowd pleasing corn recipe for your next cook out? Not only is this recipe simple, but can be made ahead of time and put on the grill whenever you are ready, leaving you time to focus on the rest of your meal.
https://youtu.be/2pNWJFOc8n0
Easy Spicy Grilled Corn

Looking for an easy but delicious way to grill corn? Try this spicy version at your next cookout!
1 EACH CORN ON THE COB
1/8 TSP CAYENNE PEPPER
1/8 TSP SALT
1/8 TSP PEPPER (FRESHLY GROUND)
1/8 TSP GRANULATED GARLIC
2 SPRAY COOKING SPRAY
PREHEAT GRILL ON MED-LOW HEAT (ABOUT 380°F TO 400°F)
CLEAN HUSK FROM CORN
PLACE CORN ON A SHEET OF ALUMINUM FOIL. SPRAY BOTH SIDES OF THE CORN WITH COOKING SPRAY.
SPRINKLE CAYENNE PEPPER, SALT, PEPPER, AND GRANULATED GARLIC EVENLY ON THE CORN AND WRAP WITH ALUMINUM FOIL.
PLACE CORN ON THE GRILL FOR 20 MINUTES, FLIPPING HALF WAY THROUGH. *IF YOU ARE UNABLE TO GRILL? DON’T WORRY! THE CORN CAN BE COOKED IN THE OVEN AT 425°F FOR 15 MINUTES AND STILL BE JUST AS DELICIOUS.
UNWRAP CORN FROM FOIL AND ADD BUTTER IF DESIRED. ENJOY!
Via https://wickedhandy.net/easy-spicy-grilled-corn/
source http://wickedhandy1.weebly.com/blog/easy-spicy-grilled-corn
0 notes
Text
DIY Garden Planters
Want to upgrade the look of your outdoor space without breaking your budget? Love the look of wooden planters but hate the expensive price tag? These DIY planters are the perfect weekend project that can be customized for your exact style and only cost $36 to make.
For this project, I decided I wanted a larger tapered planter for the top of my driveway to add a little color to the front of my house. These plans will build one 24.5″ tall planter that is 14.75″ wide at the top. You can modify this plan to fit your specific needs by scaling up or down. I would recommend that you buy the plastic pot that is going to go inside the planter first to make sure you are building the wooden planter in the right dimensions.
DIY Garden Planter
Active Time: Half a day
Total Time: 2 Days (depending on how you decide to finish your planter)
Materials:
(5) 1″x4″x8′ Common Boards
12″ Plastic Square Pot
1.5″ 18 Gauge Brad Nails
1″ 18 Gauge Brad Nails
Wood Glue
Plasti Dip
Finish of Your Choice
Tools:
Router Saw
Nail Gun
Table Saw
Clamps
Sander
The first step is to cut all the side pieces. Since my planter is 24.5 inches all, I need 7 pieces on each side. Each board is tapered on the side by 5° so I would suggest cutting all 4 pieces for each layer at once to make sure you get a consistent cut. The easiest and quickest way I found to do this was to cut your first piece to the size you want it, then put a stopping block on your router fence to ensure each board was the same size. Then I just made the cut on my router saw at a 5° and flipped the board for the next cut. This made it really easy since you didn’t have to measure between cuts or adjust the saw. Your boards should look like this:
To make the next layer, just line up your wood to the completed board (line up will be easy since the edges should both be 5°) and mark the next cut with a straight edge. Repeat this until all your layers are cut.
Now you need to build each complete layer. For this you just take all 4 side piece and glue them together and secure with a nail gun and 1.5″ 18 gauge brad nails. This part can be slightly frustrating since the slight angle makes it a little difficult to keep the boards steady while nailing but once you do it a couple times it goes pretty quickly.
Now you are ready to stack the layers together.
Once you confirm that it is the height that you want and all the pieces stack together properly, it’s time to glue the layers together. This not only adds stability to the planter but it will make it easier to put the corner pieces on next. I started with the bottom layer on a couple scrap 2x4s to make it easier to clamp the layers together at the end.
While this dries it is time to make the corner pieces. The corner pieces are going to not only make the final product look great, but will also add feet to the planter which will limit the amount of the planter exposed to the ground directly. For the legs I used the same wood as the body of the planter and cut it in half lengthwise on my table saw with the blade at a 45°. I then cut the wood down into (8) 26.5″ pieces.
Once I’ve sanded down the pieces, it is time to put them together. Just take two of the pieces and fit the 45° angles together at the corner. Then add glue and secure with 1″ finishing nails. Repeat this step until all the legs are constructed.
Now, since everything is being cut at and angle you might find that not all of your pieces have a perfect seam where the two pieces meet. This might not be a big deal depending on how you finish your piece, but if you are leaving it unfinished or using stain, that gap may bother you. I know gaps like this will bug me because I know they are there. Here is a quick and easy trick to fix it:
Add a little wood glue to the uneven seam. Sand the wood at the seam, the wood shavings and the glue will mix together to fill the gap. Once the glue has dried completely sand down any excess glue and the gap is gone! (Sometimes you will still have a smaller gap if the original gap was on the larger side, you can just repeat the process until it is completely gone).
Once you are happy with the way your legs look, it’s time to complete the final step of construction. Since the planter’s sides are tapered, the legs need to be cut at an angle at the bottom so they sit on the floor evenly. To do this simply set your table saw at a 5° and with the point of the leg facing up, trim the bottom of the leg. Once you do this with all the legs, make sure they are all the same exact length so the planter has no chance of wobbling once the project is done.
Now that you have the legs and the body of the planter built, it’s time to sand everything before you assemble. Once everything is sanded, you simply line up the top of the planter with the top of the leg (make sure it is the side that doesn’t have the 5° angle) and glue in place, then secure with more finishing nails. Wipe off any excess glue.
While that is drying it’s time at cut the finishing trim for the top of the planter. For this I used the extra scraps from our wood that was 1.5″ wide wood that was 16″ long. I then lined it up on the top of the planter, securing with wood glue and finishing nails. Be careful on this step with the nail gun since the planter is at an angle so you don’t have nails coming through the sides of your planter.
The final step for assembly is to add bracers to the inside of the planter that will hold the plastic pot. I decided I wanted to add smaller supporting bracers to longer pieces of wood that would go across the whole planter length, so when the pot was in there would be no visible gaps. To do this I took 4 pieces of 1.5″ x 8″ wood and installed them 3″ down from the top of the planter. To make sure I was getting it exactly even all the way around I used a scrap piece of 3″ wood. For installation I simply added a little wood glue and secured with finishing nails.
Once this is done I used 1″ x 8″ strips that I nailed into the bracers to make the ledge the planter will sit on. Once this is done you can add the pot into the planter. Keep in mind depending on what pot you picked for your project that the dimensions of the ledge could be different based on what height you want to the pot to be at so make sure to double check the dimensions before you cut.
Once that is completed you are ready to finish the planter however you like. Make sure no matter what you seal the planter with some kind of waterproofing protective finish so you don’t have to worry about the wood rotting over time if they would be exposed to moisture.
For my planter I used 2 coats of Rust-oleum premium indoor/outdoor navy latex paint, then sprayed the planter with Krylon Colormaxx satin bright white indoor/outdoor paint. Once that dried I lightly sanded the planters to have to blue come out, giving it an aged look. I then sealed the planter with 2 coats of Thompson’s WaterSeal multi-surface clear waterproofer. That’s it, now you can enjoy your planter for years to come for a fraction of the retail price!
Via https://wickedhandy.net/diy-garden-planters/
source http://wickedhandy1.weebly.com/blog/diy-garden-planters
0 notes