
Don't wanna be here? Send us removal request.
Statistics
We looked inside some of the posts by webonli-blog and here's what we found interesting.
Average Info
Notes Per Post
0
Likes Per Post
0
Reblog Per Post
0
Reply Per Post
0
Time Between Posts
4 days
Number of Posts By Type
Text
17
Last Seen Tumblr Blogs


Fun Fact
Post activity is at the highest at 4:00 pm EDT; notes peak at 10:00 pm EDT.
Text
Websites, Forums and Guest Blogs

While these strategies for boosting your web traffic may be a bit more time-consuming, they pay a steady long-term return long into the future. Unlike with social media, the links you post in the comments sections of other websites, and forums, and the guest posts you curate, don't continue to get overshadowed by newer material, allowing them to remain visible for anyone who lands on a particular discussion page, website, or specific post. The idea here isn't to go crazy and start spamming links to your site everywhere you can, but to find relevant discussions on competing websites and other similar amateur sites that people may often visit to read up on information that pertains to your business as well. Commenting on Competing Websites When using competing websites to gain more traffic to your website, ensure that you only post a few links to your own business site, on each website. If you get too crazy with commenting on competing sites with a link back to your site, the site administrators may take action and remove the links or even remove your comments altogether. To make the best use of competing websites, you want to make sure that the comments you make are meaningful and add value to the topic that is being discussed; otherwise, you'll come off as nothing more than a spammer, effectively ruining your chances of increasing traffic to your site. Read the full article
0 notes
Text
How To Increase Your Conversion Rates

Once your sales funnel is set up and live, all that’s left to do is to watch as the sales come in and then tweak it to try and generate more revenue and profit. The best way to do this is to increase your conversion rates at each stage of the funnel. How do you make sure that more people go from visiting your site to signing up for your email list? And how do you encourage them to go from buying your cheapest item, to buying your most expensive item? Investment One simple answer is to invest. As money starts to come in from your sales, invest back into your funnel by improving each step of the process. That means making your products better by adding more sheen and more freebies, it means making your videos better, it means investing in more marketing and it means building a better brand with the right logo and the right web design. Hire writers, hire web designers and generally keep growing and improving your business. Your job is not ‘done’ once your funnel goes live! PPC One of the easiest ways to increase your conversion rates is to improve your targeting. And one of the best ways to get more targeted visitors to your sites, other than using your established ‘routes to market’, is to use PPC to create targeted adverts. PPC is ‘Pay Per Click’ advertising and is most commonly associated with either Google AdWords or Facebook Ads. Both types of advertising allow very precise targeting for your campaigns so you can ensure your ads are being seen by the right people. Read the full article
0 notes
Text
Why You Absolutely Need A Sales Funnel

Imagine if someone came up to you in the street and asked you if you’d like to buy a $5,000 watch. 99.9999% of the time, you would say no to that offer. Why? Well, apart from the fact that you might not want a watch (you are a ‘cold lead' in that respect), there’s also the small issue of trust, recognition and authority. You don’t know who this person is, you’ve been given no reason to trust them and probably won’t want to give them your money. That’s why companies don’t do this. Instead, they give you flyers which you can choose to accept or throw away – but either way, they don’t cost you anything and you won’t feel like you’re being pressured into anything. Other stores do something different: they give away 'freebies'. Walk past Starbucks and you’ll often find them giving away free samples of their new drinks and cakes for you to try. Again, you can easily walk away if you’re not interested and you won’t feel you’re being strong-armed. However, if you like the free sample, then you can come in and try whatever else they’re offering. If you try and sell to people right away on your website though, then you’re the equivalent of someone trying to sell thousand-dollar watches in the street. And if that’s the only thing you’re offering and the only way your visitors can engage with you, then they’re just going to say ‘No thanks’ and leave, giving you no way to contact them again and no way to get them back. Read the full article
0 notes
Text
8 Reasons Why You Should Do Social Media Marketing

Just to be sure, if you're in any way, shape or form unclear as to the immense value of social media marketing, here are 8 reasons why it needs to be part of your comprehensive online marketing plan. Maybe your current plan puts more emphasis on SEM (Search Engine Marketing), maybe you're currently focused on outreach—those are all well and good. But to really round things out and add a lot more value to your current online marketing campaign, social media marketing has to be part of the equation. It doesn't have to take center stage or be your overarching priority, but it has to be part of the total mix. Here are just 8 of the thousands of reasons why your company, regardless of its size, needs to do social media marketing. Reason #1: Social media's huge direct and viral reach If you build a solid page on a social media platform like Facebook, you develop a direct reach. This means a certain percentage of people who like your page will see your updates. While it's true that Facebook has been reducing the organic reach of Facebook pages recently, there's a workaround to that. When people go to your page, you can instruct them to like your page and then click your page's setting to show your updates first. You might want to show a video that teaches them how to do this. You might even post an animated gif. Whatever you do, clue people in that they can change their settings to see your updates first. #contentmarketing #socialmediacontent #socialmediamarketing Read the full article
0 notes
Text
8 Reasons Why You Should Do Social Media Marketing

Just to be sure, if you're in any way, shape or form unclear as to the immense value of social media marketing, here are 8 reasons why it needs to be part of your comprehensive online marketing plan. Maybe your current plan puts more emphasis on SEM (Search Engine Marketing), maybe you're currently focused on outreach—those are all well and good. But to really round things out and add a lot more value to your current online marketing campaign, social media marketing has to be part of the equation. It doesn't have to take center stage or be your overarching priority, but it has to be part of the total mix. Here are just 8 of the thousands of reasons why your company, regardless of its size, needs to do social media marketing. Reason #1: Social media's huge direct and viral reach If you build a solid page on a social media platform like Facebook, you develop a direct reach. This means a certain percentage of people who like your page will see your updates. While it's true that Facebook has been reducing the organic reach of Facebook pages recently, there's a workaround to that. When people go to your page, you can instruct them to like your page and then click your page's setting to show your updates first. You might want to show a video that teaches them how to do this. You might even post an animated gif. Whatever you do, clue people in that they can change their settings to see your updates first. Read the full article
0 notes
Text
Creating A Targeted Facebook Group

One of the best ways to find leads in your niche and spark meaningful conversations with them is by creating a group that is targeted at their interests and behaviors, and in this lesson we are going to show you how to create one of your own, the easy way. Getting Started Okay, so the first step is to sign into your Facebook account. Next, you are going to click on the “Create” tab in the top bar menu, and then you are going to click on the “Group” option. Creating A Group Now you are going to add the info to personalize your group. Start by entering the name of your group into the “Name Your Group” field. Now, the name of your group doesn’t need to be the name of your brand or business, because you already have a page for that. Instead, the best strategy is to use a name that targets the interest, needs, or behaviors of your potential customers. You can for example use the keywords or search terms that describe the problem that your products solve, or the category of your products or services. In this example, we are going to create a group for people looking for cheap products in our niche, so we’ll start the name with the word “Cheap”, followed by the category name of the product. This way, we are going to use a high-traffic search name as the name of our group. Next, you are going to add the email addresses or Facebook usernames of people that you’d like to invite to join the group. Read the full article
0 notes
Text
Reverse Engineer Your Competitors' Top Content
A question that's probably on your mind is, "How do I know which content to produce?" Well, there are two main ways to do this: You can try to figure things out on your own and engage in all sorts of experiments, or you can just simply allow your competitors to do your homework for you. I hope you can see which path is the easiest. It should be obvious. If you are sending the very best content on your niche, your original content must be at the same level or better. Otherwise, your followers are not going to take the bait. They're not going to trust your brand. They appreciate the fact that you're collecting all this information, and they're probably going to stick around and follow your social media accounts, however, you can't count on them to do much of anything else. There's really no incentive for them to join your email list. Why should they? Your content is not that great. They only need to compare the kind of original content you produce with the other top notch third party stuff you're sharing to see your weakness. Do you see the problem here? If you want your brand to be credible, you have to produce top content. Thankfully, this is easier than you think. Simply reverse engineer your competitors. Look at their most successful stuff. How do you know? Look at the social media indicators of their content. #contentmarketing #socialmediacontent Read the full article
0 notes
Text
Reverse Engineer Your Competitors' Top Content
A question that's probably on your mind is, "How do I know which content to produce?" Well, there are two main ways to do this: You can try to figure things out on your own and engage in all sorts of experiments, or you can just simply allow your competitors to do your homework for you. I hope you can see which path is the easiest. It should be obvious. If you are sending the very best content on your niche, your original content must be at the same level or better. Otherwise, your followers are not going to take the bait. They're not going to trust your brand. They appreciate the fact that you're collecting all this information, and they're probably going to stick around and follow your social media accounts, however, you can't count on them to do much of anything else. There's really no incentive for them to join your email list. Why should they? Your content is not that great. They only need to compare the kind of original content you produce with the other top notch third party stuff you're sharing to see your weakness. Do you see the problem here? If you want your brand to be credible, you have to produce top content. Thankfully, this is easier than you think. Simply reverse engineer your competitors. Look at their most successful stuff. How do you know? Look at the social media indicators of their content. Read the full article
0 notes
Text
The Classic Approach To Social Media Marketing And Why It's A Waste Of Your Time
Before I jump into the actual meat and potatoes of this training, I need to devote some real estate to how other people are doing social media marketing. I need to do this because it's very tempting for people to engage in the same practices. I can see where they're coming from. It is easy. It's like seeing some chump change in front of you and it's almost irresistible to fight the urge of bending over and picking up that change. But when you do that, it will throw you off. It will give you a false sense of incentive or reward and don't be surprised if you end up giving into your worst instincts only to walk away with less than nothing. This happens all the time because human beings, being the way they are, would always take the path of least resistance. Who can blame them? But by warning you about how this works out, it is my hope that you stay away from this and focus instead on investing your time, effort and energy on the right way to do things. The Classic Approach to Social Media Marketing So what is the classic approach to social media marketing? Well, it's actually quite simple. Whether we're talking about Instagram, Twitter or Facebook, you need to only "follow", "like" or "friend" people who are interested in your niche. You connect with all these people, and then after you have followed them, a lot of them would actually follow you back. For example, on Twitter, for every 100 follows, don't be surprised if maybe 20 to 30 people follow you back. Read the full article
0 notes
Text
Content Curation: Your Secret Social Media Marketing Weapon
After picking the specific sub-niche that you're going to be targeting and doing advanced research on where your sub-niche or niche segment audiences are located on social media platforms, the next step is to find content. I've got some good news and some bad news. The good news is that you stand to save a lot of money. The bad news is that you need to put in a lot more time and pay attention to details. There are no two ways about it. You cannot drop the ball when it comes to the quality of the content that you are going to be sharing on your social media accounts. Each and every piece of content you share must build your brand. This is non-negotiable. You can't just pick random pieces of content that somehow, some way, has something to do with your niche. That's not going to help you get the right eyeballs. That's not going to help you establish the kind of credibility and authority you need to eventually convert highly specific and qualified traffic from social media into cold, hard cash. What is Content Curation? As I've mentioned above, you stand to save a lot of money with content curation. This should be obvious. After all, you're not going to be using the content that you yourself created. Content curation is all about picking other people's content and sharing those materials on your social media accounts. This creates a win-win situation. Since you're sharing links and descriptions of such content, the creator of that content gets free traffic. Read the full article
0 notes
Text
How Facebook Retargeting Works

Chances are that you have been on the receiving end of retargeting at some point or other. You’ve probably also heard people talk about retargeting without really knowing what it is. Maybe your mom exclaimed at some point how weird it was that she kept seeing ads for a new heating unit… and just when she was shopping for a new heating unit! How did Facebook know to show her those ads? That’s some incredible coincidence! Of course, you and I know that this is not a coincidence at all. But perhaps you’re not entirely sure how precisely it works. The answer is cookies. Cookies are actually small files that can get saved on your computer via the browser. These files are stored there by websites, and that in turn enables the website to identify that user again in future. This is how you can stay logged into a website when you return to it later on – because the website checks for the file, which identifies you. This also means that other websites can interact with cookies placed by yours. In the case of Facebook retargeting, your website might leave a file on the visitor’s computer, and then Facebook can identify that file in order to use it to show you the correct ads. Any page on a website can leave a cookie, which means that not only can you tag users, you can also tag their specific actions. So, one cookie might tell Facebook that a visitor came to your website, but another might tell Facebook that they looked at THIS specific product and then added it to their checkout but stopped just short of clicking buy. The cookie can even contain additional information – such as the time of day that they were active. Facebook retargeting actually allows you to do several different things with this basic functionality though, and uses some unique terminology to describe the various different methods. These can work in slightly different ways in some cases too. Many of these fall under the category of the ‘Custom Audience’.
Custom Audiences Explained
Custom audiences on Facebook are basically lists or filters that you create in order to show your adverts only to specific members of the public that you have somehow pre-selected. One example of this is the ‘Website Traffic’ custom audience. This is the type we just discussed – audience members who have visited your website OR your specific web pages. That allows you to use cookies to identify visitors at different points in your sales funnel, and thereby help to push them toward clicking buy. We’ll go into depth on how to set this up, as well as how to make it work wonders for you in a moment. First, we should address the two other types of options here. One is the Customer List. A customer list is exactly that: a list of people with their details. You will collect things like their emails, their phone numbers, their Facebook IDs, etc. You can also integrate this with email marketing tools such as MailChimp and simply upload an entire list. Facebook will then match those visitors to its own huge user base, looking for users that added those same numbers and emails as their contact details. This form of retargeting works slightly differently in that it doesn’t look for a specific action the user has taken, but rather looks for leads that you have already generated. A lead is any contact that has had some kind of interaction with your brand and that you have the contact details of. Leads are important because they give you the option to take further action and convert them into customers. Leads can further be broken down into cold leads, warm leads, and qualified leads. The more engaged with your brand the lead is, the ‘warmer’ they are, and the more likely they are to be persuaded to buy from you. If someone has willingly and knowingly subscribed to your email list, then you should certainly consider them ‘warm’ – as they clearly know your brand and at least want more information about them. And of course, you can always create lists based on the engagement of the users. Some autoresponders (email list tools) will allow you to organize your lists based on how many emails they open, and how many links they click. Likewise, you may have one email list for people who are interested in your brand generally, and another list for people who want to hear about news for a specific product. In that way, this form of retargeting can become just as highly targeted. Finally, the ‘App Activity’ option is for retargeting to people who have taken an action of some sort in an app or game that you created. This is a useful option for those marketing across multiple formats, but otherwise works similarly to the two mentioned above. There are other methods you can use to target your audiences. You might use a ‘Lookalike Audience’ for instance, which looks for potential customers that share similar properties with your lists and your warm leads. Likewise, you can filter audience members based on a whole range of different factors from their interests, to their age, to their geographic location. These alternative forms of Facebook marketing may be useful when used in conjunction with retargeting strategies, but are distinct and separate from that approach.
Facebook Dynamic Ads
Another great feature Facebook has introduced to make retargeting that much simpler, is its dynamic product ads. These are adverts that you only have to create once, but which will adapt to show visitors the products that are likely to be most relevant to them. Facebook’s dynamic product ads will employ a simple template which will show a number of different products, along with their details, depending on the data provided by the cookie or the app SDK you provide. To use this, you will need to create a product catalog, which Facebook lets you do by adding your products through your account. It’s worthwhile doing, as it allows you to effectively turn Facebook into a storefront! Read the full article
0 notes
Text
Creating Optimized Facebook Marketing Posts

Facebook pages are much more than virtual billboards, they’re basically social profiles for brands, companies, and businesses, and they give you all the tools you need to interact with your audience. The primary and most basic tool for interaction is Facebook posting. With Facebook posts you can establish thought leadership by engaging with users through comments, images, videos, and curated content. But Facebook posting can be ineffective if not done right, and in this lesson, we are going to teach you how to create optimized Facebook marketing posts that reach more people and generate more engagement.
Creating And Composing A Facebook Marketing Post
To create a post on Facebook, you have to start by going to your page and clicking on the “Write a Post” field on top of the page timeline. Here is where you are going to compose your marketing posts. Now, the secret to creating an effective marketing post is to compose the right structure.
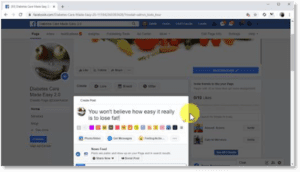
Start with a headline. The post headline is a one-line description of the content in your post. Think of it as a blog post title. You have to include an actionable phrase or word, such as “read”, or “watch”, or “you won’t believe”, or information that makes the user stop to read the headline. Now you are going to compose the post copy below. This is going to depend on the content that you are going to share. In general, your post copy is going to be a brief summary of the content that you are going to share. Now, a little-known secret to increase your reach is to use keywords in your post as hashtags. Simply identify the keywords in your post text and type a hashtag symbol right before them. This will transform them into hashtags that make your post discoverable in Facebook searches.
Adding Media And Content

Now you are going to insert the media or content that you are going to share, into your post. If you are going to share an image or video, you will simply have to click on the “Photo/Video” button to upload your media. This is crucial, because text-only posts don’t generate as much engagement as image or video posts. The type of media that generates the most engagement on Facebook are info-graphics, short videos, and images, so make sure to always include them in your posts. For this example, we are going to share a blog post from our website. When you insert a link into a Facebook post, Facebook will fetch a preview that includes the feature image from the URL into your post. A word of warning: if you are going to post a video, make sure to upload it directly to the post using the “Photo/Video” button, instead of sharing it from an outside link. If you share a video from an outside source, the Facebook algorithm basically ignores it, and won’t push it to the timeline of other users. It will only be visible to users that visit your timeline! Okay, so let’s proceed with the example. To insert a link, simply paste the URL below your post text. Once it fetches the preview and inserts the clickable link, you simply have to delete the text URL you pasted.
Publishing A Post

You can see how your post is going to look in the timeline by clicking on the “Preview” button. In the preview window, you can see a desktop preview and a mobile preview. Once you are ready to publish your post, click on the “Share Now” button. And that’s it! This is how you are going to compose your Facebook post from now on to get the most engagement and the best results possible. Next up, we are going to show you how to easily boost the reach of your newly published post, so stay tuned! Read the full article
0 notes
Text
Creating A Facebook Content Marketing Calendar And Scheduling Posts

If you’ve been doing Facebook marketing recently, then you should be familiar with the term “content marketing”. If you’re not, content marketing is simply the use of content in any format to drive and achieve marketing results.

Now, the thing about content marketing is that it has to be strategic. If you want to drive results using content, then you need to know when’s the right time to launch your content pieces. This is especially important when you do content marketing on social media, because not all social media sites generate the same level of engagement at the same times. In fact, it’s been found that users on Facebook engage the most at different times than users on Twitter, or on Instagram, and you need to use this information for your advantage. The good news is that we’ve tracked and analyzed how our Facebook followers react to our content, when they engage the most, and when they interact the best, and we’ve prepared a content marketing calendar that you can apply in your Facebook Marketing campaign.
Planning Your Content Marketing Calendar

Before you sit down to decide your social media posting schedule, it is important that you actually know what you’ll post. Having a clear idea of the type of content you will publish will make it way easier for you to plan your content marketing schedule: Make an audit of the type of content that you have created in the past and identify the topics that have generated the best results. If you are new to social media or content marketing in general, simply do some research about the topics that people in your niche like the most. Find out what formats generate the most engagement, and what content has gone viral in the past. When you are clear about this, you will be able to identify several topics and keywords that you can use as inspiration to create content. Find and collect highly informational content pieces from competitors in your niche. Look for videos and blog posts. Follow authority accounts in your niche, examine their Facebook posts, and save the ones that you think your audience will like. Once you have identified the best topics to share in your page and business, and after you have collected a good number of content pieces, videos, and Facebook posts, you are going to prepare a posting schedule according to these guidelines: The best times to post on Facebook are on Mondays from 8 AM to 4 PM, on Tuesdays from 7 AM to 4 PM, on Wednesdays from 8 AM to 4 PM, on Thursdays from 8 AM to 4 PM, on Fridays from 7 AM to 4 PM, and on Sundays from 9 AM to 1 PM. Saturdays are a low-engagement day all across the board. The best posting frequency on Facebook is 2 posts per day. What you’ll do is to prepare a calendar where you’ll mark what content pieces you are going to post in the future, in their respective days and times.
Scheduling Your Posts

Now, it is important that you learn how to automate scheduling. This way you won’t have to stay vigilant of those dates when you have to post content, because you can simply create the posts ahead and to schedule when they’ll be published. To create a scheduled post, go to your Facebook page, and click on the “Publishing Tools” tab in the top bar menu. Next, click on the “Create” button. What you have to do next is to create a page post like you would normally do. First, compose your post headline and copy into the text field. Next, insert the media or link, and add the other customizations you want to add. Now that you’ve created the post, you are going to schedule it by clicking on the “Share” menu button, and then clicking on the “Schedule” option. Next, click on the calendar function to select a date to publish your post. Now enter the time when you want to publish the post on that day. Then click on “Schedule”. To finalize, click on the “Schedule Post” button. Your post will enter the scheduled queue, which you can check by clicking on the “Scheduled Posts” tab under the “Posts” menu. And that’s it! Read the full article
0 notes
Text
Integrating A Lead Capture Campaign On Your Facebook Page

Did you know you can use your Facebook page to capture email leads with just a few clicks and a simple integration? In this blog post, we are going to show you how to integrate your mailing list on your Facebook page.
Getting Started

The right way to integrate lead generation to a Facebook page is by connecting to an email marketing service. There are many email marketing services you can choose from, and in this lesson, we’ll be using MailChimp. If you use a different email marketing service there is nothing to worry about though, as email marketing integration is the same across the board, which means you can apply very similar steps regardless of the platform you use!
Integrating Your Mailing List And Your Facebook Page
Okay, so let’s start by signing in to the MailChimp dashboard. From here you’ll click on the profile menu, and then on the “Account” option. In the following page, you are going to click on the “Integrations” tab.

Now you are going to click on the Facebook tab. Then on the “Login” button. Make sure that you are logged in to your Facebook account when take this step! Next, click on the “Continue as” button, and then on “Ok” to give MailChimp access to your Facebook account and pages. On this same page, click on the “Page to Use” menu button, and select the page where you’ll integrate the sign-up form. Now click on the “Audience to Use” menu button to select the list where you’ll save your Facebook leads. Next, select “Yes” under “Use Sign Up Tab”. Now click on the “Form Theme” menu button and select “Facebook-esque”. Now you are going to enter the label of the sign-up tab on your Facebook page into the “Tab Label”, and then click on “Save”.
Checking Your Facebook Page Lead Capture Form

Let’s now go to our Facebook page to see the sign-up form that we just integrated. The form will integrate in the page tabs menu on the left, so that’s where you are going to check. And there you go; this is the sign-up form tab label we set up. Let’s click on it to check it out! As you can see, a complete sign up form integrated with your Facebook page, with just a few clicks! Now your page followers and visitors can join your mailing list easily. Read the full article
0 notes
Text
Creating A Facebook Retargeting Campaign

There are going to be a lot of times when you get website visitors that will simply forget that your business exists a few minutes after, even if they liked your content and intended to visit your site again, simply because they get distracted with something else. Because of this, Facebook offers an amazing marketing service called retargeting. With retargeting, Facebook tracks users that visit your website and shows them your content when they’re on Facebook. This is a very technical marketing method for advanced users, but in this lesson, we are going to show an easy way to create Facebook retargeting campaigns in just a few clicks.
Getting Started
Retargeting works by tracking Facebook users that visit a website using a tracking code called the Facebook Pixel. The Facebook Pixel is simply a line of code that you have to install on your website once, and you will find it right on the ads manager. So, you have to start by visiting the “facebook.com/adsmanager” URL while logged in to your Facebook account. Next, you are going to click on the menu icon in the top bar and then on the “Pixels” option under the “Measure and Report” section. This will take you to the “Data Sources” page, where you’ll find the pixel code corresponding to your ads account. To get your pixel, click on the “Set Up Pixel” button, then click on “Manually Add Pixel Code To Website”. Now you are going to click on the code to copy it to your clipboard, so you can install it on your site.
Installing The Retargeting Code On Your Site
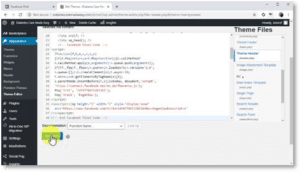
You are going to install this code into the header section of your site. This will depend on what type of content management system you use. We currently use WordPress, so in this example we are going to show you how to install it on a WordPress site, though adding the code in that section of your site is going to work the same on other CMS. If you’re using WordPress, go to your site’s dashboard, move over the “Appearance” tab in the sidebar menu, and click on the “Theme Editor” option. In the following page, locate “Theme Header” under the “Theme Files” menu and click on it. What you’ll do now is to locate the “” tag and paste the pixel code right above it. Now click on “Update File” to install the code on your site. Now go back to where you left on Facebook and check that the pixel is active. Once the pixel shows activity, click on “Continue”. In the following page, click on “Manually Add Event Code”. Now click on the “View Content” option. Scroll down this page and copy the event code. Now go back to WordPress and paste this code right below the “” tag. Then, click on “Update File”. Awesome! Now the tracking code is fully installed and working on your site, so you can create retargeting campaigns, so let’s get to it!
Creating A Retargeting Campaign
Creating a Facebook retargeting campaign is fairly similar to creating a traffic campaign, so what you’ll do is to go to your ads manager dashboard, and then you’ll click on the “Create Ad” button.

Once in the campaign creation page, select “Conversions” as the marketing objective. Next, enter the name of this campaign, click on “Set Up Ad Account”, and then click on “Continue”. Now it is time to set up the ad set. Start by entering the name of this new ad set into the “Ad Set Name” field. Now move to the “Conversion” section. Make sure that “Website” is selected as the “Destination”, Then, click on the “Conversion Event” field and select “View Content” as the conversion event. Leave the “Cost Control” field empty and move to the “Audience” section. Here we are going to define the retargeting audience just like we did in the previous lesson, so let’s start by selecting the target locations. Next, let’s select the “Age”, and then the “Genders”. Lastly, let’s open the “Detailed Targeting” section to define the detailed targeting with keywords. In “Placements” we are going to leave “Automatic Placements” selected, so let’s move to the “Budget and Schedule” section. Here you simply select “Daily Budget” as the budget strategy, and “Run My Ads Continuously Starting Today” as the schedule.

Enter your daily budget into the amount field, and click on “Continue” to start creating the ad. First, enter the name of the retargeting ad into the “Ad Name” field. Now move to the “Identity” section, click on the “Facebook Page” menu button, and select your Facebook business page. Because your retargeting targets come from viewing on your site, the best strategy here is to show them more content by targeting them with one of your page posts. So, what you’ll do now is to click on the “Use Existing Post” tab. Now click on the “Select Post” button. Next, select the Facebook post that you are going to retarget and click on “Continue”. Now preview your retargeting ad in the preview window to the right, click on “Review” to review your campaign settings, and then click on “Confirm” to launch the campaign. And that’s it! An easy way to create Facebook Retargeting campaigns so you never miss the chance of converting a website visitor into a Facebook lead! Read the full article
0 notes
Text
Creating A Facebook Page To Promote Your Business

Let’s start at the very beginning of your Facebook marketing journey: creating a Facebook page to promote your business. This is a very important step that you can’t afford to half bake, because a Facebook page for your business is the channel that you are going to use to build your presence and audience. Having a Facebook page also makes it easier for you to set up advertising campaigns and capture email leads on the platform!
Getting Started

Creating a Facebook page for your business is free, and all you need is a Facebook account and your business info at hand. To get started, simply log in to your Facebook account, click on the “Create” tab in the top bar menu, and then click on the “Page” option. Next, click on the “Get Started” button in the “Business or Brand” section.
Customizing And Creating Your Page
Now you are going to enter the name of your brand or business into the “Page Name” field. Now type the keyword that best describes your niche into the “Category” field. Select a category from the results, and then click on “Continue”. Awesome job! Now it's time to start customizing the page. First, click on “Upload a profile picture” to add a profile photo to your Facebook page.

Next, click on the “Upload a cover photo” button to upload a cover photo to make your Facebook page much more attractive. Great job so far! Now it's time to add a contact CTA button and your business information to your Facebook page. To add the CTA button, click on “Add a button”, and then click on the “Contact you” drop-down icon. Now you are going to select the contact method you want to integrate with your page. The options include “Contact us”, “send message”, “Call now”, “Sign up”, and “Send email”. Your choice will depend on how you want to be contacted, and each option allows you to integrate a different method. For this example, we are going to select “Send message”. This method allows users to send a message directly from their Facebook accounts using Messenger. So, select your contact method, and click on “Next”. In the following window, you’ll simply have to select the service users will use to contact you, and then to click on “Finish”. You can start building your page’s audience by sending invites to your Facebook friends in the “Invite your friends to like your page” section. Alright, now it is time to add your page info. To do this, click on the “Edit page info” tab on top. Start by adding your “About” info into the “Description” field and click on “Save changes”. Okay, now you are going to move to the “Contact” section to add your contact information. First, add your “Phone number”. Then add your “Website”. And then add your “Email address”. Remember to click on “Save changes” to save your contact info.
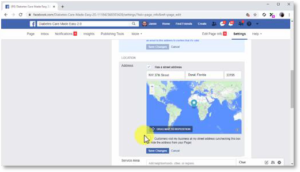
Now move to the “Location” section and enter your address. In case your business doesn’t have a physical address, simply uncheck the “Has a street address” option. Or, in case that you enter your business registration address but don’t take store visits, uncheck the “Customers visit my business at my street address”. This is the setting you’ll choose if your business is online only. Okay, so click on “Save changes” and move to the “Hours” section. Here you are going to select the open hours that you’ll show on your page. If you have a physical store or business that customers can visit, select “Open on selected hours”, then select your open days and times below. If your business is 24 hours or always online, you can select “Always open”. Now, if you’re online only and don’t take live orders or consultations, select “No available hours”. You can click on “Save changes” after selecting your hours. You can enter additional information in the “More” section. Let’s start with the “Impressum” field, where you have to add a declaration of business ownership if you reside in a country where it is required by law. In the “Products” field you can add the names of products and services that you sell. Lastly, in the “Privacy Policy” field you can add your privacy policy and terms of service. This is especially useful when you take customer information on your page, or when you contact your page followers. And that's it! You just created your Facebook channel, and you are ready to get your Facebook marketing going. Read the full article
0 notes
Text
Unlock The Power Of Repurposed Content


When you create original content for your blog or website, you already know that this content has some sort of traction in your niche. You already know that there is a significant amount of demand for this particular type of content. Not only did you base your decision on the social signals of your reverse engineered competitor’s content, but you're also picking out content choices based on your own statistics. In other words, you're basing your best content on tried and proven material. You're not taking shots in the dark, you're not taking wild guesses, you're not crossing your fingers and hoping that something sticks.
How to Repurpose Your Content
Instead, you have based your decision on what actually works. Congratulations. But you shouldn't stop there. Once you have noticed that this content really performs based on the amount of clicks as well as the social media engagement it gets, the next step is to repurpose that content. Turn them into other types of content, and re-share them on platforms that specialize in those content types. For example, if your blog post is getting a lot of retweets and clicks, you might want to strip the blog post into questions. This isn't all that hard because if you look at any type of content, it consists of answers to questions. The questions may not be obvious, the questions may not be plainly stated, but the content is meant to address certain concerns. These concerns can be reworded into questions. Strip your most powerful and best performing content into a series of questions. Each question then is linked to the article or blog post that answers it. Tweet these and pair them with niche-specific hashtags.

By using automation tools, you can rotate different questions that essentially promote the same piece of content. Since you're rotating hashtags, there's a high chance that different people looking for different segments of your niche would become aware of your tweet and possibly click through. Another thing you can do is turn your article into slideshows. Each article brings to mind many different mental images. Come up with different pictures for each of the topics raised by your article and create a simple slideshow using PowerPoint. Share these PowerPoint presentations on Slideshare. You can also use other tools to create a video from your slideshows. Once you've created these videos, you can obviously share them on YouTube. Alternatively, you can look through the issues you raised in your blog post and turn them into infographics. Infographics are essentially stripped down graphical forms of articles or blog posts. They focus on the most important points you raised and make them easier to understand by the viewer by converting them into pictures. Share these infographics on Pinterest. Finally, you should make sure that all your blog posts or articles have a nice header picture. This way, when you load the link on Facebook, a nice preview shows up. It grabs eyeballs and people are excited to share the content. On Facebook, you have a wide range of content formats to choose from. You can share links, videos, infographics, photos, diagrams, and even audio files. After you share materials on your Facebook page, you should then get the link to that post and then share that Facebook page link in Facebook groups that cater to your niche or a related niche.
It's All About Promotion
This is how you unlock the power of repurposed content. If you play the game this way, you spend less time creating content and more time promoting. Promotion is the name of the game. You may have great content, but it's not going to do you much good if people don't even know it exists. For every hour you spend creating content, you should spend 10 hours promoting that piece of content. This is how you build a successful email list and create a solid brand on social media. Start with powerful content, but create different versions and spread it on many different social media platforms. Read the full article
0 notes