
Don't wanna be here? Send us removal request.
Statistics
We looked inside some of the posts by wsc-custom-controller-jb and here's what we found interesting.
Average Info
Notes Per Post
0
Likes Per Post
0
Reblog Per Post
0
Reply Per Post
0
Time Between Posts
3 days
Number of Posts By Type
Text
17
Last Seen Tumblr Blogs


Fun Fact
Average visit duration of Tumblr.com is 10 mins and 25 secs.
Text
Game Anglia
We got to show off the games we made in our previous projects at game anglia.
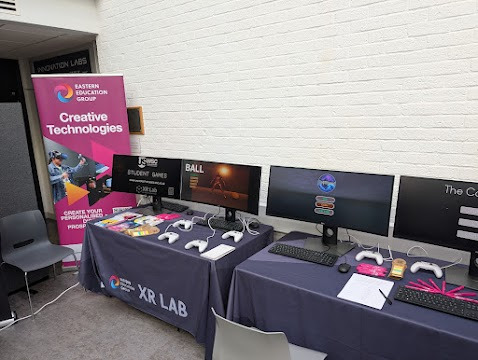
Unfortunately, despite me sending in the correct build of the game, the one shown was unfit for playing and, thus, wasn't up for very long so there aren't any pictures of our game being played.
Despite this, we did get to talk to some people, and play some other games. One such game has inspired me quite a bit. It was a multiplayer splitscreen game, and me and my friends had a lot of fun playing, so I'd definitely want to do something similar in the future.
Overall, the experience wasn't the greatest. I and my teammate worked to make a game and ended with it fully working, only to drive all the way to Ipswich, find out somehow an old version of the game was on display, and spend the rest of the day trying to move around in the cramped room because our game was taken off display quite quickly.
0 notes
Text
Why the drawing tablet works
The drawing tablet and pen are designed for artists to make digital art, while keeping it simple for developers to easily accommodate.
The pen has a few inputs: whether or not it's being pressed, the pressure and the position. Things like the velocity can be calculated by getting the difference in the position over time. On the mouse, pressing the left mouse button is exactly the same as tapping the screen with the pen.

Though it says mouse, the art tablet maps the pen input to the mouse input, so it's the same thing.
Unity provides us with the "ScreenToWorldPoint()" function, which is able to take a position on the screen and put it in the world, which is what I used do get the movement input.
0 notes
Text
The Entity System
Recently I found out how to use abstract classes in Unity, which has made quite a few things easier.
Abstract classes are classes that hold generic data and information, with a few more steps. alongside the usual "private" and "public" variables, there are "protected" variables. private variables are only accessible to the abstract class, whereas protected variables are accessible to both the abstract class and any classes that inherit from it. public variables are the same as usual.
Next there are virtual functions, which are functions in which you can override their function, while keeping the same name. An example would be for the entities: the entity script would have a virtual "TakeDamage" function, and the specific entity would override it to do something different when it takes damage, so a specific enemy could explode when you hit it.
Anyway, I basically made the player and slimes use this entity system, containing health variables, the TakeDamage and Die functions, as well as some utility. The player then also contains stuff like mana so they can't just spam spells.
The entity system used to create a slime enemy:
youtube
0 notes
Text
Games with UI systems similar to what I want.
In this project, I have the system in which you can hold down the pen in order to begin drawing the spell. My system involves slowing down time so that people have an easier time, making sure you wont die when trying to attack.
Hue
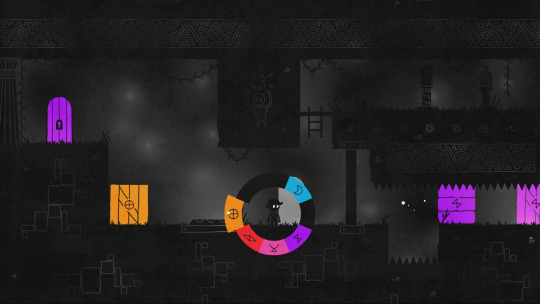
Hue's main gameplay revolves around changing the player's colour, making it so that the player can no longer interact with anything with that same colour. The main thing I'm looking for, however, is its UI. When picking a colour, the game will freeze and all interactions will instead be targeted to the wheel of colours, similar to what I wanted for my project.
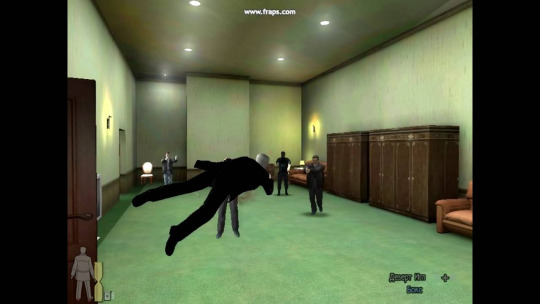
Max Payne
While not exactly UI, the act of slowing down time to allow players finer control is something my game also employs, so I might as well talk about it.
Max payne allows the user to aim in realtime, while the environment around them is slowed down, quite similar as to how, in my game, the player is able to draw out spells in full speed, while the environment is slowed down.
Hogwarts Legacy
youtube
Hogwarts Legacy, while not one that slows down time for the player, is a game with a spell system, and its worth looking at other games with spell systems, to see how I could have done mine. Though i've not played it before, it looks quite intuitive, with different spells being bound to different buttons. I'd presume they're also customisable. This is sort of similar to my method, where the player can choose out of a bunch of spells, but mine has a little more complexity in that the player must also draw out the spell to use it.
0 notes
Text
My Dream Job Role
It should come as no surprise that, with all of the things I do to do with graphics, that I would like to make my graphics programming adventures to a more professional level. I spend most of my time working with things like HLSL and GLSL, whether its writing post-processing effects like screen-space reflections or simple VHS effects, or realistic PBR surface rendering and water simulations. I've spend a long time working with this sort of thing, so its only natural that I'd want to take it further.
Of course, I didn't learn graphics programming all by myself, and I am still learning things to this day. just recently I learned about creating textures on the GPU, which I used to make voxel-based global illumination in Minecraft.
First off is one of the people who actually got me into graphics programming in the first place: Sebastian Lague.
Sebastian Lague - YouTube
He has this little youtube series called "Coding Adventures" where he spends a while working on something he finds interesting. For example, recently he's been doing a lot about his 3D fluid simulator, doing things like accurate physics and rendering, as well as getting it to work on a 3D planet with tides and such. I got into graphics programming after his video on volumetric clouds, in which he did a small section on how Unity's image effect shaders work, which led me to experiment more with myself, eventually wanting to create my own volumetric clouds, which I now have.

Atmospheric scattering and procedural 3D planet generation by Sebastian Lague
Next we have Acerola.
Acerola - YouTube
Acerola does a lot of post processing things, much like Sebastian Lague, he'll do a video on something either his followers suggest or something he wants to do. His videos are all quite informative, while remaining funny, which is quite hard to do when you're talking about the physics behind ocean wave simulations and the Fast Fourier Transform.
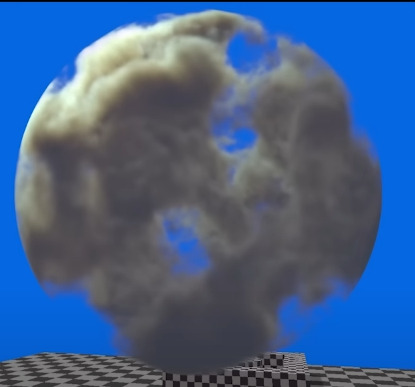
A screenshot from Acerola's video on trying to recreate Counter Strike 2's smoke grenade
And finally, Inigo Quilez.
Inigo Quilez :: computer graphics, mathematics, shaders, fractals, demoscene and more
While he has not really helped directly, through a website he helped develop: Shadertoy, I've really found out a lot about rendering and rendering efficiently. Whereas things like raymarching and raytracing used to seem unreachable and just something I'd have to imagine creating, I now know how they work and can confidently use techniques, knowing (for the most part) how they work. Also, his website has a lot of usefull things about rendering, like signed distance functions for all of the primitive shapes (sphere, cube, etc...).

Inigo Quilez's terrain environment made entirely with raymarching and maths in Shadertoy. No pre-made textures, just maths.
0 notes
Text
Making the grass

That's a lot of grass
With the standard way of rendering objects, this would quite possibly cause the computer to combust, but I used GPU instancing to essentially calculate a very small number of real grass objects, and duplicate it a bunch of times. There's a bunch more that goes into it, but its what allows for so much grass to be rendered in realtime.
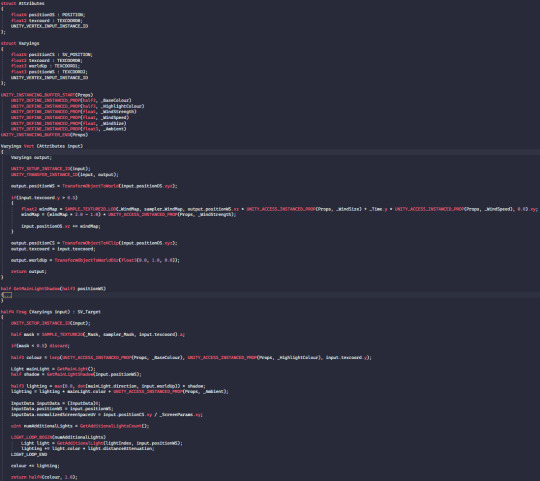
When writing a shader in Unity, you'll always have four main things: the vertex data struct (object-space position, vertex colour, normal vectors, etc...), the fragment data struct (data created in the vertex shader to be passed to the fragment shader (clip-space position, texture coordinates, etc...), the vertex program (where you convert the vertex data into renderable data) and the fragment program (where you actually add colour to the surface).
To get this to work with GPU instancing, you need to use a bunch of Unity's built-in macros to call specific functions. I don't know exactly what they do, but I have an idea:
VERTEX_INPUT_INSTANCE_ID is used to check what instance we're rendering, to then get the correct data.
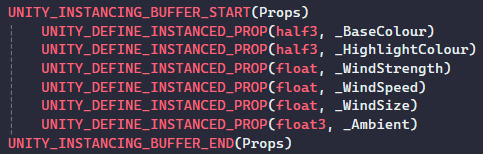
UNITY_INSTANCING_BUFFER is all the data shared by exact same instances:
UNITY_SETUP_INSTANCE_ID is to get the correct data for each instance within the vertex program.
UNITY_TRANSFER_INSTANCE_ID is to send the instance ID to the fragment program.
UNITY_ACCESS_INSTANCED_PROP is to access one of the instanced variables from the instancing buffer.
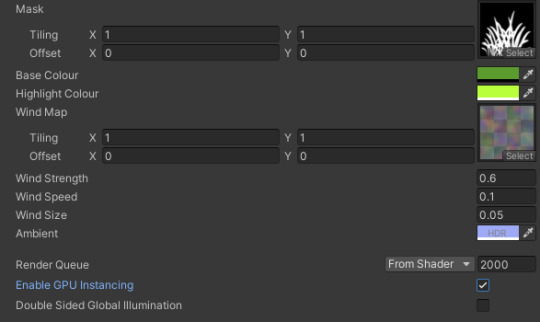
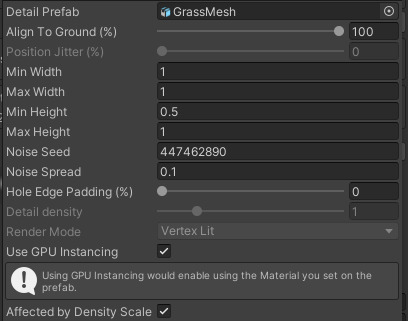
You'll also need #pragma multi_compile_instancing for it to work, and to set the object to use gpu instancing, both in the terrain and material:
To get the grass to also work with the fog, I needed a depth normals pass.
Unity shaders are split into several passes (most of the time), they're essentially several different shaders in one, but they can use the same data and stuff. the depth normals pass renderes the surface's depth and normal information to the depth normals texture, which I then use in the fog to make sure it renders correctly:
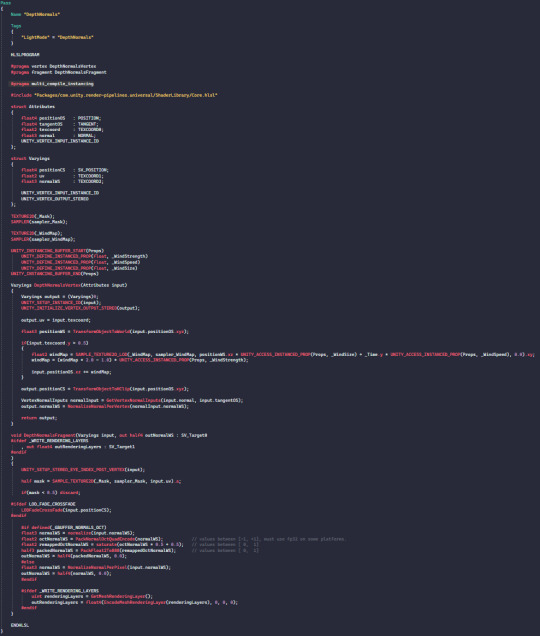
There's a much simpler way to do this as the vertex shaders are exactly the same, so I can just write it once and just have it copy to both, but oh well. I don't know exactly what it's doing because I just copied the "DepthNormalsPass.hlsl" file used by most if not all shaders in URP and modified it a bit, but it works.
0 notes
Text
Letting the user change spells
Up until now, I've had to set the spell manually, meaning I couldn't test the spells as how they would actually be used.
Luckily, I set the whole thing up so that you only need to change the "spell data" to change the pattern and the object that you spawn, which can also be done in realtime.
The first thing I did was create a list of spells, I chose a list as opposed to an array because lists allow you to dynamically add and remove spells from it. I also created an integer for what the current spell is, the scripts then check the list at that index, rather than using the spell directly.
I then created some UI, including an image for the spell's icon and some arrows so the player can switch spell. The "Spell Data" now also contains a sprite for the image to display on the UI. Here's me messing around with the black hole spell, as well as the fireball spell:
youtube
0 notes
Text
Making slime enemies
As with almost every fantasy game, the first enemy must be a slime. This is just law.
I have a slime model I made a while ago for another project, which I spent time rigging for animation. Rather than making the animations myself, I decided to do it procedurally.
Pre-made animations are great: they give you as much control as you need and can look quite natural with things like motion capture. But they have a problem: if you want them to really feel natural in motion, you have to make animations for every possible movement, or use something like inverse kinematics.
Slimes are wobbly near-fluid like things, and the stiff nature of pre-made animations just won't do it for me, so I added jiggle physics. Using the bones from the rig I made, I can allow the top part of the slime to wobble about, as well as allowing it to squish and stretch with the movement, making it feel incredibly natural.
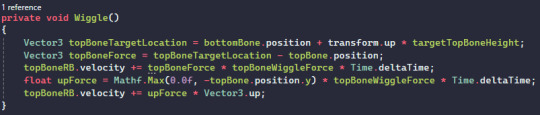
This function moves the top bone, making the slime always try to stay in it's initial position, but with some wobble from the physics.
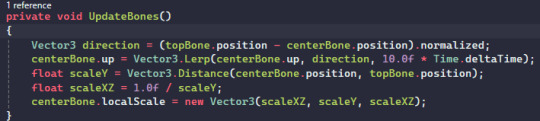
This function moves and scales the bone, making sure to preserve the shape's volume.
youtube
0 notes
Text
Fancy popups
I wanted there to be a little popup when you cast a spell in my game, as well as for dialogue (If I get around to it).
Essentially, I use Unity's Animation curves to control certain aspects of UI elements, including: transparency, scale, rotation and position.
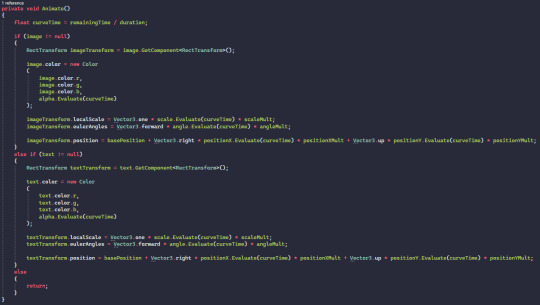
It's a bit bigger than I would have liked, and that's mainly because I made it support both text and images, but it does as I said, and it does it pretty well.
0 notes
Text
Making the spell system
If you remember, the main gameplay will revolve around drawing pre-designed spells on the screen, which will create some form of projectile or effect or something.
There were a few ways I could have done this. I could've had the player draw directly to a texture and have a neural network detect what the player is trying to draw, but that would've been a bit too much for this project. Instead, I made a system where I can define a number of key points, and have the player draw over those points in order, with the final one creating the spell.
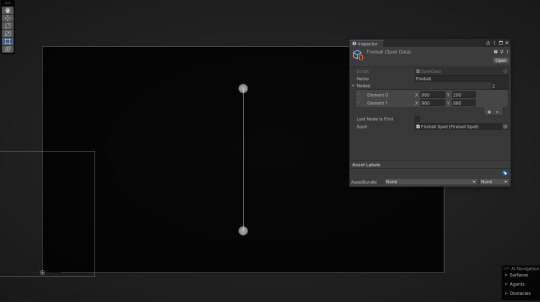
This spell is the first one the player will learn, so it's quite simple. You define a number of "nodes" which are 2D points on the screen. I've used Unity's debug tools to allow me to visualize the points and the connections, as seen above.
The reason I chose to use this UI system is to make it easier for everyone: it provides the full screen to draw, instead of clicking the spell and having it used immediately, which makes the gameplay a little more interesting and saves on having to scroll through a long list of spells, depending on how many I add.
"The role of game UI design is to create a seamless bridge between players and the game as well as provide players with a smooth and enjoyable gaming experience." - A Complete Guide to Game UI Design | AND Academy
To get the player to use this, I first check if the player is holding down the pen, and open the spell UI. this creates all the points where they should be, and lets the player draw over them. The final one creates the spell object in game:
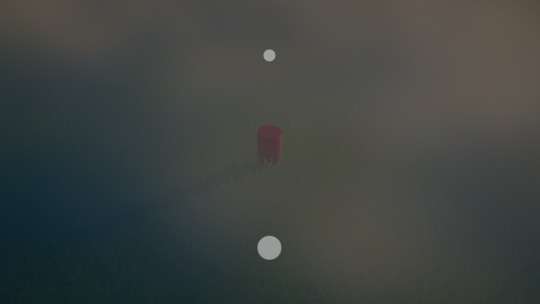
I made a little indication for what the current node is by making it larger, but im going to make some actual fancy ui soon.
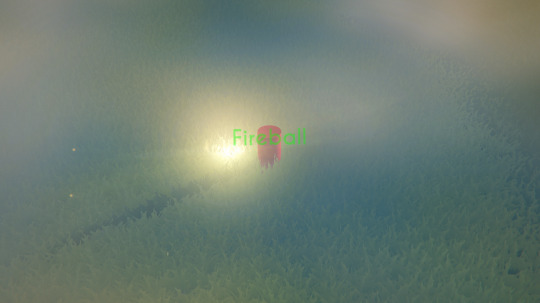
You may notice the little glowing bit. That's the effect I made for the fireball spell using Unity's Visual Effect Graph. Think of it as like Unreal's Niagara system, but easier to use and with a bunch more customizability.
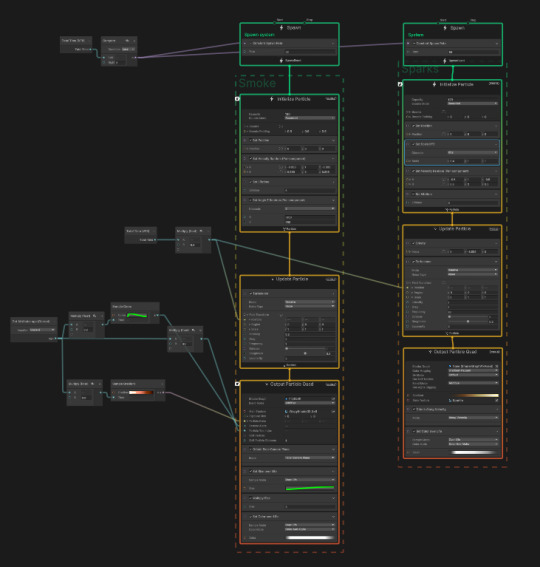
It's made of two main systems: the smoke and the sparks. Here's how it looks in-game:
I also attached a point light and a lens flare to it, but I think i'll decrease the lens flare's intensity a little.
0 notes
Text
Volumetric Fog
I'm sorry, I just couldn't help myself.
Volumetric fog is something I really quite enjoy creating, and the results almost always look great. The excuse I'm going with is "the game's gonna be outside, so I need fog".
There are many ways to create volumetric fog, but there's only one way to make real volumetric fog. Ray marching. By creating virtual "rays" and shooting them out into the scene, we can sample the fog's density at set points, accumulating it to create fog.
This is fine, and you can use it, but if you're stopping here then there's no point to using volumetrics. The real power of volumetrics comes with its ability to do things in 3D space, unbound to any geometry. This is what allows for things like light shafts, more complex shaping and things like point lights.
Instead of just sampling the density at every point, we can shoot another ray towards the sun, with a lower sample count and higher step length to improve performance. We can then use that to calculate how much light there should be at that sample. The maths is a bit much to explain, but in short, there are two variables: the transmittance and light energy. The transmittance is essentially a mask for the fog, for how much of the background scene shines through, and the light energy is the intensity of the light at that point.
With a bit of colouring, here's what I had at this point:

Another important thing for volumetric lighting is the anisotropy. For this more stylized example, it's how intense the light is around the sun. I went with the Henyey Greenstien phase function, which models how light scatters through large particles like dust or water
For the additional lights, like point lights and spot lights, I chose not to overcomplicate things for once, and faked it by using the distance from the light source.
Do you see any issues? No, obviously not, but I do.
Unity's Universal Render Pipeline (which is what I'm using) has three rendering methods: Forwarded, Deffered and Forwarded+. I'm not going to go into what they do, just know that Forwarded is locked to only having four additional lights on screen at one time.
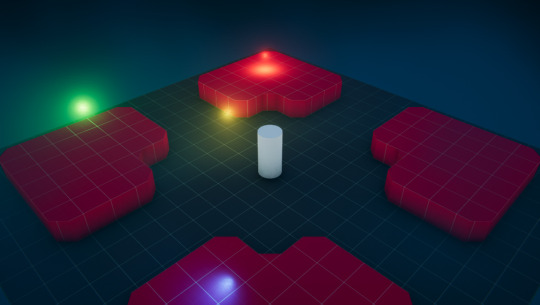
The reason I was using forwarded is because I couldn't quite fix an issue with forwarded plus, where the lights would flicker on and off. As it turns out, most unity documentation isn't written with making volumetrics in mind, so I looked through some of the code, found that I needed to set "normalizedScreenSpaceUV" in the InputData struct, and it fixed it. now I can have ~256 additional lights with the fog!

(256 lights not shown, because it might blow up my computer.)
And here's it all together:

I have added support for allowing the additional lights to also cast shadows, but I won't be using that unless absolutely needed.
I would like to say, this is all being rendered at full resolution (1920x1080). Later on I'd like to render this on a half or maybe quater resolution image, and composite it to save massive performance, but it's not too much of an issue right now.
0 notes
Text
The Movement
As said in the "Idea Generation - Part Two" post, I want to be able to point in the world and have the player move to that point.
With Unity's NavMesh, this is quite easy to do, so long as the environment is static. All you need to do is have a NavMesh Surface object and bake it. NavMesh also allows for dynamic obstacles in the scene, so I could make (sparing) use of that if I so please.
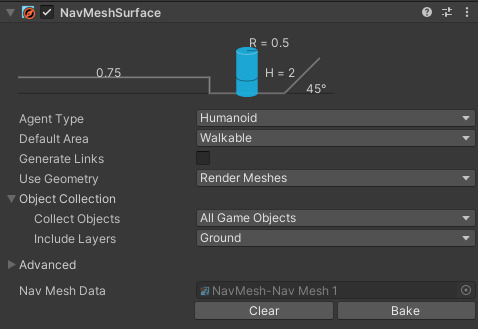
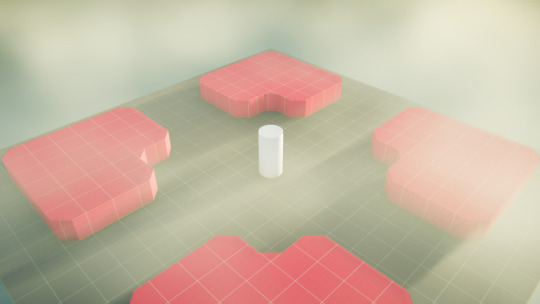
^ The NavMesh surface.
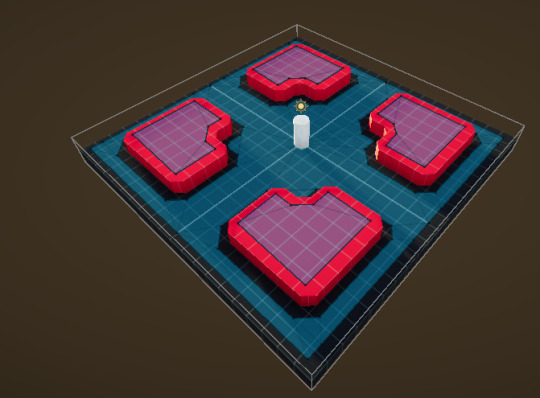
^ The generated NavMesh on a test environment made with ProBuilder.
The reason I'm using the NavMesh system, is because it calculates the path the player should take to reach a point, rather than just moving it in the direction towards the point. It does appear quite robotic, however, as it always picks the closest path, even if it doesn't seem logical. I would try and make my own system, but I doubt I'd have the time.
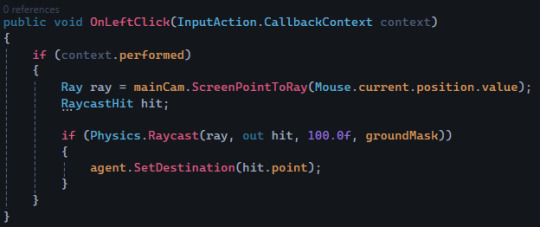
To actually move the player, It's incredibly simple, but first I must talk about the new Input System.
Everyone still calls it the "new" input system, but it's been out for quite a while. That aside, To use it, you create an "Input Actions" object to hold the input, along with an "Action Map" (the group the input falls under, to seperate things like UI input and Player input), and the "Actions", which are the actual inputs the player will press:

This allows me to get the left click input (which corresponds to tapping on the art tablet, and the draw input, which I've used a modifier on so that the player has to hold it down:

I then used the built-in "Player Input" script, to call functions in my movement script.
With all of that done, I now do a Raycast (line trace for unreal engine) in the direction of the mouse, to get the corresponding point in the scene, and use the SetDestination() function to move the player:
0 notes
Text
Idea Generation - Part Two
Out of the ideas I proposed, the second idea sounds the best. In terms of gameplay, as far as I'm aware, its quite unique, and in terms of development, it'll be quite an interesting challenge.
The idea of drawing shapes on the screen to use different types of combat isn't something I've seen much of, so here's the initial plan for the game:
You explore through a small open world in a top-down (or isometric) view, killing enemies with spells you can find in chests. You use these spells by drawing on the art tablet (which equates to using your mouse or using the touchscreen, but pretend it doesn't). Because you'll also use the art tablet to move, you wont be able to do fast-paced movements, so I'll make sure to keep the opponents slow, and also add some sort of aim-assist. When you cast a spell, they'll show up in the world as particles that fly towards where you look, and their effect applies either when they hit an enemy or after some time. In order to move around the world, you use the drawing tablet to tap on the screen, drawing tablets are essentially mouse cursors with extra steps, so I can test it even without the art tablet.
As for the art style, I enjoyed working on more stylized and "calm" feeling visuals, as opposed to my usual in-your-face what-the-heck-is-going-on visuals. I want to do this again for this project, but in an outside environment instead. The camera will be fixed perspective, as there is no sensible way to move it with the gameplay I have in mind, but can be moved to better fit part of the world, if need be.
[Probably unfinished]
0 notes
Text
Idea Generation
Idea One
I've been wanting to create a local multiplayer game for a while now, something where you can plug in a bunch of controllers into one computer and all play on one screen/splitscreen. These types of games work best for either co-op or PvP games, both can be enjoyable. I think there are enough local multiplayer PvP games so a co-op game could be more fun to make and potentially play. I like the idea of a round-based game, perhaps you need to defend something in the center of the world, either by building defenses or using combat. In terms of the visuals, I think an isometric game would work well for this, and 3D could potentially make it easier, but 2D could also be fun.
Idea Two
I think drawing tablets are quite an underused thing in games. Of course, touchscreen exists, but using the pen and the tablet just feels nicer. I think the idea of drawing out spells or something as the main gameplay aspect could be fun: you move around by tapping on the screen, so the player moves to that point in-game, and then draw a spell to do something, perhaps even combining spells to do more funky things. This would potentially be quite hard to create, but I'm sure I could make it work.
Idea Three
On the topic of touchscreen, this idea is less of a game and more of a simulation: GPU particle systems are something I've wanted to try and make for a while now, and something like a particle-based gravity simulation could be an enjoyable way to waste your time, especially with GPU collision as well. You'd put your finger on the screen and it could either attract or repel particles. A very simple idea, but optimization could be difficult as I rarely work with compute shaders. Alternatively I could make the simulation pixel based where each pixel has a velocity, which could be easier, but I'd have to do a bit of research and look at some papers on the topic.
[To be continued...]
0 notes
Text
Making a Pause Menu
Unreal Engine:
First off, you need a widget to show that the game is actually paused.
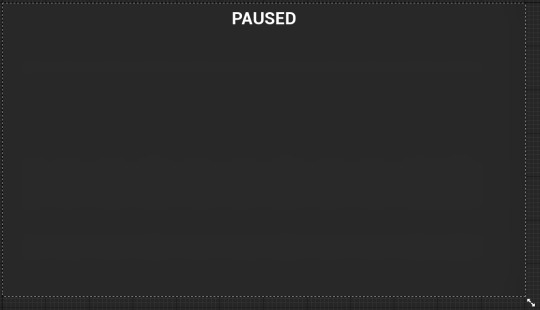
This is just a blur background that fills the screen, as well as a text element on the top.
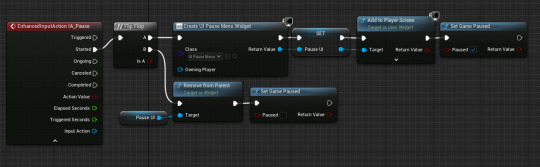
I then created an Input Action called "IA_Pause", which is then set in the Input Mapping Controller to the spacebar (for now). The Input Action also has "Trigger When Paused" turned on.
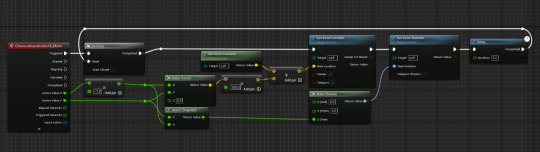
Finally, in the player blueprint, we check for the input and plug it into a flip flop. The first output is for creating the pause menu, and the second is for removing it from the screen:
Here are a few things I'd change to make this better:
I'd put the logic for creating the pause menu inside the world blueprint or in a custom "UI Handler" blueprint. The "BP_ThirdPersonCharacter" blueprint is for things unique to the in-game player, adding UI logic to it would make it a mess for more complex UI.
Creating and removing things in real-time isn't generally something you want to do, by this I mean actually adding it into the world and removing it from the world, especially if the object contains complex logic. This is why things like Object Pooling exist. A better way would be to hide and un-hide the UI, rather than create a new UI and add it to the screen every single time. The UI would be created at the start of the game and immediately hidden, which can then be enabled and disabled whenever.
In Unity:
In unity, I created a button (to open and close the pause menu) and a pause menu. Unity's UI system is in the world itself and is edited just as everything else is:
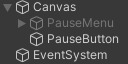
You'll notice the pause menu is grayed out, this is because it's disabled and won't be visible. The "EventSystem" is for things like getting the player input.
I then created a GameManager script to manage things like the pause menu. As far as I'm aware, Unity doesn't have a function to pause the game, so I set Time.timeScale to zero instead, which effectively does the same thing. The final script includes some interpolation so that the pause isn't so jarring:
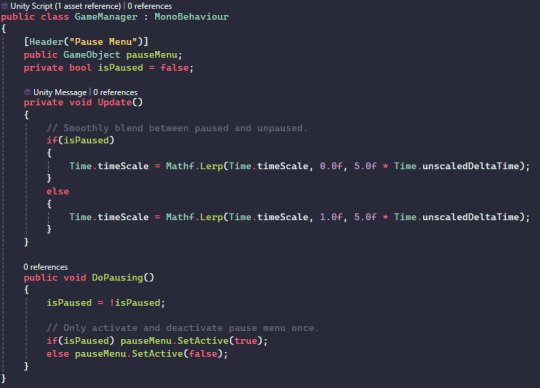
To actually pause the game, Unity's UI button has an "On Click" event, which lets you call any function or change any variable on any script (as long as it's public, like the DoPausing() function):

Time.deltaTime is the time in seconds between each rendered frame. This is important because when doing anything over time, simply doing it every frame will it to happen faster with higher framerates and slower with lower framerates. Here's a visualisation of why:
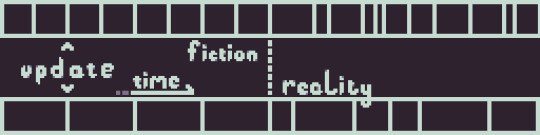
(Credit: ME.) ^
In a perfect world, every Update (or Event Tick) happens every frame, higher framerates mean every function is being called more often. In reality, the framerate varies over time, which means this is an even worse problem because now its going to be all jittery.
How do we fix this? Multiply by delta time (delta seconds if you use unreal). This ensures that any change in variable will happen at a constant rate.
0 notes
Text
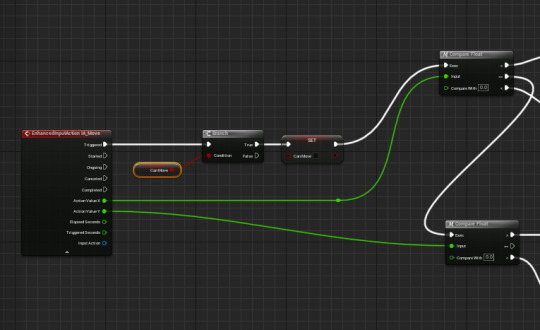
Grid-Based Movement
Unreal Engine:
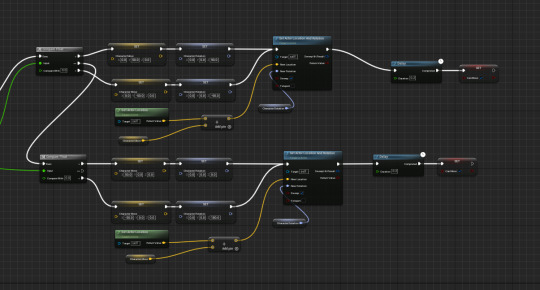
The method shown in the tutorial looked a little bit over the top, for what it was trying to do, so I re-did it myself. The original method shown said to do a lot of comparing and then setting a variable, however the easier and more scalable method would be what I did. It's by no means perfect, but it still works:
This makes use of the fact that the input already snaps with [-1, 0, 1], and so you can just make a vector out of that. The Atan2 function is a mathematical function that takes a 2D direction and converts it into an angle, which I then use to rotate it, instead of hardcoding every movement.
This is the method proposed in the tutorial:
Unity:
First off, I installed Unity's new input system to have better control over input. I decided to use rigidbodies as well for the built in physics, despite not really using physics (its also for collision). I also added interpolation because instantly snapping just isn't very visually appealing:
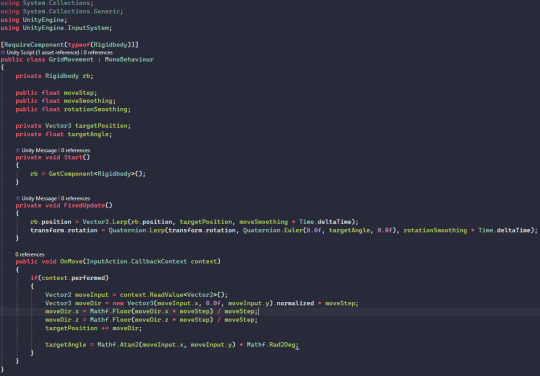
the "OnMove" function is then called by the input system:
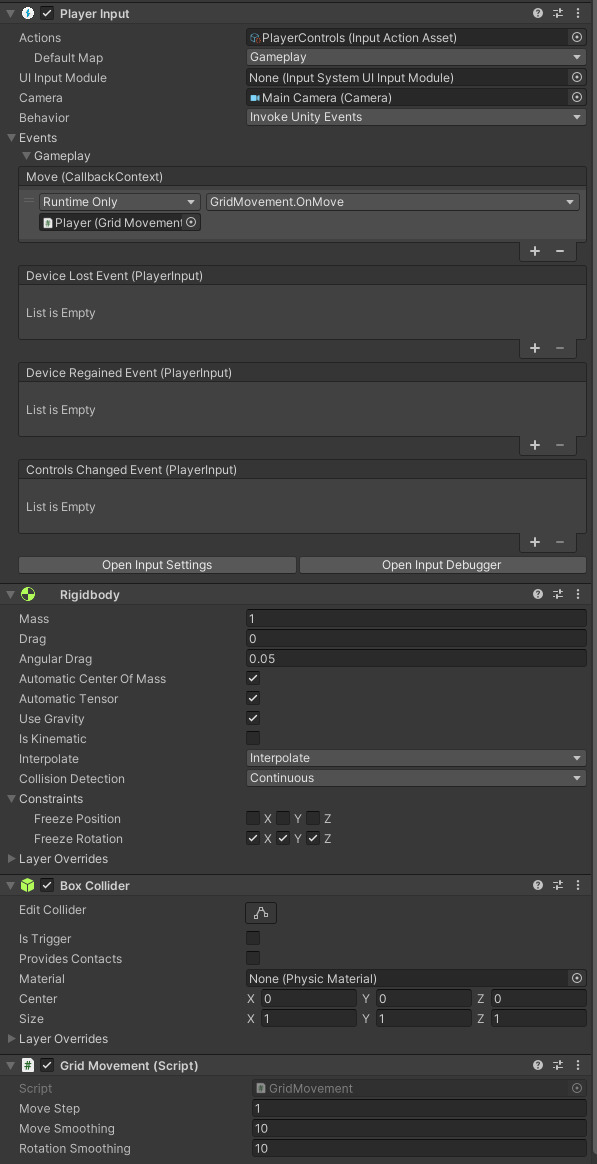
Unity's new input system can be used in many different ways. You can choose to use the built-in PlayerInput script, or you can write your own handling for it like I used to do. It's a little bit difficult to explain, so think of it like Unreal's "Enhanced Input", but without having to make a new Input Action for everything + a whole lot more control over what you can do with it, because that's what it is.
0 notes