
A current student who plays games such as Mabinogi, Vindictus, DragonNest, Rusty Hearts, and whatever my guild throws at me. My artwork blog: Aristatia Please stay and have a look around~
Don't wanna be here? Send us removal request.
Statistics
We looked inside some of the posts by xailus and here's what we found interesting.
Average Info
Notes Per Post
3M
Likes Per Post
1M
Reblog Per Post
1M
Reply Per Post
145
Time Between Posts
6 months
Number of Posts By Type
Text
7
Photo
7
Video
3
Last Seen Tumblr Blogs


Fun Fact
In 2020, 44% of users from Denmark used Tumblr daily.
Text

i just invented a cathedral rose window granny square pattern and i feel insane now
16K notes
·
View notes
Text
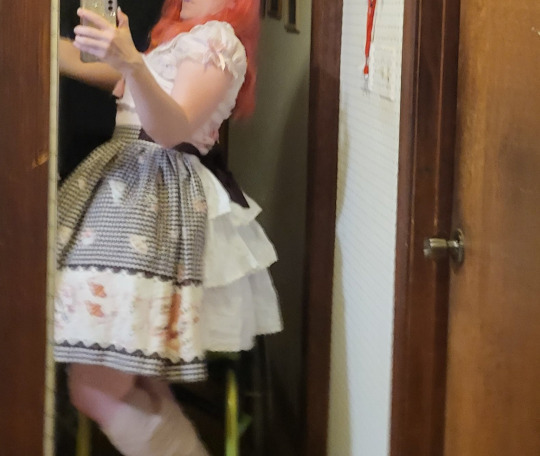
(It's been entirely too long since we've started a tutorial with a very blurry picture, which is a 20dollarlolita tradition. Am I about to fall over and only staying upright because of a death grip on this trim? Stay tuned to find out)
Let's make a skirt.
There's a lot of lolita fashion that doesn't fit most people. It's me. I'm most people. I'm going to wear it anyway, so I'm going to resize that to fit me.
The hardest part of resizing a lolita skirt (or skirt part of a dress) is that you almost never can get the fabric that the skirt was made out of. Lolita prints are usually pretty limited run. While some dresses will let you redistribute the fabric to have a slightly less full skirt, that's usually a major reconstruction that ends up drifting a bit away from the lolita shape.

x
A ruffled bustle bustle, however, is pretty common. Bustles like this are pretty common in lolita fashion and add an additional detail. In addition, you can make the waist of the skirt several inches bigger without a problem, and without compromising skirt fullness. If you ever want to undo the alteration, seaming the skirt back up is not very difficult. It's not a fully seamlessly reversible alteration, but there's far worse things you could do to the garment (ask me about my AP dress with mesh pits).
The problem is that bustles like this take quite a bit of energy and fabric, especially if you want to have details like lace trim. It's one of the more time-consuming alterations to do.
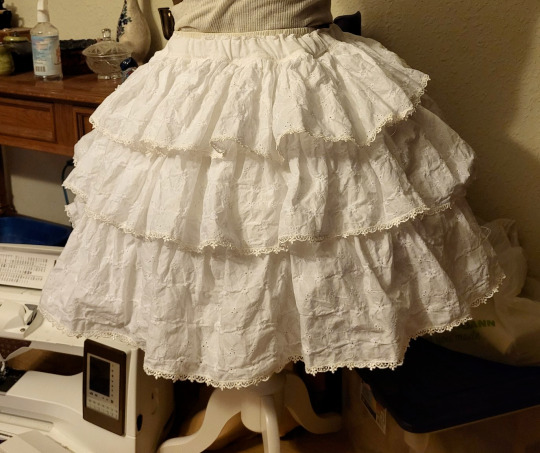
Or you can make one bustle/ruffle underskirt, one time, and wear it with all your skirt and dress modifications. You can splurge and get some nice trim and get some nice fabric, because you only need to buy it once. You can also wear it as a standalone skirt. (Just remember to never, ever steam it before taking pictures. You wouldn't want to look competent)
I put off making one of these for a very long time, because I'd made the process much more complicated in my head than it turned out needing to be. Once I was building this and realized I needed to simplify the fuck down, this became a really easy project.
Materials: I decided to make the ruffles on my skirt out of eyelet lawn, which is a cotton fabric that has an all-over embroidery. I got this for about $10 a yard on ebay. I don't have a very accurate judgement of how much I used on the skirt. I bought 4 yards and used probably 3.5, but I also wasted a bunch of fabric on an extra tier that I had to chop off. I wanted a fabric with more detail than broadcloth, but that wasn't exclusively going to work with OTT styling.
I got 30 yards of 1/2" Venise lace off cheeptrims.com for $9. I really recommend putting lace on your ruffles if you can. It really adds to the detail level, and you only need to buy it once. You already have to hem all of this so you might as well hem it with lace.
You will also want some fabric for the slip layer (for want of a better term) to attach the ruffles to. My ruffles were a little bit sheer, so I wanted an opaque base fabric for modesty. Depending on the look you're going for, you can also use this layer to add some subtle detailing or changes to the finished look. If you're only wearing it with over-the-top looks, using a base fabric with shine or glitter can stop your ultrabustle from looking too plain. If you're wanting your ruffles to lay flatter, getting a soft fabric with a lot of drape will make the ruffles droopier. I just used some weird cotton plainweave that I got at Green Store for 75% off due to a bolt-long defect.
I used 1" elastic in the waistband here, because this skirt can get a little bit heavy, and then you often have another skirt on top of it adding to the weight.
The other thing that I used that made this much easier was a ruffling attachment for my serger. You don't need to use a serger, but a ruffling or gathering attachment that allows you to ruffle a flat strip of fabric and sew it onto another piece of (not to-be-ruffled) fabric will speed things up considerably. I know a lot of people buy a ruffler or a gathering foot when they start sewing lolita, and then are disappointed when they don't use it very much. There's a very limited number of lolita applications for these attachments, and I'm happy to tell you that this is one of them. If you don't have one, you don't need to go buy one. You can just do the two-step process of gathering the fabric and then sewing it on. But if you wanted an excuse to go buy one, well, you have one.
The Plan:
So I'd previously made a lot of math and calculations for how each tier was going to gather into the previous one, and then realized during the build phase that actually was way too complicated.
What we need is a rectangle with ruffles on it gathered into a waistband. Yes, a rectangle. I know, I was stunned too, but the final result worked the best.
I wanted the tops of the ruffles to be hidden in seams. If you just sew ruffled strips onto a single piece of fabric, it's very difficult to hide all the raw edges and to make sure you're not spreading loose threads all over the place. We're going to make ruffled strips, and sew them to each other. This covers up the raw edges very nicely.
This also will allow you to slightly gather the second and top tiers to each other, if you want to make this skirt in an a-line instead of a bell/cupcake shape.
The Math:

If you know what skirts you're planning on wearing your ultrabustle with, it can help to measure them and get a good guideline.
Generally, you want your ultrabustle to be a number somewhere within these guidelines.
~~Close to the same length of the skirt you're wearing it with or ~~4"ish longer than the skirt you're wearing it with. (This depends on if you want the bottom ruffle to stick out. If you're Tallita and all the skirts and dresses you're resizing are also too short, you might want this to double as a ruffled underskirt) and ~~An acceptable length to wear as a skirt all on its own.
My first run at this ultrabustle was WAY too long, and after chopping off the entire top tier, it ended up being either 1" shorter or 1" longer than the skirts I'm planning on wearing it with, which is a great number for me.
As for the total fullness of the skirt, you have to remember that the ruffles will add visual volume to the skirt. This means that you don't actually need the hemline of your skirt to be super full. All that matters is that your petticoat can comfortably squeeze in there. For this, I measured the hemline of the smallest dress that I had that still fit my petticoat, and used that. It turned out to be about 80" around.
So, what sizes do we cut this at? It's math time.

Here's a worksheet if you want. You're going to need to know how long you want the finished skirt, how wide you want the hem of the slip (not the ruffle) of the skirt, how many ruffle layers you want, and your waist measurement.
The slip needs to be shorter than the ruffles, so it doesn't show. So total slip length is your skirt length minus 2.5". Divide that by the number of ruffle layers that you have, and you'll have how long to cut each of those. This is slip tier short side.
Each ruffle layer needs to be longer than each slip layer, so that the slip doesn't show. You want each ruffle to overlap the previous one. So, take your slip tier short side and add 2-3" (or more, if you want). This is your ruffle short side.
Your finished slip diameter is your slip tier long side. That one's easy.
If you're a math and planning person, you can determine your ruffle long side measurement. You'll want to take a piece of your fabric, cut to the ruffle short side measurement and also about 45+ inches wide, and a piece of your slip fabric. Run them both through your gathering attachment so that your ruffle fabric is sewn onto your slip fabric. If you like how that looks, you can then measure the finished length of the ruffled fabric and use that to calculate how much fabric you'll need for the ruffles. There's four places where people mess this up. First of all, if you're using your gathering attachment to sew and gather at the same time (which is the point of that attachment), you want to do all your test runs gathering it onto a fabric. The amount of fabric that goes into a machine ruffle changes depending on if it's onto fabric or just gathering. Second, you want to use your finished fabric, at your finished ruffle length. Different fabrics will ruffle different amounts, and different ruffle widths will look different even at the same gathering amount. Third mistake people make is to not gather a long enough strip. The longer a strip you gather, the more accurately you can measure how much fabric is actually going into your ruffle. And the fourth is to take that measure as an accurate one, and not plan for needing extra fabric. The upside of the gathering attachment is that it will save you so much time. The downside is that you can't be as accurate with knowing how much fabric you'll use. Remember, you can always turn the leftovers into a matching accessory. Even if you're going to go yolo like I did and not do the math about how many ruffles you need, you will still want to run a check that you like how your ruffling attachment looks. You don't need to measure super accurately, but try to get a feel for how much fabric is going into each ruffle. For example, if your ruffler takes a strip and makes it 1/3 it's flat size, then you'll need more fabric than if your ruffler makes it 1/2 it's flat size. If you're really on a budget, you can just cut your ruffles at 2.5x your slip long dimension and precisely gather by hand. My time's worth something to me and so it wasn't worth it to do that just to save a yard of $10 fabric.
The last part is just to check that your ruffle long dimension (or it's rough approximation) is still at least 2.75x your waist measure (3.25 is better). If you don't have that, your skirt likely won't look full enough for a lolita silhouette. If that's the case, just add to your skirt dimension until it is.
Actually making it:

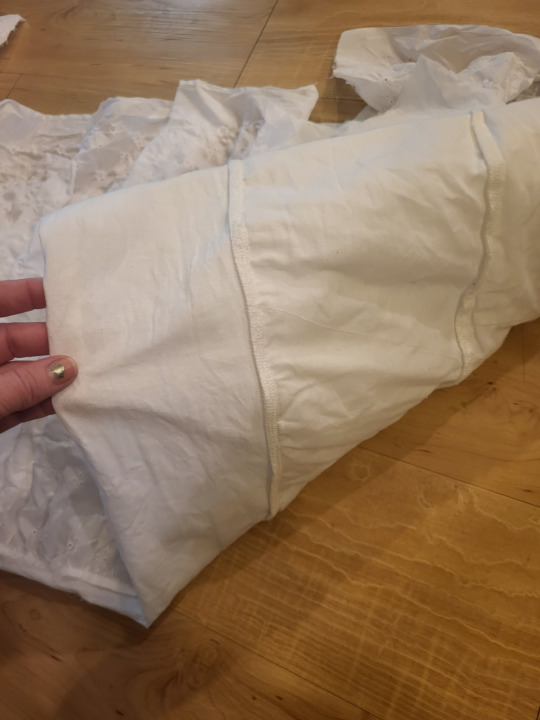
Before you forget, cut out a piece for your waistband. You can decide if this looks better in your ruffle fabric or your slip fabric (I used slip). This piece should be 3ish" longer than the distance around the fullest part of your booty. You need this to be longer than your booty distance so that you can get it on your body. If you're using 1" elastic, you want this piece to be a minimum of 3" wide.
I've found that the easiest way to do this is to start out by making the whole skirt as a single, very long strip. So, I take my slip tiers and cut them all out, and sew them into a long strip.
On my specific fabric, I decided that I wanted the pattern on the eyelet to go lengthwise. So, instead of cutting the fabric across the grain (short side, selvedge to selvedge) like I normally would, I cut down the 4 yard length of the fabric. This meant a lot less seaming. Since I didn't really know how much fabric I was going to use (you know that test I described to check how much fabric you're going to use? Yeah, guess who didn't do that), I just cut them one 4-yard strip at a time. I'd ruffle one all the way, stop, and cut the next one. This did actually save me quite a bit of fabric versus cutting them all at once. I had to go back and sew the sides of the ruffle together once the skirt was done. It was a small price to pay for the convenience I experienced.
I knew what size I wanted the finished ruffle length to be, but I cut my ruffles about 2.5" longer than that. I wanted a little bit of wiggle room once the skirt was done, so that I could do the length adjustment once the whole skirt was assembled.
And then, it's just a matter of letting the ruffler do its work. My serger ruffler works by you putting the item to-be-ruffled on the bottom, and the item to attach the ruffle to on the top, and then just hitting go. Some other rufflers work by putting the to-be-ruffled at the top, so you can see it as you go. Like all sewing machine attachments, if you're not sure, just go on youtube and search "HOW SINGER GATHERING FOOT DO THING NOT LOOK LIKE SHIT?" and someone's probably made a video of it.
So, once you've run all your ruffle through your machine, you should have a nice single strip of slip fabric with a ruffle on top of it. Now, some gathering attachments don't actually sew super strong seams, because you have to adjust tension or stitch length pretty severely to get it to ruffle like you want. The other advantage of putting the ruffles in a seam instead of just topstitching them onto a piece of fabric is that it doesn't matter how strong your ruffle attachment is, as long as it's strong enough to hold until you can put the ruffle in the seam. The seam provides the strength.
Once you have your single long ruffle, cut off a section that's the diameter of your bottom tier.
Now you just need to sew them together (and finish your inside edges). I like to start at the bottom tier and go up.
For each tier, you're sewing the bottom of the slip layer to the top (ruffle and slip) of the tier below. Just pull the ruffle of the higher tier out of the way, put right sides together, and sew.
If you aren't using a serger, you can zigzag over your edges and then trim them down, use an overcasting stitch from your sewing machine, or topstitch some seam binding over the seams. The extra line of stitching on the slip layers in front won't be visible. One of the other nice things about building this in the way we have is that, when you finish the edges of your inside seams, you're putting three layers together and finishing it as one. This is actually a lot less then 1/3 of the work of finishing them separately, because you'd have to finish the ruffle as a flat piece, which would take way more time. Have I convinced you on the greatness of this technique yet?
Continue cutting pieces off your ruffle layer and stacking them until you have as many layers as you decided you were going to have.
Once you have your layers all stacked up on each other, it's time to sew the skirt back seam. I find that it looks best to hold the ruffles out of the way, sew the slip together, and then go back and sew all the ruffle pieces. Basically now is a good time to just check for any ugly spots and to touch them up.
There's like 50 ways to attach a waistband to a skirt. For this one I used this method (what a blast from the 20dollarlolita past we have there. Also please note that the cost of ruffler feet seems to have gone up from $15 to $60-$100 in the past 10 years and despite working in a sewing machine store, I'm not totally sure why).
Once you've got the whole skirt assembled, it's time for the finishing.
The first thing that I did was put it on and try to judge how short I wanted my top ruffle. I'd cut all my ruffles extra long in the short dimension, so that I could shorten them when they were on the skirt. I picked a length that worked, marked it out, and chopped at that point. I then did this for the other two layers. I found that I wanted my bottom ruffle to be a little bit longer than my top ones, and cutting it long allowed me to make that choice.

I then started just zigagging on my lace. If you don't have a serger, you can use the lace as a hem finish, which also saves you an additional step. The lace really added a lot to this, and since I only need to make this once to wear with a lot of different garments, it was an economical use of nice lace.
I started putting the lace on the top layer first. This is because, if I ran out of lace, having a different (wider) lace on the bottom layer wouldn't look strange. As previously mentioned, I did zero measuring of how long my ruffles are, and had no idea if 27 yards would be enough lace. Don't be like me. Do some tests. Or be like me and choose the life of treachery. Anyway, stick lace on this thing, please. You worked hard and your skirts deserve it.
The only other thing that I did was to cut the slip layer down by about 3" on the very bottom. I did this because I made a mistake, but I like how it looks.

You can take this system of ataching ruffles in rectangles or even a trapezoid and stick it in the back of a skirt (or skirt on a dress). I did that here because I knew that I wanted a pink bustle, not a white one.

I'll do a tutorial for the actual skirt resizing sometime after I actually resize a skirt with this. Here, all I did was slice the back, hem those edges, and then button on some waist ties from another dress. This let me easily add several inches to the back of this skirt, without needing to re-distribute pleats, and without sacrificing the fullness of the shape.
This will all sit a little bit better once I've pressed the skirt, as well. Steaming the top layer of this while the garment is on me/a dress form/a hanger will decrease the poof in the top layer a little bit, and honestly, we could benefit from that in this case.
Anyway, if you have this, you have a very fast way to enlarge existing garments.
So, while this has thankfully very much decreased in the past years, there's still some people with weird opinions on MoDiFyInG bUrAnDo, so let's have a talk. Lolita clothing is not community owned. If someone who was never going to sell a dress to you modifies it, that doesn't take it away from you. This is a mentality that we tend to have in lolita more than other fashion just because of our high resell scene, but it wasn't ever going to be your dress and so you don't need to have an opinion about what happens to a thing you were never going to personally own. Things have value more than money, and value is often changed rather than destroyed. AP's Halloween Treats OP has no value to me when sold for $500 on Lacemarket. I don't spend that much money on lolita, ever. But a questionably-altered AP's Halloween Treats OP that I can un-alter has value to me if the price is good. But a questionably-altered AP's Halloween Treats OP has very little value to someone who likes the price, but can't undo the alterations. When someone resizes a dress or skirt, true, sometimes the people who are the size it was originally made can't wear it anymore. You've decreased the value to them, but you've made it more valuable to people who are the size that you've made the garment become. This skirt had no value to me when it's waist measure is 7.5" too small, but now I can wear it, so it has functional value to me. A lot of people who say that modifying the dress ruins it are either ignoring that also the stress of putting a dress not sized large enough for your body can damage it and not look as great while doing so, or else they have a much worse take. People who say that modifying clothes ruins the garment, but also say that wearing a garment that's too small ruins the garment, what they're actually saying is that wearing that garment is a privilege that should not be extended to larger sized people, and if they say that then they can just, you know, go fuck themselves. We don't need that in the community. Everyone deserves to wear lolita, and some people have to work harder to achieve it, and that's not fair, but everyone deserves it.
So yeah, kiddos! Build a skirt! Go cut up some clothes! Wear the skirts you've always wanted to wear! You can do anything!
And to answer the question we opened this with, yes, I was absolutely falling over.
256 notes
·
View notes
Text
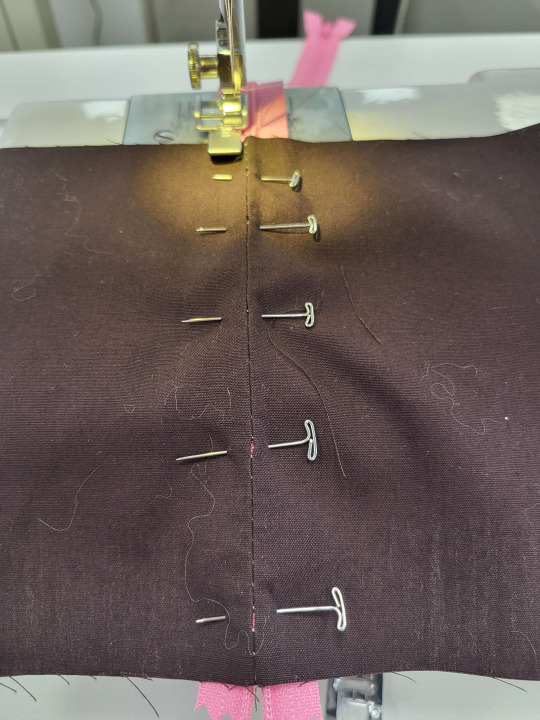
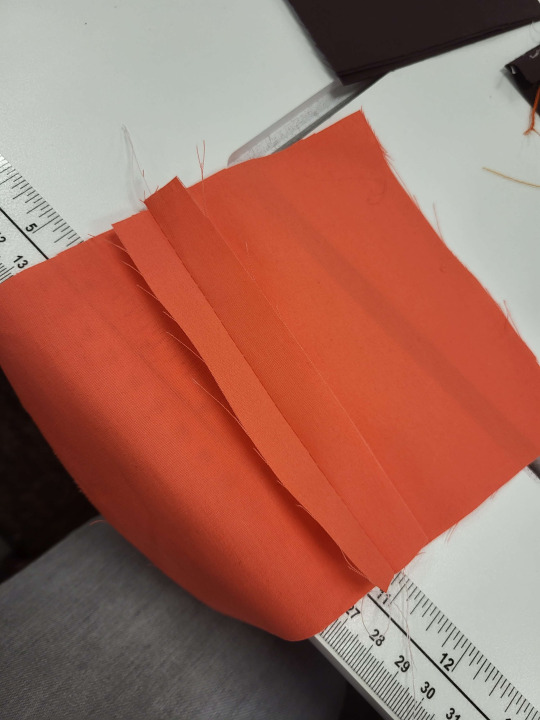
Quick guide to inserting zippers into garments without hand-basting.
Because I know that no matter how many times I tell y'all that you need to hand-baste, you're not going to do it.
Quick note: zippers are ALWAYS easier to put in when the zipper is several inches longer than your seam. This lets you put the slide out of the way when you sew. When you're done, you can pull the slide back down and then cut the excess tape. For every zipper where it's even vaguely possible, I get a long zipper, center the bottom of the tape at the place where you want the zipper to end, and leave extra tape hanging at the top. I don't know why zippers tell you to shorten them at the bottom. It's lies. Don't believe it.
Centered zipper:
You'll use the centered zipper application when you're putting a zipper in the center back or center front of a piece. There's a different application method for side seam zippers, which we'll go into later.

I start all zippers by machine-basting the seam closed. This is especially important on dresses, where you need the seam between the bodice and the skirt to match up. If your seam looks good basted shut, it will look good when a zipper is in there. So set your seam length to the longest, and baste the seam shut.
A note on seam allowances: You need your seam allowances to be big enough for the zipper to fit on. If your garment was made by someone insane and deranged who put a 1/4" seam allowance in a zipper seam, and you're only just not realizing it, you're going to need to sew twill tape or seam binding onto your seam allowance to make it big enough.
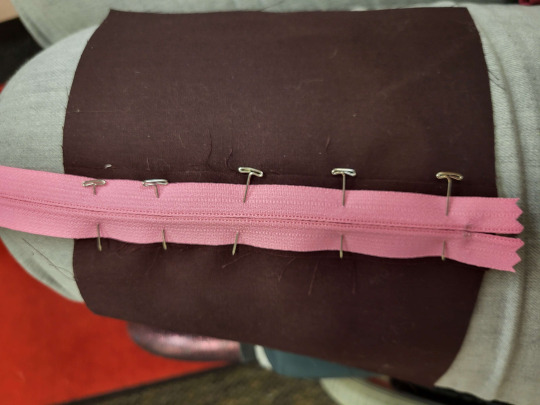
Put the zipper tape onto that seam. You want the center of the teeth to line up with the center of the seam. It's called the centered application for a reason.
When you're pinning from this viewpoint, you're best equipped to make sure that the teeth are perfectly centered. I'm going to recommend pinning with the pins perpendicular to the zipper teeth. You'll see why.
However, you can't actually sew the zipper from this side, with any kind of precision, so you'll need to do the flip.

So, go ahead and flip your garment so that you can access the right side. Next to each pin that you have on the wrong side, put a pin next to it on the right side. You can then remove the wrong-side pin.
And yes, you do need to do it like this and not just pinning from the front. It won't be centered. Trust me. It won't be centered.
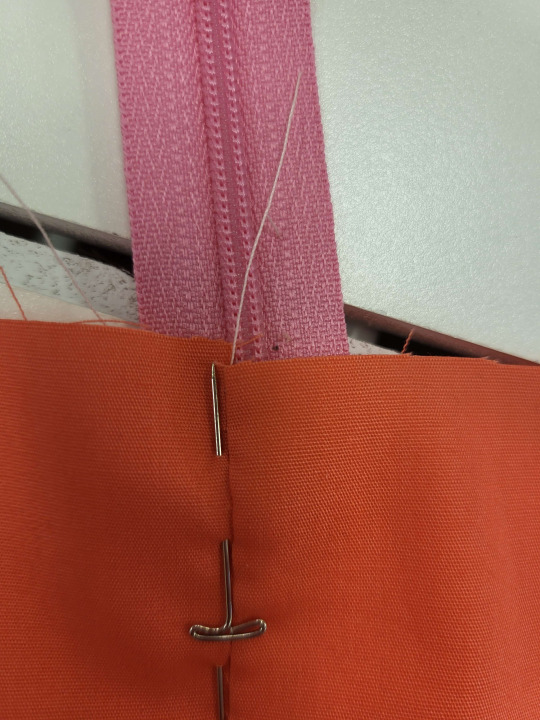
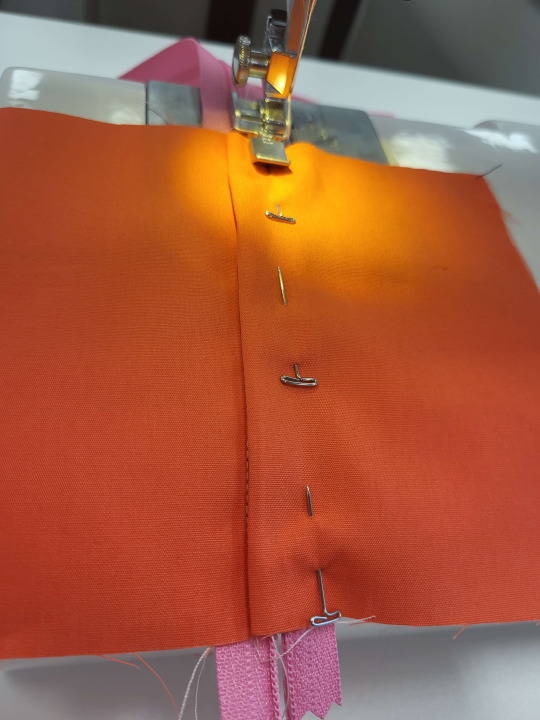
Zipper foot time. When you're sewing a zipper, you will ALWAYS sew from the top to the bottom. Put your zipper on the side of the tape where the points of your pins are.
Quick note: is your machine still set to a basting stitch? Now's the time to change it, and not after you did 13" of sewing. Ask me how I know.
Here's where you're going to decide how wide you want the lap (the fabric flaps that cover the zipper) to be. For a lot of people, this is a style choice. I like mine more narrow, and I like to just eyeball them. As long as it's straight and not stuck in the teeth, all options are fine.
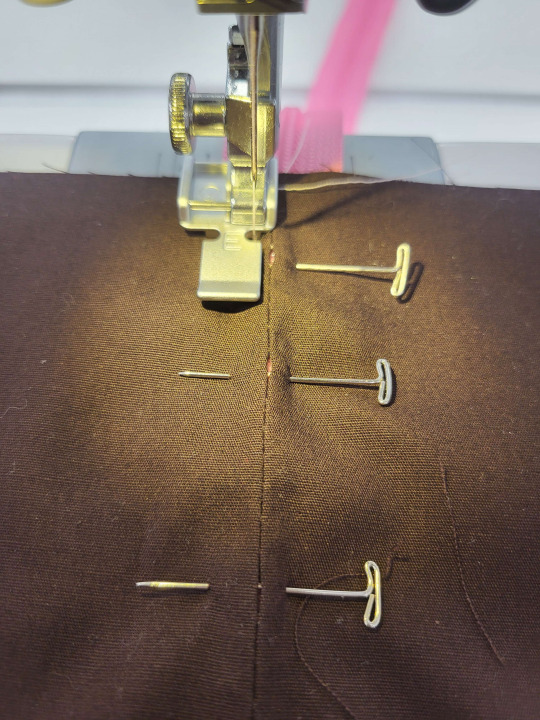
The reason that we're starting on the side with the points of the pins is that you can slide the point of the pin out of the way to sew over them, and then slide them back into place so that they hold the zipper in place for the other side.
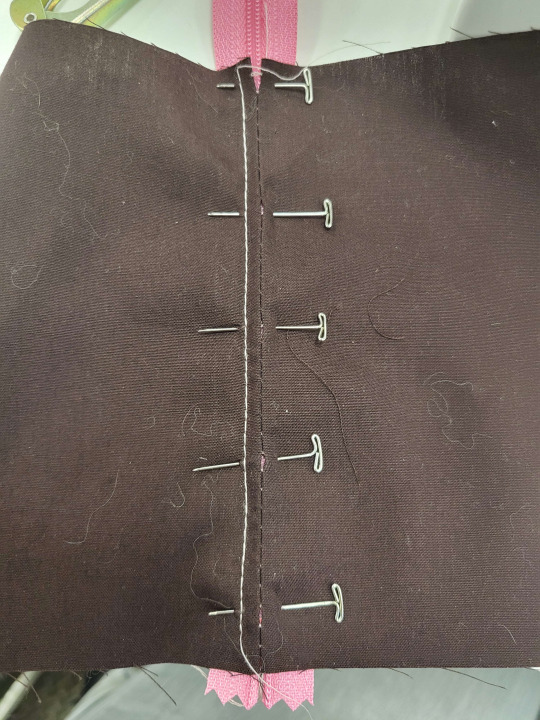

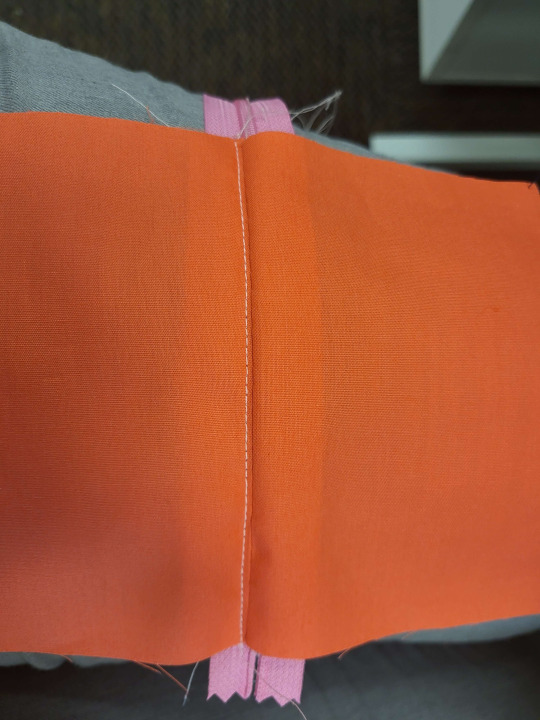
Once you've sewn down one side, cut your thread, bring your foot back to the top, and sew down the other side. (If you keep sewing and go up, your lapping will be wrinkled when you're done).
Once you hit the bottom of your zipper, sew a couple of stitches across the bottom, connecting the two lines of stitching. If you're using a nylon coil zipper, you can just sew straight through it. If your zipper has metal teeth or big plastic ones, sew this connecting stitch just below where the teeth end.
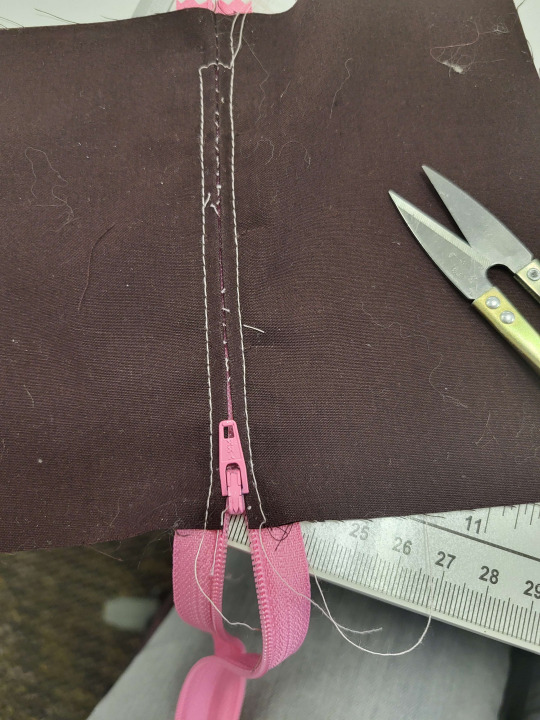
Now you just take your seam ripper and take out the basting stitches, and you're done!
What about that extra zipper tape at the top? Well, if you're putting the zipper in a seam where there will be a top facing, top hem, application of lace, or anything else, you can trim the tape and the hide it in that facing/hem/lace/etc. If there's absolutely no way to hide the top of the tape, you can stitch around the top of the teeth on each side, so that the slide doesn't come off, and then trim the excess tape off.
Side application:
If you're putting a zipper in a side seam, you don't want to center it. I mean, you can if you want to, and it'll probably look fine, but it's not the technically correct application.
In a centered application, both seam allowances cover the zipper tape and hide it from view. In a side application, the front seam allowance is longer, and covers the zipper tape. The back seam allowance is just along for the ride.
Like the centered zipper, this one starts by machine basting the seam shut.
Not everyone starts their side zippers like this, but I think that it's important because it keeps the waist seam even on both sides. People who don't like this method are going to point out that my method here does make your seam allowance 1/8" smaller than what you baste. If you think this will really mess your work up, remember to sew this seam at 1/16th" smaller than you would normally sew it. I don't ever bother with that and it never has made a difference to me. If you don't want to do it like that, you can just hand-baste this in. This is a no-hand-baste tutorial, so you're on your own for that.
You're going to pin this in a different place. On the centered zipper, you wanted the seam to be in the middle of the teeth. In the side application, you want the seam to be right along the edge of the teeth.
You'll also note that I'm pinning differently from how I did the centered version. Here, I have the pins with the points facing the top of the zipper.

So, always sewing top to bottom, we're going to sew down the side seam. We pointed all the pins at the top of the seam because now you can pull them out as you go.
It's hard to tell when you're just doing a sample like this, but we're going down the seam attached to the back of the dress.
Remember that "it takes 1/8" off the side seam" statement? Here's where it happens. We're going to take the front seam allowance, and just sneak it a little bit more over the edge. You're just going to roll it so that it covers that previous line of stitching. Then you're going to pin in place and sew down the other side. At the bottom, just like you did with the centered zip, you're going to turn a right angle and sew along the bottom, closing off the lapping.
I find that my favorite width of this is to sew where the fold of the lap to the line of stitching measures at about 1/2". If you're not good at eyeballing this, some people like to use tape as a topstitching guide.

Just like with the last one, time to take out the basting stitches that hold the seam shut, and there's your zipper.
Invisible zipper application:
NO.
159 notes
·
View notes
Text
Friendly reminder that the creator of Pokemon, Satoshi Tajiri, is autistic.
6K notes
·
View notes
Text
Chunky Braided Cabled Blanket
Way back in February 2016, I was inspired to make a cabled blanket of some sort after the popularity of my “Cabled Slouchy Beanie” and since I was designing my “Cabled Legwarmers” at the same time. It was around this time that I also began my partnership with Lion Brand Yarn, so I excitedly browsed through their website to determine which yarn I wanted to use for this blanket. I came across their “Color Clouds” that they had just launched, and it looked very intriguing! It is classified as a Jumbo level 7 yarn, a brand new weight class that has been added due to the popularity of very thick yarns and arm knitting. It is 100% acrylic and machine washable.

I decided to go with the “Travelers Tan” colourway as I loved the blend of tan and white, and of course I always gravitate towards neutrals. I knew cables would look gorgeous in this colourway!

I was inspired to learn new cabling methods when a reader sent me a message through Ravelry and told me to check out these “Cable Crochet Squares” by Elizabeth Ham. In her free Ravelry download and post HERE, Elizabeth details how to do various crochet cables and has accompanying YouTube videos as well. I was drawn to the “Single Plaited Square” as it had a braided look to it, and I decided to use this technique to design my blanket! I would HIGHLY recommend checking out her Youtube tutorial HERE to see the braided cables in action as this is how I learned how to do it (be sure to check out all three videos as Elizabeth has divided the tutorial into three parts)! I started off by doing a series of foundation single crochets (see how to do this stitch HERE) with my Clover Amour 15 mm hook.

I drew up my design, determining how many stitches I would need to have three braided cables, front post stitches framing these cables, and three stitches in between each cable and frame. I was done the first row of my blanket after doing 50 foundation single crochets.

Next, I worked single crochets across for Row 2. It is important to note that ALL EVEN ROWS are worked the same, by working single crochets across.

Row 2 is complete!

Row 3 is when the cabling begins!

To begin Row 3, I did three single crochets in the first three stitches. Next, I worked two Front post double crochets (Fpdc) in the next two stitches 2 rows below (of Row 1, where the arrow is pointing).

The Front post double crochets have been worked. See how they bump out?

After the two Fpdc’s, I then single crocheted three stitches. Next, I did six Fpdc’s across the next six stitches 2 rows below.

The six Fpdc’s have been worked!

I then did three single crochets across the next three stitches. I then repeated the pattern again until the end (i.e. two Fpdc’s, three sc’s, six Fpdc’s across).

Row 3 is complete!

I then flipped my work and began Row 4. Remember that all even rows are worked the same: by working single crochets across.

The even rows work up quickly since you’re just single crocheting along!

Row 4 is complete!

I then turned my work and began working Row 5.

I started Row 5 by once again doing three single crochets. Then, I worked 2 Fpdc’s across the next two post stitches from two rows below (the previous Fpdc’s from Row 3) as indicated by the arrows.

These Fpdc’s really help frame the braided cables as you’ll see later on. Working around the posts from two rows below helps to build the framing upwards!

Next, I skipped two post stitches (1 and 2 in photo below) and worked two Front post triple crochets (Fptc) in the next two post stitches (3 and 4 in photo below).

Below you can see I’ve worked Fptc’s across the third and fourth posts. Next, I need to work BEHIND the post stitches I just made and work 2 Fptc’s in the two skipped post stitches (1 and 2 in the photo above).

I’ve placed my fingers behind the post stitches to show where you need to insert your crochet hook.

Thus, your crochet hook goes behind the posts and works Fptc’s around those initial skipped posts.

Now four Fptc’s have been worked. You then work 2 Fpdc’s across the next two post stitches.

Your initial set of cabling is complete! Now you repeat the same process across!

For Row 6, you once again single crochet across. Now we will begin Round 7!

The beginning of Row 7 is worked the same as the beginning of Row 5 where you do three single crochets, two front post double crochets, and three single crochets. Now we will approach the cabling! You work two Front post double crochets in the next two post stitches as indicated below.

You then skip 2 post stitches and work two Front post triple crochets in the next two post stitches as indicated below.

Now it gets a little tricky. You need to work IN FRONT of the post stitches you just made and work two Front post triple crochets around the two skipped posts. These two skipped posts are hard to see in the picture below!

In the picture below, I am showing you where those “hidden” stitches are that we skipped. It is around these stitches that you need to work your two Front post triple crochets (note that the orientation of my finger is NOT how you would insert your hook- I’m just demonstrating where the stitches are).

Thus, you swing your crochet hook in front of the stitches you just made, and work your front post triple crochets in the indicated stitches.

You keep repeating this pattern across for Row 7. Below I’ve indicated the order of the stitches so you can see where all six stitches of the cabling are located for subsequent rows as you build up the cabling!

You keep repeating rows 4-7 until Row 77! It’s amazing watching your beautiful braided cables build up!

Don’t these braided cables look gorgeous? The texture is stunning, and the light colours really help show off the intricacy of the design!

I had so much fun working up my blanket as it kept me warm as I was crocheting it. Repeating rows of these gorgeous braided cables was very relaxing!

I started a couple of afghan projects as a pre-teen when I was first learning how to crochet, but I never ended up finishing any of them. Thankfully, this blanket works up very quickly since it uses jumbo yarn and such a large crochet hook!

For the edging of my blanket, I joined my working yarn at any point and began single crocheting around.

I worked three single crochets in each of the four corners.

Single crocheting around helps finish off the edges!

I then slip stitched to close my round and began working back post single crochets around to really help define the border and give it beautiful edging!

You work back post single crochets by inserting your crochet hook in front of the post of the stitch!

Doesn’t this border edging look beautiful? It has an almost braided look to it too!

*************************************
Here is the free pattern for the “Chunky Braided Cabled Blanket”!

***You can purchase an INEXPENSIVE AD-FREE PDF of this pattern on Etsy HERE and on Craftsy HERE! This beautifully formatted PDF includes the cabling tutorial, step-by-step pictures and pattern, and is a total of 7 pages including the cover page!
Materials:
15 mm Clover Amour hook
Jumbo Yarn (I used Lion Brand Yarn’s “Color Clouds” in “Travelers Tan”, 20 balls. Each skein of Color Clouds is 55 yd/50 m for reference.) In total, I used 1100 yards of Color Clouds for my blanket.
Special stitches:
Front Post Treble Crochet (Fptc): Yarn Over (YO) twice, insert hook behind post of stitch (insert hook from front to back). YO and pull up a loop, [YO and draw through 2 loops on hook] 3 times.
Front Post Double Crochet (Fpdc): YO, insert hook behind post of stitch (insert hook from front to back of stitch), YO, pull up a loop, YO, (pull through 2 loops) twice.
Back Post Single Crochet (Bpsc): Insert hook in front of post of stitch (insert hook from back to front of stitch), YO and pull up loop, YO and draw through two loops on hook.
Notes:
All even rows are single crochet rows.
All Fptc’s and Fpdc’s are worked in indicated stitches 2 rows below.
To increase the width of this blanket with more cable cycles, add multiples of 14 stitches.
Try holding two strands of super bulky yarn (level 6) together as a substitute for the Jumbo level 7 yarn.
To see videos of the Braided cables, see Elizabeth Ham’s very helpful 3-part YouTube tutorial HERE!
Row 1: Foundation single crochet 50. (50 sts)
Row 2 & all even rows: Ch 1, turn. Starting in second st from hook, sc in each st across.
R3: Ch 1, turn. Sc 3, Fpdc in next 2 sts 2 rows below, sc 3. *Fpdc in next 6 sts 2 rows below, sc 3, Fpdc in next 2 sts 2 rows below, sc 3*, rep 3 times.
R5: Ch 1, turn. Sc 3, Fpdc in next 2 post sts, sc 3. *Skip 2 post sts, Fptc in next 2 posts, working BEHIND post sts just made, Fptc in 2 skipped post sts. Fpdc in next 2 post sts, Sc 3, Fpdc in next 2 post sts, sc 3*, rep 3 times.
R7: Ch 1, turn. Sc 3, Fpdc in next 2 post sts, sc 3. *Fpdc in next 2 post sts. Skip 2 post sts, Fptc in next 2 post sts. Working IN FRONT of post sts just made, Fptc in 2 skipped post sts. Sc 3, Fpdc in next 2 post sts, Sc 3*, rep 3 times.
Repeat Rows 4-7 until Row 77.
Border:
Row 1: With cabled side of blanket facing you, Sc around perimeter, making sure to do 3 sc in each corner. Sl st to first sc.
Row 2: Chain 1, Back post single crochet around. Sl st to Chain 1 and fasten off.
Finished Dimensions: 42″/107 cm x 53″/135 cm
*************************************
I love the luxurious look of my Chunky Braided Cabled Blanket! Even though I finished this project in March, I thought I would wait to post about it in the fall/winter when everyone is picking up their crochet hooks again and getting ready for the dip in temperature. T’is the season for cuddling up in warm blankets whilst sipping hot chocolate and apple cider!

Note that this blanket is more of a throw blanket with its sizing. I underestimated how much yarn I would need to complete my blanket as I originally through I would only need 10 skeins of Color Clouds. However, as I started working up the pattern, I could quickly tell that I would need much more. Keep in mind that each skein of Color Clouds is 55 yards/3.5 oz, compared to a skein of Wool-Ease Thick & Quick which is 106 yds/6 oz. In the end, I needed 20 skeins to complete my project. Out of all the crochet projects I’ve worked on, this definitely used up the most skeins of yarn. You can try playing around with the sizing and possibly hold two strands of super bulky (level 6) yarn as a substitute for the jumbo (level 7) yarn. Always keep an eye out for sales, and jumbo yarn can sometimes be found on clearance too, especially at the end of the season!

While we were out during a family walk enjoying the beautiful fall landscape, I brought my blanket along so we could snap some pictures! I love snuggling the girls and I make sure I get enough cuddles with them each and every day! Just look at their adorable expressions!

Here I am wrapped in my blanket! Wouldn’t the braided cables make a gorgeous sweater or wrap? I think the girls ran off to play with leaves along the side and I was trying to peek at them and see what they were up to!

I am so glad I learned the technique of braided cables as they are simply stunning! It was so much fun seeing the braided cables build up, and I am in love with my finished blanket. If you are a knitter, be sure to check out Jessica of Mama in a Stitch’s “Endless Cables Chunky Knit Throw Pattern” as she also used Color Clouds in the same colourway! We thought it was so funny when we were working with the exact same yarn…and using it for cabled blankets! It’s neat seeing the different looks of crochet and knit cables, and I hope to learn the technique of knitting cables one day. Keep up to date with my work through my Facebook page, Twitter (@AllAboutAmi) and Instagram (@AllAboutAmi)! I know many of you are looking for a good blanket project to tackle, so I hope this inspires you to try a cabled one!

{This post is sponsored by Lion Brand Yarn! I’ve loved working with their yarn throughout the years and I’m thrilled that I get to collaborate with them every month!}
This pattern is an original pattern by Stephanie Lau of All About Ami. Please do not claim this pattern as your own. If you wish to share this pattern, you may link to this pattern but please do not reprint it on your site. You may keep a copy for your own personal use but please DO NOT sell the pattern or distribute it.
You may sell products made from this pattern but please clearly credit the design to me, Stephanie Lau of All About Ami, and provide a link to my blog www.AllAboutAmi.com. Permission is NOT granted for mass production or factory manufacturing of any kind. Thank you for being respectful and for your understanding!
354 notes
·
View notes
Photo

Gunpowder, gelatine, dynamite with a laser beam! ♫
12K notes
·
View notes

Photo


This is finally done: a more concise description of demon summoning. This kind of handbook would probably have been given out to all the military cadet mages. For further reading:
[Detailed Explanation of Demonic Constructs]
[Examples of Amalgams]
[Magician Character Reference]
[Amalgam Character Reference]
99K notes
·
View notes
Video
vimeo
Pokemon-Pikachu and Ash’s Reunion
An Animation I started during my 2nd year at the Animation Workshop and I decided to continue. It was a good challenge and a pleasure to use those childhood characters !
113K notes
·
View notes
Video
tumblr
There was a bee in Simone’s flowers 😭 😂
260K notes
·
View notes
Photo


2014 Dragon nest costume concept.
ⓒeyedentity games
145 notes
·
View notes
Photo


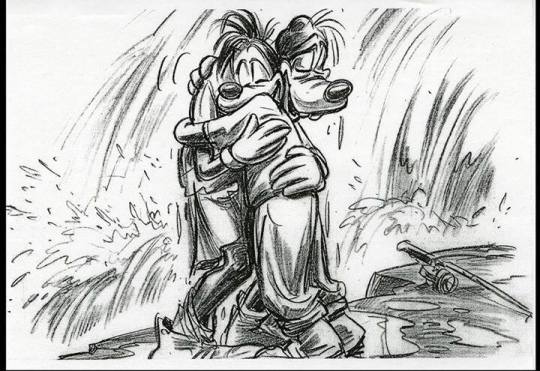
Celebrating 20 years of “ A Goofy Movie”
Storyboards by Andy Gaskill from “A Goofy Movie” (Walt Disney,1995)
27K notes
·
View notes


Photo

Scathach (Lancer version) - “Fate/Grand Order”
106 notes
·
View notes
Text
did anyone see that video of the guy who was like “im really good at finding moles” and hes saying that hes gonna pull a mole right out of the ground and for a few seconds youre like ok whats the joke and then he just squats down to the grass and and jams his fist into the ground and pulls a mole up
i think about it so much
437K notes
·
View notes