
Don't wanna be here? Send us removal request.
Last Seen Blogs


Text
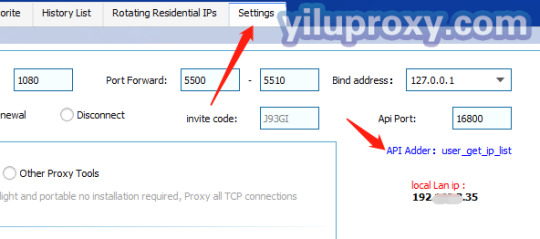
Is there an API interface?
API interface is available.
API interface generates proxy IPs in batches: http://127.0.0.1:16800/user_get_ip_list?num=10&protocol=socks5&country=us&state=&city=&infoformat=1&datacenter=0&session=1
After opening the address, you can modify the parameters by yourself. The specific parameters are described as follows: num=represents the number of IPs generated; protocol=represents proxy IP type, currently supports socks5 and http types; country=country shortcode&state=state&city=city; infoformat= is the format of the generated IP: 1= IP:Port:Username:Password; 2= Username:Password@IP:Port. datacenter= represents rotating IP: 0 is rotating residential IP; 1 is rotating datacenter IP. session = represents the duration of IP usage: 1 is to keep the IP unchanged for a period of time; 0 is to change IP for each request.
Interface location in the software:
0 notes
Text
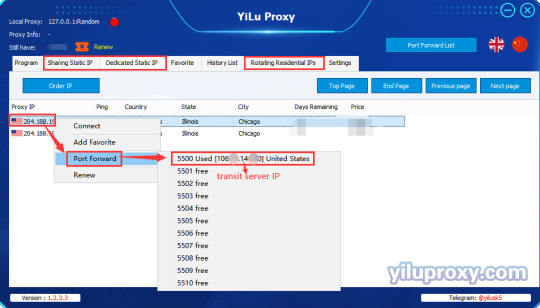
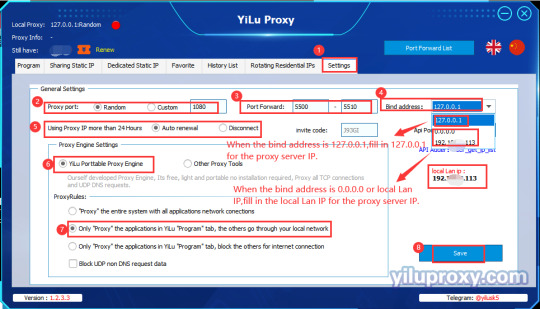
YiLu cross-computer usage-LAN multi-port forwarding
When the computer and YiLu client are not used on the same computer, or when the computer is used on multiple devices such as third-party software, phones, emulators, tablets, virtual machines, VPS, etc., you can use LAN multi-port forwarding to connect YiLu proxy IP.
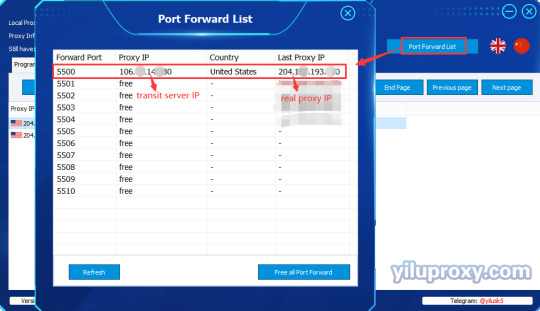
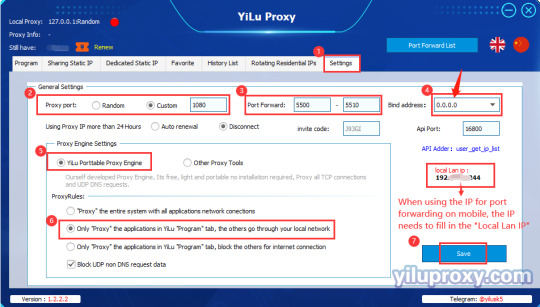
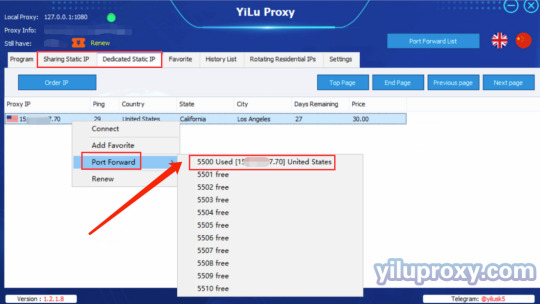
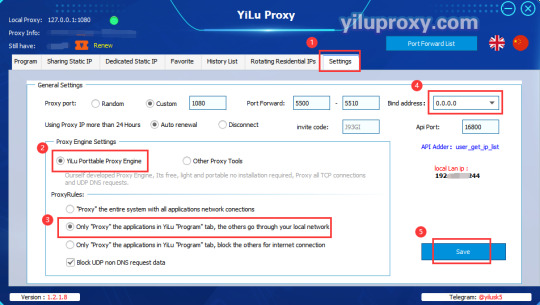
1.YiLu "Settings": ① Proxy Port: Random and Custom are both OK; ② Port Forward: Set the port range according to your needs. For example, if you choose 5500 to 5510, that means you can forward multiple ports at the same time, and every port should be set to an independent IP; ③ Bind address: Choose "0.0.0.0 or local LAN IP", if you are using it on multiple devices or other computers etc; ④ Proxy Engine Settings: Select "YiLu Porttable Proxy Engine"; ⑤ ProxyRules: Select "Only ‘Proxy’ the applications in the YiLu ‘program’ tab, the others go through your local network"; ⑥ Set the other settings by default; ⑦Click "Save". 2.Sharing/Dedicated Static IP, Rotating Residentials/Datacenter IP port forward settings: ① Select an IP; ② Right-click to choose the "Port forward"; ③ Choose a "Port" for the IP that you want to use, you can also check the IP and port information on “PortForwardList” in the YiLu client.

0 notes
Video
youtube
如何批量注册tinder账号? @yiluproxy-com #交友 #社交 #婚恋
0 notes
Text
Computer and phone use YiLu Proxy at the same time
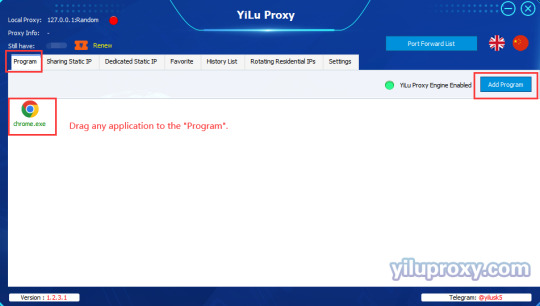
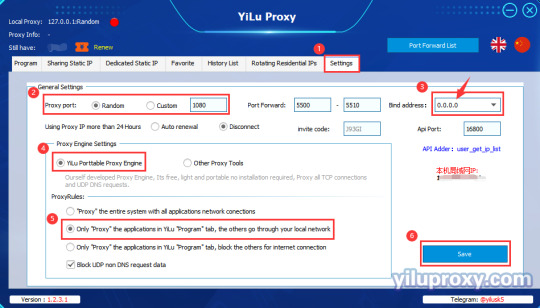
If you want to use YiLu proxy in multiple environments at the same time, such as the local browser, anti-detect browser, and mobile phone, you can refer to the following tutorial: 1.YiLu "Program": ① If you need to use YiLu in the local browser, you need to drag the local browser into "Program", such as Chrome, Firefox or Edge, etc., browser ; ② If you need to use YiLu in the anti-detect browser, you need to drag a software into the program randomly. You cannot drag the anti-detect browser into the program, otherwise, the connection will be unstable; ③ If you need to use YiLu on your mobile phone, put a software into the "program" randomly; ④ In summary, you can add the Local browser (Chrome, Firefox or Edge, etc., browser) to the program whether you use in local browser, anti-detect browser, or mobile phone. 2.YiLu "Settings": ① Proxy Port: Random and Custom are both OK; ② Port Forward: Set the port range according to your needs. For example, if you choose 5500 to 5510, that means you can forward multiple ports at the same time, and every port should be set to an independent IP; ③ Bind address: Choose ”0.0.0.0 or local LAN IP", if you are using it on the computer and mobile phone together; ④ Using Proxy IP more than 24 Hours: The user can choose the “Auto renewal” or “disconnect” for their own needs; ⑤ Proxy Engine Settings: Select "YiLu Porttable Proxy Engine"; ⑥ ProxyRules: Select "Only ‘Proxy’ the applications in the YiLu ‘program’ tab, the others go through your local network"; ⑦ Set the other settings by default; ⑧Click "Save". 3.Sharing/Dedicated Static IP, Rotating Residentials/Datacenter IP port forward settings: ① Select an IP; ② Right-click to choose the "Port forward"; ③ Choose a "Port" for the IP that you want to use, you can also check the IP and port information on “PortForwardList” in the YiLu client.
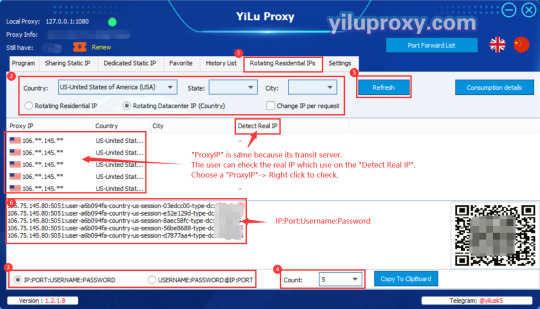
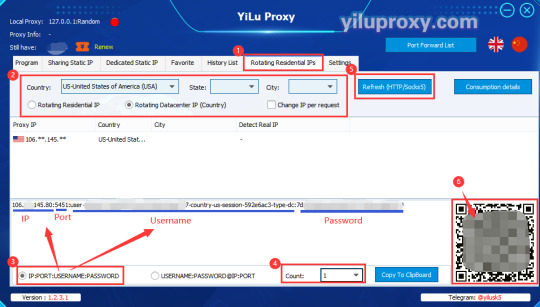
4.Rotating Residential / Datacenter IP settings”(Account and Password): ① Click the "Rotating Residential IPs" button; ② Select the "Rotating Residential IPs" or "Rotating Datacenter IPs" for your needs; ③ Select the Country, State, and City (Rotating Datacenter IP only supports choosing country); ④ Select the format for the generating IP ( "IP:PORT:USERNAME:PASSWORD" or "USERNAME:PASSWORD@IP:PORT"); ⑤ Select the number of IPs to be generated; ⑥ Click the "Refresh(HTTP/Socks5)" button to extract IP information; ⑦ Copy the generated IP:PORT:USERNAME:PASSWORD, and fill into the Chrome, Firefox, Edge, etc., local browser or anti-detect browser, for the mobile phone can directly scan the QR code on the right to add the proxy (the proxy type supports Socks5 and HTTP).

0 notes
Text
Leidian Simulator uses YiLu Static IP
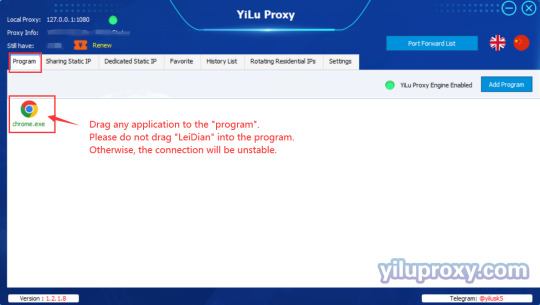
Open the YiLu client, and add any application to the "Program" page, please do not add "LeiDian" to the YiLu program, otherwise, the connection will be unstable;
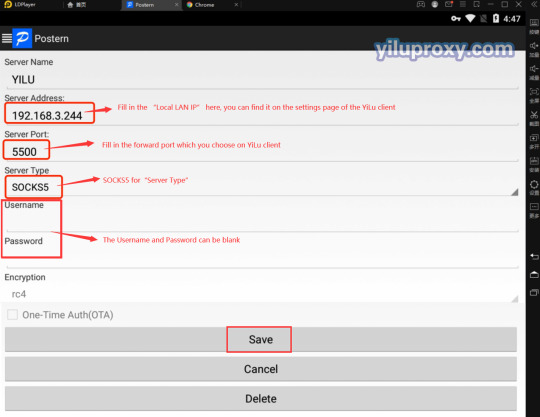
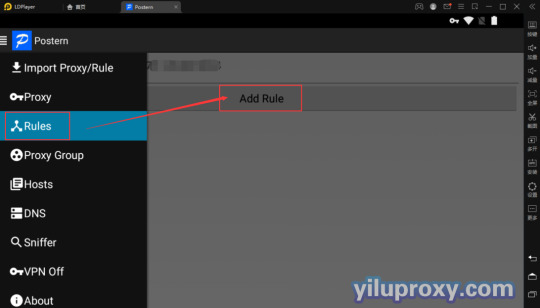
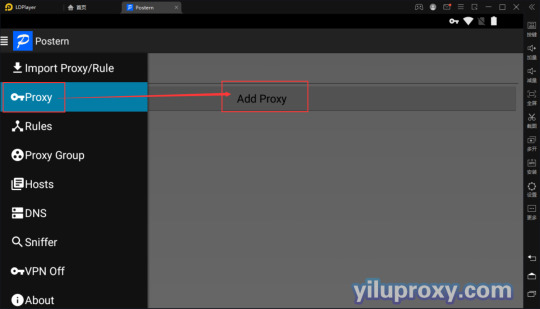
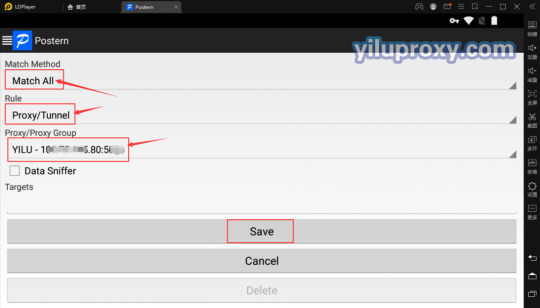
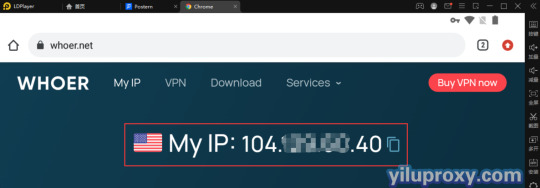
2.YiLu settings: ① Click on the YiLu "Settings" page; ② Port Forward: Set the port range according to your needs. One port represents one IP address. ③ Select "YiLu Porttable Proxy Engine"; ④ Select "Only ‘Proxy’ the applications in the YiLu ‘program’ tab, the others go through your local network"; ⑤ Select "0.0.0.0" for the Bind address; ⑥ Other options can be set by default -> Click "Save"; Note: The Local Lan IP is the “Server Address” of “Postern” in the “LeiDian” simulator. 3.Sharing Static IP/Dedicated Static IP port forward: ① Click the “Dedicated Static IP” page (Sharing Static IP’s settings method is the same ); ② Click “Order IP” to purchase an IP, then right-click to select the “Port Forward”; ③ Select a Port for this IP like 5500; 4.“LeiDian” simulator "Postern" settings: ① Open the "Postern" ; ② “Proxy” -> Click "Add Proxy " to add proxy; ③ Fill in the relevant IP information in the form and save it; Server Name: Fill in the name according to your needs; Server Address: Fill in the “Local Lan IP”, you can find it on the YiLu’s settings page; Server Port: Fill in the forward Port which you choose on the YiLu client; Server Type: SOCKS5 Type; Username and Password: Blank. ④ Rules -> Click “Add Rule” Match Method - > Select the "Match All” ; Rule -> Select the “Proxy/Tunnel”; Proxy/Proxy Group - > Select the created proxy; Click "Save". ⑤ After the Proxy IP settings are complete, please close the “VPN On”, then reopen; ⑥ Open the browser to check whether the IP is changed.


0 notes
Text
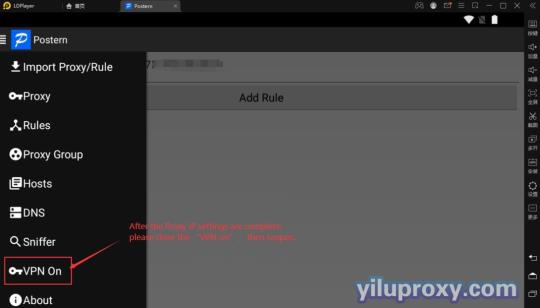
Leidian Simulator uses YiLu Rotating IP
Open the YiLu client , and add any application to the "Program" page, please do not add "LeiDian" to the YiLu program, otherwise, the connection will be unstable;
2.YiLu settings: ① Click on the YiLu "Settings" page; ② Select "YiLu Porttable Proxy Engine"; ③ Select "Only ‘Proxy’ the applications in the YiLu ‘program’ tab, the others go through your local network"; ④ Select "0.0.0.0" for the Bind address; ⑤ Other options can be set by default -> Click "Save"; 3.Extract IP information from the "Rotating Residential IP": ① Click the "Rotating Residential IP" page; ② Select the Rotating IP type (Residential IP or Datacenter IP) and the desired country, state, or city; ③ Select the type of proxy information to be generated ( "IP:Port:Username:Password" or "USERNAME:PASSWORD@IP:PORT" ); ④ Select the number of IPs to be generated; ⑤ Click the "Refresh" button to refresh IP information; Note: The generated "Proxy IP" is the IP of the transit server, so they are all the same. The IP which you are using is the IP in the "Detect Real IP" list, you can select the IP and right-click to view it. 4.“LeiDian” simulator "Postern" settings: ① Open the "Postern" ; ② “Proxy” -> Click "Add Proxy " to add proxy; ③ Copy the “IP:Port:Username:Password” from YiLu client which was generated, and fill in the corresponding IP information into the form and save it; Note: The proxy type needs to select "SOCKS5", and the IP’s username must be filled in completely. ① Match Method - > Select the "Match All” ; ② Rule -> Select the “Proxy/Tunnel”; ③ Proxy/Proxy Group - > Select the created proxy; ④ Click "Save". After the Proxy IP settings are complete, please close the “VPN On” , then reopen; Open the browser to check whether the IP is changed.


0 notes
Text
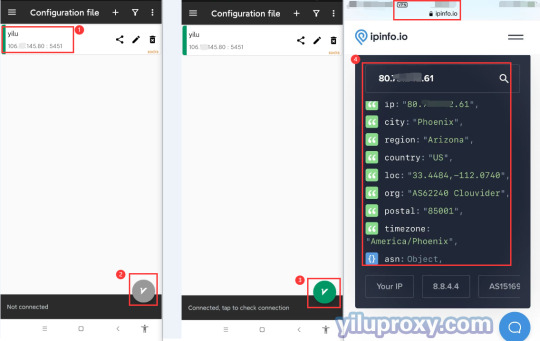
iPhone Shadowrocket: YiLuProxy Rotating IP settings
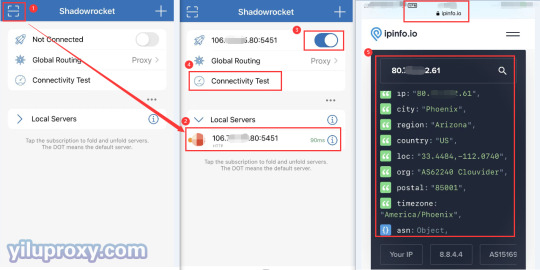
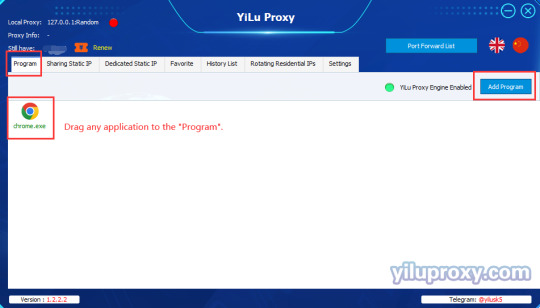
Ⅰ. YiLuProxy settings: 1.YiLu “Program”: Drag any application to the “Programs” TAB, such as the Chrome browser. 2.YiLu “Settings”: ① Proxy Port: Random and Custom are both OK; ② Bind address: Choose 0.0.0.0, if you are using it on the phone; ③ Proxy Engine Settings: Choose the “YiLu Porttable Proxy Engine”; ④ ProxyRules: Only “Proxy” the applications in YiLu “Program” tab, the others go through your local network; ⑤ Set the other settings by default; ⑥ Click “Save”. 3.Rotating Residential/Datacenter IPs settings: ① Click the “Rotating Residential IPs” button; ② Choose the IP type, Country, State, and City for your needs (Rotating Datacenter IP only supports choosing country); ③ Choose the format for the generating IP; ( “IP:PORT:USERNAME:PASSWORD” or “USERNAME:PASSWORD@IP:PORT” ); ④ Select the number of IPs to be generated; ⑤ Click the "Refresh (HTTP/Socks5)" button to extract IP information; ⑥ Click on the extracted "IP information", the right side will show the HTTP type QR code, currently only supports HTTP type software scanning QR code, Socks5 type software requires users to manually fill in IP:Port:Username:Password in the software. Ⅱ. Shadowrocket Settings: 1.Open Shadowsocks software on the phone, click the button in the upper left corner, then directly scan the QR code generated in YiLu software; 2.After successful scanning, the server will be saved automatically; 3.After selecting the added server, open it; 4.Click on "Connectivity Test" to see if it is connected; 5.After the successful connection, open the ipinfo.io website to detect the Proxy IP relevant information; 6.After the successful setup, you can start operating your business. Note: ① This tutorial supports all IOS systems; ② Shadowrocket software can only be downloaded by overseas accounts; ③ For the rotating residential / datacenter IP port forward method, please refer to the static IP settings tutorial.


0 notes
Text
iPhone Shadowrocket: YiLuProxy Static IP settings
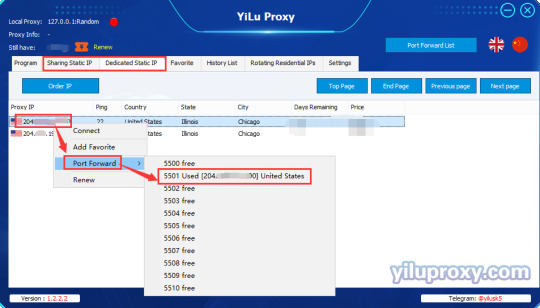
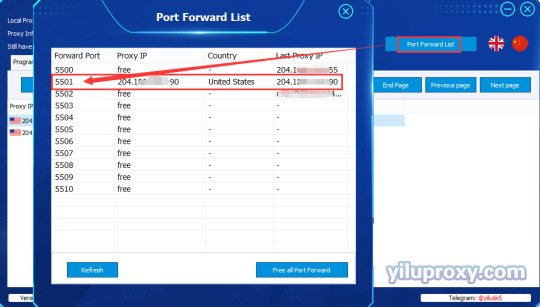
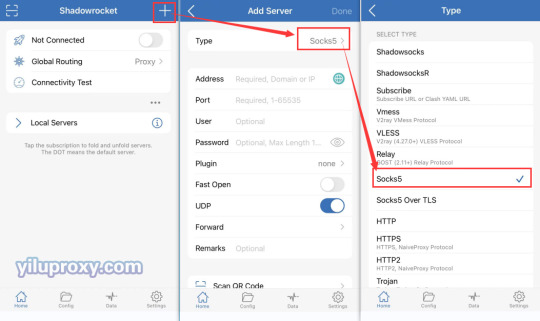
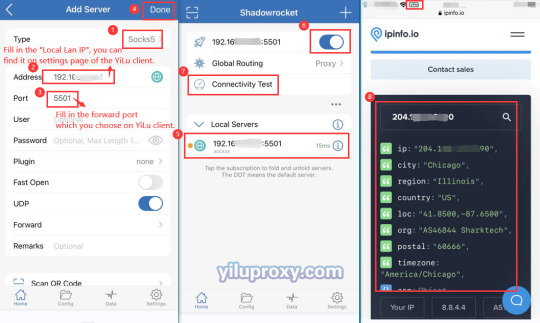
Ⅰ. YiLuProxy settings: 1.YiLu “Program”: Drag any application to the “Programs” TAB, such as the Chrome browser; 2.YiLu “Settings”: ① Proxy Port: Random and Custom are both OK; ② Port Forward: Set the port range according to your needs. For example, if you choose 5500 to 5510, that means the user can forward multiple ports at the same time, and every port should be set to an independent IP; ③ Bind address: Choose 0.0.0.0, if you are using it on the phone; ④ Proxy Engine Settings: Choose the “YiLu Porttable Proxy Engine”; ⑤ Set the other settings by default; ⑥ Click “Save”. Note: ① The “Local Lan IP” is the “address” that you need to fill in on “Shadowrocket”, you can check it on YiLu’s setting page; ② The phone must be on the same LAN as the YiLu client. If it cannot be connected, turn off the local firewall. 3.IP Port Forward Settings (Sharing Static IP and Dedicated Static IP): ① Choose an IP; ② Right-click to choose the “Port forward”; ③ Choose a “Port” for the IP which you want to fill in it in “Shadowrocket”, you can also check the IP and port information on “PortForwardList” in the YiLu client. Note: ① Used means the port sets the IP, Free means the port is idle and it's not set the IP; ② All IP port forwarding settings are the same. Ⅱ. Shadowrocket settings: 1.Open “Shadowrocket” software on the phone, click "+" in the upper right corner to add Server; 2.Type: Select Socks5; 3.Address: Fill in the “Local Lan IP”, you can find it on the settings page of the YiLu client; 4.Port: Fill in the forward port set by the user in the YiLu client; 5.User and password can be empty; 6.Click "Done" to save the server; 7.After selecting the added server, open this server; 8.Click on "Connectivity Test" to see if it is connected; 9.After the successful connection, open the ipinfo.io website to detect the current IP is consistent with the IP set by you in YiLu; 10.After the successful setup, you can start operating your business.


0 notes
Text
Android v2rayNG: YiLuPoxy Rotating IPs settings
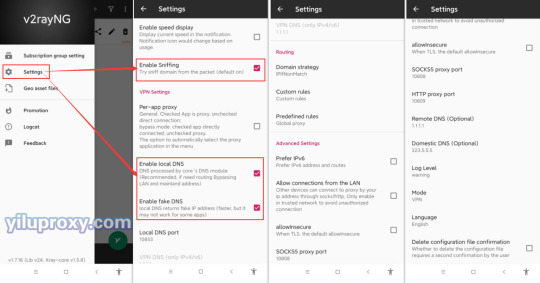
Ⅰ. YiLuProxy settings: 1.YiLu “Program”: Drag any application to the “Programs” TAB, such as the Chrome browser. 2.YiLu “Settings”: ① Proxy Port: Random and Custom are both OK; ② Bind address: Choose 0.0.0.0, if you are using it on the phone; ③ Proxy Engine Settings: Choose the “YiLu Porttable Proxy Engine”; ④ ProxyRules: Only “Proxy” the applications in YiLu “Program” tab, the others go through your local network; ⑤ Set the other settings by default; ⑥ Click “Save”. 3.Rotating Residential / Datacenter IPs settings: ① Click the “Rotating Residential IPs” button; ② Choose the IP type, Country, State, and City for your needs (Rotating Datacenter IP only supports choosing country); ③ Choose the format for the generating IP; ( “IP:PORT:USERNAME:PASSWORD” or “USERNAME:PASSWORD@IP:PORT” ); ④ Select the number of IPs to be generated; ⑤ Click the "Refresh (HTTP/Socks5)" button to extract IP information; ⑥ Click on the extracted "IP information", the right side will show the HTTP type QR code, currently only supports HTTP type software scanning QR code, Socks5 type software requires users to manually fill in IP:Port:Username:Password in the software. Ⅱ. v2rayNG software settings: 1.Open v2rayNG software on your phone, click the “settings” to set it; 2.Enable the settings of “Enable Sniffing”, “Enable local DNS”, and “Enable fake DNS”, for other settings just set as default; 3.Click “+” in the upper right corner to add the configuration file; 4.Choose “Type manually [Socks]” to set the Proxy, (The user needs to fill in the IP:Port:Username:Password manually, because the V2 doesn't support HTTP type for the Proxy); 5.Remarks: just fill in it for your needs; 6.Fill in the address (IP):Port:Username:Password, you can find on the YiLu software; 7.Click "√" to save the proxy; 8.Click the icon “” to connect the proxy that you added, After the connection is successful, the icon will change to the green “”, and you will see “Connected” ; 9.Open the detect website of the ipinfo.io to check the Proxy IP relevant information.

0 notes
Text
Android v2rayNG: YiLuProxy IP port forward settings


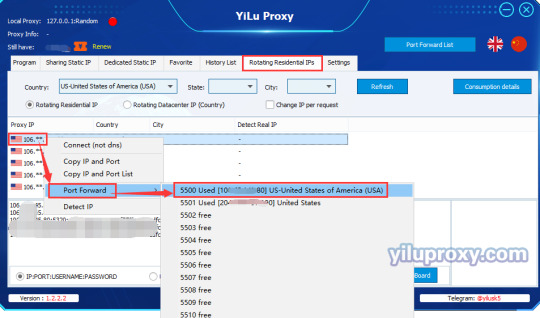


Ⅰ. YiLuProxy Settings: 1.YiLu “Program”: Drag any application to the “Programs” TAB, such as the Chrome browser; 2.YiLu “Settings”: ① Proxy Port: Random and Custom are both OK; ② Port Forward: Set the port range according to your needs. For example, if you choose 5500 to 5510, that means the user can forward multiple ports at the same time, and every port should be set to an independent IP; ③ Bind address: Choose 0.0.0.0, if you are using it on the phone; ④ Proxy Engine Settings: Choose the “YiLu Porttable Proxy Engine”; ⑤ Set the other settings by default; ⑥ Click “Save”. Note: ① The “Local Lan IP” is the “address” that you need to fill in on v2rayNG, you can check it on YiLu’s setting page; ② The phone must be on the same LAN as the YiLu client. If it cannot be connected, turn off the local firewall. 3.IP Port Forward (Sharing/Dedicated Static IP, Rotating Residential/Datacenter IPs): ① Choose an IP; ② Right-click to choose the “Port forward”; ③ Choose a “Port” for the IP which you want to fill in it in v2rayNG, you can also check the IP and port information on “PortForwardList” in the YiLu client. Note: ① Used means the port sets the IP, Free means the port is idle and it's not set the IP; ② All IP port forwarding settings are the same; ③ The below screenshots are example of the Static IP, Rotating IPs, and PortForwardList. Ⅱ. v2rayNG software settings: 1.Open v2rayNG software on your phone, click the “settings” to set it; 2.Enable the settings of the “Enable Sniffing”, “Enable local DNS”, and “Enable fake DNS”, for other settings just set as default; 3.Click “+” in the upper right corner to add the configuration file; 4.Choose “Type manually [Socks]” to set the Proxy; 5.Remarks: just fill in it for your needs; 6.Address: Fill in the “Local Lan IP”, you can find on the settings page of the YiLu client; 7.Port: Fill in the forward port which you choose for the YiLu client; 8.The User and Password can be blank; 9.Click "√" to save the proxy; 10.Click the icon
0 notes
Text
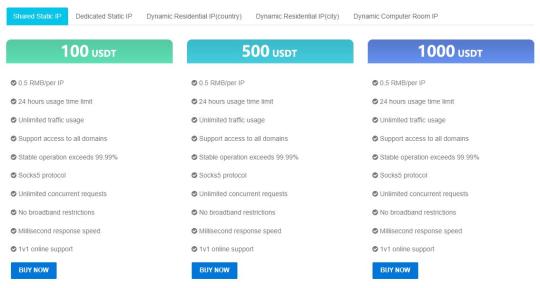
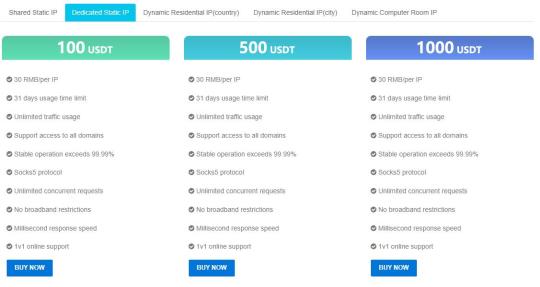
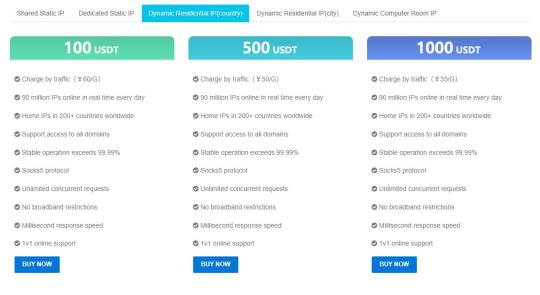
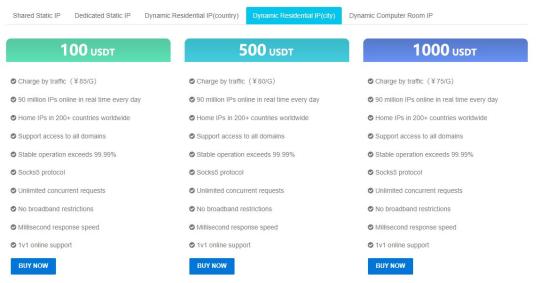
PRICING PLANS
For shared static IP, dedicated static IP, dynamic residential IP (country), dynamic residential IP (city), dynamic computer room IP, our billing model is as follows:

0 notes
Text
Advantages of YiLuProxy
1.Over 240+ countries/regions worldwide,90 million residential IP resources 2.Unlimited concurrent requests,High performance, high efficiency, latency less than 10ms 3.Anti-tracking, protect privacy, protect data security, Easily break through various access restrictions, doubling efficiency 4.Adopt international operator IP, Stable operation over 99.99% 5.Professional technical team, Master cutting-edge proxy technology, provide the best experience 6.Mon-Sat 10:00~22:00 (UTC+09:00), 1v1 professional guidance, problem solving
0 notes
Text
YiLu Introduction
YiLuProxy is the world's top IP proxy service provider. Adopt international operator's own pure residential IP, high-performance, high-anonymity server, stable and without any restrictions. It is suitable for any kind of business scenarios to access network data anywhere in the world, and efficiently expand your online business. Official website:https://www.yiluproxy.com Download link:https://www.yiluproxy.com/YiLuProxy.zip Channel: https://t.me/yilusk5_support
0 notes
Text
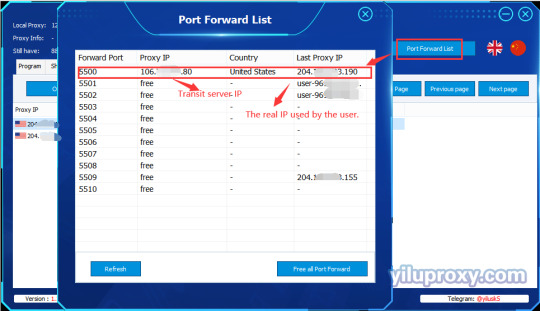
Google Chrome – YiLu Static IP Port Forwarding


Open Yilu official website to download YiLu software.
Open YiluP.roxy software, open the [Program] tab, drag Google software directly into the blank space.
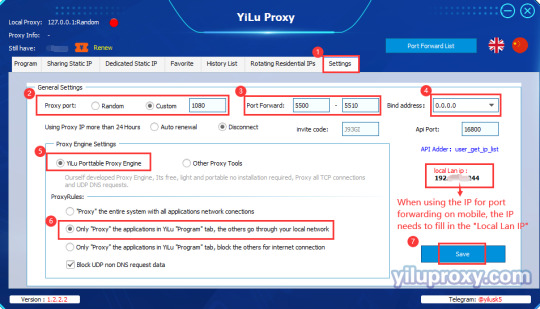
Open [Settings] interface in the software: ① Proxy port: select “Random” or “Custom”; ② Port Forward: Set the port range according to your own needs, such as 5500-5510, it means that multiple ports can be forwarded at the same time, and each port needs to be set with an IP; ③ Bind address: 127.0.0.1: When using the local Google Chrome browser, if 127.0.0.1 is selected, fill in 127.0.0.1 in the "Proxy Server" IP in the browser; 0.0.0.0 or LAN IP: When using multiple devices or across computers, you need to select 0.0.0.0 or Local LAN IP. After selecting, fill in "Local LAN IP" in "Proxy Server" in the browser. ④ Use proxy IP more than 24 Hours: set according to your needs; ⑤ Proxy Engine Settings: select "Yilu Portable Proxy Engine"; ⑥ Proxy Rules: Select"Only‘Proxy’the applications in YiLu ‘Program’ tab, the others go through your local network”.
Sharing Static IP/Dedicated Static IP settings (take Dedicated Static IP as an example): ① Select an IP line; ② Right-click to choose "Port forward"; ③ Choose a "Port" as needed, you can also check the IP and port information on “Port Forward List” in the YiLu client.
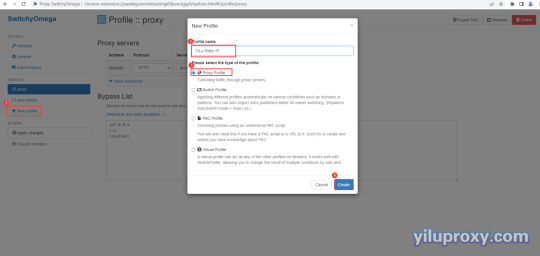
Open Google Chrome, download and add the SwitchyOmega plug-in in the Chrome Web Store, then set the proxy server in the profile mode.
① Click "New Profile" under "Profiles";
② Enter the agent name such as "YiLu Static IP";
③ Select "proxy profile" type of the profile;
④ Click the "Creat" button;
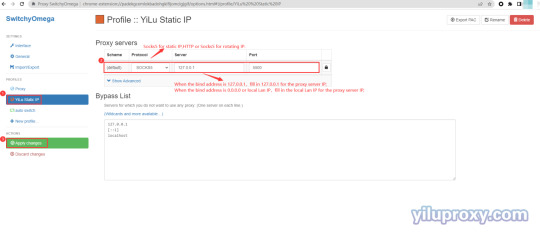
⑤ Select "Proxy Protocol": select HTTP or Socks5 type for rotating IP, and select Socks5 type for static IP;
⑥ Set "proxy server":
Select 127.0.0.1 for the bind address, and fill in 127.0.0.1 for the proxy server IP;
When the bind address is 0.0.0.0 or Local LAN IP, fill in the Local LAN IP for the proxy server IP (You can view the local LAN IP in "Settings" tab of the YiLu client).
⑦ Proxy port: Set "Port" when selecting IP can be viewed in the "Port Forwarding List";
⑧ Click the "Apply changes" button to save the settings;
⑨ Open the local Google browser, click the SwitchyOmege plug-in button, and select the "YiLu Static IP" proxy;
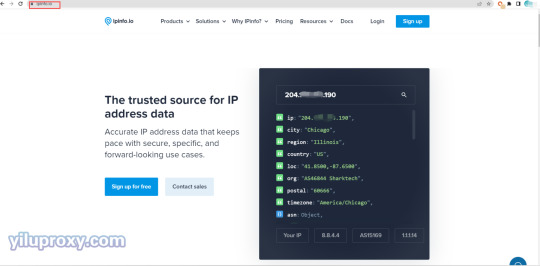
⑩ Open the ip-api.com website to check the current IP information.
0 notes
Text
Firefox browser – YiLu Proxy Direct Connection
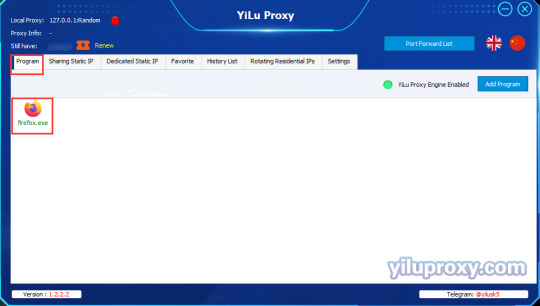


Open the official YiLu website and download the YiLu software.
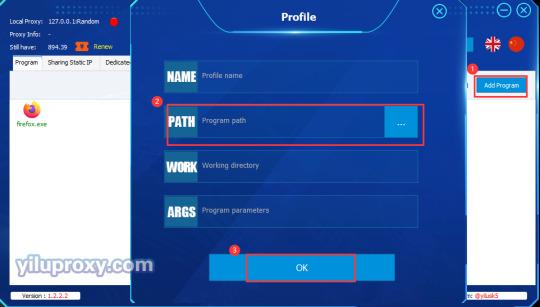
Open the YiLu proxy software, open the [Program] tab, and add software in the following two ways: ① Drag Firefox software into the blank space; ② You can also click the "Add Program" button to add the desired program to the blank space; Click "Path", select the software you want to use proxy, and click” Save”.
Open the [Settings] tab in the software: ① Proxy port: choose random or custom; ② Port Forward: Set the port range according to your needs; ③ Bind address: generally choose 127.0.0.1; ④ Use proxy IP for more than 24 hours: set according to your needs; ⑤ Proxy Engine Settings: select Yilu portable proxy engine; ⑥ ProxyRules: Select “Only ‘Proxy’ applications in YiLu "Program" tab, the others go through your local network.
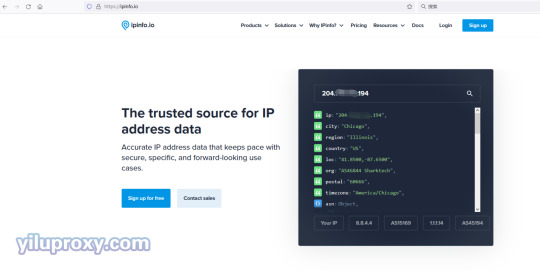
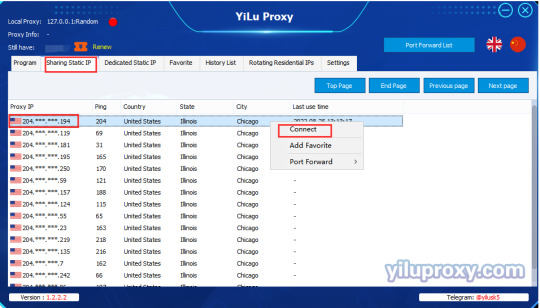
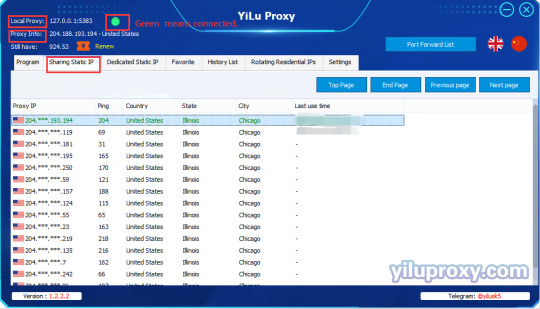
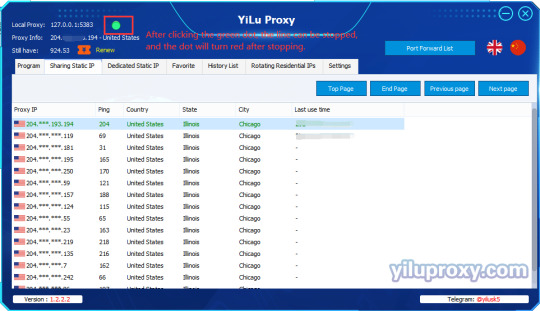
Sharing Static IP/Dedicated Static IP settings: ① Select an IP ; ② Right-click; ③ Select "Connect" to use the proxy. At this time, the information of the proxy IP will be displayed in the upper left corner, including "Local Proxy" and "Proxy Info". At this time, the status of the small dot is marked in green; ④ Open the local Firefox browser and open the ipinfo.io website to detect the IP information set; ⑤ After success, you can start to operate your business; ⑥ If you do not want to continue to use the current IP, you can select another IP and right-click to connect to use it, or close the line by clicking the dot "Stop Proxy Route" next to the "Local Proxy".
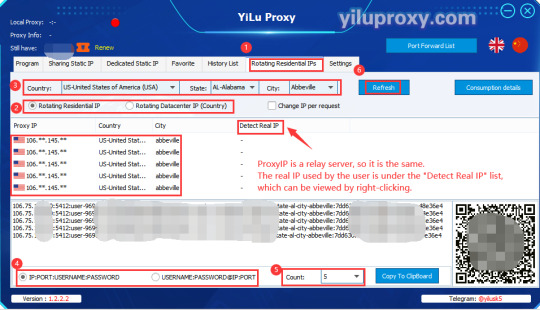
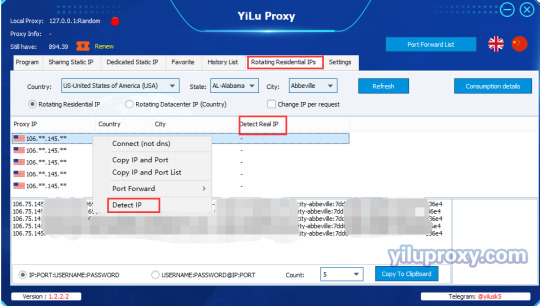
Rotating residential IP/Rotating datacenter IP: ① Click [Rotating residential IPs] to enter the page; ② Select IP type: Rotating residential IP or Rotating Datacenter IP; ③ Select the desired country, state and city (only rotating residential IP can select state and city, rotating datacenter IP does not support selection); ④ Select the rotating IP generation format, "IP:port:username:password" or "username:password@IP:port"; ⑤ Select the generation quantity; ⑥ Click the "Refresh(HTTP/Socks5)" button to obtain IPs; ⑦ After obtaining the IP, select an IP line, right-click, and select "Connect" to use the proxy; ⑧ Open the local Firefox browser and open the ipinfo.io website to check the current IP information; ⑨ After success, you can start operating your business. Note: The Proxy IP in the rotating residential IP/rotating datacenter IP is our transit server IP, so the extracted IPs are displayed the same. The IP you actually use is our export IP. After selecting an IP, right-click to select "Detect IP", you can see the real IP you are using.
0 notes
Text

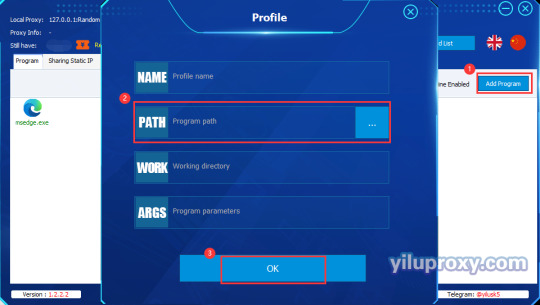


Edge browser – YiLu Proxy Direct Connection
Open the official YiLu website and download the YiLu software.
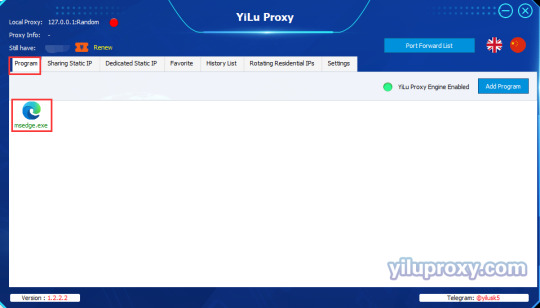
Open the YiLu proxy software, open the [Program] tab, and add software in the following two ways: ① Drag Edge software into the blank space; ② You can also click the "Add Program" button to add the desired program to the blank space; Click "Path", select the software you want to use proxy, and click” Save”.
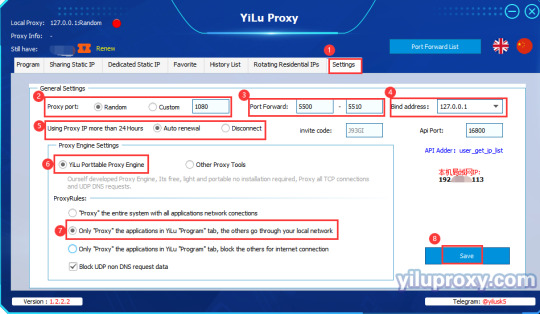
Open the [Settings] tab in the software: ① Proxy port: choose random or custom; ② Port Forward: Set the port range according to your needs; ③ Bind address: generally choose 127.0.0.1; ④ Use proxy IP for more than 24 hours: set according to your needs; ⑤ Proxy Engine Settings: select Yilu portable proxy engine; ⑥ ProxyRules: Select “Only ‘Proxy’ applications in YiLu "Program" tab, the others go through your local network;
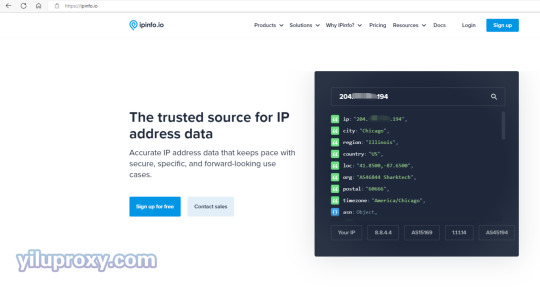
Sharing Static IP/Dedicated Static IP settings: ① Select an IP ; ② Right-click; ③ Select "Connect" to use the proxy. At this time, the information of the proxy IP will be displayed in the upper left corner, including "Local Proxy" and "Proxy Info". At this time, the status of the small dot is marked in green; ④ Open the local Edge browser and open the ipinfo.io website to detect the IP information set; ⑤ After success, you can start to operate your business; ⑥ If you do not want to continue to use the current IP, you can select another IP and right-click to connect to use it, or close the line by clicking the dot "Stop Proxy Route" next to the "Local Proxy".
Rotating residential IP/Rotating datacenter IP: ① Click [Rotating residential IPs] to enter the page; ② Select IP type: Rotating residential IP or Rotating Datacenter IP; ③ Select the desired country, state and city (only rotating residential IP can select state and city, rotating datacenter IP does not support selection); ④Select the rotating IP generation format, "IP:port:username:password" or "username:password@IP:port"; ⑤ Select the generation quantity; ⑥ Click the "Refresh(HTTP/Socks5)" button to obtain IPs; ⑦ After obtaining the IP, select an IP line, right-click, and select "Connect" to use the proxy; ⑧ Open the local Edge browser and open the ipinfo.io website to check the current IP information; ⑨ After success, you can start operating your business. Note: The Proxy IP in the rotating residential IP/rotating datacenter IP is our transit server IP, so the extracted IPs are displayed the same. The IP you actually use is our export IP. After selecting an IP, right-click to select "Detect IP", you can see the real IP you are using.
0 notes
Text
Google Chrome – YiLu Proxy Direct Connection


Open the official YiLu website and download the YiLu software.
Open the YiLu proxy software, open the [Program] tab, and add software in the following two ways: ① Drag Edge software into the blank space; ② You can also click the "Add Program" button to add the desired program to the blank space; Click "Path", select the software you want to use proxy, and click” Save”.
Open the [Settings] tab in the software: ① Proxy port: choose random or custom; ② Port Forward: Set the port range according to your needs; ③ Bind address: generally choose 127.0.0.1; ④ Use proxy IP for more than 24 hours: set according to your needs; ⑤ Proxy Engine Settings: select Yilu portable proxy engine; ⑥ ProxyRules: Select “Only ‘Proxy’ applications in YiLu "Program" tab, the others go through your local network;
Sharing Static IP/Dedicated Static IP settings: ① Select an IP ; ② Right-click; ③ Select "Connect" to use the proxy. At this time, the information of the proxy IP will be displayed in the upper left corner, including "Local Proxy" and "Proxy Info". At this time, the status of the small dot is marked in green; ④ Open the local Edge browser and open the ipinfo.io website to detect the IP information set; ⑤ After success, you can start to operate your business; ⑥ If you do not want to continue to use the current IP, you can select another IP and right-click to connect to use it, or close the line by clicking the dot "Stop Proxy Route" next to the "Local Proxy".
Rotating residential IP/Rotating datacenter IP: ① Click [Rotating residential IPs] to enter the page; ② Select IP type: Rotating residential IP or Rotating Datacenter IP; ③ Select the desired country, state and city (only rotating residential IP can select state and city, rotating datacenter IP does not support selection); ④Select the rotating IP generation format, "IP:port:username:password" or "username:password@IP:port"; ⑤ Select the generation quantity; ⑥ Click the "Refresh(HTTP/Socks5)" button to obtain IPs; ⑦ After obtaining the IP, select an IP line, right-click, and select "Connect" to use the proxy; ⑧ Open the local Edge browser and open the ipinfo.io website to check the current IP information; ⑨ After success, you can start operating your business. Note: The Proxy IP in the rotating residential IP/rotating datacenter IP is our transit server IP, so the extracted IPs are displayed the same. The IP you actually use is our export IP. After selecting an IP, right-click to select "Detect IP", you can see the real IP you are using.
0 notes