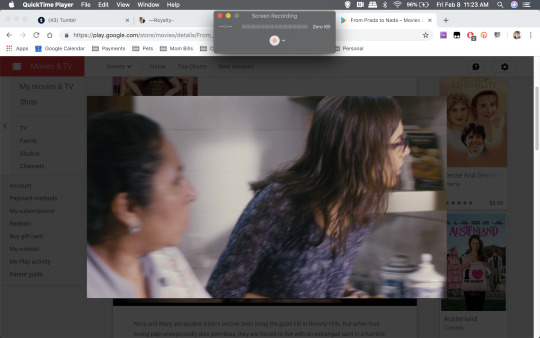
#3MB/s down
Explore tagged Tumblr posts
Visit Tumblr Blog
Explore Tumblr blogs with no restrictions, modern design and the best experience.
Last Seen Tumblr Blogs


Fun Fact
US Tumblr user growth rate is estimated to slow down to 4.1%.
Text
I love Ethernet cables!
I love wiring my house with cables along the skirting boards!!
I love having a reliable connection to the internet!!!
I love fast inter-lan connections between my computers!!!!
I love how switches look when all wired!!!!!
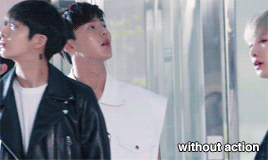
#ethernet#ethernet cables#networking#LAN#i would usually say faster internet speeds#but my speeds are so shit i reach max just on wifi#3MB/s down#700KB/s up#its BAD#i mainly use the cables to game stream from my pc to my laptop using#moonlight#and#sunshine#as the router throttles all connections no matter if its internet or intranet to slower than slow#its so stupid#but using a switch and Ethernet i can actually stream games at good quality
2 notes
·
View notes
Text
Throughout the past decade, the cybersecurity industry has shown a great increase in VPN usage. Recent trends don’t lie—VPNs are among the most popular forms of security available right now, especially for people managing IoT devices. But what is VPN for? In a time where a pandemic has forced us to work from home, encrypted communication is important, which is exactly what a VPN provides. 5 Things to Consider Choosing a VPN can be difficult. To soften the blow that is having to research dozens of VPNs, allow me to tell you the 5 things you should consider when looking for the perfect VPN for you. Price First up, we have the price of the VPN. When it comes to your security, money is just an object. That doesn’t mean you need to spend a fortune, however, as most reputable VPN services cost anywhere from $10 to $15 a month. But while we’re on the discussion of price, let me give you one warning—do not trust free VPNs. While the idea of never having to spend money on extra security is great, it’s not ideal. Many free VPNs carry malware, sell data to other companies, and straight-up may not work. Reliability Next up, we have reliability, the crowning jewel of reputable VPNs. What’s the point of a VPN if it doesn’t work? If it shuts down during the middle of the workday? Trick question: there is none. Make sure that whichever VPN you choose actually works. User reviews and tech news websites are great sources for things like these. There’s no reason to pay for a VPN service if it doesn’t provide the security promised. Versatility A VPN that doesn’t offer versatility is a VPN not worth using. But what do I mean by versatility? By versatility, I’m talking about the ability to be used on any device whenever, wherever. If you use multiple devices for your work, you’ll want a VPN with known versatility, AKA it has an app for phones, tablets, consoles, laptops, and vice versa. Speed Slow internet annoys me. I used to live in a house with 3Mb/s down…it was not fun. So when choosing a VPN, you’ll want to consider the speed of the servers it’ll connect to. Some VPNs offer faster services than others, and some are much slower. Fortunately, many sites perform speed tests for most VPNs so you won’t be left in the dark. Your Needs But what is every piece of criteria I’ve listed if you don’t care about 99% of them? I could give you a detailed guide on how to choose the perfect VPN, but I don’t know your exact needs. Not knowing your exact needs puts me at an inherent disadvantage. What I’ve listed here is a guideline, but if you have different needs that don’t require high speeds and extreme versatility, then choose according to your needs. Conclusion Choosing the right VPN is an important task—it’s what sets the stage for your security every day. If it doesn’t work, you’ll be left vulnerable. If it does work, you won’t need to worry about cybersecurity attacks near as much as you had to in the past. But choosing the right one can be difficult, which is why I thought I’d write you a quick, little guide. The process doesn’t need to be difficult, and I think everyone deserves a reputable VPN that conforms to their needs. With this guide, choosing one will be one of the easiest things you’ve ever done! Well, at least I hope it is!
0 notes
Video
tumblr
a DM’s natural habitat (x)
#artists on tumblr#dnd shenanigans#dungeon master#taz#critical role#wizards of the coast#dm meme#dnd#cat#dnd meme#coffee#animation#hey if anyone knows how to get like a 16mb gif file down to 3mb p l e a s e tell me im dying#take a vid instead
515 notes
·
View notes
Text
ohhhh my god I got an ethernet cable for my desktop because for the last month and a half the wifi in my office has been absolutely garbage (we're talking 3mb/s max) and after spending an hour tacking down 60 feet of cable I can finally load my email in under 5 minutes again 😩 I've never known such speed
4 notes
·
View notes
Photo

so i thought it’d be a good idea to make a full indepth tutorial on how i make my gifs and what i do to achieve them! please be aware that everyone’s giffing style is different and this is just how i make them and what my settings are! you can do absolutely whatever you wish when you’re making your gifs!
i will be going over where you can get videos, how you can download them, how to use photoshop, vapoursynth, and colouring (regular gifs, performance gifs and selective colouring to change colours in gifs)!
step one: downloading the video
so i always try to get 1080p videos and if not 720p for the highest quality possible (there is the option of 4k as well but that’s not used so often)
TS files: kpopexciting, kpop24hours (you need a login for this), HDhallyu (for more older performances circa 2015 and before), dongyoungsang (for kdramas/tv shows)
Youtube videos: 4K Video Downloader
Vlive videos: Soshistagram
Twitter videos: Twitter Video Downloader
Instagram videos: Dredown
step two: using vapoursynth
so vapoursynth is similar to avisynth but it works much faster and has more options when it comes to sharpening and denoising gifs especially performance gifs! i’ll go over the steps i do to use vapoursynth but i have also provided a video i’ve recorded (it’s very basic) in case text is a little too confusing! there’s also this tutorial that goes into details on how the options work and how you can use them!
have two windows open, one containing the videos you’re using and the other with vapoursynth.
drag whatever video you want to use onto ‘vapourscript.bat’ and a terminal window will popup. this is where you put in the the timestamp of where you want to start and end your clip in the HH:MM:SS format.
enter your starting point first and then it will prompt you again asking for the duration of how long you want the clip to be.
hit enter again and wait until the resizer.html pops up and from here you’ll put the settings you want to use for your gifs.
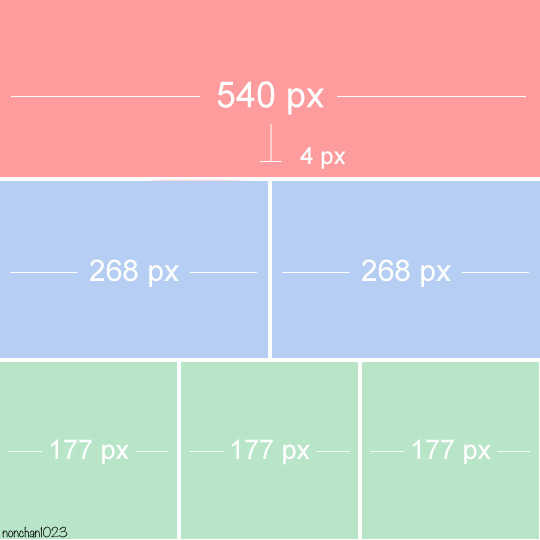
gif size
gif widths (the first number) recommended for Tumblr:
1 gif per row: 540px
2 gifs per row: 268px
3 gifs per row: 177/178px
opacity
changes how you view the video in the window.
preprocessor
refers to how the video will render! it refers to the number of frames per second (30 frames or 60 frames). i don’t normally use this cause it slows down the application for me personally but you can use it to your liking1
denoise
helps remove noise from gifs. I use KNLM and you can toggle the settings how you see fit
extra sharpening
it’s pretty self-explanatory but you just basically go off of your preference!!
then you just copy and paste your what you see on that white box in the browser onto the application and trim it to the length or number of frames you need! once your done you go to script > encode video and make sure to change the ‘no header’ to ‘y4m’!
step three: using photoshop
to create gifs in Photoshop, go to File > Import > Video Frames to Layers and then select your video file/output file from Vapoursynth. depending on how long your clip is you can press ok or select the option “limit to every 2 frames”.
with photoshop you can adjust the timing of your gif even further! my usual preferences are:
<20 frames: 0.15
20-59 frames: 0.1
60+ frames: 0.07
you gif should be under 3mb - to decrease a gif’s size, i usually delete frames and/or use selective color to increase the black percentage for whites, neutrals, and blacks.
with tumblr saying you can go over 3mb for gifs you definitely can but it will lower the quality of the gif. if i need to i’ll go up to 4mb at most.
step four: sharpening
it’s completely optional to do this since vapoursynth does some sharpening for you and you can find a ton from @completeresources and @yeahps to just name a couple ps resource blogs!!
you have to change the timeline from frame animation to video timeline and you can do that by clicking the button on the bottom left corner on the timeline that looks like stacked rectangles.
from here you will have to make all your frames into one layer so you have to go to filter > convert for smart filters. and you can use your action on that by going to the actions panel, selecting what action you want to use and press the play button.
now you can put the colouring that you would like on your gif!
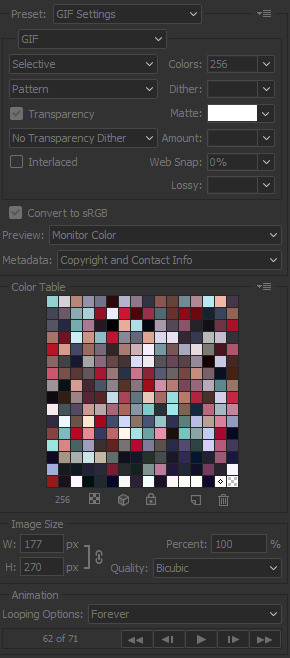
step five: saving
now when you save you can do the shortcut ctrl+alt+shift+s or go to file > export > save for web and these are my setting for when i save:
miscellaneous notes
here i have three different gifs of the same scene to just show the difference between using .mp4, .ts only, and .ts + VS. as you can see there’s a significant difference between each of them especially the .mp4 versus .ts + VS.

how i colour
the adjustments i currently use the most are:
curves
brightness/contrast
color lookup
levels
selective color
some things that i personally like when i’m colouring is:
having the black of the gif to the darkest it can be
vibrant
to get the black areas to the darkest it can be, there are two options. option one is i would use a mix of curves and levels. i would start off with the curves and use the eye dropper tool that is filled with black and click on that then i would click on the darkest spot of the gif then it’ll automatically recolour the gif so the area that you selected would be black.
to keep the skin tone of idols intact i usually do the following:
keep the vibrance high
use selective colour to colour correct the skin
give a warmer tone to the gif using color balance
here’s just an example of how colouring can make a difference in the gifs and how they look afterwards as well:

most of the time i have around 3-5 adjustments for gifs if i need to but you definitely can add more to your desire!
how to change colours on gifs
changing colours completely is honestly a lot and sometimes it can take up to 10+ adjustment layers if you need to. it takes a lot of practice but the more you do the better you’ll be at it! i’ll basically be explaining how i went from this:

to this:

so tips for this type of colouring:
its easier on gifs that have mostly white backgrounds
it’s easier to change from cool tones to warm tones rather than the other way; especially if there are people in the gif. trying to change warm tones will affect the person’s skin colour
the main adjustments that i use to achieve this colouring is:
hue/saturation
colour balance
colour selective
so i’m going to be changing the blues of this gif into red/pink!
so you use the hue/saturation tool and click the drop-down with master and go to really any option cause you need the eye dropper to be activated.

i’ll use the eye dropper tool to select the cyans/blues in the gif and from there it’ll only change that colour to pretty much any colour you want. it doesn’t always allow you to have smooth changing of colours like this gif so sometimes you may need to use multiple hue/saturation layers to fix it! sometimes using colour balance also helps as well but it’s more broad in that it will change everything that is within the shade range of the colour you’ve selected.
for mostly white backgrounds what’s easiest is that you create a new layer and fill that layer with the colour you wish and change the layer from normal to multiply.
before:

after:
350 notes
·
View notes
Photo
Recently someone asked if I would do a gif making tutorial, so here I am! I’m going to make this as in depth as I can, but if you have remaining questions or problems, feel free to send me them and I will try to help you to the best of my abilities.
Disclaimer: There are many ways to make a gif, but this is the method I’ve been using for years. This tutorial is very long and may make the process seem tedious, but I assure you, once you get the hang of making gifs you could do it in just under a few minutes!
This tutorial includes:
links to all of the sites and programs I use
lots of rambling (w/ pictures)
a short masterlist of my favorite photoshop sources at the end
Links:
Adobe Photoshop CC 2017
PotPlayer (64 bit)
uTorrent
4K Video Download
Photoshop, PotPlayer and uTorrent are the three programs you MUST have for this tutorial. The 4K Downloader is for YouTube/Instagram, which there are other sites you can use for that, but I prefer 4K to make sure I’m getting the best quality I can get. Best part, they’re all free :)
Torrent sites:
PirateBay
yts.lT (favorite)
Nyaa (anime)
These aren’t the only sites that offer torrents (nor are they the only ones I use). When you download torrents, try to be careful; if you think it’s sketchy, go ahead and try to find another. It’s not as scary as it seems, just be aware of what you’re clicking. Some are total duds but I usually have a pretty smooth time finding what I need unless it’s something unpopular or obscure. Whatever site you’re on, try to use the latest links (past hour/day/week) if it’s for a new movie or ongoing show. Also, if there’s the option, download magnet.
PirateBay gives me an ongoing issue with their links, so I try to avoid getting torrents from there if I think I can find it elsewhere. YTS is my favorite site for movies; they’re trustworthy and I’ve never had an issue :)
HD/1080p torrents often start popping up when the BluRay comes out, so don’t depend on any site to have it the day something premieres. Usually you’ll have to wait a few weeks/months. Until then it’ll just be CAMs which no one likes!
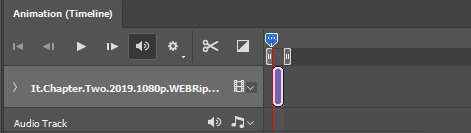
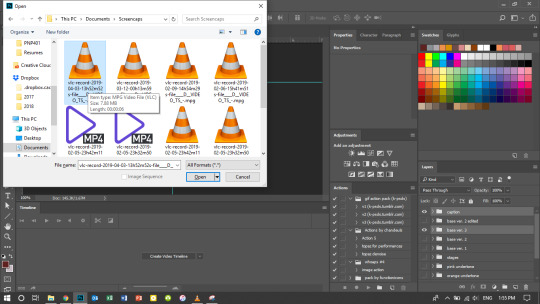
For this tutorial I’m going to be making a gif from IT: Chapter Two (link- click 1080p.WEB). Once you’ve gotten your torrent, open up uTorrent. It’ll ask you where you want your download stored, which I always just choose my Downloads folder.

It’s normal for it to take a while. It doesn’t take all day, but 40 min-2 hrs is usually what I have to wait. My laptop is pretty slow, RIP.
After it says it’s downloaded, you’ll have the .mp4 sitting in your Downloads folder (or whatever destination you chose, but Downloads is the default).
Before you close uTorrent, press the torrent file and then delete it (trash can icon above) so you can delete it from your Downloads folder. Otherwise, your computer will tell you the torrent is still open in the program and won’t let you. You won’t need it after you’ve gotten the .mp4.
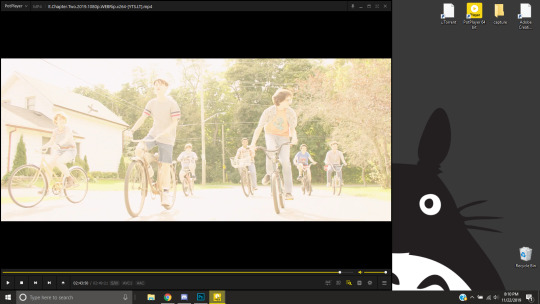
So now we have the movie! Go ahead and open it up in PotPlayer. Right click > Open file(s) and select the movie. It will start playing automatically.
Note: You need to make folders for the frames to be held in. Its been so long since I’ve set up PotPlayer, I can’t remember if the program made the capture folder that’s in Desktop or if I did... if not, go ahead and make sure you have designated folders. (If you’re making 4 gifs, you need 4 separate folders, and so on.)
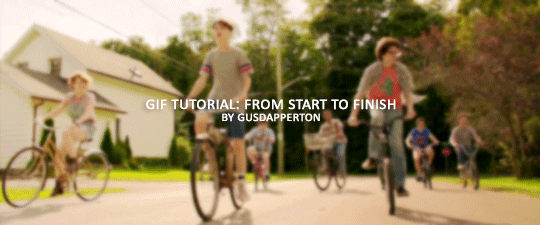
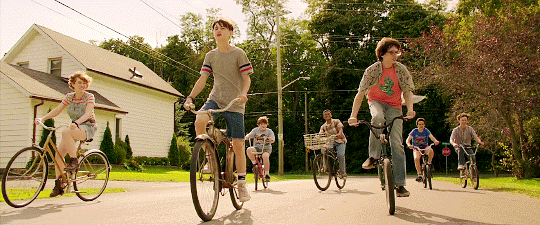
Go to the scene you’d like to gif. The scene I chose in this movie is one of the end scenes of the young Losers Club on their bikes (2hr43min).
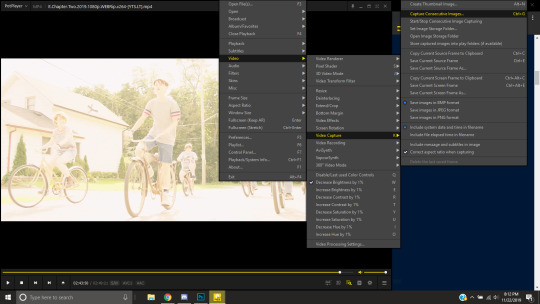
Slide the edge of the program in to minimize the screen a little for the next step.
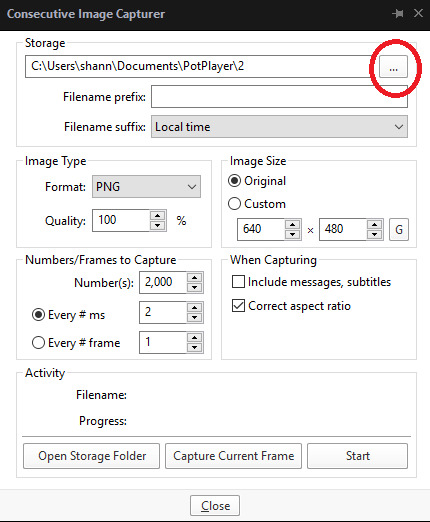
Now, right click > Video > Video Capture > Capture Consecutive Images
This will pop up:
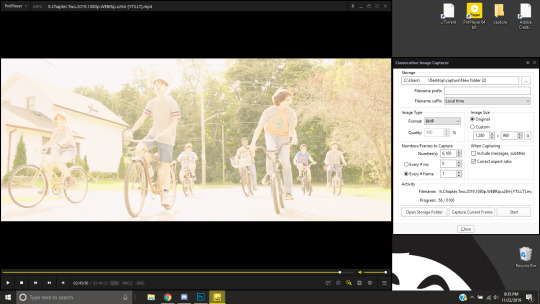
Here is a closer look at the settings:
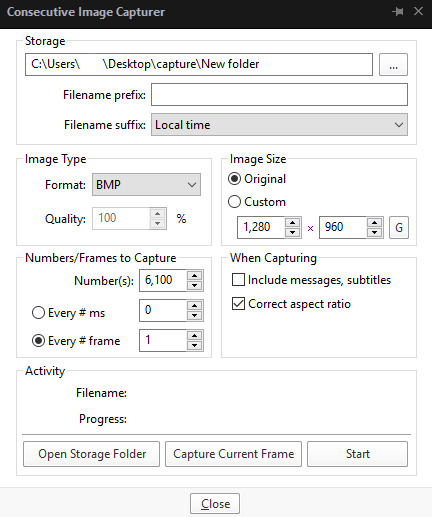
The key things to look at are the Image Type, Image Size, and Numbers/Frame to capture. And of course, make sure you have the right destination chosen in the Storage box because that’s where your frames are going to be. PNG and BMP are the best quality for the type of image. Always choose the original size of the frames. And, make sure you’re saving every frame (Every # frame must be kept at 1).
Make sure to start a few seconds before where you actually want to make a gif. Sometimes (every time lol) the start will lag and you won’t get every single frame you want or thought you were getting. In my case, the screen is fading from white, so I’m going to capture a few frames where the white can still be seen before the full color appears. This way I know I’m getting the most frames I can, and I don’t have to redo it later when I think my gif is too short because I’m missing frames.
While the movie is still paused, press Start in the smaller window, then press Play on your movie. Keep your mouse over the Pause button and end it when you’ve gotten all the frames you wanted. Then, Stop back in the small window.
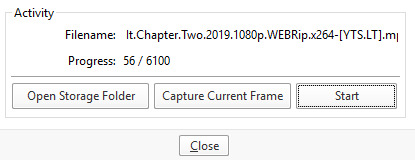
I’ve saved 56 frames to my folder.
The size of the gif you want to make dictates how many frames you’ll be using. Remember the file size needs to be under 3MB. Recently Tumblr increased that size to 8MB, but the quality of the gif will drop drastically, so I ignore it now. (Although, it probably won’t look too different if it’s at like 3.1MB and barely goes over that limit.
540px wide- ~30 frames and under. Because these gifs are so wide, naturally, they’re already going to be a large file.
268px wide- ~50 frames
177px- ~70 & up
These numbers aren’t concrete, though. The taller and/or more contrasting colors in a gif, the bigger the file will be. The shorter and less contrast in colors, the smaller, and more likely you will be able to fit more frames into your gif. These are just what I find to be the case most of the time.
For the gif I’m making now, I’m going to keep it at 30 frames, so I know I’ll be deleting ~26 out of the 56 I saved to that folder.
Tip: I rarely make big changes to the coloring of my gif if I really like the way it looks. If my gif exceeds 3MB, I’d rather delete frames. IMO, nice coloring comes before fitting in as many frames as I can.
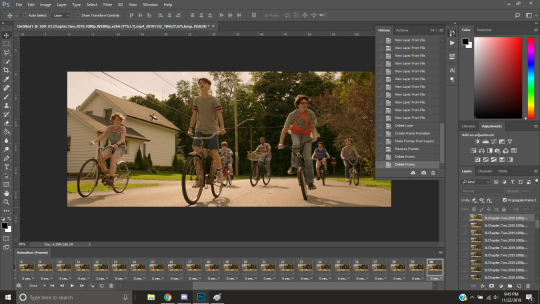
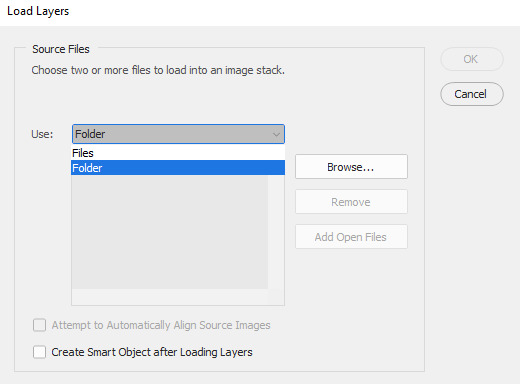
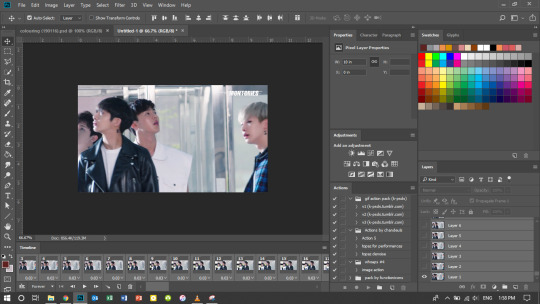
Moving on, now that we have the frames we want, go ahead and open up Photoshop. Go to File > Scripts > Load Files into Stack. The drop down that says ‘Files’ I change to ‘Folder’ and simply select wherever your frames are held. For me, they’re here:
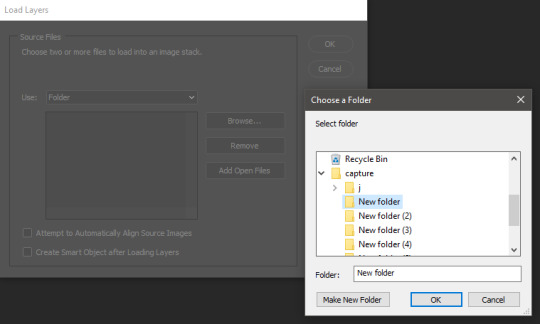
Press OK, let them all load up, then you’ll press OK again in that grey window.
It takes a minute for all of the frames to load up in photoshop. The more you have, the longer it’ll take. Again, my laptop is slow as hell, so maybe it will be really fast for you.
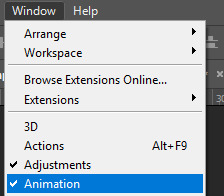
When they’re done loading, go to Window > Animation.
Then, inside the Animation tab, make sure you have Create Frame Animation selected:

Then once you’ve pressed it Create Frame Animation, your first frame will appear. But we need them all, so look over to that four bar icon to the right of the tab and press Make Frames From Layers.
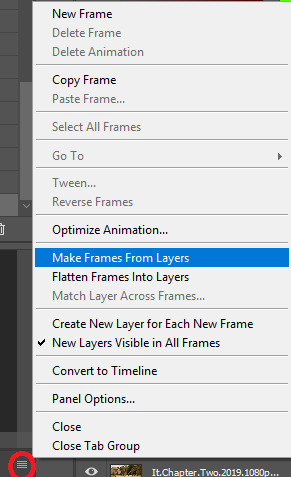
They’ll load all at once, but the gif is backwards. To fix that, simply go back to the same four bar icon and click Reverse Frames.
I’m going to go ahead and delete the frames I don’t want. For me, the beginning frames are unusable because there’s that white fade out in the start of the scene I chose. I’m going to delete those, then go ahead and delete any frame that comes after frame 30.
Here’s where I’m at now:
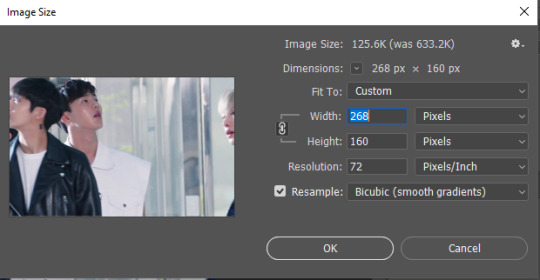
Now to resize it. I like the dimensions it currently has, so I’m not going to use the crop tool at the moment. But once you’ve cropped it to where you like, go to Image > Image Size and a new window will pop up. The widest a gif should be is 540px. How tall it is is up to you. Since I’m keeping the dimensions currently, my gif will resize to 540x225.
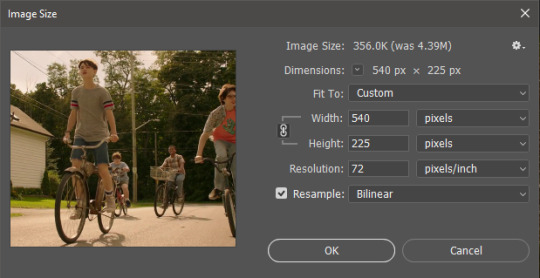
It’s VERY important to note, where it says ‘Resample:’ you need to have Bilinear selected. This effects the borders of your gif. Also, don’t make the mistake of resizing it in centimeters instead of pixels.
Now that it’s resized, you need to set the the frame delay. I choose either .05, .06, or .07. Anything outside of that looks to fast/slow to me (but I know a lot of people who like the way .03 or .04 look. It’s all preference.)
To select all of your frames at once, select the first frame, hold shift, then select your last frame. Then press where it says ‘0 sec.’ > Other > type in however fast you’d like your gif to be. I’m going to use .06. Double check every frame says .06, otherwise it’ll stay at 0 and be way too fast.
Now, again, click that four bar icon and select Convert to Timeline. The Animation tab looks like this now:

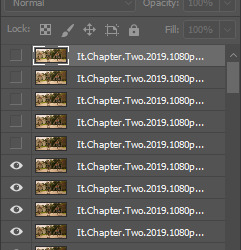
For now, look at our Layers Tab, so we can delete every frame that doesn’t show an eye icon next to it (as you can see, my first 5 frames):
With all of the excess frames gone, select all of the frames you have left (hold shift again) and then right click > Convert to Smart Object

Now, we see this left:
And, technically we’re done with the very basics of making a gif. But you definitely should sharpen and color it for it to look ‘nice’ and aesthetic. I’m going to color my gif now. Personally, I rarely use psds. It takes way too long for me to look through millions of psds, so I make coloring my own for each gif I make. I have two of my own psds, if you’d like to use either of those.
PSD01- this is a super basic psd I use to make any gif look brighter and more vibrant. There are more details in the post on how I use it.
PSD02- I included this psd within another tutorial for how I do color edits.
Both of these are my base psds, but if anyone wants me to do a separate tutorial for how I color gifs on a regular basis, I’ll gladly make one of those too!
Once you’re happy with how the colors look, it’s time to sharpen. Select your gif layer and go up to Filter > Sharpen > Unsharp Mask.
Here are my settings:
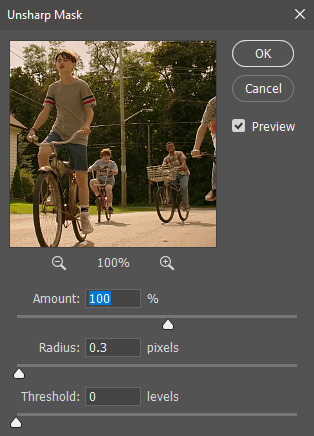
(Amount: 100%, Radius: 0.3px, Threshold: 0 levels)
Now sharpened and colored, here is my final result ready to post:
If you’re wondering, this gif is 2.42MB, so I could still make it brighter/more vibrant if I wanted to!
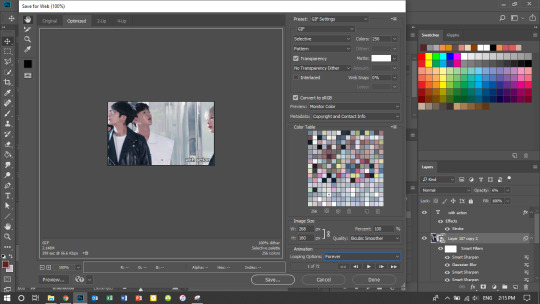
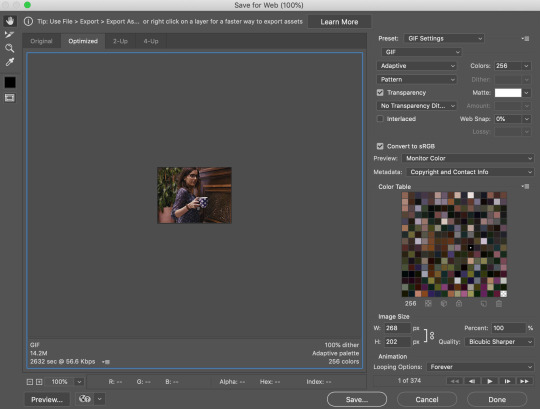
To save, go to File > Export > Save for Web.
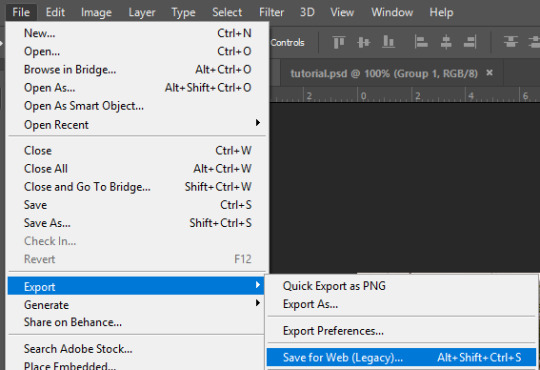
A new window will pop up. There are more settings that you should check to make sure your gif looks as nice as possible, but they’re also up to preference and can range from creator. This is what I prefer:

Diffusion is good for bright and/or colorful gifs, but if the gif is dark, I’ll change it to Noise to see if I like that better. Also, always double check you have the loop set to forever, otherwise your gif will only loop once.
And you’re all done!
Here is a short masterlist of resources I recommend checking out and use often:
allscallie (DeviantArt)
Their psds are beautiful, especially if you’re into making moodboards. Everything is very aesthetic!
sttoneds (DeviantArt)
More psds, especially if you’re into gifsets/photosets that are color focused.
BEAPANDA (DeviantArt)
Literally everything they publish is gold. From brushes, textures, psds, renders; they have it all. Their packs are extremely well made, too. I highly recommend bookmarking them. (The renders and brushes look beautiful when you use them in your headers!)
allresources (Tumblr)
There are so many photoshop resource blogs here on tumblr, so to make it easy on you, theirs is the one I recommend the most! The tutorials and resources she makes herself are really great too.
Thank you for reading, and good luck +.゚(*´∀`)b゚+.゚イィ
144 notes
·
View notes
Note
1, 5, 15, 30
how did you get into graphics / gif making? i think i was like 14 and just really wanted to make a loki, thor, and jane edit from dark world lmfao. it MAY have been a little bit before that with wanting to make myself icons for like roleplay purposes? maybe? i can’t remember exactly. but i got into gif making bc i wanted to make a parallel gifset from star wars lmao and this was it.
what do you dislike most about making graphics / gifs? hmm. probably finding which scenes to cap when i’m not looking for specific scenes. like when it’s just things like the pride edits i’m doing, i hate having to look for scenes where the characters aren’t moving much/are behind a pretty solid background/etc. also having to cut gifs down to make them under 3mb.
color(s) you dislike: i don’t really dislike any when other people use them but my least favorite to work with is probably green. i use it sometimes but.
biggest errors you’ve made in graphic / gif making (with or without realizing)? fasdfasd so for a while i used potplayer instead of kmplayer bc my computer wasn’t running kmplayer right but i didn’t realize that potplayer wasn’t taking all the screencaps i needed ? like the settings were right but for some reason it wasn’t taking every single frame so my gifs were really choppy and it took me WAY too long to figure out that it was potplayer and that it was a number of frames issue so a lot of my old gifsets have that choppy look and it makes me upset lmao
gif making asks!
2 notes
·
View notes
Note
How do you make a gif?
What a fantastic question.
This will be a full-blown tutorial, and I’m going to do my best to keep this as beginner-friendly as possible, but if anyone has any questions, feel free to ask via inbox or DMs or whichever way suits you.
You will need Photoshop to be able to follow this tutorial. I will be using this particular gif as an example:
The rest of the tutorial is under the cut.
Step 1. Download
First we download the video we’re going to gif. It always has to be in HD quality, preferably 1080, but sometimes 720 can work too, but no less. Gifs will not look good if the video you’re giffing is in bad quality.
The idea is to use torrent as little as possible because of the consequences, so, depending on what I want to gif, my method of download will vary. If it’s a relatively recent and well-known movie/tv show, then I usually check out this website for movies, and this one for tv shows.
If it’s something more obscure than that - say an old movie - you’ll have to use torrent, unfortunately.
For youtube videos, I use this app.
Step 2. Screencaps
Now that you’ve downloaded your video, you’ll need to make screencaps. The app I use is MPlayer OSX Extended - it works only for Mac. For both Mac and Windows, you can use MPEG Streamclip, but I prefer the former because it can be used for any format, whereas MPEG Streamclip only works with mp4.
I actually don’t have MPEG Streamclip anymore, so this tutorial will only show how I personally make screencaps, so with MPlayer.
The steps are simple:
Open the video
Find the scene you want to capture
Pause the video
Hold ‘command + shift + S’ until the scene ends
Make sure you choose a folder in which you want your screencaps to save (before you start capturing). To do this, while your video is open, go:
Mplayer OSX Extended > Preferences

This window will open:
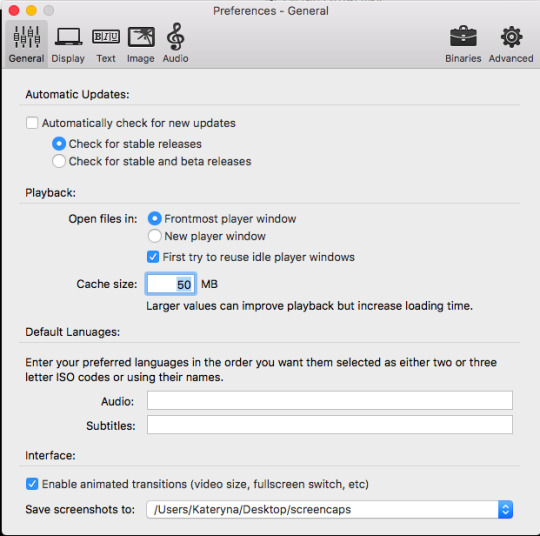
At the bottom, where it says “Save screenshots to”, you can choose your location.
Step 3. Importing Screencaps
Once the screencaps are done, we open Photoshop and go: File > Scripts > Load Files into Stack

Next it’ll open a browsing window, and you find the folder in which you saved your screencaps. At this stage I like to make sure I only upload the shots that will be on my gif, leaving out the extra ones I may have captured (like the beginning of the next scene, for example).
Use Shift to choose a lot of shots at the same time:
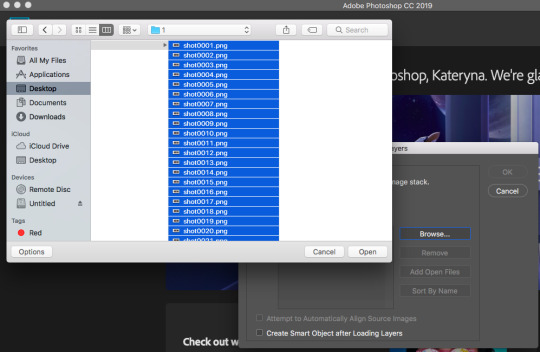
Then click OK.
While they’re uploading to photoshop, make sure you don’t click anywhere until the process is finished because otherwise it might not upload all the shots.
Step 4. Editing
Once your screenshots are in, the first thing you need to do is decide on the size of the gif. There are specific sizes which tumblr supports so that your gifs don’t appear blurred. I’m going to make a list of all possible combinations that I know. This will go from largest possible size a gif can be to the smallest and will show how it will look in gifsets (all the gifsets will be mine, sometimes from sideblogs).
Any number of gifs, one in a row:
540x540 (example)
540x450 (example)
540x320 (example)
540x240 (example)
An even number of gifs, two gifs in a row, side by side:
268x404 (example)
268x350 (example)
268x300 (example)
268x268 (example)
268x220 (example)
268x192 (example)
268x150 (example)
9 gifs:
177x177 for side gifs and 178x177 for the middle gif in each row (example)
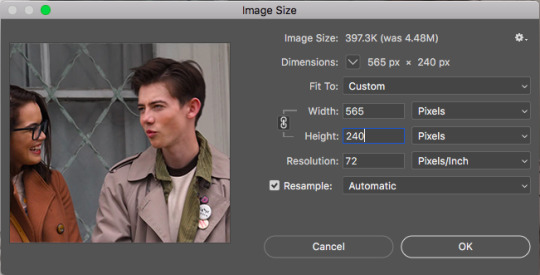
In this case, I will be making a standard 540x240 gif.
First we resize the image. Because these are caps from a movie and not a TV show (resolutions are different for TV), the cap is wide but short, that means that I change the size of the image by height. To do this:
Image > Image Size

This window opens:

Where it says “height”, we type in 240 and click OK.
Then we zoom in to a 100%.
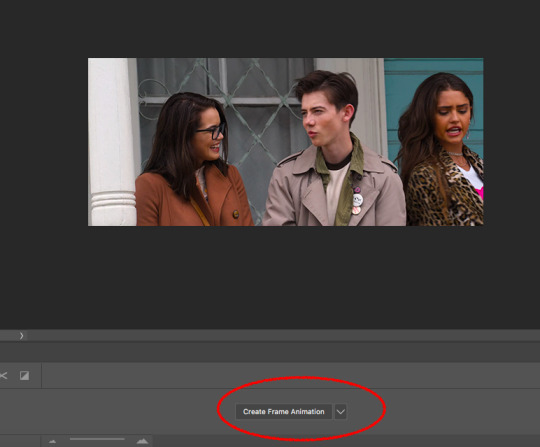
Next, we make sure the timeline is open. To do this:
Window > Timeline

Once that’s done, down at the timeline, we click “Create Frame Animation”:
At the right of the timeline, right under the layers, we click on this little thing:
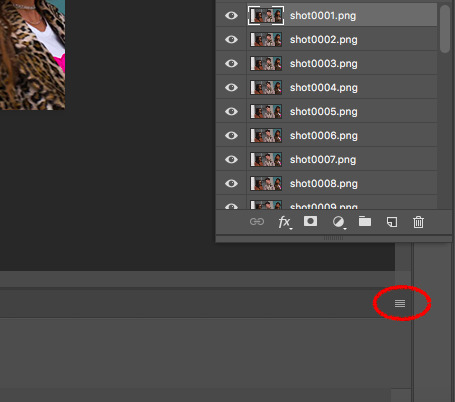
And choose “Make Frames from Layers”

The frames will now be in reversed order because that’s how the layers always upload, so we click on that little four lines thing in the upper right corner of the timeline again and choose “Reverse Frames”:

And now is the time to have a look at your frames and see if you need to delete any. Make sure that if you delete a frame, you delete a corresponding layer as well. The gif will have to be under 3mb for tumblr to display it correctly, so make sure there aren’t too many frames. But this isn’t a huge issue because once you’ve saved the ready gif, you can always reopen it and delete some frames.
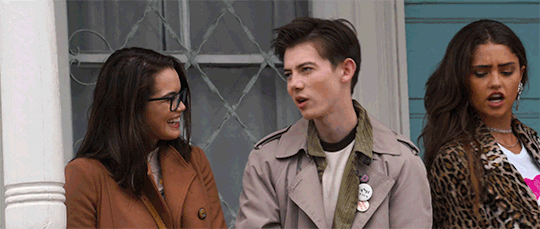
In this case I have 36 frames, and I’m going to take it down to 34 just to be safe. This is what the gif looks like at this stage:

Once that’s done, the next step is to set the delay. Every giffer does this according to their personal preferences, but I personally do this. If your gif doesn’t involve any talking - so you won’t be adding text, then set the delay to 0.07. If it involves adding text later, don’t touch the delay at all at the moment, it’ll have to be done later.
Because this gif doesn’t involve adding any text, I’m setting the delay to 0.07. Again, hold Shift to choose all the frames.


The slowed down gif looks like this:
Now it’s time to crop! Choose the cropping tool and type 540x240 where it says “ratio”:
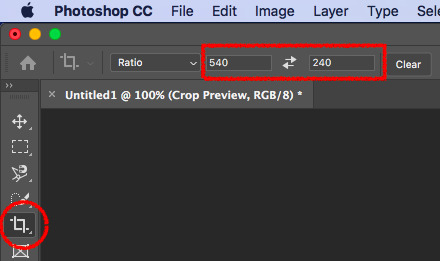
Choose the crop positioning to your liking and press enter.
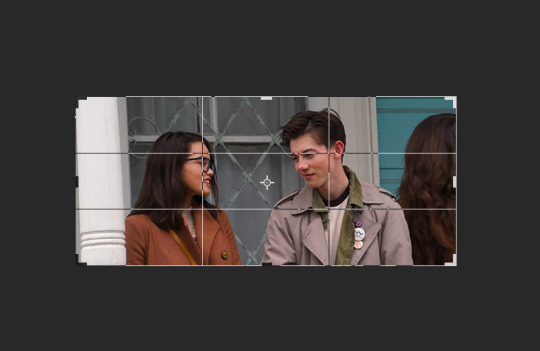
The gif at the moment:

Now we do last preparations before colouring. For this, click at the little four lines again:
And choose “Convert to Video Timeline”.
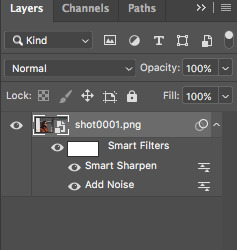
Then choose all the layers and go Filter > Convert for Smart Filters.

Then go Filter > Sharpen > Smart Sharpen:

Which will open the window for smart sharpening, and here are my settings:
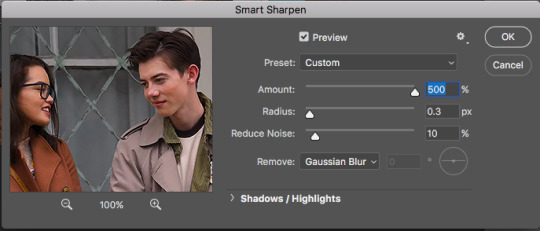
This is another one of those things that is down to each giffer, but what I usually do is, if it’s a really small gif, like 268x150 for example, I set radius to 0.2. If it’s a huge close up to a person’s face or a really big gif, like 540x540, I set the radius to 0.4. For all other gifs I always keep it on 0.3.
Then click OK.
Next, go Filter > Noise > Add Noise. Here are my settings for this:

Then, move the noise layer under the sharpening layer (I don’t know if this changes anything, but I always do it this way lol):
The gif ends up looking like this:

Now the editing is done, and it’s time to colour!
Step 5. Colouring
This is by far the hardest thing a giffer has to do, so if you don’t immediately get the hang of it, don’t be upset. You’ll learn eventually. I’m still learning, personally.
Again, all of this is very much down to each giffer, but here’s the way I do it.
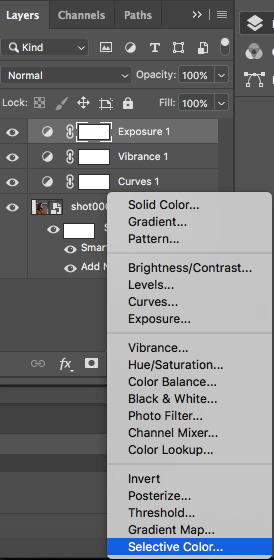
Press the little “fill layer” button and choose Curves:

So the way I use curves is to even out the entire shot’s colouring. So if the scene is too red or too green or too blue or too yellow, it gets rid of the excess of that colouring and brings it down to normal. Can help so much in some cases.
What you do is choose the middle pipette in the window, which is to sample image to set grey point.

There’s also the option to set white point (bottom pipette) or black point (top pipette), but I don’t use those because it screws with your lighting too much.
To choose a point, I usually use the person’s eyebrows or hair. Sounds ridiculous, but it does work. In this case clicking on Dunkleman’s eyebrow makes the image too green:

So what I do instead is click on his hair, where it’s reddish brown, somewhere here.

This makes the image noticeably less red compared to the original:

But also, it made the image less vibrant, so we’re fixing that next. Fill layer > Vibrance:
And then I set Vibrance to 100, always. If the image is still not vibrant enough for my liking, I set saturation (in the same window) to 10 or 25 in some cases. And for this gif, I will set saturation to 10.
Here’s how the image ends up looking (just make sure it doesn’t make their faces ridiculously red or something, but if there’s some excess of colour, don’t worry):
Now go Fill layer > Exposure.

Here are my settings for this gif:
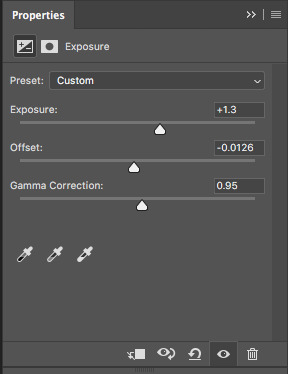
With exposure, it’s just a matter of keeping that balance between lightening it as much as possible but without their faces or bodies looking as bright as a christmas tree, and then adding offset and gamma correction to return normalcy to the picture.
Here’s what the image looks like now:

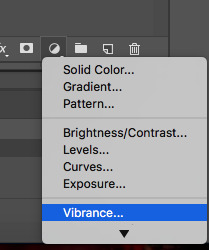
It’s obvious right now that their faces are a little too red and too yellow, so we’re going to fix that. Go Fill Layer > Selective Colour:
The task here is to make their faces appear as if they’re stood in normal daylight with no other filters. So as close to normal skin colour as possible. Be careful when giffing people of colour so that you don’t whitewash them.
In this case, I’m adding cyan in reds:

And taking down yellow in yellows:

And here’s what the image ends up looking like:
I’m quite satisfied with this result, so I’m going to leave it how it is, but sometimes I will tweak things more and use colour balance and other things.
Step 6. Add Text
Make sure you group your colouring layers at this point and then add your text as the top layer.
Step 7. Save the gif
To save a gif moving, you go File > Export > Save for Web:
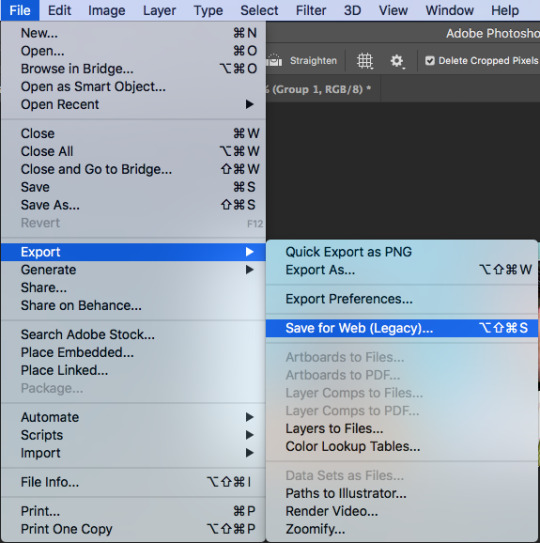
This window opens up, and make sure that in the bottom right corner, where it says “looping options”, it’s set to “forever”:
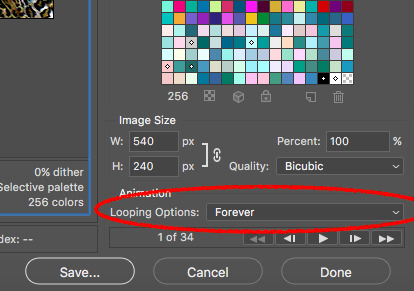
As the last step, I add dither because it evens out the edited colours in the background. I tend to use “pattern”:

Then we press “save” and our gif is done!
Step 9. Reopen
If you added text to the gif and followed my advice, you wouldn’t have touched the delay back at the beginning. This is because converting to video timeline kicks the delay either into 0.03 (too fast) or into 0.07 (too slow for speaking gifs). So you have to reopen the gif now and set the delay to 0.06 (that’s the speed I like for my gifs where someone’s talking on them).
This is also a good time to delete some frames if your gif is 3mb or over. Remember it won’t move if it’s not under 3mb!
Hope all of this makes sense, and let me know if you have any questions!
149 notes
·
View notes
Note
Did you see the series finale of CM? If so, any thoughts?
hey CM/Henney Nonny. I watched the finale episodes of Criminal Minds last night. Twice, in fact - live to tweet my reactions as the episode(s) aired, and very early this morning to make edits (there will be several; I’m crossing my fingers all the gifs load as some of them are over 3MB and I’ve seen conflicting info on the new gif size limits).

I…need a minute.
I’m feeling bittersweet about the episodes and the season in general. Take this all with a grain of salt, because I haven’t watched all the episodes of the entire series. I haven’t been a viewer from the pilot episode air date, nor have I binged the series like I do with other shows, so I’m missing some of the nuanced dynamics of this cast and their characters.
That being said…I know Lynch/Chameleon was a twisted unsub that’s caused problems for the BAU, but the dread/danger associated with him didn’t feel as intense as they made it out to be. This is less about the cast, and more about the writing (the actors can only do so much with the material they’re given to work with). Maybe because he’s a “new” unsub (I mean, they only introduced him last season) whereas with other procedural type shows I’ve watched in the past (Hawaii Five-0 and NCIS, to stick with one network) the recurring antagonist/villain pops up over the course of several seasons for a game of Cat & Mouse before getting away.
There’s also more humor incorporated into the other shows, compared to CM. Even just a little joking and teasing between coworkers, like the way Steve and Danny on Five-0 bicker like an old married couple, or DiNozzo/Torres had a swag/brag attitude that often had them putting their foot in their mouth. Ellie with her junk food/stress eating quirk, or recurring/side characters that added brevity in what’s a very serious line of work. Max the medical examiner who always dresses up as one of Keanu Reeves’s roles for Halloween, Ducky’s trivia nuggets while reviewing cause of death. Sang Min. #fullstop #he’s-hilarious
We get some humor via Garcia (her need for bright and colorful everything), Reid’s trivia via his massive brain full of information, and the occasional amused side-eye from someone on the team, but they’re all pretty serious for the most part. Maybe Morgan added more humor while he was on the show, but like I said, I haven’t watched a lot of the earlier seasons. I get that they’re profiling unsubs and these killers are dark and twisted, but that’s all the more reason to joke around and add a little light to conversations adjacent to tracking down their target. That much darkness will mess with your head if you don’t have a way to release it.
I rolled my eyes at the “let’s walk around in Reid’s subconscious while he fights a brain bleed” otherwise known as CM Wants To Be The Reid Show while not Jane Lynch was in the middle of kidnapping Rossi’s friggin WIFE. The split between what was going on with Reid vs. the rest of the team felt uneven, given that it was the final episode e v e r. Also there was no sign of Max (not even at the party!). Did she decide to nope outta there after the whole thing with her family and Cat? Did she get annoyed by everyone thinking Reid was her boyfriend when he was soooo not her boyfriend?
The positives from the finale?
Reid’s going back to doing something that he loves
Penelope’s going to go do something that she loves
GARVEZ. GARVEZ.
Matt Simmons is secretly a huge adorable dork with minimal dance rhythm and I love him for it
JJ…making eyes at the coffee Alvez bought, over the green juice Garcia bought to help with hangovers
Rossi staying where he is for the time being, “for the team” we know it’s because you’ll go insane if you retire for real, man
Prentiss looking for property in Colorado for…reasons
Tara…looked pretty in her green party dress? seriously, they didn’t write in anything personal for her at all.
#zaff answers#Henney anon#CM anon#criminal minds#criminal minds spoilers#not choices#I might just be overly critical of CM compared to Five-0 because I'm watching Five-0 again#and they're on the same damn network#but give off vastly different show vibes#both going after bad guys but I can stream Five-0 all day#but I gotta step away from CM after a couple of episodes because it is TOO. HEAVY.#I meant to post this hours ago and got distracted#Anonymous#long post#I dunno there's a read more line when I look at this on my laptop#but it's not there in the app
21 notes
·
View notes
Photo


@s-k-y-w-a-l-k-e-r tagged me in this gif meme thank you! These gifs don’t show quite as much difference as some of the other gif memes I’ve seen but I try to avoid any super dark footage. 😅I have a gif tutorial here if anyone wants to check out the steps below in detail.
Acquiring footage
I always screen record footage I use, regardless of where it came from, because Photoshop (in my instance) plays nice with Quicktime videos, but not necessarily with other file types. Screen recording is easier to me than downloading files, so I use Quicktime to record whatever I want to gif, then trim it down to the essentials or (if it’s a long recording) splice it in sections for ease of use. I then save it and open up the video file in Photoshop.
From there I use an action I made to process the video to do all the work of flattening frames into layers, changing frame speed, creating the timeline, etc. In the end this process spits out a ready to use set of frames at 0.04 speed, resized to 540px width by default. I usually do full width gifs so that’s all there is to that.
Coloring
My coloring process is not super involved - it’s really only four steps. These are all done using adjustment layers above all of the layers in the document. I don’t use any .psds, so this is done manually for each gif. If gifs are from the same scene or set I will generally copy the same adjustment layers over, then simply tweak them if needed.
First, curves. This is essential to making the image pop. Usually images are too dark, so simply pulling the curve line in a gentle arch to the left does it (see the tutorial linked above for visuals). Images that need deeper blacks can have the lower left value adjusted, while ones that need brighter whites can have the upper left value adjusted. There are some default options too but I always adjust manually for each gif. There are little guides that show up when you drag the curve - if you use these to make a little square shape between where you drag the guides to and the sort of x and y axis on the curve view background, the effect tends to brighten the image without blowing out any values.
Second, vibrance. I dunno if other people do this, but I find that it makes the colors look more appealing without giving the fakey look that increasing saturation does. I always bump vibrance up by +14, which is an arbitrary number but it’s the one that I like. Vibrance adds a subtle something to the look of the gif that there isn’t a substitute for.
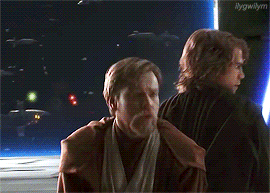
Third, color balance. This is where the fun begins (insert Anakin gif here). Color balance is what makes the gif look truly different from the original material. When I do this adjustment, I always start with the shadows, then do the highlights, then the midtones. After that initial coloring is done, if I’m not happy with the look I tweak each value a little, going higher or lower on it until I find the point where I’m happy with it. This part is really all up to your eyes/color perception. I generally aim for something realistic, without blatant color casts, but I try to give it some tonality that suits the material.
For instance, the first colored gif above has a summery sunshine feel, while the last one is more chocolatey and warm. I usually deepen shadows (often with blues and magentas) and lighten highlights (with cyans and greens/yellows depending) and then the midtones I adjust to generally make the image look “right”. This means no color cast on white in the image, and a person’s skintone should look normal for them (within reason, lighting can change appearance but they shouldn’t look like they are not themselves). If there is ever an overly strong color cast on an image, I will sometimes add a plain fill layer of that color and set it to subtract and tweak the opacity until it appears to be eliminated.
Last, contrast/brightness. This is the finishing step of coloring. While curves do handle most of the light/dark balance adjustments, sometimes a little extra pop of brightness is needed. Doing that can make the image start to get washed out sometimes, however, so I always tweak the contrast to suit as well. The image should look believable to your eyes as a real scene, so if it gets too lightened it will lose that realism. Also brightening too much can lead to lots of little gross pixely effects.
Sharpening
This is the final step before adding any text or watermarks. Once I have the adjustment layers done for the coloring, I chop down the gif to a suitable length (if it isn’t already), which tends to be around 50-70 frames depending on how much contrast, color variation, and movement are present in the material. I convert to timeline, delete any unused layers, then merge the rest of the gif frame layers into a smart object. I then applying smart sharpening to this, at the usual 0.3 radius, 500%, and remove Gaussian blur settings, with the more accurate box checked. This always does the job, to my mind, then all that’s left is saving. Adding text (if needed) and the watermark is something I also do. But it’s not too exciting. When I do put text on an image I give it a 2px border so it’s easy to read, and my watermark is usually white with a lowered opacity.
Saving
When I save gifs I always use the Save for Web & Devices option. I then use a save setting I created, which is actually a ditherless gif. I think I created it based off of a default ditherless gif setting - having no dither is convenient because it results in a smaller file size than say having 100% dither. I always make sure the gif will be under 3mb when saved, since I don’t care for tumblr’s built-in compression, then I make sure to select loop forever, then save and viola! All done.
That’s all there is to it, really. I’ve done some more complicated stuff like combining gifs together or making “3D” gifs but those are a more complicated process and I have to keep some secrets. 😉 Overall if you use good quality footage, adjust brightness with curves, remove obvious color cast, and apply some smart sharpening, you’ll already be on track to making something great.
I would tag somebody but everyone I can think of to tag has already done this/been tagged already!
9 notes
·
View notes
Text
Shoot Secret Santa Guidelines
All your gifts have to be Shoot related, the rest is up to you!
TIP: If you’re still unsure what to make, check out your Secret Santa’s Tumblr page or Twitter to see what they like. Maybe a little canon number adventure or soulmate AU or Dr. Shaw or Fix It. You can also send them an Anon message, asking what they’d specifically like! Or ask us to ask them :-) Just don’t reveal yourself to them yet.
Please, keep Your Ask Box enabled at all times, so your Secret Santa can reach out to you if they need to.
If you change your username at any point, please let us know to cut down on confusion.
For Fic/Drabbles:
Minimum of 500 words
Maximum is up to you - feeling really inspired - Than go for it! Bless us all with 100k ;-)
You can write several drabbles or one bigger ficlet, as long as the overall total is minimum 500 words.
Please submit your fic as a Word file via email, so we post it on the Shoot Secret Santa Tumblr. And later after the reveal if you post to AO3, feel free to tag it ShootSecretSanta2019.
For Art: (borrowing this from http://stereksecretsanta.tumblr.com/guidelines - hope they don’t mind! actually all of this was inspired by them - Thank you!!)
Can be drawings or still graphics
Minimum width size has to be at least 540 pixels, height is optional (max file size for jpg and png is 20MB!)
You have to make at least 2 graphics/drawings (or 1 large graphic/drawing if it’s at least 1000 pixel width)
Maximum of 5 graphics
Animated graphics are allowed, as long as they don’t exceed the Tumblr limit.
Please do not put your name/tumblr url anywhere on the graphic/drawing, it’s to be a secret until after the big reveal, you can watermark them with Shoot SS to avoid stealing. Then after the reveal, please add your name for credit.
If you’re drawing on paper, please submit your drawing as a scan and not as a photo.
For Gifsets
Has to be at least 6 gifs in one set
Maximum of 3 gifsets
Gifsets have to be Tumblr-friendly (aka the gifs can’t be more than 3MB)
Please do not put your name/tumblr url anywhere on the gifset(s), it’s to be a secret until after the big reveal, you can watermark them with Shoot SS (or Shoot Santa? or is that too mean?) to avoid stealing.
Please number your gif file names in sequence order and if you’d like you can send me a private Tumblr post link to show me how you’d like the gifset to be posted :)
For Fanmixes:
Has to include a front and back cover (like CDs)
Minimum of 10 songs
Maximum of 20 songs
Can do 2 small fanmixes or 1 large one!
Have to upload the songs anonymously somewhere (e.g. 8tracks)
Inclusion of lyrics can be optional
Please do not put your name/tumblr url anywhere on the fanmix, it’s to be a secret until after the big reveal, you can watermark them with Shoot SS to avoid stealing.
For Fanvideos:
Minimum length of 45 seconds
Maximum length of 3 minutes
Have to upload the fanvideo anonymously somewhere (e.g. youtube) or send me the file via email
Please do not put your name/tumblr url anywhere on the fanvideo, it’s to be a secret until after the big reveal, you can watermark them with Shoot SS to avoid stealing.
ALL GIFTS HAVE TO BE NEW, DO NOT RE-USE EARLIER CREATED/WRITTEN STUFF!
Please, email your gifts to [email protected] When you submit your gifts, please include your Tumblr URL or Twitter and that of your Secret Santa.
SUBMISSION DEADLINE: FRIDAY DECEMBER 20th - If you need an extension like to maybe Dec. 22nd - let us know!
FRIENDLY REMINDER: Do not post your gifts before we post them on December 24th/25th, nor reveal yourself to the person whom you made gifts for. Otherwise it won’t be a Secret Santa anymore! We’ll be doing the Big Reveal on who made gifts for whom on December 24th/25th, after that you’re free to post your gifts to wherever. Thanks so much!!
ps. Thanks so much for the inspiration to http://stereksecretsanta.tumblr.com/ :-) And for borrowing their guidelines, I hope that was okay.
9 notes
·
View notes
Text
Updated gif tutorial
This is an updated tutorial on how I make and colour my gifs. You can find all of my previous tutorials here.
What I use:
Windows 10 laptop
Potplayer (to screencap)
Photoshop CC
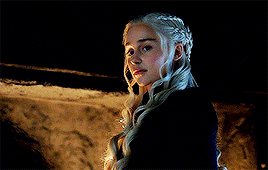
I’ll be making this:
Note: This tutorial won’t be as in-depth as my previous tutorials since this is geared more towards people that have basic understanding of how to gif and use Photoshop. You can find my gif making tutorial for beginners here and colouring tutorial for beginners here.
This tutorial will be divided into two parts - Part 1: Making the gif and Part 2: Colouring the gif.
PART 1: MAKING THE GIF
1. Screen capping
The first step to making gifs is taking screen caps of what you want to gif. I do this using Potplayer, which you can download for free here.
Note: A lot of gif makers use KM Player to screen cap, but I found that it constantly crashed on my laptop and wasn’t very functional so I switched to Potplayer which suits me much better. You can download both programs for free along with others such as VLC and others, so it’s all about finding one that works best for the laptop/computer you’re using.
Open Potplayer (or whatever program you’re using) and open the video source you’re going to be giffing from. I’m giffing from a downloaded episode of Game of Thrones so I go to Open File(s) > Videos and open the correct file.
Top tip: To ensure your gifs are of the highest quality always aim to use videos that are 1080p or at least 720p (HD).
Go to the scene you want to gif, pause just before it and hit CTRL + G, which will bring up the Consecutive Image Capturer (below).
These are the settings I use. You can use the same or adjust them to suit you best.
Note: You can choose where you’d like to save your screen caps by clicking on the square with three dots which is been circled red (above).

I always minimise the screen and drag the Consecutive Image Capturer box alongside the video so I can see what I’m giffing.
To start screen capping the scene hit start and press stop when the scene has ended.
Where it says Progress beneath Activity, it will tell you how many screen caps you’ve taken. I took 54.
2. Cutting screen caps down
Go to the folder where you’ve saved your screen caps and check to see if there are any unnecessary caps that need deleting. In my scene, I accidentally captured Tyrion so deleted those caps and I now have 41 left.
Note: Thankfully the increased 3mb limit means that we don’t have to be as stingy with the size of our gifs anymore, but I still try to stick to no more than 60-80 screen caps for one gif just to cut down on the amount of time it takes to make it.
3. Open in Photoshop
Once you’re happy with the screen caps you have open Photoshop > File > Scripts > Load into stack
Note: I used to use Photoshop C5 which a friend sent me via Dropbox, but having since paid for the full version of PS, I wouldn’t recommend using any free version of PS you’ve found online. There is a risk of viruses, but free versions are also rarely fully functional (mine actually stopped working completely without warning) and a lot slower. It’s worth paying the £9.98 per month (if you’re a student) to have the full use of the program.
The following box will appear:
Where it says File click the drop down menu and select Folder. Once Folder has been selected, click on Browse to the right, locate the folder where you saved your screen caps to and click OK. The screen caps will begin to load in the window and when they’re done the OK button to the right (above cancel) will be available for you to click on, so click on it and they will load into PS.
Depending on how many screen caps you have, you may have to wait a few minutes for them all to finish loading.
4. Making the gif
Now that all of my screen caps have finished loading my PS looks like this:

Everyone’s PS will have a slightly different layout because on the right sidebar you can order the different tabs however you choose.
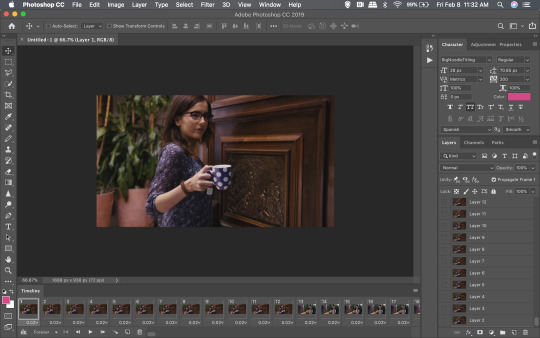
The important thing is to make sure you have the essential tabs open. To do this go to Window (on the top bar) and ensure you have the following ticked: Timeline, Layers, Tools and Options.
It’s also essential to have Adjustments (this is how we colour the gif), Actions (if you’re using actions to sharpen like I do) and Character (this is how we make subtitles) open. You can see that I have all of these tabs open in a cluster together at the top of my right toolbar, but as I said you can drag them to wherever you prefer.
In this step the Timeline is the most important part. Go ahead and click Create Video Timeline, now your Timeline will look like this:

Click on the three small squares to the left of the Timeline (circled red below) that say ‘Convert to frame animation’ when you hover over it.
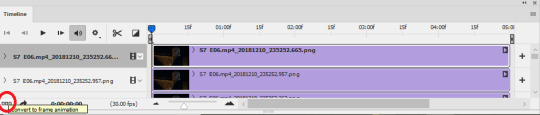
Now your Timeline will look like this:

Click on the menu symbol with four horizontal lines to the top right of the Timeline (circled below) and ‘Make Frames From Layers’

Now you’ll notice that your caps have appeared along the timeline. Click again on the four horizontal lines menu symbol you just clicked on and click Select All Frames (when they’re all selected they’ll turn a darker shade of grey) > Reverse Frames. Note: We do this because the caps have been loaded into PS backwards and by reversing them, they’re now in the right order.
Keep all of the Frames selected (if you’ve already clicked off them, simply repeat the above step go to the menu and Select All Frames) and now we’re going to set the timing of the gif.
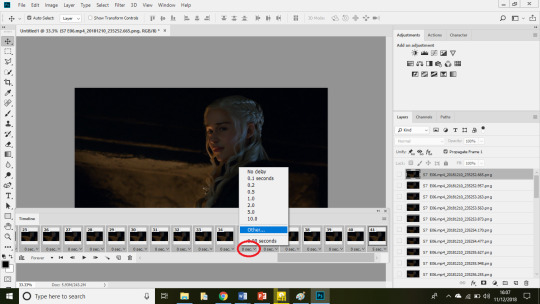
Underneath any of the frames click the time stamp where it says ‘0 secs’ (circled above) until the above options come up and then click Other...
When the Set Frame Delay Box pops up, simply type 0.05 and OK.
Note: You can now hit play on the gif if you want to see how fast it is and can readjust the speed to your liking.
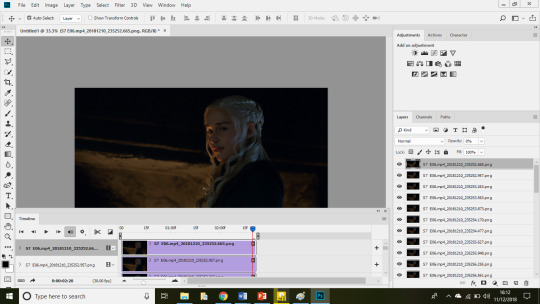
Now click on the symbol in the bottom left hand corner of the Timeline to the left of the word ‘Forever’. You’ll know it’s the right one, because when you hover on it, it should say ‘Convert to video timeline’.
Your Timeline will now look like this:
5. Resizing and cropping
Here are the Tumblr dimensions as of 2018:
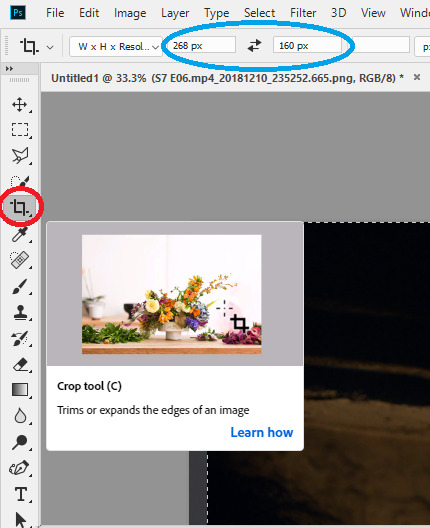
Since most people tend to make 268px gifs, those are the dimensions I’m going to go use for this tutorial.
Select Crop from the left tool bar (circled red below) and adjust the size you want your gif to be in the boxes circled in blue.
As you can see my crop tool is currently set to a width of 268px which is correct, but I want to change the height to be a little bigger so I’m going to type 170px instead.
Now click on the gif until it looks like this:

And press Enter to crop it. Since Daenerys is slightly to the right of my gif, I dragged the crop to the right so she’d be more central and this is what my gif now looks like:
Note: When changing the size of your gif, you may need to change your zoom. After I cropped my gif it was tiny because my zoom was set to 50%. To adjust your zoom simply click on View and you then have the option to Zoom in, out or go to 100%.
6. Sharpening the gif.
I use actions to sharpen my gifs, just because that’s the way I’ve always done it. You can download the action I use here or find another that you like at yeahps.
Note: If you don’t already have an action or don’t know how to use them, simply download it, go to the actions tab, the four horizontal lines at the edge of the tab to bring up the menu, load actions and locate it.
First we need to convert the layers to a Smart Object. To do this click on the timeline at the start of your gif so that the red line with the blue shape on top is at the beginning (below, if you compare it to the image above, you can see the red line has moved from near the end of the timeline on the last image to the beginning now).
Next go to the Layers tab (in my case it’s located to the left of the Timeline), select the top layer (it’ll be dark grey when it’s selected, like mine above), hold SHIFT, scroll down to the bottom and select the last layer until everything is highlighted (below).

Click on the menu button to the right (circled red below) > Convert to Smart Object
Once it has converted to smart object it will look like this:

Go to the Actions tab, find the action you’ve loaded into PS and hit the play button (circled below) so that the action is applied to your gif.
Once it has been applied you’ll see under Layers the smart object will have lots of little sections saying ‘Smart Sharpen’ have appeared below it.
For reference this is how my gif looked before sharpening:

And after:

PART 2: COLOURING THE GIF
Now for the hardest, but most fun part - colouring the gif.
You can see my previous colouring tutorials here. I generally follow the same process for colouring, but I have better understanding of colour balance and selective colours now (thank goodness lmao). If you’re a beginner, it’s worth referring to my beginners colouring tutorial alongside this, because it’ll be more detailed than this tutorial is.
For this part, the Adjustments tab is essential, so make sure you have it checked (if not go to Window > Adjustments).
Step 1: Curves
Select curves and drag the line until you’re happy with how bright your gif is (remember, we’ll also be brightening the gif later with levels and brightness, so don’t go overboard.)
I adjusted mine to this:

Step 2: Levels
Next click levels, the levels box looks like this:

The three boxes just below the little line graph thingy (where it says, 0, 1.00 and 255) are the settings you need to change. You don’t need to change of the far right box (where it says 255) and the first two boxes (where it says 15 and 1.1).
By increasing the number in the left box, the gif darkens and increasing the number in the middle box brightens it.
Generally in the left box I’ll choose anything ranging from 10-30, but my go to is 20. The middle box generally ranges from 1-1.6 depending on how dark the scene is.
For this gif I went with 20 and 1.5.
Step 3: Brightness and Contrast
I chose the following settings.

My gif now looks like this:

4. Colour Balance
This is the setting I’ve learned to use better since I first started colouring and I’ve earned how much of a difference it can make to a gifs appearance.
The box looks like this:
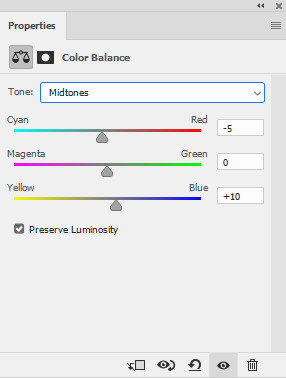
Since my gif is yellow/red in colour due to the fire I changed the Midtones settings to the above.
An important element of Colour Balance which I didn’t use before is Shadows and Highlights. By clicking on the dropdown menu where it says Midtones, you can also select Shadows and Highlights.
When you change the colour balance on Shadows, it changes the undertones of the gif, the background, whilst midtones changes the middle layer of the gif and highlights the top surface of the colour (sorry, I suck at explaining this, but play around with the settings to see what I mean about how the different settings change the colours in different ways).
I changed Shadows to +10 Blue and -5 Red.
Before colour balance:
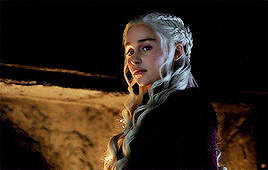
After:

Step 4: Selective Colours
Selective colours can completely change the appearance of a gif and it’s important to play around with them as often as you can and to get an eye for colours.
For example, when I look at my gif as it is now I can see that the colour balance has helped diminish the yellow/red tones, but not quite enough, so I’m going to adjust yellows to -20.
I can also see that the colour balance has brought out some cyan/blue tones in Dany’s hair, which I want to get rid of so I’m going to change cyans to -100 on every option and blue on blues to -100.
The difference is subtle, but it’s there. Now that I’m happy with the colour of the gif, it’s time to go back and readjust any of the previous layers I’ve added such as brightness, levels etc. to add any final touches.
My final result is this:
Thanks for reading. I hope this was useful to you. Please share if it was and feel free to ask if you have any questions, I’d be happy to help.
I’ll also be creating a ‘Gif Colouring Tips’ post for people that are new to colouring there gifs or are currently using other’s PSDs and would like to learn. I’ll link it here when it has been posted.
421 notes
·
View notes
Text
gif tutorial with vlc player
in this tutorial i will be explaining how to make gifs with vlc player!! if you want to learn how to make gifs with vaporsynth you can use this tutorial~
what you will need:
photoshop
vlc player
step 1: recording
so you will first need to use vlc to record what you want to gif. by that you can click on the recording button that looks like this:

i suggest recording a bit before and after your desired scene so that you get every part you want.
step 2: importing
now you go into photoshop and go to file > import > video frames to layers and a window will pop up and you go find the file:
then this will pop up and depending on how long your clip is you can press ok or select the option “limit to every 2 frames”. since the clip i got is a bit long i selected that option:

now it will pop up as a new document like so:
step 3: cropping
now you can go to the cropping option and i like to two a two step process with cropping so i don’t lose any quality in the clip so i have it in ratio first (you can change the height and width to your preference):

then i’ll go press ctrl+alt+i or go to image > image size then i’ll shrink it down to the proper size i want which in this case is 268 x 160. and be sure to have these settings and click ok:
step 4: sharpening
so i use a sharpening action i found on tumblr and it just makes everything look crisper. you can find a ton from @completeresources and @yeahps to just name a couple ps resource blogs!!
to use an action you will have to select all the layers on the layers panel and you should also set your timing for your gif here too in the animation timeline:

now you have to change the timeline from frame animation to video timeline and you can do that by clicking the button on the bottom left corner on the timeline that looks like stacked rectangles.
from here you will have to make all your frames into one layer so you have to go to filter > convert for smart filters. and you can use your action on that by going to the actions panel, selecting what action you want to use and press the play button.

now you can put the colouring that you would like on your gif! i have a few tutorials on how i colour that you can check out here~
step 5: saving
now when you save you can do the shortcut ctrl+alt+shift+s or go to file > export > save for web and this will pop up:
and so you make you sure you have these settings:

and also check to see if you are under the 3mb limit and that’s really it!
75 notes
·
View notes
Video
tumblr
At long last, here is my tutorial on how to create something like this graphic here (and also this and this)! I also included the video above for reference (since some of the steps can be confusing) 👍
To make this process easier, create your clips ahead of time! I used avisynth to shorter mine (also cause I used ts files).
Start off by creating your base. Here I use a 540x200 canvas. You’re basically making your template for the entire graphic.
Next create small rectangles (or whatever shape you like). These will be where you place your gifs. I used a fixed size of 150x100. Fill in your selection and duplicate as needed. Then move them to your desired locations.
Once your template is complete, select all of your frames and click “convert frame animation”. Converting your shapes into smart object is optional!
Load in some of your clips. Don’t load them in all at once! I did 3 at a time.
Do your usual process of giffing (crop, convert to frame animation, convert to smart object). Make sure to add a layer of black to the back of your gif (to remove any transparency from cropping). Do NOT add in your psd or sharpening!!! It will slow down the process (we will add that at the very end).
Once that is done, drag your gifs over to the template and place them accordingly.
Now onto the main portion of this tutorial! We are going to shrink the length of the clips by dragging the edges of them. Always go by your shortest clip! Once your first set of clips are timed together, you can move onto the next set!
Repeat steps 6-9 on your next set of gifs.
Now you are going to drag your second set of gifs to then end of your first set (so now they play one after the other).
To create a fading effect, click the square next to the scissors icon and drag the fade option onto the end of the first set of gifs. Drag the edge of the fade to the duration you want (I use 0.05 for everything). Repeat the process on the beginning and end of the second set of gifs.
To tidy up your workspace, drag the sets into folders (this is optional of course)!
Repeat steps 6-12 until all of your gifs are in place!
Now continue your usual giffing process! (add a psd, sharpening, flatten frames into clips, male frame animation, convert timeline, fix speed).
If your graphic ends up over 3mb (which is sure to happen), split it up into sections. Or even reduce the amount of frames (not recommended though as it can ruin the timing/fading you did before).
And you are done!
Here are a couple other ways you can tackle steps 11 + 12!
Instead of having multiple gifs playing at once, you can split them up! So do the exact same thing as in step 11 but have each gif go after the other.
Another way is for each gif to play in the same location! The only difference in this step is that all of the gifs occupy the same shape!
And that’s it! If you have any questions, feel free to send them in!
#chaoticresources#khelpers#yeahps#itsphotoshop#loona#this took a lot out of me#plus i tried to put text on the video but that was a mistake#anyways hope this is understandable and not a jumbled mess
300 notes
·
View notes
Note
hello jess! could u share how u make your gifs please?
Sure thing! It’s been a while since I’ve made a tutorial, so please bear with me. In the tutorial below the cut, I’ll show you how I make my GIFs. There’s a million different ways to make GIFs— I know 3 different ways myself— but I’ll show you how I go from a video clip and produce this in less than TEN STEPS!:
Also, TW for length! Please like/reblog this post if you found it helpful! // Buy me a coffee?
What You’ll Need:
Mac
Quicktime
Photoshop CC 2019 (or Photoshop version that allows Video to Frames conversion)
Movie or Video that you want to clip!
This ATN Pack, by yours truly! Please like/reblog this post if using!
Step One: Open Up Everything You’ll Need
Open up that video, movie or clip you want to GIF. Start up Quicktime & while you’re at it, Photoshop too. Did you download that ATN Pack (action pack)? If you did, open it up too (double-click is what I mean by open it up)!
Step Two: Screen-Record
Go to the Quicktime application. In the top bar, open up the ‘File’ drop down and select ‘New Screen Recording’. You’ll get a pop up titled ‘Screen Recording’. Now if you did step one, then you should have the video/movie that you’re gonna record. I’m doing a small clip ‘From Prada to Nada’. Click the red recording button and you’ll get a message. That message says something along the lines of ‘click anywhere to record the entire screen OR click and drag to outline what area you want to record’. I like to click and drag to ONLY record the movie. You can see what that looks like, below.
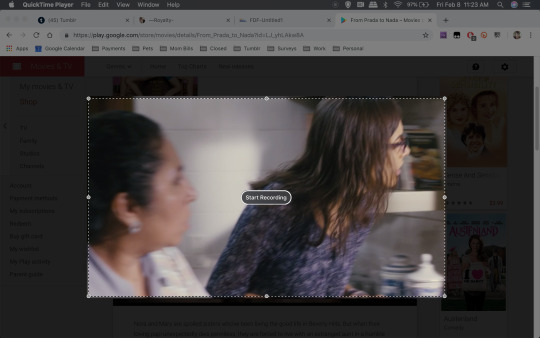
Great. Now start recording! NOTE(S): If you’re doing the whole movie, just set it and forget it; but make sure that the captions/subtitles are off & your laptop is plugged in or fully charged.
Once you’ve recorded whatever it is that you want to GIF, then go to the top bar again and on the righthand side, you’ll notice a small ☐ (stop button). Click it and save your recording!
Step Three: Video Frames To Layers
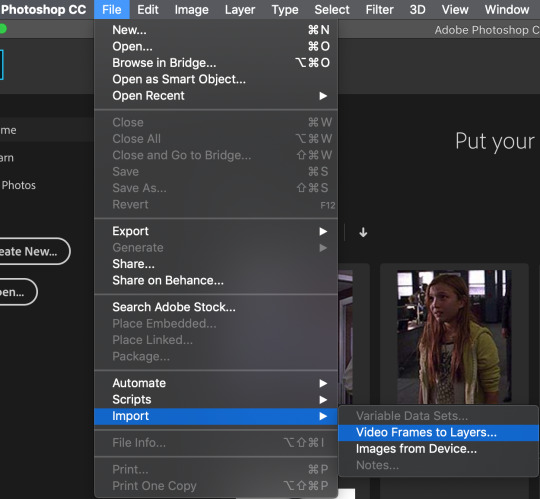
For the sake of keeping this tutorial quick and short, I did a very small clip! Photoshop should be open, so now what you want to do is click File > Import > Video Frames to Layers! Select the screen recording you just saved. After a minute or two (depending on size of recording), you’ll get this pop-up:
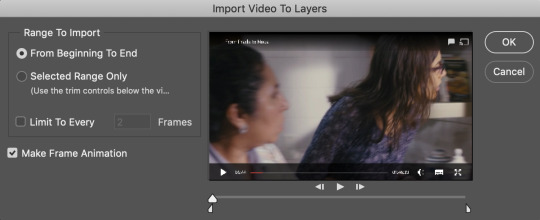
You have a couple of options here, you can choose to convert the entire clip by selecting the ‘From Beginning to End’ option OR convert only a specific scene/part of the video by selecting the ‘Selected Range Only’. For either of these options you have the option of limiting how often a frame actually gets converted— this is the ‘Limit To Every # Frames’ option that you see above. More frames = less of the scene, bigger file (remember Tumblr restricts GIFs to 3mb)! For the most part, I like to do Selected Range Only and I use the trim controls (the 2 funky looking triangles under the video preview) to select the scene I want. AND I check the box to limit frames and I change it from 2 to 7! See my settings below:

Select OK and give it a few seconds/minutes. Why I specifically prefer the video to layers option: it’s quick (usually), easy, and does most of the work for me. After it’s finished doing its thing, your screen should look like this:
NOTE(S): delete any frames and layers you don’t need/don’t want to GIF.
Step Four: Crop/Resize
Several options here! on how to crop and or resize. My preference is to make GIFs that are 268px wide and about 150px in height, but the height can vary due to a number of things like the FC being in the background/part of a group. For this step and the ones that follow, be sure to have the actions menu open. If the action menu is not open, go to the top bar, then go to Window > Actions. It’ll open up on the side and if you did step one, then my action pack should be loaded on there!
Option 1: Select All (the entire image) by doing CMD + A.
You should get a dashed and moving outline around the entire image:
Option 2: Select a specific part of the image by using the rectangular marquee tool.
In case you don’t know what that is, it’s that dashed rectangle button that’s on the left panel:

Click it. Be sure that the Style is set to normal. Click and drag on the image to select the specific FC/area you want to GIF. NOTE(S): if your FC moves around a lot in the scene, then you do NOT want to do this option! The outline will not follow your FC. You should get a dashed and moving outline around your selection:
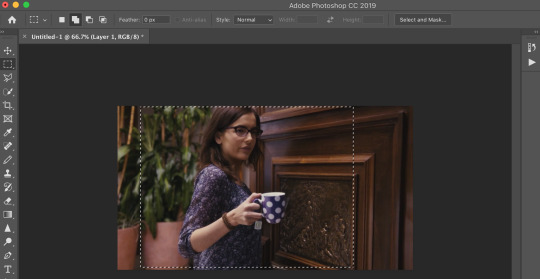
Now, open up the action menu by clicking the sideway triangle/play button that’s to the right of the preview. You should see my ATN Pack in there. Click the ‘>’ that’s next to my ATN Pack. It’ll reveal about 5 individual actions.
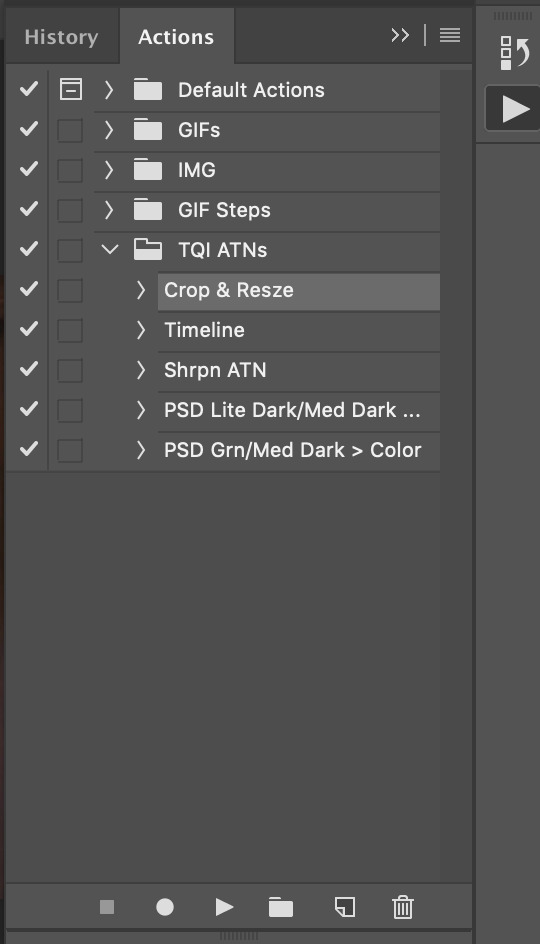
You’re going to select the ‘Crop & Resze’ action just by clicking it. Then press the play button under it. The image/GIF will now be cropped and resized to 268px wide with an auto adjustment on the height! This is what I ended up with:

Step Five: Video Timeline
Alrighty-roo. This step is a must. You’ll be focusing on the layer panel, which looks like this:
Select ALL LAYERS. Quickest and easiest way is to select Layer 1. Then hold down the SHIFT key and scroll to the top. Click the top layer and everything should be highlighted like so:
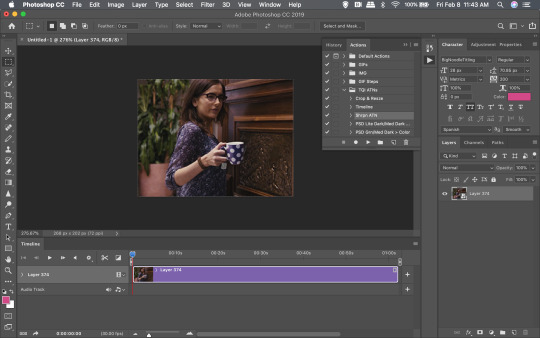
Great, now go back to the action menu and click the action that’s labelled ‘Timeline’.
Press the play button. And after it’s done, you should see something like this:
Step Six: Sharpen
Quick step. Back to the Actions menu. Click the action labelled ‘Shrpn ATN’ and press the play button. You’ll notice the Sorry, no preview for this, bc I forgot to screenshot. You’ll pretty much end up with a sharper/less blurry image.
Step Seven: Coloring
You can apply your coloring PSDs now. You’ll note that I included two coloring PSDs in my Pack. They’re pretty simple and, definitely won’t work with everything. For this GIF though? I actually liked the movie’s coloring. Everything I tried either made it look too grainy or whitewashy.
Step Eight: Save For Web
Quick shortcut: Press the CMD + Alt/Option + Shift + S keys at the same time. It’ll open up this window:
Take a look at my settings on the right. That first drop down has preloaded preset settings. The one you’re looking at on the screen is one I saved on my PS. From that drop down, you’re gonna want to select ‘GIF 128 Dithered’. Then, you have the option of using those preloaded settings or you can copy mine; I’d play around with em to see what works best for you. NOTE(S): The two things you MUST select are the GIF option from the second drop down AND the Forever option from the Looping Options drop down at the bottom.
°˖✧◝(⁰▿⁰)◜✧˖° And voila, you’re done! °˖✧◝(⁰▿⁰)◜✧˖°°˖✧◝(⁰▿⁰)◜✧˖° Found this helpful? please donate! °˖✧◝(⁰▿⁰)◜✧˖°
#tutorial#rph#photoshop tutorial#gif tutorial#dearindies#( anon. )#( answered. )#( inbox. )#( mine. )#( my resources. )#( requests. )#( my tutorials. )
16 notes
·
View notes
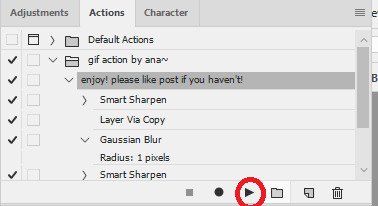
Text
gif tutorial !! (feat. anamo)
for everyone asking how i get my gifs so crispy
note: this tutorial is made using photoshop cs5! and while it should still work for newer versions, not everything may be the same. sorry :(
programs
photoshop cs5 (this is the only version i’ve really ever used so sorry cs6 and cc users)
topaz clean & denoise (optional)
kmplayer
media downloaders
4k video downloader
twitch leecher (for clips longer than what twitch allows)
how to download twitch clips (I use the “slow” method) twitch update made this useless ! so now i just use this site to download clips :)
1. extracting your frames when you can’t do video frames to layers
I think you need QuickTime (i don’t, which is why i can’t use this method) for this, but if your version of photoshop allows you to do File > Import > Video Frames to Layers, here’s another tutorial to help with that!
Remember that the best, clearest gifs come from the highest quality sources! However, I don’t normally recommend downloading actual 4k videos because while your gifs may be super HD, the frame rate is almost always really weird and slow.
After downloading your video/clip using one those nifty programs listed above, we need to extract your frames! Personally, I’ve only ever used KMPlayer to do this, but I’m sure that other equivalents will work pretty much the same.
Anyways, after opening your video in KMPlayer, pause right before the scene you want to gif and right click. There should be a tall menu that pops up, and from there you click Capture > Frame: Extract. This brings up yet another menu, and here are the best settings (at least I think so) for extracting your frames!
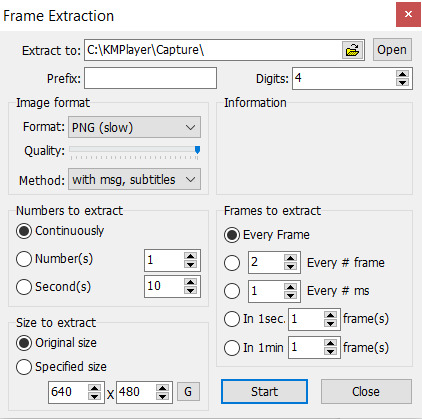
Now, you need to click start and let your video play. Once you’ve captured all the frames that you want, they should all be in your Capture folder that KMPlayer made for you (mine is located under This PC > Windows (C:) > KMPlayer > Capture). Just organize the frames as you want - I usually separate the frames for each gif into separate folders, but do whatever you want.
To actually get these frames into PS, start up the program and go to File > Scripts > Load Multiple DICOM Files and locate your Capture folder. Look, we have frames now. Cool.
2. actually making gifs
Make sure that your Animation window is open (it’s under Windows on PS if it’s not) so you can see what is likely only one frame, which is probably way less than the amount of frames that you captured (this will be different if you used Video Frames to Layers). To fix this, click on the symbol (a little upside-down triangle next to four lines) on the far right of the animation window and choose Make Frames From Layers.

Since we now have a lot more frames in our timeline, you can click the play button and watch them scroll through. Decide how you want to crop your gif and then resize the cropped frames to fit Tumblr (sizes here). Once you’ve done this, click on the upside-down triangle again and select Convert to Timeline, then select all the frames in the Layers tab that’s probably on the right of your screen and right click > Convert to Smart Filters. This will make sharpening easier because you can sharpen every layer all at once like this.
3, sharpening
At the top of your PS window, there should be a Filter tab. From there, click Sharpen > Smart Sharpen. Using my fairly limited experience with PS versions other than CS5, I do know that not every version of PS sharpens the same, so if you’re using something other than CS5, settings may vary somewhat. But anyways, here’s what my Smart Sharpen settings look like:
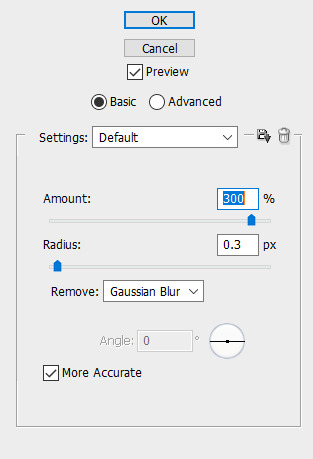
I then have my own personal sharpening action that I apply to the gif to somewhat smooth out the sharpness, but this tutorial has something towards the end that’ll give you a similar effect. And don’t forget to play your gif again to make sure that it works before you start coloring!
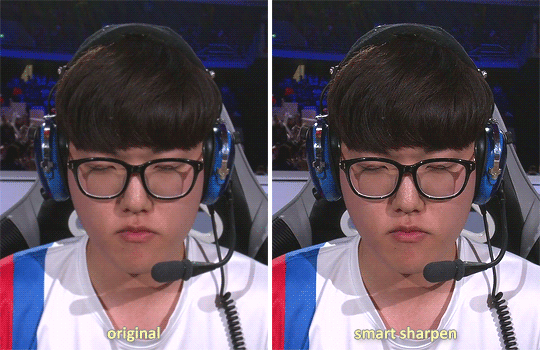
4. coloring
As a lot of players are POC, please be conscious of how you color the gif! Obviously, Obivously, it’s one thing to lighten up a dark scene because it’s hard to see what’s going on. However, when you purposefully and consciously make the decision to lighten (or darken) solely a player’s skin color, that’s gross! Stop!
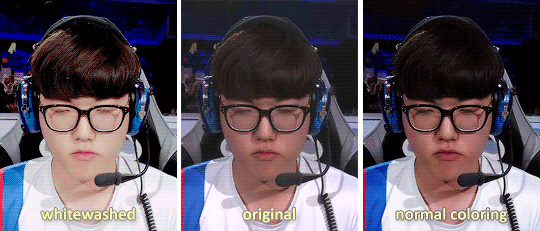
This being said, there are 5.6 million gif coloring tutorials out there and 5.6 million ways to color a gif. Personally, I tend towards more “””natural””” and true-to-life colorings for my OWL gifs, but I’ve made vibrant and pastel and colorful gifs as well. Here’s what the base PSD for all my OWWC gifs looks like, and this is pretty representative of all my other OWL PSDs as well.
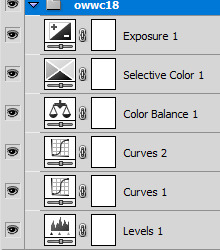
But as I said, there are so many different ways to color gifs - some of my gifs only have a total of three adjustment layers - and everyone has their own preferences for how they like their gifs to look. However, I will say that my first step in coloring is a gif is always use Levels and click the Auto option for a little color correction.
When you’re all done coloring your gif, select everything in your Layers tab (PSD + actual gif), then right click > Convert to Smart Filters again so that you only have one (1) layer in the tab.
5. using topaz to be extra (this is optional)
Is using Topaz necessary to make gifs? No, absolutely not. It also makes the giffing process take longer. It’s literally just to be extra yet I still use it on every single one of my gifs. Why? Because it makes them s m o o t h and I hate seeing pixels. Even if most OWL stages are pretty noiseless and nice overall.
To use Topaz, click on your single Smart Object gif layer and go to Filter > Topaz Labs.
While I do have both Topaz Clean and DeNoise, I typically prefer DeNoise over Clean, and that’s mostly because it’s a bit more difficult to mess it up. Topaz DeNoise does exactly what it sounds like it does - it removes noise from images. However, it also smoothes skin and hair and everything else, which is why you still need to be careful using it unless you’re going for an unrealistic, completely airbrushed look. Topaz Clean does the same, but with more emphasis on the smoothing (I guess), so it’s easier to accidentally go overboard with it.
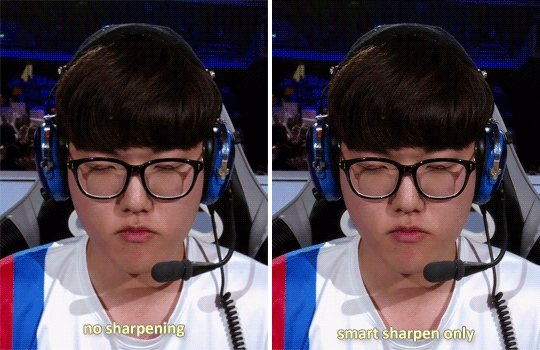
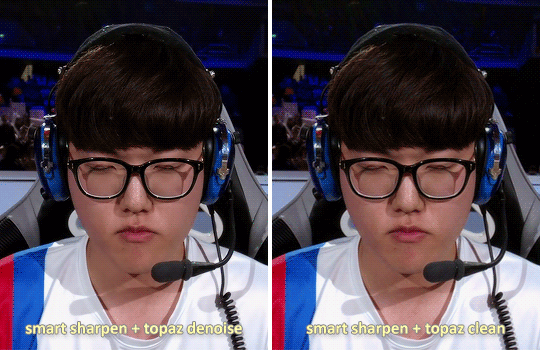
I almost never use the two in conjunction, but a good thing about Topaz is that it also reduces your gif file size by reducing noise! Which is nice! Also here are some nice Topaz settings. I use these (for the most part)!
update as of jan. 6, 2019: I am a Big Liar and I use both Clean and Denoise together all the time now and have been doing so since pretty much immediately after writing this tutorial. Just be careful when using both otherwise your gif might start looking too smooth - as with anything else, Topaz should be used in moderation :)
6. saving your gif
This part is actually super important if you used Topaz on your gifs. After you’ve made everything into a Smart Object, click on the upside-down triangle on your Animation window and select Flatten Frames Into Layers. If you used Topaz and don’t do this before trying to save your gif for posting, you will crash PS.
This process might take a while for Topaz users, but at the end, once your Smart Object has been made into many layers, go back to the upside-down triangle, click Convert to Frame Animation, and then select Make Frames from Layers from that same menu.
Now all your frames are visible on the timeline! Delete the very first one (otherwise the same frame will be repeated twice), select all of the frames on your timeline, then click on the little “0 sec” thing beneath the frames to set the gif timing. For this, I generally recommend using 0.03 or 0.04 seconds, but this depends on personal preference as well as the frame rate of the original video.
It’s time to finally save our gif. You just go to File > Save for Web & Devices and a big window will pop up. Honestly, the only save setting that really matters is that you have your gif set to loop for forever. Some people prefer using Diffusion over Pattern when saving, but this is what mine looks like right now:
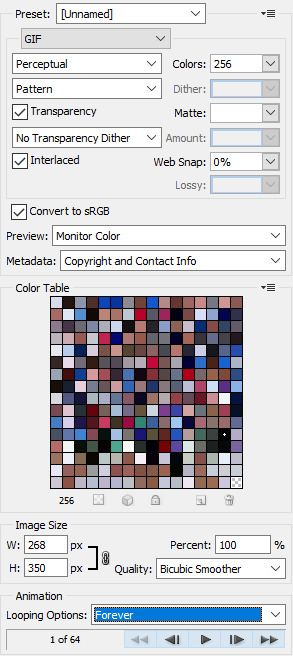
If you go to save your gif and find that it’s above Tumblr’s 3MB gif limit, you are probably just going to want to delete frames if you don’t want to lose the overall gif quality. Otherwise, you can click on that Colors: 256 box and try to cut down the number of different colors in your gif - though I will warn you that this generally makes gifs look more pixelated. And once your good and settled, click save and your gif is ready to post!
12 notes
·
View notes