#3ds max import obj
Explore tagged Tumblr posts
Visit Tumblr Blog
Explore Tumblr blogs with no restrictions, modern design and the best experience.
Last Seen Tumblr Blogs


Fun Fact
Tumblr was named as a finalist in Lead411’s New York City Hot 125 in Aug 2010.
Text
update regarding me ripping the models from both DDSAT games
I am still very much stuck.
1 thing I want to make clear about what types of files each DDSAT model is saved as, it is a .PB file, which was engineered by ATLUS themself (meaning that these cannot just be opened regularly and are unrecognized by model viewers such as Noesis.
Games such as Raidou 1-2, DDSAT 1-2 and SMT Nocturne use these file formats for models.


anyway. so at this point after ruling out both the mass PB to FBX/OBJ/DAE convertor only giving me the models textures, i gave up and ended up loading 3ds MAX and then using TGE's plugin to import the .PB files into there. 1st Image pictured is Harley Q's textures, it's in a DAE folder which was a result of a line of code i ran to convert PB files to DAE, but there is no .DAE model file present in the results.
i'm putting the rest of this under a readmore for coherency and not to spam the main tag with a really long post, but I do really want to figure this out as I'm sure a lot more people want the models that are not present on modelers resource + other assets.

i got autodesk 3ds max (i get a year free bc I go to an arts school lmao)
i'm given this error when I run the plugin in 3DS MAX. afterwards only the textures are provided to me.
at this point given both these circumstances, I'm inclined to believe that the .PB model files only have textures, whether it is that or:
1. none of my programs or command lines are working or i am not executing code correctly
2. the code I used to convert the .IMG (file containing data inside the actual ISO/ROM of ddsat) was either executed incorrectly by me or is causing the data to be released incorrectly.
3. I am missing something (.net plugin or whatever) on my laptop that causes the code to execute incorrectly in 3DS MAX
4. im doing everything wrong and nothing is right
5. while i have .net on the laptop, in order to run the 3DS MAX code properly I need to allow the code to properly locate encoding number 932 as listed in the error. That is far beyond my current capability/ understanding of coding.
At first i thought maybe it was the ROM but I tried the aforementioned methods to get the files for DDS 2 and none of them worked, I'm still stuck with only textures.
you guys can probably expect a dump of all of the files on google drive in a bit, i'm a bit hesitant regarding it bc of potential copyright or whatever but I'll piece together a coherent directory of the plugins and resources I used to make this attempt in case someone other than me who may or may not be more tech literate would want to attempt it.
6 notes
·
View notes
Text
I’ve started 3D scanning places that are important to me. The scans let me see a full 3D map of the place again whenever I want. They’ve got all the shapes and the colors. They capture things I didn’t even notice were there until afterwards!
For places like my apartment or my childhood home, I’ll take in depth scans of each room and stitch them together into one model. But, for some places I just take a scan from my perspective without moving around at all. As long as I view the 3D model from that perspective, it’s like having a little snippet of that moment.
Sometimes I scan objects too. I have an iPhone with LiDAR (lasers that tell the phone how far away stuff is) and I use that for rooms, but you don’t need that to use photogrammetry (algorithms that figure out how an object should look in 3D just from a bunch of photos of it taken in a circle) which is way better at objects anyway.
If you’re on iOS, I like to use 3D Scanner App or Scaniverse. If you’ve got an iPhone 12 Pro/Pro Max or any newer Pro or Pro Max model, you can use LiDAR, but both of those apps support photogrammetry as well as some other methods for capturing spaces.
For Android, Polycam is probably your best bet, but be aware that most of the apps available for android do their processing in the cloud, so they usually only let you do a few scans for free. Polycam lets you get some additional free credits by jumping through hoops, but YMMV so try out some other apps as well.
If you want to stitch models together, you can export them (I’ve had a lot of success with exporting to the OBJ format, but it depends on what program you want to send it to) and import it into 3D modeling software like Fusion360 (runs on your computer, there’s a free personal edition if you make an account) or SketchUp (runs in your browser, free).


@fairycosmos / Comic by @shhhitsfine / Comic by @incendavery
145K notes
·
View notes
Text
Engaging 3ds Max Online Classes | Boost Your 3D Design Skills

Unlocking the Power of 3ds Max for CADBench Users
In the world of 3D design, Autodesk 3ds Max stands as a powerhouse for modeling, rendering, and animation. For CADBench users, integrating 3ds Max into their workflow can enhance visualization, improve design efficiency, and bring concepts to life with stunning realism. Whether you’re an architect, product designer, or visual effects artist, 3ds Max offers a comprehensive suite of tools to elevate your projects.
Why Use 3ds Max with CADBench?
CADBench provides a robust CAD modeling environment, but when paired with 3ds Max, the possibilities expand significantly. Here’s why 3ds Max is a game-changer:
Advanced Visualization: CAD models often need photorealistic rendering for presentations and client approvals. 3ds Max’s Arnold Renderer allows for high-quality visuals with realistic lighting and materials.
Seamless Import and Export: 3ds Max supports a variety of file formats, making it easy to import CAD models from CADBench and refine them for rendering and animation.
Powerful Animation Tools: 3ds Max is renowned for its animation capabilities, making it an excellent tool for creating walkthroughs, mechanical simulations, and product animations.
Enhanced Material and Texture Editing: The extensive material editor in 3ds Max allows for intricate detailing, realistic textures, and procedural material creation.
How to Optimize 3ds Max for CADBench Models
To make the most of 3ds Max when working with CADBench models, consider the following best practices:
Optimize Your CAD Model: Before importing, clean up your CAD model in CADBench by reducing unnecessary details and ensuring a smooth polygonal structure.
Choose the Right File Format: Use formats like .FBX, .OBJ, or .STEP for a seamless transition between CADBench and 3ds Max.
Utilize Retopology Tools: Converting high-polygon CAD models to a manageable mesh structure in 3ds Max improves performance and rendering efficiency.
Leverage the Material Editor: Apply high-quality materials and textures to enhance the visual appeal of your models.
Use Lighting and Camera Settings: Experiment with HDRI lighting and realistic camera settings for immersive renderings.
Real-World Applications
Many industries leverage the combination of CADBench and 3ds Max to achieve superior results. Some common applications include:
Architectural Visualization: Create lifelike renders and virtual walkthroughs for building designs.
Product Design and Prototyping: Present detailed product visuals with realistic materials and lighting.
Mechanical Animation: Simulate and animate moving parts for engineering applications.
Entertainment and VFX: Generate high-quality assets for films, games, and virtual reality.
Integrating 3ds Max into your CADBench workflow unlocks new creative possibilities and enhances the overall quality of your projects. Whether you’re looking to improve visualization, animation, or rendering, 3ds Max provides the tools you need to bring your ideas to life. Start exploring today and take your designs to the next level!
0 notes
Text
Ok guys listen up
obj. files are the most stable when importing to lumion, it's only downside is that it doesn't come with materials, you have to assign it yourself because lumion is unable to reat mtt. file types. obj. also can be imported into sketchup but it is very high poly and heavy 😬
3ds. is the most unstable file type to import to both lumion and sketchup, they get disoriented although they do come with its assigned materials
Is it my problem or what cuz it's been troublesome to deal with playground suppliers when their main modelling software is 3ds max while in Landscape Architecture field here in my country its SketchUp 😬
0 notes
Text
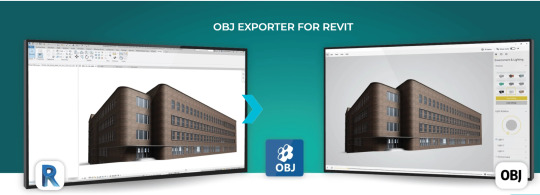
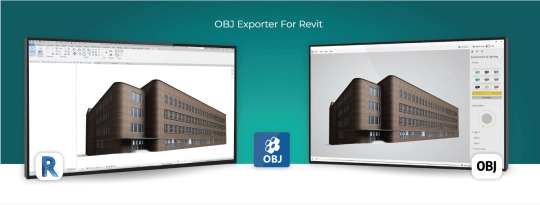
OBJ Exporter for Revit: Bridging the Gap in 3D Design
Introduction
Autodesk Revit is a powerful Building Information Modeling (BIM) software used by architects, engineers, and construction professionals for designing, documenting, and managing building projects. While Revit is renowned for its 3D modeling and drafting capabilities, there are times when users need to collaborate with professionals using other 3D modeling software or rendering engines. This is where OBJ Exporter for Revit comes into play. In this in-depth blog, we will delve into the need for OBJ Exporter for Revit and explore its significance in the world of architectural design and visualization.
Understanding the OBJ File Format
Before delving into the need for an OBJ exporter, it's important to understand the OBJ file format. OBJ stands for "Object" and is a widely used file format for 3D geometry data. It's a simple and open standard that stores 3D models in a way that is easily readable and usable by a wide range of 3D modeling and rendering software. OBJ files can contain information about vertices, faces, texture coordinates, normals, and material properties. This format's versatility makes it an ideal choice for interchanging 3D data between various software applications.
The Need for OBJ Exporter in Revit
Revit, while a robust BIM tool, primarily focuses on the architectural and structural aspects of a building project. This includes creating detailed models of walls, floors, roofs, and other building components. However, it may not always cover the entire spectrum of 3D design and rendering needs, especially when it comes to creating highly detailed and realistic 3D scenes, and animations, or collaborating with professionals using different 3D software.
Here are some key reasons for needing an OBJ exporter for Revit:
1. Interoperability: Not all 3D modeling or rendering software supports the direct import of Revit files. Exporting Revit models to the OBJ format provides a universally accepted 3D model that can be easily imported into various applications, fostering collaboration and integration with other tools in the design and visualization pipeline.
2. Advanced Rendering and Visualization: OBJ files are versatile and can carry texture, material, and lighting information. Exporting a model in OBJ format allows for more advanced rendering and visualization in software like Blender, Maya, or 3ds Max, where you can apply realistic textures, lighting, and environmental effects to create stunning visualizations.
3. Virtual Reality and Augmented Reality: OBJ files can be used to create interactive and immersive experiences in virtual and augmented reality. Exporting Revit models as OBJ files enables professionals to develop applications and experiences for VR and AR, providing clients with a richer understanding of the design.
4. 3D Printing: OBJ files are compatible with many 3D printers. By exporting Revit models in OBJ format, architects and designers can easily prepare their designs for physical manifestation through 3D printing.
5. Sculpting and Post-Processing: OBJ files can be manipulated in software like ZBrush or MeshLab to further refine the model, sculpt details, or make necessary adjustments, which is crucial in the production of highly detailed and customized designs.
6. Game Development: Game developers often require 3D assets in OBJ format for integration into their game engines. Exporting Revit models as OBJ allows for the creation of architectural elements within game environments.
Conclusion
The OBJ Exporter for Revit plays a vital role in extending the functionality of Autodesk Revit. It provides architects, engineers, and designers with the flexibility to collaborate with professionals using different 3D modeling and rendering tools, enabling them to take full advantage of advanced rendering, visualization, and interactive experiences. In a world where design and visualization are becoming increasingly sophisticated and interconnected, the OBJ Exporter for Revit is an indispensable bridge that empowers professionals to create, share, and utilize 3D models to their fullest potential. Whether it's for advanced rendering, virtual reality, 3D printing, or any other creative endeavor, the OBJ Exporter for Revit has become an essential tool in the arsenal of modern design professionals.
Get A FREE TRIAL Today!
#OBJ Exporter in Revit#ProtoTech's OBJ Exporter in Revit#Revit#Autodesk Revit#OBJ Exporter#OBJ Format
0 notes
Text
youtube
In this tutorial, we will deal with two issues when importing an Obj file into 3DS Max. 1- Invalid Normal Index 2-Wrong geometry
#3ds max#3ds max tutorials#3ds max import obj#3ds max problems#3ds max troubleshooting#3ds max bad geometry#3ds max online tutorial#3ds max course#3ds max expert#autodesk#Youtube
0 notes
Note
Thank you for such a quick response despite being sick—I hadn't seen that you had COVID, so I apologize greatly for bothering you! I hope your recovery goes smoothly, and as an aside, I absolutely adore your mods (your Top Surgery Scars mod is a permanent mod in my list!).
As for the making of the hair, I've done a little more research and unfortunately niftools' blender plugin doesn't support any models newer than new vegas. Apparently, one would have to go through 3DS max to get the correct head mesh without it being oriented wrong and the wrong size, which is super expensive (300$ a month, less if you're a student but I am not a student) 😭.
As for the rest, I can model the hair cards onto the head, I've done that quite a lot, it's just the rest of it that is confusing. I actually followed the Fallout 4 Armor tutorial on the nexus wiki, since I assume it's the same steps as for the hair, just different places.
as for hair cards, I have a some tutorials on how to make them! It's really as easy as making curves with a ( shaped bevel and moving the points to look like hair. some of these are for sims 4, but it's the same process to make them, just a different way to export and add them to fallout:
watch?v=xmmbvfSwQ1k , watch?v=f44DuxndEYI , and here's one on how to properly texture them! watch?v=-cO16ubmgmc I used these to mess around with making hair cards in the event I'd like to make my own custom hairs for FO4 (or the Sims 4).
AUTODESK SUCKS FARTS here's a mega link to a cracked version of 3ds 2013 which will handle the official nif plugin that comes with fo4.
you cannot legally get this version at all anymore so i have no qualms about handing this out.
i'll write up some notes on hair stuff but it is pretty similar to armor. obviously that only helps so much.
there's a few caveats in that you can only have one single object in a .nif for hair otherwise it won't display at all. fo4 hairstyles have a few different pieces 'extra parts' if you look at them in the ck or fo4edit you'll see that usually they're divided into main mesh and a 'hairline'
facebones fuckin suck all the ones i've done have been kinda hacky copied off vanilla meshes and finetuned. dont worry about those too much at least not right away
uhhhh hair physics will need to be copied off existing vanilla styles which i actually just use outfit studio for l m a o
if you get to the point where you have the hairstyle done, even in blender, you can export as OBJ and import that OBJ into outfit studio to convert to nif, and skip going through 3ds. its not technically the 'proper' procedure but if you cant pirate 3ds max its the most accessible workflow. a little hacky but thats what mods are at the core. pick a hairstyle with a similar silhouette, import that to outfit studio, set as reference and copy the weights to your custom model.
and i will have to take a look at theeeeese videos when i can understand how things work again. thank you
(i never actually mentioned gettin the plague over here, you're good, i wouldn't be answering things if i didnt feel at least a little up to it)
9 notes
·
View notes
Note
Hi there, just a question for you if you have the time ♡ I know that you allow people to convert your Cyberpunk items from TS3 to TS4 freely (you are amazing, you know that?). However since I have the game, do you have or know of a tutorial for exporting from my files? The one I found was very general, very not 'beginner friendly'. Else I will just bring some of your stuff over if it's not been done yet, miss having them in my game (and base game TS4 only is limited). Love you ♡
Hi! Yeah, feel free to convert whatever; I think CC TOU/policies are ridiculous, and perversely counterproductive to uploading content publicly on the internet anyway.
Just be warned that a lot of my CC's not that great, cuz C2077 uniquely does not use or include typical diffuse textures, so I had to make many of the textures myself (and that's never a good idea, LOL). Not to mention, I had to shave off 1/2 - 3/4 of the polys on most of the meshes, cuz they're just excessively high. Even after decimating the polys they're still too dang high. It's been a pain in the neck to do anything with this effing game, even when not actually playing it! (-‸ლ)
☽✶•.¸(✶•.¸★¸.•✶´)¸.•✶´☾ ☆«´¨`•°°•´¨`»☆ ☽.¸.•✶(¸.•✶´★`✶•.¸)`✶•.☾
Welcome to Murf’s School of Crap and Crap-Making!
School Motto: Prepare to be tortured! For Science!
Lesson #6B: MORE ON GAME EXTRACTING (PT2)
☽✶•.¸(✶•.¸★¸.•✶´)¸.•✶´☾ ☆«´¨`•°°•´¨`»☆ ☽.¸.•✶(¸.•✶´★`✶•.¸)`✶•.☾
Trust me: extracting from C2077 in general is not very beginner friendly--this is the hardest game I've ever converted from, next to all the Koei Warriors games. Because not only did I have to use EFFING COMMAND LINES again, but the way CDPR arranged the game files (particularly the textures--or lack thereof)--were just saturated in demonic energy.
Mind you, I extracted C2077 back in the EARLY days, within the first weeks of the game's release, way before the Toolkit updated and got a GUI and CDPR released its dev toolkits for modders, so it’s possible I’m giving you outdated information, as the process nowadays might be pretty different from how it was back when I did it. ¯\_(ツ)_/¯
I used the CP2077 Toolkit here, and followed the steps here.
To be fair, the steps themselves are actually very straightforward. I'm just a lazy, spoiled little ingrate who likes nice clean and simple GUI tools so i can click a button and see all the meshes & textures and go about my frikkin day. But no, instead i have to sit here with EFFING COMMAND LINES and try to figure out WTF these lines of code & text frikkin mean, with zero mesh preview tool to speak of. So I literally have no frikkin idea what anything looks like until I import it into Milkshape/Blender/3DS Max. GRAND. 🤬
(My horoscope told me I needed to get more sleep, and boy they weren't kidding, cuz I'm ornery AF today. 😩 )
But yeah, basically all you have to do is open the CP2077 toolkit .exe, and use the format the steps provide you with whatever the directory is where you installed the game.
As I've explained before in Pt1, all games bundle their files differently, so the trick with extracting is just to figure out what kind of bundle it is, what's in it, how to open it, and how to convert the mesh files into .obj format and the textures into .dds format.
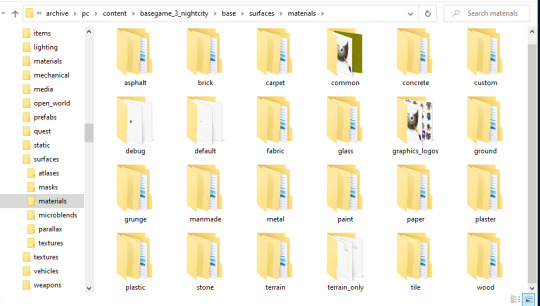
For C2077, most of the files are in typical .bin files, with the meshes (.mesh files) & textures (.xbm files) in content\basegame_4_gamedata.archive | content\basegame_3_nightcity.archive |
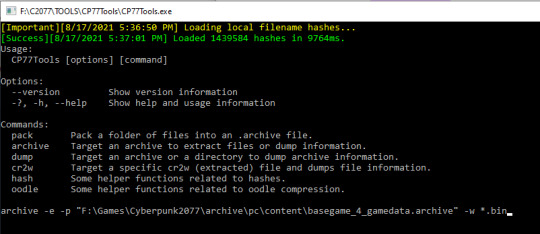
So all you have to do is follow the steps and the formats they give you: copy/paste their extraction format code, and the "path to archive" is your installation directory: (e.g.: "archive -e -p "F:\Games\Cyberpunk2077\archive\pc\content\basegame_4_gamedata.archive" -w *.bin" to extract the .mesh files; or "archive -u --uext dds -p F:\Games\Cyberpunk2077\archive\pc\content\basegame_4_gamedata.archive -w *.bin" to extract the .dds files from the Gamedata bin archive).
Then just wait several HOURS (no exaggeration) for each archive to extract. I let mine run overnight for a a day or two--it took bloody frikkin forever.
Once you have all the meshes extracted, the good news is that converting them to .obj files The Sims can read is very easy, cuz all you have to do is use good ole NOESIS, THANK GOD~! ^0^ (Noesis can also open the .xbm texture files, BTW--it’s that clutch; I keep telling y’all.)

The issue with the textures is that C2077 just legit doesn't have many. 💀 It's a feature, not a bug--instead of using diffuse textures (like The Sims' overlay/multiplier diffuse), games like C2077 and Call of Duty instead use materials--kind of like the sample fabric swatches in a textiles shop or tailor, with dozens upon dozens of simple materials & microblends & patterns (a leather print, a metallic sheen, a paisley pattern, etc) shared between all meshes. It’s awful.
So you the extractor/porter/converter are now left with the sad task of patching all these materials together to make a lick of sense on a mesh that might very well use 100 different material files (no joke!) rather than 1 or 2 diffuse textures. And WOE BE UPON YOU if you’re trying to convert it for The Sims 3, where meshes can only use textures on ONE UV Map. The saving grace of TS3′s UV Mapping is that we have CASt, so often we can get away with having plain multipliers, so long as the RGBY Mask allows us to have recolorable channels that do a lot of that heavy lifting for us with patterns & color wheels. For TS2/TS4, however, I imagine more work would need to be done providing swatches, as nothing’s recolorable in those games.
So REJOICE at the pithy handful of actual diffuse textures (mostly decals & posters, etc) that CDPR bothered to grace us with in C2077--they're acts of mercy, I promise you. 🙏
And speaking of UV Maps--C2077′s are upside down. Which is absolutely frikkin lovely; who doesn’t love extra work, seriously. 😒
But yeah, that’s it for extracting, really.
Again, the method I used might be outdated by now, since I did all of mine in December 2020/January 2021, and I haven’t needed to stay up to date with the tools or anything since i already got what I needed out of them. :\
17 notes
·
View notes
Text
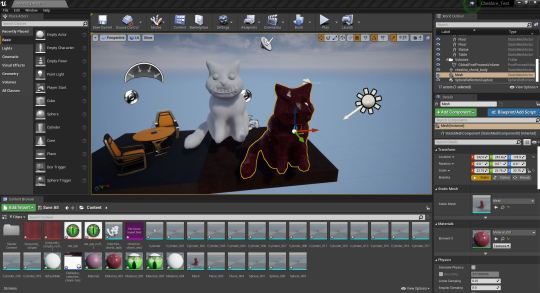
W11 Studio - In over my head?
3D Model Update
After learning my lesson yet again as to why saving is important, I finally got around to giving Cheshire cat eyeballs and teeth. The results are horrifying.

Cute...
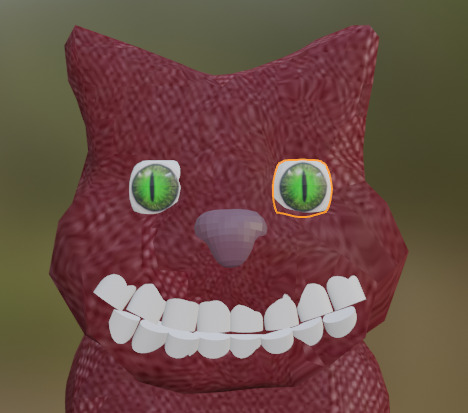
To evil...
Before continuing, I had to see what was the best way of exporting the model and importing it into unreal. Exporting it as an OBJ kept the body shape nice, but took away the texture and wouldn’t let me interact with the eyeballs and teeth seperately. Exporting as an FBX kept the texture and the eyeballs and teeth seperate, but the body was full of edges and assembling all of the pieces would be tricky.
I am not as far along with the process as I would have liked to be, but I am proud of what I have been able to accomplish so far considering I am essentially learning a new software with only youtube as my teacher.
My next steps from here are: - Find the best way to export it (with the help of my team, especially Milo and Max who are doing the Unreal Engine side) - Animate the model: cut up the mesh on the tail so he can wag, maybe add eyelids so he can blink, and maybe animate the smile?
Next steps in general: - Meeting to discuss what we want done by the submission - Who will make the video for the digital submission - Making sure everyone is happy :)
2 notes
·
View notes
Text
WEEK 9 Work Exercise 3D Print with digital model
Step1:From the work in last week exercise about digital model in Fusion 360. I export it and I think it is the great file for making the model again and try on the other editor which is 3D Max.

Step2: Try to Use 3D Max to create my digital model.


I have to say, this is first time for me to install and use 3D Max. So before I start I research some of info and video for helping me to learn and use. The multiple screens, and neat arrange are all good for me to use at this first time. Further more, because this is the first time I try to use, I choose to set my first language to help me understand.


Step3: import on Cura.
After finishing digital model on Fusion 360 and 3D Max, respectively, I export each of them with the OBJ and STL format. Then I put the file into Ultimaker Cura. However, it is the first time for me to use 3D print, so I am not sure if I was totally correct for me to sent it to print. Anyway, I have try my best to exercise and learn how to use and follow these steps. That was really great experience for me.

5 notes
·
View notes
Text
Postcard Aesthetics
I have been making new postcards recently. This is something that that's part and parcel within the art world of metalsmithing; they help you promote your work by giving people high quality images of what you're all about. The last batch of postcards I made was in 2016, and they were for my MFA thesis--so clearly I am overdue.
I picked three pieces of mine for this first batch: Unnatural Satellite, Non-Ferrous Belt Buckle, and of course A E S T H E T I C S. Two out of three of the postcards consist of a picture of the artwork on the front, my name below, and then my contact info on the back with a diagram. Their typefaces and layout schemes are very modernist and non-distracting. The third postcard however…

…got a little bit out of hand.
Come with me and I will give you a deep dive into the cartoonish amount of effort I put into this postcard; it truly is a tale of suspense and excitement.
I'll start by saying that I love that stupid brooch so much. It's one of my favorite things I've ever made, and I wanted its postcard to scream Vaporwave. I began with the back I knew I wanted to have Windows 95 message boxes as the means to display information about the piece and provide my contact info. A lot of people use an ancient error generator for stuff like this, but I wanted the authentic W95 experience--so I ran Windows 95 in a virtual machine and studied how the message boxes behaved.

After taking a lot of screen-shots, I tracked down the font 95 used and downloaded a pack of vintage desktop icons. After getting a plugin so that Photoshop could open .ICO files, I imported everything and got to work meticulously pixel editing them together. (My experience with sprite editing from my wasted youth served me well.)

From here, I wanted to have a background that looked like some kind of surreal 90's algebra textbook vista. I used Microsoft's iconic cloud wallpaper as the backdrop, and made a checkerboard texture for the "ground." (The water texture was one of those tessellating background images people use to use on their Anglefire/Geocities/Tripod websites.)

Unfortunately, I could not get it to do what I wanted to in Photoshop.

Frustrated, but undeterred I decided that it would be easier to create the scene in a 3d modeling program and import the rendered image into Photoshop. I started by looking for CGI programs from the 90s. I found some via abandonware websites, but I couldn't get them to run on my modern computer. (Shocking.) I did find one program called "POV-Ray" but I couldn't wrap my head around it.
Ultimately I gave up on that pursuit and decided to render the scene in Rhinoceros 3d, which is a program that I am very familiar with. I figured the next best thing would be to track down some vintage 3d models and pose them in Rhino. After doing some mockup sketches, I decided on a computer, a pillar, and a floating cube of water.
The water was easy: I just made a 3d shape in Rhino and wrapped a texture around it. The other two were more difficult. Starting with the pillar, I scoured the internet for a vintage pillar model, however every one I came across was in a dinosaur format that stopped being supported decades ago. Eventually I found a CD from 1996 on the Wayback machine containing thousands of 3d models in .3DS format. The only problem was that every file was named a series of numbers, and Windows 10 cannot preview that format… so I had to open them in Rhino one by one to try and find it. Eventually I did, but unfortunately the ionic column looked… off

Things continued this way for an hour until I stumbled upon the prefect pillar model in .OBJ on a website filled with royalty free models. Next, I tackled the PC. I ran into the same problem as the pillar, but eventually I found it: the perfect vintage late 90s 3d PC model… in .MAX format.
This is when I learned about Autodesk's proprietary format that only their $1,620 per year program can open and convert. After trying several avenues to convert it, I finally concluded that any .MAX was not going to work. My next idea was to get the beige desktop PC model from Halflife 2. 2004 was pretty damn close to the 90s, and HL2 was the source game for modding--someone must have a way to easily convert it into something Rhino can open… right? After an hour of messing with GCFscape and Crowbar I gave up on that and eventually found a good looking PC on another royalty free 3d model repository website.
With all the models collected, I started to position them around a sphere I wrapped with that checkerboard texture and strategically place the camera.
You may notice a giant black box in that first image. I put that there so that the "pool" of water would get a more defining shadow on the side facing the viewer. After some minor setting tweaks, I rendered the viewport and placed it in Photoshop. I had to manually black out the screen, but that wasn't too difficult. Originally I was going to put a dithered CGA bust of Helios on the screen--but that ended up being too much visually.

The front was a lot easier. I did some font research and grabbed a clone of ITC Fenice Std for my name, and made a custom gradient for the background. Originally I was going to dither the hell out of it by saving it as a .GIF with only 4 colors… but I was worried that it wouldn't look as good in print.

So I looked through some websites filled with pre-y2k CGI and found this wallpaper among one of them. I cropped out everything but the water in the lower left hand corner.

I then applied the gradient over it with some transparency, and put my name on it. The yellow color was an accident; I was trying to decide what color would look the best here and accidentally selected it. It looked good, so I kept it.

It was still missing something though…

There we go. A heavy drop shadow behind the text and a more sleek underline.
As of writing this, I have the postcards in hand and they look great. I can't wait to shove these in the faces of the old guard in my corner of the art world.
4 notes
·
View notes
Note
I'm trying to convert an object but when i try to import the mesh into Milkshape nothing shows up, i know the mesh is fine because i opened it into a 3d converter to change it to a obj file. Any idea how to fix this ?
Yup, your poly count is probably too high, that is the main reason things won’t import into MS. MS has a max poly and vert count it will deal with. Try reducing poly/vert count in blender and try again!
3 notes
·
View notes
Text
The Bridge to Innovation: Why Revit Needs an OBJ Exporter
Introduction
Autodesk Revit is a powerful BIM (Building Information Modeling) software used extensively in the architecture, engineering, and construction industries. It enables professionals to design, model, and document complex building structures with precision and efficiency. However, there are situations where you may need to export your Revit models to other software applications for various purposes, such as visualization, simulation, or 3D printing. This is where an OBJ (Wavefront Object) exporter for Revit becomes invaluable. In this blog post, we'll explore the reasons why you need an OBJ exporter for Revit and the benefits it brings to your workflow.
1. Compatibility with a Wide Range of 3D Software
One of the primary reasons for using an OBJ exporter for Revit is compatibility. OBJ is a widely recognized 3D file format supported by an extensive list of 3D software applications. When you export your Revit models as OBJ files, you can easily share your designs with collaborators or transfer them to other specialized software for tasks such as rendering, animation, or simulation. Some popular software packages that support OBJ include Blender, 3ds Max, Maya, Unity, and many more.
2. High-Quality Mesh Export
Revit models consist of BIM elements like walls, floors, roofs, and families. These elements are typically represented as parametric objects with detailed information. When exporting to OBJ, Revit converts these parametric objects into polygonal meshes, allowing for a more efficient transfer of geometry. OBJ files maintain the visual fidelity and structural integrity of your design, ensuring that complex architectural details and textures are preserved accurately.
3. Streamlined Visualization
Visualization is a critical aspect of architectural and construction projects. An OBJ exporter for Revit simplifies the process of rendering and visualizing your models in other 3D software. You can import your OBJ files into rendering software like Blender or 3ds Max to create stunning, photorealistic renderings, which are essential for client presentations, project approvals, and marketing materials. OBJ files can also be used in virtual reality (VR) and augmented reality (AR) applications, enhancing your ability to communicate design concepts effectively.
4. Simulation and Analysis
In certain scenarios, you may need to analyze your Revit models for structural integrity, energy efficiency, or other factors. Many simulation and analysis tools, such as finite element analysis (FEA) or computational fluid dynamics (CFD) software, require 3D models in a compatible format. By exporting your Revit models to OBJ, you can seamlessly integrate them into these specialized software packages for in-depth analysis and optimization.
5. 3D Printing
The field of 3D printing has seen rapid growth in recent years, and architects and engineers often use it to create physical prototypes, scale models, or custom building components. OBJ files are widely accepted by 3D printing software and services, making it easy to translate your Revit designs into tangible objects. Whether you're working on an architectural model or a structural component, exporting your Revit model as an OBJ file ensures that it can be easily converted into a 3D-printable format.
6. Cross-Platform Collaboration
Collaboration is key in the AEC (Architecture, Engineering, and Construction) industry. Teams often consist of professionals using various software tools, and seamless data exchange is crucial for project success. An OBJ exporter for Revit facilitates cross-platform collaboration by providing a standardized format that can be imported into different software environments. This compatibility reduces the risk of data loss and ensures that all team members can work with the same model.
Conclusion
In conclusion, an OBJ exporter for Revit is a valuable tool that enhances the versatility and compatibility of your BIM workflow. It enables you to share, visualize, analyze, and produce physical models from your Revit designs with ease. By using OBJ as an intermediary format, you can tap into the full potential of your Revit models, allowing you to collaborate more effectively with colleagues and unlock new possibilities in architecture and construction projects. Whether you're creating stunning visualizations, conducting simulations, or 3D printing prototypes, an OBJ exporter for Revit is a valuable addition to your toolkit.
Get FREE Trial
#OBJ exporter for Revit#Autodesk Revit#3D Software#CAD Plugins#CAD Expoters#CAD Importers#CAD Extensions#CAD Software#3D printing#visualization#BIM (Building Information Modeling) software
0 notes
Text
youtube
#3dsmax#3dsmaxtutorial#3ds max script#3ds max plugins#autodesk#autodesk 3dsmax#3ds max obj#3ds max import#3ds max import obj#Youtube
0 notes
Text
UV Mapping Guide
This guide is made under the presumption that you already know the basics of how to work with DAI meshes and other modding features.
What is UV Mapping?
To explain it as best as I can, it's how a mesh determines what exact sections of a texture is displayed on each polygon.
So for example, if you want to add a braid into your hairstyle but would prefer to isolate it to just that one singular strand such as how my character had hers done here, it would require editing the UV map. Creating a new diffuse may work to an extent, but you run the risk of having random strands throughout the hair displaying the braid where you don’t want it to.
REQUIRED
3ds Max (Any version will work)
Adobe Photoshop / GIMP
Note: This probably works with any other 3D editing software perfectly fine (such as Blender), 3ds Max is just what I personally use and ultimately will be showing in this guide.
1.) Import your desired mesh into 3ds Max along with a vertically flipped file of the associated texture. It’s recommended you flip the diffuse file in an image editing software beforehand in order to save time. Since I’m looking to edit hair, I’ll be grabbing something like hair_straight_thick_d to use as a reference.
2.) With the mesh you will be editing selected, go to your Modifiers dropdown list either from the very top toolbar or the ‘Modify’ tab on the far right and select Unwrap UVW.

3.) You should now see that your editing menu has changed drastically from before. Scroll down until you see the Edit UVs menu and select Open UV Editor ...

4.) From there, a new window should open up on your screen with what will most likely be the UV map on a checkboard pattern background.

5.) At the top right, open the dropdown menu and select the imported flipped texture in order to view it during editing. From here, you can shift the map around to suit your needs. All changes made will show up live on your mesh.

6.) Once finished, exit out of the editing menu and Export your mesh as an OBJ file. Make sure your Materials are toggled in your settings or you'll end up with empty holes in game.

Huge thanks to @aileani for being incredibly patient and helping me figure out my exports to get UV mapping working again!
68 notes
·
View notes
Note
what program do u use for dai mesh modding
blender 2.79 my friend. import OBJ as normal, erase all but LOD_0, then do ur business on LOD_0, then on export select the hair, tick "export selection only" and untick "export materials"
also similar steps as with 3ds max modding - delete NOTHING, add NOTHING, to get rid of extra hair planes make em tiny and hide them in the top of the head somewhere
and as for the uv map dont flip it, flip the texture if you work in textured view otherwise when u import it will have holes
lastly... use daitools .17 if u can find it. i had issues with .19 and .16
good luck!!!

14 notes
·
View notes