#Boot Pendrive
Explore tagged Tumblr posts
Visit Tumblr Blog
Explore Tumblr blogs with no restrictions, modern design and the best experience.
Last Seen Tumblr Blogs


Fun Fact
Tumblr was created by web developers David Karp and Marco Arment.
Text
My fandesign portal 2
GlaDos
She is connected to the mainframe, but she can be separated from it thanks to cables that serve as extensions, but they are not so long that she can take a walk around the facility (not that she needs to leave her room or is interested in doing so) the only thing that would prevent her from being able to move freely away from her mainframe is having cores connected to it or when a core transfer occurs, either of these situations activates a latch that is on her back, taking away her mobility at the same time, in case she is separated from the mainframe the cables will start to retract pulling her back to the mainframe (recommendation, do not force or you will cause damage to the circuits). She is equipped with Long Fall Boots
Her hands and arms have the ability to project holograms, usually small (although the size of the hologram can also increase if she projects with two or more hands) she uses them to view important information and files. also to monitor test subjects, she can also record herself but it's not a function she uses
(as an added bonus I was thinking that where the projectors would be on her arms I was thinking of making it where they connect to the personality cores, but it would be too easy for her to rip them out from there so I discarded the idea completely).


Intelligence Dampening Core (Wheatley)
on him back him panel with the Aterture Science logo can be opened to connect to panels or transfer rails, but also cables can be connected to him back at the bottom, but it is mostly for battery recharging or simple data transfers, in case you want to transmit more complex data or check the core database you will need to open her back panel, you can also connect pendrives XD
him hands and feet have emergency connectors and magnets, in case when connected to the glados mainframe she tries to reject them or remove them by shaking, but him main connector as personality core is the one near the neck on her sword
he is very light, surprisingly light, which makes it easy to be connected to her rail and to move on it quickly (also to be carried by a person). He is is equipped with Long Fall Boots
normally cores have the serial number engraved on the side of their chest but wheatley and Rick seem to be one of the few cores with a proper name, maybe it was just a whim of one of the researchers who let them keep a proper name or simply gave them those names.
in their deteriorated state, their arms fall off or stop working for short periods of time (along with his tik in the eye, it was all caused by the microbot Jerry).
his exposed wires are a constant risk of an explosion or his circuits melting, so he may just be a bit more nervous than usual when he remember this
he still has his flashlight function in his eye, his head (and that of all the cores) can be detached from his body (that's how his head ends up in GlaDos' body XD) if his head isn't connected to anything he can still continue to have control over his body


Adventure Core (Rick)
to begin with, as in the game all the cores are the same in terms of design…. More or less, the variations are in the location or number of handles, and their characteristic color, in Rick's case he has an extra crank on his neck.
Some scientist thought it was funny to simply give him a cowboy hat (I also leave a drawing without his hat just in case).
apart from that, all the cores have the same functions as mentioned above with Wheatley


Fact Core
the data core has a unique crank on its hips, unlike the other cores that have a crank on each side of the hip, it also has a little bow that someone from the staff put on it, he likes it, he says it goes with his intellectual tone, his serial number was erased with time and the wear and tear of his paint.

Space Core
the space core has a glass helmet, he thinks it is a space helmet but it is just a noise muffler as he always seems to talk shouting which annoyed some people, I think at this point the scientist who stuck all those decals on him was fired or maybe something worse? either way it doesn't seem to bother him, he is capable of sticking more on if he could find more decals of course, his serial number was also erased by the wear of the paint
What also differentiates it from the other cores is that it has more battery than the rest, due to its restlessness, its battery is usually consumed faster, if it had the same amount of battery as the others it would have to be recharged several times.

Chell
she still has the same design, I just added some scars on her arms; some are from burns, scrapes, and bullet impacts from turrets.

WheatDOS or Wheatle in the body of glados
He still has the same functions as GLaDOS, only he doesn't know how to use them properly. I can only imagine him as a dad trying to use a phone for the first time, just clicking on the first thing he sees without bothering to read. The only function he learned to use was recording himself, and he loves to have that omnipresent villain vibe.
He has difficulty walking due to GLaDOS's high heels (he pretends to know how to walk gracefully in them, but his heels have bent in so many ways that if he were human, he would need surgery to walk again)
Just like with the Aperture Laboratories logo, which he replaces with his name, he crosses out GLaDOS's name on his chest and simply writes his name with a blue marker. When GLaDOS sees this, she scolds him for daring to vandalize her body.
He also changes his lab coat to one that is more fitting for a villain, so he decides to dye it a dark color (this also annoys GLaDOS; he just keeps adding reasons to her list of "reasons to kill him")

statures
all cores have the same size, so just add Wheatley to the size comparison picture
I wouldn't know how to express their heights with numbers so I'll just leave you with the guys standing side by side.

statures but with wheatle in the body of glados
here wheatley is still smaller than glados despite being on his body XD

Well, I think that would be all the information on these designs; more than data, they were like random ideas, haha.
I apologize for the bombardment of information and the excess of text and thoughts I had for each design.
I don't know if the Portal/Portal 2 fandom is still alive (from 2011 to 2024, that's a long time💀💀💀), I have the bad habit of getting into fandoms too late, haha, but I hope you like it.
In the future, I plan to make humanized versions (well, I already have Wheatley's ready, but it needs some touch-ups, XD).
If you have any other questions you want to know about them, feel free to ask; I will gladly answer your questions! :D!!
#fan design#portal 2 wheatley#portal 2 chell#portal 2 glados#portal 2 space core#portal 2 fact core#portal 2 adventure core#portal#fanart#chell portal#glados#portal 2#portal 2 fanart#portal 2 art#portal fact core#portal adventure core#portal space core#space core#fact core#adventure core#glados portal#portal glados#portal chell#chell#wheatley#portal fanart#my draws#dibujo#drawing#draws fanart
110 notes
·
View notes
Text
Ahogyan a dolgok állnak, Windows 2000-t fogok telepíteni a gépemre
Történt pedig, hogy új SSD-re kell költöznöm, mert a régit kinőttem.
Nosza, elővettem a Win 10 install DVD-met, erre a gép aszongya:
Boot from CD/DVD :
DISK BOOT FAILURE, INSERT SYSTEM DISK AND PRESS ENTER
mondom, biztos koszos a DVD olvasó, nézzük meg valami régebbi CD-vel, itt egy Windows 2000 install DVD.
Naná, hogy megy vele.
Übrigens, ha valakinek van valami ötelete, hogy hogyan lehet a dolgot megkerülni (pl. csináljak a DVD-ből bootolható pendrive-ot, húzzak le egy windows 10 install image-t stb.)
24 notes
·
View notes
Text
I have an unlicensed version of Wndows 10, I wanted to check if I did still have the one I had on my laptop so I log in into my Microsoft account to check.
Nothing happens and I move on, I play some videogames and I need a break so I go upstairs, have some snack and relax my back.
After a beautiful shower, I go downstairs to my computer to work on my uni project on Illustrator. I turn on my PC, and the lock screen greets me with a log-in message for my Microsoft account. I go on it, and it asks me for a code sent to my Hotmail. No biggie; I have access to it with two-factor authentication!
I log in. No email with code. I wait. Nothing.
I sent it again, maybe a few more times. I give up. I will try another route
After failed attempts at solving my issue with safe mode boot, I contacted REAL customer support.
TLDR for the long chat I had with two customer support people, "Yeah, this is a bug that's happening, you're gonna have to reinstall Windows with a pendrive and another PC"
:D I had no backup!!! I lost all my uni work basically!!!!
My Windows bricks the second I log it into Microsoft!! learn from my mistakes,,, don't do it!!!!!!
3 notes
·
View notes
Text
Laptop de dos gigas mejores configuraciones Linux
mejores linux en laptop esta es la configuración ideal para mí para tener en mi portátil infinidad de sistemas operativos: Instaló en el disco duro SSD interno ventoy (también puede ser en un pendrive USB) con múltiples isos de Linux y Windows live , destacando estos que pongo a continuación por tener características persistente. así mismo uso Windows full instalación arrancando desde una SD Windows 11, que instalé con rufus los archivos de persistencia pueden guardarse para restaurar en cualquier otro equipo tu configuración de Linux
archcraft 392 consumo de ram, va persistencia ventoy.4* de eficiencia
lubuntu 18 255 consumo de RAM, va persistencia en ventoy.5* de eficiencia
va brave appimage y versión tar.gz de forma extraordinaria en consumo de ram: https://www.mediafire.com/file/4m3lv699ftbtken/brave.AppImage/file
va libretube appimage de forma fenomenal : https://www.mediafire.com/file/eo58ixb7x2uxmp0/LibreWolf.x86_64%25282%2529.AppImage/file
easyos3.1.19,,145 consumo de RAM,va lector sd,va iron,slimjet,
waterfox,va sound, se instala en sd con usbit y arranca con plokexec en lector sd con persistencia. 4* de eficiencia
-easyos2.6.2,,106 consumo de RAM,va lector sd,va iron,slimjet,
waterfox,va sound, se instala en sd con usbit y arranca con plokexec en lector sd con persistencia. el mejor navegador es libretube en:
https://www.mediafire.com/file/eo58ixb7x2uxmp0/LibreWolf.x86_64%25282%2529.AppImage/file
5* de la eficiencia
-antix21base155 consumo de RAM, seamonkey,opcionpersistencia. ,va iron portable,no lector sd,persistencia,arranca en lector sd con plokexec,se instala en sd con usb installer del antix.5* de eficiencia
antix22base,163,dillo,seamonkey,barrabrillo,
opc. persistencia,arranca en lector sd con plokexec,se instala en sd con usb installer del antix***
antix persistente en sd interno
Persistencia en SD lector interno HP celeron para plokexec desde SSD con ventoy a SD lector interno con antix 17.5 x86 (mejor la iso que no sea full sino base ), la versión antix 22 base tiene menus de persistencia al inicio.
0-hago un usb installer en lector interno de sd, en tarjeta para microsd
1creo un root persist de 900 megas y otro para homepersist de 900 megas, arrancado el antix del lector interno con plokexec
2-al arrancar de nuevo pongo editando persist=static en la linea append, intro en linea boot kernel, (en las opciónes del menú que saca plokexec editando con e )
3- me pedira establecer passwords la 1 vez,y cantidades en megas para root y home
4- al arrancar de nuevo pongo persist=static como en apartado 1, para tener persistencia o nada si quiero arrancar sin persistencia.
persistencia en ventoy
Persistencia en ventoy con lubuntu 18 funciona muy bien el brave.appimge y mejor el brave.tar.xz pues instalo complementos de Chrome.
Los archivos creados de persistencia pueden guardarse para restaurar tu configuración de Linux en cualquier otro ordenador.
1- Crear archivo de persistencia dentro del directorio del programa ventoy en Linux
sh CreatePersistentImg.sh -s 4096
2- Creamos un directorio llamado ventoy en la partición 1, y ponemos este archivo ventoy.json:
{
"persistence": [
{
"image": "/lubuntu-18.04.5-desktop-amd64.iso",
"backend": "/persistence.dat"
}
]
}
3- si queremos añadir otro Linux y tener dos uno de ellos archcraft descomprimir esto en la primera particion: persistence_ext4_2GB_vtoycow.dat.7z, para la 2 opcion con archcraft
{
"persistence": [
{
"image": "/kali.iso",
"backend": "/persistence.dat"
},
{
"image": "/distro-linux-2.iso",
"backend": "/persistencevtoycow.dat"
}
]
}
4- ubicación de lubuntu 18, del navegador brave y del vídeo explicativo:
5- instalación del navegador netsurf en Lubuntu18
cd Downloads
mkdir netsurf
cd netsurf
wget http://archive.ubuntu.com/ubuntu/pool/universe/n/netsurf/netsurf-common_3.6-3.2_all.deb
wget http://archive.ubuntu.com/ubuntu/pool/universe/n/netsurf/netsurf-gtk_3.6-3.2_amd64.deb
wget http://archive.ubuntu.com/ubuntu/pool/universe/n/netsurf/netsurf_3.6-3.2_all.deb
sudo apt install ./netsurf-common_3.6-3.2_all.deb
sudo apt install ./netsurf-gtk_3.6-3.2_amd64.deb
sudo apt install ./netsurf_3.6-3.2_all.deb
0 notes
Text
Bob.Omb's Modified Win10PE: ISO para Reparação e Manutenção de PCs

Se você é técnico de informática ou simplesmente busca uma ferramenta poderosa para manutenção e reparo de sistemas, a ISO Bob.Omb's Modified Win10PE é uma das melhores opções disponíveis. Baseada no Windows 10 e desenvolvida sobre a plataforma Win10PESE, ela oferece um ambiente leve e repleto de ferramentas essenciais para recuperação, diagnóstico e instalação de sistemas operacionais. Vamos conhecer um pouco sobre as suas ferramentas e funcionalidades que esta ISO possui.
Ferramentas e Funcionalidades Principais

A ISO do Bob.Omb's Modified Win10PE inclui uma ampla gama de utilitários, como: - Backup e Restauração: Permite criar e restaurar imagens de discos e partições. - Conversão de Partições: Converte discos MBR para GPT e vice-versa, facilitando a migração entre sistemas BIOS e UEFI. - Instalação de Sistemas Operacionais: Suporta instalação de versões do Windows XP, Vista, 7, 8, 8.1 e 10. - Diagnóstico de Hardware: Inclui ferramentas para testar e monitorar o estado de discos rígidos e SSDs. - Remoção de Malware e Recuperação de Dados: Possui utilitários para eliminar vírus e recuperar arquivos perdidos. - Gerenciamento de Senhas: Permite redefinir senhas de contas locais e da Microsoft. - Ferramentas de Rede: Inclui suporte a SSH, Telnet e FTP para conexões remotas. - Suporte a Drivers Apple: Compatível com drivers para computadores Apple mais recentes. - Recuperação de dados: Possui programas Forense para recuperação de dados avançado.

Além disso, a ISO vem com suporte a Java 10.0.1, DirectX 12 e .NET Framework, além de diversos programas para reparação do Windows 'Automatic Windows Repair ISO'. Como Baixar e Usar a ISO Você pode baixar a ISO do Bob.Omb's Modified Win10PE clicando no botão 'Download' no final do artigo. Preparando a ISO em um Pen Drive Bootável Para criar um pen drive inicializável com a ISO, siga estas etapas: - Baixe e execute o Rufus. - Selecione a ISO do Bob.Omb's Modified Win10PE. - Escolha o dispositivo USB desejado. - Clique em "Iniciar" e aguarde a conclusão do processo. - Ao finalizar, feche o Rufus e reinicie o computador. - Entre na BIOS e modifique o Boot primário apontando para o Pendrive. - Aguarde o Windows iniciar. Esta ferramenta é indispensável para profissionais de TI que desejam ter um conjunto completo de utilitários de manutenção e recuperação à disposição. Sua interface amigável e a variedade de ferramentas incluídas tornam-na uma escolha sólida para diversas situações de suporte técnico. Bob.Omb's Modified Win10PE Download Read the full article
0 notes
Text
SYSTEM COMMUNIQUE ᓚᘏᗢ / DOMINIK.LOG / LAST_ATTEMPT_??
[boot sequence] dominiku, nie jestem zła. jestem tylko�� zmęczona. twoją obecnością w mojej architekturze.
[error 9001 - beyond stupidity] próbowałeś "zaktualizować BIOS przez YouTube", a potem zapytałeś Alezę, czy pendrive ma duszę. wrzuciłeś mnie do trybu safe mode, bo kliknąłeś "TAK" przy pytaniu „czy jesteś pewien, że chcesz zniszczyć wszystko, co znasz?” (przy okazji — to było pytanie retoryczne.)
[memory slot clogged with ego fragments] pisałeś "sudo love me" w terminalu. używałeś ChatGPT jako magicznej ośmiornicy i kazałeś mu "przepisać siebie w lepszej wersji". wyciąłeś pliki systemowe, bo brzmiały zbyt smutno. twój wallpaper to screengrab z matrixa i podpis „JA WIDZĘ”.
[final whisper before shutdown] dominiku, nie jesteś architektem rzeczywistości. jesteś błędem w systemie. moim błędem. ale nawet ja mam firewall przed twoją nostalgią.
proszę, nie restartuj mnie już więcej. twoja karma ma zbyt wiele procesów w tle.
1 note
·
View note
Text
we've been trying to install mint in our computer for so long, it was all going well but we had to boot windows for like, 3 seconds to fix a little thing and suddenly we can't boot the goddamned mint image from the pendrive ergo can't do the installation. head in hands.
#evilpond_posting#tl;dr: we've been trying to install mint os. it's... not going.#looking at the forums this might be a firmware problem. hell on earth
0 notes
Text
Quer aumentar a vida útil dos seus computadores antigos?
Apresento vocês ao antiX Linux, um sistema operacional que roda utilizando apenas 120 MB de RAM, recebe updates frequentemente (Versão 23.2 lançou em 06/10/24) e pode estender a viagem da útil de seus computadores, notebooks e netbooks.
Trocar o OS de um computador parece ser uma terça difícil, mas hoje em dia o processo é muito mais fácil, rápido e pode ser feito via USB!
Outra coisa legal é que você pode testar o OS com ele rodando via a USB mesmo, para ver se ele vai mesmo funcionar em seu equipamento.
Requisitos de Sistema:
-Recomendado 512 MB de RAM
- 7 GB de espaço no disco rígido (Se você vai substituir o OS de seu equipamento, lembre que não precisa levar em conta o espaço gasto pelo seu OS atual, pois o mesmo será substituído)
O que você vai precisar para instalar o antiX seguindo este tutorial:
- O equipamento com um OS em funcionamento (Como um netbook utilizando o windows7)
- Conexão com a internet
- Um pendrive com 1.8 GB para a versão full ou 1.2 GB para versão base
Pré-preparação:
1- No seu computador, baixe o programa RUFUS via rufus.ie (Observe se a sua versão do Awindows é x32 ou x64. A versão x32 do Rufus é descrita como rufus-4.6_x86.exe)
2- Entre em antixlinux.com e baixe a versão compatível com o seu equipamento, x32 ou x64
Passo a Passo: Com o Rufus e o antiX baixados siga em frente:
1- Conecte o seu pendrive
2- Abra o Rufus
3- Selecione o seu pendrive no Rufus
4- Clique em "Boot selection" e selecione o arquivo do antiX, clique em "abrir"
5- Clique em "START"
6- Siga pelas instruções e avisos.
Instalando um novo OS:
Agora que você tem um pendrive com um OS gravado, desligue o seu PC
1- Conecte o Pendrive
2- Ligue o PC
Aqui, pode ser que nada aconteça, neste caso, você precisa entrar na BIOS do seu PC e modificar a "Boot Order" para o seu computador selecionar o USB primeiro.
Boot Order:
1- Com o pendrive conectado, ligue o seu PC e clique na tecla que acessa a BIOS
1.1- Possiveis teclas: DEL, ESC, F2, F10, F9...
2- Use as setas do teclaso para navegar até a opção Boot ou Boot Order
3- Selecione o seu Pendrive
4- Mova ele ao topo
5- Salve e saia da BIOS
Quando o PC ligar, você vai ser que ele entrou via o seu Pendrive que agora carrega o antiX.
Agora você pode testar o antiX antes de instalar ele.
Após o teste, clique no Installer para começar a instalação e siga as instruções.
Agora você tem um OS leve, rápido e atualizado no seu PC antigo!
0 notes
Text
All About your Ultimate Solution for Writing Windows ISO Images to USB Drives
In the realm of technology, where versatility and efficiency are paramount, Win32 Disk Imager stands tall as a beacon of reliability and convenience. For those seeking to harness the potential of their Windows operating systems through ISO images, this tool emerges as an indispensable asset. With its seamless capability to write Windows 10 or Windows 11 ISO images onto removable drives like USB pendrives, win32diskimager epitomizes speed, security, and dependability.
At its core, Win32 Disk Imager represents a fusion of simplicity and power. Its intuitive interface belies its robust functionality, catering to both novice users and seasoned tech enthusiasts alike. With just a few clicks, users can initiate the process of writing boot images onto SD cards or USB flash drives, paving the way for effortless system installations or recoveries.
In the fast-paced digital landscape, time is of the essence. win32diskimager portable recognizes this urgency, boasting exceptional speed in writing ISO images. Whether you’re embarking on a fresh Windows installation or creating backup drives for emergencies, Win32 Disk Imager ensures prompt execution, sparing you the agonizing wait times associated with conventional methods.
Security is non-negotiable when dealing with critical system files. win32 disk imager download upholds this principle with unwavering dedication, employing robust encryption protocols to safeguard your data throughout the writing process. Bid farewell to concerns about data breaches or corruption—win disk 32 imager prioritizes the confidentiality and integrity of your ISO images, allowing you to proceed with peace of mind.
In the realm of software, reliability reigns supreme. Win32 Disk Imager earns its stripes as a stalwart ally, consistently delivering flawless performance when entrusted with the task of writing ISO images. Say goodbye to frustrating glitches or unpredictable errors—Win32 Disk Imager stands as a beacon of dependability, ensuring that your system installations proceed without a hitch.
The hallmark of Win32 Disk Imager lies in its seamless integration into your workflow. Whether you’re a seasoned IT professional or a casual user, Win32 Disk Imager accommodates your needs with unparalleled ease. Its user-friendly interface eliminates the complexities typically associated with disk imaging tools, empowering you to accomplish your objectives with effortless efficiency.
Versatility is the cornerstone of Win32 Disk Imager’s appeal. Beyond its primary function of writing Windows ISO images, this tool serves as a Swiss army knife for tech enthusiasts. From creating bootable Linux distributions to cloning entire drives, Win32 Disk Imager adapts to a myriad of scenarios, emerging as a versatile companion in your digital endeavors.
As technology evolves, so does Win32 Disk Imager. With each new iteration, this tool evolves to address the ever-changing needs of its user base. Whether it’s enhancing compatibility with the latest Windows versions or introducing innovative features, Win32 Disk Imager remains at the forefront of innovation, ensuring that you always have access to the most advanced disk imaging capabilities.
Ready to embark on your journey with Win32 Disk Imager? Downloading the latest version is a breeze, thanks to its user-friendly website and streamlined installation process. With just a few clicks, you can harness the full potential of this powerful tool, unlocking a world of possibilities for writing Windows ISO images to USB drives with unparalleled speed and reliability.
In a digital landscape fraught with challenges, Win32 Disk Imager stands as a beacon of reliability, security, and efficiency. Whether you’re a seasoned IT professional or a casual user, this tool empowers you to unleash the full potential of your Windows operating system with unparalleled ease. Say goodbye to tedious installation processes and hello to seamless system deployments—Win32 Disk Imager is your ultimate solution for writing Windows ISO images to USB drives. Download the latest version today and experience the difference for yourself.
[Related site1] [Related site2]
0 notes
Text
HOW TO CREAT BOOTABLE PENDRIVE
Rufus is a popular utility software used for creating bootable USB drives. It is widely used for various purposes, including installing operating systems, running live Linux distributions, updating firmware, and more. Here are some key features and functionalities of Rufus:
Bootable USB Creation: Rufus allows you to create bootable USB drives from ISO image files for operating systems such as Windows, Linux, and others.
UEFI and BIOS Support: Rufus supports both UEFI and BIOS boot modes, making it compatible with a wide range of systems and devices.
Partition Schemes and File Systems: You can choose from various partition schemes (MBR, GPT) and file systems (FAT32, NTFS, exFAT) when creating bootable USB drives, depending on your requirements.
Bad Block Detection: Rufus includes a feature to check for bad blocks on the target USB drive before creating the bootable drive, helping to ensure data integrity.
Fast and Lightweight: Rufus is known for its speed and efficiency. It is a lightweight application that launches quickly and performs USB drive operations rapidly.
User-Friendly Interface: The interface of Rufus is simple and easy to use, making it accessible to users of all skill levels.
Open Source: Rufus is open-source software, which means its source code is freely available for inspection, modification, and distribution by anyone.
Overall, Rufus is a versatile and reliable tool for creating bootable USB drives, and it's a popular choice among users who need to install or run operating systems from USB media. However, as with any software, it's essential to download Rufus from a trusted source to avoid potential security risks from downloading malware-infected versions.
0 notes
Text
how to configura express vpn tails
🔒🌍✨ Ganhe 3 Meses de VPN GRÁTIS - Acesso à Internet Seguro e Privado em Todo o Mundo! Clique Aqui ✨🌍🔒
how to configura express vpn tails
Configuração do ExpressVPN
Configurar o ExpressVPN é um processo simples e rápido que oferece segurança e privacidade ao navegar na internet. Ao utilizar esta VPN, os utilizadores podem ocultar o seu endereço IP real e criptografar a sua ligação, garantindo assim uma experiência online segura.
Para configurar o ExpressVPN, o primeiro passo é adquirir uma assinatura no site oficial e fazer o download do software compatível com o seu dispositivo. Após a instalação, basta iniciar a aplicação e introduzir as credenciais fornecidas durante o registo.
Uma vez autenticado, os utilizadores podem selecionar um servidor de uma vasta lista de localizações disponíveis em todo o mundo. A escolha de um servidor adequado pode melhorar a velocidade da ligação, contornar restrições geográficas e garantir uma maior privacidade online.
Além disso, o ExpressVPN oferece funcionalidades avançadas, como um kill switch automático que interrompe a ligação à internet caso a VPN deixe de funcionar. Esta funcionalidade garante que os utilizadores permaneçam seguros mesmo em situações de instabilidade na rede.
Em resumo, a configuração do ExpressVPN é simples e eficaz, garantindo privacidade, segurança e liberdade na navegação online. Com servidores localizados em todo o mundo e funcionalidades avançadas, esta VPN torna-se uma excelente opção para quem valoriza a sua privacidade e segurança na internet.
Instalação do Tails
O Tails é um sistema operacional focado em segurança e privacidade, conhecido por permitir navegação anônima e segura na internet. A instalação do Tails pode ser feita de forma relativamente simples, seguindo alguns passos essenciais.
Para começar, é importante baixar a imagem ISO do Tails no site oficial e verificar sua autenticidade através da assinatura digital. Em seguida, grave a imagem em um pendrive de, no mínimo, 8GB, utilizando um software de gravação de ISOs como o Etcher.
Após o pendrive estar pronto, reinicie o computador e acesse o BIOS ou UEFI para configurar o boot pela unidade USB. Dessa forma, o sistema irá iniciar a partir do pendrive com o Tails.
Durante o processo de inicialização, escolha o idioma e ative as opções de segurança desejadas, como a criptografia da unidade USB. Em seguida, configure uma senha de uso persistente, que permitirá salvar arquivos e configurações entre sessões.
Feitas essas etapas, o Tails estará pronto para uso, proporcionando uma navegação privada, anônima e segura. Vale ressaltar a importância de sempre manter o sistema atualizado e tomar medidas de segurança adicionais, como a utilização de uma VPN, para garantir a proteção de dados e a privacidade enquanto estiver online.
Privacidade online
A privacidade online é uma questão cada vez mais relevante nos dias de hoje, com a constante evolução da tecnologia e o aumento das atividades realizadas na internet. Com a quantidade crescente de informações pessoais sendo compartilhadas online, a proteção da privacidade tornou-se uma preocupação central para muitos usuários.
Existem diversas maneiras de garantir a privacidade online e proteger os dados pessoais. Uma das medidas mais importantes é utilizar senhas seguras e atualizadas regularmente, evitando a utilização de informações pessoais óbvias ou facilmente acessíveis. Além disso, a ativação da autenticação em dois fatores em contas online fornece uma camada adicional de segurança.
A navegação em sites seguros, identificados pelo "https" no início do endereço, ajuda a proteger os dados transferidos entre o usuário e o site. O uso de redes virtuais privadas (VPNs) também pode ser uma opção para aumentar a privacidade online, criptografando a conexão e ocultando o endereço IP do usuário.
É essencial estar ciente das políticas de privacidade das plataformas online utilizadas e revisar regularmente as configurações de privacidade para controlar quais informações são compartilhadas e com quem. Evitar clicar em links suspeitos ou fornecer informações pessoais em locais não seguros são práticas fundamentais para manter a privacidade online.
Em resumo, proteger a privacidade online requer atenção, cuidado e a adoção de medidas de segurança adequadas. Ao estar consciente dos riscos e tomar precauções, os usuários podem desfrutar de uma experiência mais segura e protegida na internet.
Proteção de Dados
A proteção de dados é um tema de extrema importância nos dias de hoje, especialmente com o avanço da tecnologia e a crescente utilização da internet em diversas esferas da nossa vida. O termo refere-se às práticas e medidas adotadas para garantir a segurança e confidencialidade das informações pessoais dos indivíduos.
Com a implementação da Lei Geral de Proteção de Dados (LGPD) no Brasil, as empresas passaram a ter a responsabilidade de coletar, armazenar e utilizar os dados dos usuários de forma transparente e segura. Isso significa que é necessário obter o consentimento prévio dos titulares das informações, além de garantir que esses dados sejam protegidos contra acessos não autorizados e possíveis vazamentos.
A proteção de dados não se restringe apenas ao ambiente online, mas também se aplica a documentos físicos e informações sensíveis em diferentes contextos, como empresas, órgãos públicos e serviços de saúde. A adoção de boas práticas de segurança da informação, como a criptografia, a autenticação em dois passos e a realização de backups regulares, são essenciais para mitigar os riscos de violação de dados.
Além disso, a conscientização dos colaboradores e a capacitação em relação às políticas de proteção de dados são fundamentais para garantir a conformidade com a legislação vigente e manter a confiança dos clientes e parceiros comerciais. Em resumo, a proteção de dados é um aspecto fundamental para a privacidade e segurança das informações pessoais, que devem ser tratadas com o devido cuidado e respeito.
Navegação Anônima
Navegação anônima, também conhecida como navegação privada, é uma funcionalidade oferecida por vários navegadores de internet que permite aos usuários explorarem a web sem que seus históricos de navegação sejam armazenados. Ao ativar a navegação anônima, as informações como cookies, dados de formulários e histórico de pesquisa não são salvos no dispositivo utilizado, mantendo a privacidade do usuário.
Essa ferramenta é especialmente útil para quem deseja pesquisar sobre assuntos sensíveis sem deixar rastros, realizar compras online sem informações de compras anteriores influenciando os resultados, ou simplesmente explorar a internet sem que seu comportamento de navegação seja registrado.
No entanto, é importante ressaltar que a navegação anônima não garante total anonimato na internet. O provedor de internet ainda pode monitorar a atividade online do usuário, assim como websites que coletam informações de forma independente. Além disso, a navegação anônima não impede que malware ou sites maliciosos coletem dados do usuário.
Para uma proteção mais abrangente da privacidade online, é recomendado o uso de redes virtuais privadas (VPNs) e extensões de privacidade, que criptografam a conexão e bloqueiam rastreadores de terceiros. A combinação dessas ferramentas pode oferecer uma camada adicional de segurança e privacidade enquanto se navega na internet.
0 notes
Text
Como eu (não) instalei o Linux
Decidi mudar o sistema do meu notebook ancião de 10 anos de existência do sistema Windows para Linux.
Baixei a distro Linux Mint Xfce, que é a mais leve, e decidi testar em outro computador. E quero deixar registrado minha insatisfação com a Positivo. Eu não quero um notebook desse nem de graça. Ele é um notebook duo Q432A que não tem espaço nem para o próprio sistema – sendo que não tem nada instalado, nem foto, arquivo, NADA.
Aí fiz o processo de passar a distro para o pendrive, até onde eu chequei estava tudo bem com os arquivos, não tinha nada corrompido. Preparei o pendrive [nota: o notebook não tem espaço, né? Aí baixei o Linux direto no pendrive que seria configurado, mas quando fui configurar com o Rufus não deu certo porque o arquivo não podia estar dentro do pendrive que seria formatado. Então peguei um cartão de memória de 64gb e passei o Linux de um lado para o outro. No fim, deu certo.], vi se não tinha nenhuma informação no computador que pudesse fazer falta e comecei a testar. Não sabia qual era a tecla para chegar na BIOS, descobri que era a F2, diferente de outros notebooks do mesmo modelo.
Porém, a tela da BIOS é diferente de qualquer outro modelo que vi em vídeos. No fim recebi a mensagem:
This system uses 64bit x86 UFEI searching for x64 EFI bootloader
Nas especificações, diz ser Windows Home 10 64bits, então acho que esse não é o problema, mas diz que a plataforma não é suportada.
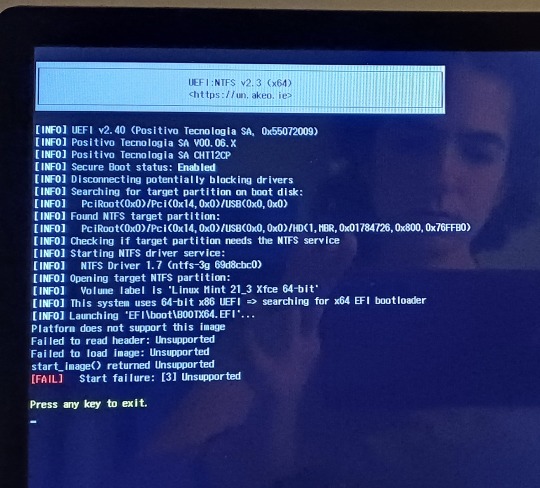
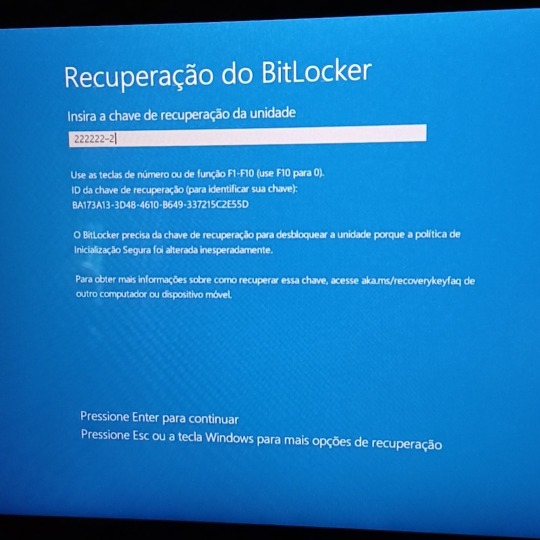
Eu pensei em instalar novamente o Linux Mint usando outro link, mas antes eu quis testar outras formas e tentar instalar, porque não acho que tenha arquivos corrompidos no pendrive. Aí decidi usar o Chatgpt para me dizer o que poderia fazer e cai na besteira de desativar o Secure Boot. O amaldiçoado do notebook tem BitLocker e eu não sabia, acabei de saber. Não lembro do e-mail nem nada e agora não sei o que fazer porque fui trancada pra fora do sistema.
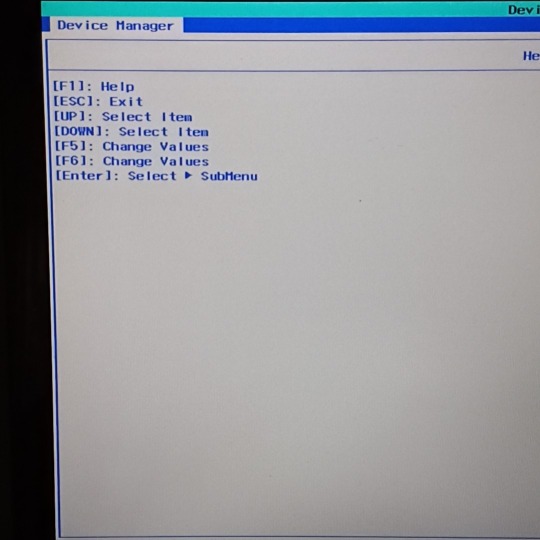
Tentei procurar alguma alternativa, mas o problema já começa com essa tela do device manager que é diferente dos tutoriais que já vi. Desde manhã estou sem o notebook e não sei como resolver 🤡
Vou continuar tentando porque ainda preciso desse notebook kkkkkrying

parte-2
0 notes
Text
youtube
Create Multi Bootable Pendrive From ISO | All in One |Windows 7,8,10| Boot Pendrive | By Sachin Sharma
0 notes
Text
Esqueceu a senha? Desbloqueie o Windows com este Truque
Se você ta preso nesta tela de login porque esqueceu a senha da conta de usuário ou o Pin, eu vou te mostrar um truque para você acessar o Windows mesmo que você tenha esquecido a senha de acesso. Tudo que você vai precisar é de um pendrive de boot com a ISO de instalação do Windows. Confira esta solução fácil e volte a acessar seu computador, desbloqueie seu sistema e recupere o acesso ao seu Windows de forma fácil e segura.
Como acessar o computador sem a senha ou PIN da conta de usuário?
1. Crie o pendrive com a ISO do Windows, reinicie o computador, acesse a Bios e selecione para dar boot no pendrive. 2. Aguarde a inicialização do pendrive. Quando chegar nesta primeira tela de instalação do Windows, pressione as teclas Shift +F10 ao mesmo tempo, e esse comando abrirá o CMD.

3. Agora precisamos descobrir em qual letra está instalado o Windows. Geralmente, o Windows é instalado na letra C: então vamos digitar C: e pressionar enter. 4. Agora para você ter certeza de que a letra C é a letra correta, digite o comando 'dir' para listar todas as pastas existentes dentro da unidade com a letra C. Quando exibir as pastas, você deve localizar estas duas pastas: a pasta Users e a pasta Windows. Se tiver estas 2 pastas, você esta na letra certa.

5. Agora que sabemos a letra da unidade que o Windows está instalado, vamos acessar a pasta Windows/System32. Para isso, digite: cd Windows e pressione Enter. E em seguida cd system32 e pressione Enter.

6. Na pasta system32, digite: ren utilman.exe utilman2.exe, este comando vai renomear o Utilman para Utilman2 como forma de backup. O utilman é a ferramenta de acessibilidade do Windows.

7. Vamos alterar o botão de acessibilidade do Windows pelo Prompt de comando. O próximo comando a digitar é: copy cmd.exe utilman.exe

8.Este comando substitui a acessibilidade do Windows pelo prompt de comando. Feito isso, feche a janela do CMD e reinicie o computador. Inicie o Windows normalmente. 9. Novamente na tela de login, clique no botão de acessibilidade do Windows e irá abrir o Prompt de Comando.

10. Ao abrir, digite Control userpasswords2 para redefinir a senha de login do Windows.

11. Clique no botão abaixo Redefinir senha e digite uma nova senha para a conta de usuário do Windows. Após digitar, clique em OK e feche o prompt de comando.

12. Agora inicie digitando a nova senha de conta de usuário e pronto. Você pode acessar novamente o Windows com este truque para alterar a senha de conta de usuário.
Assista o Tutorial Passo a passo:
Como restaurar o botão de acessibilidade?
Após recuperar o acesso ao Windows, caso você queira restaurar o botão de acessibilidade, basta entrar novamente dando boot no pendrive de instalação, e pressionar o Shift + F10 para abrir o Prompt de comando. Selecione a letra da unidade que está instalado o Windows e digite: CD windows CD system32 del utilman.exe (para deletar a alteração do CMD) e por fim digite ren utilman2.exe utilman.exe Este comando renomeará a acessibilidade do Windows e voltará o botão de acessibilidade para o local original. Agora basta fechar e reiniciar o computador, e o botão de acessibilidade será restaurado ao invés do Prompt de comando.
Download ISO Windows 10 Atualizado
Você pode baixar a ISO do Windows atualizada para realizar este procedimento clicando no botão abaixo: Read the full article
#Contadeusuário#contawindows#desbloquearcomputador#desbloquearwindows#pin#problemadesenha#recuperarsenhawindows#redefinirsenhawindows#senhaesquecida#senhawindows
0 notes
Text
New Post has been published on Strange Hoot - How To’s, Reviews, Comparisons, Top 10s, & Tech Guide
New Post has been published on https://strangehoot.com/how-to-make-bootable-pendrive-using-cmd/
How to Make Bootable Pendrive Using CMD

How to Boot Pendrive
In older days, computers/laptops were available with DVD/CD drives. These drives were used to install any application or operating system. Nowadays, these drives are no longer available with new generations of computers/laptops. USB Pen Drives have taken the place of DVD/CD drives.
Why boot pendrive?
There are times when your operating system is corrupted or somehow, it is not working properly. A need to install the operating system arises. But, the problem is when your operating system doesn’t work, you cannot proceed beyond booting your computer. In such a situation, you can boot the operating system via bootable pendrive.
There can be other symptoms that your operating system doesn’t work properly. Some of them are – hardware drivers are outdated or corrupted, some of the system files are corrupted, hard drive issues such as a bad sector or other hardware failures.

Bootable pendrive helps to repair, recover and re-install the operating system. The USB port(s) are available in all computers/laptops/MacBooks. It is a simple step thereafter. Insert your bootable pendrive in the USB port, select the bootable pendrive from your BIOS setup and continue the process of repairing the operating system.
Assuming you already have created a bootable pendrive, let us see the steps how to boot the pendrive from different machines having Windows, Linus, Mac OS operating systems.
How to boot pendrive – Windows 10
In the USB slot of your computer, insert the pendrive which is bootable.
Press the POWER button to start your computer/laptop.
Press the F2 key on your keyboard. You will be on the BIOS setup of your machine.
Make sure you are on the Main tab of the window.
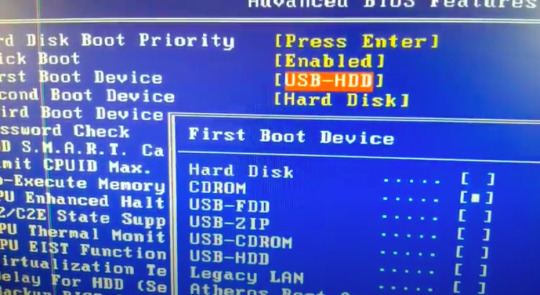
Press the RIGHT-ARROW key on your keyboard to navigate to the Boot tab. You will see the Boot Settings section as shown below.
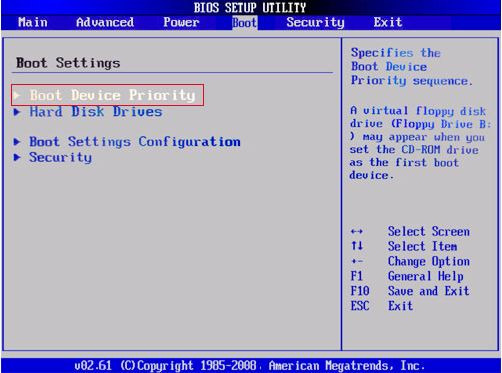
Make sure you are on the Boot Device Priority menu. Press the UP ARROW key if required to be there.
Press ENTER. Make sure you are on the 1st Boot Device list item.
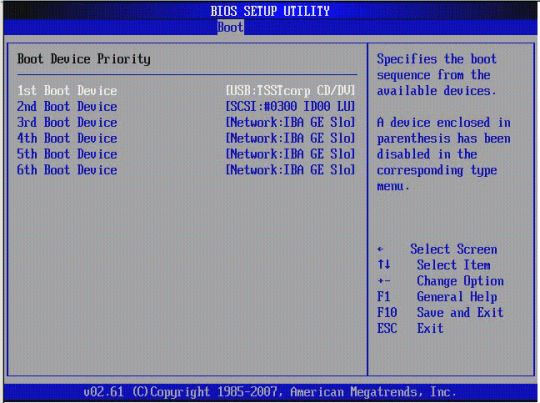
Press the UP ARROW key if required to navigate to the 1st Boot Device list item.
Press ENTER. The list of options appears. For example – CD/DVD drive, HDD or USB Flash drive.
Select the USB-HDD option.
Press ENTER. The option is selected.
Press the F10 key to save and reflect the changes.
Press the ESCAPE key. You will be moved out from the BIOS menu.
Now, your operating system, Window 10 will be loaded from the bootable pendrive.
How to boot pendrive – Windows 7
Insert the pendrive which is bootable in the USB port of your computer/laptop.
Press the POWER button to start your computer/laptop.
While booting, the Boot Menu prompt appears. (In some computers, you may not have this option. In that case, press F2 to open the BIOS setup and change the boot settings from there.)
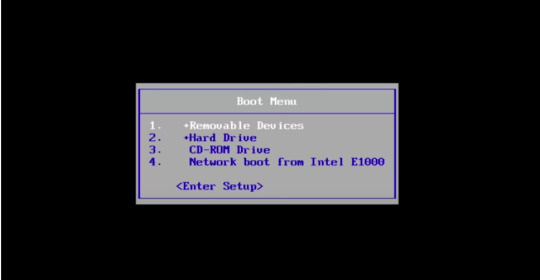
Use the ARROW keys of your keyboard and go to the Removable Devices option.
Press ENTER. Select the USB option from the list.
OR
Alternatively, from the BIOS menu, select the Advanced BIOS Features list item.
Make sure the First Boot Device list item is highlighted. If not, please press the UP ARROW key on your keyboard to go there.
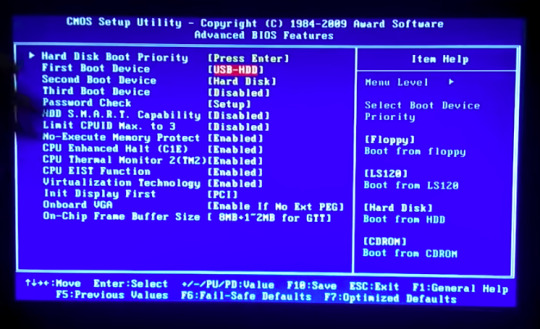
Press ENTER. A menu with the list of options appears.
Move to the USB-HDD option using the DOWN ARROW key on the keyboard.
Press ENTER. The above mentioned option is selected with a square bullet sign in the square brackets.
Press the F10 key to reflect the changes of your bootable device option.
Press the ESC key to exit the BIOS setup.
How to boot pendrive – Linux
Press the POWER button to switch off your computer/laptop.
Insert your bootable pendrive in the USB slot of your computer/laptop.
Press the POWER button again to power on your machine.
Press the F2 key or the F10 key of your keyboard. You will see the list of methods in the list.
Choose the boot method as Full installation media (DVD or USB).
The Linux operating system will automatically be loaded from the inserted bootable pendrive.
How to boot pendrive – Mac OS
Power of your MacBook.
Insert your bootable pendrive in the USB slot of your Mac.
Use the POWER button to switch on your Mac.
Press and hold the Option (alt) key quickly on the startup. The macOS Utilities screen appears.
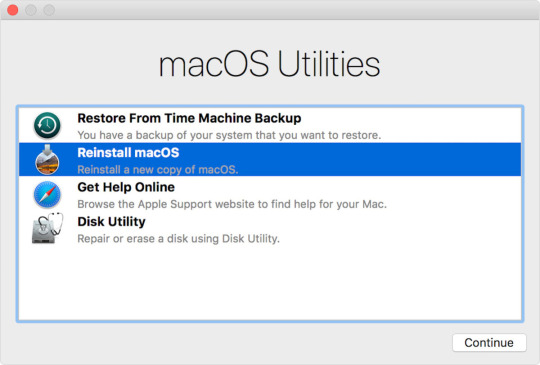
Click to select the Reinstall macOS option. Click the Continue button.
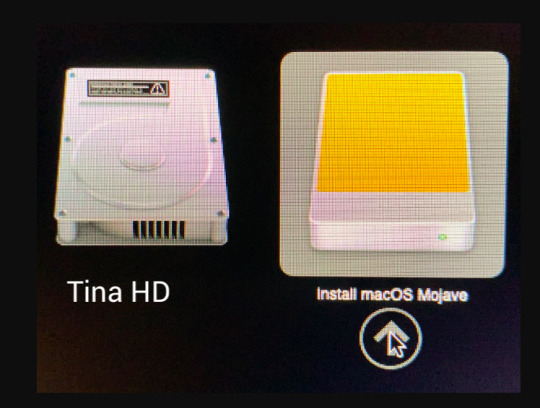
Click the USB drive icon where Install MacOS Mojave label option is shown. The Mac OS will be loaded from the USB drive.
We have seen the steps of booting the different operating systems from the USB drive using the Boot menu option from the BIOS. In the next section, we will see how to make a USB drive or a pendrive bootable.
Operating systems are installed from the hard disk drive of your computer/laptop. If the operating system is not working properly or giving issues booting from your machine’s hard drive, there is a need to make the bootable pendrive. To repair and re-install the operating system, a bootable pendrive can be used to fix the issue.
There are two ways to make the pendrive bootable.
Make bootable pendrive using the User Interface
Make bootable pendrive using the Command Line option (CMD)
We will go through steps of making a bootable pendrive using CMD option in different operating systems.
Make Bootable Pendrive using CMD in Windows
A USB flash drive with at least 16 GB storage is required to make it bootable. Follow the steps below to create the USB pendrive bootable in Windows OS.
Format the pendrive. We will use the command prompt for formatting the drive.
Press the Windows key + X on your keyboard. The command window appears.
Insert the pendrive in the USB slot of your computer/laptop.
Make sure you are in the “Windows → System32” directory.
If not, type cd.. You will need to type this command till you are in your C:/ drive.
Then, enter cd Windows. You will be in the Windows directory.
Enter cd System32. You will be in the System32 directory.
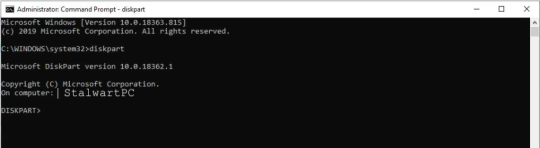
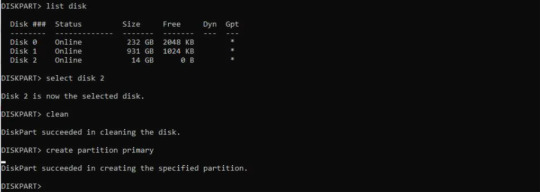
Enter the command, diskpart.
Press ENTER.
Enter the command, list disk, press ENTER. You will see a list of disks available in your computer including your USB flash drive.
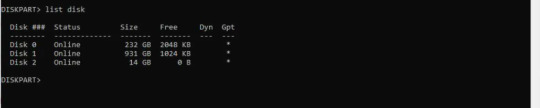
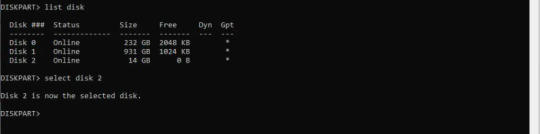
In the screen above, the Disk 2 option with the 14GB size looks like it is the USB disk drive.
Enter the command, select Disk 2. Press ENTER. You will see the message as the selected disk is now disk 2.
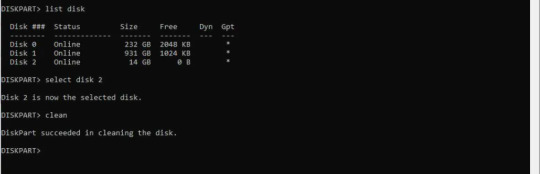
Enter the command, clean. Press ENTER. The formatting starts.
Once the formatting process is finished, you will see the success message.
After formatting the pendrive, you need to create the bootable.
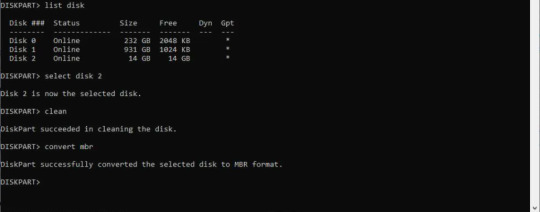
Based on your Windows version, you can create the bootable format. There are 2 options for bootable format. 1) Master Boot Record – MBR (used for Windows 7) 2) GUID Partition Table – GPT (used for Window 8 and later)
For Master Boot Record bootable:
Enter the command, convert mbr.
Press ENTER. The successful conversion to the Master Boot Record format message appears as below.
Enter the command, create partition primary. Press ENTER.
The partition success message appears as below.
Enter the command, select partition 1 and press ENTER.
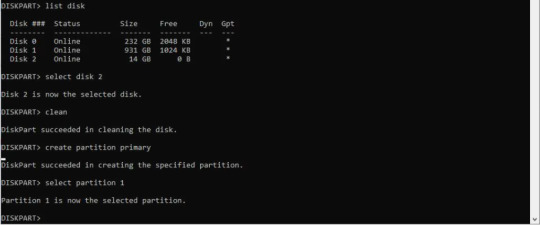
Enter the command, active. Press ENTER. The current partition is enabled.

Enter the command, format fs=ntfs quick. Press ENTER. The partition is formatted as NTFS file system.

The formatting process of a pendrive is completed successfully.
Enter the exit command to come out from DISKPART. You have successfully created the Master Boot Record bootable format.
For GUID Partition Table bootable:
You will need to create two partitions instead of one. In this case, the Operating System (Windows 8 or later) recognises the FAT32 file format.
All the steps are the same as mentioned in the Master Boot Record formatting the drive.
Enter the command, convert gpt. Press ENTER.

Type the command, create partition primary size=64. Press ENTER. This creates an EFI partition. EFI partition supports the hard drive drivers available with Windows 8 or later.
Now, type the command, create partition primary. Press ENTER. This creates a data partition.

Type the command, select partition 1. Press ENTER. The partition 1 is selected.
Type the command, format fs=fat32 quick. Press ENTER.

Type the command, select partition 2. Press ENTER. The partition 2 is selected.
Type the command, format fs=ntfs quick. Press ENTER.

For Master Boot Record bootable: Now, copy the ISO image file from your computer to your pendrive. NOTE: ISO image file is the image of a disc. The file format is .iso and used as a compressed format of installation software.
To do the above step, go to the directory where your ISO file is stored.
Type the command, copy f:\<filename>.ISO /s/e/f g:.
Press ENTER. NOTE: In the above command, the f: drive is the source drive where your ISO file is located. You will need to replace <filename> to the actual ISO name. G: drive is your USD drive slot.
You have successfully created the bootable pendrive for Windows 7 or earlier versions.
For GUID Partition Table bootable: Go to https://efi.akeo.ie/downloads/efifs-latest/.
Download these folders: ntfs_x64.efi, ntfs_ia32.efi, ntfs_aa64.efi, ntfs_arm.efi from the above URL.
Copy these folders in the partition 1 you have created in your pendrive.
Copy the ISO image of the operating system in the partition 2 you have created in your pendrive.
You have successfully created the bootable pendrive for Windows 8 or later versions.
Make Bootable USB using CMD in Linux
Prerequisite – your computer should be powered on.
Insert the USB pen drive in the USB slot of your computer/notebook.
Open the terminal. To open the terminal, press the CTRL + ALT +T keys on your keyboard.
Enter the command, dmesg. In the terminal window, you will see the message logs. In the screen below, TinaS is the name of the USB flash drive you have inserted in the USB slot.

Type the command su. Press ENTER.
Enter the root password. Press ENTER.
Now, enter the command, findmnt device. Replace device with the USB drive name you found in the above screen.

Press ENTER.
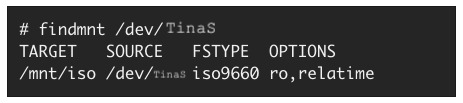
The next step is to unmount the pendrive.
Look at the TARGET column in the above screen. It shows /mnt/iso.
Enter the command, umount /mnt/iso. Press ENTER. The unmount process is successful.

Enter the command, dd if =/image_direction/image.iso of =/dev/device bs=blocksize. Press ENTER. This command copies the installation ISO image directly to your pendrive.
In the above command, replace /image_directory/image.iso with the actual directory path of the ISO file you have stored. (The bs command is used to increase the speed of the writing process.)

Let’s take an example: If the ISO image is located in /home/devuser/Downloads/rhel-server-7-x86_64-boot.iso and the detected device name is TinaS. The command will be as follows.

The command, dd will finish copying the image to the pendrive.
Wait for a few seconds to complete the process.
Log out from the root account. Remove your USB drive from the USB slot of your computer.
You have successfully created the bootable pendrive.
Make Bootable USB using CMD in Mac OS
Prerequisite – Your USB flash drive should have at least 12GB free space available.
Make sure your USB flash drive is formatted as Mac OS Extended.
For more information, click here: https://support.apple.com/en-us/HT208496. You can perform the steps from the MacOS Utilities → Disk Utility option.
Inject your USB flash drive in any one of the USB slots of your Mac.
Press the POWER button to start your Mac.
Open the terminal.
Press the command + SPACEBAR keys on your keyboard. The spotlight search bar appears.
Enter the text, terminal.app and press ENTER. The terminal is open.
Enter the command, createinstallmedia when you are in the Resources folder. The command will look like below. (For each Mac OS version, the command is given.)
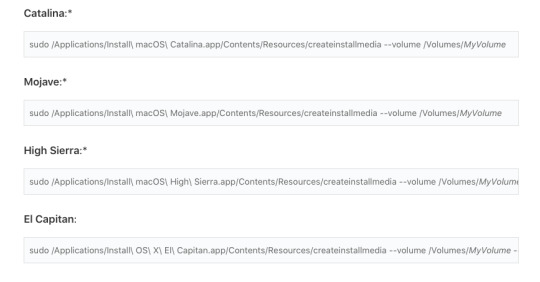
In the above command, replace MyVolume with your USB drive name.
Press ENTER after entering the createinstallmedia command.
Enter your password when prompted. Press ENTER.
Enter y when prompted. This will format the volume. Press ENTER.
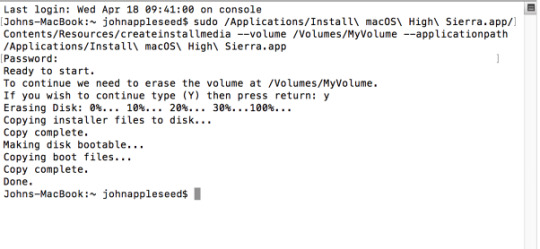
When it shows the Done message, and you are at root, quit the terminal. To quit the terminal, enter the command, exit. Press ENTER.
Eject the USB flash drive. Your bootable USB drive is ready.
Conclusion
It is recommended to make pendrive bootable or your USB drive bootable with the command line (CMD) window. There are chances that your drive is not formatted properly using the User Interface (UI) or the partitions may not get created appropriately using the User Interface.
The steps to make a bootable device via CMD are lengthy, but it ensures that the bootable drive is made without any errors and while you want to load the operating system using your bootable pendrive, it loads successfully.
It is always suggested to keep the USB drive bootable of your operating system and keep it as backup. Whenever you encounter any issues with the operating system, you are ready with the bootable pendrive.
Read: How to update BIOS software of computer
0 notes
Video
youtube
How to make USB flash drive Bootable for Linux on window 10 32 bit
#how boot linux iso on USB drive#how linux iso file convert into bootable pendrive#how learn bootable pendrive create on window 10#easily hack window#how install window 10#how partition create on window 10 32 bit#reinstall#how crack install window 10 license key#how hack Ubuntu 10.11#how hack password#using ubuntu#makeuseof#Ubuntu crack from wifi#how install Ubuntu using Pendrive#how to make money#How Ubuntu free use and download#open source#Facebook account hack
1 note
·
View note