#how linux iso file convert into bootable pendrive
Explore tagged Tumblr posts
Visit Tumblr Blog
Explore Tumblr blogs with no restrictions, modern design and the best experience.
Last Seen Tumblr Blogs


Fun Fact
China blocked Tumblr because of pornography and censorship problems in 2013.
Video
youtube
How to make USB flash drive Bootable for Linux on window 10 32 bit
#how boot linux iso on USB drive#how linux iso file convert into bootable pendrive#how learn bootable pendrive create on window 10#easily hack window#how install window 10#how partition create on window 10 32 bit#reinstall#how crack install window 10 license key#how hack Ubuntu 10.11#how hack password#using ubuntu#makeuseof#Ubuntu crack from wifi#how install Ubuntu using Pendrive#how to make money#How Ubuntu free use and download#open source#Facebook account hack
1 note
·
View note
Text
Download windows 10 iso to flash drive

How to Convert Windows 10 ISO to USB Drive (2 Ways)?.
How to Create Windows 10 Installation USB Flash drive/ ISO DVD.
How to create Windows bootable USB Flash Drive from ISO.
How to Download Windows 10 to USB (3 Ways) - MiniTool.
How to download Windows 11 onto a USB flash drive.
Download Windows 10 ISO - CCM.
How to download a Windows 10 ISO file without using the Media Creation.
BalenaEtcher - Flash OS images to SD cards & USB drives.
How to Install Microsoft Windows using a USB 2.0 Flash Drive.
Windows 7 64 Bit Uefi Iso Download - Telegraph.
Download Windows 10.
Iso Demand Download Windows 10 Features 1903 On Version.
Download Iso Win 9.
How to Convert Windows 10 ISO to USB Drive (2 Ways)?.
Search: Download Windows 10 Iso. Windows 10 May 2019 Update Downloading and installing the Windows 10 ISO file allows you to install the latest Microsoft OS Microsoft provides multiple ways to download and install the latest version of Windows Then follow the setup steps Technical information about "Windows 10, Version 1607 32-bit English ISO" available from MSDN Subscriber Downloads.
How to Create Windows 10 Installation USB Flash drive/ ISO DVD.
If you want to create an ISO file and then burn it to USB later, you can choose the ISO file option. Step 6: Select the USB flash drive connected to your PC and click Next. Then, wait until the Windows 10 is downloaded to the USB. After that, you can use the USB to install Windows 10 on another PC.
How to create Windows bootable USB Flash Drive from ISO.
If you want to install Windows 10 directly from the ISO file without using a DVD or flash drive, you can do so by mounting the ISO file. This will perform an upgrade of your current operating system to Windows 10. To mount the ISO file: Go to the location where the ISO file is saved, right-click the ISO file and select Properties. If you have a Windows 10 ISO file, you can use many ways to install the system via the ISO file. For example: Way 1: Install Windows 10 21H2 from USB. If you want to install Windows 10 21H2 on another device, you can use Rufus to burn the ISO file to a USB flash drive to create a Windows 10 installation USB drive and then install Windows 10. On the General tab, click Change… and select Windows Explorer for the program you would like to use to open ISO files and select Apply. Right-click the ISO file and select Mount. Double-click the ISO file to view the files within. Double-click to.
How to Download Windows 10 to USB (3 Ways) - MiniTool.
.
How to download Windows 11 onto a USB flash drive.
To Download Windows 10 Version 2004 RTM ISO Images, Sign in with your Microsoft Account connected to the Insider Program on the following page 1316 by Zosma Download and mount the Windows 10 version 1709 Language Pack ISO from VLSC and make a note of the drive letter Remember to check out Microsoft Power Toys for better productivity This ISO is.
Download Windows 10 ISO - CCM.
Create bootable USB drives the easy way. Rufus is a utility that helps format and create bootable USB flash drives, such as USB keys/pendrives, memory sticks, etc. It can be especially useful for cases where: you need to create USB installation media from bootable ISOs (Windows, Linux, UEFI, etc.) Despite its small size, Rufus provides. Select ISO Image Point to the Windows 10 ISO file Check off Create a bootable disk using Select GPT partitioning for EUFI firmware as the Partition scheme Choose FAT32 NOT NTFS as the File system Make sure your USB thumbdrive in the Device list box Click Start Close when complete Initiating the installation.
How to download a Windows 10 ISO file without using the Media Creation.
If you want to install Windows 10 directly from the ISO file without using a DVD or flash drive, you can do so by mounting the ISO file. This will perform an upgrade of your current operating system to Windows 10. To mount the ISO file: Go to the location where the ISO file is saved, right-click the ISO file and select Properties. Right-click anywhere on the Microsoft Windows 10 download page and select Inspect from the context menu. This will open the Developer Tools flyout console as shown in Figure B. The screen is. Go to the Windows 10 download page, download Windows 10 ISO file by selecting Download tool now, then run the tool as an administrator. In the tool, select Create installation media (USB flash drive, DVD, or ISO) for another PC and click Next.
BalenaEtcher - Flash OS images to SD cards & USB drives.
Using the official windows 11 Media Creation Tool you can create a bootable USB flash drive or download the latest windows 11 ISO image for a clean install. windows 11 and Windows 10 Tips and How to Guide.... On the next screen, you have to select the ISO file so that you will be able to download the Windows 11 ISO file click on next. To create the USB Flash drive, follow these steps: Mount the Windows ISO downloaded from Microsoft. To mount the ISO, double-click on the ISO in Finder. Drag all the files and folders from the mounted ISO to the USB flash drive. Drag the contents of the Windows Support Software to the USB flash drive. Step 1. Connect the USB flash drive to the computer, download, install and run Hasleo WinToUSB and then click the "Windows To Go USB". Step 2. Click "Select installation source", then click "Browse image file" and select the Windows 10 installation ISO file from the open dialog box as installation source, or choose a CD/DVD drive with a Windows.
How to Install Microsoft Windows using a USB 2.0 Flash Drive.
Now the downloading process will start, and it will take time according to your internet speed. 6. After the downloading is complete, you will get the ISO file of Windows 10, and now you need to burn that ISO file on the DVD; for that, first, download and install Windows USB/DVD Download tool is available for free of cost by Microsoft Corporation. Under the "Device" section, select the USB flash drive. Under the "Boot selection" section, click the Select button on the right side. Select the Windows 10 ISO file from the folder location.
Windows 7 64 Bit Uefi Iso Download - Telegraph.
The following article will show you how: How to download official Windows 10 ISO files. Best, Andre. twitter/adacosta. Here's a look at using the utility called Rufus to create a bootable USB flash drive for Windows 10 which... O.S. different to Windows then it is easy to download the ISO file from Microsoft. If you download an ISO file for your version of Windows, you can skip down to the next section. Install a free burning program. There are a number of free burning utilities available online.
Download Windows 10.
When you are done, press Next. Select the language, architecture, and edition. You are asked to choose which media to use. Select "ISO file" and click or tap Next. Select ISO file and press Next. The Windows 10 Media Creation Tool asks you to select where you want to save the ISO file and the name you want to give it.
Iso Demand Download Windows 10 Features 1903 On Version.
A few weeks after the release of the Windows 10 May 2020 Update, Microsoft is ready to talk about what's next for Windows 10 in the fall Windows 10 Ltsc Iso Download I researched a lot on Youtube and I found Linux Lite Windows 10 Serial Key Technical Preview for Consumer: 334NH-RXG76-64THK-C7CKG-D3VPT Technical Preview for Enterprise: PBHCJ-Q2NYD-2PX34-T2TD6-233PK Windows 10 Home: KTNPV. Open a second File Explorer window, locate the Windows 10 ISO file you downloaded, and double-click to mount it as a virtual drive. Position the two File Explorer windows side by side and drag the.
Download Iso Win 9.
A cross-platform tool to flash OS images onto SD cards and USB drives safely and easily Update 3: Windows 10 is out and here's how to download the official ISO files It is a very efficient implementation of rainbow tables done by the inventors of the method 8zf and msys-openssl to 1 Like previous version, it lacks true protected memory or pre.. Figure F. On this screen, just click the USB device button. When the third screen appears, you should see your USB flash drive in the list box, as shown in Figure G. If not, click the Refresh.
See also:
Windows 10 64 Bit Iso Download Microsoft
Donkey Kong Game Free Download Full Version
Rocket League Free Download For Windows 10
Download Mysql Server 5.0 For Windows 10 64 Bit
0 notes
Text
New Post has been published on Strange Hoot - How To’s, Reviews, Comparisons, Top 10s, & Tech Guide
New Post has been published on https://strangehoot.com/how-to-make-bootable-pendrive-using-cmd/
How to Make Bootable Pendrive Using CMD

How to Boot Pendrive
In older days, computers/laptops were available with DVD/CD drives. These drives were used to install any application or operating system. Nowadays, these drives are no longer available with new generations of computers/laptops. USB Pen Drives have taken the place of DVD/CD drives.
Why boot pendrive?
There are times when your operating system is corrupted or somehow, it is not working properly. A need to install the operating system arises. But, the problem is when your operating system doesn’t work, you cannot proceed beyond booting your computer. In such a situation, you can boot the operating system via bootable pendrive.
There can be other symptoms that your operating system doesn’t work properly. Some of them are – hardware drivers are outdated or corrupted, some of the system files are corrupted, hard drive issues such as a bad sector or other hardware failures.

Bootable pendrive helps to repair, recover and re-install the operating system. The USB port(s) are available in all computers/laptops/MacBooks. It is a simple step thereafter. Insert your bootable pendrive in the USB port, select the bootable pendrive from your BIOS setup and continue the process of repairing the operating system.
Assuming you already have created a bootable pendrive, let us see the steps how to boot the pendrive from different machines having Windows, Linus, Mac OS operating systems.
How to boot pendrive – Windows 10
In the USB slot of your computer, insert the pendrive which is bootable.
Press the POWER button to start your computer/laptop.
Press the F2 key on your keyboard. You will be on the BIOS setup of your machine.
Make sure you are on the Main tab of the window.
Press the RIGHT-ARROW key on your keyboard to navigate to the Boot tab. You will see the Boot Settings section as shown below.
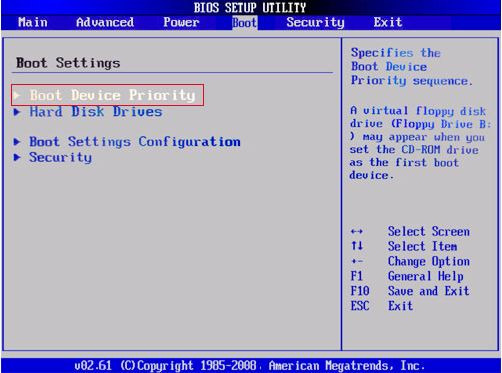
Make sure you are on the Boot Device Priority menu. Press the UP ARROW key if required to be there.
Press ENTER. Make sure you are on the 1st Boot Device list item.
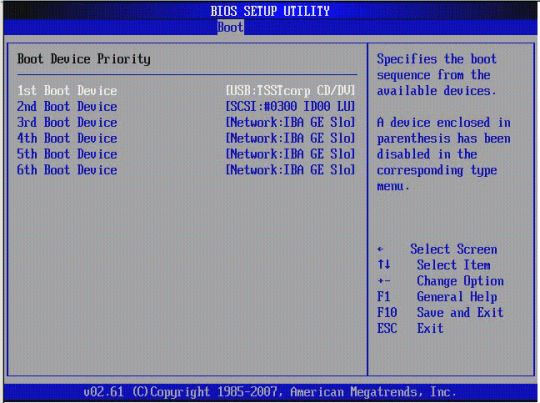
Press the UP ARROW key if required to navigate to the 1st Boot Device list item.
Press ENTER. The list of options appears. For example – CD/DVD drive, HDD or USB Flash drive.
Select the USB-HDD option.
Press ENTER. The option is selected.
Press the F10 key to save and reflect the changes.
Press the ESCAPE key. You will be moved out from the BIOS menu.
Now, your operating system, Window 10 will be loaded from the bootable pendrive.
How to boot pendrive – Windows 7
Insert the pendrive which is bootable in the USB port of your computer/laptop.
Press the POWER button to start your computer/laptop.
While booting, the Boot Menu prompt appears. (In some computers, you may not have this option. In that case, press F2 to open the BIOS setup and change the boot settings from there.)
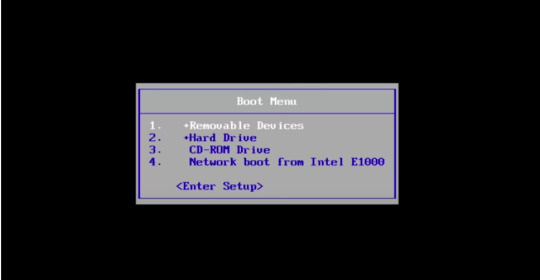
Use the ARROW keys of your keyboard and go to the Removable Devices option.
Press ENTER. Select the USB option from the list.
OR
Alternatively, from the BIOS menu, select the Advanced BIOS Features list item.
Make sure the First Boot Device list item is highlighted. If not, please press the UP ARROW key on your keyboard to go there.
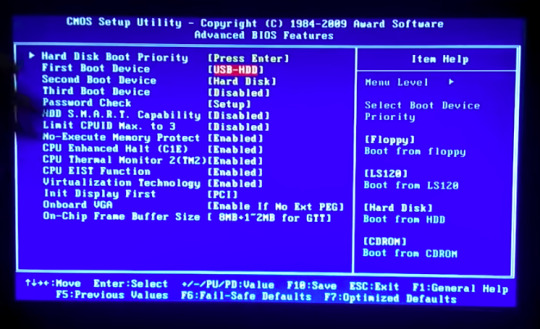
Press ENTER. A menu with the list of options appears.
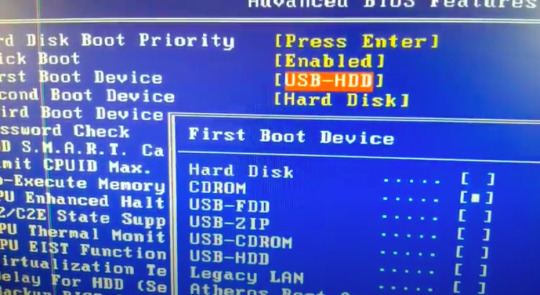
Move to the USB-HDD option using the DOWN ARROW key on the keyboard.
Press ENTER. The above mentioned option is selected with a square bullet sign in the square brackets.
Press the F10 key to reflect the changes of your bootable device option.
Press the ESC key to exit the BIOS setup.
How to boot pendrive – Linux
Press the POWER button to switch off your computer/laptop.
Insert your bootable pendrive in the USB slot of your computer/laptop.
Press the POWER button again to power on your machine.
Press the F2 key or the F10 key of your keyboard. You will see the list of methods in the list.
Choose the boot method as Full installation media (DVD or USB).
The Linux operating system will automatically be loaded from the inserted bootable pendrive.
How to boot pendrive – Mac OS
Power of your MacBook.
Insert your bootable pendrive in the USB slot of your Mac.
Use the POWER button to switch on your Mac.
Press and hold the Option (alt) key quickly on the startup. The macOS Utilities screen appears.
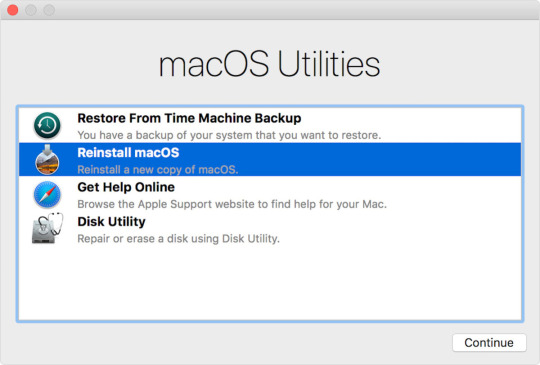
Click to select the Reinstall macOS option. Click the Continue button.
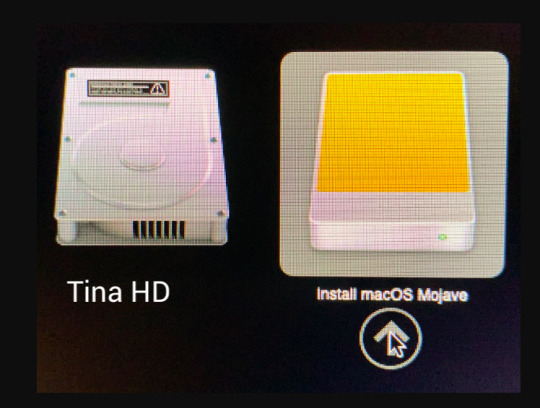
Click the USB drive icon where Install MacOS Mojave label option is shown. The Mac OS will be loaded from the USB drive.
We have seen the steps of booting the different operating systems from the USB drive using the Boot menu option from the BIOS. In the next section, we will see how to make a USB drive or a pendrive bootable.
Operating systems are installed from the hard disk drive of your computer/laptop. If the operating system is not working properly or giving issues booting from your machine’s hard drive, there is a need to make the bootable pendrive. To repair and re-install the operating system, a bootable pendrive can be used to fix the issue.
There are two ways to make the pendrive bootable.
Make bootable pendrive using the User Interface
Make bootable pendrive using the Command Line option (CMD)
We will go through steps of making a bootable pendrive using CMD option in different operating systems.
Make Bootable Pendrive using CMD in Windows
A USB flash drive with at least 16 GB storage is required to make it bootable. Follow the steps below to create the USB pendrive bootable in Windows OS.
Format the pendrive. We will use the command prompt for formatting the drive.
Press the Windows key + X on your keyboard. The command window appears.
Insert the pendrive in the USB slot of your computer/laptop.
Make sure you are in the “Windows → System32” directory.
If not, type cd.. You will need to type this command till you are in your C:/ drive.
Then, enter cd Windows. You will be in the Windows directory.
Enter cd System32. You will be in the System32 directory.
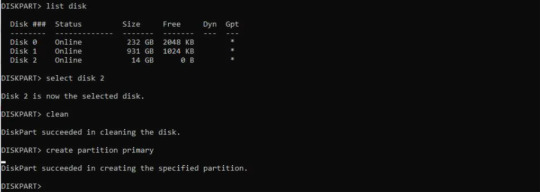
Enter the command, diskpart.
Press ENTER.
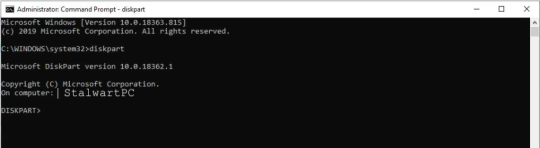
Enter the command, list disk, press ENTER. You will see a list of disks available in your computer including your USB flash drive.
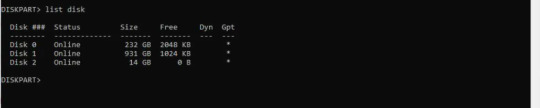
In the screen above, the Disk 2 option with the 14GB size looks like it is the USB disk drive.
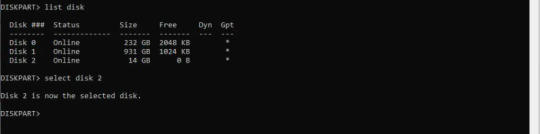
Enter the command, select Disk 2. Press ENTER. You will see the message as the selected disk is now disk 2.
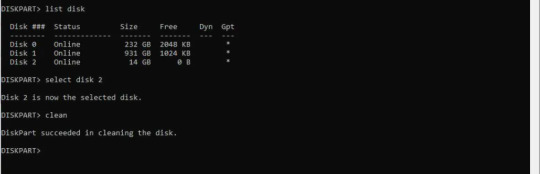
Enter the command, clean. Press ENTER. The formatting starts.
Once the formatting process is finished, you will see the success message.
After formatting the pendrive, you need to create the bootable.
Based on your Windows version, you can create the bootable format. There are 2 options for bootable format. 1) Master Boot Record – MBR (used for Windows 7) 2) GUID Partition Table – GPT (used for Window 8 and later)
For Master Boot Record bootable:
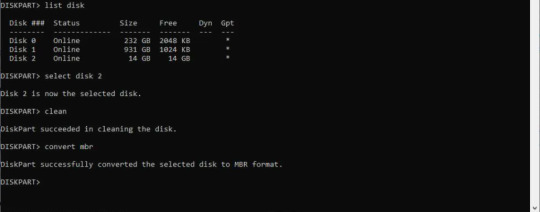
Enter the command, convert mbr.
Press ENTER. The successful conversion to the Master Boot Record format message appears as below.
Enter the command, create partition primary. Press ENTER.
The partition success message appears as below.
Enter the command, select partition 1 and press ENTER.
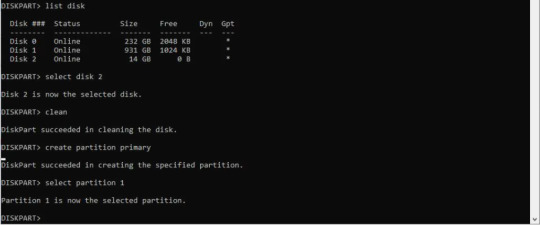
Enter the command, active. Press ENTER. The current partition is enabled.

Enter the command, format fs=ntfs quick. Press ENTER. The partition is formatted as NTFS file system.

The formatting process of a pendrive is completed successfully.
Enter the exit command to come out from DISKPART. You have successfully created the Master Boot Record bootable format.
For GUID Partition Table bootable:
You will need to create two partitions instead of one. In this case, the Operating System (Windows 8 or later) recognises the FAT32 file format.
All the steps are the same as mentioned in the Master Boot Record formatting the drive.
Enter the command, convert gpt. Press ENTER.

Type the command, create partition primary size=64. Press ENTER. This creates an EFI partition. EFI partition supports the hard drive drivers available with Windows 8 or later.
Now, type the command, create partition primary. Press ENTER. This creates a data partition.

Type the command, select partition 1. Press ENTER. The partition 1 is selected.
Type the command, format fs=fat32 quick. Press ENTER.

Type the command, select partition 2. Press ENTER. The partition 2 is selected.
Type the command, format fs=ntfs quick. Press ENTER.

For Master Boot Record bootable: Now, copy the ISO image file from your computer to your pendrive. NOTE: ISO image file is the image of a disc. The file format is .iso and used as a compressed format of installation software.
To do the above step, go to the directory where your ISO file is stored.
Type the command, copy f:\<filename>.ISO /s/e/f g:.
Press ENTER. NOTE: In the above command, the f: drive is the source drive where your ISO file is located. You will need to replace <filename> to the actual ISO name. G: drive is your USD drive slot.
You have successfully created the bootable pendrive for Windows 7 or earlier versions.
For GUID Partition Table bootable: Go to https://efi.akeo.ie/downloads/efifs-latest/.
Download these folders: ntfs_x64.efi, ntfs_ia32.efi, ntfs_aa64.efi, ntfs_arm.efi from the above URL.
Copy these folders in the partition 1 you have created in your pendrive.
Copy the ISO image of the operating system in the partition 2 you have created in your pendrive.
You have successfully created the bootable pendrive for Windows 8 or later versions.
Make Bootable USB using CMD in Linux
Prerequisite – your computer should be powered on.
Insert the USB pen drive in the USB slot of your computer/notebook.
Open the terminal. To open the terminal, press the CTRL + ALT +T keys on your keyboard.
Enter the command, dmesg. In the terminal window, you will see the message logs. In the screen below, TinaS is the name of the USB flash drive you have inserted in the USB slot.

Type the command su. Press ENTER.
Enter the root password. Press ENTER.
Now, enter the command, findmnt device. Replace device with the USB drive name you found in the above screen.

Press ENTER.
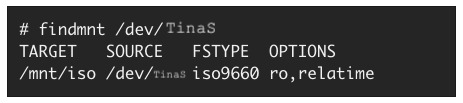
The next step is to unmount the pendrive.
Look at the TARGET column in the above screen. It shows /mnt/iso.
Enter the command, umount /mnt/iso. Press ENTER. The unmount process is successful.

Enter the command, dd if =/image_direction/image.iso of =/dev/device bs=blocksize. Press ENTER. This command copies the installation ISO image directly to your pendrive.
In the above command, replace /image_directory/image.iso with the actual directory path of the ISO file you have stored. (The bs command is used to increase the speed of the writing process.)

Let’s take an example: If the ISO image is located in /home/devuser/Downloads/rhel-server-7-x86_64-boot.iso and the detected device name is TinaS. The command will be as follows.

The command, dd will finish copying the image to the pendrive.
Wait for a few seconds to complete the process.
Log out from the root account. Remove your USB drive from the USB slot of your computer.
You have successfully created the bootable pendrive.
Make Bootable USB using CMD in Mac OS
Prerequisite – Your USB flash drive should have at least 12GB free space available.
Make sure your USB flash drive is formatted as Mac OS Extended.
For more information, click here: https://support.apple.com/en-us/HT208496. You can perform the steps from the MacOS Utilities → Disk Utility option.
Inject your USB flash drive in any one of the USB slots of your Mac.
Press the POWER button to start your Mac.
Open the terminal.
Press the command + SPACEBAR keys on your keyboard. The spotlight search bar appears.
Enter the text, terminal.app and press ENTER. The terminal is open.
Enter the command, createinstallmedia when you are in the Resources folder. The command will look like below. (For each Mac OS version, the command is given.)
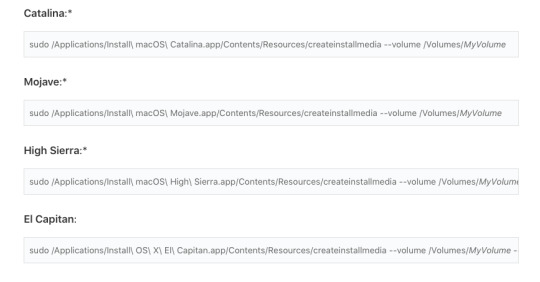
In the above command, replace MyVolume with your USB drive name.
Press ENTER after entering the createinstallmedia command.
Enter your password when prompted. Press ENTER.
Enter y when prompted. This will format the volume. Press ENTER.
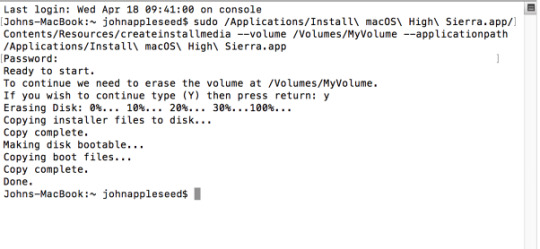
When it shows the Done message, and you are at root, quit the terminal. To quit the terminal, enter the command, exit. Press ENTER.
Eject the USB flash drive. Your bootable USB drive is ready.
Conclusion
It is recommended to make pendrive bootable or your USB drive bootable with the command line (CMD) window. There are chances that your drive is not formatted properly using the User Interface (UI) or the partitions may not get created appropriately using the User Interface.
The steps to make a bootable device via CMD are lengthy, but it ensures that the bootable drive is made without any errors and while you want to load the operating system using your bootable pendrive, it loads successfully.
It is always suggested to keep the USB drive bootable of your operating system and keep it as backup. Whenever you encounter any issues with the operating system, you are ready with the bootable pendrive.
Read: How to update BIOS software of computer
0 notes