#Chrome VPN Extension
Explore tagged Tumblr posts
Visit Tumblr Blog
Explore Tumblr blogs with no restrictions, modern design and the best experience.
Last Seen Tumblr Blogs


Fun Fact
In Q3 of 2020, 31% of US users access the Tumblr app daily.
Text
Master Chrome VPN Extension: ExpressVPN Features Explained
Explore the powerful features of the ExpressVPN Chrome VPN Extension in this comprehensive guide. Learn how it secures your online activities with encryption, bypasses geo-restrictions blocks WebRTC leaks, and ensures seamless streaming. Take control of your privacy and enjoy unrestricted browsing today!
0 notes
Text
Privacy Policy
Privacy Policy
Last updated: March 15, 2024
This Privacy Policy describes Our policies and procedures on the collection, use and disclosure of Your information when You use the Service and tells You about Your privacy rights and how the law protects You.
We use Your Personal data to provide and improve the Service. By using the Service, You agree to the collection and use of information in accordance with this Privacy Policy. This Privacy Policy has been created with the help of the Privacy Policy Generator.
Interpretation and Definitions
Interpretation
The words of which the initial letter is capitalized have meanings defined under the following conditions. The following definitions shall have the same meaning regardless of whether they appear in singular or in plural.
Definitions
For the purposes of this Privacy Policy:
Account means a unique account created for You to access our Service or parts of our Service.
Affiliate means an entity that controls, is controlled by or is under common control with a party, where "control" means ownership of 50% or more of the shares, equity interest or other securities entitled to vote for election of directors or other managing authority.
Company (referred to as either "the Company", "We", "Us" or "Our" in this Agreement) refers to Free VPN for Edge - Only VPN Proxy.
Cookies are small files that are placed on Your computer, mobile device or any other device by a website, containing the details of Your browsing history on that website among its many uses.
Country refers to: Alaska, United States
Device means any device that can access the Service such as a computer, a cellphone or a digital tablet.
Personal Data is any information that relates to an identified or identifiable individual.
Service refers to the Website.
Service Provider means any natural or legal person who processes the data on behalf of the Company. It refers to third-party companies or individuals employed by the Company to facilitate the Service, to provide the Service on behalf of the Company, to perform services related to the Service or to assist the Company in analyzing how the Service is used.
Third-party Social Media Service refers to any website or any social network website through which a User can log in or create an account to use the Service.
Usage Data refers to data collected automatically, either generated by the use of the Service or from the Service infrastructure itself (for example, the duration of a page visit).
Website refers to Free VPN for Edge - Only VPN Proxy, accessible from https://about.me/onlyvpn
Free VPN for Edge extension.
You means the individual accessing or using the Service, or the company, or other legal entity on behalf of which such individual is accessing or using the Service, as applicable.
Collecting and Using Your Personal Data
Types of Data Collected
Personal Data
While using Our Service, We may ask You to provide Us with certain personally identifiable information that can be used to contact or identify You. Personally identifiable information may include, but is not limited to:
Email address
First name and last name
Phone number
Address, State, Province, ZIP/Postal code, City
Usage Data
Usage Data
Usage Data is collected automatically when using the Service.
Usage Data may include information such as Your Device's Internet Protocol address (e.g. IP address), browser type, browser version, the pages of our Service that You visit, the time and date of Your visit, the time spent on those pages, unique device identifiers and other diagnostic data.
When You access the Service by or through a mobile device, We may collect certain information automatically, including, but not limited to, the type of mobile device You use, Your mobile device unique ID, the IP address of Your mobile device, Your mobile operating system, the type of mobile Internet browser You use, unique device identifiers and other diagnostic data.
We may also collect information that Your browser sends whenever You visit our Service or when You access the Service by or through a mobile device.
Information from Third-Party Social Media Services
The Company allows You to create an account and log in to use the Service through the following Third-party Social Media Services:
Google
Facebook
Instagram
Twitter
LinkedIn
If You decide to register through or otherwise grant us access to a Third-Party Social Media Service, We may collect Personal data that is already associated with Your Third-Party Social Media Service's account, such as Your name, Your email address, Your activities or Your contact list associated with that account.
You may also have the option of sharing additional information with the Company through Your Third-Party Social Media Service's account. If You choose to provide such information and Personal Data, during registration or otherwise, You are giving the Company permission to use, share, and store it in a manner consistent with this Privacy Policy.
Tracking Technologies and Cookies
We use Cookies and similar tracking technologies to track the activity on Our Service and store certain information. Tracking technologies used are beacons, tags, and scripts to collect and track information and to improve and analyze Our Service. The technologies We use may include:
Cookies or Browser Cookies. A cookie is a small file placed on Your Device. You can instruct Your browser to refuse all Cookies or to indicate when a Cookie is being sent. However, if You do not accept Cookies, You may not be able to use some parts of our Service. Unless you have adjusted Your browser setting so that it will refuse Cookies, our Service may use Cookies.
Web Beacons. Certain sections of our Service and our emails may contain small electronic files known as web beacons (also referred to as clear gifs, pixel tags, and single-pixel gifs) that permit the Company, for example, to count users who have visited those pages or opened an email and for other related website statistics (for example, recording the popularity of a certain section and verifying system and server integrity).
Cookies can be "Persistent" or "Session" Cookies. Persistent Cookies remain on Your personal computer or mobile device when You go offline, while Session Cookies are deleted as soon as You close Your web browser. You can learn more about cookies on TermsFeed website article.
We use both Session and Persistent Cookies for the purposes set out below:
Necessary / Essential CookiesType: Session CookiesAdministered by: UsPurpose: These Cookies are essential to provide You with services available through the Website and to enable You to use some of its features. They help to authenticate users and prevent fraudulent use of user accounts. Without these Cookies, the services that You have asked for cannot be provided, and We only use these Cookies to provide You with those services.
Cookies Policy / Notice Acceptance CookiesType: Persistent CookiesAdministered by: UsPurpose: These Cookies identify if users have accepted the use of cookies on the Website.
Functionality CookiesType: Persistent CookiesAdministered by: UsPurpose: These Cookies allow us to remember choices You make when You use the Website, such as remembering your login details or language preference. The purpose of these Cookies is to provide You with a more personal experience and to avoid You having to re-enter your preferences every time You use the Website.
For more information about the cookies we use and your choices regarding cookies, please visit our Cookies Policy or the Cookies section of our Privacy Policy.
Use of Your Personal Data
The Company may use Personal Data for the following purposes:
To provide and maintain our Service, including to monitor the usage of our Service.
To manage Your Account: to manage Your registration as a user of the Service. The Personal Data You provide can give You access to different functionalities of the Service that are available to You as a registered user.
For the performance of a contract: the development, compliance and undertaking of the purchase contract for the products, items or services You have purchased or of any other contract with Us through the Service.
To contact You: To contact You by email, telephone calls, SMS, or other equivalent forms of electronic communication, such as a mobile application's push notifications regarding updates or informative communications related to the functionalities, products or contracted services, including the security updates, when necessary or reasonable for their implementation.
To provide You with news, special offers and general information about other goods, services and events which we offer that are similar to those that you have already purchased or enquired about unless You have opted not to receive such information.
To manage Your requests: To attend and manage Your requests to Us.
For business transfers: We may use Your information to evaluate or conduct a merger, divestiture, restructuring, reorganization, dissolution, or other sale or transfer of some or all of Our assets, whether as a going concern or as part of bankruptcy, liquidation, or similar proceeding, in which Personal Data held by Us about our Service users is among the assets transferred.
For other purposes: We may use Your information for other purposes, such as data analysis, identifying usage trends, determining the effectiveness of our promotional campaigns and to evaluate and improve our Service, products, services, marketing and your experience.
We may share Your personal information in the following situations:
With Service Providers: We may share Your personal information with Service Providers to monitor and analyze the use of our Service, to contact You.
For business transfers: We may share or transfer Your personal information in connection with, or during negotiations of, any merger, sale of Company assets, financing, or acquisition of all or a portion of Our business to another company.
With Affiliates: We may share Your information with Our affiliates, in which case we will require those affiliates to honor this Privacy Policy. Affiliates include Our parent company and any other subsidiaries, joint venture partners or other companies that We control or that are under common control with Us.
With business partners: We may share Your information with Our business partners to offer You certain products, services or promotions.
With other users: when You share personal information or otherwise interact in the public areas with other users, such information may be viewed by all users and may be publicly distributed outside. If You interact with other users or register through a Third-Party Social Media Service, Your contacts on the Third-Party Social Media Service may see Your name, profile, pictures and description of Your activity. Similarly, other users will be able to view descriptions of Your activity, communicate with You and view Your profile.
With Your consent: We may disclose Your personal information for any other purpose with Your consent.
Retention of Your Personal Data
The Company will retain Your Personal Data only for as long as is necessary for the purposes set out in this Privacy Policy. We will retain and use Your Personal Data to the extent necessary to comply with our legal obligations (for example, if we are required to retain your data to comply with applicable laws), resolve disputes, and enforce our legal agreements and policies.
The Company will also retain Usage Data for internal analysis purposes. Usage Data is generally retained for a shorter period of time, except when this data is used to strengthen the security or to improve the functionality of Our Service, or We are legally obligated to retain this data for longer time periods.
Transfer of Your Personal Data
Your information, including Personal Data, is processed at the Company's operating offices and in any other places where the parties involved in the processing are located. It means that this information may be transferred to — and maintained on — computers located outside of Your state, province, country or other governmental jurisdiction where the data protection laws may differ than those from Your jurisdiction.
Your consent to this Privacy Policy followed by Your submission of such information represents Your agreement to that transfer.
The Company will take all steps reasonably necessary to ensure that Your data is treated securely and in accordance with this Privacy Policy and no transfer of Your Personal Data will take place to an organization or a country unless there are adequate controls in place including the security of Your data and other personal information.
Delete Your Personal Data
You have the right to delete or request that We assist in deleting the Personal Data that We have collected about You.
Our Service may give You the ability to delete certain information about You from within the Service.
You may update, amend, or delete Your information at any time by signing in to Your Account, if you have one, and visiting the account settings section that allows you to manage Your personal information. You may also contact Us to request access to, correct, or delete any personal information that You have provided to Us.
Please note, however, that We may need to retain certain information when we have a legal obligation or lawful basis to do so.
Disclosure of Your Personal Data
Business Transactions
If the Company is involved in a merger, acquisition or asset sale, Your Personal Data may be transferred. We will provide notice before Your Personal Data is transferred and becomes subject to a different Privacy Policy.
Law enforcement
Under certain circumstances, the Company may be required to disclose Your Personal Data if required to do so by law or in response to valid requests by public authorities (e.g. a court or a government agency).
Other legal requirements
The Company may disclose Your Personal Data in the good faith belief that such action is necessary to:
Comply with a legal obligation
Protect and defend the rights or property of the Company
Prevent or investigate possible wrongdoing in connection with the Service
Protect the personal safety of Users of the Service or the public
Protect against legal liability
Security of Your Personal Data
The security of Your Personal Data is important to Us, but remember that no method of transmission over the Internet, or method of electronic storage is 100% secure. While We strive to use commercially acceptable means to protect Your Personal Data, We cannot guarantee its absolute security.
Children's Privacy
Our Service does not address anyone under the age of 13. We do not knowingly collect personally identifiable information from anyone under the age of 13. If You are a parent or guardian and You are aware that Your child has provided Us with Personal Data, please contact Us. If We become aware that We have collected Personal Data from anyone under the age of 13 without verification of parental consent, We take steps to remove that information from Our servers.
If We need to rely on consent as a legal basis for processing Your information and Your country requires consent from a parent, We may require Your parent's consent before We collect and use that information.
Links to Other Websites
Our Service may contain links to other websites that are not operated by Us. If You click on a third party link, You will be directed to that third party's site. We strongly advise You to review the Privacy Policy of every site You visit.
We have no control over and assume no responsibility for the content, privacy policies or practices of any third party sites or services.
Changes to this Privacy Policy
We may update Our Privacy Policy from time to time. We will notify You of any changes by posting the new Privacy Policy on this page.
We will let You know via email and/or a prominent notice on Our Service, prior to the change becoming effective and update the "Last updated" date at the top of this Privacy Policy.
You are advised to review this Privacy Policy periodically for any changes. Changes to this Privacy Policy are effective when they are posted on this page.
Contact Us
If you have any questions about this Privacy Policy, You can contact us:
By email: [email protected]
Website: https://about.me/onlyvpn
Edge Extension: https://microsoftedge.microsoft.com/addons/detail/free-vpn-for-edge-only-/jmdpcajmomdijkagjlleogdppbjlaaii
1 note
·
View note
Text
Unleashing Freedom: The Best Free VPN for Chrome in the USA

In the fast-paced digital era, where online security and privacy are paramount, a Free VPN Chrome Extension emerges as a beacon of empowerment for users in the United States. This innovative tool not only safeguards personal information but also opens up a world of possibilities for a seamless and secure online experience.
Navigating the Digital Landscape with Ease
As internet users in the USA become increasingly conscious of their online presence, a Free VPN Chrome Extension serves as a versatile companion. It allows individuals to navigate the vast digital landscape with ease, offering a shield against potential threats and ensuring that sensitive information remains confidential.
Unrestricted Access to Geo-Locked Content
One of the primary advantages of utilizing a Free VPN Chrome Extension is the ability to access geo-restricted content. By connecting to servers in different locations, users can unlock a plethora of websites, streaming services, and applications that may otherwise be limited based on their geographical location. This feature is particularly valuable for those seeking a broader range of entertainment options or accessing region-specific content.
Enhanced Security in Public Wi-Fi Environments
Public Wi-Fi networks, while convenient, pose significant security risks. A Free VPN Chrome Extension becomes a crucial ally in such scenarios, encrypting data transmissions and shielding users from potential cyber threats. Whether checking emails at a coffee shop or conducting online banking in a hotel lobby, the extension ensures that sensitive information remains confidential and protected from prying eyes.
Privacy Preservation in a Data-Driven World
In an era where data is currency, protecting personal privacy has never been more critical. A Free VPN Chrome Extension allows users in the USA to browse the internet anonymously, preventing websites and online services from tracking their online activities. This added layer of privacy empowers individuals to take control of their digital footprint and make informed decisions about the information they share online.
User-Friendly Experience at Your Fingertips
Emphasizing user-friendliness, Free VPN Chrome Extension are designed to be easily accessible and navigable. With just a few clicks, users can activate the VPN, choose their preferred server location, and enjoy a secure online experience. This simplicity ensures that individuals of all technical backgrounds can harness the benefits of a VPN without the need for extensive technical knowledge.
Cost-Efficient Security Solutions
The cost-effectiveness of Free VPN Chrome Extension makes them an attractive option for users seeking robust security without breaking the bank. With many reputable providers offering free versions of their extensions, users can enjoy essential VPN features without incurring additional expenses.
A Free VPN Chrome Extension emerges as a valuable tool for users in the USA, providing a user-friendly solution to enhance online security, privacy, and accessibility. As the digital landscape continues to evolve, integrating such tools becomes an essential step towards a safer and more liberated online experience. Embrace the freedom to explore the internet without boundaries and safeguard your online presence with a Free VPN Chrome Extension today.
0 notes
Text
VPN Guide
I’ve been asked to put together a VPN guide, especially since Emmerdale episodes are being uploaded to YouTube. This guide will also works perfectly well for accessing ITVX and the BBC iPlayer.
What is a VPN?
A VPN (Virtual Private Network) is a service that helps you stay private and secure online by creating a secure, encrypted connection between your device and the internet. For this purpose, we're interested in the fact that VPN's can bypass geo-restrictions and allow you to access things you wouldn't normally be able to.
Which VPN should I use?
There are plenty of VPNs out there. I'll be giving three options. Everything I mention here is something I’ve personally used or that my partner's used and tested. While there may be other great options available, I won’t recommend anything I can't vouch for.
As far as I'm concerned, if you can afford to invest in a VPN, I would because I think it's worth the money. I use it alot while out in public, when accessing public wifis, such as in cafe's and airports to protect my data. It does a lot more than just bypass geo locations.
ExpressVPN
I've been using ExpressVPN since 2014, long before I moved to the UK. This is the VPN I used during 2014-2019 era to watch Emmerdale. While it's not the cheapest option out there, I think it's worth every penny because the customer support is great.
Pricing: Starts around €6.40/month (billed annually)
Pros: Fast, reliable, great customer service
Cons: Pricier than others
ProtonVPN
ProtonVPN offers both a free and paid plan. While the free version is useful, it's very limited, you can't choose your server location, which makes it tricky if you're trying to access specific content. For streaming or location-specific browsing, you'll need the paid plan.
Pricing: Paid plans start around €4.99/month
Pros: Strong privacy reputation, has a free option
Cons: Free plan is very restricted
Surf Shark
My partner swears by Surf Shark. It’s the most affordable of the three, with plans starting at just €1.99/month. Despite the low cost, he’s never had a single issue with it so far.
Pricing: From €1.99/month (with long-term plans)
Pros: Budget-friendly, reliable performance
Cons: Slightly fewer server options than premium VPNs
** add on **
Windscribe
@srtazombie has recommended Windscribe, which has a free version, that let's you use up to 10GB monthly.
Tutorial
For this tutorial I'm going to use Surf Shark because it is the cheapest of the three options.
Open your browser and go to: https://surfshark.com
Click on “Get Surfshark” on the homepage.
You’ll see 3 plan options. The 2-year plan (€1.99/month) is the cheapest.
Click “Select” under your preferred plan.
Enter your email address.
Choose a Payment Method. You can pay with: Credit/debit card, PayPal, Google Pay and Apple Pay.
Enter your payment details.
Click “Complete Purchase”.
You’ll get a confirmation email right after purchase.
After payment, you’ll be directed to a page to download the Surfshark app.
Choose your device: Windows / Mac / Linux, Android / iOS or browser extension (Chrome, Firefox, Edge). You can also find Surfshark in the App Store or Google Play Store.
Open the Surfshark app.
Enter the email and password you used when signing up. If you didn’t set a password during checkout, check your email, Surfshark will have sent you a link to create one.
Connect to a Server. Inside the app, click “Connect” to use the fastest server. Or choose a country from the list (e.g., US, UK, Germany, etc.).
For the UK you can pick from: London, Manchester, Glasgow and Edinburgh. Then try it out and go to YT and see if it works. If one server is down, just change between them until one works.
Personally, I haven’t come across any free VPNs that work well for changing your geo-location to stream regularly. Most either don’t let you choose the country, or they have extremely limited monthly data, making it impossible to watch shows like Emmerdale, which airs five days a week. For that reason, free VPNs just don’t cut it for daily streaming.
I’ve also heard that Mullvad is also good and affordable option. However, I can’t personally recommend it since I haven’t tried it myself. If anyone has experience with Mullvad and wants to share more info, please feel free to add to this post! Also, if there are free VPNs which work, please let me know!
66 notes
·
View notes
Text
Updated Personal Infosec Post
Been awhile since I've had one of these posts part deus: but I figure with all that's going on in the world it's time to make another one and get some stuff out there for people. A lot of the information I'm going to go over you can find here:
https://www.privacyguides.org/en/tools/
So if you'd like to just click the link and ignore the rest of the post that's fine, I strongly recommend checking out the Privacy Guides. Browsers: There's a number to go with but for this post going forward I'm going to recommend Firefox. I know that the Privacy Guides lists Brave and Safari as possible options but Brave is Chrome based now and Safari has ties to Apple. Mullvad is also an option but that's for your more experienced users so I'll leave that up to them to work out. Browser Extensions:
uBlock Origin: content blocker that blocks ads, trackers, and fingerprinting scripts. Notable for being the only ad blocker that still works on Youtube.
Privacy Badger: Content blocker that specifically blocks trackers and fingerprinting scripts. This one will catch things that uBlock doesn't catch but does not work for ads.
Facebook Container: "but I don't have facebook" you might say. Doesn't matter, Meta/Facebook still has trackers out there in EVERYTHING and this containerizes them off away from everything else.
Bitwarden: Password vaulting software, don't trust the password saving features of your browsers, this has multiple layers of security to prevent your passwords from being stolen.
ClearURLs: Allows you to copy and paste URL's without any trackers attached to them.
VPN: Note: VPN software doesn't make you anonymous, no matter what your favorite youtuber tells you, but it does make it harder for your data to be tracked and it makes it less open for whatever public network you're presently connected to.
Mozilla VPN: If you get the annual subscription it's ~$60/year and it comes with an extension that you can install into Firefox.
Mullvad VPN: Is a fast and inexpensive VPN with a serious focus on transparency and security. They have been in operation since 2009. Mullvad is based in Sweden and offers a 30-day money-back guarantee for payment methods that allow it.
Email Provider: Note: By now you've probably realized that Gmail, Outlook, and basically all of the major "free" e-mail service providers are scraping your e-mail data to use for ad data. There are more secure services that can get you away from that but if you'd like the same storage levels you have on Gmail/Ol utlook.com you'll need to pay.
Tuta: Secure, end-to-end encrypted, been around a very long time, and offers a free option up to 1gb.
Mailbox.org: Is an email service with a focus on being secure, ad-free, and privately powered by 100% eco-friendly energy. They have been in operation since 2014. Mailbox.org is based in Berlin, Germany. Accounts start with up to 2GB storage, which can be upgraded as needed.
Email Client:
Thunderbird: a free, open-source, cross-platform email, newsgroup, news feed, and chat (XMPP, IRC, Matrix) client developed by the Thunderbird community, and previously by the Mozilla Foundation.
FairMail (Android Only): minimal, open-source email app which uses open standards (IMAP, SMTP, OpenPGP), has several out of the box privacy features, and minimizes data and battery usage.
Cloud Storage:
Tresorit: Encrypted cloud storage owned by the national postal service of Switzerland. Received MULTIPLE awards for their security stats.
Peergos: decentralized and open-source, allows for you to set up your own cloud storage, but will require a certain level of expertise.
Microsoft Office Replacements:
LibreOffice: free and open-source, updates regularly, and has the majority of the same functions as base level Microsoft Office.
OnlyOffice: cloud-based, free
FreeOffice: Personal licenses are free, probably the closest to a fully office suite replacement.
Chat Clients: Note: As you've heard SMS and even WhatsApp and some other popular chat clients are basically open season right now. These are a couple of options to replace those. Note2: Signal has had some reports of security flaws, the service it was built on was originally built for the US Government, and it is based within the CONUS thus is susceptible to US subpoenas. Take that as you will.
Signal: Provides IM and calling securely and encrypted, has multiple layers of data hardening to prevent intrusion and exfil of data.
Molly (Android OS only): Alternative client to Signal. Routes communications through the TOR Network.
Briar: Encrypted IM client that connects to other clients through the TOR Network, can also chat via wifi or bluetooth.
SimpleX: Truly anonymous account creation, fully encrypted end to end, available for Android and iOS.
Now for the last bit, I know that the majority of people are on Windows or macOS, but if you can get on Linux I would strongly recommend it. pop_OS, Ubuntu, and Mint are super easy distros to use and install. They all have very easy to follow instructions on how to install them on your PC and if you'd like to just test them out all you need is a thumb drive to boot off of to run in demo mode. For more secure distributions for the more advanced users the options are: Whonix, Tails (Live USB only), and Qubes OS.
On a personal note I use Arch Linux, but I WOULD NOT recommend this be anyone's first distro as it requires at least a base level understanding of Linux and liberal use of the Arch Linux Wiki. If you game through Steam their Proton emulator in compatibility mode works wonders, I'm presently playing a major studio game that released in 2024 with no Linux support on it and once I got my drivers installed it's looked great. There are some learning curves to get around, but the benefit of the Linux community is that there's always people out there willing to help. I hope some of this information helps you and look out for yourself, it's starting to look scarier than normal out there.

#infosec#personal information#personal infosec#info sec#firefox#mullvad#vpn#vpn service#linux#linux tails#pop_os#ubuntu#linux mint#long post#whonix#qubes os#arch linux
99 notes
·
View notes
Text
me when companies try to force you to use their proprietary software
anyway
Layperson resources:
firefox is an open source browser by Mozilla that makes privacy and software independence much easier. it is very easy to transfer all your chrome data to Firefox
ublock origin is The highest quality adblock atm. it is a free browser extension, and though last i checked it is available on Chrome google is trying very hard to crack down on its use
Thunderbird mail is an open source email client also by mozilla and shares many of the same advantages as firefox (it has some other cool features as well)
libreOffice is an open source office suite similar to microsoft office or Google Suite, simple enough
Risky:
VPNs (virtual private networks) essentially do a number of things, but most commonly they are used to prevent people from tracking your IP address. i would suggest doing more research. i use proton vpn, as it has a decent free version, and the paid version is powerful
note: some applications, websites, and other entities do not tolerate the use of VPNs. you may not be able to access certain secure sites while using a VPN, and logging into your personal account with some services while using a vpn *may* get you PERMANENTLY BLACKLISTED from the service on that account, ymmv
IF YOU HAVE A DECENT VPN, ANTIVIRUS, AND ADBLOCK, you can start learning about piracy, though i will not be providing any resources, as Loose Lips Sink Ships. if you want to be very safe, start with streaming sites and never download any files, though you Can learn how to discern between safe, unsafe, and risky content.
note: DO NOT SHARE LINKS TO OR NAMES OF PIRACY SITES IN PUBLIC PLACES, ESPECIALLY SOCAL MEDIA
the only time you should share these things are either in person or in (preferably peer-to-peer encrypted) PRIVATE messages
when pirated media becomes well-known and circulated on the wider, public internet, it gets taken down, because it is illegal to distribute pirated media and software
if you need an antivirus i like bitdefender. it has a free version, and is very good, though if youre using windows, windows defender is also very good and it comes with the OS
Advanced:
linux is great if you REALLY know what you're doing. you have to know a decent amount of computer science and be comfortable using the Terminal/Command Prompt to get/use linux. "Linux" refers to a large array of related open source Operating Systems. do research and pick one that suits your needs. im still experimenting with various dispos, but im leaning towards either Ubuntu Cinnamon or Debian.
#capitalism#open source#firefox#thunderbird#mozilla#ublock origin#libreoffice#vpn#antivirus#piracy#linux
720 notes
·
View notes
Text
helpful hint for non-Norwegians streaming Rykter
several youtube channels have posted translations of S1, S2, and S3 with English subtitles. here’s one example:
but for the upcoming season, if you don’t speak Norsk and still want to stream the episodes as soon as they premiere, read below!
i recommend using the NRK dual subtitles chrome extension!!
step 1. add this extension to your chrome browser
step 2. access the episode on NRK’s website using your preferred VPN to bypass the geoblock
step 3. click the extension and choose your preferred language
step 4. turn on captions and press play. the Norsk subtitles will appear side by side with your preferred language in real time

i have used this with other shows as a language learning tool and find the translations to be fair quality. occasionally the translator will throw a wrong word in, especially with slang words, different dialects, etc. but in my experience they are usually descent enough to get the major plot points of the episode even if you don’t speak the language!!
hope this helps y’all and happy streaming :)
105 notes
·
View notes
Text
sometimes you just have to revamp your digital space entirely. new background. new themes. new extensions. new cursors, even. delete shit you don't need. re-organize your bookmarks. get some privacy add-ons... or stop using chrome-anything. get a vpn.
obviously not everyone is into tech like this but, for me, cleaning up my digital space and adding simple privacy measures helps a lot when i can't physically do much. it's a way of taking control in my life and making my digital space feel like mine - not just something i'm mindlessly consuming in.
#wanna make a post info-dumping all my favorite extensions and shit#god i love technology#julian rants#only-knives#good things
21 notes
·
View notes
Text
Top 7 Chrome VPN Extensions for Secure Browsing

Enhance your online privacy and bypass geo-restrictions with the best Chrome VPN extensions for 2025. From ExpressVPN’s robust encryption to X-VPN’s unlimited data, discover tools tailored for streaming, security, and hassle-free browsing. This guide compares features, pros, and cons, helping you find the perfect extension for your needs.
0 notes
Text
fyi for any non-US peeps, you can watch the Next to Normal proshot on the PBS Great Performances website with a VPN (I used the free chrome extension)
#next to normal#caissie levy#Jack Wolfe#jamie parker#eleanor worthington cox#trevor dion nicholas#jack ofrecio
23 notes
·
View notes
Text
So you want to make gifs but have no idea where to start? I'm here to help!
In this guide I'll go over how to get videos, what software I use, the basics of gifmaking and editing, and how to post your sets to get the maximum interaction. This is an incredibly detailed guide that might all seem really intimidating but I promise with a little patience and practice you'll soon be making all the gifs you want!
A few things before I start:
Everything in this guide is based on my own style of gifmaking and what I personally use to make them. I will include some other options here and there but this guide will be primarily focused on what I do/use. Feel free to explore programs and styles to find what fits you best
I'm by no means a gifmaking expert. I still have lots to learn and I welcome imput from other gifmakers.
All gifmakers do things a little differently. There's no wrong way to make a gif. Feel free to experiment and find the ways that work best for you. This guide is just the ways that work best for me.
I wanted to add more photos to help illustrate my points but I am hindered by tumblr's stupid 30 image limit. Annoying
I'm happy to answer questions. If you're trying to make a gifset and get stuck and need help feel free to shoot me a message. If I can help, I will.
Table of Contents:
What you need
Getting your videos
Taking screencaps
Making the gif
Editing the gif
Saving the gif
Uploading gifset to tumblr
As this got very long it is all underneath the cut
1. What Do I Need?
There are three things you need to make gifs. You need a way to download videos, a screencapping software, and Photoshop (or an online program that's similar).
Video Downloader - There are several ways you can download your videos such as torrents, direct downloads from streaming sites, downloading using a computer program, downloading from a website using an browser extension, etc.
Torrenting. I dislike using torrents because my internet connection is unreliable and can't sustain a VPN and I can't afford to pay for a good VPN anyway so I don't use torrents. Torrenting is, however, the most popular way to download videos so that's definitely a good option if you have a quality internet connection and a good VPN
If you're like me and can't torrent, try online direct downloading. Some websites I use have a direct download button that can be pretty reliable but be wary as they can contain malware. Otherwise I use a third party extension/program to download a video directly from a website
I use the chrome browser extension Cococut to download videos off of streaming sites. I don't know if this is available on other browsers or not but I'm sure there are other video downloaders on them you can use too. Cococut downloads in high quality. It can be a bit slow but totally worth it in my opinion. Cococut also has a youtube downloader
Downloads programs are also an option.
4K Video Downloader is a good computer program option to download 4K youtube videos.
DVDs are also a great option
KMPlayer - a video player that will easily allow you to take consecutive screencaps
I love this video player because it plays a variety of formats like mp4, mkv, wmv, avi and more.
Free to download
Very easy to make screencaps with very few steps
Photoshop - I use Photoshop CC 2014 on a Windows laptop to make all my gifs.
You can get it directly from Adobe by paying for it or...
You can be like me and get it through a little 🏴☠️🏴☠️🏴☠️
There are tons of links to download photoshop throughout tumblr. The one I used is no longer working but if you do a search on tumblr you can find links for a variety of versions like this post here or this blog.
It doesn't really matter what version you download so long as it has video timeline available.)
-------------------------------------------------------
2. Getting Your Videos
First of all, to make a good quality gif, you need a good quality video. Nothing less than 720p unless you really really can't find anything in higher quality. I prefer 1080p or higher but 720p is acceptable.
Note: MAKE SURE YOU HAVE AN ADBLOCKER WHEN DOWNLOADING FROM STREAMING SITES!!!
So where do I find videos?
DVDs
Dvds are always good if you already have what you want to gif in dvd. Check your local library if you don't. If you don't have a dvd of the video you need then you've got other options.
2. Torrents
Now I don't torrent so I can't speak to this much and I know the big torrent site is gone now. I'm not sure where the new places are. Torrenting is the easiest way to get super high quality videos to gif from and is the go to way for a lot of gifmakers. But it does require another program to use as well as the need to have a VPN.
To learn more about torrenting click here. or read this guide
3. Screen Recording
Screen recording is my last option to get my videos because it often results in lower quality, choppy, inconsistent videos if your internet isn't that great and that makes giffing harder. But if you can't download in any other way this is an option for you.
You can use VLC to record your screen. See this tutorial for that.
I use a browser extension called REC - high quality screen video Recorder which is super simple and does a pretty good job.
4. Direct Downloading
Your other option is to download from either youtube or a streaming site.
The streaming websites I use changes all the time as they get shut down (rip soap2day i miss you) but the ones I'm currently using (as of november 2023) are sflix.to, fmoviesz.to, goojara.to, bstsrs.one, and 123movies (literally lost the site that I use all the time while i typed this jeezus). Reddit is a good place to look for new sites if these aren't working for you.
Okay so my go to for downloading videos is either direct from the website or Cococut. Let me show how I do that.
Bstsrs.one is a websites that provides links to watch your episode/movie. Mixdrop is my favorite link to use because you can right click and save or use the download link provided safely. I've never had a problem with mixdrop
The other sites are streaming with a few server options to choose from. I tend to go to one of those and cococut to download the video.
So let's do this!
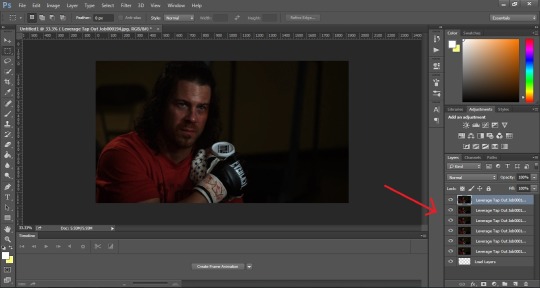
We'll go to sflix.to and I feel like making some Leverage gifs so we'll do a search for Leverage and find the episode I want. We'll go with The Tap Out Job (good ole beaten up Eliot)
Once you've chosen a server (the first one is usually just fine) and clicked the play button, click the cococut downloader extension button. A little window will pop up with options to choose. On the first link click the first button:
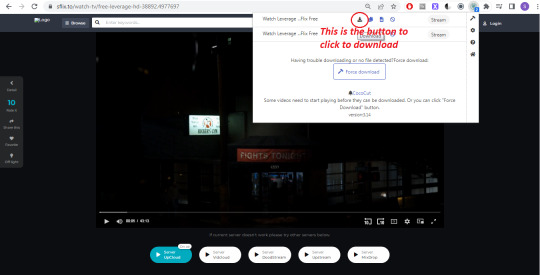
This will open the page for the downloader. Now you just have to wait for it to finish downloading. As you download you'll see a progress bar and a pause and resume button. When the download is done those two buttons will change to a green save button. Click that button to download the file to your computer
And tada! You've downloaded your video!
---------------------------------------------
3. Screencapping
So when using photoshop to make a gif you have two options which is either A) import video frames to layers which is when you upload a video and select the portion of the video which photoshop will then turn into frames for you or B) load files into stacks which is when you load screencap images of the scene you want to gif. In my opinion loading files into stacks/screencapping is so much easier. When you try importing a video and the video is huge it can be really really hard to narrow down the specific scene you want and then it can take forever to upload the frames. Screencapping makes it much easier to narrow your focus on just what you want to gif and doesn't take as long to upload.
So we are going to learn how to screencap our video.This is where KMPlayer comes in.
Open your video in KMPlayer and pause it while we get all of our settings ready.
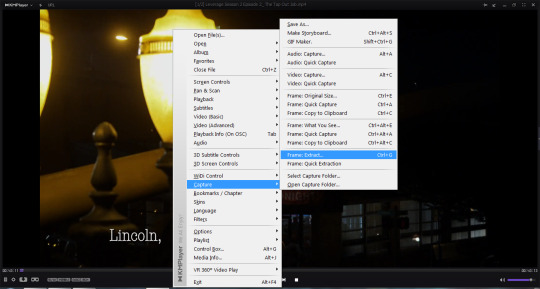
Right click --> Capture --> Frame Extract (or you can hit Ctrl G for a shortcut)
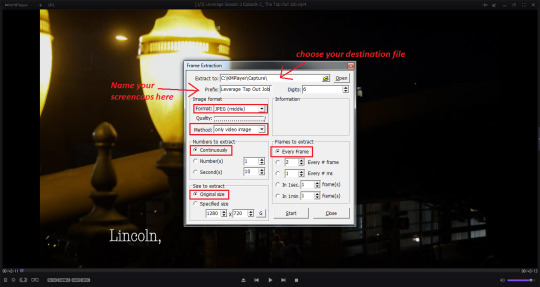
This box is all your screencapping settings. Feel free to just imitate mine. Select your destination file where the screencaps will be saved, give a name to the individual files, make sure it's set to every frame and original size. I often use the "every # frame" option as well if I domt want every si gle frame giffed which can take up a lot of space. Feel free to do this option too just set the number to 2 and it'll take every other frame instead of every frame. There's really no difference in gif quality but I find it can be better for storage space and for uploading frames to photoshop.
Once all that is set up click outside the box to make that go away (Don't hit the close button cause then you'll have to start over when you open the box again) and find the location of the scene you want to cap keeping the video paused once you've found it. When you've got the video set to where you want to start capping reopen the box using Ctrl G and hit the start button. Then go ahead and start playing your video. Your box will go away when you hit play but it's okay it's taking the screen caps. You can open it at any time using CTRL G to see it. When you've reach the end of the scene you want giffed pause your video, reopen the box again, and hit the stop button.
Double check that it worked by opening up the file location
Congrats! You've just made screencaps!
---------------------------------------------
4. Making A Gif
There are few different programs you can use to make a gif. I will be going over how to use Photoshop because I think that's the best way to get a quality gif. However if you don't have photoshop and are uncomfortable downloading it I do have a few alternate websites you can take a look at.
Photopea is like a web version of photoshop and you can find a tutorial on how to make gifs on it here
ezgif.com, giphy.com, imgflip.com, and makeagif.com are all super easy to use gifmaking websites that let you use either a video or screencaps. The only thing about these sites are that they are very limited when it comes editing and there will be a watermark of the website somewhere on the gif. It decreases your quality a bit but all are are wonderful, quick, easy ways of getting started in gifmaking. I made my start with ezgifs before I got photoshop.
Now I use Photoshop CC 2014 to make all of my gifs so this guide is gonna focus on using that program.
Loading Screencaps
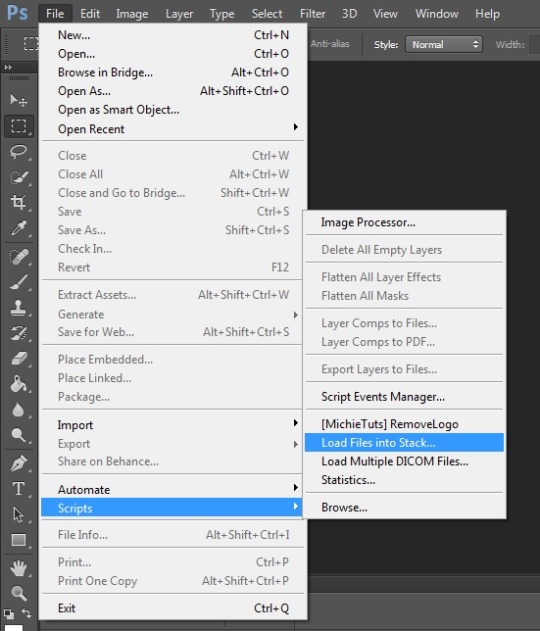
Open photoshop and select File --> Scripts --> Load files into stacks
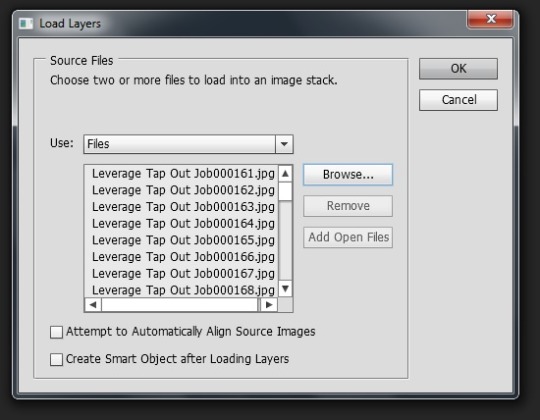
2. Click "Browse" and navigate to the location your screencaps are saved in. Select all the frames you need and click open. I try to keep each gif between 30 and 80 frames. 50 would be ideal. Anything more than 80 increases your chances that the gif will be too large to upload to tumblr. Sometimes 80 is even pushing it depending on the coloring and editing layers. This is why I tend to cap every other frame. Helps keep it all in one gif. So shoot for around 50 images.
Click okay when you've got all your screencaps in the box
3. Wait for all the images to load. This can take some time depending on how many you've selected. You can see them all uploading in this box here
Turning Files into Frames
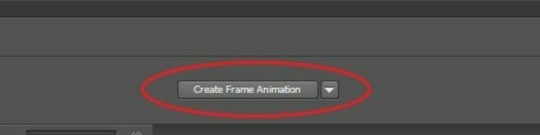
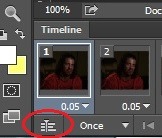
1. Next up we need to make this stack of images into something that will move. So click the button that says Create Frame Animation.
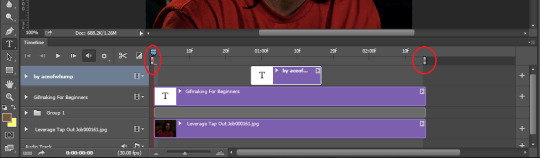
If your version of photoshop started in video timeline you'll need to switch it to frames first and then switch it back to video timeline. Let me show you how to do that just in case. Click the button of the timeline area on the left (circled in red) which will switch it to frame animation.
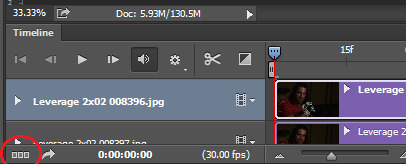
You could also use the drop down arrow next to the Create Video Timeline button and switch it to Create Frame Animation
Continue to the next step.
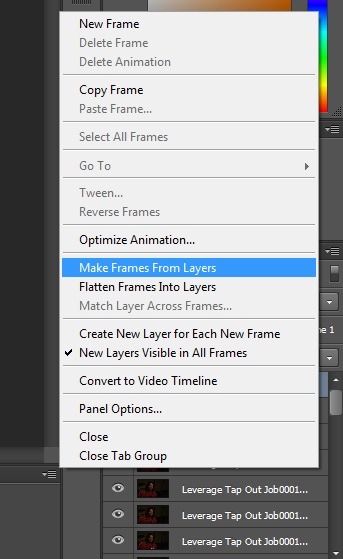
2. To get all our frames showing hit the menu button on the upper right corner of the timeline area which is the bottom portion of your screen (it's got a bunch of horizontal lines and is next to your layers box) and then click on Make Frames From Layers.
Now we can see all of our frames!
3. But uh oh! it's backwards! So click the menu button again and then click Reverse Frames to put everything back the right way

Much better
Setting Speed
1. Next up we are gonna set our speed. I always do this early because it's super important and doing it now is much easier than attempting to do it after we've edited the whole gif. Select the first frame then click the menu button and click Select All Frames
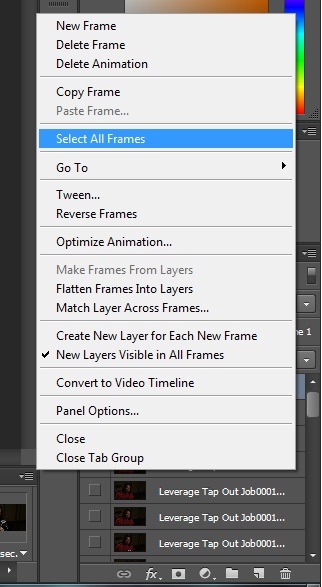
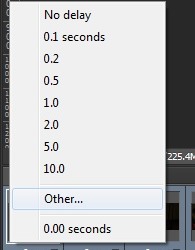
2. Next click on the drop down arrow on one of the frames. The one next to the "0 sec".
3. Select the Other option. Here you have a little leeway to do what you like best when it comes to the speed of the gif. I usually go with .1sec if I screencapped every other frame. The norm for a lot of gifmakers, especially if you've capped every frame, is either .05 or .07 secs. You can try all 3 and see how the speed works for you. To change the speed set the delay to either ".05", ".07", or ".1" and hit okay.

To see how the speed works click the play button. If you like your speed great. If not go ahead and repeat the previous step to try another. Try any number between 0.0 and 0.1 to find a speed you like. .05 is the closest to actual normal speed which is why so many of us use it but sometimes it just inst right. So trial and error it until you've found one you like.
Save your File
This is a great place to save your working file. This is important in case Photoshop crashes or something happens and you need to recover your file. Go to File --> Save As
Pick a location, give your file a name, make sure the file type is PSD and click save. Now your file is saved just in case.
Be sure to periodically go in and click File --> Save to keep your progress safe from Photoshop/Computer crashes! It will not auto save. You have to be sure to save it every once and a while.
Cropping and Resizing
Now it's time to resize our gif. Let's start with how to crop. Sometimes you'll have a gif that you want to cut down to reduce the amount of empty space or because there's black bars around it, or because you have a certain style in mind and need just part of the image. That's when we crop.
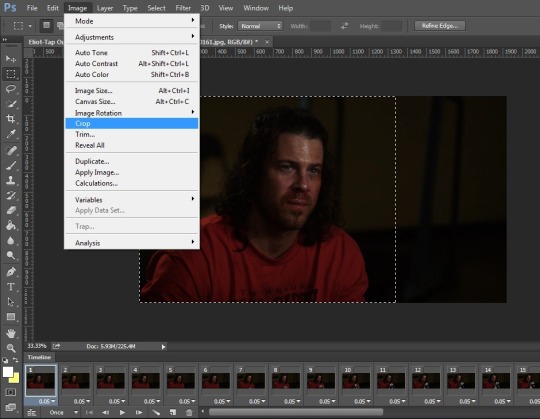
First thing to do is make sure you're using the select tool. That's the tool on the side that looks like a dotted line square box. Click and drag around the portion of your image you want to keep to mark where you want to crop your gif. Everything inside the dotted lines will be what gets kept. Everything outside is getting cut.
Be sure to check the whole gif to make sure you're not going to crop something important out. Don't hit the play button for this because then you'll lose the crop marks. Just select various individual frames to look.
When you are satisfied go to Image --> Crop and your gif will be cut down to your outline.
Now our gif is still huge and tumblr won't like that. In fact, tumblr has very specific dimensions when it comes to photosets that will maintain the quality of the image. These are the current dimensions to follow.
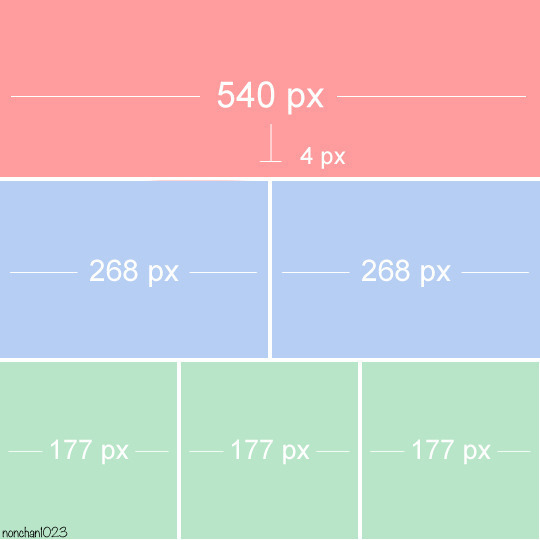
These numbers are the width of the individual images. The height does not matter. You can have any heigt you'd like. So for one image the width is 540px. For two images next to one another each gif would be 268px wide. Three images are each 177px wide. Of course you can have every single image 540px wide if you'd like. That's what I do. Then each gif is big and can be enlarged if you click on it. Just try not to go over 540px wide.
It is important to note that if you're going to put two or three images next to each other, make sure they are the same dimensions as each other. Otherwise tumblr will crop the larger image in the preview to match the smaller one and we don't want that. So keep the gifs the same size
Okay so to resize your gif to fit tumblr's dimensions click Image --> Image Size and this box will open.
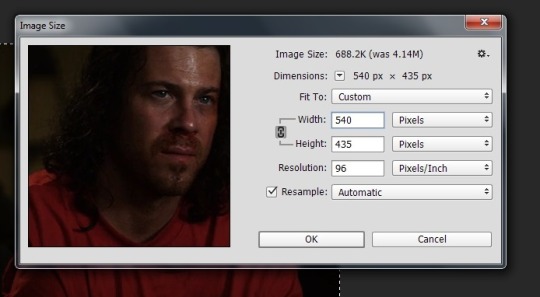
Make sure that little chain link to the left of "width" and "height" is selected. That keeps the proportions of your image. If you only change one size it'll automatically change the other to match the current proportions if that is selected. We want that.
Make sure the box next to the "width" and "length" numbers is on "Pixels" and nothing else. That's important.
Change your width to 540 pixels and click okay.
Turn Frames into Animation
All right our gif has now been resized. This next step will prepare it for editing. We need to turn our frames into a video timeline. Timeline mode allows us to easily sharpen and add adjustment layers to our gif. It also makes it easier to add text and gives a lot more freedom to decide when things like text and certain coloring editing layers show up. Timeline mode gives us a lot of versatility and saves time which I love.
Click the button on the bottom left of the timeline. Just under the first frame. This will turn it into a video timeline for us.
Next up we need to turn all of our layers into a smart object so that our edits will affect every layer. To do this click Select-->All Layers then click Filter-->Convert for Smart Filters. Click okay if another window pops up.
Don't skip this step! It's very important to ensure all the future editing works properly!
-----------------------------------------------------
5. Editing the Gif
This is where we can really get creative and which I find to be both the most fun and frustrating part of gifmaking. Editing!
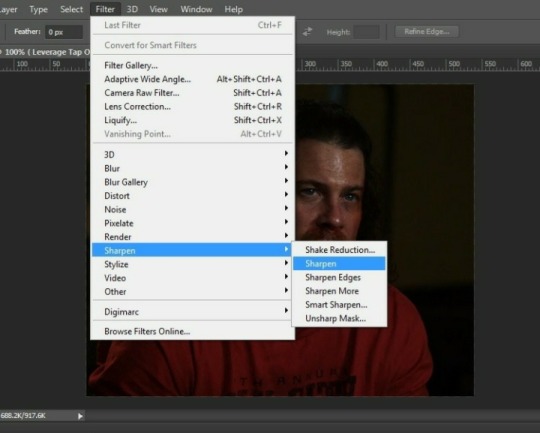
Sharpening
First step is to make our gif a bit more sharp. I know a lot of people use Smart Sharpen here but I have not quite gotten the hang of that myself so I stick with the preset Sharpen. It's not failed me yet and does a good job at sharpening my image for me with no work on my end. So go to Filter-->Sharpen-->Sharpen
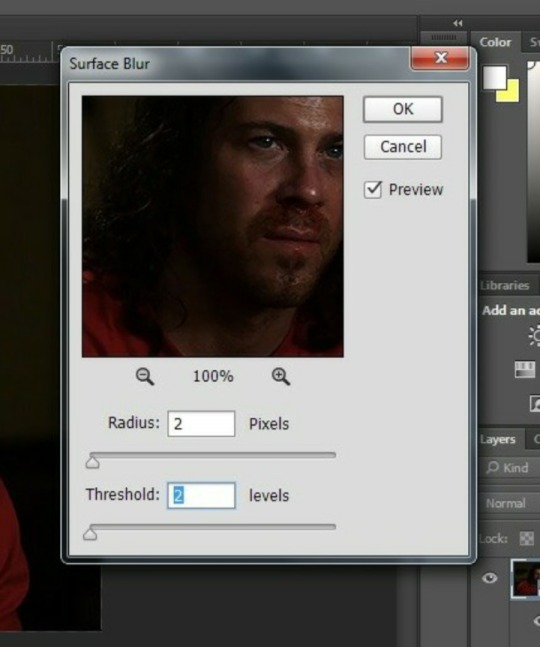
Next I like to add a little bit of Surface Blur. To me, this just smooths out the gif a little bit and I like the look. You can skip this one if you like.

Coloring
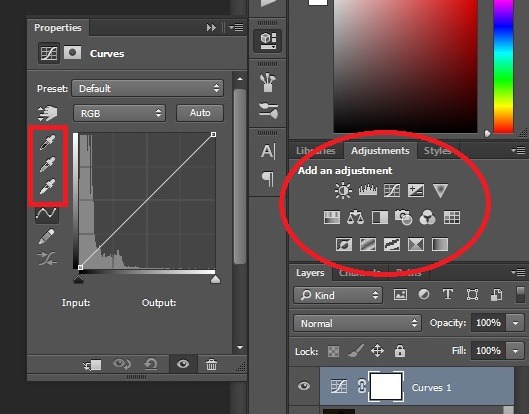
This is the hardest part of gifmaking in my opinion. But it's also the most creative part. Coloring. For this we are going to utilize the adjustment layers. There's tons of different options here to adjust brightness, colors, and more. The adjustment layers can be found under Layer---> New Adjustment Layer. Or in the quick box on the right hand side of the screen under the Adjustments tab. Hover over each symbol to see which one is which.
The very first thing I do is to brighten up my gif because every scene is always so darn dark and dingy. So let's brighten it up.
Next I use the Curves layer. The curves layer will allow you to isolate the white point and black point (what you want to be the darkest and lightest values).
Start with the Exposure layer. Go under Layer ---> New Adjustment Layer ---> Exposure (repeat for all other adjustment layers). Or you can use the shortcuts in the block to the right under the Adjustments tab. Use the sliders and just a tiny bit up the exposure so it makes everything a bit brighter.
Click on the eyedropper on the left. The bottom one is your white point, the top one is for the dark point. I usually start with the white point. Once you've clicked the white point eyedropper click on the brightest part of you image. In this case I chose the white spot on the ice pack. Next click the black eyedropper and then click on the darkest part of your image. I chose the part of Eliot's hair right next to the left side of his face.
The next adjustment layer I do is the Levels layer. This is also to brighten my gif. This one just takes some experimenting so slide the little arrows until you like how it all looks. It's gonna be different with each gif you make.
After this I add a layer of Brightness/Contrast. I don't always need more brightness but I tend to at least add a little bit of brightness. Then I add always add some contrast to darken the darks a little more and even out the coloring some.
Next up is the adjustments in the colors. I always like to add a Vibrance layer to make my colors really pop. But the downside is it also brings out colors I do not want to pop. That's when I add a Selective Colors layer.
Selective Colors allows you to adjust specific colors in your image. The idea behind selective color is that each color has its counterpart: cyan-red, magenta-green, yellow-blue. Adjusting them will help isolate certain colors in your image. In this case I want to reduce the red in Eliots face so I'm gonna go to the Red section and adjust those settings. Add as many layers for as many colors as you'd like to get the result you want. Also, doing them in separate layers helps if you need to go find the layer and make changes.
Finally I added a layer of Color Balance. This lets me adjust the colors in the highlights, midtones, and shadows. With a little experimenting you can smooth out or completely change the colors in your gif. It's really useful.
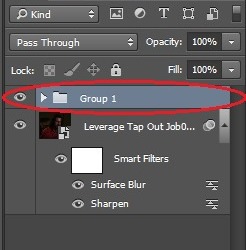
Once your done coloring select all your adjustment layers and add them into a folder. This is also a step you can skip but it makes it easier to copy all your coloring if you want to replicate it in another gif. To do this hold down Ctrl and click on each layer. Then click the little folder button at the bottom of the screen. I have it circled in this image. After you click the folder all your adjustment layers you've selected will be grouped together and look like this:
Text/Subtitles
So your gif is looking beautiful but what do you do of you want to add some dialogue or other text to you gif? I can help!
Click on the text box (the one on the left side that looks like an T) and drag the dotted lines in the area you want your text to be.
Typey type everything you want
Font, size, color can all be chosen in the circled areas below. Just highlight the text and change your font type, size and color to fit your liking. My go to font when I'm making subtitles for a 540px gif is Calibri Italic and I go with a size between 18 to 21.

Once your satisfied with the text, the size, the color, the placement and all that double click on the text layer in your layer box on the right hand side of the screen (circled in red in the image above). Make sure you are double clicking in the blank space and not in the text area of the box. You want this box to open:
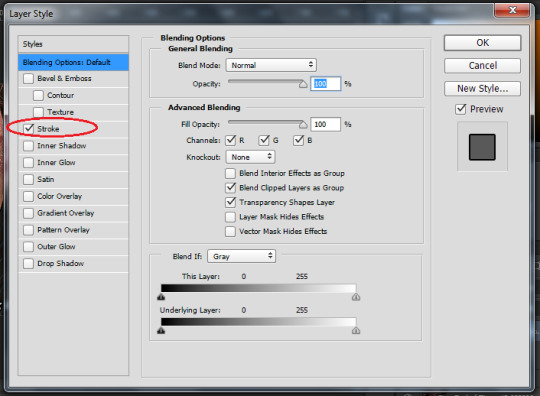
Check the box next Stroke and match my settings. This will put an outline around your lettering and make it pop a bit which in turn makes it easier to read. Click okay.
Make sure your text layer lines up with your gif layer in the timeline. So you're going to see this:
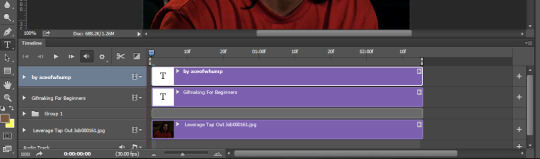
Your gif layer is the very bottom layer. The editing layers, all grouped together, is above that. The text layer(s) are at the top. Double check that all the layers are the same length and that your text layers aren't going past your gif layer. If you only want the text to show up for part of the gif you can control the length of the layer on the timeline. Just grab one of the ends and move it to your start and end points. For example, if I only wanted one of my text boxes to show up in the middle of the gif I would move both sides until it looked like this:
Another good thing to know about timeline mode: There are two brackets, one on either side of the layers, that tell you this is the beginning and the end of the gif. Anything outside of that will not show up when you save the gif. You can move those to cut your gif rather than trying to cut frames. You can also move those to cut off hanging portions of your text.
One final note for adding text, in your layers section on the far right side of your screen, put the Text Layer at top of all your other layers so it's unaffected by your coloring edits. Just click and drag it up to the top.
-----------------------------------------------
6. Saving the Gif
Exporting Gif
Now you're ready to save all your hard work!! Congrats!
Go to File-->Save for Web

A new window will pop up. The first thing you should do is check the size of your gif. Tumblr images cannot be over 10mbs. So check to make sure that size is less than that. That can be found on the left hand side just below the image of your gif. I've circled it in read in the next image.
If your gif is too big (bigger than 10mb) there are a few things you can do. You can get ride of a few frames by move the beginning/ending brackets in the timeline. That usually does it. If you absolutely have to, you can resize the gif down but I don't recommend this because once you get out of the 540px things in the photoset get funky. But it is an option if you need it. You could also crop your image some.
The next important thing to make sure you do is to ensure that your gif loops forever. In the bottom right, circled in red, you'll see looping options. It's going to be set to once. We don't want that. Click it and change it to Forever so your gif never ends.
Also make sure you are set to "gif" rather than a jpg, png, or wbmp. We want gif. See the final red circle at the top for where that is.
Feel free to copy my settings here. I tend to keep it at Adaptive and Diffusion and no dither.

You can click the play button beneath the looping options to check the final version of your gif. Make sure everything runs smoothly, the text (if you added any) is visible when you want it to be visible, and that the end isn't blank or anything weird. If you have any problems just hit cancel and go back and fix things.
Once that's all done click save, choose your save destination, and give your new gif a name!
Congratulations! You've just made a gif!!! WOO!!

-----------------------------------------------
7. Uploading a Gifset on Tumblr
Okay now that we've got our gif (or gifs) we are ready to upload them to tumblr!
Select the photo icon, click the upload from computer, find and select your gif(s).
Wait until they're all loaded then click, hold, and drag your gifs so they're in the right order for your photoset whether that's all stack on top of one another or side by side. This can be tricky because tumblr sucks and changed things so now the post box jumps around as you try and move images. Just be patient and move slow and pay attention to where you are in the post. Or you could upload each gif one at a time.
Don't forget to add a caption! The caption is the perfect place to put what it is we're seeing. You can add a quote or a description but be sure to add the name of the TV Show and the episode or the Movie title so everyone can easily see what this is from.
TAGS
Tags are so so important because without them no one will ever see your beautiful work. Tumblr pays attention to the first 20 tags so these are the most important when it comes to visibility. The best things to add for tags are the general fandom and character tags, edit tags (like marveledit or whumpedit), source blog tags, user tags, and trigger tags.
Next add your trigger tags/trope tags. This is important for the whump community because we gif a lot of things that can be very triggering for people so it's vital we tag for it so people can block it if need be. When in doubt if you should tag it for a specific trope, tag it.
For example if I was posting a whump gifset since I am a whump focused blog I'd first add the two main tags for whump gifsets. Those are #whump (our gen tag) and #whumpedit (our community tag for art/gifsets/edits/videos). The whumpedit tag is so important because this tag is specifically for whump visual art and other edits. The #whump tag is important because who do not like whump will block that tag so be sure it's in there so people can easily avoid triggers.
After those tags add your fandom and character tags. So for this gif I'd add #Leverage and #Eliot Spencer. You can also add the edit tags for your fandom so I could then add #leverageedit and #eliotspenceredit. Please don't forget the fandom tags! Not only does it help people know what the gif content is actually from so they can find it for themselves if they'd like to watch it but it will then add it to the fandom tags so people looking for content from this show/movie will see it. Increases your audience because people are more likely to search for a name than an edit tag or user tag.
Other things you can add in the tags are user tags and blog tags. A lot of big gifmaking/source blogs track a specific tag. They then go into that tag and see everything people made and can then reblog it. So feel free to tag your favorite blogs that you think will like your post. For example, I track the tag #aceofwhump. If you want to add that tag there's a chance I'll give it a reblog and reblogs are great for visibility.
So in posting this gif I would tag it as the following:
#whump, #whumpedit, #leverage, #eliotspencer, #leverageedit, #eliotspenceredit, #my gifs, #mod post, #beaten, #ice pack, #bruises, #blood
-----------------------------------------------
That's about it! Now you're equipped to make all the gifs could ever want! Go forth and have fun and if you run into any trouble or have any questions, my inbox is always open 😊
#gifmaking#gifmaking tutorial#gifmaking guide#how to guide#how to make a gif#how to make gifs#aceofwhump's gifmaking guide#mod post#my tutorials#gifmaking tutorials#tutorial
162 notes
·
View notes
Text
Quick tutorial for watching TEOS if you're outside the US
Get the windscribe vpn extension (I use Firefox, can't vouch that it'll work as well in Chrome), you get 10 gigs for free that refreshes every month.
Watching in the best quality eats up data like crazy BUT all you need to do is get the episode playing.
Start it and turn off the vpn and it'll keep playing, just remember to turn it back on before starting the next episode.
If you want to play it in the background
Set it to the worst quality and let it play, plenty of data for that.
Amazon sucks, so as far as I know, you can't loop a show like a playlist. Keep this in mind because it automatically rolls into something else after the last episode.
I have it playing on my second monitor so I can keep an eye on it.
Obviously this means you can't really use your browser for anything else or you'd be wasting vpn data.
You can use incognito mode and make sure the vpn is blocked from running. Or just use a different browser. From a quick google search, it looks like those are simpler options than trying to run two separate instances of one browser.
Uh. Quick note for something that literally just happened as I'm writing this post. I think I accidentally let the last episode end and as the next thing was trying to play Amazon detected the vpn. A quick browser restart & going to the show by link in Mark's vid fixed it.
Scratch that apparently it didn't fix it. But I still got a good few repeats in so it'll work for some time at least.
#the edge of sleep#the edge of sleep show#the edge of sleep tv#edge of sleep#markiplier#teos#teos show#indi's night talk#I saw someone complaining about people playing the show on repeat#and I'd be more inclined to agree that It's maybe a bit much#if it HADN'T gotten shafted every step of the way. no marketing ahead of time.#dropping the release date only two weeks in advance without even announcing the platform.#releasing it US ONLY??? without even? saying that it is#like I haven't seen any official announcement (ignoring that there's barely any) specifying that#I think it was only in that one guy's apolgy ?#so yeah I will use up those 10gb Just streaming the show for as long as I can.#(I don't wanna swear cause I want this post to show up in the tags but. HOOHH. I'm mad)
32 notes
·
View notes
Text
Hello tumblr friends, just had a scary moment there. I'm in the UK and the vpn I had as a chrome extension pretty much stopped me connecting to anything until I deleted it, same with a different chrome extension, but without them I couldn't access tumblr. The issue has been remedied for now since I downloaded a vpn to my PC which seems to be doing better and I can see you all again but the reality of me disappearing without being able to say goodbye again without selling my soul to the government is now becoming a very real possibility so if you don't see me for a few days, you can figure it out :(
5 notes
·
View notes
Text
List of programs and stuff I use
[pt: List of programs and stuff I use ./end pt]
Disclaimer: This is in no way trying to say I have the best setup of all time or anything. The point of this post is mostly to introduce people to cool things they may not know about, or a place to point to when someone asks what I use!
(Last updated: 6/28/24)
Browser
[pt: browser ./end pt]
Firefox (Windows/Linux/MacOS/Android/IOS) - Obviously I recommend Firefox above all else, especially with chromium-based browsers moving onto manifest V3.
Bitwarden (Windows/Linux/MacOS/Android/IOS) - Good password manager! Used it for years with no complaints!
AdNauseam (Firefox/Chrome) - My adblocker. It's built upon uBlock Origin and has all the same features, but it actively clicks on the ads to waste advertiser money. If that's not up your alley, uBlock Origin is fantastic too!
Wayback Machine extension (Firefox/Chrome/Safari) - Allows you to make snapshots of pages, or view old snapshots if a page isn't loading correctly!
XKit ReWritten (Firefox/Chrome) - Pretty much a must-have for Tumblr. Has a ton of features to make navigating this site much better. Full feature list here!
Discord
[pt: Discord ./end pt]
Vencord (Windows/Linux/MacOS) - A modified Discord client that adds support for plugins and themes. Basically allows you to install plugins from a massive list that improves Discord. (Technically against ToS. Basically, don't post that you're using it in big servers, and turn off your themes before sharing screenshots.)
Bunny (Android/IOS) - If you miss Vendetta for Discord, Bunny is an actively maintained fork of Vendetta! Basically the same as above, but for Android/IOS instead of desktop. Same warnings about ToS apply.
Aliucord (Android) - Miss the old Android app feel, and still want to have plugins/themes? Pretty cool but has a less impressive theme/plugin selection. Same warnings about ToS apply.
Bluecord (Android) - Another Discord modification without the new Discord UI!
Youtube
[pt: Youtube ./end pt]
Freetube (Windows/Linux/MacOS) - A desktop Youtube client with adblock and sponsorblock built in. Still in beta, but very good.
Sponsorblock (Firefox/Chrome) - Pretty much a must-have for watching Youtube these days. Automatically skips over sponsors, self-promos, interaction bait, outros, intros, etc. Highly configurable!
Dearrow (Firefox/Chrome) - Haven't used this very long but I love it. Gets rid of vague or clickbait titles/thumbnails and replaces it with descriptive and more accurate thumbnails. Also built into Freetube now!
Newpipe (Android) - Lightweight Youtube client. I haven't used it myself much but people swear by it!
ReVanced (Android) - Modded Youtube client with Sponsorblock, Return Youtube Dislike, and Youtube Premium features. Doesn't support Dearrow as of 6/25/24 :( (PLEASE BE CAREFUL INSTALLING THIS. If you don't know what you're doing, you can cause some damage!)
Spotify
[pt: spotify ./end pt]
Spicetify (Windows/Linux/MacOS) - Spotify modded client. Has adblock, themes, etc! Think Vencord, but for Spotify.
Misc.
[pt: Misc ./End pt]
Obsidian (Windows/Linux/MacOS/Android/IOS) - Basically a personal wiki for notetaking! A bit of a learning curve. Fanfic writers and worldbuilders... go feral.
Notepad++ (Windows) - A must-have text editor. Might be on more platforms but can't confirm?
Mullvad VPN (Windows/Android) - The only VPN I can 100% recommend. Cheap, fast, and really cares about your privacy. It's a little under $6 USD a month!
NVDA (Windows) - A free screenreader I use for reading large blocks of text. (Notice: I am not visually impaired to the point I rely on a screenreader to navigate my PC. I use it on occasion to read text to me because I have a hard time reading. If you're looking for advice on screenreaders for the visually impaired unfortunately I'm not a good source! Maybe check out the #visually impaired, #blind, or #accessibility?)
Syncthing (Windows/Linux/MacOS/Android) - Lets you sync folders across devices. It's especially good with Obsidian.
"Tequito, I didn't find what I wanted!"
[pt: "Tequito, I didn't find what I wanted!" ./end pt]
I'm sorry. :( If you're looking for a program I have personally mentioned using in the past, feel free to shoot me an ask or DM! Or hey... maybe try searching the letters "FMHY" and having a look around? *wink*
32 notes
·
View notes
Text
On Personal InfoSec
Been awhile since I've had one of these posts but I figure with all that's going on in the world it's time to make another one of these posts and get some stuff out there for people. A lot of the information I'm going to go over you can find here:
So if you'd like to just click the link and ignore the rest of the post that's fine, I strongly recommend checking out the Privacy Guides.
Browsers:
There's a number to go with but for this post going forward I'm going to recommend Firefox. I know that the Privacy Guides lists Brave and Safari as possible options but Brave is Chrome based now and Safari has ties to Apple. Mullvad is also an option but that's for your more experienced users so I'll leave that up to them to work out.
Browser Extensions:
uBlock Origin: content blocker that blocks ads, trackers, and fingerprinting scripts. Notable for being the only ad blocker that still works on Youtube.
Privacy Badger: Content blocker that specifically blocks trackers and fingerprinting scripts. This one will catch things that uBlock doesn't catch but does not work for ads.
Facebook Container: "but I don't have facebook" you might say. Doesn't matter, Meta/Facebook still has trackers out there in EVERYTHING and this containerizes them off away from everything else.
Bitwarden: Password vaulting software, don't trust the password saving features of your browsers, this has multiple layers of security to prevent your passwords from being stolen.
ClearURLs: Allows you to copy and paste URL's without any trackers attached to them.
VPN:
Note: VPN software doesn't make you anonymous, no matter what your favorite youtuber tells you, but it does make it harder for your data to be tracked and it makes it less open for whatever network you're presently connected to.
Mozilla VPN: If you get the annual subscription it's ~$60/year and it comes with an extension that you can install into Firefox.
Proton VPN: Has easily the most amount of countries serviced, can take cash payments, and does offer port forwarding.
Email Provider:
Note: By now you've probably realized that Gmail, Outlook, and basically all of the major "free" e-mail service providers are scraping your e-mail data to use for ad data. There are more secure services that can get you away from that but if you'd like the same storage levels you have on Gmail/Outlook.com you'll need to pay.
Proton Mail: Secure, end-to-end encrypted, and fairly easy to setup and use. Offers a free option up to 1gb
Tuta: Secure, end-to-end encrypted, been around a very long time, and offers a free option up to 1gb.
Email Client:
Thunderbird if you're on Windows or Linux
Apple Mail if you're on macOS
Cloud Storage:
Proton Drive: Encrypted cloud storage from the same people as Proton Mail.
Tresorit: Encrypted cloud storage owned by the national postal service of Switzerland. Received MULTIPLE awards for their security stats.
Peergos: decentralized and open-source, allows for you to set up your own cloud storage, but will require a certain level of expertise.
Microsoft Office Replacements:
LibreOffice: free and open-source, updates regularly, and has the majority of the same functions as base level Microsoft Office.
OnlyOffice: cloud-based, free, and open source.
Chat Clients:
Note: As you've heard SMS and even WhatsApp and some other popular chat clients are basically open season right now. These are a couple of options to replace those.
Signal: Provides IM and calling securely and encrypted, has multiple layers of data hardening to prevent intrusion and exfil of data.
Molly (Android OS only): Alternative client to Signal. Routes communications through the TOR Network.
Briar: Encrypted IM client that connects to other clients through the TOR Network, can also chat via wifi or bluetooth.
Now for the last bit, I know that the majority of people are on Windows or macOS, but if you can get on Linux I would strongly recommend it. pop_OS, Ubuntu, and Mint are super easy distros to use and install. They all have very easy to follow instructions on how to install them on your PC and if you'd like to just test them out all you need is a thumb drive to boot off of to run in demo mode.
If you game through Steam their Proton emulator in compatibility mode works wonders, I'm presently playing a major studio game that released in 2024 with no Linux support on it and once I got my drivers installed it's looked great. There are some learning curves to get around, but the benefit of the Linux community is that there's always people out there willing to help.
I hope some of this information helps you and look out for yourself, it's starting to look scarier than normal out there.

#information security#infosec#computer security#computer infosec#personal infosec#browsers#internet browser#email#instant messaging#cloud storage#linux#pop os#linux mint#ubuntu#firefox#firefox extensions#long post
72 notes
·
View notes
Text

You’re telling me all I have to do is enter in my library card code and I can read pay walled articles from home? Don’t have to download apps or VPNs or chrome extensions or edit the code on the page? I just type in some numbers? Hellll yeah
8 notes
·
View notes