#HDR Tutorial
Explore tagged Tumblr posts
Visit Tumblr Blog
Explore Tumblr blogs with no restrictions, modern design and the best experience.
Last Seen Tumblr Blogs


Fun Fact
In February 2021, Tumblr had 518.6 million blog accounts.
Text


BASE PSD FOR HDR CAPS by @manny-jacinto
- as per requested by @lady-alicent, this psd is specifically made for HDR muddy caps. this probably won't work for SDR caps - like / reblog if you use - don’t repost or claim as your own *note: this was made on a mac with a retina display so the coloring may be off according to what computer you use
download link | basic coloring tutorial
#userzil#usergif#psd#psds#gif psd#base psd#photoshop tutorial#photoshop tip#hdr#photoshop#resources#*#fair warning this will also probably do not work on every HDR caps. every scene is lightened differently
457 notes
·
View notes
Text

i told my friend i would find him some beginner’s giffing tutorials, but all the one’s i could find were either years out of date, used a method that made me go “huh”, or incorporated ready-made actions. all perfectly fine, but if i’m sending someone a tutorial i’d rather it be one for a method i understand enough to help with.
so, here is a beginner’s guide to giffing, as told by cleo, a neurotic, detailed, and organization happy individual. there will be many pictures.
this tutorial will strictly cover the gif making portion of the process, from getting your screencaps to importing in photoshop, resizing/cropping, and sharpening. i was going to briefly go over colouring, but tumblr only allows 30 images and i ran out of space, so i'll have to do a separate colouring tutorial (which also means i can go into more detail, yay).
downloading the videos, whether direct downloads or t*rrents, is also another tutorial. but make sure you’re using at least 1080p, and the bigger the file the better. a single episode of a ~45 minute show should ideally be 2gb at minimum. a full length movie should ideally be at least 5gb. imo 2160p/4k files are not really necessary; the quality increase is negligible, and it takes a lot longer to screencap them. if you do use 2160p/4k files, try and make sure it is not HDR, as those videos are often washed out and require a different screencapping program to fix.
Programs
I am using a cracked version photoshop 2022, but whichever version you use should be pretty much the same
Actions. not a program but a function inside photoshop, where you essentially record a series of steps, and then you can simple play that action when needed and those steps will repeat, which saves considerable time when giffing. I will note which parts of the tutorial are best saved as actions, and explain how to create actions at the end.
For screencapping i use kmplayer it’s free and very simple to use
not at all a necessary program, but i use freecommander instead of the regular windows file explorer as i find the dual panels very helpful when moving the frames around
Screencapping
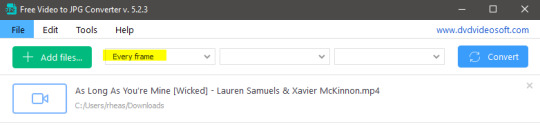
there are many programs you can use to get the screencaps from a video, a lot are basically the same, some are better suited for particular video file types. kmplayer is a very simple program to use, but afaik the capture function only works on mkv. files (the only other file type i’ve tried is mp4, which plays but does not capture)
once you open your video file in kmplayer, we’re going to open the advanced capture window, found under capture→advanced capture, or alt+v
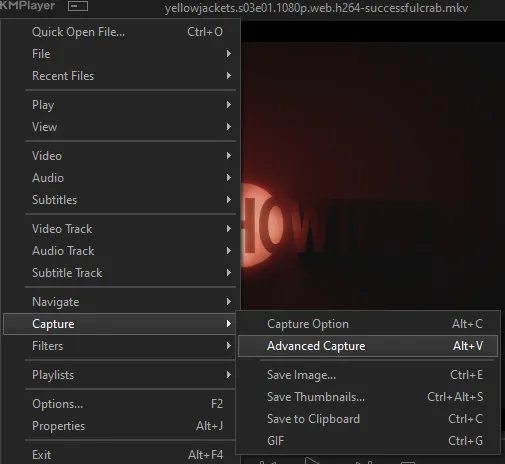
the window should look like this
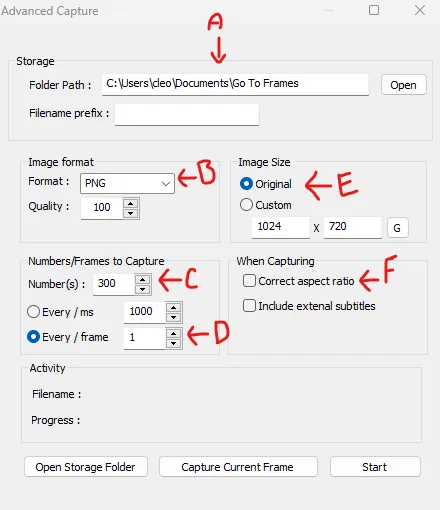
A-this is where all your screencaps will save to. i recommend making a specific folder for all your screencaps
B-make sure this is set to png for best quality
C-this is the number of screencaps you want to take, guesstimate how many you will need, keeping in mind that most videos are approx. 25 frames per second, and you should always cap a bit more than you think just in case
D-make sure “every/frame” is selected and set to 1
E-make sure “original” is selected, resizing will be done in photoshop
F-make sure “correct aspect ratio” is unselected
go to the part of the video you want to gif, and pause it just slightly before that part starts, then select ‘start’. the screencaps will start to save to the file, no need to play the video, and will automatically stop once it has capped the number of frames you have chosen
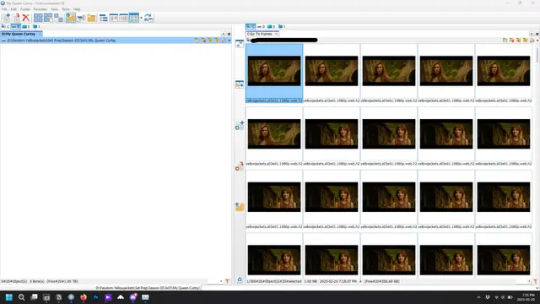
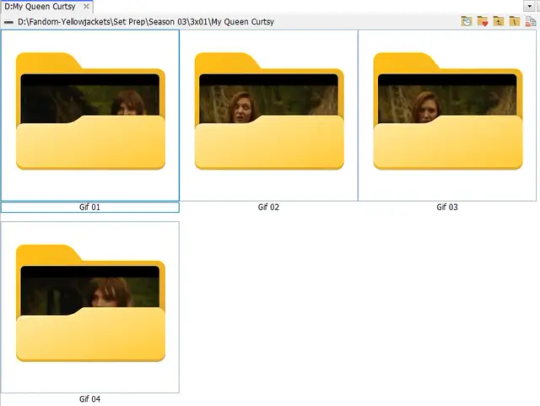
and here is how they look inside freecommander. i have already made a folder for this gifset, which is on the left. now you’re going to make a folder for each individual gif. i’ve decided this one will have four gifs, so create four folders (i just label them gif 01, gif 02, etc) and then move the frames for each gif into their respective folder
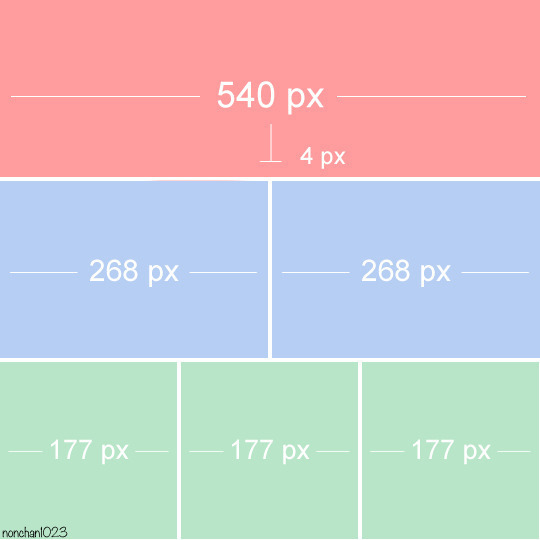
while you can always delete frames once the gif is made if it’s too big, i prefer to make sure i have the correct number of frames before i start. the gif limit on tumblr is 10mb, so it’s good to look at the scene/shots you’re giffing and decide approx. what dimensions your gif will be. full size gifs have a width of 540px and your choice of height. if you go for a square gif (540x540) you can usually fit 40-50 frames. if you’re planning for a smaller height (such as 540x400) you can usually fit more around 50-60 frames.
and here are the caps inside the folders. another reason i like freecommander is it’s ability to “multi-rename” files. the default file explorer can do so as well, but you have to do each folder individually and you can’t customize the new names as much. either way, i prefer to rename the files to each gif just to scratch my organization itch.
Introduction to Photoshop
NOTE: i have changed many of my keyboard shortcuts in photoshop to ones i prefer, so any you see listed in the menus of these screenshots are likely not the original shortcuts. you can see and change them yourself under edit→keyboard shortcuts

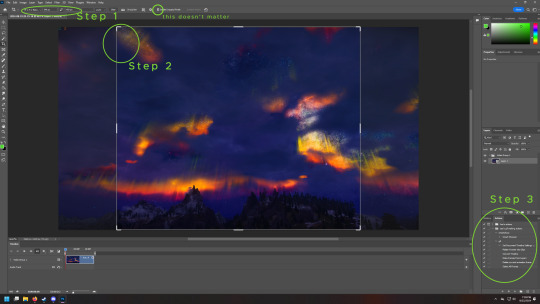
quick run-down of the photoshop interface. i have adjusted placement of some things from the default so this isn’t exactly how your photoshop will look when you open it, but everything is labelled, either on top or by hovering over the element. once you’re more familiar and have your process down i would recommend adjusting the workspace to suit your process.
A-your main tools and colour selector. almost all the tools have either several tools in one, or have alternate options which can be accessed by right-clicking the tool. you can also hover over each tool to get a pop-up with a quick explanation of the tool
B-additional “windows” such as history, properties, actions etc. can be opened from the window menu at the top and moved around with click-and-drag. history and properties should already be there by default, but probably on the right hand side instead. each window opens and closes with a click
C-the timeline window where the gif is made. the white square is a single frame of a gif, and on the row below is the play controls. this will not be there by default and will need to be opened from the window menu
D-adjustment layers for colouring
E-layers box. this is where the screencaps will show, along with adjustment layers, text layers, etc.
Opening Screencaps in Photoshop
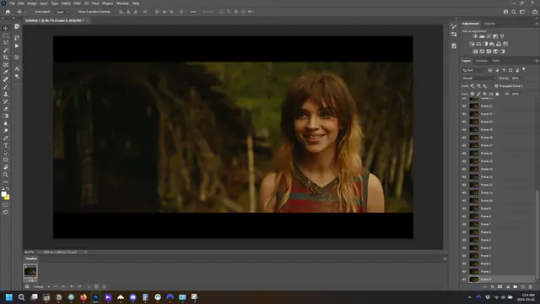
go to file → open navigate to the folder for your first gif, select the first screencap, and check the image sequencing, and click open

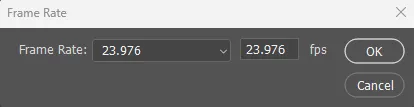
a window will open labelled frame rate. set it to 23.976 and select ok
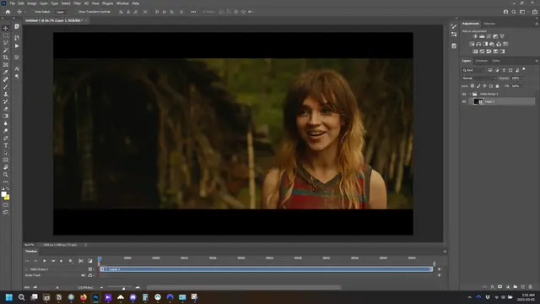
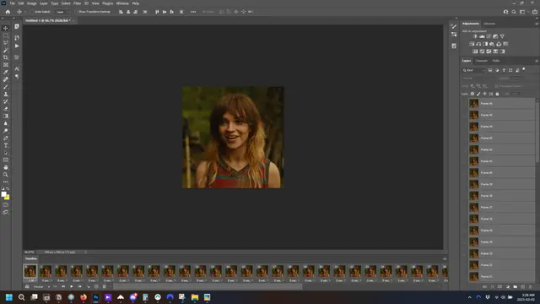
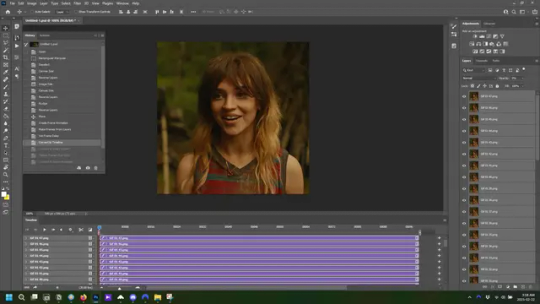
the screencaps will open in the timeline view, seen as the blue panel line at the bottom, and the screencaps are combined into video layer in the layer panel on the right.
Creating Frames
technically, you could go right into your cropping/resizing and sharpening from here, however if you do that directly then you have to keep the screencaps in the folders you have, otherwise if you save and re-open the gif it won’t move.
this next part should be made into an action.
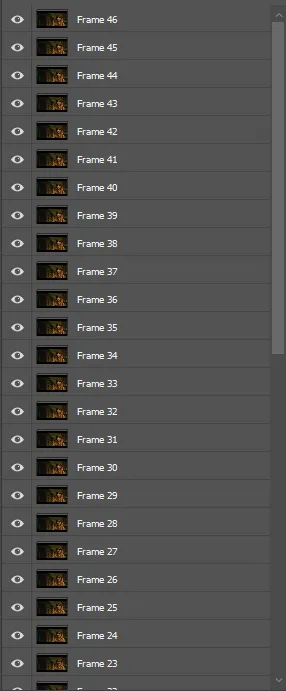
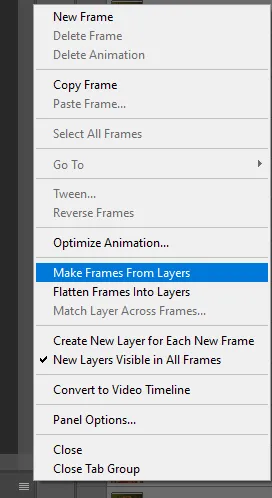
at the top right of the timeline window, click four vertical lines to open the menu and select convert frames → flatten frames into clips. depending on how long the gif is, this can take a minute.

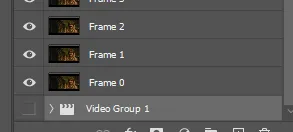
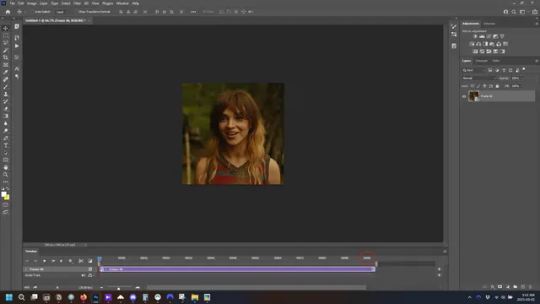
the layers panel should now look like this, each frame of the gif is now its own layer.
the very bottom layer will be the video group. this can be deleted as we’ve made the frames from it
in same timeline menu as before, right under “flatten frames into clips”, select “convert to frame animation” and the screen should now look like this. this will be the end of this action.
Cropping and Resizing
with widescreen footage, sometimes it’s just shorter than 1080p, but most of the time it will have the black bars on the top and bottom, and frustratingly, they’re not always the same size. it’s good to save the most common sizes as actions.
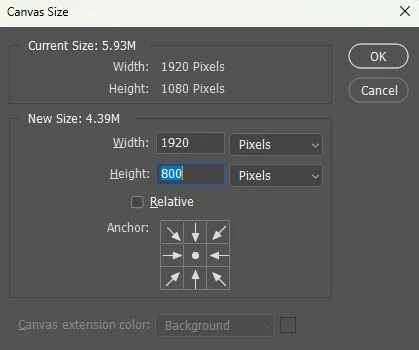
to find the size of the actual screen you turn on the rulers under view→rulers and check the height. then open your canvas size dialogue box under image→canvas size and change the height, making sure pixels are selected in the dropdown. yellowjackets is what i call “xtra wide” which is 800px. “normal” widescreen is 960px.
next we’re going to resize the caps. i also make actions for this, one for each potential gif size. open the image size dialogue box under image→image size and change the height of the image to your desired height plus 4 pixels. these extra pixels are to prevent a line at the top and/or bottom of your completed gif. now re-open the canvas size box, change the width to 540px, and the height to the desired, removing those 4 extra pixels. i have set this one to 540x540. this is where you would end the resizing action.
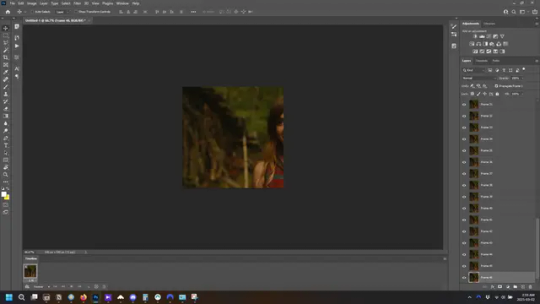
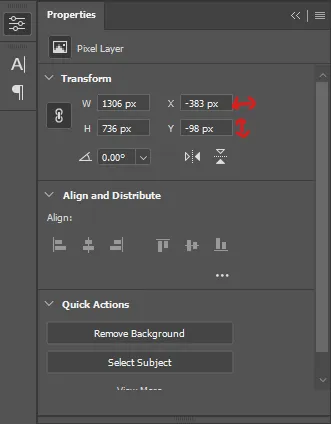
and as you can see she is off-screen. select the top layer, hold down shift and select the bottom layer to select them all, and with the move tool (the very top one) activated, click and drag to move it left to right as needed to centre the figure/s. as you move it a box will appear telling you how far you are moving it in any direction. make sure you are only moving it left or right, not up or down. to be certain of that, open the properties tab.
the y axis is your up/down, x is left/right. for this gif the y needs to stay at -98. you can also manually change the x axis number instead of dragging the image. also helpful for making sure multiple gifs of the same shot are all positioned the same.
the layer are currently ordered with the 1st at the top and the last at the bottom. with all layers still selected, go to layers→arrange→reverse. the last layer will be on top now. if there is movement in your gif, check if you need to alter the position again to make sure the movement properly centred. but once you are satisfied with the position, the layers should be in “reverse” position, of last layer on top. this is to ensure that the gif plays forwards.
Converting Gif
this should also be made into an action, going through sharpening process
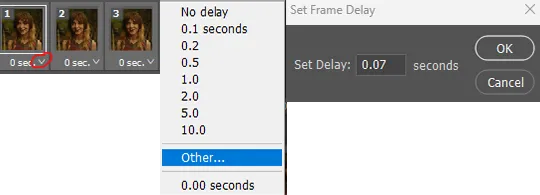
in the timeline menu, select “make frames from layers”
the frames are now populated in animation window. in timeline, click select all frames. go to any of the frames on the bottom and click the little arrow beneath it, select other, and enter 0.07 seconds. this is not a necessary step, as we will have to adjust the frame rate at the end, most likely to 0.05, but if we don’t change the frame rate here, then when we play the gif while working on it to check how it looks, it will play very fast.
in the same menu at the right of the timeline box, select “convert to video timeline”
then, making sure all layers in the panel on the right are selected, go to filter→convert for smart filters. this turns all the layers into a single smart object.
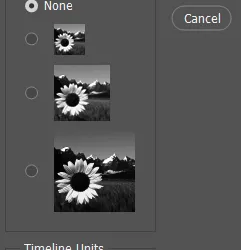
but if you look where i’ve circled, it says the gif is 99 frames long*, when in fact there are only 47. if you are making regular “scene” gifs, basic colouring and maybe a caption, this is fine and does not need to be fixed, it will play at the same speed. if you want to change it to display (approx.**) the correct number of frames, go to the timeline menu on the right, select “set timeline frame rate” and change it from 30 to 15
*if it does not list a frame number by 4 digits but instead says 5f, 10f, 15f, etc. go to the timeline menu on the right, select panel options, and change timeline units to “frame number”
**the reason why this is only approximate is because the actual frame rate is not a a whole number, so when changing the frame rate it isn’t a 1:1, and 47 frames becomes 50 frames. the extra frames are removed at the very end, but if you are not doing any edits that require working frame by frame, there’s no need to change the frame rate here at all
Sharpening
this is, as it sounds, making the gif look sharper. to start go to filter→sharpen→smart sharpen and this window opens. play around with the dials to see what each ones does. the below settings are good for most high quality footage.
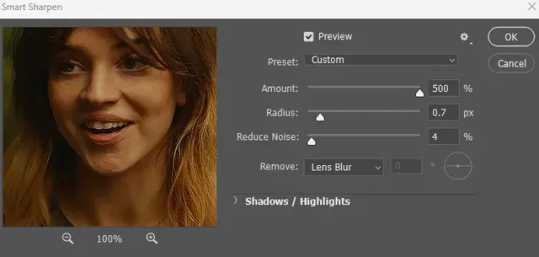
Amount-basically, how sharp do you want it
Radius-hard to explain, but this essentially sets how deep the lines of the sharpness are
Reduce Noise-smooths the pixels
once you click okay your single layer should look like this.
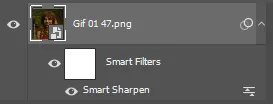
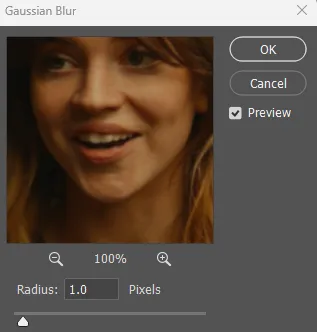
you’re going to then right click the layer and select duplicate layer. with the top layer selected, go to filters→blur→gaussian blur and set the radius to 1.0 pixels.
then change the opacity of the top layer to 10%. this is to essentially soften the sharpening a bit, as if it’s too sharp it can make the colouring wonky. this opacity level can also be changed depending on need.
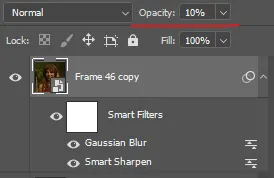
finally, select both layers, right click, and click “group from layers”. your gif is now fully made and sharpened.
Colouring
yeah. ran out of image space. but this is where you would do your colouring and add a caption or any other text.
Converting & Exporting
when all your colouring is done, you’re ready to start saving your gif. you can do it directly from your current file, but that means essentially losing your colouring, as all those layers will be merged together. i am someone who likes to save my psd’s (photoshop files), at least until i’ve posted the gifs, in case i need to fix something in the colouring. if you’d like to keep yours as well, open the history tab and select the first icon at the bottom “create new document from current state”. this will open a copy of the file in a new tab. save the original file and you can close it, continuing all work on the copy file.

select your all your layers, convert them into a smart object from filter->convert for smart filters, then follow the same steps from Creating Frames above. once you're back in frame animation, select Create Frames From Layers, and once again set the frame animation speed.
most people set the speed to 0.05. i personally set it to 0.05 or 0.06 depending on the length of the gif. check how it looks at 0.05, if it seems too fast, try 0.06.
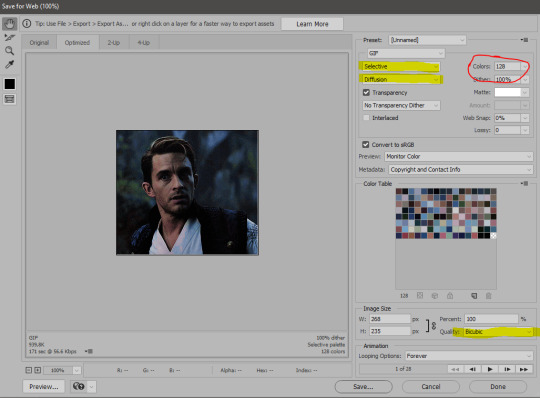
now to save. go to file->export->save for web (legacy). the number is the lower left corner is your gif size, it needs to be under 10mb or else you'll have to delete some frames.

the right panel is your save options. the preset dropdown has some built-in settings, but you won't use them because (at least on my version) the presets only go up to 128 colours, instead of the full 256. the 3 i've highlighted in green are the only one's you'll adjust as needed. the settings below i use for i'd say 90% of my gifs. i'll sometimes change the adaptive dropdown to one of the other options, ocaissionaly the diffusion, and rarely the no transparency dither, but play around with them and see how they change the look of the gif.

when you're satisfied with the look of your gif, click save at the bottom right of the window.
voilà! you now have a gif.
Actions
this is your actions panel. the triangle on the left side is the button to open it. remember, if it's not already there, go to windows->actions to open it.
the buttons on the bottom, left to right, are stop recording, record action, play action, new folder, new action, and delete.

as you can see, i have different folders for my resizing, sharpening, captions, saving, and my 1 step (temporary) actions. to run an action is very simple; click the action, and click play.
to create an action, click the new action button, a box will pop up, give the action a name, and click record. the record button at the bottom of the action window will turn red. now perform all the steps you want it to record, and click stop recording. keep in mind it will record every single thing you do, including in other open files, so if the action you plan to record will have a lot of steps, it might help to write them down first.
to modify an action, select the step in the action above where you'd like the new step to be, hit record, perform the step, stop recording. select the step you'd like to delete, and click the delete button.
steps within the actions can be clicked and dragged, both within that action and moved to other actions. actions can also be moved between folders.
273 notes
·
View notes
Note
hi i'm sorry to bother you but do you have any tips on giffing dark indoor scenes? yours always look so good!
hi there! not a bother at all :) i can definitely try to explain the steps i usually take under the cut!
this tutorial will assume that you already know the basic steps of gif-making — if you don't, there are lots of great tutorials floating around on this site that can help you out! :)
here's the gif i'll work with to explain my steps, the bottom being the original and the top being the coloured/brightened version.

before we start, a general tip i recommend keeping in mind: if you want to brighten a dark scene, you'll want to get your hands on the highest quality download you can find. 1080p is decent, but if your laptop can handle 2160p 4k hdr files* without sounding like it's about to explode, that'll get you even better results!
(*colouring hdr 4k files requires a different set of steps — the scene will appear washed-out on photoshop, so you need to make sure that you don't end up whitewashing anyone if you do choose to work with this type of file.)
since most of my downloads are 1080p, i'll use this type of file in this tutorial.
the first step of my gifmaking process with 1080p files is almost always the same no matter what scene i'm giffing. i make a brightness/contrast layer and set the blending mode to screen:

now my gif looks like this:

depending on the scene and how washed out it looks after this layer, i'll play around with the opacity. for this gif, i didn't touch the opacity at all. use your best judgement for this, because every scene is different!
i find that dark indoor scenes are usually tinted in yellow or green. one of my first goals is to try to fix the undertone of this scene before focusing on brightening it any further. i go to colour balance for this, and play around with the midtones, shadows, and highlights.
again, every scene is different, so the amount to which you use colour balance will differ, but for this specific scene, my goal was to neutralize the yellow. i focused particularly on the midtones and shadows of the colour balance layer, moving the scales to the opposite of the reds.


doing so will help with neutralizing the yellow. the only reason i moved the scales towards magenta and blue (therefore making it a bit more red than less) rather than green and yellow in shadows was because i wanted a darker contrast in the blacks. moving them to green and yellow made the overall scene more yellow since there were so many dark spots that shadows affected. (you'll see what i mean when you start experimenting with your own gif — this part of the process really just depends on your preferences!)
our gif might not look that much better yet, but it will soon! our best friend channel mixer is gonna help us out. for an in-depth post about how to use this adjustment layer, i recommend checking out this tutorial.
i'm someone who prefers to make more than one layer for the same adjustment layer for a reason i can't even explain (i just find that it helps me stay more organized). so don't think of this process like i can only use this layer once so i MUST fix it NOW. you can create multiple layers of the same adjustment layer, because every layer on top will affect the ones underneath it.
since my priority is getting rid of the yellow tint, i went to the Blue section of the channel mixer and increased it in all of the scales:

this step alone has helped us out so much, because look at our gif now!

not only does the background look less yellow, but so does izzy's skintone.
now i'm going to focus on trying to brighten the scene even more without destroying the quality. the levels layer can actually help out a lot with this.

the amount to which i move each toggle differs per scene, and i think experimenting depending on your gif works best for this layer.
side note: i prefer not to use the ink droppers on the side because the contrast in the result usually ends up feeling too strong for my preferences, but if you find that this works better for you, then go for it! basically, the first dropper with the black ink should be clicked before you select the darkest part of the scene that you can find, and vice versa for the third dropper with the white ink — click it, and then select the brightest part of your scene.
curves is the next layer that does fantastic work! unlike the levels layer, i do actually use the ink droppers for this. it's the same concept, with the first dropper being used on the darkest part of the scene, and the third dropper on the brightest.
try to think of curves as something that not only further brightens your scene, but also helps with the colour neutralizing process.
i grab the first dropper, then click the darkest parts of the gif that i can see. depending on the undertone of the blacks that you're clicking on, the tint of your gif might actually change significantly. this is why i prefer to click once, then undo the action if i don't like what it gives me. izzy's leather jacket was the sweet spot for this gif.
when i'm satisfied, i make another curves layer and use the third dropper to click the bright/white parts of the scene. for this gif in particular, the lights in the background were a good fit because they carried a yellow undertone — this meant that my curves layer actually helped to further neutralize the yellows in the scene as a whole!


(i manually dragged the curves graph upwards for the third dropper to make it brighter. i don't need to do this if the dropper does this for me automatically, but since the lights were pretty bright, it only changed the tone of the scene and didn't increase the brightness — hence the manual step.)
pat yourself on the back, because this is what our gif looks like now!

this is good, but it's not great — there's still just a bit too much yellow in the scene for my liking (sorry, i'm picky! :P)
i created another channel mixer layer and played with the toggles until i was satisfied:


ta-da! the gif as a whole is much less red/yellow now:

this is when i start fixing the colouring now — namely, his skin tone. selective colour will be your best friend here. i wanted to make his face just a tad brighter and less of a yellow-ish magenta shade, so i focused on the reds and yellows.


then, out of habit, i created another selective colour layer and took out more of the "yellow" in the whites to make them whiter, and increased the black (just by +1, since the contrast is pretty good enough already).


note: i switched to "absolute" for these two colours. basically, relative = less vibrant colour manipulation, and absolute = more vibrant/stronger colour manipulation. i prefer to stick to "relative" for fixing skin-tone since "absolute" can be a bit too strong for that.
our gif looks like this now!

his face looks brighter and much less yellow, so i'm satisfied!
this next step is not mandatory at all — again, i'm just picky and despise yellow-tinted scenes. i personally believe that indoor scenes that are yellow/green tinted make them look more dark than they actually are, so i do my best to get rid of these colours.
i also don't always do this, but for this gif, i just simply went to hue/saturation, selected the yellows from the drop-down menu and decreased its saturation.

be careful not to do this too much. depending on the quality of your download, this can significantly decrease your gif quality. i tend to worry less about this when i'm working with 2160p files, but again, those files require an entirely different set of steps when it comes to brightening/colouring.
since this was a 1080p file download (and one that was actually less than 1GB, oops, don't do that), i played it safe and decreased it by -39 only.
note: you also want to be cautious of colour-washing skintone when it comes to this step. i find that another selective colour layer can help perfect the skintone in case the yellow drains out of it too much, but skip the hue/saturation step if it's too difficult to work with — better to be safe than sorry.
anyway, this is the final gif!

that's usually what i do when it comes to colouring dark indoor scenes! i hope this tutorial makes sense, and if you have any further questions, don't hesitate to reach out! :)
#tutorial#gif tutorial#resources#completeresources#coloring tutorial#allresources#dailyresources#userraffa#userdean#uservivaldi#alielook#usercats#usermoonchild#usernaureen#userbarrow#userabs#useraish#useralison#userisaiah#*mytutorials#i am so sorry if this is incoherent#it’s so hard to explain things coherently 😫
755 notes
·
View notes
Note
hi! i was wondering if you have any advice/certain programs or anything you use for making gifs, because there’s something i really want to make but i have zero experience 💔💔
hello hello!
ah, yes, I have a TON, let's hope this ADHD girlie can give a somewhat concise description lmao. I will answer this publicly, in case it's useful for anyone else.
Software I use:
To make the screenshots: - for single scenes: KMPlayer 12.22.30 (the newer versions are trash) - for shorter videos, or something you want to get all the screenshots out of Free Video to JPG converter is awesome.
To make the gifs: - Adobe Photoshop 2021 (I don't recommend much later versions, because of the Cloud connection they have)
General gif-maker wisdom: "we spend more time on making sure that something looks serviceable, not pixelated, and good quality, than to get it moving and shit" - Confucius, probably
Useful stuff to make your life easy:
- Squishmoon's action pack for sharpening your screenshots. You can also find their detailed use explained here. - If you are planning to gif Wicked, some scenes are a bit tricky, ngl. But I have two PSDs that you can use, while you're perecting your own craft, and you can edit and update them to make them more "you".
A neutral PSD for mostly indoors and lighter scenes | download

A blue-enhancing PSD for darker scenes | download
Some info on videos to use: - always, always (ALWAYS) use at least HD videos. Otherwise your gif will look like shit. This should be ideally at least 720p in resolution, but go with 1080p for the best results. Coloring gifs in 1080p is easy, but... - if you want to go pro *rolls eyes*, you could go for HDR (2160p) quality. However HDR is a mf to color properly and I would not recommend it for a beginner. When you extract frames from an HDR video, the image colors will end up being washed out and muddy so you will always have to balance those colors out for it to look decent, however, the quality and number of pixels will be larger. If you ar okay with making small/medium sized images, then stick with 1080p. (Storytime, I spent a lot of time making HDR screenshots, only for me to realize that I really hate working with them, so I'm actually considering going back to 1080p, despite that not being "industry standard" on Tumblr lmao. I'm not sure yet But they take up so much space, and if you have a laptop that is on the slower side, you will suffer.)
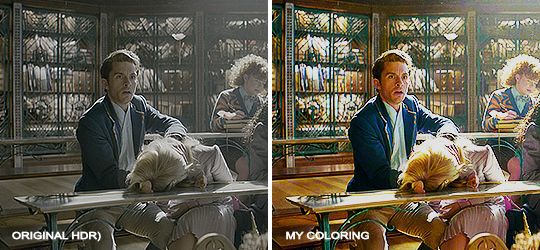
See the below example of the image differences, without any effects. You will probably notice, that HDR has some more juicy detail and is a LOT sharper, but well... the color is just a lot different and that's something you will have to calculate in and correct for.

The ✨Process✨
Screencaptures
I like to have all screenshots/frames ready for use. So as step one, you need to get the movie file from somewhere. This should definitely be a legal source, and nothing else (jk).
Once I have the movie. I spend a lot of time making and sorting screencaps. Since I mostly work in the Wicked fandom only atm, that means I will only need to make the frames once, and thats awesome, cause this is the most boring part.
For this, I let the Video to JPG Converter run the whole movie while I was aleep, and by morning, it created gorgeous screenshots for me and my laptop almost went up in flames.
You need to make sure you capture every single frame, so my settings looked like this:
Screenshots do take up a lot of space, so unless your computer has a huge brain, I suggest storing the images in an external drive. For Wicked, the entire movie was I think around 200k frames total. I reduced that to about 120k that I will actually use.
And then I spend some time looking through them, deleting the scenes I know I won't do ever (goodbye Boq, I will never gif you, I'm so sorry :((( ) and also, I like to put them into folders by scene. My Wicked folder looks like this:

If you don't want this struggle and you only need a few specific scenes, there is this great tutorial on how to make frames from KMPlayer. Note that some of the info in this tutorial on gif quality requirements and Tumblr's max allowance of size and # of frames are outdated. You are allowed to post a gif that is a maximum of 10 Mb and 120 frames (maybe it can be even more, idk, said the expert) on Tumblr. But the process of screencapturing is accurate. Also ignore the gifmaking process in this tutorial, we have a lot easier process now as well!
Prepping the images
I have a folder called "captures", where I put all of the specific screenshots for a set I want to use. Inside this folder I paste all the shots/scenes I want to work on for my current gifset, and then I create subfolders. I name them 1, 2, 3, etc, I make one folder for each gif file I want to make. Its important that only the frames you want to be in the gif are in the folder. I usually limit the number of images to 100, I don't really like to go above it, and usually aim to go lower, 50-70 frames, but sometimes you just need the 100.
Sidetrack, but: Keep in mind that Tumblr gifs also need to be a specific width, so that they don't get resized, and blurry. (Source) Height is not that important, but witdth is VERY. But since there is a limit on Mb as well, for full width (540px) gifs you will want to go with less frames, than for smaller ones.
Once you have the frames in folders, you will open Photoshop, and go to: File > Scripts > Load files into stack.
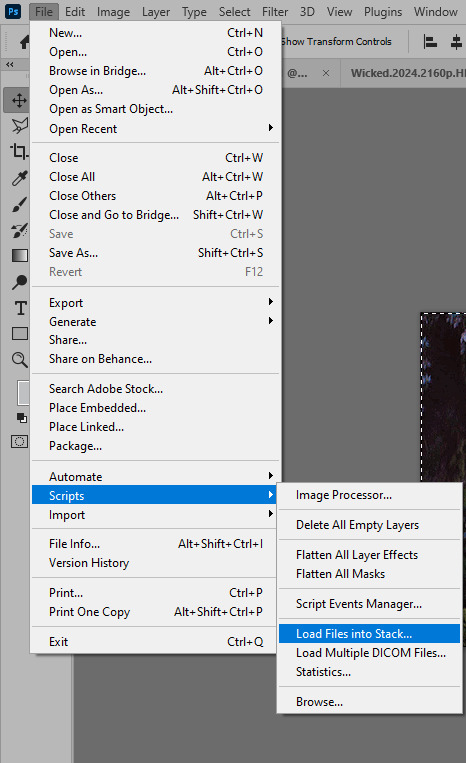
Here you select Folder from the dropdown menu, and then navigate to the folder where you put the frames for your first gif. It will take a moment to load the frames into the window you have open, but it will look like this:

You click "OK" and then it will take anther few moments for Photoshop to load all the frames into a file.
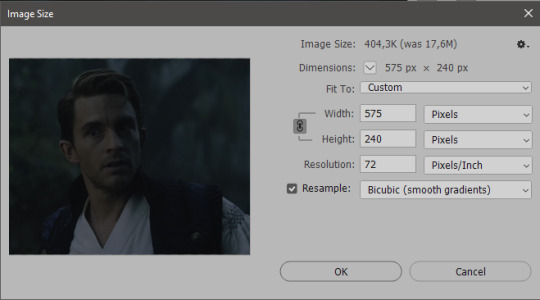
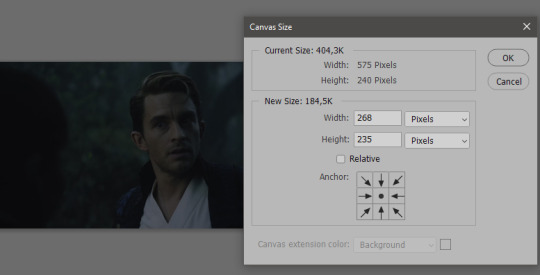
But once that's done, and you have the frames, you next have to resize the image. Go to Image > Image size... When you resize in Photoshop, and save as gif, sometimes you do end up with a light transparent border on the edge that looks bad, so, when you resize, you have to calculate in that you will be cutting off a few pixels at the end. In this example, I want to make a 268px width gif. I usually look at heights first, so lets say I want it to be a close-up, and I will cut off the sides, and it will be more square-ish. So I set height to 240px. Always double check that your width doesn1t run over your desired px numbers, but since 575 is larger than 268 (can you tell I'm awesome at math?), I should be good. I click OK.
Next, you have to crop the image. Go to Image > Canvas size... At this point we can get rid of those extra pixels we wanted to drop from the bottom as well, so we will make it drop from the height and the width as well. I set the width to 268px, and the height to 235px, because I have OCD, and numbers need to end with 0 or 5, okay?
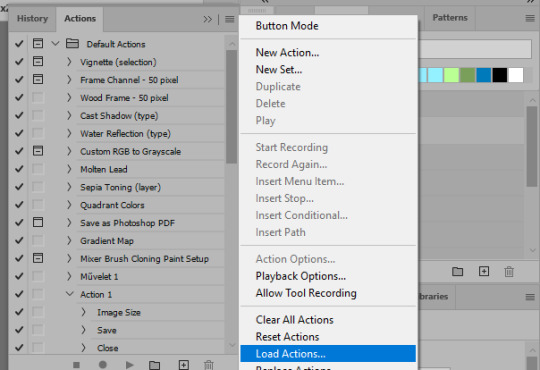
And now, the magic happens! First, go to Window > Actions to have the actions window show up. While you're at it, in the Window menu also select Timeline (this will be your animation timeline at the button) and also Layers. Once you have the Actions window showing up, on the menu in the upper right corner click the three lines menu button, and from the list select "Load Actions". I hope you downloaded the Squishmoon action pack from the start of this post, if not, do it now! So you save that file, and then after you clicked Load, you... well, load it. It will show up in your list like so:
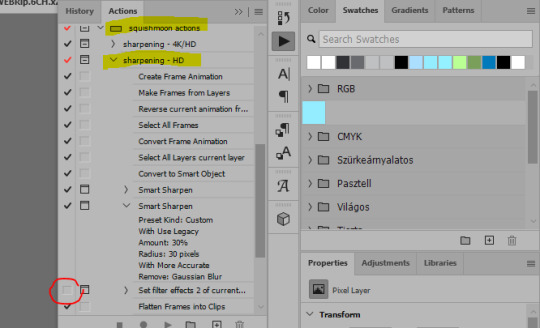
You will want to use the sharpening - HD one, BUT I personally like to go, and remove the tick from the spot I circled above, so leave that empty. This will result in the image having more contrast, which is very much needed for these darker scenes.
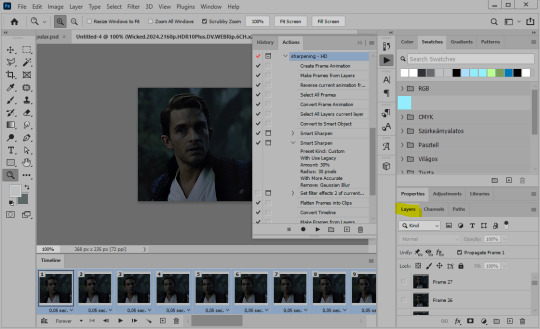
When you have that, you select the action itself like so, and click the play button at the bottom. The action will do everything for you, sharpen, increase contrast and also, create the gif and set the frame speed. You won't need to edit anything, just whatever window pops up, click "OK"

Now it should all look like something like this:
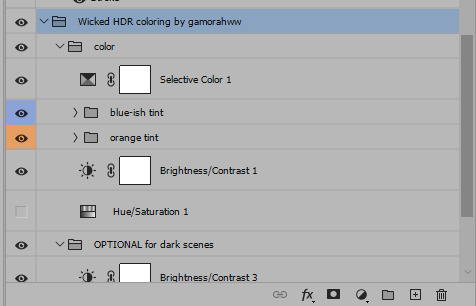
In the Layers window on the side, scroll all the way up to the top. The frame on the top is your last frame. Every effect you want to add to the gif should go to here, otherwise it won't apply to all frames. So at this point I open my PSD for darker scenes, and pull the window of it down, above the gif I'm working on like so:

And then I grab the folder I marked with yellow, left click, hold the click down, and drag that folder over to my current gif. And bamm, it will have the nice effect I wanted! You can click the little play button at the button to see a preview.

Once you have it sorted, now its time to extract it, but first, here's our before and after view:

Now, if you are happy with this, you can just save and close.
If you want to add subtitles, you can do that as well either manually with the text tool (remember, to add as the TOP layer as we did with the coloring) or you can use a pre-set PSD for that as well, here's mine.
Now, we just need to export it. Go to File > Export > Save for Web (Legacy) and copy my settings here. Others may use other settings, but these are mine, so! I hope you are happy with them :3
In this case, for colors, I picked 128 colors, because on dark sscenes you can get away with using less colors, and the larger that number is, the bigger the filesize. If you use lighter images, you will need to bump that shit up to 256, but that will make your file larger. You can see at the bottom of the screen, how large your file will end up being. So long as you are under 9 Mb, you should be good :3
Conclusion
Look, Gif making and Photoshop in general is a bit scary at first. There are a lot of settings you can mess around on your own, a lot to play with, and also a lot can go wrong. This is a very basic tutorial, and also my current process and preferred coloring. However if you look at "gif psd" or "gif tutorial" or similar tags on Tumblr, you can find a LOT of great resources and steps, for many-many things. Usually people are not too antsy about sharing their methods either. You make 4-5 gifs, and you will have the steps locked down, and then it's all about experimenting.
After you have some muscle memory, your next step should be to explore what is inside a PSD coloring folder that you use. Open them up, try clicking around, click the little eye, to see what happens if they are turned off, and double click them, and play around with the sliders, to see what each does. Most people on Tumblr don't really know what each one does, we all just pressed a few buttons and got really lucky with the results, lol.
If anything is unclear, don't hesitate to ask, I'll gladly help!
Good luck <3
45 notes
·
View notes
Text
aes' video game gif making tutorial 2024 Part 1
Using your own footage. While everything regarding photoshop can be applied to nearly all media, apart from long form videos(5+mins) and videos not in mp4 format; I am still focusing on walking you through making your own footage look as nice as possible.
Needed:
A game and potentially mods for said game
Camera tools for various games (optional)
OBS
Photoshop
My gif making actions so you too can be fast
This tutorial simply opens your recorded footage in photoshop, no other screen cap software is required. Lets fucking go!
[Part 2]
INTRO: From Skyrim to Destiny, recording your own footage of various games is the best method of making your own gifs.
The reason for this is myriad;
+ less artifacting vs YT vids, as seen below

+ you’ll have more control over the content + you can have personal characters + you can alter the settings of the game to be better for gif making purposes
While this tutorial does walk you through most of the steps it is light on exactly/why I use various adjustment layers for coloring, mostly because tumblr began to block my images/links. Other folks have tutorials but I can make one if its something people want.
But the real purpose of this tutorial is to cut the time it take to make gifs down by just opening your file vs. screencaping and so on.
1. Select your game and edit game settings for gif making.
Because we are using OBS, and recording the screen and not the game itself(more on this later), what game you are playing matters little.
Other paid programs like FRAPS still work, as do some free programs like Afterburner/RivaTuner, but when it comes to multiplayer, some may be caught by various anti-cheats and shut down. (ESO will not launch if afterburn is already open, for example). OBS has simply been my go to for around seven years.
Settings.
Please feel free to play around with your game settings to find what works, you may even play a game on different settings from what you record footage under. I do not play with DOF settings on in games but do record with them on.
Dropping your screen-size from and being able to turn on ultra vs medium settings may make your gifs look much better as another example.
+ At least 30FPS, try to avoid stuttering, lower the settings if needed. + Avoid crushing of blacks or blown out whites, especially when giffing POC! Adjust brightness and gamma as needed, HDR isn't your friend here. + While dark nights maybe more realistic and challenging for you, it often produces a dark gif in which nothing can be seen. + Turn off motion blur and film grain, these both add needless file size and look off when scaled down in photoshop. If you want grain add some after. + 720p is about as low for footage as you want to go unless making gifs for very old games. Work with what you have with old games. + Using mods and things like reshade can make your game shine.
Example time; ENB only on top, heavily modded on bottom, no adjustments were made in photoshop.
Modding can really alter a game.
Skyrim is very famous for it, but everything from Mass Effect to Pathfinder: Wrath of the Righteous have visual mods! They can make your footage stand out immensely, they can make your FPS drop, or even make it better.
Please be respectful of mod authors. As someone who made them in the past, we are not content farms, we are just folks with a fun hobby like gif making!
I highly suggest any mod that removes screen blur, vignette and film grain!
2. Camera Tools (optional)
So you have your game, now it's time to learn what camera tools exist, if any, for your game. Many games like Rogue Trader and Dragon Age, have free camera mods. Some games like Bethesda games and some Mass Effects, have built in, or partially built in fly cams.
I used to back in the day before DA:O had camera tools back myself into a corner and swing the over-the-shoulder camera around to get gifs, so you have to work with what you have.
If you want to go the paid route there are plenty of camera mods available from assassin’s creed games to BG3. These are generally of better quality and work smoothly, but check around for reviews before you dish out your hard earned money!
Each of these tools will have different commands that you will have to learn.
3. Obtain OBS & set it up
Why OBS?
It's free, it uses very little of your computer's resources. OBS also allows you to switch between screen recording, what I always use, and recording a specific program. Many other recording programs will not record some very old games, some can't record specific games.
Add to that, some hardware recording software will not record shadows or can get light values wrong and you are fighting a battle game after game. So I just go for what's free and works consistently.
I've only known one person for whom OBS failed to work, and that I think was a version issue.
Install OBS, and then make a specific scene all the way on the left;

You can rename this or duplicate it if you also intend to stream(right clicking scene will bring up the menu to do so), I don't use OBS when streaming so I leave this as is.
Right click on the source and ensure it is set as Display Capture. Because some, especially older games, won't work with Game Capture you are going to record the screen. Double click Display Capture if you have multiple screens(I have 2) and select which you want to record!
Next we need to go into settings, over there on the right under Controls. Once in settings, go down to Video and keep the base and output values whatever your actual display size is. I have a 1440 display so it's set to 1440, if you are running 720 make sure it's 720 and so forth.
Ensure 30fps is chosen. Anything more is overkill, for both photoshop and your rig!

Next go to Hotkeys. This will be different if you are using OBS to stream as well, but because I am not, I cleared everything but the recording hotkeys and I assigned them to scroll lock. This is because I've yet to encounter any game or mod that uses the key for anything. Use what makes sense for you, however.

Finally make your way to Output, this is important. Ignore streaming, look at Recording.

+ Pick a folder you want to save in + pick indistinguishable quality, large file size. + Pick MP4+ which encoder you use is up to your system! This is the one that made sense for me and my system. There are tons of videos on YT that go over each encoder. Also here https://obsproject.com/kb/audio-video-formats-guide is the official guide. We need to be able to open the file in photoshop so I tend to lean toward H.264.
3. Test OBS and your game footage together!
Go into your game, record a menu!
If you see something weird here, like your game footage not actually recording, troubleshoot!
With your recording you shouldn't see any stretching.
Now go into game and for 3-5 seconds record you playing, if something isn't recording well, again, troubleshoot. OBS takes a small amount of resources but for older rigs you may need to adjust settings in either game or OBS to get better recordings.
Once you are comfortable, it's time to go wild!
4. Record your gif footage.
+ 5 second clips are best for scenery gifs, + anything from 2-10 seconds can be used for a character talking + anything more than 10 seconds? You'll hit tumblr's limits instantly and will need to make multiple gifs. Which isn't a big deal, but do make note of it as it is much harder for older rigs to open a 5 min 1440p recording than 10 seconds. Depending on the rig it may not even open, so try and make several recordings rather than one long one.
5. Photoshop set up if you pirated an older version
If your gifs look weirdly stretched, check pixel ratio! If your photoshop is legit, or you know that it isn't stretching your gifs wildly you can skip this step.
I don't care how you obtain photoshop, but photoshop has had the ability to open MP4 videos for nearly 15 years. You do not need to, and I do not encourage you to use any screencapping software. That's great for long-form videos, but my computer 12 years ago could open a 5min music video fine and it was a potato.
Often photoshop 'portable' aka pirated photoshop comes with some wild settings, namely, pixel ratio changes. Please check this first;

And look at what default is actually set at, if your gifs always look stretched oddly when uploaded to tumblr.
It should be 1:1.
Then look at,

Again set it to square! Newer photoshop, and non-pirated versions often will let you look at other aspect ratios but won't save weirdly. so 2:1 will still save to 1:1, this hasn’t always been the case with cracked photoshop, especially the version from around 2014.
6. Open
Either drag in all your videos, or just... file → open.
This is why you saved as 5 seconds and MP4, so you didn't need any extra steps!
++Please be aware that older/weaker rigs and laptops can struggle, and if you are seeing crazy hot temps and such its an issue. Seeing Photoshop pause to open/play an action is normal but not chugging. I tell you this so you remember to dust your case and give your hardware some love, fiddle with settings and if this straight up doesn't work with your version of photoshop it might not be for you.
7. Crop your videos
Once you have your video/s open, select the crop tool. (it should be right here in the default setup. or Simply press C on newer Photoshops)

Step 1- in the far left box you want to select Width by Height and then type what size you want to crop to. Height Matters little but Width does matter.
Here are tumblr’s current 2024 sizes again!

10mb is the max, anything more will have a new compression algorithm applied to make it under 10mb.
Please look at the sizes closely. I'll give you an example! Lets say you make your widest gif 1000 pixels, a common wrong size.

I could only fit 20 frames in this bad boy, and its squished, despite the saving compression used, tumblr eats the quality to make it pixelated/artifact-filled.
Compare that to this, 66frames

Slightly different cropping but you get the point.
Same thing with using 540px in the 268px spot.
Compare it to the gifs below which is a 4.83mb 133 frame image in the 268 spot. see how it's less pixelated?
Now back to that Image. Lets talk about... Step 2. Select a range from within the image, try to avoid going to the edges, otherwise you get a 1 pixel wide transparent line. It's hard to see on some blogs, and so obvious on others. Mobile users won't likely see it, but it does take a slight amount more file size as well.
This is what I mean.
Step 3. Time is money, friend. And by this I mean I am going to provide you with the means to skip a TON of steps in the gif making process and just use my action, I'm even going to help you figure out how to fix it when it fails. For the low price of free. If you want the how to, I can break down what all the action is doing, but I haven't even thought about these steps in about 8 years or so.
PART 2 THIS WAY
(because tumblr hates more than 30 images)
49 notes
·
View notes
Text
Table of Contents
Easily find all my posts. That way you won't have to scroll through my reblogs to find what you want! ( ꈍᴗꈍ)
Resources for Creatives
Video Tutorials
Surround Sound on YouTube
Downmixing Discrete 5.1 Surround Sound to Dolby Pro Logic II
Upmixing Dolby Pro Logic II to Discrete 5.1 Surround Sound
Manually Encoding Dolby Pro Logic II
Isolating or Removing the Center Channel In Audacity
Custom Closed Captions on YouTube
HDR on YouTube
Optimizing Video Quality on YouTube
Masters for Archiving
yt-dlp: Downloading YouTube Videos the Right Way
Animation and Film Tutorials
Free Animation Production Tracker Spreadsheet
Free Storyboards and Layout Templates
Underlighting
Cel Color Palette
Film Grain
Film Gate Jitter
Animation help reblogs
My Work
Neurodivergent Help and Personal Blog
Autism help
Health help
Personal blog
80 notes
·
View notes
Text
Inazuma Eleven: Victory Road Worldwide Beta Test Demo for PS5, PS4, and PC launches July 18 - Gematsu

The Inazuma Eleven: Victory Road Worldwide Beta Test Demo will launch for PlayStation 5, PlayStation 4, and PC via Steam on July 18 at 4:00 a.m. PT / 7:00 a.m. ET, developer LEVEL-5 announced.
The demo launched first for Switch on March 28 and ended distribution on June 28.
The Worldwide Beta Test Demo includes the following contents:
Single-Player Matches – Team Selection / Difficulty Selection
Online Competition – Random Matches / Private Matches / Team Selection / Character Progression / Save Function (no transfer to the main game)
Story Mode – Chapter 1 / Save Function Available (no carryover to the main game and no cross-save support)
Supported languages include English, Japanese, Traditional Chinese, Simplified Chinese, French, Italian, German, Spanish, and Brazilian Portuguese.
The PlayStation and PC release of the demo also comes with the following updates:
Adjustments for the PlayStation 5, PlayStation 4, and Steam Versions
4K support, HDR support, high frame rate support, and more.
ON / OFF setting for HQ Mode.
Changes to the title screen for certain platforms.
Additional Storyline and Gameplay Features
You will be able to experience the continuation of the main story, picking up from where Briar / Sakurazaki kicks the football.
As a new feature, the Football Chest gimmick will change based on your story progression.
Parameters Updated to the Final Release Version’s Specifications
The Training Gauge, initially planned for the final release version, will be implemented in this update ahead of time.
Improvements to Focus Squabbles
Pressing the L2 button during combat will bring up icons showing the enemies’ Rock Paper Scissors hands.
Additionally, this display will remain on the screen for a short period of time after releasing the button.
The Recovery button will flash when you’re in a pinch.
Tutorials have been added to better explain the Rock Paper Scissors and Recovery features.
The player’s cooldowns have been decreased, effectively speeding up the pace of combat.
Implementation of Training Effects
To increase motivation for Focus Squabbles, “Training Effects” originally intended to appear partway through the story will now be displayed at the start of combat.
Gradual Changes in the Focus Squabble System
With the addition of new story content, you will experience the Focus Squabble System evolving to resemble football more closely as the story progresses.
Cats Are Pettable
You will be able to pet cats. By doing so, you may gain an increase in Training parameters or obtain items.
Improvements to Football Chests
An arrow indicating the direction of the kick has been implemented for more accurate aiming.
Items dropped from Football Chests can be picked up from a more forgiving distance.
Addition of Equipment and Outfits
You will be able to obtain equipment usable in Story Mode.
You can customize the appearance of your character by equipping different outfits.
Camera Sensitivity Settings
The default camera sensitivity will be slightly increased, and the speed can be adjusted in the Options.
Improvements to the Map
A full-screen map display for close-up areas will be added.
An option to rotate the Minimap will be added, and can be turned ON/OFF in the Options.
Adjustments to the Quest Marker
The sorting priority of the UI above characters will be improved.
A marker for quest items will be displayed onscreen.
Other Bugs and UI Changes
Minor bugs and UI changes will also be addressed.
Visit the official website for the Worldwide Beta Test Demo here.
Inazuma Eleven: Victory Road is due out for PlayStation 5, PlayStation 4, Switch, PC via Steam, iOS, and Android in 2024.
Watch a new trailer below.
Trailer #6
English
youtube
Japanese
youtube
Traditional Chinese
youtube
Simplified Chinese
youtube
15 notes
·
View notes
Note
hi shea! 💚 can i ask how you do screencapping for gifs? i’m new to all this i’ve always used mov/mp4 files so do you have like have a beginners tutorial you like? what software do you use? right now i have a mac, vlc player, and a dream 👍
yes of course amanda! I use mplayer osx extended (sometimes mpv for HDR 4k footage) to make screencaps. but i recommend mplayer if your footage isn't 4k.
here is good tutorial by @hayaosmiyazaki that covers screencapping for mplayer
this tutorial by @kylos covers screencapping for mpv
you can download mplayer here and mpv here
let me know if you need anything else!! <3
5 notes
·
View notes
Note
Hi, I really love you gifs colouring and I’m kinda new to colouring and I was wondering if you would please post a colouring tutorial for any gifset you’re working on right now?
hi! thank you so much! i actually have a few basic gif-making tutorials that include coloring tips already:
coloring HDR footage + basic tutorial
coloring anime + sharpening action
color manipulation (via usergif)
and all my other tutorials can be found here! i hope this helps!
9 notes
·
View notes
Text
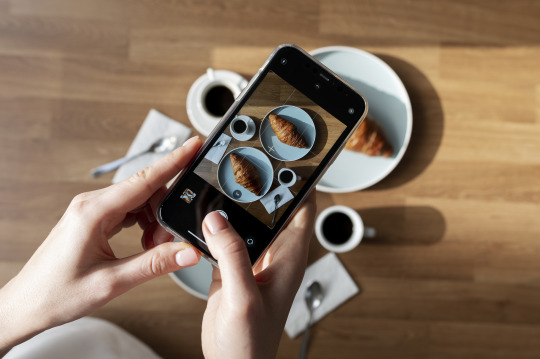
Yvette Heiser - Phone Photography Essentials without Formal Education
In today's digital world, the art of photography has become more accessible than ever. You no longer need a formal education or expensive camera equipment to create stunning images. With advancements in smartphone technology, your phone can be a powerful tool for capturing professional-quality photos. Here’s everything you need to know to excel in phone photography without a formal education.
Understanding Your Phone’s Camera
Before diving into photography, it’s essential to understand the capabilities of your phone’s camera. Modern smartphones are equipped with high-resolution sensors, multiple lenses, and advanced image processing software. Take some time to familiarize yourself with the various settings and features available on your phone's camera, including HDR, portrait mode, night mode, and manual controls for ISO, shutter speed, and white balance. For more detailed insights, consider exploring resources like Yvette Heiser Texas – All You Need to Know about Phone Photography.
Mastering the Basics of Photography
Even without formal education, you can learn the fundamental principles of photography. Start with the basics:
Composition: The rule of thirds, leading lines, and framing are essential techniques that can help you create balanced and visually appealing photos.
Lighting: Excellent lighting is essential for taking outstanding photos. Natural light is your greatest ally, so it's important to learn how to use it effectively. Understand the differences between soft and hard lighting and how to leverage shadows and highlights to enhance your images.
Focus and Exposure: Ensure your subject is in sharp focus. Most smartphones allow you to tap the screen to set the focus point. Adjusting exposure can help you manage the brightness and contrast of your photos.
Leveraging Photography Apps
One of the advantages of phone photography is the plethora of apps available to enhance your images. Here are a few must-have apps:
Editing Apps: Tools like Adobe Lightroom, Snapseed, and VSCO provide robust features for tweaking exposure, contrast, saturation, and other elements. They also come with presets and filters that can add unique and creative touches to your photos.
Camera Apps: Apps like ProCamera and Camera+ offer advanced manual controls, allowing you to fine-tune settings like ISO, shutter speed, and white balance.
Special Effects: Apps such as Lens Distortions and Afterlight can add unique effects and overlays to your photos, helping them stand out.
Building a Strong Portfolio
Your portfolio is your introduction in the photography world. Create a diverse collection of your best work to showcase your skills and style. Include different subjects such as landscapes, portraits, and macro shots. Regularly refresh your portfolio with updated and enhanced photographs. Sharing your portfolio on social media platforms like Instagram, Facebook, and Pinterest can help you reach a wider audience and attract potential clients.
Networking and Marketing
Building a successful photography career requires more than just taking great photos. Networking and marketing are essential components:
Networking: Join online photography communities, attend local meetups, and participate in photography challenges. Networking with other photographers can lead to collaborations, referrals, and learning opportunities.
Social Media Marketing: Use social media to market your photography services. Regularly post your work, engage with your audience, and share behind-the-scenes content. Consider creating a website to establish an online presence and make it easy for clients to find and contact you.
Continuous Learning and Experimentation
Photography is an ever-evolving field, and staying updated with the latest trends and techniques is crucial. Follow industry leaders, read photography blogs, and watch tutorial videos. Don’t be afraid to experiment with new styles and subjects. Continuous learning and experimentation will help you grow as a photographer and keep your work fresh and innovative.
Conclusion
Excelling in phone photography without formal education is entirely achievable with dedication and practice. By understanding your phone’s camera, mastering photography basics, leveraging apps, building a strong portfolio, networking, and continuously learning, you can create stunning images and establish a successful photography career. Yvette Heiser- Is it possible to start a career in photography without formal education? Embrace the journey, and let your creativity shine through your lens!
#wedding#moments#camera#pictures#photographer#photography#childphotography#yvette heiser#photographytips#events
8 notes
·
View notes
Text
Sega Dreamcast - Sonic Shuffle
Title: Sonic Shuffle / ソニックシャッフル
Developer/Publisher: Sega (Sonic Team) / Hudson Soft / A.I. / JAM
Release date: 21 December 2000
Catalogue No.: HDR-0125
Genre: Party Game


Take Sonic and his friends to the mysterious and pointless land of video game board games. (^v^)
For what it is, it's quite good but I can't help thinking that Sonic Team should have spent their time on making NiGHTS 2 or Burning Rangers 2 instead of making a Sonic card-based board game for Dreamcast. However, I do know that Sonic Team did not develop this themselves as it was Hudson (of Mario Party and Bonk fame) who made this a collaborative effort together with Sonic Team.
Despite Hudson's success with the Mario Party series, this game failed to meet expectations. It was criticized due to the confusing rules in some mini-games, excessive load times, poor music, an unfulfilled promise of network play, and an AI that would frequently cheat and steal the player's best cards. The game manual and in-game tutorial were largely unhelpful to players as well.
Ignore the damaged spine card my copy has. I just need to find a replacement.


youtube
5 notes
·
View notes
Note
this camera raw tutorial were made by other person and you just re-wrote it, why didn't you credit the author? or reblog the original tutorial?
What? I found it on YouTube while watching a video on how to gif HDR x265 videos and one person mentioned it in the comments?? And I literally just shared the link and how to open it.
I’m sure many people shared it here and elsewhere, I don’t know the tutorial you’re talking about and if I did, I would’ve reblogged it just as I do with other tutorials.
7 notes
·
View notes
Text
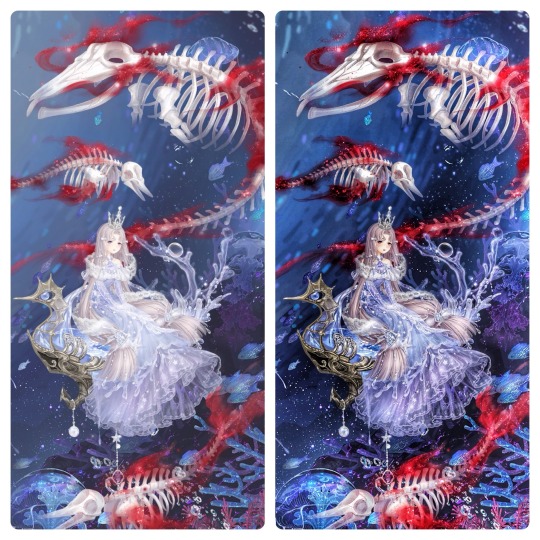
How I make my HDR edits
So someone asked me how I edit my edits of my photos to give them that detailed look to them. I decided to give a little tutorial on it I do it. Here’s how I edit my photos from the original screenshot to the bright and vibrant edit.
More under the cut
Which app do I use?
First off, let me clarify that this tutorial is specific to the app called ‘Snapseed’. It can be found on both IOS and Android. The app’s icon looks like this:
Just a heads up, Snapseed will only export on the .jpg format. If you import a .png file it will be turned into a .jpg file instead.
Note:
This editing tutorial is mainly geared towards Love Nikki screenshots.
Tutorial
Okay, so assuming you’ve got Snapseed downloaded, opened, and have loaded in the screenshot you want to edit, here’s how I do it.
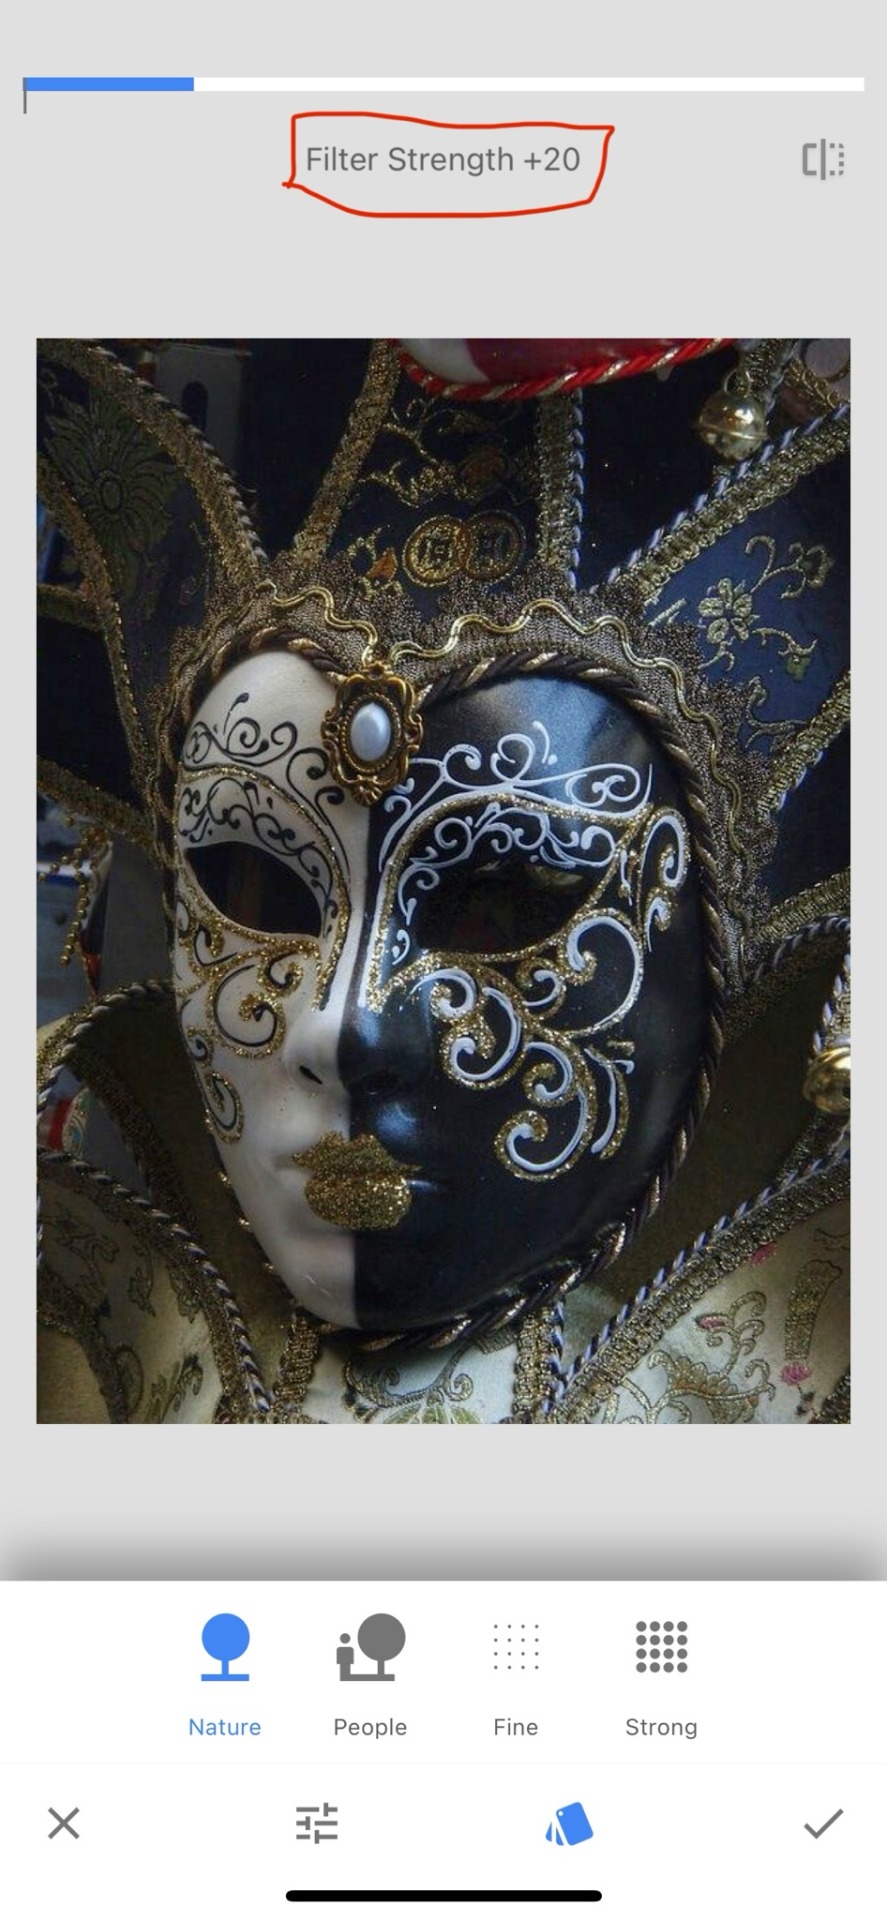
First, go the tools section and select HDR Scape.
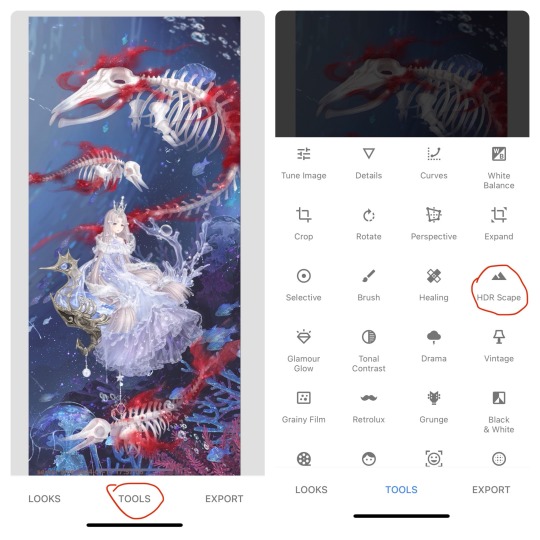
This filter will give a more detailed look to the screenshot. Note how there are different options for the filter - Nature, People, Fine, and Strong, along with a slider showing the strength of the filter.
The default settings are Nature with the filter strength set to 50. I find that the default tends to work just fine for what I go for, but on rare occasions, I may use the People option instead of Nature. I will usually increase the filter strength to 100 if I want that extra detailed look.
To change the filter strength, slide your finger to the left to decrease it and to the right to increase it. Play around with the filter strength slider until you’re satisfied with the results.
I don’t use the Fine or Strong options as they don’t usually give off the results I want.

Once you’ve found the settings you like for the HDR Scape filter, press the checkmark at the bottom-right corner of the screen to conform the changes.
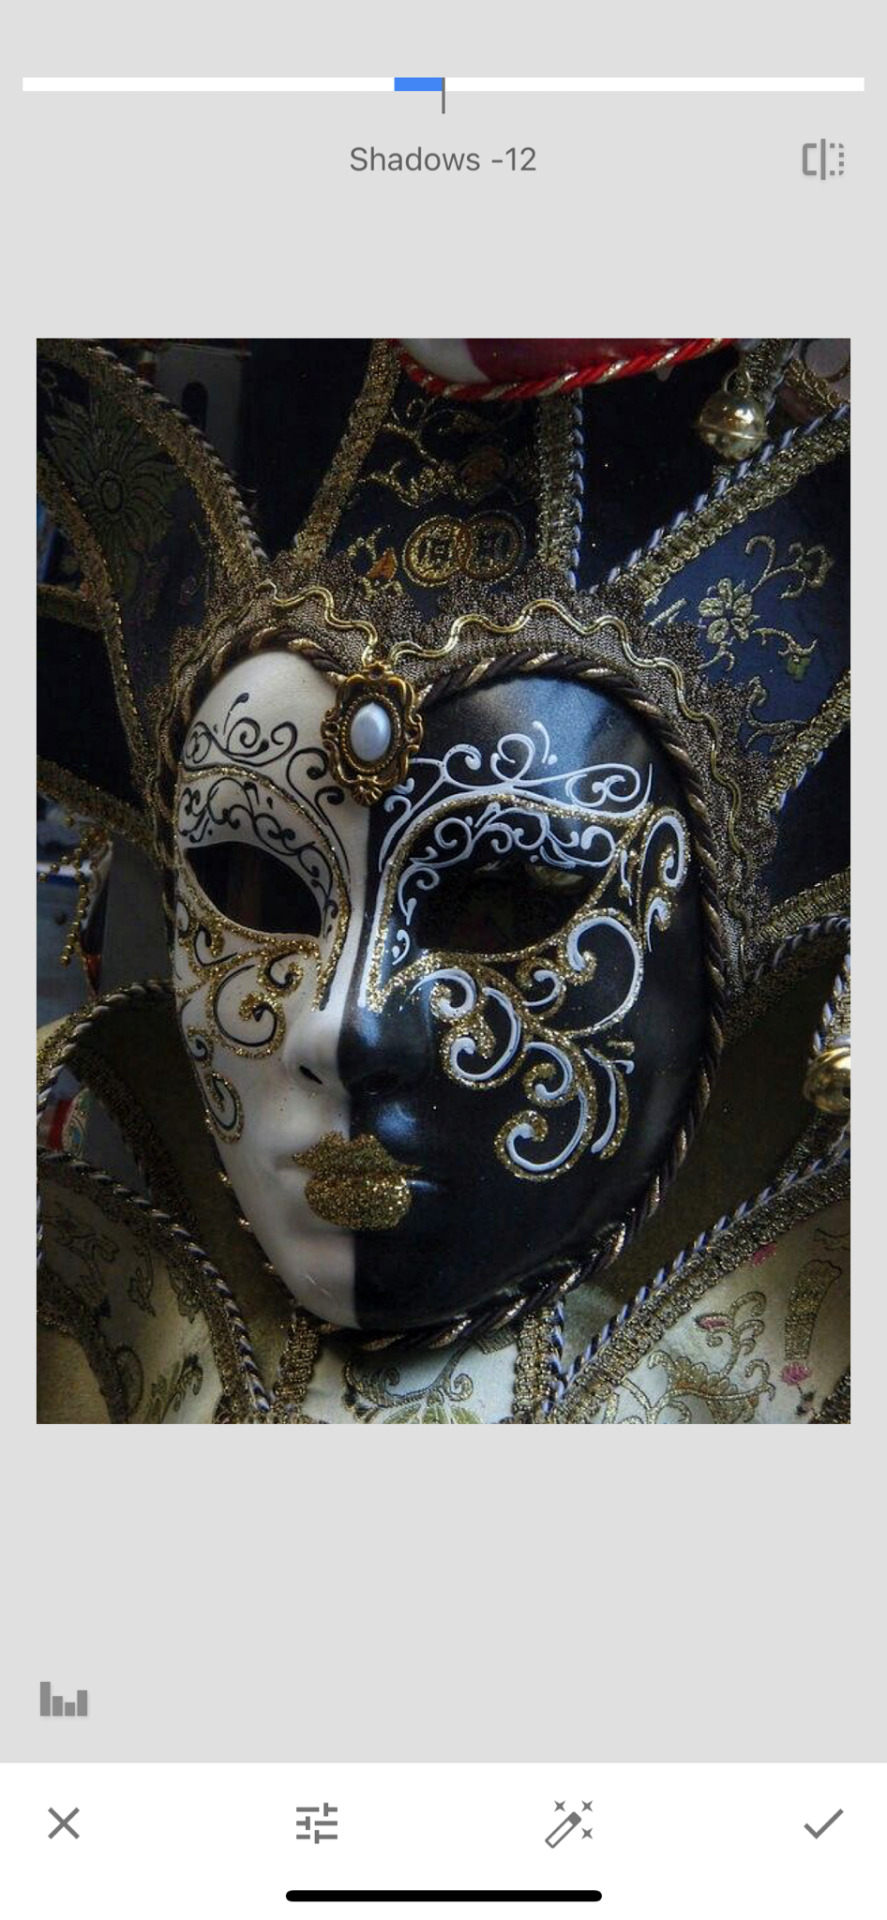
Next, go to the tools tab again and go to Tune Image. Press the icon showing the three sliders and go down to Shadows.
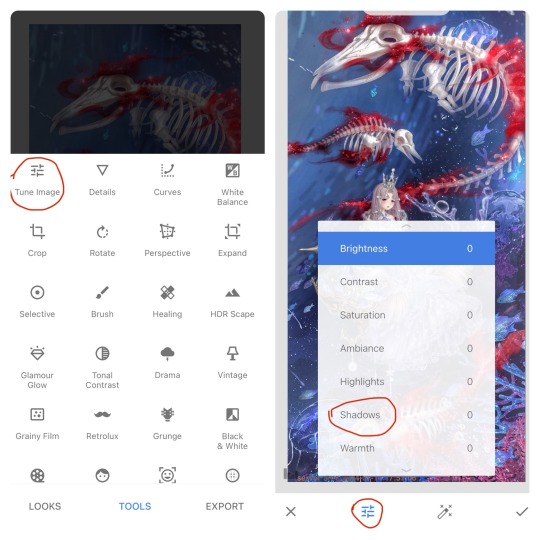
I use this to bring out the shadows a little bit. Typically, I slide the slider to around -30 or -25 for most of my edits, however, it the image has a darker elements in either the character or background, I will keep the slider at -15 to -10 instead to make sure the shadows don’t make the image too dark.
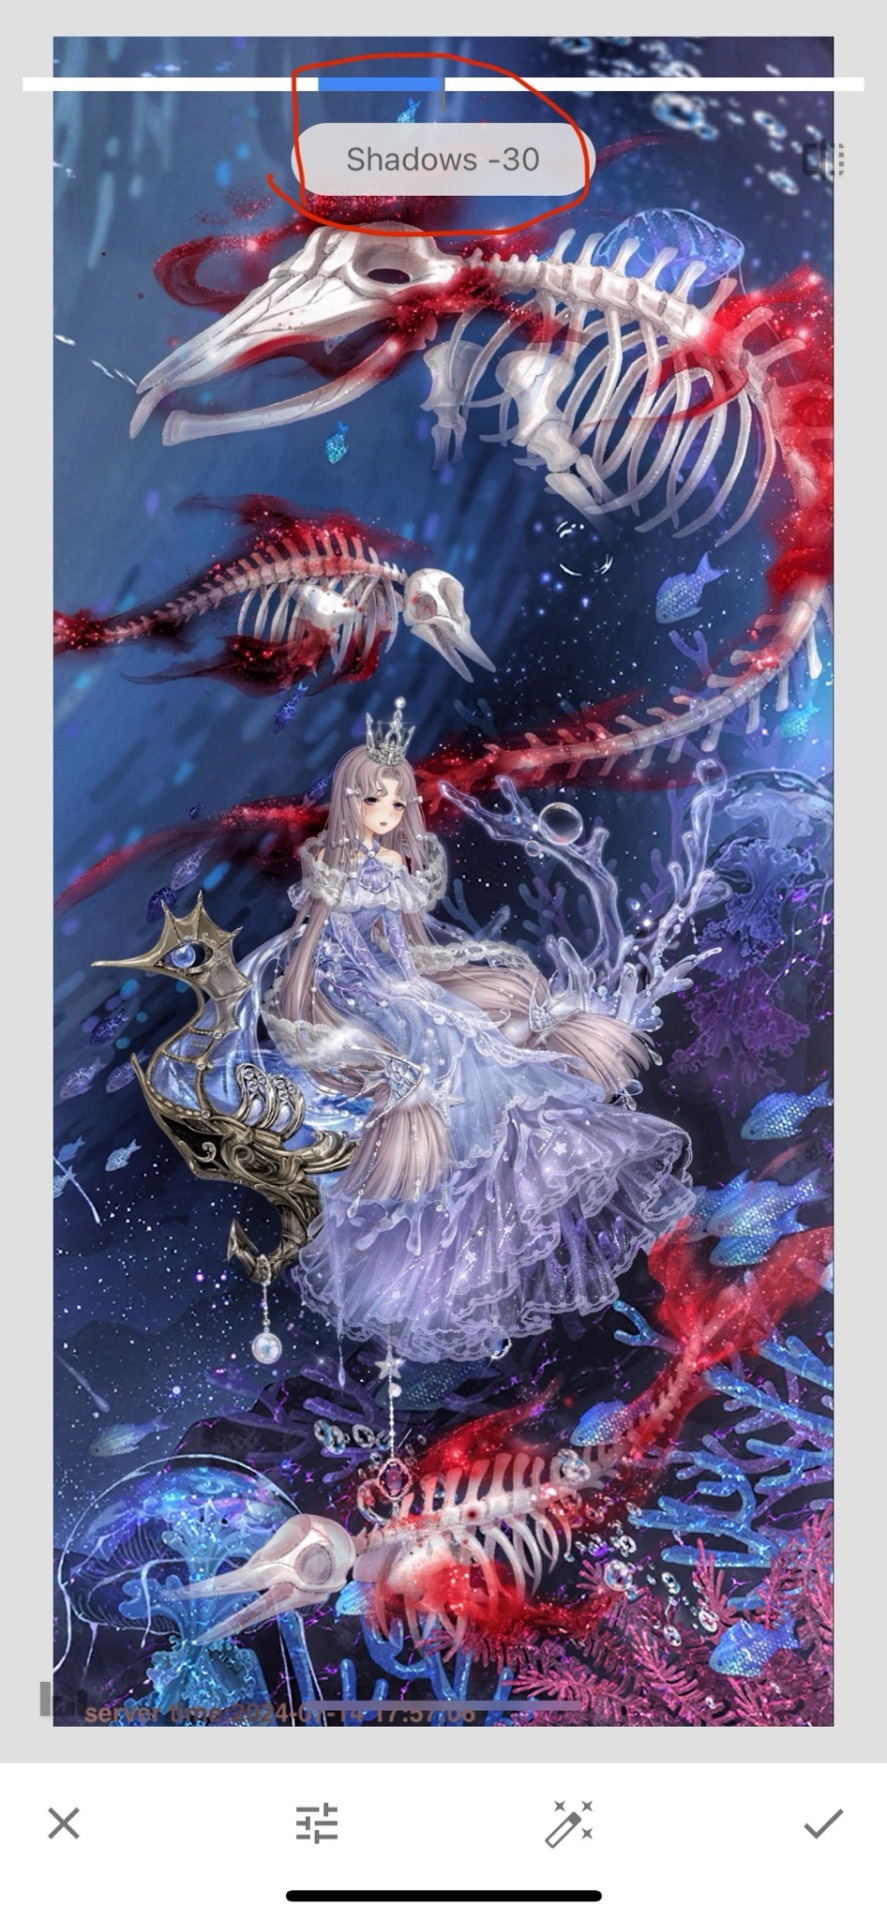
Once you’ve found what looks best to you, press the checkmark to confirm the filter.
Finally, navigate to the Looks section and find the ‘pop’ setting. I do this to give my edit a little bit of extra vibrance to it. This isn’t something that has a slider, it’s stuck at what it is.
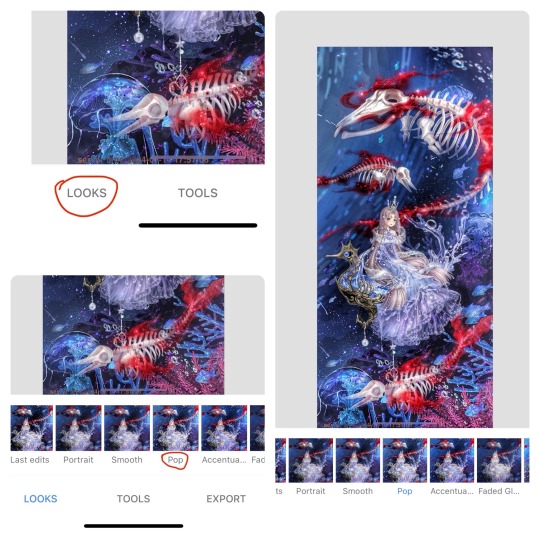
If you’re happy with the results, press the checkmark and confirm. This can be either a hot or a miss depending on your preferences.
All that’s left to do it export the image and you’re done!
Bonus:
If you’re looking to edit pictures of real life things, you can absolutely use this tutorial, but you may want to lower filter strengths for the HDR Scape and the Tune Image (Shadows) filters as the settings I use for Love Nikki screenshots look too intense for photos of real life stuff. The filter strength you do use will highly depend on the image in question. Here’s a brief example to what setting I’d use on a picture of a real thing. (I got the photo off Pinterest, so I have no idea who the real creator of said photo is.)

4 notes
·
View notes
Note
How the fuck do you draw like that? (compliment)
Hello :)
Actually, I don't.
A while ago I explained (w/screenshots) how I do them, and I'll try and show you how I create collages using screenshots/photos:
Canva I select the photos I want to see in a collage. Here I turned Aziraphale in b & w, and I sharpened Crowley.

To create a collage I have to work with layers, they're probably the most important thing when working on a collage. In this case I needed 1 layer for the bg, 2 layers for Aziraphale, 3 layers for Crowley and 2 layers for good omens appreciation society (signature). As you can see I removed the background from Aziraphale 2, only one thing I love about Canva, it works perfect!

To give Aziraphale 2 kind of a 3D look I blurred Aziraphale 1.

And the first result looked like this.

2. Lightroom
I love working with Lightroom, because it gives you so many opportunities! I use so called presets. They can be filter, colours, shadows, highlights and so much more. Over the years I created my own, but when I started working with Lightroom, I bought so called bundles (darks moods, bright moods, fall, summer a. m.). You really can do amazing things with presets!

And when I'm happy with the result I usually work with shadow, brightness, colours, sharpness, soften, hdr, vignettes until I'm happy with the final result :)

Sometimes I also work with Photoshop, but that's more on a rare basis.
I hope my little tutorial gives an inside on how I work on my collages. I don't call myself an artist because I don't draw but work with screenshots and photos only.
Love, Shen.
2 notes
·
View notes
Note
Hi. Any tips on how to color gifs? I've seen your gifs and I really like the way you color them.
hi anon! thank u for ur kind words 🙇🏻♀��🙇🏻♀️🙇🏻♀️ for me i think using the white & black color pickers in the curves layer & then often times the grey color picker really does a lot of the heavy lifting for me to get a base & then i tweak the red, yellow, cyan, & blue in the selective layer. and since i use 2160 hdr vids…they’re so dark so i 99% of the time start with the brightness layer & change it to “screen” which lightens the scenes a lot. i finish off with a b/w gradient layer set to “soft light” with an opacity of 10-20% & a vibrance layer. im sorry i dont have a tutorial or anything but im really just winging it 😅
2 notes
·
View notes