#How to Setup Cricut Explore Machine
Explore tagged Tumblr posts
Visit Tumblr Blog
Explore Tumblr blogs with no restrictions, modern design and the best experience.
Last Seen Tumblr Blogs


Fun Fact
28.6 is the average number of monthly visits per US mobile user.
Text

To set up your Cricut Explore Machine, start by unboxing it and locating the setup materials. Connect the machine to power and your computer using the provided USB cable. Visit the Cricut website to download and install Design Space software. Follow the on-screen instructions to create a Cricut ID and pair your machine with Design Space. Calibrate the machine by loading a sheet of paper and following the prompts on Design Space. Once calibrated, you can start crafting by selecting or creating projects in Design Space and letting your Cricut Explore cut, write, or score materials as desired.
#How to Setup Cricut Explore Machine#Setup Cricut Explore#install cricut explore air 2#cricut explore air 2#cricut explore 3#cricut setup
0 notes
Text
How to Calibrate Cricut Explore Air 2? (Full Guide!)
Cricut Explore Air 2 is a worthwhile machine for crafters who want to make pro-level crafting projects. The machine offers precise cuts for more than 100 different types of materials, including Cricut Smart Material, leather, wood, glass, metal, etc. With its easy-to-use interface, the machine allows users to work on DIY projects even if they are novices. Moreover, sometimes crafters may need to perform Cricut Explore Air 2 calibration before a cut.
Calibration is a process that helps set the machine’s blade to cut the design accurately without any flaws. Many users don’t know the procedure and struggle to get the perfect cut. If you have the same problem, then the follow-up blog will provide you with all the information about calibrating your machine.
Cricut Explore Air 2 Calibration on Windows/Mac
If you are using your Cricut Explore Air 2 machine on a computer, then the following is the extensive guide that will help you perform the calibration process.
Step 1: Selecting the Printer
Open the ‘Cricut Design Space app‘, sign in to your account, and then click on the Settings option.
Then, follow the path Machines > Machine Calibration, and select Cricut Explore Air 2.
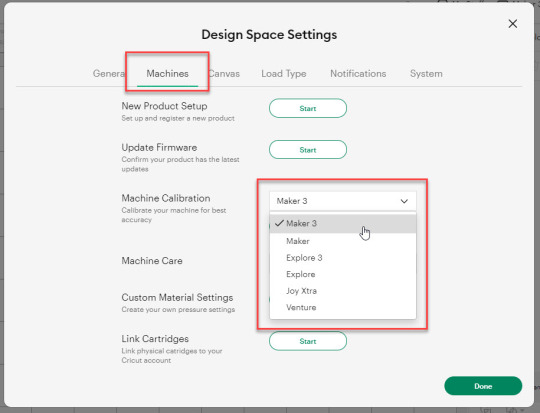
After selecting your crafting machine, click on the Start option.
Depending on the machine you choose, you will be asked to complete the calibration; select the Print Then Cut option.
In the next step, choose what you like to use with your printer machine for the process.
After that, click on the Continue option.
Step 2: Starting the Calibration Cut
Now, you should place the printed calibration sheet on the mat, position it perfectly, and select the Continue option.
For the next step, ensure that your machine is ON and connected to your computer using USB or Bluetooth. Select the machine from the drop-down menu, insert the cutting mat into your crafting machine, and click Go.
Furthermore, the device will start scanning the markings for the calibration.
After the cutting is complete, check if the cut-makings are touched without unloading the mat from the machine. (If the markings are touched, then choose the Yes option in the app and select Continue to move to the next step.)
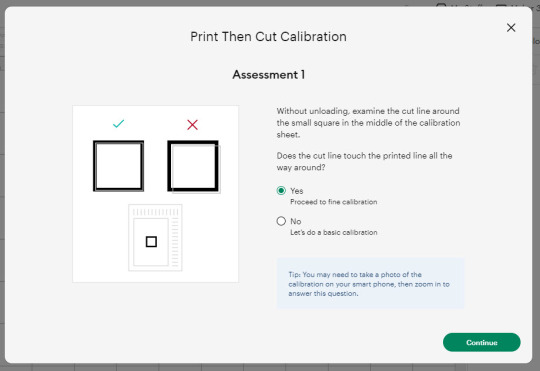
Note: If you choose the No option, then the machine will perform a cut for the next time for the accurate cut.
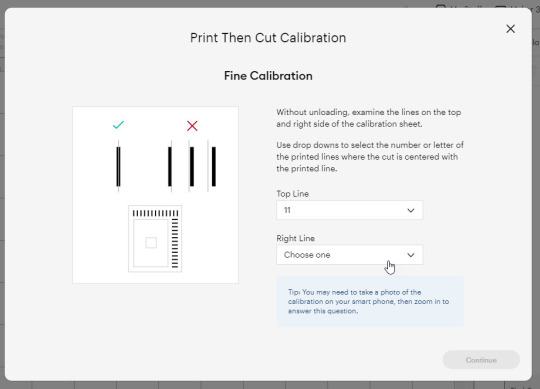
Also, the machine will start the calibration cut at the top and side of the page.
Now, check if the markings are correct without unloading the mat from the device. (The cut should be on or before line 1 and on or before line 21.)
If your cut meets all the conditions, choose the line closest to the center of the printed lines, the same as the following image; when you are done, select the Continue option.
In the next step, the Cricut Explore Air 2 machine will perform a confirmation cut around the large sheet. When this step is complete, unload the mat from the machine and remove the calibration sheet; now, you need to answer the final question on the app.
You need to choose Yes, cut is close enough to the center if you are happy with the cut. (Select no and follow the further process if you are not happy with the cut.)
Cricut Explore Air 2 Calibration On iOS/Android
The follow-up method will allow you to Calibrate your Explore Air 2 machine without any hassle. So, let’s begin the process.
Step 1: Connecting the Printer to Your Machine
Start by signing into your Cricut account on the app and selecting the menu option from the upper right corner.
After that, tap on Settings and then select Print Then Cut Settings.
Also, tap on the Calibration.
Next, you have to choose the Send to Printer, or I have a calibration sheet option.
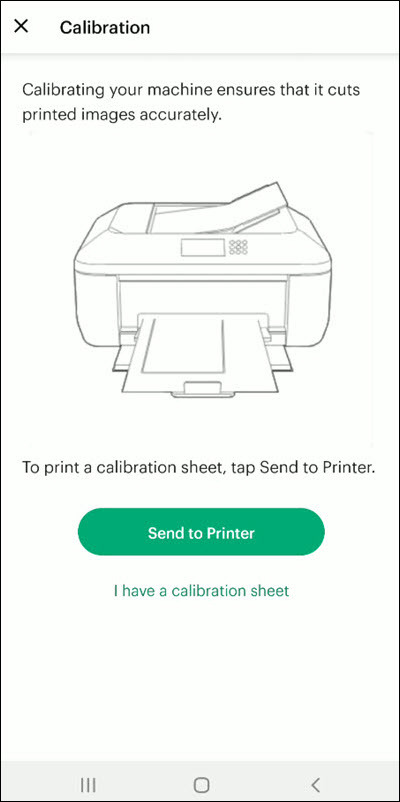
Now, the preview of the calibration sheet will appear on the screen (it can be a little different depending on the device you are using.)
Afterward, tap “Select a printer” and select the printer device you are using. Then, choose Next.
Step 2: Perform Sheet Calibration Process
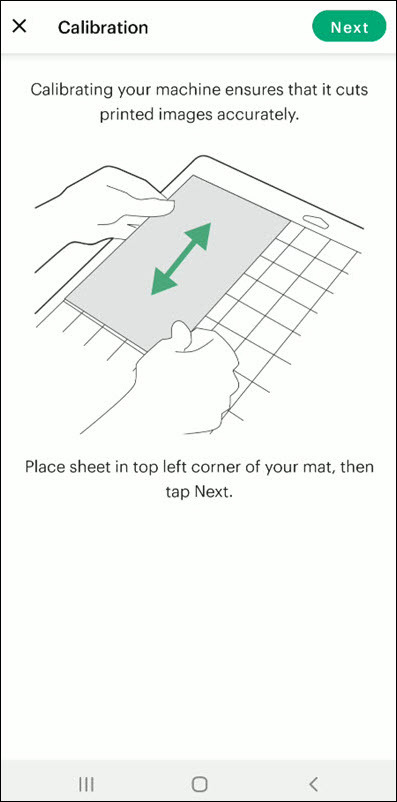
After that, take the printed calibration sheet, place it onto the machine mat perfectly, and select Next.
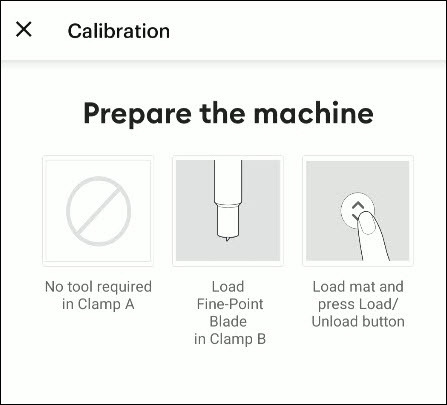
Specify the appropriate material setting for your machine.
Then, after loading the mat into the machine, press the Go button on it.
Also, the machine will look for the marking for the calibration and then start the cutting process near the small square.
Afterward, without unloading the mat from the machine, check for the cut to ensure the cut touches the marked lines all the way around. (If the lines touch the cut, then tap Yes in the app, then select Next to proceed with the next step.)
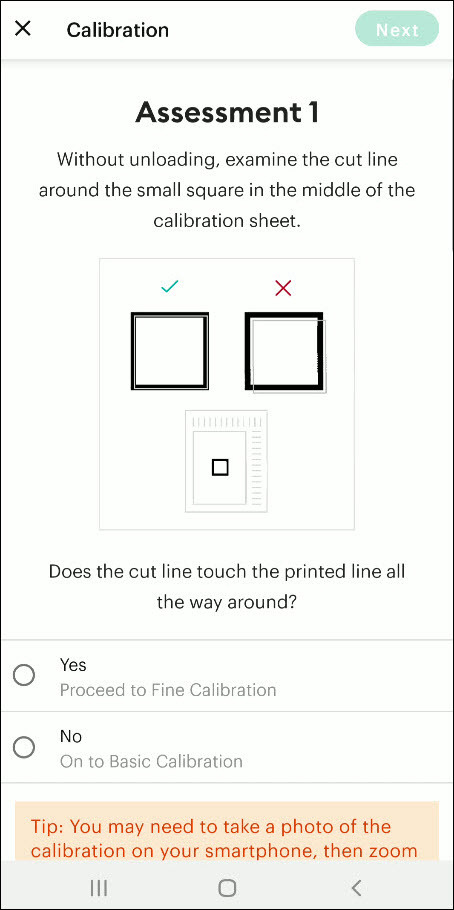
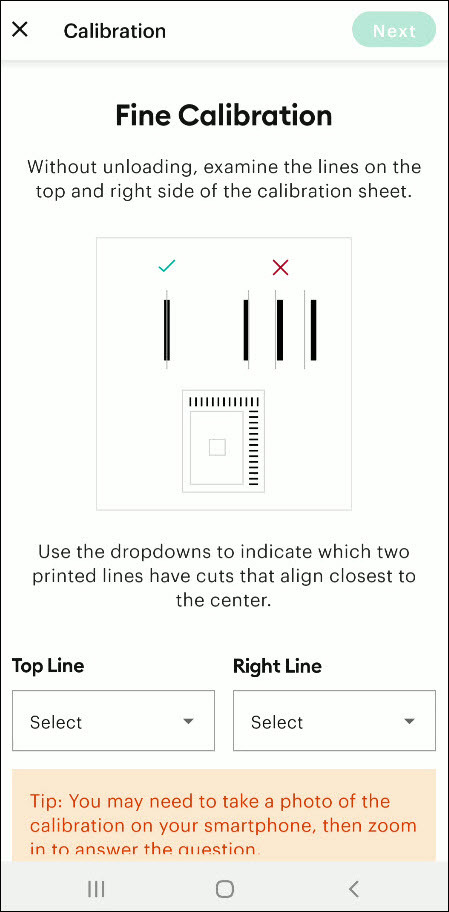
However, if you select the No option, then the machine will try to cut close to the top and sides of the page. (Once done, look closely without unloading the mat; there should be a cut before line 1 and on or after line 21.)
If the cut meets these lines, you need to specify which cut is closest to the center of the printed lines and the right side of the calibration sheet.
Once you are done, select Next to move forward.
After that, keep following the instructions on the screen to complete the procedure.
Once the process is complete, you can start cutting materials on your machine.
Final Words
Cricut Explore Air 2 calibration is the best way to get the pin-point cuts. These methods will help you to perform the calibration process on computer and smartphone devices. With these methods, you cannot only calibrate your Explore Air 2 but also any other cutting machine of the brand. Furthermore, if you have any doubts regarding the procedure or have any issues, then it would be good to ask for more assistance and guidance.
Frequently Asked Questions
Why Is My Cricut Explore 2 Not Cutting Properly?
Cricut Explore machines are known for their flawless and fast-cutting results. Sometimes, it is due to the material you are trying to cut on your device. Also, in some cases, the machine faces technical issues. To get your machine out of this problem and start cutting properly, you can use the calibration procedure. The process to calibrate your machine is simple.
Why Should I Calibrate My Cricut Machine?
However, the cuts can sometimes be misaligned due to various reasons. Crafters can calibrate their devices to get the blades and cuts aligned to their initial position. After the calibration, the machine starts to provide flawless cuts once again. However, the calibration process is a little complex and differs from device to device. So, you must know the whole process before performing it.
What Is the Thickest Setting on Cricut Explore Air 2?
We all know that Cricut cutting machines are known for their fast and flawless cuts, even for intricate designs. Thus, the Cricut Explore machine can cut a wide range of materials of a certain thickness. If you want to cut the wood, metal, leather, etc., then your machine can cut up to 2mm. However, different materials need to use specific blades to get the desired results.
Source: How to Calibrate Cricut Explore Air 2
#how to calibrate cricut explore air 2#cricut design space app#cricut design space download#cricut design space software#cricut machine setup#cricut explore air 2 setup
2 notes
·
View notes
Text
How to Use Cricut Mug Press: An Easy Tutorial for Beginners
Read this blog to learn How to use Cricut Mug Press? The Cricut Mug Press is a tool that transfers heat with a no-fuss, easy-to-use machine for making mugs. It allows you to create high-quality, permanent mug designs using a sublimation process. Using Cricut’s Infusible Ink Transfer Sheets or the Infusible Ink Pen, you can create your design in Design Space, draw or cut it, and place and transfer your design on the mug. Mugs made with the Cricut Mug Press are microwave-safe and dishwasher-safe.
It is so easy and fun to make. Read this write-up to learn about the Cricut Mug Press, the materials required, and some easy steps to make our customized Mug.
Materials Requirement
Here are the things that you will need to make custom, vibrant mugs using the Cricut Mug Press:
Cricut Cutting Machine
Cricut Mug Press
Infusible Ink
Heat resistant tape
Cricut Mug Blank
Standard grip-cutting mat
Now that you know what supplies to make your mugs, proceed to the next step: learning how to activate the Mug Press. Afterward, follow the tutorial for easy instructions on how to use the Cricut Mug Press.
How to Activate the Cricut Mug Press
Before you start using the Cricut Mug Press, you must know how to activate it. Follow the below steps to learn:
First, open your Design Space app on a Windows or Mac. If you do not have Design Space installed, download it and double-click on the file in your downloaded folder to Open or Run it.
Now, Sign in with your Cricut ID and password. If you do not have a Cricut ID, then create one.
A page titled “Welcome to your Cricut Setup” will appear. Then, Select Heat Press and click on Cricut Mug Press.
Follow the on-screen prompts to connect your press, verify firmware, and complete activation.
Select Get Started to make your first mug when the activation is complete.
How to Use Cricut Mug Press: 4 Stepwise Tutorial
Now that you know what material to make your mugs using the Cricut Mug Press, follow the steps below to make one for yourself:
Step 1: Making Your Designs
First, open the Design Space app and select the machine from the drop-down menu. Next, you can look for pre-prepared projects or create your design using the fonts and images available in the app. When making a design for your mug, check the size of your design and mug to see if they are compatible. Then next, you can look for
Step 2: Cutting Your Designs
This process is very similar to any Cricut project. When you are done creating your design, do not forget to mirror it, especially if you choose a design with words or elements. Afterward, click “Make It” in the Design Space app when you can cut your design. Then, select Infusible Ink as your material and load your cutting mat into the cutting machine. When the machine is loaded, follow the prompt shown on the screen and click on the “Go” button once it flashes. When your machine is done cutting the design, remove the design from the mat and the extra part with the help of the weeding tool.
Step 3: Clean Your Mug
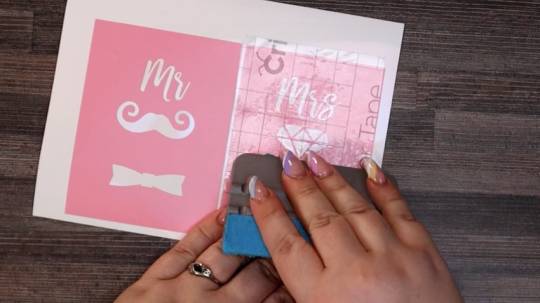
First and foremost, use a lint roller to remove dust from the mug. This step is important before applying the design to your blank Cricut Mag because you will only get an even and smooth transfer if there is fine dust on the mug. Once your mug is nice and clean, place your design where you would like it on the mug and firmly press it down to sit. Use the Cricut Scraper tool to avoid and press out any air bubbles.
Step 4: Transfer Your Design to the Mug Press
Turn on your Cricut Mug press so that it can start to heat up; the light will be red when it starts to heat up and green when it is ready.
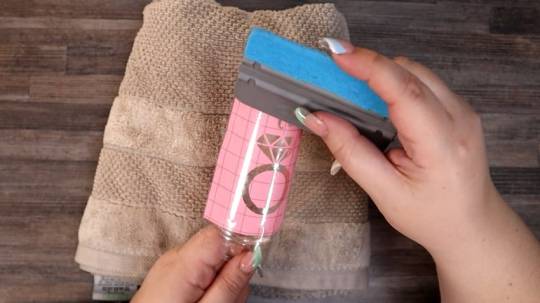
When the press is heated, take your heat-resistant tape to secure the edges of your design. This step is necessary to ensure your design does not move around when we press it. Once done, simply slide your mug into the Cricut Mug Press by holding the handle. When it is ready, the lights will be full and beep. Then, remove your mug from the Mug Press with the help of the handle and put it into the mat to cool down. Wait 10-15 minutes to peel off the transfer sheet to reveal your design.
Summary
This guide teaches you how to use Cricut Mug Press. The Mug Press makes creating custom permanent dishwasher mugs at home easy. Whether you are a beginner or a Cricut newbie, following the simple instructions above will allow you to create the next level of professional mugs for yourself or your loved ones. So, start making your mug today.
FAQs
What should I do if the machine shuts off and the power button turns red?
If your Cricut Mug Press shuts off and the power button turns red, it could be due to a powerful related issue, or it could be due to an error. If the machine is on, check the temperature and allow it to adjust the room temperature.
Which mugs can be used with the Cricut Mug Press?
The Cricut Mug Press is designed for smooth, curved ceramic mugs, but it can also be used with non-Cricut mugs labeled sublimation-compatible. It is likely to work with infusible ink and Cricut Mug Press.
How does the Cricut Mug Press differ from other Mug Presses?
Cricut Mug Press is a press that passes heat and makes it easy to create custom, quality, and permanent mugs in minutes. It has sleek, safety-design features, one-touch settings with just the right temperature control, and an auto-off feature, distinguishing it from other mug presses. It has a user-friendly design and does not require manual adjustments.
Source: How to Use Cricut Mug Press
#how to use cricut mug press#cricut mug press#cricut design space#cricut explore air 2 setup#cricut machine setup#Cricut design space download#Cricut design space app
1 note
·
View note
Text
How to Connect Bluetooth to Cricut Explore Air 2: Full Guide
How to connect Bluetooth to Cricut Explore Air 2? — Is that what you were looking for? Kudos to you! You have landed on the right page. This write-up focuses on establishing a connection between Cricut and computer/mobile devices using Bluetooth.
When I started crafting with Cricut, I was a little overwhelmed as I didn’t know where to start. Thanks to Cricut’s easy manual, it saved me a lot of time. Yet, I had to rely on various tutorials on the internet. Anyway, companies try their best to make their manual easier, but still sometimes it’s not easy for users to get everything on their own. Hence, that’s when this blog comes into a play.
However, crafting experts like me can’t sit alone doing their own crafting. It really doesn’t interest me🥴. I believe “The secret to growth is helping others grow.” Hence, I want to teach the best to all my novice crafters. So, let’s connect the Cricut machine to a device without any further ado!
How to Connect Bluetooth to Cricut Explore Air 2 (Desktop)?
Whether it is a Mac or Windows computer, you need to make sure you have built-in Bluetooth. Having a system with Bluetooth is a must to establish a connection via Bluetooth. To connect, follow the steps described below:
For Windows
You have to begin by turning on the Cricut machine.
Then, ensure you have placed your Cricut Explore 10 to 15 feet from your PC.
Now, you should hit the Windows logo + I keys on the keyboard, and it will open your PC’s Settings.
After that, click on Devices.

Next, you need to check if your Bluetooth is turned on. If not, you have to turn it on.
As you have turned on Bluetooth, hit Add Bluetooth or other device.

Also, you will receive a pop-up to add a device.
There, you need to select Bluetooth.
After that, wait and let your PC’s Bluetooth detect your Cricut model.
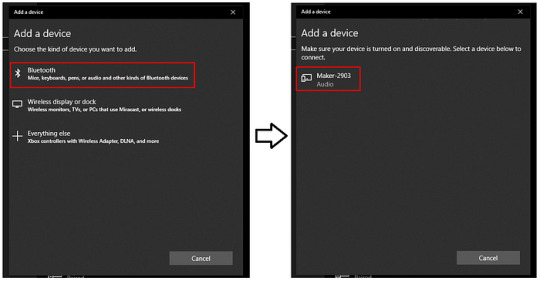
Now, you have to pair it with your Windows PC.
For macOS
The first and second steps will be the same as Windows (See above steps for Windows computer).
After that, press the power button on your Mac and turn it on.
Then, you have to head to your Apple menu.
Now, you should choose System Preferences.
Next, you will need to search for the Bluetooth choice.

Also, you should ensure that your Mac’s Bluetooth is turned on.
If it is on, choose the Cricut machine from the list.
How to Connect Bluetooth to Cricut Explore Air 2 (Mobile)?
Mobile phones are also compatible with Cricut machines. Hence, you can easily connect your Cricut to your mobile device. Whether Android or iOS, both devices are easily connected; let’s follow the steps I have explained below.
For Android
On Android, look for phone Settings.
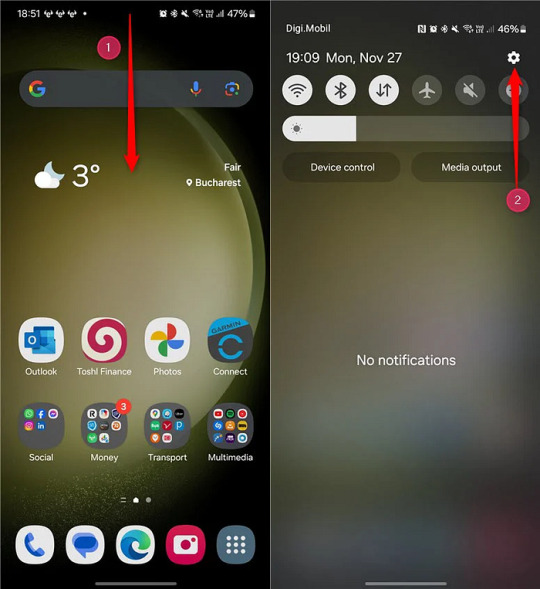
On settings, head to the Bluetooth option.
Now, you will need to turn on your Bluetooth.
Once it is turned on, you have to wait.
Wait until your phone’s Bluetooth discovers nearby Cricut Explore Air 2.
Once the Cricut Explore Air 2 name is visible in the list, select it to pair it.
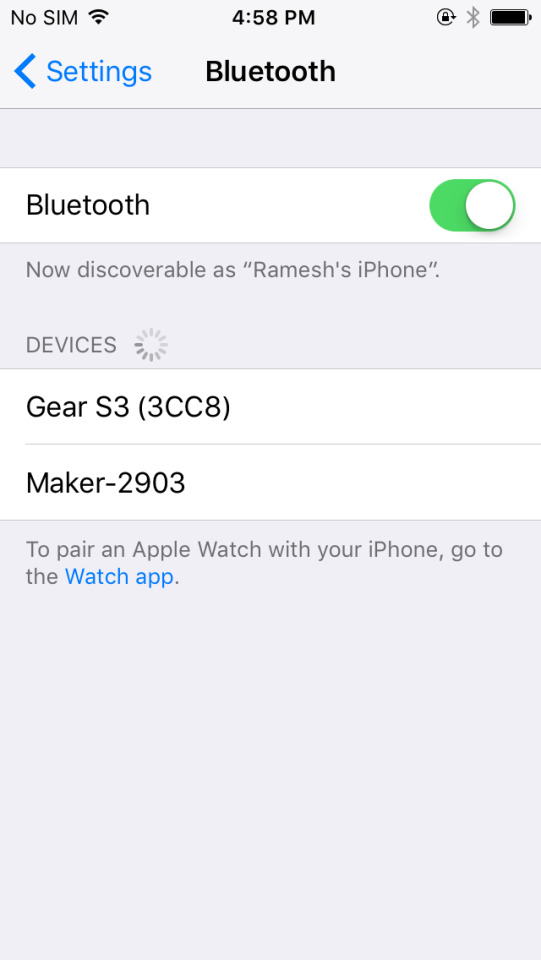
For iPhone/iPad
On an iPhone or iPad, look for the Settings.
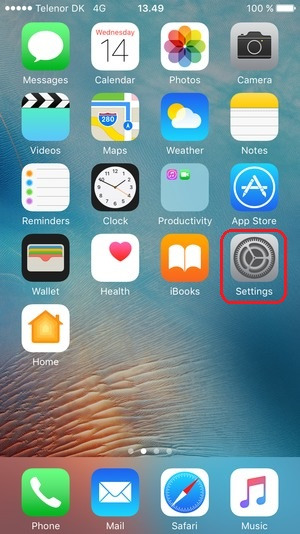
Once you’ve found the Settings app, you have to launch it.
Then, you need to search for the Bluetooth option.
Now, enable your Bluetooth by clicking on the toggle button.
After that, you will need to wait.
Next, let your iPhone or iPad search for your Cricut Explore Air 2.
Once it is detected, you will need to click on it to pair.
By now, you must have understood how to connect Bluetooth to Cricut Explore Air 2. You can connect to any device you want, from a computer to a mobile phone.
FAQs
Question 1: Which software do I need to connect my Cricut to device?
Answer: There is nothing to do with Cricut software if you want to connect your Cricut to your computer or mobile device. However, you will need to download the Cricut Design Space later to setup your Cricut cutting machine. Besides design creation or setup, you will not need Cricut software for any reason.
Question 2: Can I only connect my Cricut via Bluetooth?
Answer: No! You can insert your USB cable into the Cricut machine’s USB port to connect it to your desktop. However, you can’t use USB when you want to connect your Cricut to your smartphone. For this, Bluetooth is compulsory, as the smartphone does not have bigger USB ports like the one your desktop has.
Question 3: Why do I need to connect Cricut to any device?
Answer: In order to setup your Cricut machine, you will need to connect it to your computer or smartphone using USB or Bluetooth. Without connecting, your computer can’t communicate with your Cricut, making it impossible for you to send your design to the machine for cutting. In short, you have to connect Cricut to your devices because you want your design to be sent from your device to your Cricut for further operations.
Final Words
Throughout this blog, I have highlighted how to connect Bluetooth to Cricut Explore Air 2 on a Windows, MacBook, or smartphone (Android or iOS). Connection is important if you want to setup your Cricut machine. Without Cricut setup, you can’t perform any other operations easily on your cutting machine, meaning a single cut is impossible without it. Get ready with your Cricut and connect it to your device via Bluetooth in no time.
Read more: cricut setup for pc
install cricut design space app
Cricut New Machine Setup
Source: How to Connect Bluetooth to Cricut Explore Air 2
#How to Connect Bluetooth to Cricut Explore Air 2#Cricut New Machine Setup#install cricut design space app#cricut.com/setup#cricut setup for pc
0 notes
Text
How Do I Connect Cricut to Computer: A Step-by-Step Guide
How do I connect Cricut to computer? This was a question I got on one of my blogs a week ago. Not only this, but I also received similar questions regarding connection from many readers. Since none of my posts has a complete guide to Cricut connection in one single guide, I tried to write this.
Without thinking twice, dive into this blog and explore the steps one by one. In this blog, I have answered how do I connect my Cricut to my computer via Bluetooth. Let’s start now!
What Do I Need to Connect My Cricut to a Computer?
In order to learn how do I connect Cricut to computer, you have to first understand what you need before connecting to your Cricut. As we know, the connection is a part of the Cricut setup, meaning we are actually setting up our machines. So, there are things that are required before setup. Let’s get a look into it:
Cricut machine
Power cable to connect your Cricut to a wall outlet
A flat surface like a table for keeping the machine on
A Windows/Mac computer with the following system requirements:
For Windows
Operating System – Windows 10 or later (64-bit)
RAM – Minimum 4GB
Disk – 2 GB free
CPU – Intel Dual Core or equivalent to AMD processor
Display – 1024px x 768px screen resolution
Connectivity – A USB port/Bluetooth connection
For Mac
Operating System – macOS 11 or later
CPU – 1.83 GHz
RAM – Minimum 4GB
Display – Minimum 1024px x 768px screen resolution
A USB port or Bluetooth is required
Disk – 2GB
How Do I Connect Cricut to Computer (Windows)?
You will need to set up your Cricut on a Windows PC, which requires a connection. Since the connection is part of the Cricut setup, you must use a compatible Windows PC, such as Windows 10 or a later version. I have explained the easy steps I followed to connect my Cricut to a Windows computer.
Here are the easy steps to connect your Cricut to a computer on a PC:
First, you need to look for a flat surface to place your Cricut.
Here, ensure the distance is no more than 15 feet from the PC.
Afterward, go to the Start menu and select a gear icon to open Settings.
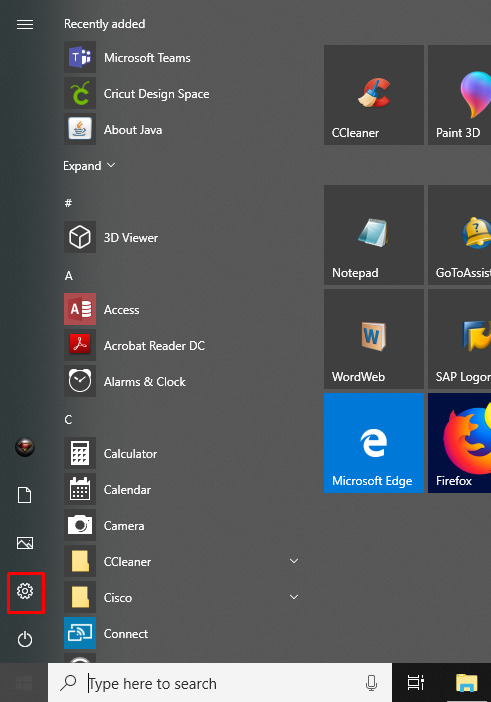
As you click on Settings, you will move to another screen, where you need to click on Devices.

Verify if your Bluetooth is ON, then go to Add Bluetooth or other device.
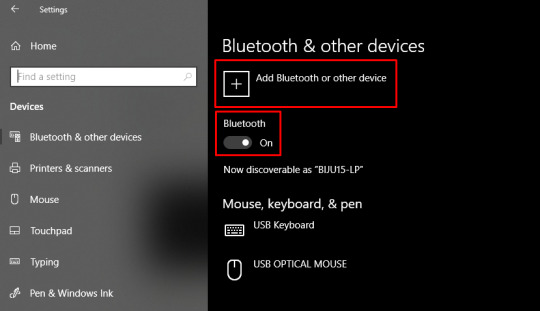
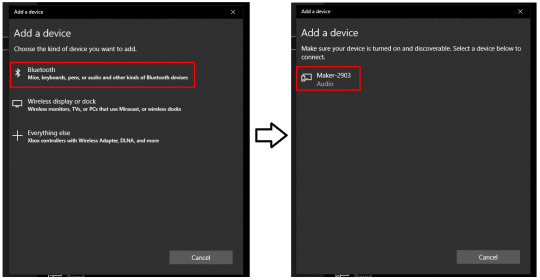
Next, select the Bluetooth option and wait for your PC to detect your Cricut machine.
Select it as it is visible in the open list, and your pairing will be done.
How Do I Connect Cricut to Computer (Mac)?
Mac users need to follow the following steps. However, the placements of Cricut and your computer are almost the same as for Windows. Here are the easy steps to connect your Cricut to a computer on a Mac:
Review if your computer is powered on or off.
After that, move to the Apple menu and choose the System Preferences option.
Now, go to the Bluetooth app on your Mac computer.
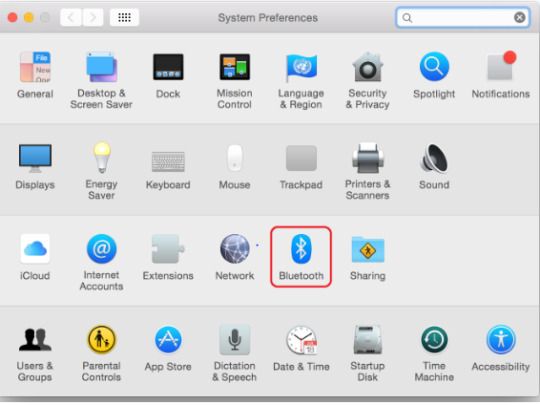
Afterward, turn on the Bluetooth.
Next, select the detected Cricut model from the available list.
Last but not least, you have connected your Mac computer to your Cricut.
FAQs
Question 1: What is the “Connect to Computer via Bluetooth” screen on Cricut?
Answer: The “Connect to Computer via Bluetooth” usually appears during the setup of Cricut Maker 3 or Cricut Explore 3. It happens because the Cricut Design Space app has detected an AMD Ryzen chip on your desktop. Actually, there is a problem with some Windows AMD Ryzen chips that may cause problems when you try to connect your Cricut via a USB cable. Therefore, Cricut recommends you use a Bluetooth connection for these computers.
Question 2: What should I do if my Cricut won’t connect?
Answer: If your Cricut is not connecting to your device, then you need to try the following useful tips:
You need to clear the cache and history of the web browser.
Run a scan on your computer for potential malware.
Defragment the hard disk.
Ensure your firewall or antivirus is blocking Cricut connections.
Question 3: Are all Bluetooth dongles compatible with Cricut machine?
Answer: According to Cricut’s official website, CSR (Cambridge Silicon Radio) Bluetooth dongles are incompatible with the Cricut machine. However, if you want to use a Bluetooth dongle, you need to use one that supports audio devices. Cricut doesn’t guarantee that all dongles will connect to your machine, but those that support audio devices are more likely to be able to connect.
Conclusion
To learn how do I connect Cricut to computer, I have explained all the steps carefully. Before that, I also mentioned things that were required before the Cricut setup. In it, I have especially discussed the system requirements. Make sure your Cricut meets the requirements so that you can do the setup in no time. To have an error-free, smooth connection with the Cricut software, go to this write-up and follow the steps mentioned above.
Read more: install cricut design space app
cricut.com/setup mac
Cricut Design Space
Cricut New Machine Setup
Source: How Do I Connect Cricut to Computer
#How Do I Connect Cricut to Computer#Cricut New Machine Setup#install cricut explore air 2#cricut design space#cricut explore 3#cricut.com/setup#design space signin#cricut.com/setup mac#cricut.com/setup windows
0 notes
Text
Cricut Machine Set up: Essential Guide for Beginners
Are you wondering about the Cricut machine set up on computers and smartphones? Don't worry, as I am going to help you with everything. If you remember, last time, I taught you what exactly a Cricut is and what its models are. But this blog will teach you how to set up your machine on computers and smartphones. As mentioned in the previous blog, Cricut is a cutting machine that can cut 100+ materials with ease and accuracy.
Before starting the crafting process, all users are supposed to set up their respective systems on the Cricut machine. After completing the setup process, you must connect both devices. Besides, you need a Cricut Design app that will help you make a variety of DIY projects. This post will provide all the details on downloading and installing the Cricut software and setting up the Cricut machine with different systems.
How to Download Cricut Design Space on Mac?
As shared in the introductory paragraph of the Cricut machine set up blog, Cricut Design Space is one of the most essential tools for all DIYers. You can easily make numerous customized projects through its various features and tools within a few minutes. To get the app on your Mac, you are instructed to have a look at the below steps:
Start the process by visiting Cricut Design Space's official portal, design.cricut.com.
After arriving at the portal, tick the Terms to Use and Privacy Policy box.

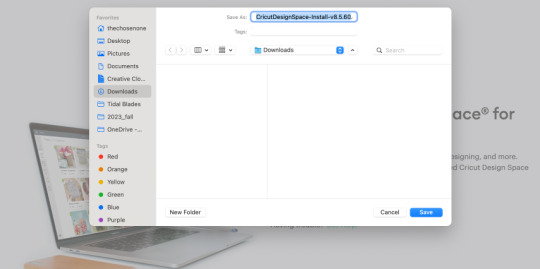
Next, choose the folder to save the Design Space downloaded file.
Then, click the Start button, and the file will download to your system.

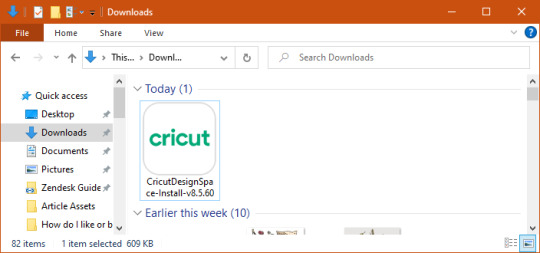
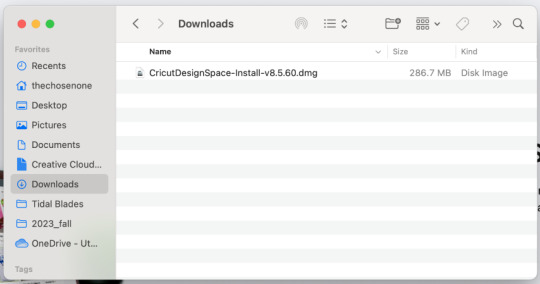
When the download is finished, minimize the window and go to the Downloads folder.
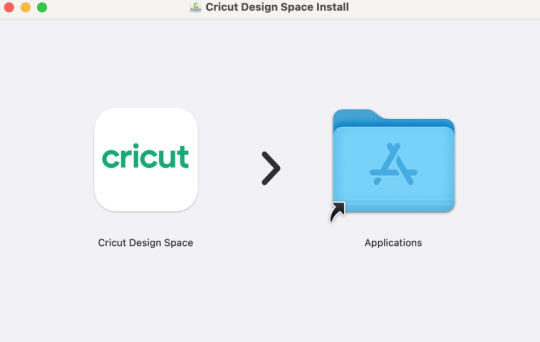
Now, double-click the .dmg file, and a small pop-up window will appear on your system screen.
Following this, move the Cricut software to the Applications folder to start the installation process.
At this point, launch the app by double-clicking the Cricut app, which is available inside the Applications folder.
A small Mac window will appear, and you must click Open to continue the process.
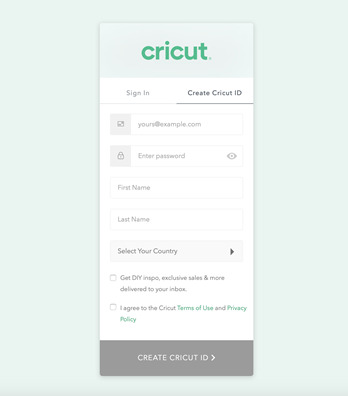
In conclusion, sign in or create your Cricut account using your login details.

As a result of this process, you can now use the Cricut app to make uncountable DIY designs.
Cricut Machine Set up on iOS Smartphones
Answer: If you are an iPhone user and want to create your DIY ideas from a cutting machine, you must set it up with your mobile device. Have a look at the below steps to learn about the method:
First, plug your machine power cord into the nearby wall socket.
After that, pair your smartphone with the Cricut product via Bluetooth.
Next, install the Cricut Design Space app and create your account.
Now, launch the app, create your Cricut ID, or sign in by entering the details.
Following this, open the Menu tab and select the Machine Setup section.
Choose your model and complete the setup by following the on-screen instructions.
Cricut Machine Set up on Mac Computers
Simultaneously, you can set up your devices to get the appropriate craft out of the cutting machine by setting it up with your Mac computer. If you aren't aware of the stages that are part of the setup process, then follow these steps:
Initiate the process by plugging in the Cricut model and turning it on.
Afterward, unpack your device and connect it via USB cable or pair it up with Bluetooth.
Next, go tocricut.com/setup and download the Cricut Design Space app.

Now, follow the instructions to create your Cricut account and set up your machine.
Finally, you will learn that the setup was made when you were invited to cut a material.
At the end of the Cricut machine set up blog, it's pretty evident that to create your favorite DIY project, you need to set up & connect the craft plotter to desktop and mobile devices. Without performing the process, you won't be able to start the machine and work on the Cricut Design app.
Frequently Asked Questions
Question: How Can I Pair Cricut to My Windows?
Answer: With the help of the following details, you can easily pair up your cutting machine with Windows:
Begin by checking that your machine is on and comes under your computer's 10-15 ft. range.
After that, enable Bluetooth on your device and look for your model name inside the list.
Next, choose your model name from the list and enter the password.
Finish the process by clicking the Pair button in the middle of your screen.
Question: How to Install Cricut Design Space on Android?
Answer: To get the Cricut app on your phones, to get this designing app you need to follow the steps available below:
First, you need to open the Google Play Store and look for Cricut Design Space.
Next, press the Install button visible on the right side of the page.
After the installation is done, open the app and tick the Machine Set up or Sign In.
Finally, you can create various DIY projects on your canvas.
Question: What Do I Need to Use Cricut?
Answer: To use a Cricut machine, you need to have several supplies that will help you create the project as you wish. The names of certain supplies are:
Cricut machine
Cricut ID and password
Computer or mobile device
Materials
USB cable
#how to setup cricut maker#install cricut design space app#Cricut.com/setup#cricut.com/setup windows#cricut.com/setup pc#cricut.com/setup mac#cricut design space#install cricut explore air 2#cricut maker bundle#cricut new machine setup#cricut explore 3#cricut machine set up
0 notes
Text
How to Setup Cricut on a Computer and Smartphone?
The day I got my new Cricut Maker machine, I was blown away by its setup. At first, I didn’t understand how to setup Cricut. In order to seek assistance, I contacted a friend of mine, Jennifer, who is a professional crafter.
Back then, I was a beginner, so she helped me with many things. Whether it was Cricut’s setup or the right way to purchase materials for Cricut, she was always there for me. But not everyone can be as lucky as me. So, I decided to share it through this blog.
I am optimistic about the importance of this write-up as it might help newbie crafters who just want to get started with their new Cricut. Don’t worry – this setup will be helpful for all platforms, such as Windows, Mac, Android, or iOS Devices. Are you ready to setup your Cricut? Let’s get started!
What Do You Need to Setup Your Cricut Machine?
If you want to know how to setup your Cricut, ensure you have the following to begin the Cricut setup:
Cricut with everything in the box
Design Space
An internet connection
Power cord
USB cable
A desktop computer, laptop computer, tablet, or smartphone
Cricut ID
Material for a test cut
So, the accessories mentioned above are essential if you want a guide for Cricut machine setup.
How to Setup Cricut on Your Windows/Mac Computers?
So, while setting up your Cricut cutting machine, carefully follow a few steps. Let me walk you through the steps I have provided below so that you can set your Cricut Explore, Maker, Joy, or more:
First, open an internet browser (Chrome or Firefox) and type cricut.com/setup.
Next, you have to download and install your Cricut Design app on your Windows/Mac.

Afterward, you will need to rely on the prompts shown on display to install the app.
On the upcoming screen, you need to select your Cricut machine.
Then, you need to plug in your Cricut machine using a power cable.
After that, press the power button on the Cricut.
You will have to proceed as per the steps given to connect your computer to your Cricut cutting machine using Bluetooth.
Once it is connected via Bluetooth, the Cricut software will start updating your machine.
Lastly, you will be asked to register your machine. You might need to create a Cricut account and register the machine.
How to Setup Cricut on an Android/iOS Smartphone?
Now, let’s delve into another Cricut setup for your mobile device. As of now, Cricut supports only two operating systems, such as Android and iOS.
Here are simplified ways for your Cricut machine setup:
First, you will have to connect the machine to the power source.
Afterward, you need to pair the Android or iOS phone with your Cricut machine using Bluetooth.
Once you have paired with the mobile device, you will need to download the app:
Go to the Google Play Store on Android and look for Cricut Design Space.
Then, click on the Install tab to download the Cricut Design app.

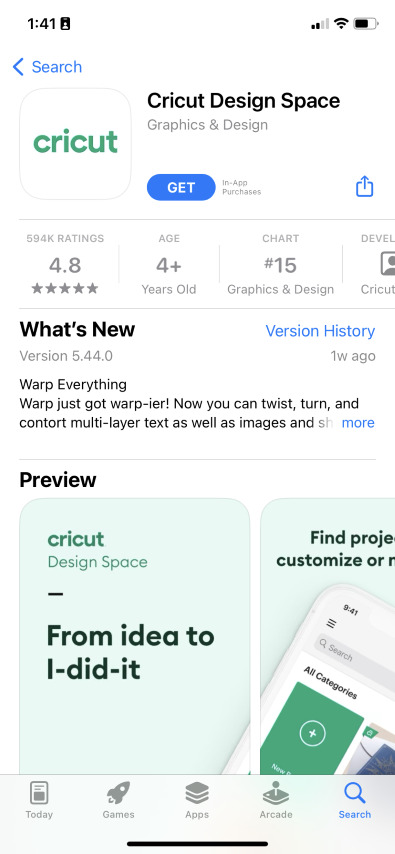
To download the Design Space app on iOS, you should navigate to the Apple Store and search for Cricut Design Space. Hit the Get button.

After installing the Cricut app, you should move ahead on the app to create your Cricut Account.
After that, sign in to your Cricut account as per the instructions given on the screen.
Finally, your Cricut setup ends here.
Finally, I have taught you how to setup Cricut as easily as possible. Now, you can easily set up all your Cricut models, such as Maker, Explore, Joy, and Venture. So, what are you worrying about? Start setting up your new Cricut today hassle-free!
FAQs
Question 1: How can Bluetooth connect your Cricut to a Windows computer?
Answer: Follow the instructions given below to connect your Cricut via Bluetooth on a Windows computer:
First, navigate to the Start button and then select Settings.
After that, you have to select the Devices option.
Now, you need to ensure that the Bluetooth is on.
Then, you will need to click on Add Bluetooth or other device.
Wait for a while until your computer detects your Cricut.
Once detected, you have to click on it to pair.
Finally, you have to enter the PIN – 0000 if asked.
Question 2: How do I setup my Cricut to my Mac computer via Bluetooth?
Answer: Follow the instructions given below to connect your Cricut via Bluetooth on a Mac computer:
First, you need to open the Apple menu.
Then, select the System Preferences option.
Now, you go to Bluetooth and make sure it is turned on.
Next, you have to look for a machine model.
Once it appears, you have to select it to establish a connection.
Afterward, hit the Pair tab.
Enter the PIN 0000 when prompted.
Question 3: How to connect Cricut using a USB cable?
Answer: Connecting any computer with a USB cable is easy and not as complex as the wireless connection is. This is because a wireless connection can be lengthy and tedious sometimes. However, if you want to connect it through a cord, you need a USB cable and connect one end to the computer and another to your Cricut machine. That’s all you need to do.
Conclusion
In this blog, I am basically talking about how to setup Cricut on various devices, including Windows, Mac, iOS, and Android. You don’t need to worry about setup since you can use Cricut Design Space on mobile phones and computers. In simpler terms, you can setup your Cricut with a mobile device or computer. Thus, start setting up your Cricut. No matter which model you are using, this guide has everything you need to setup all models of Cricut.
#cricut machine setup#How to setup your cricut#How to setup cricut#how to setup cricut maker#how to setup cricut explore
0 notes
Text
How to Upload Fonts to Cricut Design Space: Stepwise Guide
What’s up, crafters? I am sure you are thinking of something creative, am I right? Well, making crafts is nothing new to you, but there are multiple ways to upgrade yourself. Are you thinking about uploading a new font to your Design Space? Sure, you can do that and create your own font. The best part is that this process is going to be easy for you. So, follow me to learn how to upload fonts to Cricut software.
You don’t need to spend hours finding the right font in Cricut Design Space — rather, you can find it somewhere else, which is what I’m going to tell you about. Adding fonts to the Cricut app is an extremely easy process. So, let’s get started with that.
How to Find a Perfect Font to Upload?
Options for perfect fonts are never-ending. There are many places to find Cricut fonts, and some of my favorite ones are fonts.google.com and Creative Fabrica. On these websites, you will surely find some cool fonts. Apart from them, there are also some sources like
Creative Market and dafont.com are where you can get some high-quality fonts completely free.
Isn’t it great? However, not all fonts will be free on them, and to get some specific fonts, you may need to pay some money. So, if your purpose is to sell items you make, you can go for the paid fonts that often have a commercial use license.
How to Download a New Font to Cricut Design Space?
If you have finally selected your perfect font and you are all set to download it, go ahead with my simplest steps here.
Download your font from a site and check where it gets downloaded to your folder.
Then, unzip your font folder and then double-click on that file. Usually, you will get the font files in .ttf or .otf type. But, I will .otf file.
Now, continue with all the on-screen prompts on your desktop to get the font file.
When your font is installed, launch your the Cricut software.
After that, you need to create a new project.
Next, add the new text layer and choose the text box to add the text to Design Space.
That’s how you will add the font easily to your Design Space canvas. When you download fonts, your guesswork will become zero as you will know which font to use.
How to Upload Fonts to Cricut on a Windows PC?
Are you a Windows user? Perfect. Most of my work is PC-based, so I can tell you well how to upload fonts correctly to your Design Space. Look at the steps below.
In the first step, download your font file, move it to your Downloads folder, and get the downloaded file.
Then, right-click on the file if it’s compressed and choose Extract to get the files.
Now, your font will be added to your PC and the software.
You have understood the download procedure. You can move it to the Cricut Design app canvas by using the steps I have shared at the start.
How to Upload Fonts to Cricut on Your Mac Computer?
Well, if you are a Mac user, I have different steps for you. I don’t use Mac often, but for all of you, I tried adding a font to my friend’s Macbook. So, the steps are easy; let’s check them below.
Similarly, download a font file to your Mac.
After that, unzip your file if it is compressed in the .zip format.
Double-click on the font in your Finder window and let the font install.
You will get your fonts in just three simple steps. Now, you can do anything with your fonts and make great projects.
How to Upload Fonts to Cricut on Smartphones (Android/iPhone)?
If you prefer a mobile phone to use Cricut Design Space, don’t worry. You can also get the latest fonts on your device. Follow my steps below.
For Android
First of all, install an app to manage fonts. I prefer iFont.
Then, download your font and navigate to it under the Downloads folder.
Now, if your file is compressed into .zip format, get the file.
Launch your iFont app and then head to the My Font option.
Next, open that option to see the preview of your font and then install it on your device.
At last, hit the Set option to finish the installation.
These are the final steps for adding fonts to Cricut on an Android smartphone. Now, create your favorite designs with your unique fonts.
For iPhone
iPhone users don’t need to worry; I have a separate section for them. You will also need to install an app to manage fonts. iFont is a perfect app for you, too. Let’s look at the steps.
First of all, install the iFont app to manage your fonts.
Then, download your font and unzip it from the Downloads folder.
Now, launch your iFont and choose the Font Finder.
After that, choose the Open Files window and search for your font file to install.
Next, choose the Installer tab and hit the Install button with the font to allow the installation.
Then, hit the Continue button and then click the Allow option.
Next, launch your Settings app and close the iFont app.
Now, click on the Profile Downloaded option.
Finally, you will get the option to Install your favorite font.
Finally, the font is installed on our iPhone, and you are all set to use it. Now, you have learned the uploading process on almost all the devices.
Conclusion
If you are thinking about how to upload fonts to Cricut Design Space, this blog can be helpful to you. Fonts are so creative and can add spark to your lovely projects. Also, if you are someone who likes to sell your creative items, the addition of a great font will level up your projects and will make you grow as a crafter. I have shared all my favorite sources with you, like dafont.com and Creative Fabrica; if you have better sources than mine, go for it.
#Setup Cricut Machine#Cricut Machine Stepwise Guide#How to Upload Fonts on Cricut Design Space#Stepwise Guide#How to Upload Fonts#cricut explore air 2#cricut setup#cricut new machine setup#cricut crafts
0 notes
Text
How to Etch Glass With Cricut? [Step-by-step Guide]
Are you looking forward to a budget-friendly wedding with each item in its place? Today, we will be making you learn about how to etch glass with Cricut. Simply put, etching is a simple method of forever spreading the glass’s outer layer with design. After learning about glass etching, you will really do tons of DIY projects for your friends, family members, and house.
Before starting glass etching with Cricut, all the DIYers need to carry some supplies by their side. The supplies are as follows:
Cricut Machine
Design Space Account
Wine Glass
Scraper Tool
Paint Brush
Gloves
Transfer Tape
Self-Adhesive Vinyl
Glass Etching Cream
Rubbing Alcohol/ Baby Wipes
The following tutorial is going to help you out in grabbing details revolving around etching glass with Cricut.
Step 1: Create a Design on Cricut Software
First, open a new canvas on your Design Space and tick the Upload button.
Now, press the Upload Image and choose the image from the Cricut library or by dragging the image from the system Downloads folder.
After choosing the image, click the Simple option given under Select Image Type and select Continue.
Now, remove the image background and float the mouse over the area that you want to remove.
Below, we’ve shared the image that you will come across after removing the background.

Following this, always tap the Preview Cut Image to ensure that you’ve clean lines to ensure that you got the design of your choice.
You can also tick the Hide Cut Image to make any changes to your image.
After getting happy with the design, press the Apply & Continue and outline the image by adding the Cut Image on the page.
Following this, tick the Upload option and then Add to Canvas, given under the Recent Uploads folder.
Step 2: Create Your Glass Stencil
After uploading the final design, go back to the canvas and tap the Text toolbar.
Next, change the font and resize it along with the color of your choice.
Afterward, choose the shape, right-click, and then tap Send to Back to move the design to the top of the shape.
Further, press the padlock to unlock the proportions so that you can change the square size.
Now, start resizing the shape to ensure that there is enough space around the complete design.
Further, choose and drag to highlight everything in its place and press the Attach option.

Step 3: Cut and Print Your Design
Following this, tap the Make It option and select Without Mat or With Mat, then tick the Continue option.
After this, choose your base material and load it inside the machine by pressing the Play button flashing on the machine.
Now, you need to wait till your cut-die machine is doing the cutting and printing process on the mat.
Lastly, click the Unload buttonto remove the mat from the machine to proceed towards the next step.
Step 4: Weed Out Design
Further, start removing the inside parts from the design by using the weeding tool with gentle hands.
Next, cross-check that you’ve got rid of all the extra bits from the design.
Now, use the Transfer tape on the design and scraper tool to apply the tape properly.
Step 5: Apply Stencil on Glass
Now, flip over the design and remove the mat, leaving the sticky side on the surface.
Next, clean your glass with steady use of baby wipes/rub alcohol covering the whole glass.
Following this, hold on to the wine glass and place the material backward, allowing for an easy line-up.
Also, use the scraper tool to place the design on the glass while doing glass etching with Cricut process.
Step 6: Spread Etching Cream
After completing the above-said steps while performing how to etch glass with Cricut, wear gloves and empty the etching cream in a disposable bowl.
Next, start spreading the thin area of the cream across the entire area, adding more cream.
Now, let the cream set for at least five minutes, and use the alcohol rub or baby wipe to remove the cream.

Following this, if the cream has dried up, then place the glass under the tap and rinse it off.
Step 7: Disclose the Final Etch Glass
At this point, carefully remove the material from the material once the wine glass gets completely dry.
Now, you’ve learned how to etch glass with Cricut or a similar machine.
Congrats! You have successfully finished the Cricut etching on glass and show it off to your guests.

Thank you so much for staying with us to grab content in regard to etching glass with Cricut cutting machine. Besides, you need to be very careful as etching glass with a cut-die machine can be very addictive.
Frequently Asked Questions
Question: Which is the Perfect Glass for Glass Etching Process?
Answer: To get the perfect result out of Cricut, the DIYer needs to ensure that they are using a non-tempered glass. It simply means the glass shouldn’t get scratched very easily and last for many years. Plus, these glasses are resistant to the type of acid that the etching cream is made of. Besides, the glass won’t have any side effects if we leave the cream for hours during the process.
Question: Is Cricut Glass Etching Permanent?
Answer: Yes, the designs etched on the glass are completely permanent. However, it completely depends upon the user which type of etching cream you are using during the process. Apart from that, you need to ensure that you place the design in its correct position without any bubbles. Once the final product is made, you won’t be able to make any changes in the future.
Question: How Can I Clean My Cricut Etched Glass With Dishwasher?
Answer: Here you will learn about the tips that will help you learn about cleaning the custom etched glass via dishwater:
First, use a distilled white vinegar to remove fingertips or any spots from the glass.
Besides, take the help of acetone, and don’t forget to clean with baby wipes or cotton cloth.
Next, mix a small amount of toothpaste with baking soda, apply it to the glass with your finger, and then clean it with a soft cloth.
Visit: – Cricut.com/setup Install cricut design space app Cricut Design Space Cricut.com setup mac glass etching with Cricut
#Cricut.com/setup#cricut.com/setup mac#cricut.com/setup windows#cricut explore air 2#cricut design space login#design.cricut.com#cricut new machine setup#glass etching with Cricut#Cricut etching on glass#how to etch glass with Cricut
1 note
·
View note
Text
How to Make Decals With Cricut? [A Complete Guide]

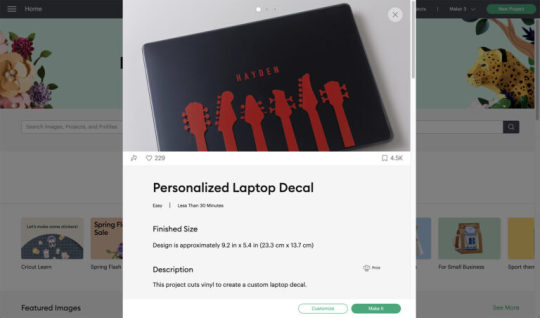
Crafting with Cricut is something everyone loves. Whether you are new to Cricut or you are a long-time crafter, making decals/stickers is likely to be on your to-make craft list. Considering this, I am going to share how to make decals with Cricut in this post. Therefore, if you own a Cricut cutting machine, you can get started with the process explained here. Also, I want to share everything about how I made it and how easy the process is.
I love to personalize my belongings, and that is why I tried out some amazing decals. Last time, I made beautiful decals for my laptop. And you know what? Plus, the project turned out to be ultimate in just a few simple steps. Are you excited to make the one with your Explore 3 machine? Here, I will discuss all the supplies and the step-by-step process I performed.
Initially, let’s begin with the needed supplies.
Supplies Needed to Make Cricut Decals
The first thing to consider is the supplies and materials needed for the project. Since I had used Cricut Explore 3, I will mention the machine below. But you can use any one of the Cricut machines to get started. Moreover, find below the supplies you will require to make decals with your Cricut machine.
Cricut Explore 3 machine
A laptop or PC
Material Trimmer
Smart Vinyl, red
Transfer Tape
Accessories
Once you have all these supplies, you can go ahead with the process of making them. After all, I am going to explain all the steps thoroughly.
Easy Guide: How to Make Decals with Cricut?
I had used a guitar headstock design in my last guitar. However, you can get started with images in the Design Space or start with a blank canvas. If you choose the latter process, you will need to start from scratch. Moreover, if you want to decorate the wall, you can perform the same steps for how to make wall decals with Cricut. Now, let’s make the decals.
Step 1: Go to Cricut Design Space
Initially, launch the Cricut Design Space on your system. You can open it on your Windows or Mac computers.
Firstly, launch Design Space on your Windows/Mac computer.
Then, open your project in Design Space.
After that, select the Customize option.
Step 2: Enter the Text
In the second step, you can type in the text you want. Here is how you can type in the text for your decal.
Move to Name.
Next, double-click on Name.
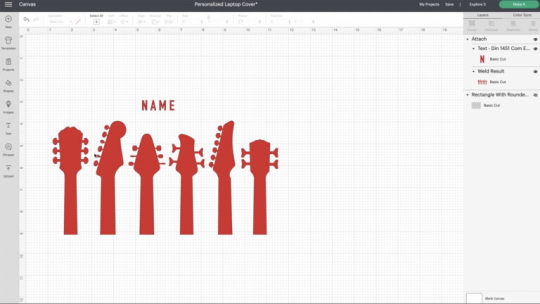
Finally, type in the text you want to show on your Cricut decal.
Note: If you want to find the recently used colors, you will need to tap on the color swatches. It will save you time while making it easy to find the colors.
Step 3: Change the Text Color
Cricut Design Space allows crafters to change the text color. Thus, if you want to change the color of your text, you can do it based on your preferences. In my decor project, I changed the font to red so that it would all cut the same red vinyl piece.
Step 4: Preview Your Design
If you are happy with the color and design’s layout, click on Make It and proceed. Here are the steps to preview your design.
Firstly, click on Make It. You can find it in the top-right corners.
When the Design Space asks you to load the material, select Without Mat.
Hit Continue, then.
Finally, you will see the Review Artwork screen.
After previewing your design, click Continue if the design layout is good.
Step 5: Cut and Weed Your Design
Now, go ahead with the next steps of how to make decals with Cricut. It is the cutting and “weeding” process. Please note that it is one of the most important steps of making decals with Cricut.
First, Set Base Material.
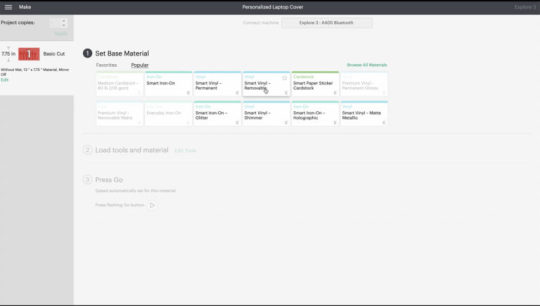
Now, the software will start to send the info from Design Space to the Cricut machine
Afterward, perform all the prompts to continue to cut your design.
After the design is cut, unload your material and remove the excess vinyl from the images.
The process of removing excessive vinyl from around the images is known as weeding. Don’t forget to do it after the cutting process.
Step 6: Apply the Transfer Tape
After you cut and weed the design, the next step is to apply transfer tape. This plastic film makes the vinyl decals apply easily. Make sure to apply the transfer tape to the front of your design.
I performed these steps, and the efforts turned out vibrant decals for my laptop. Do you want to know how to make car decals with Cricut? You can perform the same steps and return with a perfect car decal.
Conclusion
Beginners, as well as experienced crafters, can create a wide variety of decals using different materials. It will add personalization and make the belongings look elegant. The project is excellent for a beginner crafter and fun for long-time crafters. Start making them by learning how to make decals with Cricut. You can use any of the machines, Cricut Joy, Maker, or Explore, to get started. Create your designs/fonts and take your creativity to the next level. Crafting becomes joyous with Cricut, supplies, and a thorough process.
Frequently Asked Questions
Q.1 How Can I Cut a Vinyl Decal With the Cricut Machine?
Cutting a vinyl decal is one of the essential steps of making a decal. Here are steps that you can follow to cut Vinyl decals with your Cricut machine.
First, select your Cricut machine.
Next, choose the material you want to cut.
After that, press the arrow button on your machine.
Lastly, tap on the Cricut button to start cutting.
Q.2 How Do You Make Custom Decals With a Cricut Machine?
Custom decals are an excellent way of adding the ultimate statement to personal items. Do you need to learn how to make decals with Cricut? You can create them effortlessly with your favorite Cricut machine. Here are a few steps to follow.
First, go to Cricut Design Space.
Next, select Customize.
Thereafter, type your text and change the text color.
After that, Set the Base Material.
Now, follow all the prompts to cut.
Lastly, apply transfer tape to your design.
Q.3 How Can I Create Window Decals Using Cricut Machine?
The Cricut machine plays a pivotal role in making a wide variety of decals. Therefore, choose your favorite machine to make window decals. Perform the below-mentioned steps.
Firstly, open the project in Design Space.
After that, resize your project.
Then, tap on Make it.
Select the appropriate cut setting.
Remove excess materials from the design.
At last, apply the transfer tape.
Visit: https://cricuts-mart.com/
install cricut design space app
cricut.com/setup
www.cricut.com/setup login
Source: https://cricuts-mart.com/how-to-make-decals-with-cricut-a-complete-guide
#cricut new machine setup#cricut#cricut setup#cricut.com/setup#cricut explore air 2#cricut design space login#design.cricut.com#www.cricut.com/setup login#www.cricut.com/setup#How to Make Decals With Cricut#install cricut design space app
0 notes
Text

Creating custom baby clothes with a Cricut machine setup is a delightful and personalized way to add flair to your little one’s wardrobe.
#How to make custom baby clothes with Cricut#design.cricut.com#design.cricut.com/setup#cricut.com/setup mac#cricut.com/setup#cricut design space#cricut new machine setup#install cricut explore air 2#cricut explore 3
0 notes
Text
install Cricut Design Space app
"Cricut is a leading brand in the world of crafting and DIY projects. With a range of cutting machines and intuitive software, Cricut enables you to bring your creative ideas to life with precision. To get started, simply install the Cricut Design Space app on your mobile device. This app serves as the gateway to designing, editing, and cutting a variety of materials. Create custom projects and access a library of designs and fonts, all at your fingertips with the install Cricut Design Space app." https://criccricut.com/
#cricut design space#cricut design space app#cricut design space login#cricut design space software#cricut design space setup#cricut design space for mac#cricut#cricut.com setup mac#install cricut design space app#how to setup cricut explore#cricut.com/setup mac#cricut new machine setup#cricut explore air 2#how to setup cricut maker
1 note
·
View note
Text
How to Connect Cricut Bluetooth to Mac and Windows?

Have trouble connecting a crafting machine? Here, I answer how to connect Cricut Bluetooth on Mac and Windows computers. During my six-year crafting journey, I faced many challenges. Be it creating a project or setting up the machine, the journey was full of ups and downs.
Nothing can be worse for crafters than setting up this machine. It takes time, and many non-tech-savvy people do not like to do it—no worries; I know your pain😉! In addition, these years of experience have taught me a lot about this exceptional machine.
Hence, believe it or not, these overall steps can be fun. To learn more, delve into this tutorial and check out the blog. I will explain the system specs first, then show you how to connect Cricut to computer via Bluetooth.
System Specifications for Using Cricut Design Space
Alright, we are heading to learn how to connect Cricut Bluetooth. But before you connect, you need to check the system specs. As I said earlier, checking the system steps can prevent your PC from crashing and many other errors. Let’s take a look at a few important points provided below:
Mac
Supported Operating System: macOS 11 or later
RAM: 4 GB
CPU: 1.83 GHz
Display Resolution: 1024px x 768px
Internet: Minimum 2 – 3 Mbps Download & 1 – 2 Mbps Upload
Hard Disk Space: 2 GB required at least
Connection Type: Bluetooth wireless or wired USB
Offline Feature: Yes, it is available for Mac
Windows
Supported Operating System: Windows 10 or later
RAM: 4 GB
CPU: Intel Dual-Core or equivalent AMD processor
Display Resolution: 1024px x 768px
Internet: Minimum 2 – 3 Mbps Download & 1 – 2 Mbps Upload
Hard Disk Space: 2 GB required at least
Connection Type: Bluetooth wireless or wired USB
Offline Feature: Yes, it is available for Windows
How to Connect Cricut Bluetooth to Your Computer?
Here, I am going to connect your machine to Bluetooth devices such as Windows and Mac. By connecting this machine to your compatible device, you will be able to start your crafting journey in one go! Let’s delve into the steps given below:
Mac
Power on your machine and MacBook.
Cutting machine should be within 10-15 feet of your Mac.
After that, you will need to go to the Apple menu given in the upper left corner.
Next, choose System Preferences or System Settings.
Now, search for the Bluetooth option.
Turn on the Bluetooth.
Wait and see if your Mac detects your nearby machine.
When detected, select it and click on the Pair button.
Once done, return to your Design Space app and Cricut New Product Setup.
Then, your machine will show that your device is connected.
Windows
Turn on the PC and place it 10 to 15 feet away from the machine.
After that, press the Start button (Windows logo-like key) on the keyboard and select a gear icon, which is your Settings.
Once the Settings opens, you need to select the Devices option.
Now, you will need to find the Bluetooth option and check if it is on.
If your Bluetooth is off, turn it on.
Then, you have to add your machine by clicking on Add Bluetooth or other device.
On the next pop-up screen, you are required to select the Bluetooth option.
Also, your PC will start looking for the machine nearby.
Once it finds your machine model, click on it to pair.
Finally, you learned how to connect Cricut to computer. Afterward, you can open your Design Space and start setting up the machine. For setup, you will need to follow the on-screen prompts displayed on the Design Space app. Once done, you are all set to craft!
Final Words
So, yeah, that’s all in this blog tutorial. By now, you might have learned how to connect Cricut Bluetooth. Afterward, you are ready to proceed and complete the machine setup. To conclude, I explained the system specs so that you can understand your system’s compatibility before setting it up. After the system specs, I explained the steps for connecting the machine to the PC and Mac separately. Good luck with your crafting journey.
FAQs
How can I connect my Cricut to Bluetooth?
To create your machine to your Bluetooth device, check out the following points:
Go to your mobile device (Android or iOS).
Ensure Bluetooth is turned on.
Also, turn on the heat press.
Then, head to Google Play Store (on Android) or App Store (on iOS).
Search for the Cricut Heat app and download it.
Open the app and select the Cricut Setup button on the screen.
After that, your device will detect your nearby device.
Tap on the Connect button.
Finally, your heat press is paired now.
Which Cricut machine is Bluetooth enabled?
Several Cricut machines are Bluetooth enabled, such as the Maker, Maker 3, Explore Air 2, Explore 3, Joy, and Joy Xtra. These latest and smart cutting machines have built-in Bluetooth and are compatible with iOS, Android, Windows, and macOS. However, they can be connected via USB cable except for the Joy model.
How to install a Bluetooth adapter in Cricut?
In order to install a Bluetooth adapter in your Explore or Explore One machine, delve into the following quick steps:
Turn on the Explore machine.
Grab the Bluetooth adapter and remove its cap.
Insert the adapter into your Explore machine.
Ensure the text on the adapter is facing up
When you notice a blue light flashing, it means you have installed the adapter.
Source: How to Connect Cricut Bluetooth
#how to connect cricut bluetooth#how to connect cricut to computer#cricut design space download#cricut design space app#cricut design space software#cricut explore air 2 setup#Cricut setup on computer#how to setup cricut explore#cricut explore air 2 software#Cricut New Machine Setup#Cricut maker setup
1 note
·
View note
Text
How Do I Download Cricut Design Space: All Devices Covered!
How do I download Cricut Design Space? Does that sound like you? You’re in the right place. This blog outlines the basic steps to download Cricut software on various devices, such as Windows, MacBooks, iPhones/iPad, and Android. If you have been looking for this, read this write-up until the end.
While writing this post, I was pretty sure about your needs. Beginner crafters like you who’ve just started crafting might be intimidated initially. Although Cricut is an amazing machine, its setup process can slightly confuse you. Since I have experienced it already, I know what you want. Therefore, I have written this blog to keep your needs in demand. Besides, I am covering all the compatible devices on which you can use the Cricut app.
So, shall we start? Let’s get ready with your computer or mobile device where you want to download the app.
How Do I Download Cricut Design Space on My Computer?
I got my first Cricut machine in 2018. Then, I installed the Cricut Design app for the first time on my PC. At that time, I had an HP laptop with Windows 10 and an Intel Dual Core or equivalent AMD. In addition, 4 GB RAM is the minimum needed for using Cricut software on a PC. So, ensure you meet all the basic needs to run this software on your PC.
Here are the steps to download and install the Cricut application on a PC:
Step 1: Download the Cricut Software
Start by turning on your Windows PC.
Then, plug in your Cricut machine.
After you have turned on the devices, click on the Start menu from the taskbar.
Now, type any browser’s name that you use. Here, I use Google Chrome, but you can try any other alternatives.
You have to use your internet browser’s search bar.
Next, paste this URL design.cricut.com.
Then, press the Enter button on your keyboard.
You will go to a page with a checkbox. Click on it to enable the Download button.

Once you have enabled the button, click it to download Cricut software on your PC.
When the download begins, wait for a while and let it finish.
Step 2: Install the Cricut Design Space app
When downloading is finished, you must go to the Downloads folder or file where you downloaded and saved the file.
Once you have found the downloaded file, click on it twice to open it.
Then, you will see a pop-up that asks, “Whether you trust the application to make changes to your PC.”
Here, you need to select Yes to allow.

How Do I Download Cricut Design Space on Mac?
MacBook is an Apple computer with its own exceptional MacOS, which is more advanced than other OSs like Windows. However, you should have a MacBook with macOS 11 or later and 4 GB RAM. Besides, make sure you have free 2 GB disk space available.
Here are the steps to download and install the Cricut software on MacBook:
Step 1: Download the Cricut App
The first and second steps are the same as those for your Windows PC.
Then, paste this URL design.cricut.com into your browser’s search bar.
Next, you have to tick the checkbox to accept Cricut’s terms & conditions.
Now, you will notice that your Download button is activated.
Click on this enabled Download button and begin downloading the app.

After that, you will reach a page where you will have to select the folder to save the file that you are downloading.
Once you have selected the desired location, hit on the Save tab to start downloading.
Step 2: Install the Cricut Design Space app
When you have downloaded the Cricut software, you have to head to the Downloads folder.
Now, click on the .dmg file twice in the Downloads folder.
On the next window screen, drag the Design Space icon to the Applications folder icon to start installing the app.

How Do I Download Cricut Design Space on Smartphones?
Thanks to Cricut, you can now use your Cricut app on your smartphone. Yes, that’s true! Whether you use Android or iOS, you can use this software hassle-free. Make sure that if you’re an Android user, you have an Android 10.0 or higher OS. While for iOS users, they must have at least iOS 15 or later. Here’s how to download and install the app on Android/iOS:
For Android
Use any Android phone that you use. (You can check the eligible list of devices on Cricut’s official site).
In order to download the app, you must find the Google Play Store icon on your device.
Then, you should type Cricut Design Space software in the search bar.
After that, you will have to look for the apps displayed in the provided result below.
You will need to select it and click on the Install button to begin the installation.

For iOS
You have to head to the App Store on your iOS device (iPhone/iOS)
After that, you need to type Cricut Design Space in the search bar.
Now, you have to look for the app.
Then, you should select the app based on the visible results.
Click on the Get tab to install the app.

Conclusion
This blog focuses on how do I download Cricut Design Space for macOS, Windows, Android, and iOS devices. I have written the steps simply so that every beginner user can understand them hassle-free. Downloading the Cricut software is a must, as it allows you to create intricate designs smoothly and then send them to your Cricut machine for further cutting. Start your crafting journey with Cricut Design Space today!
FAQs
Question 1: Which Device is the best for Cricut Design Space?
Answer: Although the Cricut software is compatible with both computer and mobile, Windows and macOS are the most suitable options for the Cricut app. They run the Cricut app easily and offer more features than Android and iOS. In a nutshell, try Windows and macOS to use the software.
Question 2: Do I always need to use Cricut Design Space online?
Answer: Not necessarily. In order to use some features of Cricut Design Space, you have to stay connected to the internet. However, Cricut allows users to edit and make changes to their design even when they are offline. Besides, you will only need the internet when you want to download some new images, fonts, or projects.
Question 3: Can I use Cricut Design Space without a Cricut machine?
Answer: Yes, you can! Users can use the Cricut Design app without using their Cricut machine. Cricut is a simple software used to create designs where you can access thousands of images, projects, and more. Use the app without any cutting machine, and when you are done with your design, you can connect Cricut to cut.
Read more: cricut.com/setup mac
install cricut design space app
Cricut Design Space
Source: how do i download cricut design space
#how do i download cricut design space#Cricut Design Space#cricut.com/setup mac#cricut.com/setup#cricut explore air 2#cricut design space app#cricut new machine setup#download cricut software
0 notes
Text
How to Use a Cricut Joy: Quick and Easy Guide
A few days ago, I went to my cousin’s house and saw a new Cricut Joy collecting dust in the corner. Being a crafter myself, I couldn’t resist asking her why. She replied that she was confused about how to use it. With a smile, I offered to help. From unboxing the machine to setting it up, I guided her through each step, even teaching her how to create her first project.
Then, I realized that some beginners may not have even opened the box and could use my assistance. That’s why I have prepared this guide for you all. Just like I helped my cousin, I will tell you how to use a Cricut Joy from scratch. However, it is necessary to follow this guide till the end because every piece of information is important for using your Cricut Joy.
Step 1: Unboxing the Cricut Joy
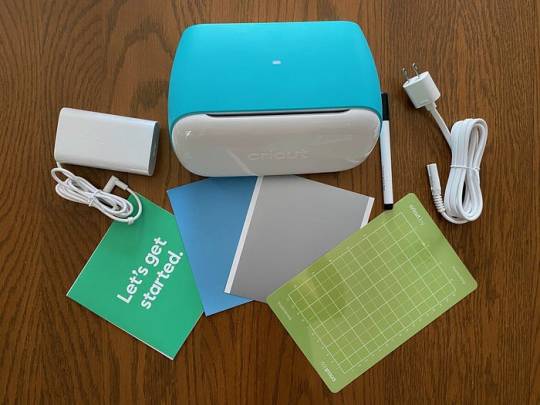
If you have already unboxed your Cricut Joy machine, you can continue to the second step below. If not, let’s take a look at what you’ll find inside the box:
Welcome card
Cricut Joy machine
Power adapter
Fine Point pen (0.4 mm)
StandardGrip mat
Sample of smart vinyl
Around 50 pre-made projects
Free Cricut Access for 30 days
Step 2: Setting up Your Cricut Joy Machine
Setting up a Cricut Joy is a crucial step in learning how to use a Cricut Joy machine effectively. Let’s start by setting up the machine first.
Prepare Your Cricut Cutting Machine
Place the Cricut Joy machine on a flat and clean surface near the electric outlet.
Assemble the machine’s power cord and insert one end into the machine and the other end into the electrical outlet.
After that, turn the power button on, and a light will illuminate the machine.
Connecting a Cricut Joy to Your Computer
The Cricut Joy does not have a USB cord, so you have to connect the cutting machine to a computer via Bluetooth.
Turn on the Cricut Joy machine 10–15 feet away from your desktop computer.
Next, locate the Bluetooth option, turn it on, and wait for the computer to detect your machine.
Now, select Cricut Joy from the list, and if asked for a PIN, enter 0000 and hit Connect.

Downloading and Installing Cricut Design Space
Downloading and installing Design Space on your desktop computer is necessary to complete the process of how to use a Cricut Joy machine.
Go to cricut.com/setup, agree to Cricut’sterms and conditions, and download the file.

After downloading Design Space, locate the file you see on the screen and install it.
Once the software is installed, launch it, create a Cricut ID and password, and sign in.
Note: If you want to access Cricut Joy from mobile (Android or iOS), download the Cricut app from the Play Store or App Store.
Adding Your Cricut Joy Machine in Design Space
Once you have installed and signed into the Cricut software, it’s time to set up the Cricut Joy. To do this, launch the Cricut software, click on the drop-down menu, and select New Machine Setup > Cricut Cutting Machine > Cricut Joy. Also, make sure the connection is established.
Step 3: Using a Cricut Joy to Make a Project
You will need to cut vinyl with Cricut Joy to personalize a wooden tissue holder. Here’s what you need for this project:
Cricut smart vinyl
Unfinished wooden tissue box
Cricut Joy machine
Computer or transfer tape
Design
Create a Design in Design Space
Open the Cricut Design app and select the New Project tab.
After that, use the Text function and a text and change its font.
Once you have the design ready to cut, click the Make It option to move on to the next page.
Then, select the mat page. There is no need to mirror this project. Click Continue.
From the All Browse Material option, search for vinyl and select it as a material.
Now, load the green vinyl into Cricut Joy without using a mat.
Cut & Weed Out the Vinyl Design
Once everything is ready, go back to Design Space and hit Continue to begin cutting.
Once the machine completes cutting, it automatically stops. Now, unload the smart vinyl and weed out unwanted designs.

Next, cut the transfer tape to the size of the vinyl and apply it to the design.
Apply Your Design
Frequently Asked Questions
What can you make using a Cricut Joy?
Cricut Joy is a smart, compact, and portable machine that can be used to create different projects. Below, I have listed some of the Cricut Joy projects.
Vinyl mug
Greeting cards
DIY pillow
Leather earrings
Wall art
Tumblers
Cake toppers
Stickers
Labels
Banners
T-shirts
Jewelry
How does Cricut Joy work?
The Cricut machine works with the user-friendly Cricut Design Space or Cricut Joy app. Users need to install one of these and start a project. Also, the Cricut Joy connects to devices via Bluetooth. Once everything is set up, the user designs it and sends it to the machine. Finally, the Cricut Joy will cut or write according to the selected settings.
Do I need a computer to use a Cricut Joy?
That’s not necessarily true; you can also use your mobile device to use Cricut Joy. All you need is a device where you can download and install Cricut Design Space to command the Cricut machine. However, all of this can also be done from a mobile phone or tablet. So, it depends on the user’s preference and their comfort level.
Conclusion
The Cricut Joy is a beginner-friendly crafting tool that is compact yet versatile. Setting up the Cricut Joy and learning how to use it may not be too difficult for beginners. I have discussed everything in detail in the blog post above. If you followed the instructions exactly, you can now use your Cricut Joy without any hassle.
Read more: install cricut design space app
cricut.com/setup
cricut.com/setup mac
Cricut New Machine Setup
Source: how to use a Cricut Joy
#how to use a Cricut Joy#Cricut New Machine Setup#cricut software app#cricut design space download#cricut explore air 2#cricut.com/setup#cricut project ideas#design.cricut.com/setup#cricut.com/register#cricut.com#cricut.com/create
1 note
·
View note
Text
How Do I Setup My Cricut Joy? [Easy Guide]
Have you bought a new Cricut Joy for your DIY or Crafts? Well, we are glad to know that! The Cricut Joy is a small, versatile cutting machine that is too portable to carry anywhere. This is the best tool for anyone who wants to make hassle-free crafts quickly. However, the Cricut Joy machine setup is easy for everyone, including beginners.
We want to walk you through this blog to answer your query — how do I setup my Cricut Joy? This guide is dedicated to beginners who are going to set up their Joy cutting machine for the first time. The write-up explores the overview of Cricut Joy, the download of the Design Space app. Finally, we will learn the setup process of Cricut Joy. Let’s get started.
How to Download Cricut Design Space on a Computer?
Having Design Space software is essential if you want to set up your Cricut Joy machine. Because this is the software that will help you use the Joy device, let’s see how to download it on a Windows computer first. Then, we will learn to download on a Mac.
For Windows
For Mac
How Do I Setup My Cricut Joy on a Computer?
Since you have installed the Cricut Design Space on your computer, you can follow the setup process for Cricut Joy. To set up your Cricut Joy with a computer device, you have to follow the steps written below:
How Do I Setup My Cricut Joy on a Mobile Device?
You need to follow the steps mentioned below to set up the Cricut Joy on your iOS/Android device.
For iOS
For Android
You can also set up the Joy on Android, and the process is quite similar. To connect your Cricut Joy with your Android mobile device, follow the steps below:
Final Words
No matter which Cricut cutting machine you are going to set up. You always need a Cricut Design Space. Hence, we explained the steps to download the software on Windows and Mac computers separately. Since it was the beginner guide, we tried to describe the Cricut Joy in detail. However, the blog finally ends with how do I setup my Cricut Joy. The Write-up explains each step most readily so that beginners can set up their Cricut Joy without any hassle.
FAQs
Question 1: Do I need a computer to use Cricut Joy?
Answer: Not necessarily! The Cricut Design Space, which is a compatible software for Cricut Joy, can also be used on your mobile device (iOS and Android). Hence, you can use the Cricut Joy without your PC and Mac. However, when we use the Design Space app on the computer, we get more features. However, there are limited features available for mobile devices. So it is always better to use the app with a Computer. If you don’t have any option, then you can still use your machine with mobile devices.
Question 2: Does Cricut Joy support Bluetooth?
Answer: Yes. Since there is no USB port available in Cricut Joy, you can’t connect it via a USB cable. As a result, you can connect your Joy only via Bluetooth. With this Bluetooth feature, you can easily set up your Joy cutting device with your Android, iOS, Mac, and Windows devices. However, Bluetooth makes it easier for us to connect wirelessly without any hassle. We don’t need to manage those long wires, and we can freely work from an adequate distance.
Question 3: How to connect Cricut Joy to Android devices?
Answer: Below are the steps to connect your Joy cutter to your Android mobile device:
Visit: cricut.com/setup
Source: https://medium.com/@setupcricutdesignspace/how-do-i-setup-my-cricut-joy-easy-guide-e89b38d8aa91
#How Do I Setup My Cricut Joy#digital design#design space setup#cricut explore air 2#cricut setup#cricut design space login#cricut new machine setup#cricut design space download#cricut.com/setup mac#cricut design space#how to setup cricut explore#cricut.com/setup
0 notes