#How Do I Connect Cricut to Computer
Explore tagged Tumblr posts
Visit Tumblr Blog
Explore Tumblr blogs with no restrictions, modern design and the best experience.
Last Seen Tumblr Blogs


Fun Fact
Hackers stole 65M passwords from Tumblr in 2013.
Text
How Do I Connect Cricut to Computer: A Step-by-Step Guide
How do I connect Cricut to computer? This was a question I got on one of my blogs a week ago. Not only this, but I also received similar questions regarding connection from many readers. Since none of my posts has a complete guide to Cricut connection in one single guide, I tried to write this.
Without thinking twice, dive into this blog and explore the steps one by one. In this blog, I have answered how do I connect my Cricut to my computer via Bluetooth. Let’s start now!
What Do I Need to Connect My Cricut to a Computer?
In order to learn how do I connect Cricut to computer, you have to first understand what you need before connecting to your Cricut. As we know, the connection is a part of the Cricut setup, meaning we are actually setting up our machines. So, there are things that are required before setup. Let’s get a look into it:
Cricut machine
Power cable to connect your Cricut to a wall outlet
A flat surface like a table for keeping the machine on
A Windows/Mac computer with the following system requirements:
For Windows
Operating System – Windows 10 or later (64-bit)
RAM – Minimum 4GB
Disk – 2 GB free
CPU – Intel Dual Core or equivalent to AMD processor
Display – 1024px x 768px screen resolution
Connectivity – A USB port/Bluetooth connection
For Mac
Operating System – macOS 11 or later
CPU – 1.83 GHz
RAM – Minimum 4GB
Display – Minimum 1024px x 768px screen resolution
A USB port or Bluetooth is required
Disk – 2GB
How Do I Connect Cricut to Computer (Windows)?
You will need to set up your Cricut on a Windows PC, which requires a connection. Since the connection is part of the Cricut setup, you must use a compatible Windows PC, such as Windows 10 or a later version. I have explained the easy steps I followed to connect my Cricut to a Windows computer.
Here are the easy steps to connect your Cricut to a computer on a PC:
First, you need to look for a flat surface to place your Cricut.
Here, ensure the distance is no more than 15 feet from the PC.
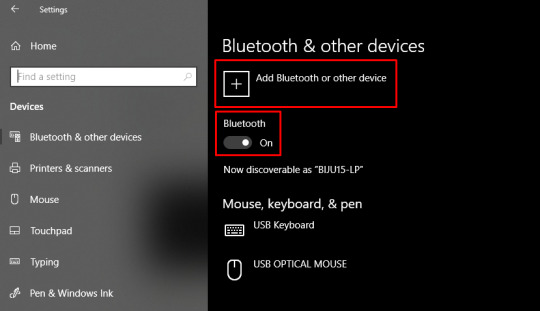
Afterward, go to the Start menu and select a gear icon to open Settings.
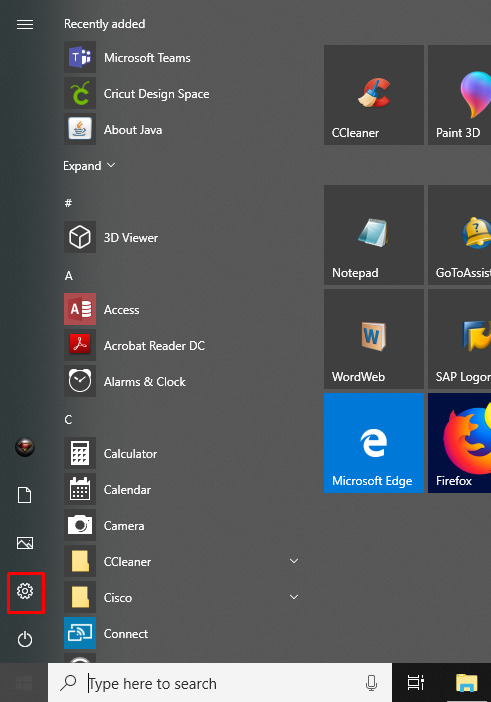
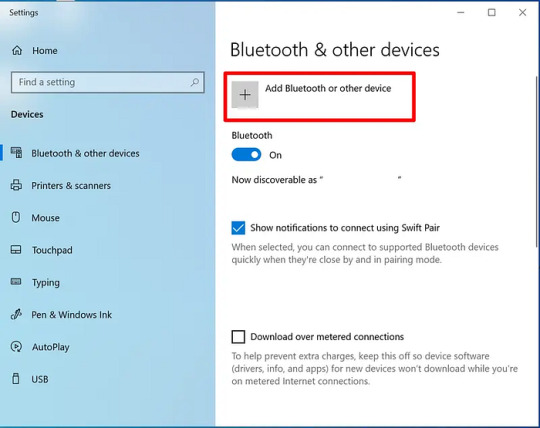
As you click on Settings, you will move to another screen, where you need to click on Devices.

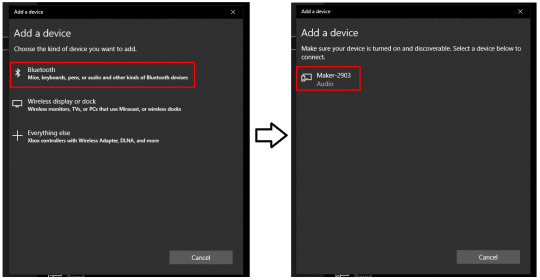
Verify if your Bluetooth is ON, then go to Add Bluetooth or other device.

Next, select the Bluetooth option and wait for your PC to detect your Cricut machine.
Select it as it is visible in the open list, and your pairing will be done.
How Do I Connect Cricut to Computer (Mac)?
Mac users need to follow the following steps. However, the placements of Cricut and your computer are almost the same as for Windows. Here are the easy steps to connect your Cricut to a computer on a Mac:
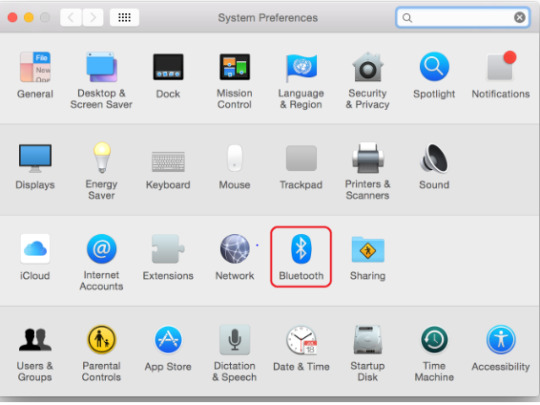
Review if your computer is powered on or off.
After that, move to the Apple menu and choose the System Preferences option.
Now, go to the Bluetooth app on your Mac computer.

Afterward, turn on the Bluetooth.
Next, select the detected Cricut model from the available list.
Last but not least, you have connected your Mac computer to your Cricut.
FAQs
Question 1: What is the “Connect to Computer via Bluetooth” screen on Cricut?
Answer: The “Connect to Computer via Bluetooth” usually appears during the setup of Cricut Maker 3 or Cricut Explore 3. It happens because the Cricut Design Space app has detected an AMD Ryzen chip on your desktop. Actually, there is a problem with some Windows AMD Ryzen chips that may cause problems when you try to connect your Cricut via a USB cable. Therefore, Cricut recommends you use a Bluetooth connection for these computers.
Question 2: What should I do if my Cricut won’t connect?
Answer: If your Cricut is not connecting to your device, then you need to try the following useful tips:
You need to clear the cache and history of the web browser.
Run a scan on your computer for potential malware.
Defragment the hard disk.
Ensure your firewall or antivirus is blocking Cricut connections.
Question 3: Are all Bluetooth dongles compatible with Cricut machine?
Answer: According to Cricut’s official website, CSR (Cambridge Silicon Radio) Bluetooth dongles are incompatible with the Cricut machine. However, if you want to use a Bluetooth dongle, you need to use one that supports audio devices. Cricut doesn’t guarantee that all dongles will connect to your machine, but those that support audio devices are more likely to be able to connect.
Conclusion
To learn how do I connect Cricut to computer, I have explained all the steps carefully. Before that, I also mentioned things that were required before the Cricut setup. In it, I have especially discussed the system requirements. Make sure your Cricut meets the requirements so that you can do the setup in no time. To have an error-free, smooth connection with the Cricut software, go to this write-up and follow the steps mentioned above.
Read more: install cricut design space app
cricut.com/setup mac
Cricut Design Space
Cricut New Machine Setup
Source: How Do I Connect Cricut to Computer
#How Do I Connect Cricut to Computer#Cricut New Machine Setup#install cricut explore air 2#cricut design space#cricut explore 3#cricut.com/setup#design space signin#cricut.com/setup mac#cricut.com/setup windows
0 notes
Text
How Do I Install Cricut Design Space: All Devices Covered!
How do I install Cricut Design Space - this is a question that all Cricut users face when setting up their crafting machines. If you are facing the same, there is no need to worry. As a long-time Cricut user, I am going to guide you through the process of installing the software on your device. By reading this blog, you can easily download and install the Cricut Design app hassle-free.
Design Space is a versatile and flexible app available for both computers and phones. However, your device needs to meet certain specifications to download and use the software. This works with Android and Apple devices, as well as Windows and Mac computers.
How Do I Install Cricut Design Space on Windows?
If you want to download the app on your computer, then a Windows computer is a great option. Just make sure that you are using Windows 10 or one of any later versions. Here is the process for downloading the software on your computer:
How Do I Install Cricut Design Space on Mac?
If you want to use the Design Space on a Mac system, it is equally good for the app. It has all the features that you have to download and log in with it. But, just like a Windows computer, you have to remember that you are using either a macOS 11 or a newer version. This is the process for downloading the software:
How to Install Cricut Design Space on Android?
A computer is not necessarily needed to use the app on your computer. Even if you do not have a desktop, you can use the app on an Android and Apple phone. Here is how you can install the software on your Android phone:
How Do I Install Cricut Design Space on iOS?
An iPhone is equally good for downloading the application. Here is the complete process for downloading the software:
Conclusion
So, if you have worries about how do I install Cricut Design Space, I am sure that after reading this blog, your problem is solved. Whichever of the above-mentioned devices you have, you can download the software on your device by following the steps written in this post. However, you should keep one thing in mind: after you download it, you will have to log in with your Cricut account. In the case of a first-time user, creating an account will be necessary for you.
FAQs
What do I need Cricut software for?
Design Space is the app that you need to run a Cricut machine. This is a free app by Cricut itself. You can get this app on your operating system and use it to create your own projects. Also, it helps you use the crafting machine on your computer and mobile device. In the app, you can create designs for your projects, or you can upload any design from your device as well. It simply means that the software is the backbone of Cricut.
Can I use my own image on Cricut Design Space?
Yes, Design Space gives you multiple options when it comes to creating or choosing a design for your projects. The first thing you can do is pick any design from the app. The software has over 100,000 ready-made free designs, templates, and texts on the app. You can pick any of them and use them. You can also create your own design by going to the New Project section. If you want, you can choose any design from outside the app and upload it to the app.
How can I upload a file on Cricut app?
To upload a design to the Design Space app, you have to open it and choose the Upload option. Then, you should click on “Browse” and choose the file you want to upload on the app. Once you select it, you will see a preview of the design. If you are happy with the design, you can simply press “Continue,” and the file will be uploaded to the software.
Visit: install cricut design space app cricut.com setup mac www.cricut.com setup login
Source: https://cricutcraftcreate.wordpress.com/2024/08/20/how-do-i-install-cricut-design-space-all-devices-covered/
#How Do I Install Cricut Design Space#cricut create connect to computer#cricut setup#cricut design space app#cricut venture#cricut new machine setup#cricut design space#install cricut design space app#cricut.com setup mac#www.cricut.com setup login#www.cricut.com/setup login#www.cricut.com/setup
0 notes
Text
Argentina 50 Años Jersey Font – Celebrate a Legacy in Style

Celebrate the golden legacy of Argentine football with the exclusive Argentina 50 Años Jersey Font – a tribute to the nation’s rich history and its collaboration with Adidas. Perfect for custom jerseys, Cricut projects, or football-themed gifts, this font echoes the design of Argentina's 50th Anniversary Kit and honors their 1978 World Cup win.
👉 Get the Argentina 50 Años Jersey Font on Etsy
🏆 Adidas x Argentina 50th Anniversary Kit – On-Pitch Tribute
Kit Release & Debut: Adidas released the Argentina 50th Anniversary Kit on November 14th, 2024, and the national team debuted it during a match against Peru on November 19th.
Design & Features: The kit blends classic white and light blue stripes with gold details, including the Adidas Trefoil logo and AFA lettering. It features a special collar graphic, black and gold shorts, and matching socks. The look is both modern and nostalgic.
Historical Significance: This is Argentina’s first-ever anniversary kit, celebrating 50 years of partnership with Adidas, which began in 1974. Though Argentina worked with other brands like Le Coq Sportif in the past, the Adidas connection was renewed in 2001 and remains iconic today.
Color Palette:
Main color: Ambient Sky
Gold accents for the Trefoil, AFA, and laurel wreath
3 stars symbolizing Argentina’s World Cup wins
🎨 What You’ll Get – Argentina 50 Años Font
This font is inspired by the unique number and name styling seen in the anniversary kit. You’ll receive:

✅ OTF & TTF files for easy installation
✅ Complete A–Z and 0–9 set
✅ Retro feel blended with modern block design
✅ High-resolution quality for vinyl and fabric use
👉 Get the Argentina 50 Años Jersey Font on Etsy
🖨️ How to Customize Your Jersey
Whether you're a collector or a fan who loves to wear your pride, you can apply this font to your own kit using:
Install the font on your computer
Open your software (like Canva, Illustrator, Cricut)
Create your name + number using this font
Export it for print
Use HTV or DTF printing with a heat press for best results

🛠️ 5 Best Tools for Using Football Jersey Fonts
To create your custom designs professionally, try:
Canva – Quick and easy mockups
Cricut Design Space – For vinyl cutting and layout
Adobe Illustrator – Vector editing and pro design
CorelDRAW – Great for large-format printing
Inkscape – A free alternative for SVG editing

youtube
🛍️ Why Buy from Etsy?
Our fonts are listed on Etsy, a safe and trusted marketplace for creatives. With instant download and secure checkout, Etsy gives you:
🔐 Trusted payments
📥 Immediate access to your files
✉️ Easy communication and support
🌍 Global accessibility
👉 Get the Argentina 50 Años Jersey Font on Etsy
❓ Frequently Asked Questions (FAQ)
Can I use this font with Cricut or Silhouette? Yes – the SVG and vector files are fully compatible.
Is this an official AFA font? No. This is a fan-made recreation inspired by the 50 Años kit for personal use.
Can I sell jerseys made with this font? The font is for personal use only. Contact us if you need a commercial license.
What formats are included? You’ll get OTF, TTF, SVG, AI, EPS files in a zip download.
How do I install the font? Just double-click the OTF or TTF file and click "Install" on your Mac or PC.
—
Unlocking the Style: The Significance of the 🇦🇷 Argentina 50 Años Jersey Font
The Historical Context of the 🇦🇷 Argentina 50 Años Jersey
Argentina football history, 50 years celebration, soccer jersey design, iconic sportswear
The Design Elements that Make the 🇦🇷 Argentina 50 Años Jersey Font Unique
jersey typography, font design in sportswear, visual identity, branding in jerseys
Why the Right Font Matters in Sports Jerseys: A Look at Impact and Recognition
sports branding, jersey recognition, fan engagement through design, typography importance in sports
The Influence of Typography on Team Spirit and Fan Culture
fan loyalty symbols, cultural significance of fonts, community identity through jerseys
A Closer Look at How to Acquire Your Own 🇦🇷 Argentina 50 Años Jersey Font Design
where to buy jerseys online, custom jersey options, limited edition sportswear availability
Conclusion: Celebrate Argentine Football Legacy with the Iconic 50 Años Jersey Font Today!
👉 Get the Argentina 50 Años Jersey Font on Etsy
Unlock the Nostalgia: Discover the Argentina 50 Años Jersey Font
Introduction: The Significance of the Argentina 50 Años Jersey
Argentina football history, commemorative jersey, sports design, football culture, jersey typography
The Unique Style of the Argentina 50 Años Jersey Font
jersey font design, typography in sports, unique athletic fonts, visual identity, custom jersey fonts
How to Incorporate the Argentina 50 Años Jersey Font into Your Designs
graphic design tips, sports branding, using jersey fonts in projects, personalizing jerseys, font applications
The Legacy of Argentina's Football Achievements Celebrated Through Design
football achievements history, Argentine football legends, cultural impact of sports jerseys, iconic designs in football history
Where to Find and Download the Argentina 50 Años Jersey Font for Your Projects
font download sources, free font resources for designers, where to buy jersey fonts online, creative marketplace options for fonts
Conclusion: Celebrate Argentine Football History by Using the Iconic 50 Años Jersey Font Today!
👉 Get the Argentina 50 Años Jersey Font on Etsy
#argentina#Argentina 50 Años#messi font#messi custom#leo messi#Messi jersey#world cup#world cup 2026#font#font design#fonts#fonts & typography#football#football jerseys#football numbers#jersey#soccer font#soccer#Soccer ttf#Soccer otf#Custom jersey#Youtube
4 notes
·
View notes
Text
How to Connect Cricut Bluetooth to Mac and Windows?

Have trouble connecting a crafting machine? Here, I answer how to connect Cricut Bluetooth on Mac and Windows computers. During my six-year crafting journey, I faced many challenges. Be it creating a project or setting up the machine, the journey was full of ups and downs.
Nothing can be worse for crafters than setting up this machine. It takes time, and many non-tech-savvy people do not like to do it—no worries; I know your pain😉! In addition, these years of experience have taught me a lot about this exceptional machine.
Hence, believe it or not, these overall steps can be fun. To learn more, delve into this tutorial and check out the blog. I will explain the system specs first, then show you how to connect Cricut to computer via Bluetooth.
System Specifications for Using Cricut Design Space
Alright, we are heading to learn how to connect Cricut Bluetooth. But before you connect, you need to check the system specs. As I said earlier, checking the system steps can prevent your PC from crashing and many other errors. Let’s take a look at a few important points provided below:
Mac
Supported Operating System: macOS 11 or later
RAM: 4 GB
CPU: 1.83 GHz
Display Resolution: 1024px x 768px
Internet: Minimum 2 – 3 Mbps Download & 1 – 2 Mbps Upload
Hard Disk Space: 2 GB required at least
Connection Type: Bluetooth wireless or wired USB
Offline Feature: Yes, it is available for Mac
Windows
Supported Operating System: Windows 10 or later
RAM: 4 GB
CPU: Intel Dual-Core or equivalent AMD processor
Display Resolution: 1024px x 768px
Internet: Minimum 2 – 3 Mbps Download & 1 – 2 Mbps Upload
Hard Disk Space: 2 GB required at least
Connection Type: Bluetooth wireless or wired USB
Offline Feature: Yes, it is available for Windows
How to Connect Cricut Bluetooth to Your Computer?
Here, I am going to connect your machine to Bluetooth devices such as Windows and Mac. By connecting this machine to your compatible device, you will be able to start your crafting journey in one go! Let’s delve into the steps given below:
Mac
Power on your machine and MacBook.
Cutting machine should be within 10-15 feet of your Mac.
After that, you will need to go to the Apple menu given in the upper left corner.
Next, choose System Preferences or System Settings.
Now, search for the Bluetooth option.
Turn on the Bluetooth.
Wait and see if your Mac detects your nearby machine.
When detected, select it and click on the Pair button.
Once done, return to your Design Space app and Cricut New Product Setup.
Then, your machine will show that your device is connected.
Windows
Turn on the PC and place it 10 to 15 feet away from the machine.
After that, press the Start button (Windows logo-like key) on the keyboard and select a gear icon, which is your Settings.
Once the Settings opens, you need to select the Devices option.
Now, you will need to find the Bluetooth option and check if it is on.
If your Bluetooth is off, turn it on.
Then, you have to add your machine by clicking on Add Bluetooth or other device.
On the next pop-up screen, you are required to select the Bluetooth option.
Also, your PC will start looking for the machine nearby.
Once it finds your machine model, click on it to pair.
Finally, you learned how to connect Cricut to computer. Afterward, you can open your Design Space and start setting up the machine. For setup, you will need to follow the on-screen prompts displayed on the Design Space app. Once done, you are all set to craft!
Final Words
So, yeah, that’s all in this blog tutorial. By now, you might have learned how to connect Cricut Bluetooth. Afterward, you are ready to proceed and complete the machine setup. To conclude, I explained the system specs so that you can understand your system’s compatibility before setting it up. After the system specs, I explained the steps for connecting the machine to the PC and Mac separately. Good luck with your crafting journey.
FAQs
How can I connect my Cricut to Bluetooth?
To create your machine to your Bluetooth device, check out the following points:
Go to your mobile device (Android or iOS).
Ensure Bluetooth is turned on.
Also, turn on the heat press.
Then, head to Google Play Store (on Android) or App Store (on iOS).
Search for the Cricut Heat app and download it.
Open the app and select the Cricut Setup button on the screen.
After that, your device will detect your nearby device.
Tap on the Connect button.
Finally, your heat press is paired now.
Which Cricut machine is Bluetooth enabled?
Several Cricut machines are Bluetooth enabled, such as the Maker, Maker 3, Explore Air 2, Explore 3, Joy, and Joy Xtra. These latest and smart cutting machines have built-in Bluetooth and are compatible with iOS, Android, Windows, and macOS. However, they can be connected via USB cable except for the Joy model.
How to install a Bluetooth adapter in Cricut?
In order to install a Bluetooth adapter in your Explore or Explore One machine, delve into the following quick steps:
Turn on the Explore machine.
Grab the Bluetooth adapter and remove its cap.
Insert the adapter into your Explore machine.
Ensure the text on the adapter is facing up
When you notice a blue light flashing, it means you have installed the adapter.
Source: How to Connect Cricut Bluetooth
#how to connect cricut bluetooth#how to connect cricut to computer#cricut design space download#cricut design space app#cricut design space software#cricut explore air 2 setup#Cricut setup on computer#how to setup cricut explore#cricut explore air 2 software#Cricut New Machine Setup#Cricut maker setup
1 note
·
View note
Text
How Do I Set Up My Cricut Maker? [Ultimate Guide]
Buying a new Cricut Maker can be overwhelming for all of us. Initially, setup can be daunting, but once you do it, you will love the overall process. However, you can easily set up any Cricut machine without needing much assistance.
The post is all about how do I set up my Cricut Maker. Through this write-up, we will see the items while unboxing the new Cricut Maker. Further, you will explore the Cricut Maker and its types. Afterward, we will explain the complete process of setting up your Cricut Maker machine.
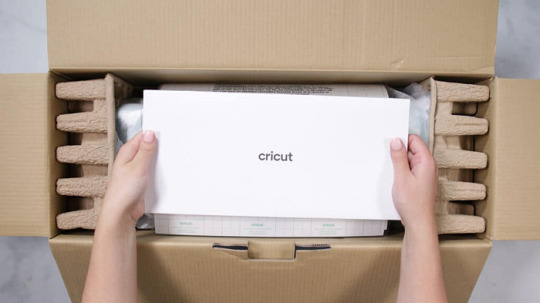
What Do You Get in the Cricut Maker Box?
Unboxing a new product is always an exciting task. While unboxing the Cricut Maker machine, we got several items that we will be discussing here. However, you always have the option to select the bundles when you buy the machine from Cricut's official website.
Following are the items that you get in the box of the new Cricut Maker:
Apart from these, you will get the following:
The best thing is that we get the blades and tools along with the new Cricut machine. These blades allow us to try various products before buying more blades.
How Do I Set Up My Cricut Maker on a Computer?
When we talk about setting up Cricut Maker machine, it means we want to connect it to our devices like computers or mobile phones. However, there are certain ways to connect these machines to our devices. For example, we can connect our Cricut Maker to our computer or phone via Bluetooth or USB cable. So, it is the users’ choice to choose which way is the most suitable for them.
Below, we explain how to set up Cricut Maker. This method is only applicable for Windows or Mac users only:
How Do I Set Up My Cricut Maker on a Mobile?
Here's how to set up your Cricut Maker on Mobile devices with iOS or Android operating systems:
Cricut Maker is the most advanced and versatile in Cricut's lineup. However, the box contains various items that you can use to make several projects uninterruptedly. In this write-up, we explained the Maker and its features in detail. It helps the users to get an overview of machines so that they can use them without any hassle. After exploring the Maker cutting machine, the blog found out how do I set up my Cricut Maker.
FAQs
Question 1: Can I set up the Cricut Maker easily?
Answer: People think the setup is daunting, but this is not the case. Cricut machines are just like printers. The only difference is that Cricut has blades to cut. However, when you go through the notice period, you will find the setup is too easy and complete in less time. While setting up, you will need to download and install the Design Space app. This app will guide you through the further setup process, making it easy for beginners to set up the machine in one go.
Question 2: How do I connect my mobile phone to my Cricut?
Answer: Here, we are going to show you the method to connect your mobile device to the Cricut machine. Here, we are using iPhone or iOS devices. So, ensure you have an iOS device.
Question 3: Can I use the Cricut without its software?
Answer: No, you must use the Cricut Design Space app to send your design to your Cricut device. The machine is the companion for your Cricut cutting machine. Without this machine, you can't cut anything. However, the Design Space is essential for creating intricate designs and then sending them to the machine. Also, the app is the only way to maintain communication between your computer and Cricut.
Visit: cricut.com/setup
cricut.com/setup
Source: https://cricutmakersetup.wordpress.com/2023/10/21/how-do-i-set-up-my-cricut-maker-ultimate-guide/
#cricut explore air 2#design space setup#cricut maker#cricut.com/setup#cricut.com design space#cricut.com/create#cricut.com sign in#design cricut.com download#digital design
2 notes
·
View notes
Text
How to Use Cricut Autopress: Your Get Started Guide
If you are reading this blog, it’s because you want to learn how to use Cricut Autopress. Ever since I started my crafting journey, I have created a lot of crafts. But for the long term, I decided to start my own venture, which is a custom T-shirt business. Through this business, I have sold thousands of T-shirts using my press.

Since Cricut Autopress is designed for industrial purposes, it offers incredible features compared to conventional heat press machines. Since I am an expert in using this machine, I can guide you in getting started with your Cricut Autopress machine. Plus, I will show you how to make your first project using this heat press.
After reading this blog, you will be able to use it without anyone’s help. So, whether you want to make a bunch of T-shirts for your family or tote bags, this Cricut machine has you covered!
What Can You Do with Cricut EasyPress?
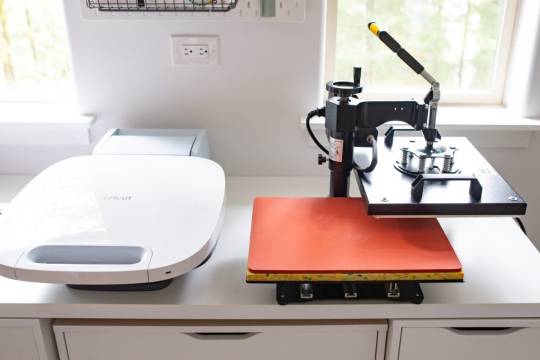
Earlier, we had a traditional heat press, which was not very user-friendly. That used to be so heavy, making it difficult to place it somewhere else. But Cricut launched its new version of heat-press which is called a Cricut Autopress. With this press, you can stick iron-on vinyl, Cricut Infusible Ink, and sublimation prints on a wide range of flat blanks. These blanks include T-shirts, coasters, tote bags, and much more.
I know you might be thinking about Cricut EasyPress, such as why we can’t use EasyPress instead of buying this bulky machine. After all, they both do the same things as EasyPress.

But, being the owner of a T-shirt designing business, I know the utmost importance of having an Autopress. In contrast, it was not made for personal use but for industrial use so that it could handle massive projects quickly. But for smaller projects, EasyPress is always a good option.
Steps for Cricut Autopress Setup on Your Computer
Before we move to how to use Cricut Autopress, every machine needs to be set up. However, setting up an Autopress is relatively easy. Follow the steps below to set your Cricut Autopress heat press:
First of all, unbox the machine by removing the black handles.
Take out the USB cord to connect your Autopress Control Pod to your computer.
Go to the Cricut Setup and follow the steps given on the screen to set up your heat press.
If you want to set it up via Design Space, then just go to the top left menu and select the New Product Setup.
Note for Mac users: Newer computer users who do not have a Standard USB driver will need to use a USB-to-USB converter. But if you have a Cricut Mug Press, then you must already have this converter.
How to Use Cricut Autopress for Making an Iron-on Project?
Let’s take an example to understand the usage of Autopress. In this example, I am going to use a Cricut Infusible Ink on my customer’s T-shirt. Before we use this press, we will first need to create a design on Design Space. Afterward, cut the same design using your Cricut cutting machine. After cutting the design, move to the step-by-step instructions given below to apply the design to the T-shirt:
Step 1: Set the Time & Temperature
First of all, I am going to switch on my Cricut Autopress. Next, I am going to preheat my blanks. For this, we need to set the time and temperature for our compatible materials based on a heat guide. For my blank, I have set the temperature to 400° for 15 seconds. You can modify your temperature and time according to your materials using the Cricut Heat Guide.
Step 2: Preheat the Blank

Let’s learn how to use Cricut Autopress for preheating. In order to preheat my blank, I simply put my shirt on the base of the heat press. Afterward, I close the Autopress and try to press the handle downward until it gives a click sound.
After closing it, the timer will start counting down. Then, the press will open up automatically once the timer reaches zero. Since it might be too hot, do not try to touch it very soon, and leave it to cool down.
Step 3: Place Your Design on the Blank T-shirt
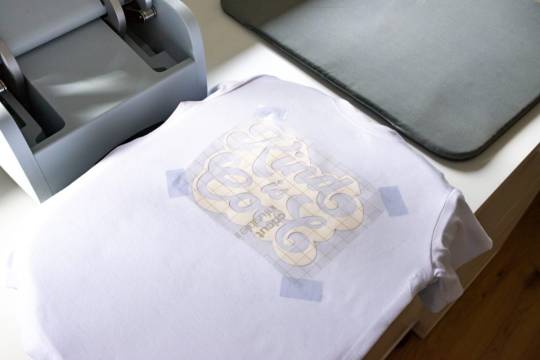
I always do preheat because it removes the crease, and the surface becomes evenly flat, making it an ideal surface for your design. So, after preheating, I place a cardstock inside my blank and then place the Infusible Ink design on my blank.
As you can see in the above image, I have used heat-resistant tape to keep the design in the center. Also, my design is facing downward. Afterward, I place the butcher paper on the top of my T-shirt blank.
Step 4: Apply the Pressure to Your T-shirt
Before applying the pressure, I reset the Pod for 45 seconds. Then, pull the handle down to apply the pressure until it produces a click sound. Once your countdown reaches zero, you should leave it for a while to cool down. Later on, you can remove the transfer!
Finally, our guide on how to use Cricut Autopress comes to an end. Here’s what my Infusible Ink design looks like on a white T-shirt.

FAQs
Question 1: What projects can I make with Cricut Autopress?
Answer: the upgraded version of the traditional heat press, Cricut Autopress, is mainly designed for bigger projects. However, the possibilities are endless with this advanced heat press. These projects include clothing such as T-shirts, tote bags, and any other oversized clothes. Besides, you can also make home Decor, e.g., personalized address sign plate/board and ceramic coasters.
Question 2: Should I use Cricut Autopress without the mat?
Answer: You can only use Autopress without a mat when you are using a thicker blank. However, thin blanks require you to use the mat. Then, just adjust the heat and temperature for your compatible materials and place the design onto your blank. Afterward, you can pull down the handle to press the heat press. As a result, your design will adhere to the blank. Make sure you do not touch it just after applying the design. Let it cool down and take it out.
Question 3: Can I adjust the pressure on Cricut Autopress?
Answer: No, you don’t need to apply pressure yourself, as Cricut Autopress comes with an automatic pressure feature. Thus, it can apply the necessary pressure automatically on any project with up to 2 inches of thickness. However, you just need to lower the heat plate and press down the handle so that the motor engages properly. Finally, the in-build mechanism will do the rest to adjust the pressure.
Conclusion
In a nutshell, I have written this guide on how to use Cricut Autopress for beginners. Using this guide, they can make their first project easily. To help the beginner, I have added points like what you can do with your Cricut Autopress. Further, I discussed the setup procedure of the press. Without this setup, we cannot get started with this device. Last but not least, the step-by-step tutorial to make your first project can help you apply your design on a T-shirt or any other blank effortlessly.
1 note
·
View note
Text
How to Pair Cricut Machine via Bluetooth or USB? (Easy Tips)
Cricut machines are a must-have for DIY crafters, designers, and small business owners. Whether you’re working on vinyl decals, paper crafts, or fabric designs, pairing your Cricut machine correctly is the first step to getting started.
I still remember the day my Cricut machine arrived as if it were yesterday. But within minutes, my excitement faded as I struggled to connect the machine to my laptop. I couldn’t figure out how to connect it to my laptop. But you don’t have to worry about that. Pairing your Cricut isn’t as complicated as it seems once you know what to do.
In this blog, I’ll explain exactly how to pair Cricut machine with your Windows or Mac, whether you use Bluetooth or a USB cable. It’s a beginner-friendly guide designed to help you avoid the roadblocks I encountered.
Let’s get your machine up and running so you can start creating!
Step 1: Turn On Your Cricut Machine
Before you start pairing, make sure your machine is powered on. Follow these steps:
Plug in your machine: Make sure the power cable is connected to the machine and plugged into a power source.
Turn on the machine: Press the power button (usually located on the side or top) to turn it on. A blinking light indicates readiness.
Step 2: Connect via Bluetooth (Wireless Connection)
You can connect your machine wirelessly via Bluetooth. Here’s how to do it:
For Windows Users
Follow the steps given below to learn how to pair Cricut machine via Bluetooth on Windows:
Open Bluetooth settings: Click onthe Start menu, then select Settings, then Devices. After that, go to Bluetooth & other devices.
Turn on Bluetooth: Ensure Bluetooth is turned on in your computer’s settings.
Put your machine in pairing mode: Press and hold the Bluetooth button on the machine. The machine’s Bluetooth light will begin blinking, indicating that it’s ready to pair.
Select your machine in Bluetooth settings: On your computer, under the “Bluetooth & other devices” settings, click on Add Bluetooth or another device. Choose Bluetooth, then select your machine from the list of available devices.
Confirm the connection: Once paired, the Bluetooth light on your machine will stop blinking and become solid, indicating that it is connected to your computer.
TIP: Cricut Explore and Maker models include Bluetooth functionality by default. Older models may require a separate Bluetooth adapter.
For Mac Users
Follow the stepwise guide listed below to learn how to pair Cricut machine via Bluetooth on a Mac:
Open Bluetooth settings: Tap on the Apple menu > System Preferences > Bluetooth.
Enable Bluetooth: Make sure Bluetooth is turned on in your Mac’s settings.
Put your machine in pairing mode: Press and hold the Bluetooth button on your machine until the Bluetooth light blinks.
Select your machine name: On your Mac, you should see your machine model in the list of available Bluetooth devices. Click on Pair to connect.
Confirm the pairing: After pairing, the Bluetooth light on your machine will remain solid, confirming the connection.
Step 3: Connect Using a USB Cable (Wired Connection)
If you prefer a wired connection or your device doesn’t support Bluetooth, you can connect your crafting machine using a USB cable.
Locate the USB port on your machine: The USB port is on the left side of the machine, where you can connect the USB cable.
Plug in the USB cable: Now, connect one end of the USB cable to the machine and the other end to a USB port on your computer.
Open Design Space: Launch the software on your computer, and the machine should be automatically recognized.
If prompted, follow the on-screen prompt to complete the setup.
Step 4: Setup Cricut Design Space on Your Device
Now that your Cricut machine is paired with your device, you need to set up Design Space to start creating designs.
Download Design Space: If you haven’t already, download and install Design Space on your computer or mobile device.
Create or sign in to your account: Open the software and either sign in with your existing account or create a new account.
Select your machine name: Once logged in, the software will automatically detect your machine. If not, go to Settings and select your machine from the list.
Start designing: Once everything is set up, you can start creating your projects in Design Space and send them to the cutting machine for cutting.
Troubleshooting Cricut Pairing Issues
Sometimes, your machine may not pair correctly due to device settings or software glitches. Here are quick fixes.
Turn off both the machine and your computer or phone. Turn them back on and retry the pairing steps.
Remove any old Bluetooth devices that could be conflicting.
Ensure both your device’s operating system and the Design Space software are updated to their latest versions.
Clear the cache in the Cricut Design Space software.
Reopen the software and attempt to pair again.
Final Words
Pairing your machine doesn’t have to be difficult. Whether you use Bluetooth or a USB cable, the steps above will help you connect quickly and efficiently. Just keep your software up to date, follow the correct steps, and stay patient!
Once your Cricut machine is paired, the world of crafting will be at your fingertips!
Frequently Asked Questions (FAQs)
What to do if Design Space doesn’t recognize my Cricut machine?
If Design Space isn’t recognizing your machine, make sure of the following key points:
Ensure that the Bluetooth or USB connection is enabled and that the machine is discoverable.
Restart both your computer and machine.
Ensure your machine is within the recommended range of 15 feet from your device.
Make sure Cricut Design Space and your machine’s firmware are up to date.
If updates don’t resolve the issue, consider uninstalling and reinstalling Cricut Design Space.
Do all Cricut Machines have Bluetooth?
No, not all Cricut machines have Bluetooth connectivity out of the box. While newer models like the Cricut Joy, Joy Xtra, Maker, Maker 3, Explore Air 2, Explore 3, and Venture utilize Bluetooth, older models like the Explore One require a separate Bluetooth adapter to connect to devices.
Note: Cricut Explore and Explore One require a Bluetooth adapter.
Can I pair the same Cricut Machine with multiple devices?
Yes, you can connect extra devices to one Cricut machine, but only one device can actively control the machine at a time. This prevents conflicts and ensures that the machine receives clear instructions. You can install Cricut Design Space on multiple devices and access the same account and projects. You can connect to the machine via USB or Bluetooth, and the software will guide you through selecting the desired machine for your project.
SOURCE: How to Pair Cricut Machine via Bluetooth or USB
#how to pair Cricut machine#Cricut Setup#Cricut software app#cricut machine setup#cricut design space app#cricut design space software
0 notes
Text
How to Fix Cricut Calibration Not Working? (Easy Steps)
I still remember the panic in my chest when my Cricut Maker made that off-cut. I’d spent days designing custom stickers and cupcake toppers for my niece’s birthday party. I printed them on glossy vinyl sheets and loaded my crafting machine. Everything was going great until I hit “Print Then Cut.” Suddenly, the cuts were completely misaligned. Some shapes were misaligned, others were chopped in half. I knew something wasn’t right.
I thought, it’s time to calibrate. I went into Design Space, Settings, Calibration, and chose “Print Then Cut.” I followed every prompt exactly, printed the test sheet, and selected the best-aligned line.
It still didn’t work and failed repeatedly. Don’t worry, though, Learn “How to fix the Cricut calibration not working“. If you’re here because of this problem, you’re not alone, and you’re in the right place. Let’s fix it together and save yourself time!
What to Do When Cricut Calibration Isn’t Working
Calibration involves more than just following software steps; factors like paper type, lighting conditions, and printer settings significantly affect its accuracy. Here’s what many tutorials don’t tell you:
1. Use the Right Paper
Calibration sheets should be printed on matte white paper. Glossy paper reflects light and can confuse Cricut’s sensor, causing misreads.
2. Control the Lighting
Avoid overhead lights, direct sunlight, or shadows during calibration. Glare can cause your Cricut to misread the black lines on the test sheet. Use soft, indirect lighting, or try calibrating with controlled desk lighting at night.
3. Clean the Sensor
The little black sensor on your Cricut (located under the housing unit) can get dusty or smudged. Wipe it gently with a microfiber cloth before calibration.
4. Check Printer Settings
5. Reboot and Retry
Sometimes, Design Space or your machine needs a clean slate. You can perform a hard reset by switching off your machine, unplugging it for a minute, and restarting your computer.
6. Try a Different Printer
If the issues persist, try printing the calibration sheet from a different printer. If it works, the problem may be with your primary printer.
How to Recalibrate Properly: Quick and Easy Steps
Let’s learn why Cricut calibration not working with the help of the following steps:
Open Settings on Cricut Design Space
Step 1: Open the Cricut Design Space software on your device.
Step 2: Ensure your machine is powered on and connected to your system with a USB or Bluetooth connection.
Step 3: Then, go to Menu and select Settings.
Step 4: Within Settings, choose “Machines” and then “Machine Calibration.”
Step 5: After that, choose your specific Cricut Machine Model.
Step 6: Select the appropriate calibration type (e.g., Print Then Cut, Knife Blade).
Step 7: Next, select “Print Then Cut” from the options.
Step 8: Cricut Design Space will guide you through printing a calibration sheet.
Place Sheet on Mat
Step 1: Place the printed sheet onto your StandardGrip (green) mat as instructed by Design Space (usually the top left corner, but it might be different for some machines).
Step 2: Follow the prompts in Cricut Design Space, including selecting your machine in the dropdown menu, loading the mat, and pressing “Go.”
Step 3: The Cricut machine begins by scanning the printed sheet for calibration markings, which are small squares printed on the sheet. Once the scanning is complete, the machine will then cut around a small square near the center of the sheet.
Step 4: Tap Yes in Cricut Design Space to confirm that the calibration is accurate. After that, the user should click “Continue” in the app to proceed to the next step in the Print Then Cut process.
Step 5: The machine will make a test cut around the printed rectangle on the calibration sheet. Once the cut is complete, unload the mat from the machine.
Step 6: Remove the calibration sheet from the machine and respond to the final question in Cricut Design Space.
Note: Cricut Design Space might prompt you to recalibrate multiple times, especially if the initial calibration isn’t perfect.
Still off? Repeat the process using different lighting or paper.
Tips to Consider While Cricut Calibration
Follow these tips to avoid mistakes while calibrating properly:
Final Thoughts
This guide could save you from unnecessary stress. Now that my Cricut is calibrated, my projects are finally printing and cutting like a dream. Cricut calibration problems can feel like a nightmare, especially when your projects are due or tied to your business. But most of the time, the solution is simple: the right paper, the right light, and a little patience.
Frequently Asked Questions (FAQs)
Why Won’t My Cricut Cutting Properly After Calibration?
If your machine is still not cutting accurately after calibration, it could be due to a few factors.
Why Won’t My Cricut detect Sensor Marks?
A machine’s inability to read cut sensor marks can stem from various factors. These include improper mat placement, material defects (like wrinkles, smudges, or reflective surfaces), or issues with the machine itself. Ensure the following points:
Is it Possible to Recalibrate a Cricut too Many times?
No, you cannot recalibrate your machine too many times. If your cuts are consistently off, you can repeat the calibration process multiple times until you achieve the desired accuracy. If you’re still having issues, it could be a sign of a machine malfunction. Sometimes, Cricut Design Space might have issues saving calibrations, which can cause you to recalibrate multiple times.
Visit: cricut.com/setup
Source: https://explorenewmachine.com/how-to-fix-cricut-calibration-not-working-easy-steps/
#cricutcomsetup#installcricutdesignspaceapp#wwwcricutcomsetuplogin#cricutcreateconnecttocomputer#cricutnewproductsetup#settingupmycricutmaker#connectingcricutmakertocomputer#cricutsetupcreateaccount#cricutcuttingmachinesetup#cricutsetuponcomputer#settingupnewcricutmaker#cricutsetuplogin#cricutaccountsetup#cricutcomsetupdownload#cricutinstallsetup#cricutprintersetup
0 notes
Text
How to Connect Cricut to Laptop With USB and Bluetooth?
Do you want to connect your Cricut to your laptop? If so, this blog is perfect for you. As a craft expert, I’ll tell you how to connect Cricut to laptop and use it for your creative work. I know it’s a little technical, but trust me, it’s very simple. You’ll learn it quickly.
Everybody starts from scratch, and maybe this is your first time setting up your machine on a laptop. Basically, I’ll share the two best methods here: via USB and Bluetooth. So, without wasting a minute, let’s dig into it.
What Do You Need to Get Started?
Well, when you’re connecting your machine to a laptop, you should take care of a few things. Check out the list below:
Considering all of these factors, you can start connecting your crafting machine to your laptop.
How to Connect Cricut to Laptop: 2 Different Methods
You’re finally ready with your devices to set up your machine. I’m sharing two of the best methods to connect your machine to your laptop. So, follow all the steps carefully to set up your machine and start your DIY journey.
Method 1: With the Help of a USB Cable
This is the most preferred method. Since it’s a wired method, you don’t need to setup any complex settings to connect your devices with it. Check out the steps below to connect it.
This is how to connect Cricut to laptop via USB. It’s a beginner-friendly method, and anyone can use it to setup their machine with a laptop.
However, you must ensure that your laptop has the necessary USB drivers installed. If not, install them immediately to avoid any obstacles during the setup.
Method 2: Using a Bluetooth Connection
This is another way to connect your machine to a laptop. Check all the steps to connect your devices together via a Bluetooth connection. Learn the procedure below.
You know how to connect your crafting machine to your laptop or computer using a Bluetooth connection. As a wireless connection, it’s highly recommended for a hectic working environment. You can use this connection for your devices.
Conclusion
Finally, you know how to connect Cricut to laptop. Both USB and Bluetooth are good for connecting your machine to a laptop. You can choose anyone. Two things that I want you to know are that you should make sure your laptop supports Bluetooth if you’re choosing a wireless network. And, if you’re choosing a wired connection, ensure that your laptop has USB drivers installed. Besides, everything is simple.
FAQs
How to Connect Cricut to Laptop Without USB?
If you want a wireless connection to connect your machine to your laptop, Bluetooth is the only option. As Cricut machines don’t support a Wi-Fi connection, Bluetooth is a reliable method for connecting your devices and starting work on your projects.
How to Install USB Drivers on Laptop?
If your laptop doesn’t have USB drivers installed, it may create problems with your USB connection. Check how to get them.
How Do I Get My Cricut Software on My Laptop?
Downloading and installing the software on your laptop is pretty simple. All you need to do is to follow the steps below:
Visit: cricut.com/setup cricut design space
Source: https://cdesignspace.wordpress.com/2025/01/15/how-to-connect-cricut-to-laptop-with-usb-and-bluetooth/
#cricut design space#cricut design space setup#cricut setup#cricut com setup#www.cricut.com/setup login#www.cricut.com setup login#cricut explore air 2 setup#cricut explore air 2#cricut project ideas#cricut#cutfiles#cricutprojects#svgtrending#cutfilesforcricut
0 notes
Text
How to Install Cricut Design Space: Quick and Easy Steps
Are you planning to set up your first Cricut machine? If yes, then you need to know how to install Cricut Design Space on your phone or computer. Downloading this software is a must when using a machine. You can download it on your device from the official website for free. If you do not know how to do it, follow the blog to learn how. Here, I am writing down the app’s downloading and installation methods on multiple devices. You can easily download the software from any of these devices you are using.
Design Space is an app designed for Cricut users. It is free to use, which will especially benefit beginners. They can learn to use Cricut for free and later switch to the Cricut Access app. Without any further delay, let’s start the installation process right away.
Install Cricut Design Space on Windows
Here, we are going to talk about four different devices that are compatible with Design Space, and the first device I will talk about is a Windows computer. It is a good option to use with your machine. You can connect both devices using Bluetooth or USB. To download the app on a computer, follow these steps:
Install Cricut Design Space on Mac
A Mac is as good as a Windows computer for using Design Space. You just have to ensure that your computer contains the required features. Here are the steps for the app installation on a Mac system.
Install Cricut Design Space on Android
You can use an Android or iOS phone instead of a computer to use your machine. Both smartphones are compatible with your machine and work great with the app. You need to follow the steps to download the app on an Android phone.
Install Cricut Design Space on iPhone
Just like an Android, an iPhone is amazing to use with your crafting machine. You can connect your iPhone to your machine and download the app from it. This is the process of downloading the software on an iOS device.
Conclusion
Here, you read how to download and install the Cricut software on multiple devices. You may be using any of these devices, and you can easily download the app from them. The app is a must-have tool for all crafters, especially for those who are new to Cricut. Once you have learned how to download and install the app on your device, you can proceed to connect your device to your machine and do other things for the setup so that you can use the app later.
FAQs
What Features Should My Windows Have for Cricut?
If you want to use the machine on your Windows computer, make sure it has these features.
Can I Use Cricut Machine Without Design Space?
No, you cannot! To use any crafting machine, you need Design Space. You will have to download the app on your mobile device or computer. However, to use the software on your device, you will have to make sure that the device is compatible with the app. Now, you can download it and work with your machine.
Why Is My Cricut Design Space Not Working?
If your software is not working properly, you should do a few things. First, check whether your app is updated. If it is not, you should update it. You also need to make sure you are using a strong and stable internet connection while using the app. Before downloading the app, check the compatibility of your device. Plus, you can reinstall the software to fix the problem and start working on your craft projects.
Visit: install cricut design space app
cricut.com setup mac
Source: https://cricutdesignspacesetup.blogspot.com/2024/09/how-to-install-cricut-design-space.html
#cricut.com/setup#cricut setup#cricut.com setup mac#www.cricut.com/setup login#www.cricut.com/setup#install cricut design space app#install cricut explore air 2#cricut setup for pc#cricut setup create account#cricut setup explore air 2 setup#cricut#cricut setup maker#cricut setup log in#cricut setup on computer#cricut create connect to computer
0 notes
Text
How to Setup Cricut Machine? [Computer & Smartphone]
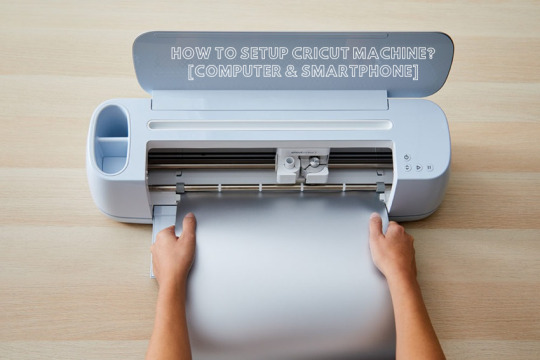
Do you want to learn how to set up a Cricut machine? Worry not—this blog covers all the necessary information you need to know.
Cricut machines are paving a new path for crafters around the world to make brand-like DIY projects at home. In addition, the Cricut machines are easy to use and come with advanced connectivity options to streamline the setup process. By following the instructions, crafters can complete the machine setup and start their crafting journey easily.
However, some users may find it difficult to complete the setup from scratch or face issues. As a result, it is necessary to have a proper understanding of the setup. So, let’s learn about the Cricut machine setup on PC and smartphone devices.
How to Set Up a Cricut Machine on a Computer?
Follow-up guides will help you complete your machine setup on a computer device using the Bluetooth connection and downloading the Design Space app. Follow the steps properly to establish a successful connection.
Step 1: Connect via Bluetooth
First, you need to unbox your machine, turn it on, and then place it within the 10-15 feet range of your computer.
On your PC, open the Settings window by going to the Start menu and then choose the Devices option.
On the next page, ensure that the Bluetooth toggle is on and then click on the “Add Bluetooth or other device” option.
Click on Bluetooth on the open page; it will start looking for your crafting machine.
You need to look for your machine name in the results and select it. (You can look for your machine’s Bluetooth device code, which is printed or engraved on your machine and is near the serial number.)
If asked to enter the password, then enter 0000 and then click on the Pair option.
Now, the Bluetooth pairing of your crafting machine will be complete with your PC.
After that, you can move to the next step of your Cricut machine set up.
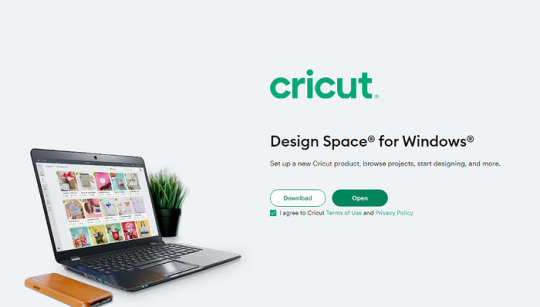
Step 2: Download Cricut Design Space
At the start, browse the official Cricut support website Cricut.com/setup on your PC and type the name of your machine in the search section.
After that, you need to click on the checkbox next to the “I agree to Cricut Terms of Use and Privacy Policy” option, then select the Download button.
Now, the download process will start, and the screen will show a progress bar indicating the download status.
Wait for the download to complete; double-click on the Cricut Design Space setup file in your browser to begin the installation.
Open the downloaded file from the Downloads section on your device.
Once you launch the Cricut file, a prompt will ask if you trust this app. Select the right option to continue with the installation process.
Now, the installation process will appear in a pop-up box.
After the installation, you should complete the sign-in process using the Cricut account credentials. (If you are a new user, then click on “Cricut Cricut ID” to make a new account.)
Then, choose the option to set up your machine and then select it.
When the setup process is complete, you can continue with your first project.
How to Set Up a Cricut Machine on a Smartphone?
Carefully read the procedures below and use them if you want to set up your cutting machine on your smartphone.
Step 1: Establish the Bluetooth Connection
First, you need to turn on your machine and bring your smartphone near your machine.
From the homescreen, tap on Settings and then go to Bluetooth.
Now, you need to ensure that the Bluetooth toggle is on; if the toggle is off, then tap on it to turn it on.
Your device will search for all the available Bluetooth devices and show them on the screen.
From the list of devices, you need to tap on your machine. (If you see a prompt to type the PIN, then enter 0000 and then tap on Pair.)
Next, your device will be connected via Bluetooth.
Step 2: Download the Cricut App
Go to your smartphone device’s home screen and tap on the Google Play Store or Apple App Store icon.
Once the app opens, go to the search bar and enter ‘Cricut Design Space‘ to search for it.
From the list of results, tap on the Cricut green C icon and then choose the Install option to start the download.
Once the download is complete, open the app. (The app icon will also be added to your device’s home screen.)
Complete the sign process and tap on the Machine Setup option.
Click on your machine model number from the options, and then the setup will be complete.
Here you go! You can now create awesome crafts using the Cricut supplies and machines.
Final Words
With the help of the above-mentioned guides, you can complete your Cricut cutting machine setup on a PC or smartphone running various operating systems, such as Mac, iOS, Android, and Windows. Carefully use the specific method according to the device you are using, and start your crafting journey right away. However, if you are facing any problems or need more help with the setup, then it would be good to seek further help.
Frequently Asked Questions
How to set up my Cricut machine?
Below are the major steps you can follow to set up your machine with a device.
First, you should turn on the machine and keep it close to your PC or mobile phone.
After that, connect both devices using the USB cable or Bluetooth connectivity.
Next, you are required to download and install the Design Space app on your device.
Once the download is complete, complete the sign-in process. (Create a new account if needed.)
Then, choose the Machine Setup option to search for the machine.
Select the machine, and the setup will be successful; you can start using it.
Why can’t I connect my Cricut machine?
The process of setting up the machine is simple, but you can face many problems. Here are some major reasons you are unable to complete the setup.
The machine may not be compatible with your device if it does not meet the system requirements or lacks Bluetooth connectivity.
You are following the wrong method when setting up the machine.
You have downloaded a corrupt or outdated app.
The devices are not within the same network connection range.
Connection settings on computers or smartphones are not correct, and other issues.
Can I use Cricut machine without completing setup?
Cricut mainly offers heat press devices and cutting machines. If you want to use the heat press device, then there is no need to complete the setup. However, if you want to work with the cutting machine, then it is necessary to connect it to a desktop or smartphone device to use its functions. In addition, without completing the setup, you will not be able to use the machine. For the hassle-free setup of your machine, you need to have proper knowledge of the whole procedure.
Source: How to Setup Cricut Machine
#how to setup cricut machine#setup cricut machine#Cricut Setup#cricut machine setup#Cricut design space Software
1 note
·
View note
Text
How to Install Cricut Design Space on Windows [Beginners Tutorial]
We all know that you should have a device if you want to use a Cricut machine. It can be a phone or a computer. One such device is a computer with Windows 11 on it. It is an excellent choice for a Cricut machine. To use your crafting machine, you must learn how to install Cricut Design Space on Windows 11. For that, I would suggest you read this blog till the end. This guide will help you not only download the app on a computer but also connect the machine to your device wirelessly. You will also be able to check the computer’s system requirements.
You can download the Design Space software from the Internet for free. To download it on Windows 11, you have to visit the official site. This blog explains the process for downloading the app. So, let’s dive into it to start the crafting journey today.
Minimum System Requirements for Cricut App on Windows 11
If you want to use a Windows computer on your machine, you have to first make sure that it is capable of downloading and running Design Space. The computer will require certain features that are essential to run the app. The features that the computer requires for Design Space are mentioned below:
How to Connect Cricut Machine to Windows 11?
Once you make sure that your computer has the required system features in the process of learning how to install Cricut Design Space on Windows 11, you should connect it to the machine. Here, we will see the connection process of the Windows PC to a machine via Bluetooth:
How to Install Cricut Design Space on Windows 11?
By now, you have checked the features of your computer and have learned the Bluetooth connection process on the machine. Now, you have to download the app on a Windows 11 computer. But before downloading the software on your computer, you have to connect it to a stable Wi-Fi network. To download the app, you have to follow the steps written below:
Conclusion
To conclude, I would say this blog helped you learn how to install Cricut Design Space on Windows 11. Windows 11 is one of the newest operating systems and has the ability to run the app on it. But before you download the software on a computer, you must know about the minimum features any computer needs to run the app on it. Once you are sure of your computer’s compatibility, you can connect it to the machine. You read about the Bluetooth connection on the computer. Finally, you saw the Design Space installation process. Now, you can easily set up a machine on a Windows PC.
FAQs
Is Cricut Design Space Available for Windows?
Yes, it is! Design Space is an official app, and it is essential for Cricut machines. It works with multiple devices, including a Windows computer. If you want to use the machine on a Windows PC, you will have to download the software from the Internet. It is available on the official site. After installing the app, you can start crafting on your desktop.
Why Is Cricut Design Space Not Installing on My Computer?
If you are trying to install the app on your computer but are unable to do so, you should do a few things. First, you must ensure that your computer is connected to good internet broadband. After that, you will have to check the compatibility of your computer. If the computer lacks the required features, you might have trouble downloading the app. Also, you have to check the browser you are using to download the app. If it is an outdated browser, you must update it.
Is Windows 11 Compatible With Cricut Design Space?
Windows 11’s operating system is good enough to download the Design Space software on it. A Cricut machine requires Windows 10 or newer. But to make sure that it is actually compatible with the machine, you also have to check its features. The computer should have at least 2 GB free disk space and 4GB RAM. It needs to have a resolution of 1024 x 768 pixels and 2-3 Mbps of internet speed.
Visit: cricut com setup www.cicut.com setup login setting up my cricut maker install cicut design space app
Source: https://cricutspaces.blogspot.com/2024/09/how-to-install-cricut-design-space-on.html
#cricut.com/setup#cricut.com/setup login#cricut setup#install cricut explore air 2#cricut.com setup mac#www.cricut.com/setup login#www.cricut.com/setup#cricut install setup#install cricut design space app#cricut design space setup#cricut design#setting up new cricut maker#setting up your cricut maker#cricut design space app#cricut explore air 2
1 note
·
View note
Text
How to Set Up Cricut Explore 3: A Comprehensive Tutorial
You need to know how to set up Cricut Explore 3 if you want to use the machine. I am going to guide you through the process to learn how to do that. I have been using this machine since it was launched, and I would like to ask you to follow the blog to learn how to set it up. You can use several devices to set up the machine, but I will write about a Windows computer here.
How to Prepare Cricut Explore 3 for Setup?
When you want to learn how to set up Cricut Explore 3, you should first unbox your machine and then start preparing the machine to set it up. When you open the machine, you get a few tools with the machine. However, those tools are not enough to work on any project. You will need to buy some other tools in order to work on the machine.
When you open the machine, you will find these items inside.
Crafting machine
Premium fine-point blade
Safety document
Quick start guide
USB cable
Power adapter
Test cut materials
Bonus materials
Once you have checked the materials, you have to do the following things to prepare your machine and then finish the setup.
To start with the setup, you should place the machine in a safe place.
Then, use the power adapter you got in the box and connect it to your machine and the wall socket.
Next, press the power button on the machine, and then it is prepared for the setup.
Now, you have to go to your browser and visit cricut.com/setup.
After that, download the Design Space software on your computer.
Following this, you need to open the app and log in or sign up with your account.
Once you finish the setup, you can proceed with your first cut.
How to Download Cricut Design Space on Your Computer?
In order to learn how to set up Cricut Explore 3, you need to download the Design Space app on your computer. After downloading the app, you will need to log in using a Cricut ID, and if you have never made any user ID, you must create one to begin with your machine. Read the steps in the section below:
Start by opening the internet browser on your computer and then visit cricut.com/setup.
Then, click the checkbox to agree to Cricut’s Terms of Use and Policy. After that, click on Download.
Next, go to the Downloads folder and open it. You will find the file over there. Click on it twice.
Now, a new window opens on your computer screen. It asks you whether you trust the app on your computer or not. You have to select the trust option.
After that, you can see that the app has started installing.
In the last step, you can log in with your email ID and password.
How to Connect Cricut Explore 3 to Your Computer?
In the process of learning how to set up Cricut Explore 3, the final part you have to do is connect your machine to your computer. To connect your machine to your device, you can go for either Bluetooth or USB. Here, we will look at the Bluetooth connection. Check the steps below:
Make sure that you have turned on the Explore machine and keep it within 10–15 feet of your computer.
Now, find the Start menu at the bottom left side of your computer and go to Settings.
After that, open the Devices option on the computer and turn on Bluetooth.
Next, click on Add Bluetooth or other device and select Bluetooth later.
Also, you will have to select the machine from the list of devices available to connect.
The cutting machine will be connected to your computer very soon.
Your machine setup on your computer is complete. To make any project or cut any design, you can create or pick a design on the Design Space app and then cut it on your machine.
Conclusion
To sum up, you read about how to set up Cricut Explore 3, and I am sure after reading the blog, you will learn how to do it. To set up your cutting machine, you need to remove the packaging and the items from the machine. Then, you should prepare to set up the machine. Once you are ready, you will have to download the Design Space app and connect your machine to it. After downloading the app and logging into it, your setup will be complete. Now, you can start working on your projects.
Source: how to set up Cricut Explore 3
Visit here to Know More: Cricut.com/setup
Pinterest
0 notes
Text
How to Connect Cricut via Bluetooth: Easy Setup Guide

Hello readers! Thanks for stopping by. Today, I have something very interesting for you all. As you’re all inspired by Cricut machines, what will be more meaningful than a brief note on its connection setup? With this blog, I will be sharing with you how to connect Cricut via Bluetooth. If you guys are looking for that, you will get it all here. Keep reading this blog to explore methods to connect your Cricut to a computer and phone via Bluetooth.
However, don’t forget to download and install the latest version of Cricut Design Space Software on your computer and mobile device. Only then will you be able to use your Cricut machine to make something. Now, let’s get started with my most awaited blog.
How to Connect Cricut via Bluetooth to Desktop?
Maximum users have a desktop to control their Cricut machines, so do I have. A desktop makes your work easier with a wider screen and fast speed. So, let’s go through the steps for connecting your Cricut via Bluetooth to a desktop.
Windows
From those maximum users who use desktops, the majority of users have a Windows PC for its utmost convenience. Let’s check out the steps to set up your Cricut.
Initially, make sure that your Cricut product is ON and within a range of 10-15 feet from your Windows PC.
Then, go to the Settings option from the Start menu and move to the Devices option.
After that, make sure that the Bluetooth option is ON.
In the following screen, press the Add Bluetooth or other device option.
Choose the Bluetooth option and let your PC recognize your Cricut machine.
Next, choose your machine from the list of devices.
Finally, your Cricut machine will pair with the Windows PC via Bluetooth.
That’s how to connect Cricut via Bluetooth to a Windows PC. Don’t have a Windows PC? Don’t worry; I will cover all devices here.
Mac
For the Mac users, here are the simplified steps for connecting their Cricut machine via Bluetooth to it. Look at the steps below to learn it.
In the beginning, make sure that your Cricut product is ON and at a distance of 10-15 feet from your Mac.
Then, head to the System Preferences from your Apple menu and check the Bluetooth option.
After that, make sure that the Bluetooth option is ON and choose your Cricut model from the given list of devices.
Now, your Cricut cutting machine is all set for the Bluetooth connection.
That’s it for connecting a Cricut via Bluetooth to a Mac device. You can now start using your Cricut after installing Cricut Design app on your device.
How to Connect Cricut via Bluetooth to Phone?
If you want to connect your Cricut via Bluetooth to a mobile device, it’s possible. Let’s check the steps here.
iOS
Use the following steps to connect your Cricut to iOS via Bluetooth. Then, you can use your Cricut the way you want.
First, make sure that your machine is utmost and at a distance of 10-15 feet from your mobile device.
Then, open the Bluetooth option under the Settings.
After that, make sure that the Bluetooth option is ON and choose your Cricut model from the available list of devices.
Now, your Cricut machine will pair with a Bluetooth connection.
Next, go to the Cricut Design Space and select the Cricut New Product setup.
That’s how to connect Cricut via Bluetooth to an iOS device to setup your machine. Now, It’s time to check the steps for an Android device.
Android
Android users should follow the steps below to connect their Cricut via Bluetooth. Let’s check the steps here.
In the first step, make sure that your Cricut is ON and within 10-15 feet away from your phone.
Then, open the Bluetooth option from the Settings option.
After that, make sure that the Bluetooth option is ON and choose your Cricut from the list.
Now, your devices are paired with each other.
At last, go back to the Cricut Design Space and click on the Cricut New Product Setup.
That’s it for connecting Cricut via Bluetooth to an Android device. Once you set up your devices, you’re ready to use your machine.
Conclusion
Finally you’ve learned how to connect Cricut via Bluetooth to different devices. It’s so simple that even beginners can perform it. Moreover, you need to understand that you must download Cricut Design Space to allow your device to connect with the Cricut machine. Only then, you’ll be able to use your machine for creating compelling projects. Once you connect your Cricut to a computer or mobile device, you’re good to go with all the crafting work.
FAQs
How to Connect a Cricut Machine to Laptop Wirelessly?
To connect a Cricut product to a laptop wirelessly, follow these steps:
To start, make sure that the Bluetooth is ON on your laptop and Cricut.
Now, tap on the Add Bluetooth or other device option.
Choose the Bluetooth option and allow your laptop to recognize your machine.
After that, pick your Cricut model from the list.
Finally, your machine is paired with a Bluetooth connection.
What to Do if My Cricut Is Not Connecting to Bluetooth?
If you see that your Cricut machine is unable to connect via Bluetooth, you must ensure that your machine is ON and within a distance of 10-15 feet from the computer. If not, you need to change their place to the required location. Moreover, if your Cricut machine doesn’t have a Bluetooth connection, you can buy a Bluetooth adapter.
How Do I Connect Cricut via Bluetooth to Windows 10?
To connect your Cricut machine to Windows 10, follow these steps:
To start, make sure that your Cricut is at least 10-15 feet away from your computer.
Open the Settings tab from the Menu and then launch the Devices option.
Thereafter, check if the Bluetooth option is ON.
Then, hit on the Add Bluetooth or other device option.
Tap the Bluetooth option to let your Windows 10 PC detect your machine, and pick your machine from the list.
Finally, your machine is paired with Bluetooth.
For more information visit: www.cricut.com/setup login design.cricut.com Cricut New Machine Setup
Source: How to Connect Cricut via Bluetooth
#how to connect cricut via bluetooth#cricut design space download#cricut design space app#cricut design space login#cricut machine setup#Cricut New Product setup#Cricut setup on computer
2 notes
·
View notes
Text
How to Pair Cricut Machine With a Computer? (Full Guide)
Last week, I helped my neighbor set up her brand-new Cricut machine. She had recently taken up card making and was excited to start her first project. But the moment she opened the box, her smile turned into confusion.
She wanted to make birthday cards and asked if I knew how to pair her Cricut machine with a computer or mobile device so she could get started. We took a break, sat down together, and looked up the steps online. That’s when I realized there’s no need to feel overwhelmed; it’s just about following a simple, step-by-step guide.
So, if you’re like her, excited about crafting but unsure how to pair your Cricut machine, keep reading this post for a complete solution.
How to Pair a Cricut Machine With Your Computer?
Pairing your crafting machine to your computer might seem tricky, but it’s quite easy, especially if you follow the instructions carefully. Using Cricut Design Space with Windows offers several benefits, including access to a user-friendly interface for creating and customizing designs, the ability to import or use pre-made designs, and the option to save projects and share them with the Cricut community.
Cricut offers two methods for connecting your machine to a computer:
Let’s take a look at both:
Method 1: With Bluetooth
Bluetooth enables wireless connectivity without the need for additional cables, making it ideal for those who prefer a cleaner, cord-free setup.
Step 1: Plug your crafting machine into a power outlet and press the power button.
Step 2: Navigate to Settings by clicking the Start button and then selecting the gear icon.
Step 3: After that, go to the Devices section.
Step 4: Next, select Bluetooth & other devices and enable Bluetooth.
For Mac: In the top-left corner, click the Apple icon. Open System Preferences and then click on Bluetooth to enable it.
Step 5: Look for a device starting with “Cricut,” such as Cricut Explore, Maker, or Joy, within the list of available devices.
Step 6: If asked for a PIN, enter 0000.
Step 7: Once connected, the machine should appear Connected in your Bluetooth list.
Step 8: Go back to Design Space and complete the setup of your new product.
Tip: Cricut Joy, Maker, and Explore series all support Bluetooth. Older machines, such as the Cricut Explore One, may require a Bluetooth adapter for connectivity.
Method 2: Using a USB Cable
If your computer doesn’t have Bluetooth or you prefer connecting through a USB cable, follow these steps:
Step 1: First, power on both your machine and computer.
Step 2: Now, connect one end of your USB cable to the machine and the other to the computer.
And that’s it. You’re all done. Your computer should now automatically recognize and connect to the Cricut machine.
Note: The Bluetooth method works only with the Cricut Maker series, Explore series, and Venture. Cricut Joy and Joy Xtra do not support USB. They can only be paired via Bluetooth.
How to Pair Your Cricut to Mobile Devices?
If you prefer working from your phone or tablet, Cricut has made it easier for you to connect your crafting machine to your Android and iOS devices. It offers portability and convenience, enabling users to create projects from virtually anywhere.
Follow these steps to pair your machine to your mobile device:
Step 1: Download the Cricut App
Step 2: Turn on Bluetooth
Step 3: Pair From Within the App
Your Cricut machine is now paired and ready to use with the app on your mobile phone.
Mistakes to Avoid While Pairing Your Cricut Machine
These are some common errors that you must avoid while pairing your machine to any device:
Should You Use Cricut Design Space on a Computer or Phone?
One of the most common questions beginners have is: Which is better for using Design Space, my phone or computer?
Pro Tip: You can switch between devices at any time. You can start making a design on your phone or tablet and finish it on your computer (or vice versa), as long as you’re logged into the same Cricut account.
Frequently Asked Questions (FAQs)
Why Is My Cricut Not Connecting?
If your crafting machine is not connecting, follow the steps listed below to get it working again.
How to Put Your Cricut Machine in Pairing Mode?
To pair your machine, you can opt for any of the following methods:
Can you use a smartphone with a Cricut machine?
Yes, you can use a smartphone to connect to a Cricut machine via Bluetooth using the Cricut Design Space app. However, some features may be limited compared to using a desktop or laptop.
While you can access and edit existing projects, upload images, and resize designs, some advanced features, such as the Offset tool, are not available on mobile devices. Advanced tools, such as the Knife blade, are only available when using a desktop.
Visit: cricut.com/setup
Source: https://cricutsetjoy.com/how-to-pair-cricut-machine-with-a-computer-full-guide/
#HowtoPairCricutMachine#cricutcomsetup#cricutdesignspace#wwwcricutcomsetuplogin#cricutdesignspacesetup#cricutexploreair2setup#designcricutcomsetup#cricutdesignspacelogin#cricutsetup#cricutdesigns#cricutsoftware#cricutsetupforpc#designcricutcomdownload#cricutdesignspacedownload#cricutdesignspaceonline#cricutdesignspaceapp#cricutdesignspacedesktop#cricutaccountsubscription#cricutaccess#Cricutexploreair2setuppdf#cricutexploreair2download#howtousecricutexploreair2withphone#howtosetupcricutexploreair2oniphone#cricutexploreair2bluetooth#cricutcomsetupmac#cricutcomsetupforwindow#supportcricutcom#cricutnewmachinesetup#cricutaccountlogin#cricutsoftwareapp
0 notes
Text
Cricut Machine Setup: A Full Guide for Beginners
Are you wondering how to setup your brand-new Cricut machine? Worry not! You have come to the right place. All you need to setup this amazing machine are the items that come in the box: a power cord, blade, cutting mat, USB cable, etc.
Some find the Cricut machine setup process tricky and troublesome, especially to beginners. Although it may feel difficult in the beginning, you don’t have to panic. In this blog, I will guide you through every step in a detailed manner to help you setup your crafting machine. Without any further delay, let’s start the machine setup procedure right away.
Cricut Machine Setup on Computer Using a USB Cable
You can setup your machine on both a computer and a phone. In this section, we will look at the computer setup instructions for your machine. To start setting up your machine, follow the steps in the section below:
To Cricut setup your machine, you must have the exclusive Design Space app installed on your computer. Also, you must have your Cricut ID. If you do not have either, you should create one.
First of all, ensure your crafting machine is plugged in properly, and then turn it on.
Now, connect your Mac to the back of your machine with the help of a USB cable. Insert one end into the USB port of your Mac and another cable end into the back of your machine.
After that, head to the cricut.com/setup website on your computer.
Next, you will need to download the Design Space software.
On the following screen, complete the steps on your screen and then log in to your account.
Also, setup your machine, and you will be all set to start crafting your projects.
If the app redirects you to do a test cut, know that your setup is complete. If not, rest assured that you have either not followed the above instructions carefully or your Cricut details are wrong. Another reason for this failure could be that your machine is not compatible with the version of your Mac.
Following the above steps carefully, you can easily setup your machine and enjoy designing DIY projects and giving them life on various materials.
NOTE: When setting up your machine for the first time and activating it at the same time, you should set it up very carefully. If you do not meet this requirement, you will have to reconnect the machine by navigating to design.cricut.com/setup again. You can also do this by selecting New Machine Setup, which is accessible through the Design Space menu.
Cricut Machine Setup on Your Mobile with Bluetooth
You can setup your brand-new crafting machine in the same way as in the above section. Ensure you have the Design Space app installed on your mobile phone and your Bluetooth is on. Also, you must know your Cricut details beforehand; if you do not have one, you must create a new one. To do the setup for your machine, follow these steps:
To start, ensure your machine is on and connected to a power source.
The next thing to do is to pair your mobile device to your machine via Bluetooth. To do this, go to the Settings tab and turn the Bluetooth on.
After that, open the app and then sign in with your Cricut credentials.
From the menu on the home screen of the app, move to the Machine Setup option and choose the correct machine model.
Lastly, follow the on-screen instructions to complete the full setup.
If the app takes you to the page to do a test cut, know that your Cricut machine setup is finally complete, and you can start making your designs and projects.
How to Setup Cricut Machine on Computer via Bluetooth?
You can also use your machine on your windows computer with the help of Bluetooth. These days, almost all computers and mobile devices have Bluetooth features built into them. If not, you can use a Bluetooth adapter as an external tool. Now, let’s start the process:
For Windows
To connect your machine, be it Explore, Maker, or Joy, you must perform these steps:
In the beginning,click the Start button from the search bar on the dock.
Now, open the Settings panel and then to Bluetooth and other devices.
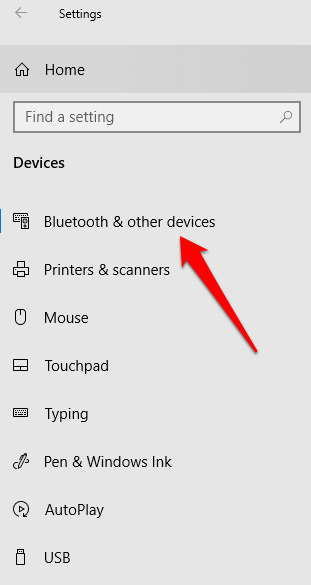
After that, click on Add Bluetooth or another device and tap on Bluetooth toggle to turn it on.
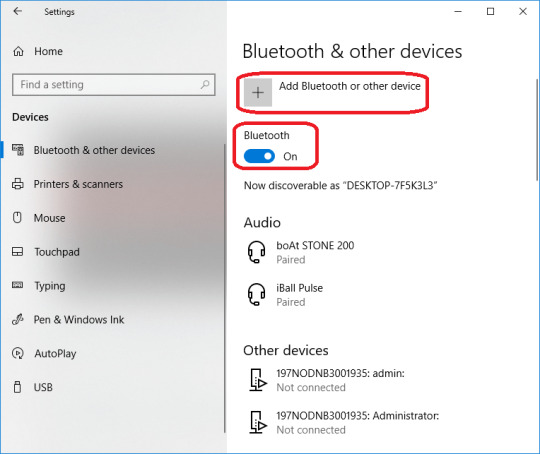
Next, you will have to wait for a few seconds to let your machine be discoverable.
Once you find the name of your machine in the list, click on it. The password for any machine is 0000. If it still does not work, look at the bottom of your machine; you will find the password close to the serial number.
For Mac
Follow the below steps to connect your machine to your Mac via Bluetooth. Also, remember that your Mac must be supported by Bluetooth.
In order to connect and setup your machine (Joy, Maker, or Explore), you must tap on the Apple icon, which is visible on the dock page.
Now, tap on the System Preferences option.
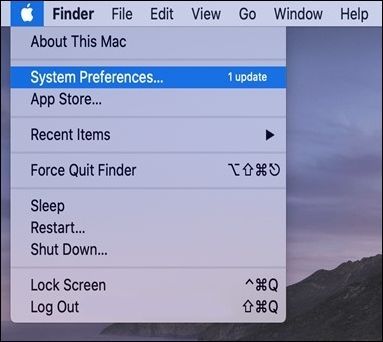
Next, look for the Bluetooth and turn it on.
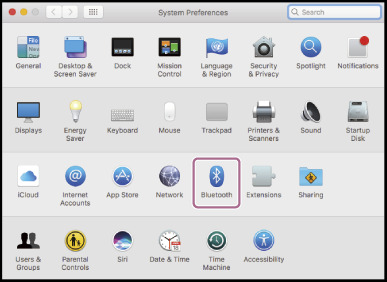
Lastly, look for the name of your machine from the list of devices. And click on your machine’s Bluetooth name. If a password is asked, type in 0000. Otherwise, you can find it at the bottom of your machine, next to the serial number.
Your setup is finally complete. Open the Design Space app, log in, and start your crafting journey. It was simple. Wasn’t it?
NOTE: Also, you must know that Cricut Joy cannot be setup with a USB cable because it is not equipped with a USB port.
Wrapping Up
Congratulations! Count yourself lucky now that you know how to do a Cricut machine setup. I hope that any confusion regarding your setup has already been removed, reading this blog. You also know how to connect your machine through USB and Bluetooth. Enjoy giving your crafts a new life. Happy designing!
0 notes