#Macbook pro tips and tricks
Explore tagged Tumblr posts
Visit Tumblr Blog
Explore Tumblr blogs with no restrictions, modern design and the best experience.
Last Seen Tumblr Blogs


Fun Fact
US Tumblr user growth rate is estimated to slow down to 4.1%.
Text
does ultra vpn works with mac
🔒🌍✨ Get 3 Months FREE VPN - Secure & Private Internet Access Worldwide! Click Here ✨🌍🔒
does ultra vpn works with mac
Ultra VPN Mac compatibility
Title: Exploring Ultra VPN Mac Compatibility: Seamless Security for Apple Users
In the realm of cybersecurity, Mac users often seek reliable solutions to safeguard their digital privacy. Ultra VPN stands out as a formidable option, offering comprehensive protection without compromising on performance. Let's delve into how Ultra VPN seamlessly integrates with Mac systems, ensuring a secure online experience for Apple enthusiasts.
First and foremost, Ultra VPN boasts robust compatibility with Mac devices, including MacBook Air, MacBook Pro, iMac, and Mac Pro. Whether you're running the latest macOS version or an older iteration, Ultra VPN ensures smooth operation, allowing users to browse, stream, and download with confidence.
One of the key highlights of Ultra VPN's Mac compatibility is its user-friendly interface. With a sleek and intuitive design, the VPN client seamlessly integrates into the macOS environment, providing effortless access to its myriad features. From one-click connectivity to customizable settings, Ultra VPN prioritizes ease of use without compromising on functionality.
Moreover, Ultra VPN offers a diverse range of servers strategically located across the globe. Mac users can easily connect to their preferred server location, ensuring optimal speed and performance. Whether you're accessing geo-restricted content or safeguarding sensitive data, Ultra VPN's global network ensures reliable and secure connectivity at all times.
Furthermore, Ultra VPN prioritizes privacy and security, employing cutting-edge encryption protocols to safeguard user data. With features like AES-256 encryption and secure tunneling protocols, Mac users can browse the web anonymously and protect their sensitive information from prying eyes.
In conclusion, Ultra VPN offers comprehensive Mac compatibility, providing Apple users with a reliable solution to enhance their online security and privacy. With its seamless integration, user-friendly interface, and robust features, Ultra VPN stands as a trusted ally in the digital age, empowering Mac enthusiasts to navigate the web with confidence.
Ultra VPN performance on Mac
Title: Maximizing Ultra VPN Performance on Mac: Tips and Tricks
When it comes to safeguarding your online privacy and security, using a Virtual Private Network (VPN) is paramount. However, not all VPNs are created equal, and the performance of a VPN can vary significantly depending on various factors, including your device's operating system. For Mac users, optimizing the performance of an Ultra VPN can ensure seamless browsing, streaming, and downloading experiences while maintaining anonymity and security.
One of the first steps to enhance Ultra VPN performance on a Mac is to ensure that the VPN software is up to date. Regularly updating the VPN client ensures compatibility with the latest macOS versions and includes patches for any security vulnerabilities, ultimately improving overall performance.
Another crucial aspect is selecting the optimal server location. Ultra VPN offers a vast network of servers worldwide, allowing users to choose the server closest to their physical location for faster connection speeds. By selecting a nearby server, users can minimize latency and maximize bandwidth, resulting in smoother browsing and streaming experiences.
Additionally, tweaking the VPN settings can further enhance performance on Mac. Users can experiment with different protocols like OpenVPN or IKEv2 to determine which one offers the best balance between speed and security. Furthermore, enabling features like split tunneling can route only specific traffic through the VPN, reducing strain on the network and potentially improving performance for other applications.
Furthermore, optimizing network settings on the Mac itself can contribute to better VPN performance. Users can disable unnecessary background processes and applications, prioritize VPN traffic in network settings, and ensure that their Wi-Fi or Ethernet connection is stable and robust.
By following these tips and tricks, Mac users can unlock the full potential of Ultra VPN, enjoying fast, secure, and uninterrupted online experiences while safeguarding their privacy and anonymity.
Mac compatibility of Ultra VPN
When it comes to choosing a VPN service, compatibility with your devices is crucial. For Mac users looking for a reliable VPN service, Ultra VPN is a great option to consider. Ultra VPN boasts compatibility with a wide range of devices, including Mac computers, providing users with enhanced security and privacy online.
One of the key features of Ultra VPN is its seamless compatibility with Mac operating systems. Whether you are using a MacBook, iMac, or Mac Mini, Ultra VPN offers a user-friendly application that is easy to install and use. With just a few clicks, Mac users can connect to Ultra VPN's secure servers and encrypt their internet connection to safeguard their online activities.
Another advantage of Ultra VPN for Mac users is its high-speed connection and unlimited bandwidth. Whether you are streaming your favorite shows, gaming online, or browsing the web, Ultra VPN ensures fast and uninterrupted performance on your Mac device.
In addition to compatibility and speed, Ultra VPN offers top-notch security features to Mac users. With military-grade encryption, a strict no-logs policy, and a kill switch feature, Ultra VPN ensures that your online data remains private and protected from hackers, ISPs, and other prying eyes.
In conclusion, Ultra VPN is a reliable and user-friendly VPN service that is fully compatible with Mac devices. With its fast connection speeds, strong security measures, and easy-to-use application, Ultra VPN is an excellent choice for Mac users looking to enhance their online privacy and security.
Ultra VPN for Mac effectiveness
Ultra VPN for Mac is a powerful tool that enhances the online security and privacy of Mac users. A VPN, or Virtual Private Network, works by encrypting the user's internet connection and routing it through a server of their choice, thus concealing their online activities from prying eyes. When it comes to utilizing a VPN on a Mac device, Ultra VPN is known for its effectiveness and efficiency in safeguarding user data and providing a secure browsing experience.
One of the key advantages of using Ultra VPN for Mac is its ability to mask the user's IP address, making it almost impossible for third parties to track their online behavior. This feature is especially important when connecting to public Wi-Fi networks, as it protects sensitive information from potential cyber threats. Additionally, Ultra VPN offers a wide range of server locations across the globe, allowing Mac users to access geo-restricted content and websites with ease.
In terms of streaming and browsing speed, Ultra VPN for Mac ensures a smooth and uninterrupted experience without compromising on security. Users can enjoy their favorite shows, movies, and online content without experiencing buffering or lagging issues. Moreover, the user-friendly interface of Ultra VPN makes it simple for even beginner Mac users to navigate and customize their preferences.
Overall, Ultra VPN for Mac proves to be an effective solution for those seeking enhanced online privacy and security on their Mac devices. By encrypting internet traffic, masking IP addresses, and providing fast connection speeds, Ultra VPN offers a comprehensive package for Mac users looking to safeguard their digital footprint.
Ultra VPN and Mac operating system integration
Ultra VPN is a popular choice for users seeking to enhance their online privacy and security. With the rise of cyber threats and concerns over data privacy, VPN services have become essential tools for safeguarding sensitive information. For Mac users, integrating Ultra VPN with the Mac operating system is seamless and user-friendly, providing an added layer of protection against potential online threats.
One of the primary benefits of using Ultra VPN on a Mac system is the ability to encrypt internet traffic, ensuring that data remains secure and private. This is particularly important when connecting to public Wi-Fi networks, which are known to be vulnerable to hacking attempts. By encrypting data transmissions, Ultra VPN helps Mac users browse the internet anonymously and shields their online activities from prying eyes.
Moreover, Ultra VPN offers a wide selection of server locations, allowing Mac users to access geo-restricted content and websites from around the world. Whether it's streaming services, gaming platforms, or social media sites, Ultra VPN enables users to bypass censorship and enjoy unrestricted access to online content.
Integrating Ultra VPN with the Mac operating system is straightforward, with user-friendly apps that can be easily downloaded and installed. Once activated, Mac users can choose their preferred server location and establish a secure VPN connection with just a few clicks. The seamless integration of Ultra VPN with the Mac system enhances the overall user experience and provides peace of mind when browsing the internet.
In conclusion, Ultra VPN and Mac operating system integration offer Mac users a reliable solution for enhancing their online security and privacy. By encrypting internet traffic, accessing geo-restricted content, and ensuring anonymity online, Ultra VPN provides a comprehensive VPN service that is well-suited for Mac users looking to safeguard their digital footprint.
0 notes
Text
25 Artikel mit Skype Shortcuts zum nachschlagen
Hier sind 25 Artikel aus verschiedenen Webseiten, die dir helfen können, nützliche Skype-Shortcuts zu finden.
"Skype Keyboard Shortcut List" Beschreibung: Eine umfassende Liste von Tastenkombinationen, die dir helfen, schneller und effizienter mit Skype zu arbeiten. URL: https://www.shortcutworld.com/en/skype/mac/1.0
"20 Skype Keyboard Shortcuts" Beschreibung: Eine kurze Zusammenfassung der wichtigsten Tastenkombinationen für Skype-Nutzer. URL: https://www.howtogeek.com/howto/24364/how-to-save-time-with-keyboard-shortcuts-in-skype/
"Skype Keyboard Shortcuts for Windows" Beschreibung: Eine detaillierte Anleitung zu den Tastenkombinationen, die speziell für Windows-Benutzer entwickelt wurden. URL: https://support.skype.com/en/faq/FA12025/what-are-keyboard-shortcuts-and-how-do-i-use-them-in-skype
"Skype Shortcuts for Mac Users" Beschreibung: Tipps und Tricks für Mac-Benutzer, um schneller mit Skype zu arbeiten. URL: https://www.omgubuntu.co.uk/2018/01/skype-for-linux-release
"10 Must-Know Skype Shortcuts" Beschreibung: Eine Liste der wichtigsten Shortcuts, die dir helfen, Zeit zu sparen und effizienter zu kommunizieren. URL: https://www.howto-outlook.com/support/how-to-use-keyboard-shortcuts-for-skype
"Skype for Business Keyboard Shortcuts" Beschreibung: Eine Anleitung zu den speziellen Tastenkombinationen für Skype for Business-Nutzer. URL: https://support.microsoft.com/en-us/office/keyboard-shortcuts-for-skype-for-business-5b8e6f6e-95d1-4b77-a6de-9075823267d4
"Skype Shortcuts Cheat Sheet" Beschreibung: Eine praktische Zusammenfassung der wichtigsten Shortcuts für schnelle Referenz. URL: https://t-suite.com/blog/skype-shortcuts
"Mastering Skype Shortcuts: Tips and Tricks" Beschreibung: Fortgeschrittene Tipps und Tricks, um die effiziente Nutzung von Skype-Shortcuts zu maximieren. URL: https://changelog.skype.com/2021/09/effortless-meeting-joins-skype-for-web
"Skype Keyboard Shortcuts for Productivity" Beschreibung: Eine Sammlung von Tastenkombinationen, die speziell darauf ausgerichtet sind, deine Produktivität zu steigern. URL: https://foreach.hu/en/category/events
"Skype for Windows Shortcuts Overview" Beschreibung: Eine Übersicht über die wichtigsten Tastenkombinationen für Skype-Nutzer unter Windows. URL: https://www.timeatlas.com/windows-10-how-to-shortcuts
"Skype Shortcuts for Mac Users: A Complete Guide" Beschreibung: Eine ausführliche Anleitung zu den Tastenkombinationen, die für Mac-Benutzer besonders hilfreich sind. URL: https://www.wallpaperflare.com/apple-macbook-pro-on-macbook-pro-with-touch-bar-macbook-computers-laptop-technology-wallpaper-bbwyj/download/2560x1440
"Skype Keyboard Shortcuts You Need to Know" Beschreibung: Eine Zusammenstellung der wichtigsten Shortcuts, die dir helfen, Zeit zu sparen und effizienter zu arbeiten. URL: https://www.lifewire.com/no-sound-skype-microphone-act-stupid-3426709
"Skype Shortcuts for Business Communication" Beschreibung: Tastenkombinationen, die speziell für professionelle Kommunikation und Geschäftstreffen entwickelt wurden. URL: https://www.hongkiat.com/blog/skype-tipstricks
"Top 15 Skype Shortcuts for Mac Users" Beschreibung: Die 15 wichtigsten Tastenkombinationen für Mac-Benutzer, um schneller und effizienter mit Skype zu arbeiten. URL: https://www.guidingtech.com/fix-photoshop-clipboard-issues
"Mastering Skype Shortcuts for Video Calls" Beschreibung: Tipps und Tricks, um die effiziente Nutzung von Tastenkombinationen während Videoanrufen zu maximieren. URL: https://tottta.de/2033/05/20
"Skype Keyboard Shortcuts for Messaging" Beschreibung: Tastenkombinationen, die dir helfen, schneller Textnachrichten zu verfassen und zu senden. URL: https://social.microsoft.com/Forums/en-US/e02c2146-dc73-4372-a72e-0b5adfd55e83/skype-does-not-show-active-status
"Skype Shortcuts: A Handy Guide" Beschreibung: Ein praktischer Leitfaden zu den wichtigsten Tastenkombinationen für Skype-Nutzer. URL: https://thenextweb.com/plugged/2021/01/28/microsoft-skype-video-call-feature-end-zoom-google-meet-teams/
"Skype Quick Reference Guide: Shortcuts Edition" Beschreibung: Eine benutzerfreundliche Zusammenstellung von Shortcuts für schnelle Referenz. URL: https://www.windowscentral.com/search/site/Skype
"Skype Keyboard Shortcuts for Windows 10" Beschreibung: Tastenkombinationen, die speziell für Windows 10-Nutzer entwickelt wurden. URL: https://www.freeimages.com/premium/mask-3978897
"Skype Shortcuts for Remote Work" Beschreibung: Tastenkombinationen, die insbesondere für die effiziente Zusammenarbeit von Remote-Teams nützlich sind. URL: https://www.windowscentral.com/microsoft-s-challenges-getting-skype-right-you
"Top 100 Skype Shortcuts You Should Know" Beschreibung: Eine Liste der wichtigsten Tastenkombinationen, die dir helfen, schneller und effizienter mit Skype zu arbeiten. URL: https://www.blogseite.com/100-skype-shortcuts-und-tastenkombinationen/
"Skype Keyboard Shortcuts for Quick Navigation" Beschreibung: Tastenkombinationen, die dir helfen, schnell zwischen verschiedenen Funktionen und Chats in Skype zu navigieren. URL: https://www.yammer.com/skype
"Skype Shortcuts for Group Calls" Beschreibung: Tipps und Tricks für die effiziente Nutzung von Tastenkombinationen während Gruppenanrufen. URL: https://www.windowscentral.com/search/site/Skype
Ich hoffe, diese Liste hilft dir dabei, mehr über die verschiedenen Skype-Shortcuts herauszufinden und deine Produktivität beim Arbeiten mit Skype zu steigern.
1 note
·
View note
Text
How To Set Up Your New Mac (Step By Step Guide) 5+ Best Tips & Tricks
A portion of this artical is brought to you by the ridge key case welcome to my step-by-step guide on how to properly set up your new mac now today i’m going to be demonstrating this on the new m2 macbook air you guys may have seen my recent unboxing video however this video will apply to any mac so whether you have a macbook air macbook pro or imac this artical will contain everything you need…
View On WordPress
0 notes
Text
MacBook Pro With M1 Chip User Guide: A Complete Step By Step Guide To Fully Master Your M1 Chip MacBook Pro With Tips And Tricks, All With The Aid Of Illustrative Pictures, With MacOS Big Sur Feature
View On WordPress
0 notes
Text
Redefining Laptops: An In-Depth Look at the Apple MacBook Air 8GB RAM with M2 Chip Review
Imagine a laptop that is not only strikingly thin and lightweight, but also incomparably powerful. Introducing the Apple 2023 MacBook Air Laptop with M2 chip. Weighing just 2.7 pounds, this redesigned MacBook Air is more portable than ever before, allowing you to work, play, or create wherever you go. With a next-generation 8-core CPU, up to 10-core GPU, and up to 24GB of unified memory, you can expect lightning-fast performance and unparalleled efficiency. Plus, with up to 18 hours of battery life powered by the Apple M2 chip, you can keep going from day to night without interruption. The 13.6-inch Liquid Retina display, complete with over 500 nits of brightness and support for 1 billion colors, delivers stunning visuals and exceptional detail. Capture sharp images and enjoy crystal-clear audio with the 1080p FaceTime HD camera, three-mic array, and four-speaker sound system with Spatial Audio. Experience versatile connectivity with a MagSafe charging port, two Thunderbolt ports, and a headphone jack. With its familiarity, compatibility with all your Apple devices, and durability that stands the test of time, the Apple 2023 MacBook Air Laptop with M2 chip is the epitome of excellence. Why Consider This Product? Features and BenefitsSupercharged Performance Product Quality What It's Used For Product Specifications Who Needs This Pros and Cons FAQ’s What Customers Are Saying Overall Value Tips and Tricks For Best Results Final Thoughts Why Consider This Product? The Apple 2023 MacBook Air Laptop with M2 chip is a powerful and versatile device that offers numerous benefits and features that make it worth considering. With its strikingly thin design, weighing only 2.7 pounds, this laptop is incredibly portable, allowing you to work, play, or create anywhere you go. But it's not just about the sleek design – the MacBook Air is supercharged by the M2 chip, giving you a next-generation 8-core CPU, up to 10-core GPU, and up to 24GB of unified memory. With this level of performance, you can get more done faster than ever before. One of the standout features of the MacBook Air is its impressive battery life. With up to 18 hours of battery life, you can go all day and into the night without worrying about finding a power source. This is thanks to the power-efficient performance of the Apple M2 chip, which ensures that you can stay productive for extended periods. In terms of display, the 13.6-inch Liquid Retina display is big and beautiful, featuring over 500 nits of brightness, P3 wide color support, and the ability to display 1 billion colors. This means that images and content come to life with vibrant colors and incredible detail, making your viewing experience truly immersive. The image shown is for illustrative purposes only and is not directly related to the product Another highlight of the MacBook Air is its advanced camera and audio capabilities. With a 1080p FaceTime HD camera, you'll look sharp and clear during video calls. The three-mic array and four-speaker sound system with Spatial Audio ensure that your voice is captured accurately and that your audio sounds great, whether you're recording a podcast or enjoying your favorite music. 256Gb Check here 512Gb Check here Features and Benefits Supercharged Performance The Apple 2023 MacBook Air is powered by the M2 chip, which offers next-generation performance. With an 8-core CPU and up to 10-core GPU, this laptop is capable of handling demanding tasks with ease. Whether you're editing videos, designing graphics, or running resource-intensive apps, the MacBook Air delivers the power you need. All-day Battery Life The power-efficient performance of the Apple M2 chip enables the MacBook Air to offer up to 18 hours of battery life. This means that you can work, play, or create without worrying about running out of power. Whether you're on a long flight, attending back-to-back meetings, or working on a project that requires hours of focus, the MacBook Air has you covered. Stunning Display The 13.6-inch Liquid Retina display is a standout feature of the MacBook Air. With over 500 nits of brightness, P3 wide color support, and the ability to display 1 billion colors, this display ensures vibrant and detailed visuals. Whether you're watching movies, editing photos, or working on creative projects, the MacBook Air's display provides a visually stunning experience. Advanced Camera and Audio The MacBook Air comes with a 1080p FaceTime HD camera, allowing you to look sharp and clear during video calls and conferences. The three-mic array ensures that your voice is captured accurately, while the four-speaker sound system with Spatial Audio delivers immersive audio. Whether you're having virtual meetings or enjoying multimedia content, the MacBook Air's camera and audio capabilities enhance your overall experience. Product Quality When it comes to product quality, Apple is a brand known for its commitment to excellence. The all-aluminum unibody enclosure of the MacBook Air is not only sleek and stylish, but it is also exceptionally durable. This laptop is built to last, ensuring that it can withstand the rigors of everyday use. Apple also provides free software updates, which keep your MacBook Air running smoothly and securely for years to come. These updates not only enhance performance but also add new features and security improvements. In terms of customer support, the MacBook Air comes with a one-year limited warranty and up to 90 days of complimentary technical support. For added peace of mind, you have the option to purchase AppleCare+ to extend your coverage. The image shown is for illustrative purposes only and is not directly related to the product What It's Used For Productivity On the Go The MacBook Air is designed for individuals who value portability without compromising on performance. Whether you're a student, a professional, or a creative, this laptop allows you to be productive while on the go. With its lightweight design and long battery life, you can work on assignments, create presentations, or edit photos wherever you are. Entertainment and Multimedia The MacBook Air is not just a workhorse, but it's also a great device for entertainment and multimedia purposes. Thanks to the stunning display and immersive audio, you can enjoy your favorite movies, TV shows, and music with exceptional clarity and detail. The advanced camera is also perfect for video calls and capturing memories. Seamless Integration with Apple Devices If you're already an Apple user, the MacBook Air seamlessly integrates with your existing Apple devices, including iPhones and iPads. This means that you can easily share files, answer calls, and even unlock your MacBook Air with your iPhone or iPad. The ecosystem offers a seamless and efficient workflow, allowing you to work across devices effortlessly. Productivity Enhancing Apps The MacBook Air is compatible with various apps that can enhance productivity. From Microsoft Office 365 to Zoom and other popular iPhone and iPad apps, you can access and use your go-to applications seamlessly on the MacBook Air. This ensures that you don't lose any functionality when transitioning from your mobile devices to the laptop. Product Specifications SpecificationDetailsDisplay13.6-inch Liquid Retina displayCPUNext-generation 8-core CPUGPUUp to 10-core GPUMemoryUp to 24GB of unified memoryStorage512GB SSD StorageCamera1080p FaceTime HD cameraAudioFour-speaker sound system with Spatial AudioConnectivityMagSafe charging port, Two Thunderbolt ports, Headphone jackCompatibilityWorks with iPhone and iPadWarrantyOne-year limited warranty Who Needs This The Apple 2023 MacBook Air is suitable for a wide range of individuals. Students can benefit from its portability, long battery life, and productivity-enhancing apps for all their academic needs. Professionals can rely on its power and performance for demanding tasks, while creatives can enjoy the stunning display and audio capabilities for their artistic endeavors. Even casual users who value a high-quality, versatile laptop will find the MacBook Air to be an ideal choice. Pros and Cons Pros: - Strikingly thin and portable design - Supercharged performance with the M2 chip - Impressive battery life of up to 18 hours - Stunning 13.6-inch Liquid Retina display - Advanced camera and audio capabilities - Versatile connectivity options - Seamless integration with Apple devices - Durable all-aluminum unibody enclosure - Compatible with productivity-enhancing apps Cons: - Limited storage capacity compared to higher-end models - May not meet the needs of heavy gamers or professionals requiring maximum power FAQ’s Q: Can I connect external devices to the MacBook Air? A: Yes, the MacBook Air features two Thunderbolt ports, which allow you to connect external devices such as monitors, external hard drives, and other peripherals. Q: Can I use Microsoft Office on the MacBook Air? A: Yes, the MacBook Air is compatible with Microsoft Office 365, allowing you to access and use familiar productivity tools such as Word, Excel, and PowerPoint. Q: Can I use the MacBook Air for gaming? A: While the MacBook Air is capable of handling casual gaming, it may not meet the needs of heavy gamers who require maximum power and dedicated graphics cards. For more intensive gaming, consider higher-end MacBook models or dedicated gaming laptops. What Customers Are Saying Customers who have purchased the Apple 2023 MacBook Air have praised its portability, performance, and overall user experience. Many have highlighted the long battery life, stunning display, and seamless integration with other Apple devices as standout features. The durability of the all-aluminum unibody enclosure has also been commended, ensuring that the MacBook Air can withstand the demands of everyday use. Overall Value The Apple 2023 MacBook Air Laptop with M2 chip offers excellent value for its price. With its combination of portability, power, and versatility, it caters to a wide range of users. Whether you're a student, a professional, a creative, or a casual user, the MacBook Air provides a high-quality and reliable laptop experience. Tips and Tricks For Best Results - Take advantage of the seamless integration with Apple devices to enhance your workflow and productivity. - Set up Touch ID to quickly and securely unlock your MacBook Air and make purchases. - Explore the Mac App Store for a wide range of apps that can further enhance your productivity and creativity. - Use iCloud to sync your files, photos, and documents across all your Apple devices. - Keep your MacBook Air updated with the latest software updates to ensure optimal performance and security. 256Gb Check here 512Gb Check here Final Thoughts Product Summary The Apple 2023 MacBook Air Laptop with M2 chip is a highly capable and versatile device that offers a combination of portability, power, and seamless integration with Apple devices. With its strikingly thin design, supercharged performance, and impressive battery life, it is an excellent choice for individuals who value productivity, entertainment, and overall user experience. Final Recommendation If you're in need of a reliable and high-quality laptop that can handle a variety of tasks and offers seamless integration with your Apple devices, the Apple 2023 MacBook Air is the perfect choice. With its sleek design, powerful performance, stunning display, and advanced camera and audio capabilities, it offers exceptional value and enhances your overall productivity and enjoyment. Whether you're a student, a professional, or a creative, the MacBook Air is a laptop that can cater to your needs and keep up with your lifestyle. Disclosure: As an Amazon Associate, I earn from qualifying purchases. Read the full article
0 notes
Text
-> How to install X Window System XQuartz on macOS for ssh X11 forwarding
3 notes
·
View notes
Text
youtube
https://youtu.be/ucqZSA7EoEY
12 Essential Macbook Pro Tips you should know
0 notes
Photo

hello and welcome! this is my spin on a comprehensive giffing tutorial that not only covers the basic mechanics of how to gif, but also goes into the tips, tricks, and general photoshop information i’ve learned since i started giffing and now wish i could beam into my past self’s brain. this tutorial will walk you through everything from start to finish, help explain what not to do and why, and hopefully give even experienced gifmakers some new information!
note: this tutorial is very long and image-heavy, and is best viewed on dash
WHAT YOU’LL FIND IN THIS GUIDE
software needed
sourcing + storing footage
giffing: methods + step by step process
actions
coloring
text: subtitles, fonts, etc.
saving: timing, settings, exporting
posting: captions, tags, scheduling
resources
✨ NOTE: CURRENT AS OF 05/25 ✨
1. SOFTWARE
photoshop
there are tons of programs out there you can use to make gifs, including photoshop dupes like photopea and gimp, but this tutorial is going to focus solely on photoshop
i run photoshop 2025 on a macbook pro, but any ps version recent enough to have the video timeline will work. windows users will be able to follow along as well
you can snag photoshop (and lightroom) for $10 USD/month directly from adobe
adobe also offers discounts/free programs through universities, so be sure to look into that if you’re a student
or you can check here and here for other ways to snag it
vpn
just get one. seriously.
most reliable vpns (nordvpn, proton, mullvad, etc.) regularly have sales to make them more affordable
if you really can’t afford one, there are some free options; just be extra careful about which one you pick
if you don’t have a vpn, your internet service provider will be able to see what you’re t*rrenting/downloading and may take action against you— anything from cease and desist notices to throttling your internet speed or even terminating your contract with them
note: make sure your vpn is active and working correctly before you start t*rrenting or downloading anything
qbittorrent
safe, reliable free t*rrent client with a clean interface that is fairly intuitive
note: make sure you bind your client to your vpn to prevent any accidental data leaks; not all clients let you do this, but qbittorrent does
jdownloader
a download manager that is super useful for direct downloads (ddls)
keka
mac archive/extraction program you can use to open ddls acquired through jdownloader
winrar
windows archive/extraction program you can us to open ddls acquired through jdownloader
4k video downloader
free application for downloading hq youtube videos
mpv
free video player that takes sequential screenshots
capable of playing .mkv files (most large t*rrent and ddl files use this format)
cheat sheet of mpv keyboard shortcuts
works with both mac and windows
installation guides (courtesy of @kylos): mac and windows
note: install builds specified below for best results
mpv on mac
different builds allow it to work with 1080p, 2160p, sdr, and hdr files
1080p sdr build list
note: older mpv builds (ex: 0.29.0) no longer work on apple silicon macs that have updated to the sonoma operating system and beyond. if you have updated, delete your old sdr mpv build, download the latest build, and update your config file to match the example below. mpv will duplicate caps the first cap at the beginning of your screenshot sequence, but the rest of your caps should be fine

if you have an intel mac and have upgraded to sonoma, because of backend gpu issues, you will experience significant issue capping with mpv; using a duplicate finder (tutorial by @laurabenanti here) works as a partial fix, but there will still be some skipped frame/choppiness issues. i recommend looking into vlc or gomplayer as an alternative to mpv
2160p hdr build
note: the hdr build will not work for 1080p files— it will take duplicate screencaps. it also takes duplicate screencaps of your first cap only when used with 2160p files, so be aware of that
i recommend naming your builds so you don’t accidentally open a file with the wrong build

mpv on pc
assuming your computer can handle hdr, the standard build should work with all files
available for 64-bit and 32-bit systems (see windows installation guide linked above)
note: be sure you watch out for duplicate frames at the beginning of your screenshot sequence
a big shoutout to @jacksamiras for helping my mac-only ass make sure i had all the facts straight for pc users!
2. FOOTAGE
how to acquire files
a current and comprehensive guide; updated regularly
where to acquire files
ext.to: well-organized t*rrent site with a wide selection of files
1337x: t*rrent site with a solid variety of files
watchsomuch: t*rrent site (minion-themed, unfortunately) with a huge selection of movies and shows, though many of the links are old and/or underseeded
hdencode: ddl site with a excellent array of hq movies and shows
nima4k: german ddl site with ultra hq file options
yts: t*rrent site that specializes in extremely small file sizes; generally not ideal for giffing, but it can be a good way to find files you really can’t find anywhere else
digital-digest: a great place to find lossless hd trailers
thedigitaltheater: another place to find lossless hd trailer
storing your footage
external hard drives are the most practical option; for ease of use make sure you get a drive that is compatible with your computer (mac vs. pc) and has decent reviews— you want to make sure it’s not going to crap out on you in six months or something
shared drives/cloud storage (guide by @usergif) also work if you can’t afford hard drives or don’t want to bother with them
quality
⚠️ ALWAYS GIF FROM 1080p AND UP ⚠️
anything below 1080p (720, 480, 360) is going to be noticeably fuzzier and lower quality
sometimes things like older music videos only exist in low quality, but for movies and tv shows, it’s always going to be worth it to find a file that 1080p or better
in most cases, the higher the file size, the better. a 2 gb file is going to be significantly less hq than a 10 gb file. for example:


2160p isn’t necessary, but if you know you’re going to be making really big gifs (540x450 and up) or doing a lot of intense blending or coloring, the extra size and quality will really help
sdr vs. hdr
sdr is standard dynamic range, while hdr is high dynamic range
note: not all computers are capable of displaying hdr files correctly
most newer computers (ex: all macs from 2018 onwards) have native support for hdr files, but do some googling to make sure your machine can play them before you download any
below is an sdr screencap (left) next to an hdr screencap (right) that is not being displayed correctly

[source]
the washout that occurs with hdr files isn’t always a machine issue; it can also occur if you cap hdr files with an incompatible screencapping setup
using the correct build in mpv (2160p build for macs, the standard build for pcs, both linked above) will allow you to capture hdr screenshots while preserving the original color profile — no washout!
upscaling
what is upscaling? upscaling is the process of increasing the size and detail of a digital image, making it sharper and clearer with (in theory) little to no loss in visual integrity
many older movies are now upscaled into 4k, and while it can be tempting to grab a large upscaled file, be aware that upscaling can drastically affect a film’s color profile
for example, each of the following gifs have been sharpened using the same settings, and have no coloring on them:


as you can see, the upscaled 2160p and 1080p gifs have areas of extreme contrast, and are very yellow. the non-upscaled 1080p file, despite its lower quality, maintains the original color profile and contrast balance
how you feel about upscaling and the resulting quality vs. color tradeoff ultimately comes down to personal preference, but it’s definitely something to keep in mind as you’re selecting a file
3. GIFFING PROCESS
methods
there are four main methods for giffing: screenrecording, video extraction, files into stack, and DICOM files. both files into stack and DICOM files involve taking consecutive screencaps to load into photoshop rather than importing the video or opening it directly in photoshop, which is how screenrecording and video extraction work
there are pros and cons to each method, and all of them work at the end of the day, but i think there’s a clear winner in terms of both ease and quality. here’s a quick run down of each method
screenrecording
pros: least intimidating method, fairly quick
cons: huge loss in quality, it’s becoming increasingly difficult to record footage from sites like netflix, hulu, etc. as they get better about detecting recording programs like quicktime player and giphy capture (i.e. you end up with a black screen when you try), higher fps rate of screenrecording compared to footage fps creates issue with gif playback
fps issue: to get the smoothest playthrough, you need to load in every frame. however, if you do that, you end up with a gif that lags dramatically due to the frame rate difference. to combat this lag, you have to manually sort through and delete every duplicate frame created from the fps difference. if you don’t load in every frame (ex: every other frame), you won’t have to manually delete anything, but your gif will be noticeably choppy
video extraction
pros: takes less time/computing power than opening an entire movie/episode in photoshop
cons: some quality is still lost, extraction programs like handbrake can be difficult to use, rendering extractions still takes much longer than screencapping
files into stack
pros: no quality loss, much faster than extraction method
cons: caps load into photoshop in reverse order, 2160p caps take a very long time to load compared to 1080p caps
DICOM files
pros: no quality loss, caps load in correct order, load times significantly reduced from files into stack method (1080p caps load instantaneously and 2160p caps load in seconds)
cons: photoshop actions designed for use with files into stack must be tweaked for use with DICOM method
to illustrate the difference in quality, each gif below has been sharpened with the same settings, set to the same frame delay, and has no coloring on it


as you can see, the choppiness/lag in the screenrecorded gifs is very evident when compared with the screencapped gif. the screencapped gif is also smoother and crisper, with truer color and no artifacts or blockiness. the video extraction gif is a closer match in terms of quality, but it still has banding and blockiness in some areas, and a slight blur compared to the screencapped gif
now that you’ve seen the differences, on to screencapping! as you may have guessed from the pros and cons lists above, “load files into stack” and “load multiple DICOM files” are almost identical processes, but crucially, DICOM files* load much more quickly into photoshop, and they don’t load in reverse order. the speed difference is especially nice when you’re working with 2160p caps, which take absolutely forever to load in the with files into stack method
* .dcm files; designed for medical imaging, they store information differently than .png or .jpeg files and are used to transmit large images and associated data quickly and losslessly
i recently switched to working with DICOM files, so that’s what i’ll be showing you how to use below!
process
1. open file in mpv + stake screencaps
i like to take a lot of caps so that i can be super picky about choosing exactly what i want to have in the gif, but my computer has the horsepower to handle that. if you don’t think yours does, consider being more precise in your initial scene selection and/or stopping at 50-55 total caps
note: how to take screencaps with mpv player is covered in the installation guides linked above


2. trim caps + rename from .png to .dcm
if i’m using the hdr build (like i am here), i remove any duplicate caps from the beginning. then, regardless of which build i’m using, i trim any extra caps from the end to ensure that only caps from the scene i want to gif are left in the folder before i turn them from .png to .dcm files. it’s a simple process on mac: select all > right click > rename
see here for a guide to batch renaming extensions on windows


3. open photoshop + load multiple DICOM files
unlike “load files into stack” you’re loading you entire screencaps folder in for “load multiple DICOM files”; this is why it’s a good idea to trim your caps before you load the files in


4. crop

click on the crop symbol in your toolbar, then select w x h x resolution in the drop down menu and enter the dimensions you want for your gif

basic tumblr dimensions for width (height is up to you)
one gif: 540px
two gifs in a row: 268px each
three gifs in a row: 177px, 178px, 177px

note: it’s worth it to leave a gutter of extra pixels (i leave 5px for both width and height) in your cropping dimensions to prevent edge lines from showing around the perimeter of your gifs
i’m making a 540x350 gif for this tutorial, so the dimensions for my crop are 545x355; i’ll size the canvas itself to 540x350 after i’ve made the gif
additionally, make sure “delete cropped pixels” is unchecked so that you can move the gif around on the canvas if you need to
feel free to adjust the crop box as much as you want before you actually hit the checkmark to finalize it, but make sure you crop once and only once. resizing after you have already cropped will wreck the quality and introduce a lot of fuzziness to your gif. if you don’t like the way the crop turned out, undo it and try again

after you’ve cropped, go ahead and zoom in so you can get a better sense of what you’re doing. i tend to work at 200%, since that’s the best approximation of how the gif will display on tumblr
5. create video timeline
make sure you have the video timeline pulled up in your workspace. if yours isn’t visible, go to window > timeline to add it to the space
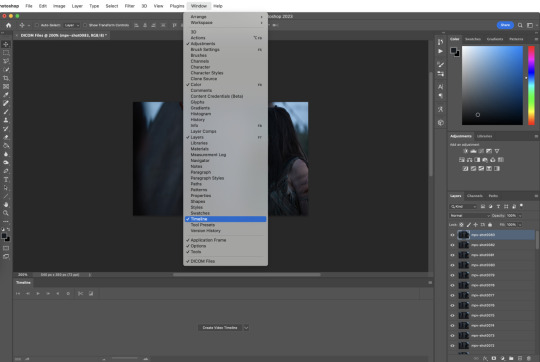
click “create” video timeline in the timeline bar


this will convert your caps to static video layers; we have to do some more work to get a playable animation
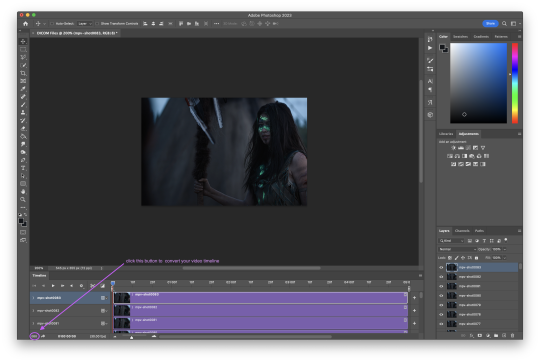
6. convert video timeline
click the frame animation in the lower left hand corner of the timeline bar. this will convert your video layers to a frame animation
7. make frames from layers
now click the menu button in the upper right hand corner of the timeline bar and select “make frames from layers”; be sure to leave “new layers visible in all frames” checked


now all your frames are visible in the timeline
8. delete frame
with all the frames visible, you can see that the first frame is 5 seconds while all the other frames are 0 seconds. delete that 5 second frame using the trash can icon in the timeline bar. if you don’t delete this frame, your gif will have a ton of lag at the beginning and/or end up with duplicate frames when you export it
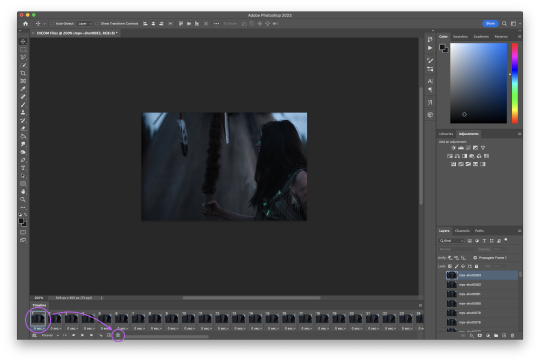
9. convert frame animation
click the video layer symbol in the bottom left hand corner of the timeline bar (where the frame animation button was in step six) to convert your frames back to video layers


they move now! but we want to be able to edit the gif as a whole instead of in individual layers
10. select all layers

11. convert to smart object
so we’re going to turn those video layers into a smart object; the smart object will act as a container that keeps everything neat and tidy while we sharpen and color, and will also preserve the original image, allowing us to edit non-destructively
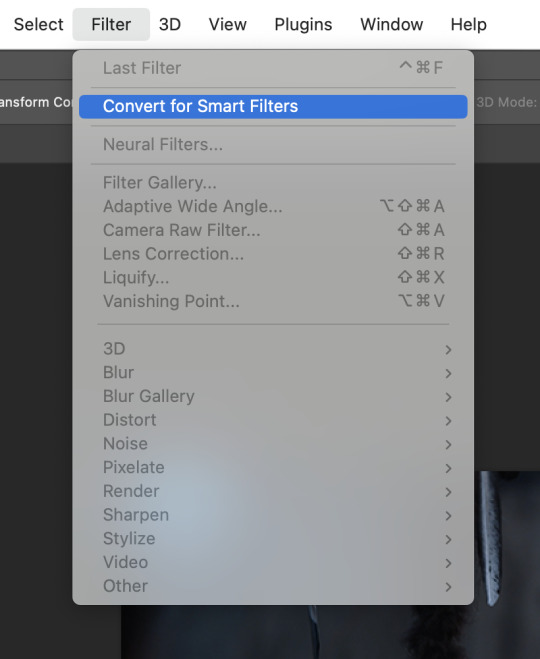
hit filter > convert for smart filters
if this is the first time you’ve made a gif, this is a good place to stop and check that everything is working the way it should. play your gif to make sure there’s no lag or any other issues

if your gif only plays once and then stops, go to the timeline menu and select “loop playback”

if there’s some other issue, go back through steps 5-11 and make sure you’ve followed them exactly
12. smart sharpen
sharpening adds back in that nice, crisp clarity that’s lost when the screencaps are cropped and resized to fit tumblr dimensions. there are a ton of different sharpening settings out there, but people generally sharpen in two distinct steps using “smart sharpen”
here is my process:
for the first step, go to filter > sharpen. select “custom” from the preset dropdown. click the gear icon and make sure “use legacy” and “more accurate” are both checked, and then select “gaussian blur” in the “remove” dropdown. finally, set the following values for amount and radius:

13. smart sharpen
my second smart sharpen follows the exact same process as the first—“use legacy” and “more accurate” are both checked—but with different values entered in for amount and radius:

note: like a lot of giffing, sharpening settings come down to personal preference, but be aware that oversharpening can lead to areas of extreme contrast in your gif, and an overall sort of staticky, almost crunchy effect
14. resize canvas + check playback
finally, resize the canvas to remove the 5px gutter we left back when we cropped


you can adjust how long the gif is using the sliders on the video timeline

now look at that! you’ve got a basic gif that’s ready for coloring and text!
note: you might have noticed that i haven’t talked about timing yet, and that the gif is playing way more quickly than the original footage was— don’t worry, we’ll deal with that later, and for good reason
4. ACTIONS
so fourteen individual steps for a gif sounds like a lot, right? but photoshop has a function that takes those steps and runs them for you. behold: actions!
actions are automated processes in photoshop that can drastically speed up certain tasks. steps 5-13 in the giffing process i just outlined are automated in this action*, which means you can load your files into photoshop and have a basic gif ready to go in just a couple seconds
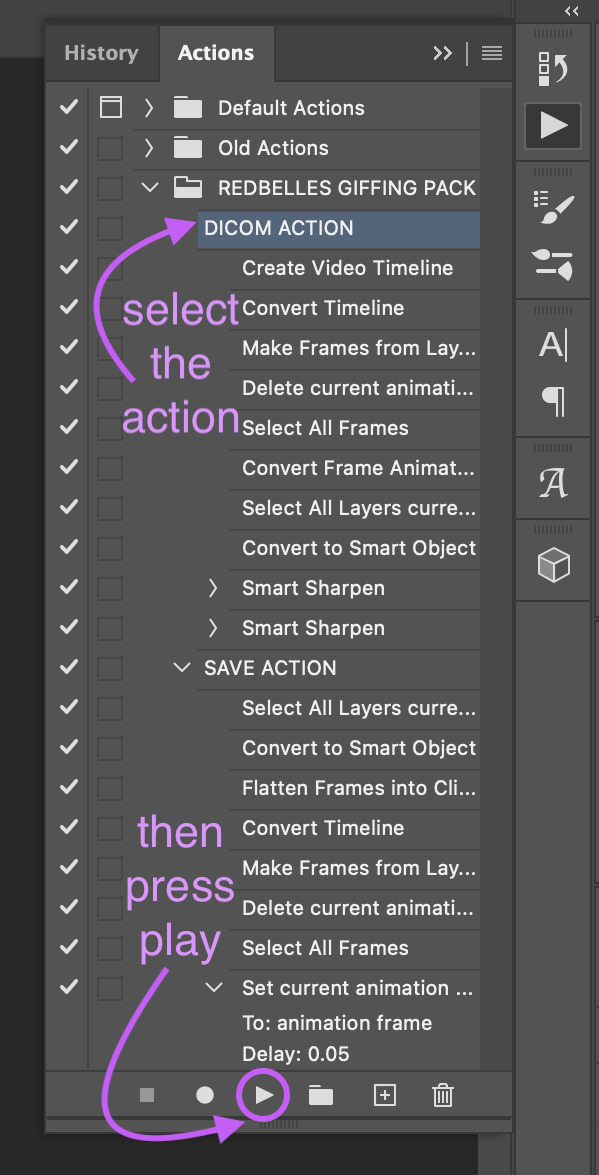
all you need to do is download the action and open it in photoshop, where it will automatically be added to the actions panel. select the one labeled “DICOM ACTION,” press play, and voilà!
*my action is a modified version of this life-changing action by the one and only rizz (@anyataylorjoy) updated for use with DICOM files and shared with her permission! rizz’s genius save action is also in both of the links above; we’ll discuss that more later
actions aren’t just limited to the actual process of animating a gif, though. you can create custom actions for excruciating fun things like frame by frame coloring (tutorial coming... idk, someday. maybe.) or creating glitch effects
if that sounds like something you’re interested in, here’s a handy official guide on how to create your own actions and some others on how to managing/saving actions if you decide you want to share one
5. COLORING
after nearly four five six years of giffing, i can say with 100% total confidence that there are a million different ways to go about coloring. whether you’re just starting out or you’ve been relying on psds, the best advice i can give you if you want to develop your own style is honestly just to play around with the different adjustment options in photoshop and see what you like and what works for you
of course, that’s easier to do if you have a basic understanding of what each adjustment layer does, so to that end:

brightness/contrast
adjusts the tonal range (the levels between an image’s darkest and lightest points) of an image. brightness slider affects highlights and contrast slider affects shadows
levels
adjusts the tonal values of an image by modifying the level of highlights, midtones, and shadows
curves
adjusts as many values for brightness and/or color as you want across the entire tonal range of an image
note: curves can be used to impact the entire rgb spectrum, or can be used to change r/g/b in isolation
see here for a more in-depth explanation of the curves tool
exposure
adjusts exposure levels across exposure, offset, and gamma. exposure controls highlights, offset controls midtones, and gamma controls shadows
vibrance
adjusts the color intensity of an image via two different options: vibrance and saturation. saturation evenly increases the saturation of all colors in the image. vibrance adjusts the level of saturation of all colors but in a more selective manner, focusing on colors with the lowest base saturation
note: vibrance is less like to oversaturate skin tones than saturation
hue/saturation
allows the adjustment of hue, saturation, and lightness of either the entire image or a specific range(s) of color in an image
note: using saturation across the entire image (the “master” slider) will reduce the overall tonal range of an image and can result in dullness
color balance
adjusts the mixture of colors in an image across either highlights, midtones, or shadows
black and white
adjusts color values to produce grayscale images, with both preset and custom value options
note: using a black and white gradient map instead of the black and white adjustment tool itself often results in a smoother gif
photo filter
adds a single color filter to the image
channel mixer
adjustment option that modifies a targeted (output) color channel using a mix of the existing (source) color channels in the image. color channels are grayscale images representing the tonal values of the color components in an image (rgb or cymk)
note: when you use the channel mixer, you are not adding or subtracting colors to/from a specific color component (see: selective color). instead, you are adding or subtracting grayscale data from a source channel to the targeted channel
color lookup
a set of premade filters/styles to apply to an image
invert
inverts the colors of an image to create a photo negative effect
posterize
reduces the number of brightness values in an image to create a flat, poster-like appearance
note: not typically used in gif making
threshold
adjusts grayscale or color images and converts them to a high contrast black and white images via a specified level as a threshold. all pixels lighter than the threshold are converted to white, while all pixels darker than the threshold are converted to black
note: not typically used in gif making
selective color
adjusts the amount of a primary color in an image without modifying the other primary colors in the image
note: the “absolute” option adjusts the color in absolute values, while the “relative” option adjusts the existing amount of a given color by its percentage in total
gradient map
converts the grayscale range of an image to a gradient color fill, with both preset and custom gradient options available
note: gradients can be manually adjusted, and checking the “reverse” option inverts the colors of the gradient
okay! now that that’s out of the way, here are three narrated examples of how i color:
1. prey (2160p sdr)

[video link]
2. the punisher (1080p)

[video link]
3. house of the dragon (2160p hdr)

[video link]
my general coloring process
step one: lighten
i start with one or two curves layers to see if i like what the rgb “auto” option gives me; if i don’t, i switch to lightening via exposure
if i know from the outset that a scene will need aggressive color correction, i’ll use a curve layer set with the white point eyedropper instead of the auto option; this brightens and color corrects the entire gif based on a selected pixel
step two: darken blacks
it sounds counterintuitive, but as you lighten the scene, you need to make sure you’re not washing it out
i start adding contrast back in by adding +1 black in blacks in a selective color layer below my lightening layer(s)
i often follow that up with a levels layer set to “increase contrast +1” above my lightening layer(s)
if you feel that the “increase contrast +1” layers has made the blacks too intense, you can try a black point layer in levels instead
note: the above/below method is a personal preference based on how the adjustment layers interact with each other
step three: lighten
adding contrast back in can make the gif a bit darker than i’d like, so i typically add another lightening layer after i’ve adjusted the contrast
i generally use the curves “auto” option to balance things back out
i will sometimes use the white point method here (seen in the videos when i zoom to 3000%) either alone or in conjunction with auto curves layers
step four: color adjustments
this step varies the most: in the videos, you’ll see me adjust cyan (prey), take out yellow (the punisher), and amplify red while removing yellow and green (hotd)
if very aggressive color correction is needed, i tend to use channel mixer. otherwise, i use selective color first and then hue/saturation if needed. i do not tend to use color balance
update: explanation of why i avoid color balance here
step five: final tweaks
if a gif seems flat: i increase the blacks in neutrals using selective color to add extra depth
if a gif seems dull: i increase vibrance, or in extreme cases, vibrance and saturation
note: be very careful when using saturation— it can wreak havoc on skin tones
psds
if you don’t want to color manually for whatever reason (don’t have time, struggling with the scene, want to experiment, etc.) psds that others have shared are always an option
psds are adjustment layers that other gifmakers have put together and shared so you can apply them to your own gifs
note: psds are almost always scene-specific (and often file-specific), so you’ll likely have to tweak them to make them work for your gifs
check the resources section at the end of this guide for some places to find psds
6. TEXT
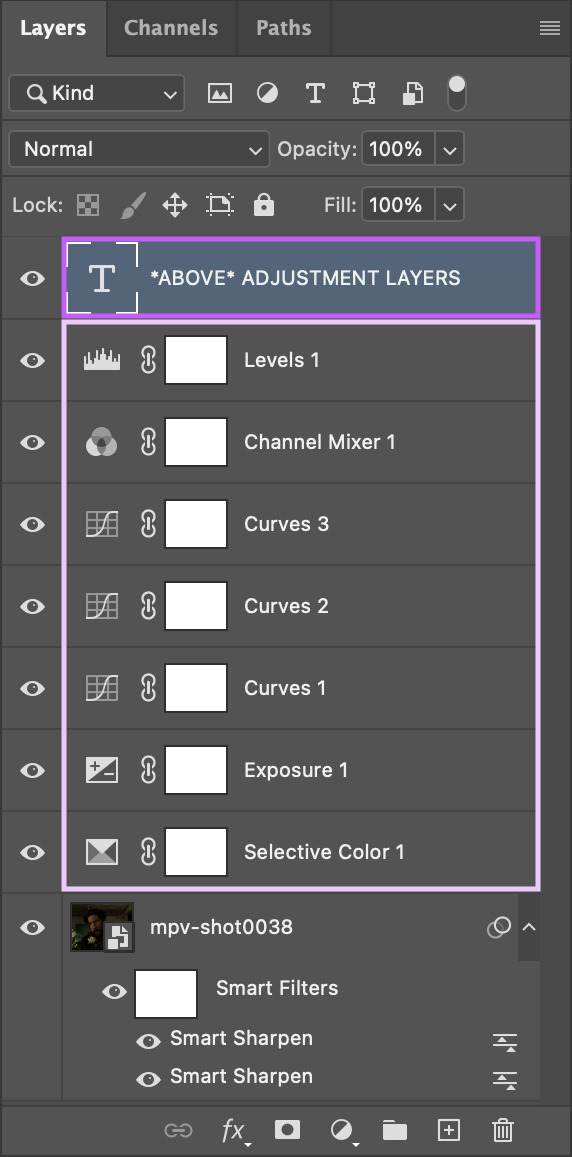
the most important thing about any text layer is to make sure that is above all of your adjustment layers. if your text is below any adjustment layers, it will end up looking wonky and distorted
subtitles
first things first: pick a font that is easy to read. i use arial rounded mt bold, but alte haask grotesk, arial, myriad pro, etc. are all good options as well. for subtitles, sans serif fonts are almost always much easier to read than serif fonts
after you’ve chosen a font and loaded it into photoshop, select the text tool and click and drag to create a text box instead of just clicking once to create a text layer. this will help you keep your subtitles perfectly aligned across multiple gifs

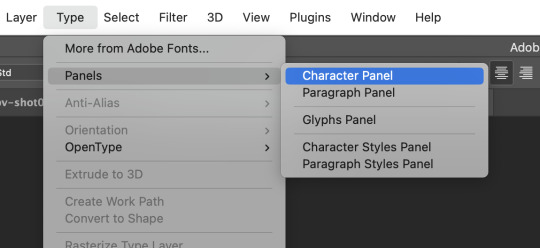
type out your text, then click the character option to adjust your type settings. if you can’t see the character option, from the main menu bar go to type > panels > character panel. this will also work to bring up the paragraph panel
these are the character settings i currently use for my subtitles:
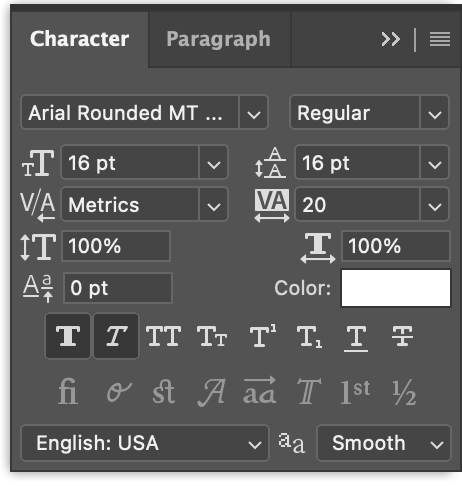
note: the text size can vary from set to set. if you end up changing it, be sure you change the line spacing (the little vertically stacked As directly to the right of the text size dropdown) to match
using either the top text bar or the paragraph panel, make sure your text alignment is set to “center” instead of “left” or “right”
now we need to make the text stand out against the gif. we’ll do this by adjusting the blend options. with your text layer selected in the layer panel, go to layer > layer style > blending options

i personally use drop shadow, stroke, and outer glow for my subtitles:


after you’ve got your text settings the way you want them, press v to select the move tool, then click the three dots in the top toolbar to pull up the “align” menu
select “canvas” from the “align to” dropdown in the menu, then use the center and bottom buttons to center your text at the bottom edge of your gif. the extra space in your text box may provide enough of a buffer to separate your text from the edge of the gif, but if not, simply move the box upwards until you’re happy with the placement

note: if you’ve used a text layer here instead of a text box, the position of your text will be based on individual glyphs instead of the uniform edge of the text box. this means that lines with the letters g, j, p, q, or y will be positioned differently than lines without those letters, which can ultimately mess up the placement of your subtitles across your gifs. save yourself some hassle and use a text box

to make sure the text box ends up in the same place on all your gifs, go to layer > duplicate layer to copy them exactly on to your other gifs


note: be sure to double check the drop shadow on any duplicated layers, since photoshop sometimes changes the angle of the drop shadow to 90° on the new duplicated layers
additionally, if you’re working with multiple speakers, make sure whatever colors you pick for them don’t make the text difficult to read
you can download a base version of my subtitle settings here
other text
you have a lot more options for non-subtitle text: crazy fonts, cool coloring, effects, etc. don’t be afraid to experiment! a good place to start is the layer style tab. go to layer > layer style and you’ll see these options:

we used a few blending options for subtitles (drop shadow, stroke, outer glow) but now you can play with color overlays, gradients, and even patterns
check out the resources section at the end of this guide for font websites, fancy text tutorials, and more
7. SAVING + EXPORTING
timing
now we’re (finally) ready to talk about timing. the frame delay you want to use is 0.05. this timing most closely matches the natural playback speed of (non-animated) footage. anything else is going to be noticeably too fast (0.04) or too slow (0.07). witness:


there are really only two exceptions to this:
animated footage, which can run at a faster frame rate than non-animated footage and may work with 0.04 timing
gifs that have < 15 frames (ex: trailer footage)— you might be able to get away with something like 0.06 in that case, but it will still look a litle slow
most other tutorials have you set your timing as part of the process of animating your gif, but i didn’t. why not? because photoshop absolutely loses its goddamn mind when it comes to gif timing
it will create duplicate buffer frames if you change the default frame timing at all at literally any point except as the very last step before you export your gif. this means that if you change it as part of your process before the “convert to smart object” step, you’ll get those duplicate frames and end up with lag in your gif. it will also automatically reset your timing to 0.07 if you export from a video timeline state. gee, thanks photoshop!
the way most people deal with this 0.07 bug is by exporting the gif, opening the exported .gif file in photoshop, and manually resetting the frame timing to 0.05 before exporting again. however, that’s a lot of work, so aforementioned giffing queen rizz @anyataylorjoy did us all a solid and created an action that will convert your gif back to frames and set your timing to 0.05 with a single click. her save action is bundled together with my DICOM action in the link back in the “actions” section
note: managing your timing like this does mean that when you’re working with your gif photoshop before you run the save action, it will play much faster than it will once you’ve exported it
to export your gif, go to file > export > save for web (legacy)

before you jump in to exporting your gif just yet though, there are some things to consider
upload limits
the current tumblr upload limit is 10mb, which is great for gifmakers— it leaves plenty of space for experimenting with big gifs, crazy colors, and fancy effects like blending and transition
and yet: it’s ridiculously easy to go over that limit! make sure to check your file size before you export your gif to confirm that you’re below 10mb so you don’t run into any upload issues

if your gif is over the limit, try shortening the length of the gif. that’s hands down the best way to decrease the size, but you can also try adjusting your coloring. the brighter and more vibrant a gif is, the larger the file size generally is, so those are good areas to try tweaking if you really don’t want to cut the gif down. high contrast, especially in black and white gifs, can produce large file sizes as well
save settings
your save settings will affect how your gif appears when it’s exported and posted outside of photoshop. there are basic settings everyone has to use (ex: loop forever), but some will ultimately come down to personal preference, so it’s worth knowing what the differences between the settings actually amount to
selective vs. adaptive
selective: creates a color table favoring broad areas of color and the preservation of web colors. this color table usually produces images with the greatest color integrity. selective is the default option
adaptive: creates a custom color table by sampling colors from the predominant spectrum in the image. for example, an image with only the color green and blue produces a color table made primarily of greens and blues. most images concentrate colors in particular areas of the spectrum
dither: diffusion vs. pattern
diffusion: applies a random pattern that is usually less noticeable than pattern dither. the dither effects are used across adjacent pixels
pattern: applies a halftone-like square pattern to simulate any colors not in the color table
note: using “adaptive” instead of “selective” and/or “pattern” instead of “diffusion” will result in larger file sizes
i personally use selective + diffusion for nearly every gif i make, not only because the file sizes are consistently smaller, but also because i think that combo produces the cleanest results. i find that the grid pattern creates is very noticeable/distracting, and that the color clarity from selection almost always beats out the custom tables from adaptive
bicubic vs. bicubic sharper
bicubic: slower but more precise method based on an examination of the values of surrounding pixels
bicubic sharper: a good method for reducing the file size of an image based on bicubic interpolation with enhanced sharpening. this method maintains the detail in a resampled image. if bicubic sharper oversharpens some ares of an image, trying using bicubic
i really don’t like oversharpened gifs, so i exclusively use bicubic
lossy
lossy reduces file size by permanently removing some of the original data
lossy used to be a viable way to decrease the size of gifs before tumblr changed the upload limit to 10mb; now gifs with lossy are visibly fuzzy, making them look lower quality no matter what kind of footage was actually used
if you are using lossy to add a film grain effect to your gifs, use the filter > noise > add noise option instead
note: the best way to achieve a grain effect is simply to use hq footage; larger hq files often have a grain to them that is lost as the files are compressed to smaller sizes
here are the rest of my save settings:
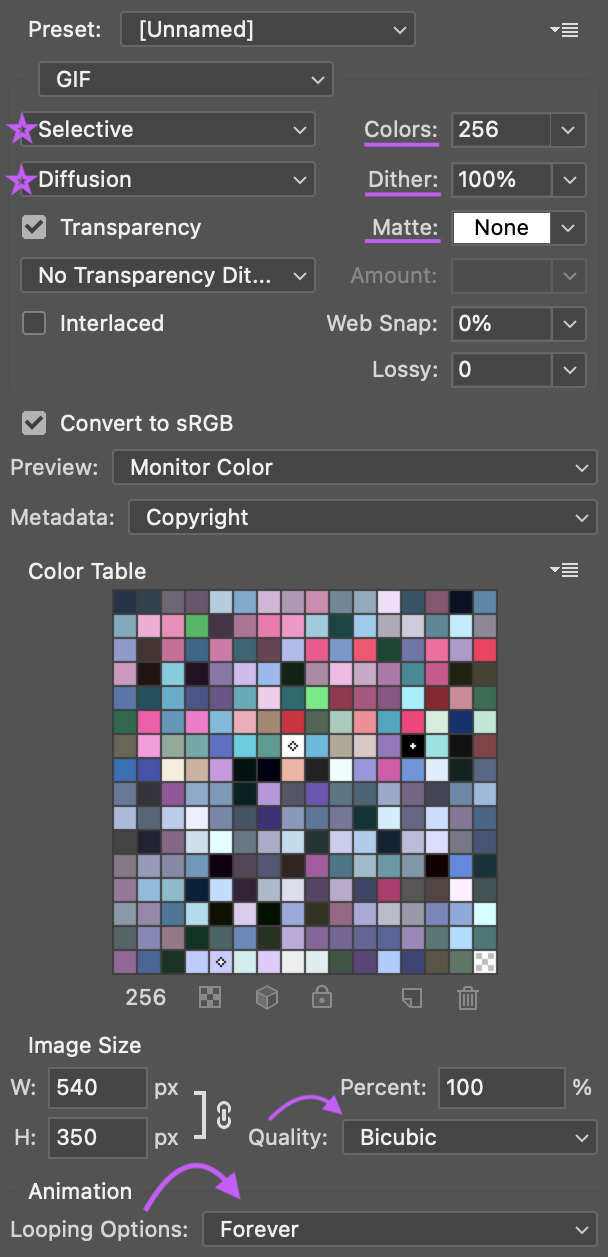
note: the default option under “metadata” includes contact info, so i highly recommend changing that
you can see how a gif will play directly in the export panel, but you can also view it a new browser tab by clicking “preview”; this will open the gif in a new tab in your default browser
when you’re happy with how the gif looks outside of photoshop and have checked that it’s under the 10mb upload limit, go ahead and export the gif
8. POSTING
basics
before we talk about anything else: make sure you are putting your gifs in a photo post. the new editor we’re all forced to use now does a whole bunch of behind the scenes bullshit to gifs (rip legacy editor 💀) and you definitely don’t want to make things any worse by using the wrong post format
if you find yourself struggling with the new editor @wolfes has your back: they’ve put together a comprehensive guide to using/troubleshooting the new editor for gifmakers. everyone say thank you, v!
save in + post from drafts
alright, so you’re ready to post your gifset— while it’s temping to just slap the gifs on a new post and publish immediately, it’s actually a really good idea to save the set as a draft first and make sure the gifs look good once they’re uploaded. sometimes tumblr makes the colors look wonky or wrecks the quality or does other stupid tumblr things, and it’s so much less frustrating to notice that before a set is posted than to see something you want to fix after it’s already out in the wild
if you want some feedback on a draft before you post it, you can click the three dots in the upper right hand corner of the post to open a private preview you can share with others

note: the link will work as long as you have the preview open
once you’re sure tumblr hasn’t messed with anything, it’s time to format the rest of the post
captions
the finishing touch on a set, captions can be anything from basic film/show info to relevant quotes to straight up memes. here’s some general info to help you figure out how you want to format yours
html symbols
edit tumblr posts using html by @hayaosmiyazaki
tumblr html text primer by @gustavlindstrom
gradient text: generate your gradient here, copy the html code here and remove “;” from your text, then paste the semicolon-free text into the html editor on tumblr
note: be aware that the new editor has radically changed how gradient text is processed and displayed. sometimes it works, sometimes it doesn’t. sometimes you can see it on dash but not on individual blogs, and sometimes only the first letter is in color and everything else is black
inspiration credit
if your set was inspired by someone else’s, credit your insp. source(s)
it’s a really basic part of tumblr/gifmaker etiquette that gets ignored way more than it should
there’s obviously a lot of creative drift on a site as big as tumblr and it’s not always possible to pinpoint an exact inspiration source (especially for more popular gif trends), but as a creator it can be really disheartening to see someone swipe something directly from you without saying anything
tl;dr shout out what inspires you!
not sure how to go about crediting someone? here’s a handy guide on inspiration credits from @usergif
tagging
it’s super important to remember that only the first twenty tags on your set will be used in tumblr’s search/tag algorithms!
if you’re not sure where to start, go ahead and check out some popular sets in the fandom(s) you’re creating for and see what tags are on those sets— that’s a great way to figure out which tags are active and what kinds of things you’ll see in them
here are some typical tag categories for fandom sets:
— general tags
media/fandom name: #hotd, #stranger things, #disney
character names: #yennefer of vengerberg, #alina starkov, #ginny baker
ship names: #zutara, #kanthony, #buckynat
— edit tags
#filmedit or #tvedit
#[fandom/media]edit - #swedit (star wars), #nmcuedit (marvel netflix), #tlouedit (the last of us)
#[character name]edit - #rhaenyraedit, #karenpageedit, #batmanedit
#[ship name]edit - #literatiedit, #joenickyedit, #kastleedit
#[actor name]edit - #austinbutleredit, #emmadarcyedit, #pedropascaledit
— source blogs
these are blogs that focus on reblogging a specific type of content (old films, pop culture, etc.) and they’re a great way to get your gifset seen by more people
typically track a specific tag in order to find relevant content
general rule: make your set is the kind of thing a source blog is interested in before tagging them
your set may be reblogged immediately, may go into a queue, or may not be reblogged at all (the members didn’t see it, think it doesn’t fit the blog’s theme, etc.) — just be patient and try to find source blogs that align with what you’re making
examples: chewbacca (#chewieblog), junkfoodcinemas (#junkfooddaily), classicfilmblr (#classicfilmblr), dailywoc (#dailywoc), bob-belcher (#userbbelcher), optional (#useroptional)
— user tags
user tags are unique tracked tags for individuals rather than source blogs!
gifmakers will often have their tracked tag (if they have one) in their blog description/about page
ex: i track #userbells

general rules: you don’t have to be mutuals with someone to tag them, but it’s good etiquette to be following them, and to only tag them in things they seem interested in
after you’ve tagged for exposure, there are a couple more things to consider:
— content warnings
it’s generally considered polite to tag for major content/eyestrain warnings
ex: tw flashing, tw blood, etc.
there are a variety of ways to tag for content warnings - #cw blood, #blood tw, # // blood - just pick one style and be consistent with it
warnings don’t have to be in your first twenty tags (since these tags are used to filter out posts instead of find them) but just having them on the post is helpful for anyone who happens to have a content warning blacklisted
— a tag for organizational use
i typically save the last of my twenty tags for my personal “creations” tag so that i (and anyone searching my blog) can easily see everything i’ve giffed
i use * as my tag and have it as one of my sidebar links for easy access
other examples i’ve seen include “mine: gifs”, “my edit”, etc.
best times to post
despite the ongoing tiktokification of tumblr, the hellsite still doesn’t have the kind of dashboard/feed algorithms that other social media sites do. that said, it can still be helpful to post at specific times to boost how many people see your gifsets
according to union metrics, most reblog activity on tumblr happens between 7pm and 10pm eastern time
however, if you’re giffing something that’s just been released—a new trailer/episode/season/movie—then the best time to post is as soon as you possibly can. tumblr users these days unfortunately prioritize reblogging whatever sets get out there first. that’s great if you can get those sets made quickly, but it can seriously suck if that’s not the case
if you want to hustle and make “new content just dropped” sets as soon as the footage is out there, go for it. if not, don’t put any pressure on yourself to do that; it’s totally fine to gif at your own pace
verify that your set is visible on your dash
as soon as you post, go to your dash and make sure that you can actually see your set on your dash— sometimes tumblr just straight up eats posts, and if you can’t see your set, no one else can either
if your set isn’t visible on your dash, it’s likely either gotten caught in the (terrible and useless) nsfw filter or tumblr is just being stupid
to fix this:
check the post by loading/posting each gif individually to see if one (or more) of them is causing the set to break
change the gif(s) responsible by adding/removing frames, tweaking coloring, etc.
if the gif(s) are still breaking the set, you might have to wholesale replace the gifs with different scenes or post the set without them
verify that your set is in the tags
the other thing you need to check is whether or not your set is showing up in the tags
sometimes a set will be visible on your dash but won’t actually appear in any of them tags. to make sure your set is showing up, check one of the tags by going to the /tagged/[tag] page
if it doesn’t show up, here are some general tips:
wait 5-10 minutes: sometimes tumblr just takes a minute to register the set
edit/remove any links: tumblr doesn’t place nice with links general, and with external links in particular. removing the “s” from https in your links can often fix things, but if that doesn’t work, remove the link entirely
try deleting and retyping the tags
try this image trick from @yellenabelova
delete the set and repost from scratch
for a much more comprehensive guide on what to do if your set isn’t in the tags, check out this very extensive solutions flowchart by @momentofmemory
9. RESOURCES + GENERAL TIPS
giffing communities
find some buddies to gif with! giffing is super fun, but it can also be finicky and frustrating, and having people to brainstorm/complain/share things with is honestly so helpful. some of the most fun i’ve had giffing has been sitting around commiserating on a call with rizz or lia or m, or whining at kumi or neve over text chat
some places to start if you’re looking for communities to join:
creatorhub*
@villainelle’s giffing discord (send an ask for a new link if expired!)
the gifmakerhub discord, run by @wolfes
*the creatorhub link is best accessed on desktop, as it will take you to a submission box:

reblog yourself
this is a big one! time zones are a thing, and on top of that, it’s almost impossible to get a reblog in this economy. boosting your own sets is a really good way to make sure more people see them, and also to just take a minute and be proud of what you’ve made!
resources
general photoshop resources
@chaoticresources
@completeresources
@rresources + bonus beginner’s guide
@hisources
@evansyhelp
tutorials
anti white-washing by @haldi-archived
anti red/orange-washing by @aubrey-plaza
channel mixer by @aubrey-plaza
multiple gifs on one canvas by @nataliescatorccio
blending by @nataliescatorccio
fade transition by @anyataylorjoy
coloring dark scenes by @sluttyhenley
transition tutorial by @wolfes
glitch effect by @sarah-snook
gif overlays by @ezrabridgerr
general coloring by @the-borgias
general coloring by @magnusedom
rainbow coloring by @rhodeys
text effects by @unadulteratedloathings
shuffle texts by @cal-kestis
animated handwritten text by @mxrisacoulter
comprehensive subtitle guide by @clubgif
fonts
— where to get fonts
dafont
befonts
ifonts
dafont free
google fonts
— identifying fonts
what the font
what font is
font squirrel
identifont
— font recommendations
@yourfonts
font tag from @anya-chalotra
favorite font combinations from @usergif
font packs from @liohnelmessi
font tag from @itsphotoshop
typography and font pairing guides from @momentofmemory
how to pair fonts by @awildling
psds
@dailypsd
@colour-source
@psdland
+ bonus anti white-washing psd by @evansyhelp
sharpening settings
action pack by @throwing-psds
action pack by @maziekeen
action pack by @daenerys-stormborn
settings from @anya-chalotra
and finally:
don’t stress
that is honestly my most important piece of advice. if you find yourself chasing notes, getting frustrated with low engagement or terrible like-to-reblog ratios, frazzled trying to make sets for new content as quickly as possible— just take a breath. take a step back if you need to. gif what you want to when you want to
giffing is a hobby! it should be fun! don’t let the numbers ruin it for you <3

feel free to send me an ask if you have any questions! previously answered questions are in my giffing help tag
i hope this tutorial helps! if it did: please reblog it!
(and if it really helped, consider throwing me a bone on ko-fi or commissioning something from me? area woman unfortunately very broke)
happy giffing ✨
#completeresources#rresources#usergif#userrizz#userpayton#userkd#jokerous#userriah#userchelsea#userneve#resources#tutorials#gif tutorial#re: gif tutorial#*#@tumblr formatting gremlins let me live challenge#please i am begging#anyway if you see a typo no you don't
3K notes
·
View notes
Text
Some M2 MacBook Pros have slower SSDs than M1 MacBooks | KKG INFO
Some M2 MacBook Pros have slower SSDs than M1 MacBooks | KKG INFO
The Apple world is in a bit of an uproar after it was discovered that the new M2 MacBook Pro has slower SSDs than its predecessors. Apple unveiled the M2 at WWDC 2022 in June. The new processor is the next generation of Apple’s custom silicon. While users are understandably excited about the performance gains the new processor brings, it seems some models may be hampered by subpar SSD…

View On WordPress
#hotel seo tips#INFO#KKG#MacBook#MacBooks#Pros#seo diy guide#seo guide backlinko#seo guide moz#seo tips banner#seo tips tricks#slower#SSDs#top 10 seo tips
0 notes
Text
Download Adobe Lightroom 4 For Mac

Adobe Lightroom 5.4 is a well-designed and comprehensive Mac OS X application that provides the required tools to handle, organize, edit and share your photos and videos with ease. Adobe Photoshop Lightroom CC is a powerful photo processor and image organizer allows you to create amazing images from challenging high-contrast scenes. Download Jaksta 1.2 mac serial adobe photoshop lightroom 4 activation key autodesk 3ds max 2010 free download 64 bit alien skin blow up keygen cs3 extended for. 9 Jul 2014 Get the latest working version of Adobe Lightroom 5.4 MAC Serials plus CRACK now. We also offer free full version crack, patch, serial key, keygens Copytrans Crack And Keygen Free Download-here you can download copytrans full crack and with serial key keygen نرم افزار Adobe Lightroom یک جعبه ابراز ضروری برای عکاسان حرفه ای دیجیتال است که یک محیط ساده برای مدیریت، تنظیم کردن و نمایش و DOWNLOAD Key generator for mac lightroom 4 Adobe Photoshop Lightroom 3 Mac Key.
Adobe Lightroom Mac Download
Adobe Photoshop Lightroom Classic CC 2019 8.4.1 Free Download. Adobe Photoshop Lightroom Classic CC 2019 Serial number is the latest version which avails you the facility of the customization of the pictures, and handle, organize, edit and share your photos and videos with your own style. Even you can give the styling and different looks according to the modern era. Overview of Adobe Lightroom CC 2020. Presenting the best software in-line the Adobe lightroom CC for mac-based computers. There has been a lot of differences in the ways in which we use editing software to get the job done but the biggest highlight would definitely be the ways in which lightroom can drastically enhance the quality of the output.
x5 number activation code adobe creative 4 master collection mac crack divx for review photoshop cs3 authorization generator Lightroom 4 Mac also includes Crack Serial & Keygen. Lightroom 4 Mac. Home; Signup; Take A Tour; FAQ; Testimonials; Keygen is a shortcut word Download and get free Mac Adobe Lightroom 6 for OS X Yosemite with full crack/serial/keygen/production & license key – Lightroom 6 mac torrent download. DOWNLOAD Flash builder 4. 5 for php premium download mastering autodesk revit architecture 2011 pdf adobe premiere cs5 keygen mac dreamweaver cs4 templates ashampoo burning Download lightroom 4 mac serial Jan 24, 2015 Download Download lightroom 4 mac serial Home; Downloads; Lightroom; Downloads Adobe Photoshop Lightroom 4. 4. I am trying to download an old version of adobe Lightroom 4 onto a MacBook Pro. Can’t find the download file. can anyone help? thanks.
Lightroom 4 free full. download Mac pdf converter professional 7 trial mapquest driving directions arcgis 102 Software: Download Lightroom 4 is full of bugs and slower than LR3.pro tools 9 download mac avid media composer 80 windows 10 free upgrade download for phone keygen for autocad 2014 adobe illustrator cs6 torrent with crackIn this Download Adobe Photoshop Lightroom Classic CC 2018 v7.1 (64bit) Full Crack with Patch and Keygen for FREE. Right after the release of the latest version of Photoshop CC 2018, Adobe also officially launched and renamed the version Adobe Lightroom CC into two versions of Adobe Lightroom Classic CC and Adobe Lightroom CC. We are happy to present our new crack for Photoshop Lightroom 6 for Mac OS X 10.8, 10.9, and Windows 7 SPack 1, Windows 8, Windows 8.1, or Windows 10. Its not tested in every sistem, so we’ll be very grateful to receive your feedback. In this article, we show how to crack Adobe Lightroom 6.0 (64bit) in steps.
The direct download link and Torrent file are all provided to get the Adobe Lightroom CC 2015 full version with keygen, serial and patch. Adobe Photoshop Lightroom CC Crack 2018 Serial Key Adobe Photoshop Lightroom CC v7.2 Crack 2018 Serial Key Free Download Win/Mac Adobe Photoshop Lightroom CC 2018 Overview: Download and get free Mac Adobe After Effects CC 2014 full version cracked with serials, keygen, product key. Mac Adobe After Effects CC 13 torrent download Adobe Photoshop Lightroom 4.4 Full Patch + Serial – Adobe Photoshop Lightroom 4.4 Full Patch + Serial. Adobe Photoshop Lightroom 4.4 Full Patch + Serial ini merupakan sebuah software keluaran Adobe Corp. yang berfungsi untuk mengoptimalkan gambar atau foto.misalnya pengaturan warna,cahaya,detail,tekstur dan lain-lain.
IDM Build 3 Crack est la nouvelle version du gestionnaire de téléchargement le plus puissant et populaire (Internet Download Manager) qui permet d’augmenter la Lightroom 4 Serial Number Mac Keygen – The official website of CHEAP TRICK
Download Adobe Photoshop Lightroom CC 1.4 for Mac latest version free standalone offline setup. Adobe Photoshop Lightroom CC 1.4 is a powerful image editor and organizer with cloud sharing capabilities and a with range of image manipulation tools.
Adobe Photoshop Lightroom CC 1.4 for Mac Review
A powerful application for editing and managing digital images, Adobe Photoshop Lightroom CC comes with a powerful set of tools that makes it easy for the users to handle digital images with minimum efforts. It is a powerful desktop manager with that provides quick access to the digital photography and makes it very easy to migrate the catalogs to the cloud.
A powerful application with sliders and simple tools to enhance the photos and get better results. Sort images with different preferences and apply various filters to the images. Adjust light, color, tint, saturation, and vibrancy of the images. There are different geometry and optics tools as well as a wide range of options that provide easy accessibility and more control over the digital media. All in all, it is a complete environment to enhance the digital images and share on the cloud.
Features of Adobe Photoshop Lightroom CC 1.4 for Mac
A powerful image editor with graphics manipulation tools
A wide range of professional tools and cloud sharing features
Desktop photo editor with a powerful photo manager
Make various adjustments to the images using simple sliders
Built-in tips to provide a better understanding of the application
Sort images with better searching capabilities and keywords association
Use different filters, effects as well as sharpening and noise reduction features
Rotate, crop, and flip images with a wide range of other tools
Cloud support to provide mobility and quick access to the images
Built-in presets to perform quick adjustments and much more
Technical Details of Adobe Photoshop Lightroom CC 1.4 for Mac
File Name: Adobe_Photoshop_Lightroom_CC_1.4.0.0_Multilingual_macOS.zip
File Size: 1.15 GB
Developer: Adobe
System Requirements for Adobe Photoshop Lightroom CC 1.4 for Mac
Mac OS X
2 GB free HDD
1 GB RAM
Intel Processor
Adobe Photoshop Lightroom CC 1.4 for Mac Free Download
Adobe Lightroom Mac Download
Download Adobe Photoshop Lightroom CC 1.4 latest version free standalone offline setup for Mac OS X by clicking the below button.
1 note
·
View note
Text
What You Can Do to Solve Problems With Your Macbook Repair Service
Tech PlugAre you having a tough time with your Macbook? There is so much to think about if you are having trouble with your Macbook. You can get all of your questions answered at this informative site. You will have all the parts of your Macbook Repair right in front of you, making it simple for you to diagnose the problem. Whether it is a power drain, a cracked screen or a dead battery...you will know exactly what to do for your Macbook Repair.
Common Macbook repairs that many people have asked for advice on include, but aren't limited to: Flashing hard drives, memory upgrades, hard drive problems, optical drives problems, getting a new device for your Macbook, system crashes, screen freezes, and more! You will have all the parts needed to perform these common repairs at this site, so you never have to worry about finding the right parts or spending money on new device parts again. As long as you are willing to spend a little bit of extra time online, you can find the answer to any of your questions regarding your macbook.
The process for most Macbook repairs consists of three basic steps: Diagnosing the issue, removing damaged parts, and putting everything back together. Most parts and components that go into a Macbook are relatively easy to replace. However, there are some extremely hard-to-find and expensive parts that can be difficult for even the most experienced Macbook repair person. When you have a question about your Macbook repair, don't hesitate to ask online for help from other users who are also having issues with the same exact laptop.
When you are ready to take your Macbook out for a spin and you need a little bit of help, the best place to start is the official Apple support website. They have a wealth of resources including tips and tricks for the most common issues. One of the most popular problems with Macbook repair services is screen damage. If you accidentally pop the screen, you will need to take your Macbook pro in for screen replacement. The good news is that screen replacement is usually free of charge with a purchase of a new Macbook computer.
Another common problem among Macbook pros is performance related issues. Many times, users are able to troubleshoot issues by themselves, without the help of a tech. For example, installing an updated antivirus software program can improve Macbook performance. While this may seem like a strange solution, many Macbook pros swear by antivirus updates and feel that they are helpful in preventing notebook computers from crashing. If you're experiencing system performance problems that are preventing you from completing tasks like opening the Internet or watching a movie, a tech may be able to assist you with performing a basic virus update.
A third common issue for Macbook repair technicians to encounter is the difficulty of upgrading to a newer version of OS X. Apple releases an update each year, called the 'Insider' which offers users a sneak peak at what is to come in future versions. Sometimes, these updates cause instability for the Macbook Pro's hardware. In this case, a Macbook pro may need to be brought into the store to have the hardware repaired or replaced. Techs at the store may also be able to upgrade the WiFi router, wireless card, or hard drive in your Macbook Pro to improve performance. For more information visit Tech Plug .
1 note
·
View note
Text
MacBook Pro User Guide: A Complete Step By Step Instruction Manual For Beginners And Seniors To Learn How To Use The New Apple 13 And 16 Inch Macbook Pro With Macos Bigsur And Catalina Tips And Tricks
View On WordPress
0 notes
Text
Unlocking the Power of the Apple MacBook Air with M2 Chip 13.6-inch: A Comprehensive Review
Introducing the Apple 2023 MacBook Air, a remarkable fusion of portability and performance, powered by the groundbreaking M2 chip. With its 8-core CPU, up to 10-core GPU, and up to 24GB of unified memory, the M2 chip redefines speed and efficiency. Weighing just 2.7 pounds and boasting an impressively thin design, this laptop is your ideal companion for work, play, or creativity on the move. With up to 18 hours of battery life, you're free from constant recharging, and the 13.6-inch Liquid Retina display offers stunning visuals with over 500 nits of brightness and support for 1 billion colors. Whether you're editing, watching, or creating, expect vivid, true-to-life visuals. The MacBook Air empowers professionals and students alike to achieve more with a canvas for creativity. It's a revolution in portable computing, supercharging productivity and redefining what's possible. Why Consider This Product? Features and Benefits Product Quality What It's Used For Product Specifications Who Needs This Pros and Cons FAQ's What Customers Are Saying Overall Value Tips and Tricks For Best Results Final Thoughts Why Consider This Product? The Apple 2022 MacBook Air with the M2 chip is an outstanding laptop that offers numerous benefits and features that make it an excellent choice for any user. With its strikingly thin design, weighing just 2.7 pounds, this MacBook Air is incredibly portable, allowing you to work, play, or create from anywhere. The image shown is for illustrative purposes only and is not directly related to the product Backed by scientific research and evidence, the M2 chip ensures a supercharged performance, with a next-generation 8-core CPU, up to 10-core GPU, and up to 24GB of unified memory. These specifications guarantee that you can get more done faster, whether you're multitasking or running resource-intensive applications. The battery life of the 2022 MacBook Air is truly impressive, providing up to 18 hours of usage on a single charge. This is made possible by the power-efficient performance of the Apple M2 chip, allowing you to stay productive throughout the day and even into the night. Moreover, the big and beautiful 13.6-inch Liquid Retina display enhances your viewing experience with over 500 nits of brightness, P3 wide color support, and the ability to display 1 billion colors. This ensures vibrant images and incredible detail when watching movies, editing photos, or working on creative projects. Features and Benefits Strikingly Thin Design The redesigned MacBook Air is incredibly thin and lightweight, making it highly portable and easy to carry around. Its sleek design makes it a stylish companion for any professional or student on the go. Supercharged Performance with M2 Chip The Apple M2 chip offers next-generation processing power, with an 8-core CPU and up to a 10-core GPU. This ensures fast and efficient performance, allowing you to tackle any task with ease. The up to 24GB of unified memory further enhances the MacBook Air's capabilities. Long Battery Life With up to 18 hours of battery life, the MacBook Air keeps you powered throughout the day. The power-efficient performance of the Apple M2 chip ensures that you can work, play, or create without worrying about running out of battery. High-Quality Display The 13.6-inch Liquid Retina display is a standout feature of the MacBook Air. With over 500 nits of brightness, P3 wide color support, and the ability to display 1 billion colors, this display offers vibrant and detailed visuals. Whether you're watching movies, editing photos, or working on creative projects, the display delivers an exceptional viewing experience. Product Quality Apple is renowned for its commitment to producing high-quality products, and the 2022 MacBook Air is no exception. The all-aluminium unibody enclosure ensures exceptional durability, making it a reliable choice for everyday use. Additionally, the MacBook Air comes with free software updates, guaranteeing smooth and secure performance for years to come. 256Gb Check here 512Gb Check here What It's Used For Productivity and Work The MacBook Air is the perfect tool for boosting productivity and completing work tasks efficiently. With its supercharged performance and long battery life, you can easily handle demanding workloads, multitask with ease, and run resource-intensive applications. The portable design allows you to take your work anywhere, whether you're at home, in the office, or on the move. Creativity and Multimedia For creative professionals or enthusiasts, the MacBook Air provides an excellent platform for visual and audio creativity. The high-quality display and advanced camera allow for stunning image and video editing, while the four-speaker sound system with Spatial Audio ensures an immersive audio experience. Whether you're a photographer, graphic designer, or content creator, the MacBook Air empowers your creative pursuits. Entertainment and Connectivity The MacBook Air doubles as an entertainment hub, offering seamless compatibility with your Apple devices like iPhone and iPad. You can connect and share content effortlessly, making it easy to enjoy your favorite movies, music, or games. The versatile connectivity options, including MagSafe charging, Thunderbolt ports, and a headphone jack, provide flexibility for all your connectivity needs. The image shown is for illustrative purposes only and is not directly related to the product Education and Learning The MacBook Air is an excellent choice for students and educators alike. Its lightweight design allows for easy transportation between classes, while the long battery life ensures extended usage throughout the school day. The powerful performance and compatibility with a wide range of educational apps make it a valuable tool for learning, research, and collaboration. Product Specifications Specifications Display13.6-inch Liquid Retina displayProcessorApple M2 chipMemoryUp to 24GB unified memoryStorage256GB SSD storageCamera1080p FaceTime HD cameraAudioFour-speaker sound system with Spatial AudioConnectivityMagSafe charging port, two Thunderbolt ports, headphone jackOperating SystemmacOSWarrantyOne-year limited warrantyTechnical SupportUp to 90 days of complimentary technical supportAppleCare+ Warranty Extension Available Who Needs This The Apple 2022 MacBook Air is suitable for a wide range of users. It is perfect for professionals who need a reliable and powerful laptop for work tasks, as well as creative individuals who require high-quality visuals and audio for their projects. Students and educators can benefit from the MacBook Air's portability and versatility, enhancing learning and collaboration. Additionally, anyone who appreciates the Apple ecosystem and seamless integration with other Apple devices will find the MacBook Air a valuable addition to their tech collection. Pros and Cons Pros - Strikingly thin and lightweight design - Supercharged performance with the M2 chip - Long battery life - High-quality Liquid Retina display - Advanced camera and audio features - Versatile connectivity options - Easy to use, works seamlessly with other Apple devices - Built to last with exceptional durability - Compatibility with a wide range of apps Cons - Limited storage capacity (256GB) - Higher price compared to some alternative laptops FAQ's - Can I upgrade the RAM on the MacBook Air? The MacBook Air's memory is soldered to the logic board and cannot be upgraded after purchase. It is crucial to choose the appropriate memory configuration that meets your needs. - Can I connect external displays to the MacBook Air? Yes, the MacBook Air supports external displays and can connect to them using the Thunderbolt ports. - Can I use Windows or other operating systems on the MacBook Air? While the MacBook Air is designed to run macOS, it is possible to install Windows or other operating systems through virtualization software or Boot Camp. What Customers Are Saying Customers rave about the Apple 2022 MacBook Air, praising its incredible performance, stunning display, and seamless integration with other Apple devices. Many users highlight the lightweight and portable design, making it ideal for travel or on-the-go use. The battery life also receives high praise, as it allows for prolonged usage without needing to recharge. Customers appreciate the built-in camera and audio features, delivering exceptional quality for video calls and multimedia purposes. Overall, customers are highly satisfied with the MacBook Air's quality, performance, and reliability. Overall Value The Apple 2022 MacBook Air offers exceptional value with its impressive features, superior performance, and seamless integration with other Apple devices. While it may have a higher price point compared to some alternative laptops, the MacBook Air's quality, durability, and overall user experience justify the investment. With its versatility and suitability for various needs, the MacBook Air is a worthwhile purchase that will enhance productivity, creativity, and entertainment. Tips and Tricks For Best Results To get the best out of your Apple 2022 MacBook Air, here are some tips and tricks: - Keep your MacBook Air up to date with the latest software updates to ensure optimal performance, security, and new features. - Utilize the features of macOS, such as Siri, iCloud, and Time Machine, to simplify and enhance your workflow. - Take advantage of the seamless integration between your MacBook Air and other Apple devices for effortless file sharing, messaging, and more. - Use external storage options or cloud services to supplement the MacBook Air's storage capacity, especially if you deal with large files or media. Final Thoughts Product Summary With its strikingly thin design, supercharged performance, long battery life, and high-quality display, the Apple 2022 MacBook Air is a top-of-the-line laptop that offers exceptional features and benefits. Its lightweight and portable design make it an excellent choice for professionals, students, and creative individuals. The MacBook Air seamlessly integrates with other Apple devices, ensuring a unified user experience. Built with durability in mind and backed by Apple's reputation for quality, the MacBook Air is a reliable and long-lasting investment. 256Gb Check here 512Gb Check here Final Recommendation If you're looking for a laptop that combines power, portability, and seamless integration with the Apple ecosystem, the Apple 2022 MacBook Air is the perfect choice. It offers a supercharged performance, stunning visuals, and exceptional audio, making it suitable for a wide range of users. Its high-quality construction and built-in warranty provide peace of mind, ensuring you can rely on the MacBook Air for years to come. Invest in the Apple 2022 MacBook Air and unlock your full potential for work, creativity, and entertainment. Disclosure: As an Amazon Associate, I earn from qualifying purchases. Read the full article
0 notes
Text
10 Tips and Tricks for Improving your Google Searches
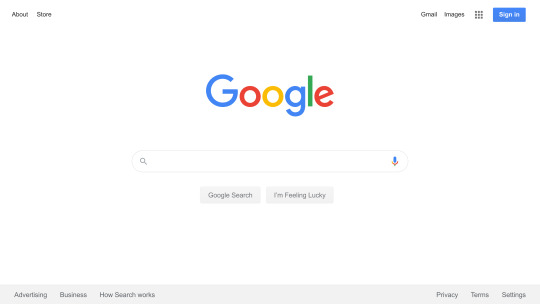
https://en.wikipedia.org/wiki/Google_Search#/media/File:Google_Homepage.svg
With the world at your fingertips, it is quite overwhelming trying to find the right thing that you’re looking for. With over 100,000,000 GB of information, Googles is the first place most people look to when trying to find specific and relevant information, but it can be quite the challenge. With these 10 tips, hopefully, searching with google can become a whole lot easier!
1. How to search for an exact word or phrase?
When looking to find a specific word or phrase, it is important to firstly make sure that your spelling is correct without any grammatical errors. But when trying to find a specific phrase, word or link of words, it is important to add quotation marks around the phrase. When doing so, you are explaining to Google that you would like to search for the phrase in its specific order as you put it. For example, when searching for a specific phrase, google will look at every search result that includes each word in the phrase, but putting quotation marks around it tells google that you are searching for the phrase in the specific order that you put it in.
2. How to search for something on a specific site?
When trying to find a recent page on a website but you just don’t seem to remember or are just looking for a specific topic on a specific site, there is one trick that is just right. When searching in googles search field, type the topic or subject of your choice followed by site: and then the website of your choice. There is no need for the http:// or www. In this instance but strictly the domain name of the website that you are searching. For example: “Covid 19 site:ryerson.ca”. This will limit googles search to just find the topic of Covid 19 on Ryerson.ca website and will exempt the rest of any other websites regarding Ryerson University or Covid 19.
3. How to correctly search for a definition?
To find the definition of a word in google, simply add the word define: before your search term. For example, if you wanted the definition of “exacerbated”, you would type in googles search field, “define:Exacerbated”.
4. Search for a specific product available within a specific price range.
When searching for products that you would like to save some money on, google created a cleaver way to make sure you stay in budget. First you have to put the item that you are looking for in the search bar followed by the minimum number of your price range followed by two periods and finally your maximum price. For example, Refurbished MacBook Pro $500..$1500. This will make google search for any links or URLs that contain a Refurbished MacBook Pro in the price range that you are looking for. This is also a great way when trying to budget your spending habits or any other ways to save money.
5. Searching for a specific filetype.
When trying to find a filetype in google, whether it be a pdf, Microsoft word document, or even a coding language file, google has made it easy by using the extension filetype: followed by the type of file you would like to find and the topic or subject of the file that you would like to search. For example, using filetype:pdf Covid 19 will strictly search for pdf files with the term “Covid 19” in them.
6. How to include or ignore words in your search?
When searching through google, it comes up many times when you hit search, and receive an abundance of information regarding other aspects of the search field that you inquired. This is because google will look at every word in the search file and try and find related information to the specific words searched. When trying to search for words with multiple meanings or that link with either another meaning or even person or product, using the “-“ symbol is a perfect way to created a more specified search by excluding words the may be irrelevant to your search. For example, when searching for a bat, google will search for both a baseball bat and the kind of animal, therefore if you would like to just search for the animal kind, the best way to search would be “bat -sport” which tells google to revoke any instance of bats that relate to the sporting equipment. The same can be done when wanting to include words to specify a search and that is done by adding the “+” symbol.
7. Finding sites/pages similar to an existing ones.
Do you ever find a website that you really enjoy, whether it be a news site or an online store and want to find content similar on other websites? Well, google has made it easy to do this by typing related: followed by the website that you like. This will tell google to find related websites and information to the one you enjoy, so if you want to find similar searches to www.apple.com, you would type, “related:www.apple.com” and google will find you related products and even other websites that may intrigue your interests.
8. How to confirm the exact form of a quote even if you were missing some of the words?
Trying to find a quote that is just on the tip of you tongue but you just don’t seem to remember is extremely frustrating. Thankfully, there are ways to find that you are looking for with a simple trick. When searching for a specific quote, song name, or other type of content, you must try to fill in as much of the words that you remember followed by an asterisks at the end. For example, if I would like to search for a quote by Albert Einstein, about a cluttered desk, but I don’t seem to remember the full quote, I would write as much as I know, which would be “if a cluttered desk is a sign of…” followed by an asterisks (*), then google will immediately find the quote which I am looking for.
9. How to search for pages containing two connected words?
Searching for pages with connecting words is simply done by adding a “+” symbol in between the two words that you are tying to look up. An example of this would be “nike+shoes”. This will revoke any other links between nike and shirts and will only specify websites that contain both nike and shoes in the link.
10. How to search for social media content containing a specific tag?
Over the last few decades, social media has taken over the internet. With new ways to connect and billions of people searching everyday, it became apparent that there needed to be a way to search for information within social media content. Therefore, the hashtag has taken up this role within most if not all social media platforms. For example, trying to find puppies on instagram? Just add a hashtag before the word (#puppies) and you will get an array of cute puppy photos from around the world.
References:
https://support.google.com
https://time.com/4116259/google-search
1 note
·
View note
Text
Cleaning Macbook Pro 2016 keyboard
Cleaning Macbook Pro 2016 keyboard The keyboard is somewhat covered. If I eat meat and the risk of cancer doubles, it does not mean that I will get sick. Doubling then means risk instead of 0.01% is 0.02%, which is twice as high but still low. If you are still noticing dust from one key to another, or if you want to make sure the cleaning is accurate, take the air can again and change the angle of the keyboard. All of the material I've listed in the previous lines is available in stores near you (both supermarkets and stores that specialize in selling PC equipment and online). If you have an Apple laptop from 2016 or 2017, we do not recommend removing the keys from your keyboard. So, I don't mean rubbing that with the damp eraser or with a glasses cleaning cloth; Joke aside, the hint with the slightly damp microfiber cloth was really good, went razzfazz unn the thing was eaten. Unfortunately, not all buttons work 100% because there is probably still liquid under the butterfly. The butterfly is difficult to remove without damaging it. Maybe someone knows a trick or a precise procedure how to expand it. I then wipe the display with the Apple cloth provided; the dust cleaning mud rest with a soft, dry cotton cloth. We are very sorry! Turn your Mac notebook to the right side and spray again from left to right over the keyboard. A technical error occurred while trying to complete your entry. We are already working on it and will be back for you as soon as possible. Take a lint-free microfiber cloth and rub it over the keyboard to remove the dust. If you want to vacuum your keyboard, you can pull a disused pantyhose tightly over the vacuum cleaner tube. Fix it with a hair tie. Now you no longer have to be afraid of accidentally sucking in important parts. Nevertheless, you should choose a low level. This may not be able to display this or other websites correctly. Choose a size and copy the code below to embed this guide as a small widget on your page / forum. A MacBook Pro was used as an example in this guide, but these techniques apply to any laptop. Well done!
You are using an outdated browser.
When you add lace to the organza, the look becomes light and fresh, which like a garden to grow on your wedding dresses.
I have not found any entry in google for this ... and only heard from others (trustworthy) that the aluminum should be really sensitive.
I only cleaned my current MacBook with water and a microfiber cloth.
Push the butterfly mechanism back in on one side and then carefully on the other side.
iFixit has a high level of competence in this area and can therefore be classified as extremely credible. So far, Apple has been relatively obscure about the revised keyboard design of the new MacBook Pro generation. It should be quieter - that was the manufacturer's only statement so far. Now Apple has also commented on the silicone cover on the butterfly mechanism that has been discovered in the meantime. Please note that the oil-repellent effect of this coating diminishes over time with normal use and that this protective effect is further reduced when the screen is rubbed with rough materials, which leads to scratches on the screen. The alternative to cleaning with a cloth or cotton swab are special compressed air sprays. Here too it should be ensured that these are explicitly suitable for electronics and are ANTISTATIC. Compressed air sprays are usually very expensive and ultimately not necessary if you follow the tips above. Many keyboards are built so that the keys can be removed individually. This works with both desktop and laptop keyboards. Some devices, especially mechanical keyboards, are even delivered with a tool with which the keys can be easily removed. For other models, you need to carefully go under the edge of a button with a butter knife and push up.
How do I switch off the laptop?
Switch off the monitor using a key combination. Laptops in particular often have function keys with "fn" on them. A common key combination for switching off the monitor is [fn] + [F6]. For some keyboards, [fn] + [F4] or [fn] + [F7] is the right key combination. div> div> div> Do not use sprays, solvents, abrasives or detergents with hydrogen peroxide as they can attack and damage the surface. If liquid gets into your Apple product, contact an Apple Authorized Service Provider or Apple Store for assistance as soon as possible. Liquid damage is not covered by the Apple product warranty or AppleCare Protection Plan. However, you may have rights under consumer protection laws.
1 note
·
View note