#Photoshop tips and tricks
Explore tagged Tumblr posts
Visit Tumblr Blog
Explore Tumblr blogs with no restrictions, modern design and the best experience.
Last Seen Tumblr Blogs


Fun Fact
Mobile US users spent an average of 115.8 minutes on Tumblr app monthly.
Text
Advanced Photoshop Techniques: Elevate Your Design Skills
Introduction
Once you've mastered the basics of Photoshop, diving into advanced techniques can significantly enhance your creative projects and workflow. These advanced skills will allow you to push the boundaries of your creativity, creating professional-grade designs that stand out. In this guide, we'll explore a variety of advanced Photoshop techniques to help you elevate your work.
1. Mastering Layer Styles and Blending Modes
Understanding and utilizing advanced layer styles and blending modes can create stunning effects and bring your designs to the next level. Layer styles like Bevel & Emboss, Drop Shadow, and Gradient Overlay can add depth and dimension to your designs. Experiment with blending modes such as Multiply, Screen, Overlay, and Soft Light to blend layers creatively and achieve unique visual effects.
2. Advanced Masking Techniques
Mastering advanced masking techniques allows for precise control over image adjustments and compositions. Using layer masks, you can seamlessly blend multiple images or selectively apply adjustments to specific areas. Refine Edge and Select and Mask tools help create intricate selections for complex subjects like hair or transparent objects, ensuring smooth and realistic composites.
3. Non-Destructive Editing with Smart Objects
Smart Objects offer a powerful way to apply transformations and filters non-destructively, preserving the quality of your original images. Convert layers to Smart Objects before resizing, warping, or applying filters. This way, you can make changes without degrading the image quality, and you can always revert to the original state if needed.
4. Creative Use of Filters and Effects
Applying creative filters and effects can transform your images and add unique artistic touches. Use the Liquify filter for surreal distortions, the Oil Paint filter for a painterly look, or the Tilt-Shift filter for miniaturization effects. Combine multiple filters and effects to develop your own signature style, and use the Filter Gallery to preview combinations.
5. Advanced Retouching and Healing Techniques
Advanced retouching and healing techniques can help you achieve professional-quality results in portrait and product photography. The Healing Brush and Clone Stamp tools are excellent for removing blemishes, imperfections, and unwanted elements. Frequency Separation is a technique that separates texture and color, allowing for precise and natural-looking skin retouching.
6. Using Actions and Scripts to Automate Workflow
Automating repetitive tasks with actions and scripts can streamline your workflow and save valuable time. Photoshop Actions record a sequence of steps that you can apply to multiple images with a single click. Scripts, written in JavaScript, offer even more advanced automation possibilities, such as batch processing and complex adjustments.
7. Creating Complex Selections with Channels
Channels provide a powerful method for creating complex selections, especially when dealing with intricate details like hair or fur. By isolating the color information in different channels, you can create precise masks. Use the Alpha channel to store and refine selections, combining them with layer masks for detailed compositing work.
8. Advanced Typography and Text Effects
Elevate your text designs with advanced typography techniques and text effects that stand out. Use Layer Styles to add shadows, glows, and textures to your text. Explore the capabilities of the 3D Text tool to create dynamic and realistic text effects. Combine text with clipping masks and layer blending modes for creative and impactful typography.
9. 3D Effects and Compositing
Explore the world of 3D in Photoshop to create immersive effects and complex composites. Use the 3D workspace to build, texture, and light 3D objects. Integrate 3D elements with 2D images to create realistic scenes. Experiment with depth maps, extrusions, and 3D layers to add an extra dimension to your designs.
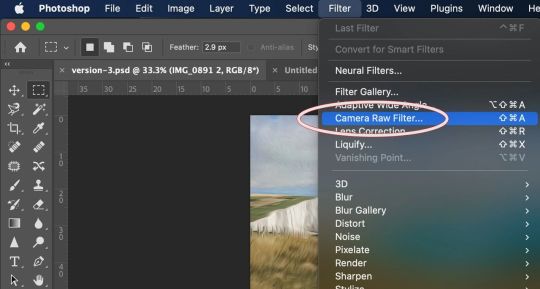
10. Leveraging the Power of Camera Raw
The Camera Raw filter offers advanced tools for photo editing, providing greater control over exposure, color, and detail. Use Camera Raw to make global adjustments, such as correcting white balance, enhancing contrast, and sharpening details. The local adjustment tools, like Graduated Filter and Adjustment Brush, allow for precise, targeted edits to specific areas of your image.
Conclusion
By incorporating these advanced Photoshop techniques into your skill set, you can push the boundaries of your creativity and produce professional-grade designs. Mastering layer styles, blending modes, and advanced masking techniques will refine your compositing skills, while non-destructive editing and automation will streamline your workflow. Embrace the power of Photoshop's advanced features, and watch your design capabilities soar.
#photoshop#onlineducation#hrishionlinebuddhi#onlinelearing#career#course#graphic design#Photoshop#graphic design tutorials#Photoshop tutorials#learn graphic design online#best graphic design software#free Photoshop course#graphic design courses#advanced Photoshop techniques#graphic design certification online#Photoshop for beginners#graphic design inspiration#Photoshop tips and tricks#online graphic design degree#how to use Photoshop#graphic design portfolio examples#free graphic design resources#graphic design trends 2024#Photoshop editing techniques#graphic design jobs
0 notes
Text
Blue Print Effect in Adobe Photoshop
#Blue Print Effect in Adobe Photoshop#how to create blue print effect in photoshop#Blue Print Effect#wireframe design#photoshop tutorial#adobe photoshop#photoshop tips and tricks#youtube shorts#shorts#shorts videos#photoshop shorts#photoshop shorts tutorial#motion graphics projects#creative motion graphics ads#promotional motion graphics
0 notes
Text
easy caustic lighting fx in PS
step 1: use simple brush to paint blobs on transparent layer

step 2: select the shapes and invert selection:

step 3: fill the inverted selection on a new layer; I did this with grey fill on a new white base layer.
step 4: apply box blur for wrinkly water effect

step 5: duplicate the layer and offset the layer position, set blend mode to Difference <- important. Repeat for a total of 3 overlapping/offset layers

step 6: merge the layers, invert, and recolor as desired (the inversion is a needless step if you hit the right colors from the start or use appropriate blend modes but i prefer to do it like this)

step 7: transform to perspective and ready to incorporate in your pic!

for reference I'm rocking an old version of PS so there's probably better ways to do it in 2025 but you work with what you got :D
59 notes
·
View notes
Text

2025 Eye Drawing Tutorial
I have made an updated eye drawing tutorial!
This is how I personally draw my eyes!
Feel free to use if you'd like! No credit needed if you use this, but it's always appreciated! 💜💙
#art#digital art#artwork#drawing#artist#artists on tumblr#art tumblr#art tips#art tutorial#drawing tips#drawing tutorial#art guide#drawing guide#tutorial#how to draw#eye tutorial#eyes tutorial#digital artist#ipad artist#digitalart#digital drawing#illustration#creator#clip studio paint#procreate#medibang#paint tool sai#photoshop#firealpaca#tips and tricks
25 notes
·
View notes
Text
youtube
How Hackers CRACK Every Software: How it’s Done
Ever wondered how hackers crack expensive software in just days? In 2013, Adobe spent millions on "uncrackable" security for Creative Cloud - only to see it broken in 48 hours. This video reveals the shocking truth about software protection and the invisible army that defeats every security measure.
#How Hackers CRACK Every Software#adobe photoshop#educate yourselves#educate yourself#free education#education#youtube#technology#hacking#tips and tricks#Adobe#hacking software#Youtube
4 notes
·
View notes
Text
one of these days im gonna sit down and watch a tutorial on how to use clip studio paint
#i still remember some stuff i learned in my photoshop class in high school which translates to csp but some of the tips and tricks escape me#carto speaks
2 notes
·
View notes
Text

How to Avoid 10 Common Mistakes in Photoshop
Photoshop is an amazing tool for creating and editing images, but even seasoned users can slip up now and then. Here are ten common mistakes people make in Photoshop and how to avoid
1. Not Using Layers Properly
Mistake: Doing everything on one layer or merging layers too soon.
Solution: Always use multiple layers and label them clearly. This way, you can tweak parts of your project without messing up the whole thing. Group your layers to keep things tidy.
2. Ignoring Non-Destructive Editing
Mistake: Making changes you can't undo.
Solution: Use non-destructive editing techniques, like adjustment layers and smart objects. These let you make changes that you can easily modify or remove later.
3. Overusing Filters and Effects
Mistake: Applying too many filters and effects, making the image look unnatural.
Solution: Use filters and effects sparingly. Small adjustments can enhance your image without overdoing it. Always compare the before and after to make sure the effect looks good.
4. Forgetting to Save Work Regularly
Mistake: Working for long periods without saving, risking loss of progress.
Solution: Save your work often. Use shortcuts like Ctrl+S (Cmd+S on Mac) to save quickly. Turn on auto-save to avoid losing work if something goes wrong.
5. Working with Low-Resolution Images
Mistake: Using low-resolution images, which leads to pixelation and poor quality.
Solution: Start with high-resolution images whenever possible. If you have to use a low-resolution image, be aware of its limits and avoid scaling or cropping too much.
6. Not Using Keyboard Shortcuts
Mistake: Relying only on menus, which slows you down.
Solution: Learn and use Photoshop keyboard shortcuts. They can make you work much faster. Customize shortcuts to fit your workflow and make things easier.
7. Skipping the Use of Guides and Grids
Mistake: Placing elements without alignment, leading to a messy layout.
Solution: Use guides and grids to align and position elements correctly. This makes your design look more professional and organized. Turn on snapping for easier alignment.
8. Ignoring Color Profiles
Mistake: Not thinking about color profiles, leading to color inconsistencies.
Solution: Use the right color profile for your project. For web images, use sRGB. For print, use CMYK. Check your color settings before starting to avoid problems later.
9. Not Backing Up Files
Mistake: Not backing up files, risking complete loss of work.
Solution: Regularly back up your Photoshop files to an external drive or cloud storage. Save multiple versions of your project so you can go back if needed.
10. Not Updating Skills
Mistake: Sticking to outdated techniques and not learning new features.
Solution: Keep learning new Photoshop skills. Watch tutorials, take classes, and stay up-to-date with new features. The more you learn, the better and more creative you can be.
Conclusion
Avoiding these common mistakes in Photoshop can save you time, improve your workflow, and help you create better images. By using layers wisely, embracing non-destructive editing, and continuously updating your skills, you'll become a Photoshop pro in no time. Happy editing!
To learn more about Photoshop skills and design check out our complete guide to mastering Graphic design skills.
#graphic desing#photoshop psd#photoshop mistake#tips and tricks#useful stuff#resource#helpful#tips#useful
2 notes
·
View notes
Text
Advanced Photoshop Tutorial: Mastering Camera RAW Filter for Photograph Enhancement
Introduction: Adobe Photoshop's Camera RAW filter is a powerful tool for enhancing the quality of your photographs. It allows for non-destructive adjustments to exposure, colour temperature, clarity, and more. In this tutorial, we'll explore advanced techniques to make the most out of the Camera RAW filter to transform your images into stunning works of art.
Step 1: Open Your Image in Photoshop Start by opening your image in Photoshop. Go to "File" > "Open" and select the image you want to enhance.
Step 2: Access Camera RAW Filter Once your image is open, go to "Filter" > "Camera Raw Filter" or use the shortcut Ctrl+Shift+A (Cmd+Shift+A on Mac) to access the Camera RAW filter.
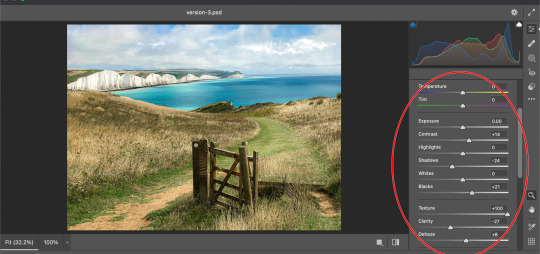
Step 3: Basic Adjustments The Camera RAW filter interface provides various panels for adjusting different aspects of your image. Start with the "Basic" panel, where you can adjust exposure, contrast, highlights, shadows, whites, blacks, and clarity. Use these sliders to balance the overall tonality and contrast of your image. Pay attention to the histogram to ensure you're not clipping any highlights or shadows.
Step 4: White Balance Next, move to the "White Balance" panel to adjust the colour temperature and tint of your image. You can use the Temperature and Tint sliders to correct any colour casts and achieve a more natural look. Experiment with different settings until you find the right balance.
Step 5: HSL Adjustments The "HSL/Grayscale" panel allows you to fine-tune specific colours in your image. HSL stands for Hue, Saturation, and Luminance. Use these sliders to adjust the hue, saturation, and luminance of individual colours. This is particularly useful for making colors pop or toning down distracting elements.
Step 6: Detail Enhancements In the "Detail" panel, you can enhance the sharpness and reduce noise in your image. Use the Sharpening sliders to increase the overall sharpness while paying attention to avoid introducing artifacts. Additionally, adjust the Noise Reduction sliders to reduce any visible noise in the image, especially in areas with low light or high ISO settings.
Step 7: Lens Corrections If your image has any lens distortions or chromatic aberrations, you can correct them in the "Lens Corrections" panel. Enable the "Enable Lens Profile Corrections" option to automatically detect and correct distortions based on the lens used. You can also manually adjust vignetting and chromatic aberration sliders if needed.
Step 8: Effects and Vignette The "Effects" panel allows you to add creative effects such as vignettes and grain to your image. Experiment with the "Post-Crop Vignetting" slider to add a subtle vignette that draws attention to the subject. You can also adjust the "Grain" slider to add texture and character to your image, especially useful for achieving a vintage look.
Step 9: Graduated Filters and Radial Filters For selective adjustments, utilize the Graduated Filter and Radial Filter tools available in the Camera RAW filter. These tools allow you to apply adjustments selectively to specific areas of your image. Use the Graduated Filter for linear adjustments like sky enhancements or the Radial Filter for circular adjustments like spotlight effects.
Step 10: Final Touches and Output Once you're satisfied with the adjustments, click "OK" to apply the changes and return to Photoshop. You can further fine-tune your image using additional Photoshop tools or proceed with any further editing. Finally, save your enhanced image in your desired format.
Conclusion: Mastering the Camera RAW filter in Photoshop opens up a world of possibilities for enhancing your photographs. By following these advanced techniques, you can take your images to the next level, achieving professional-quality results with ease. Experiment with different settings and adjustments to develop your unique style and make your photos stand out.
#my art#artists on tumblr#art#photoshop#disabled artist#photographers on tumblr#adobe photoshop#graphic design#tutorial#art tips#art resources#art help#art tutorial#art reference#landscape#digital art#photographer#original art#how to draw#tips and tricks#useful#tips
4 notes
·
View notes
Text
youtube
1 note
·
View note
Text
Career in Graphic Designing? Start with Adobe Photoshop to Level Up

Introduction
If you're thinking about a career in graphic designing, there’s no better way to begin than mastering Adobe Photoshop. This powerful software is the foundation for countless creative projects—from social media content and marketing banners to website designs and brand identity. Whether you're an aspiring designer or just someone curious about the field, learning Photoshop can be your first step toward becoming a professional graphic designer.
Why Start with Adobe Photoshop?
Photoshop isn’t just for editing photos—it’s a powerful creative tool for so much more. It’s a full-fledged design environment where you can bring your imagination to life. From beginners to professionals, it’s widely used in graphic designing courses in Delhi, and mastering it is considered a key milestone in the design industry.
Here’s what makes Photoshop essential:
User-Friendly Interface: Even beginners can quickly understand its tools and start creating.
Creative Control: Offers full freedom to design from scratch or enhance existing images.
Industry Standard: Most graphic design institutes in Delhi include it as a core part of their curriculum because it’s used across various design industries.
What You’ll Learn in a Graphic Designing Course with Adobe Photoshop
When you enroll in a graphic designing course in Yamuna Vihar or graphic designing course in Uttam Nagar, Photoshop is usually the first module. The course typically covers:
Basics of the Photoshop interface
Layering and masking techniques
Retouching and manipulating images
Creating layouts for print and web
Typography and color theory
These skills prepare students for real-world projects and help build a strong portfolio, which is essential to land freelance gigs or full-time roles.
Where to Learn Photoshop: Choosing the Right Institute
If you're looking for professional training, you’ll find a variety of Graphic Designing Coaching Centers in Yamuna Vihar and Graphic Designing Institutes in Uttam Nagar that offer beginner to advanced level courses. Opting for a reputed Graphic Designing Training Institute in Yamuna Vihar or Multimedia Training Institute in Uttam Nagar ensures you learn from industry experts with hands-on experience.
Some of the best graphic designing classes in Delhi focus heavily on practical training with Adobe Photoshop and provide certification, which adds value to your resume.
Career Opportunities After Learning Photoshop
After completing a graphic designing training course in Yamuna Vihar, doors open to various creative job roles such as:
Graphic Designer
Visual Designer
Photo Editor
UI Designer
Creative Executive
You can also work as a freelancer, take up online projects, or even start your own design venture. Those who pursue graphic designing diploma courses in Delhi often find roles in advertising agencies, digital marketing firms, and e-commerce companies.
Final Thoughts
A career in graphic designing begins with the right foundation—and Adobe Photoshop is exactly that. When you join a graphic designing training institute in Yamuna Vihar or graphic designing coaching centre in Uttam Nagar, you start a journey of creativity, innovation, and professional growth.
So, take your first step today. Enroll in a graphic designing course in Delhi that specializes in Photoshop and start building your future in design.
Suggested Links:
Adobe Premiere Pro
Website Designing Training
Digital Marketing
Graphic Designing
#graphic design tips#graphic design tutorials#adobe photoshop#graphic designers#photoshop tricks and tips#learn graphic design
0 notes
Text

I've only got gimp to work off of but omg there has to be a better way to get rid of this pattern than just smudging it around to look like folds for an hour
#wish I had photoshop but I aint giving adobe money#i need to learn lil tips and tricks for gimp#i mean theres gotta be an easier way right??#anyway heres a preview of some new recolors coming soon~#sims 4 recolor
0 notes
Video
youtube
Relleno Generativo con Adobe Photoshop CC - Lostanaw Studio #shorts
#youtube#photoshop#tips#tips and tricks#ai generated#retouching#photo edit#tiktok#artists on tumblr#shorts#lostanaw
1 note
·
View note
Text
🎯 Take Your Logo Design to the Next Level! Learn the secrets behind professional logo design with this FREE online course. Master advanced typography, Photoshop techniques, and converting raster images to vector shapes. Plus, discover expert tips for finding clients and setting your rates. 🚀
✨ Start today and create logos that stand out!
#tricks and techniques of logo design#free courses#logo design free course#logo design tips#graphic design course#photoshop skills#typography lovers#learn logo now#freelance tips#online learning#design community#creative skills boost#design education#free education#master logo design#next level#vector shapes#expert tips#find clients#set your rates#shine now#career boost
0 notes
Text
I wrote this article two years ago, but the tips on lighting and combining photos to create the right mood and atmosphere are still very much applicable. 📸 💡
Combining photos to achieve the desired mood 🖼️
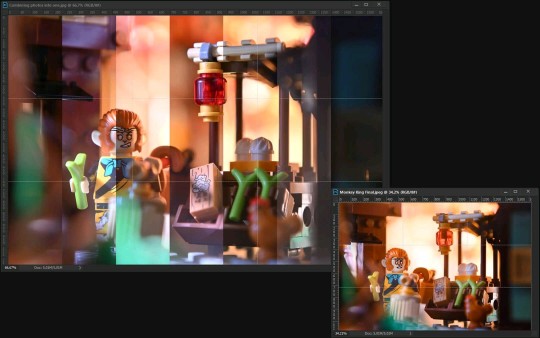
What I've learned over the last two years doing toy photography is that lighting is extremely important, but not only to make a good picture in low light conditions – it can drastically change the look and mood of the photo. However, the images don't always turn out the way I envision them.
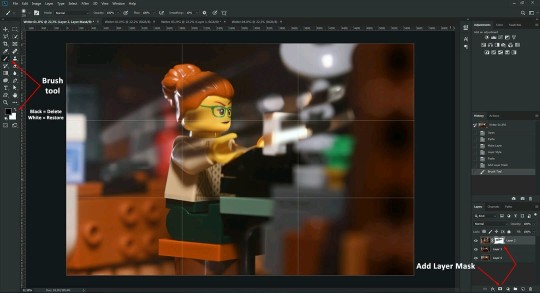
Fortunately, I found a way to overcome this problem – by combining photos in Adobe Photoshop. I wrote about it in a new article for the Toy Photographers blog.
#photo editing#photoshop#photography#photography tips#lego photography#toy photography#lego#photographers on tumblr#toy photographers#lighting#focus stacking#tips and tricks#good to know#useful
81 notes
·
View notes
Text
how to get Digital Signature - Photoshop Tutorial
Email: [email protected]
#photoshop#graphic design#designrockdh#tips and tricks#design tips#adobe photoshop#digital signature
0 notes
Video
youtube
Composition Tips for Portrait Photography you Need to Know
#youtube#portrait#composition#photography#photoshop#how to photography#learn photography#photography tips#dos and donts#compose your shot#editing#photography for all#photography tips and tricks#digital learning
0 notes