#Question and base Html Template
Explore tagged Tumblr posts
Visit Tumblr Blog
Explore Tumblr blogs with no restrictions, modern design and the best experience.
Last Seen Tumblr Blogs


Fun Fact
70% of Tumblr users say the Dashboard is their favorite place to spend time online.
Text
Terror Camp is hiring!
We are looking to expand our volunteer staff for this year’s conference.
We have two job listings based on our current needs, but if we receive a lot of great applicants there is the possibility we’ll split up these responsibilities into 3 or even 4 separate positions.
Terror Camp is a fully volunteer, remote, asynchronous workplace (with occasional sync meetings as schedules permit). We communicate over Discord and organize our documentation over Notion and Google Drive.
We are looking for people who can devote up to a few hours a week, depending on the time of year. Commitment increases around the times of Submission Opening (June 1), Submission Closing/Acceptances (September 1-Oct 1) and the conference itself (early December).
Terror Camp looks great on your resume. You can say that you volunteer for a successful community-led online history & heritage conference with an audience in the thousands!
You don’t need to match the job descriptions perfectly in order to apply. If your experience doesn’t match up but you think you’d still be good at the job, please apply anyway!
Here are the positions we're looking to fill:
🎨 Designer 🎨
Terror Camp is seeking a dedicated Designer who will:
Ideate and deliver a new evergreen brand identity for TC that can be revamped and reused each year
Including logo, logotype, color scheme, font families, and other brand assets for use on web, social media, and printed merch
Be an proactive team member with strong communication skills, able to quickly and regularly deliver new graphics for promotional use on social media and in email marketing
Help design an evergreen/permanent collection of merchandise as well as a limited-edition collection for this year’s conference
Assist our Webmaster in revising our website & email marketing templates to fully match new brand identity and meet best practices for UX
Potentially work on print layout for a Terror Camp book or zine (TBD)
This job would be a good fit if you:
Work or have worked professionally or semi-professionally as a graphic designer; or are a hobbyist designer with a standout portfolio
Have experience working with both digital and print assets
Have a working knowledge of web design best practices and HTML/CSS
Have experience with Photoshop, Illustrator, InDesign, Canva (but not ONLY Canva, sorry) and Wix or similar WYSIWYG ESP/site builder
The Designer will report to our Assistant Director/Webmaster, & will also collaborate closely with our Marketing Lead on graphic assets for social media and with our Merch Lead on preparing designs for print.
To apply, please fill out this form.
💬 Communications Coordinator 💬
Terror Camp is seeking an enthusiastic Communications Coordinator who will:
Own Terror Camp’s main email inbox and oversee all direct communication with attendees and interested parties
Respond promptly to inquiries including:
Requests for past recordings
Requests to join the Discord
Questions about schedule, programming, submissions, guests, and other conference topics
Catch inbounds to social media inboxes (Tumblr, X, Bluesky, Insta) & answer or redirect to email as appropriate
Act as coordinator/assistant for Marketing Lead, with responsibilities including:
Scheduling pre-written content
Assisting with ideating and drafting content, proposing content ideas
Cross-posting content to multiple platforms
Consistently and frequently engaging with social audiences (finding content to repost, replying to people, etc)
This job would be a good fit if you:
Work or have worked in any digital customer-facing environment; have experience with support tickets and/or ongoing user communications; have run social media for brands or institutions; are an efficient and clear writer able to work creatively within brand voice guidelines
Have successfully and sustainably moderated Discord servers, Tumblr communities, social media for other fandom projects like fests, zines, and charity events
Can spare the time and attention to respond to inquiries and turn around new social media posts in a timely manner
Are prepared to represent the Terror Camp brand professionally and maturely in digital public spaces
The Communications Coordinator will report directly to our Marketing Lead.
To apply, please fill out this form.
If you have any questions about these positions, please email us at command [at] terror [dot] camp!
117 notes
·
View notes
Text


ANDROMEDA is a minimalist, flex-based skin built with responsive functionality in mind. It is optimized for Google Chrome. Unlimited multi-sale, £30.
FEATURES:
A comprehensive installation guide that explains every step from download to use.
Unlimited support for troubleshooting, bug fixes and modifications.
Variables for group colours, fonts, font sizes and more.
Fully customised HTML templates.
A light/dark toggle.
A toggle-on sidebar.
A filtered memberlist.
A fully customised UCP.
A pop-out profile.
A tabbed main profile with five sections.
Optional extra profile templates.
Before purchase, be sure to view my policies on Tumblr, and feel free to contact me for a live preview or questions. I have a support server (contact jaackaalope on discord for an invite) or can be contacted via ask here on tumblr.
Note: due to Jcink's internal tables and the customised UCP, certain functions (today's top 10 posters and sort online users by last click/member name) are not useable. They are not linked anywhere in the skin and will not impact use.
101 notes
·
View notes
Text
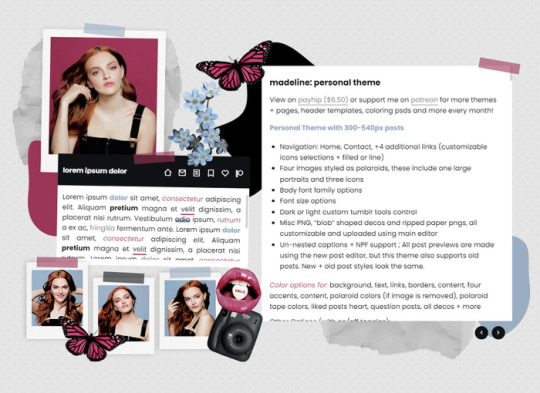
MADELINE: PERSONAL THEME BY ETHEREAL THEMES
View on payhip ($6.50), check out the preview or support me on patreon for more themes + pages, header templates, coloring psds and more every month!
Personal with 300-540px posts
Navigation: Home, Contact, +4 additional links (customizable icons selections + filled or line)
Four images styled as polaroids, these include one large portraits and three icons
Body font family options
Font size options
Dark or light custom tumblr tools control
Misc PNG, "blob" shaped decos and ripped paper pngs, all customizable and uploaded using main editor
Un-nested captions + NPF support ; All post previews are made using the new post editor, but this theme also supports old posts. New + old post styles look the same.
Color options for: background, text, links, borders, content, four accents, content, polaroid colors (if image is removed), polaroid tape colors, liked posts heart, question posts, all decos + more
Other Options (with on/off toggles):
Blog Title
Sharpened images (large polaroids are slightly rotating which can cause blurriness)
Do edit any feature to make it your own.
Don’t use as base code, remove credit or claim as your own.
Everything you see can be edited including colors, texts and much more. This theme was made with personal (and muse / rp) blogs in mind.
Basic HTML to edit, all info is on the main editor, so no html needed! Please reblog or like if using. And let me know if you come across any issues.
#personal theme#muse theme#contained theme#rpt#codingcabin#dearindies#personal#rp#themes#all#madeline#muse*#personal*#contained*#premium theme#ethemes#all*
82 notes
·
View notes
Text
An Unhappy Announcement
Now that round four is over, Sam has decided to step down as a bingo mod. I know I speak for myself and Raven when I say that they will be greatly missed – Sam, your help has been invaluable these last three years, and we are lucky to have had you join us!
A Slightly Happier Announcement
In light of the above, we are looking for someone new to join us! You can find information about what modding our little fest entails below the cut, so if you want more information or think you might be interested, you can drop us a message here, on discord, or via email.
The basics of modding bingo:
We work largely in canva (for making the cards) and google forms (for sign ups and fill submission) and sheets (for tracking participants and fills). That said, you don't need a whole lot of experience with any of these things: we've got handy-dandy templates set up on canva for the cards, and I like to think the spreadsheets are as close to foolproof as a spreadsheet can get (though if you happen to open any of them and immediately find a better way to do something, I'm very happy to listen).
We get a lot of sign ups in January, and then a steady trickle for the rest of the year. The sign up spreadsheet randomly selects prompts based on the categories someone picked, we check the list over to make sure there's a decent number of their wanted prompts and none of their unwanted prompts on there, then copy it to the tracker spreadsheet, pop the prompts onto the template in canva, and then email out the card.
February onwards, the bulk of the work is the tumblr queue. There's a formula on the tracker spreadsheet that puts all the info from the fill submission form into a nice neat html format that we copy to a tumblr post. It's not difficult, but it can be a bit time consuming.
Badges: so far, I'm the one who has done the badges, but if someone artistically inclined wants to volunteer I would be very happy to have the help. We do three main badges (participation, bingo and blackout) and a minimum of five bonus badges (one every two months). In an ideal world, these would go out throughout the round, but those of you still waiting for your round three badges know that this is very much not an ideal world…
Discord stuff: all our participants are lovely people, so mostly all that's required here is answering the occasional question. There's no real requirement for you to be an active participant in the main discord server, though we have a few mod channels where we discuss the technical side of running things and make sure we're all on the same page, plus figuring out what we're doing for bonus badges and card designs and whatnot. It's a nice, easy way for us to communicate with each other, but if you desperately don't want to join I'm sure we could find a way around it.
Think some/all of the above sounds like it might be in your wheelhouse? Drop us an email, or send us a DM here or on discord!
18 notes
·
View notes
Text
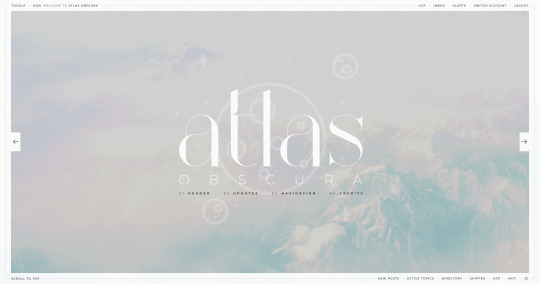


ATLAS OBSCURA (60$)
ATLAS OBSCURA is a fully flex skin optimized for Chrome but has been adjusted for compatibility across Firefox and Safari. A low contrast, dark background is recommended. A live preview can be requested at any time through my support discord. PURCHASE HERE: https://ko-fi[DOT]com/s/740013f3a4 WEBPAGES HERE: https://ko-fi[DOT]com/s/07654e42a0 TEMPLATES: https://ko-fi[DOT]com/s/020489ee5a
Includes:
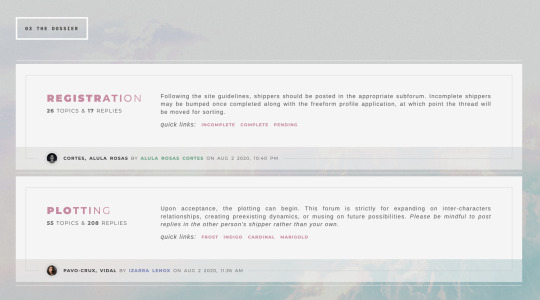
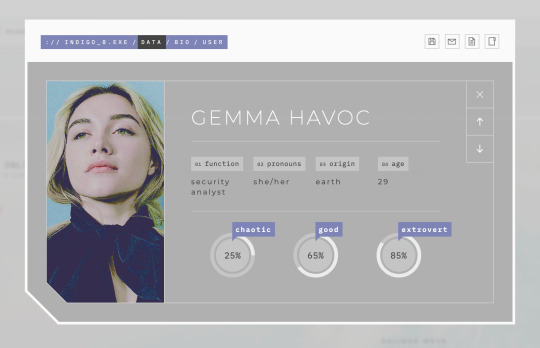
light/dark toggle sidebar that auto transitions to a module for mobile custom forums, topics, memberlist, posts (optional larger post avatar with sticky) tabbed, popup application profile member group colors set up across the skin css variables set up for images, fonts, and colors for ease of editing guest to member links on login for easy navigation various indicators for messages/alerts customized tooltips tabbed header basic post template with all basic styles (bold, italics, h1 through h7, blockquote, hr, lists, etc)
Files:
full xml file html templates xml file easy to import field set json file general installation guide pdf skin specific instructions with member group prefix/suffix codes and user fields
Policies:
credit must remain intact and unchanged you may not claim my codes as your own at any point, nor may they be used as a base for other projects I offer unlimited support for bugs present at purchase
Please review the rest of my my policies prior to making any purchases: koncodes[DOT]tumblr.com/policies For questions or a live preview, you can contact me through ko-fi or my support discord: discord[DOT]gg/MXD5nDgDzq
153 notes
·
View notes
Note
Hi there !! I absolutely love warrior cats and roleplays based off/inspired by it, however the only roleplays I've ever really been in have been a) in Amino (that godforsaken site/j) and b) in discord servers. Do you have any tips for forum roleplays specifically ?
Absolutely! Forum roleplays can be a little different from Discord or Amino, but they offer a lot of benefits, especially for organization and long-term storytelling. Here are some tips to help you get comfortable with forum RP:
Think of It Like a Bigger Discord – Instead of category's you have boards and instead of channels you have threads with posts inside of them!
The Participation Button – This lights up when you have new responses in threads you're involved in, making it easier to keep track of your active roleplays.
Bookmark Important Threads – bookmarking key threads (like plot updates, character sheets, or guides) can help you find them quickly - this is like your own personal list of every important thread you have.
Take Advantage of Thread Flexibility – Unlike Discord, where everything moves fast and can get lost in scrolling, forums let you have long-term threads that stay organized. You can have multiple threads for the same character in different locations, all happening at different points in time.
Use Formatting & Posting Templates – Many forum roleplayers use HTML or BBCode to format their posts, making them visually appealing. Don't worry if you're not familiar with them—many people create templates that you can simply copy and paste. It's an optional feature, not a requirement, but some players enjoy it as an added perk!
Keep up with active posts! – Forums often use "Recent Threads" or "Recent Posts" sections where you can see what's new across the whole board.
Character Trackers Are Your Friend – Since forums allow for more long-term development, many players keep a tracker thread for their characters to organize their relationships, plots, and ongoing threads.
Don’t Be Afraid to Ask Questions – Forum RP can seem overwhelming at first, but I promise it's not as daunting as it looks, and the benefits are amazing!
You'll get the hang of it in no time! Forum RP really gives you a lot of flexibility with character development and world-building. We also have a new member guide on the site to help out anyone new! 😊
14 notes
·
View notes
Note
Hi!! Sorry if this is a weird question and u don’t have to answer it but how did u do the moodboard/visual media thingie on ur office gossip nanami fic? Do u have a tutorial/tips? You’re one of my favourite writers by the way ur nanami fics are so good 😘😘
omg thank you soooo! 🤍 it's not a weird question at all, and i hope i'm able of explaining everything! (@gothsuguru i'll tag you since you mentioned the layout, feel free to ignore!)
so a tip i'll give anyone before starting to edit is just to stop and visualize what you would like to do. this fic is an office au and the main character is a mess, so i just thought her home screen would be painful to look at and things evolved from there.
your best friend is pinterest, ibis paint, photopea and deviantart. you can use any other editors of course, go with what makes you more confortable, but i use photopea a lot for college and i personally think it's pretty easy for everyone to use + it's free.
on deviantart you will look for templates (as in: "playlist template", "instagram feed template", etc.), pngs, textures, all those things that will make the base of your edit.
pinterest you will go for both inspiration and what will give flavor to it. like i used a gallery template, and on my many pinterest board i chose what would fit it better.
on photopea/photoshop you will open the template you downloaded and play with it. you will add photos, text, etc. don't be afraid of making something wrong. all you need to do is ctrl+z and try again. if you're not familiar with it, explore, try to look at some tutorials on yt, have your fun.
then on ibis/color pallete sites you will find the color you want everything to be, use the hex code to edit, and give the final touches.
when it comes to the dividers, i make them on ibis. i just paint it with the two colors i want my gradient then change the pencil to the blur and... well, blur.
for you to get the perfect colors, i mostly just fuck around with rgb until i get the ones i like the most.
and the gradient texts i use those two sites: this one to copy the html code at the end and this one where i replace ; with blank space (literally put nothing on the second box and hit replace text then copy).
my tip is that you go on tumblr, create a post, change the configuration on the post to html, paste the code, save as a draft. then hit on edit to open the draft, copy the text already with the gradient, and add it to the post that it'll actually be on.
i say that because if you change the configuration to html it'll fuck whatever photos you had on it, so for me it's way more practical to have a draft where i just drop any gradient codes and simply copy it.
from the 12 posts on my draft at least five of them look like that:

#so was it helpful? i don't fucking know#it feels so weird to explain it in text#if you have any doubts just tell me#the gradient thing is super easy really i probably just made it sound awful#ask box
6 notes
·
View notes
Note
Hi! Gonna start off and say that I love the work you're doing with the Welcome Home neocities website! It's perfectly stylized for the project/puppet show and I can see the work you're putting into it.
I'd love to learn how to make my own neocities website (for fun? For a personal project??), so I was wondering if you could provide some tips and/or pointers for a first-timer.
Thank you!
HAHA well first of all i'm flattered that someone would think i'm skilled enough to be giving pointers in the first place. i still consider myself a novice when it comes to web design (for example, if you're wondering why every page on welcome to welcome home has its own CSS, it's because CSS is Way harder for me to wrap my head around than HTML) so i can't give any Super advanced tips, but i can at least write about what's helped me so far:
GUIDES. neocities has its own tutorial and list of HTML/CSS resources, but user-made guides are your best friend when it comes to figuring out where to go from there. a.n. lucas and pauli kohberger both have really good guides for beginners, but for the more advanced stuff, i found myself referencing the resources on solaria's webspace and sadgrl.online the most. w3schools is also very helpful when it comes to answering more specific questions like "how do i use two different fonts on the same page?" (and probably more.) if all else fails, then usually just googling "how to (x) in HTML" or "how to (x) in CSS" will yield at least one useful result. for making your website more accessible, there's the accessible net directory and this masterpost by foxpunk on tumblr.
it sounds obvious, but it helps to have a solid idea of what kind of site you want to build before you actually dive in, and then snoop around on neocities to get an idea of how other users approach the same topic. for example, i got the idea to start a welcome home wiki on neocities after being reminded of the 8:11 wiki on the same site, and then i spent a couple days just looking up stuff like "wiki" or "fansite" on neocities and then clicking on any page that caught my attention to study it.
layouts! there's no shame in using a premade one, and you can even learn more about HTML/CSS in real time just by messing around with the base code before implementing any intentional changes. sadgrl.online's layout builder is a VERY popular choice, since you can already do a lot with the basic options it offers and it's easy to further customize once you have it set up on your page; it's what i used to make welcome to welcome home. sadgrl.online's webmaster links also feature a bunch of other options under the "layouts" tag, and if none of those work for you, then you can even find something just by looking up template/templates/layout/layouts/HTML/CSS on neocities itself.
side note: if you're reading this and you want to make a wiki then you can also use this wikitable code. it came out after i had already established the Look of welcome to welcome home, so i probably won't implement it any time soon, but i TOTALLY WOULD HAVE if it was around when i first set the site up.
you can scale images up or down using percentage, with 100% being the image's default size. i don't know how helpful or acceptable that is, but i use it a lot.
don't feel pressured to get everything done at once, even if you expect people to be visiting your site frequently. usually if you just slap on an "under construction" gif or even just write "hey this site is still under construction" then people will understand. i don't think i've ever seen anyone get super huffy about slow updates on neocities, anyway.
EDIT: OH. GRAPHICS. i mention all of these on welcome to welcome home's front page but i Also wanted to note them here: betty's graphics and websets by lynn both have HUGE collections of background tiles and other graphics that work especially well if you're going for that old web charm. i also like to use this mirror of patterncooler for backgrounds bc of the customization options. you can also make your own background tile and then use a seamless tile maker like this if all else fails.
EDIT 2: ALSO. obviously. do not be like me and use discord or any other chat client as a filehost, no matter how promising it looks, because one day you WILL get a very nasty surprise when the request signature on those urls expire and the images are no longer accessible on other sites. there are a myriad of other filehosts out there, but personally i recommend file garden (and also donating to file garden if you can, even if only for a couple months. i know i said that just yesterday, but if it gets more folks to subscribe then i'm gonna keep saying it.)
#imaginatorofthings#ask#welcome to welcome home#web design#? yeah i'll slap that tag on there why not#neocities
20 notes
·
View notes
Note
The timeline thing is a godsend!! Is there any chance or you creating one that is year based, instead of days? This is more intuitive than any other writing/plotting timeliness I've been able to find.
Hi, thank you and I'm glad this is (somewhat) helpful to you!
To be entirely honest, the timeline I am using for my own story purposes got even MORE insane with even more options, and I've been wanting to share that template as well. But unfortunately... Making it "I don't know how to code 😭" friendly is insanely hard (even more so because now I'm using a python script to automatically generate the main HTML file out of sub-files + a number of parameters that can adjust things such as which time period is shown, how wide/thin the time scale is, custom elements for the size of icons and such, etc, and ALSO by far the most important detail, my timeline now actually has a smooth transition between day X and day X+1 instead of having a blank that creates an offset every time the clock strikes midnight, I'm so sorry that the currently downloadable version has that issue in horizontal mode), and unfortunately I just don't have the free time to make that right now (<- PhD student with way too many side projects).
I could try sharing the current state of my timeline as it is now, but I don't want to do that because it's like. full of spoilers for my own fanfic for obvious reasons lmfao. So for the time being I guess I can just share a screenshot of what it looks like and just how insane I am:
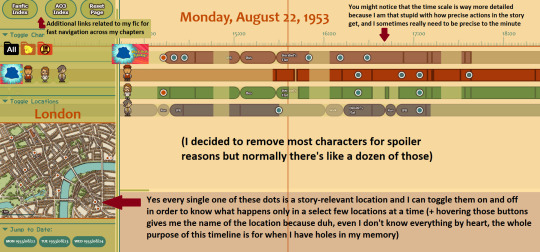
Regarding your question on the time scale: you could change that yourself by changing the contents of the svg file named "scale.svg" in the chr folder. It is actually a text file, not an image, and hopefully the logic behind it can be guessed easily enough! So if you know what exactly you want, and if you're willing to risk tinkering with it yourself, you can make a backup of that file, remove/change a few lines of code in the scale.svg file (don't rename it or move it around, change exclusively the file "scale.svg"), then reload your main timeline HTML page in order to see what that does.
The numbers in that file are X/Y coordinates for the most part, so by adding/moving/removing vertical bars, you could transform that 24-hour scale into a year scale. I guess it's convenient that a day has 24 hours and a year has 12 months! You could start first by deleting one in two hour bars and renaming the labels from "XX:XX" to month names. After that if you want to add the days... Well, it'll be trickier, but hopefully you'll have figured out a bit better how the logic of that file works so you'll be able to add these smaller day marks through a bit of trial and error.
......After looking at the state of my SVG file actually that might be a bit trickier. However, I have good news for you: you can copy-paste the code into the website SvgPathEditor in order to make your editing process much easier! All you have to do is copy-paste only the part of the code that looks like "M0 20 0 50M300 20 300 50M600 20 600 50M900 20 900" (the logic here is "M 0 20 0 50" = one vertical bar that starts at coordinates (0, 20) and ends at coordinates (0, 50), so it's just a list of the vertical bars one after the other. Sorry it's much less clear than I remembered it ^^')
(EDIT: I just hope you don't need to account for leap years, because due to the way the timeline is coded, I don't think it can afford to do that unless you make your scale so that it works by four years instead of only one. And let's not even get started on the "sometimes it's a new century so there's no leap year but some centuries do start with a leap year anyway" rule.)
All that being said, thank you again for your kind message, I'm sorry I can't do more than that for the time being (and you shouldn't hold your breath waiting for an update, I honestly don't know when / if it will ever have the time to happen :')), and good luck! I hope what I gave with the current zip file + this reply's advice will be good enough for you.
(EDIT²: For people who never heard of the original timeline post, here it is! It's a tool I made forever ago that lets you create a timeline in order to keep track of what each character does at what time in your own stories.)
14 notes
·
View notes
Text
Will AI Replace Frontend Developers? Myths vs. Reality

With tools like ChatGPT, GitHub Copilot, and website builders becoming more advanced, it’s natural to wonder if artificial intelligence will eventually take over frontend development completely. Many businesses, students, and even tech professionals are asking this question.
Let’s break down what’s real and what’s just hype.
What AI Can Currently Do in Frontend Development
AI tools today can write HTML, CSS, and even simple JavaScript code. Platforms like Wix, Framer, or Webflow already allow non-coders to build websites using visual editors powered by AI. GitHub Copilot, for example, can autocomplete lines of code based on context.
These tools are great for tasks like:
Creating static website layouts
Suggesting code snippets
Fixing minor bugs
Writing repetitive functions
However, these tasks represent only a small part of what a frontend developer does. The real work goes far beyond just writing code.
Why Frontend Developers Still Matter
Frontend development isn’t just about typing out HTML and CSS. It includes thinking through user experience, performance, accessibility, responsive design, and aligning visuals with a brand's goals.
Developers also work with designers, SEO teams, and backend developers to make sure everything functions smoothly. This requires human judgment, collaboration, and real-world understanding — things AI still can’t match fully.
Understanding the Limits of AI
AI works based on patterns in existing data. It’s great at repeating what it has seen before, but it struggles with:
Making creative design decisions
Handling unexpected edge cases in user behavior
Solving problems in real-time collaboration
Understanding the purpose or business logic behind a feature
Even a simple requirement like adjusting layout behavior on different screen sizes for specific user flows often needs real testing, logic, and human touch.
Also, AI-generated code may look clean, but it can contain security flaws or performance issues that aren’t immediately obvious.
Will AI Replace Junior Developers First?
AI might impact tasks often assigned to junior developers. Writing standard form components, implementing simple layouts, or building starter templates may be automated to an extent.
But even junior developers add value through testing, debugging, and learning how to adapt solutions to real project needs. Instead of replacing them, AI can be a learning tool — helping new developers build confidence and save time.
The Role of Frontend Developers Will Change
Instead of full replacement, it’s more accurate to say the role of frontend developers is changing. They’ll increasingly work with AI, using it to speed up the routine parts of the job.
In the same way calculators didn’t replace mathematicians, AI won’t replace developers — but it will change the way they work. Adaptability and willingness to learn new tools will be essential.
What It Means for Businesses
For business owners and startups, AI in web development may lower entry costs for basic websites. But for anything custom, scalable, or built around specific goals, skilled developers are still essential.
Many businesses still rely on real experts — whether it's a software firm or a digital marketing agency Bhubaneswar — to create websites that load fast, rank well, and reflect their identity. A basic AI-built site won’t offer those deeper advantages.
In fact, some companies are already partnering with a digital marketing agency in Bhubaneswar to integrate AI tools into their workflows while maintaining the human oversight needed to produce quality, reliable outcomes.
Final Thoughts
AI is changing how websites are built, but it’s not replacing frontend developers — at least not the good ones. It’s a tool, not a substitute. Developers who embrace AI will likely be more efficient and valuable, not less.
So if you're learning frontend or running a business, don’t fear AI. Use it wisely, and you’ll get ahead instead of falling behind.
#digital marketing agency bhubaneswar#digital marketing agency india#performance marketing agency#performance marketing agency odisha#performance marketing agency bhubaneswar#online reputation management companies in india
0 notes
Text
Documentise: a neat, effective webflow website template for knowledge base websites and documentation
Any good, service, or tool requires unambiguous, orderly written documentation. Whether you are endorsing a CMS tool, digital product, app, or online service, your user experience will be much improved by a visually appealing help center. Documentise is here — a potent and adaptable Webflow Website Template meant for knowledge bases, FAQs, documentation websites, and help centers.
Get Started Now: https://tncflow.com/template/documentise/
Documentise enables teams to provide support material in the simplest, most user-friendly manner possible with a clean layout, search-friendly design, and easily managed CMS system.
Documentise what you mean?
Designed for technical documentation, product manuals, internal wikis, and client support portals, Documentise is a modern, totally responsive Webflow Website Template. For startups, CMS companies, software developers, and tech support teams looking to give their customers quick responses — without creating a custom system from scratch — this is perfect.
Documentise provides the tools you need to make documentation of features, tutorials, or a thorough FAQ section simple.
Why Documentize for Your Help Center? Teams love Documentise for the following reasons when developing or enhancing their support and knowledge platforms:
Features Fully Highlighted: This webflow template highlights the features of your documentation website in a way that the visitors can learn the usage and every detail perfectly about your documentation service.
Sleek & Premium Design: Documentise template has a clean and minimal yet modern design style. It follows the latest design trends, so your website will have a modern and premium website design.
CMS Functionality: Documentise is built using webflow CMS functionality. It allows you to publish informative blog posts, news and testimonials with powerful CMS integration.
Impressive Topics Dashboard: Streamline your documentation workflow with this user-friendly Topics page dashboard. You can easily organize content, track updates, and control publication, all in one place. Save time and improve efficiency.
Contact details: You can clearly display your information, including address, phone number and an interactive map. So, everyone can easily find and reach you.
FAQ Showcase: Our FAQ page fully highlights every detail answers the most common questions and provides valuable information.
Perfect for tech companies and CMS providers
New product startups starting from nothing
Developers of apps need user guides
Support teams and customer success programs
Internal records and onboarding manual for
Base of knowledge or FAQ systems
Dedicated Customer Support: You get exceptional support from the TNCFlow support team. Our dedicated professionals can answer your questions and ensure your online presence.
Thoughts on Final Matters Good support materials improve customer satisfaction and build confidence, not only by providing answers to questions. Building a smart, scalable, easily managed help center or knowledge base is simple with Documentise.
Join Now: https://webflow.com/templates/html/documentise-website-template
#documentales#documentation#documentário#documentary#document journal#complete#technology#tech#technique#smart tech#technoblade#techinnovation#web design#webflow#business#digital marketing agency#small business#startup#website
0 notes
Text
Consultant Website Page Template for Webflow
Online presence of a consultant is equally crucial in the digital-first environment of today as their qualifications. Whether your role is life coach, business consultant, marketing strategist, or career advisor, your website serves as your digital showhouse, presenting your offerings, highlighting your experience, and drawing fresh business. But creating a professional-looking website from nothing can be daunting, particularly if you're not tech-savvy.
Webflow templates then become rather helpful. Designed specifically for particular sectors, including consulting and coaching, they provide pre-designed, completely customisable layouts A Consultant Website Page Template for Webflow is your ideal answer if you want to start quickly, wow clients, and expand your brand without engaging a developer.
Buy Now → Webflow Consulting & Coaching Website Template

Why should one use a Webflow Consultant Template?
Among the most robust no-code website builders available today is Webflow. It combines production-ready code with professional design flexibility, so your website not only looks fantastic but also runs faultless. Webflow's consultant templates are:
Contemporary and attentive: tuned for desktop, tablet, mobile screens all sizes.
Simple Edit: Without programming, use visual editors and drag-and-drop tools.
Built using clean code and Webflow's strong hosting capability, fast-loading
Create better search visibility by customizing meta titles, alt tags, and structure.
Add blog entries, tools, case studies, booking forms, and more scalably.
Using a Webflow template provides you a solid basis to highlight your professionalism and turn visitors into clients, whether your rebranding or starting from scratch.
Webflow Consulting & Coaching Website Template - Life CoachX
One especially well-liked template among consultants and coaches is Life CoachX, a premium Webflow template created by TNCFlow. Designed especially for life coaches, career mentors, wellness professionals, and independent consultants, Life CoachX combines design, utility, and conversion optimization into one gorgeous package.
Let's investigate why Life CoachX would be the ideal fit for your consulting company.
1. Gorgeous, orderly design
The simple, understated design of Life Coach X centers your services and personality. Soft typeface, lots of white space, and well placed call-to- action buttons help to create a friendly environment that gains site visitors' trust. Like your approach of coaching, the design seems both personal and professional.
2. Designed Pre-built Pages specifically for Coaches
This template covers all the pages a coach or consultant must have on hand:
Highlights your value proposition, offerings, testimonies, and CTA on the home page.
Services Page: List your offerings, bundles, and special qualities of your work.
Booking Page: Linked with Calendly or Acuity for tools of scheduling.
Blog Page: Using insightful pieces, educate and involve your readers.
Contact Page: Map and social media links help clean form design.
Customizing any part is simple using your own text, pictures, and branding colors.
3. Mobile-optimal for clients on-the-go
Many possible customers will search your website on their phones. Life Coach X is completely responsive, meaning any device will show every page, button, and image looking great. This lowers bounce rates and facilitates user booking of a session while in motion.
4. High Conversion-Based Plans
The layout is meant to produce results. Clear call-to- action lines inspire bookings, newsletter sign-ups, and questions. Included to create credibility and eliminate uncertainty are testimonial sliders, client logos, and FAQ areas.
5. Not Required Any Programming
Webflow's visual editor will let you edit Life CoachX even if you have never built a website before. Drag, drop, type, and publish — that is rather simple. And Webflow allows you complete control over HTML, CSS, and interactions should you require more personalizing.
Advantages of applying a Webflow Template for Your Consulting Website
Not sure if a template fits you either. Using Webflow consulting templates like Life CoachX has several more advantages as follows:
Save Money and Time: Start your website in days rather than months without calling on a developer.
Start with a strong basis and work on it to match your own brand exactly.
Designed for marketing, include email campaigns, webinars, lead magnets, and more.
Driven by Webflow's lightning-fast and secure hosting, secure and fast hosting
Your site can expand with your company as it grows, always flexible.
Whether you run a full-service consulting agency or one-on-one life coach, having a strong online presence will help you stand out from rivals and establish you as a credible expert.
Who Should Apply Life CoachX?
Life Coach X is perfect for: life coaches
Executive and corporate coaches
Wellness and health advisers
Therapists and mental wellness counselors
Mentors in personal growth
Consultants in careers
Freelance mentors starting their own brands
Life CoachX will help you stand out, build trust, and increase client involvement whether your field of work is coaching, consulting, or mentoring and you wish a modern, professional online presence.
Last Notes
A good website can make a strong first impression and turn inquisitive visitors into paying customers. Especially great choices like Life CoachX, Webflow Consultant Website Page Templates help you to have a professional, functional, and beautiful online presence free from the complications of conventional web development.
Investing in a premium Webflow template makes sense whether your coaching path is just beginning or you are redesigning your present brand. All set to increase your web profile? Explore Life CoachX and other coaching models on TNCFlow right now to begin confidently building your brand.
0 notes
Text
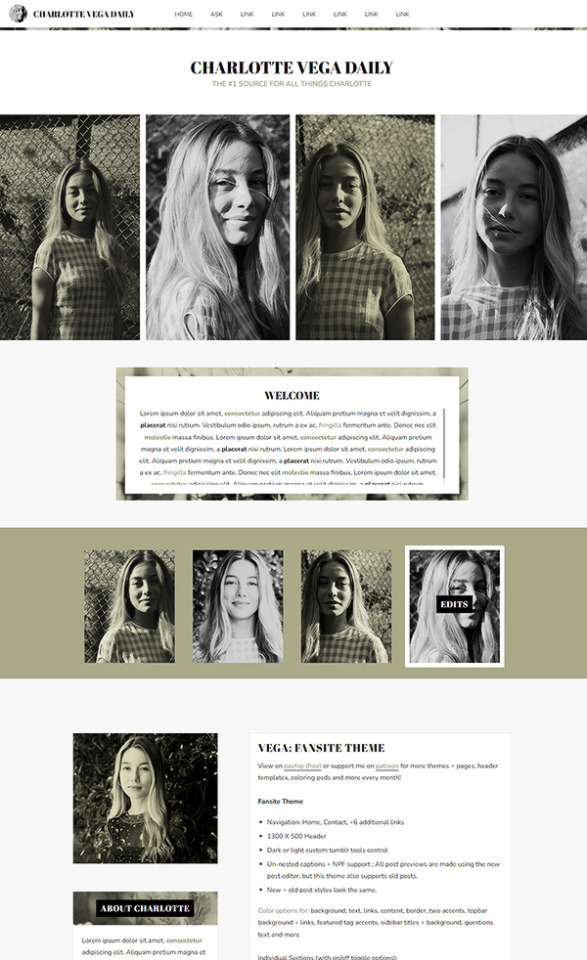
VEGA: FANSITE THEME BY ETHEREAL-THEMES
View on payhip (free) or support me on patreon for more themes + pages, header templates, coloring psds and more every month! Fansite Theme
Navigation: Home, Contact, +6 additional links
1300 X 500 Header
Body font options
Dark or light custom tumblr tools control
Un-nested captions + NPF support ; All post previews are made using the new post editor, but this theme also supports old posts.
New + old post styles look the same.
Color options for: background, text, links, content, border, two accents, topbar background + links, featured tag accents, sidebar titles + background, questions text and more Individual Sections (with on/off toggle options):
Welcome
Featured Tags with four 200x250 images
Sidebar with on/off toggle options for:
320px wide sidebar image
Biography
Official Links
Schedule
Projects with 100X100 images
Twitter feed
Members
Extra Section
Affiliates
Site Info
Disclaimer
Do edit any feature to make it your own. Don’t use as base code, remove credit or claim as your own.
Basic - Advanced HTML to edit depending on what you’re editing. There are settings in the default editor, but being a fansite theme you will need to add details such as affiliates, project details, etc. Please reblog or like if using. And let me know if you come across any issues.
#fansite theme#free theme#fansite#codingcabin#theme#themes#vega#free#header image#fixed navigation#multi size#sidebar#sidebar image#fansite welcome#featured tags#header#all#fansite*
118 notes
·
View notes
Text
How to Create Dynamic Forms in Angular
Creating forms is a common task in web development, and Angular provides powerful tools to make this process easier and more flexible. One advanced feature is the ability to build dynamic forms, which are forms that can change based on data or user actions. If you’re looking to master Angular and build such smart form systems, enrolling at the Best Angular Training Institute in Hyderabad, Kukatpally, KPHB can help you gain the right skills and practical knowledge.
What Are Dynamic Forms?
Dynamic forms are forms that are not hard-coded in the template but are created and adjusted at runtime. This means the structure of the form — the number of fields, types of inputs, and even validations — can change depending on the situation. For example, if you're building a form where the user selects a category, and based on that selection different input fields appear, you are working with a dynamic form.
Why Use Dynamic Forms?
Dynamic forms offer several benefits:
Flexibility: They allow your application to respond to user choices and backend data in real time.
Scalability: Instead of creating multiple templates for different forms, a single dynamic form can handle multiple use cases.
Efficiency: They reduce code duplication and allow you to reuse form logic across different sections of your application.
Real-World Use Cases
Dynamic forms are especially useful in applications such as:
Surveys and Quizzes: Where each question and its options are fetched from a database.
E-commerce Platforms: Where different product categories require different sets of input fields.
Custom Form Builders: That let users define their own fields and input types.
Admin Dashboards: Where settings or preferences may vary by role or department.
How Does Angular Support Dynamic Forms?
Angular provides a form system that is well-suited for dynamic behavior. With features that allow form controls to be created and managed using logic written in the component, Angular makes it possible to build forms that are generated and modified entirely based on data.
Developers can also apply validations, control visibility, and handle user input seamlessly using Angular’s form handling features.
Key Concepts Behind the Scenes
Although we’re not going into technical details or code here, it’s useful to understand the key parts:
Form Groups are used to group related fields.
Form Arrays allow multiple similar fields to be added dynamically (like a list of addresses or phone numbers).
Validation Rules can be applied to ensure users enter correct data, even for fields that appear dynamically.
By managing these structures programmatically, developers can adjust the form layout and behavior as needed without writing static HTML for every scenario.
Conclusion
Dynamic forms in Angular are a powerful feature for building flexible, responsive, and intelligent user interfaces. They help reduce repetitive code and make your application more adaptable to user and data needs. If you want to become confident in working with such advanced Angular features, consider joining Monopoly IT Solutions — a trusted institute that provides in-depth, hands-on training tailored for today’s web development needs.
#best angular training in Hyderabad#best angular training in Kukatpally#best angulat training in KPHB#web-development-angular-training
0 notes
Text
Step-by-Step Guide to Setting Up Odoo Learning Management System (LMS)
Odoo offers a powerful eLearning module that allows businesses, educators, and trainers to manage courses, lessons, quizzes, and certifications in one place. Whether you're setting up a training portal for employees or an online academy for learners, Odoo makes it easy to organize and deliver high-quality content. This step-by-step guide will walk you through how to set up your Odoo Learning Management System.
Step 1: Install the eLearning Module
To begin, you need to install the eLearning app in Odoo:
Log in to your Odoo backend with administrator rights.
Go to the Apps module.
Search for eLearning or a Learning Management System.
Click Install on the eLearning module.
Once installed, you will see a new menu called eLearning or Courses on your dashboard.
Step 2: Create a Course
After installing the module, the next step is to create your first course:
Navigate to the eLearning app.
Click Create to add a new course.
Fill in the basic course details:
Title: Name of your course.
Responsible: Assign a person or department.
Description: Write an overview of what the course covers.
Tags: Add categories to group similar courses.
Turn on or off features like Forums, Quizzes, and Certifications as needed.
Once done, click Save.
Step 3: Add Course Content (Lessons)
Courses in Odoo are structured with lessons or content blocks. Here's how to add them:
Open the course you created.
Scroll down to the Content tab.
Click Add Content.
Choose the type of content:
Document (PDF, Word files)
Video (YouTube or upload)
Quiz
Web Page (HTML content)
Enter a title, upload your content, and add any notes or instructions.
You can reorder lessons using drag and drop to match your preferred sequence.
Step 4: Create Quizzes
Quizzes help reinforce learning. To create one:
Go to the Content section of a course.
Click Add Content and select Quiz.
Name the quiz and add a short introduction if needed.
In the Questions tab, click Add a Question.
Choose question type:
Multiple choice
Single choice
Text input
Add answers and mark the correct one(s).
Quizzes can be scored, and you can define passing criteria.
Step 5: Set Up Certification (Optional)
You can provide certificates for course completion:
In the course form, enable the Certification option.
Define the criteria (e.g., complete all lessons or pass the final quiz).
Choose a certification template or create your own.
Certificates will be auto-generated and available for download in the learner's portal.
Step 6: Assign Courses to Users
You can assign users manually or allow them to enrol via the website.
Manual Assignment:
Go to the course.
Under the Participants tab, click Add.
Select users from the list.
Public Access:
Make the course Published.
Set the course as Free or Paid.
Share the link with users or embed it on your site.
Step 7: View Learner's Progress
Track how learners are engaging with your courses:
Go to the eLearning dashboard.
Click on Reports.
View:
Course completions
Quiz scores
Certification status
Time spent on lessons
You can also export reports in Excel or PDF for sharing.
Step 8: Customize the Learning Portal
Odoo allows customization of the portal interface:
Go to Website > eLearning.
Use Odoo's website builder tools to:
Customize fonts, colours, and banners
Organize course listings by categories
Add filters and search options
You can also add a blog, testimonials, or FAQ section to support learners.
Step 9: Enable Email Notifications
Keep learners informed with automated notifications:
Use Automated Actions or Marketing Automation to:
Send welcome emails
Notify learners of new content
Remind about upcoming quizzes or deadlines
Set the conditions and templates for each scenario.
Step 10: Monitor and Improve
After setup, continue improving your LMS:
Collect feedback using forms or surveys.
Analyze popular courses and content.
Update lessons regularly based on learner performance.
Offer new certifications or advanced training.
Conclusion
Odoo Learning Management System is a flexible and user-friendly tool to train employees, teach students, or deliver professional courses. With features like quizzes, certificates, progress tracking, and detailed reporting, you can build a complete learning platform that fits your business needs. Follow these steps to get started and make learning accessible, engaging, and effective for everyone involved.
#odoo learning#odoo learning software#odoo learning software management#Odoo eLearning management software#odoo#odoo app#odoo erp
1 note
·
View note
Text
The Ultimate Guide to Hiring Django Developers in 2025
If you’re building a scalable, secure, and high-performing web application in 2025, Django remains one of the best frameworks to use. But to unlock its full potential, you need to hire Django developers who understand how to use this Python-based framework to meet your business goals.

Why Choose Django in 2025?
Django is still a top choice for web development in 2025 due to:
Rapid Development: Built-in admin panel, ORM, and modular architecture
Scalability: Used by companies like Instagram, Spotify, and NASA
Security: Protection against XSS, CSRF, and SQL injections
Community Support: A mature and well-documented ecosystem
When Should You Hire a Django Developer?
You should hire Django developers if:
You need to build a custom web application or CMS
You’re planning a secure eCommerce site
You require API development for mobile/web apps
You want a high-performance MVP or startup product
You need a secure backend for SaaS or enterprise software
Key Skills to Look For
Before hiring, make sure the Django developer is skilled in:
Python programming
Django framework (ORM, views, forms, templates)
REST APIs (DRF — Django REST Framework)
Front-end integration (HTML, CSS, JavaScript, React/Angular)
Database systems (PostgreSQL, MySQL, SQLite)
Version control (Git)
Deployment (Docker, AWS, CI/CD)
Hiring Options: Freelancer vs Agency
Option Pros ConsFreelancer Cost-effective, flexible Limited availability, may lack team supportAgency (like Oodles)Scalable, full-stack team, support & QASlightly higher cost
If you want a full-cycle development solution with guaranteed timelines and post-launch support, hiring through an agency is ideal.
Interview Questions to Ask
Here are a few practical questions you can ask during the interview:
What’s the difference between a Django model and a Django form?
How would you handle user authentication in Django?
Explain the role of middleware in Django.
What are signals in Django and when should you use them?
How do you optimize Django for performance?
How Much Does It Cost to Hire Django Developers in 2025?
Freelancers: $20 — $60/hour (based on location & experience)
Agencies: $25 — $100/hour (comes with project managers, QA, and design support)
Dedicated Developer (Full-Time): $2000 — $6000/month
Outsourcing to countries like India gives you access to highly skilled developers at lower cost without compromising quality.
Where to Find Django Developers?
Freelance Platforms: Upwork, Freelancer, Toptal
Developer Marketplaces: Turing, Arc, Gun.io
Agencies: Oodles — Hire Django Developer
Job Boards: StackOverflow, GitHub Jobs, Remote OK
✅ Final Thoughts
Hire Django developers in 2025 is about more than just technical skills. You need someone who understands your business vision, works well with your team, and builds secure, scalable web applications with future growth in mind.
Whether you’re launching a new product, upgrading your tech stack, or expanding your backend, make sure you hire a Django developer who brings value from day one.
Looking to hire Django experts? Partner with Oodles for experienced Django developers who deliver quality, speed, and security.
0 notes