#Remote desktop ubuntu from windows
Explore tagged Tumblr posts
Visit Tumblr Blog
Explore Tumblr blogs with no restrictions, modern design and the best experience.
Last Seen Tumblr Blogs


Fun Fact
The KCSC sent more than 20K requests to delete posts related to prostitution and porn to Tumblr from January to June 2017.
Text
Amazon DCV 2024.0 Supports Ubuntu 24.04 LTS With Security
NICE DCV is a different entity now. Along with improvements and bug fixes, NICE DCV is now known as Amazon DCV with the 2024.0 release.
The DCV protocol that powers Amazon Web Services(AWS) managed services like Amazon AppStream 2.0 and Amazon WorkSpaces is now regularly referred to by its new moniker.
What’s new with version 2024.0?
A number of improvements and updates are included in Amazon DCV 2024.0 for better usability, security, and performance. The most recent Ubuntu 24.04 LTS is now supported by the 2024.0 release, which also offers extended long-term support to ease system maintenance and the most recent security patches. Wayland support is incorporated into the DCV client on Ubuntu 24.04, which improves application isolation and graphical rendering efficiency. Furthermore, DCV 2024.0 now activates the QUIC UDP protocol by default, providing clients with optimal streaming performance. Additionally, when a remote user connects, the update adds the option to wipe the Linux host screen, blocking local access and interaction with the distant session.
What is Amazon DCV?
Customers may securely provide remote desktops and application streaming from any cloud or data center to any device, over a variety of network conditions, with Amazon DCV, a high-performance remote display protocol. Customers can run graphic-intensive programs remotely on EC2 instances and stream their user interface to less complex client PCs, doing away with the requirement for pricey dedicated workstations, thanks to Amazon DCV and Amazon EC2. Customers use Amazon DCV for their remote visualization needs across a wide spectrum of HPC workloads. Moreover, well-known services like Amazon Appstream 2.0, AWS Nimble Studio, and AWS RoboMaker use the Amazon DCV streaming protocol.
Advantages
Elevated Efficiency
You don’t have to pick between responsiveness and visual quality when using Amazon DCV. With no loss of image accuracy, it can respond to your apps almost instantly thanks to the bandwidth-adaptive streaming protocol.
Reduced Costs
Customers may run graphics-intensive apps remotely and avoid spending a lot of money on dedicated workstations or moving big volumes of data from the cloud to client PCs thanks to a very responsive streaming experience. It also allows several sessions to share a single GPU on Linux servers, which further reduces server infrastructure expenses for clients.
Adaptable Implementations
Service providers have access to a reliable and adaptable protocol for streaming apps that supports both on-premises and cloud usage thanks to browser-based access and cross-OS interoperability.
Entire Security
To protect customer data privacy, it sends pixels rather than geometry. To further guarantee the security of client data, it uses TLS protocol to secure end-user inputs as well as pixels.
Features
In addition to native clients for Windows, Linux, and MacOS and an HTML5 client for web browser access, it supports remote environments running both Windows and Linux. Multiple displays, 4K resolution, USB devices, multi-channel audio, smart cards, stylus/touch capabilities, and file redirection are all supported by native clients.
The lifecycle of it session may be easily created and managed programmatically across a fleet of servers with the help of DCV Session Manager. Developers can create personalized Amazon DCV web browser client applications with the help of the Amazon DCV web client SDK.
How to Install DCV on Amazon EC2?
Implement:
Sign up for an AWS account and activate it.
Open the AWS Management Console and log in.
Either download and install the relevant Amazon DCV server on your EC2 instance, or choose the proper Amazon DCV AMI from the Amazon Web Services Marketplace, then create an AMI using your application stack.
After confirming that traffic on port 8443 is permitted by your security group’s inbound rules, deploy EC2 instances with the Amazon DCV server installed.
Link:
On your device, download and install the relevant Amazon DCV native client.
Use the web client or native Amazon DCV client to connect to your distant computer at https://:8443.
Stream:
Use AmazonDCV to stream your graphics apps across several devices.
Use cases
Visualization of 3D Graphics
HPC workloads are becoming more complicated and consuming enormous volumes of data in a variety of industrial verticals, including Oil & Gas, Life Sciences, and Design & Engineering. The streaming protocol offered by Amazon DCV makes it unnecessary to send output files to client devices and offers a seamless, bandwidth-efficient remote streaming experience for HPC 3D graphics.
Application Access via a Browser
The Web Client for Amazon DCV is compatible with all HTML5 browsers and offers a mobile device-portable streaming experience. By removing the need to manage native clients without sacrificing streaming speed, the Web Client significantly lessens the operational pressure on IT departments. With the Amazon DCV Web Client SDK, you can create your own DCV Web Client.
Personalized Remote Apps
The simplicity with which it offers streaming protocol integration might be advantageous for custom remote applications and managed services. With native clients that support up to 4 monitors at 4K resolution each, Amazon DCV uses end-to-end AES-256 encryption to safeguard both pixels and end-user inputs.
Amazon DCV Pricing
Amazon Entire Cloud:
Using Amazon DCV on AWS does not incur any additional fees. Clients only have to pay for the EC2 resources they really utilize.
On-site and third-party cloud computing
Please get in touch with DCV distributors or resellers in your area here for more information about licensing and pricing for Amazon DCV.
Read more on Govindhtech.com
#AmazonDCV#Ubuntu24.04LTS#Ubuntu#DCV#AmazonWebServices#AmazonAppStream#EC2instances#AmazonEC2#News#TechNews#TechnologyNews#Technologytrends#technology#govindhtech
2 notes
·
View notes
Text
Installing XRDP on Ubuntu Remote Desktop Access Easy Way

Introduction
Remote access to systems has become an essential part of today’s tech environment. Whether for system administration, remote support, or accessing files on a home server, having reliable remote desktop access is crucial. For Ubuntu users, one of the most efficient ways to achieve this is by Installing XRDP on Ubuntu.
XRDP is an open-source server that allows Linux users to access their systems via the Remote Desktop Protocol (RDP), which is widely supported by Windows and other operating systems. With XRDP, you can log into your Ubuntu machine’s graphical desktop environment from virtually any other device.
This comprehensive guide will cover what XRDP is, why it’s useful, how to install and configure it on Ubuntu, and how to ensure it runs securely and efficiently.
What is XRDP?
XRDP is a free and open-source implementation of the Microsoft RDP server for Unix-like systems, including Linux. It bridges the gap between Linux and RDP, allowing remote access to the Linux desktop using Microsoft’s native Remote Desktop client.
This means if you're using a Windows PC and want to remotely control your Ubuntu machine, you can use the built-in “Remote Desktop Connection” tool to log in and interact with your Linux desktop. That’s the power of XRDP.
Why Use XRDP on Ubuntu?
Using XRDP on Ubuntu brings multiple benefits:
Cross-Platform Access: XRDP allows users to connect from Windows, macOS, or another Linux system.
No Extra Clients Needed: Windows has a built-in RDP client, which makes it easy to connect without installing third-party software.
Multiple Desktop Environments: XRDP supports lightweight desktops like Xfce, MATE, and more, ensuring fast and smooth sessions.
User-Friendly: Graphical desktop access makes tasks easier for those less comfortable with the command line.
Open Source & Free: No licensing costs or vendor lock-in—just a reliable tool supported by the community.
Preparing to Install XRDP on Ubuntu
Before Installing XRDP on Ubuntu, make sure:
Your system is updated.
You have sudo access.
The firewall allows traffic on port 3389 (the default RDP port).
You have or plan to install a desktop environment.
This guide is tailored for Ubuntu 20.04, 22.04, or later, but the steps will work for most Ubuntu versions.
Step-by-Step Guide: Installing XRDP on Ubuntu
Step 1: Update the System
Run the following commands to update all packages:sudo apt update && sudo apt upgrade -y
This ensures the system is running the latest stable software before adding XRDP.
Step 2: Install XRDP
Install XRDP using the apt package manager:sudo apt install xrdp -y
After installation, XRDP runs automatically. You can check its status:sudo systemctl status xrdp
It should show the XRDP service as active and running.
Step 3: Install a Desktop Environment
If you're using Ubuntu Server or a minimal version without a graphical interface, install one. Xfce is lightweight and works well with XRDP:sudo apt install xfce4 xfce4-goodies -y
Other supported desktop environments include MATE, LXQt, and KDE Plasma, but Xfce is preferred for speed and compatibility.
Step 4: Configure the Desktop Environment for XRDP
Tell XRDP to use Xfce for the remote session:echo "startxfce4" > ~/.xsession chmod +x ~/.xsession
This file will be executed when you log in via XRDP, starting the Xfce desktop.
Step 5: Edit XRDP Startup File (Optional Fix)
Edit the XRDP startup script to ensure the right session loads:sudo nano /etc/xrdp/startwm.sh
Find and comment out the following lines (if present):# test -x /etc/X11/Xsession && exec /etc/X11/Xsession
Then add this line before the final exec:startxfce4
Save and close the file.
Step 6: Allow RDP Through the Firewall
Enable RDP traffic through the default port 3389:sudo ufw allow 3389/tcp
If you’re using another firewall tool, adjust the settings accordingly.
Step 7: Restart XRDP
Apply all configuration changes:sudo systemctl restart xrdp
Connecting to Ubuntu via XRDP
After installing and configuring XRDP, connect from another computer.
On Windows: Open “Remote Desktop Connection,” type the Ubuntu system’s IP address, and log in with your Ubuntu username and password.
On Linux/macOS: Use an RDP client such as Remmina, FreeRDP, or Microsoft Remote Desktop.
Upon connection, you’ll be greeted with your Ubuntu desktop environment remotely.
Securing XRDP on Ubuntu
While XRDP is powerful, security should always be top of mind. Here are best practices:
Use SSH Tunneling
Instead of exposing XRDP directly to the internet, set up an SSH tunnel to forward port 3389 securely. This encrypts your connection and reduces attack risks.
Restrict Access to Specific IPs
Use UFW or other firewall tools to allow RDP access only from trusted IPs:sudo ufw allow from 192.168.1.100 to any port 3389
Use Fail2Ban
Install Fail2Ban to monitor failed login attempts and block potential brute-force attacks:sudo apt install fail2ban -y
Enable TLS Encryption
XRDP supports TLS for encrypted communication. Set this up by creating and configuring SSL certificates in the XRDP config files.
Keep Your System Updated
Security patches and updates often fix vulnerabilities in XRDP and Ubuntu itself. Keep your system current using:sudo apt update && sudo apt upgrade -y
Troubleshooting XRDP on Ubuntu
Black Screen After Login
This usually means the desktop environment isn’t configured correctly. Verify .xsession has the line:startxfce4
Also check if the session is conflicting with another X server.
Immediate Logout
This can occur if file permissions are incorrect. Ensure the user owns their home directory and .xsession is executable.
Port Blocked
If you can’t connect, test port 3389 using telnet or nmap from the client machine. Check firewall settings if blocked.
Advantages of XRDP for Ubuntu Users
Seamless Remote Access: Provides a graphical interface without the need for SSH or CLI-based tools.
Lightweight Performance: Excellent for low-resource systems when paired with Xfce.
Reliable for Daily Use: Stable connections and session persistence.
Great for Teams: Enables multiple users to access their own sessions simultaneously.
Enterprise-Friendly: Can be integrated with Active Directory and centralized access management.
Final Thoughts
Installing XRDP on Ubuntu gives users a powerful and flexible way to remotely access their Linux systems through a graphical interface. Whether you are managing your home server, working remotely, or offering IT support, XRDP is a reliable solution that integrates easily with Windows-based RDP clients.
The steps outlined above provide everything needed to get started—from installation to configuration and security. By taking the time to set up XRDP correctly, you can ensure stable, secure, and smooth remote desktop sessions on any Ubuntu machine.
0 notes
Text
fix connecting to ubuntu remote desktop in headless/remote mode from macos using microsoft remote desktop client (which has been renamed, for whatever stupid reason, to "windows app"):
export profile
open resulting .rdp file in a text editor
change use redirection server name:i:0 to use redirection server name:i:1
delete old profile
drag now-edited rdp file into "windows app"
#for future reference#yes I did have to manually edit this link to give it a title and description.#no I have not figured out how to make that an elegant xkit extension yet.
0 notes
Text
The Benefits of Using Cheap USA Private RDP Services
In today's digital landscape, businesses and individuals alike are constantly seeking reliable and cost-effective solutions for their remote computing needs. One such solution that has gained significant traction is the Cheap USA Private RDP service. Remote Desktop Protocol (RDP) allows users to access a remote computer from anywhere in the world, making it an invaluable tool for remote work, server management, and various other applications. In this article, we will explore the advantages of opting for affordable RDP services based in the USA and how they can enhance your productivity and efficiency.
What is a USA Private RDP?
A USA Private RDP refers to a remote desktop service hosted within the United States. This means that the server infrastructure is physically located in the US, providing users with several benefits such as low-latency connections, high-speed performance, and compliance with US data privacy regulations. Private RDP services offer dedicated resources, ensuring that your computing environment is secure and optimized for your specific requirements.
Key Advantages of Cheap USA Private RDP Services

1. Cost-Effectiveness
One of the primary reasons businesses and individuals opt for Cheap USA Private RDP services is the affordability factor. Unlike traditional dedicated servers, RDP services provide a cost-effective alternative without compromising on performance. Providers like KhanRDP offer competitive pricing plans starting at just $6.00 per month, making it accessible for small businesses, startups, and even personal use.
2. High Performance and Speed
Despite being affordable, Cheap USA Private RDP services deliver impressive performance. With high-speed connectivity and minimal downtime, these services ensure seamless remote access. KhanRDP, for instance, guarantees lightning-fast speeds backed by a robust infrastructure, allowing users to stay productive regardless of their location.
3. Full Admin Access
When you purchase a Cheap USA Private RDP, you gain full administrator access to the server. This means you have the freedom to install or uninstall applications, configure settings, and customize the environment to suit your needs—much like you would on your local computer.
4. Scalability
As your requirements evolve, so can your RDP service. Cheap USA Private RDP providers typically offer scalable solutions, allowing you to upgrade resources such as RAM, CPU, or storage whenever needed. This flexibility ensures that your remote desktop can grow alongside your business demands.
5. 24/7 Support
Reliable customer support is crucial when dealing with remote services. Reputable providers like KhanRDP offer round-the-clock support to assist with any issues or questions, ensuring that your operations run smoothly without unexpected disruptions.
Why Choose KhanRDP for Your RDP/VPS Needs?
KhanRDP stands out in the market by offering a comprehensive range of RDP and VPS plans designed to cater to diverse user needs. Here’s what makes them a preferred choice:
Affordable Pricing: With plans starting at just $6.00/month, KhanRDP provides budget-friendly solutions without cutting corners on quality.
Multiple Locations: They offer RDP/VPS services in the USA, Europe, and Asia, ensuring low-latency access regardless of your geographical location.
Flexible Plans: Choose from a variety of configurations, including different CPU, RAM, SSD storage, and bandwidth options.
Operating System Variety: Users can select their preferred OS, including Windows, Linux, CentOS, Ubuntu, Debian, and Fedora.
Money-Back Guarantee: KhanRDP offers a 3-day money-back guarantee, allowing customers to test their services risk-free.
Free Trial: New users can avail a 1-hour trial to experience the service before committing.
Use Cases for USA Private RDP Services
Remote Work and Access
With the rise of remote work, having a reliable RDP service is essential. It allows employees to access office computers or servers from anywhere, facilitating collaboration and productivity.
Server Management
IT professionals can efficiently manage servers and perform maintenance tasks remotely, reducing downtime and enhancing security.
Application Testing
Developers can test applications in different environments without the need for multiple physical machines.
Data Backup and Recovery
RDP services provide a secure platform for backing up critical data and ensuring quick recovery in case of system failures.
How to Get Started with KhanRDP
Getting started with KhanRDP is straightforward. Simply visit their website, explore the available plans, and select the one that aligns with your requirements. Their user-friendly interface and responsive support team make the onboarding process seamless.
Conclusion
Investing in a Cheap USA Private RDP service is a strategic move for businesses and individuals seeking reliable, high-performance remote computing solutions. With providers like KhanRDP offering affordable, scalable, and secure options, there’s a plan suitable for every need. Whether you’re managing remote teams, testing applications, or ensuring data security, a USA-based RDP service can significantly enhance your operational efficiency.
0 notes
Text
How to Enable Remote Desktop Protocol (RDP) in Ubuntu 22.04
In this guide, we will walk you through how to enable RDP in Ubuntu 22.04, install necessary software, configure your firewall, and establish a remote connection to your Ubuntu machine from a Windows or Linux system. Why Use RDP in Ubuntu 22.04? Ubuntu 22.04 offers several methods to access a machine remotely, such as SSH or VNC. However, RDP has its advantages: Better Performance: RDP offers a…
0 notes
Text
Setting Up a Home Server: A Comprehensive Guide
In today’s digital age, having a home server can be a game-changer. It allows you to centralize your data, stream media, and even host your own websites or applications. Setting up a home server may seem daunting, but with the right guidance, it can be a rewarding and empowering experience. In this blog post, we’ll walk you through the steps to set up your very own home server.
Choosing the Right Hardware
The first step in setting up a home server is to select the appropriate hardware. The hardware you choose will depend on your specific needs and budget. Here are some factors to consider:
Processor: The processor, or CPU, is the heart of your server. Look for a processor with multiple cores and a decent clock speed to ensure smooth performance.
RAM: The amount of RAM you need will depend on the tasks you plan to perform on your server. As a general rule, aim for at least 4GB of RAM, but 8GB or more is recommended for more demanding applications.
Storage: The storage capacity of your server will determine how much data you can store. Consider using a high-capacity hard drive or a combination of hard drives in a RAID configuration for redundancy and improved performance.
Operating System: Choose an operating system that suits your needs. Popular options include Windows Server, Linux (e.g., Ubuntu Server, CentOS), or even a NAS (Network Attached Storage) operating system like FreeNAS or Synology DSM.
Setting Up the Server Hardware
Once you’ve selected your hardware, it’s time to set up the physical server. Follow these steps:
Assemble the Hardware: Carefully follow the instructions provided with your server components to assemble the hardware. This may involve installing the CPU, RAM, and storage drives.
Connect the Cables: Connect the necessary cables, such as the power cable, network cable, and any additional cables required for your specific setup.
Install the Operating System: Follow the installation instructions for your chosen operating system. This may involve creating bootable media, partitioning the storage, and configuring the initial settings.
Configuring the Server Software
With the hardware set up, it’s time to configure the server software. The specific steps will vary depending on the operating system you’ve chosen, but here are some general guidelines:
Update the Operating System: Ensure that your operating system is up-to-date by installing the latest security patches and updates.
Set Up Network Settings: Configure the network settings, such as the server’s IP address, subnet mask, and default gateway, to ensure it can communicate with your home network.
Install and Configure Services: Depending on your needs, you may want to install and configure various services, such as a web server (e.g., Apache or Nginx), a file server (e.g., Samba or NFS), a media server (e.g., Plex or Emby), or a database server (e.g., MySQL or PostgreSQL).
Secure the Server: Implement security measures, such as setting up a firewall, enabling two-factor authentication, and regularly updating your server’s software to protect against potential threats.
Accessing and Managing the Server
Once your server is set up and configured, you’ll need to learn how to access and manage it. Here are some tips:
Remote Access: Depending on your server’s operating system, you may be able to access it remotely using a web-based interface, a desktop client, or a command-line tool. This allows you to manage your server from anywhere.
Backup and Restore: Implement a reliable backup strategy to protect your data. This may involve using a cloud-based backup service or setting up a local backup solution.
Monitoring and Maintenance: Monitor your server’s performance, logs, and resource usage to ensure it’s running smoothly. Regularly maintain your server by applying updates, managing user accounts, and addressing any issues that arise.
Practical Applications for a Home Server
A home server can be used for a variety of purposes, including:
File Storage and Sharing: Use your home server as a central storage location for your files, documents, and media, making them accessible to all devices on your home network.
Media Streaming: Turn your home server into a media hub by hosting your personal media library and streaming it to various devices throughout your home.
Web Hosting: Host your own websites, web applications, or even a personal blog on your home server, giving you full control over your online presence.
Backup and Disaster Recovery: Utilize your home server as a backup solution, ensuring your important data is safe and secure in the event of a hardware failure or other disaster.
Home Automation: Integrate your home server with smart home devices and services, allowing you to centralize and automate various aspects of your home.
0 notes
Text
Linux Life Episode 84

Hello everybody and welcome back to Linux Life I admit its been a little while since I made an entry which was informing you of the death of Mangelwurzel and entry of the new Dell Inspiron 3525 I am currently using to type this article on.
Reason its been so long was I actually went back to Windows (stop spitting at back please it’s not pretty) because I wanted to play Blur and a few other games. Well I did and in that time I also tried several ways to have a Linux installation in some form of VM.
So first I used Virtualbox which is a Type 2 Hypervisor basically what that means is everything is emulated in its own little sandbox and all the hardware is virtual. I did manage to get Ubuntu Studio running but to say it was rough would be an understatement.
Virtualbox does not like KDE to say the least and it was painful to run. Also the networking was slow. Sure I could have used normal Ubuntu to see if GNOME was faster but for all I have tried it many times I really don’t like GNOME. Everything needs extensions and the interface is horrible.
Finding apps requires typing in a search because of that stupid Mac Launchpad icon design. I really detest it. I’m sure if you were using a touchscreen then it makes sense but most laptops definitely are not.
Anyway after far too many hours wasted with that I moved on to try Hyper V which is a Type 1 Hypervisor which allows much more connection to base metal components... it lets you use your actual graphics card, the hard drive can be accessed better and you have access to USB and the likes which makes it much better.
Now at the time I was using Windows 11 Home as that’s what came pre-installed on the Dell. So I had to download Hyper V as it wasn’t there by default. So first I try Ubuntu as Canonical have an agreement with Microsoft due to WSL.
Sure enough it installed and was pretty fluid but it had no sound. There was an enhanced mode which refused to work as to do so it needed RDS (Remote Desktop Support) which also prevented sound from working (Huh ?).
To get RDS you need Windows 11 Pro which Microsoft informed me if I wanted a key would be £119. Hmmm not happy obliterated Ubuntu VM. Went web-side got a Windows 11 Pro for £1.67 as it was OEM key. They key would have been £3.35 but I found a 50% off code.
After a bit of fiddling I got Windows 11 Home to go to Pro using a key to switch it then once it did that registered the new OEM key and it worked and guess what I have access to Remote Desktop Services.
So as I felt that Hyper V could cope I now tried installing EndeavourOS which installed without a single hitch. I admit the network was slow but a million times quicker than Virtualbox.
It had no issues with KDE whatsoever but once again no sound. I installed several Hyper V tools and things from the AUR. Even changed out pipewire back to pulseaudio but no matter what I did, sod all worked. RDS couldn’t see the VM even including doing the various Powershell tips.
Bugger all, now sure I could have run Endeavour without sound but I had come this far damn it. OK deleted VM. OK I now have Win 11 Pro so lets try the Ubuntu stuff again.
OK now enhanced mode shows a dialogue and when I log in screen goes black and bugger all happens. Click off enhanced mode and Ubuntu is working. Enhanced mode just black. Setup Ubuntu. reboot now enhanced mode doesn’t come up and even the VM crashes now.
This wasted too many hours and days of messing around. I even got the RDS side running but when I tried to Remotely Access using RDS it crashed. What a complete waste of bloody time.
I even tried running a Ubuntu Studio VM using VMWare Player 17. It didn’t work.
I doing think about setting up a KVM version of QEMU to run a Linux installation but guess what if you want sound on QEMU you need to get a specific version called the Screamer and it won’t let you use KVM setup meaning it wouldn’t allow you to install the Linux.
By this point I just gave up I honestly don’t care what type of Hypervisor it is I am obviously too thick to get things running as they should and I gave up.
I almost tried Proxmox and XCP-NG but upon seeing what they entailed just gave up.
After all that I thought I would leave alone and just use Windows. Then everyone started informing my Facebook had been cloned, well lets just say that didn’t happen when I had Linux.
The internet under Windows just ran slower than when I had Linux. Watching YouTube stalled regularly, downloads failed due to time out and my frustration levels were getting to breaking point.
I tried to dual boot Linux as I found out how to shrink the partition in Windows and use it for Linux installation. So tried EndeavourOS but because of the Secure boot it wouldn’t let the system install.
However for some reason Fedora will install if Secure boot is still on. So I installed Fedora Beta 40 because I wanted to try the new KDE Plasma 6. Now I know it’s beta software so not to have many expectations but most of the software I use was not in the store nor could I find the appropriate dnf installer.
However Fedora now would boot but my Windows 11 wouldn’t the partition was there but it didn’t add it to the menu so now I could load Fedora but Windows wouldn’t load.
Tried OS Prober, Grub Customizer, no matter what I did could not get the Windows 11 partition to boot or get it in the options
Pissed off now I finally turned off Secure boot. Wiped the whole hard drive and installed EndeavourOS Galileo Neo (the latest version) and set up the Dell with KDE.
It now is running on KDE 6 Plasma 6.0.2 running Wayland. It is running seamlessly, the internet is quicker. No issues with YouTube. Updating fine. When I tried KDE 5 Plasma Wayland, Steam and several other programs stopped working.
Well Steam is working fine using XWayland (a Wayland to X11 bridge) and there is a version of Cairo Dock that works with Wayland (it is experimental but so far has not died on me).
So all is right with the world in that respect. Only issue is screen capture isn’t great in Wayland but someone is working on it. OBS and other video capture work fine but screen capture programs such Flameshot, Shutter and other need work.
Well Wayland is slowly being adapted so in time I am sure these things will be fixed over the next few months as more and more main distros seem to be moving to Wayland.
It works well enough and to be honest it's even faster for program launch it seems than the original X11 which is now over twenty years old.
I am yet to try the Steam Proton games such as Path of Exile but who knows maybe next time we speak I may have done so.
So with all that madness abound I bid you farewell for this episode.
Hopefully I will try not to break anything major... until next time take care.
#linux life#ubuntu#ubuntu studio#virtualization#virtual machines#hyper v#virtualbox#wayland#x11#waffle#steam
1 note
·
View note
Text
Streamlining Server Management: Uninstalling Roles on Windows Server 2022.
In the realm of server management, efficiency is key. Whether you're a seasoned IT professional or just diving into the world of server administration, knowing how to uninstall server roles from Windows Server 2022 is an essential skill. In this guide, we'll walk you through the process step by step, ensuring a smooth transition and optimal performance for your server. Additionally, we'll explore the benefits of integrating Ubuntu Server, Linux, and Windows RDP, and even how to buy RDP for enhanced functionality.

When it comes to optimizing your server's performance, it's essential to understand which roles are necessary and which may be surplus to requirements. Windows Server 2022 offers a wide range of roles to cater to various needs, from file servers to web servers and everything in between. However, as your server evolves, so too might your requirements change. This is where knowing how to uninstall unnecessary roles becomes invaluable.
To begin the uninstallation process, log in to your Windows Server 2022 instance using Windows Remote Desktop Protocol (RDP). RDP provides a convenient and secure method of remotely accessing your server, allowing you to manage it from any location with an internet connection. If you don't already have RDP set up, you can easily buy RDP services from reputable providers to streamline your server management experience.
Once logged in, navigate to the Server Manager dashboard. Here, you'll find a list of installed server roles under the "Manage" menu. Select the "Remove roles and features" option to initiate the uninstallation wizard. From here, you can choose the specific roles you wish to uninstall, ensuring that only the necessary components remain on your server.
As you streamline your Windows Server 2022 environment, consider the benefits of integrating Ubuntu Server and Linux-based solutions. Ubuntu Server offers a lightweight and versatile operating system that is well-suited for a wide range of server applications. By installing Ubuntu on your RDP-enabled Windows Server instance, you can leverage the power of Linux alongside familiar Windows tools and environments.
To install Ubuntu on your RDP-enabled Windows Server instance, begin by downloading the Ubuntu Server ISO image from the official website. Next, create a new virtual machine within your RDP environment and mount the Ubuntu ISO as a virtual CD drive. Follow the on-screen prompts to install Ubuntu, ensuring that you allocate sufficient resources to support your desired workload.
Once Ubuntu is installed, you can access it directly from your Windows Server instance using RDP. This seamless integration allows you to take advantage of both Windows and Linux environments within the same server environment, providing unparalleled flexibility and scalability for your infrastructure needs.
In addition to optimizing your server environment, it's essential to prioritize security throughout the uninstallation process. Windows Server 2022 includes robust security features to help safeguard your data and infrastructure against potential threats. By regularly updating your server and implementing best practices for access control and encryption, you can minimize the risk of unauthorized access and data breaches.
As you fine-tune your server environment, consider the specific requirements of your organization and workload. Whether you're hosting a website, managing databases, or supporting internal applications, tailoring your server roles to meet your needs is essential for optimal performance and efficiency. By leveraging the power of Windows Server 2022 alongside Ubuntu Server and Linux-based solutions, you can create a dynamic and resilient infrastructure that meets the demands of your business.
In conclusion, uninstalling server roles from Windows Server 2022 is a straightforward process that can help optimize performance and streamline server management. By leveraging tools such as Windows RDP and Ubuntu Server, you can create a flexible and scalable environment that meets the needs of your organization. Whether you're removing unnecessary roles or integrating new solutions, prioritizing security and efficiency will ensure that your server environment remains robust and resilient in the face of evolving challenges.
0 notes
Text
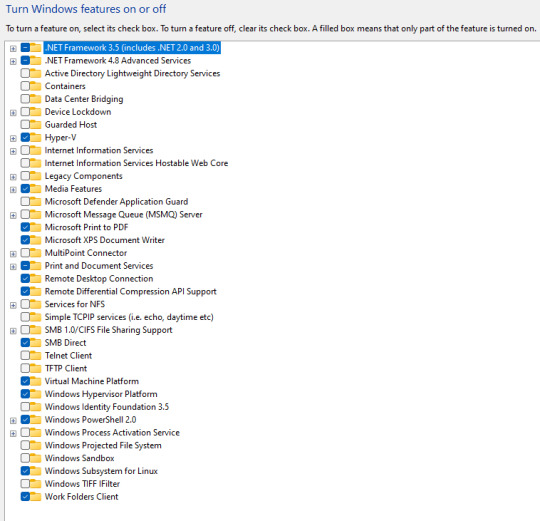
Add Lixus terminal in Windows
Enable the below feature from the start>> Windows features HYPER-V Remote desktop connection Virtual Machine Platform Windows Hypervisor Platform Windows Powershell 2.0 Windows Subsystem for Linux Now GO to Microsoft Store>> download and install the below applicationsTerminal and Ubuntu’s latest version of LTS (for ex.Ubuntu 22.04.3 LTS)Open the terminal and select Ubuntu from the…
View On WordPress
0 notes
Video
youtube
How To Make oracle cloud free vps rdp server with latest Ubuntu OS|නොමිලේ උබුන්ටු VPS එකක් හදමු
https://samuduravlogs.blogspot.com/2022/10/how-to-make-oracle-cloud-free-vps-rdp.html
මේ වීඩියෝ එකෙන් මං ඔයාලට පෙන්නන්න හදන්නේ උබුන්ටු මෙහෙයුම් පද්ධතියක් ඔරකල් සර්වර් එකකට ඉන්ස්ටෝල් කරලා රිමෝට් ඩෙස්ක්ටොප් ඇප් එක හරහා සාමාන්යය පරිගණයක් හා සමානව භාවිතා කරන ආකාරය ගැනයි.ඉතිං තමන් ළඟ ලොකු ස්පීඩ් එකක් නැති කම්පියුටර් එකක් තියෙන කෙනෙක්ට වුනත් මේ වර්චුවල් පරිගණකය හරහා ලොකු වැඩ කොටසක් කරගන්න හැකියාව ලැබෙනවා.ඒ වගේම මේ වර්චුවල් පරිගණකය නිර්මාණය කරගන්න OCPU කොර් 4 ක් වගේම 24 gb රැම් ධාරිතාවක් ඔරකල් ක්ලවුඩ් සේවාවෙන් ඔයාලට ලබාගන්න පුළුවන්.
අපි කලින් අපි හදපු වින්ඩෝස් කම්පියුටර් එකේ තිබුනේ OCPU 1 ක් එක්ක 1 GB රැම් එකක් විතරයි.නමුත් අපි දැන් හදන්න යන මේ පරිගණය ඊට වඩා ලොකු ස්පීඩ් එකක් තියෙන හොඳ ඉන්ටනෙට් කනෙක්ෂන් එකක් තියෙන කම්පියුටර් එකක්.
ඉතිං මේ වගේ පරිගණක හරහා අපිට ලැබෙන වාසි මොනවද? ඉතිං මේ වගේ වර්චුවල් ප්රයිවට් සර්වර් පරිගණක ක්රිප්ටෝ මයිනින් වලට...වීඩියෝ කන්වර්ට් වලට... තමන්ගේ යු ටියුබ් චැනල් එකේ වොච් හවර් එක කම්ප්ලීට් කරගන්න වගේම තවත් නොයෙක් කාර්යන් ගනනාවකකට පාවිච්චි කරන්න පුළුවන් ඒ වගේම මේ පරිගණක වල තැන්පත් කරන අපේ ඩේටා වලට ලොකු ආරක්ෂාවකුත් ලැබෙනවා.ඒ වගේම අන්තර්ජාලය පවතින ඕනෙම තැනකදී IP ඇඩ්රස් පාස්වර්ග් ගහලා ක්ෂණිකව මේවා ඇතුලට ලොග් වෙලා ඉහල කාර්යක්ෂමතාවකින් යුක්තව ඕනෙම ගැලපෙන ඇප්ලිකේෂන් පහසුවෙන් ඉන්ටෝල් කරගෙන තමන්ගේ වැඩක් කරගන්න පුළුවන්.
https://samuduravlogs.blogspot.com/2022/10/how-to-make-oracle-cloud-free-vps-rdp.html
In this video, I am going to show you how to install an Ubuntu operating system on an Oracle server and use it like a regular computer through the Remote Desktop app. So even a person with a computer that does not have a high speed can do a lot of work through this virtual computer. Also, to create this virtual computer, you can get 4 CPU cores and 24 GB RAM capacity from Oracle Cloud Service. The Windows computer we built earlier had only 1 GB RAM with 1 OCPU, but this computer we are going to develop now is a computer with a better internet connection and a faster speed.
#youtube#free vps serverfree vps 2021free vps hostingfree vps trialvpsfree vps for forex tradingfree vps server linuxhow to create free vps serverlif
1 note
·
View note
Text
Remote desktop ubuntu from windows

#REMOTE DESKTOP UBUNTU FROM WINDOWS HOW TO#
#REMOTE DESKTOP UBUNTU FROM WINDOWS DOWNLOAD#
#REMOTE DESKTOP UBUNTU FROM WINDOWS WINDOWS#
#REMOTE DESKTOP UBUNTU FROM WINDOWS HOW TO#
You can toggle between full screen and window mode by pressing CTRL +ALT + Enter. This tutorial will show you step-by-step and demonstrate how to install and then use the xRDP Remote Desktop software on Ubuntu 20.04 (but any flovour of Lin.
#REMOTE DESKTOP UBUNTU FROM WINDOWS WINDOWS#
N.B.:- To open the remote Windows Desktop in full screen mode, you may type the following command at the command prompt in the terminal Once the Windows desktop is opened, you can work in this box as if you are working on a real Windows machine. Now the Windows desktop will open as shown in the following screenshot. It is a cross-platform software that is freely available for personal use. Teamviewer is one of the popular remote desktop application. Now by entering the User Name and Password, and then pressing the OK button, we can log in to the distant Windows machine. Best Linux Remote Desktop Tools For Ubuntu 20.04 LTS To Share Your Desktop In 2020. Therefore, by typing the following command, I will begin the remote desktop sessionĪfter issuing the command, a Window will open with Windows login screen as shown in the following screenshot. In the following example, IP address of my distant Windows machine is 10.42.43.11. Where, IP-address is the address of the distant Windows machine on a LAN or Internet. Now you can connect to a Windows machine by typing the following command: Step 2: Access the distant Windows machine This command will install rdesktop utility on your Ubuntu machine. Click on ‘Yes’ in the message box that appears. In the session, enter the IP address of your remote Linux computer that you have noted down earlier, and click on ‘Open’. Once the terminal is open, type the following command in the command prompt Here we will enter remote Linux server Ip address in Putty. This is done from the Menu bar by navigating to Applications -> Accessories -> Terminal and then clicking on Terminal.
#REMOTE DESKTOP UBUNTU FROM WINDOWS DOWNLOAD#
To use rdesktop, you have to download it from the repository and install it on Ubuntu Linux-based machine. This utility uses Ubuntu Remote Desktop (remote desktop Linux) Protocol to connect to another machine. Highlighted is the New Connection Profile button. Screenshot of Remmina remote desktop client. After that’s loaded up, click the New Connection Profile button in the top left corner of the window. Screenshot of the Ubuntu program select menu. In this article, I’ll show you how to access a windows computer from a remote machine running on Ubuntu Linux Operating System.įrom Ubuntu Linux, you can access Windows machine using a utility called rdesktop. This is a Remote Desktop client built into Ubuntu. When such a need arises, you can connect to your Windows-based computer from a distant place by using Ubuntu Remote Desktop Protocol.Īccessing Windows computer from another Windows computer is very easy using RDP, but when you want to access Windows computer from a machine that is running on Linux, it can be a challenging task. At other times, you may need to access your home computer from a remote place. Sometimes you may not be able to go to the office and you need to access into your work computer from a distant place.
0 notes
Video
Ubuntu 20.10 Remote Desktop Access from Windows 10
0 notes
Text
Pop!_OS 22.04 LTS has landed!
Now that those bunny eggs have been painted and the afikomen has been found, it’s time to upgrade Pop!_OS! Here’s what’s new in Pop!_OS 22.04 LTS:

Automatic Updates
Update and upgrade Pop!_OS automatically from the OS Upgrade & Recovery panel in Settings! Minimize interruption by scheduling what day & time that you want your computer to perform the updates. Scheduled automatic updates include support for Debian, Flatpak, and Nix packages.
To reduce distractions, notifications for available updates are set to show weekly by default. The frequency can also be set to daily or monthly notifications. Notifications won’t show if you have automatic updates enabled. Automatic updates are turned off by default.

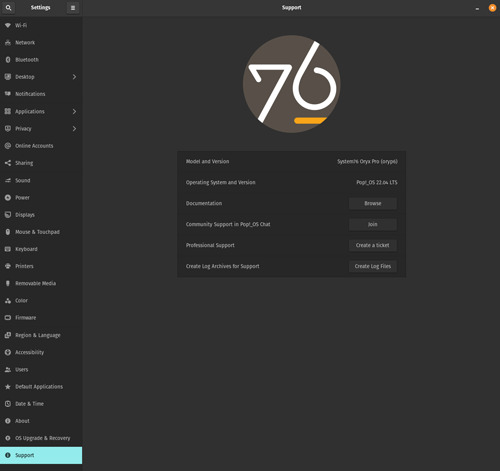
Troubleshoot from the New Support Panel
At the bottom of the Settings menu, you’ll find the new Support panel. Here, you’ll have quick access to troubleshooting resources such as:
Documentation articles for both Pop!_OS and System76 hardware on the Support Page
The community support chat, where you can get help from veteran users and report bugs directly to System76 software engineers
Professional support, where System76 hardware users can submit a support ticket to System76 Happiness Technicians (only visible on System76 hardware)
Generating log files, enabling Happiness Technicians to troubleshoot your issue more quickly and effectively
Dark vs Light Backgrounds
You can now set one Dark Mode background and one Light Mode background from the Background panel in the Desktop settings. Search for Desktop, Background, Appearance, Dock, and Workspaces directly from the Launcher for the fastest way to navigate those settings options.
Enhanced Performance with the System76 Scheduler
The System76 Scheduler optimizes performance by directing resources to the window in focus. So if you’re doing something intensive like gaming in full screen, you’ll get a much smoother experience.
A New and Improved Pop!_Shop
After some significant renovations, the Pop!_Shop is once again open for business! The updated storefront includes:
Backend code improvements for more responsive operations
Improved reliability for package operations (update, install, etc.)
UI Improvements to aid in allowing small window sizes for tiling
Update and Install buttons now also function as a progress bar
New "Recently Updated" homepage section highlighting newly added/updated apps
The result is a consistently smooth overall experience that we know you’ll love.
Switch to PipeWire for Audio Processing
To take advantage of the capabilities of modern sound hardware, Pop!_OS will now use PipeWire by default for audio processing. Software built to use PulseAudio will still be compatible with PipeWire, and this change will open up the door for better audio quality, control, and customization going forward.
Nuts and Bolts Improvements
The workspaces view has received a sizable tune-up, which includes:
Better multi-monitor support
Fixed layout on HiDPI displays
Increased performance

Additional improvements:
Installed NVIDIA drivers are now visible in Pop!_Shop, and will no longer include an “Install” button. Older drivers are also available to install, though the most recent available NVIDIA driver is recommended for most NVIDIA GPUs.
Better performance with improvements to the CPU scaling governor, which keeps your CPU running at the optimal frequency for your system.
The Pop!_OS upgrade service will now only activate when checking for or performing release upgrades. (Previously it was active 24/7.)
If your upgrade gets interrupted, debian packages are now resumable—meaning you can pick up the upgrade from where you left off.
File type for icons has been changed to .svg
Max disk capacity for journald logs is now limited to 1GB.
Added support for laptop privacy screens
RDP by default for remote desktop use
Better performance, scaling, and reliability in Pop!_Shop
Added this funky new user icon

Foundational Upkeep
Based on Ubuntu 22.04
Linux kernel 5.16.19 at release (regularly updated)
Mesa 22
Updated to the GNOME 42 base with System76 COSMIC UX
What about COSMIC DE?
It’s in progress! Our UX Team has been testing new designs, and the Engineering Team has begun packaging various elements in the new Rust code base. An alpha release for the COSMIC desktop environment could be available as early as this summer!
Note: Back up your system to a storage drive before upgrading, reinstalling, or refreshing your OS. Creating frequent backups is guaranteed to save users from the extremely rare chance of data loss and ensuing heartbreak.
How to Upgrade
IN SETTINGS
Before diving into the upgrade, open up Pop!_Shop to the Installed view and perform any outstanding updates. This will ensure a faster and more reliable upgrade.
Open the Settings application to the OS Upgrade & Recovery menu, then click the Download button at the top to download the upgrade. To apply the upgrade, click Upgrade once the download is complete.

IN TERMINAL
Open Terminal from your desktop or with Super + T. To make sure you’re fully updated before upgrading, use the commands below one at a time, pressing Enter after each.
sudo apt update
sudo apt full-upgrade
You’ll be prompted to enter your password, which will be cloaked in invisible ink as you type. This is normal. Once the process is finished, run the following command:
pop-upgrade release upgrade
As your system upgrades, you may be prompted to answer a few yes or no questions. Press Y and then Enter to continue. After a reboot and about 15 minutes, bam! Upgrade complete.
FRESH INSTALL
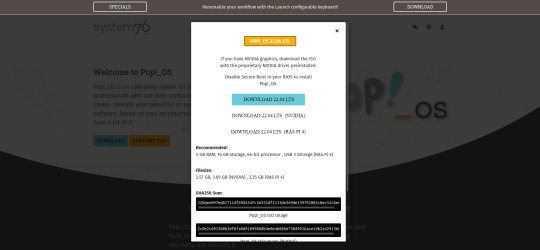
Back up your files. Then, head to this web page. Click the Download button at the top, then select Download 22.04 LTS. If you have or plan to have an NVIDIA GPU in your system, select the NVIDIA download instead. Once Pop!_OS is installed, you’ll encounter a series of prompts for setting up your operating system. Check out this article if you need guidance.
You’ve done it! Play around with all the new features Pop!_OS 22.04 LTS has to offer, and see which configuration works best for you.
#Pop!_OS#System76#linux#ubuntu#open source#open source software#software#computer#computers#STEM#creativity#creative inspiration#development#web development#game development#gaming#pc gaming#gaming pc#software development#engineering#ai#artificial intelligence#machine learning#reinforcement learning#deep learning#science#computer science#coding#coder#codergirl
59 notes
·
View notes
Text
Tap Forms Organizer 5 Database Dmg Cracked For Mac
Download GLMixer for free. Graphic Live Mixer. GLMixer performs real time graphical blending of several movie clips and of computer generated graphics. Drop video files in the mixing workspace and place them in a circular area to change their opacity. Tap Forms – Organizer Database App for Mac, iPhone, and iPad › Forums › Using Tap Forms › TB 5 for Mac Database Disappeared — Poof! This topic has 19 replies, 3 voices, and was last updated 3 years, 3 months ago by John Fineberg. A library of over 125,000 free and free-to-try software applications for Mac OS.

'I spent the last few years looking for a low-cost way to track inventory at an elementary school I work at. Most apps that seemed like they “could” get the job done, all had considerable subscription costs, and were therefore not going to work with a School’s budget. My goal was to find an app that allowed me to use the camera on my iPhone to scan the barcodes that our school uses to identify our assets to either add the item, or search for it later. Several apps that even had this, the barcode scanning was limited, not always that accurate, or didn’t allow to scan on both data entry as well as searching for it. I first downloaded TapForms on my iPhone, and as I explored through the app, I started to see that it had the features of many these ultra-expensive apps as well as features they did not have! Not only was I able to complete a full inventory in 10% of the time it took with paper, but now this year, I’m expanding all that data I collected last year, and presenting in a nice way that I can start keeping track of other things in each room that were not part of my required inventory. Many other apps I tried, if you wanted to change the form after collecting the data, it messed it all up, and I would have to re-inventory after making any adjustments to the forms. Tap Forms has blown me away in how much it can do, and I’m now buying the Mac version to expand what I can do with it a little further (printing barcodes from the records I’ve collected). This truly is a very versatile app, and it has made inventory an absolute breeze! Thank you for making such a great product, and selling it at such an accessible price.'
— Matthew Johnson
Install on your Desktop or Laptop

No internet connection required. Fully-featured and free forever.
On Mobile / Tablet?
Get these download links emailed to you so you can install later when on your desktop or laptop:
Windows
Tap Forms Organizer 5 Database Dmg Cracked For Mac Torrent
Requires Windows 7 (64-bit) or newer. If you are using 32-bit Windows, use alternative download.
Linux
Requires Ubuntu 16.04 LTS (64-bit) / Fedora 29 (64-bit) or newer
Tap Forms Organizer 5 Database
Frequently Asked Questions
Some of the more common questions we get.
Is this 100% free accounting software?

Yes. You can use the desktop edition for as long as you like, use all the features and enter as much data as required. There are no time limits, no usage limits, no ads.
If you give away your software for free, how do you make money?
Desktop edition is single-user software. Businesses requiring multi-user capabilitities or remote access will use cloud edition which is not free.
Tap Forms Organizer 5 Database Dmg Cracked For Mac Computer
If I'm working on Mac, can I send my file to an accountant who is on Windows?
Yes. Manager data is cross-compatible across all operating systems. We have a helpful guide which explains how to make backup and restore on another computer.
Tap Forms Organizer 5 Database Dmg Cracked For Mac Screen
What happens to my data when I upgrade?
Tap Forms Organizer 5 Database Dmg Cracked For Mac Download
When you upgrade to the latest version, your data will be automatically rolled-over. Still, we strongly recommend you make regular backups of your data whether you are upgrading or not.
2 notes
·
View notes
Text
Rhel Docker

Rhel Docker
Rhel Docker Ce
Rhel Docker
Rhel Docker Ce
The Remote - Containers extension lets you use a Docker container as a full-featured development environment. Whether you deploy to containers or not, containers make a great development environment because you can:
Develop with a consistent, easily reproducible toolchain on the same operating system you deploy to.
Quickly swap between different, isolated development environments and safely make updates without worrying about impacting your local machine.
Make it easy for new team members / contributors to get up and running in a consistent development environment.
Try out new technologies or clone a copy of a code base without impacting your local setup.
Rhel Docker
Rhel Docker Ce
The extension starts (or attaches to) a development container running a well defined tool and runtime stack. Workspace files can be mounted into the container from the local file system, or copied or cloned into it once the container is running. Extensions are installed and run inside the container where they have full access to the tools, platform, and file system.
Rhel Docker
Amazon Web Services (AWS) and Red Hat provide a complete, enterprise-class computing environment. Red Hat solutions on AWS give customers the ability to run enterprise traditional on-premises applications, such as SAP, Oracle databases, and custom applications in the cloud.
Windows 10 Home (2004+) requires Docker Desktop 2.2+ and the WSL2 back-end. (Docker Toolbox is not supported.) macOS: Docker Desktop 2.0+. Linux: Docker CE/EE 18.06+ and Docker Compose 1.21+. (The Ubuntu snap package is not supported.) Containers: x8664 / ARMv7l (AArch32) / ARMv8l (AArch64) Debian 9+, Ubuntu 16.04+, CentOS / RHEL 7+ x8664.
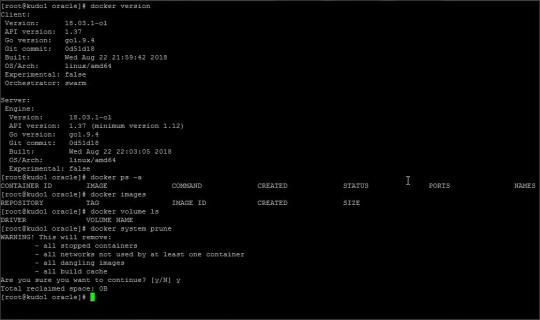
Docker volumes allow you to back up, restore, and migrate data easily. This tutorial explains what a Docker volume is and how to use it, as well as how to mount a volume in Docker.
Amazon Web Services (AWS) and Red Hat provide a complete, enterprise-class computing environment. Red Hat solutions on AWS give customers the ability to run enterprise traditional on-premises applications, such as SAP, Oracle databases, and custom applications in the cloud.
You then work with VS Code as if everything were running locally on your machine, except now they are isolated inside a container.
System Requirements
Local:
Windows:Docker Desktop 2.0+ on Windows 10 Pro/Enterprise. Windows 10 Home (2004+) requires Docker Desktop 2.2+ and the WSL2 back-end. (Docker Toolbox is not supported.)
macOS: Docker Desktop 2.0+.
Linux: Docker CE/EE 18.06+ and Docker Compose 1.21+. (The Ubuntu snap package is not supported.)
Containers:
x86_64 / ARMv7l (AArch32) / ARMv8l (AArch64) Debian 9+, Ubuntu 16.04+, CentOS / RHEL 7+
x86_64 Alpine Linux 3.9+
Other glibc based Linux containers may work if they have needed prerequisites.
While ARMv7l (AArch32), ARMv8l (AArch64), and musl based Alpine Linux support is available, some extensions installed on these devices may not work due to the use of glibc or x86 compiled native code in the extension. See the Remote Development with Linux article for details.
Note that while the Docker CLI is required, the Docker daemon/service does not need to be running locally if you are using a remote Docker host.
Installation
To get started, follow these steps:
Install VS Code or VS Code Insiders and this extension.
Install and configure Docker for your operating system.
Windows / macOS:
Install Docker Desktop for Mac/Windows.
If not using WSL2 on Windows, right-click on the Docker task bar item, select Settings / Preferences and update Resources > File Sharing with any locations your source code is kept. See tips and tricks for troubleshooting.
To enable the Windows WSL2 back-end: Right-click on the Docker taskbar item and select Settings. Check Use the WSL2 based engine and verify your distribution is enabled under Resources > WSL Integration.
Linux:
Follow the official install instructions for Docker CE/EE. If you use Docker Compose, follow the Docker Compose install directions.
Add your user to the docker group by using a terminal to run: sudo usermod -aG docker $USER Sign out and back in again so this setting takes effect.
Rhel Docker Ce
Working with Git? Here are two tips to consider:
If you are working with the same repository folder in a container and Windows, be sure to set up consistent line endings. See tips and tricks to learn how.
If you clone using a Git credential manager, your container should already have access to your credentials! If you use SSH keys, you can also opt-in to sharing them. See Sharing Git credentials with your container for details.
Getting started
Follow the step-by-step tutorial or if you are comfortable with Docker, follow these four steps:
Follow the installation steps above.
Clone https://github.com/Microsoft/vscode-remote-try-node locally.
Start VS Code
Run the Remote-Containers: Open Folder in Container... command and select the local folder.
Check out the repository README for things to try. Next, learn how you can:
Use a container as your full-time environment - Open an existing folder in a container for use as your full-time development environment in few easy steps. Works with both container and non-container deployed projects.
Attach to a running container - Attach to a running container for quick edits, debugging, and triaging.
Advanced: Use a remote Docker host - Once you know the basics, learn how to use a remote Docker host if needed.
Available commands
Another way to learn what you can do with the extension is to browse the commands it provides. Press F1 to bring up the Command Palette and type in Remote-Containers for a full list of commands.
You can also click on the Remote 'Quick Access' status bar item to get a list of the most common commands.
For more information, please see the extension documentation.
Release Notes
While an optional install, this extension releases with VS Code. VS Code release notes include a summary of changes to all three Remote Development extensions with a link to detailed release notes.
As with VS Code itself, the extensions update during a development iteration with changes that are only available in VS Code Insiders Edition.
Questions, Feedback, Contributing
Have a question or feedback?
See the documentation or the troubleshooting guide.
Up-vote a feature or request a new one, search existing issues, or report a problem.
Contribute a development container definition for others to use
Contribute to our documentation
...and more. See our CONTRIBUTING guide for details.
Or connect with the community...
Telemetry
Visual Studio Code Remote - Containers and related extensions collect telemetry data to help us build a better experience working remotely from VS Code. We only collect data on which commands are executed. We do not collect any information about image names, paths, etc. The extension respects the telemetry.enableTelemetry setting which you can learn more about in the Visual Studio Code FAQ.
License
By downloading and using the Visual Studio Remote - Containers extension and its related components, you agree to the product license terms and privacy statement.
2 notes
·
View notes
Text
How to Use Windows Remote Desktop to Connect to Ubuntu: A Step-by-Step Guide
In this article, we will guide you through how to use Windows Remote Desktop to connect to Ubuntu system. You’ll learn about the necessary tools, installation steps, and security measures to ensure a smooth connection. Why Use Remote Desktop to Connect to Ubuntu? Before we dive into the how-to, let’s briefly discuss why you might want to use RDP to connect from Windows to Ubuntu: Cross-platform…
0 notes