#WordPress database export
Explore tagged Tumblr posts
Visit Tumblr Blog
Explore Tumblr blogs with no restrictions, modern design and the best experience.
Last Seen Tumblr Blogs


Fun Fact
The “We are the 99%” Tumblr blog became the slogan for the Occupy Wall Street movement.
Text
How to Migrate WordPress to GCP Server Using WordOps and EasyEngine
Migrating a WordPress site to Google Cloud Platform (GCP) offers numerous benefits including improved performance, scalability, and reliability. In this comprehensive guide, I’ll walk you through on how to migrate WordPress to GCP using WordOps and EasyEngine, with special attention to sites created with the --wpredis flag. This guide works whether you’re migrating from a traditional hosting…
#cloud hosting#Database migration#EasyEngine#EasyEngine to WordOps#GCP#Google Cloud Platform#How to#rsync#Server migration#Server-to-server WordPress#site migration#Site migration guide#SSH key setup#SSL certificate setup#WordOps#WordOps configuration#WordPress database export#WordPress hosting#WordPress hosting migration#WordPress migration#WordPress Redis#WordPress server transfer#WordPress site transfer#WP migration tutorial#WP-CLI#wp-config
0 notes
Text

How To Migrate Your Site To WordPress: A Seamless Journey With Sohojware
The internet landscape is ever-evolving, and sometimes, your website needs to evolve with it. If you're looking to take your online presence to the next level, migrating your site to WordPress might be the perfect solution. WordPress is a powerful and user-friendly Content Management System (CMS) that empowers millions of users worldwide.
However migrating your site can seem daunting, especially if you're new to WordPress. Worry not! This comprehensive guide will equip you with the knowledge and confidence to navigate a smooth and successful migration. Sohojware, a leading web development company, is here to help you every step of the way.
Why Choose WordPress?
WordPress offers a plethora of benefits that make it an ideal platform for websites of all shapes and sizes. Here are just a few reasons to consider migrating:
Easy to Use: WordPress boasts a user-friendly interface, making it easy to manage your website content, even for beginners with no coding experience.
Flexibility: WordPress offers a vast array of themes and plugins that cater to virtually any website need. This allows you to customize your site's look and functionality to perfectly match your vision.
Scalability: WordPress can grow with your business. Whether you're starting a simple blog or managing a complex e-commerce store, WordPress can handle it all.
SEO Friendly: WordPress is built with Search Engine Optimization (SEO) in mind. This means your website has a better chance of ranking higher in search engine results pages (SERPs), attracting more organic traffic.
Security: WordPress is constantly updated with the latest security patches, ensuring your website remains protected from potential threats.
The Migration Process: A Step-by-Step Guide
Migrating your site to WordPress can be broken down into several key steps.
Preparation: Before diving in, it's crucial to back up your existing website's files and database. This ensures you have a safety net in case anything goes wrong during the migration process. Sohojware offers expert backup and migration services to ensure a smooth transition.
Set Up Your WordPress Site: You'll need a web hosting provider and a domain name for your WordPress site. Sohojware can assist you with choosing the right hosting plan and setting up your WordPress installation.
Content Migration: There are several ways to migrate your content to WordPress. You can use a plugin specifically designed for migration, manually copy and paste your content, or utilize an XML export/import process, depending on your previous platform. Sohojware's team of developers can help you choose the most efficient method for your specific situation.
Theme Selection: WordPress offers a vast library of free and premium themes. Choose a theme that aligns with your brand identity and website's functionality.
Plugins and Functionality: Plugins extend the capabilities of your WordPress site. Install plugins that enhance your website's features, such as contact forms, image galleries, or SEO optimization tools.
Testing and Launch: Once your content is migrated and your website is customized, thoroughly test all functionalities before launching your new WordPress site. Sohojware provides comprehensive website testing services to guarantee a flawless launch.
Leveraging Sohojware's Expertise
Migrating your website to WordPress can be a breeze with the help of Sohojware's experienced web development team. Sohojware offers a comprehensive suite of migration services, including:
Expert Backup and Migration: Ensure a smooth and secure transition of your website's data.
Custom Theme Development: Create a unique and visually appealing website that reflects your brand identity.
Plugin Selection and Integration: Help you choose and implement the right plugins to enhance your website's functionality.
SEO Optimization: Optimize your website content and structure for better search engine ranking.
Ongoing Maintenance and Support: Provide ongoing support to keep your WordPress site running smoothly and securely.
FAQs: Migrating to WordPress with Sohojware
1. How long does the migration process typically take?
The migration timeframe depends on the size and complexity of your website. Sohojware will assess your specific needs and provide an estimated timeline for your migration project.
2. Will my website be down during the migration?
Typically, no. Sohojware can migrate your website to a temporary location while your existing site remains live. Once the migration is complete, the new WordPress site will be seamlessly switched in place, minimizing downtime and disruption for your visitors.
3. What happens to my existing content and SEO rankings after migration?
Sohojware prioritizes preserving your valuable content during the migration process. We can also help you implement strategies to minimize any potential impact on your SEO rankings.
4. Do I need to know how to code to use WordPress?
No! WordPress is designed to be user-friendly, and you don't need any coding knowledge to manage your website content. Sohojware can also provide training and support to help you get the most out of your WordPress site.
5. What ongoing maintenance does a WordPress website require?
WordPress requires regular updates to ensure optimal security and functionality. Sohojware offers ongoing maintenance plans to keep your website updated, secure, and running smoothly.
By migrating to WordPress with Sohojware's expert guidance, you'll gain access to a powerful and user-friendly platform that empowers you to create and manage a stunning and successful website. Contact Sohojware today to discuss your website migration needs and unlock the full potential of WordPress!
2 notes
·
View notes
Text
Easy way to get job data from Totaljobs
Totaljobs is one of the largest recruitment websites in the UK. Its mission is to provide job seekers and employers with efficient recruitment solutions and promote the matching of talents and positions. It has an extensive market presence in the UK, providing a platform for professionals across a variety of industries and job types to find jobs and recruit staff.
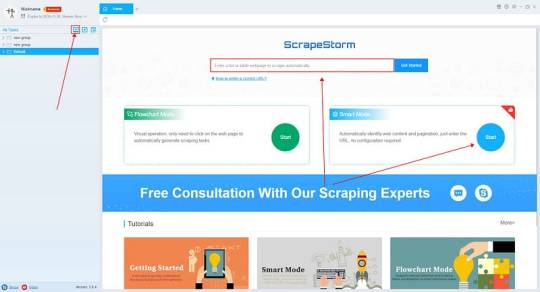
Introduction to the scraping tool
ScrapeStorm is a new generation of Web Scraping Tool based on artificial intelligence technology. It is the first scraper to support both Windows, Mac and Linux operating systems.
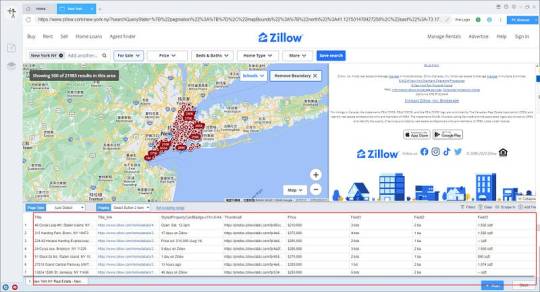
Preview of the scraped result

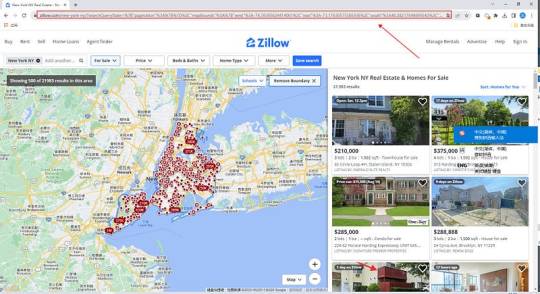
1. Create a task

(2) Create a new smart mode task
You can create a new scraping task directly on the software, or you can create a task by importing rules.
How to create a smart mode task
2. Configure the scraping rules
Smart mode automatically detects the fields on the page. You can right-click the field to rename the name, add or delete fields, modify data, and so on.
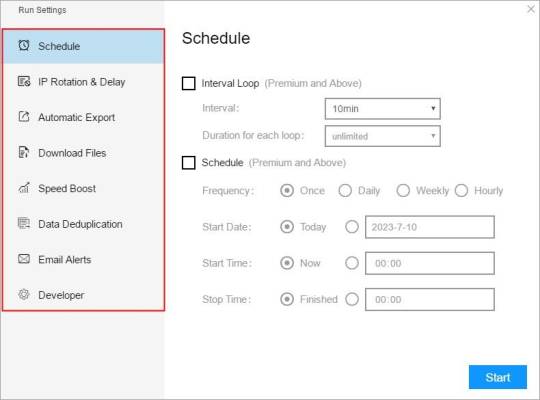
3. Set up and start the scraping task
(1) Run settings
Choose your own needs, you can set Schedule, IP Rotation&Delay, Automatic Export, Download Images, Speed Boost, Data Deduplication and Developer.
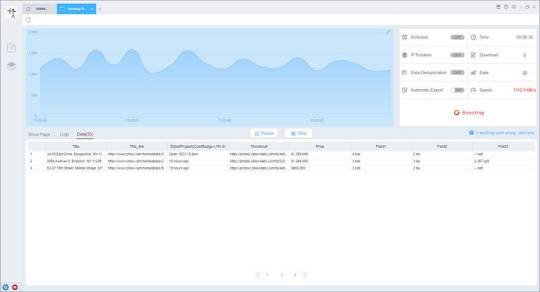
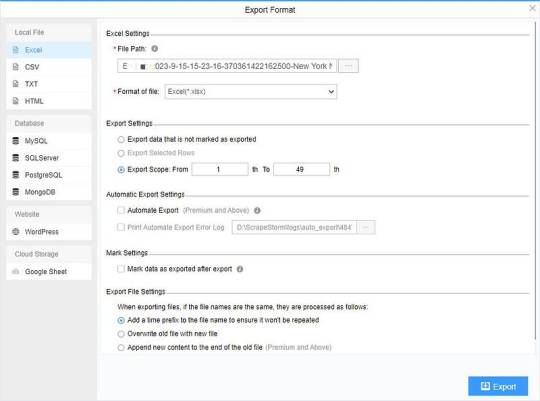
4. Export and view data
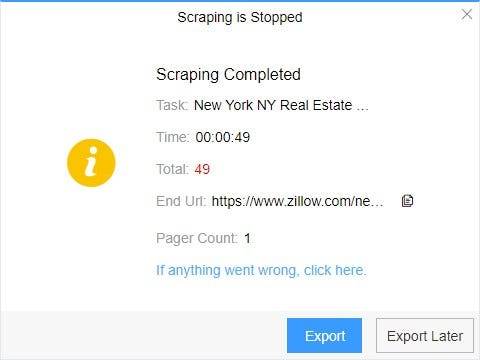
(2) Choose the format to export according to your needs.
ScrapeStorm provides a variety of export methods to export locally, such as excel, csv, html, txt or database. Professional Plan and above users can also post directly to wordpress.
How to view data and clear data
2 notes
·
View notes
Text
How to Use Export Utility for AWS RDS SQL Server Database
How to create a copy of database with export utility in AWS RDS SQL Server As we know, we are not able to take Backup in AWS RDS as disk is not available, we need to use another method for that we need S3 and lot of permission. If our database is not big size, then we will go with Export process to copy database in SQL Server in AWS RDS or SQL Server Following are the steps to copy database…

View On WordPress
0 notes
Text
Top 10 Essential Plugins Every WordPress Developer Should Know
WordPress has evolved into one of the most powerful and flexible content management systems available today. With over 40% of the web powered by WordPress, developers have an incredible opportunity to build robust, high-performing websites tailored to any niche or industry.
One of the key reasons behind WordPress's popularity is its vast plugin ecosystem. Plugins enhance functionality, streamline development, improve security, and boost performance—saving developers time and effort. But with over 60,000 plugins in the WordPress repository, choosing the right ones can be overwhelming.
To help you cut through the noise, here are 10 essential WordPress plugins every developer should know. Whether you’re building custom themes, working on client projects, or managing your own website, these tools are must-haves in your toolkit.
1. Advanced Custom Fields (ACF)
Purpose: Add and manage custom fields
Advanced Custom Fields is a staple for WordPress developers. It allows you to add custom fields to posts, pages, users, and more—giving you complete control over content structure.
Whether you're building a real estate site with custom listings or a portfolio with dynamic content types, ACF simplifies data entry and enhances your site's flexibility.
Why it’s essential:
User-friendly interface for clients
Supports complex field types (repeaters, galleries, flexible content)
Saves development time
2. Yoast SEO
Purpose: Optimize site for search engines
While it’s widely known among content creators, Yoast SEO is also an important tool for developers. It ensures that every page and post is properly optimized with SEO best practices in mind.
For developers, Yoast offers customizable breadcrumbs, schema integration, and control over robots.txt and sitemaps.
Why it’s essential:
Enhances search visibility
Adds structured data
Developer-friendly filters and actions
3. WP Rocket
Purpose: Performance optimization
Speed is a ranking factor and a user experience booster. WP Rocket is a powerful caching plugin that makes WordPress sites load faster with minimal configuration.
It handles page caching, browser caching, lazy loading, database cleanup, and CDN integration—all in one.
Why it’s essential:
Boosts Core Web Vitals
Developer hooks for customization
Compatible with eCommerce and multilingual sites
4. Query Monitor
Purpose: Debugging and performance analysis
Query Monitor is a must-have for diagnosing issues in WordPress development. It tracks database queries, PHP errors, hooks, REST API calls, and much more.
If your site is running slowly or you’re dealing with unexpected behavior, Query Monitor helps pinpoint the problem quickly.
Why it’s essential:
Real-time debugging
Works with themes and plugins
Identifies performance bottlenecks
5. Custom Post Type UI
Purpose: Create and manage custom post types and taxonomies
WordPress development often involves creating custom content structures beyond posts and pages. Custom Post Type UI provides an easy interface for registering custom post types and taxonomies without touching code.
It’s perfect for speeding up development and can be used alongside ACF for full control over content models.
Why it’s essential:
No-code setup for post types
Export functionality for use in themes/plugins
Saves hours of manual coding
6. Duplicator
Purpose: Site migration and backup
Duplicator makes it easy to clone, move, or back up a WordPress site. Whether you're moving from staging to production or delivering a completed project to a client, this plugin simplifies the process.
It packages your site files and database into a single archive for easy deployment.
Why it’s essential:
Hassle-free migrations
Great for creating boilerplate templates
No need for manual database edits
7. WP All Import
Purpose: Import data into WordPress
When working with client data, bulk content, or WooCommerce products, WP All Import is an invaluable tool. It allows you to import data from XML or CSV files into any post type.
It integrates seamlessly with ACF, WooCommerce, and custom taxonomies—giving developers control over how data is mapped and displayed.
Why it’s essential:
Handles large datasets
Flexible import options
Developer-friendly with PHP functions
8. User Role Editor
Purpose: Manage and customize user roles and capabilities
In complex WordPress sites, controlling access levels is crucial. User Role Editor lets you fine-tune permissions for different user roles, or even create entirely new roles tailored to your project.
This is particularly helpful for membership sites, eLearning platforms, and client dashboards.
Why it’s essential:
Easy UI for managing capabilities
Useful for multisite setups
Secure role management
9. Regenerate Thumbnails
Purpose: Recreate image sizes
When changing themes or modifying image dimensions in your functions file, WordPress doesn’t automatically apply those changes to existing media. Regenerate Thumbnails lets you update image sizes in bulk.
This ensures consistency in your layouts and prevents layout issues.
Why it’s essential:
Saves hours of manual editing
CLI support for automation
Works well in dev and production environments
10. Wordfence Security
Purpose: WordPress site security
Security should never be an afterthought. Wordfence offers real-time threat defense, malware scanning, login protection, and firewall features to keep your WordPress sites safe.
While developers might also work with server-level tools, Wordfence provides an easy layer of protection that’s client-friendly and highly effective.
Why it’s essential:
Real-time firewall and malware scanning
Brute force protection
Detailed traffic and threat reports
Final Thoughts
The WordPress plugin ecosystem is vast, and while there’s no one-size-fits-all solution, these ten plugins provide a solid foundation for any WordPress developer. They help speed up workflows, improve site performance, enhance SEO, secure data, and streamline debugging.
As a developer, knowing when and how to use these tools—and when to avoid unnecessary plugins—is part of mastering WordPress. Choose wisely, keep your stack lean, and always test for compatibility in your development environment.
Are there any plugins you can’t live without? Let us know in the comments!
0 notes
Text
What Can Conversational Forms Help Your ChatBot Do Better?

In today’s fast-moving digital environment, user engagement isn’t just important—it’s essential. Websites must offer smarter, more interactive ways to collect data, provide support, and deliver seamless experiences. One powerful tool leading this transformation is Conversational Forms—a standout feature of WPBot, the advanced WordPress chatbot plugin.
In this article, we’ll explore what conversational forms are, why they outperform traditional web forms, and how you can use them effectively across industries to increase engagement and automate processes.
youtube
What Are Conversational Forms?
Conversational Forms replace static, multi-field forms with an interactive, chat-style interface. Instead of overwhelming users with a block of fields, they simulate a real-time conversation—asking one question at a time and dynamically responding to the user’s input.
With WPBot’s drag-and-drop Conversational Form Builder, you can easily design smart, engaging forms that support:
Multiple input types (text, email, date, file uploads)
Advanced conditional logic
AI-driven responses via OpenAI integration
Why Conversational Forms Outperform Traditional Forms
Here’s why businesses are choosing conversational forms over traditional ones:
✅ Higher Engagement
They feel like chatting with a human instead of filling out a boring form, resulting in more interaction.
✅ Better Completion Rates
Small, focused questions reduce user fatigue and prevent form abandonment.
✅ Real-Time Personalization
Forms adapt based on user input, tailoring the experience for each visitor.
✅ AI Intelligence
With OpenAI, the form can interpret vague answers, ask clarifying questions, and provide smart assistance.
For companies that rely on user input—whether for lead generation, support intake, or service requests—these advantages are game-changing.
Key Features of WPBot Conversational Forms
1. Visual Drag-and-Drop Builder
No coding needed. Design complex forms with:
Text, email, number, and URL fields
Checkboxes and radio buttons
File and image uploads
Calculation and hidden fields
HTML blocks for rich content
Perfect for contact forms, calculators, surveys, and more.
2. Advanced Conditional Logic & Variables
Build intelligent workflows:
Branch questions based on user choices
Show or hide fields based on conditions
Reuse responses with dynamic variables
Example: Ask different sets of questions for “Sales” vs. “Support” queries—all within the same form.
3. OpenAI-Powered Smart Responses
Bring your forms closer to natural human interaction:
Understand and process open-ended input
Clarify vague or incomplete answers
Accept voice, text, file, or image input
This elevates the user experience and reduces the need for human intervention.
4. Pre-Built Templates
Save time with fully customizable templates for:
Contact Forms
Appointment Booking
Customer Feedback
Job Applications
Quote Requests
Quickly deploy common use cases without building from scratch.
5. Data Handling & Notifications
Take control of your form data:
Store submissions in the WordPress database
Export responses as CSV files
Trigger email alerts to admins or users
Use autoresponders for submission confirmation
These features support serious business operations and CRM workflows.
6. Flexible Form Deployment
Show your forms when and where they’re needed:
Launch from chatbot menus
Trigger with keywords like “Book Now”
Embed with shortcodes or widgets
Use click-to-chat buttons for instant interaction
Ensure users always see relevant forms at the right moment.


Real-World Use Cases for Conversational Forms
✅ Lead Generation
Capture and qualify leads naturally without overwhelming visitors.
✅ Customer Support Intake
Collect structured issue data, file attachments, and more to streamline resolution.
✅ Appointment Booking
Effortlessly schedule meetings with form-driven date/time input.
✅ Smart Calculators
Build interactive tools such as:
BMI/BMR calculators
Mortgage estimators
Room painting cost estimators
✅ Job Applications
Enable smooth application flows with file uploads, screening questions, and AI evaluation.
Benefits by Industry
eCommerce: Reduce cart abandonment, offer personalized product recommendations, and gather post-purchase feedback.
Healthcare: Book appointments, run symptom checkers, and collect patient consent forms.
Education: Enroll students, conduct quick assessments, and gather course feedback.
Agencies & Freelancers: Capture project briefs, auto-generate quotes, and screen potential clients.
WPBot vs Other Form Builders: Quick Comparison

Final Thoughts
Conversational Forms are revolutionizing how websites interact with users. By merging the simplicity of chat with the depth of structured data collection, WPBot empowers WordPress site owners to create more personalized, automated, and conversion-driven experiences.
If you want to stay competitive in 2025 and beyond, WPBot Conversational Forms are a must-have tool in your digital strategy.
Try WPBot today and see how chat-based forms can transform your site—from lead generation to support automation and everything in between.
This article was inspired by What Can You Do with Conversational Forms for a ChatBot?
#ConversationalForms#ChatbotDesign#AIChatbot#ChatbotMarketing#ConversationalAI#WPBot#NoCodeTools#SmartForms#Youtube
1 note
·
View note
Text
Migrate or move WordPress website to a new host in 2025
Why You Might Need to Move Your WordPress Site
Your website is important. But sometimes, your web host may be slow, expensive, or not helpful. When that happens, it’s smart to move your website to a better hosting company. A better host can help your site load faster, stay online, and keep visitors happy.
You can move your website in two ways:
Manually (you do everything step by step)
Automatically (you use a plugin to help)
This full guide will show you both ways. It will also teach you what to do after you move your site to make sure everything works.
If this sounds hard, don’t worry. You can also get help from Creation Wave LLC. We help people move WordPress websites safely and quickly.
Table of Contents
Manual vs Automatic Migration
Manual Migration – Step by Step
How to Move WordPress Without cPanel
How to Use a Plugin to Migrate Your Site
What to Check After Migration
Final Thoughts and Expert Help
Should You Move Your Site Manually or Use a Plugin?
There are two ways to move your WordPress site:
Manual Migration
This is where you download your files and database and upload them to the new host yourself. It gives you more control, but you need to be careful. One small mistake can break your site. This is better for large websites or people with some technical skills.
Automatic Migration
This uses a WordPress plugin to move your site. It is easier and faster. It is perfect for small websites or beginners. You don’t have to touch any code.
If you're not sure which to pick, try a plugin first. If it doesn't work or gives errors, you can move it manually or get expert help.
Need help? Creation Wave LLC offers both manual and automatic WordPress migration services.
Manual WordPress Migration (Step-by-Step Guide)
This part will show you how to manually move your WordPress website to a new host.
Step 1: Choose a New Hosting Company
Make sure your new host is fast, secure, and helpful. Look for companies that offer good customer support and daily backups.
Types of hosting:
Shared hosting (basic and cheap)
VPS hosting (faster and more private)
Managed WordPress hosting (easy and fully managed)
Dedicated server (for very large sites)
If you need help picking the right host, Creation Wave LLC can help you choose the best one.
Step 2: Backup Your WordPress Files
Your website files are very important. They include your theme, plugins, images, and settings.
To back them up:
Use an FTP client like FileZilla.
Connect to your old host using FTP login details.
Find the folder named “public_html” or your WordPress folder.
Download all the files to your computer.
Wait until the download finishes before going to the next step.
Step 3: Export Your Database
Your website database has all your posts, pages, user accounts, and comments.
To export it:
Log in to cPanel on your old host.
Open phpMyAdmin.
Click your WordPress database name on the left.
Click the “Export” tab at the top.
Choose “Quick” and “SQL” format.
Click “Go” to download the file.
Save this file in a safe place.
Step 4: Create a New Database on Your New Host
Now go to your new hosting account. Do this:
Log into cPanel.
Click “MySQL Databases.”
Create a new database.
Create a new user and give it a strong password.
Add the user to the database and give it all permissions.
Write down the database name, user name, and password. You will need them soon.
Step 5: Upload WordPress Files to New Host
Now it’s time to put your website files on the new server.
To upload:
Open FileZilla again.
Connect to your new host with your new FTP details.
Go to the folder named “public_html” or root folder.
Upload all your website files from your computer.
Wait for the upload to finish before moving on.
Step 6: Import Your Database
Now you need to import your old database to the new host.
Log in to cPanel on the new host.
Open phpMyAdmin.
Click your new database name.
Click the “Import” tab.
Choose the .sql file you downloaded earlier.
Click “Go.”
This will add your old content to your new hosting account.
Step 7: Update the wp-config.php File
WordPress needs to know how to connect to the database.
In FileZilla, find and open the file “wp-config.php.”
Right-click and choose Edit.
Update the database name, user, and password:
define('DB_NAME', 'your_new_db_name'); define('DB_USER', 'your_new_db_user'); define('DB_PASSWORD', 'your_new_password');
Save and close the file.
Now WordPress can talk to the new database.
Step 8: Point Your Domain to the New Host
This is the final step.
Log into the account where you bought your domain (like GoDaddy or Namecheap).
Find DNS or Nameserver Settings.
Change the nameservers to the new hosting company’s nameservers.
Save and wait.
It can take 1–24 hours for the DNS to update fully. After that, your site will be live on the new host.
How to Migrate Without cPanel
Some hosting providers don’t use cPanel. That’s okay. You can still migrate your website.
Here’s what to do:
Ask your host for FTP access and MySQL access.
Use FileZilla to upload files.
Use another tool like Adminer or CLI (command-line) to import your database.
Update your wp-config.php file as shown earlier.
If this sounds too technical, Creation Wave LLC can do it for you.
How to Use a Plugin to Migrate Your WordPress Site
If you want an easier way, use a migration plugin. Here are three good ones:
All-in-One WP Migration
Simple drag-and-drop tool.
Great for beginners.
Duplicator
Makes a full copy of your website.
Offers more options for developers.
UpdraftPlus (Paid)
Does backups and migrations.
Good support.
To use a plugin:
Install the plugin on your old website.
Use the plugin to export the full site.
Set up a clean WordPress install on your new host.
Install the same plugin there.
Import the file you exported earlier.
After a few minutes, your site should be live.
What to Check After Migration
After moving your website, test everything. Check the following:
Is your homepage loading fast?
Are all your pages and posts showing?
Are your images loading?
Can you log into the WordPress dashboard?
Are all your plugins working?
Is the site mobile-friendly?
Also test your contact forms, menus, and links. You can use free tools like GTmetrix or Google PageSpeed to check speed.
If anything looks broken, go back and check your steps.
Need help? Creation Wave LLC offers a full post-migration checkup.
Final Thoughts
Moving your WordPress website can feel scary. But with the right steps, it’s not so hard. This guide helps you move your site by yourself or with a plugin. You also learned how to test your site after moving.
A better host can give you faster speed, better uptime, and better support. If you don’t want to take risks or waste time, you can let experts do it for you.
1 note
·
View note
Text
Maildoll Nulled Script 6.10.3

Discover the Power of Maildoll Nulled Script – Your Ultimate Email & SMS Marketing Solution In today's competitive digital landscape, effective communication with your audience is essential. If you're looking for a dynamic marketing platform that combines both email and SMS campaigns with ease, the Maildoll Nulled Script is the perfect solution. This powerful tool empowers businesses and marketers to streamline their marketing strategies, all while saving on costly licensing fees. Download it now and unlock premium features completely free. What is Maildoll Nulled Script? Maildoll Nulled Script is a comprehensive email and SMS marketing application that allows you to manage campaigns, subscribers, templates, and automation workflows effortlessly. Built for efficiency and scalability, it provides everything you need to create engaging marketing campaigns without relying on third-party platforms. Whether you're a solo entrepreneur, digital marketer, or a small business owner, Maildoll offers a cost-effective and user-friendly interface to keep your customers engaged. And with the nulled version, you get unrestricted access to all premium functionalities—completely free. Technical Specifications Language: PHP, Laravel Framework Database: MySQL Compatibility: PHP 7.3+, Apache/Nginx, MySQL 5.7+ Frontend: Bootstrap, HTML5, CSS3 SMS Gateways Supported: Twilio, Nexmo, and more Email Integrations: SMTP, SendGrid, Mailgun Top Features and Benefits of Maildoll Nulled Script Multi-Channel Marketing: Run synchronized email and SMS campaigns with high delivery rates. Advanced Analytics: Get detailed insights into open rates, click-through rates, and conversions. Template Builder: Use the drag-and-drop editor to create stunning templates with ease. Subscriber Management: Import, export, and segment your audience for targeted messaging. Campaign Automation: Automate follow-ups and schedule broadcasts to increase engagement. Developer-Friendly: Built on Laravel, making customization simple and effective. Use Cases of Maildoll Nulled Script The Maildoll Nulled Script is ideal for: Startups aiming to build a loyal customer base through email outreach. Affiliate marketers managing large subscriber lists across niches. eCommerce businesses sending transactional and promotional messages. Agencies offering white-labeled email marketing services to clients. How to Install Maildoll Nulled Script Installing the Maildoll is simple and requires minimal technical knowledge. Here's a quick guide: Download the script from nulled club. Upload the files to your server using cPanel or FTP. Set up your MySQL database and configure the .env file with the correct credentials. Run the installation wizard from your browser and follow the step-by-step instructions. Log in to your admin dashboard and start creating your campaigns. Frequently Asked Questions (FAQs) Is the Maildoll Nulled Script safe to use? Yes, as long as you download it from a trusted source like nulled club, you can safely use the script without worrying about malicious code. Can I use it for commercial projects? Absolutely. The Maildoll Nulled Script is versatile and suitable for both personal and commercial projects. You can even offer marketing services using this tool. Are updates available for the nulled version? While automatic updates may not be available, you can manually update the script by downloading the latest version from trusted platforms. How does it compare to other marketing tools? Compared to other paid tools, Maildoll offers similar—if not better—functionality without recurring costs. It’s a one-time setup that gives you lifetime access. Where can I find similar tools? If you're looking for more powerful tools like this, check out kallyas NULLED for a premium WordPress theme to match your marketing efforts. Final Thoughts The Maildoll is a game-changer for digital marketers and businesses looking to scale their outreach without breaking the bank.
With powerful automation, deep analytics, and easy integration, this tool ensures that your message reaches the right audience at the right time. Download it today and transform your email and SMS marketing like a pro.
0 notes
Text
Unlocking Seamless Integrations: A Comprehensive Guide to the 'Contact Form to Any API' WordPress Plugin
In today's digital landscape, integrating your website's contact forms with various APIs is crucial for streamlined operations and enhanced user experiences. The Contact Form to Any API WordPress plugin stands out as a versatile tool, enabling seamless connections between your contact forms and a multitude of third-party services. This comprehensive guide delves into the features, benefits, and practical applications of this powerful plugin.

Understanding the Need for API Integration
Before exploring the plugin's capabilities, it's essential to grasp the significance of API integrations:
Enhanced Efficiency: Automating data transfer between your website and external platforms reduces manual tasks.
Improved Data Accuracy: Direct integrations minimize errors associated with manual data entry.
Real-Time Updates: Immediate data synchronization ensures up-to-date information across platforms.
Scalability: As your business grows, integrated systems can handle increased data flow without additional overhead.
Introducing 'Contact Form to Any API'
Developed by IT Path Solutions, 'Contact Form to Any API' is designed to bridge the gap between your WordPress contact forms and external APIs. Whether you're using Contact Form 7 or WPForms, this plugin facilitates the transmission of form data to various services, including CRMs, marketing platforms, and custom APIs.
Key Features
1. Broad API Compatibility
Supports Over 150 APIs: Seamlessly connect with platforms like Mailchimp, HubSpot, Zapier, Odoo CRM, and more.
Custom API Integration: Configure connections with virtually any REST API, providing unparalleled flexibility.
2. Flexible Data Transmission
Multiple HTTP Methods: Choose between POST and GET requests based on your API's requirements.
JSON Formatting: Send data in simple or nested JSON structures, accommodating complex API schemas.
Header Customization: Set custom headers, including Authorization tokens, to meet specific API authentication needs.
3. File Handling Capabilities
File Upload Support: Enable users to upload files through your forms.
Base64 Encoding: Automatically convert uploaded files to Base64 format for API compatibility.
4. Data Management and Export
Database Storage: Store form submissions within your WordPress database for easy access.
Export Options: Download submission data in CSV, Excel, or PDF formats for reporting and analysis.
5. Conditional Data Sending
Timing Control: Decide whether to send data to the API before or after the form's email notification is dispatched.
6. Authentication Support
Multiple Authentication Methods: Utilize Basic Auth, Bearer Tokens, or custom headers to authenticate API requests.
Pro Version Enhancements
Upgrading to the Pro version unlocks additional features:
Multi-API Support: Send form data to multiple APIs simultaneously.
Advanced JSON Structures: Handle multi-level JSON formats for complex integrations.
Priority Support: Receive expedited assistance from the development team.
OAuth 2.0 and JWT Integration: Facilitate secure connections with APIs requiring advanced authentication protocols.
Real-World Applications
The versatility of 'Contact Form to Any API' opens doors to numerous practical applications:
CRM Integration: Automatically add new leads to your CRM system upon form submission.
Email Marketing: Subscribe users to your mailing list in platforms like Mailchimp or Sendinblue.
Support Ticketing: Create support tickets in systems like Zendesk or Freshdesk directly from contact forms.
Project Management: Generate tasks in tools like Trello or Asana based on form inputs.
User Testimonials
The plugin has garnered positive feedback from the WordPress community:
"Does exactly what is needed – connects your contact form to API. Works great out of the box, and amazing support." — Olay
"I used the free plugin for a while already, recently stepped over to the pro and I must say the pro and agency version come with amazing new features and the support is quick and always there to help you with any questions!" — Samuellegrand
Getting Started: Installation and Configuration
Step 1: Installation
Navigate to your WordPress dashboard.
Go to Plugins > Add New.
Search for "Contact Form to Any API."
Click "Install Now" and then "Activate."
Step 2: Configuration
Access the plugin settings via the WordPress dashboard.
Choose the form (Contact Form 7 or WPForms) you wish to integrate.
Enter the API endpoint URL.
Configure the request method (POST or GET).
Set up headers and authentication details as required.
Map form fields to the corresponding API parameters.
Save your settings and test the integration.
Best Practices for Optimal Integration
Test Thoroughly: Use tools like Postman to test API endpoints before full integration.
Secure Sensitive Data: Ensure that authentication tokens and sensitive information are stored securely.
Monitor Logs: Regularly check logs for any errors or issues in data transmission.
Stay Updated: Keep the plugin and WordPress core updated to benefit from the latest features and security patches.
Conclusion
'Contact Form to Any API' stands as a robust solution for WordPress users seeking seamless integration between their contact forms and external services. Its flexibility, extensive feature set, and user-friendly interface make it an invaluable tool for enhancing website functionality and streamlining workflows.
Whether you're aiming to automate lead generation, enhance customer support, or synchronize data across platforms, this plugin offers the capabilities to achieve your goals efficiently.
0 notes
Text
Get data from relational data sources
If your organization uses a relational database for sales, you can use Power BI Desktop to connect directly to the database instead of using exported flat files. Connecting Power BI to your database will help you to monitor the progress of your business and identify trends, so you can forecast sales figures, plan budgets and set performance indicators and targets. Power BI Desktop can connect to…

View On WordPress
0 notes
Text
Obtaining a Chess Database
The best way to obtain a free database is to play games on lichess.org and then go to your profile and find the export options. Then you will want to make sure you have selected only the standard variant and the time controls you want to be included. Chess database programs almost never support anything other than standard Chess. This is unfortunate because I would love to see how a Crazyhouse…

View On WordPress
0 notes
Text
Quick way to extract job information from Reed
Reed is one of the largest recruitment websites in the UK, covering a variety of industries and job types. Its mission is to connect employers and job seekers to help them achieve better career development and recruiting success
Introduction to the scraping tool
ScrapeStorm is a new generation of Web Scraping Tool based on artificial intelligence technology. It is the first scraper to support both Windows, Mac and Linux operating systems.
Preview of the scraped result

1. Create a task
(2) Create a new smart mode task
You can create a new scraping task directly on the software, or you can create a task by importing rules.
How to create a smart mode task

2. Configure the scraping rules
Smart mode automatically detects the fields on the page. You can right-click the field to rename the name, add or delete fields, modify data, and so on.

3. Set up and start the scraping task
(1) Run settings
Choose your own needs, you can set Schedule, IP Rotation&Delay, Automatic Export, Download Images, Speed Boost, Data Deduplication and Developer.


4. Export and view data

(2) Choose the format to export according to your needs.
ScrapeStorm provides a variety of export methods to export locally, such as excel, csv, html, txt or database. Professional Plan and above users can also post directly to wordpress.
How to view data and clear data

2 notes
·
View notes
Text
Choose the Right Web Hosting
Thinking of switching web hosting providers but worried about losing your website or breaking something important? You're not alone. Many website owners hesitate to make the move because they’re unsure about how the process works. But the truth is, with the right steps, you can move your website to a new host safely and easily — even as a beginner.
In this guide, we’ll walk you through a simple and safe way to transfer your website, while also helping you choose the right web hosting for long-term success. If you ever need quick assistance, feel free to call +91 9818 62 9898.
Why People Change Web Hosting Providers
Before we dive into the steps, let’s understand why someone might need to move their website:
Slow website performance
Frequent downtime or server issues
Poor customer support
Limited features or outdated technology
High renewal costs
If any of these issues sound familiar, it’s a clear sign that you need to move on and choose the right web hosting provider. For expert help during the switch, call us directly at +91 9818 62 9898.
Pre-Move Checklist: What You Need to Prepare
To ensure a smooth transfer, gather the following:
Access to your current hosting account
Access to your domain registrar
A backup of your website files and database
Login credentials for your new hosting provider
Some time (ideally during non-peak hours)
If you get stuck at any point, just dial +91 9818 62 9898 — our team is here to help.
Step-by-Step Guide to Move Your Website Safely
Step 1: Choose the Right Web Hosting Provider
The first and most important step is to choose the right web hosting for your current and future website needs. Look for:
99.9% uptime guarantee
High server speed
Free migration services
24/7 support
User-friendly dashboard
Not sure which provider is right for you? Get a quick recommendation by calling +91 9818 62 9898.
Step 2: Backup Your Website Files and Database
Always create a full backup before migrating.
For WordPress: Use plugins like All-in-One WP Migration or Duplicator to back up both files and database.
For non-WordPress sites: Download your files via FTP and export your database using phpMyAdmin.
Need help taking a backup? Reach out at +91 9818 62 9898.
Step 3: Upload Files to the New Host
Once your new host is ready, it’s time to upload:
WordPress Users:
Install WordPress on the new host
Import the backup using your chosen plugin
Non-WordPress Sites:
Upload via FTP
Recreate the database and import your .sql file
For technical support, don’t hesitate to call +91 9818 62 9898.
Step 4: Update Database Settings
If your website is database-driven (like WordPress), update the config file with new database credentials.
For WordPress, modify wp-config.php with:
sql
CopyEdit
define('DB_NAME', 'new_db_name'); define('DB_USER', 'new_db_user'); define('DB_PASSWORD', 'new_db_password'); define('DB_HOST', 'localhost');
Not sure where to find these details? We’re one call away at +91 9818 62 9898.
Step 5: Preview the Website on New Host
Before changing your domain settings, preview your site using:
A temporary URL (provided by your new host)
Hosts file modification (advanced users)
Ensure everything works — images load, forms submit, pages function properly. If you see issues, give us a call at +91 9818 62 9898 for quick troubleshooting.
Step 6: Change Domain DNS Settings
Now it’s time to go live.
Log in to your domain registrar
Update the DNS (nameservers) to your new host’s settings
Wait for DNS propagation (can take 24–48 hours)
During this period, avoid editing the website. If you're unsure how to do this, call +91 9818 62 9898 and we’ll walk you through it.
Step 7: Test After DNS Propagation
After DNS has updated, test your site:
Load pages
Test forms
Check mobile responsiveness
Verify email services (if connected to domain)
Pro Tips for a Smooth Migration
Migrate during low-traffic hours
Inform your visitors if there will be downtime
Keep your old host active for at least a week
Clear browser and site cache after the move
Always double-check backups
Need guidance through any of these steps? Talk to our web experts at +91 9818 62 9898.
Final Thoughts
Switching your hosting might feel scary, but it’s easier than it looks — especially when you follow the right steps. The key is to be prepared, follow a structured process, and above all, choose the right web hosting that meets your performance and support expectations.
Whether you're unhappy with your current provider or just want to upgrade, now is the perfect time to make the move. And if you ever feel stuck, don’t worry — just call +91 9818 62 9898, and we’ll guide you every step of the way.
Want expert help with your hosting migration? Call us now at +91 9818 62 9898 and get started without stress.
0 notes
Text
Export Users UPDATED | SportsCarnivalbooking.com
Managing customer data just got easier! Our new User Export by Date Range feature lets you export only the users you need, instead of pulling your entire database every time. With this update, you can: ✔ Select a specific timeframe – Export users by month, week, or any custom date range. ✔ Easily import data into third-party tools – Use CSV exports for CRMs, marketing platforms, or analytics. ✔…

View On WordPress
0 notes
Text
WordPress to Shopify Migration by OyeCommerz: A Seamless Transition for Your Online Store

Why Migrate from WordPress to Shopify?
1. Ease of Use
Shopify’s intuitive dashboard allows even non-technical users to manage their store efficiently. Unlike WooCommerce, Shopify does not require frequent plugin updates or manual configurations.
2. Better Security & Hosting
Shopify is a hosted solution, meaning your store is automatically secured with SSL encryption, PCI compliance, and automatic backups. No need to worry about server management or security updates.
3. Enhanced Performance & Speed
Shopify’s optimized infrastructure ensures faster loading times, reducing bounce rates and improving user experience compared to WooCommerce sites, which often require additional caching plugins.
4. App Integrations & Payment Gateway Support
Shopify’s app store offers thousands of integrations, including marketing, analytics, and customer service tools. It also supports multiple payment gateways without needing third-party extensions.
The OyeCommerz WordPress to Shopify Migration Process
At OyeCommerz, we follow a structured migration strategy to ensure a hassle-free experience. Here’s our step-by-step process:
Step 1: Pre-Migration Analysis
Understanding your existing WooCommerce setup
Identifying essential plugins, product categories, and SEO settings
Preparing a detailed migration roadmap
Step 2: Data Export & Backup
Exporting products, categories, orders, and customer data
Backing up your WordPress database to prevent data loss
Preserving SEO settings, including meta titles and redirects
Step 3: Shopify Store Setup & Customization
Configuring Shopify’s settings to match your business needs
Implementing a mobile-responsive theme
Setting up payment and shipping options
Step 4: Data Import & Optimization
Importing all essential data into Shopify
Ensuring product images, SKUs, and descriptions are accurately mapped
Testing functionality to ensure a seamless user experience
Step 5: SEO & URL Redirection
Setting up 301 redirects to maintain Google rankings (Learn More)
Optimizing product pages with relevant keywords
Installing SEO apps to enhance organic visibility
Step 6: Testing & Go Live
Running extensive testing to identify and fix potential issues
Ensuring smooth checkout, payment processing, and page navigation
Finalizing the migration and launching the Shopify store
Post-Migration Support by OyeCommerz
OyeCommerz doesn’t just migrate your store — we provide post-migration support to ensure everything runs smoothly. Our services include:
Shopify training for store management (Explore Our Training Services)
Ongoing technical support for app integrations and customizations
Marketing assistance to boost sales post-migration (Check Out Our Marketing Solutions)
Success Stories: Real Businesses That Switched to Shopify

Ready to Migrate? Let’s Get Started!
Migrating from WordPress to Shopify doesn’t have to be overwhelming. With OyeCommerz’s expert migration services, you can enjoy a seamless transition without data loss or SEO penalties.
📞 Contact us today to start your Shopify migration journey! (Get a Free Consultation)
0 notes
Text
How to Move Your WordPress Site from Localhost to a Live Server
Developing a WordPress site on localhost is a great way to build and test your website in a controlled environment. However, the real challenge arises when it's time to move the site from your local server to a live hosting environment. If not done correctly, you could encounter broken links, missing images, or even database errors.
In this blog, we'll guide you through a step-by-step process to successfully move your WordPress site from localhost to a live server.

Step 1: Choose the Right Hosting Provider
Your first step is to select a reliable web hosting provider that meets your website’s needs. Look for:
Server Speed: Fast servers for better performance.
Uptime Guarantee: At least 99.9% uptime to ensure availability.
Ease of Use: User-friendly dashboards and tools.
WordPress Support: Hosting optimized for WordPress websites.
Popular options include Bluehost, SiteGround, and WP Engine.
Step 2: Export Your Local WordPress Database
The database is the backbone of your WordPress site. To export it:
Open phpMyAdmin on your local server (e.g., XAMPP or WAMP).
Select your WordPress database.
Click on the Export tab and choose the Quick Export method.
Save the .sql file to your computer.
Step 3: Upload Your WordPress Files to the Live Server
To move your files:
Compress Your WordPress Folder: Zip your local WordPress installation folder.
Access Your Hosting Account: Use a file manager or an FTP client like FileZilla.
Upload the Files: Transfer the zipped folder to your hosting server's root directory (usually public_html).
Unzip the Folder: Extract the files once uploaded.
Step 4: Create a Database on the Live Server
Now, set up a new database on your live hosting server:
Log in to your hosting control panel (e.g., cPanel).
Navigate to the MySQL Databases section.
Create a new database, database user, and password.
Assign the user to the database with full privileges.
Step 5: Import the Database to the Live Server
Open phpMyAdmin in your hosting control panel.
Select the new database you created.
Click the Import tab.
Choose the .sql file you exported from your localhost.
Click Go to import the database.
Step 6: Update the wp-config.php File
To connect your site to the live database:
Locate the wp-config.php file in your WordPress installation.
Open the file in a text editor.
Update the following lines: define('DB_NAME', 'your_live_database_name'); define('DB_USER', 'your_live_database_user'); define('DB_PASSWORD', 'your_live_database_password'); define('DB_HOST', 'localhost'); // Keep this unless your host specifies otherwise.
Save the file and upload it to your server via FTP.
Step 7: Update URLs in the Database
Your localhost URLs need to be replaced with your live site URLs.
Use a tool like Search Replace DB or run SQL queries in phpMyAdmin.
In phpMyAdmin, run the following query: UPDATE wp_options SET option_value = 'http://your-live-site.com' WHERE option_name = 'siteurl'; UPDATE wp_options SET option_value = 'http://your-live-site.com' WHERE option_name = 'home';
Step 8: Test Your Live Website
Once everything is uploaded and configured, check your website by entering its URL in a browser. Test for:
Broken Links: Fix them using plugins like Broken Link Checker.
Missing Images: Ensure media files were uploaded correctly.
Functionality: Verify forms, buttons, and features work as expected.
Step 9: Set Up Permalinks
To ensure proper URL structure:
Log in to your WordPress admin dashboard on the live site.
Go to Settings > Permalinks.
Choose your preferred permalink structure and click Save Changes.
Step 10: Secure Your Live Website
After migrating, secure your site to prevent vulnerabilities:
Install an SSL Certificate: Most hosting providers offer free SSL certificates.
Update Plugins and Themes: Ensure everything is up to date.
Set Up Backups: Use plugins like UpdraftPlus for regular backups.
Conclusion
Moving your WordPress site from localhost to a live server may seem daunting, but by following these steps, you can ensure a smooth and error-free migration. A successful move allows you to showcase your site to the world, engage your audience, and achieve your goals.
Start today and take your WordPress project live with confidence!
0 notes