#bootstrap is making this entire process a LOT easier
Explore tagged Tumblr posts
Visit Tumblr Blog
Explore Tumblr blogs with no restrictions, modern design and the best experience.
Last Seen Tumblr Blogs


Fun Fact
The total number of visits Tumblr.com received during January 2021 is 327 million.
Text
Doing some more work on the comic viewer since I haven't worked on it for a few months :] I think it's coming along nicely! I'm not entirely sure what else I'm gonna add to it yet. The transcript system is a lil different than the one that the SC pages have and it's a little wonky so I'm thinking of altering it a bit but I'm not entirely sure how I'm gonna do that yet... We'll see.
#as of rn the transcripts are just collapsible tabs on each update but I'm gonna see if i can find a way to make it a little more-#-user friendly. i have a few ideas but i havent actually tested them at all yet so i guess we'll just have to see what i can do...#bootstrap is making this entire process a LOT easier#ill just have to see how i can make it a little more efficient. idk yet#right now my code is pretty complex and clunky and I'd like to reduce its complexity if i can#itll save me a lot of stress in the future i think...#text#btw i make posts like this bc this is currently a development blog!
30 notes
·
View notes
Note
Ooc: how did Tolya's upbringing shape how they view mental illness (their own and others')? How do they feel about the broader societal stigma towards mental illness & conversely the pockets of radical acceptance in their new world?
How did Tolya's upbringing shape how they view mental illness (their own and others')?
(BADLY. Tolya had incredibly high expectations placed on them from childhood while also struggling developmentally due to their neurological disorder. This was never recognized for what it was, and from a very young age they accrued baggage about not being able to keep up with others, or coming across as lazy or stupid.
The solution pushed for their falling behind was invariably Taking Personal Responsibility™ and just trying harder to push through because failure was not an option, and that idea being beaten in so consistently throughout their younger years left a permanent mark on them. There was a long while where they subscribed completely to the 'pull yourself up by the bootstraps' mentality, and their damaged self image from not being able to do so was weaponized against them very successfully, in a way that really reinforced a sense of desperate inadequacy and led to them more readily deferring to others.
In the early years of their freedom post-incarceration, Tolya had IMMENSE internalized ableism, and their self loathing, frustration, and the more troubling aspects of their delusions caught plenty of people in the crossfire. Openly anxious, paranoid, guilty, or especially meek people were easiest to project onto (negative), and their self flagellation would turn external and hostile quickly in the wrong situation. There has been a LONG journey taken to unlearn some of this bullshit and alter their behavior, even if it's still dangerously cathartic to other themself from their memories of who they were and look down on their past self's entire mental health situation.
How do they feel about the broader societal stigma towards mental illness & conversely the pockets of radical acceptance in their new world?
Eternal frustration that social attitudes make it difficult for people to seek help or even acknowledge mental health struggles. What a shame that THIS is what people feel so afraid to talk about and share of all things. They're also acutely aware that openly expressed mental illness, down to just seeming off or awkward or lost/annoying/inconvenient will be used against a person the moment they become any kind of a target, and they take note of egregious examples that victimize the ill (or homeless) specifically. There's A Lot more judgement about that happening behind the screen than they'll let on. On that note, they compulsively seek to be solace for those they see their own mental health struggles in. Even to a degree that doesn't serve them. As for the last part of the question; Y'all have no idea how easy it could still be to reduce this fucker to sobbing over unexpected shows of grace or forgiveness, especially if they've just had a fit of some kind or shown their hand regarding their mental health. This is stuff that online interactions can't get across but you have no idea.
It's easier than it used to be, but I expect it'll never be easy to process. NOW ON THE OTHER HAND, some things that you could call objectively maladjusted are falling under that Radical Acceptance umbrella and well. I'll say it's not helping their attempt at being Normal* and connecting to people. This is a Freak who Is having a lot of freak behaviors wholly enabled. Yay!)
5 notes
·
View notes
Text
Best Practices for Reducing JavaScript and CSS Bloat
When a website takes too long to load, visitors don’t stick around. In most cases, the reason behind this slow experience is something hidden under the hood—too much JavaScript and CSS code. If your site feels sluggish, it’s time to take a closer look at the code that's running in the background.
Let’s talk about what JavaScript and CSS bloat is, and more importantly, what you can do to fix it without getting lost in technical stuff.
What Is Code Bloat and Why Should You Care?
JavaScript and CSS are essential parts of any modern website. They handle everything from styling the layout to making buttons clickable and menus slide open. But when these files get too big or too messy, they slow down your site. That means longer load times, higher bounce rates, and lower rankings on search engines.
And it’s not just about speed. A slow site makes users frustrated. And frustrated users don’t become customers.
If you're running a business website or an online store, this could be the difference between gaining and losing customers. Even the best digital marketing company in Bhubaneswar would agree: speed matters.
Clean Up Unused Code
One of the easiest ways to cut down on bloat is to remove unused code. Websites often include large libraries or frameworks but only use a small part of them. For example, you might load the entire Bootstrap or jQuery library but only use a couple of features.
Use tools like Chrome DevTools, PurifyCSS, or UnCSS to scan your pages and remove the code that's not being used. This step alone can shave off a lot of unnecessary weight from your site.
Combine and Minify Files
Each time a visitor lands on your website, their browser sends requests for different files—CSS, JavaScript, images, fonts, and so on. The more requests, the longer it takes to load everything. A smart move is to combine multiple JavaScript or CSS files into one and then compress (or minify) them.
Minification removes spaces, comments, and unnecessary characters, making your files smaller and faster to load. Tools like UglifyJS for JavaScript or CSSNano for CSS are popular and easy to use.
Load Only What’s Needed
Why load everything on every page if it’s not needed? For example, a slideshow script is not needed on your blog page if the slideshow only appears on the homepage. You can use conditional loading or lazy loading to bring in files only when they’re required.
This reduces the initial load time and keeps your site snappy.
Use Asynchronous and Deferred Loading
JavaScript can block your page from loading if it’s not handled right. By using the "async" or "defer" attributes when linking JavaScript files, you tell the browser not to pause everything just to load a script.
Async loads scripts while the page continues to load. Defer waits until the rest of the page has loaded before running the script. Both can make a huge difference in how fast your page feels.
Avoid Inline Styles and Scripts
Adding CSS and JavaScript directly inside your HTML may seem easy, but it can get messy quickly. It also makes your files larger and harder to manage. Keeping your CSS and JS in separate files makes them easier to update and cache.
Plus, browsers store these external files so they don’t need to be downloaded again the next time someone visits your site.
Keep Your Code Organized
Even if you’re not a developer, it helps to keep your team—or your web agency—in the loop about best practices. Clean code isn’t just for show. It’s easier to maintain, faster to debug, and less likely to cause problems.
The best digital marketing company in Bhubaneswar will always make this part of their process when building or upgrading a website.
Final Thoughts
A fast, smooth website doesn’t just happen on its own. Reducing JavaScript and CSS bloat takes a little planning, a few smart tools, and regular cleanups. But the payoff is big: better user experience, faster load times, and improved search rankings.
You don’t need to be a tech expert to get started. Begin with the basics—remove what you don’t need, compress what you do, and load things wisely. Your visitors (and your bottom line) will thank you.
#online reputation management agencies#website development companies in bhubaneswar#ecommerce website development companies in bhubaneswar#shopify website development agency#best digital marketing company in bhubaneswar#digital marketing company near me
0 notes
Text
no shade but I don’t trust anyone that shits on early Martin for being a pushover, or thinks that his early characterization was somehow like, a “fake” version of himself until he “revealed” he was “actually” more confident later on
not to be like, “y’all have no concept of anxiety, emotional abuse, or self-worth issues,” but y’all literally don’t. ok sure, maybe Martin crafted that persona, in part, but ya wanna know why people do that?
when your very existence is treated like a burden-- especially from a young age-- you learn to make yourself smaller. you learn to move quietly, to talk softly, to simply nod and move on, and to shut down the parts of you that may be too big
because if you don’t? there’s going to be a fucking problem, and you’ll do everything in your power to stave off that hurt and rejection, even if it means denying yourself the simple joy of existing
and sure, that’s absolutely a kind of manipulation-- making people think you’re small on purpose. but coming from experience, it’s mostly just to prevent trouble and pain? it just makes life easier, to fade into the background, to make sure ppl underestimate and don’t bother you-- no chance for rejection if the people around you have no expectations, yeah? more often it’s a decision to not participate rather than a decision to actively warp others’ views, ya get me?
of course, I do think Martin takes a slightly more active role in trying to craft a soft persona for others, but I still don’t think it comes from a “fake” place? like, he does genuinely want to help others, and make ppl feel good and welcome? which makes sense coming from someone who was made to feel broken and unwelcome his entire goddamn life?? like, of COURSE he actively chooses to be kind and homely, he’s trying to give others the home he never had!!
and maybe, just maybe, if he can get one prickly, stubborn, bad-tempered person in his life to like him, then maybe he has a chance to fix things with the other prickly, stubborn, bad-tempered person in his life. just a thought.
"well if he did it on purpose, then that means it’s still fake--” NO
for one, there’s literally no possible way to untangle the knot of cause-effect here-- where does abusive influence stop, and where does Martin’s decision-making begin, exactly? where does an inherent personality trait stop, and an active cultivation of that trait begin? you can’t separate these things
BUT ALSO I think a lot of ppl have rly fucked up ideas abt self-identity in general, even outside of abusive scenarios. like, you CAN just choose to be a particular kind of person, if you want? choosing to be something doesn’t make it fake-- in fact, I think taking an active role in crafting yourself is a rewarding process, if it’s something you actually want to be doing
anyways, Martin partly choosing to be small doesn’t make that persona fake-- it’s still a version of himself! like, I get that this capitalistic hellscape forces us to dissociate from our work personas, but just b/c we may hate our jobs doesn’t mean that the part of ourselves we show at work is “fake”? like, I’m still ME at work, just a smaller me, y’know?
besides, do you rly think Martin should’ve just talked back to Jon-- his BOSS-- when Martin was already full of anxiety over lying on his CV? you rly think that would’ve been a smart decision, regardless of how “””real””” y’all think his self-worth issues are? y’all rly want him to risk his livelihood in s1 THAT bad??
but god like, it genuinely hurts to see ppl shit on characters like early Martin, and esp when ppl praise him for “finally” being a bitch in later seasons, like. you understand that blaming a person with self-worth issues, for their lack of confidence.... isn’t going to help them? like, how do u think it must feel for anxious folks to see meek characters mocked constantly, only for those characters to later be praised for “finally bucking up”?
like, hello? you don’t just “bootstrap” your way out of confidence issues! it only hurts to make ppl think that IS how it works, b/c they’re gonna start hating themselves MORE for feeling like they aren’t “strong enough” to pull themselves out of their anxiety all on their own!!
idk maybe I’m projecting too much, but a lot of what’s helped me heal from my own mom issues has been seeing my past self as a just a person rather than specifically *me*. b/c I may have trouble admitting that *I* deserved better, because it’s hard to admit that every situation isn’t automatically my fault. BUT I CAN admit that a confused 5 yo, a scared 10 yo, a nervous-wreck 15 yo child did NOT deserve the shit my mom put her through. because nobody deserves that-- NOBODY deserves abuse, it’s just a basic human right
so like, the hate for early Martin just feels like ppl are blaming him for being fucking abused? for having trauma that he hasn’t had the safe space and community to heal from yet? like, there’s a fucking reason he’s meek, and it’s not because he’s faking it, or because he somehow deserves it for the awful crime of not being confident enough?? fucking jesus
to be clear, I love “bitchy” Martin in later seasons-- it’s so rewarding to see him finally stick up for himself! but his confidence issues weren’t fake, nor do I blame him for being meek in early seasons-- hell, s5 even confirmed that these issues aren’t even gone! Martin still doesn’t see himself as worth much, even if his anxiety has been pushed to the background in the face of so much other violently traumatizing shit
meek Martin is still a real Martin, and ‘bitchy’ Martin isn’t a “better” Martin
#martin blackwood#the magnus archives#THIS IS INCLUDING ALEX HIMSELF ALRIGHT. ALEX I LOVE YOU BUT STOP BEING MEAN TO MARTIN#Diana and I were talking abt this and like#it LITERALLY is like how certain HS fans unironically buy into the whole 'Vriska did nothing wrong' thing#I DO NOT fucking trust anyone who thinks Tavros is the reason for Vriska's bad behavior I will blow a gasket#shut up ashley#long post
20 notes
·
View notes
Text
Benefits of Angular JS based Applications
AngularJS was introduced in the year 2009, by Google. AngularJS is a software framework used worldwide by developers. The entire base of this framework is open source. AngularJS has gained popularity among developers because of how it has become for them to create web applications. AngularJS helps in building apps that require less work and reduces the use of unnecessary codes. AngularJS is also used as a platform for developing frameworks for single-page apps, these are created with the help of CSS. javascript, and HTML. The coding system for angularJS was written in TypeScript. AngularJS easily implements optional and core functions into its typescript libraries, this is then imported by app developers for work.

AngularJS application development is a javascript framework. AngularJS has a clear goal to make the entire process simpler, it also helps app development process and operations as much as it could. AngularJS is used for building applications that support MVC (model view controller) and SPAs (single page web apps) coding and programming structures. AngularJS has been used by some of the top companies in the world to simplify their app development process, like, Google, Paypal, Udemy, mobile site in iPad for HBO, etc.
AngularJS has a lot of aspects that make it different and much better than the other coding frameworks out there.
1. AngularJS is a front-end and open-source framework from JavaScript.
2. The libraries of AngularJS do not need a lot of changes.
3. AngularJS has a library of JavaScript codes, these codes are based on HTML and JavaScript.
4. AngularJS has the ability to handle heavy liftings.
5. HTML pages can be added on AngularJS with a script tag only.
6. Developers with the help of AngularJS can easily use modular building blocks by JavaScript.
7. AngularJS helps in developing single-page applications.
AngularJS benefits

1. Easy to learn by anyone.
AngularJS can be easily learned by developers who know how to use HTML, CSS and JavaScript. Learning about AngularJS has a lot of benefits and opportunities for website development. Any new developer can learn AngularJS by watching tutorials online or by attending workshops on web application development. Online tutorials are better options for developers because they can learn and practice at the same time. Once a developer learns how to use the AngulaarJS framework, they can easily develop web applications.
2. Two-way binding feature.
AngularJS helps in synching application views and model views together. If developers have altered any app data into the model view, it will be easily reflected into the view by the framework. And likewise, any new change in the view data will be reflected into the model view. With two binding features, developers are able to simplify the process of the presentation layer. This helps developers use a less invasive approach to their UI systems.
Data binding has its features for developers and web apps.
1. Data binding is a simple programming procedure.
2. Reduced boilerplate code quantity.
3. There are fewer errors due to the test controller systems.
4. With this, developers do not have to write codes that help in synching the model view and the view together and vice versa.
5. Data binding allows MVVM architecture.
6. You write fewer codes with the help of data bindings. When a developer works with AngularJS, it becomes easy for them to write fewer codes and helps them achieve goals on time and increases efficiency.
3. Ionic framework.
Ionic frameworks are a front-end software development kit for mobile application development. The ionic framework allows the use of different UI systems to give the user a powerful feel while using the app. You can hire AngularJS developer to get your app built which will be future-ready.
4. AngularJS supports SPA features.
The main motive of developing single-page apps is that they are faster and easier to build and provide faster web functions. These apps can then function like native applications. Websites with the help of this can easily communicate with a web browser. The website will have to replace the existing web page. This helps in loading new pages with the help of server data. This entire process is known as SPA (single page app).
5. UI systems.
AngularJS helps in making portable UI applications. These include both angular stages and bootstrap stages. AngularJS is able to implement HTML, this is a language that helps in creating new, intelligent and flexible UI systems. The coding style in UI systems is very The templates used in AngularJS have different features and filters, these are form-controls, models, ng-apps, etc. UI systems help in making things much easier to understand. When developers use binding tools for connecting the components of UI with different data models. Designers can easily work with creating UI systems only and developers can work on developing components for UI. This helps both parties work together.
6. AngularJS has support from Google.
The AngularJS framework is supported by Google. Google uses this for their own application development. Google has hired dedicated angular JS developers, who help in making new and advanced improvements in their software systems. Many developers have gained credibility from Google. AngularJS has developers from around the world and they have their own network system now. This helps them make important suggestions from time to time.
7. Web application management.
Most of the time developers have to break down codes into three parts, model, view, and control. This is because they have to merge codes of different components. With the help of AngularJS, developers can save time by automatically connecting codes. In angularJS, the model component helps in maintaining and managing data from different applications. The view model components help in displaying only specific parts of a data browser to its users. And control components are able to entirely dictate the connection of different models and view components. MVC makes it easier for developers to manage UI codes and databases.
8. Better number of flexibility in apps.
The framework for AngularJS comes with different special designs for architectural purposes and for improving the server performance. AngularJS framework is also very convenient to use for app development. This is the main reason behind angularJS software systems popularity among developers and programmers.
9. Security in AngularJS framework.
No matter what you are doing or where you are, security is one of the main concerns. Even while developing an application, security is a big concern. Any kind of security breach can cause the company a ton of money and data malfunctions. No one can afford to take a risk this big. But when you use AngularJS from developing web software systems, you use representative state transfer systems, APIS, etc for the HTTPS interface. This is to connect various servers to interact and offer data and app protection from viruses and threats.

Conclusion
AngularJS framework comes with has made the lives of developers much easier. AngularJS is one of the most important frameworks of JavaScript and has huge benefits for its users, businesses and developers. Using angularJS in your software systems can help improve the performance of web pages and sites. You can also grow your business to the next level with the help of this coding tool. You can hire dedicated angular JS team in the USA, Canada, UAE, Saudi Arabia, etc. These teams will help you understand and simplify the entire software development process better.
#hire angular js developer#hire dedicated angular js developer#angular js application development#hire dedicated angular js team#hire best angular js application developer#software development#app developer
1 note
·
View note
Text
The lovely @jsunshine tagged me for the three random facts thing! So, here goes:
1. Because @zerocarb asked for the story: I used to live in a dilapidated trailer with a trashbag over a hole in the kitchen floor and an entire room that simply stayed closed because it was covered in black mold. This was during my senior year of high school. I had early release, so I went to school from 7-11am and then worked full-time as the third-key manager of a Suncoast (a video store. . .I’m old). I lived in that sh*thole because I was a high school student and no one legit would rent to me and there wasn’t much I could afford. Eventually, the delightful human who would go on to be my ex-husband moved in with me to make 2001 one of the worst years of my life. Still, that whole period of my life helped to make me who I am, and I don’t regret it at all.
2. Why on earth did I move out in high school if I was going to live like that? At the end of middle school (for me), my older half-sister committed suicide. In her note, she talked about how much “easier” life was for me and a lot of other things that my young brain took as her blaming me for her not wanting to live anymore. I didn’t process until MUCH later that she had bipolar disorder which was untreated at that time and also that there’s only so much control you can have over other people’s perceptions of you. Things were not easy for me in middle school. And, after that, they got worse because I somehow tried to compensate by only feeling entitled to love or kindness if I “earned it” (read: I let a lot of people use me and treat me like garbage and then when they’d have moments of being kind to me, I felt like those were the only moments I deserved). I kept anyone who was good to me (like my now husband who was my friend in high school) at arm’s length. My parents were reeling from their loss and didn’t have any idea how I was handling it or what my thoughts were--they just saw me pulling further and further away from them. They didn’t want me to move out, but they let me make my own choice (and, I turned 18 during my senior year).
3. The opportunities I had when I got (surprise) pregnant with Conner and decided that I did not want my life being his definition of “normal” or my ex-husband being his daily example of manhood allowed me to be in the extremely fortunate position I am in today. I am under NO illusion that I simply “picked myself up by my bootstraps.” Yes, I made decisions and took steps to change the course of my life, but I got a LOT of help along the way. I don’t talk a lot about my politics here because I think screaming into the social media void changes exactly nothing and if I’m going to argue my beliefs, I’ll do it in person, but I feel very passionately about social justice and health justice and there was never a single doubt that pursuing a career in social work was it for me.
Tagging: @youknowyoulovemexoxojennifer, @meishafindingbalance, and @beenjen
60 notes
·
View notes
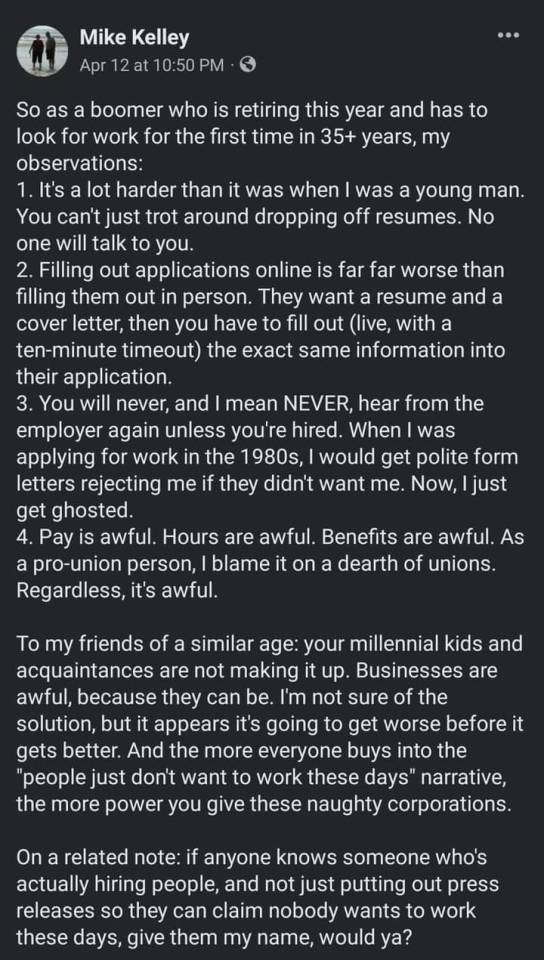
Text
So interesting thing about this is that it's not entirely wrong but the framing on it is a bit weird. Things were definitely different back when this person was probably originally looking for work but my mother specifically taught me growing up that whenever she was getting work that the one thing she would have to do is get back in touch with people who she is trying to work for.
I was explicitly told that one of the things that I had to do with tester the people who I am applying with to make sure that they are indeed looking at my application. This was my mother's version of pull myself up on my bootstraps and hit the pavement. Grant you my mother was born in the seventies.
And while yes I agree that wages are fundamentally different than they used to be and pay and benefits are definitely different than they used to be you can't compare things to how they were before. Between inflation and various amounts of red tape and legislation things are going to change.
And while yes it is more difficult to get a job now sometimes there are also far more jobs now in existence than there ever have been. More so a lot of those jobs do not pay dirt wages. There are also lots of different methods you can use to find work.
You have websites like monster.com, indeed.com, and other similar websites that are aggregates to help people find work. Also many cities often throw job fairs that help people get into the door of jobs like warehouse workers welders and other jobs where they can train you on site.
What's more outside of job fairs there are actual places like the company Manpower, that will actually contract you out to varying different jobs until one likes you and will take you on. There are resources on top of resources on top of resources that you can use to get work and I don't condemn a boomer for not knowing that.
However today is youth have a tendency to not understand that there are a lot of different avenues that are used to get work. And sometimes it'll be a job they know absolutely nothing about and be at a company they've never heard of. The issue however, is the fact that during the Boomer era it was super easy to just walk into a building walk up to a clerk and ask them for a application.
Honestly if I'm not mistaken most companies are still required to provide paper applications because not everybody has absolute access to the internet or good internet for that matter.
I don't think that their sentiment is wrong. But I think that a boomer trying to Trek into the job Force after having not been a part of it for a lengthy period of time is very much not understanding how things were for Gen x and older millennials. Because a lot of today's work and labor are easier generally speaking than they used to be.
Because things during the silent generation were not sunshine and rainbows. And a lot of the work they did back then was not OSHA compliant. Was extremely high risk. And was exceptionally difficult labor jobs. Mind you, those jobs do still exist. But between red tape and modern conveniences a lot of those jobs are not nearly as difficult.
His experience is less of a "yes things are harder", and more a lack of understanding of the generational Gap that he missed. The dynamic for applying to jobs changed significantly in the 80s and 90s. Even in the 00's. And like I mentioned before there are resources stacked on top of resources stacked on top of resources for people to get work.
It's just that a lot of people are not persistent enough or driven enough to go through the processes for that.
120K notes
·
View notes
Photo

Recent Trends And Developments In A WP Theme Bundle
In today’s ultramodern world, where a website is a basic need for every business or profession; you need to add various elements to your website to make it even more attractive. Have you ever thought why would people visit or see your website when there are thousands of websites available? In order to make your website noticeable, you need to be different from the others. Adding design elements and effects to your website can be a way that may prove helpful in attracting the visitors.
The WordPress theme bundles that are being made recently are packed with themes that have special elements to make your website dazzle. With many fascinating and distinct attributes, the themes have been upgraded and included in the WP theme bundle. There some recent trends that many theme developers are following for making the WP theme bundle more fascinating.
More Color Options For Content
A set of new features is introduced by WordPress to the content editor with the help of a new block-based Gutenberg editor. This new editor has many new features. Among those is the ability to add the background color to content blocks without the need of writing any code. With this cool option, you can now highlight any of the sections of a particular blog or page with ease. WordPress wants to popularise these features. It wants the majority of the users and developers to start using the styling options as well as the distinct features of this new editor. The themes that now have this advanced Gutenberg editor are being included in the WP theme bundle. Using the unique features of the editor, you can make blog posts, websites and pages look more alluring and colorful as well.
Special Animations And Effects
To offer an entertaining experience to the user, adding attractive animations to the website is a great option. However, most of us have already seen the hover effects and all other kinds of animations. And hence, they don’t seem to fascinate the audience anymore. Adding motion effects is the newest trend that is being followed in WordPress theme animations. This is an advanced strategy that is implemented to create animation experiences that are based on page-scrolling and mouse-hover. It is not a completely new trend in web design. You can call it a modified or advanced animation effects that give the web developers and theme designers to make more attractive themes and web pages with stylish motion effect animation. This trend is followed by the themes that are packed in the latest and best WP theme bundle.
Design Enabling Section Scrolling
The new design trend enables section scrolling that is made to replace the parallax scrolling. Though this trend is based on the parallax scrolling effect, the Section scrolling is here to offer the users with a convenient and smoother experience. There are so many positives of section scrolling. You don’t need to move over the entire page any more while scrolling down. With section scrolling, you can browse a particular section at a time. The need to create sticky menus is eliminated. Also, you don’t need to scroll all the way to find the navigation links. Due to all these positives, this design trend is already picking up and now you can see more WP theme bundle with themes that have adopted this trend.
Allows Content Overlapping
Earlier, the designers were confined to work within a particular limit as they were forced to make websites as per certain standards so that the website remains fully functional. This had hampered their creative ability because they were unable to explore their creativity and implementing them in creating distinct and unique website experiences. Thankfully, because of much new advancement in the page builder plugins, the designers are now able to come out freely with their creativity through WordPress themes. As a new wave of creative theme designs, there is a trend of overlapping design. This happens to be so unique that they make an appeal for visiting your site. Earlier it used to be challenging especially when it came to optimizing the websites. Such themes are included in WP theme bundle. The bootstrap frameworks and page builder plugins make the process a whole lot easier.
Color Palletes With Gradient Color
Colorful website designs are all over the place as we see now. To develop such colorful websites, WordPress themes are also being developed accordingly. The use of vibrant colors in web designing has made the page look appealing. At the same time, it engages a diverse range of audiences. The use of gradient colors is the step ahead in designing WordPress themes. If you go on browsing for a good WordPress theme, you will be automatically attracted to colorful themes.
The themes or websites that stand out and catch your eye instantly are the ones with alluring and modern gradient colors. Keeping this in mind, all the themes that are now being included in a WP theme bundle are now upgraded to have a gradient color design.
Mobile-First Design
Optimizing a theme for mobile devices was something that was rarely cared about. This scenario has changed drastically with the growth of the mobile market. As more than seventy percent of internet traffic is coming from mobile devices and smartphones, there is a need for mobile-friendly themes. So, designers need to explore ways to get designs that are mobile-ready with an objective to get an optimized experience on mobile devices as well.
All the effects that are set and designed for themes to look great in desktop view must also be designed to suit well on mobile devices as well. the designers are implementing these changes so that the users should be able to get a fantastic mobile experience. In a WP theme bundle, you now get such kind of mobile-friendly and responsive themes.
#WP theme bundle#WordPress theme bundle#best WP theme bundle#WordPress theme bundle sale#premium WordPress theme bundle#best WordPress theme bundle
1 note
·
View note
Text
Nintendo Switch Kernel Patching and Emulation - Achieving Maximum Modification Flexibility with Minimal Replacement
Ever since shofEL2 was released earlier this year it's been interesting to watch how different custom firmwares have tackled the prospect of modifying Nintendo's firmware for both homebrew and piracy applications, and as someone who hasn't really had much stake in that race I feel like it's interesting to watch how different solutions tackle different problems, but at the same time since I do have a stake in a few places (namely, Smash Bros modding, vulnerability hunting, personal projects) I ended up in a situation where I needed to sort of 'set up camp' with Nintendo's Horizon microkernel and have a comfortable working environment for modification.
Binary Patching is Weird, and Horizon makes it weirder.
Probably the biggest difficulty in Switch development I would say is iteration time, followed by a general difficulty in actually modifying anything; even just booting modified core services (ie filesystem management, service management, spl which talks to the EL0 TrustZone SPL [commonly misnomered as the security processer liaison...?], the boot service which shows boot logos and battery indications, ...) requires, at a minimum, reimplementing Nintendo's package1 implementation which boots TrustZone and patches for TrustZone to disable signatures on those services and kernel. Beyond the core services, modifying executables loaded from eMMC requires either patching Loader, patching FS, reimplementing Loader, or something else.
Unfortunately with binary patching there generally isn't a silver bullet for things, generally speaking the three methods of modifications are userland replacement, userland patching, and kernel patching. The first two are currently used for Atmosphere, but the solution I felt would be the most robust and extensible for the Nintendo Switch was kernel patching. Here's a quick rundown on the pros and cons for each method:
Userland Replacement
- Requires rewriting an entire functionally identical executable - Often not feasible for larger services such as FS - Can easily break between firmware updates, especially if new functionality is added or services split. This makes it difficult to maintain when the OS is in active development. - Added processes can potentially leave detectable differences in execution (different PIDs, different order of init, etc) + Easier to add functionality, since you control all code + Can operate easily on multiple firmwares + Can serve as an open-source reference for closed-source code
Userland Patching
- Adding additional code and functionality can be difficult, since expanding/adding code pages isn't always feasible without good control of Loader - Finding good, searchable signatures can often be difficult - Can easily break between firmware updates, especially if functionality or compilers are tweaked + With good signatures, can withstand firmware updates which add functionality + Often has less maintenance between updates when functionality does change; patching is usually easier than writing new code + Harder to detect unless the application checks itself or others check patched applications
Kernel Patching
- Greater chance of literally anything going wrong (concurrency, cache issues, ...), harder to debug than userland - Minimal (formerly no) tooling for emulating the kernel, vs userland where Mephisto, yuzu, etc can offer assistance - Can easily break between firmware updates, and is more difficult (but not impossible) to develop a one-size-fits-all-versions patch since kernel objects change often - Easier to have adverse performance impacts with syscall hooks + Harder to detect modifications from userland; userland cannot read kernel and checking if kernel has tampered with execution state can be trickier + Updating kernel object structures can take less time than updating several rewritten services, since changes are generally only added/removed fields + Direct access to kernel objects makes more direct alterations easier (permission modification, handle injection, handle object swapping). + Direct access to hardware registers allows for UART printf regardless of initialization state and without IPC + Hooking for specific IPC commands avoids issues with userland functionality changes, and in most cases IPC commands moving to different IDs only disables functionality vs creating an unbootable system.
mooooooo, a barebones Tegra X1 emulator for Horizon
Obviously the largest hangup with kernel patching is debugging, the Switch has RAM to spare (unlike 3DS) and setting up an intercept for userland exceptions isn't impossible to do by trial and error using SMC panics/UART and a lot of patience, but for ease of use and future research I really, really wanted an emulator to experiment with the Switch kernel. I ended up building a quick-n-dirty emulator in Unicorn, and with a few processes it works rather well but it still struggles with loading Nintendo's core processes currently, but for a small and contained test environment (two processes talking to each other and kernel patches watching them), I would say I had reached my goal and it was enough to at least be able to work quickly and sanely on my intercept.
For the most part, the Switch Horizon microkernel doesn't actually use much of the Tegra MMIO; it uses some of the more obvious ARM components like GIC for interrupts, and it also has a large initialization sequence for the memory controller, but as long as interrupts are functional, timers work, MC returns some correct values and SMC return values are all correct, it boots into userland without issue.

I actually found that emulating multiple cores in Unicorn actually isn't all that difficult, provided you're using a compiled language where uc_mem_map_ptr works. Rather than messing with threads, I opted for a round-robin scheduling scheme where I run each Unicorn instance for a set number of instructions, with memory being mapped and unmapped from the running core so that any cached data gets written out before the next core has its turn. A lot of modifications/cherry-picking to Unicorn did have to be made in order to properly support interrupts, certain coprocessor registers (ie core indexes), translation tables (for uc_mem_read/uc_mem_write, vaddr->paddr translation, and just in general there were some odd issues).
Patching Horizon for Syscall MiTM
With a decent environment for modifying kernel, the next issue really just became actually bootstrapping an SVC intercept. Figuring out where exception vectors are located isn't difficult with the emulator handy, but really the issue becomes
1. Extra code has to be loaded and copied by TrustZone, along with kernel 2. New code needs to be placed in a safe location and then given memory mappings 3. Existing code needs to be modified with hooks pointing to the new code
To guide the kernel towards salvation I ended up hooking just before translation table addresses are written into coprocessor registers. This way, the payload can allocate pages and copy code from less-safe soon-to-be-condemned .bss memory for the bulk of the SVC interception code, set up those pages in the translation tables, and then patch the ARM64 SVC handler to actually jump to the new mapping. For ease of development, the mapping is given a constant address along with any hardware registers which it needs to access, as opposed to being randomized like the rest of the kernel.
In the end, patched the kernel executes as follows:
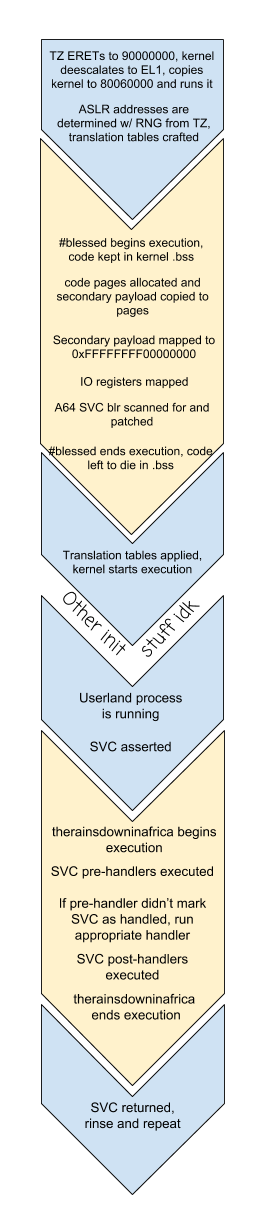
Since hashtagblessed is able to map UART, CAR and PINMUX registers into translation tables, getting communication from the right Joy-Con rail using existing BPMP-based drivers was fairly straightforward, and even without any source code to reference there's a fairly basic driver in TrustZone. Between the transition from emulation to hardware however, I had kept an SMC to print information to the console, but I ultimately ended up using UART even in emulation. On hardware, I got by using UART-B (the right Joy-Con railed) for a while, but had to switch to UART-A (internal UART lines for debugging) due to GPIO issues once HOS tried to initialize Joy-Con.
Identifying IPC Packets, Accurate Results With Simple Tools
With therainsdowninafrica loaded, hooked in and blessed, the next step is actually being able to identify specific IPC requests sent through svcSendSyncRequest, and doing this requires getting our hands dirty with kernel objects. Userland is able to utilize different kernel objects indirectly through the use of handles and system calls. Each KProcess has a handle table which maps handles to the underlying object structures, so translating handles to KObjects is simply a matter of checking the table for a given handle passed to a syscall. To access the current KProcess object which has the handle table, we can use the per-core context stored in register X18 as of 5.0.0 (prior to Horizon implementing ASLR, it was stored in a hardcoded address per-CPU) and the handle table can be accessed through the current KProcess object. Printf debugging was extremely useful while figuring out exactly how KProcess has its fields laid out since the structure changed slightly between versions, and with a bit of reversing added in it's not particularly difficult to figure out exactly where the KProcessHandleTable is at how handles are translated into objects.
Probably the most useful fields in KProcess/KThread, in our case, are the process name and title ID, the handle table, and the active thread's local storage, where all IPC packets are read from and written to. To give a quick overview on how Switch IPC generally works, services are able to register a named port to wait for communications on which can be connected to by other processes via svcConnectToNamedPort. In practice, Nintendo only uses globally-accessible named ports for their service manager, `sm:`. On a successful call to svcConnectToNamedPort, processes recieve a KClientSession handle for sm: which allows those processes to send IPC requests to the service manager to either register/unregister/connect to 'private' named ports managed by the service manager, with sm checking whether the requesting process actually has access to said service.
From a practicality standpoint, since so much communication relies on IPC the most obvious mechanism to establish is a system for hooking requests going into specific named ports, both globally accessible ones such as sm: and private ones provided by sm itself. This kinda leads into why it's important to have access to the underlying KClientSession objects as opposed to trying to track handles; mapping out exactly which KProcess' handles go to what, while also tracking where handles might be copied and moved to is an almost impossible task, however mapping specific KClientSessions to specific handlers avoids the handle copying/moving issue since the KClientSession object pointer does not change in those cases.
Additionally, many interfaces aren't actually accessible from either svcConnectToNamedPort nor sm, as is the case with fsp-srv which gives out IFileSystem handles for different storage mediums. However, by providing a generic means for mapping KClientSession objects to specific intercept handlers, you can set up a chain of handlers registering handlers. For example, intercepting a specific eMMC partition's IFile's commands would involve setting up a handler for the sm global port, and then from that handler setting up a handler for any returned fsp-srv handles, and then from the fsp-srv handler checking for the OpenBisFileSystem command for a specific partition to hook the IFileSystem to a handler, which can have its OpenFile command hooked to hook any outgoing IFile handles to a specific handler for IFiles from that eMMC partition. From that point all incoming and outgoing data from that IFile's KClientSession can be modified and tweaked.
Finally, in order to prevent issues with KProcess handle tables being exhausted, Nintendo provided virtual handle system implemented in userland for services which manage large amounts of sessions. Effectively, a central KClientSession is able to give out multiple virtual handles (with virtual handles given out by virtual interfaces) only accessible through that KClientSession handle. As such, a process can take a service such as fsp-srv and with a single handle can manage hundreds of virtual interfaces and sub-interfaces, easing handle table pressure on both the client and server ends. These handles can be accommodated for by watching for KClientSession->virtual handle conversion, and then keeping mappings for KClientSession-virtual ID pairs. And again, since copied/moved KClientSessions keep their same pointer, in the event that somehow the central handle and a bunch of domain IDs were copied to another process, they would still function correctly.
Tying it All Together
Let's take a look at what it would take to boot homebrew via hbloader utilizing only SVC interception. The key interface of interest is fsp-ldr, which offers command 0 OpenCodeFileSystem taking a TID argument and an NCA path. From a userland replacement standpoint, booting homebrew involves redirecting the returned IFileSystem to be one from the SD card rather than one from fsp-ldr, since Loader (the process accessing fsp-ldr) doesn't really do any authentication on NSOs/NPDMs, only FS does. From a kernel standpoint, we just need to watch for an IPC packet sent to fsp-ldr for that command, hook the resulting handle, and then for each OpenFile request check if an SD card file can better override it. From there, swap handles and now Loader is reading from an IFile on the SD card rather than an NCA.
Taking a few steps back, there's obviously a few things to keep in mind: Loader never actually accesses the SD card, in fact it doesn't even ask for a fsp-srv handle. Since it is a builtin service it has permissions for everything, but the issue still remains of actually making sure handles can be gotten and swapped in. As it turns out, however, calling SVC handlers from SVCs is more than possible, so if Loader sends a request to sm asking for fsp-ldr, we can send out a request for fsp-srv, initialize it, and then send out the original request without Loader even knowing.
Interestingly, the first thing Loader does with its fsp-ldr handle is it converts it into a virtual domain handle, so that all OpenCodeFileSystem handles are virtual handles. This does make working with it a little more tricky since the code filesystem and code files all operate under the same KClientSession object, but it was an issue which needed resolving anyhow. For SD card IFile sessions, it also means that we have to convert them to virtual handles and then swap both the file KClientSession handle and the file virtual handle ID, while also watching for their virtual ID to close so that we can close our handles at the same time and avoid leakage.
A few other tricks are required to properly emulate the SD redirection experience: swapping in handles isn't the only concern, it's also important to ensure that if the SD card *doesn't* have a file then that error should be returned instead, and if the SD card has a file which doesn't exist in the original IFileSystem, we still need a file handle to replace. To accomodate for this, the original FileOpen request is altered to always open "/main" and if the SD card errors, that virtual handle is closed, and otherwise the SD handles are swapped in.
The end result is, of course, the homebrew launcher being accessible off boot from the album applet:
youtube
Other Potential Thoughts for Kernel Stuff
* Process patching is as easy as hooking svcUnmapProcessMemory and patching the memory before it's unmapped from Loader. Same goes for NROs but with different SVCs, all .text ultimately passes through kernel. * Reply spoofing. IPC requests can simply return without ever calling the SVC, by having kernel write in a reply it wants the process to see. * SVC additions. I'm not personally a fan of this because it starts to introduce ABIs specific to the custom firmware, but it's possible. One of the things I'm not personally a fan of with Luma3DS was that they added a bunch of system calls in order to access things which, quite frankly, were better left managed in kernel. The kernel patches for fs_mitm also violate this. Userland processes shouldn't be messing with handle information and translation tables, i m o. That's hacky. * Virtual services and handles. Since the intercept is able to spoof anything and everything a userland process knows, it can provide fake handles which can map to a service which lies entirely in kernel space. * IPC augmentation: Since any IPC request can be hooked, it can be possible to insert requests inbetween expected ones. One interesting application might be watching for outgoing HID requests and then, on the fly, translating these requests to the protocol of another controller which also operates using HID. * IPC forwarding: similar to augmentation, packets can be forwarded to a userland process to be better handled. Unfortunately, kernel presents a lot of concurrency issues which can get really weird, especially since calling SVC handlers can schedule more threads that will run through the same code. * As currently implemented, A32 SVCs are not hooked, however this is really more an issue if you want to hook outgoing requests from A32 games like MK8, since services such as Loader will generally only operate in a 64-bit mode.
Source
Horizon emulator, https://github.com/shinyquagsire23/moooooooo
therainsdowninafrica, https://github.com/shinyquagsire23/therainsdowninafrica
2 notes
·
View notes
Text
Is Full Stack Development Better Than Mean Stack Development?
Here comes the question, which development option is better? Full-stack development or mean stack development? Here we will try to figure out these questions. Some of you might have been working on full-stack development while some of you might be planning to go for it. In today’s article, we will talk about what full-stack development and mean stack development actually are and then will try to answer the question that whether full stack development or mean stack development is better? Which one should you go with? We hope our discussion will help you in understanding which one suits your business requires more and makes your business successful.

1) What is Full Stack Development?
Full-stack development is a term used to describe a web application that incorporates all layers of the web stack, including both front-end and back-end components. A full-stack developer can be responsible for creating and maintaining each layer of an application. Depending on how their skill set is applied, they may create and design each component as well as code it. At its most basic level, full-stack development means that one person or company is responsible for building an entire product or service.
2) Advantages of hiring Full stack development Company
If you want to build a robust web app then you can hire full-stack developers. This will ultimately help you in building the application as per your business demand. When it comes to building an application, there are multiple ways that you can go about it. A lot of startups end up using what’s popularly known as the mean stack or full-stack. It refers to a specific architecture when it comes to developing applications and websites. If you decide to use the mean stack for your web app, then there are a couple of advantages that will come your way: fast deployment, easy scaling, and quick response time in production environments. In addition to that, development is relatively easier when compared with other options because most tasks can be handled by developers working on their own part of a project.
3) What is mean stack development?
Mean stack refers to MEAN (MongoDB, ExpressJS, AngularJS, and Node.js) is a full-stack JavaScript framework for developing server-side Web applications. Here each layer of MEAN app development means MongoDB: It is a JavaScript object store that uses JSON documents with schemas. ExpressJS: It is a web application framework or web app engine used to develop routing and middleware.
4) Difference between full stack and mean stack development
Full-stack development deals with two to three different languages. Whereas, mean stack deals with one language for both front-end and back-end development. Both types of developers must have in-depth knowledge of JavaScript programming language, CSS, HTML, etc. There are various full-stack frameworks available online that help in building full-stack applications like Bootstrap (Javascript), Meteor (NodeJS) Angular (JavaScript), etc. While using MERN (MongoDB + Express + React + Nodejs) you will be mainly using one language for both back-end and front-end i.e JavaScript. By using MEAN stack, your web application is easier to develop as it uses just one language, as such there is lesser scope for bugs and error due to less scope of multiple coding languages involved. Also, MEAN Stack has a greater community support system online. It means that if at any point you face a hurdle while developing an app on your own or run into a technical issue then you can take support from a number of people across the world who use MEAN Stack or know about it well enough. On the other hand, if you go by the full-stack approach then it can lead to lesser code reusability hence chances are high that someone may need some extra time to write new codes for similar components that were already written by someone else earlier on at some point during the application development process. Also Read: https://www.valuecoders.com/blog/technology-and-apps/full-stack-developer-vs-mean-stack-developer/
0 notes
Text
How To Launch An Ecommerce Business In 24 Hours

5 Fast And Easy Steps To Launch An Online Ecommerce Business Today

How To Launch An Ecommerce Business In 24 Hours There are many different ways to start a business, but one of the most popular and fastest methods is starting an eCommerce store. This article post will outline some of the steps on how you can launch your own eCommerce Business in as little as 24 hours! As we all know, there's more competition in online business today than ever before. So if you're looking for a way to get ahead of your competitors, then this article is perfect for you! It'll show you how to be creative with product selection and e-commerce marketing strategies that work. https://youtu.be/_2tGlY6xMzI How To Launch An Ecommerce Business In 24 Hours In the past, starting your own e-commerce business was a lot more difficult than it is today. There were many people who had great ideas and good products but didn’t know how to build an online store or start marketing their brand. Fortunately, there are now a number of different options for building an e-commerce website without knowing any coding skills. If you have a great idea and are willing to put in enough time to market you can do it! Here's what you'll need: A domain name, a website builder or template, the products that you want to sell, a payment processor, and a good online e-commerce marketing strategy. You can find more information on how to start your own e-commerce business with these three simple steps.
1. Decide What E-commerce Products You Want To Sell
The first thing you'll need to do when launching an e-commerce business is determining what products you want to sell. If you're not sure, then it's best to start with a few things that are easy to ship and have a high demand. From there, you can grow your inventory and your customer base as needed. Here are a few e-commerce businesses that many e-commerce entrepreneurs have started successfully: Clothing, accessories, jewelry, food, and drink. In each case, I would search for "how to start an e-commerce business" from Google. The first page results usually have great guides on the best products to sell when you are looking to start up your own e-commerce store and brand.
2. Get A Quality Ecommerce Domain Name
Signing up for an account at GoDaddy, BlueHost or any other domain hosting provider is free of charge. There are plenty of different domain name options available and you should choose one that fits the nature of our e-commerce business. There will be a number of options to choose from, so you should go through the entire list and try to find one that is different but also easy to remember.
3. Choose An E-commerce Website Builder or eCommerce Website Template
If you want to start an e-commerce business on a budget, then Wix and Weebly are two great options for building your website. You don't need any technical knowledge to set up a website with these two providers, and they will help you optimize your e-commerce web page for SEO. Accessing the templates that come with these websites is easy and shouldn’t take more than 5 minutes to complete. You can also choose from an entire library of different styles and themes if you want to change the appearance of your website later on. There are some other great options for website templates as well, so you should do a little bit of research to see what would work best for your needs. You don't need to spend any money if you want to start an e-commerce business now, but it is worth investing in a good template or theme. A free option that offers a little bit more creative freedom than the templates on Wix or Weebly is to build the website yourself. There are some great tools for building websites without any coding skills, and you can use one of these for your e-commerce business as well. One of the best options out there is Bootstrap, which is a front-end framework that is easy to use and can help you build a website without any coding skills. Bootstrap offers plenty of different templates, components, and styles for your e-commerce website, and it will save you plenty of time in the long run. The free version is enough to get started with an e-commerce store, but you can also upgrade to Pro or Extra for more features. It might seem a little complicated at first, but using Bootstrap is not all that different from using Wix or Weebly. Anyone who has built an e-commerce website before should have no problem getting the hang of things with this tool. There are plenty of other frameworks as well, and you should consider your options before choosing one for your e-commerce site. Bootstrap is a great way to get started with an e-commerce business without any coding skills but there are also some other great options out there. Although most of the work will be done on the inside, you will also need to focus on the appearance of your e-commerce site. It is very important that you pick a theme or design that looks professional but also differentiates itself from other websites in its industry. It is possible to choose a free option or build the website yourself, but this can be complicated and time-consuming. You can try to find some good-looking templates online, but some of them might not be the right fit for your business. You should also consider spending a little bit of money on a premium theme or design if you want to create an e-commerce site that is appealing and welcoming to customers. A great alternative to templates is Shopify themes, which cost from $49 to $199 depending on what you need. These themes can be a great investment, and they allow you to build an e-commerce site without any coding skills or design experience. You will want to take your time on this step of the process because it is very important that your website looks professional and appealing to potential customers. There are also plenty of resources online that can help you come up with a great e-commerce theme or design. There are some templates from online providers that look really nice, but you should consider taking things one step further and creating your site from scratch. These templates might be more complex than what you are looking for, so it is not all that difficult to build an e-commerce store from scratch. You can use Bootstrap, but it is also possible to build an e-commerce website using HTML and CSS as well. You will need to get a little bit creative if you want a unique e-commerce site, but there are some great guides out there for people who have never built a website before. The first thing you will want to do is head over to Google and type in "build an e-commerce website" or something similar. You can also try to find guides for specific providers, like Shopify, but this should be your first step. There are plenty of great resources available online, and you don't have to spend a lot of money to build a beautiful e-commerce site. You can always hire a freelancer to help you out, but most of this work can be done in-house if you aren't looking for anything too complicated.
4. Select An E-commerce Payment Platform
Now that you have taken all the necessary steps to get your e-commerce store off the ground... it's time to choose the best shopping cart platform for your newly established brand or product so that you can start taking orders and payments from customers and start getting those sweet, sweet e-commerce sales! So once the website is built up and ready to go, then you will need to choose an e-commerce platform. This might seem like a daunting task at first, but most of these platforms are very similar and they all do the same thing. It is possible to choose from three main e-commerce platforms: WooCommerce Shopify and Big Cartel You can also find plenty of other options out there, and you should consider your needs before choosing one that is right for your business. Shopify is the most popular e-commerce platform online, and it also has one of the most beautiful sites. It allows you to create a website without any coding skills or outside help, and it is very easy to set up and launch. This platform will cost around $29 per month at its lowest subscription plan, but there are also more expensive options. You can pay around $79 per month or more for additional areas, like shipping. There are plenty of other great e-commerce platforms out there on the market, but Shopify is likely to be the best option for most people looking to get started with a new business. It offers everything that you need to get started quickly, and it is easy to use without any coding experience. You will want to make sure that your website appears professional because this will show customers that you are a legitimate business worth doing business with. It is possible to find some great WordPress hosting providers online, or even through Amazon Web Services. You can get started for as little as $19 per month if you use an Amazon Web Services package, which is very affordable. Online merchants are expected to see a huge surge in sales this year, and it can be difficult for new e-commerce businesses to compete. This doesn't mean that you should give up though, because there is plenty of money to be made online with platforms like Shopify. It is possible to set up your store and begin selling goods in less than a day, especially if you choose to go with Shopify or another pre-made e-commerce platform. They are designed for anyone looking to get started as quickly as possible, and they can be customized to fit your business needs. As you can see, it isn't all that difficult to launch an e-commerce business, and it can be even easier with the right tools.
5. Use Digital Marketing To Start Generating Ecommerce Sales
Now that you have your payment processor handled, you will need to get your name out there to start making sales, and you can accomplish this through digital marketing. Companies like Yelp are a great way to get the word out about your products, but you should also consider advertising on Facebook or Google Plus. Make sure that your business stays present online, and you should see some increase in visitors over time. You won't get rich overnight with an e-commerce site, but it can be very profitable if you put in the necessary work. This guide is just to help get you started on the right path, and there are plenty of other resources available online for anyone looking to get started with e-commerce. If you know what you are doing, then it might seem like a complicated process, but it isn't all that hard once you get the hang of it. Even though this guide mentioned three main e-commerce platforms, there is plenty more choice out there if you aren't happy with those options. Just be sure to do your research before deciding on any particular platform, because they can range from beginner-friendly to more advanced solutions. Ecommerce has grown into a multi-billion dollar industry in recent years, and anyone looking to get started should make sure that they are ready for the competition. This doesn't mean that new eCommerce businesses can't compete though, because they have plenty of opportunities out there. As long as you know what you are doing online, then it is possible to get started and create your own e-commerce business today. It isn't all that different from other businesses, and anyone with a laptop and an internet connection can get started. If you have a great idea for an e-commerce business, but you don't know if you are confident enough to follow all of these steps for yourself, but you still want to get started in e-commerce NOW. Then you can find more information on how to start your own e-commerce business, while having an experienced e-commerce agency hold you by the hand and lead you to success every step of the way on your e-commerce journey, by heading over to the premiere e-commerce training agency online - ECaccelerate.com Thanks for reading, if you found this article helpful then please share it out to your social media profiles and favorite places on the web, and be sure to check back with our site often for more great content on anything and everything! Originally Published On: InterestArticles.com Read the full article
0 notes
Text
Angular vs React 2021: Which JS Framework To Select For Your Project?

Selecting the right JavasScript framework is very confusing especially when your team has the right suite of tools and architecture to facilitate the project requirements. Selecting the right framework that works best for your requirements demands strong knowledge and understanding of the frameworks. Choosing between Angular and React for your project requirements is completely debatable. According to our research, we have tried our best to showcase which framework is the best. Which one should you go for? Angular or React? In this blog, we have compared these front-end frameworks to help you out in selecting the framework that would better streamline your project requirements.
We know how difficult it is to select a particular framework for your project. To overcome this difficulty, we have segmented this blog into 5 main aspects that highlight the strong points of each framework. Let’s dive into these aspects.
1)Working With The Front-End Framework
Maturity of Frameworks
Understanding the maturity of these frameworks is important before adopting any of them. Your agile team would want to incorporate state-of-the-art technology to streamline project requirements. But, maintaining a balance between the new technology and proven methodologies is extremely crucial.
Selecting unmatured tools and frameworks can bring new challenges. The framework might not be completely developed and might be full of bugs. Apart from that, the community base might not be large. If you run into any problem, you will have to deal with it on your own.
Learning Curve
Angular houses a huge dynamic library which makes it difficult for the developers to learn. There are several concepts and languages associated with it. Learning every concept and language takes time and makes a learning curve a bit rough with several ups and downs. Apart from that, Angular consists of a lot more components that complicate things up. Being a developing framework, Angular is constantly updating so the developer has to keep updated with the frequent changes in the Angular ecosystem.
React is more minimalistic and simple to learn. It has no complicated templates or dependency injections and other irrelevant features. The developers might take some time to get used to the structure as there is no predefined project structure. The developers need to learn only the Redux library which is used for state management. The most basic thing React offers in the learning curve is the management of the internal states, components, and prop configuration.
Components & Architecture
The Angular framework is based on the MVC architecture which is a complex and fixed structure. The Angular framework allows the developers to break down the codes into separate files. This makes it easier to use and reuse the templates and codes in other projects as well.
On the other hand, React architecture does not have a fixed format to write the codes. The code that is written using the React library is readable and well-structured. The use of component trees allows the developers to dynamically structure the code accordingly.
Development, Productivity & Speed
The Command-Line Interface of the Angular framework allows a great development experience. It creates a brilliant workspace and allows the developers to design the components with just a few lines of code. Apart from that, there are a lot of built-in processes that can solve complex issues easily.
On the other hand, the use of third-party libraries affects the speed in the case of React development. There are several tools in this framework. The importance of these tools varies from project to project. This framework demands more time if the project is given to a new developer for an update or feature up-gradation.
Backward Compatibility
Angular 4 is backward compatible with Angular 2 and above. The versions below Angular 2 are not backward compatible and this is one of the disadvantages of the AngularJS framework. Apart from that, Angular 2 is not compatible with AngularJS.
React is a completely different framework. The latest version React 16 is 100% backward compatible with the previous versions and also supports asynchronous rendering. Apart from that, it is open-source and is licensed under MIT with GraphQL and Jest.
2)Technical Aspects Of The Frameworks
Performance
Angular uses DOM that greatly affects its performance which makes the process slow and inefficient. Not only the DOM but the two-way data binding also affects the overall performance of the Angular-powered applications. However, the recent update has come with improved performance.
React uses virtual DOM that enables access and change of document layout and structure. The virtual DOM updates the document without rewriting the entire document. This saves time and renders the updates quickly. The data-binding process in React is unidirectional and thus there is no unnecessary workload.
Ease Of Update
Angular comes with an improved Command Line Interface (CLI) that comprises different commands that make it easy to upgrade the latest Angular applications. This reduces the development time to a minimum. On top of that, the up-gradation is automated, which makes this framework more preferable.
React allows the developers to make smoother transitions from one version to the other. The front-end development libraries depend on the external libraries to migrate and update the third-party components. Apart from that, the developers have to check whether the third-party libraries they have used are compatible with the newer versions of the JS framework.
Data Binding
The Angular library uses a two-way data binding approach that changes the model state automatically when any change takes place in the UI element and/or vice versa. The two-way data binding approach is extremely easy to incorporate.
On the other hand, the React library uses a one-way approach. This one-way approach allows the change in the UI elements only after a change is made in the model state. The one-way approach is far more effective for giant projects with tons of development and coding hours.
Document Object Modeling: Regular VS Virtual
Document Object Model (DOM) is an important KPI in the performance evaluation of each of the frameworks. The Document Object Model organizes HTML, XML, and XHTML document format in the form of a tree.
In Angular-powered applications, a real DOM is used. The entire tree structure is refreshed when a small change is made. This makes the process slower in the case of the Angular framework.
The React framework uses a virtual DOM. This allows the developers to make changes to the tree without refreshing it. This does not slow down the development process.
Flexibility
There is quite a huge difference between Angular and React frameworks. These both offer different levels of flexibility.
Angular does not provide the flexibility that React provides. The components of the Angular framework can be used only within the other frameworks. The codes should be embedded within an HTML application. This framework does not help the apps that require real-time updates. On top of that, every component in the framework has a lifecycle.
On the contrary, the React framework offers the developers several tools, libraries, and huge architecture. A professional and skilled team of React developers can easily get the tools and architecture they need in the beginning to deliver a customized application. React architecture helps the developers reduce the time-to-market.
Developers’ Perspective
Angular is easy to incorporate but it takes time to deliver the projects since it has a very steep learning curve and there are tons of unnecessary elements, syntax, and things that are compulsory to learn. These elements delay the project deliveries and increase the coding time.
React takes longer to incorporate and set up but assists the developers with projects and software development quickly. Although it lacks the Model and Controller components, it allows the development team to add new features through the React library.
Languages
Angular uses Javascript or Typescript that happens to be a superset of JS This script is used in the development of bigger projects. Additionally, the code refactoring process is simpler and faster. This makes Typescript more compact than Javascript.
On the other hand, React is based on JavaScript ES6+ which is combined with JSX script. The JSX is an extension for JavaScript code syntax that is written in HTML. This makes the code easy to understand. Furthermore, the typos are easy to spot.
Suite Of Tools
The Angular framework is supported by several code editing tools such as Visual Studio, Sublime Text, and Aptana. The Command-Line Interface can be used to set up any project. The Angular Universal can be used for server-side rendering. Different platforms can be used for end-to-end testing in Angular.
Just like Angular, React is also supported by some code editors like Atom, Sublime Text, and Visual Studio. The developers can also use the Create React App to bootstrap a project. Developers can use the ‘Create React APP’ (CLI) tool to bootstrap a project. The React ecosystem consists of Next.js to complete the server-side rendering. The Enzyme code editor is used for component testing.
App structure
There are three main layers in the structure of the Angular framework namely Model, View, and Controller. An object that is responsible for the Model layer is initialized by the second layer and displayed in the third layer. TypeScript is used to implement the component, an HTML file is used for defining the view and the CSS file is used to define the features.
The structure of React provides the developers with the freedom to have their customizations. React offers only the View layer and the other two layers are added with the usage of other libraries. The entire architecture of React is component-based. The code is also made of React components that are rendered with the help of the React DOM library.
3)Popularity
Stack Overflow
Angular has been extremely popular till 2016 and Stack Overflow shows that both Angular and React frameworks were equally popular among several developers in the year 2018. Since then, Angular has become one of the most popular open-source JavaScrip libraries.
Since 2016, React framework has been gaining a lot of popularity, unlike Angular. Its popularity acquired the market in 2018 and it has been gaining more users ever since.
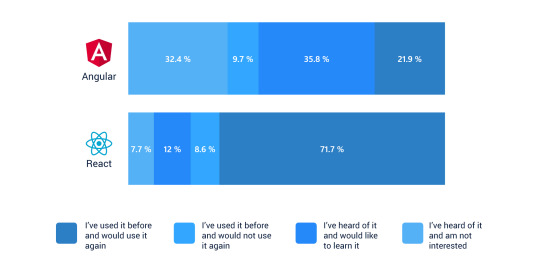
If we compare Angular and React, the former is ranked third in popularity for the year 2020, and React is the clear winner. According to a survey by Stack Overflow, React is popular over Angular.
Google Trends
Google Trends neither shows the popularity nor the usage, but it shows which of these frameworks are the most talked about the created hype in the developer community. Analytics and data show which frameworks, people are more curious to talk about.

According to Google Trends, React is extremely popular and the most talked-about framework at the moment. On the other hand, Angular has seen a steep fall.
NPM Downloads
NPM is the package manager of the NodeJS platform. It streamlines the modules in place so that the node can find them easily. Apart from that, this package manager also handles the dependency conflicts smartly.
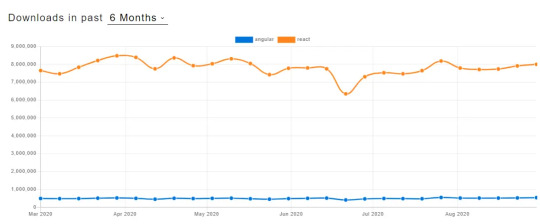
React is the clear winner in the NPM downloads too as being the most downloaded framework. This framework has seen popularity since 2018.
Community
Image for reference:
Angular
Developers are quite skeptical when it comes to Angular as compared to React. It’s mainly because of Angular’s unpopularity due to Angular 1.0Although, Angular is developed by Google which provides constant improvements and long-term support for the framework. Angular is used by business giants including Nike, HBO, Forbes, Apple, AT&T, Microsoft, and many more.
React
In comparison to Angular, React has a wider community on both Github and Gitlab. Developers working with React need to learn continuously as the framework gets frequent updates. Because of the frequent updates, there is always an issue of lack of documentation. This framework is used by Facebook, Twitter, Airbnb, PayPal, Netflix, etc.
Advantages Of Angular JS
Two-way Data Binding
AngularJS has the MVC architecture and the framework synchronizes with the Model and View. As the model changes, the View also changes and so does the data in it. The two-way binding structure reduces the development time so the developers can effectively utilize the time in other development activities. This approach eliminates the need to write any additional code to continuously synchronize the View and Model synchronization.
Directives
This feature enables the use and proper implementation of HTML extensions. Proper implementation of HTML extensions help the developers to assign special behavior to the DOM. This helps them to create feature-rich and dynamic content with HTML.
Dependency Injection
AngularJS allows the developers to use the injectors that define dependencies as external elements. These external elements decouple the components from their dependencies. Dependency injections make the components more reusable and easier to manage.

Advantages Of React
React Guarantees Stable Code
ReactJS uses the downward data flow only. When an object is changed, particular components are updated. This structure of data binding offers code stability and improves the performance of the application.
Virtual DOM Offers Better UX
Web browsers use layout engines to parse the HTML syntax into a document object model which is either in the form of HTML, XML, or XHTML. ReactJS uses virtual DOM that offers a better user experience.
Fast Time-To-Market
Reusing the components saves tons of development hours. In programming and development, developers face several changes and this affects the work of other components in the system. The React framework offers a code-reuse feature that saves significant development hours.

Why & When: The Important Question
Your agile development team needs to know the requirements, resources, and toolchain of these frameworks. Different projects have different requirements and deliveries. It is better to select the framework that resonates with your development environment and streamlines your application development activities.
Why & When To Choose The Angular Framework?
You should select the Angular framework when:
Your agile team has sound knowledge of C#, Java, and has hands-on expertise on the previous versions of the framework
Your project requirement falls under the difficulty level of low to medium
Your tech team requires higher productivity and quality and you are open to adapt to the done-for-you solutions and templates
If you want to regulate the application size
You require a wide-scale feature-rich application
Why & When To Choose The React Framework?
You should select the React framework when:
Your team has hands-on experience in HTML, CSS, and JavaScript
When you need to develop a highly customized application
The development process involves a huge number of components with variable states
You have time to spare on the pre-development processes
Down The Road
Selecting a framework depends on the learning curve for the companies and the agile development teams. React can go a long way in getting the job done by organizing the HTML and also offers the easiest ways to reuse the components and elements. On the other hand, Angular is capable of handling multiple elements without any additional help so it seems a bit tricky and complex at first.
Both React and Angular provide varied methodologies and approaches to develop customized web applications and software. Many startups, SMEs, small and medium-sized businesses, prefer either of these two frameworks due to the vast talent pool across the world. Both these technologies are adaptable and neither of them is good or bad.
0 notes
Text
How to Use Tailwind on a Svelte Site
Let’s spin up a basic Svelte site and integrate Tailwind into it for styling. One advantage of working with Tailwind is that there isn’t any context switching going back and forth between HTML and CSS, since you’re applying styles as classes right on the HTML. It’s all the in same file in Svelte anyway, but still, this way you don’t even need a <style> section in your .svelte files.
If you are a Svelte developer or enthusiast, and you’d like to use Tailwind CSS in your Svelte app, this article looks at the easiest, most-straightforward way to install tailwind in your app and hit the ground running in creating a unique, modern UI for your app.
If you like to just see a working example, here’s a working GitHub repo.
Why Svelte?
Performance-wise, Svelte is widely considered to be one of the top JavaScript frameworks on the market right now. Created by Rich Harris in 2016, it has been growing rapidly and becoming popular in the developer community. This is mainly because, while very similar to React (and Vue), Svelte is much faster. When you create an app with React, the final code at build time is a mixture of React and vanilla JavaScript. But browsers only understand vanilla JavaScript. So when a user loads your app in a browser (at runtime), the browser has to download React’s library to help generate the app’s UI. This slows down the process of loading the app significantly. How’s Svelte different? It comes with a compiler that compiles all your app code into vanilla JavaScript at build time. No Svelte code makes it into the final bundle. In this instance, when a user loads your app, their browser downloads only vanilla JavaScript files, which are lighter. No framework UI library is needed. This significantly speeds up the process of loading your app. For this reason, Svelte applications are usually very small and lightning fast. The only downside Svelte currently faces is that since it’s still new and doesn’t have the kind of ecosystem and community backing that more established frameworks like React enjoy.
Why Tailwind?
Tailwind CSS is a CSS framework. It’s somewhat similar to popular frameworks, like Bootstrap and Materialize, in that you apply classes to elements and it styles them. But it is also atomic CSS in that one class name does one thing. While Tailwind does have Tailwind UI for pre-built componentry, generally you customize Tailwind to look how you want it to look, so there is less risk of “looking like a Bootstrap site” (or whatever other framework that is less commonly customized). For example, rather than give you a generic header component that comes with some default font sizes, margins, paddings, and other styling, Tailwind provides you with utility classes for different font sizes, margins, and paddings. You can pick the specific ones you want and create a unique looking header with them. Tailwind has other advantages as well:
It saves you the time and stress of writing custom CSS yourself. With Tailwind, you get thousands of out-of-the-box CSS classes that you just need to apply to your HTML elements.
One thing most users of Tailwind appreciate is the naming convention of the utility classes. The names are simple and they do a good job of telling you what their functions are. For example, text-sm gives your text a small font size**.** This is a breath of fresh air for people that struggle with naming custom CSS classes.
By utilizing a mobile-first approach, responsiveness is at the heart of Tailwind’s design. Making use of the sm, md, and lg prefixes to specify breakpoints, you can control the way styles are rendered across different screen sizes. For example, if you use the md prefix on a style, that style will only be applied to medium-sized screens and larger. Small screens will not be affected.
It prioritizes making your application lightweight by making PurgeCSS easy to set up in your app. PurgeCSS is a tool that runs through your application and optimizes it by removing all unused CSS classes, significantly reducing the size of your style file. We’ll use PurgeCSS in our practice project.
All this said Tailwind might not be your cup of tea. Some people believe that adding lots of CSS classes to your HTML elements makes your HTML code difficult to read. Some developers even think it’s bad practice and makes your code ugly. It’s worth noting that this problem can easily be solved by abstracting many classes into one using the @apply directive, and applying that one class to your HTML, instead of the many. Tailwind might also not be for you if you are someone who prefers ready-made components to avoid stress and save time, or you are working on a project with a short deadline.
Step 1: Scaffold a new Svelte site
Svelte provides us with a starter template we can use. You can get it by either cloning the Svelte GitHub repo, or by using degit. Using degit provides us with certain advantages, like helping us make a copy of the starter template repository without downloading its entire Git history (unlike git clone). This makes the process faster. Note that degit requires Node 8 and above.
Run the following command to clone the starter app template with degit:
npx degit sveltejs/template project-name
Navigate into the directory of the starter project so we can start making changes to it:
cd project-name
The template is mostly empty right now, so we’ll need to install some required npm packages:
npm install
Now that you have your Svelte app ready, you can proceed to combining it with Tailwind CSS to create a fast, light, unique web app.
Step 2: Adding Tailwind CSS
Let’s proceed to adding Tailwind CSS to our Svelte app, along with some dev dependencies that will help with its setup.
npm install tailwindcss@npm:@tailwindcss/postcss7-compat postcss@^7 autoprefixer@^9 # or yarn add tailwindcss@npm:@tailwindcss/postcss7-compat postcss@^7 autoprefixer@^9
The three tools we are downloading with the command above:
Tailwind
PostCSS
Autoprefixer
PostCSS is a tool that uses JavaScript to transform and improve CSS. It comes with a bunch of plugins that perform different functions like polyfilling future CSS features, highlighting errors in your CSS code, controlling the scope of CSS class names, etc.
Autoprefixer is a PostCSS plugin that goes through your code adding vendor prefixes to your CSS rules (Tailwind does not do this automatically), using caniuse as reference. While browsers are choosing to not use prefixing on CSS properties the way they had in years past, some older browsers still rely on them. Autoprefixer helps with that backwards compatibility, while also supporting future compatibility for browsers that might apply a prefix to a property prior to it becoming a standard.
For now, Svelte works with an older version of PostCSS. Its latest version, PostCSS 8, was released September 2020. So, to avoid getting any version-related errors, our command above specifies PostCSS 7 instead of 8. A PostCSS 7 compatibility build of Tailwind is made available under the compat channel on npm.
Step 3: Configuring Tailwind
Now that we have Tailwind installed, let’s create the configuration file needed and do the necessary setup. In the root directory of your project, run this to create a tailwind.config.js file:
npx tailwindcss init tailwind.config.js
Being a highly customizable framework, Tailwind allows us to easily override its default configurations with custom configurations inside this tailwind.config.js file. This is where we can easily customize things like spacing, colors, fonts, etc.
The tailwind.config.js file is provided to prevent ‘fighting the framework’ which is common with other CSS libraries. Rather than struggling to reverse the effect of certain classes, you come here and specify what you want. It’s in this file that we also define the PostCSS plugins used in the project.
The file comes with some default code. Open it in your text editor and add this compatibility code to it:
future: { purgeLayersByDefault: true, removeDeprecatedGapUtilities: true, },
Tailwind 2.0 (the latest version), all layers (e.g., base, components, and utilities) are purged by default. In previous versions, however, just the utilities layer is purged. We can manually configure Tailwind to purge all layers by setting the purgeLayersByDefault flag to true.
Tailwind 2.0 also removes some gap utilities, replacing them with new ones. We can manually remove them from our code by setting removeDeprecatedGapUtilities to true.
These will help you handle deprecations and breaking changes from future updates.
PurgeCSS
The several thousand utility classes that come with Tailwind are added to your project by default. So, even if you don’t use a single Tailwind class in your HTML, your project still carries the entire library, making it rather bulky. We’ll want our files to be as small as possible in production, so we can use purge to remove all of the unused utility classes from our project before pushing the code to production.
Since this is mainly a production problem, we specify that purge should only be enabled in production.
purge: { content: [ "./src/**/*.svelte", ], enabled: production // disable purge in dev },
Now, your tailwind.config.js should look like this:
const production = !process.env.ROLLUP_WATCH; module.exports = { future: { purgeLayersByDefault: true, removeDeprecatedGapUtilities: true, }, plugins: [ ], purge: { content: [ "./src/**/*.svelte", ], enabled: production // disable purge in dev }, };
Rollup.js
Our Svelte app uses Rollup.js, a JavaScript module bundler made by Rich Harris, the creator of Svelte, that is used for compiling multiple source files into one single bundle (similar to webpack). In our app, Rollup performs its function inside a configuration file called rollup.config.js.
With Rollup, We can freely break our project up into small, individual files to make development easier. Rollup also helps to lint, prettify, and syntax-check our source code during bundling.
Step 4: Making Tailwind compatible with Svelte
Navigate to rollup.config.js and import the sveltePreprocess package. This package helps us handle all the CSS processing required with PostCSS and Tailwind.
import sveltePreprocess from "svelte-preprocess";
Under plugins, add sveltePreprocess and require Tailwind and Autoprefixer, as Autoprefixer will be processing the CSS generated by these tools.
preprocess: sveltePreprocess({ sourceMap: !production, postcss: { plugins: [ require("tailwindcss"), require("autoprefixer"), ], }, }),
Since PostCSS is an external tool with a syntax that’s different from Svelte’s framework, we need a preprocessor to process it and make it compatible with our Svelte code. That’s where the sveltePreprocess package comes in. It provides support for PostCSS and its plugins. We specify to the sveltePreprocess package that we are going to require two external plugins from PostCSS, Tailwind and Autoprefixer. sveltePreprocess runs the foreign code from these two plugins through Babel and converts them to code supported by the Svelte compiler (ES6+). Rollup eventually bundles all of the code together.
The next step is to inject Tailwind’s styles into our app using the @tailwind directive. You can think of @tailwind loosely as a function that helps import and access the files containing Tailwind’s styles. We need to import three sets of styles.
The first set of styles is @tailwind base. This injects Tailwind’s base styles—mostly pulled straight from Normalize.css—into our CSS. Think of the styles you commonly see at the top of stylesheets. Tailwind calls these Preflight styles. They are provided to help solve cross-browser inconsistencies. In other words, they remove all the styles that come with different browsers, ensuring that only the styles you employ are rendered. Preflight helps remove default margins, make headings and lists unstyled by default, and a host of other things. Here’s a complete reference of all the Preflight styles.
The second set of styles is @tailwind components. While Tailwind is a utility-first library created to prevent generic designs, it’s almost impossible to not reuse some designs (or components) when working on a large project. Think about it. The fact that you want a unique-looking website doesn’t mean that all the buttons on a page should be designed differently from each other. You’ll likely use a button style throughout the app.
Follow this thought process. We avoid frameworks, like Bootstrap, to prevent using the same kind of button that everyone else uses. Instead, we use Tailwind to create our own unique button. Great! But we might want to use this nice-looking button we just created on different pages. In this case, it should become a component. Same goes for forms, cards, badges etc.
All the components you create will eventually be injected into the position that @tailwind components occupies. Unlike other frameworks, Tailwind doesn’t come with lots of predefined components, but there are a few. If you aren’t creating components and plan to only use the utility styles, then there’s no need to add this directive.
And, lastly, there’s @tailwind utilities. Tailwind’s utility classes are injected here, along with the ones you create.
Step 5: Injecting Tailwind Styles into Your Site
It’s best to inject all of the above into a high-level component so they’re accessible on every page. You can inject them in the App.svelte file:
<style global lang="postcss"> @tailwind base; @tailwind components; @tailwind utilities; </style>
Now that we have Tailwind set up in, let’s create a website header to see how tailwind works with Svelte. We’ll create it in App.svelte, inside the main tag.

Step 6: Creating A Website Header
Starting with some basic markup:
<nav> <div> <div> <a href="#">APP LOGO</a> <!-- Menus --> <div> <ul> <li> <a href="#">About</a> </li> <li> <a href="#">Services</a> </li> <li> <a href="#">Blog</a> </li> <li> <a href="#">Contact</a> </li> </ul> </div> </div> </div> </nav>
This is the header HTML without any Tailwind CSS styling. Pretty standard stuff. We’ll wind up moving the “APP LOGO” to the left side, and the four navigation links on the right side of it.

Now let’s add some Tailwind CSS to it:
<nav class="bg-blue-900 shadow-lg"> <div class="container mx-auto"> <div class="sm:flex"> <a href="#" class="text-white text-3xl font-bold p-3">APP LOGO</a> <!-- Menus --> <div class="ml-55 mt-4"> <ul class="text-white sm:self-center text-xl"> <li class="sm:inline-block"> <a href="#" class="p-3 hover:text-red-900">About</a> </li> <li class="sm:inline-block"> <a href="#" class="p-3 hover:text-red-900">Services</a> </li> <li class="sm:inline-block"> <a href="#" class="p-3 hover:text-red-900">Blog</a> </li> <li class="sm:inline-block"> <a href="#" class="p-3 hover:text-red-900">Contact</a> </li> </ul> </div> </div> </div> </nav>
OK, let’s break down all those classes we just added to the HTML. First, let’s look at the <nav> element:
<nav class="bg-blue-900 shadow-lg">
We apply the class bg-blue-900 gives our header a blue background with a shade of 900, which is dark. The class shadow-lg class applies a large outer box shadow. The shadow effect this class creates will be 0px at the top, 10px on the right, 15px at the bottom, and -3px on the left.
Next is the first div, our container for the logo and navigation links:
<div class="container mx-auto">
To center it and our navigation links, we use the mx-auto class. It’s equivalent to margin: auto, horizontally centering an element within its container.
Onto the next div:
<div class="sm:flex">
By default, a div is a block-level element. We use the sm:flex class to make our header a block-level flex container, so as to make its children responsive (to enable them shrink and expand easily). We use the sm prefix to ensure that the style is applied to all screen sizes (small and above).
Alright, the logo:
<a href="#" class="text-white text-3xl font-bold p-3">APP LOGO</a>
The text-white class, true to its name, make the text of the logo white. The text-3xl class sets the font size of our logo (which is configured to 1.875rem)and its line height (configured to 2.25rem). From there, p-3 sets a padding of 0.75rem on all sides of the logo.
That takes us to:
<div class="ml-55 mt-4">
We’re giving the navigation links a left margin of 55% to move them to the right. However, there’s no Tailwind class for this, so we’ve created a custom style called ml-55, a name that’s totally made up but stands for “margin-left 55%.”
It’s one thing to name a custom class. We also have to add it to our style tags:
.ml-55 { margin-left: 55%; }
There’s one more class in there: mt-4. Can you guess what it does? If you guessed that it seta a top margin, then you are correct! In this case, it’s configured to 1rem for our navigation links.
Next up, the navigation links are wrapped in an unordered list tag that contains a few classes:
<ul class="text-white sm:self-center text-xl">
We’re using the text-white class again, followed by sm:self-center to center the list—again, we use the sm prefix to ensure that the style is applied to all screen sizes (small and above). Then there’s text-xl which is the extra-large configured font size.
For each list item:
<li class="sm:inline-block">
The sm:inline-block class sets each list item as an inline block-level element, bringing them side-by-side.
And, lastly, the link inside each list item:
<a href="#" class="p-3 hover:text-red-900">
We use the utility class hover:text-red-900 to make each red on hover.
Let’s run our app in the command line:
npm run dev
This is what we should get:

And that is how we used Tailwind CSS with Svelte in six little steps!
Conclusion
My hope is that you now know how to integrate Tailwind CSS into our Svelte app and configure it. We covered some pretty basic styling, but there’s always more to learn! Here’s an idea: Try improving the project we worked on by adding a sign-up form and a footer to the page. Tailwind provides comprehensive documentation on all its utility classes. Go through it and familiarize yourself with the classes.
Do you learn better with video? Here are a couple of excellent videos that also go into the process of integrating Tailwind CSS with Svelte.
youtube
youtube
The post How to Use Tailwind on a Svelte Site appeared first on CSS-Tricks.
You can support CSS-Tricks by being an MVP Supporter.
How to Use Tailwind on a Svelte Site published first on https://deskbysnafu.tumblr.com/
0 notes
Text
Top 20 Startups of 2020

2020 has been nothing short of a challenge, yet some businesses have found stable footing in the value that they provide to customers..
Aleksey (Aleks) Weyman
List created and published on millennialmoderator.com
As American-British investor John Templeton once famously stated- the best opportunities come in times of maximum pessimism. Calming idea but difficult to embrace when the pessimism is at your front door. In light of the COVID-19 pandemic that has ravaged our world, halted entire industries and resulted in millions of deaths (literally and economically), much of the business world has become skeptical and; in reaction, withdrawn certain risk behaviors like innovating and investing.
However, despite the trend, there exist companies that have taken grasp of this uncertain time, buckled down on their operation and found a way to endure, if not grow even more. It’s these companies (both startups and established) that I want to highlight today. If they can do this well today, imagine what they’ll be doing tomorrow. Here’s our top 20 startups of 2020!
1. Phonic
First up on our top companies of 2020 is next-level survey software Phonic. With their revolutionary voice and video survey features (among others), they are radically redesigning the way that online surveys are conducted. They’ve had PR on Techcrunch and are already integrated with top educational institutions around the United States like Stanford and Cornell. You can learn more about Phonic as well as how to level up your own survey strategy, in this article.
2. The Closing Docs
Identifying a problem and providing a solution is the core of every great company’s value proposition, which is exactly what The Closing Docs is doing for landlords and property owners. With their software, landlords can easily verify tenant income without having to spend a copious amount of time managing multiple reports. Their platform is very user friendly and trustworthy- a key factor when handling finances. It’s a tenant application software that I personally will be using when I rent out my condo next year!
3. Iowa Solar
No list of forward-thinking companies would be complete without alternative energy sources, which is exactly where Iowa Solar shines bright. Servicing the Iowa/Illinois area, they have designed an extremely cost-effective solar panel solution for homeowners and businesses. They also provide installation and maintenance, truly bringing the cost-to-value ratio of solar energy down to consumer level. Not to mention, there are tax benefits associated with solar energy that both homeowners and businesses should take advantage of.
4. CornerNook
Work from home is seemingly the new norm around the world, with many organizations allowing for full time WFH accommodations for the foreseeable future, even after the global pandemic. CornerNook saw the value in this change of work-life, and began offering equipment and furniture that every home office needs to be functional and comfortable. From ergonomic chairs to electrical components, you can bet that they have all the home office equipment you need.
5. Cover Video
Our 5th startup to highlight has a unique backstory- founder and developer Nicholas Treybig had spent copious amounts of time applying for various jobs at companies like Amazon and Google, going so far as to create custom cover letter-videos to enhance his applications. He realized the struggle with creating multiple videos and thus, created a simple solution for applicants and employers alike. Covervideo.com is a key-protected cover video sharing web service that helps companies interview and hire candidates more readily and safely than ever before.
6. See Inside Media
2020 has been an eye opener to many industries of the possibilities that come with virtual reality and 3D user experiences, and founder David Schanen has been well aware of these possibilities since 2018, when he formed See Inside Media. This company provides virtual, 3D tour technology and has an existing market foothold in the real estate and music industries, with virtually every market an option in the foreseeable future. They are currently exploring volumetric video productions, which will allow for virtual reality live-stream experiences. A business to surely keep an eye on!
7. All About PDF
If there was one business that cares about your digital documents more than anyone else, it’s All About PDF. Founder Steven Amani has designed a suite of features that allow anyone to become a master of the portable document format. From PDF expiration dates, online file conversion options (in browser as well as downloadable software), PDF merging, not to mention a relatively new feature- DRM (digital rights management) to protect the monetary value of your documents, Amani and team are looking out for your digital documents in ways most don’t even think about.
8. BrandLume
It’s no surprise that there is an abundance of digital marketing solutions available on the web, so how can someone possibly explore them all? BrandLume has the answer- They provide expert-level services for every area of your business. Think of them as a one-stop-shop for all your digital marketing, branding and website services. They have been helping build businesses from the ground up since 2011! BrandLume offers wholesale prices and no-contract-needed consultations (among other features) for all digital marketing needs under the sun.
9. Emi
Being stuck at home for days on end has been a testing ground for relationships around the world, which is exactly where the Emi App has stepped up to the plate. They offer a simple yet valuable set of relationship exercises that are designed to rekindle and strengthen relationships with your significant other. The best part- it’s intuitive and easy to set up, with the premise being that you won’t have to take time out of your busy day to focus on relationship tips- Emi will do all the reminding for you!
10. Pry
Budgeting can be a sensitive subject for bootstrapped startups (or any company for that matter) but that doesn’t mean there isn’t value in planning ahead. Pry Financials makes it simple for companies to manage their budget, hiring plan, financial models, and cash runway. Their cloud-based platform allows for live, team collaboration and encourages a positive mindset with its clean and intuitive finance planning dashboards.
11. Finally
Unlike business finance, personal finance is a much more intimate topic to digest, with the majority of decisions based on personal goals and current economic conditions. Finally is (finally) providing a solution for the individual, by creating educational material about which financial options are available, and then automating financial portfolios based on the individuals goals’ and desires. Not to mention, they offer financial advising for a fraction of the cost.
12. NITL
So much of our news media today is fluffy and misleading, which fuels and perpetuates the concept of fake news around the world. NITL (News In Three Lines) is solving this problem by objectively scraping the facts out of current news articles and presenting them to readers in just three lines. From there, the viewer can decide whether they want to read the full article or not- an important decision that is often swayed by how clickbaity the title is, but no more!
13. Intervue
In our exceedingly technological world, software developers are becoming the builders of tomorrow, but it can be difficult to properly assess the skill that a developer has, especially in remote working conditions. Intervue has arisen to this challenge by offering an immersive, live coding environment for employers and applicants to assess technical capabilities in real time, with video chat, multiple compilers, loggable interview notes, and more. Hiring quality developers is now much easier!
14. Palabra.io
Email automations are the bread and butter of a hands-free digital business or service. The Palabra.io team has created a platform that allows for complete landing page optimization, allowing users to define how customer contacts are collected, when to engage with them (down to the minute) and write copy in advance. All that’s left is to connect Palabra to your site and your email automation workflow is live!
15. Flip Booklets
Digital presentation is vital in todays world- portfolios, landing pages, all seeking to educate the user in the most innovative way possible. Flip Booklets allows users to upload any PDF document and turn it into an interactive, digital flip book (like the ones you’d find in stores). These books are a great digital marketing tool for 2021 and beyond!
16. Wiza
Linkedin poses a lot of opportunities for customer leads, but it can be tricky to navigate their UI and pull meaningful (email) contact infos. The Linkedin Sales Navigator tool can help with this, but even it has limitations; specifically, the amount of time it takes to scrape contacts. Wiza is a tool that allows you to quickly export Linkedin contacts and even vets the users for quality. Getting leads on Linkedin doesn’t have to be a painful process!
17. Twisted Road
Despite the stay-at-home protocols enforced by many governments in 2020, travel enthusiasts are still finding time to get out of their homes and hit the roads. Twisted Road is essentially Uber for motorcycles specifically, and it allows users to list their bikes or rent from others. Vehicle renting apps are a hot commodity, plus we won’t be in lockdown forever!
18. Earned Value App
Tracking a projects budget involves more than just a projection and some receipts, especially if the project has many moving pieces (as most organizations do). The Earned Value App leans on the earned value mathmatic formula, which helps identify potential financial issues that could lead to overspending, before you get there. Budget tracking apps are critical to monitoring a projects financial success.
19. Video Jaguar
Like mentioned before, video content will likely see an upswing in 2021, so businesses need to get ahead of the curve and adapt. Video Jaguar is a video template tool that has simplified video creation to the point where all users need to do is choose a format, upload text, and the platform will do the rest. Video content marketing in 2021 could be the difference between a positive and negative impacting campaign!
20. Lionshare Digital
Digital marketing is a diverse beast, with various potential avenues to explore. However as most business owners know, time is never on their side. Lionshare Digital is a full stack digital marketing agency that creates everything from websites to brand bibles, and has a long track record of serving professionals in the creative (among others) field. Building an effective website could be the start of something great!
21. EXTRA: GMASS
Last on our list is the GMASS service, a plugin for Google that helps automate email workflows right from within Gmail. This plugin is versatile and constantly updated with new features. In fact, it’s one of the several tools that our team at Millennial Moderator relies on! Check out our Tools page for more information.
Conclusion
As we wrap up a rather tumultuous year, we reflect on the companies that have given us value in times of uncertainty. This list is surely not collectively exhaustive, but it does highlight some startups that we believe will be paving the way for businesses in 2021. Have a great rest of 2020 and we’ll see you in the new year!
If you enjoyed this Mod, please sign up for our exclusive newsletter, where we share the latest Mods, tips, and more! Please share this Mod using the social links below. Any questions or comments? Let us know on Twitter!
List created and published on millennialmoderator.com
0 notes
Text
How to Use Github Actions to Deploy a Next.js Website to AWS S3
The beauty of Next.js and static web apps is that they let you run the project pretty much anywhere using object storage, like on AWS S3. But it can be a pain to manually update those files each time.
How can we use GitHub Actions to automate and continuously deploy our app to S3?
youtube
What are GitHub Actions?
GitHub Actions is a free service from GitHub that allows us to automate code tasks.
I previously wrote about how we can use them to automate tasks like running tests on our code and sending notifications to Slack.
They provide a flexible way to automatically run code based on our existing workflows. This provides a lot of possibilities like even deploying our website!
What is AWS S3?
S3 (Simple Storage Service) is an object storage service from AWS. It allows you to store files in the cloud easily making them available around the world.
It also allows you to use these files as a website. Because we can upload an HTML file as an object, we can also configure S3 to access that file as an HTTP request. This means that we can host an entire website right in S3.
What is Continuous Deployment?
Continuous Deployment, often referred to by its acronym CD, is the practice of maintaining code in a releasable state and deploying that code automatically or in short cycles.
Particularly in our use case, we’re going to configure our project so that any time a new update is pushed or merged to the primary Git branch, our website will deploy.
What are we going to build?
We’re first going to bootstrap a simple Next.js app using the default Next.js starting template and configure it to compile to static files.
If you don’t want to create a Next.js project, you can follow along with even a simple HTML file and not run any of the build commands. But Next.js is a modern way to build dynamic web apps, so we’ll start there.
With our website files ready to go, we’ll create and configure an S3 bucket in AWS where we’ll host our website.
Finally, we’ll create a new GitHub Action workflow that will automatically update the website files in S3 any time a new change occurs on our primary branch (main).
Step 0: Setting up a new Next.js project on GitHub
We’re going to get started with the default template with Next.js.
After navigating to the directory you want to create your project in, run:
yarn create next-app my-static-website # or npx create-next-app my-static-website
Note: Feel free to replace my-static-website with the name of your choice. We’ll use that for the rest of this tutorial.
If you navigate to that directory and run the development command, you should be able to successfully start up your development server.
cd my-static-website yarn dev # or npm run dev

New Next.js App
Next, let’s configure our project to statically compile.
Inside the package.json file, update the build script to:
"build": "next build && next export",
What this will do is tell Next to take the website and export it to static files, which we’ll use to host the site.
We can test this out by running the command:
yarn build # or npm run build
And once finished, we can look inside of the out directory and see all of the files of our new website.

Static output from Next.js
Finally, we want to host this on GitHub.
Inside of your GitHub account, create a new repository. This will then provide instructions on how you can add an existing project to that repo.
And once you push our your project to GitHub, we should be ready to set up our new website project!

New repo in GitHub
Follow along with the commits:
Step 1: Manually creating and deploying a Next.js project to a new S3 Bucket
To get started with our new S3 Bucket, first log in to your AWS account and navigate to the S3 service.

No buckets in S3
We’ll want to create a new bucket, using the name of our choice, which will be used for the S3 endpoint where our website is hosted. We’ll also want to configure our S3 bucket to be able to host a website.
Note: this tutorial will not walk you through how to host a website on S3, but you can check out my other tutorial that will walk you through hosting a website on S3 step-by-step.

Static website hosting in AWS S3
Once we have our S3 bucket configure as a website, we can go back to our Next.js project folder, run our build command, and then upload all of our files from the out directory into our new S3 bucket.

S3 Bucket with Static App
And once those files are uploaded and we’ve configured our S3 bucket for website hosting, we should now be able to see our project live on the web!

AWS S3 hosted Next.js app
Step 2: Creating a new GitHub Action workflow to automatically build a Next.js project
To get started, we’re going to need to create a new workflow.
If you’re familiar with GitHub Actions, you could create one manually, but we’ll quickly walk through how to do this in the UI.
Navigate to the Actions tab of your GitHub repository and click on "set up a workflow yourself."

New GitHub Action Workflow
GitHub provides a starting template that we can use for our workflow, though we’ll want to make some changes.
Let’s do the following:
Optional: rename the file to deploy.yml
Optional: rename the workflow to CD (as it’s a bit different from CI)
Optional: remove all of the comments to make it a bit easier to read
Remove the pull_request definition in the on property
Remove all steps except for uses: actions/checkout@v2
So at this point we should be left with:
name: CD on: push: branches: [ main ] jobs: build: runs-on: ubuntu-latest steps: - uses: actions/checkout@v2
This code alone will trigger a process that spins up a new instance of Ubuntu and simply checks out the code from GitHub any time there’s a new change pushed to the main branch.
Next, once we have our code checked out, we want to build it. This will allow us to take that output and sync it to S3.
This step will differ slightly depending on if you are using yarn or npm for your project.
If you’re using yarn, under the steps definition, add the following:
- uses: actions/setup-node@v1 with: node-version: 12 - run: npm install -g yarn - run: yarn install --frozen-lockfile - run: yarn build
If you’re using npm, add the following:
- uses: actions/setup-node@v1 with: node-version: 12 - run: npm ci - run: npm run build
Between both of these sets of steps, what we’re doing is:
Setting up node: this is so that we can use npm and node to install and run our scripts
Install Yarn (Yarn Only): if we’re using yarn, we install it as a global dependency so that we can use it
Install Dependencies: we install our dependencies and we use a specific command that makes sure we use the lock file available to avoid any unexpected package upgrades
Build: finally, we run our build command which will compile our Next.js project into the out directory!
And now we can commit that file right to our main branch which will kick off a new run of our workflow that we can see in our Actions tab.

New workflow in GitHub Actions
To see that it works, we can navigate into that run, select our workflow, and see that all of our steps ran including building our project!

Successful build logs for a GitHub Action workflow
Follow along with the commit!
Step 3: Configuring a GitHub Action to deploy a static website to S3
Now that we’re building our project automatically, we want to automatically update our website in S3.
To do that, we’re going to use the GitHub Action aws-actions/configure-aws-credentials and the AWS CLI.
The GitHub Action that we’re using will take in our AWS credentials and configuration and make it available to use throughout the lifecycle of the workflow.
As of now, the Ubuntu instance that GitHub Actions provides allows us to use the AWS CLI as it comes included. So we’ll be able to use the CLI commands right in our workflow.
Alternatively, we could use the S3 Sync action. But by using the AWS CLI, we gain more flexibility to customize our setup, we can use it for additional CLI commands, and it’s also generally nice to get familiar with the AWS CLI.
So to get started, let’s add the following snippet as additional steps in our workflow:
- uses: aws-actions/configure-aws-credentials@v1 with: aws-access-key-id: $ aws-secret-access-key: $ aws-region: us-east-1
What the above will do is use the AWS credentials configuration action to set up our AWS Access Key, Secret Key, and region based on our settings.
The AWS Region can be customized to whatever region you typically use with your AWS account. I’m in the northeast United States, So I’ll keep us-east-1.
The Access Key and Secret Key are credentials that you’ll need to generate with your AWS account. The way our code is set up is that we’ll store those values inside of GitHub Secrets, which will prevent those keys from being leaked. When the action runs, Github changes those values to stars (***) so people can't access those keys.
So to set up those secrets, we first want to generate Access Keys in AWS.
Navigate to the AWS console. Under the user menu, select My Security Credentials, and then select Create access key.

Creating an Access Key in AWS
This will provide you with two values: the Access key ID and the Secret access key. Save these values, as you won’t be able to access the Secret key ID again.

Finding Secret and Access Key in AWS
Note: remember to NOT include the Access Key and Secret Key inside of your code. This could lead to someone compromising your AWS credentials.
Next, inside of the GitHub repo, navigate to Settings, Secrets, then select New secret.
Here we’ll want to add our AWS keys using the following secrets:
AWS_ACCESS_KEY_ID: your AWS Access key ID
AWS_SECRET_ACCESS_KEY: your AWS Secret key
And once saved you should have your two new secrets.

Creating Secrets in GitHub
Now that we have our credentials configured, we should be ready to run the command to sync our project to S3.
Inside of the GitHub Action, add the following step:
- run: aws s3 sync ./out s3://[bucket-name]
Note: be sure to replace [bucket-name] with the name of your S3 Bucket.
This command will trigger a sync with our specified S3 bucket, using the contents of the out directory, which is where our project builds to.
And now, if we commit our changes, we can see that our action is automatically triggered once committed to the main branch, where we build our project and sync it to S3!
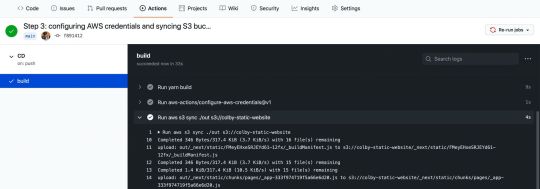
Successful AWS S3 sync in GitHub Action workflow
Note: Make sure that before setting up this action you’ve configured the S3 bucket to host a website (including unblocking permissions on S3 bucket) – otherwise this action may fail.
At this point, our project probably looks the same, as we didn’t make any changes to the code.
Next.js app on AWS S3
But if you make a code change, such as changing the title of the homepage inside of pages/index.js and commit that change:
<h1 className={styles.title}> Colby's <a href="https://nextjs.org">Next.js!</a> Site </h1>
We can see that our change triggers the workflow to kick off:

New GitHub Action workflow from code change
And once our workflow finishes, we can see that our content is now automatically updated on our website:

AWS S3 hosted app with updated code changes
Follow along with the commits:
What else can we do?
Setting up CloudFront
The goal of this post wasn’t to go through the entire process of configuring a website for AWS, but if you’re serving a website on S3, you might want to also include CloudFront in front of it.
You can check out my other guide here which walks you through setting up CloudFront as well as a step-by-step guide through creating the site in S3.
Invaliding CloudFront cache
If your S3 website is behind CloudFront, chances are, you’ll want to make sure CloudFront isn’t caching the new changes.
With the AWS CLI, we can also trigger a cache invalidation with CloudFront to make sure it’s grabbing the latest changes.
Check out the docs here to learn more.
Pull request deployments
If you’re constantly working on website changes in a pull request, sometimes it can be easier to see the changes live.
You can set up a new workflow that only runs on pull requests, where the workflow can dynamically create a new bucket based on the branch or environment and add a comment to the pull request with that URL.
You might be able to find a GitHub Action that exists to manage the comments on the pull request for you or you can check out the GitHub Actions docs.
0 notes
Text
ReCharge Payments: Technical Product Manager

Headquarters: Santa Monica, CA URL: https://rechargepayments.com/about
Overview
With over 10,000 online merchants launching subscriptions and over 1,000,000 subscribers powered by ReCharge, we have a lot of store owners to support. Our mission to make repeat orders easier began five years ago as a bootstrapped startup and today we're at the forefront of recurring billing software with over 150 remote-first employees around the globe processing tens of millions of dollars in sales every week.
We’re looking for teammates who are resourceful, dedicated, and passionate about solving challenging problems. This role is for someone who loves diving into the details while also keeping the big picture in mind. We need a creative and resourceful integrator who will actively listen for problems and then accelerate the team towards solving.
Our stack includes: Python, Flask, JavaScript, Vue.js
What You’ll Do
Live by and champion our values: #ownership, #empathy, #simple-solutions.
Create new products and features for merchants to sell and manage subscriptions along with making it easier for customers to manage their subscriptions.
Work on a new internal tools team consisting of 2-4 teammates, consisting of software engineers.
Write epics and detailed user stories for the engineering, QA, and design teams to fully understand the scope of functionality and business drivers, so they can estimate and deliver in a timely manner with high quality.
Facilitate and work in 2 week sprints with daily stand-ups, bi-weekly grooming and planning sessions.
Prioritize features and define requirements for successful delivery.
Dive into the technical details to understand what is happening.
Dig into details and figure things out from detailed business logic to a high level technical perspective.
Turn high level ideas and requirements into technical specifications.
Effectively communicate and collaborate with all groups in the organization over the entire product development lifecycle from requirements gathering to release to rollout training.
We're an agile, fast growing company and you'll get to do much more as the company grows.
What You'll Bring
Typically, 5+ years of product management experience in a fast paced technology driven company (preferably SaaS)
Track record of launching products rapidly on a SaaS platform with a large number of customers
3+ years experience working directly with software engineering teams
Experience owning and delivering high-impact software products
Ability to work autonomously with a balanced team approach, you don't need to wait for directions, but know when buy-in is critical
Some light programming experience or general technical aptitude
Ability to read if/else statements, JSON, and basic API documentation
Motivated by finding ways to use process to produce results (not as an end unto itself)
Dynamic problem solving skills and a love for figuring out solutions
An entrepreneurial spirit and excited to work on complex problems at scale
Ability to work remotely and desire to make an impact in a highly visible role
Bachelor’s degree or equivalent experience
To apply: https://grnh.se/273dad282us
from We Work Remotely: Remote jobs in design, programming, marketing and more https://ift.tt/2XGGdex from Work From Home YouTuber Job Board Blog https://ift.tt/3be4TyV
0 notes