#duplicator plugin
Explore tagged Tumblr posts
Visit Tumblr Blog
Explore Tumblr blogs with no restrictions, modern design and the best experience.
Last Seen Tumblr Blogs


Fun Fact
Forty percent of Tumblr users are between the ages of 18 to 25.
Text
🚀 Protect Your WordPress Site with Backups!
Backing up your WordPress site is essential—think of it as an insurance policy for your hard work! Whether you’re running a blog, a business, or an online store, a solid backup strategy can save you from major headaches. Here’s a quick overview of three popular plugins to back up your site: 1) UpdraftPlus: Schedule backups, choose cloud storage, and restore with ease. 2) Duplicator: Simplifies backups and migrations—just create a package of your entire site. 3) All-in-One WP Migration: Exports your entire site into a single, easy-to-download file. 👉 Best Practices: Schedule regular backups Store backups in multiple locations Test your backups periodically
Ready to safeguard your content? Check out the full guide here: https://lnkd.in/gyuPz3ax
0 notes
Text
Navigating the inricate landscape of WordPress often involves dealing with database issues. Whether you’re troubleshooting conflicts or starting fresh for development, the importance of a reliable WordPress database reset plugin cannot be overstated. In this blog, we delve into the intricacies of resetting your WordPress database and explore the unparalleled benefits of the Duplicate It Plugin.
0 notes
Text
4t3 Conversion of Grouped posters by @cosmiccs4 + Recoloring PSD with tutorial
8 non-recolorable presets
1024 textures
Included PSD for retexturing (tutorial how to use under the cut)
113 poly, all LODs
Shiftable
Price - 5§
BGC
Compressed package
TOU, Ko-Fi

DOWNLOAD | ALT | SIMBLR.CC
Tutorial: How to use my PSD for retexturing
You need:
Photoshop with .dds plugin
My retexture PSD and package file of posters
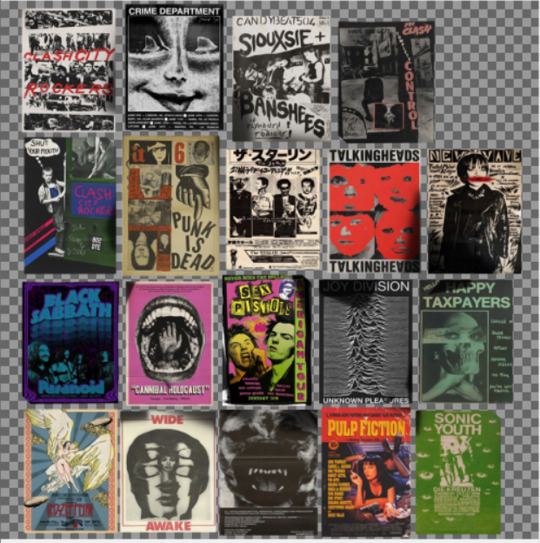
19 pictures to your liking, preferably vertical
TSRW
Sims3Pack Multi Installer and Compressionizer
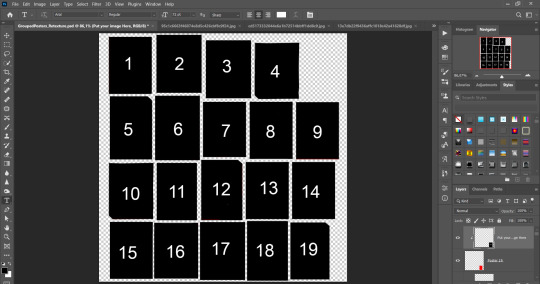
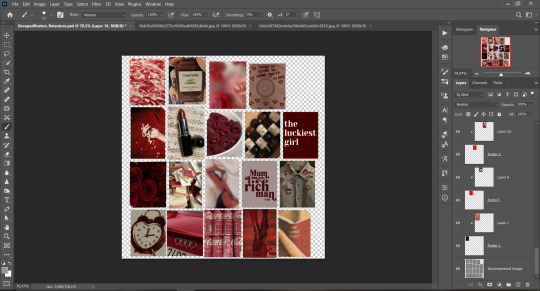
Step 1: Open my PSD file, open your images:
Step 2: Select (Ctrl+A) copy and paste to posters file (Ctrl+C, Ctrl+V) first of your images :
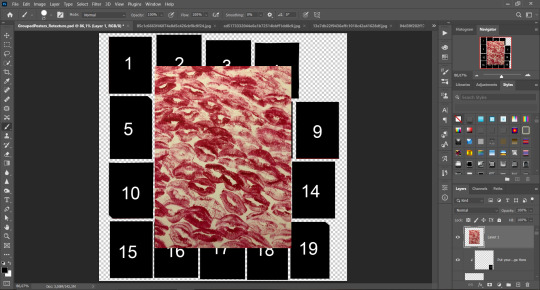
Step 3: Choose where you want to put it, for reference you can use one of the presets:
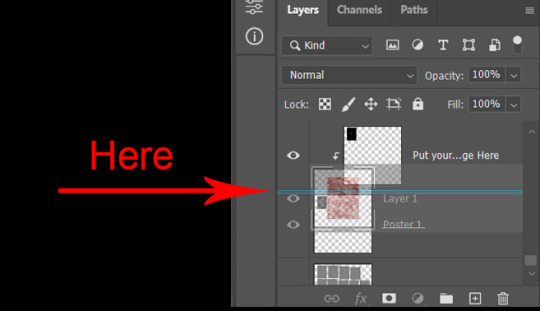
Step 4: After you decided with placement of your image. Move its layer in the Layers tab between "Poster x" and "Put your image here" layers, it will create a clipping mask, which allows the picture to be fit within the poster without cropping. Hide or delete "Put your image here" layer.
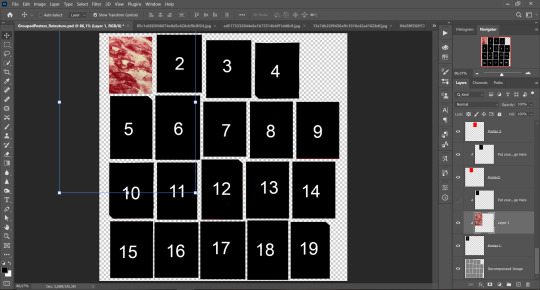
Step 5: Use Transform, Free Transform and Move tools to resize the image by your liking:

Step 6: Repeat the Step 2-5 with other 18 images:
*vibes are totally random, all images from Pinterest*
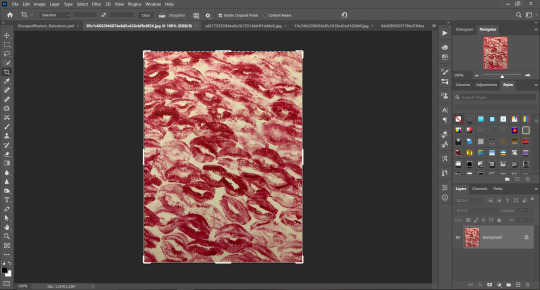
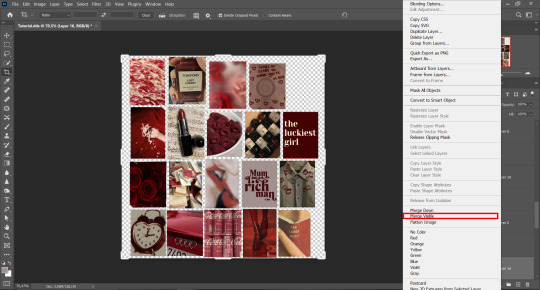
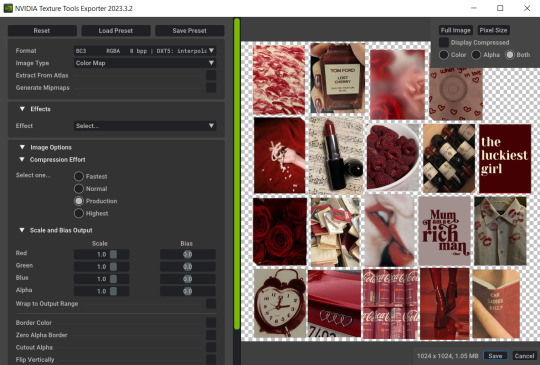
Step 7: After you've done, delete all the "Put your image here" layers, if you didn't it before. Right-click on the Layers tab and press Merge Visible (Shift + Ctrl + E). Now press Save As (Control + Shift + S) and save your image as .DDS with this parameters (2nd picture):
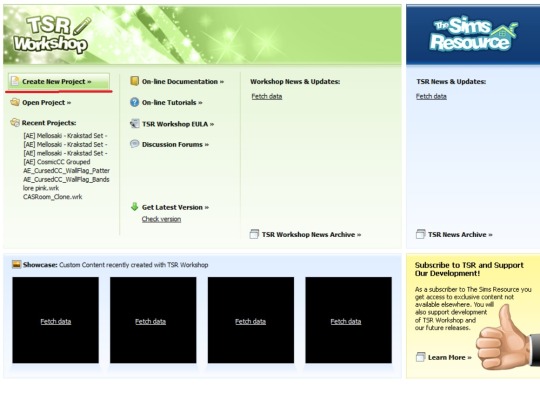
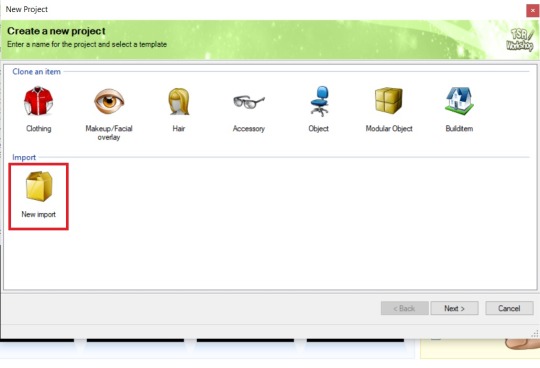
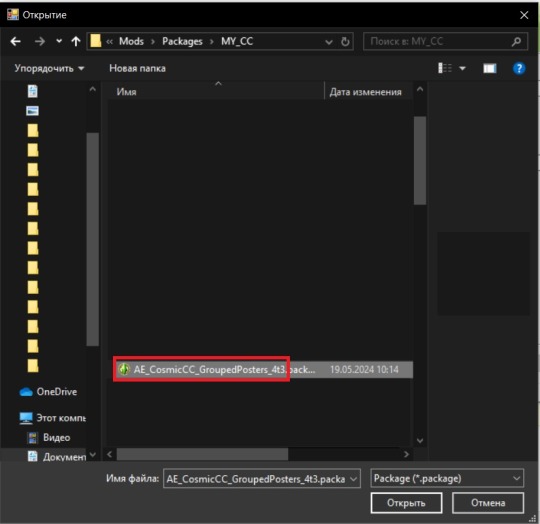
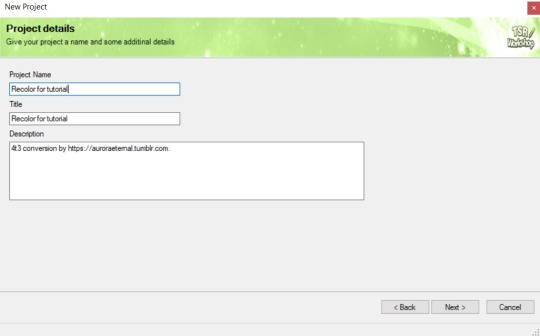
Step 8: Go to TSRW. Press Create New Project > New Import, and select package with my posters. Give for your recolor unique Title and Project name, otherwise it will override original posters:
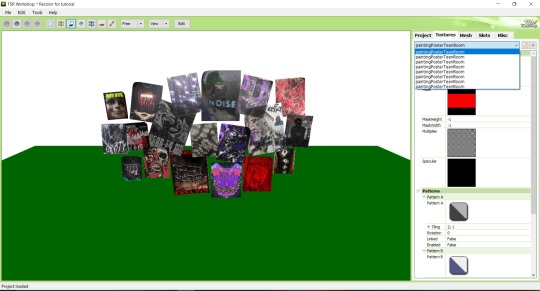
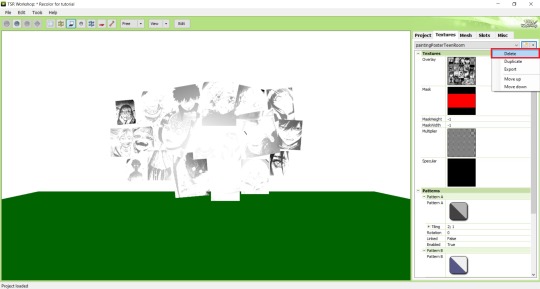
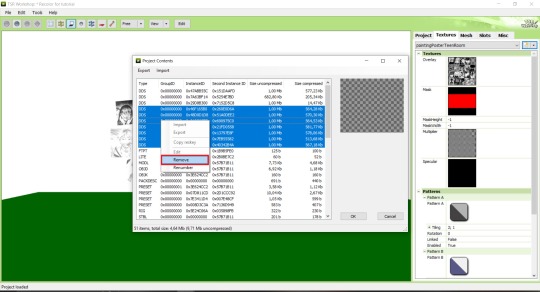
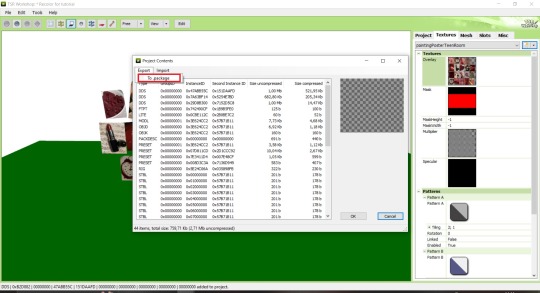
Step 9: In Textures tab go through all the presets except the first one and delete them. Then go to Edit > Project Contents and remove all the textures of removed presets. Its pretty common when someone make retexture of TS3 mesh and leave that unused textures in file, which leads to increasing its size:
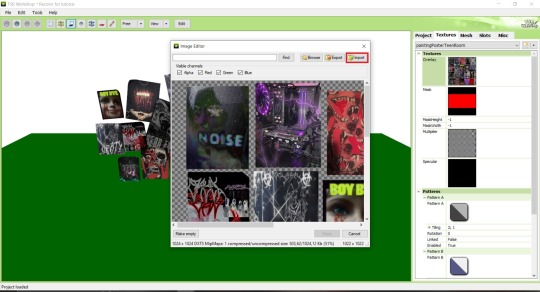
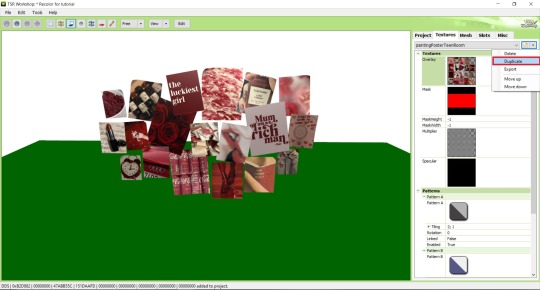
Step 10: Press Edit button next to the Overlay tab. Then press Import button and select your retexture. Press Done and when this pop-up appears, press Yes:
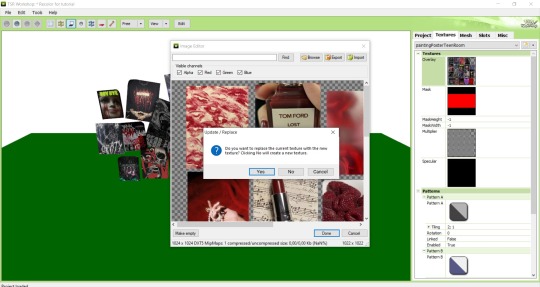
Step 11: If you want to add more presets press Duplicate and reapeat Step 10, but instead, when pop-up about replacing the texture appears, press No.
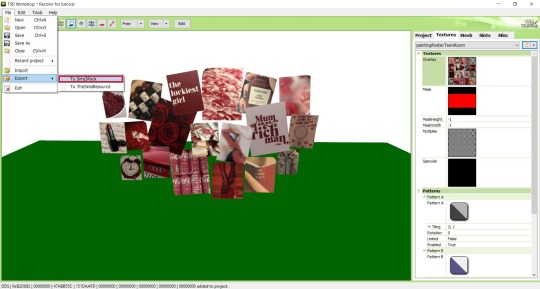
Step 12: After you've done, press File > Export > To Sims3pack or Edit > Project Contents > Export > To .package. If you choose the first method, convert your Sims3pack to Package and in both cases run it through Compressionizer. Test your recolor In-game, make thumbnails (if you want to share it) and have fun!
For those who read this tutorial to the end, click HERE to download this recolor.

@pis3update @xto3conversionsfinds @wanderingsimsfinds @kpccfinds @simfluencer-network @sssvitlanz @simblrcc-site
890 notes
·
View notes
Note
hey dog! sorry to bug you with a coding question, but i'm learning rpg maker mv for a fangame & i'm wondering how you did a couple things. if it's not too much trouble, could you quickly explain some of it? i've scrounged around as much as i can but i cant find what i need so i thought it'd be worth asking directly ^^;
how did you get the players name to show up in the message log? i know theres a plugin that adds the name windows for other characters & i've got that figured out, but i have no idea how to get the players name to show up in the history after selecting stuff
how'd you get the graphic for the route diverging choices to show & play During choices? so far ive figured out that looping the images recreates the visual but then the game doesn't progress, bc its just stuck in that loop...
how'd you disable ( + grey out) dialogue options after selecting them??
how'd you add the fullscreen option? i found a code that was supposed to add a fullscreen option to the optionscore settings but that one just breaks the plugin & i simply Don't know enough javascript to figure it out myself
i'm using all the same plugins that dialtown has so clearly these are possible without extra ones, i just don't know how to do it,, thanks for explaining your pronoun system a little while ago btw! i wasn't the one who asked but your post was super helpful when i was setting it up for myself :D
It's been close to 6 years since I started making DT, and I had to figure out a few solutions to specific issues that cropped up which I've likely forgotten now, but I'll answer what I can remember. I'm also gonna give you some advice and advise you not to use RPG Maker for projects like these.
I basically Scott Cawthon'd DT and forced the engine to yield to my demands because I wanted to use the one I knew best. A few of these solutions are over-complicated because the easier ones (which would've worked in other engines) had to be constructed differently. I'll also mention a few solutions to problems you might not have encountered (but inevitably will if you try to recreate DT.) With that out of the way...
1)

You'll want these settings for the backlog plugin. the \c[x] commands refer to standard name colours. Log special inputs set to true, followed up by this below:
\n<\c[4]\n[1]\c[0]>%1
With \n[1] being the name you want and the number after the first c being what colour you want.
I'll also save you a potential future issue: I'd actually recommend you find the backlog plugin I used in DT's files (located inside the www/js/plugins folder) and use the version I have instead of the official release if you're not already, because I made a small change to fix an error. Basically, it breaks slightly with the plugin that lets you bring up the menu during dialogue because text reloads when you leave the menu and re-enter the text box, causing text to be logged at least twice after you pause it. If you keep bringing up the menu, you'll get constant duplication. I simply added a line of code that tells the log not to have two duplicates in a row. Not a programmer, but it seems works.
2)I did it in a funny way to ensure the engine wouldn't screw it up. Basically, there's 3 steps to the event and it's kinda hard to explain (and would be annoying to reproduce without a lot of trial and error for a beginner.) It's easier if I show my code. The first thing I do is run a common event (you can also just paste this code in and run it from the event) that renders the frames used by the popup, so they're loaded into memory + ready to go.

As you can see, they're set to 0 opacity but now ready to be used. Obviously they have to be on a layer that isn't being used by anything else in the scene (and won't be during this part of the game.) I run this event ahead of time, usually 4 messages before the choice comes up or so, so even slower PCs should have time to get them up.
The 'if head' thing just switches between the files for phone/typegingi's heads. I render each frame on separate layers and toggle their opacity from one to the next on a single frame to avoid flickering (bc RPG maker's renderer is hot trash and I have to work around it. Case in point.)
Step 2 is a second command event that orders the frames to fade in.

One layer is the text (which doesn't move) and the other is the first frame of the little head animation. A switch is also turned on at the end, and this signals the animation to go, which is handled by an event on any map where a choice like this comes up.
The event page that handles the animation itself has 2 pages, one to handle the animation as it goes and the other to handle when it stops (note that you could use one page and simply use a conditional branch. I didn't.)

Set to parallel so it runs in the bg behind normal events. As you can see, every 17 frames, I command one image to fade out over a single frame and another to fade in. It loops perfectly, cycling from middle frame, to left, to middle, to right, back to middle. Finally, when you select any route diverging choice, it sets off a second switch, which activates the second event page and commands the game to dispose of the graphics and then turn itself off.

Basically, it's the same animation but with a twist. The text is faded out over 60 frames and then the same animation is played as before, except the values it fades back into go from 255, to 170 to 85. Each of those commands is also followed by a 17 second fade to the opacity of the next frame. So, frame one renders in one frame at 255. Then seventeen frame fadeout to 170... Next frame renders for 1 frame AT 170, then fades out gradually to 85. Then next frame renders at 85 during 1 frame, fades to 0. This is how i synced the turning animation to fade out convincingly.
At the very end, I turn both of the switches this event page uses off so both event pages don't continue on loop. I also have a check for the first event variable to check if the game should still think the animation is running, as a failsafe. I don't remember if this mattered.
3)It's a function in the YEP Extended Message Pack. You'll see the commands for hiding (temporarily removing) + disabling choices (greying them out) as you scroll through the help list, almost 2/3 down. The thing you have to remember though is that messages that are commanded to be hidden/disabled will STAY disabled unless you turn them back on. So, ANY time there's a possibility to make a choice with a disabled or hidden message, add this plugin command to EVERY selectable choice
ClearChoiceSettings
This will ensure the game doesn't break from having a choice permadisabled. If you use loops or labels to make the game return to a previous choice, make sure the looping point is BEFORE any logic that may disable/hide a choice so it doesn't autoenable everything if the game has to go back.
4)Make a new RPG Maker project, copy the js folder from www/data/js and open the new project alongside your other one. Then check my YEP Option core plugin and follow this path in the plugin editor

This code should work.
On a similar note, I'd also take a look at how my plugins are ordered, if your list is different. I had to meddle with the list to make sure some plugins functioned correctly. This engine is held together with duct-tape and spite, so do what this advice what you will.
Hope this helps!
90 notes
·
View notes
Note
I LOVE this set and i was wondering if you could pls explain how you did the text, including how you added texture to the ripped text and the highlighting/circling/etc of words? thank you for posting your beautiful gifs 😊
thank you!! 🥺 & of course! (photopea tutorial)
the majority of the texture for the ripped paper effect i can't really take credit for it's on the paper it's self all i did was make the paper white (because the texture was yellow) and used curves to darken the texture), i got the texture from one of photopea's templates but it seems their whole template section has changed drastically and no longer has like anything i used to see before ???? so i'll just share both versions here:
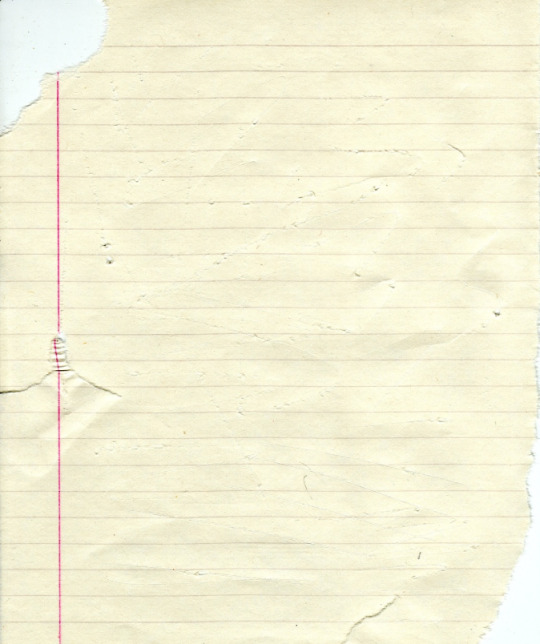
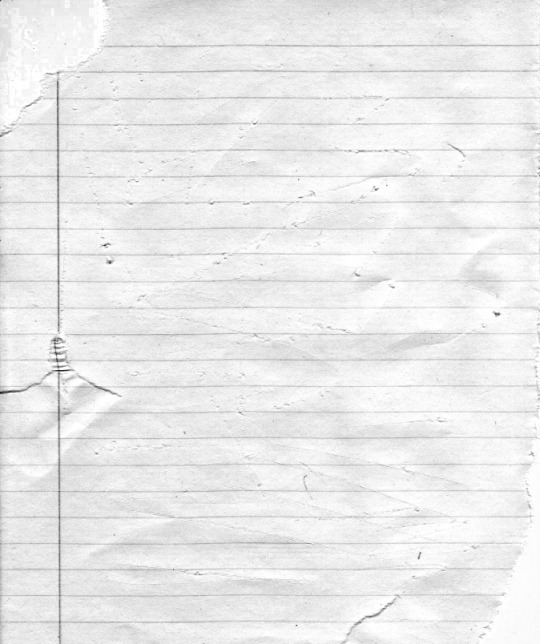
(original & my edited version)
for the ripped parts i just played around with this brush set in the plugins
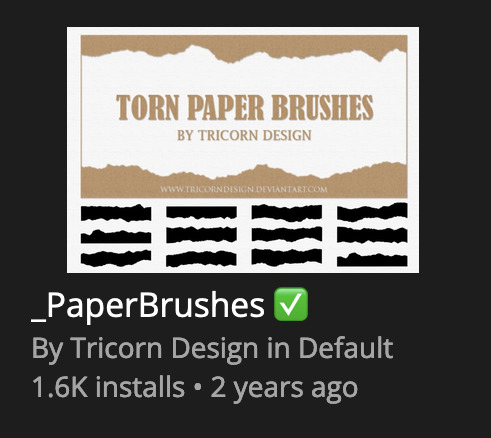
once i decided which of the paper brushes to use i had a new layer and used it where i wanted, so top left in the gif above, i clip masked the paper texture (and the adjustment layers as well) onto it so you get that ripped effect (if you don't like or want to add to that you can always use the brush tool again (or the erasure tool) set as the paper brush to add or remove sections i did this a lot when i realised certain words i wanted to show weren't on there (also changing the size of the paper brush when wanting to add a little bit or take a little bit away was a massive help)
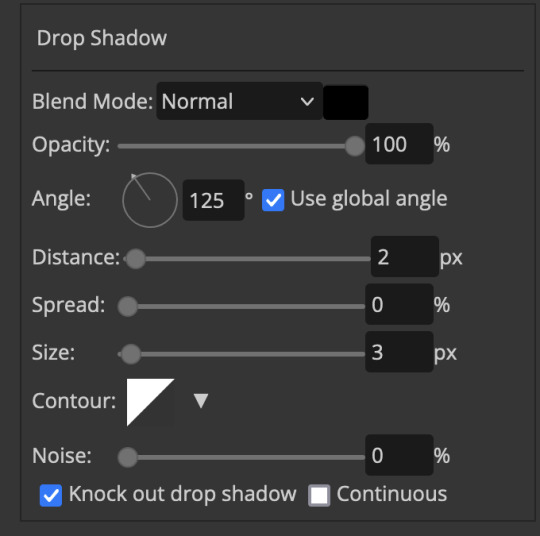
i also always add a drop shadow to my paper textures, the settings i used is mostly the same EXCEPT for the angle for all of the ripped paper (it's also my text drop shadow settings) because depending on how the ripped paper looks you might have to change the angle
also i know in the screenshot below it's on but make sure the use global angle is off if you're going to have multiple different angles of drop shadow in your one gif (so if you want your paper texture on 125° but anything else on 60° the global angle needs to be off but if you want them the same then you can keep that on, which is why it's on for me because the angle is the same for both the text & the ripped paper) (and by text this isn't the text on the ripped paper, there isn't any drop shadow on the text itself there, just to clarify this was for my "ripped paper text tutorial by dengswei" text)
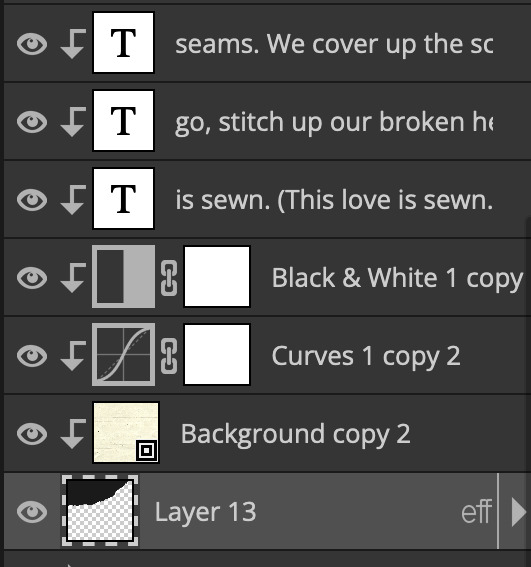
as you can see i also clipped my "handwriting" text to the paper layer this is so it stayed on the paper rather then going onto the gif itself (and it saved the fiddly part of masking it away & it felt more authentic this way too)
i found for me it was easier to seperate the text line by line so i knew exactly which part of the text was on which and if i wanted to change anything either it being a typo, changing the paper texture, or wanting a different word on a different line it was easier that way because it didn't end up messing up all of the text (though you don't have to do it that way, it's just what worked for me here)
font i used was: vag-handwritten (a default photopea font)
all of the next part needs to be above the text on your ripped paper:
for the highlighting, circles, and the lines it's pretty much all the same, i chose the colour which matched the gif (so say purple), for the highlight used the rectangle select & colour fill tools and set that to multiply & then played around with opacity (for most of my highlighting it's set to 50%), for the circles it was the same except the circle shape tool (no fill just stroke) set to purple, set to multiply, with 100% opacity (i found the circles looked better with 100% on some gifs depending on what colour i used), & then duplicated it once or twice and then just moved each circle to where i thought it looked best & the double lines is also the same using the line tool, set to multiply, & playing around with the opacity, & positioning them where i like
for the squiggly lines, the hearts, the 3 small doodle lines at either side of a word, & any other doodles i had on there i doodled them myself with my drawing tablet (you probably don't have to use a drawing tablet i just found it easier that way) using the free pen tool and then did the same thing set it to multiply and played with the opacity
if the colour you choose looks too dark or too light with it set to multiply either try a lighter/darker colour, try out something else like lighten, or screen, or increase/decrease the opacity more (i found i had this issue with the yellow being hard to see on the white paper so i used a darker yellow and kept everything at 100% opacity rather than 50%)
hope that helps! and please if anything is confusing or you want to ask any more don't hesitate to ask i know i ramble on a bit and it can sometimes get a bit confusing 🤣 or if there was anything i missed feel free to ask again 🥰
#replies#edwinas#mine | tutorials#gifmakerresource#photopeablr#photopea tutorial#photopea tutorials#gif tutorial#gif tutorials#usergif#tutorial#tutorials#photopea has so many great default fonts i just spend hours searching through them i barely download fonts now 🤣#i hope i didn't miss anything#also i don't know why the paper textures & my screenshots posted this way i had them side by side#okay they're side by side on mobile but not desktop ??? but mobile doesn't have the read more okay
128 notes
·
View notes
Text
PUTTING OUT A SIGNAL TO ALL GAMEDEVS
I do a lot of palette swapping in Tynk! by this point in the project and it's becoming unruly to keep track of color use. I'd really like to be using one of the many gamedev apps that allow palette swapping and duplicating (with sprites bound to those palettes for reference) but every one I find so far is missing one or two key things for me to be able to make use of it with my current setup.
I'm looking for a palette editor with the following features:
can import palettes from a png, including subpalettes, not just the base
allows duplicates of dummy colors
retains assigned color order after setup
can export all palettes to a single png
Programs I've already tried:
Aseprite (with various plugins)
Lizbox
pixelatedpope's pal swapper
ColorTool
130 notes
·
View notes
Text
Minhas tentativas/My attempts
PT/BR: Sou um produtor autista e indie que gosta de experimentar. Atualmente, estou focado em três gêneros: Synthwave, Dreamscape e Vaporwave (Broken Transmission e uma tentativa de Late-Night Lo-Fi, que é um tipo de Vaporwave).
Todas as minhas produções serão gravadas em demos e talvez algumas delas se tornem lançamentos. Making Music in The Night é um página e uma série de postagens onde irei mostrar eu fazendo músicas com tentivas e erros até se tornar bem legal para se tornar um Album, EP ou um Single
Vamos lá. EN: I am an autistic indie producer who enjoys experimenting. Currently, I focus on three genres: Synthwave, Dreamscape, and Vaporwave (which includes Broken Transmission and some Late-Night Lo-Fi).
Making Music in The Night is a page and a series of posts where I will show myself making music with trials and errors until it becomes really cool to turn into an Album, EP, or Single.
Let's go.

Arranjos, plugins e presets/ Arrangement, plugins and presets
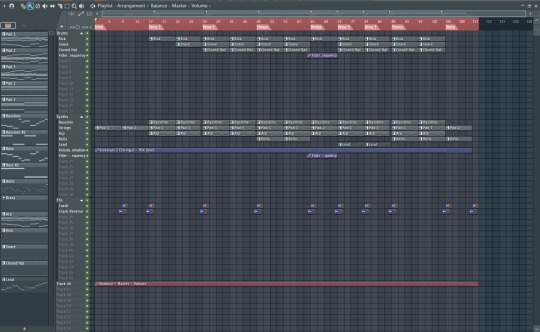
PT/BR: Primeiro, irei mostrar como ficou meu arranjo e depois mostro os synths que eu usei e o presets.
EN: First, I going to show you my arrengenment and after I show you synths and presets.
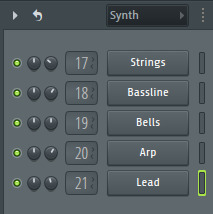
PT/BR: Eu usei um synth de instrumento de cordas, baixo estilo anos 80, sinos e arps.
Plugins e presets que foram usados:
Instrumentos de cordas: Adagio Expressivo - Omnisphere - Baixo: BASS Aviator - DIVA (Oblivion Sound Lab - Neon Circuits) - Sinos: BELL 106 Pluck - DIVA (Oblivion Sound Lab - Neon Circuits) - Arp: ARP Absently Bemused - DIVA (Luftrum - 9) - Melodia: LEAD Obie Saw - DIVA (Oblivion Sound Lab - Nen Circuits)
A maioria que eu usei foi o VST Diva, eu gosto dele porque ele tem uma liberdade para ter esses sons mais retro anos 80 e mais nostalgico.
EN: I used 3 instruments: Strings Ensemble, Bass, bells and arps. Plugins and presets are used: - Strings Ensemble (Adagio Expressivo - Omnisphere) - Bass: BASS Aviator - DIVA (Oblivion Sound Lab - Neon Circuits) - Bells: BELL 106 Pluck - DIVA (Oblivion Sound Lab - Neon Circuits) - Arps: ARP Absently Bemused - DIVA (Luftrum - 9) - Lead: LEAD Obie Saw - DIVA (Oblivion Sound Lab - Nen Circuits)
Most of what I used was the DIVA VST. I like it because it offers the freedom to create those more retro 80s sounds and a more nostalgic feel.
------------------------------------------------------------------------------
Progresão de acordes e melodias/Chords Progressions and melodies
PT/BR: Eu usei esses acordes para fazer os instrumentos de corda (que eu vou chamar de Pad).
EN: I used this chord progressions for make Strings Pad.

PT/BR: Já no segundo momento do Pad 2 eu fiz uma melodia como se fosse tocando uma orquestra so de cordas, mas com os mesmos acordes. Como eu fiz isso? Você duplica uma pattern e depois bem no cantinho do pattern clica em "Make unique" - (Tornar único).
EN: In Pad 2, I used the same chords progression but adding new melodies.
How can I do this? Simple, duplicate same pattern and in the top left corner and select "Make unique".

PT/BR: Agora iremos mexer no baixo. Foi usado as linhas de baixo do Pad e cortei para ir mais rápido.
EN: I used same bass notes in the strings pattern and chop the bass notes.

PT/BR: Agora vamos ver os Arps, como o arp é automático quando você faz um acorde, eu gostei do som. Eu usei a mesma progressão de acordes do instrumentos de cordas.
EN: Let's check the Arps. I used automatic arps for this and I love the song

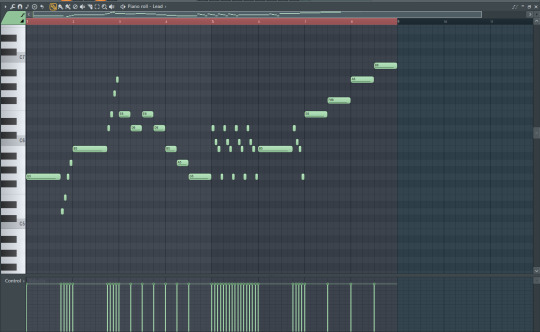
PT/BR: Vamos dar uma olhada nos sinos, para eu fazer a melodia deles eu fui seguindo as progressão de acordes e depois fui alterando algumas notas.
EN: Let's check the bells, for make the bells I following chord progression and change few notes.

PT/BR: Na segunda melodia que seria o solo, eu fiz de cabeça para combinar com a música. Como se fosse uma guitarra elétrica.
EN: In the Lead, which would be the solo, I improvised to match the song. As if it were an electric guitar.
------------------------------------------------------------------------------
Mixagem, automações e canais/Mixing, automations and channels
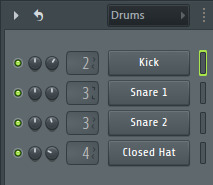
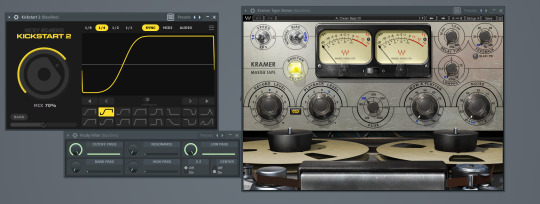
PT/BR: Vamos brincar um pouco com a mixagem e também com os canais. Irei mostrar os plugins que eu usei e não irei falar muito, mas as sequências de fotos vão está em ordem para não se perderem.
OBS: Irei mostrar os os volumes de cada canal, separei em grupos para ficar mais legal de entender.
EN: Let's play around a bit with mixing and also with the channels. I'll show you the plugins I used, and I won't talk much, but the photo sequences will be in order so you don't get lost.
PS: I will show the volumes knobs of each channel, I separated them into groups to make it easier to understand.


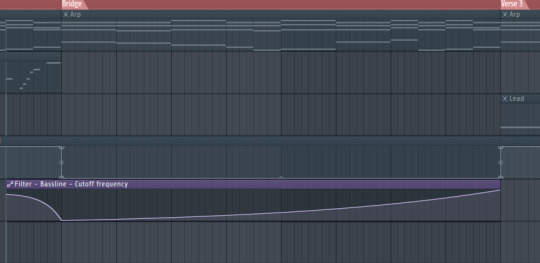
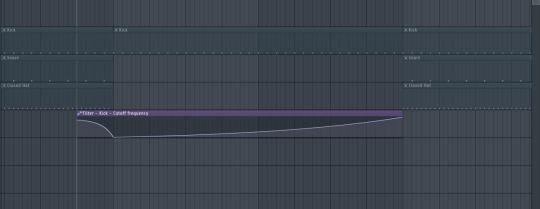
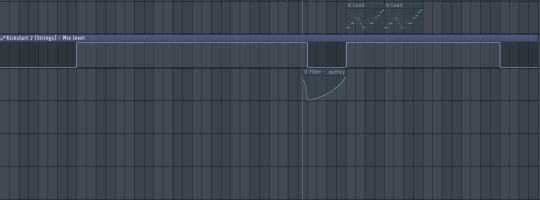
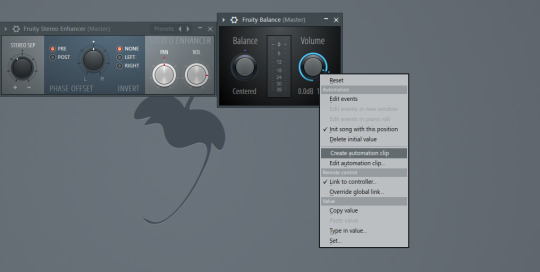
PT/BR: Vamos falar das automações. Eu criei 3 clipes de automações: Um para o baixo, um para o kick e outro para o pad.
Para criar as automações você clica com botão esquerdo do mouse e clica em "Create an automation clip" (Criar um clipe de automação). Para os plugins nativos e mais rápido e mais fácil, mas para os plugins de terceiros tem que clicar com botão direito em cima de um icone de knob.
EN: Let's talk about automation clips. I create 3 automations clips: On for the bass, one for the kick and one for the pad.
To create automations, you left-click and select "Create an automation clip." For native plugins, it's faster and easier, but for third-party plugins, you have to right-click on a knob icon.


------------------------------------------------------------------------------
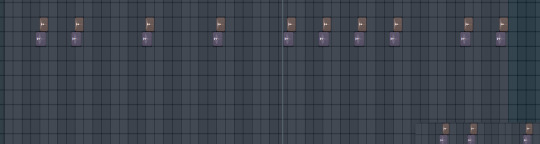
Efeitos/FXs
PT/BR: Irei falar dos efeitos. Coloquei somente o básico para ser mais simples nas transições. Os efeitos de transições coloquei apenas nos momentos em que precisava para não ficar tão poluido. E sim foram somente um Crash e um Crash reverso. EN: Let's check these FXs. I adding some basics: One crash and one reverse crash.
I only applied transition effects at moments when they were needed to avoid making it too cluttered.


------------------------------------------------------------------------------
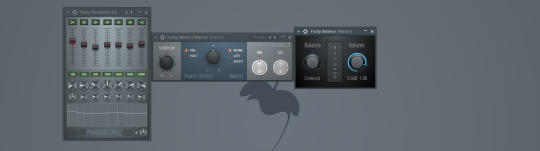
Masterização/Mastering
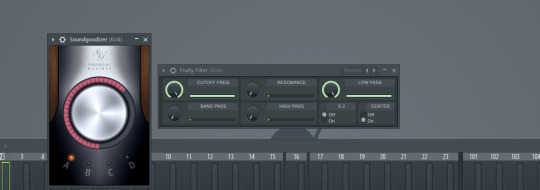
PT/BR: Para finalizar, vamos falar da masterização. Usei apenas apenas 3 plugins nativos do FL Studio: Fruity Parametric EQ, Fruity Stereo Enhancer e o Fruity Balance.
Fruity Balance foi usado para criar um clipe de automação para aumentar e diminuir o volume, para não mexer no volume do canal.
EN: For final step. I used 3 native plugins only: Fruity EQ, Fruity Stereo Enhacer and Fruity Balance.
Fruity Balance is used for create a automation volume.

------------------------------------------------------------------------------
PT/BR: Obrigado por verem meu tutorial de como eu fiz essa demo/ID, ele está disponível no meu Soundcloud. Me seguem para mais tutoriais desses tipos, caso não agradarem esse tipo de formato, posso gravar em video.
EN: Thank you for watching my tutorial on how I made this demo/ID. It’s available on my SoundCloud. Follow me for more tutorials like this. If you don’t like this type of format, I can make a video.
------------------------------------------------------------------------------
Agradecimentos/ Thanks to PT/BR: Obrigado ao Tumblr Brasil, por eu está començando a escrever por aqui e sempre atualizar do que estou fazendo de novidades nas minhas produções, investir em dominio para ser sempre o meu blog de atualizações aqui no Tumblr e a Geminicodes por ter feito um tema pra mim que eu adorei.
EN: Thank you to Tumblr Brazil for allowing me to start writing here and always keeping updates on what I’m doing with my new projects, investing in a domain so this can always be my update blog here on Tumblr, and to Geminicodes for creating a theme for me that I loved. PS: My english is rust, I am studying by myself, feel free to correct me.
Tumblr Brasil: @equipebrasil Geminicodes: @geminicodes
Apoia-me/Support-me:
Soundcloud YouTube Ko-Fi Instagram Buy Me a Coffee
#retro#nostalgia#80s#aesthetic#synthwave#vaporwave#retrowave#80s aesthetic#anos 80#anos 2000#early 2000s#00s#00s nostalgia#00s aesthetic#aesthetics#Making Music in The Night#SoundCloud
10 notes
·
View notes
Text
Tiny cc making tips
Over the years of making cc i've picked up some tricks along the way. These are just some of them in a tiny format. So not a tutorial of any kind, just some tips and tricks! I'm sure many are already doing some of these things and some might require you to Know things already. This is NOT the only one way to do things, it's just how I do things. I wont go in to super detail since it's not a tutorial but i'll try to add as much info as possible and then let you figure it out. Or send an ask.
When naming things, images, packages, blends, whatever files in relation to cc making, create a naming system! Trust me when i tell you it will make your cc making process a lot more streamlined. My system is as follows: "BG maxi dress flower on shoulder pink fem". What we learn here is that it's a base game maxi dress with a flower on the shoulder, and it's the pink swatch. This way, if it's a blender file, i know i can export the diffuse map directly inside blender if i need it later without having to locate the dress in s4s. Fem is there to show what frame the mesh is from without having to open it. Same goes for "masc" items. For example "CL open jacket long sleeves turtleneck camo blue". This tells us it's city living and an open jacket with long sleeves in camo blue and has a turtleneck. Note: sometimes a pack name will have a similar abbreviation, like Cottage Living. My way is just adding another letter or two, COL. Or if the pack only has one word like Toddlers or Strangerville, you could then call it TOD and SV for example.
Make folders! One thing i find that makes things a little easier is that i make folders separating things. So first i have the project folder inside my cc making folder. Let's say i'm making a short satin dress, i'll make a folder "Short satin dress". Inside there i'll make a folder for blender files and one for image files. Inside blender folder i make a folder for lods and inside image folder i make folders for swatches and one for maps. If you're making a fem and masc framed version of the same thing, separate folders by frame as well, so you have a main folder inside "Short satin dress" for fem and one for masc etc and so on. This is so you don't mix textures and blend files up, because for example, sometimes the diffuse map sits differently on a masc frame mesh compared to a female framed mesh.
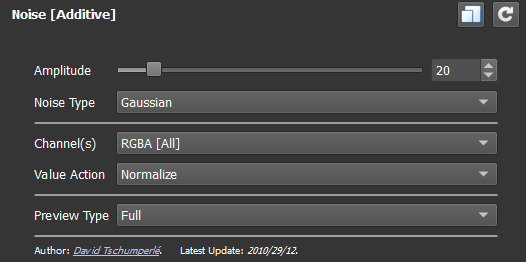
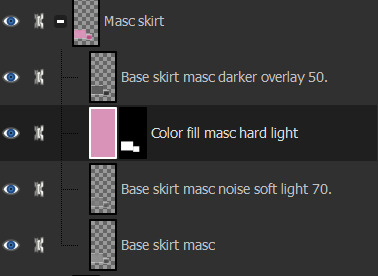
One thing i hate about making cc (other than MAKING cc.........) is making textures. I'm not good at it and this d.o.a game eats textures like it's the last can of catfood in the world, compressing it to hell and back. One thing i've learned and my friend @faaeish told me about is that adding a bit of noise helps! What i like to do, once i have finished my base layer i know i will recolor later, i make a noise layer out of it using "Noise [Additive] with this plugin and i do Output mode: New layer(s) at the bottom. I use gimp but this plugin can also be used with nearly every program under the sun, including ps. It's also online based. You can play around with the settings but i like to use something like below. One thing i realized well, just the other day is that, if you use RGBA noise instead of gray noise, it adds a bit more depth and texture. But not too much! Just a smidgen, to give the texture and the color fill layer more pixels to cling to and it will minimize the risk of artifacts. Ugly blobs, essentially. Once i have that noise layer i alpha to selection on my base layer, invert and sharpen and click the noise layer to remove the access around that the filter adds. I'll also clean up any alpha channels, filling them with white if i need to. Then i play around with layer modes on the noise layer, add a color fill above that and maybe i'll duplicate the base layer and put above the color fill layer. Like below is an example.
Next is a thing for blender, tiny miniature tip but that i find helps me. And that's this little plus sign button when you "Save as.." in blender. So what you need to do when you FIRST save some edits on your mesh, say you swapped the sleeves out. You "File-Save as..-bg no pockets tshirt rolled up sleeves blue fem LOD0_edit0. 0. Zero is important. You need to save the very first save as 0. Next time you make any changes you Save As and click the plus and it will just change 0 to 1. Next time 1 to 2 etc etc. To me this makes it easier to go back in case i mess up. Which i sometimes do. Like the other day i noticed fingers were messed up and i had to go back to nearly the beginning of my edits to pull original fingers and sleeves from. And i always save right before i make any major edits.

That's all i can think of right now. I'll put a read more in case i think of more later. Hope this helps!
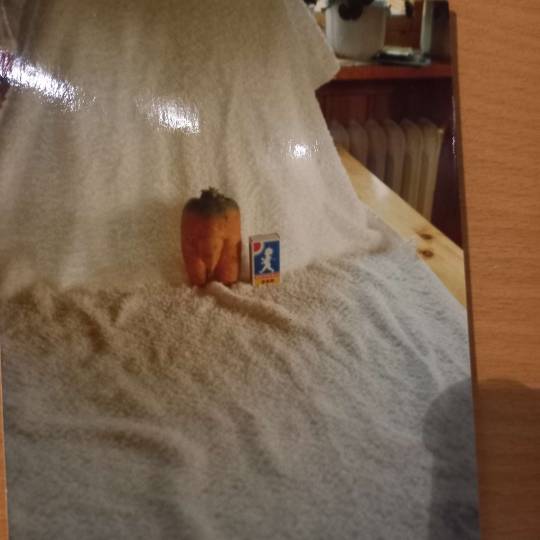
ooo 👻 welcome to under the cut aaaa 👻. But look at this photo i took of a photo i found among my grandmas old stuff. I guess the crops were hung that year.
30 notes
·
View notes
Text
downloading youtube subtitles/captions en masse (or videos, with diff options) & searching them
i wanted to take a playlist and download all of the autogenerated captions so i could then search them. here's the solution i've come up with. tried to cover even the basics here and not assuming you have any particular experience with installing/using stuff in command line
all these instructions will be for windows (11), the wiki has instructions for other OSes
install yt-dlp this can be used to download youtube and thousands of other sites' videos with a high level of customization, and fortunately for me also allows the option of downloading the subtitles without the video. i didn't really want to download 600+ videos for my project!
https://github.com/yt-dlp/yt-dlp -> download the yt-dlp.exe (see for other OSes)
put it in an executable path, i just added a new one to make things easier, see under the cut for detailed instructions
install ffmpeg this is needed for a variety of things, but specifically for my case, i need it to convert the .vtt file that youtube gives us (which is very cluttered to read because it has formatting info in it too) to .srt which is text and timing only
https://www.ffmpeg.org/ -> same deal as yt-dlp, ditto the executable path - i downloaded this one: https://www.gyan.dev/ffmpeg/builds -> ffmpeg-release-essentials.zip
install srt_fix (for cleaning up autogenerated captions) to fix the doubling of text caused by how youtube creates the autogenerated captions:

before fix -> after
https://github.com/bindestriche/srt_fix -> create a folder in your path with the .exe's called 'yt-dlp-plugins' and copy the folder with srt_fix in it there (so the final path of the srt_fix.py for me is: C:\Users\ns\bin\yt-dlp-plugins\srt_fix-1.0.1\yt_dlp_plugins\postprocessor)
there are other methods of installation on that page as well as a link to the general yt-dlp plugin installation documentation
install grepWin if you want to search the text of the files quickly (which was the whole point of this project for me 🤪) grepWin is a good option, made by the person who did tortoisesvn. at some point i might look into putting these on The Internet somewhere that would be searchable and link to the original videos/timestamps, but right now, i just wanted a quick way to search them.
https://github.com/stefankueng/grepWin - click on the release on the right
documentation with direct link to current release: https://tools.stefankueng.com/grepWin.html
now we're ready to go!
open powershell (start->windows powershell) and navigate to where you want the files to be placed, for example: (ps: press tab after writing a couple letters and it'll fill out the dir name automatically)

paste your command (using one of the panel videos for example):

yt-dlp -t sleep --write-auto-sub --convert-subs "srt" --skip-download --use-postprocessor srt_fix:when=before_dl https://youtu.be/tjqkei7nLhw?si=EfaEnVnf-oCv1kxt
replace with the video or playlist you're interested in. recommend starting with a video first :) if it seems to be bombing out repeatedly, stop with ctrl+c
the flags are needed as follows:
-t sleep - if you don't use this, youtube will stop the download after 300 videos and make you wait an hour, this adds some delays to get around that
--write-auto-sub - this is to grab the autogenerated captions as opposed to the uploaded/created versions
--convert-subs "srt" - to use ffmepg to convert the vtt subs into an srt file
--skip-download - to not download the actual video, we only want the subtitles
--use-postprocessor srt_fix:when=before_dl - this is calling the srt_fix specifically when using the skip-download flag

when it's working correctly, it'll look something like this and the folder will contain two files per video, the original srt and the -fixed srt with the non-duplicated text

the file it creates is named (by default, this can be changed, see the docs) video title [youtube video id] - aka plop that string on the end of this url and it'll pull up the source video https://www.youtube.com/watch?v=
and lastly, searching! obviously this is where things kind of break down, because common words are more likely to be understood and captioned correctly; but proper names, sketchy audio quality, mumbling, etc is going to miss a lot. just for kicks, i thought i'd see if it ever got mark of cain:

detailed instructions on adding a new entry to the path environment variable below - just be careful with this

open system properties - search for that in the start menu or enter environmental - it'll pull it up
in the system properties window -> click environment variables

double-click the user variable Path

click New and put the path. i made a new folder at my profile folder level (ns) called 'bin' for this:

so the path i entered was %USERPROFILE%\bin

#tutorial#yt-dlp#youtube#captions#powershell#downloading videos#panel transcript project#i have no idea what to tag this lol#this is beyond niche content but maybe someone somewhere out there also has a project this might be handy for
4 notes
·
View notes
Note
if you don't mind sharing, what's yr process for recording yr music? i'm looking to record an album i'm going to burn on cd for some friends.
Hi and yes I would love to share!
For me it really depended on what instruments i had on hand. I don’t feed my guitar directly into my computer because 1) I can’t be bothered 2) im in favour of the ‘room sound’, I like that it sounds exactly like it was played in my bedroom because it was, so having a guitar and effects board/pedal with the tone I liked was important. I also got a bass specifically to record
So my gap was just drums -> I went on GarageBand and built the full drum line for the song (I say built but I also did use the genre drummers with the adjustable settings quite a lot, theyre good if you can configure them to what you want). Then export the rhythm track as .wav -> import into audacity (lol) (i say lol because audacity I think is generally agreed to be kind of shit for producing. More on this later. you should maybe get an FL studio crack instead) -> put guitar, vocs, bass on
The mic I use is a blue yeti USB mic which I’ve been overall pleased with. A good value for money, can recommend, probably easy to get secondhand (I used my friend’s and then my cousin’s). Guitar, voc, and bass tracks go on separately, so it helped for me to record a ‘sketch’, essentially a pre recording in time with the drum track, where I play guitar and sing, just so when I record the real guitar track I know where I am in the song. On the sketch either the vocals or the guitar will sound far off and faint but it’s enough to like orient yourself. Yknow.
Before you mix on audacity (if you’re using that) go and get the musefx/musehub plugins, musehub de-esser, reverb, eq, are all stuff I consistently use (this is mixing process though sorry im off track).
Guitar i use two tracks, preferably not duplicates of each other but you could do that if needed, panned far left and far right respectively for a full wraparound sound. (Effects: Compress, plate reverb). Recording set up wise I just put the mic on the ground far in front of my amp. Test a bit and then move the mic where you get the best results
Vocals go middle/no pan. I have no good advice for mixing vocals because im bad at it still . Bass pans to wherever your drums are, usually middle also but sometimes double tracked and like 10% right and left. But these aren’t hard and fast rules cause I break them sometimes depending on my whims and what sounds good unexpectedly. Recording and mixing has been a lot of trial and error mostly error but anything you record and make still feels valuable because you literally made something out of nothing. Godspeed
#lmk if I didn’t answer any specific curiosities you had or if you have follow up questions#I really sit in my chair at my desk in front of my pc#I find usb mic to laptop has laptop lag that is kind of unworkable for me#so I had to record onto audacity on a PC#which doesn’t have issues with lag
7 notes
·
View notes
Text
#duplicate plugin#database plugin#social media services#web design services#seo company#seo tools#reset plugin
0 notes
Text
ANIME SPEED LINES BACKGROUND TUTORIAL
Y'know those speedy backgrounds they use in anime and stuff, sometimes with additional speed lines? I found a way to make something similar with Paint NET and a couple of free plugins from pyrochild and Red ochre.

Random Shape Fill (pyrochild plugin)
Adjust Number and Sizes to taste
Greyscale, No Outline, Max Opacity

Motion Blur at max, Edge Behavior > Wrap
Duplicate layer, Merge with below
Repeat until desired
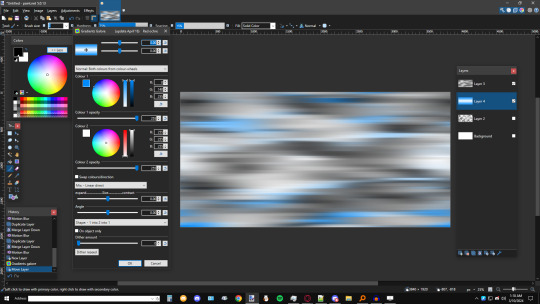

Create a gradient with Gradients Galore (Red ochre plugin) on a new layer under the lines layer
Set the Shape to "1 into 2 into 1"
Mess with duplicate/additional layers and their blend modes, brightness, contrast, etc. until desired


Since the final result is seamless, you can pull it into whatever program you like that allows you to take advantage of that (OBS, Sony Vegas, ZGameEditor Visualizer, etc.)
You could probably go the extra mile and start with a really wide canvas. Experimentation encouraged.
pyrochild plugins: https://forums.getpaint.net/topic/7291-pyrochild-plugins-2020-11-21/ Red ochre plugins: https://forums.getpaint.net/topic/117826-red-ochre-plugin-pack-101/
#had to revise that tutorial because this one is more efficient#caikslyce#tutorial#art tips#art tutorial#paint.net#gif#long post#tips and tricks#useful#bright colors#paint net#paintnet#pdn
31 notes
·
View notes
Text
It's been a while, but I finally have an update to share! I finally had some free time to work on the script for the game and... ended up replacing the entire glossary system instead. oops
It turned out the one I had been using wasn't very good at accounting for duplicate entries, so if you used the back button you'd just end up with several of the same entry, which wasn't ideal, so I found a new one
I ended up using this encyclopaedia plugin, which is. way more complicated than I really needed (and took me a while to figure out) but it offers a bunch of sorting options and seems to more reliably keep track of persistence, which fixes the problem I had been having.
It did take a fair bit of wrangling to get the interface to match the rest of the menus, due to the base plugin being made of multiple copies of the same frame instead of one big background image, but I got it working after a lot of trial and error.
Here's a comparison between the old one and the new one:
Old:

New:

I still have to figure out how to intergrate it better with the in game menus, since it is the only menu that doesn't show the in game menu when it's open, but that's mostly cosmetic so I can leave that for another day (I'll probably end up remaking the in game menu bar to be along the top like tabs anyway)
6 notes
·
View notes
Note
Thank you for sharing how you did the head sculpt! If youd be able to go into more detail I'd truly appreciate it!
Started typing and then before I knew it tips turned into a tutorial so I reformatted the whole thing into a loose step-by-step of how to make them.
This is a tutorial on how to add details to heads like Isahla's neck detail, so not quite how to make everything from scratch but 90% of it at least.
This tutorial will teach you how to bake details on to a head's normal map. I'm using a scar in this tutorial as an example but you can paint any details you like this way. The things to be aware of are:
this tutorial assumes you've got some basic knowledge of Blender and sculpting in Blender. It also assumes you know how to navigate tools like Photoshop or GIMP.
this tutorial won't explain how to make diffuse/other maps match the normal map. That's kind of a whole separate thing with a lot of different methods that can go with or against this one.
this tutorial can be applied to the body as well as the head.
this tutorial won't explain how to blend details across seams (wrist, neck, ankles).
this tutorial can't be applied to… mostly everything else. Skyrim normal maps are special like that, and that's why I love 'em.
And so I don't overwhelm you before going in, here's a quick rundown of the entire process: We're taking the player's head and preparing it for sculpting. We'll sculpt in the details we want. Then we bake out that sculpted detail into a normal map. Then we edit the player's existing normal map to include the new detail. And that's all.
Also, everything can be done with freeware so you have no excuses. Let's go.
1 Preparing the head.
Exporting your character's head from the game isn't always necessary, but it is encouraged. The closer the head in Blender is to the shape of the head in the game, the more accurate your details will be to their head shape. If you don't wish to use a specific head, feel free to use any other head you like, whether thats the vanilla head, High Poly Head, ECE's head, etc. There is a difference between these heads that should be noted, typically in the UV space, but for individual cases it's not too important. Exporting is done with RaceMenu, and the resulting nif file can be imported into Blender using the PyNifly plugin available here. If you struggle with this plugin, converting the nif file to another format through Outfit Studio is also possible. When the head is in Blender, remove any clutter. We don't need anything except the head model for this so we can remove scar and eyebrow masks, eyes, hair, and so on. Now, duplicate the head model so you have two copies of the same head, and for clarity, label your heads low and high poly. I'll be distinguishing between my heads with a _low/_high suffix. We don't need the low poly for now so you can hide it. Your scene should look something like this:

I'm going to sidebar a little bit here to mention that there are two ways to prepare the head for sculpting. One is by "cleaning" the model which I've detailed below. Another (and the method I prefer) is to use Blender's Human Base Meshes bundle (available here) and just scaling and contorting the sculpt-ready model they have to the shape of your character's head. If you feel confident doing that unguided, skip the rest of this step.
Right-click the model and choose Shade Smooth. Enter into edit mode, tap 1 to enter vertex selection, A to highlight everything, and M to merge vertices (choose By Distance). The distance will need to be tweaked depending on the scale the model was imported at but you'll want to merge enough that model isn't splitting when you sculpt later. It should look indistinguishable from before, but there should be no aggressive seam lines like on the back of the head. In Edit mode, go into Edge selection and Alt-Left Click the border of the neck. Alt-F to Fill. Get inside the head and repeat the process for the back of the lips like you see below.
The head should now be prepared for sculpting. You can verify this by attempting to Remesh it, and if it bugs out, there's probably a hole somewhere.
2 Sculpting the head.
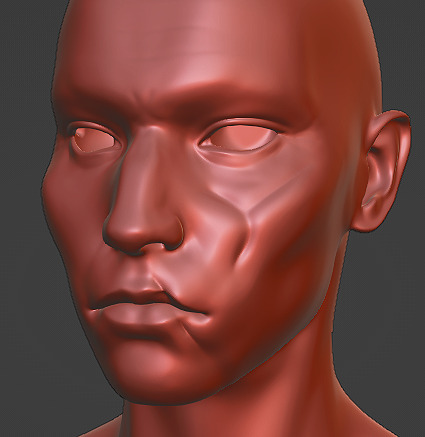
This guide isn't going to have a tutorial for sculpting in it as there's plenty online. The techniques you use are up to you. Personally, I'm a large-detail-to-fine-detail kind of person. That said, Dyntopo is far more intuitive and was how I made Isahla's neck details way back when. You do not need to sculpt every detail on the head although there's nothing stopping you; just do your best to keep the head as close to its original shape as possible. Also, if you have a computer that's struggling with higher poly counts—you can absolutely remove entire parts of the model that you aren't going to use later.
For this example, I've haphazardly cut two scars into a head I had previously sculpted for a different mod. Again, you do not have to sculpt the entire head.
3 Baking.
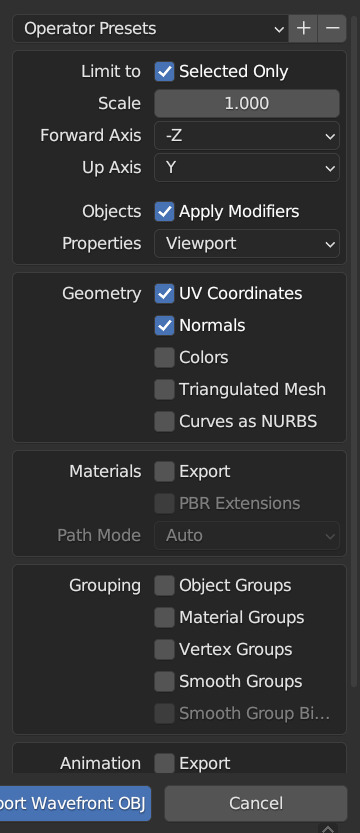
Once you're done, you'll need to export the two heads as .obj files. Remember to name them in a way that you can recognise them as either high or low poly. You can see my export settings below. You may need to tweak these depending on how the bake goes.
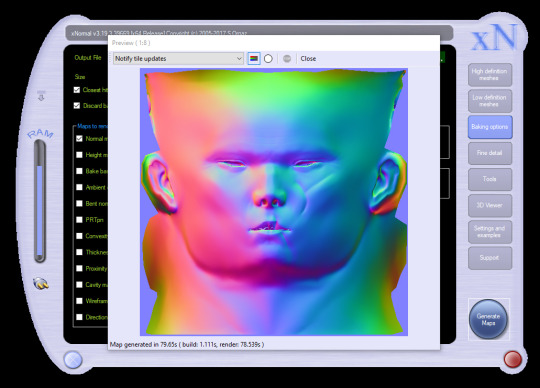
For baking, I'll be using xNormal (available here). It's the shadiest looking site on the modern web but it is what it is. Feel free to use another if you find yourself with a better alternative. If you aren't familiar with baking or what it is, it's a process where we take all the detail from the sculpt, compare it with the low poly in a software like xNormal, and it outputs a texture that can be used to mimic the sculpt's detail.
In xNormal, click 'High definition meshes' in the top-right. Right-click, 'Add meshes'. Locate your high poly obj file and select it. Repeat the same steps for the 'Low definition meshes' tab, then move on to the 'Baking options' tab. In 'Baking options', start by defining a location for the output texture in the 'Output File' field. Name it whatever you like--it'll automatically slap a "_normals" suffix on the end. Bitmap is fine but it's up to you. Set the size to the same size as the normal map you're currently using. For most skin textures these days, your normal map will be 4096x4096. Under 'Maps to render' is a large list of maps you can output but for this we want to only have Normal map checked. Click the three dots beside it. Change the settings to match what I have below.

These changes are important because Skyrim bodies use model space normal maps instead of tangent space, and their world Z direction is inverted. Just don't ask me why. You can now 'Generate Maps' in the lower-right. This process can take a little while and if done correctly, the resulting window should look something like this:
If it's looking like a complete mess and nothing like this, I'm sorry to say you may have a bit of troubleshooting to do. Make sure both meshes are set to use exported normals, and make sure your normals are oriented properly in Blender (see guides on face orientation). It may also help to choose the triangulate option on the high poly model on export.
If yours looks mostly the same but maybe the colours are in different orientations, you can try inverting the "swizzle coordinates" and regenerate the map or invert the colour channels in Photoshop/GIMP. You want Red on the left, Green on the top, Blue at the front.
If yours has all sorts of odd marks around the lips, eyes and ears like mine, that's to be expected. Fixing those spots is outside of the scope of this tutorial.
4 Finishing the texture.
For this next step, I'll be using Photoshop. Feel free to use GIMP or Paint.NET, even. You should be able to follow along mostly fine. If you have never edited Skyrim textures before, this may be difficult to follow, and it's not really the space for a tutorial on it. So, I'll quickly address the following:
GIMP 2.10.10+ should have DDS support already.
Paint.NET has DDS support already.
Photoshop requires a plugin. There are two. Hell, I think there's three. I don't know why. I'm using Intel's plugin available here.
If for whatever reason things aren't working out in one program, you can always switch to one of the others.
LE users should export their normal maps uncompressed.
SE users should export theirs at BC7 (Fast, Linear with Intel but don't quote me on that).
I don't know if any of the non-Photoshop ones support BC7 compression or not. If it doesn't, go uncompressed.
First, load your character's current normal map into the program. Then load your new normal map you got from xNormal into the program on top of the first. Name the two layers however you like, or don't, but for clarity's sake, I'll be referring to the original map as Base and the new map as Scar. Attach a layer mask to Scar (if you aren't familiar with layer masks and how they work, pause now, look it up. Super simple; very useful.) and start to subtract all the stuff that you don't need. You should see the Base layer showing up behind it, filling in all the areas you're erasing.

You'll notice very quickly that the Scar layer will be much smoother than the Base layer, and probably has some differences in hue. Use a really soft brush if you need to blend out the skin. Minor differences in colour value go a LONG way here, so if you see noticeable lines or contours where your new map meets the old one, those will also show up in the game. Do your best to eliminate them if you can. Also, don't be afraid to erase some of the details you're trying to add. Making sure it blends in is the key.

Here's a gif showing the texture I started with, and how it looks with the scar. Note that other than the scar itself, there's nothing new that's been added to the image. This is to keep things as consistent with the original work as possible.
When that's done, you can export it as a .dds file. Make sure not to export with the Alpha channel, as it's unused and will add significantly to the size of the file.
Aaaaand, finally, that's it. Sort of. There's still a lot more you can do but it's all easy tweaking from here on.
Here's how mine turned out:

Even without changes to the diffuse or specular maps, the depth still stands out a lot and if you're willing to keep going and adding details to all three maps, you can really make it stand out.
#asks#skyrim#sorry for the delay in the response btw i came down with something over the weekend and im just coming back now#looking over this whole thing now is honestly really embarrassing#ill be looking over it again and again before bed#but im sure the right people will want it#if thats you then you're welcome <3#skyrim mods#skyrim modding#tutorial#i have a tutorial tag now ig#artsick
22 notes
·
View notes
Text
Eleanor: I love my pronouns being put twice
Eleanor: You just gotta make sure
AiKO: Yeah I don't know why they started duplicating?
AiKO: Maybe Vencord made that plugin a permanent thing, I don't know
Eleanor: It just wanted to make sure you remember
AiKO: Never again will I forget your pronouns
AiKO: By the way, what are your pronouns?
5 notes
·
View notes
Text
Optimizing Your Online Presence with Expert SEO and WordPress Services

In today’s competitive digital landscape, a robust online presence is essential for businesses to thrive. Whether you're running a small blog or managing a large e-commerce platform, search engine optimization (SEO) and a well-maintained website are the cornerstones of success. At Jazinfotech, we specialize in providing tailored SEO and WordPress solutions that help businesses grow and stay ahead of the curve.
Why SEO Matters for Your Business
SEO is not just about ranking higher on search engines—it's about creating a seamless experience for your audience. With over 3.5 billion searches conducted on Google daily, ensuring your website is optimized for search engines is critical to attract organic traffic, increase visibility, and improve conversions.
Effective SEO involves various elements, including keyword research, on-page optimization, technical SEO, and link-building. Each component plays a significant role in improving your site's search engine ranking. At Jazinfotech, we use proven strategies to ensure your website’s content, structure, and user experience are fully optimized for search engines, driving better results.
Expert WordPress Services
WordPress powers over 40% of websites on the internet, and for good reason. Its user-friendly interface, flexibility, and vast plugin ecosystem make it a top choice for businesses looking to create or enhance their online presence. However, just having a WordPress website is not enough; it requires ongoing optimization and maintenance to ensure it's performing at its best.
At Jazinfotech, we provide comprehensive WordPress services, from initial website development to ongoing support and maintenance. Our team of WordPress experts ensures that your site is not only visually appealing but also fast, secure, and optimized for SEO.
You Achieve SEO Success
Comprehensive Keyword Research and Analysis Understanding the terms your audience is searching for is the first step in effective SEO. Our team at Jazinfotech conducts thorough keyword research to identify the best keywords for your business. We analyze search volume, competition, and user intent to develop a strategy that will drive quality traffic to your site.
On-Page SEO Optimization On-page SEO involves optimizing individual pages to rank higher and earn more relevant traffic. This includes optimizing title tags, meta descriptions, header tags, images, and internal linking. At Jazinfotech, we ensure that every page of your WordPress site is optimized to meet both user needs and search engine requirements.
Technical SEO Technical SEO is a behind-the-scenes effort that ensures your website is crawling and indexing correctly. It includes optimizing site speed, mobile responsiveness, structured data, and fixing issues like broken links and duplicate content. Our team ensures that your WordPress site is technically sound, providing a smooth experience for both search engines and users.
Content Strategy and Blogging Quality content is at the heart of any successful SEO strategy. Jazinfotech helps you develop a content strategy that aligns with your audience’s interests and search intent. Regular blogging, optimized for both readers and search engines, is a powerful way to attract visitors and establish authority in your niche.
Link Building and Outreach Building high-quality backlinks from reputable websites is essential for improving your domain authority and search rankings. Jazinfotech uses white-hat link-building strategies to ensure your website gains credibility and improves its SEO performance.
SEO Analytics and Reporting Tracking your SEO performance is key to understanding what works and what needs improvement. Jazinfotech provides in-depth SEO analytics and reporting, giving you actionable insights into your website’s traffic, keyword rankings, and overall performance.
SEO and WordPress Services?
At Jazinfotech, we pride ourselves on delivering customized SEO and WordPress services that meet the unique needs of each business. Our team stays up-to-date with the latest SEO trends, Google algorithm updates, and WordPress best practices to ensure your website stays ahead of the competition.
Whether you're looking to optimize your existing website or develop a new WordPress site from scratch, Jazinfotech is your trusted partner in achieving digital success. With our proven track record of helping businesses improve their online presence, we’re confident that we can help your business grow and thrive in the digital world.
Conclusion
Investing in SEO and WordPress services is an essential step toward building a successful online presence. At Jazinfotech, we combine our expertise in both areas to offer a comprehensive solution that helps businesses achieve their goals. Let us help you optimize your website, increase traffic, and boost conversions. Contact us today to learn how our tailored services can make a difference for your business.
About Jazinfotech
Jazinfotech is a leading provider of SEO and WordPress services, offering customized solutions to businesses of all sizes. With a team of experienced professionals, Jazinfotech helps businesses optimize their online presence and achieve their digital marketing goals. Whether you're looking for SEO optimization, website development, or ongoing maintenance, Jazinfotech is your partner for success.
This blog post highlights Jazinfotech’s expertise and how businesses can benefit from its SEO and WordPress services.
4 notes
·
View notes