#easy beginner Cricut projects
Explore tagged Tumblr posts
Visit Tumblr Blog
Explore Tumblr blogs with no restrictions, modern design and the best experience.
Last Seen Tumblr Blogs


Fun Fact
The most popular pages on Tumblr are about Minecraft, GIFs, and David J. Peterson.
Text
7 Easy Beginner Cricut Projects to Get Started in 2024

Are you finding some ideas for easy beginner Cricut projects? If so, you are in the right place! In this blog, I am basically going to discuss the 7 free Cricut projects for beginners. If you are excited to explore, you must read this write-up once.
I came up with a few Cricut project ideas because of my sister. She insisted I use my Cricut machine setup to create wall decals to decorate her room. She was very excited about her new personal room decor, so all she wanted was a wall decal. During the making process, I recommended a simple design, as it suits most walls. Also, I didn’t want to work on any complex project😅, so I made one I mentioned in this blog.
In addition, I have also created some other projects like coasters, T-shirts and more. To explore, look into this post.
1. Wooden Coaster
Love personalized coasters for gifting someone? This could be a great idea if you want easy beginner Cricut projects. I tried this to show you all because it is very easy to create, and any novice in crafting can make this coaster without any hassle. All you need is wooden slices and some vinyl in your desired color. Just add the first letter of anyone’s name and choose some stylish font. Next, send the design to Cricut, and it will do its work!
2. Customized T-Shirt
When it comes to customized T-shirts, I am always ahead in making one. I have gifted many family members, including friends, a personalized shirt. So, you can also do the same. You must be prepared with some supplies you will need to create this shirt. The supplies include a blank shirt, an iron-on vinyl sheet, and a Cricut machine with accessories. After that, create the design you want to add to your shirt and let your Cricut handle the rest of the task!
3. Earrings
Would you believe me if I told you I made this earring using veneer wood? Yes, it’s true, and I cut these veneers using my Cricut machine. That’s what your Cricut can do😉! And you won’t even realize it—you will have something so beautiful. This wooden earring was a gift for my sister on her 22nd birthday. In order to make these easy beginner Cricut projects, you will need a piece of veneer wood with a recommended thickness and a Cricut cutting machine.
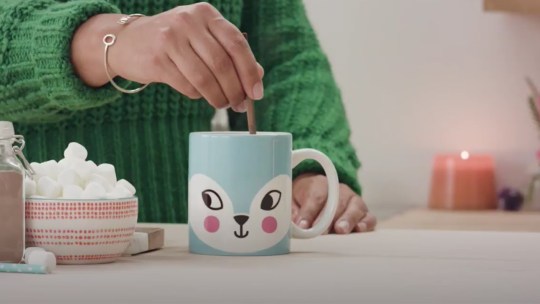
4. Mug
Is someone’s birthday approaching? If it’s a child’s birthday, you can try the design I have done in mine. It is easy to create on Cricut Design Space app. However, you can find numerous ready-made mug designs on the Cricut app for free; you can still create them as they require simple shapes and text. But when working on mugs, having a Cricut Mug Press is a must. Make sure you have one at least.
5. Keychain
I have many keychains, all personalized for every family member. There is a different keychain for a car’s key, a room’s key, and so on. And any of them belonging to a particular person has a first letter printed. Some of them are engraved keychains, which can be done on a Cricut machine. Yes, that is true—Cricut can engrave acrylic, wood, etc. What are you waiting for? Let’s get started with such easy beginner Cricut projects.
6. Wish Card
A wish card can be the best way to wish someone good wishes on their anniversary, birthday, and other special occasions. This project is so easy to create on your Cricut Joy without hassle. So, bring your Cricut Joy and start enthusiastically creating crafts. Use things like the Cricut card mat and its basic toolset to support your project’s crafting.
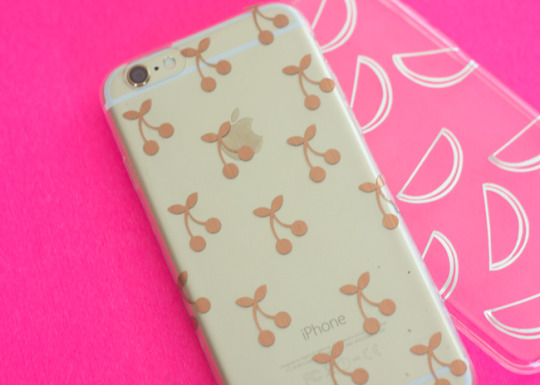
7. Wall Decals
Want to decorate your home? Here’s one of the best wall decals I made using my Cricut Maker 3 Setup. This one is my favorite. It doesn’t have many intricate designs, which makes it look complex, so I thought I’d try this simple design. The benefit of such a simple design is that you don’t waste hours creating these easy beginner Cricut projects.
FAQs
What are free Cricut projects for beginners?
For beginners, you will need something easy to create and less time-consuming for crafts. However, if you are looking for such projects which are also free, you should look into the following list:
Stickers
Coasters
Jewelry
Apparel
Wall decals
Mugs/tumblers
Canister/jar labels
Banners
Cards
Tea towel
What cardstock projects can I make with Cricut?
Using material like cardstock paper, you can easily create several projects. However, I have mentioned some of the easiest projects you can try making on your Cricut. Find the project list given below:
Gift card holder
Canvas wall art
Paper heart envelope
Heart box
Cake toppers
Paper star lanterns
Shadow boxes
Drawer dividers
Gold paper flower
Treat boxes
How to make paper flowers using Cricut?
Follow the steps below to make flowers using your Cricut:
You need to cut the flower template on Cricut
Then, cut the petals from cardstock by using a machine.
Now, overlap the slit at the bottom of each petal and glue.
After that, use clothespins or wonder clips while the glue sets.
Glue the first layer of petals to the flower base, starting with the largest bottom layer.
Next, continue gluing each layer of petals towards the center.
Finally, add the center of the flower and leaves if desired.
For more information visit: cricut.com/setup app cricut account login design.cricut/setup
Source: Easy Beginner Cricut Projects
#easy beginner Cricut projects#cricut design space download#cricut design space app#design.cricut.com#cricut software app#cricut machine setup#cricut account login#cricut joy extra#cricut maker setup
1 note
·
View note
Text
10 Easy Cricut Projects for Beginners to Try in 2024
Hey! Want some easy Cricut projects for this year? Today, I have a list of Cricut projects that are easier than ever. Also, I received many comments on my previous blog, and many readers wanted me to write on Cricut projects for beginners. Hence, I decided to pile up all such projects without a second thought.
So, what will you find in this blog? Well, I have included 10 easy beginner Cricut projects. They are all very different from each other and may require additional resources to make. But do you know that all projects have one thing in common? You guessed it right! It’s a Cricut machine. Without a craft machine, the projects I mention below would be impossible to create.
Hence, grab your Cricut, search for your favorite projects, and make them using different materials and blanks. You will find everything from personalized shirts to keychains in this post. Now, let’s dive in!
1. Jar Labels
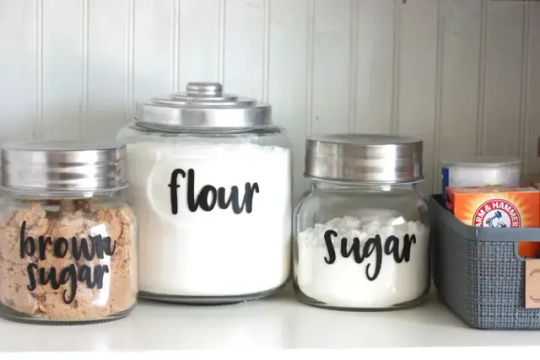
Want some easy Cricut projects? Here are the labels that I created with my Cricut Joy. This is the best idea I can give you if you are a beginner and want to make something easy. This project hardly consumed my time, so I created something useful for my kitchenware. My mom also loves these labels as they help her find the necessary items instantly. So what are you waiting for? Give it a try, and let your mom find the required items immediately.
2. Happy Birthday Acrylic Sign

Every year, we have to celebrate our loved one’s birthday. Why don’t you create something using your Cricut? This will add more love and value to your celebration. As you can see in the picture above, I made this on my grandma’s 60th birthday. And I remember when she asked me to make something on her birthday using my Cricut. She was excited and happy when I got her this birthday acrylic sign. If you want, you can make these signs in advance for upcoming loved ones’ birthdays.
3. Personalized Mug
Personalizing a coffee mug is the best gift idea for all age groups. This is easy and simple to make. Also, you don’t need so much of materials to create this amazing mug. I have only used my Cricut Mug Press and the sublimated Cricut mug. The poly-coated mug works well with vinyl material.
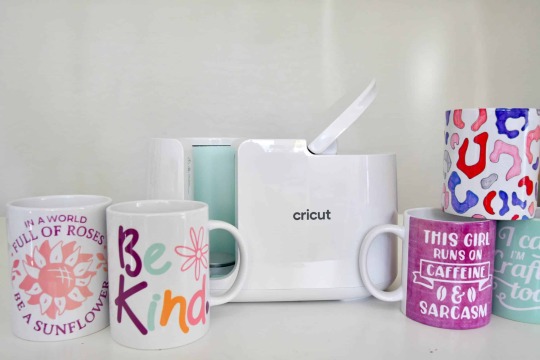
Simply put, vinyl cannot adhere to any mug. Therefore, you will need a mug with a sublimation coating. In short, easy Cricut projects mean personalized mugs because they are easy to create and are considered the best for gifts.
4. Coasters
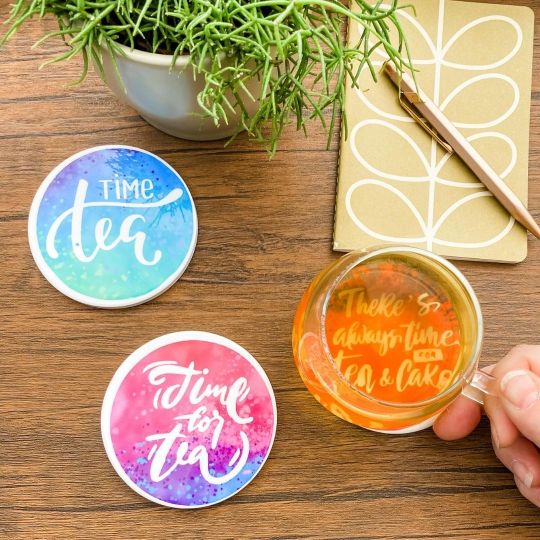
Do you want to create personalized coasters for your office or home? All you need is infusible ink and Cricut coasters. But wait, you need something! This is nothing but a Cricut machine. Yes, you get that right! A Cricut machine is required to cut your intricate design. Besides, use colorful or single-colored vinyl to transfer it to your coasters blank.
5. Holographic Cricut Vinyl Water Bottles
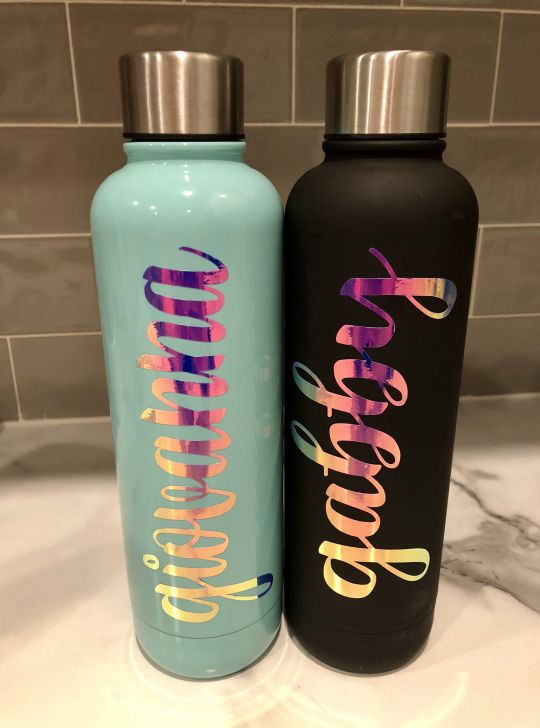
My children and I love personalized bottles. But our happiness doubles when they are made of holographic Cricut vinyl. This vinyl works like a cherry on the cake! It gives the bottles a gleam and appeal that no one can ignore. So if you are planning to make something similar, then I would suggest you choose a dark-colored bottle, as I have chosen a black bottle. However, try sky blue or light pink if you want a little lighter. Since we all use water bottles, I love making such easy Cricut projects every year.
6. T-Shirt
Want to make something beautiful for your mom? Whether it is her birthday or you want to make her feel special, you can make this simple vinyl T-shirt with the text ‘Blessed Mama.’ In addition, this top-notch quality cut of the Cricut cutting machine will give it a professional look on the T-shirt. So, don’t wait; try this today, as you don’t want to miss a chance to see her smiling.
7. Dog Paw Stickers
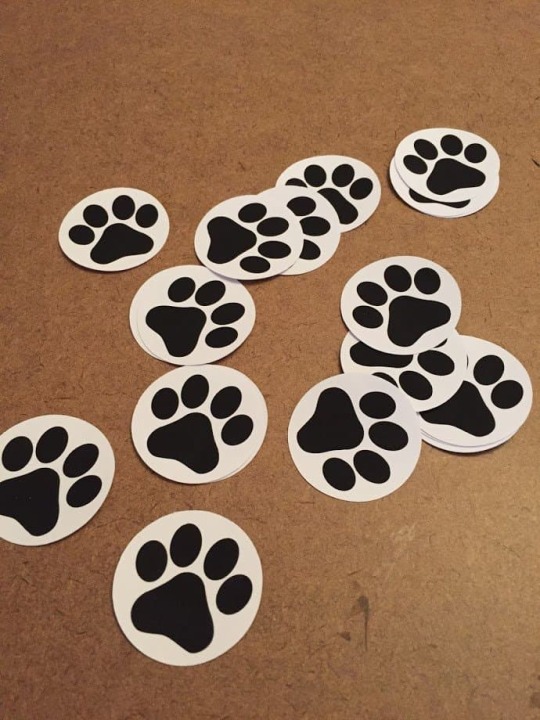
Stickers are simple and easy beginner Cricut projects. All of us make stickers for personalizing our diaries or journals. I use them in my planner, too. But wait! Here, there is something different. Recently, I created new paw stickers for my dog’s kennel. I wanted to personalize my dog’s home. But it doesn’t matter what type of stickers you are making; making such easy Cricut projects is always effortless.
8. Keychain
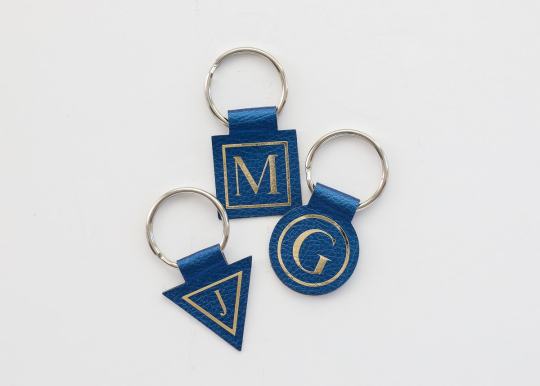
Now, you can also personalize your key chain using acrylic and vinyl. You can transfer the vinyl design made with your Cricut machine to acrylic. However, the key chain I created in the above picture is not made with acrylic but faux leather. Previously, I created many acrylic keychains, but I craved something different this time. Thus, I created a leather-based key chain and used vinyl to make it personalized.
9. Gift Card Holder
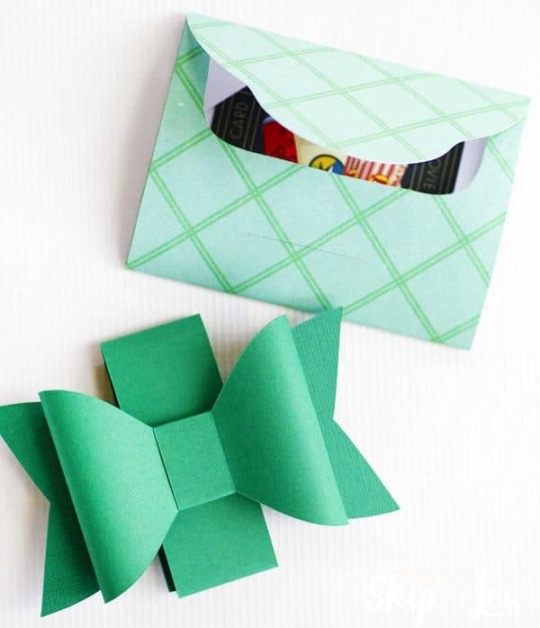
Have Cricut but have yet to try this paper gift holder? If so, you must give it a try! This card holder can be used for special occasions such as weddings, birthdays, or festivals. I created this holder using my handy Cricut Maker and cardstock. I don’t know why, but I love making things on cardstock because cutting them on a Cricut seems interesting. Anyway, if you are interested in making this Cricut project, you should never hesitate.
10. Butterfly Birthday Card
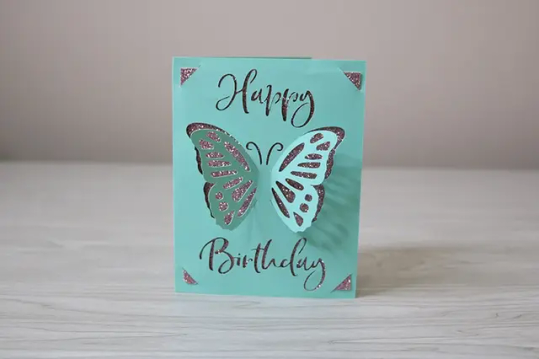
Making such a birthday card using an insert card is my favorite one. The insert card gives it a unique and gleaming look that I love. My cutie, the small Cricut Joy, helped me so much in making this easy card. So try this card for your loved ones’ birthday and send them to bring a smile to their face. Also, you can modify the design easily on your Cricut Design Space. Try this on Cricut Joy and add joy to your celebration.
Final Words
In this blog, I have included 10 easy Cricut projects that are simple as well as unique to create on a Cricut cutting machine. So, whether it is jarring labels or butterfly birthday cards, the Cricut does everything you need. Besides, these projects are those that I created when I was a beginner, so they will be useful for you as a beginner. However, if you want to add your creative touch, you are free to do so.
#Easy Cricut Projects#Easy beginner Cricut projects#cricut explore air 2#cricut design space app#cricut software#install cricut design space app#cricut.com/setup#www.cricut.com/setup login#cricut.com sign in#cricut design space login
0 notes
Text
How to Use Cricut Pens? (Easy Steps!)
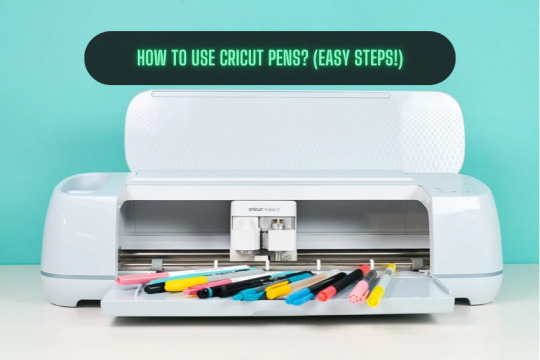
If you are a Cricut user, then surely you know that this brand makes some smart tools and machines. You know about its capabilities and how useful it is. But did you know that apart from cutting materials, you can use pens to simplify the crafting process significantly? But how to use Cricut pens? Cricut machines are not only used for cutting different shapes out of paper or vinyl. These machines use pens to create doodles, illustrations, and intricate designs. However, you need to know some basic steps you need to perform when you are designing your projects to make them better.
Using the pens is easy and straightforward, but the important thing is that you know the process. Read this blog to discover all about Cricut pens and what projects you can make with them.
What Types of Cricut Pens Are Available?
All of the current Cricut machines can use a pen, whether Maker, Explore, or Joy. The Maker and Explore machines have interchangeable pens, and Joy has a lineup of small pens. Joy pens are incompatible with other machines due to their unique, smaller size. Before you proceed with how to use Cricut pens, here is the list of pens that you can use with the machine:
Fine Point Pens
This has an F stamped on it for fine, has a 0.4mm tip, and comes in multiple colors.
Extra Fine Point Pens
These are finer, and the pens are just 0.3mm thick.
1.0 Pens and Markers
They have a thickness of 1.0mm and can be called markers, too.
Gel Pens
Gel Pens have a roller ball instead of a tip and are 0.8 mm in size.
Glitter Gel Pens
It has a roller ball and is 0.8 mm in size.
Calligraphy Pens
These pens have a gray barrel and have C stamped to denote calligraphy.
Infusible Ink Pens
It has a 1.0mm tip, and it is used for sublimation and infusing the ink on the surfaces.
How to Use Cricut Pens: Easy and Simple Steps
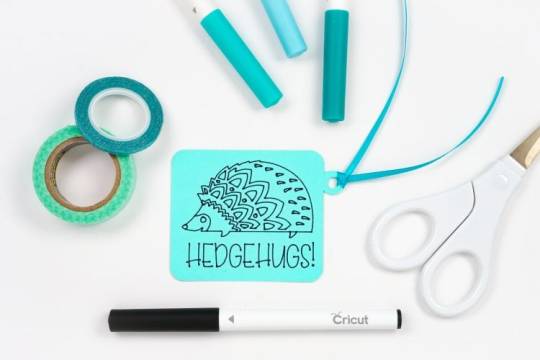
Placing or installing pens is easy, but if you are a beginner, then it will be a new thing for you. Always use the pens carefully, and pens should always be fitted to the clamp A of the cutting machine. Here, I am going to show you something different about using Cricut pens to create a simple gift tag. Now, let’s look at the below process to understand how to use it:
First, go to the Design Space and click on a new project to create a design.
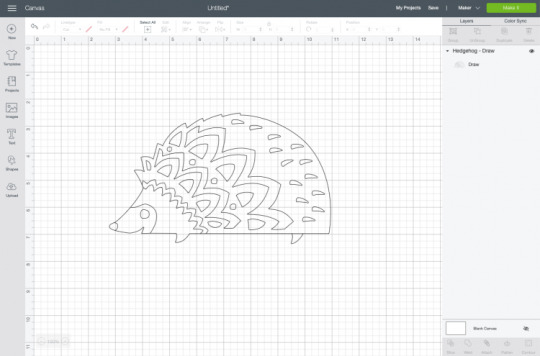
Then, create a design, or you can choose a text that you want to use with your pen. Cricut Design Space has its own vast library of images for your DIY projects.
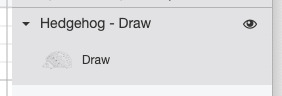
Now, remember you have to draw, not cut the image. So, go to the Edit toolbar, and from there, select the Draw option in the Layers panel.
When you click the colored square box next to the line type dropdown, you can select the type of pen and choose the Fine Point pen.

After you have completed drawing your design, it is time to add text. In the Font menu, you can filter by Cricut Writing fonts. Choose the writing style font.
You can insert a shape into your Canvas. Then, using the Align tool, you can change its size and color and move it to the back of your Canvas.
Next, select your drawing and text layer and click Attach on the right-hand side of the Layers panel.
On the preview screen, your image will appear on the mat. Click Continue, and in the Make screen option, select the material you are using. Here, I am using cardstock. The Cricut Design Space app will prompt you to insert your pen, and you can use a fine-point blade.
In the last step, you have to insert your mat into the machine, and your machine will draw and cut the tag.
Conclusion
Now you know how simple it was to learn ‘how to use Cricut pens‘.? In this post, I have explained the types of pens and how you can craft your project with the pen. After reading this blog, you can choose a pen for your project, load it into the machine, and start crafting. Start crafting with your pen and unlock the full potential of the machine.
FAQs
How Do You Load the Pen Into Cricut Machine?
When you open the machine, you will see two clamps: Clamp A and Clamp B. To load the pen into your cutting machine, open Clamp A and insert the pen into it. Gently press the pen into the clamp until it fits properly, and you hear a click sound. Then, close the cover, and you are ready to use the machine.
What Are Cricut Pens?
Cricut makes different types of pens, which are great ways to add drawn or handwritten details to your projects. Cricut pens come in different sizes and can be easily loaded into the machine. This can be used for various creative projects, such as writing on gift tag cards or adding doodles.
What Is the Difference Between Cricut Pens and Markers?
A Cricut pen usually has a fine tip, which allows it to create a thinner line, compared to a marker, which has a thick tip and creates a thicker line. Pens are ideal for writing detailed text, signatures, or fine lines within a design, whereas markers are better for filling large areas with color.
Source: How to Use Cricut Pens
#how to use Cricut pens#cricut design space download#cricut design space app#cricut maker#cricut joy#cricut pens
4 notes
·
View notes
Text
Cricut Iron On Vinyl Instructions: Quick & Easy Guide
If you’re new to the world of Cricut and want to upgrade your crafting with iron-on vinyl, then this quick and easy tutorial is for you. Cricut iron on vinyl is a thin, flexible pre-cut sheet or roll of vinyl with an adhesive backing that is activated after heat and pressure. You can create beautiful personalized T-shirts, makeup bags, pillowcases, wine bags, and more from iron-on vinyl.
In this guide, I am going to show you detailed Cricut iron-on vinyl instructions to help you explore other possibilities for the Cricut machine. Don’t worry; I have written this tutorial for beginners in mind — I will walk you through the entire process in depth from start to finish. Plus, I will discuss the essential supplies, how to make a design, how to cut iron on vinyl, and so much more. So, let’s get started.
Essential Tools and Materials for Designing a T-shirt
Gathering enough supplies is the most important instruction for making any Cricut iron-on vinyl project.
A Cricut cutting machine
Weeding tool
Cricut Easy Press
Everyday iron-on vinyl
Base material (T-shirt, tote bag, etc)
Cricut cutting mat
Heat Press mat
Cricut Design Space
Cricut Guide
Butcher paper
Step 1: Create or Upload a Design in the Cricut App
The first thing you need to keep in mind for any Cricut iron-on project is a digital design that allows you to cut iron on vinyl. You use the design and apply it to the desired surface.
First, download a design in SVG format from the internet and make sure it is compatible with Cricut Design Space.
Unzip the SVG file, open the Cricut app, and click on New Project.
Also, hit the Upload button on the left sidebar and upload the file to the canvas.
Next, drag and resize the design to fit the surface. I chose a shirt as the surface to demonstrate the Cricut iron on vinyl instructions.
When the design is ready for iron on vinyl, click the Make It option.
Step 2: Select Your Materials
Now is the right moment to choose the materials and configure the settings one by one in the Design Space.
On the prepare screen, toggle the “Mirror” option and press the Continue button.
Click Browse All Material on the next make-screen and search for iron on vinyl. Note: If you have Cricut Explore Air 2, turn the wheel to custom.
Step 3: Cut & Weed Out Iron On Vinyl
As soon as you select iron as the material, it’s time to cut out the design.
First, place the vinyl on the Cricut cutting mat and insert the mat into the machine.
You have to press the flashing Go button to start cutting your design on the vinyl.
Once the machine stops cutting, remove the mat and the negative parts from the design using the weeding tool.
Step 4: Preparation for Applying Heat
Once your design is ready, it is time to learn Cricut iron-on vinyl instructions and prepare everything to apply the heat.
Initially, visit the Cricut Heat Guide and get accurate timing & temperature info.
Set up the workspace, place the Easy Press mat on a clean surface, and preheat it.
Now, lay down the shirt on the heat press mat and preheat it for 5 seconds to remove the wrinkles.
Step 5: Place the Vinyl on Your Shirt
These are the final Cricut iron on vinyl instructions that need to be followed to complete the process.
First, center the vinyl design on the shirt you just cut out, and be sure to place the shiny vinyl side up.
Now, place butcher paper over the design and apply heat to the vinyl following the Cricut heat transfer guide. I use light pressure at 315F for 30 seconds.
Finally, leave the surface (shirt) until it cools, then peel off the plastic transfer sheet.
Frequently Asked Questions
Question 1: How do I use a Cricut iron on vinyl?
The following are brief step-by-step instructions for using the Cricut vinyl.
Create or upload a design in Cricut Design Space.
Select vinyl as the material and other cut settings.
Cut and weed out the design.
Place the heat press on your design.
Question 2: How long should you leave the Cricut iron on vinyl?
Once you apply heat to the Cricut iron on vinyl, it penetrates the surface, and the time and temperature depend entirely on the Cricut Heat Guide instructions. For better results, apply moderate pressure with the iron for 25 to 30 seconds. As for how long to leave the iron on vinyl, the answer is simple: until the surface has cooled.
Question 3: What materials should you avoid while using Cricut iron on vinyl?
Before deciding how to use Cricut iron on vinyl, it is important to know its compatibility with various materials. Iron on vinyl is suitable for use on cotton, polyester, blends, and burlap canvas. But, it is not compatible with fabrics like nylon and spandex. Therefore, refrain from using iron on vinyl on such fabric surfaces.
Final Words
Crafting with a Cricut machine is both adventurous and challenging, offering many opportunities. One such difficult task is cutting and applying heat iron on vinyl with Cricut to create popular DIY projects like T-shirts, tote bags, cards, banners, keychains, and makeup bags. If you are here, you’ve already navigated through the step-by-step Cricut iron-on vinyl instructions necessary to achieve the desired output.
Source: Cricut iron on vinyl
Cricut iron on vinyl instructions
Visit here for more Information: Cricut.com/setup
Cricut explore 3
#Cricut iron on vinyl#Cricut iron on vinyl instructions#cricut.com/setup#cricut explore 3#design space cricut#cricut maker 3 vs explore 3#2024
2 notes
·
View notes
Text
How Do I Set Up My Cricut Maker? [Ultimate Guide]
Buying a new Cricut Maker can be overwhelming for all of us. Initially, setup can be daunting, but once you do it, you will love the overall process. However, you can easily set up any Cricut machine without needing much assistance.
The post is all about how do I set up my Cricut Maker. Through this write-up, we will see the items while unboxing the new Cricut Maker. Further, you will explore the Cricut Maker and its types. Afterward, we will explain the complete process of setting up your Cricut Maker machine.
What Do You Get in the Cricut Maker Box?
Unboxing a new product is always an exciting task. While unboxing the Cricut Maker machine, we got several items that we will be discussing here. However, you always have the option to select the bundles when you buy the machine from Cricut's official website.
Following are the items that you get in the box of the new Cricut Maker:
Apart from these, you will get the following:
The best thing is that we get the blades and tools along with the new Cricut machine. These blades allow us to try various products before buying more blades.
How Do I Set Up My Cricut Maker on a Computer?
When we talk about setting up Cricut Maker machine, it means we want to connect it to our devices like computers or mobile phones. However, there are certain ways to connect these machines to our devices. For example, we can connect our Cricut Maker to our computer or phone via Bluetooth or USB cable. So, it is the users’ choice to choose which way is the most suitable for them.
Below, we explain how to set up Cricut Maker. This method is only applicable for Windows or Mac users only:
How Do I Set Up My Cricut Maker on a Mobile?
Here's how to set up your Cricut Maker on Mobile devices with iOS or Android operating systems:
Cricut Maker is the most advanced and versatile in Cricut's lineup. However, the box contains various items that you can use to make several projects uninterruptedly. In this write-up, we explained the Maker and its features in detail. It helps the users to get an overview of machines so that they can use them without any hassle. After exploring the Maker cutting machine, the blog found out how do I set up my Cricut Maker.
FAQs
Question 1: Can I set up the Cricut Maker easily?
Answer: People think the setup is daunting, but this is not the case. Cricut machines are just like printers. The only difference is that Cricut has blades to cut. However, when you go through the notice period, you will find the setup is too easy and complete in less time. While setting up, you will need to download and install the Design Space app. This app will guide you through the further setup process, making it easy for beginners to set up the machine in one go.
Question 2: How do I connect my mobile phone to my Cricut?
Answer: Here, we are going to show you the method to connect your mobile device to the Cricut machine. Here, we are using iPhone or iOS devices. So, ensure you have an iOS device.
Question 3: Can I use the Cricut without its software?
Answer: No, you must use the Cricut Design Space app to send your design to your Cricut device. The machine is the companion for your Cricut cutting machine. Without this machine, you can't cut anything. However, the Design Space is essential for creating intricate designs and then sending them to the machine. Also, the app is the only way to maintain communication between your computer and Cricut.
Visit: cricut.com/setup
cricut.com/setup
Source: https://cricutmakersetup.wordpress.com/2023/10/21/how-do-i-set-up-my-cricut-maker-ultimate-guide/
#cricut explore air 2#design space setup#cricut maker#cricut.com/setup#cricut.com design space#cricut.com/create#cricut.com sign in#design cricut.com download#digital design
2 notes
·
View notes
Text
Top 5 Cricut Beginner Projects to Get Started
Buying a Cricut machine for the first time, and if you are a beginner, the device can be intimidating by its features and looks. It can also seem like a complicated machine, with many blades, mats, materials, and tools. So, choosing your first project can be challenging given the wide range of Cricut machine's abilities. As you might already know, Cricut machines are cutting devices, and its high-end models can cut more than 300 materials. This blog contains curations of Cricut beginner projects to help you understand and work smoothly with the machine.
1. Custom Phone Case
If you want to make your mobile's trendiest new phone case, it is possible with your Cricut machine. You can mainly use the Explore machine for creating this project. It is because, along with Design Space, select your respective smartphone model from the iPhone and Android phones list. You can make a perfect Cricut phone case in just a few minutes.
Further, the supplies you need for creating a personalized phone case are an Explore or Maker machine. You also need a clear phone case, foil adhesive vinyl, or standard permanent vinyl. Also, you need Transfer tape and the respective designs you want to cut on the material.
2. Cute Face Mug
It is one of the easiest Cricut beginner projects. You just need to cut some vinyl material and stick it on a mug with a clean surface. You can select super cute designs from the official Design Store or create your design. You can choose some cute doodles you or your kids like. And you can make various faces and expressions, even using animals such as a kitty, puppy, or unicorn.
Further, the supplies you need for this project are a sheet of vinyl, a Cricut Machine, and a weeding tool. Plus, you need Transfer tape to transfer the design onto the surface of the mug.
3. Greeting Cards
You can make a set of greeting cards with your new Cricut machine as your first project. To do this project, all you need to do is cut two types or colors of cardstock, fold them, and put them together. Creating a set of greeting cards is very simple and quick, and you will also have cards with fancy patterned looks.

Further, all the standard cards are 5 x 7 inches, so you can keep them in envelopes and mail them easily. So, you need a standard cardstock, A Fine-point blade, a Cricut Joy, or Explore. Plus, the design of your greeting card. Additionally, you don't have to score or glue the end products. That is why it is the easiest of all Cricut beginner projects.
4. Wall Decals
The wall decals are another set of great projects to begin your Cricut crafting journey. You can add inspirational quotes or simple messages in your living room or bedroom. For this project, it is better to use regular permanent vinyl. However, you can also use colored vinyl to create a pop-up look.
Further, this project requires a Cricut machine, permanent vinyl, and an SVG design file. Additionally, you need to measure your space and cut the quote of your choice. After missing, clean the wall, free it from dirt, and then apply the design.
5. Coasters
Another way to decorate your coffee or personal table is by adding personalized coasters. Making coasters is easy and takes less time. It also needs less materials to make it. All you need to create a coaster is first to decide on the design you can easily peel off from the material. In addition, you need permanent vinyl and cut the design on it using your Cricut Maker or Joy.
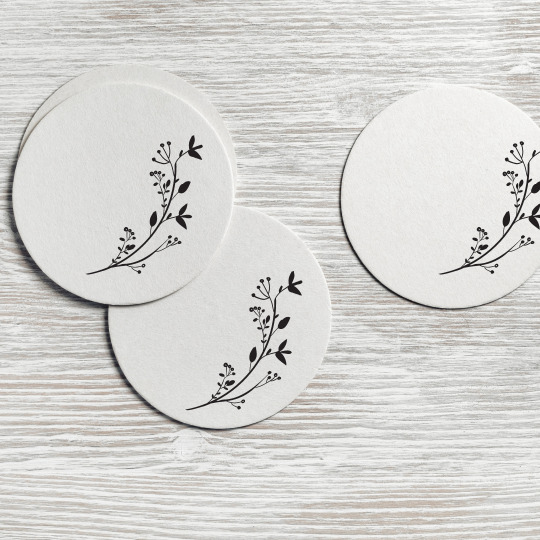
Further, using permanent vinyl to make coasters assures you of longer life and won't quickly come off from the coaster.
Conclusion
Using a Cricut machine is easy once you get comfortable with the materials, tools, and Design Space. To get comfortable as a fresh user, you must pick up projects that read to you the fundamental aspects of working with a Cricut machine. This blog will be an easy guide and Cricut beginner projects to help you in the initial stages of working with the device. In addition, you need to pick a project with fewer materials, simple steps, and less time to complete. Once you master the basic techniques, you can create complex designs and projects.
FAQs
What is the helpful advice on Cricut beginner projects?
Some important suggestions are to pay attention to instructions and get suitable materials/supplies and tools for your project. Additionally, if you are in doubt, test it first. As a beginner, you need to accept that you will make certain mistakes, and that's Okay. And your aim should always be learning and on the process and less on perfection.
What should ideally be the first Cricut project for a beginner?
Ideally, Card making is the first project new users should try with their Cricut machines. It is because you can make your cards for any situation. You can use your machine to cut the design on your cardstock and remove all the extra materials. Now; you will have your first Cricut project.
Do you need a computer to work with Cricut machine?
No, you don't need a computer to work with Maker. It is because you can use Cricut Maker with your Android or iPhone. But you can only do some things you want with a mobile. So, to use the machine's full potential, connecting it to the computer is a must.
#Cricut Beginner Projects#Top 5 Cricut Beginner Projects to Get Started#Cricut.com/setup#www.cricut.com/setup
2 notes
·
View notes
Text
How to Make Rhinestone Template on Cricut? (Complete Tutorial)
As a Cricut expert, I would like to guide many beginner-level or experienced crafters through creating rhinestone templates. In Cricut, you can easily transform a simple design into an impressive masterpiece. You can create your own rhinestone template and add sparkle to your crafts.
I’ve worked on many rhinestone template projects, and it’s always an exciting and enjoyable process. First and foremost, it is important to be ready with all the necessary tools and supplies to help achieve better results. I will show you how you can show your crafting abilities and get deserved appreciation. Let me share the steps to make a rhinestone template on Cricut, but before that, I want to tell you how you should prepare.
What to Keep in Mind When Making Rhinestone Template?
When you are about to start designing your rhinestone template on Cricut, you may already be excited. However, keep certain key points in mind, which are:
Collect all the essential tools and supplies, such as rhinestones, adhesives, template material, and more. You must also have tweezers and a pick-up tool for handling tiny pieces.
On the Cricut Design Space application, select the right size and effect for the rhinestones according to your design’s requirements. You must also select the correct font or image and see whether it fits perfectly on the material you are using for the template.
Designing the template with precision is crucial. Transfer your pattern or image onto the template material using methods like tracing, iron-on transfer paper, or carbon paper. Check that all the lines are clear and accurate for optimal results.
Secure the rhinestones to the template material. Then, apply adhesive to the rear of all the rhinestones and carefully place them on the template. Let the glue dry before you proceed further.
Always use durable and versatile materials to cut rhinestone templates. The materials should last long, work well with various kinds of stones, and be easy to store. Consider vinyl sheets, as they are durable, flexible, and cost-friendly.
Steps to Make a Rhinestone Template on Cricut
Making a rhinestone template with Cricut can be a fun and exciting DIY project. But you must learn the right steps to get clean, accurate templates for sparkling designs:
If you are not aware of “How to create a rhinestone template on a Cricut Machine“, here are the steps:
Design Rhinestone Template in Cricut App
Step 1: On the Cricut Design Space app, download and install a rhinestone font.
Step 2: Click the Text tool on the left-hand side of the screen.
Step 3: Now, click the font drop-down menu, search for a rhinestone font, and select your preferred font.
Step 4: Next, navigate to the Shapes tool, select a circle, and resize it to match the size of a rhinestone.
Step 5: With the circle selected, click the color watch button in the Operation section and change the color.
Step 6: After that, you must resize the design to match the circle in the design to the rhinestone circle you just created.
Step 7: Zoom in, place the design over the circle, and see whether the size matches.
Step 8: Duplicate the design and place it onto the mat. This way, you’ll double-check the circle’s size.
Adjusting and Preparing a Design for Cutting
Step 1: Click the Shapes icon and select another circle. After that, resize that circle.
Step 2: Place the circle on the corner of the design. Make sure that it covers one dot.
Step 3: Select the duplicated design and the circle you just created. Then, click the “Slice” tool.
Step 4: Go to the Layers tab and click the Delete icon to delete all the slice results excluding the circle. After that, check the size of the circle from the toolbar.
Step 5: Resize the design till the circles are the correct size.
Step 6: If the design is too large for the surface, select it and, at the bottom of the screen, click the Combine and Unite icon. Then, you must edit the design.
Step 7: Once the design is ready, click the Make It button at the top right of the screen. Then, set it to On Mat from the Material Load Type section.
Step 8: Now, reposition the design on the mat and click Continue at the bottom of the screen.
Create Custom Material Settings
Step 1: Click “Browse all Materials” and then click Material Settings to create a new material cut setting for Rhinestone Flock.
Step 2: Scroll down and tap the Add New Material button. Give it a name, and click the “Save” option.
Step 3: Scroll to locate the new material, set the pressure to 275, and turn off multiple passes. Select the Fine-point Blade from the list and click the Save button.
Step 4: Click on “x” at the top to close the Custom Material window. Then, click the “Browse All Materials” option again, find and select the new cut settings, and click the “Done” button.
Step 5: Set the Pressure to More and check the “Remember Material Settings” box to save your preferences.
Step 6: Place the flock material on the LightGrip cutting mat with the liner side facing down.
Step 7: With a brayer tool, smooth it down on the mat.
Step 8: The next step is to load the mat on your machine. Just press the Load/Unload button on the machine and then the Start button to begin cutting.
Weeding, Applying Rhinestones, and Heat Pressing
Step 1: After you are through with the cutting, remove the mat and peel off the material from the mat.
Step 2: Take a piece of strong grip transfer and place it over the flock material. Burnish it down well.
Step 3: After that, peel off the transfer tape to weed out the small circles.
Step 4: Use a weeding tool to weed out the remaining design.
Step 5: From your design, peel the back sheet off. Next, stick it to the felt mat.
Step 6: Sprinkle the rhinestones on top of the design. Brush them all over your design.
Step 7: Carry on brushing until the rhinestone starts filling the circles right-side up.
Step 8: After you have set most of the rhinestones, fill the rest of the circles with a tweezer tool and flip the upside-down rhinestones.
Step 9: After setting all the rhinestones, place a piece of heart transfer mask over the design.
Step 10: Get a scraper tool and lightly scrape over the stone to ensure it sticks to the transfer mask.
Step 11: Remove the transfer mask gently and ensure that the stones stay on the mask.
Step 12: Get the Cricut Heat Press machine and set the heat press settings. Prepare the material.
Step 13: Pre-press the material to get rid of the wrinkles.
Step 14: Press the rhinestones on the surface for a few seconds at a medium-pressure setting.
Step 15: If needed, press once more, and then peel off the transfer mask.
Frequently Asked Questions (FAQs)
What Should I Do If Some Holes Do Not Cut Cleanly?
If some of the holes in your design are not cutting cleanly, it means your blade is dull, or you have entered unfitting material settings. You may also not be using a strong grip mat. To avoid this, you must always test cut before you proceed with the full project.
Are Smart Materials Suitable for Creating Rhinestone Templates?
The short answer is no. Smart materials are not intended to create rhinestone templates. They don’t have the thickness, texture, and adhesive properties required to hold rhinestones in place during application. If you want the most optimum results, stick to recommended materials like flock HTV.
Is It Possible to Reuse the Same Rhinestone Template?
Only if you are using durable flock material can you reuse your template multiple times. This is a great alternative for those looking to create designs in bulk or for small businesses with a minimal budget.
Can I Create a Rhinestone Template Using Cricut Joy?
The answer is yes. Cricut Joy allows you to make “Rhinestone templates“. You can use it to cut permanent adhesive vinyl and apply rhinestones. The Cricut Joy is an appropriate machine for creating rhinestone templates, which involve cutting the template material and then applying the rhinestones.
It is crucial to know that Cricut Joy is incompatible with cutting flock material (a preferred material for traditional rhinestone templates). Also, for excellent results, you must check that the rhinestones are flat back and the vinyl is positioned on a smooth, non-fuzzy surface.
Visit: cricut.com/setup
Source: https://cricutmakermachines.com/how-to-make-rhinestone-template-on-cricut-complete-tutorial/
#cricutcomsetup#installcricutdesignspaceapp#wwwcricutcomsetuplogin#cricutcreateconnecttocomputer#cricutcomsetupmac#cricutnewproductsetup#settingupmycricutmaker#connectingcricutmakertocomputer#cricutsetupcreateaccount#cricutcuttingmachinesetup#cricutsetuponcomputer#settingupnewcricutmaker#cricutsetuplogin#cricutaccountsetup#cricutcomsetupdownload#cricutinstallsetup#cricutprintersetup
0 notes
Text
Cricut Joy Setup: A Stepwise Guide for Beginners
Excited to start crafting with your new Cricut Joy? You’re in the right place! In this updated and beginner-friendly guide, we’ll walk you through the complete Cricut Joy setup process.
This machine is easy to use to create stickers, greeting cards, personalized apparel, labels, and more. Yes, it's small, and it sets up instantly. You can operate the crafting machine using any compatible phone, tablet, or laptop. Let Cricut Joy measure and cut while you tend to other matters.
Here's a quick preview: Connect it with Bluetooth, and you’re ready to start crafting! Once the cut or drawing is finished, remove it from the machine and personalize it. Cricut Joy can cut any image—pick from thousands of images or design your own. Simply load your chosen material into the machine, and let it handle the cutting or drawing for you!
Tools and Compatibility Requirements for Cricut Joy Setup
The Cricut Joy machine can cut smart materials without a machine mat, but other materials may require a mat.
Important Note: Cricut Joy and Joy Xtra can be connected through Bluetooth only.
Cricut Joy Setup Instructions for Windows
To set up your cutting machine with a Windows computer, download and install the Cicut Design Space software, connect your machine via bluetooth, and then follow these steps to complete the setup.
Step 1: Plug Your Machine Into the Power Outlet
Step 2: Connect Cricut Machine via Bluetooth
Ensure your crafting machine is within 10-15 feet of your computer.
Your Cricut cutting machine is now paired for Bluetooth connection.
Step 3: Download and Install Design Space
You can download Design Space to your mobile device or tablet by visiting the Apple App Store (for iOS) and Play Store (for Android), which you'll usually find within your apps.
Finally, you have installed the Design Space application on your device.
Note: It's not compulsory for you to have a Cricut machine to download Design Space. You can simply create your profile, save endless designs, and get to know your way around the app before you open your machine if you want to.
Step 4: Sign In to Your Account
Now, you have successfully installed the Design Space on your device.
Step 5: Set Up and Register Your New Cricut Product
Now, it's time for your Cricut Joy setup.
You will know when the setup is complete when you are prompted to make a test cut.
Frequently Asked Questions
How to Setup Cricut Joy on Mac?
Follow these steps to set up the machine on your Mac:
Do You Need Software for Cricut Joy?
Yes, you need the free Design Space software to use Cricut Joy machines, which are available for computers (Windows/Mac) and phones (iOS/Android). It is free to use, so you won't need to pay extra for the software. You can use Design Space to create your own designs or browse the library of ready-made projects. Once you've designed your project, you can send it to your crafting machine and start making it.
Can a Cricut Joy Engrave?
Yes, with the right tools, you can engrave with a Cricut Joy using an engraving tip specifically designed for the machine and compatible materials. This engraving tip works beautifully on Cricut Joy & Joy Xtra machines. You can engrave on materials like soft metals, brass, leather, acrylic, and plastic. Use Design Space to upload your design and prepare it for engraving.
Visit: cricut.com/setup
Source: https://cricutdesigncom.wordpress.com/2025/06/23/cricut-joy-setup-a-stepwise-guide-for-beginners/
#CricutJoySetup#cricutcomsetup#installcricutdesignspaceapp#wwwcricutcomsetuplogin#cricutcreateconnecttocomputer#cricutcomsetupmac#cricutnewproductsetup#settingupmycricutmaker#connectingcricutmakertocomputer#cricutsetupcreateaccount#cricutcuttingmachinesetup#cricutsetuponcomputer#settingupnewcricutmaker#cricutsetuplogin#cricutaccountsetup#cricutcomsetupdownload#cricutinstallsetup#cricutprintersetup
0 notes
Photo
Cricut Maker Machine Review: Ultimate Crafting Tool for Every Project - https://craftideas.blog/craft-supplies-tools/best-craft-products/cricut-maker-machine-review-ultimate-crafting-tool-for-every-project/ Cricut Maker Machine Review Cricut Maker is known for its versatility and power. This review highlights why the Cricut Maker is the ultimate crafting tool for any project, from home decor to sewing. Device that makes it easier to make homemade cards and crafting projects Cricut Maker Machine What We Like Easy-to-use smartphone app Beautiful machine that doesn’t need to be hidden away Fast mode for quicker cutting What We Don't Like Custom design software is cloud-based More of a beginner machine The Bottom Line If you’re a beginner and intimidated by the task of working a die cutting machine, do yourself a favor and start with this one. View On Amazon Cricut Maker Machine Craft Ideas Blog / Erika Owen View On Amazon I have never seen a die-cutting machine firsthand before. I’ve witnessed other people work magic with these tools on reality crafting shows, but I’ve never had the opportunity to play around with one before. I’m a creative person and avid crafter, so the opportunity to review this machine interested me. I’m not going to lie; I was intimidated from the moment I read that you’ll only get the most out of the machine if you hook it up to Cricut’s online design app. Any time I have to transfer files of any kind, I start to sweat a little bit. But, I wanted to explore this cutting machine's functions and determine whether or not it helped me design my projects. I’ll look at the setup, what it is like to use the machine, and the projects you can make with the Cricut Maker Machine. Set-Up Process: Could not be easier Setting up this Cricut machine could not have been easier. You establish a Bluetooth connection to sync and update the machine. I used my iPhone 8. First, I was directed to cricut.com/setup, where I was prompted to download the machine’s DesignSpace app. You’ll be asked to register the machine with your name and email. Then, you connect your smartphone or device with the Cricut machine via Bluetooth. Using this connection, your machine is updated, which I found especially simple and pain-free, given how complicated software updates can be. Craft Ideas Blog / Erika Owen Once the machine is updated, the app prompted me to start the practice project included with the Cricut Maker. The initial set-up was as close to straight-out-of-the-box use as you can get. Any intimidation I felt opening the package was instantly gone. The only downside to the process is that you have to reconnect the Bluetooth connection every time you turn the machine on or off. The machine looks nice. We got the lilac version, and I didn’t feel the need to hide it from sight. Performance: Quick with very little guidance required If you aren’t working on a custom project, then there isn’t much brainwork that goes into working on this device. The iPhone app stepped me through every single aspect of the practice project, which was a cute little greeting card. Despite having no idea what I was doing, my project came out perfectly. There is a bit of noise associated with the machine as it draws and cuts your materials, but it’s nothing the neighbors will call and complain about. The machine comes with two blades, a sharp knifepoint, and a rotary cutter for fabric, but you can purchase other special accessories for more advanced projects. The machine worked quickly on the normal speed mode, and a fast mode kicks the device to work twice as fast. I stood over the machine and watched it—half in awe—not needing to do anything aside from click “continue” and push a button on the navigation. There’s a button for lining up the mat, and the "Go" button on the iPhone while in the app directs the machine to start drawing and cutting. Craft Ideas Blog / Erika Owen The only thing that made me anxious was placing the cardstock evenly on the light grip mat. The mat is sticky, and a crooked placement could mean a crooked card. You need to be precise in your set-up, and if you are, then you’re good to go. Once you’re finished with your practice project, the biggest job you’ll have is making sure you have the correct materials or coming up with your own design if you’re feeling creative. Features: More designs than you’ll know what to do with The DesignSpace app and its software was my favorite feature. It has hundreds of project options—some are free, and others come with a low cost (most around 99 cents). Each project breaks down the necessary materials and any additional Cricut accessories you may need for the task at hand. You can also sort the projects by many categories: ready to make, accessories, cards, free, iron-on, and so on. DesignSpace is compatible with iOS, Android, Windows, and Mac. The machine connects to smart devices via Bluetooth, meaning you can work on custom designs on your phone or laptop and transfer them directly to the machine. You can also work with a ton of different materials, including cotton fabric, vinyl to cardstock, and balsa wood. The machine can cut through more than 300 materials up to 2.4mm thick. If you’re a new Cricut customer, you get a free trial to Cricut Access, which has hundreds of patterns and designs. This resource is not to be confused with DesignSpace, the iCloud-based software that allows you to put together your own custom designs and projects. Think of Cricut Access as a super-user accessory. Design: Simple as could be The machine looks nice. We got the lilac version, and I didn’t feel the need to hide it from sight. It’s relatively compact: The buttons and inner mechanics are hidden by a colored top flap that later serves as the support for your smart device. Once opened, I used the lilac-hued slot to set up my iPhone, so I could follow the app’s directions in real-time as I created my project. Craft Ideas Blog / Erika Owen There are four buttons on the machine's right side: power, pause, go, and a double-arrow button that serves as the mat release. The app told me when to push the buttons, and it didn’t take long to catch on to their uses. There are also two small storage cups on the left side of the machine, perfect for the Cricut marking pen that came with the machine. If your phone or iPad is running low on battery while you’re using the Cricut Maker, there’s a USB cord included in the package that can be used to charge the phone. When not in use, this machine could easily fit on a single shelf. Price: Slightly higher than average You can find a die-cutting machine for less, but if you work a lot from your phone and you want to design your own patterns and projects, the Cricut Maker Machine is perfect for you. The combination of free patterns and projects, easy storage, sleek look, simplistic instructions, and smart device display makes it a great option for first-time cutting machine users. Craft Ideas Blog / Erika Owen If you plan on purchasing a Cricut Access membership once the trial expires, you’ll want to add the $9.99 monthly subscription cost to your pro and con list. Competition: Better than the rest Like the Brother ScanNCut2 CM350e, most newer models of die-cutting machines offer some custom-design options, as well as a large variety of free patterns and designs to use. Unline the Brother machine; the Cricut Maker is sleeker and easier to use. There are a few thoughtful design elements in Cricut Maker that put it above the others: the smart device rest on the top of the machine, the compact design that makes it easier to store or display, and the easy-to-navigate project app. Final Verdict This is a great gift for the crafter in your life. This device is great for all beginning crafters and would make a fantastic gift for someone who loves crafting. This neat gadget for adults is easy and fun to use with great results. Read more: 9 Best Die Cut Machines for Crafters and DIY Projects in 2025
0 notes
Text
How to Make Stickers on Cricut? 2025
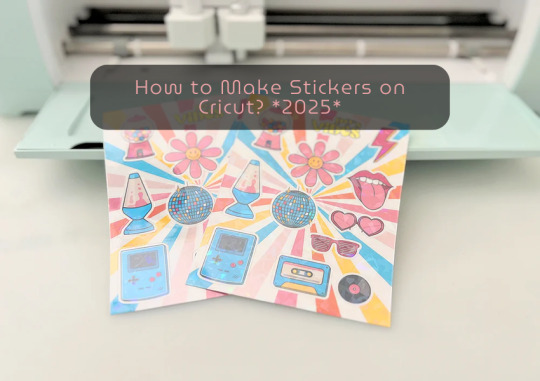
learn ‘how to make stickers on Cricut‘, then you have come to the right place. Stickers are loved by everyone, whether you’re a child or an adult. You do not need a printer to make custom stickers. You can create stickers at home using the crafting machine and some supplies and tools.
Stickers may look like ordinary sheets of paper, but they are a great way to personalize journals or gifts. Whether you are a Cricut user or a beginner, if you have a crafting machine and Cricut Design Space app downloaded to your device, you can make stickers in any shape, color, or size you can imagine.
There are three general types of stickers you can create with your Cricut cutting machine: written labels, vinyl decals, and Print Then Cut stickers. In this blog, you will learn about Print Then Cut stickers.
What Materials Do You Need for Your Project?
Before starting the process of how to make stickers on Cricut the first step is gathering all of the supplies and equipment needed for sticker making.
Cricut Explore, Explore Air 2, and Maker 3
Design Space
LightGrip cutting mat
Inkjet printer
StandardGrip mat
Sticker paper, printable vinyl sticker paper
Making Print Then Cut stickers is a great way to personalize gifts, decorate water bottles, or add stickers to scrapbooks and journals. Creating stickers is fun and easy, but to get started, you need to gather the materials mentioned above and then follow the steps below to proceed with the sticker-making.
How to Make Stickers on Cricut: 6 Simple Steps
Here are the steps you will need to follow for creating stickers on your crafting machine. So, let’s get started right away.
Step 1: Calibrate Your Machine for Print Then Cut
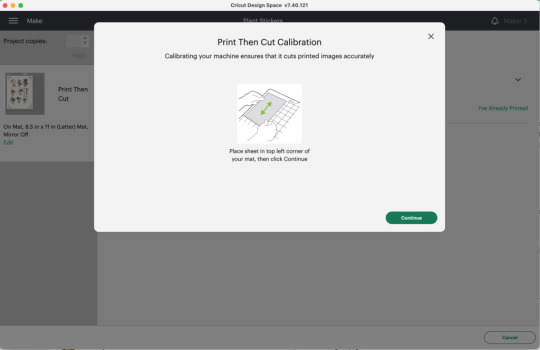
Calibrating your machine can sound optional, but this is the important part of making stickers with Cricut. In the Cricut Design Space app, choose Calibration from the menu, and then choose Print Then Cut. The software will prompt you to print a test sheet and load it into your machine. Tip: If possible, try to use a lightGrip machine mat.
Step 2: Add a Printable Image to Your Canvas
Now, within the Cricut Design Space Software, you can add multiple images to your canvas to make custom stickers. Or you can upload your SVG file. Once you have placed the images on your canvas, select Print Then Cut under the Operation menu and change the design from a Basic cut to a printable design.
Step 3: Format Images With Offset Feature
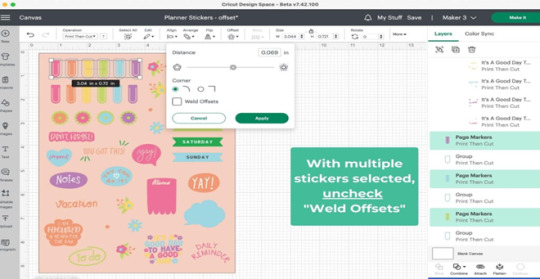
When you are done creating your stickers, you can add a finishing touch. To do this, you need to create a white border around your images. This creates a decorative outline called an offset, adding dimension to your sticker. Choose the design/ image that you want to offset, and then click the Offset option in the toolbar. When you are done selecting the offset feature by default, it can show you dark gray, which you may need to change to white.
Step 4: Attach the Images

Once you are done formatting your stickers, select each with its layers in the layers panel and click Flatten. When you flatten the images, make them into one layer, and to keep your project in order, select all photos and click on the Attach option.
After flattening the design, you cannot change the colors. But you can always Unflatten the images and make changes later.
Step 5: Print Sticker Sheet
Now, you’ve reached the best part of sticker making. Once you click the Make It button, you are ready to print your design. Click on Use System Dialog, and a preview box will appear where you can fix your print settings. Printer settings vary depending on your model, but select the highest-quality print setting if possible. Make sure the sticker paper is compatible with the printer and the paper you have chosen.
Step 6: Cut the Image Using Your Machine
This is the last step of ‘how to make stickers on Cricut‘. Firstly, when your stickers are printed, put them on the Cricut mat, then choose your material settings. After that, load your cutting mat and press start to cut using the standard fine-point blade. Remember to change your custom settings to Sticker paper. They have clear white options, so choose accordingly. When the stickers are done cutting, remove them from the mat, and it is ready to use.
Summary
Making stickers with Cricut is a very fun and creative process. Using your machine, you can make different kinds of stickers in different colors for your journals, scrapbooks, or for your gift hampers. It is a great way to get kids involved in a fun and creative activity. You can create stickers for your journal, notebook, or customized gifts. Not only is it a creative process, but it is also a great way to add a unique touch to your belongings.
In this blog, you explore ‘how to make stickers on Cricut’, and now you can decide which kind of stickers you want to make.
Source: How to Make Stickers on Cricut
#how to make stickers on Cricut#cricut stickers#cricut design space app#cricut design space software#cricut maker setup
1 note
·
View note
Text
How to Use Cricut Mug Press: An Easy Tutorial for Beginners
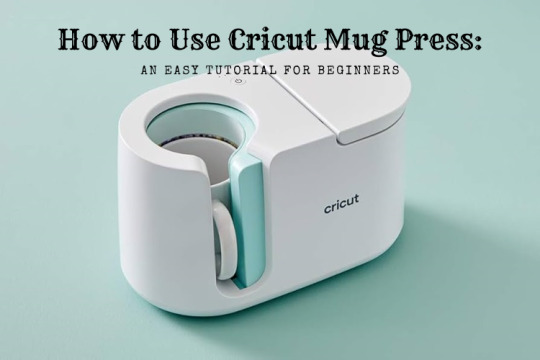
Read this blog to learn How to use Cricut Mug Press? The Cricut Mug Press is a tool that transfers heat with a no-fuss, easy-to-use machine for making mugs. It allows you to create high-quality, permanent mug designs using a sublimation process. Using Cricut’s Infusible Ink Transfer Sheets or the Infusible Ink Pen, you can create your design in Design Space, draw or cut it, and place and transfer your design on the mug. Mugs made with the Cricut Mug Press are microwave-safe and dishwasher-safe.
It is so easy and fun to make. Read this write-up to learn about the Cricut Mug Press, the materials required, and some easy steps to make our customized Mug.
Materials Requirement
Here are the things that you will need to make custom, vibrant mugs using the Cricut Mug Press:
Cricut Cutting Machine
Cricut Mug Press
Infusible Ink
Heat resistant tape
Cricut Mug Blank
Standard grip-cutting mat
Now that you know what supplies to make your mugs, proceed to the next step: learning how to activate the Mug Press. Afterward, follow the tutorial for easy instructions on how to use the Cricut Mug Press.
How to Activate the Cricut Mug Press
Before you start using the Cricut Mug Press, you must know how to activate it. Follow the below steps to learn:
First, open your Design Space app on a Windows or Mac. If you do not have Design Space installed, download it and double-click on the file in your downloaded folder to Open or Run it.
Now, Sign in with your Cricut ID and password. If you do not have a Cricut ID, then create one.
A page titled “Welcome to your Cricut Setup” will appear. Then, Select Heat Press and click on Cricut Mug Press.
Follow the on-screen prompts to connect your press, verify firmware, and complete activation.
Select Get Started to make your first mug when the activation is complete.
How to Use Cricut Mug Press: 4 Stepwise Tutorial
Now that you know what material to make your mugs using the Cricut Mug Press, follow the steps below to make one for yourself:
Step 1: Making Your Designs
First, open the Design Space app and select the machine from the drop-down menu. Next, you can look for pre-prepared projects or create your design using the fonts and images available in the app. When making a design for your mug, check the size of your design and mug to see if they are compatible. Then next, you can look for
Step 2: Cutting Your Designs
This process is very similar to any Cricut project. When you are done creating your design, do not forget to mirror it, especially if you choose a design with words or elements. Afterward, click “Make It” in the Design Space app when you can cut your design. Then, select Infusible Ink as your material and load your cutting mat into the cutting machine. When the machine is loaded, follow the prompt shown on the screen and click on the “Go” button once it flashes. When your machine is done cutting the design, remove the design from the mat and the extra part with the help of the weeding tool.
Step 3: Clean Your Mug
First and foremost, use a lint roller to remove dust from the mug. This step is important before applying the design to your blank Cricut Mag because you will only get an even and smooth transfer if there is fine dust on the mug. Once your mug is nice and clean, place your design where you would like it on the mug and firmly press it down to sit. Use the Cricut Scraper tool to avoid and press out any air bubbles.
Step 4: Transfer Your Design to the Mug Press
Turn on your Cricut Mug press so that it can start to heat up; the light will be red when it starts to heat up and green when it is ready.
When the press is heated, take your heat-resistant tape to secure the edges of your design. This step is necessary to ensure your design does not move around when we press it. Once done, simply slide your mug into the Cricut Mug Press by holding the handle. When it is ready, the lights will be full and beep. Then, remove your mug from the Mug Press with the help of the handle and put it into the mat to cool down. Wait 10-15 minutes to peel off the transfer sheet to reveal your design.
Summary
This guide teaches you how to use Cricut Mug Press. The Mug Press makes creating custom permanent dishwasher mugs at home easy. Whether you are a beginner or a Cricut newbie, following the simple instructions above will allow you to create the next level of professional mugs for yourself or your loved ones. So, start making your mug today.
FAQs
What should I do if the machine shuts off and the power button turns red?
If your Cricut Mug Press shuts off and the power button turns red, it could be due to a powerful related issue, or it could be due to an error. If the machine is on, check the temperature and allow it to adjust the room temperature.
Which mugs can be used with the Cricut Mug Press?
The Cricut Mug Press is designed for smooth, curved ceramic mugs, but it can also be used with non-Cricut mugs labeled sublimation-compatible. It is likely to work with infusible ink and Cricut Mug Press.
How does the Cricut Mug Press differ from other Mug Presses?
Cricut Mug Press is a press that passes heat and makes it easy to create custom, quality, and permanent mugs in minutes. It has sleek, safety-design features, one-touch settings with just the right temperature control, and an auto-off feature, distinguishing it from other mug presses. It has a user-friendly design and does not require manual adjustments.
Source: How to Use Cricut Mug Press
#how to use cricut mug press#cricut mug press#cricut design space#cricut explore air 2 setup#cricut machine setup#Cricut design space download#Cricut design space app
1 note
·
View note
Text
How to Make Stickers With Cricut? (Easy Guide)
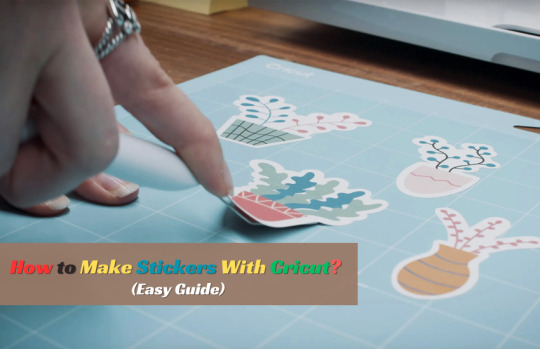
Everyone likes stickers, and it does not matter if you are a child or a grown-up. You do not need a printer to make stickers. Making stickers with Cricut is easy, but you need a basic understanding of the designs, supplies, and ‘how to make stickers with Cricut‘.
Stickers may seem like a normal sheet of paper, but they’re a great way to personalize and decorate your gifts. Whether you are a Cricut user, run a small business, or work on your planner or any other DIY project, you can tap into the fun and creative side of Cricut. Whether you are a craft expert or a beginner, with a machine and Cricut Design Space, you can make any kind of sticker in any shape, color, and size you can imagine.
There are three general types of stickers you can create with Cricut: vinyl decals, Print Then Cut stickers, and written labels. In this blog, you will learn how to make Print Then Cutstickers.
Materials You Need for Print Then Cut Stickers
These are the main tools and supplies you need to create custom stickers with your crafting machine.
Cricut Explore 3, Explore Air 2, and Maker or Maker 3
Cricut Design Space
LightGrip cutting mat
Inkjet printer
Finally, you know the basic materials for creating stickers. Now, let’s start learning the complete procedure to make stickers using the Print Then Cut feature.
How to Make Stickers With Cricut: Simple Steps
Here are some quick and easy steps to make unique and beautiful stickers with your crafting machine:
If you have never printed anything with your machine, you should first calibrate it. It is necessary; otherwise, your stickers will not be properly cut.
In Design Space, choose the Calibrate option from the main menu. Then, it will show you three options. Choose the Print Then Cut option.
After that, you can design your sticker using the Cricut Design Space software or choose a pre-design sticker that Cricut members upload. Or you can upload your SVG file.
Now, select the Offset feature once you have uploaded or chosen your sticker design from the app library. You can change the offset width and color. By default, it shows dark gray, which you can change to white.
Next, group your offset and flatten it together. In the software, the Flatten button is on the right-hand side, down towards the bottom. Flattering items makes them into one layer. You can also unflatten the image. You can select attach to keep your sticker intact and in one layer.
Afterward, select Basic from the Operation dropdown menu tool and change it from Basic to Print Then Cut.
Once you are done designing your stickers, click on “Make It.”
After that, you will be prompted to print your design. Now, a preview box will appear, and you can check your print settings. For Print Then Cut, the crafting machine can print a maximum image size of 9.25 in x 6.75 in.
Your design is ready to send to the printer, so load your printer with the sticker/printable paper. When your stickers are printed, put them on the machine mat, and they will be ready to be cut.
The final process is to cut the stickers using a machine. Remember to change your Custom settings to Sticker paper. They have white and clear options, so choose accordingly. When the stickers are done cutting, remove them from the mat, and they’re ready to use.
Finally, we create custom stickers with the help of a crafting machine and the Cricut Design Space software. Now, you make a variety of projects at home using this machine.
Conclusion
The Cricut Design Space app and your cutting machine allow you to design and cut personalized stickers in various colors, shapes, and sizes. You can create stickers for your journal, notebook, or customized gifts. Not just from an artistic perspective, but it is also a great way to add a unique touch to your belongings.
This blog explored the Print Then Cut feature and how to make stickers with Cricut. Now, you can choose which type of stickers you want to create.
FAQS
Which printer is compatible with Cricut Print Then Cut feature?
The printer needs to be an inkjet printer, not a laser printer. Using a laser printer can cause damage to the materials and stickers. The material you are planning to print on should be printable paper, sticker paper, vinyl, or clear sticker paper. Cricut recommends the whiter material, but you can use light to medium colors.
What is the process for making stickers?
First, calibrate your printer. After that, design your sticker using the Cricut Design Space app or upload your printable images. Offset the sticker, flatten it, and attach it. Then, choose the Print Then Cut feature and load the mat with stickers that need to be printed. The machine is ready to cut the stickers.
What is the offset feature in Cricut app?
You must use an offset feature while designing your stickers because it adds an outline and a decorative shadow. It works best with closed paths images. You can change the color of the offset, and you can use it for print cut design as well as regular cut design.
Source: How to Make Stickers With Cricut
#how to make stickers with Cricut#cricut design space app#cricut design space software#Cricut.com/setup
1 note
·
View note
Text
How to Use Cricut Without a Subscription for DIY Projects
Cricut machines are popular among hobbyists and professional crafters, offering a perfect blend of reliability and versatility. These qualities make them indispensable companions for a variety of DIY projects. To unlock their full potential, Cricut machines rely on an application called Design Space, which serves as a platform for making craft projects. This free software provides access to various fonts, images, and project templates, enabling users to bring their ideas to life. Also, with a Cricut Access plan, users can explore premium features, expanding their creative possibilities even further.
In this blog, we’ll show you how to make the most of your Cricut machine without needing a subscription. So, let’s dive in and explore the possibilities!
Do You Need a Subscription to Use a Cricut?
Not necessarily. Whether you need a subscription depends on your usage and crafting needs. If you are a professional who is great at designing and requires various features at hand to create cutting designs, then a Cricut subscription will work for you. However, if you’re a beginner, you don’t need a Cricut Access plan.
Cricut Access Subscription Features
In this section, we mentioned the main features you’ll receive with the Cricut Access plan. Exploring these will help you understand whether you’ll need a Cricut subscription or not.
Subscription Design Perks:
Unlimited access to over 1,000,000 images
Unlimited access to over 1,000 fonts
10% discount on licensed images
Over 100,000 ready-to-use projects
Unlimited collections
Savings Benefits:
Cricut.com every three months (includes free shipping).
Get 10% off on purchases from cricut.com, with savings of up to $100 per machine.
20% off all Cricut materials
FREE shipping on $50+ orders
Plus:
Priority Member Care
How to Use Cricut Without a Subscription
In this section, we’ll explore how you can use Cricut without a subscription by accessing exclusive features for images and fonts.
Create Your Own Images

If you’re wondering whether you can create your own image with Cricut, the answer is yes! Users can upload original art to Cricut Design Space. It doesn’t matter whether it’s hand-drawn or digitally created. Just save the file in any format: JPG, PNG, or SVG. Upload it to Design Space, and the rest is easy; use your creative mind to start customizing the design. Design Space allows you complete flexibility to create or edit your image as needed.
Upload Images to Design Space

Once you’ve done selecting the image for designing, the next step will be uploading the image to the Design Space software.
Start by launching the Cricut Design Space app on your computer, tablet, or mobile device.
Next, click on the “New Project” button to start creating a new design on the canvas.
Select the “Upload” button in the bottom left corner of the screen.
After that, select the “Upload Image” button on the screen.
Then, select the image file that you want to upload (File format: JPG, PNG, or SVG).
Next, click on Continue and remove the background from the image. To do so in Manual, select Apply & Continue.
Now, convert the image into multiple layers, then select Continue.
Next, choose “Cut Image” if you want to cut the design or “Print Then Cut Image” for printed designs before cutting.
Lastly, click on the “Upload” button, and then your image will appear in the “Recent Uploads” folder.
Note: To insert the uploaded image into your new canvas, select the image and then click on “Add to Canvas” in the bottom right corner of the screen.
Upload Fonts to Design Space

Once you have learned “how to upload and insert an image into the Cricut Design Space app“, the next step is to work with fonts. In this section, we’ll be covering this:
First, download the font you desire to your system.
Next, install the font on your system.
Now, open the Cricut Design Space application and click on the “New Project” button on the top right of the display.
After that, click on the text tool on the left-hand side of the screen.
At this point, start writing the text or phrase that you wanted on your design.
Later, click on the “Font” menu at the upper-left side of the screen.
Click on “System” fonts. A menu will open on your screen, displaying all the fonts on your system (device). Lastly, click on the desired font for your design. That’s how you can use any font you like on Cricut Design Space.
Conclusion
Cricut is a leading brand that is famous for providing excellent crafting tools that are suitable for hobbyists and pro crafters. These machines offer cutting-edge features and extensive customization options, which empower you to elevate your designs to the next level. To enhance the crafting experience further, Cricut offers a subscription plan (Cricut Access), which unlocks exclusive features and provides unlimited access to various text fonts, pictures, and ready-to-make projects. However, if you are not ready to invest in a plan, you can still take advantage of the free features available on the Cricut Design Space app to create unique and beautiful designs. By following the steps mentioned above, you can explore your creativity without limitations. If you have any questions or need help, our team of experts is always here to help you get the crafting experience.
Frequently Asked Questions (FAQs)
How to Crop an Image in Cricut App?
To crop an image in Cricut Design Space, follow these steps:
Insert the image into the canvas.
Add a shape over the area you want to keep.
Select both and click Slice.
Delete the extras and use only the cropped piece.
Note: If your file isn’t an SVG, flatten it before slicing to ensure the system doesn’t treat it as a single object.
How to Downloaded fonts to Cricut on iPhone?
First, download the third-party font app like iFont, then follow the instructions listed below:
Download the font file to your iPhone’s Files app.
Select and install the downloaded font file (usually a zip file).
Open the Cricut Design Space App and click on the Text tool.
Go to the “Font” tab in the Edit panel.
Your newly installed font should be listed under “System Font.” Enjoy it!
How to offload Cricut Design Space?
Uninstalling the iOS app may be mandatory to resolve some issues. However, if you haven’t saved your projects to the Cricut Cloud, do that right away, as uninstalling the app will also delete those projects and any images or fonts you have downloaded to the device.
To offload Cricut Design Space:
Go to the Settings app and select General.
Scroll down and find iPhone/iPad storage.
Find the Cricut Design Space app and click on it.
Select the Offload App and confirm the selection.
After that, click on Reinstall App.
Open the app and attempt your project again.
Source: How to Use Cricut Without a Subscription for DIY Projects
#cricut design space app#cricut design space setup#Cricut.com/setup#Cricut Setup#cricut machine setup#design.cricut.com
0 notes
Text
How to Use Cricut Explore Air 2: Create DIY Projects at Home
Are you excited to express your creativity with the Cricut Explore Air 2 machine? This flexible cutting machine can make your crafting dreams come true. It cuts over 100+ various materials, like paper, cardboard, vinyl, and even leather.
Whether you’re a pro crafter or a beginner, this machine is perfect for bringing your ideas to life. This stepwise guide will walk you through ‘how to use Cricut Explore Air 2‘, download the Design Space app, and create your first project.
So, get ready to venture on a crafting adventure and discover the joy of DIY projects. Let’s dive in and explore the world of Cricut!
Downloading Cricut Design Space on Your Computer
The first thing to use the machine is to download the Cricut Design Space software. To download it, navigate to design.cricut.com from your Windows or Mac. If you already have a Cricut account, log in to the app after downloading it.
If you want to download the software on your mobile device, either Android or iPhone, go to their Play Store/App Store and look for the app in the search bar. It will be a square icon with Cricut written at the center.
NOTE: You must have an account beforehand to use the app. If you don’t have one, you should create one on the sign-up page. Also, you don’t need a Bluetooth adapter to use the machine, as it comes with built-in Bluetooth. The earlier Explore series, such as the Explore One, required a Bluetooth adapter.
Connecting Cricut Machine to Your Computer With USB
Although you can use your machine wirelessly, let’s examine how to use it through USB.
Step 1: First, place it on a clean and flat surface with 10-15 inches of space behind and front to let the cutting machine move freely.
Step 2: After that, you must plug in your Explore cutting machine.
Step 3: And then attach the USB cable and power adapter.
Step 4: Next, you need to turn on your Explore machine and your computer.
Step 5: Open the Cricut Design Space software discussed in the previous section and log in using your credentials.
Step 6: Within the app, select the Menu icon visible at the top and choose New Machine Setup. This will guide you through the installation, the first project you will make, and a greeting card.
Now, you are almost ready to use the machine. The next section will examine how to make a project on your machine. So, let’s get into that.
How to Use Cricut Explore Air 2: Creating Your First Project
Now, let us walk through a project that can be made with the materials that came with the box of your machine. If this is your first project, don’t worry—it will be easy!
Step 1: From the “Cricut New Machine Setup,” you will see a design on your screen. If you don’t find it, head over to cricut.com/setup. Then, find the Menu on the top side and click “New Machine Setup.”
Step 2: Prepare all the materials that came with the machine, such as cardstock, mat, paper, and pen. Remove the plastic film from your machine and keep it aside for future use.
Step 3: Afterward, you need to load the cardstock on the machine mat. The textured side should be facing up and lined up on the machine mat vertically. Make sure to line it up on the upper side, right below the Cricut logo.
Step 4: In the next step, you must insert your cutting mat into your Explore machine. Ensure that you load the machine mat as per the guidelines. You also need to take care that it is pressed against the roller while you press the “load/unload” buttons, which are located at the top of your cutting machine. The icon looks like a set of double arrows.
Step 5: Now, you need to insert the pen in clamp A. To do that, you need to remove the cap and place it tip-down until the arrow on the pen disappears. After you are done with this, you can close the clamp.
Step 6: Then, check the design on your screen and tap the Go button.
Step 7: Next, you need to set the dial to cardstock on the machine.
Step 8: As soon as you are ready to make the necessary changes in the design, the preview “C” button on the machine will start flashing.
Step 9: Also, you will have to unload the machine mat. Once you complete the project, click on the load/unload button to take off the pen.
Step 10: Afterward, remember to put the machine mat face down on a flat surface and then curl the edge up toward you. It will be removed from the cutting mat, and as you take it off, keep curling it up to make it easier.
Step 11: Fold your paper card over, and then crease it in half. Place the same on your plain blue paper inside the card. You can glue this in place if you like.
Hoorah, you have finished your first project. Pat yourself on the back and know that your journey in this crafting world has begun.
Summing Up
That concludes our guide on ‘how to use Cricut Explore Air 2‘ for beginners. Reading the above blog should make you feel fairly comfortable working on a new project. Now, you know how to download the Design Space app, set up the machine, and use it properly. Plus, you can always return here for a quick refresher!
FAQs
How do I enable the fast mode in my Cricut Explore Air 2?
To enable Fast Mode on your machine, load your material onto the cutting mat and place it in the machine. Choose the proper material setting in the Cricut Design Space software, such as vinyl or cardstock. Then, seek the option to enable Fast Mode. After selecting it, click the blinking “C” button to cut. This mode allows your machine to cut and write up to two times faster, making it appropriate for certain materials.
What can I make with a Cricut Explore Air 2?
It is an amazing and versatile cutting machine that allows users to make unique designs and projects. It has the ability to cut over 100 materials, like vinyl, cardstock, and iron-on, and even thicker materials, including wood. Its additional features, like writing and scoring capabilities, enable the creation of custom cards, labels, and stickers. This machine gives users access to thousands of designs through Cricut Design Space; users can easily make personalized items suited to their tastes.
Can I use Cricut Explore Air 2 without a computer?
Yes, one can use the machine without a desktop by pairing it to a smartphone via Bluetooth. The machine has built-in Bluetooth connectivity, which allows one to use the Cricut Design Space app on iOS or Android devices to design and send projects to the machine. However, some features may be limited compared to those of a computer.
Visit: install cricut design space app cricut.com setup mac
Source: https://explorenewmachine.com/how-to-use-cricut-explore-air-2-create-diy-projects-at-home/
#cricut.com/setup#cricut.com/setup mac#cricut.com/setup windows#cricut.com/setup login#install cricut design space app#install cricut explore air 2#install cricut design space#install cricut#www.cricut.com setup login#www.cricut.com/setup#www.cricut.com/setup login#cricut explore air 2#cricut setup#cricut design space download#cricut design space app#cricut design space software#cutfiles#cricut design space setup#cricutprojects#cutfilesforcricut
0 notes
Text
How to Pair Cricut Machine With a Computer? (Full Guide)
Last week, I helped my neighbor set up her brand-new Cricut machine. She had recently taken up card making and was excited to start her first project. But the moment she opened the box, her smile turned into confusion.
She wanted to make birthday cards and asked if I knew how to pair her Cricut machine with a computer or mobile device so she could get started. We took a break, sat down together, and looked up the steps online. That’s when I realized there’s no need to feel overwhelmed; it’s just about following a simple, step-by-step guide.
So, if you’re like her, excited about crafting but unsure how to pair your Cricut machine, keep reading this post for a complete solution.
How to Pair a Cricut Machine With Your Computer?
Pairing your crafting machine to your computer might seem tricky, but it’s quite easy, especially if you follow the instructions carefully. Using Cricut Design Space with Windows offers several benefits, including access to a user-friendly interface for creating and customizing designs, the ability to import or use pre-made designs, and the option to save projects and share them with the Cricut community.
Cricut offers two methods for connecting your machine to a computer:
Let’s take a look at both:
Method 1: With Bluetooth
Bluetooth enables wireless connectivity without the need for additional cables, making it ideal for those who prefer a cleaner, cord-free setup.
Step 1: Plug your crafting machine into a power outlet and press the power button.
Step 2: Navigate to Settings by clicking the Start button and then selecting the gear icon.
Step 3: After that, go to the Devices section.
Step 4: Next, select Bluetooth & other devices and enable Bluetooth.
For Mac: In the top-left corner, click the Apple icon. Open System Preferences and then click on Bluetooth to enable it.
Step 5: Look for a device starting with “Cricut,” such as Cricut Explore, Maker, or Joy, within the list of available devices.
Step 6: If asked for a PIN, enter 0000.
Step 7: Once connected, the machine should appear Connected in your Bluetooth list.
Step 8: Go back to Design Space and complete the setup of your new product.
Tip: Cricut Joy, Maker, and Explore series all support Bluetooth. Older machines, such as the Cricut Explore One, may require a Bluetooth adapter for connectivity.
Method 2: Using a USB Cable
If your computer doesn’t have Bluetooth or you prefer connecting through a USB cable, follow these steps:
Step 1: First, power on both your machine and computer.
Step 2: Now, connect one end of your USB cable to the machine and the other to the computer.
And that’s it. You’re all done. Your computer should now automatically recognize and connect to the Cricut machine.
Note: The Bluetooth method works only with the Cricut Maker series, Explore series, and Venture. Cricut Joy and Joy Xtra do not support USB. They can only be paired via Bluetooth.
How to Pair Your Cricut to Mobile Devices?
If you prefer working from your phone or tablet, Cricut has made it easier for you to connect your crafting machine to your Android and iOS devices. It offers portability and convenience, enabling users to create projects from virtually anywhere.
Follow these steps to pair your machine to your mobile device:
Step 1: Download the Cricut App
Step 2: Turn on Bluetooth
Step 3: Pair From Within the App
Your Cricut machine is now paired and ready to use with the app on your mobile phone.
Mistakes to Avoid While Pairing Your Cricut Machine
These are some common errors that you must avoid while pairing your machine to any device:
Should You Use Cricut Design Space on a Computer or Phone?
One of the most common questions beginners have is: Which is better for using Design Space, my phone or computer?
Pro Tip: You can switch between devices at any time. You can start making a design on your phone or tablet and finish it on your computer (or vice versa), as long as you’re logged into the same Cricut account.
Frequently Asked Questions (FAQs)
Why Is My Cricut Not Connecting?
If your crafting machine is not connecting, follow the steps listed below to get it working again.
How to Put Your Cricut Machine in Pairing Mode?
To pair your machine, you can opt for any of the following methods:
Can you use a smartphone with a Cricut machine?
Yes, you can use a smartphone to connect to a Cricut machine via Bluetooth using the Cricut Design Space app. However, some features may be limited compared to using a desktop or laptop.
While you can access and edit existing projects, upload images, and resize designs, some advanced features, such as the Offset tool, are not available on mobile devices. Advanced tools, such as the Knife blade, are only available when using a desktop.
Visit: cricut.com/setup
Source: https://cricutsetjoy.com/how-to-pair-cricut-machine-with-a-computer-full-guide/
#HowtoPairCricutMachine#cricutcomsetup#cricutdesignspace#wwwcricutcomsetuplogin#cricutdesignspacesetup#cricutexploreair2setup#designcricutcomsetup#cricutdesignspacelogin#cricutsetup#cricutdesigns#cricutsoftware#cricutsetupforpc#designcricutcomdownload#cricutdesignspacedownload#cricutdesignspaceonline#cricutdesignspaceapp#cricutdesignspacedesktop#cricutaccountsubscription#cricutaccess#Cricutexploreair2setuppdf#cricutexploreair2download#howtousecricutexploreair2withphone#howtosetupcricutexploreair2oniphone#cricutexploreair2bluetooth#cricutcomsetupmac#cricutcomsetupforwindow#supportcricutcom#cricutnewmachinesetup#cricutaccountlogin#cricutsoftwareapp
0 notes
Text
Elevate Your Craft Game with the Best Dallas Cowboys SVG Designs

Few NFL teams command the loyalty and passion of fans quite like the Dallas Cowboys. Known as "America’s Team," the Cowboys’ iconic star logo is a symbol of excellence, tradition, and unwavering support. Whether you're a die-hard fan looking to showcase your team spirit or a small business crafting unique merchandise, a Dallas Cowboys SVG file is an essential asset for your creative projects.
In this guide, we’ll explore why Dallas Cowboys SVG files are in high demand, how they can be used in various crafting projects, and where to find high-quality designs. Plus, we’ll show you why SVGBank is the best place to source your Cowboys-themed graphics.
Why Dallas Cowboys SVG Files Are So Popular
1. Iconic Team Branding
The Cowboys' star is one of the most recognizable logos in sports. A Dallas Cowboys SVG file ensures that this legendary symbol retains its clarity and detail, no matter the project size.
2. Perfect for DIY Enthusiasts
From custom T-shirts and mugs to vinyl decals and home décor, SVG files allow fans to personalize their crafts effortlessly. The scalable vector format ensures crisp edges and professional-grade quality.
3. Ideal for Small Businesses
Entrepreneurs creating custom merchandise, stickers, and apparel find SVG files invaluable. With a high-quality Dallas Cowboys SVG, small-batch printing becomes seamless and professional.
4. Flexible & Easy to Use
SVG files are compatible with popular design software and cutting machines like Cricut and Silhouette, making them ideal for both beginners and seasoned designers.
What is an SVG File, and Why is It the Best Choice?
An SVG (Scalable Vector Graphics) file is a high-resolution, editable vector format. Unlike JPEG or PNG images, SVGs can be resized without losing quality. This is perfect for crafting projects that require different dimensions or layering effects.
Key Benefits of SVG Files:
Crisp and clean designs at any size.
Easy to edit in programs like Adobe Illustrator, Inkscape, and Cricut Design Space.
Transparent backgrounds, making them perfect for printing and web use.
Lightweight file sizes for quick processing and smooth cutting.
Best Uses for Dallas Cowboys SVG Files
1. Custom Apparel
Create T-shirts, hoodies, and hats with the Cowboys’ star, helmet, or slogans like How 'Bout Them Cowboys? Using heat transfer vinyl (HTV), fans can design unique game-day gear.
2. Home Décor & Wall Art
Turn your living space into a Cowboys fan zone with framed wall art, pillows, or banners featuring the team’s logo. Stencil designs onto furniture or create large-scale prints with ease.
3. Stickers & Decals
Perfect for car windows, laptops, water bottles, and phone cases, high-quality SVG files ensure that every cut is sharp and professional.
4. Party Invitations & Themed Events
Throwing a Cowboys-themed party? Use SVG files for custom invitations, banners, and cupcake toppers to create the ultimate game-day experience.
5. Laser Engraving & Unique Crafts
Whether it’s engraved wooden plaques, keychains, or metal designs, SVG files retain every intricate detail for one-of-a-kind handcrafted items.
Where to Find the Best Dallas Cowboys SVG Files
When looking for high-quality, well-designed SVG files, not all sources are equal. Free downloads may have low resolution, incomplete paths, or licensing issues. To ensure professional-grade quality and legal safety, choose reputable platforms like SVGBank.
Why Choose SVGBank?
✅ Wide selection of sports-themed SVGs, including Dallas Cowboys SVG files.
✅ High-resolution, layered designs for easy editing and customization.
✅ Instant downloads, so you can start crafting immediately.
✅ Clear usage rights, ensuring legal and hassle-free projects.
➡ Explore the full collection of Dallas Cowboys SVG designs on SVGBank today!
Free vs. Paid Dallas Cowboys SVG Files: What You Need to Know
Free SVG Files:
✔ Pros: No cost, easy access for personal use. ❌ Cons: May have low quality, missing layers, or be unauthorized for commercial use.
Paid SVG Files:
✔ Pros: Higher resolution, layered files, and clear usage rights. ❌ Cons: Small cost, but worth the investment for quality and legal peace of mind.
For guaranteed professional-grade designs, we recommend exploring the premium SVG selection at SVGBank.
How to Use Dallas Cowboys SVG Files with Cricut & Silhouette
Step-by-Step Guide:
Upload your SVG file into Cricut Design Space or Silhouette Studio.
Resize and adjust layers as needed.
Choose your material (vinyl, HTV, cardstock, etc.).
Set the correct cutting settings for clean and precise cuts.
Weed the design carefully to remove excess vinyl.
Apply heat or transfer tape to adhere your design onto the surface.
For troubleshooting:
Ensure the file is fully layered and grouped properly.
Reduce cutting speed for smaller intricate designs.
Get More for Less with a Dallas Cowboys SVG Bundle
Want multiple designs for a discounted price? Opt for a Dallas Cowboys SVG bundle, featuring:
Various star styles and helmet outlines.
Text-based graphics like "Cowboys Nation" or "America’s Team".
Retro & modern logo variations.
Save time and money by grabbing a Dallas Cowboys SVG bundle today!
Final Thoughts & Call to Action
A high-quality Dallas Cowboys SVG is a must-have for fans, crafters, and entrepreneurs looking to showcase their team spirit in creative ways. Whether you’re designing custom apparel, home décor, or stickers, a premium SVG ensures flawless, scalable, and vibrant results.
Ready to start crafting? Check out SVGBank for the best selection of Dallas Cowboys SVG designs today!
👉 Browse Dallas Cowboys SVG files now and unleash your creativity! 🎨🏈
0 notes