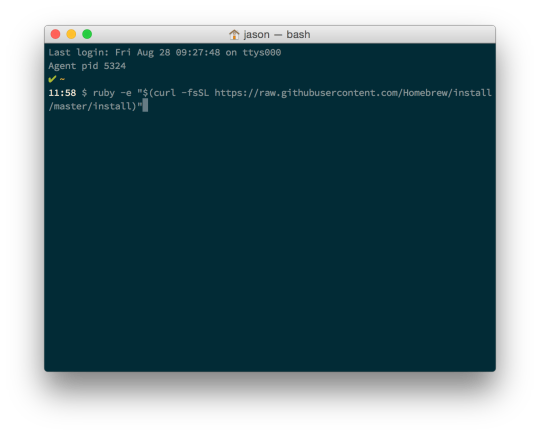
#edit bash_profile
Explore tagged Tumblr posts
Visit Tumblr Blog
Explore Tumblr blogs with no restrictions, modern design and the best experience.
Last Seen Tumblr Blogs


Fun Fact
Tumblr was the first site to host the blog for President Barack Obama in 2011.
Text
Setting Up the Java Environment: A Complete Guide for Beginners
Java is a powerful, widely-used programming language known for its platform independence, object-oriented principles, and robustness. One of the key reasons for its popularity is the fact that it can run on any machine equipped with a Java Virtual Machine (JVM), making it truly “write once, run anywhere.” However, before you can start writing and executing Java code, you need to properly set up the Java development environment on your system.
This guide will walk you through the entire process of setting up the Java environment, including downloading and installing the necessary tools, configuring environment variables, and writing your first Java program. By the end of this tutorial, you’ll be ready to start coding in Java.
Step 1: Understanding the Components of the Java Environment
Before diving into the installation process, it’s essential to understand the core components involved in the Java ecosystem. These include:
1. JDK (Java Development Kit): This is the complete suite needed to develop and run Java applications. It includes the Java compiler (javac), standard libraries, and other tools required to build and execute Java programs.
2. JRE (Java Runtime Environment): The JRE provides the libraries and the JVM necessary to run Java applications. It’s a part of the JDK but can also be installed separately if you’re only running (not developing) Java programs.
3. JVM (Java Virtual Machine): This is the heart of Java’s platform independence. It interprets the compiled Java bytecode and allows it to run on any operating system that has a compatible JVM.
For development, you’ll primarily need the JDK, which includes the JRE and JVM.
Step 2: Downloading and Installing the Java Development Kit (JDK)
To begin coding in Java, you need to download the JDK. Here’s how to do it:
1. Go to the Official Oracle Website:
Visit the official Oracle Java SE Downloads page.
You’ll see multiple versions of Java. For most use cases, it’s best to download the latest Long-Term Support (LTS) version, which is currently Java SE 17.
2. Choose the Right Version for Your Operating System:
Select the appropriate version based on your operating system (Windows, macOS, or Linux).
Download the installer (.exe for Windows, .dmg for macOS, or a compressed package for Linux).
3. Run the Installer:
For Windows:
Double-click the .exe file and follow the installation prompts. The default installation directory is usually C:\Program Files\Java\jdk-<version>.
For macOS:
Open the .dmg file, and drag the JDK into your Applications folder.
For Linux:
Extract the downloaded .tar.gz file into a directory, and follow the system-specific instructions for installation.
Step 3: Configuring Environment Variables
Once the JDK is installed, you need to configure the PATH and JAVA_HOME environment variables on your system. This allows your terminal or command prompt to access Java’s tools from any directory.
Windows
1. Open Environment Variables:
Right-click on This PC or My Computer and choose Properties.
Click on Advanced System Settings, then click Environment Variables.
2. Set JAVA_HOME:
In the System Variables section, click New.
Set the variable name as JAVA_HOME and the variable value as the path to your JDK installation (e.g., C:\Program Files\Java\jdk-17).
3. Update PATH Variable:
In the System Variables section, find the Path variable, select it, and click Edit.
Click New and add %JAVA_HOME%\bin.
Click OK to close all dialogs.
macOS
1. Open the Terminal and edit your shell profile (e.g., .bash_profile or .zshrc for Zsh) by typing:
nano ~/.bash_profile
2. Set JAVA_HOME and Update PATH: Add the following lines:
export JAVA_HOME=$(/usr/libexec/java_home) export PATH=$JAVA_HOME/bin:$PATH
3. Save and Exit:
Press Ctrl+X to exit, then Y to save changes.
Apply the changes with:
source ~/.bash_profile
Linux
1. Open Terminal and edit your shell profile (e.g., .bashrc or .zshrc) by typing:
nano ~/.bashrc
2. Set JAVA_HOME and Update PATH: Add the following lines:
export JAVA_HOME=/usr/lib/jvm/jdk-17 export PATH=$JAVA_HOME/bin:$PATH
3. Save and Exit:
Press Ctrl+X to exit, then Y to save.
Apply the changes:
source ~/.bashrc
Step 4: Verifying the Installation
Once you’ve installed the JDK and configured the environment variables, verify that everything is set up correctly.
1. Open a Terminal or Command Prompt:
On Windows, press Windows + R, type cmd, and press Enter.
On macOS and Linux, open the Terminal from your applications or press Ctrl+Alt+T (for Linux).
2. Check the Java Version: Type the following command:
java -version
You should see output similar to:
java version “17.0.2” 2022-01-18 LTS Java(TM) SE Runtime Environment (build 17.0.2+8-86) Java HotSpot(TM) 64-Bit Server VM (build 17.0.2+8-86, mixed mode)
3. Check the Java Compiler: Similarly, check if the Java compiler (javac) is working by typing:
javac -version
The output should be something like:
javac 17.0.2
Step 5: Writing and Running Your First Java Program
With the Java environment properly set up, it’s time to write your first Java program. Follow these steps:
1. Open a Text Editor: You can use any text editor like Notepad (Windows), TextEdit (macOS), or Vim/Nano (Linux). Alternatively, you can use an Integrated Development Environment (IDE) like Eclipse, IntelliJ IDEA, or NetBeans for a more user-friendly experience.
2. Write the Program: Here’s a simple “Hello, World!” program:
public class HelloWorld { public static void main(String[] args) { System.out.println(“Hello, World!”); } }
3. Save the File: Save the file as HelloWorld.java in a directory of your choice.
4. Compile the Program: Open the terminal or command prompt and navigate to the directory where you saved the file. Use the following command to compile the program:
javac HelloWorld.java
If there are no errors, this will generate a file called HelloWorld.class.
5. Run the Program: Now, run the compiled program by typing:
java HelloWorld
You should see the following output:
Hello, World!
Step 6: Installing an IDE (Optional)
While it’s possible to write and run Java programs using just a text editor and the terminal, using an Integrated Development Environment (IDE) can make the process much easier, especially as your programs become more complex.
Some popular IDEs for Java development are:
Eclipse: A widely-used IDE with many plugins to enhance functionality.
IntelliJ IDEA: A powerful IDE with smart coding assistance, refactoring tools, and an intuitive interface.
NetBeans: A free and open-source IDE with support for various programming languages, including Java.
You can download these IDEs from their official websites and install them by following the provided instructions.
Conclusion
Setting up the Java environment may seem complicated at first, but once you’ve gone through these steps, you’ll be ready to dive into Java development. From here, you can start writing basic programs, experimenting with object-oriented concepts, and eventually tackling larger projects. Whether you’re developing desktop applications, web services, or Android apps, learning Java will give you a solid foundation in programming.
1 note
·
View note
Text
HtmlGo: The interpreter that lets you 'program' in HTML! Now you can finally join the fun and proudly say you're an HTML programmer (sort of)!
The interpreter that lets you 'program' in HTML! Now you can finally join the fun and proudly say you're an HTML programmer (sort of)!
What is HTML (HyperText Machine Language)?
The HTML (HyperText Machine Language) language is our new standard we've made to to create and structure applications inspired by HTML (HyperText Markup Language).
For a comprehensive understanding of the HTML language and its syntax, we recommend referring to the Language Specification. This specification provides detailed documentation on the language's structure, elements, attributes, and key features.
To access the HTML Language Specification, please visit REFERENCE.md.
What is HtmlGo?
HtmlGo allows you to compile and execute applications in a whole new way. Say goodbye to boring lines of code and embrace a more visual and developer-friendly approach. With HtmlGo, all you have to do is write your code in .html files and let its interpreter, developed in NET 6.0, do the rest.
Yes, you heard it right, programming in HTML! But don't worry, it's not like the HTML you know. HtmlGo offers a unique way to write instructions using the tags and structure of HTML that you're already familiar with. It's like giving a fresh and creative twist to your programming experience.
The HtmlGo interpreter reads your .html file and executes the instructions you've created.
Want to be part of this new way of programming? Join the HtmlGo developer community and discover how this language can bring a fun and refreshing twist to your projects. Say goodbye to monotony and welcome a more visual, creative, and HTML-infused programming experience!
How to use?
Terminal mode
Here's a quick guide on how to use HtmlGo with commands:
Open your terminal or command prompt.
Run the following command:
htmlgo /path/to/app.html
Make sure to replace "/path/to/app.html" with the actual path and name of your app.html file.
HtmlGo will start interpreting the HTML file and executing the instructions you've created.
And that's it! With these simple steps, you'll be able to run your Html application and see the results in action.
Server mode
You can use HtmlGo as a WebAPI server:
Open your terminal or command prompt.
Run the following command:
htmlgo-server /path/to/app.html
You can add the --swagger parameter to enable Swagger UI:htmlgo-server /path/to/app.html --swagger
Getting Started for Users
Before you can start using HtmlGo to compile and execute applications, you'll need to perform a simple setup process. This involves downloading the HtmlGo package, extracting it to a directory, and configuring your system's environment variables. Follow the steps below to get started:
Download the zip file containing the HtmlGo package.
Extract the contents of the zip file to a directory of your choice.
Open the system's environment variables settings.
Add the directory path where you extracted HtmlGo to the PATH environment variable.
For Windows:
Press Win + X and select "System".
Click on "Advanced system settings".
In the "System Properties" window, click on the "Environment Variables" button.
In the "Environment Variables" window, under "System variables", select "Path" and click on "Edit".
Add the directory path to the list of paths, separating each path with a semicolon (;).
Click "OK" to save the changes.
For macOS and Linux:
Open a terminal window.
Run the command nano ~/.bash_profile to edit your bash profile.
Add the following line at the end of the file: export PATH="/path/to/htmlgo:$PATH", replacing "/path/to/htmlgo" with the actual directory path where you extracted HtmlGo.
Press Ctrl + X, then Y, and finally Enter to save the changes.
Once you have completed these steps, you have successfully installed HtmlGo on your system. You can now start using HtmlGo to compile and execute applications written in HTML.
Tutorials (Spanish)
Dev tools
Commands (list of commands I've used) - commands.bat
Watch (compile and run with hot-reload feature) - watch.bat
Watch-sv (compile and run in server mode with hot-reload feature) - watch-sv.bat
Watch-test (compile and run tests with hot-reload feature) - watch-test.bat
Publish (win-x64 release build) - publish.bat
Publish docker (generates an example docker image) - publish-docker.bat
Publish linux (linux-x64 release build) - publish-linux.bat
Publish plugins (NHibernate) - publish-plugins.bat
Run docker (runs the example docker image) - run-docker.bat
License
Please note that the license specified in this documentation apply specifically to the HtmlGo compiler and not to the HTML language itself. The HTML language is free to use, both for commercial and non-commercial purposes. Attribution-NonCommercial-NoDerivatives 4.0 International
0 notes
Text
Darle color a nuestra TTY en Void Linux
Darle color a nuestra TTY en Void Linux

¿Que es bash? Bash (Bourne again shell) es un programa informático, cuya función consiste en interpretar órdenes, y un lenguaje de programación de consola. Está basado en la shell de Unix y es compatible con POSIX. Para más información tienen la wiki aquí.
Bueno antes que nada, les recuerdo que estoy usando la shell bash para manejarme en la TTY(terminal). En el caso que usen otra, seguramente…
View On WordPress
#bash#bash linux#bash user#bashrc#bashrc edit#bash_profile edit#bourne again shell#color en bash#color en tty#darle color a bash#darle color a la terminal#darle color a la tty#darle color a nuestra tty#edit bashrc#edit bash_profile#editando bash#editando bashrc#editing bash#editing bashrc#GNU/Linux Tutorial#How To#how to bash#how to bashrc#how to shell bash#Linux#linux bash#linux shell#Linux Tutorial#modify bash#nano
0 notes
Text
Configuring the Command Prompt in Mac OS X

In an earlier post, I dealt with a glitch that displayed the command prompt in the terminal as “unknown_followed_by_several_numbers.” It now shows up as the default command prompt for Mac OS X, which does the job, but one of the nice things about the Bourne Again Shell, the bit of software underlying Terminal that actually makes it do stuff, is that it’s highly customizable.
My goal here is pretty simple. I just want to modify the command prompt - that bit of text, numbers and symbols the terminal puts out to show its waiting for the user to type something.
The settings for bash are stored in a configuration file which can be edited in any text editor. Since Mac OS X is a multiuser system, this configuration file would be stored in the user’s home directory. Most UNIX systems, this file would be called .basrc. This will work in Mac OS X as well - until you log out or reboot the computer. The next time you log in or restart the system, your bash settings will be reloaded from the global configuration file, “/etc/bashrc”, completely ignoring your customized file. The only way I’ve found to make a local configuration stick under OS X is to put the setiings into ~/.bash_profile, with “~/” representing your user home directory.

So, fire up the terminal app or navigate to your home directory if Terminal is already running. Execute “nano .bash_profile” to start the nano text editor and edit the configuration file (or create it if it doesn’t exist already.)
OK, so text for our custom command prompt is stored is a setting named “PS1”, and the way to set this up in the configuration file is “PS1=”Our Custom Command Prompt.” In fact...

...you could actually just do that. Enter some plain text and go with that. But, bash also recognizes some codes for presets to include things such as date and time, user, the working directory , and for this example, I’m going to go with something more along those lines.
These codes are in the format of “\” followed by the single letter code. The slash is an escape character which tells to treat the following single character as one of its coded presets. Any text without this escape character before it is treated as plain text and will simply be added to the command prompt, as is.
I’m going to just go ahead and build my custom command prompt, then go over how it was built.
So, using nano to edit “.bash_profile”, I’m going to enter the single line:
PS1="[\d \@] \u@\h : \w $ "
Exit nano, being sure to save the file. At the command prompt, execute “source ~/.bash_profile”. After executing this command, the command prompt on my system changed to:

And, just in case that’s hard to read in the screenshot:
[Tue Oct 22 06:17 AM] oldmacnewlife@OldMacNewLifes-Power-Mac-G5 : ~ $
Let’s take another look at that setting in the bash profile.
PS1="[\d \@] \u@\h : \w $ "
Now for the blow by blow replay. That bracket at the opening of the setting string is not preceded by an escape slash, so it’s treated as plain text and added to the command prompt, as is.
The letter ‘d’ IS preceded by a slash, and it happens to be the to insert the date into the command prompt, in day, month date format.
For the sake of readability, I added a space, then a slash followed by the ampersand sign, which is the code for time, in 12 hour format followed by AM or PM as appropriate. I then added a closing bracket followed by a space to separate the date and time from the rest of the command prompt.
The “\u” is the code for the current user. And ampersand without a slash is just an ampersand. “\h” adds the hostname.
I added a colon bracketed by spaces to split off the user and hostname, then “\w”, which is the code to display the current working directory. One more space, then the dollar sign for the traditional Unix prompt.
So, I’m calling this done. You can find the complete list of command prompt options, along with the full bash manual at:
https://www.gnu.org/software/bash/manual/html_node/Controlling-the-Prompt.html#Controlling-the-Prompt
1 note
·
View note
Text
I am SUCH A BAMF. I just solved the tiniest issue, but I felt so pleased about how self-sufficiently I did it :)
First of all, I wanted to start working on a Python data visualization project that requires the use of virtualenv and virtualenvwrapper. I have the former, no problem. I tried installing the latter and got a command line message saying basically “Nah, you already installed this.” However, when I tried to check its version, the command line had no idea what I was talking about.
So basically my computer was failing at talking to itself, and I don’t know enough about the mysteries of macOS folder structure to understand exactly where the error was. I only knew it was related to where my various versions of Python were installed (some in /usr/bin, some in usr/local/bin, etc.) and that my $PATH was probably not correct.
I know so little about $PATH editing, but I dove in anyway! Discovered a new way to view hidden folders, checked on the locations of various Python installations to confirm that, opened up my .bash_profile and determined that everything looked fine there. Then I opened my .bashrc and thought, “Ah ha! This looks more like what we’re talking about.”
I looked closely at the previous $PATH edits I’d included in that file back when I was originally installing virtualenv and its cronies a while ago, and noticed something that didn’t seem right: quotation marks around a certain folder path. So, for the heck of it, I deleted those quotation marks, re-sourced .bashrc, and tentatively typed ‘virtualenvwrapper’ into the command line.
It worked!
ULTIMATE SUCCESS.
#i know it's such a small thing lol#but i felt so good about myself#i'm slowly getting more confident with messing around with this stuff#chiseling away#path#return to this
1 note
·
View note
Text
The Chef development kit contains all the tools you need to develop and test your infrastructure, built by the awesome Chef community. Chef is an open source configuration management tool written in Ruby and Erlang. The Chef DK workstation is the location where users interact with Chef. If you don’t have Chef Server installed, check: Install Chef Automation Server on Ubuntu On the workstation users author and test cookbooks using tools such as Test Kitchen and interact with the Chef server using the knife and chef command line tools. To install Chef Development Kit on Arch Linux|Manjaro, you need an AUR helper, I recommend you use yay – yay – Best AUR Helper for Arch Linux / Manjaro Once yay is installed. download and install Chef Development Kit on your Arch Linux|Manjaro machine. yay -S chef-dk --noconfirm Wait for the installation to finish. Check the version installed using: $ yay -Qi chef-dk Name : chef-dk Version : 4.13.3-1 Description : The Chef development kit contains all the tools you need to develop and test your infrastructure, built by the awesome Chef community. Architecture : x86_64 URL : https://downloads.chef.io/chef-dk/ Licenses : Apache Groups : None Provides : None Depends On : None Optional Deps : None Required By : None Optional For : None Conflicts With : chef chef-solo chef-client chef-workstation Replaces : None Installed Size : 361.70 MiB Packager : Unknown Packager Build Date : Mon 20 Dec 2021 10:19:23 AM UTC Install Date : Mon 20 Dec 2021 10:23:09 AM UTC Install Reason : Explicitly installed Install Script : No Validated By : None From the output, you can confirm the installed version. Downloads page lists current releases of Chef DK. To use the Chef development kit version of Ruby as the default Ruby, you’ll need to edit your $PATH and GEM environment variables to include paths to the Chef development kit. For Bash use: echo 'eval "$(chef shell-init bash)"' >> ~/.bash_profile bash and ~/.bash_profile represent name of shell and its configurat If you’re using zsh shell, then run echo 'eval "$(chef shell-init zsh)"' >> ~/.zshrc Source your rc and check the ruby location. ## Bash ## source ~/.bash_profile ## Zsh ## source ~/.zshrc Installation of Chef Development Kit will provide the following command line tools: chef chef-apply chef-client chef-shell chef-solo chef-vault Click on the item link to learn more about what it does, and how it works. More ChefDK setup guides are available on Chef Documentation page.
0 notes
Text
Sqlectron install ubuntu

#Sqlectron install ubuntu how to#
#Sqlectron install ubuntu install#
#Sqlectron install ubuntu full#
#Sqlectron install ubuntu Offline#
Docker, Docker Compose: Faster build up the working and development environment.
Software & Developmentĭepends on the project or use cases I work on, it may have different tools/software needed however, the most common and must-have for every desktop for my development software/app/tools are as follow:
#Sqlectron install ubuntu install#
The easiest way to install the Dbeaver Database administration tool on Ubuntu is by using. I may spend some time writing my following review about the Fedora for development. Tutorial Install DBeaver pada Windows, SQL Client Ramah Pe. Linux is focused on most other development needed, such as API, web, software, or IoT.Īnd you may ask what distribution of Linux, the Dell XPS 13 because it's a developer edition, so it pre-install as the Ubuntu 20.04.įor the Huawei Matebook was Deepin, and for One Netbook 4, I recently installed the Fedora 34, which I like this Fedora distribution, simple and effective. MacOS, for me, is primarily for iOS / mobile app development. If you’d like to share some practical tips from experience, feel free to add them in the Comments section below.As you can see from the hardware part, there is 2 OS I majority use: macOS and Linux. We hope that this article will help you in your work.
#Sqlectron install ubuntu Offline#
This package also has a dependency on the unixodbc-dev package for Ubuntu.Ĭopy all these downloaded packages to the target Ubuntu server and then run the below commands to install these packages: -Run below commands to install SQL Server Tools in offline mode Make sure to download and copy the dependency packages – the msodbcsql package, which is a dependency. If your Linux system is not connected to the Internet or does not have access to online repositories, you need to include more steps.įirst, download the package from the Microsoft repository and copy that package to the target server. The approach we explored in this article is the online installation where your Ubuntu system is connected to the Internet. We can run queries and database activities. Now, we have successfully installed SQL Server Tools.
#Sqlectron install ubuntu full#
That is because we have not passed the full command line. Now, after executing the above two commands, Ubuntu has recognized SQLCMD.Īlthough, SQLCMD is still throwing an error. Run below command to use SQL Server Tools from the bash shell for interactive/non-login sessionsĮcho 'export PATH="$PATH:/opt/mssql-tools/bin"' > ~/.bashrc Modify the PATH in the ~/.bash_profile fileĮcho 'export PATH="$PATH:/opt/mssql-tools/bin"' > ~/.bash_profile To fix this issue, we’ll add /opt/mssql-tools/bin/ to our PATH environment variable in a bash shell by running the below commands: -Run below command to use SQL Server Tools from the bash shell for login sessions In our case, the Ubuntu system did not recognize SQLCMD. The thing is, we have already installed it as a part of mssql-tool package – SQL Server tools. Type SQLCMD to validate if Ubuntu can recognize this new utility. Configure the Path Environment Variables in a Bash Shell They are very helpful for establishing the SQL Server connection or executing any query locally on the Linux server. The role of these SQL Server tools is crucial when if it comes to Linux-based SQL Server instances.
BCP is one of the SQL Server utilities that serve to process the import and export of data.
SQLCMD is a popular command-line utility that we use to establish SQL Server connections to execute queries.
These tools include sqlcmd and bcp utilities: If you want to connect to SQL Server instances locally on the Ubuntu Linux server, we first need to install the SQL Server command-line tools. Thus, I have already installed SQL Server 2019 on Ubuntu 18.04 and shown its connectivity through SQL Server Management Studio from a remote server.
#Sqlectron install ubuntu how to#
How to install SQL Server 2019 on Ubuntu 18.04 Server.How to create a virtual machine and install Ubuntu 18.04 Linux server.Install SQL Server Tools on Ubuntu Linux Systemīefore we proceed to explore the current topic, I would suggest you refer to the previous parts of the to refresh your knowledge: Our goal is to demonstrate the step-by-step process of installing SQL Server Tools and its components on the Ubuntu 18.04 Linux system. In the previous articles, we covered sequential steps necessary to build a virtual machine, install Ubuntu 18.04 operating system, and configure SQL Server 2019 on that Ubuntu machine.
0 notes
Text
How long to install inkscape on mac homebrew

#How long to install inkscape on mac homebrew how to
#How long to install inkscape on mac homebrew install
Ultimately, I was able to resolve all the problems by installing PHP from scratch.
#How long to install inkscape on mac homebrew install
So now for installation of php extensions (like imagick or x-debug) you have to use PECL.ĭue to older php installations, I was getting lot of issues while trying to install php-imagick extension. With the migration to Homebrew-core, the php formula has stopped taking over the role of PECL. Initial search showed that, in past you could have installed php-imagick extension using command like brew install php71-imagick, but this does not work any more of Homebrew updates. In order to successfully make it work, there was a requirement to have php-imagick extension already installed in your system. Recently, I wanted to include a new module ( visualception) in my test automation project that is built on top of codeception. Further details within blog! Problem Background Reason of doing so, is to avoid conflicts that arise because of Homebrew March 2018 updates. If you already have PHP installed via homebrew, then it requires you to first remove those PHP installations and then do the fresh PHP install.
#How long to install inkscape on mac homebrew how to
This tutorial explained you to how to install NVM and node.js on macOS system.This article has detailed steps on doing clean install of PHP 7.2 (latest PHP version as of August 2018). Similarly, you can install other versions like Node 12.X or Node 15 and switch between them. To set the node 14.X as default version, simply use: nvm use 14 If you have installed multiple versions on your system, you can set any version as the default version any time. nvm install node # Installing Latest version nvm install 14 # Installing Node.js 14.X versionĪfter installing you can verify what is installed with: nvm ls You can also use aliases names like node for latest version, lts for latest LTS version, etc. Now, you can install any version listed in above output. To see available versions, type: nvm ls-remote Step 3 – Install Node.js with NVMįirst of all, see what Node versions are available to install. Go to next step to install Node.js versions with the help of nvm. The NVM has been installed on your macOS system. From the next login, it will automatically loaded. Next, load the variable to the current shell environment. Press ESC + :wq to save and close your file. Edit the following configuration file in your home directory vim ~/.bash_profileĪnd, add below lines to ~/.bash_profile ( or ~/.zshrc for macOS Catalina or later) export NVM_DIR=~/.nvm Now, configure the required environment variables. Next, create a directory for NVM in home. Update the Homebrew package list and install NVM. Now, you system is ready for the installation. brew uninstall -ignore-dependencies node brew uninstall -force node Step 2 – Install NVM on macOS My system already have installed node via Homebrew. If your system already have node installed, uninstall it first. Login to the macOS desktop system and install Homebrew on your system (if not already installed) ruby -e "$(curl -fsSL )"įor more instruction visit Homebrew installation tutorial. You must have macOS desktop access with administrator privileges. This tutorial help you to install NVM on your macOS system and manage Node.js versions. The macOS users can install NVM using the homebrew. The NVM (Node Version Manager) is a shell script used for installing and managing Node.js on a Linux based system.
0 notes
Text
Mac terminal edit file in python

#Mac terminal edit file in python how to#
#Mac terminal edit file in python install#
#Mac terminal edit file in python update#
#Mac terminal edit file in python download#
#Mac terminal edit file in python update#
How do I update python in Kali Linux 2020? You need to update your update-alternatives, then you will be able to set your default python version. But we should check what versions of Python are installed in your Linux. Does Kali use Python?Įxecuting Python scripts in Kali linux is easier as Python is installed by default. You are done! Now check your default interpreter version by simply run “python -V” command in the terminal. Open terminal and write “alias python=python3” and hit enter. 2019 How do I make Python 3 default in Kali Linux? Step 6: Add Python Path to Environment Variables (Optional)Meer items. Step 4: Verify Python Was Installed On Windows.
#Mac terminal edit file in python download#
Step 2: Download Python Executable Installer. Python 3 Installation on WindowsStep 1: Select Version of Python to Install. Once the installation is complete, verify the installation by checking the pip version: pip3 -version.
#Mac terminal edit file in python install#
Installing pip for Python 3Start by updating the package list using the following command: sudo apt update.Use the following command to install pip for Python 3: sudo apt install python3-pip. On terminal type - sudo su.Write down the root user password.Execute this command to switch to python 3. Steps to Set Python3 as Default On ubuntu?Check python version on terminal - python -version.Get root user privileges. It does not come bundled with Python and must be installed separately. This is not to be confused with the previously mentioned depreciated pyvenv script. If you wish to use multiple versions of Python on a single machine, then pyenv is a commonly used tool to install and switch between versions. Can I have 2 versions of Python installed? You'll see path to one of the python installations, change that to path of your desired version. On bottom you'll find 'Environment Variables'Double-click on the Path. How do I change Python version?įor Windows:Advanced System Settings > Advance (tab). Whenever your programs need to work with files, folders, or file paths, you can refer to the short examples in this section. Path is a module inside the os module, you can import it by simply running import os. How do I change directory in Jupyter notebook? How do I install a specific version of PIP?.How do I install the latest version of Python in Kali Linux?.How do I update python in Kali Linux 2020?.How do I make Python 3 default in Kali Linux?.Can I have 2 versions of Python installed?.How do I get the current path in Python?.How do I know where Python is installed?.Where is the working directory in Jupyter notebook?.How do I navigate to a different drive in Jupyter notebook?.How do I change directory in Jupyter notebook?.
#Mac terminal edit file in python how to#
So how to install python 3.7 as the standard-python-installation on a mac? (Could be also python3.8 by all means). I also ran the following command with an error: $ brew switch python 3.7Įrror: python does not have a version "3.7" in the Cellar.Īnd restarted the computer, but without success. bash_profile, but still python is only 3.6: $ python -V I also executed the suggested line to have python 3.7 symlinked: echo 'export > /Users/me/.bash_profile So I tried to install python 3.7 as follows brew install a lot of output. It was migrated from homebrew/cask to homebrew/core. There seems to be python 3.7 available: $ brew search pythonĪpp-engine-python boost-python3 ipython python-markdown reorder-python-importsīoost-python gst-python micropython python-yq ✔ wxpythonĪwips-python kk7ds-python-runtime mysql-connector-python I am running MacOS Mojave (10.14.6) and want to install python 3.7.Ĭurrently I have python 3.6 installed: $ python -V
0 notes
Text
Mariadb Client For Mac

Powerful database management & design tool for Win, macOS & Linux. With intuitive GUI, user manages MySQL, PostgreSQL, MongoDB, MariaDB, SQL Server, Oracle & SQLite DB easily.
Mariadb Client For Mac Os
Mariadb Client For Mac Installer
Introduction
PhpMyAdmin is a free and open source tool for the administration of MySQL and MariaDB. As a portable web application written in PHP, it has become one of the most popular administration tool for MySQL.
In this tutorial, we will learn the steps involved in the installation of phpMyAdmin on MacOS.
Just installed MariaDB (with homebrew). Everything looks like it’s working, but I can’t figure out how to have it automatically startup on boot on my Mac. I can’t find any Mac-specific docs for this. I have an issue with processing for the pip install mysqlclient for Python3 on MAC OS Sierra. Running buildext building 'mysql' extension creating build/temp.macosx-10.12-x8664-3.6 clang -DNDEB. MariaDB Connector/J is used to connect applications developed in Java to MariaDB and MySQL databases. The client library is LGPL licensed. See this article for. DbForge Studio for MySQL is a universal GUI tool for MySQL and MariaDB database administration, development, and management. The IDE allows to create and execute queries, develop and debug stored routines, automate database object management, analyze table data via an intuitive interface. DbForge Studio for MySQL – Click image to enlarge.
Prerequisites
MacOS
Login as an administrator on terminal.
Homebrew must be installed on the system.
PHP 5.x or greater
Installation
Installation of phpMyAdmin includes following steps
1) Download the file Sign in to google drive file stream.
To install the file on MacOS, we need to download a compressed file from the official website of phpMyAdmin https://files.phpmyadmin.net/phpMyAdmin/4.7.6/phpMyAdmin-4.7.6-all-languages.tar.gz
2) Extract the file
$ tar xvfz Downloads/phpMyAdmin-4.7.6-all-languages.tar.gz
3) Start the development server
To access phpMyAdmin from localhost, we need to start the development server. First, we need to change our working directory by typing the following command:
Development server will be started having the root server in the phpmyadmin directory. Now, type localhost:8080 to access phpmyadmin on localhost. It will appear like this.
Window will prompt us to fill our MySQL username and password. Fill the required details and press GO.
Now we have successfully installed phpMyAdmin on MacOS.
Next TopicHow to Install Eclipse on Mac
Introduction
MariaDB is an open source database management system. MariaDB intends to maintain high compatibility with MySQL. It is one of the most popular databases in the world. MariaDB is named after the name of younger daughter Maria of its founder Michael 'Monty' Widenius. In this tutorial, we will learn the steps involved in the installation process of MariaDB on MacOS.
Prerequisites
MacOS
Login as an administrator on terminal
Installation
Installation includes following steps.
1) Update the local repository index of homebrew package installer
Following command can be executed to update the local repository index of homebrew.
$ brew update
2) Install with homebrew
MariaDB can be installed by using homebrew package installer. Following command is executed to install MariaDB.
Mariadb Client For Mac Os
3) Start MariaDB
To start MariaDB, MySQL.server needs to be started which is located inside /usr/local/Cellar/mariadb/10.2.12/support-files. We can start the server by using following command.
$ ./mysql.server start
To execute the command, we need to either change our working directory to usr/local/Cellar/mariadb/10.2.12/support-files or change the PATH variable by editing .bash_profile.
4) Working on command line
To get started with the MariaDB shell, following command can be executed.
For this, change the working directory to /usr/local/cellar/mariadb/10.2.12/bin or edit .bash_profile.
Create database command is responsible for creating the database named as javatpoint in the records.
5) Stop MariaDB
To stop MariaDB server, we run the following command.
$ ./mysql.server stop
Hence, we have installed and get started with MariaDB.
Mariadb Client For Mac Installer
0 notes
Text
Month in review – Articles and news

Hi folks. In this post I am going to share some great articles which I recently got across. Apart from that I would also be sharing some news relating to Python. Articles Python Descriptors This IPython notebook was really helpful for me to learn about descriptors and properties in Python. It is topic which is greatly shadowed in a lot of Python books. This Notebook would be really beneficial for you if you want to grasp the concept in an effective and understandable manner. Using Coroutines for running many functions concurrently Let me be honest. I never thought of this way before. This article from Brett sheds light on an obscure method of running many functions concurrently. I never saw this being discussed before. News Google Code is shutting down Google code is the host for a number of small Python projects. If you use any library which is hosted on Google code then make sure to back it up because it would be available for long. 2. Invent Your Own Computer Games with Python 3rd Edition This book from Al Sweigart has helped a number of people to start programming in Python. If you are new then I am sure that it would help you immensely. This is a new edition of the book. Tip cdp () { cd "$(python -c "import os.path as _, ${1}; print(_.dirname(_.realpath(${1}.__file__)))" )" } Put it in your .bashrc or .bash_profile and do cdp to get in the directory where the module is defined. This work: ~ $ cdp os /usr/lib/python2.7 Read the full article
0 notes
Text
Adb Drivers For Mac

Adb Fastboot Drivers For Mac
Download Adb Drivers For Samsung
Mac Os Adb
Adb For Mac
Adb Drivers For Macos
You can use Android Debug Bridge (ADB) to connect your Fire tablet to your computer for testing and debugging. You connect your computer to your Fire tablet through a micro-USB cable.
Android Debug Bridge (ADB) is a command-line utility for running and managing Android apps on your device or emulator. For more information and instructions on using ADB, see Android Debug Bridge.
If you're looking for instructions on connecting to a Fire TV instead, see Connect to Fire TV Through ADB.
Download and install USB drivers on Windows PC or Mac PC to transfer data between Android device and PC, Unlock your bootloader, Installing TWRP, Rooting your device. ADB stands for Android Debug Bridge and it is a command-line utility included with Google’s Android SDK.
Brew cask install android-platform-tools Start using adb. Adb devices Option 2 - Manually (just the platform tools) This is the easiest way to get a manual installation of ADB and Fastboot. Delete your old installation (optional) rm -rf /.android-sdk-macosx/.
Adb driver free download - Digidesign CoreAudio Driver, USB Audio ASIO driver, IOXperts USB WebCam Driver, and many more programs. Get USB WebCam drivers for Mac OS X. Free to try User rating.
Check for Device Connections Using ADB (Optional)
Troubleshooting
Step 1: Enable Developer Options
Go to Settings > Device Options and look for a Developer Options menu. If it's not there, do the following:
a. Go to Settings > Device Options > About Fire Tablet.b. Tap your Serial Number seven times.c. Return to Device Options. A new menu appears called 'Developer Options.'
Tap Developer options. (2013 models might call this option 'Security.')
Set Developer options and USB debugging to ON.
If you have a Kindle Fire 1st Generation, ADB is enabled by default.
Step 2: Install the Kindle Fire Driver (Windows Only)
If you're using Windows, download this Kindle Fire driver: kindle_fire_usb_driver.zip.
After downloading the file, extract the contents into a new folder and double-click the Fire_Devices ABD drivers file.
Proceed through the installation wizard screens to install the driver.
Step 3: Install Android Studio
ADB is available on your computer when you install Android Studio. If you don't already have Android Studio, download and install Android Studio. If you're not using Android Studio, you need to download and install Android SDK platform tools.
Step 4: Connect Your Fire Device to Your Computer with a USB Cable
Using a USB cable, connect your Fire tablet to a USB port on your computer.
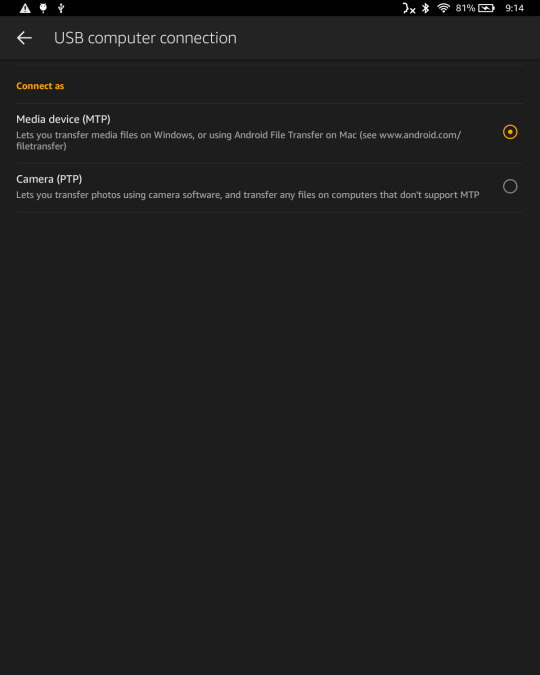
Note that Fire tablets can treat the USB with different transfer options. After connecting the USB cable, swipe down from the top of your tablet to see the USB option used. You might see various notifications, including the USB connection type that was used when you connected the cable. The relevant notification is highlighted in the screenshot below.
If you don't see 'Connected as Media Device', press Tap for other USB options. Then select Media device (MTP). Later Fire OS versions have a different interface here. If you're using Fire OS 7, select File Transfer.
Note: If your USB is connected as a Camera (PTP), Android Studio won't recognize the tablet as a device in Android Studio.
If you don't see the USB connection type in the above notifications, go to Settings > Device Options > Developer Options > USB computer connection. Set this to Media device (MTP). For Fire OS 7, select File Transfer.
When the Allow USB debugging? dialog appears on your tablet, tap OK.
Open Android Studio and look for the device to appear in devices drop-down menu:
The device's name will use the android.os.Build.MODEL property for the device. KFSUWI refers to Fire HD 10 (2017) tablet. You can see a list of build model names in the Identifying Fire Tablet Devices.
If you have not selected the 'Allow USB Debugging' dialog on your tablet, the name 'Unknown device' will appear in the devices drop-down menu in Android Studio until you allow debugging.
With the tablet connected, you can now run your app on your tablet by clicking the Run App button in Android Studio.
If you run into issues, see the Troubleshooting section below.
Check for Device Connections Using ADB (Optional)
Instead of looking in the devices menu in Android Studio, you can also use some ADB terminal commands to confirm that your device is connected. ADB is useful for performing many other operations as well, such as entering sandbox mode or installing other assets. Follow these two sections:
If you skip adding ADB to your PATH, you can also Check for Connected Devices If ADB Isn't In Your PATH.
Add ADB to Your PATH
First, add ADB to your PATH so you can more easily run ADB commands. (Your PATH is an environment variable used to specify the location of the program's executable. If you don't add ADB to your PATH, running ADB commands will require you to browse to the <Android SDK>/platform-tools directory to run adb.)
Tip: You can check whether ADB is already added to your PATH by typing adb version from a terminal or command prompt. If you get back version information, then ADB is in your PATH. If the response says adb is an unrecognized command, ADB is not in your PATH.
To add ADB to your PATH on Mac:
Get the path to your Android SDK platform-tools directory:
Open Android Studio and click the SDK Manager button .The location to your Android SDK appears near the top next to Android SDK Location. For example: /Users/<your username>/Library/Android/sdk
If this is your first time opening Android Studio, there isn't an SDK Manager button. Instead, at the Welcome to Android Studio prompt, click Configure > SDK Manager and provide the location to the Android SDK.
Copy the path to the SDK and paste it somewhere convenient, such as a text editor.
Add /platform-tools to the end of the path you copied in the previous step. ('platform-tools' is the directory containing the ADB executable.)
Copy the full path to your clipboard.
Use the following command to add ADB to your .bash_profile. Replace <your username> with your actual username. Also, make sure the path points to your Android SDK.
Your .bash_profile file is usually in your user directory, which you can find by typing cd ~ (change to your user directory). Then type ls -a (list all) to show all files, including hidden ones.
If the file isn't there, simply create one. You can then type open .bash_profile to see the paths listed.
After you add this PATH to your bash profile, you should see the following in your .bash_profile file:
(Only instead of johndoe, you will see your own username.)
Fully restart any terminal sessions, and then type adb. If you successfully added ADB to your path, you will see ADB help info rather than 'command not found.'
To add ADB to your PATH on Windows:
Get the path to your Android SDK platform-tools directory:
Open Android Studio and click the SDK Manager button .
The location to your Android SDK appears near the top next to Android SDK Location. For example: C:Users<your user name>AppDataLocalAndroidSdk
If this is your first time opening Android Studio, there isn't an SDK Manager button. Instead, at the Welcome to Android Studio prompt, click Configure > SDK Manager and provide the location to the Android SDK.
Copy the path to the SDK and paste it somewhere convenient, such as a text editor.
Add /platform-tools to the end of the path you copied in the previous step. ('platform-tools' is the directory containing the ADB executable.)
Copy the full path to your clipboard.
Click your computer's search button (next to Start) and type view advanced system settings.
Click View advanced system settings.
When the System Settings dialog opens, click the Environment Variables button.
Under System Variables (the lower pane), select Path and click Edit.
Do one of the following:
On Windows 7 or 8, move your cursor to the farthest position on the right, type ; and then press Ctrl+V to insert the path to your SDK that you copied earlier. It may look like this: ;C:Users<your user name>AppDataLocalAndroidSdkplatform-tools. Click OK on each of the three open dialog boxes to close them.
On Windows 10, click the New button and add this location.
Restart any terminal sessions, and then type adb. If you successfully added ADB to your path, you will see ADB help info rather than 'command not found.'
Check for Connected Devices
Adb Fastboot Drivers For Mac
Assuming ADB is added to your PATH, run the following commands:
Confirm that the serial number for your Fire tablet appears in the list of devices. For example:
On your tablet, your device's serial number is located under Settings > Device Options.
Check for Connected Devices If ADB Isn't In Your PATH
If your terminal doesn't recognize adb as a command (that is, you didn't add ADB to your PATH), you might have to run the commands from the SDK directory that contains ADB.
In Android Studio go to Tools > SDK Manager.
In the SDK Manager dialog box, copy the Android SDK Location.
Browse to this location in your terminal or command prompt. For example:
Mac
Windows
Then go into the platform-tools directory:
The platform-tools directory contains adb.
Now run the ADB commands as follows:
Mac:
Windows:
The response should list your device's serial number. For example:
If your Fire tablet is still not detected, you may need to reboot your computer or log out and back in for the changes to take effect.
Troubleshooting
Tablet doesn't appear in list of devices in Android Studio
If you don't see your tablet device in the list of devices in Android Studio, click the devices drop-down menu and select Troubleshoot device connections:
Click Rescan devices.
If rescanning devices doesn't detect your Fire tablet as a device, your micro-USB cable might be bad, you might have the wrong USB connection type (e.g, camera instead of media device), or you might not have enabled USB debugging. You can also try restarting your computer and the tablet.
Uninstall the non-ADB Driver (Windows)
If you previously connected a Fire tablet without first enabling ADB on the Fire tablet, you might need to remove the existing USB device driver and force re-installation of the driver. To remove the non-ADB driver:
Using a micro-USB cable, connect your Fire tablet to a USB port on your computer.
On your computer (Windows 10), click the search button (next to the Start menu) and type Device Manager in the search. Then select it in the results. (Other Windows versions have different options for accessing the Control Panel.)
In the Device Manager window, expand Portable Devices.
Right-click the Fire device and then click Properties.
In the Properties window, on the Driver tab, click Uninstall, and then Confirm.
Unplug your Fire tablet from your computer.
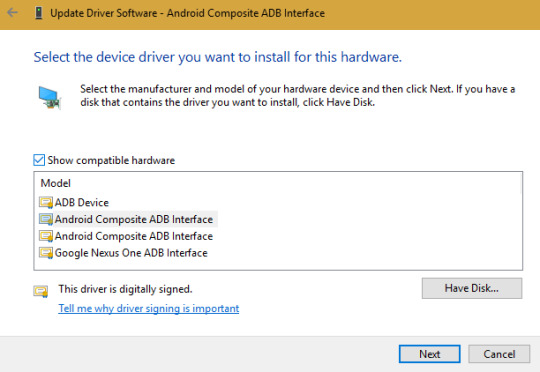
Confirm the Fire Driver Is Installed Correctly
You can confirm that the Fire driver is installed correctly by doing the following:
On your computer, click the search button search button (next to the Start menu) and type Device Manager.
In Device Manager, under Fire Devices, verify that that a device appears called Android Composite ADB Interface.
If your Device Manager shows an Other Devices section with a second Fire device with a yellow alert sign, your computer is listing Amazon's unrecognized ADB module as a separate device. To fix this issue:
Under Other Devices, right-click the Fire device and select Properties.
On the Driver tab of the Properties window, select Update Driver…
Choose to browse for the driver software, then navigate to Let me pick from a list of device drivers on my computer > Show All Devices > Have Disk.
Navigate to the folder where you installed the Amazon driver (typically C:Program Files (x86)Amazon.comFire_DevicesDrivers) and select it.
Ignore the warning regarding installing drivers and proceed.
You should now correctly see your Fire tablet with the ADB driver installed.
Last updated: Oct 29, 2020
Every Android user who loves modding and tweaking their device, who wants to try different firmware’s, root their phone, install a custom ROM and kernel’s, first they need to unlock their bootloader and install custom recovery and for that, they need to install ADB and fastboot drivers. And in this guide, we help you to install ADB and fastboot driver on Mac OS and Windows. We already discuss what is ADB and fastboot is, so we skip that part and move it to setup ADB and fastboot on Mac OS.
How to Setup ADB Mac OS and Windows: –
Download Adb Drivers For Samsung
Setting up ADB and Fastboot on Mac is as simple as in Windows. Since they both are part of the Android SDK package, all you need to do is download the kit (which is over 500 MB) and set up path variables, or you can use below methods to install ADB and fastboot driver on Mac OS. One of the first things to remember is to put your device in USB debugging mode. Without doing this, your PC won’t recognize your device.
Install ADB and Fastboot on Mac: – There are two best methods to install ADB and fastboot driver on Mac OS. First one is by passing a script in Terminal by WonderHowTo sub-blog HTC One and the second one is by using Nexus Tool. So let’s begin with setup ADB and fastboot driver on Mac PC.
Install ADB and fastboot driver on Mac OS Method 1: –
Download the Android zip file and extract it on the desktop.
Now Open Terminal on Mac PC by Pressing Command + Spacebar key combination to open Spotlight search and type ‘Terminal’ on that.
Type ‘cd Desktop/Android’ on Terminal.
Now select the file on Android folder, select file ADB-Install-Mac.sh file and drag it on Terminal and press Enter.
It will ask for your password detail to proceed, enter your login password and it will install ADB and Fastboot on Mac OS.
Mac Os Adb
You can see a message on Terminal ‘You may now run Android and Debug Bridge and Fastboot Command’ means you successfully setup ADB and fastboot on Mac OS.
Install ADB and fastboot driver on Mac OS with Nexus Tool: –
This method developed by XDA member @corbin052198 that install ADB and fastboot on Mac OS and Linux by typing a single command on terminal.
Now type or copy the quoted code and paste it on Terminal “bash <(curl https://raw.githubusercontent.com/corbindavenport/nexus-tools/master/install.sh)“
Adb For Mac
This command will setup ADB and Fastboot on Mac OS. According to the developer, this command also works on Linux and you can easily setup ADB and fastboot on Linux also.

To uninstall ADB and fastboot from Mac type or copy the quoted code and paste “bash <(curl https://raw.githubusercontent.com/corbindavenport/nexus-tools/master/uninstall.sh)“
This command will uninstall ADB and Fastboot from Mac OS.
Adb Drivers For Macos
To check ADB and Fastboot is correctly configured on your PC and type ‘adb devices’ on the terminal. It will show you the list of devices connected. Also checked by going to the location ‘/usr/bin ‘ and if you can found ADB and fastboot files their means you successfully setup ADB and Fastboot on Mac OS.
These are the easiest way to install ADB and fastboot on Mac PC. You can also check how to setup ADB and Fastboot on Windows PC If you have any doubts, comment below.
0 notes
Text
The Chef development kit contains all the tools you need to develop and test your infrastructure, built by the awesome Chef community. Chef is an open source configuration management tool written in Ruby and Erlang. The Chef DK workstation is the location where users interact with Chef. If you don’t have Chef Server installed, check: How to install Chef Automation Server on Ubuntu On the workstation users author and test cookbooks using tools such as Test Kitchen and interact with the Chef server using the knife and chef command line tools. There are two ways to install Chef Development Kit on Ubuntu 18.04: Install Chef DK using omnitruck setup script Install Chef Development Kit from Debian package Install Chef DK using the setup script This is the easiest and quickest method to install Chef Development Kit on Ubuntu 18.04 server. Open your terminal and run the commands below as root user: curl https://omnitruck.chef.io/install.sh | sudo bash -s -- -P chefdk -c stable This will install the latest, stable release. Install Chef DK from .deb package Visit Chef Downloads page to check the current releases of Chef DK. As of this writing, the latest version is 4.13.3. Download it using the wget command. Ubuntu 20.04: VER=4.13.3 wget https://packages.chef.io/files/stable/chefdk/$VER/ubuntu/20.04/chefdk_$VER-1_amd64.deb Ubuntu 18.04: VER=4.13.3 wget https://packages.chef.io/files/stable/chefdk/4.13.3/ubuntu/18.04/chefdk_4.13.3-1_amd64.deb Wait for the download to finish then install the package with dpkg sudo apt install ./chefdk_$VER-1_amd64.deb To use the Chef development kit version of Ruby as the default Ruby, you’ll need to edit your $PATH and GEM environment variables to include paths to the Chef development kit. For Bash use: echo 'eval "$(chef shell-init bash)"' >> ~/.bash_profile bash and ~/.bash_profile represent name of the shell and its configuration file. If you’re using zsh shell, then run: echo 'eval "$(chef shell-init zsh)"' >> ~/.zshrc Source your .rc file and check the ruby location. $ source ~/.zshrc #or $ source ~/.bash_profile Installation of Chef Development Kit will provide the following command line tools: chef chef-apply chef-client chef-shell chef-solo chef-vault Click on the item link to learn more about what it does, and how it works. More ChefDK setup guides are available on Chef Documentation page. Install Chef Workstation from .deb package Chef Workstation gives you everything you need to get started with Chef. Start scanning and configuring your environments today with InSpec and chef-run. Check the latest version from the Downloads page Ubuntu 20.04: VER="21.12.720" wget https://packages.chef.io/files/stable/chef-workstation/$VER/ubuntu/20.04/chef-workstation_$VER-1_amd64.deb Ubuntu 18.04: VER="21.12.720" wget https://packages.chef.io/files/stable/chef-workstation/$VER/ubuntu/18.04/chef-workstation_$VER-1_amd64.deb Install the package: sudo apt install ./chef-workstation_$VER-1_amd64.deb Thanks for using our guide to install Chef Workstation / Chef Development Kit.
0 notes
Text
Sdk For Mac Download

The 13.3.0 version of Parallels Virtualization SDK for Mac is provided as a free download on our software library. The application lies within Developer Tools, more precisely IDE. This free Mac app is an intellectual property of Parallels International GmbH.
Software Description: Hikvision Card Windows SDK V6.0 supports to develop software for DS-4200, DS-4100 & DS-4000 series card under the Windows environment. It contains SDK.
Bonjour, also known as zero-configuration networking, enables automatic discovery of devices and services on a local network using industry standard IP protocols. Bonjour makes it easy to discover, publish, and resolve network services with a sophisticated, easy-to-use programming interface that is accessible from Cocoa, Ruby, Python, and other languages.
The Dart SDK has the libraries and command-line tools that you need to develop Dart command-line, server, and non-Flutter web apps. For details, see the Dart SDK overview. As of Flutter 1.21, the Flutter SDK includes the full Dart SDK. So if you have Flutter installed, you might not need to explicitly download the Dart SDK.
-->
In this article, you'll learn how to install .NET Core on macOS. .NET Core is made up of the runtime and the SDK. The runtime is used to run a .NET Core app and may or may not be included with the app. The SDK is used to create .NET Core apps and libraries. The .NET Core runtime is always installed with the SDK.
The latest version of .NET Core is 3.1.
Supported releases
The following table is a list of currently supported .NET Core releases and the versions of macOS they're supported on. These versions remain supported either the version of .NET Core reaches end-of-support.
A ✔️ indicates that the version of .NET Core is still supported.
A ❌ indicates that the version of .NET Core isn't supported.
Operating System.NET Core 2.1.NET Core 3.1.NET 5 PreviewmacOS 10.15 'Catalina'✔️ 2.1 (Release notes)✔️ 3.1 (Release notes)✔️ 5.0 Preview (Release notes)macOS 10.14 'Mojave'✔️ 2.1 (Release notes)✔️ 3.1 (Release notes)✔️ 5.0 Preview (Release notes)macOS 10.13 'High Sierra'✔️ 2.1 (Release notes)✔️ 3.1 (Release notes)✔️ 5.0 Preview (Release notes)macOS 10.12 'Sierra'✔️ 2.1 (Release notes)❌ 3.1 (Release notes)❌ 5.0 Preview (Release notes)

Unsupported releases
The following versions of .NET Core are ❌ no longer supported. The downloads for these still remain published:
3.0 (Release notes)
2.2 (Release notes)
2.0 (Release notes)
Runtime information
The runtime is used to run apps created with .NET Core. When an app author publishes an app, they can include the runtime with their app. If they don't include the runtime, it's up to the user to install the runtime.
There are three different runtimes you can install on macOS:
ASP.NET Core runtime Microsoft expression media for mac. Runs ASP.NET Core apps. Includes the .NET Core runtime.
.NET Core runtime This runtime is the simplest runtime and doesn't include any other runtime. It's highly recommended that you install ASP.NET Core runtime for the best compatibility with .NET Core apps.
SDK information
The SDK is used to build and publish .NET Core apps and libraries. Installing the SDK includes both runtimes: ASP.NET Core and .NET Core.
Dependencies
.NET Core is supported on the following macOS releases:
.NET Core VersionmacOSArchitectures3.1High Sierra (10.13+)x64More information3.0High Sierra (10.13+)x64More information2.2Sierra (10.12+)x64More information2.1Sierra (10.12+)x64More information

Beginning with macOS Catalina (version 10.15), all software built after June 1, 2019 that is distributed with Developer ID, must be notarized. This requirement applies to the .NET Core runtime, .NET Core SDK, and software created with .NET Core.
The installers for .NET Core (both runtime and SDK) versions 3.1, 3.0, and 2.1, have been notarized since February 18, 2020. Prior released versions aren't notarized. If you run a non-notarized app, you'll see an error similar to the following image:
For more information about how enforced-notarization affects .NET Core (and your .NET Core apps), see Working with macOS Catalina Notarization.
libgdiplus

.NET Core applications that use the System.Drawing.Common assembly require libgdiplus to be installed.
An easy way to obtain libgdiplus is by using the Homebrew ('brew') package manager for macOS. After installing brew, install libgdiplus by executing the following commands at a Terminal (command) prompt:
Install with an installer
Android Sdk Download Mac
macOS has standalone installers that can be used to install the .NET Core 3.1 SDK:
Download and manually install
As an alternative to the macOS installers for .NET Core, you can download and manually install the SDK and runtime. Manual install is usually performed as part of continuous integration testing. For a developer or user, it's generally better to use an installer.
If you install .NET Core SDK, you don't need to install the corresponding runtime. First, download a binary release for either the SDK or the runtime from one of the following sites:
Quick tip about Basilisk II if you do not have a real old Mac: it even reads high density Mac floppy disks using a normal PC floppy drive! I salvaged many old files using it while 5 different Windows apps failed at the task. I highly recommend backing up all your floppy disks using Basilisk II before it's too late! Non-profit organization serving the online community by providing old versions of various programs. Download latest (newest) and older versions of free software. OldApps is the largest software archive. Safe and fast downloads for Windows, Mac and Linux apps. If you’re looking for old Mac software, there are a number of sites on the interwebs that are worth checking out: Macintosh Garden – great site for old Mac games, system software and abandoned applications Rescue My Classic Mac – old Macintosh boot floppies and applications available for purchase Macintosh Repository – a sanctuary for old software of the classic Mac OS era. https://fancytravelerkryptonite.tumblr.com/post/642762066932924417/old-app-for-mac. OldVersion.com provides free. software downloads for old versions of programs, drivers and games. So why not downgrade to the version you love? Because newer is not always bett.
✔️ .NET 5.0 preview downloads
✔️ .NET Core 3.1 downloads
✔️ .NET Core 2.1 downloads
Next, extract the downloaded file and use the export command to set variables used by .NET Core and then ensure .NET Core is in PATH.

To extract the runtime and make the .NET Core CLI commands available at the terminal, first download a .NET Core binary release. Then, open a terminal and run the following commands from the directory where the file was saved. The archive file name may be different depending on what you downloaded.
Use the following command to extract the runtime:
Use the following command to extract the SDK:
Tip
The preceding export commands only make the .NET Core CLI commands available for the terminal session in which it was run.
You can edit your shell profile to permanently add the commands. There are a number of different shells available for Linux and each has a different profile. For example:
Bash Shell: ~/.bash_profile, ~/.bashrc
Korn Shell: ~/.kshrc or .profile
Z Shell: ~/.zshrc or .zprofile
Edit the appropriate source file for your shell and add :$HOME/dotnet to the end of the existing PATH statement. If no PATH statement is included, add a new line with export PATH=$PATH:$HOME/dotnet.
Also, add export DOTNET_ROOT=$HOME/dotnet to the end of the file.
This approach lets you install different versions into separate locations and choose explicitly which one to use by which application.
Install with Visual Studio for Mac
Visual Studio for Mac installs the .NET Core SDK when the .NET Core workload is selected. To get started with .NET Core development on macOS, see Install Visual Studio 2019 for Mac. For the latest release, .NET Core 3.1, you must use the Visual Studio for Mac 8.4.
Install alongside Visual Studio Code
Visual Studio Code is a powerful and lightweight source code editor that runs on your desktop. Visual Studio Code is available for Windows, macOS, and Linux.
While Visual Studio Code doesn't come with an automated .NET Core installer like Visual Studio does, adding .NET Core support is simple.
Download and install Visual Studio Code.
Download and install the .NET Core SDK.
Install the C# extension from the Visual Studio Code marketplace.
Install with bash automation
The dotnet-install scripts are used for automation and non-admin installs of the runtime. You can download the script from the dotnet-install script reference page.
The script defaults to installing the latest long term support (LTS) version, which is .NET Core 3.1. You can choose a specific release by specifying the current switch. Include the runtime switch to install a runtime. Otherwise, the script installs the SDK.
Android Sdk Download Zip
Note
The command above installs the ASP.NET Core runtime for maximum compatability. The ASP.NET Core runtime also includes the standard .NET Core runtime.
Android Sdk For Mac
Docker
Containers provide a lightweight way to isolate your application from the rest of the host system. Containers on the same machine share just the kernel and use resources given to your application.
.NET Core can run in a Docker container. Official .NET Core Docker images are published to the Microsoft Container Registry (MCR) and are discoverable at the Microsoft .NET Core Docker Hub repository. Each repository contains images for different combinations of the .NET (SDK or Runtime) and OS that you can use.
Microsoft provides images that are tailored for specific scenarios. For example, the ASP.NET Core repository provides images that are built for running ASP.NET Core apps in production.
For more information about using .NET Core in a Docker container, see Introduction to .NET and Docker and Samples.
Android Sdk For Mac Download
Next steps
Android Sdk Mac Os
How to check if .NET Core is already installed.
Working with macOS Catalina notarization.
Tutorial: Get started on macOS.
Tutorial: Create a new app with Visual Studio Code.
Tutorial: Containerize a .NET Core app.
0 notes
Text
Configuring and using Oracle Connection Manager on Amazon EC2 for Amazon RDS for Oracle
This post describes how to configure Oracle Connection Manager on Amazon Elastic Compute Cloud (Amazon EC2) in an Amazon RDS for Oracle environment, and introduces some best practice use cases when using Oracle Connection Manager on Amazon EC2. Some customers want to have a database proxy server that forwards database connection traffic to Amazon RDS for Oracle and gives some additional controls over database sessions. Specifically, they want to have more control over specific database connections between on-premises servers and Amazon RDS for Oracle. Many on-premises firewalls allow communication between on-premises servers and cloud databases only through static IP addresses that were registered in the firewall before communication. You can also address the requirement by implementing Oracle Connection Manager. The following diagram shows a conceptual architecture regarding these requirements. Introduction of Oracle Connection Manager Oracle Connection Manager is a database proxy server that forwards connection requests to Oracle databases or other proxy servers. If you configure Oracle Connection Manager on Amazon EC2 for Amazon RDS for Oracle, you can utilize useful features such as access control and session timeout. In addition, Oracle Connection Manager on Amazon EC2 can enable some clients to connect to Amazon RDS for Oracle with non-changing static IP addresses while IP addresses of Amazon RDS for Oracle change. Also, Oracle Connection Manager can support a different database service port other than the original service port of an Amazon RDS for Oracle service port in a situation where you need to hide the Oracle Database service port toward certain programs for security reasons. However, not all features of Oracle Connection Manager are supported in Amazon RDS for Oracle. In the Amazon RDS environment, you aren’t allowed to log in to the operation system of Amazon RDS, so some of Oracle parameters can’t be modified. Some features of Oracle Connection Manager are supported only by modifying the REMOTE_LISTENER initialization parameter or only by modifying Oracle Database Server configuration files such as listener.ora or tnsnames.ora. These features of Oracle Connection Manager that require logging in to the operation system aren’t supported in Amazon RDS for Oracle. In addition, because Oracle Connection Manager is only supported in Oracle Enterprise Edition, the features of Oracle Connection Manager mentioned in this post are only available in Amazon RDS for Oracle Enterprise Edition. Overview of testing architecture In this post, I demonstrate how to use Oracle Connection Manager by implementing the common requirements based on a simple architecture of Amazon RDS for Oracle. The following diagram illustrates this architecture. Amazon RDS for Oracle is configured with Multi-AZ. Amazon RDS has a DNS endpoint with which Oracle Connection Manager installed on Amazon EC2 connects to Amazon RDS for Oracle. Oracle Connection Manager is installed on Amazon EC2 and redirects incoming Oracle Client traffic to Amazon RDS for Oracle. Oracle Instant Client is installed on Amazon EC2 and is used for connection testing on Amazon RDS for Oracle and Oracle Connection Manager. Prerequisites If you want to verify the features of Oracle Connection Manager by using the preceding architecture, you must complete the following prerequisites: Prepare an Amazon Virtual Private Cloud (Amazon VPC) for this demo architecture with following requirement: IPv4 CIDR block of the VPC set as 10.0.0.0/16. Create subnets on the VPC with following requirements: A public subnet. Two private subnets, where each private subnet resides on each Availability Zone. Create Amazon RDS for Oracle on the created private subnets with following requirements: Database should be selected as Oracle 19c Enterprise Edition because Oracle Connection Manager is only supported on Oracle Enterprise Edition. Also, you should have an Oracle Enterprise Edition license because Amazon RDS for Oracle Enterprise Edition only supports the bring your own license (BYOL) model. Amazon EC2 type can be selected as db.t3.small because db.t3.small is the smallest type that Amazon RDS for Oracle supports. For the security group of Amazon RDS for Oracle, port 1521 should be open toward 10.0.0.0/16 CIDR for accepting Oracle Client connection. Prepare Amazon EC2 with Oracle Linux 7 on the public subnet with following requirements. This EC2 instance is used for Oracle Connection Manager EC2. You can use community Amazon Machine Images (AMIs) for Oracle Linux 7. Use the AWS Free Tier-eligible t2.micro as the instance type. Amazon Elastic Block Store (Amazon EBS) size should be 10 GB or more for Oracle Client installation. For the security group, port 22 should be open for terminal access from the internet. Prepare Amazon EC2 with Amazon Linux AMI on the public subnet with following requirements. This is used for Oracle Instant Client EC2. Use the AWS Free Tier-eligible t2.micro as the instance type. For security group, port 22 should be open for terminal access from the internet. The rest of values for Amazon EC2 can be set as default values. Prepare an Oracle login account, which is required when downloading Oracle installation files and a JDBC jar file. Cost might be incurred because all resources described here are not under the AWS Free Tier. For more information about cost, see AWS Pricing. Configuring Oracle Connection Manager on an EC2 instance In this section, I show you how to configure Oracle Connection Manager on the prepared Oracle Linux EC2 instance. To do that, I explain how to install Connection Manager by using Oracle Client installation procedures. Then I demonstrate how to configure cman.ora. Also, I introduce the required steps to open a firewall and security group. Installing CMAN As a first step, you need to install Oracle Connection Manager on Amazon EC2. You use the previously prepared Oracle Linux EC2 for the Oracle Connection Manager. Complete the following steps: Download the Oracle Client installation binary to your local computer (requires an Oracle login account). Upload the downloaded binaries to the /tmp directory of Oracle Linux 7 EC2 using the following style scp command: scp -i path/to/key LINUX.X64_193000_client.zip [email protected]:/tmp Log in as the root user to Oracle Connection Manager EC2 and install the related packages and settings for Oracle Client installation: yum install oracle-database-preinstall-19c.x86_64 As the root user, make a directory for installation and grant its ownership to the Oracle user: mkdir /u01 chown oracle:oinstall /u01 Log in as the oracle user. Install Oracle Client including the CMAN module (network.cman:19.0.0.0.0) by running following commands sequentially: # prepare Oracle install directory export INSTALL_HOME=/u01 mkdir -p /u01/app/oracle/product/client19300 # unzip the install binaries for Oracle Client mkdir -p $INSTALL_HOME/stage cd $INSTALL_HOME/stage cp /tmp/LINUX.X64_193000_client.zip . unzip LINUX.X64_193000_client.zip # prepare the client install response file as follows cat < $INSTALL_HOME/stage/clientinstall.rsp oracle.install.responseFileVersion=/oracle/install/rspfmt_clientinstall_response_schema_v19.0.0 ORACLE_HOSTNAME=$(hostname) UNIX_GROUP_NAME=oinstall INVENTORY_LOCATION=/u01/app/oraInventory SELECTED_LANGUAGES=en ORACLE_HOME=/u01/app/oracle/product/client19300 ORACLE_BASE=/u01/app/oracle oracle.install.client.installType=Custom oracle.install.client.customComponents="oracle.sqlplus:19.0.0.0.0","oracle.network.client:19.0.0.0.0","oracle.network.cman:19.0.0.0.0","oracle.network.listener:19.0.0.0.0" EOF # install client with silent mode $INSTALL_HOME/stage/client/runInstaller -silent -responseFile $INSTALL_HOME/stage/clientinstall.rsp ORACLE_HOME_NAME=client19300 Log in as the root user again. Run the finalizing scripts of Oracle Client installation: # finish the install /u01/app/oraInventory/orainstRoot.sh /u01/app/oracle/product/client19300/root.sh Log in as oracle and configure .bash_profile as in the following code. It is required to run Oracle utilities such as sqlplus on an Oracle user terminal session. ## for Oracle Client export ORACLE_HOME=/u01/app/oracle/product/client19300 export PATH=$PATH:$ORACLE_HOME/bin Test cmctl by running following command: $ cmctl CMCTL for Linux: Version 19.0.0.0.0 - Production on 06-OCT-2020 00:34:01 Copyright (c) 1996, 2019, Oracle. All rights reserved. Welcome to CMCTL, type "help" for information. CMCTL> CMCTL> exit If you encounter any errors, you can find some reasons for these errors by looking into the CMAN log files, which are located in the /u01/app/oracle/diag/netcman/ip-xx-xx-xx-xx/cman_1/trace directory. Configuring cman.ora You now configure cman.ora by using the previously installed Connection Manager. The easiest way to configure cman.ora is to use the sample cman.ora file that is provided in the sample directory of $ORACLE_HOME/network/admin. Log in as oracle to Oracle Connection Manager EC2. Copy the $ORACLE_HOME/network/admin/samples/cman.ora sample file to the directory of $ORACLE_HOME/network/admin/, which is an Oracle network home directory: cp $ORACLE_HOME/network/admin/samples/cman.ora $ORACLE_HOME/network/admin/ Identify the IP address of Oracle Connection Manager EC2. You can use the ifconfig OS command as follows: $ ifconfig ens5: flags=4163 mtu 9001 inet 10.0.0.89 netmask 255.255.255.0 broadcast 10.0.0.255 inet6 fe80::66:7fff:fe15:4d prefixlen 64 scopeid 0x20 ether 02:66:7f:15:00:4d txqueuelen 1000 (Ethernet) RX packets 227122 bytes 1254800996 (1.1 GiB) RX errors 0 dropped 0 overruns 0 frame 0 TX packets 66076 bytes 5849839 (5.5 MiB) TX errors 0 dropped 0 overruns 0 carrier 0 collisions 0 Configure the CMAN alias, host IP, and port in the cman.ora file by the identified IP address. Open the cman.ora file in the $ORACLE_HOME/network/admin directory by using the vi command. Configure CMAN alias as cman_1 like the first line of the # CMAN Alias section in the file in the following code. Configure the host IP address as the identified EC2 IP address in the previous step like the following code. The host IP configuration exists in the first line of the # Listening address of the CMAN section of the file. Configure the port as 1521 like the following code. The port configuration also exists in the first line of the # Listening address of the CMAN section of the file. .. skip .. # CMAN Alias cman_1 = (configuration= # Listening address of the CMAN (address=(protocol=tcp)(host=10.0.0.89)(port=1521)) .. skip .. Test the cman.ora configuration by using following code. You can find the configured information from the output of the cmctl command: $ cmctl startup -c cman_1 CMCTL for Linux: Version 19.0.0.0.0 - Production on 06-OCT-2020 00:45:48 Copyright (c) 1996, 2019, Oracle. All rights reserved. Current instance cman_1 is not yet started Connecting to (DESCRIPTION=(address=(protocol=tcp)(host=10.0.0.89)(port=1521))) Starting Oracle Connection Manager instance cman_1. Please wait... CMAN for Linux: Version 19.0.0.0.0 - Production Status of the Instance ---------------------- Instance name cman_1 Version CMAN for Linux: Version 19.0.0.0.0 - Production Start date 06-OCT-2020 00:45:48 Uptime 0 days 0 hr. 0 min. 9 sec Num of gateways started 2 Average Load level 0 Log Level OFF Trace Level OFF Instance Config file /u01/app/oracle/product/client19300/network/admin/cman.ora Instance Log directory /u01/app/oracle/diag/netcman/ip-10-0-0-89/cman_1/alert Instance Trace directory /u01/app/oracle/diag/netcman/ip-10-0-0-89/cman_1/trace The command completed successfully. If you encounter any errors, refer to the CMAN log files, located in the /u01/app/oracle/diag/netcman/ip-xx-xx-xx-xx/cman_1/trace directory. Optionally, when you need to stop this CMAN service, you can run following command by using the CMAN alias name, which was configured in cman.ora: cmctl shutdown -c cman_1 Opening a firewall for Oracle Linux 7 For CMAN to receive incoming traffic, you need to open the service port by using a firewall command because Oracle Linux 7 doesn’t open user-defined ports by default. Log in as the root user to Oracle Connection Manager EC2 and run the following commands to open the 1521/tcp port: # farewalld package install yum install firewalld firewall-config # Make sure the service is started and will auto-start on reboot. systemctl start firewalld.service systemctl enable firewalld.service # open database service port firewall-cmd --permanent --add-port=1521/tcp firewall-cmd --reload Opening a security group Oracle Connect Manager EC2 should be able to receive traffic from Oracle Clients. Therefore, you also need to open the 1521/tcp port from the security group of Oracle Connection Manager EC2. Complete the following steps: On the Amazon EC2 console, in the navigation pane, choose Instances. Choose Oracle Connection Manager EC2. On the Security tab, choose the security group for Oracle Connection Manager EC2. Choose Edit inbound rules. Choose Add rule. For Type, choose Oracle-RDS. For Source, enter 10.0.0.0/16. Choose Save rules. Configuring Oracle Instant Client on EC2 To test the features of Oracle Connection Manager, you need to have an Oracle Client environment. The easiest way to configure Oracle Client is to use Oracle Instant Client. In this section, we configure Oracle Instant Client on the prepared Amazon Linux EC2 and set up the tnsnames.ora configuration file to connect to Amazon RDS for Oracle. Configuring Oracle Instant Client First, you download Oracle Instant Client files and configure these files on the EC2 instance for the EC2 instance to act as Oracle Client. Complete the following steps: Download the Oracle Instant Client .zip files (requires an Oracle login account). You should download the following three .zip files: • instantclient-basic-linux.x64-19.3.0.0.0dbru.zip • instantclient-sqlplus-linux.x64-19.3.0.0.0dbru.zip • instantclient-tools-linux.x64-19.3.0.0.0dbru.zip Log in as ec2-user to the prepared Amazon Linux EC2 and make an oracle directory where Oracle Instant Client is configured: mkdir oracle Upload the three .zip files into the oracle directory of Oracle Instant Client EC2. You can upload the downloaded files from your local computer to the EC2 instance by using the following scp commands: scp -i path/to/key instantclient-basic-linux.x64-19.3.0.0.0dbru.zip [email protected]:/home/ec2-user/oracle scp -i path/to/key instantclient-tools-linux.x64-19.3.0.0.0dbru.zip [email protected]:/home/ec2-user/oracle scp -i path/to/key instantclient-sqlplus-linux.x64-19.3.0.0.0dbru.zip [email protected]:/home/ec2-user/oracle Go the /home/ec2-user/oracle directory and unzip the three files: unzip instantclient-basic-linux.x64-19.3.0.0.0dbru.zip unzip instantclient-sqlplus-linux.x64-19.3.0.0.0dbru.zip unzip instantclient-tools-linux.x64-19.3.0.0.0dbru.zip When the unzip commands are finished, you can see a newly created directory where Oracle Instant Client is installed. You can see this by submitting the ls command on the terminal. The newly created directory became the Oracle Instant Client home directory. In the following code, /home/ec2-user/oracle/instantclient_19_3 is the Oracle Instant Client home directory: $ ls instantclient-basic-linux.x64-19.3.0.0.0dbru.zip instantclient-tools-linux.x64-19.3.0.0.0dbru.zip instantclient-sqlplus-linux.x64-19.3.0.0.0dbru.zip instantclient_19_3 For ec2-user to use Oracle Instant Client, you need to configure .bash_profile in the ec2-user home directory. Open .bash_profile by using the vi command Enter the following environment variables at the end of the file. INSTANT_CLIENT_PATH should match the Oracle Instant Client home directory. # Oracle Instant Client Path export INSTANT_CLIENT_PATH=/home/ec2-user/oracle/instantclient_19_3 # Oracle Configuration Path export PATH=$PATH:$INSTANT_CLIENT_PATH export LD_LIBRARY_PATH=$INSTANT_CLIENT_PATH export TNS_ADMIN=$INSTANT_CLIENT_PATH Apply the .bash_profile configuration to the connected SSH session: . ./.bash_profile Test if sqlplus is working: $ sqlplus SQL*Plus: Release 19.0.0.0.0 - Production on Tue Oct 6 01:03:20 2020 Version 19.3.0.0.0 Copyright (c) 1982, 2019, Oracle. All rights reserved. Enter user-name: If you encounter any error from the sqlplus command, the error usually is related to the wrong path setting of environment variables. In that case, you need to check again whether the path of the Oracle Instant Client is correctly applied to environment variables. Configuring tnsnames.ora Before testing Oracle Connection Manager, you need to verify that Oracle Instant Client connects to Amazon RDS for Oracle successfully by using the tnsnames.ora file. This section describes how to configure tnsnames.ora on Oracle Instant Client and verify connection to Amazon RDS for Oracle. You first locate the Amazon RDS for Oracle hose DNS and service name, which you use to configure the tnsnames.ora file. On the Amazon RDS console, choose the Amazon RDS for Oracle database that you want to connect to. On the Connectivity & security tab, locate the endpoint URL for the database. This endpoint is the Amazon RDS for Oracle host DNS. On the Configuration tab, locate the value under DB name (for this post, ORCL). This is the service name that you can use in the tnsnames.ora file. Go to network administration folder on Oracle Instant Client EC2. Use the following command: cd $INSTANT_CLIENT_PATH/network/admin You configure the tnsnames.ora file by using the identified Amazon RDS for Oracle host DNS and service name in previous step. Open the tnsnames.ora file by using the vi command. Copy the following code and enter it into the tnsnames.ora file. In the HOST section, enter the identified Amazon RDS for Oracle host DNS. In the SERVICE_NAME section, enter the identified service name. ORCL = (DESCRIPTION = (ADDRESS_LIST = (ADDRESS = (PROTOCOL = TCP)(HOST = xxxxxx.xxxxx.xxxxxxx.rds.amazonaws.com)(PORT = 1521)) ) (CONNECT_DATA = (SERVICE_NAME = ORCL) ) ) You can now connect to the Amazon RDS for Oracle database by using the connection entry that you made in the tnsnames.ora file. Enter the following command by using your user name, password, and DB name: $ sqlplus admin/*********@ORCL SQL*Plus: Release 19.0.0.0.0 - Production on Tue Oct 6 01:24:44 2020 Version 19.3.0.0.0 Copyright (c) 1982, 2019, Oracle. All rights reserved. Last Successful login time: Mon Sep 14 2020 09:57:11 +00:00 Connected to: Oracle Database 19c Enterprise Edition Release 19.0.0.0.0 - Production Version 19.8.0.0.0 SQL> If you encounter an error from this command, check whether the 1521/tcp port of Amazon RDS for Oracle is open by using the security group of Amazon RDS for Oracle. Also, verify that the DNS name and service name in the tnsnames.ora file are correctly configured. Best practice use cases of Connection Manager So far, I have explained how to configure Oracle Connection Manager. In this section, I explain the best practice use cases of Oracle Connection Manager based on typical customer requirements. These features include database proxy, session control, and support for additional service ports. Proxy configuration when using Oracle Client To configure database traffic to pass through a designated server for control or management purposes, you can use a database proxy. In this section, I explain how to configure an Oracle Database proxy, which is the most common use case for Oracle Connection Manager. I use the SQLPLUS utility of Oracle Instant Client as a testing agent. Log in as ec2-user to Oracle Instant Client. Go to the network administration directory where tnsnames.ora file exists: cd $INSTANT_CLIENT_PATH/network/admin You now configure tnsnames.ora to use Oracle Connection Manager EC2 as database proxy. Open tnsnames.ora file by using the vi command. Copy the following text, which is the connection route configuration example: (SOURCE_ROUTE=YES) (ADDRESS= (PROTOCOL=TCP)(HOST=)(PORT=1521) ) Enter the copied text into the tnsnames.ora file, under the DESCRIPTION section. Provide the IP address of Oracle Connection Manager EC2. The final output should look similar to the following code: ORCL = (DESCRIPTION = (SOURCE_ROUTE=YES) (ADDRESS= (PROTOCOL=TCP)(HOST=10.0.0.89)(PORT=1521) ) (ADDRESS_LIST = (ADDRESS = (PROTOCOL = TCP)(HOST = xxxxxx.xxxxx.xxxxxxx.rds.amazonaws.com)(PORT = 1521)) ) (CONNECT_DATA = (SERVICE_NAME = ORCL) ) ) Test if sqlplus connects to Amazon RDS for Oracle by using Oracle Connection Manager EC2: $ sqlplus admin/*********@ORCL SQL*Plus: Release 19.0.0.0.0 - Production on Tue Oct 6 01:48:37 2020 Version 19.3.0.0.0 Copyright (c) 1982, 2019, Oracle. All rights reserved. Last Successful login time: Tue Oct 06 2020 01:24:44 +00:00 Connected to: Oracle Database 19c Enterprise Edition Release 19.0.0.0.0 - Production Version 19.8.0.0.0 SQL> From the output from the command, you need to verify that sqlplus is using Oracle Connection Manager EC2. Without exiting this sqlplus session, open another SSH terminal and connect to Oracle Connection Manager EC2. Enter the following code: [oracle@ip-10-0-0-89 ~]$ netstat -an | grep 1521 tcp 0 0 10.0.0.89:1521 0.0.0.0:* LISTEN tcp 0 0 10.0.0.89:59202 10.0.0.89:1521 ESTABLISHED tcp 0 0 10.0.0.89:1521 10.0.0.89:59202 ESTABLISHED tcp 0 0 10.0.0.89:1521 10.0.0.100:52726 ESTABLISHED tcp 0 0 10.0.0.89:60028 10.0.1.24:1521 ESTABLISHED [oracle@ip-10-0-0-89 ~]$ As you can see from the result, sqlplus Oracle Instant Client [10.0.0.100:52726] is connecting to Oracle Connection Manager EC2 [10.0.0.89:1521]. Also, Oracle Connection Manager EC2 [10.0.0.89:60028] is connecting to the Amazon RDS for Oracle server [10.0.1.24:1521]. The connected sqlplus session is using Oracle Connection Manager EC2 as an Oracle Database proxy client. Proxy configuration for JDBC thin driver Many applications run based on Java. If you use a thin JDBC driver when connecting to an Oracle database in Java, you can’t make database traffic passes through Oracle Connection Manager by configuring Oracle Client. In this section, I show you how to use Oracle Connection Manager EC2 as a database proxy client even when you use a JDBC thin driver. Because the Oracle JDBC thin driver doesn’t depend on the tnsnames.ora setting, you need to find another way to use the database proxy. Fortunately, because the Oracle JDBC thin driver supports a description-based URL path, you can use this feature to utilize Oracle Connection Manager. Instead of the normal JDBC connection string, use the following style JDBC connection string: jdbc:oracle:thin:@(description=(SOURCE_ROUTE=YES)(ADDRESS=(PROTOCOL=TCP)(HOST=)(PORT=1521))(address=(HOST=)(protocol=tcp)(port=1521))(connect_data=(SERVICE_NAME=))) When you use this description as database proxy configuration, you need to modify the following parts by using your connection information: Your IP address of Oracle Connection Manager EC2 Your DNS of Amazon RDS for Oracle The service name of Amazon RDS for Oracle To use Oracle Connection Manager by using a Java program, complete the following steps: Download the Oracle JDBC driver file (requires an Oracle login account). Upload the ojdbc8.jar file into the Oracle Instant Client EC2 home directory: scp -i path/to/key ojdbc8.jar [email protected]:/home/ec2-user Log in as ec2-user to Oracle Instant Client EC2. In the home directory of ec2-user, create the java file by using the vi command. Enter the following Java script. In the conn section, change the connection information with previous description-based URL path. import java.sql.*; import java.io.*; import java.util.*; class DbConnect { Connection conn = null ; public static void main(String[] args) { DbConnect a = new DbConnect(); a.connect(); } public void connect() { try { dbConnect(); Statement stmt = conn.createStatement(); ResultSet rs = null; String sql = "select dbid, name from V$database" ; Console cnsl = System.console(); rs = stmt.executeQuery(sql); while(rs.next()) { System.out.println( "-- Result : [COL1] => " + rs.getString(1) + ", [COL2] => " + rs.getString(2) ); String readStr = cnsl.readLine( "Enter string : "); } stmt.close(); rs.close(); dbDisconnect(); } catch( Exception e ) { e.printStackTrace(); } } public void dbConnect() { try { Class.forName("oracle.jdbc.driver.OracleDriver"); conn = DriverManager.getConnection("jdbc:oracle:thin:@(description=(SOURCE_ROUTE=YES)(ADDRESS=(PROTOCOL=TCP)(HOST=)(PORT=1521))(address=(HOST=)(protocol=tcp)(port=1521))(connect_data=(SERVICE_NAME=)))","admin","**********"); } catch( Exception e ) { System.out.println( "Connect Exception : " + e ); System.exit(0); } } public void dbDisconnect() { try { conn.close(); } catch( Exception e ) { System.out.println( "Disconnect Exception : " + e ); } } } Configure CLASSPATH and compile and run the Java program: export CLASSPATH=.:/home/ec2-user/ojdbc8.jar javac DbConnect.java java DbConnect The Java program returns a record and is waiting for user input from command line. This is because the readLine() function of Java was used for the purpose of not exiting the database connection. See the following code: $ java DbConnect -- Result : [COL1] => 1576657990, [COL2] => ORCL Enter string : Log in to Oracle Connection Manager EC2 using another SSH terminal to verify that the connection is using Oracle Connection Manager. Enter the following netstat The output shows that the JDBC program [10.0.0.100] is connecting to Oracle Connection Manager EC2 [10.0.0.89] and Oracle Connection Manager EC2 [10.0.0.89] is connecting to Amazon RDS for Oracle [10.0.1.24]. [oracle@ip-10-0-0-89 ~]$ netstat -an | grep 1521 tcp 0 0 10.0.0.89:1521 0.0.0.0:* LISTEN tcp 0 0 10.0.0.89:59202 10.0.0.89:1521 ESTABLISHED tcp 0 0 10.0.0.89:1521 10.0.0.89:59202 ESTABLISHED tcp 0 0 10.0.0.89:60426 10.0.1.24:1521 ESTABLISHED tcp 0 0 10.0.0.89:1521 10.0.0.100:52732 ESTABLISHED [oracle@ip-10-0-0-89 ~]$ This demonstrates that JDBC traffic can be rerouted by using Oracle Connection Manager EC2. Access control for source IP address You can use Oracle Connection Manager for database traffic management or control purposes. Because Oracle Connection Manager can perform IP-based access control, administrators can use Oracle Connection Manager to allow database access only from specific IP addresses. In this section, we enable Oracle Connection Manager to allow traffic from a specific IP address. Log in as oracle to Oracle Connection Manager EC2. Go to the Oracle network administration directory: cd $ORACLE_HOME/network/admin Open the cman.ora file by using the vi command. Delete the existing rule_list section and enter the following configuration text. In the text, you should change the first src= part with IP address that should be allowed. The act= part should remain as accept, which means allowing the traffic. In the following code, only 10.0.0.100/32 IP address are allowed to use Oracle Connection Manager: (rule_list= (rule= (src=10.0.0.100/32)(dst=*)(srv=*)(act=accept) (action_list=(aut=off)(moct=0)(mct=0)(mit=0)(conn_stats=on)) ) (rule=(src=ip-10-0-0-89)(dst=127.0.0.1)(srv=cmon)(act=accept)) ) Restart cmctl to make cman.ora reflect the configuration: cmctl shutdown -c cman_1 cmctl startup -c cman_1 To check whether it has been applied, log in as ec2-user to Oracle Instant Client EC2, which has 10.0.0.100/32 IP address. Enter the following sqlplus command: [ec2-user@ip-10-0-0-100 admin]$ sqlplus admin/********@ORCL SQL*Plus: Release 19.0.0.0.0 - Production on Fri Oct 16 01:13:18 2020 Version 19.3.0.0.0 Copyright (c) 1982, 2019, Oracle. All rights reserved. Last Successful login time: Fri Oct 16 2020 01:11:49 +00:00 Connected to: Oracle Database 19c Enterprise Edition Release 19.0.0.0.0 - Production Version 19.8.0.0.0 SQL> SQL> exit Disconnected from Oracle Database 19c Enterprise Edition Release 19.0.0.0.0 - Production Version 19.8.0.0.0 [ec2-user@ip-10-0-0-100 admin]$ The result confirms that the client with 10.0.0.100/32 is allowed to connect to Amazon RDS for Oracle by using Oracle Connection Manager EC2. You can also test whether the specific IP address can be rejected with Oracle Connection Manager EC2. Repeat the previous steps but use the following rejecting rule. In the act= section, change allow to reject: (rule_list= (rule= (src=10.0.0.100/32)(dst=*)(srv=*)(act=reject) (action_list=(aut=off)(moct=0)(mct=0)(mit=0)(conn_stats=on)) ) (rule=(src=ip-10-0-0-89)(dst=127.0.0.1)(srv=cmon)(act=accept)) ) After applying this configuration, you can try to connect to Amazon RDS for Oracle with the following command: [ec2-user@ip-10-0-0-100 admin]$ sqlplus admin/*******@ORCL SQL*Plus: Release 19.0.0.0.0 - Production on Fri Oct 16 01:40:16 2020 Version 19.3.0.0.0 Copyright (c) 1982, 2019, Oracle. All rights reserved. ERROR: ORA-12529: TNS:connect request rejected based on current filtering rules Enter user-name: The output shows that the connection was rejected. Access control for idle timeout Idle database connections occupy database resources unnecessarily. You can use Oracle Connection Manager to control these idle database connections. Oracle Connection Manager can close the database connection if the session idles for more than a certain period of time. You can use the feature by using the mit value of action_list in the Oracle Connection Manager configuration. To do so, repeat the previously described steps, but use the following rule_list, which applies mit=10. This means that the session automatically stops when the session idles for more than 10 seconds. (rule_list= (rule= (src=10.0.0.100/32)(dst=*)(srv=*)(act=accept) (action_list=(aut=off)(moct=0)(mct=0)(mit=10)(conn_stats=on)) ) (rule=(src=ip-10-0-0-89)(dst=127.0.0.1)(srv=cmon)(act=accept)) ) Let’s test how it works after applying the setting. First, connect to Amazon RDS for Oracle with the sqlplus command. If you try to run a simple SQL more than 10 seconds after login, you encounter an Oracle connection error. See the following code: [ec2-user@ip-10-0-0-100 admin]$ sqlplus admin/******@ORCL SQL*Plus: Release 19.0.0.0.0 - Production on Fri Oct 16 01:47:37 2020 Version 19.3.0.0.0 Copyright (c) 1982, 2019, Oracle. All rights reserved. Last Successful login time: Fri Oct 16 2020 01:44:06 +00:00 Connected to: Oracle Database 19c Enterprise Edition Release 19.0.0.0.0 - Production Version 19.8.0.0.0 SQL> SQL> select * from dual; select * from dual * ERROR at line 1: ORA-03113: end-of-file on communication channel Process ID: 15708 Session ID: 639 Serial number: 2460 As shown in this example, Oracle Connection Manager EC2 can be useful when you want to control idle time of database sessions. Support for additional service ports for Amazon RDS for Oracle When using Amazon RDS for Oracle, you only have one service port. However, you may have to provide another port instead of the original service port for a specific application for security reasons, such as hiding the original database service port. You can use Oracle Connection Manager to provide an additional database service port other than the original port. To do so, you provide an additional 1630/tcp port service through Oracle Connection Manager instead of the 1521/tcp port. You first change the service port of Oracle Connection Manager EC2. Log in as oracle user to Oracle Connection Manager EC2. Go to the network administration directory. Open cman.ora by using the vi command. Change the cman service port from 1521 to 1630. You can do this by changing the port= part of the cman.ora file: # CMAN Alias cman_1 = (configuration= # Listening address of the CMAN (address=(protocol=tcp)(host=10.0.0.89)(port=1630)) # Configuration parameters of this CMAN (parameter_list = # Need authentication for connection? # Valid values: boolean values for on/off Restart cmctl with the following code: cmctl shutdown -c cman_1 cmctl startup -c cman_1 The CMAN is listening to 1630 from now on. Because Oracle Linux 7 doesn’t open the user-defined port by default, you need to open the 1630/tcp port on Oracle Connection Manager EC2. Log in as the root user to Oracle Connection Manager EC2 Enter the following commands: firewall-cmd --permanent --add-port=1630/tcp firewall-cmd --reload Next, you modify a security group rule of Oracle Connection Manager EC2 to serve the 1630/tcp port. On the Amazon EC2 console, choose Instances. Choose Oracle Connection Manager EC2. On the Security tab of the selected instance, choose the security group of the EC2 instance. Choose Edit inbound rules. Add 1630/tcp port entry for 10.0.0.0/16 CIDR. You now modify the TNS entry in the tnsnames.ora file. Log in as ec2-user to Oracle Instant Client EC2. In the network administration directory, open the tnsnams.ora file with the vi command. Modify the database proxy service port from 1521 to 1630 in the database proxy section, which is two lines below the SOURCE_ROUTE=YES description text: ORCL = (DESCRIPTION = (SOURCE_ROUTE=YES) (ADDRESS= (PROTOCOL=TCP)(HOST=10.0.0.89)(PORT=1630) ) (ADDRESS_LIST = (ADDRESS = (PROTOCOL = TCP)(HOST = xxxxx.xxxxx.xxxxx.rds.amazonaws.com)(PORT = 1521)) ) (CONNECT_DATA = (SERVICE_NAME = ORCL) Check if you can connect to Oracle Database by using the following command: [ec2-user@ip-10-0-0-100 admin]$ sqlplus admin/*******@ORCL SQL*Plus: Release 19.0.0.0.0 - Production on Fri Oct 16 07:06:36 2020 Version 19.3.0.0.0 Copyright (c) 1982, 2019, Oracle. All rights reserved. Last Successful login time: Fri Oct 16 2020 02:12:18 +00:00 Connected to: Oracle Database 19c Enterprise Edition Release 19.0.0.0.0 - Production Version 19.8.0.0.0 SQL> select * from dual; D - X SQL> You see that connection is established successfully. You can now verify that you’re connecting Oracle Connection Manager by using newly configured 1630 port. Log in as oracle user to Oracle Connection Manager EC2. Run the following netstat Oracle Instant Client (10.0.0.100) is connecting Oracle Connection Manager EC2 (10.0.0.89:1630) by using 1630/tcp port. Also, Oracle Connection Manager EC2 (10.0.0.89:22698) is connecting to Oracle RDS (10.0.1.24:1521). [oracle@ip-10-0-0-89 ~]$ netstat -an | egrep "1630|1521" tcp 0 0 10.0.0.89:1630 0.0.0.0:* LISTEN tcp 0 0 10.0.0.89:22698 10.0.1.24:1521 ESTABLISHED tcp 0 0 10.0.0.89:1630 10.0.0.100:39126 ESTABLISHED tcp 0 0 10.0.0.89:1630 10.0.0.89:28762 ESTABLISHED tcp 0 0 10.0.0.89:28762 10.0.0.89:1630 ESTABLISHED [oracle@ip-10-0-0-89 ~]$ This example showed that you can give additional database service ports to the client by using Oracle Connection Manager EC2, which is useful when you need to hide the original Oracle database service port. Conclusion In this post, I showed how to configure Oracle Connection Manager EC2 when you have to use Amazon RDS for Oracle. In addition, I explained various best practice use cases that can utilize Oracle Connection Manager EC2, such as database proxy, session control, and support for additional service ports. Security groups also support IP-based session control. However, you may have some security applications or staff that have to control database sessions and don’t have modification privileges for security groups. In that situation, you can use Oracle Connection Manager EC2 to conduct database access control. About the Author Byeong-eok Kang is a Solutions Architect at AWS. He specializes in databases and has a deep understanding of the finance industry. Outside of work, he likes riding his bike and playing with his cat. https://aws.amazon.com/blogs/database/configuring-and-using-oracle-connection-manager-on-amazon-ec2-for-amazon-rds-for-oracle/
0 notes
Text
4 Command-line tools for more Python productivity

Hi there folks. In this post I would be sharing a couple of command-line tools which can help to increase your python productivity. These tools have helped me a lot and might help you as well! This post is inspired by another post. ## IPython IPython is the Python REPL on steroids. It has some really nice editions on top of the standard REPL. I am sure that if you use it once you will fall in love with it. The easiest way to install IPython is using pip: $ pip install ipython Now you can use it by typing this in your terminal: $ ipython You can read more about the nice features and tricks of IPython over here. You can also automatically import modules when you enter the Python or IPython interpreter. Here is the Stackoverflow link which shows you how to do it. more information. ## Autoenv This is a simple tool built by Kenneth Reitz. It allows you to automatically activate your projects virtual environment. You can install it using pip: $ pip install autoenv You can also use git: $ git clone git://github.com/kennethreitz/autoenv.git ~/.autoenv $ echo 'source ~/.autoenv/activate.sh' >> ~/.bashrc And if you are on Mac OSX then Homebrew is also an option: $ brew install autoenv $ echo 'source /usr/local/opt/autoenv/activate.sh' >> ~/.bash_profile What you have to do is make a file with the name of .env in your projects directory. The contents of that file will be somewhat like this: # .env source Read the full article
0 notes