#bashrc edit
Explore tagged Tumblr posts
Visit Tumblr Blog
Explore Tumblr blogs with no restrictions, modern design and the best experience.
Last Seen Tumblr Blogs


Fun Fact
There are dozens of funny blogs to kill time on Tumblr.
Text
Linux CLI 25 🐧 Prompt Customization
New Post has been published on https://tuts.kandz.me/linux-cli-25-%f0%9f%90%a7-prompt-customization/
Linux CLI 25 🐧 Prompt Customization

youtube
a - prompt customization intro you can customize cli prompt by editing the PS1 variable for permanent changes edit nano ~/.bashrc for BASH ~/.zshrc for Zsh and ~/.config/fish/config.fish for Fish example ��� PS1="TestPrompt " export PS1 and then to apply changes source ~/.bashrc but you can test and play with it temporarily by editing the PS1 on the terminal example to only show the username → PS1="\u " b - prompt escape codes Most common escape codes for shell prompt \d → current date \H → full hostname \h → hostname \n → new line character \r → carriage return \t → time in 24 hour format \@ → time in 12 hour format with AM/PM \u → username \w → working directory \W → last part of the working directory \! → history id of the command \[ → start of non-printing character sequence ]\ → end for char sequence example → shows username - working directory last c - prompt colors codes List of colors: \033[30m → Black \033[30m → Dark gray \033[31m → Red \033[31m → Light red \033[32m →Green \033[32m →Light green \033[33m → Brown \033[34m → Blue \033[34m → Light blue \033[33m → Yellow \033[35m → Purple \033[35m → Light purple \033[36m → Cyan \033[36m → Light cyan \033[37m → Light gray \033[37m → White example 1 → shows username - working directory last in purple color and then back to white d - prompt background colors and text format codes List of background colors: \033[40m → Black \033[44m → Blue \033[41m → Red \033[45m → Purple \033[42m → Green \033[46m → Cyan \033[43m → Brown \033[47m → Light gray example 1 → shows username - working directory last in purple color and white background and then back to default List of text format codes: \033[0m → Reset formatting to default. \033[1m → Bold text. \033[4m → Underline text. \033[7m → inverse example 1 → shows username - working directory last in purple color and white background, underlined and then back to default
0 notes
Text
Setting Up the Java Environment: A Complete Guide for Beginners
Java is a powerful, widely-used programming language known for its platform independence, object-oriented principles, and robustness. One of the key reasons for its popularity is the fact that it can run on any machine equipped with a Java Virtual Machine (JVM), making it truly “write once, run anywhere.” However, before you can start writing and executing Java code, you need to properly set up the Java development environment on your system.
This guide will walk you through the entire process of setting up the Java environment, including downloading and installing the necessary tools, configuring environment variables, and writing your first Java program. By the end of this tutorial, you’ll be ready to start coding in Java.
Step 1: Understanding the Components of the Java Environment
Before diving into the installation process, it’s essential to understand the core components involved in the Java ecosystem. These include:
1. JDK (Java Development Kit): This is the complete suite needed to develop and run Java applications. It includes the Java compiler (javac), standard libraries, and other tools required to build and execute Java programs.
2. JRE (Java Runtime Environment): The JRE provides the libraries and the JVM necessary to run Java applications. It’s a part of the JDK but can also be installed separately if you’re only running (not developing) Java programs.
3. JVM (Java Virtual Machine): This is the heart of Java’s platform independence. It interprets the compiled Java bytecode and allows it to run on any operating system that has a compatible JVM.
For development, you’ll primarily need the JDK, which includes the JRE and JVM.
Step 2: Downloading and Installing the Java Development Kit (JDK)
To begin coding in Java, you need to download the JDK. Here’s how to do it:
1. Go to the Official Oracle Website:
Visit the official Oracle Java SE Downloads page.
You’ll see multiple versions of Java. For most use cases, it’s best to download the latest Long-Term Support (LTS) version, which is currently Java SE 17.
2. Choose the Right Version for Your Operating System:
Select the appropriate version based on your operating system (Windows, macOS, or Linux).
Download the installer (.exe for Windows, .dmg for macOS, or a compressed package for Linux).
3. Run the Installer:
For Windows:
Double-click the .exe file and follow the installation prompts. The default installation directory is usually C:\Program Files\Java\jdk-<version>.
For macOS:
Open the .dmg file, and drag the JDK into your Applications folder.
For Linux:
Extract the downloaded .tar.gz file into a directory, and follow the system-specific instructions for installation.
Step 3: Configuring Environment Variables
Once the JDK is installed, you need to configure the PATH and JAVA_HOME environment variables on your system. This allows your terminal or command prompt to access Java’s tools from any directory.
Windows
1. Open Environment Variables:
Right-click on This PC or My Computer and choose Properties.
Click on Advanced System Settings, then click Environment Variables.
2. Set JAVA_HOME:
In the System Variables section, click New.
Set the variable name as JAVA_HOME and the variable value as the path to your JDK installation (e.g., C:\Program Files\Java\jdk-17).
3. Update PATH Variable:
In the System Variables section, find the Path variable, select it, and click Edit.
Click New and add %JAVA_HOME%\bin.
Click OK to close all dialogs.
macOS
1. Open the Terminal and edit your shell profile (e.g., .bash_profile or .zshrc for Zsh) by typing:
nano ~/.bash_profile
2. Set JAVA_HOME and Update PATH: Add the following lines:
export JAVA_HOME=$(/usr/libexec/java_home) export PATH=$JAVA_HOME/bin:$PATH
3. Save and Exit:
Press Ctrl+X to exit, then Y to save changes.
Apply the changes with:
source ~/.bash_profile
Linux
1. Open Terminal and edit your shell profile (e.g., .bashrc or .zshrc) by typing:
nano ~/.bashrc
2. Set JAVA_HOME and Update PATH: Add the following lines:
export JAVA_HOME=/usr/lib/jvm/jdk-17 export PATH=$JAVA_HOME/bin:$PATH
3. Save and Exit:
Press Ctrl+X to exit, then Y to save.
Apply the changes:
source ~/.bashrc
Step 4: Verifying the Installation
Once you’ve installed the JDK and configured the environment variables, verify that everything is set up correctly.
1. Open a Terminal or Command Prompt:
On Windows, press Windows + R, type cmd, and press Enter.
On macOS and Linux, open the Terminal from your applications or press Ctrl+Alt+T (for Linux).
2. Check the Java Version: Type the following command:
java -version
You should see output similar to:
java version “17.0.2” 2022-01-18 LTS Java(TM) SE Runtime Environment (build 17.0.2+8-86) Java HotSpot(TM) 64-Bit Server VM (build 17.0.2+8-86, mixed mode)
3. Check the Java Compiler: Similarly, check if the Java compiler (javac) is working by typing:
javac -version
The output should be something like:
javac 17.0.2
Step 5: Writing and Running Your First Java Program
With the Java environment properly set up, it’s time to write your first Java program. Follow these steps:
1. Open a Text Editor: You can use any text editor like Notepad (Windows), TextEdit (macOS), or Vim/Nano (Linux). Alternatively, you can use an Integrated Development Environment (IDE) like Eclipse, IntelliJ IDEA, or NetBeans for a more user-friendly experience.
2. Write the Program: Here’s a simple “Hello, World!” program:
public class HelloWorld { public static void main(String[] args) { System.out.println(“Hello, World!”); } }
3. Save the File: Save the file as HelloWorld.java in a directory of your choice.
4. Compile the Program: Open the terminal or command prompt and navigate to the directory where you saved the file. Use the following command to compile the program:
javac HelloWorld.java
If there are no errors, this will generate a file called HelloWorld.class.
5. Run the Program: Now, run the compiled program by typing:
java HelloWorld
You should see the following output:
Hello, World!
Step 6: Installing an IDE (Optional)
While it’s possible to write and run Java programs using just a text editor and the terminal, using an Integrated Development Environment (IDE) can make the process much easier, especially as your programs become more complex.
Some popular IDEs for Java development are:
Eclipse: A widely-used IDE with many plugins to enhance functionality.
IntelliJ IDEA: A powerful IDE with smart coding assistance, refactoring tools, and an intuitive interface.
NetBeans: A free and open-source IDE with support for various programming languages, including Java.
You can download these IDEs from their official websites and install them by following the provided instructions.
Conclusion
Setting up the Java environment may seem complicated at first, but once you’ve gone through these steps, you’ll be ready to dive into Java development. From here, you can start writing basic programs, experimenting with object-oriented concepts, and eventually tackling larger projects. Whether you’re developing desktop applications, web services, or Android apps, learning Java will give you a solid foundation in programming.
1 note
·
View note
Text
Screw it, I'm on a linux kick, I'll answer all of these:
I started with Manjaro, but then I hopped over to endeavourOS shortly after cause I found it to be better
I remember editing a config file (I think it was .bashrc? Something similar) and not being able to login as my user. I had to log in as root to fix it
Lol no
I technically have my old PC which runs windows 10, but I'm planning on just using a VM if I absolutely need windows for something
I switched out bash for zsh on my laptop, though I'm not entirely sure why. On my PC, I'm fine sticking with good ol' bash
No. Perforce, however, has hurt me. Never again. Hopefully.
My MSi ge75 Raider laptop I got from my university. It made me realize that laptops, even "gaming" laptops, aren't really the best for gaming...
See #3
Firefox. The internet would not be tolerable without it.
I struggle to find anything I really dislike about linux, but how about this: as much as modularity can be fun, it can make the system feel like it's held together by duct tape & bubblegum as well as lead to inconsistencies in stuff like UI design, like when you use a GTK application on a Qt desktop environment.
The elitism & the racism. Everyone else has already talked about the elitism ad nauseum, but something I really hate is that the community has tons of obnoxious alt-right douchebags that fearmonger about China
Gentoo seems pretty neat so far! I second the notion that gentoo isn't much harder or even different than arch, but I've noticed I've been getting much more familiar with the inner system & editing config files & such. I have tinkered with config files on my eOS laptop, but it always felt awkward. Here on gentoo, not so much! Also, I'm sure my bleeding-edge PC doesn't benefit anywhere near as much from the "optimized code" side of gentoo as much as, say, an old thinkpad, but hey, at least I get faster emerge times lmao
I like Tux more, personally, but I'm glad all the trans linux users out there are having fun with Xenia.
Unity & Unreal Engine. I'll stick with Godot (or even try coding the engine myself with openGL for smaller projects. My college education will not go to waste, I swear!)
Yak shaving. It's almost an addiction, and with gentoo, my cup runneth over
See #8
Linux ask game
1 - what was your first distro? 2 - what was your biggest linux fuckup? 3 - have you ever run rm / on real hardware? 4 - do you dual boot or have a secondary machine with windows? 5 - did you change your default shell? 6 - are you afraid of git? 7 - what was the first machine you installed linux on? 8 - do you know your way around vim keybinds? 9 - what is your favourite non-os software? 10- biggest linux pet peeve? 11- biggest annoyance with the community? 12- do you like your current distro? 13- Xenia or Tux? 14- what software are you never using again? 15- stock distro or hours of yak shaving? 16- have you compiled the kernel?
152 notes
·
View notes
Text
Resolving the Sudo Command Not Found Error in Linux
If you’re a Linux user, you may have encountered the “sudo command not found” error at some point. This error can be frustrating, especially if you’re trying to perform administrative tasks on your system. Fortunately, there are several ways to resolve this issue. In this blog post, we’ll explore two methods for resolving the sudo command not found error in Linux.Method 1: Installing SudoThe first method for resolving the sudo command not found error is to install the sudo package. Sudo is a command-line utility that allows users to run commands with the security privileges of another user, typically the root user. This utility is essential for performing administrative tasks on a Linux system. To install sudo, you’ll need to have administrative privileges on your system. If you’re using a Linux server, you may already have these privileges. If you’re using a remote desktop protocol (RDP) client, such as Buy RDP or Charp RDP, you’ll need to log in as an administrator. Once you have administrative privileges, you can install sudo by running the following command:sudo apt-get install sudo
This command will download and install the sudo package on your system. Once the installation is complete, you should be able to use the sudo command without encountering the “sudo command not found” error. Method 2: Updating the PATH Environment VariableThe second method for resolving the sudo command not found error is to update the PATH environment variable. The PATH variable is a list of directories that the shell searches when looking for executable files. If the directory containing the sudo executable is not included in the PATH variable, you’ll encounter the “sudo command not found” error.To update the PATH variable, you’ll need to edit the .bashrc file in your home directory. This file contains shell commands that are executed every time you log in to your system. To edit the .bashrc file, run the following command:nano ~/.bashrc
This command will open the .bashrc file in the nano text editor. Scroll down to the bottom of the file and add the following line:export PATH=$PATH:/usr/bin
This line adds the /usr/bin directory to the PATH variable. The sudo executable is located in this directory, so adding it to the PATH variable should resolve the “sudo command not found” error. Once you’ve added the line to the .bashrc file, save the file and exit the text editor. To apply the changes, run the following command:source ~/.bashrc
This command reloads the .bashrc file and applies the changes to the PATH variable. You should now be able to use the sudo command without encountering the “sudo command not found” error. Conclusion The“sudo command not found” error can be frustrating, but it’s easy to resolve with the methods outlined in this blog post. By installing the sudo package or updating the PATH environment variable, you can ensure that you have the necessary privileges to perform administrative tasks on your Linux system. Whether you’re using a Linux server or a remote desktop protocol client like Buy RDP or Charp RDP, these methods will help you get past the “sudo command not found” error and get back to work.
0 notes
Text
Installing Hadoop on Ubuntu

Certainly! Let’s present the Hadoop installation process on Ubuntu uniquely and engagingly, suitable for an informative yet reader-friendly course email.
Subject: 🚀 Embark on Your Big Data Journey: Install Hadoop on Ubuntu Easily!
👋 Hello Data Enthusiasts!
Are you ready to dive into the world of Big Data with Hadoop? Here’s a straightforward guide to getting Hadoop up and running on your Ubuntu system. Perfect for beginners and experts alike!
🔧 Getting Started: Prep Your System
Freshen Up Ubuntu: sudo apt update && sudo apt upgrade
Java Installation: sudo apt install default-JDK
Java Check: Ensure it’s installed with the Java -version
👤 Create a Dedicated Hadoop User
A simple command: sudo adduser hadoop
🔑 SSH Setup: Key to Connectivity
Install SSH: sudo apt install ssh
For Hadoop User:
Switch user: su — Hadoop
Generate SSH Key: ssh-keygen -t rsa -P “
Authorize Key: cat ~/.ssh/id_rsa.pub >> ~/.ssh/authorized_keys
📥 Download Hadoop: Grab the Latest Version
Use wget with the link from the official Hadoop website.
📦 Unpack Hadoop
Unzip it: tar -xzf Hadoop-3.x.x.tar.gz
🌐 Environment Setup: Pointing in the Right Direction
Edit .bashrc: nano ~/.bashrc
Add Hadoop paths (adjust with your Hadoop version):
bashCopy code
export HADOOP_HOME=/home/Hadoop/Hadoop-3.x.x export PATH=$PATH:$HADOOP_HOME/bin:$HADOOP_HOME/sbin
Activate changes: source ~/.bashrc
⚙️ Hadoop Configuration: The Blueprint
Edit key files in $HADOOP_HOME/etc/hadoop/:
core-site.xml, hdfs-site.xml, mapred-site.xml, yarn-site.xml
🎬 Initialize and Launch
Format Hadoop FileSystem: hdfs name node -format
Start the engines: start-dfs. Sh and start-yarn. sh
👀 See Hadoop in Action!
Access Hadoop’s ResourceManager and NameNode via your browser.
🛠️ Tips & Tricks
Check firewall settings.
Log files in $HADOOP_HOME/logs/ are your best friends for any hiccups.
🚀 Your Big Data Adventure Awaits!
With these steps, you’re all set to explore the vast universe of Big Data with Hadoop on your Ubuntu machine.
Happy Data Crunching!
Your [Your Course/Team Name]
Note: Ensure the technical steps are accurate and up-to-date for the course email. Personalize the email with course-specific details and offer support for installation issues. To maintain the email’s integrity and prevent it from being flagged as spam, avoid overusing hyperlinks and ensure it’s sent from a recognized, reputable email address.
Hadoop Training Demo Day 1 Video:
youtube
You can find more information about Hadoop Training in this Hadoop Docs Link
Conclusion:
Unogeeks is the №1 IT Training Institute for Hadoop Training. Anyone Disagree? Please drop in a comment
You can check out our other latest blogs on Hadoop Training here — Hadoop Blogs
Please check out our Best In Class Hadoop Training Details here — Hadoop Training
S.W.ORG
— — — — — — — — — — — -
For Training inquiries:
Call/Whatsapp: +91 73960 33555
Mail us at: [email protected]
Our Website ➜ https://unogeeks.com
Follow us:
Instagram: https://www.instagram.com/unogeeks
Facebook: https://www.facebook.com/UnogeeksSoftwareTrainingInstitute
Twitter: https://twitter.com/unogeeks
#unogeeks #training #ittraining #unogeekstraining
0 notes
Text
Oracle Transparent Data Encryption
Oracle Wallet TDE Oracle Database EE 19c CDB Veamos cómo funciona esto de una wallet encriptada para un objeto (tabla) específicamente de encriptaremos la data de varias columnas. Trabajaremos con oracle database enterprise edition 19c CDB. Las variables de entorno se encuentran previamente definidas en el archivo cdbnnita_env. #! cdbnnita_env # Get the aliases and functions if [ -f ~/.bashrc…

View On WordPress
0 notes
Text
Fucked up my Mint install so badly that none of the three consoles I’ve tried will consistently run the same version of Ruby.
I think Gnome console is running different versions depending upon where I initialize it from - but it COULD be that I have two identical copies of Gnome console, and one wants Ruby 2.3.3, while the other alternately wants Ruby 2.6.0-dev (correct) or the nonexistent copy of Ruby 2.6.0-dev which it thinks is nested inside the Ruby 2.5.0-dev folder. Rbenv is haunted.
#no rehashing does not work#no editing bashrc / profile and resetting does not work either#updating everything that has ever existed does nothing good#rbenv’s haunted and that’s that
16 notes
·
View notes
Text
had to edit my .bashrc because my computer wouldn't power off, i love being a linux user
1 note
·
View note
Text
Linux CLI 16 - history 🐧
New Post has been published on https://tuts.kandz.me/linux-cli-16-history-%f0%9f%90%a7/
Linux CLI 16 - history 🐧

youtube
cli has a history feature that remembers the previous commands It is helpful to speed up your work history → shows all the previous entered commands history | less → shows all the previous commands but a page at a time use Pd Dn, Pd Up, Up and Down arrows to navigate. Q to quit a number after history commands specifies the commands to show history 10 → shows the last 10 commands history -c → clears the history of the current terminal session !! → executes the last command !5 → executes the command at the position 5 Pressing Ctrl + R on the terminal starts the history search type the charactes you want to search press Ctrl + R to go to the next found item press Ctrl + J to copy the command back to the terminal or press Enter to execute the command you found !alias → will repeat the last command in history that starts with 'alias' !?alias → will repeat the last command in history that contains 'alias' You can modify your history settings by editing ~/.bashrc specifies the size of the history specifies the max size of the history file displays date and time for each command appends new commands instead of overwriting them Ctrl + X → Y to save the file. source ~/.bashrc to apply the changes
0 notes
Text
Installing Auto Complete in NeoVim
Sometimes you find yourself programming in a remote server and you really start to miss the autocomplete features of modern test editors not to worry Neovim/Vim to the rescue

1. Install latest version of Vim or Neovim should be Vim 8 at least -----------------------------------------------------------------
If latest is not available from package manager then you will need to compile
I will detail steps of compiling Neovim References: https://colleowino.github.io/building-neovim
Make sure you have the following installed: sudo git
sudo apt-get install libtool libtool-bin autoconf automake cmake libncurses5-dev g++ make python bindings available: sudo apt-get install python-dev python-pip python3-dev python3-pip
pip3 install --user pynvim
git clone https://github.com/neovim/neovim
Go to the root of the project and build: sudo LC_ALL=c make sudo LC_ALL=c make test sudo LC_ALL=c make install
export NVIM_LOG_FILE=~/.local/share/nvim/log
If not there find it for your local distro add to $HOME/.bashrc file
export NVIM_LOG_FILE=~/.local/share/nvim/log
make install You may want to user your current vim config for the instance: ln -s ~/.vim ~/.config/nvim ln -s ~/.vimrc ~/.config/nvim/init.vim
2 git clone --depth=1 https://github.com/amix/vimrc.git ~/.vim_runtime sh ~/.vim_runtime/install_awesome_vimrc.sh
Also check usage documentation on https://github.com/amix/vimrc
3. Install vim-plug
For Vim ----------------------
curl -fLo ~/.vim/autoload/plug.vim --create-dirs \ https://raw.githubusercontent.com/junegunn/vim-plug/master/plug.vim
For Neovim -------------- Unix, Linux sh -c 'curl -fLo "${XDG_DATA_HOME:-$HOME/.local/share}"/nvim/site/autoload/plug.vim --create-dirs \ https://raw.githubusercontent.com/junegunn/vim-plug/master/plug.vim'
4. Edit your vimrc like so
vim ~/.vimrc
and add the following in your vimrc
set runtimepath+=~/.vim_runtime source ~/.vim_runtime/vimrcs/basic.vim source ~/.vim_runtime/vimrcs/filetypes.vim source ~/.vim_runtime/vimrcs/plugins_config.vim source ~/.vim_runtime/vimrcs/extended.vim let g:ycm_python_binary_path = 'python3' set number set clipboard=unnamedplus try source ~/.vim_runtime/my_configs.vim catch endtry colorscheme peaksea set nocompatible syntax enable filetype plugin on
call plug#begin() Plug 'Shougo/deoplete.nvim' Plug 'roxma/nvim-yarp' Plug 'roxma/vim-hug-neovim-rpc' Plug 'zchee/deoplete-jedi' call plug#end() let g:deoplete#enable_at_startup = 1
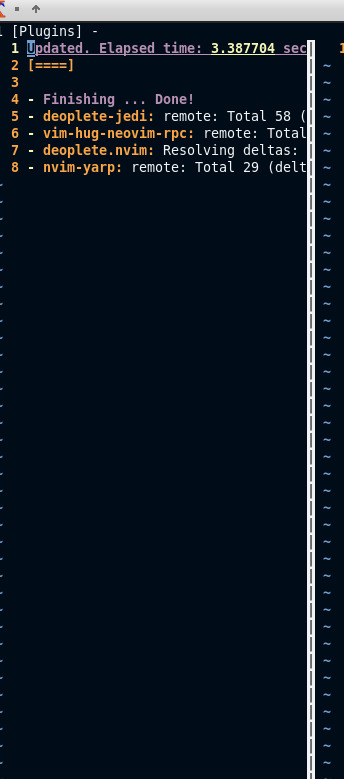
5. Open up vim and type :PlugInstall()
Should install plugins like in the image shown below
Else if still issues execute in Vim :UpdateRemotePlugins and close and start again.
6. Exit and enter nvim again try python file or anything and give it a minute and the autocomplete should load up
1 note
·
View note
Text
Darle color a nuestra TTY en Void Linux
Darle color a nuestra TTY en Void Linux

¿Que es bash? Bash (Bourne again shell) es un programa informático, cuya función consiste en interpretar órdenes, y un lenguaje de programación de consola. Está basado en la shell de Unix y es compatible con POSIX. Para más información tienen la wiki aquí.
Bueno antes que nada, les recuerdo que estoy usando la shell bash para manejarme en la TTY(terminal). En el caso que usen otra, seguramente…
View On WordPress
#bash#bash linux#bash user#bashrc#bashrc edit#bash_profile edit#bourne again shell#color en bash#color en tty#darle color a bash#darle color a la terminal#darle color a la tty#darle color a nuestra tty#edit bashrc#edit bash_profile#editando bash#editando bashrc#editing bash#editing bashrc#GNU/Linux Tutorial#How To#how to bash#how to bashrc#how to shell bash#Linux#linux bash#linux shell#Linux Tutorial#modify bash#nano
0 notes
Text
What is Apache Spark?
Apache Spark is an open-source distributed general-purpose cluster-computing framework. Spark provides an interface for programming entire clusters with implicit data parallelism and fault tolerance.
What is Cluster Computing?
Cluster Computing is a set of loosely or tightly connected computers that work together to complete a certain task.
Prerequisites- Have a minimum of 2 servers. (Tutorial is done for a cluster consisting of 3 servers)
Steps below must be done to Master and all Workers
Install Java (Only if java is not preinstalled on the server)
sudo apt install default-jdk
Confirm Java Installation
Java -version
Install Scala (Only if Scala is not preinstalled on the server)
sudo apt-get install scala
Confirm Scala installation
Scala — version
Open the host files
$ sudo vim /etc/hosts
Edit the hosts files (IP Addresses must be replaced with the your ones)
<MASTER-IP> master
<SLAVE01-IP> slave01
<SLAVE02-IP> slave02
Steps below must only be done to Master
Install Open SSH Server-Client
$ sudo apt-get install openssh-server openssh-client
Generate Key pairs
$ ssh-keygen -t rsa -P “”
Note: Leave the destination folder blank
Configure password less SSH
Copy the content of .ssh/id_rsa.pub (of master) to .ssh/authorized_keys (of all the slaves as well as master).
Check by typing
ssh slave01
ssh slave02
Note: It should ask for the password to login
Steps below must be done to Master and all workers
Spark Installation
$ wget https://www.apache.org/dyn/closer.lua/spark/spark-2.4.4/spark-2.4.4-bin-hadoop2.7.tgz
Extract the Spark File
$ tar xvf spark-2.4.4-bin-hadoop2.7.tgz
Move Spark Software to respective directory.
$ cd /usr/local/bin
$ sudo mv spark-2.3.0-bin-hadoop2.7 /usr/local/spark
Set up environment for spark
$ sudo bim ~/.bashrc
Add the following line to the ~/.bashrc file.
export PATH=$PATH:/usr/local/spark/bin
Source the bash file
$ source ~/.bashrc
Steps below must only be done to Master
Spark Master Configuration
Move to spark conf folder and create a copy of template of spark-env.sh and rename it.
$ cd /usr/local/spark/conf
$ cp spark-env.sh.template spark-env.sh
Edit spark-env.sh
$ sudo vim spark-env.sh
Enter the following lines
export SPARK_MASTER_HOST=’<MASTER-IP>’
export JAVA_HOME=<Path_of_JAVA_installation>
Spark worker configuration
$ sudo vim slaves
Enter the following in slaves file.
slave01
slave02
Start Spark cluster
$ cd /usr/local/spark
$ ./sbin/start-all.sh
Stop Spark Cluster
$ cd /usr/local/spark
$ ./sbin/start-all.sh
1 note
·
View note
Text
Configuring the Command Prompt in Mac OS X

In an earlier post, I dealt with a glitch that displayed the command prompt in the terminal as “unknown_followed_by_several_numbers.” It now shows up as the default command prompt for Mac OS X, which does the job, but one of the nice things about the Bourne Again Shell, the bit of software underlying Terminal that actually makes it do stuff, is that it’s highly customizable.
My goal here is pretty simple. I just want to modify the command prompt - that bit of text, numbers and symbols the terminal puts out to show its waiting for the user to type something.
The settings for bash are stored in a configuration file which can be edited in any text editor. Since Mac OS X is a multiuser system, this configuration file would be stored in the user’s home directory. Most UNIX systems, this file would be called .basrc. This will work in Mac OS X as well - until you log out or reboot the computer. The next time you log in or restart the system, your bash settings will be reloaded from the global configuration file, “/etc/bashrc”, completely ignoring your customized file. The only way I’ve found to make a local configuration stick under OS X is to put the setiings into ~/.bash_profile, with “~/” representing your user home directory.

So, fire up the terminal app or navigate to your home directory if Terminal is already running. Execute “nano .bash_profile” to start the nano text editor and edit the configuration file (or create it if it doesn’t exist already.)
OK, so text for our custom command prompt is stored is a setting named “PS1”, and the way to set this up in the configuration file is “PS1=”Our Custom Command Prompt.” In fact...

...you could actually just do that. Enter some plain text and go with that. But, bash also recognizes some codes for presets to include things such as date and time, user, the working directory , and for this example, I’m going to go with something more along those lines.
These codes are in the format of “\” followed by the single letter code. The slash is an escape character which tells to treat the following single character as one of its coded presets. Any text without this escape character before it is treated as plain text and will simply be added to the command prompt, as is.
I’m going to just go ahead and build my custom command prompt, then go over how it was built.
So, using nano to edit “.bash_profile”, I’m going to enter the single line:
PS1="[\d \@] \u@\h : \w $ "
Exit nano, being sure to save the file. At the command prompt, execute “source ~/.bash_profile”. After executing this command, the command prompt on my system changed to:

And, just in case that’s hard to read in the screenshot:
[Tue Oct 22 06:17 AM] oldmacnewlife@OldMacNewLifes-Power-Mac-G5 : ~ $
Let’s take another look at that setting in the bash profile.
PS1="[\d \@] \u@\h : \w $ "
Now for the blow by blow replay. That bracket at the opening of the setting string is not preceded by an escape slash, so it’s treated as plain text and added to the command prompt, as is.
The letter ‘d’ IS preceded by a slash, and it happens to be the to insert the date into the command prompt, in day, month date format.
For the sake of readability, I added a space, then a slash followed by the ampersand sign, which is the code for time, in 12 hour format followed by AM or PM as appropriate. I then added a closing bracket followed by a space to separate the date and time from the rest of the command prompt.
The “\u” is the code for the current user. And ampersand without a slash is just an ampersand. “\h” adds the hostname.
I added a colon bracketed by spaces to split off the user and hostname, then “\w”, which is the code to display the current working directory. One more space, then the dollar sign for the traditional Unix prompt.
So, I’m calling this done. You can find the complete list of command prompt options, along with the full bash manual at:
https://www.gnu.org/software/bash/manual/html_node/Controlling-the-Prompt.html#Controlling-the-Prompt
1 note
·
View note
Text
Bandit
Level 13 → Level 14
The password for the next level is stored in /etc/bandit_pass/bandit14 and can only be read by user bandit14. For this level, you don’t get the next password, but you get a private SSH key that can be used to log into the next level. Note:localhost is a hostname that refers to the machine you are working on

connect the ssh server using sshkey will lead me to next level
Level 14 → Level 15
The password for the next level can be retrieved by submitting the password of the current level to port 30000 on localhost.

Telnet can help you to establish TCP/IP connection between you and the server
Level 15 → Level 16
The password for the next level can be retrieved by submitting the password of the current level to port 30001 on localhost using SSL encryption.
Helpful note: Getting “HEARTBEATING” and “Read R BLOCK”? Use -ign_eof and read the “CONNECTED COMMANDS” section in the manpage. Next to ‘R’ and ‘Q’, the ‘B’ command also works in this version of that command…
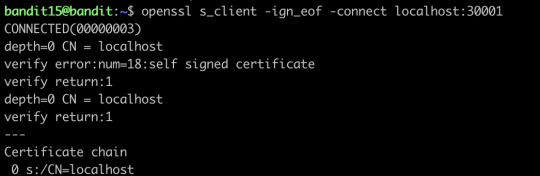
openssl will help you connect the server using SSL protocol
Level 16 → Level 17
The credentials for the next level can be retrieved by submitting the password of the current level to a port on localhost in the range 31000 to 32000. First find out which of these ports have a server listening on them. Then find out which of those speak SSL and which don’t. There is only 1 server that will give the next credentials, the others will simply send back to you whatever you send to it.
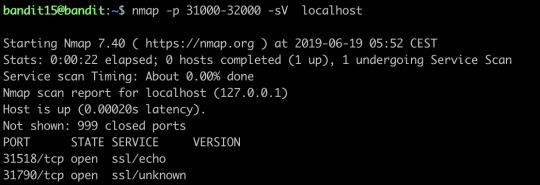
nmap can help you find out the open ports and their services on the internet, we can see we have found two open ports, and let’s try to connect the first one:


It only offers echo service, let’s try the second port:

This time it gives out the ssh key, we save it and then go to the next level
Level 17 → Level 18
There are 2 files in the homedirectory: passwords.old and passwords.new. The password for the next level is in passwords.new and is the only line that has been changed between passwords.old and passwords.newNOTE: if you have solved this level and see ‘Byebye!’ when trying to log into bandit18, this is related to the next level, bandit19

diff can show the differences between the textfiles
Level 18→ Level 19
The password for the next level is stored in a file readme in the homedirectory. Unfortunately, someone has modified .bashrc to log you out when you log in with SSH.

Though I can’t log in properly, I still can visit the file directly and get the password for the next level
Level 19 → Level 20
To gain access to the next level, you should use the setuid binary in the homedirectory. Execute it without arguments to find out how to use it. The password for this level can be found in the usual place (/etc/bandit_pass), after you have used the setuid binary.
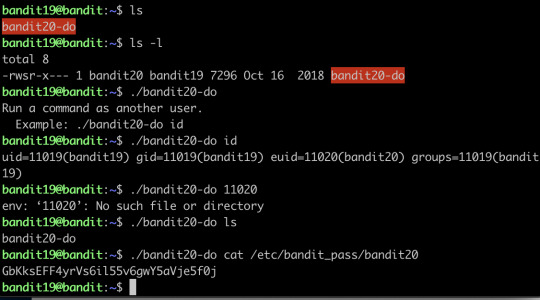
This program basically fakes you like another user, and you just use it to cat the password to the terminal directly
Level 20 → Level 21
There is a setuid binary in the homedirectory that does the following: it makes a connection to localhost on the port you specify as a commandline argument. It then reads a line of text from the connection and compares it to the password in the previous level (bandit20). If the password is correct, it will transmit the password for the next level (bandit21).
NOTE: Try connecting to your own network daemon to see if it works as you think

What you need to do is basically setting up a client and server, where nc here is actually a client sending the message, and the binary setuid here act as a server to listen to a specific code and return the password.
Level 21 → Level 22
A program is running automatically at regular intervals from cron, the time-based job scheduler. Look in /etc/cron.d/ for the configuration and see what command is being executed.

What you need to do is actually investigating what do the shells do, then you find that the shells are exporting the password to a file somewhere.
Level 22 → Level 23
A program is running automatically at regular intervals from cron, the time-based job scheduler. Look in /etc/cron.d/ for the configuration and see what command is being executed.
NOTE: Looking at shell scripts written by other people is a very useful skill. The script for this level is intentionally made easy to read. If you are having problems understanding what it does, try executing it to see the debug information it prints.
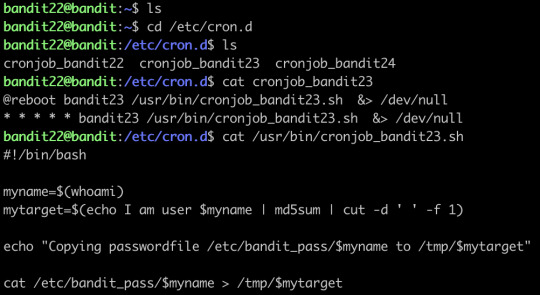
Find the shell first, an then just run it:

After running it, the password is generated.
Level 23 → Level 24
A program is running automatically at regular intervals from cron, the time-based job scheduler. Look in /etc/cron.d/ for the configuration and see what command is being executed.
NOTE: This level requires you to create your own first shell-script. This is a very big step and you should be proud of yourself when you beat this level!
NOTE 2: Keep in mind that your shell script is removed once executed, so you may want to keep a copy around…
The cron does not seem to run the sh automatically... I’ve waited for a long time and nothing happened, so I skipped this level
Level 24 → Level 25
A daemon is listening on port 30002 and will give you the password for bandit25 if given the password for bandit24 and a secret numeric 4-digit pincode. There is no way to retrieve the pincode except by going through all of the 10000 combinations, called brute-forcing.

Let’s make a new directory, and create a shell script
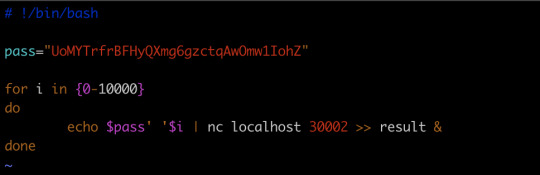
and run the script, we will get the key
Level 25 → Level 26→Level 27(actually)
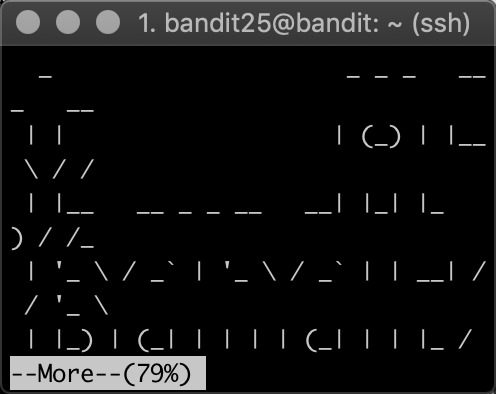
Logging in to bandit26 from bandit25 should be fairly easy… The shell for user bandit26 is not /bin/bash, but something else. Find out what it is, how it works and how to break out of it.
Honestly, this one I did not find out the solution myself, I stuck at this level for a long time, and finally, I went to google for the solution, the solution is AMAZING! The solution is so creative that I actually shocked, I will go through the solution for you:

When you tried to login, you find the connection is closed immediately. Then I tried to find some information about the shell it this level uses, then I found this:

So basically, the shell will close immediately after it showed all the text...how the hell can you connect to the level 26 and get the password of level 27???
And this is also where I stuck...
And the solution is....
The shell does close immediately after showing all the text, but... what if you can find a way to slow down the procedure of showing all the text?? And yeah!
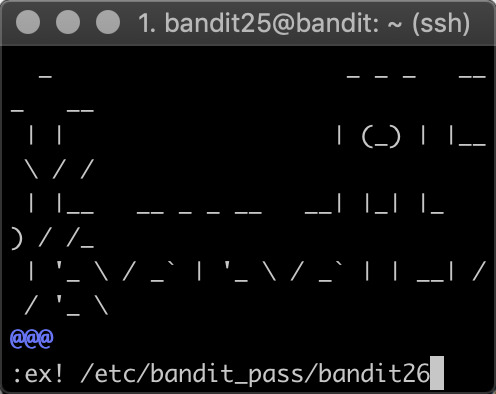
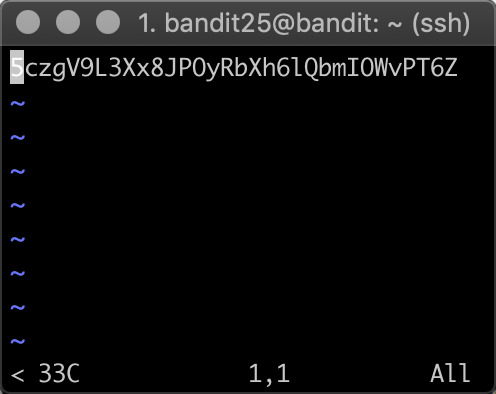
with “more”, you can actually realize this by simply resizing your terminal to a very small size, and now you can let the text show page by page...and as long as your text has not been fully shown on the screen, you still have the connection, and you could enter the edit mode, which is vim, and in the vim, you know you can open other files, and boom, you have the password!
2 notes
·
View notes
Text
Instalando o Laravel no Linux
Abra o terminal.
Primeiro atualizamos a lista de pacotes.
sudo apt update
Agora começamos instalando o Apache2, nosso servidor web livre.
sudo apt install apache2
Instalando ferramentas necessárias.
sudo apt install curl git unzip
Instalando as principais bibliotecas PHP utilizadas pelo Laravel.
sudo apt install php7.2 libapache2-mod-php7.2 php7.2-mbstring php7.2-xmlrpc php7.2-soap php7.2-gd php7.2-xml php7.2-cli php7.2-zip
Instalando MySql e o driver de acesso PHP.
sudo apt install mysql-server-5.7 php-mysql php7.2-mysql mysql-client-core-5.7
Configurando a senha do mysql.
sudo mysql_secure_installation
Execute o mysql no modo sudo para criar um novo usuário.
GRANT ALL PRIVILEGES ON *.* TO 'user'@'localhost' IDENTIFIED BY 'user';
Renicie o terminal.
Logue como root e vá a raiz.
sudo -i
cd
Agora como root baixe e instale o composer.
curl -sS https://getcomposer.org/installer | sudo php -- --install-dir=/usr/local/bin --filename=composer
Saia do usuário root.
exit
Instale o pacote global de criação de projetos Laravel.
composer global require laravel/installer
Adicione o path do pacote anterior à variável de ambiente PATH.
Edite o arquivo com o seguinte comando:
gedit ~/.bashrc
2. Acrescente na ultima linha do txt o seguinte:
export PATH=${PATH}:$HOME/.config/composer/vendor/bin
Pronto. Agora teste a instalação e comece com seus projetos.
Exemplo de teste.
cd ~ mkdir projetos cd projetos laravel new teste cd teste php artisan serve
1 note
·
View note