#edit: changed image configuration
Explore tagged Tumblr posts
Visit Tumblr Blog
Explore Tumblr blogs with no restrictions, modern design and the best experience.
Last Seen Tumblr Blogs


Fun Fact
Tumblr was created by web developers David Karp and Marco Arment.
Text


bang
#ponyart#homestuck#dirk strider#lyrics from the downward spiral (the song not the album)#shrugs#i drew this to drain the mental illness from my skull#thus was also drawn in a public library#edit: changed image configuration
219 notes
·
View notes
Text
how exactly do you get a printer to print something in the exact size you want it to 😭
#i have something im gonna transfer to smaller dimensions than letter size#so i configured it then saved it onto a letter sized canvas#the image is 8.5 x 11 inches in dimensions.#so why did i load it up to print and its off center and 500 times bigger and i cant edit this.#like.#and if u do change the size its still blown up like bro i did the work for you why are tou making this so difficult#THIS IS WHY I WORRY ABOUT MAKING THE ZINE TOO LIKE I FEAR ITS GONNA BE ALL SKEWED
14 notes
·
View notes
Text
Using Sims2Pack Clean Installer with The Sims 2: Legacy Collection (and Ultimate too!)
Bringing over a simple (and previously documented) tutorial on how to make Sims2Pack Clean Installer work with Sims 2 Legacy and UC. This is just an adapated version of SimsWiki's UC FAQ, so all credit goes to them. If you want a written step-by-step, please go to their website! STEP 1: Download Sims2Pack Clean Installer

Download (and install) Sims2Pack Clean Installer. This tutorial will be covering the installable version, but the NoInstall one probably works the same. STEP 2: Open the Sims2Pack Clean Installer configuration file

You will now go into the directory where you selected and installed Sims2Pack Clean Installer on. By default, it installs on the C:/ drive, so it is probably located at C:\Program Files (x86)\Sims2Pack Clean Installer. That may vary if you changed the directory.
Open the file called "S2PCI.ini". That is the configuration file that we will be altering. PS: You can use your computer's default Notepad for this, but software like Notepad++ can be easier to manage/edit.
STEP 3: Edit your Sims2Pack Clean Installer configuration to detect Sims 2 Legacy/UC

Where it says SaveGamePath="", you will add the directory where your game's Documents folder is in between the "", just like shown in the photo. - For The Sims 2: Legacy Collection, it is usually C:\Users\YourUserName\Documents\EA Games\The Sims 2 Legacy - For The Sims 2: Ultimate Collection, it is usually C:\Users\YourUserName\Documents\EA Games\The Sims 2™ Ultimate Collection
After that, simply save and replace the file. Depending on your computer settings, it might say it is not able to save. If this happens to you, simply save the edited S2PCI.ini on your desktop, then copy and paste the file inside the Sims2Pack Clean Installer folder and replace the original file (and it should always ask for you to replace the original file! check the tips below for clarification). It might ask for administrator permission, just click yes and proceed until the file is replaced with the one you just edited.

TIP: Not sure what your username is? Simple: on your File Explorer, go to Documents > EA Games > The Sims 2 Legacy (or Ultimate Collection) and click the bar. It will show the full path to the folder. Copy that path and follow the rest of this step. TIP 2: Make sure to save it as a .ini file and NOT a .txt one! If you are having difficulties with that, go to File > Save as on Notepad and select "All Files (*)" as file type. Make sure to also name it exactly as S2PCI.ini (it SHOULD ask you to replace the original file, if it did not, something is wrong. Try following the steps again making sure everything was properly followed!)
STEP 4: Install your Custom Content

The last step is to install your custom content. To make sure that Sims2Pack Clean Installer is working properly with the configuration file you edited, make sure that it shows the path written in the file when you press install. It should point to the game's Documents folder like the image above. Now that you showed the program where your Sims 2 Documents folder is, it should auto-detect where to put the files. Ta-da! Your Sims2Pack Clean Installer is done and working. Enjoy your Custom Content and Sims2Pack installing galore all you want <3
#ts2#sims2#ts2legacy#legacycollection#thesims2#the sims 2#the sims 2 legacy#sims 2#sims 2 legacy#ts2cc#sims2cc#s2cc
288 notes
·
View notes
Text
Easy IDs to do for beginners
[Plain text: Easy IDs to do for beginners /end PT.]
Disability Pride Month is here! And as so I think it'd be neat to incentive people to describe more images, as advocacy for acessibility.
But I get it that describing images (visual stuff) with *your own words* may seem a bit challenging, specially if you've never done that before, so I decided to gather some easy things you can describe to start!
1 - Text transcripts
What is a text transcrip? A text transcript is when you have an image whose only component is text, and you take the text from it and write it out for the people who for whatever reason can't acess the image themselves (like if they are blind and use a text-to-speech device to read what's on the screen for them and therefore can't recognize the text of an image, people with low vision that can't see average-sized text and configure theirs to display text in a bigger font, which doesn't work on images and it's too tiny for them to read...). An example of text transcript:

[ID: Text: An adult frog has a stout body, protruding eyes, anteriotly-attached tongue, limbs folded underneat, and no tail (the tail of tailed frogs is an) /end ID.]
(this is from the Wikipedia page on frogs.)
Text transcripts are easy to do because you only have to take the already existing text from an image and type it out. For longer text-only images, you can also use a text recognition AI tool, such as Google Lens, to select the text from you and then you just have to copy and paste it into the description.
2 - Memes
Despiste what you may think, most memes (specially 1-panel memes) are incredibly easy to describe, because they come from a well-known template. Take this one for an example:

[ID: The "Epic Handshake" meme. One of the people in the handshake is labelled "black people", and the other is labelled "tall people". The place where they shake hands has the caption "constantly being asked if you play basketball". /end ID.]
They are easy to describe because despiste having many elements, you can easily sum it all up in a few words, like "the loss meme", "the is this a pigeon meme", the "bernie sanders" meme, and so on. When you describe memes, you don't have to worry about every single detail, (@lierdumoa explains this better on this post) but only about 'what makes this meme funny?' If you are describing one, just describe which is the meme you're talking about, and how it differs from its template, like the captions or anyone's face that may have been edited in.
3 - One Single Thing
Images with "one single thing" are, I think, the easiest thing to describe on the world. When you describe things, what you're supposed to do is "describe what you see". If there's only one thing to see, then you can easily describe it! Quick example:

[ID: A banana. /end ID.]
See?
You could also describe this image as "a single yellow banana in a plain white background", but this extra information is not exactly important. One knows a banana is yellow. That is not unusual, and neither that nor the color of the background change anything in the image. So in these types of descriptions, you can keep things very short and simple, and deliver your message just as well.
An exception would be something like this:

[ID: A blue banana. /end ID.]
In this case, where there is something unusual about the object, describing it will be more useful. When you say "banana", one would assume the banana is yellow, so to clarify, you say that this specific banana is blue.
When you have other situations where your One Single Thing is unusual in some way, like a giant cat, a blue banana, or a rotten slice of bread, pointing out what their unusual characteristic is is the best way to go.
3.5 - A famous character of person
This one is actually similar to the One Single Thing type of ID. When you are describing, say, a random person or an oc, you'd want to describe things like their clothes, their hair color, etc., but in the case of an already well-known figure, like Naruto or Madonna, just saying their names delivers the message very well. Like this for example:

[ID: Taylor Swift, singing. /end ID.]
or

[ID: Alastor from Hazbin Hotel, leaning on his desk to pick up a cup. /end ID.]
In both of these cases, you technically could describe them as "a blonde woman with light skin...", "a cartoon character with animal ears and a suit..." but you will be more straight to the point if you just say "Taylor Swift" and "Alastor". In these cases, it's usually very useful to describe what they're doing as well, like "singing" and "leaning on his desk to pick up a cup", or whatever else.
An extra tip I can give you to describing characters in specific, is to point out if they are wearing anything different. With most cartoon characters, they usually have a signature outfit and hairstyle, that one would expect them to be in. So, similarly to the blue banana case, if they are wearing a different thing than they usually do, it comes in handy to state that in your description. Like this:

[ID: Sakura from Naruto wearing a nurse outfit. /end ID.]
Sakura's usual outfit is not a nurse one, so since she is wearing one, pointing it out is very helpful.
The last tip I have for describing characters is pointing out which franchise they are from. For example, if I just said "Sakura", you'd probably assume it was this one, since she is famous, but you wouldn't be able to be sure, because how many Sakuras are out there? So, saying "Emma from the X-Men" and "Emma from The Promised Neverland" is gonna be very helpful.
Helpful resources and final considerations:
A masterpost I did with many tutorials and tips for doing image descriptions in general
Why are image descriptions important (even for sighted people)?
And a few tips about formatting:
Putting "id" and "end id" at the start and at the end of your description is gonna help the people reading it to know where the description starts and where it ends, so they don't read, say, your caption, and think you are still talking about your description
Customized fonts, colored text, italics, bold text or tiny text aren't things you should do your ID in. Most customized fonts are pretty hard to understand, and most text-to-speech devices can't recognize them. Tiny text is hard to see for people who need big fonts, and italized text faces the same issue because it makes the words smaller. Full lines or paragraphs of colored text can cause eyestrain when people try to read them, and bolded text makes the edges of the words too close together and can make it even harder to read for people who have trouble reading already.
And that's it! Happy describing, folks!
#acessibility#disability pride month#image desciptions#alt text#described#once you are more familiarized with doing ids its always good to move on to more detailed descriptions#like all skills describing images is a think you have to harbor to get better at#but describing simple things is better than describing nothing!#it's easy AND it's good!#and also please note that i am a sighted person#what can always help is ask the blind people/people with low vision themselves what is helpful in an id#long post
59 notes
·
View notes
Text
How I Customize Windows and Android
Windows: Rainmeter
Rainmeter Skins
Rainmeter | Deviantart
r/Rainmeter
Rainmeter is where I get nifty desktop widgets (skins). There are a ton of skins online and you can spend hours just getting caught up in customizing. There are clocks, disk information, music visualizers, weather widgets*, and more.
I get most of my skins from the links I posted, but they are by no means the only resources for Rainmeter skins. r/Rainmeter and Deviantart have some awesome inspiration.
This is what my desktop looks like right now:

Dock: Dock 2 v1.5
Icons: icons8 - this is probably the best free resource for icons I know of
"Good Evening [name]": Simple Clean
Clock: Simplony
* Note about weather widgets: Older Rainmeter skins that use old weather APIs will likely not work. The Rainmeter forums has information with lists of weather skins that do work.
Windows: Useful Things for Workflow
Flow Launcher - this is basically a search bar, app launcher, and even easy-access terminal all in one. The default hotkey is Alt+Space. I use this almost primarily to do quick calculations. There are a ton of plugins and I've barely scratched the surface with how I use it.
ShareX - This is my screenshot tool and I love it. Admittedly, I find it difficult to configure, but once I had it set up, I didn't really have to adjust it. You can create custom hotkeys to screenshot your entire screen, or to select your screen, or even use OCR. This has saved me a ton of time copying over text in images and making it searchable.
Bonus - Get Rid of Windows Web Search in the Start Menu: If you're comfortable with editing your registry, and you want to get rid of the pesky web results in Windows search, this fix is what I used to get rid of it.
Android: Nova Launcher
This is my main Android launcher that I've been using for almost as long as I've owned a smartphone, and it's super customizable. The best part is that it's free with no ads, and you can purchase premium at a one-time cost.
The main things I use it for are app drawer tabs, renaming apps, hiding apps, and changing the icons.
I've had premium for so long that I've forgotten what the features were, but looking at the website, the one feature I use is app folders.
This is what my phone homescreen and app drawers look like:


Time/Weather: Breezy Weather
Calendar: Month: Calendar Widget (I got this on sale for like 30 cents once but there are a plethora of good calendar apps out there)
Icons: Whicons - White Icon Pack
Advanced Customization
Further things to enhance your customization experience to look into include:
Flashing a custom Android ROM (e.g. LineageOS)
Give up on Windows & install Linux instead (Ubuntu is a good one to start with)
Android app modification: ReVanced apps (includes Tumblr), Distraction Free Instagram
Miscellaneous notes under the cut:
None of these links are affiliate links. These are all tools I happen to use on a daily basis and I'm not being paid to promote them.
Install Rainmeter skins and programs I recommend at your own risk. Before altering Windows, such as editing the registry, make sure you have everything backed up.
The Windows web search fix works on my Windows 11 machine. I don't know if it works for Windows 10, but I do know I was able to disable it in Windows 10 at some point, so your mileage may vary.
Install non-Play Store apps at your own risk. (Although in my opinion, open source APKs are less sketchy than some apps on the Play Store...) Always check where you're downloading APKs form!
The wallpaper for my desktop and phone are custom wallpapers I made myself.
(At the request of @christ-chan-official)
11 notes
·
View notes
Note
🔥 Lórien (Irmo)
🔥 Vairë
I'm trying to come up with anything about Irmo that could be seen as controversial, and I can't really think of anything. I like the way he's written in the Leithian Script (esp. that scene with Beren where Finrod & co are worried about his state and he's just... in this way... gentle? I don't know why, but the image has always stuck with me), I think that he's the youngest of the three... but none of that fits the bill... oh well, I have seen him drawn and described in a somewhat psychodelic(?) way, and tbh that's my hot take about all of the Valar, but I've always seen them as taking forms that are mostly humanoid when interacting with the Children. They're for communication after all.
Vairë it is then, and I do have something that probably counts, but asdfhfjgjkl — I'm not sure if the idea doesn't come from you in the first place. I think she should have been counted among the Aratar, firstly because her domain seems of cosmic importance, and secondly because the male-female assymetry of their numbers is jarring compared to how even the breakdowns of the Valar and Maiar in any other configuration are in general. I wonder if Tolkien noticed that, because it almost feels like an oversight, or at least a case of "Welp! Too late to change this without excessive edits" on his part.
Possibly, she might take the place of Oromë? He is definitely important historically and in the mythical sense, as the Vala who found the elves, but domain-wise, hers feels like it encompasses more. Unless — I'm starting to have doubts whether the term "Aratar" denotes anything more than raw power potential, in which case the discussion might be a little pointless — but the Silmarillion speaks of reverence, so I'm still left asking.
Also, she's cool 😁, but I don't think a lot of people actively disagree with that.
Send me 🔥 + a character/place/theme/subject and I'll answer with a hot take for them.
#Sorry if this is a disappointing tbh#It so happens these are characters I like but whom I haven't seen discussed often enough to get an idea of what a hot take would be#Silmarillion#Valar#silm#irmo#irmo lorien#vairë#my post#asks#ask games
17 notes
·
View notes
Text
Favorite Firefox Extensions
Firefox is a very extensible browser - through a combinations of addons and userscripts you can make it behave just about any way you want. The best part is, they're all free. Here are some of my favorites.
Note: if you have an Android device, check out my post about Firefox for Android's new extended support for addons!
Note: if you have an Apple device, check out my favorite Safari extensions here!
Last updated Feb 2025 (updated list of languages supported for native, local translation by Firefox).
Index:
uBlock Origin
Tab Session Manager
Sauron
Bypass Paywalls Clean
Auto Tab Discard
Video DownloadHelper
Highlight or Hide Search Engine Results
TWP - Translate Web Pages
UnTrap - YouTube Customizer
Indie Wiki Buddy
Cookie Auto Delete
ShopSuey - Get Rid of Ads on Amazon and Ebay
LibraryExtension
Absolute Enable Right Click & Copy
uBlock Origin
(compatible with Firefox for Android)
This is the first addon I install on any new Firefox browser. It's an adblocker, but at its core it can remove pretty much any HTML element from a website, and it comes with pre-configured lists for removing everything from ads to cookie banners to those annoying popups that ask you to sign up for email newsletters.
Tab Session Manager
Have you ever accidentally lost all your open browser tabs due to a computer update, or even just accidentally closing Firefox? With this addon you no longer have to worry about that - it automatically saves your open tabs and windows every time the browser closes, and autosaves a restore point of tabs every few minutes in case the browser crashes unexpectedly. Opening all your previous tabs and windows is a one-click deal.
Sauron
Ever wished your favorite website had a dark mode? With Sauron, now it can! Sauron attempts to intelligently figure out how to edit the color scheme of the web page (including text) to make it dark-mode friendly. It preserves the original color of images, but dims them so that they don't blind you. You can disable image dimming or dark mode on a site by site basis too. It's not perfect since it is making guesses about which colors to change, but it goes a long way toward making the internet an enjoyable place for me.
Bypass Paywalls Clean
This addon removes paywalls from hundreds of news websites around the world or adds links to open the article in a wrapper that provides the article text (like the Internet Archive etc.)
Auto Tab Discard
Ever wanted to keep a tab open for later use, but you notice the browser getting slower and slower the more tabs you have open? Auto Tab Discard will automatically "hibernate" tabs that you haven't used in a while so that they use less resources on your computer. It's smart enough not to hibernate pages that are playing media (like YouTube) or that have forms you haven't submitted yet (like job applications). You can customize how fast it puts tabs to sleep too and exclude certain websites from hibernating at all.
Video DownloadHelper
This addon can download streaming videos from most modern (HTML5) websites, and even finds soft subtitles that accompany the stream and downloads those too. Just browse to the webpage that has the video on it, click the icon in the Firefox toolbar, and select the video you want to download and click "Quick Download". For YouTube I would recommend using a YT downloader website (like KeepVid) to download the video directly, but Video DownloadHelper really shines for websites that aren't popular enough to have dedicated downloader websites like that. I've used it download videos from a Japanese film festival streaming portal, news websites, etc.
Highlight or Hide Search Engine Results
This addon allows you to blacklist websites and completely remove them from Google, Bing, or DuckDuckGo search results. Don't want to see image search results from AI websites? Blacklist them. Searching for tech support advice and getting frustrated by all the auto-generated junk websites that stuff themselves full of SEO terms to jump to the top of the search results without actually providing any information at all? Blacklist them so they don't come up in your next search. Conversely, you can also whitelist websites that you know and trust so that if they ever come up in future search results, they'll be highlighted with a color of your choosing for visibility.
TWP - Translate Web Pages
(compatible with Firefox for Android)
Does what it says on the tin: auto-detects a website's language and provides a button that can translate it to a language of your choosing. You can also just select individual text on the page and translate just that. Note that this sends whatever text you translate to the servers of your selected translation service (Google, Bing, Yandex, or DeepL), so keep in mind the privacy implications if you don't want your IP address associated with having read that text.
Edit: As of version 118, Firefox now has the ability to translate text locally on your computer, without needing to send it to a cloud service. You can enable this in Settings -> Translation -> Install languages for offline translation. Note that at this time (Feb 2025), 31 languages are supported - Russian, Korean, Chinese (simplified), and Japanese were recently added. More info here.
UnTrap for YouTube
(compatible with Firefox for Android and they have a Safari for iOS extension too)
This addon lets you tweak the YouTube interface and hide anything you don't want to see. For instance, I hide all the "recommended" videos that come up when you search YT now. They have nothing to do with your search, so they're essentially just ads YT puts in your search results. I also hide Explore, Trending, More from YouTube, and Shorts sections, but you can customize it to fit your preferences.
Note: depending on the particular set of tweaks you want to make to YouTube, you may prefer to use YouTube Search Fixer instead. User preference.
Indie Wiki Buddy
I loathe Fandom.com wiki sites - they are cluttered and filled with ads and autoplaying videos that follow you down the page as you scroll. The organization is also hostile - if a community tries to leave their platform and bring their content to a new wiki hoster, Fandom bans them from the platform and reverts all their deletions/changes. Indie Wiki Buddy attempts to find an independent alternative for the wiki you're trying to browse and automatically redirects you to it, and if one doesn't exist, it will redirect you to a proxy site like antifandom or breezewiki that shows the Fandom content but removes all ads/videos/background images so you can actually, you know. READ it.
Cookie Auto Delete
(compatible with Firefox for Android)
Websites store "cookies" - little text files with info about you - on your computer as you browse so they can track you as you browse the internet. This addon automatically deletes cookies from a website a short while after you close the last tab you had open for that site. You can customize how long it waits before clearing cookies too. Note that this can sign you out of many websites, so you can whitelist any site you don't want cookies cleared for.
ShopSuey - Get Rid of Ads on Amazon and Ebay
Removes the ads/recommended products that clutter up Amazon and Ebay search results and product pages.
LibraryExtension
This fantastic addon recognizes when you are viewing a book on many popular websites and can automatically check whether that book is available in any of the library systems or subscription services you have access to, including how many copies your library(ies) have and how many are currently checked out. The best part is it shows the availability for physical books, ebooks, AND audiobooks at supported libraries. The extension currently supports libraries in Australia, Canada, Germany, New Zealand, the United Kingdom and the United States, but it also supports some global repositories like the Internet Archive and subscription services like NLS Bard for the blind and print disabled, Kobo Plus, Libro.fm, Anyplay.fm, Bookmate, and Everand. Great extension for people trying to support their local library and also save money.
Filtering+ for Tumblr
This addon lets you add tags or phrases to your tumblr tag filters with two clicks, without leaving the dashboard. I've been asking Tumblr for this tag filtering behavior on their mobile apps (i.e. press and hold a tag to get a filter option) for at least a year now in asks and surveys, without ever stopping to see if someone had already implemented this on desktop. More fool me. This addon is from the author of XKit Rewritten. Note that the right-click tag filtering only works on the dashboard; it will not appear if you are on someone's blog. Right-clicking selected text to filter the phrase works everywhere based on my testing.
Absolute Enable Right Click & Copy
This addon does its best to re-enable the normal right-click context menu and copy/paste actions on pages that try to disable them. If you run into a site that messes with either of those, select this addon and check "Enable Copy," then try again. If that doesn't work, check "Absolute mode." It doesn't work everywhere, but I find it very helpful.
126 notes
·
View notes
Text

Mandalorian's playing a game in the covert on Nevarro. Concept Art by Anton Grandert. Image from StarWars.Com
NOTE: This is a retelling of an existing story from my collection of Mandalorian Tales. It has been edited and updated to reflect some Canon specific changes (Djarin vs. Din as the Mandalorian's first name) as well as minor story edits. Enjoy.
Grogu makes a friend Part 1 / At the Cin Vhetin
The tavern was quiet. Almost too quiet given the time of day. The Mandalorian and his foundling didn’t like it. They were waiting for Ahsoka Tano to meet them and it was well past the time for her to be there. Din motioned to the server to come over. He would just pay the tab and leave. Obviously something had gone sideways.
The server came over and the Mandalorian could swear they had met before, but he couldn’t recall where. You rarely saw a human female with such strange scars. They were almost like tattoos, but they didn’t look like they had been made purposefully. Whatever accident had produced them, it must have been painful.
“Take Grogu out the back way, Mandalorian.”
The woman spoke quietly as she slipped a light saber and a metal baton out of her voluminous robes and readied herself for an unseen assailant.
“Who are you?”
Din Djarin was on his feet and Grogu had already hopped into his carry bag.
“A friend. Grogu, make him leave.”
The human female smiled at them briefly and then walked toward the tavern’s entryway.
Djarin looked around and saw that the few other patrons had already disappeared as well as the Iktotchi bartender. What did they know that he hadn’t noticed?
Grogu began to flood the bounty hunter’s mind with images of the back rooms of the bar, showing him a safe way for them to leave. Djarin resisted the urge to swat those images away and then considered his options. Given the fact that other people had already abandoned the place, he decided that discretion was appropriate. He and Grogu reached the partially hidden door to the back rooms just as a small flood of battle droids tried to enter the tavern.
The human woman waited until the doorway was jammed with the droids and ignited her lightsaber. The Mandalorian had never seen anything like it. Most light sabers were a single uniform color in his experience, limited though that was. This one was iridescent and seemed to shift colors at the holder’s whim. The battle droids took the presence of the light saber to be a threat and began to fire their blasters at the wielder.
He couldn’t help himself. He watched with fascination as she deflected each blast back into the droids. Their configuration at the door hampered them considerably and she was slicing them into a pile of smoking parts before they had even managed to get all the way into the building. Who was she?
“I told you to take Grogu out of here. Your window of escape to your ship is closing Mandalorian! I can deal with this, now go!”
This time she emphasized her words by directing the next blaster bolt, from a second wave of droids, to the floor by his foot.
Djarin finally turned and he and Grogu left the tavern. He had no idea who their benefactor was and wondered if he’d ever learn her name. It certainly wasn’t Ahsoka Tano.
As he wound his way out of the maze of alley behind the Cin V’hetin, Djarin had a few questions for his foundling, who was quiet but still looking smug about something.
“Grogu, do you know her? That woman at the tavern?”
Grogu coo’d and burbled a response.
“I see. You know of her. What ‘of’ her do you know?”
This really wasn’t the moment for Grogu to hold his peace. Usually he’d be lecturing Djarin about everything he’d told the Mandalorian already but knew his dad had ignored it.
Instead, Grogu began to explain everything, just as they came to halt at a roadway they would have to cross. It provided no cover and they could both hear the sounds of the fight they had just escaped.
“She’s not a Jedi? That’s the important part? She’s a friend of Ahsoka’s. Okay. That’s good to know. What else do you know?”
Grogu sighed.
“What do you mean you can’t tell me? I think I should know considering the circumstances.”
Djarin peered down the road from the side of the building and saw nothing remarkable. The sound of the fighting had stopped. He hoped that was a good sign and decided to risk crossing the roadway.
Grogu continued his modified lecture.
“Brethren? Great, another cult.” The Mandalorian trotted across the road, acutely aware of how exposed he and Grogu really were. They made it across without incident and continued down the path to the landing zone and their ship.
They were almost at the entryway when a bright red blaster bolt blazed through the air and connected with the Mandalorian’s partially protected right knee. He grunted at the pain, but didn’t falter, pulling his sidearm as he looked for his assailant and continued to make his way into the landing area.
What he saw was the human female from the tavern physically lift and throw his attacker presumably, still brandishing a blaster, onto the roadway he just crossed. With a swift strike, using a baton, the blaster was shattered as was the hand that had held it. Djarin saw her look over at them just after that occurred and without hesitation she ran over to join him and Grogu.
“I thought I told you to get to your ship.”
The woman snapped as she took a look at the Mandalorian’s injury. To Djarin’s surprise she didn’t even seem winded from her activities.
She chuckled, as if she had heard his thoughts.
“Lucky for you I like Mandalorians, Din Djarin. Come on. I will heal you on the ship.”
She put an arm around his waist and helped him hobble through the dock and to the spot that his ship should have occupied. Grogu babbled at her the whole way.
“Dank Farrik!”
“I thought this might happen. Come on. My ship is over here.”
She turned and nodded toward another path.
“Who are you?”
Din Djarin didn’t believe in this kind of luck and he certainly didn’t believe it could hold out any longer. He refused to move.
“Grogu, you could have told him my name.”
She spoke to the small foundling, who hadn’t cared for the Mandalorian’s tone of voice at all.
“I am called Mira Ost here. But my name is Ta’lan Bet. Ahsoka Tano asked me to keep an eye on you two. You’ve had a busy day today.”
She said as she turned to face him better. She held his gaze and that was unusual in his experience. Most people didn’t like being stared at by any Mandalorian, let alone one that was injured and angry.
Then he considered her words for a moment. Andui was not a large city, but it was the largest city on Takodana. Maybe he had seen her somewhere else that day?
“Where is Ahsoka Tano? I came here to meet her.”
Djarin had to ask the obvious question. He was not happy about this at all, no matter how content Grogu seemed.
“She was detained. And no, I do not know where she is. She contacted me and asked for a favor and I agreed. It is that simple. Now, if you’ll walk with me, I will take you to my ship and heal that wound.”
He looked at the woman again and tried to gage whether or not she could be trusted. This might just be a trick. But how would Grogu know who she was unless she was able to connect to him through the Force? He sighed.
“Fine. Let’s make it quick.”
He relented.
“As you wish.”
She set a reasonable pace and was silent, which he considered a blessing considering how much grief Grogu was now giving him.
When they reached a YT-1300 light freighter she stopped and turned her attention to both of them.
“Welcome to the Bard. We should be safe enough on her while I work out what happened to draw so much attention to the two of you. And heal you of course.”
The Mandalorian watched a ramp lower and saw two forms exit the ship. One was an astro-mech. The other was an HK series assassin droid. What! He reached for his side arm, but felt her hand on his before he could complete the motion.
“That is HK. It does not fulfill its original programming. It’s my co-pilot for this vessel. It will do nothing to harm you, unless you think being called a ‘meat bag’ is harm. We never worked out how to fix that. Right this way.”
6 notes
·
View notes
Text
FindJackWalten update and More! 1/13/24
Some of you may be familiar with the twitter thread Martin made a few days ago, talking mostly about stress and burnout and how he was planning to take some days away to relax, but that he was starting to feel like his current approach to the series was unsustainable and that he was probably going to have to re-evaluate things.
Cue last light! Or this morning, really, when two FindJackWalten pages updated. First we have the main page:
Findjackwalten.com
This page has updated to, seemingly, just show the title of The Walten Files: 4? (Or, if your screen brightness is configured specifically, a little bit more...)
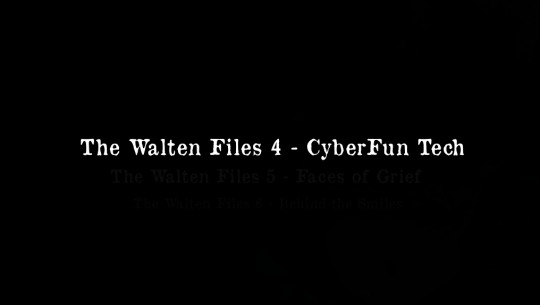
This is really all a single image, which appears like This if i copy/paste it from the website:
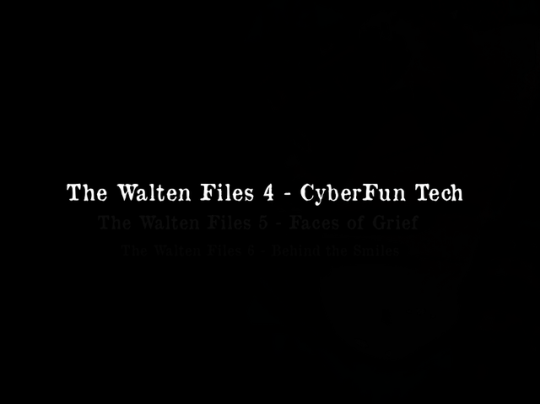
But if taken into a photo editing program and color-adjusted appears like this:
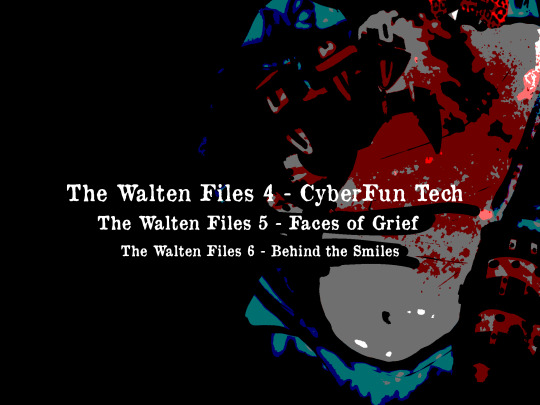
Hi Bon! And the titles of... the next three Walten Files episodes?
We get a better understanding of this when we take a look at Findjackwalten.com/name-me:
The first short part of this page is about the same, except the top text has changed to read "THE WALTEN FILES SEASON ONE (2020-2024)". Then the first three episodes are listed as they were, and then we see the new stuff
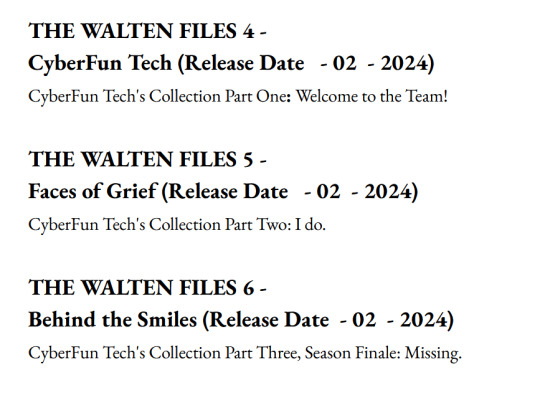
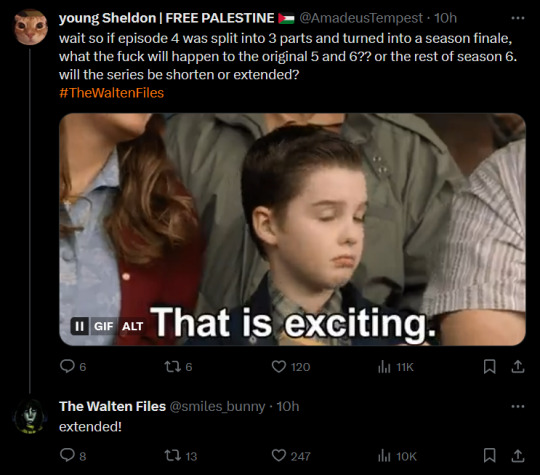
The three new episodes we'd seen before, subtitled as "CyberFun Tech's Collection"? It seems to me like The Walten Files 4 has been split up between three smaller, more manageably-sized videos. Considering TWF4 was estimated to be about an hour and 20 minutes long, I'm envisioning these new episodes to be within the 20-30 minute range, much more like TWF2 was.
Also importantly, it looks like the end of TWF4, now TWF6, is going to be the Season 1 Finale. This leaves the numbers the same, but the actual plot is different. Originally Season 1 was going to have a two-part finale revisiting Sophie and Jenny's narrative where we left off in BunnyFarm.
Speaking of, if you highlight all the text on the page, (ctrl+A is a help,) something new appears:
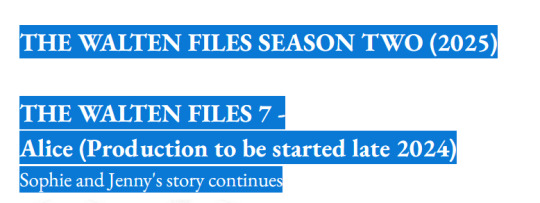
That all said, it looks like these next 3 episodes are all slated to release sometime in February? Which is exciting.
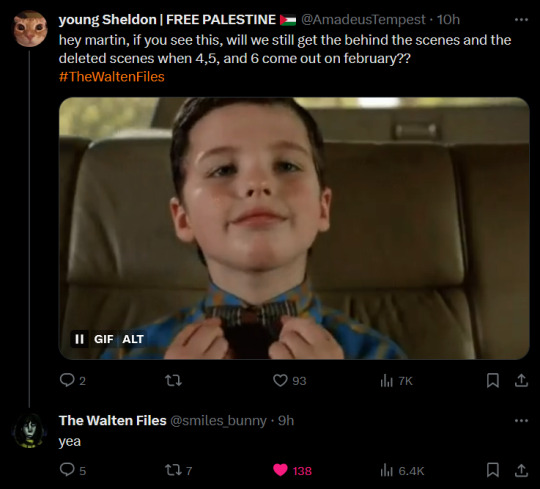
We also have some new tweets from Martin:
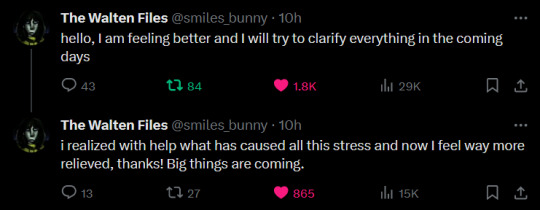
As well as some replies he left on some other people's tweets that give a little more context and explanation for everything:

I'm like, ridiculously excited, honestly? I think this was a really good decision for him to make. Pivoting to smaller episodes rather than really big theatrical ones is a really good move for him, I think. I also think this is going to be better for a lot of fans who were starting to feel like the ever-increasing scope and standard of the series was starting to feel kind of... cumbersome? I've seen more than a few people worried than an almost feature-length episode was going to feel really overwhelming.
So yeah. I think this was a good decision both to make The Walten Files more accessible for new and returning fans and to make it less of an incredible burden on its creator. And that's just a win-win to me. I'm so pleased.
52 notes
·
View notes
Note
link
hi, dear 🏛️! can i assist you rq? so, going from my own experience, it took me some time to understand how and where to make the dividers (you can search them like this here, too), and i can surely recommend photopea.com
so, when you enter the page, it will look like this

you go and press on 'new project'. next thing you'll see are these configurations:

so, on width is always 2000 but the height can be from 1 to 20 (i usually use 7 or 11, depending on my layout) once it opens, you'll see this pre-made divider:

see this little colored square besides the white one? yes. you press on the colourful one, and it will open the colour picker (to put in the hex code you want):

i usually use the # because its easier to use, and you just need 6 digits + letters. once you do, press OK and go back to where you were. you'll see that there are gonna be no changes at first. so, you go here:

and press on edit. after you do, you'll see the button fill and without changing anything, press OK again. ta-da! you have your colour. but you'll ask me "how do i download it then, soph?" and the answer is quite simple; you go on the bar below:

and press on the arrow that points downwards. i usually download it in the PNG format. then, i copy the image from my downloads folder on my laptop/phone and copy-paste it on my pinned <3 hopefully, it helps anyone!
DUDE THIS IS SO DETAILED... THIS ASK IS HELPFUL FOR ME I BEEN RAWDOGGING THIS SHIT IN FIREALPACA64. THANK YOU SO MUCH SOAP
#we hear the wilderness (ask)#soap 🧼#🏛️ anon#i liked the saints (saves & favs)#new tag just for this post so i can find it later...
4 notes
·
View notes
Text
TheraSMD 335 Providers Informational Report (Draft)
Overview: The Genetic Nuclear Development Corp introduced the TheraSMD 335 process in 2032 as a way for Therians to transition to their mentally accepted species.
The TheraSMSD 335 is a particle accelerator used to rapidly split apart DNA. Partnered with the SMD (Small Molecular Delivery device), it delivers the edited DNA to the split sections of the patient.
Configuring the subject's DNA to the selected species can take up to 9 years of treatment. The patient has to supplement the direct treatments with multiple medications and sometimes even injections or implants.
Early adopters of the treatment say it has helped them feel better physically, even if the end result is not as they intended. Current patients have mostly enjoyed results closer to their intended body physiology.
Effects of Treatment: Treatment will completely transform the patient into an anthropomorphic version of their accepted species. The number of anthropomorphic features and levels that each patient experiences differs from case to case and requires more R&D to narrow. Example of effects of a patient using Dragon HRT (Humanity Replacement Therapy): (Insert the entirety of Sabines' Dragon HRT work here) The treatment does affect mental state by putting the subject in the species' mental state. However, the patient will never have a total replacement of mentality, nor will the treatment affect memory. Most patients report body image issues even long after the body form is completely changed. This phenomenon has been widely recorded for hormone replacement patients as well.
Provider Concerns: Some professionals accepting of the point of treatment are still wary about the procedure, and a substantial number of providers make the patient wait up to 3 years, expecting the patient to attempt living as their desired species. The patients are especially expected to come out to other people in their space so that the changes do not glare as if the treatment is taken. Those doctors who do not require this tend to be research doctors. Most prescribers are still trying to learn the best ways to conduct treatment.
Patients willing to take the treatment tend to already be their species in their minds, which reaffirms that through their bodies. Surprisingly, a large number of patients are prescribed Dragon HRT. Being the most drastic change and painful, the patients are unusually well prepared. Limitations of the treatment are the anthropomorphic look of any species from a complete treatment. This must be stressed more, as those looking for a total change are few due to treatment issues in the feral state. Similarly, halting treatment creates form issues as the body is lost between the two species. Dangerous loss of body chemistry is the most common symptom. Rare cases show the subject completely losing their mind, usually triggered by outside factors from the treatment. Additional stress outside of the treatment is a major contributing factor.
Detailed Example Patient Treatment Session: Treatments are conducted the same way every visit. The subject must confirm pre-treatments of SMD are in their system (usually injections by the patient at home, followed up by bloodwork before visits) The subject enters one of the treatment rooms, is restrained, and the technician exits the room to a radiation-safe room. The subject has to remain awake for the entire treatment. The beam is placed before the top of the subject's head and then travels the length of the body, doing a diagnosis pass. After target centers are found, the beam traverses the body again, firing out segments of DNA for up to an hour. SMD, already in the body in mass, fills in these breaks relatively instantaneously. Once the technician determines the procedure, the subject is released from restraint and taken to postop holding. Another hour of post-treatment study is mainly used to verify that the body has accepted the changes. If issues are found, subsequent treatments may be required in the same session. Most patients complain of a stinging, burning sensation across their body up to two hours post-treatment. Some even mention a sometimes even "metallic burning" smell. This is attributed to the particle beam trimming and has been determined to be inconsequential.
Provider Insurance Notes: Some physicians who perform the procedure have to list treatment as a type of cancer needing radiation and gene therapy. Most insurance does not cover treatment outright; in some states, the treatment is outright banned. Some patients have been known to damage their cells through /redacted/ to justify full treatment immediately. Advise patients not to take these steps as it can drastically affect treatment outcomes.
Informal Summary (the part Dr. Dipshit ignored): As one of the team of researchers who founded this procedure, I cannot stress enough how important this work is to hundreds of thousands of people. Streamlining treatment and hastening treatment acceptance must be paramount, as some patients have no time to wait. We must be thankful that science has given us this through years of work and the support of those who need it most. As a soon-to-be patient, I implore those delivering this care to remember their goal as healthcare providers and their oath in our field. It may be messy, and you may get thrown across the room by a frustrated patient, but don't hold it against them. Know that because of you, they are still there, able to be frustrated because of your dedication to their care.
15 notes
·
View notes
Text
I remember running a terrible Zoostorm laptop when I was 12 and It had 1GB of RAM in a time when machines came with at least 2 as a standard option, and some people believed that you'd never need more than 4GB for anything.
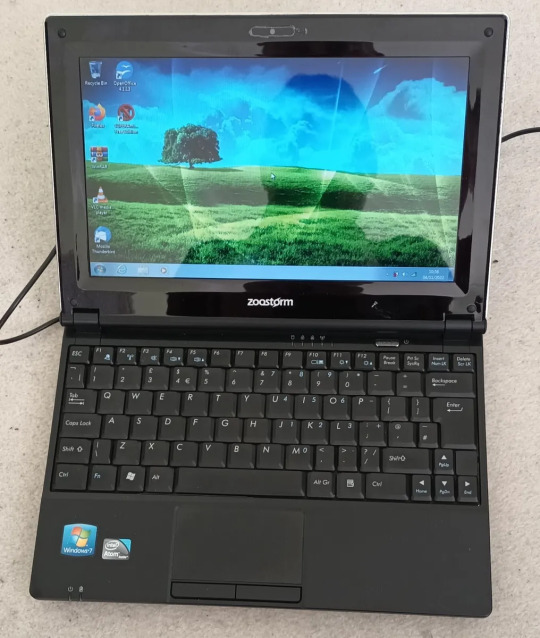
Image source
My parents bought me this thing because I had caused a little bit of an issue in our house, and that was my constant need for floppy disks post year 2000. We ran an Amiga 1200 in the dining room of our home as it was what my parents both used to code on in the mid 90's. We had tons of software for that thing but the coolest by far was a programming environment called AMOS. It used a proprietary (read: now unsupported) programming language called AMOS BASIC and the only resources we had for the language was whatever my dad remembered and the official language guide which, if i remember correctly, was thick enough to beat a goat to death with.
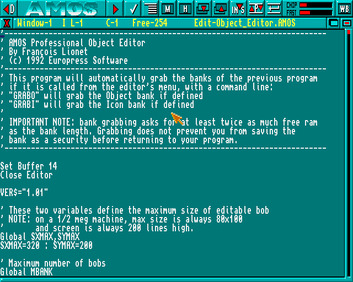
Image credit
The guide was sometimes really good at explaining language features and best use cases for mid 90's game development methodologies.
You can actually still download AMOS and run it on a Windows machine, or OSX and GNU/Linux if you have the tools to run applications meant for windows.
I moved from an Amiga sporting 2MB of chip RAM and 8MB of fast RAM to a Windows 7 laptop with a whopping, for the time, Gigabyte of Random Access Memory.
I couldn't wait to see the types of software that I could make with 32 bit technology and how I could use new... Oh, it crashed.
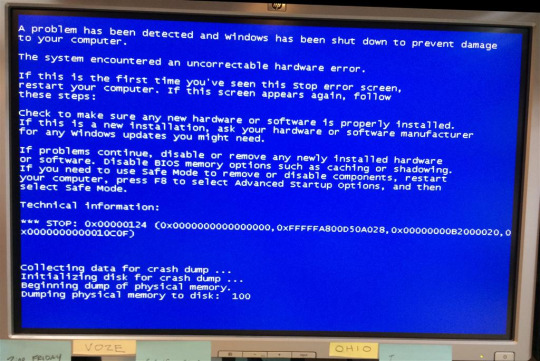
Image credit
Windows 7, at least on my machine, was a garbage fire. Somewhere along the way when we transitioned from floppy disks to hard drives and hard drives to solid state, programmers suddenly forgot how to make good decisions. The amount of driver errors, lag spikes, and crashes I experienced on that platform made me hate Windows, and even to this day, I really don't trust it.
I once turned my laptop on to find Windows using 90% of my available RAM, and it wasn't even running anything.
This frustration led me to look further afield. I knew that I liked the UNIX like systems from helping my dad run a FreeBSD server, and because of that, I very nearly bought a mac. Nearly. I still like to have a usable computer and do things that Apple don't want me to do, like change my settings in a way that matters.

Image credits
I finally found out enough to flash Arch to my USB drive and install it using a guide i found on a reddit thread. after editing all of my settings, i pressed enter, sat back... And bricked the fucking thing. Archinstall was a blessing from the gods, but we didn't have that yet.
2nd choice was Debian. Not only was it pre-configured out of the box, it had a package manager that made sense and came with development tools already built in. I played around with a few other distributions over the years until i discovered that they're all either Debian or Arch with a different package manager and desktop environment.
GNU/Linux blew my mind. The fact that all of this software was just out there for free fort anybody to use and change astounded me, and it still does to this day. You need to run a piece of hardware that nobody has made a driver for in about 20 years? Debian probably has it built in. You want to make video games? Debian can do that flawlessly. You want to play video games? Steam installs natively and comes with Proton!
By the time I was ready to go to College at 16, I was using Linux full time, and Archinstall had been added to the installation ISO (thank god). I used arch for all of my studies there, and all of my studies at University. I passed my degree because my software was free. I even had a C# compiling and running for my Programming 101 classes.
I do occasionally run Windows at some point from time to time, but i always make sure that WSL is installed. I do not see the need to download a piece of software to do something when Debian has the command built-in.
If it were not for the FOSS community, and GNU/Linux as a whole, I probably would not be the programmer that I am today, and I wouldn't have been able to learn many of the complex topics I needed for the field I have worked in due to the closed, corporate nature of the vast majority of software out there.
Sorry for yapping.
3 notes
·
View notes
Text
Glitch.GUI Cross Platform Glitch Art Generator and Effects Processor
Linux

macOS

Windows
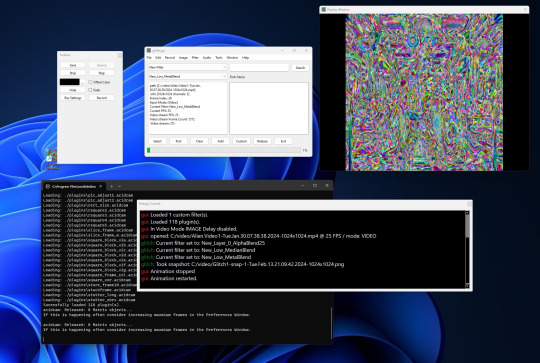
Glitch Art Generator and Effects Processor
This application enables users to generate captivating glitch art to use as base images for AI or apply various effects to any image or video, including those generated by AI. Users can chain effects together for both images and video files, and they have the ability to save custom filters created by mixing and matching different filters and plugins. Additionally, users can opt to incorporate sound from the original source video into their edited videos. The application also offers the functionality to rotate videos between portrait and landscape orientations.
How It Works
Input Files: Provide an example image or video file to begin the process.
Start Animation: Initiate the desired animation effect.
Save Output: Press the "Save" button or the shortcut key "s" to save a snapshot of the generated art.
Record Video: Optionally, record a video file by configuring the recording settings.
Navigation: Use the arrow keys to navigate through available distortion filters. Press "s" to save, "d" to start/stop recording, "e" to step through, or utilize the GUI buttons to perform the same operations.
Filter Application: Note that some filters may appear to have no effect on an image initially. In such cases, select a filter that induces visible changes, press the first button, and then choose the seemingly inactive filter. This is because certain filters require an animation to execute their intended action.
Required libraries: OpenCV 4, http://github.com/lostjared/libacidcam - libacidcam, Qt6, Qt6 Web Engine Widgets (on debian qt6-webengine-dev)
To compile for Linux download and install libacidcam
git clone https://github.com/lostjared/libacidcam.git
cd libacidcam
build cmake ../
make -j8 && sudo make install
enter directory of glitch.gui
qmake6
make -j8
./glitch.gui
Note: This program is pre-release so it may contain errors or bugs. We are working to make the program the best it can be.
Jared Bruni
2 notes
·
View notes
Text
How to Disable Copilot on Windows 11
Windows Copilot, Microsoft's new AI assistant, can assist you with a variety of tasks, such as answering questions, changing system settings, and creating AI images. However, if you're not a fan of Copilot or simply don't need it, you can remove its taskbar icon or disable it entirely on your Windows 11 PC. Here, we'll show you how.
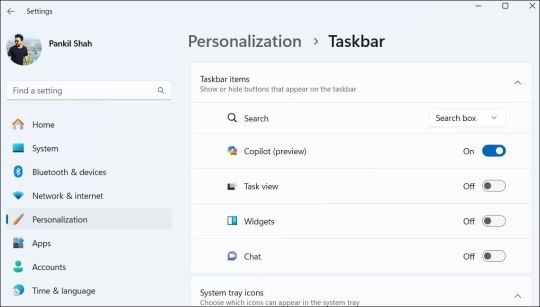
How to Remove the Copilot Icon From the Windows 11 Taskbar
By default, the Copilot icon appears in the Windows 11 taskbar. However, if you prefer not to have it there but still want to use it occasionally, it's easy to hide the Copilot icon. Simply right-click anywhere on an empty spot on your taskbar and select Taskbar settings. In the Settings window that appears, turn off the toggle next to Copilot.
This should remove the Copilot icon from the taskbar. You can still access Copilot by pressing the Win + C keyboard shortcut in Windows 11.
How to Completely Disable Copilot via Group Policy Settings
Although hiding the Copilot is quite easy, it does not turn it off completely, and you might inadvertently access it. Fortunately, you can turn off Copilot completely via the Local Group Policy Editor on PCs running the Professional, Education, or Enterprise edition of Windows 11. - Press Win + S to access the search menu. - Type gpedit.msc in the search box and select the first result that appears. - Select Yes when the User Account Control (UAC) prompt appears. - Use the left pane to navigate to User Configuration > Administrative Templates > Windows Components > Windows Copilot. - Double-click the Turn off Windows Copilot policy on your right. - Select the Enabled option. - Hit Apply followed by OK.
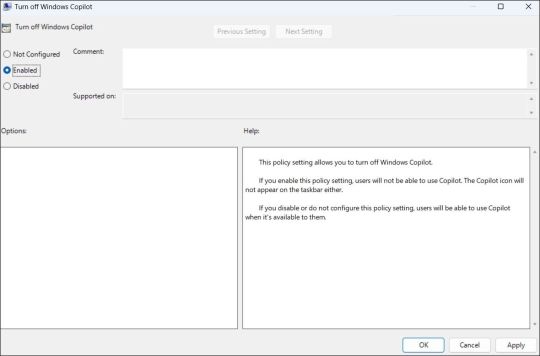
Once you complete the above steps, Copilot will be disabled on your Windows 11 PC and you won't be able to access it even with the keyboard shortcut. If you want to re-enable Copilot later, repeat the above steps and set the Turn off Windows Copilot policy to Not configured or Disabled.
How to Completely Disable Copilot by Modifying Registry Files
Another way to disable Copilot on Windows 11 involves modifying registry files. However, since editing the registry can be risky, you should follow the steps carefully. Also, be sure to back up all the registry files or create a restore point. This will allow you to restore the registry files in case something goes wrong. Once you’ve done that, here’s what you need to do to disable Copilot via the Registry Editor: - Press Win + R to open the Run dialog. - Type regedit in the text box and press Enter to open the Registry Editor. - Select Yes when the User Account Control (UAC) prompt appears. - Use the left pane to navigate to HKEY_CURRENT_USER > Software > Policies > Microsoft > Windows. - Right-click the Windows key and select New > Key. Name it WindowsCopilot. - Right-click on the WindowsCopilot DWORD, go to New, and select DWORD (32-bit) Value from the submenu. Name the DWORD TurnOffWindowsCopilot. - Double-click the TurnOffWindowsCopilot DWORD, type 1 in the text field, and click OK. - Restart your PC for the changes to take effect.
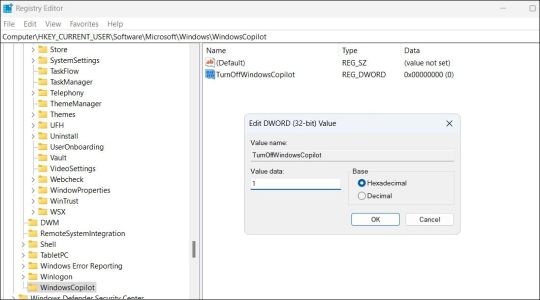
And that’s about it. Windows Copilot will be disabled on your PC. To re-enable it in the future, repeat the above steps and set the TurnOffWindowsCopilot DWORD value to 0. You can also delete the TurnOffWindowsCopilot DWORD instead.
Get Rid of Copilot on Windows 11
While Windows Copilot is a powerful tool, not everyone may want to use it. Fortunately, it’s possible to get rid of it. The above steps will help you achieve your goal, whether you want to keep Copilot out of sight or turn it off entirely. source Read the full article
3 notes
·
View notes
Text
Inform 7 Basics: when the story ends, #2
Hi all! I am travelling tomorrow, so here's Saturday's update. We talked about craft and failure last week. On Tuesday, we looked at some related code. Today, we'll continue looking at the code side of things.
Today's info involves a table, which Tumblr really can't handle. The borogove link at the bottom of this post will take you to some sample code that compiles. If you haven't used borogove before, it's pretty neat!
When play ends, a list of options are presented. In vanilla inform, those options are undo, restore, restart, and quit. These options can be configured, as they are stored in a table called, appropriately, the "table of final question options."
In inform, columns are separated by tabs. Rows are each on a new line. They don't look very good! But they work. It's an adjustment for sure. It's easier when rows fit on one line, so widen the source pane in your IDE if necessary. I'll post the table in the borogove doc below. You can find it in the standard rules [file->open installed extension->Graham Nelson->standard rules].
We can edit the table. The main reason we'd have for doing that is disabling one of the options. If we wanted to prevent undo, we could clear it from the table.
The best time to do something like that is either when play ends or begins.
when play begins: choose row with a final question wording of "UNDO the last command" in the table of final question options; blank out the final question wording entry.
syntax for tables is very specific! You can find more info in the documentation.
The options that Inform 7 prints at the game over screen are pulled from the "final question wording" column. Blank out the relevant entry, and it will no longer appear.
If you want to add something, that's yet another table change. In that case, we'll be adding a row. That's easy; we don't need an action processing rule. Inform 7 will treat our new row as part of the table, no questions asked. You can look at the Borogove snippet to play with it, but here's a picture.

Do you see the "only if victorious" column? If the value is "true," Inform will only show the option if "end the story finally" is invoked. What's this "final gloat rule?" We can trigger something--text mostly--by making and naming a rule here. That ought to be easy for us now:
this is the final gloat rule: say "Bweh heh heh heh.".
We can do conditional text, read tables, and so forth, but the game is over--changing the world state is almost certainly out of the question. I had several victorious=true rules in Repeat the Ending, mostly related to score, images, and showing the various endings. The player could view the *GUIDE* as well.
What else? You can mess with some of the response text. For instance,
the print the final question rule response (A) is "Nice! Would you like to ".
As a reminder, you can do RESPONSES ALL while playing a test build. Copy and paste the output into a text file! You can hunt down any other text you'd like to change.
As a final note: want to give players "lives," or otherwise make death conditional?
if [some condition you pick]: resume the story.
As a reminder, you can AMA! The tag for this series is #i7 for beginners.
3 notes
·
View notes
Photo


May 2023
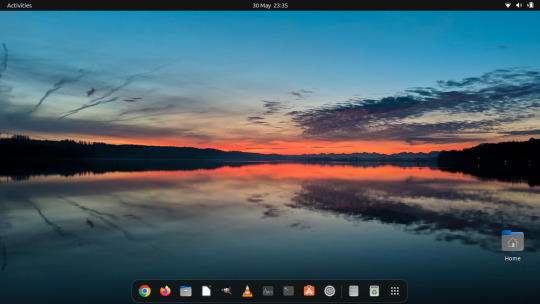
Linux Laptop Install 2
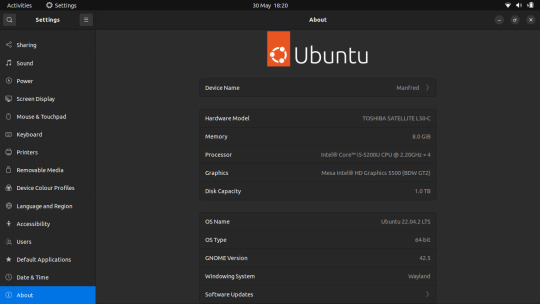
Ubuntu 22.04 LTS (Jammy Jellyfish).
Ubuntu wiki link:
https://en.wikipedia.org/wiki/Ubuntu
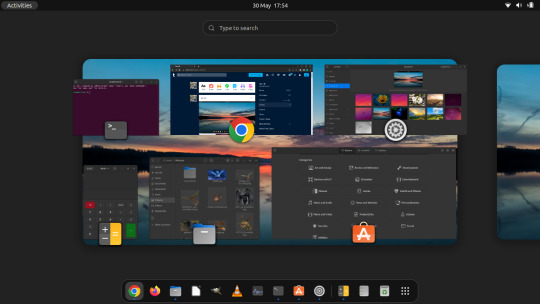
After it had installed, I checked for any outstanding system updates and then I configured Ubuntu's personalisation as follows: - Set my theme colour to Blue - Change the system theme to use the Dark theme - Changed the default position of the dock ‘left’ to ‘bottom’ of screen. - Set a desktop background
I have also set the dock to Auto-hide when windows overlap it to save workspace size.
I downloaded and installed Google Chrome and installed a number of apps through the Ubuntu SNAP store, these include: GIMP VLC Media Player For more information on SNAP see: https://en.wikipedia.org/wiki/Snap_(software) I will install more apps through the Ubuntu Store as I find out more about what's available. I found this laptop's performance has dramatically improved compared with Windows 10.
However the Bluetooth and the camera don't work properly due to hardware issues which were there before.
I connected the Epson printer to the Ubuntu laptop and printed a test page successfully.
See the printer session and test page in post below.
Also, the laptop has a maximum display resolution of 1366x768 pixels making it quite restricted when moving and spacing all of the windows on-screen.
The muti-media function keys on the laptop work perfectly with Ubuntu.
These include:
Search, Brightness, project, touchpad, media playback & volume controls.
I really like the 'Eye of GNOME' Image Viewer that comes with this distribution.
Wiki link: https://en.wikipedia.org/wiki/Eye_of_GNOME
I like its simple yet functional user interface, how snappy it feels to use, its support for SVGs (Scalable Vector Graphics) and transparent images.
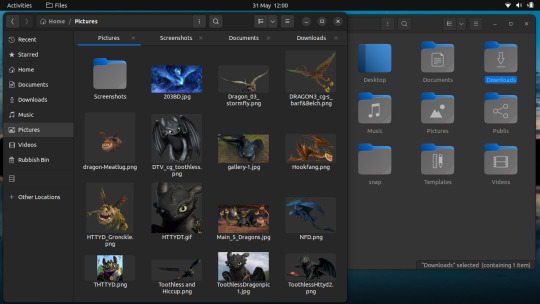
The file manager is called GNOME Files (previously Nautilus).
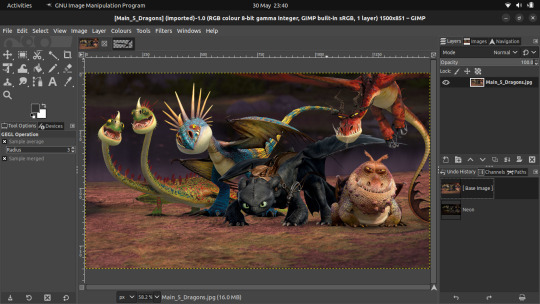
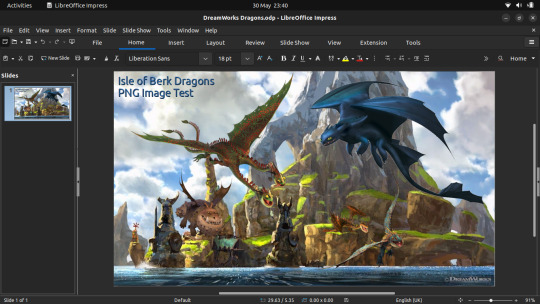
I played with LibreOffice Impress and edited some pictures in GIMP.
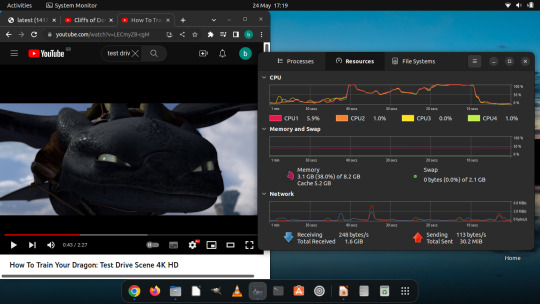
I also tested a 4K YouTube video which played flawlessly on the laptop as shown in the Activity Monitor!
The GNOME Disks utility and File Systems tab.
In the future I might try installing other Linux distributions to test.
4 notes
·
View notes