#heres how the mb from my tutorial turned out ☆
Explore tagged Tumblr posts
Visit Tumblr Blog
Explore Tumblr blogs with no restrictions, modern design and the best experience.
Last Seen Tumblr Blogs


Fun Fact
Tumblr was attacked by a cross-site scripting worm deployed by the Internet troll group GNAA on Dec 3, 2012.
Text
🥖 𝓨𝗈 𝗍𝖾𝗇í𝖺 𝗎𝗇𝖺 𝖾𝗌𝗉𝖾𝗋𝖺𝗇𝗓𝖺 ᭪ᬻ𓏸𓈒゚⃝
𝅄 ི۪۪۪ ֯ ּ ֗ ۫ 𝖤𝗇 𝖾𝗅 𝖿𝗈𝗇𝖽𝗈 𝖽𝖾 𝗆𝗂 𝖺𝗅𝗆𝖺 𝅘𝅥𝅮♪ ˟̫ː᜴ 🍰


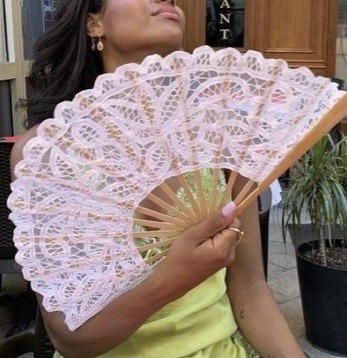
#꒰ atsubie ꒱ ౨ৎ︵⠀⠀#gif by me#heres how the mb from my tutorial turned out ☆#ㅤㅤㅤㅤㅤㅤㅤㅤㅤㅤㅤㅤㅤㅤㅤㅤㅤㅤㅤㅤㅤㅤㅤㅤㅤㅤㅤㅤㅤㅤㅤㅤㅤㅤㅤㅤㅤㅤㅤㅤㅤㅤㅤㅤㅤㅤㅤㅤㅤㅤㅤㅤㅤㅤㅤㅤㅤㅤㅤㅤㅤㅤㅤㅤㅤㅤㅤㅤㅤㅤㅤㅤㅤㅤㅤㅤㅤㅤㅤㅤㅤㅤㅤ#stayc layouts#stayc moodboard#stayc j#kpop icons#kpop layouts#messy moodboard#kpop themes#kpop moodboard#kpop aesthetic#alternative moodboard#alt moodboard#colorful moodboard#yellow moodboard#pink moodboard#indie moodboard#y2k moodboard#fresh moodboard#nature moodboard#soft moodboard#simple moodboard#maximalist moodboard#retro moodboard#vintage moodboard#dark moodboard#edgy moodboard#divider by im4yeons
236 notes
·
View notes
Note
Your art so surreal, did you take inspiration from African masks it’s amazing. You have probably gotten this question before but what’s your process and how do plan these beautiful pieces out. I am a beginner artist and would like some advice on how start doing digital painting.
thank you for bringing me back from the dead with your kindness, (i was so sad today ughhhh i think watching vampire diaries starting to affect me hjkhjk), i really, really deeply thankful that you spend your time to write something so sweet (also sorry it took me literally ages to reply phphp THE USUAL)
yeah, in buryatia shamanism like the big thing, so when i went to search what's out there in the masks department - google's mess of the results for once was helpful and showed this massive collection of beautiful african masks. the one that was inspo for tiisha lived in my head rent free for weeks before the character was even born phphph now i cant even imagine her without it
(here is little tiisha for you before i'll proceed to be not helpfull phphphph)

oof advices are not my strong side , like..........my process mostly is just sleep through the whole thing i guess..........................i very rarely do sketches, i hate study anatomy and perspective, drawing cubes makes me physically sick etc etc my approach to drawing were "fuck around and find out", always about chill and fun and barely ever about learning. imho thats why im so shitty at drawing simple things but not bad at coloring. so yeah, my biggest advice always and forever will be - be gentle to yourself, please
digital or traditional or whatever else is out there, dont forget you make it for yourself and for yourself only okay? it supposed to be fun, not sad tiring and competitive
advices for digital specifically tho - very objective, apply with caution
learn all the keyboard shortcuts, ideally to press them without thinking
explore more instruments than just brush. it will be tedious and sometimes feel like a chore so mb pick one victim once a month and browse youtube for a stuff like SECRET ULTIMATE TIPS ABOUT MAGIC WAND TOOL THAT WILL SAVE YOUR LIFE (they indeed will save your life)
check if your drawing program has artboards - turning it on will give you more freedom over canvas positioning and your refs will always be there and not in the separate window
idk about others but using auto tone, auto contrast and auto color often gives me well needed perspective on what im doing
in 99% cases be sure that you can reanimate even the most messiest artpiece you ever did. working in digital gives you the chance to mess with shapes, colors and perspective at any time so if you dont want to gave up on something - you absolutely didnt have to
from time to time while you are still learning - go out there in the wilds and search for the new brushes. tweak with them if you want. i have like ~500 and i use 6 max, but those 6 i found by at some point trying to draw with all of the 500
MADE. BACK UPS. and i mean not like save layers just in case before merging them (tho that's too will help) no, i mean click SAVE AS once an hour and create A NEW FILE. PLEASE. i lost so much stuff to sudden power outage. its never pretty and you loosing will to work for days
watch at least one tutorial about the whole rgb srgb and cmyk thing - i did, understood not a thing, but at least im not playing dora the explorer with my colors after the export now
uh idk think thats it? tried to think about those that id hope i knew when i started so hopefully something will help
have fun with your drawings!!
63 notes
·
View notes
Note
can you talk about how you made the costume please 🙏🙏🙏
:D sure!!! putting it under cut bc it's a lot lol
when i got the idea i had absolutely No clue as to how people even go abt cosplays like this, so step 0 was obviously One Billion Youtube Tutorials (this one - it's in polish but has eng subtitles - was my best friend <3 but there's really sooo many for every little aspect of making armor cosplay i owe them my life)
anyway. proceeding. assume every step takes a fuckton of trial and error and at least 3 failed attempts
REFERENCES:
collected all the covers where u can see mb's suit well, some fanarts that interpreted it in ways i liked, the 2 previous mb cosplays i found
PLANNING:
little to no planning (bad idea. btw.)
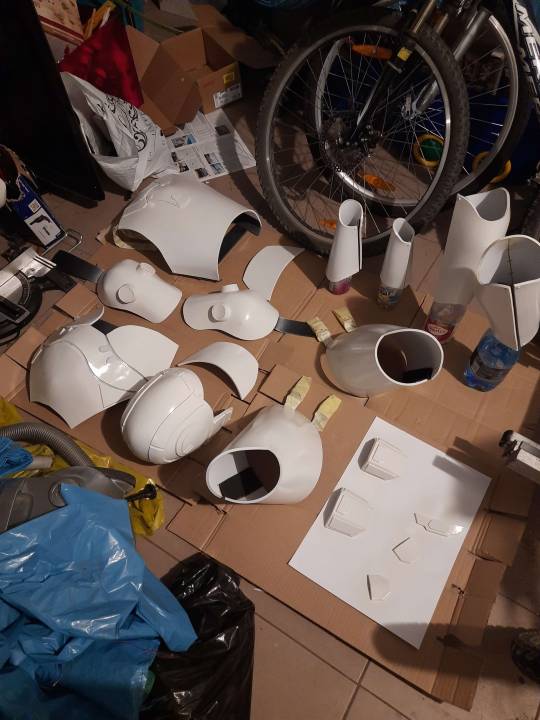
MATERIALS:
regular long-sleeved shirt+pants+cycling gloves+fanny pack. (sorry murderbot. but the armor piece over its crotch literally looks like a fanny pack)
the armor's made out of smth called EVA foam (similar to yoga mat in terms of texture/stiffness), had to order it from a cosplay-specific online shop
heat gun (i was lucky bc my dad's an amateur handyman and turned out to already have one) bc EVA foam's much easier to form+less absorbent when heated
contact glue (also known as contact cement) for glueing the armor pieces whole, superglue for details here and there
straps (the kind u use in backpacks etc)+plastic buckles+velcro. so much velcro. i'm never hand-sewing thru velcro again
wood glue+smth called glossy universal lacquer (p sure it's just car paint.) for painting
transparent plastic mask + rit dye for dyeing it (bc i couldn't find one that was already dark 😔)
tape+cling wrap for patterns
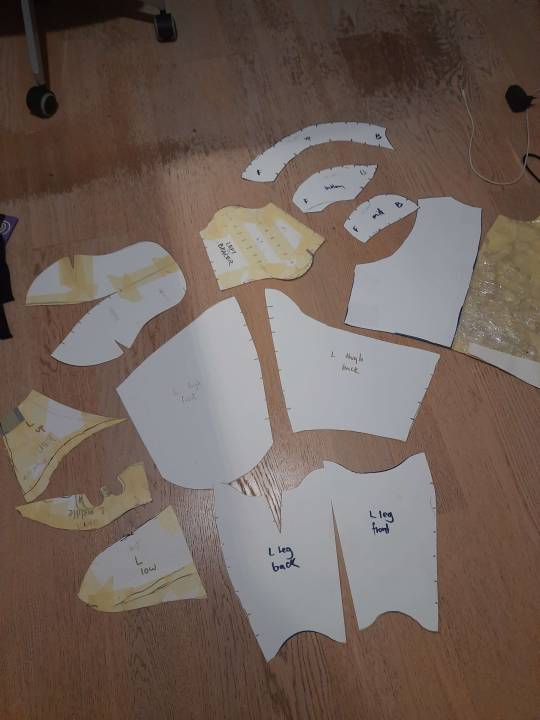
MAKING PATTERNS FOR ARMOR:
okay so. you wrap [Given Body Part] in cling wrap (yeah just regular kitchen cling wrap). put tape (i used duct tape at first but switched to masking tape bc it's cheaper) all over. draw, roughly, the shape you want the armor piece to be. cut urself out, cut away the excess edges, bam! pattern. like these:

(the chest piece was the tough part. i wanted the characteristic rounded shape so i didn't use cling wrap there, it was a lot of trial-and-error with cutting shapes out of paper, putting them against my chest, adjusting things, rinse&repeat.)
(also, the helmet - for the face shield i got these v cheap plastic masks that were advertised as lawn mowing masks (???), then tried to dye them black with Rit Dye for synthetics. that was a Whole Ordeal & my best try still turned out too see-through & more orange-tinted than i liked, but i was out of time so (shrug emoji). & for the pattern, i put on the mask + a beanie before wrapping my head in cling wrap dkjfgn)
i cut the patterns into shapes that could be flattened & copied them onto paper (to be able to transfer them onto foam more easily):
ACTUALLY MAKING THE PIECES:
the annoying part: outlining all patterns on the foam and cutting them out with a box cutter. This Sucks. then, shaping them with the heat gun. This Doesn't Work As Well As It's Supposed To. then, glueing the pieces together with contact glue. This Takes Ages.
(& it's like. near-impossible glueing them so the seams don't look terribly obvious 😭 i'm sure there's a way to cover it up well, but the method i tried (foam clay) worked Eh at best)
oh right also the. thingy around the neck. that's just a tube made out of some leggings i was gonna throw out. filled with a bunch of cotton i stole from a pillow. improvise adapt overcome
ATTACHING IT ALL:
That's Velcro, Baby 👍 it's either glued onto the foam or sewed onto the straps Everywhere. it's how the forearm & thigh & lower leg pieces close, how the chest & back pieces connect, how the face shield's made removable. Velcro All The Way Down.
the 2 exceptions: the thigh pieces are attached to a belt with some straps bc they kept sliding off; & the tiny armor pieces on my feet have a loop of string glued on the inside that i just pulled my shoelaces through
PAINTING:
the issue with EVA foam is that it absorbs stuff v easily, so before painting it i had to prime it (aka cover it in 2-4 protective layers of wood glue). then for actual painting, i sprayed all the pieces with 2 layers of universal lacquer (outside on some cardboard ofc). here it is all drying in the garage (bc it stank 💀):
and that's it!!!! done!!!! a bit over a month of work in total :]
#thank u for asking! hope it all makes sense (and if it doesnt i'd be happy to answer more questions)#going to bed now tho gn
33 notes
·
View notes
Text

@not-that-syndrigast I know I already answered you, but maybe this will make it a little clearer on how much work goes into making gifs.
Killy (known as tlkvikings, formerly underragingwaves) got a really good tutorial for gif making, so even when you don't ever wanna create gifs, it is worth giving it a read just to understand the effort a little better.
First you need the source, which means you have to download the movie, show or specific episodes you want to gif. The higher the resolution, the better the gifs will turn out. Of course, you can also screencap it directly on your laptop or phone, but that will take away from the quality. I'm not shaming anyone who does it (I did it in the past), just saying you can expect it to be a bit pixel-y. You use a different program to gather the caps of the scene you want to gif in a file and then you delete all the caps you don't need, because otherwise the gif will be too long and take up too much space (mb). Which means you might not be able to post it on tumblr, since they got a restriction.
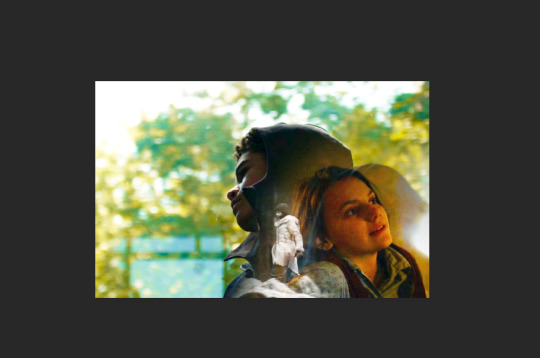
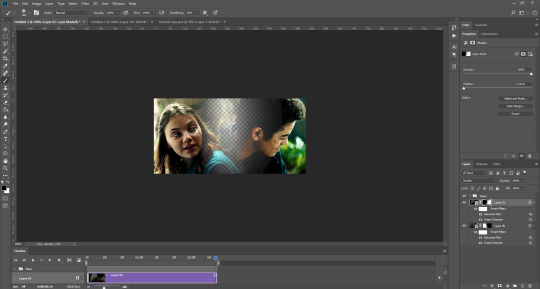
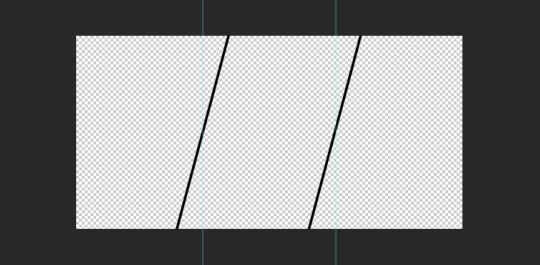
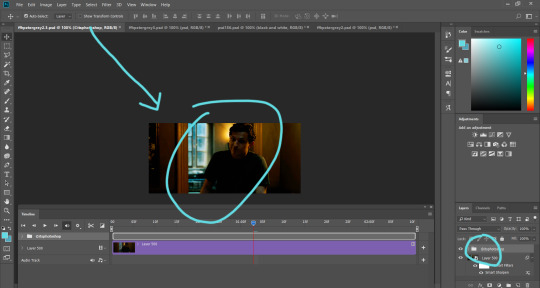
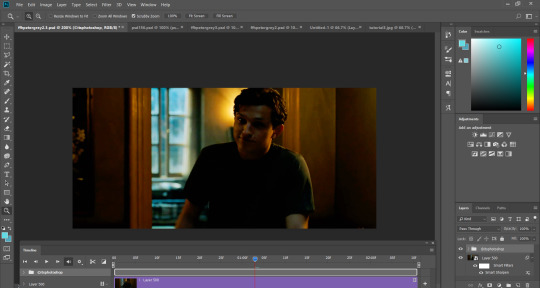
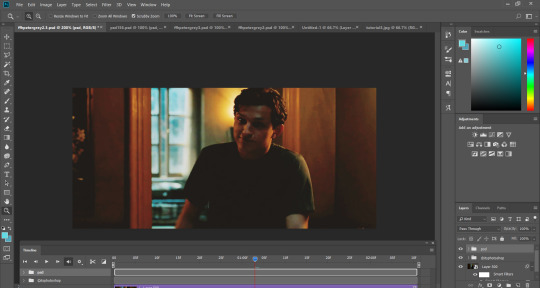
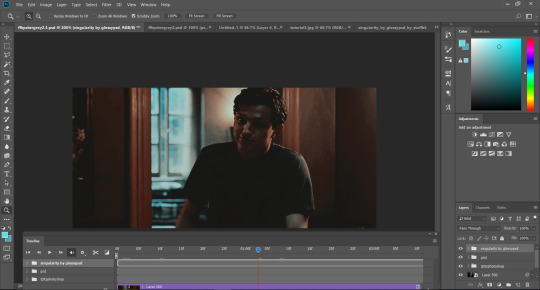
Then you follow the steps in the tutorial mentioned above (using another program again), which I won't elaborate here. Either way, when you don't do any work on gifs and just use them as they are then there is quite a huge difference (especially with Vikings, because Hirst thought it would be fun to layer the show with one abhorrent filter on another), for example, left is without any layer, right is the one I worked on:


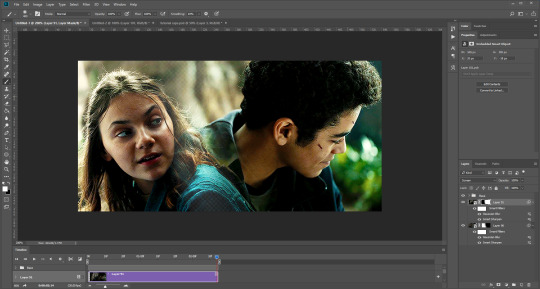
same here:


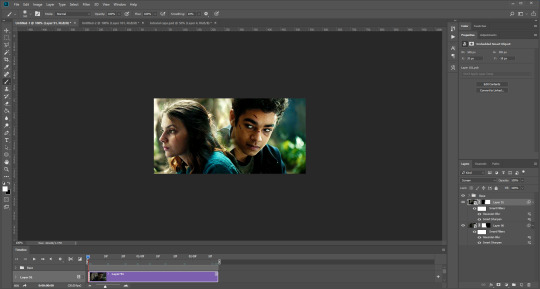
and here:


and these are just the ones with the yellow filter being a nuisance. Vikings has a shitton of scenes where everything is cyan. But you catch my drift, right? It is really hard to give these actors their actual skintone back (sometimes I google them to see if I matched it alright, like with Pekitaulet). Hell, most of the awesome outfits get fucked over due to the filters stealing all the color and details.
Is the outrage a little easier to understand? We gifmakers don't just hit one button and the scene we picked is finished and ready to post. It's a long process and I think I can speak for all gifmakers that we're really tired of our work being stolen.
You can also find Killy's before and after photoshop gifs post here!

@vikingwarrioraragnarsson No, they are not from google. Those gifs you used are from a friend of mine and other gif makers. Stop being a stealing cunt.
How mature to block me instead of apologizing for STEALING other peoples works. I am so sick of this stupid fucking RPC. Fuck off. Seriously. Get lost. You have no place in the Vikings Fandom and NO right to use other peoples art, gifs or ANYTHING.
21 notes
·
View notes
Photo

Requested by @tennant!
For this tutorial you will need:
Some basic gif-making knowledge (see my last tutorial!)
I’ll be using CC 2017 to do this, but as long as you have the timeline option, this will work for you! 🥰
So, in a sort of part two to my other gif tutorial, (https://luke-patterson.tumblr.com/post/636980573506813952/) this is a slightly more advanced part of gif-making. But I promise it’s easy when you know how!
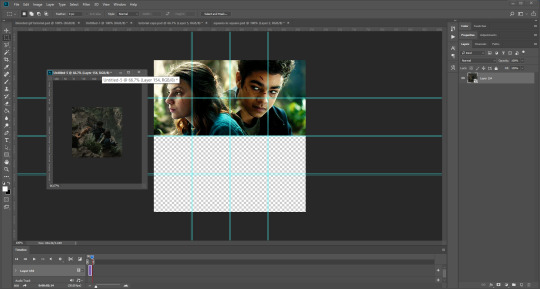
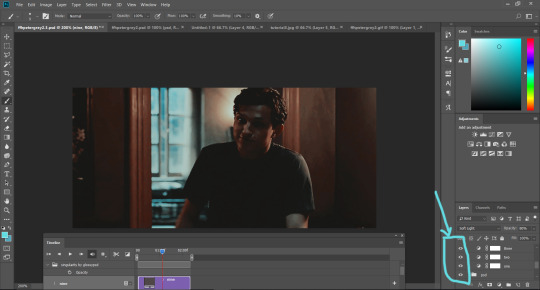
Assuming you followed the last one, you’ll already know how to make your gifs into a smart object, so we’ll start there!
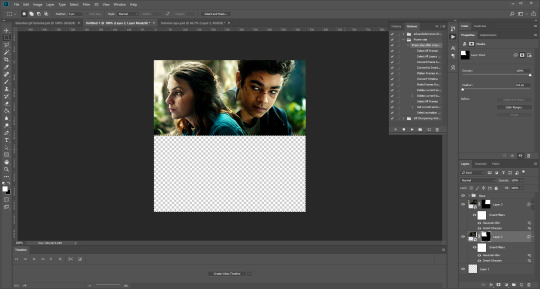
PART ONE: BLENDING
Drag both of your gifs into the same file. For this to work, your gifs have to be the same number of frames, or at least cropped to the same length in the timeline window, otherwise one will loop before the other, and it will mess up the loop of the gif. (For when we get to the multiple gif part, I recommend having between 60-80 frames, so it stays under tumblr’s 10 MB limit.) As this tutorial uses smart layers, they can both be sharpened as well.
(I made this gif 540 px by 268 px, because I’m going to add more to it later. But we’ll cover that further down in part two!)
Honestly, I find it so much easier to put my colouring on top of both/all the gifs, and then clip individual layers down onto a specific gif, if that one needs more of its own colouring. That way, the extra layers don’t interfere with the other gif(s). It’s so much less confusing visually for me than having lots of groups with their own colourings, and it makes moving the gifs around simpler.

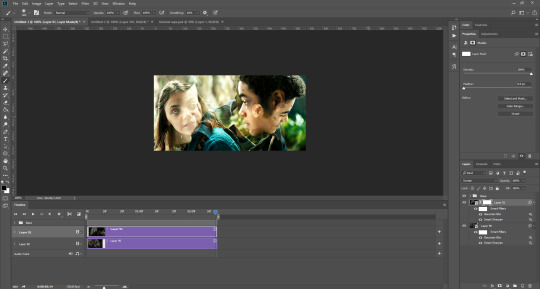
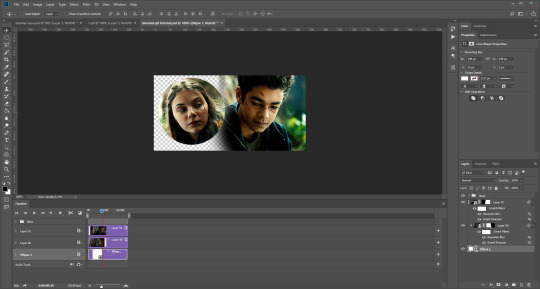
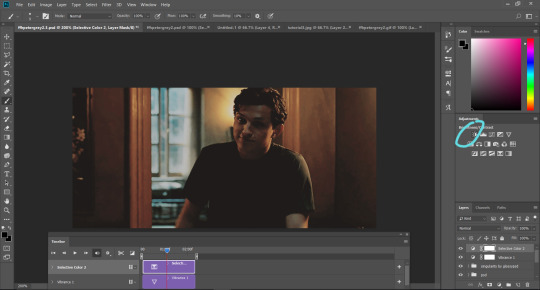
Position them side by side, one on top of the other. Obviously, you can play around with the positioning: this may be easier to do once they are blended, especially as some gifs may be smaller and you need to try them in different places. For example, this is a screenshot of a Lyra/Will set I made in the past, with three blended gifs of different sizes:
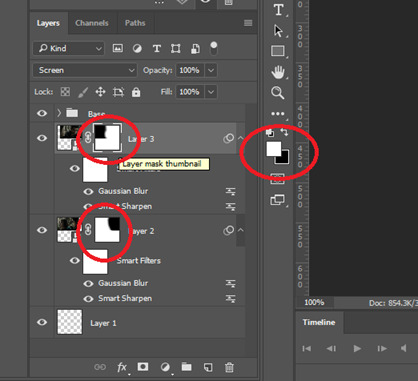
Add a layer mask to both of your gifs. You might not need to edit both, but I usually do, as I like to balance how much one gif blends into another! Using the brush tool (set to black, when you’ve clicked on the layer mask), we want the brush to be very big, and very soft.
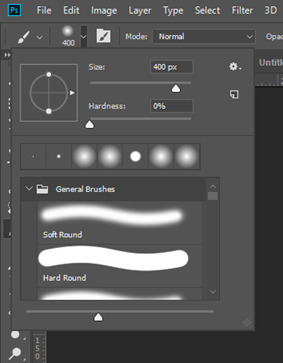
The bigger the brush, the more seamless the blending will be! By painting parts of the top gif away, the other gif will start to appear underneath. It’s not always necessary, but I usually like to set my top gif to ‘screen’ as well. This helps the gifs merge into one another even more, especially if you have one gif which is darker than the other!
As you can see, by setting it to screen, the top gif has already started to look blended. Then, you can start to paint. As the brush is so big, you might end up painting away too much of the gifs, like so:
I usually go back and forth, switching between black to remove parts of the gif, and white to add it back (always painting on the layer masks). Sometimes, you might need to make the brush slightly smaller, just to fill in tiny gaps.
Another thing you can do is to add a solid black colour underneath all your gifs, just to fill in any spaces. (Sometimes, I do this on top of gifs too, to create spaces where I want blended gifs to go, like in my current header!):


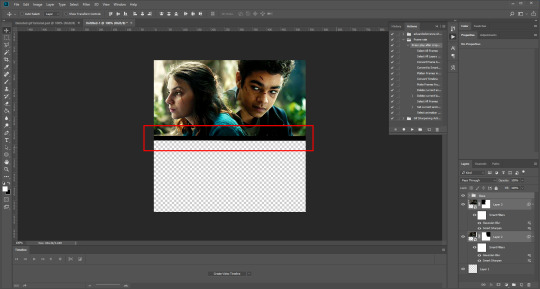
Anyway, back to the original gif. My blended gif is now pretty much how I want it to be, except Lyra is quite far to the left, and Will is taking up a lot of the screen:
So I’m going to see how they look at the start of the gif, to determine how far right I need to move them both to get them mostly in the middle:

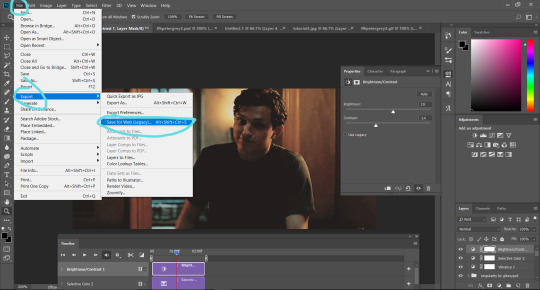
And that’s it! Now you can export them [file > export > save for web (legacy)] and you’ll have to change the timing back to 0.05, or use the action I introduced to do this in my last tutorial.
PART TWO: MULTIPLE GIFS
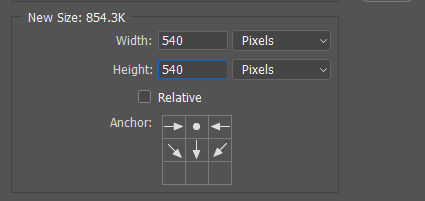
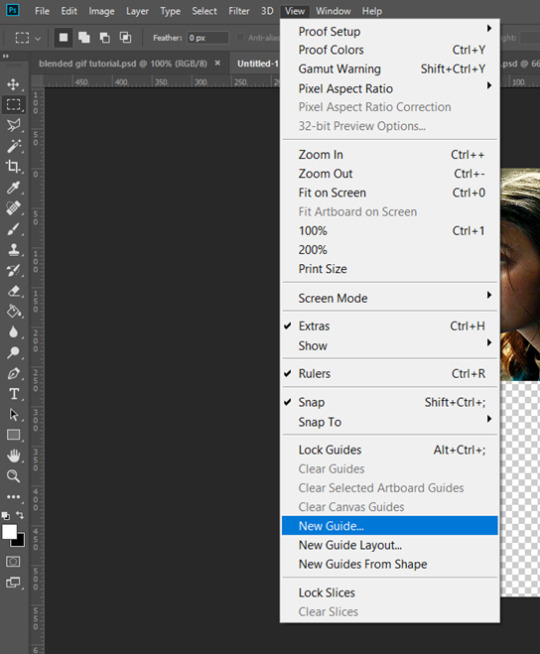
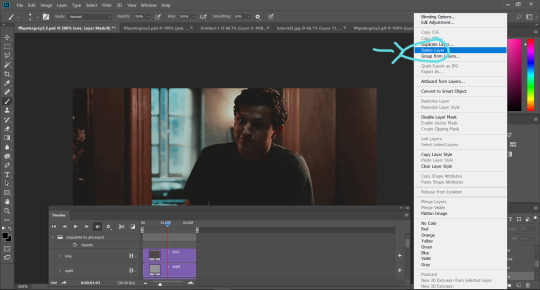
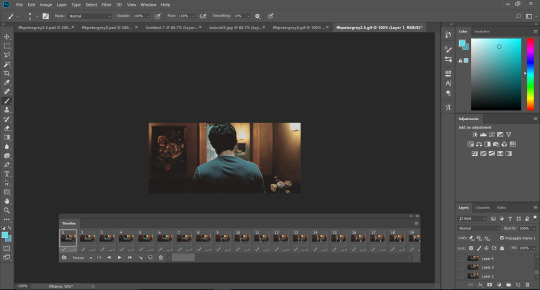
To put more gifs underneath this one I’ve made, I expanded my canvas. Go to image > canvas size. Make sure you click the little ball to the top in the anchor section, so the canvas expands underneath your gif. If you leave it in the centre, it will simply expand from the middle, or the left, right, etc.
Next, we need to remove the black line at the bottom of the gif.
You want to select the space for cropping using the rectangular marquee tool, so in this case, 540 px by 268 px. The tumblr spacing is 4px between each gif in a set, so however many gifs you want, you have to account for 4px less pixels inside your one gif, to give the illusion there are multiple (unless you want them to touch).
For example, (there’s a little maths here: forgive me!) two gifs of equal size, placed side by side, must be 268px in width or length, because (268 x 2) + 4 = 540. (There is one 4px gap in between). For four gifs, it would be (132 x 4) + 12 = 540. (For the three, 4px gaps). For three gifs of equal size, it’s a bit different. These must be 177px, 178px, and 177px, to ensure there is 8px of space left over (two gaps).

Then, make sure the colour white is the primary colour selected on the paint pad (this is vital) and (in this case), the layer mask from before when we blended, is selected. Press ctrl (command on mac), shift, and i to invert your highlighted area (or select > inverse) and then simply delete the excess line, (either using the delete button on windows, or fn + delete on mac, I think!) Then, do this again for the other gif.
And voilà! It’s gone. You can also paint it out (using the black colour as the primary colour to erase), but I would still recommend highlighting the outline of the area you want to erase, using the marquee tool, so that you can paint it out in a straight line, and don’t paint into your gif and erase parts of that by accident.

Now to add in the other gifs! To do this, I use guides, but you can also use lines at a size of 4px, to map out the spaces in between gifs. If you go with lines, just make sure you delete the shapes after. With guides, they are not actually ‘in’ your gif, so you don’t have to remove them before you save. However, guides only work for straight lines, so gifs with other shapes will need to be made using lines, (but I will touch on that at the end!)
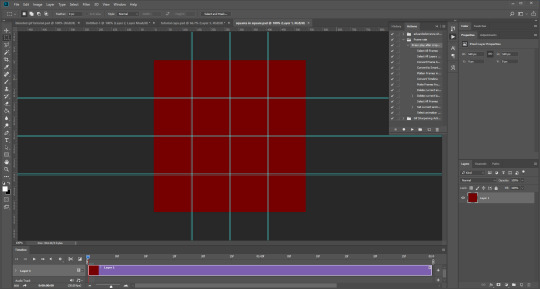
I actually have a few psds saved with guides already on, so that I don’t have to draw them out every time. If I was making a set with three gifs in a row, this would be different, but I usually stick to two or four (or three with one big square/rectangle, and two little squares), so this is my most used psd. The guides are set at: 132 px & 136 px, 268 px & 272 px, and 404 px & 408 px, both horizontally and vertically!
I have a red colour underneath just because I find it easier to see the lines between gifs this way - if you do the same, just remember to turn it off before you save your gif, otherwise it will have the colour red instead of mimicking the transparency between gifs.
Now, make a second gif! I decided to have a square in the middle as you can see in the title, and then two rectangles either side.
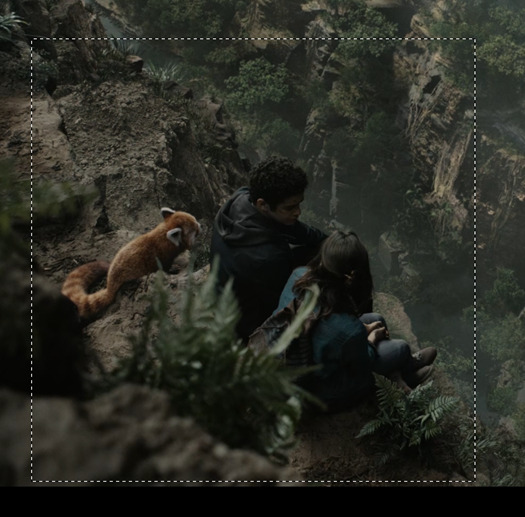
Then you want to resize it, in this case to 268 px by 268 px, and drag it across into your main file, or go to layer > duplicate layer, and move it that way. Don’t worry, when you move it, it will show the whole gif as if you haven’t cropped it. The reason I crop and resize it beforehand, is so that I can ensure it will be the correct size when I remove the excess parts of the gifs I don’t want, (rather than making it 268px including the black line for example, which would be wrong.)
Then, as before, position the gif where you want it to go, and highlight the area you want to be in the gif. Whilst this is selected, (again ensure white is the primary colour on your paint pad), click the layer mask:
Then the excess around the gif should be gone! (Making a gif of a gif tutorial... meta, lmao.) This way, if you decide you want to change the shape of the gif, or move it slightly, you can just paint parts in and out, or delete the layer mask, move the gif, and reapply it!
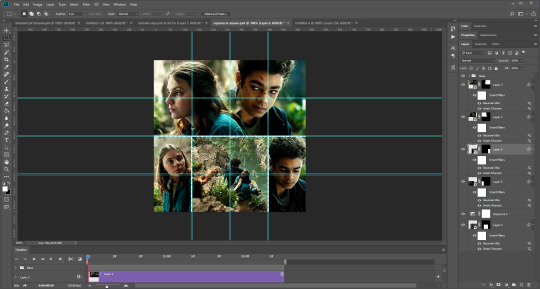
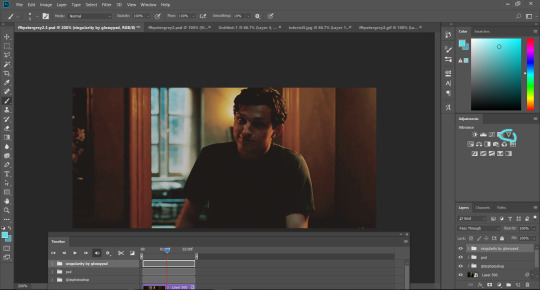
You can then sharpen and adjust your colouring to the gif as needed! Next, go ahead and repeat this process for your other gifs. Selecting the area, adding a mask, and sharpening. By the end, you should have something that looks like this:
PART THREE: OTHER SHAPES
If you want to use other shapes (which I haven’t tried myself until now, but I can talk you through some thoughts!) You can use the line tool. So, for example you could make a layer with the lines at 4px, merge it, and then at the end delete it from your gif to leave the gaps transparent:
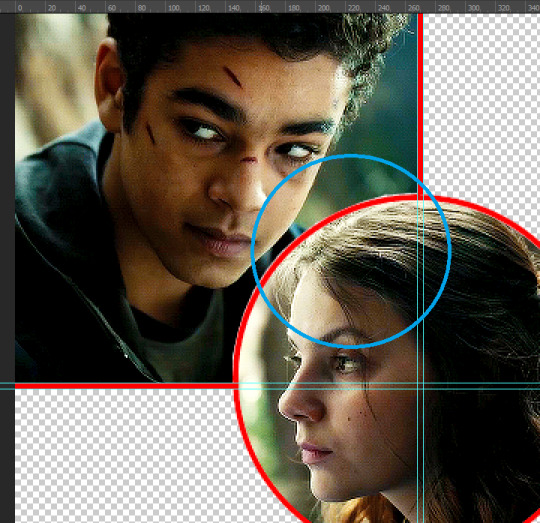
To make a gif any shape you want, choose a shape (either use the shape tool, or get a png of it), and using a clipping mask. Make sure your gif is above the shape layer, then right-click the gif layer, and select create clipping mask to clip it down:
OR you could use a circle, and then delete the circle to make it look transparent:
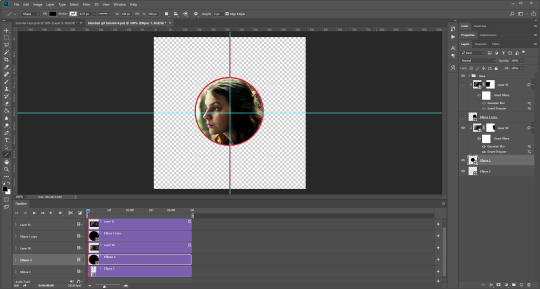
The best way to select items which are not rectangular, (so you can’t use the marquee tool), is to use the pen tool. Click around your gif so that it’s got a border of what you want selected. Once you have outlined your gif, right-click and choose make selection:
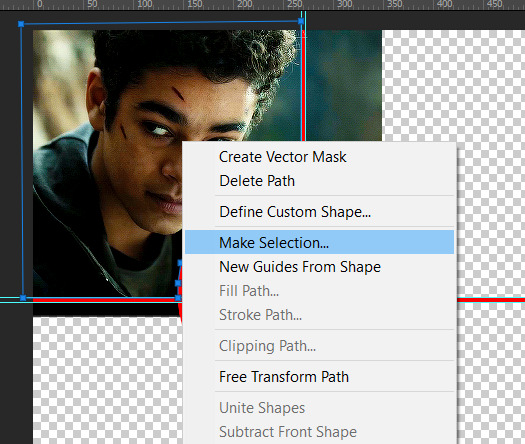
Then set the feather radius to 0, and then the area you want should be highlighted in the same way as with the marquee tool above, so you can add a layer mask, etc. However, as the pen tool is not always that accurate, there is a little white gap here where it’s not a perfect circle.
A way to overcome this could be to make all the gifs you want, and then simply add one on top with a white 4px border, so it gives the illusion of being transparent! (As I have done above, but save it as white rather than red!)
If I find a better way to do this in the future, I will update this tutorial. I hope this is helpful, and thank you for reading 🥰💖
#gif tutorial#tutorial*#completeresources#yeahps#chaoticresources#allresources#mikesmom#usertom#usersmile#heavensentnetwork#if there's any mistakes pls let me know#i am so tired rn fjghfjhgfjgh
719 notes
·
View notes
Note
Hi Nia! You're gifs are so pretty! Is it possible for you to show how you get your WandaVision gifs too look so clear and hd? And how do you do your colorings too? (specifically the wanda maximoff in episode 3 gifset ITS GORGEOUS) I'm new to giffing and all the tutorials are kind of old. It's okay if you don't want to though! I understand it may be time consuming.
omg no! never feel intimidated to ask!! i don’t mind at all!
so, i’m going to show you how i made and coloured this gif
mostly bc it’s the only gif in that set w text and i’m going to share my text settings too!
tutorial is below :)
WHAT KIND OF VIDEOS ARE BEST?
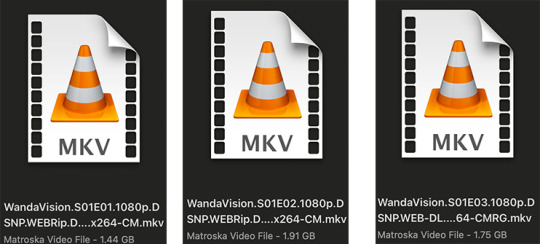
.mkv files (the bigger the better BUT i usually think anything above 5 gb is excessive and unnecessary for an episode of television BUT for a movie worth it) itunes downloads (logolesspro on twitter, hd-source on tumblr, live-action-raws on tumblr have some DEPENDING on what you’re looking for) (also, there’s a chance that if you search "show/movie hd download tumblr” you’ll find a tumblr with its itunes download available)
THAT IS IT NO OTHER TYPE OF FILES MAKE YOUR GIFS LOOK GOOD
- my suggestion is always if its new (like just came out the past month) t*rrent it! it’ll be downloaded quickly and .mkv files look the best! BUT if not check the sources above see who has the BIGGEST file if they even have what you’re looking for and then if not then you look to t*rrenting!!
here are the wandavision files i use so you can see!!
SCREENCAPPING
-if you have windows use potplayer! i have a mac so i can’t show you how to use it and it’s not available for me :( HOWEVER back when i had a windows potplayer was the best method in screencapping!!
-I HAVE A MAC! so i use mpv!! (go to mpv.io and follow the directions) BUT DON’T DOWNLOAD THE LATEST ONE (it has a bug that skips frames) try each before the latest one bc from what i heard different ones work differently for everyone!! and i don’t know which one i use (yikes!) THERE ISN’T THAT MANY I PROMISE AND IT’S WORTH IT BC MPV IS THE BEST (i used to use adapter but they didn’t take impressive screencaps in my opinion and it was evident in my gifs you can see it too! )
create a folder for your screencaps! and make sure to rmb the directory order! now we want to create a text file on our built in textedit app on mac! type up all this down below (i like jpg but you can replace jpg w png if you want) AND SAVE THE FILE AS mpv.conf THIS IS IMPORTANT SO DON’T FORGET IT! save it somewhere you’ll find easily and NEVER delete it until you don’t use mpv anymore
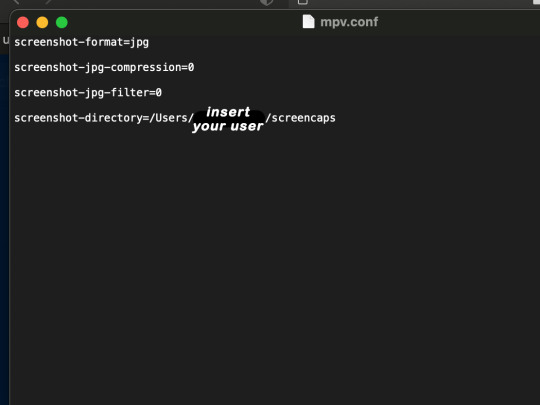
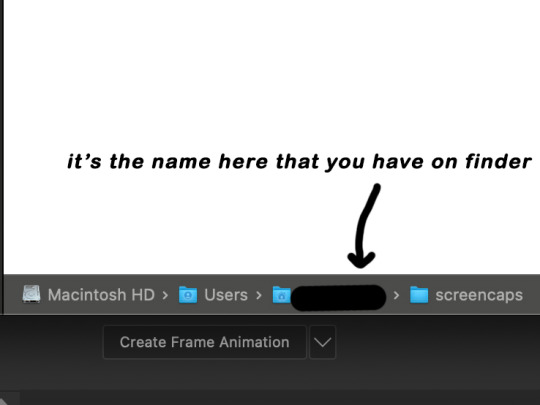
just in case you don’t know what to insert after, go to your screencaps folder
now you want to open mpv and go to the corner towards mpv -> preferences and they’ll tell you that there is no .conf file SO GO LOOK FOR THE TEXT FILE WE JUST MADE AND DRAG IT TO THE FOLDER THEY OPENED FOR US AFTER SAYING THERE IS NO .CONF FILE
(i learned all this from @kylos tutorial!! so if any of what i just said about setting up mpv makes NO SENSE to you check out their tutorial at kylos(.)tumblr(.)com/post/178497909311)
now we can screencap!
so let’s find the scene we want RIGHT BEFORE and MAKE SURE SUBTITLES ARE OFF
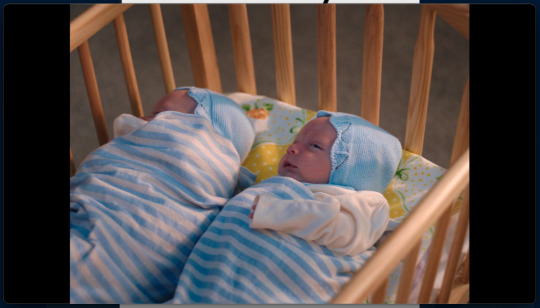
i pause and then press (option/alt + s) and then SCREENCAPS ARE BEING TAKEN!! and to end the screencaps being taken you once again press (option/alt + s)!!
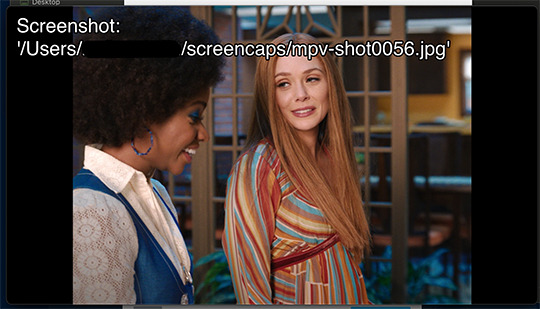
now we want to delete the excess frames! and put it all into one folder!! DO NOT DELETE FRAMES IN THE MIDDLE OF WHAT YOU WANT TO GIF!! WHEN YOU SKIP FRAMES IT WILL BE NOTICEABLE!!

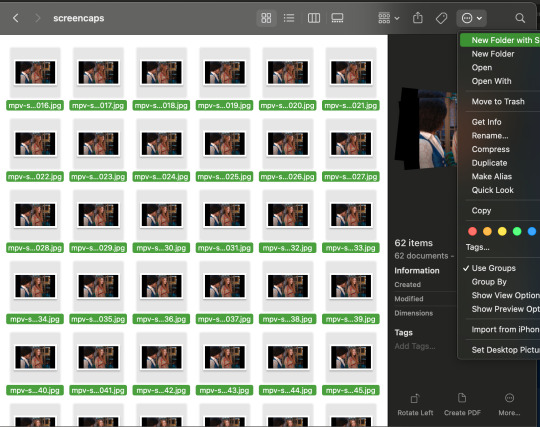
MAKING THE GIF
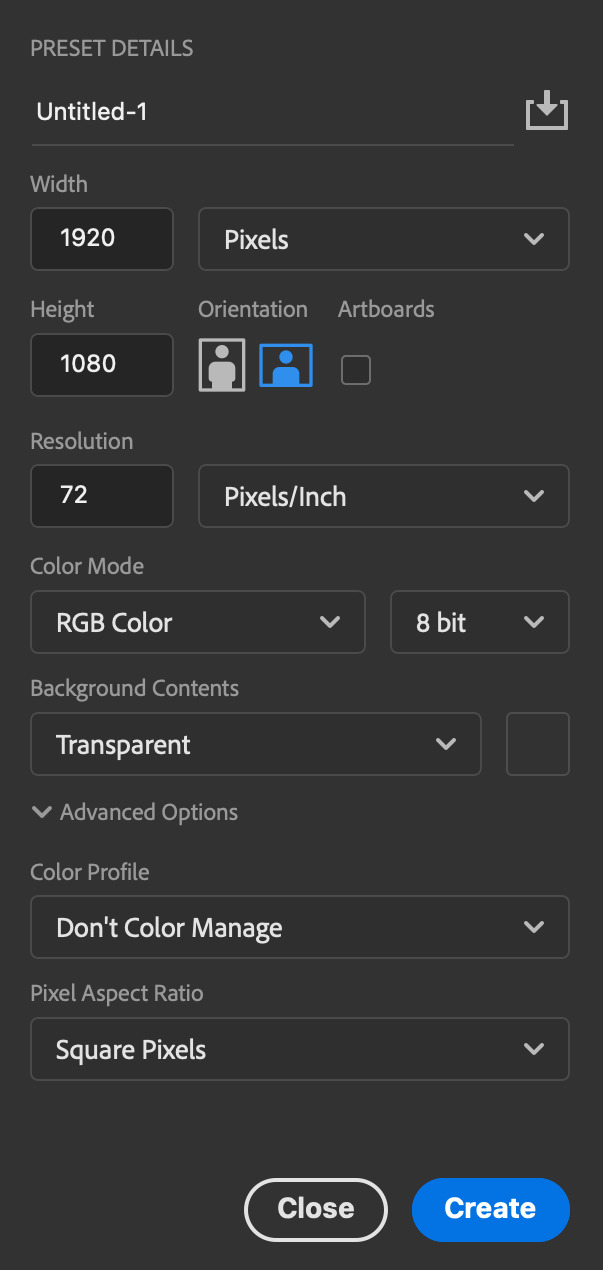
this method isn’t used that much BUT I LOVE IT so this is how i put my frames in! first i check to see the size of my frames: 1920 x 1080

so i create a NEW file on photoshop with those dimensions w these settings
now i set my tool on photoshop to path selection tool bc if you have it set on smth like move tool or crop tool at the end you might end up moving or cropping frames you don’t want to!

ok so now we select ALL our frames and drag it on top of our new file on photoshop and the MOMENT we see our first frame in photoshop JUST KEEP CLICKING ENTER until all the frames are loaded!!

you can do file -> scripts -> load files into stack but it is WAYYY slower in my opinion!
now i crop out the excess BUT i don’t resize the gif yet! the dimensions wandavision is filmed in is 4:3 so i go to crop and set the settings to this:

MAKE SURE IT’S ON RATIO SO WE’RE PRESERVING THE ORIGINAL SIZE JUST CUTTING OFF THE BLACK EDGES!! We are going from 1920 x 1080 to 1440 x 1080 this is the dimensions after i cropped

WE ARE KEEPING THE QUALITY BY NOT CHANGING THE DIMENSIONS OF ANYTHING INSIDE !!
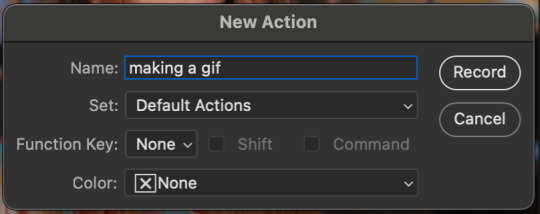
now we want to go to actions and create an action!! open up actions w one of these two depending on what your dash looks like!!


so we create an action with this button on the bottom of actions and we’re gonna title it making a gif and hit record!!

NOW LET’S GOOOOO!!
1. make sure you have timeline on your dash!

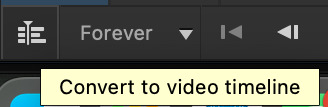
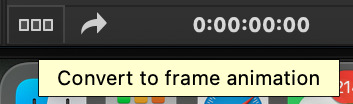
2. create frame animation (if you see create video timeline just click the arrow next to the button to see your other option which is frame animation!!)

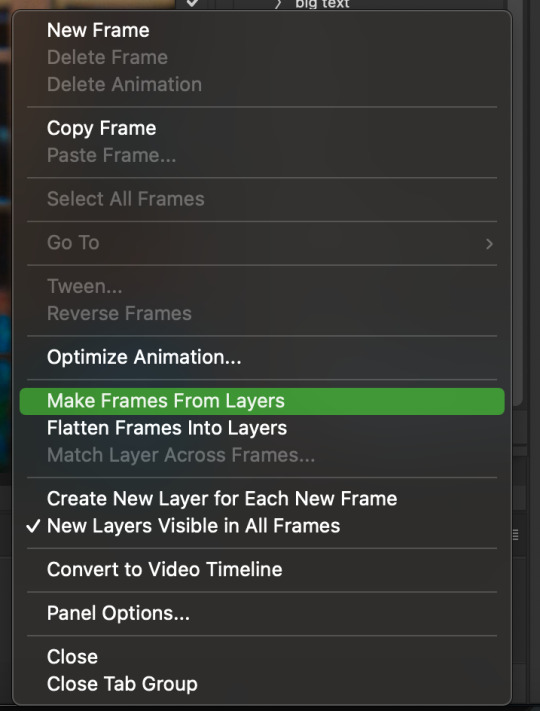
3. now let’s meet our best friend!! the little bar in the top right corner that has all the commands for making our gifs and MAKE FRAMES FROM LAYERS
4. WE HAVE TO SHARPEN OUR GIFS NOW BUT TO DO THAT WE NEED TO CONVERT TO A SMART OBJECT SO NOW WE ARE GOING TO CONVERT TO VIDEO TIMELINE there are two ways: the button in the bottom left corner or the button in the top right corner w all the other commands!
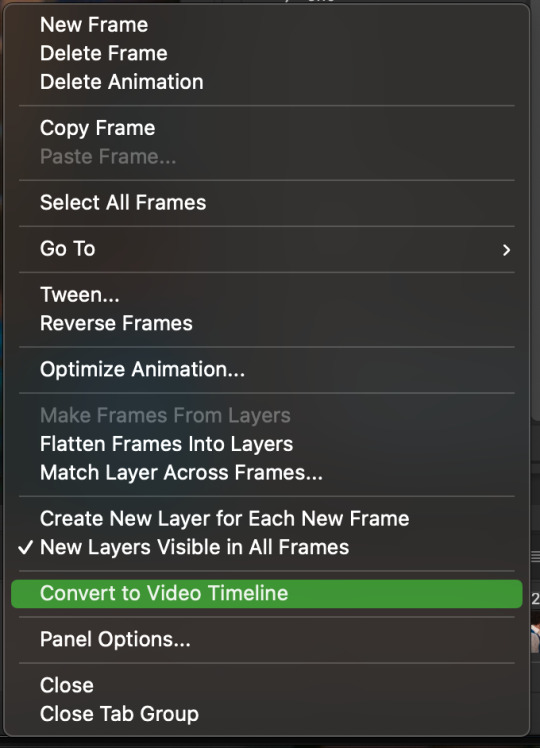
5. select -> all layers DON’T MANUALLY SELECT THEM ALL BC THE ACTION WILL ONLY SELECT THAT SAME NUMBER OF FRAMES SO IF THERE ARE MORE FRAMES YOU WON’T GET THEM IN THE SMART OBJECT!!

6. filter -> convert for smart filters
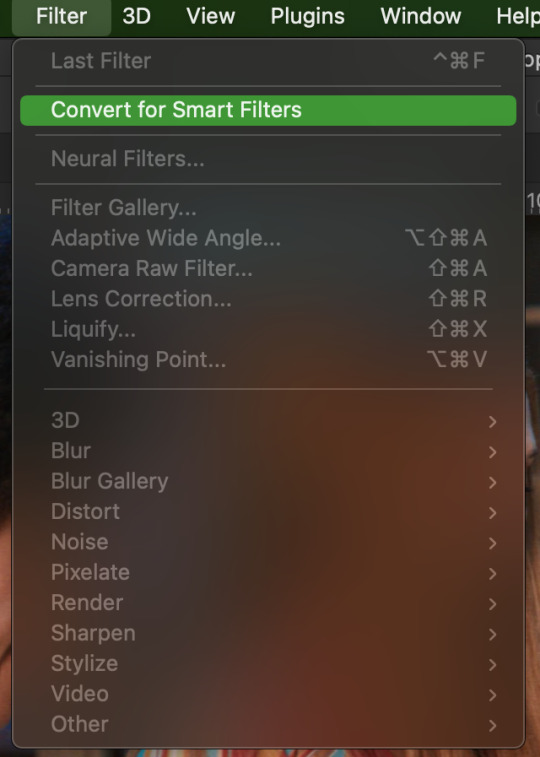
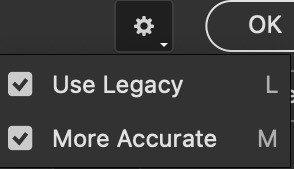
7. NOW WE SHARPEN!! (filter -> sharpen -> smart sharpen) i sharpen twice!! first, make sure we are on legacy w more accurate and remove gaussian blue! the first sharpening will be 500% with 0.4 px radius. NOW SHARPEN AGAIN (filter -> sharpen -> smart sharpen) also w legacy, more accurate and remove gaussian blur BUT this time 10% with a 10.0 px radius!


8. it’s hd now!! so let’s flatten frames into clips!! go to the top right magic button again!! and you should see a pop up saying layers are being made
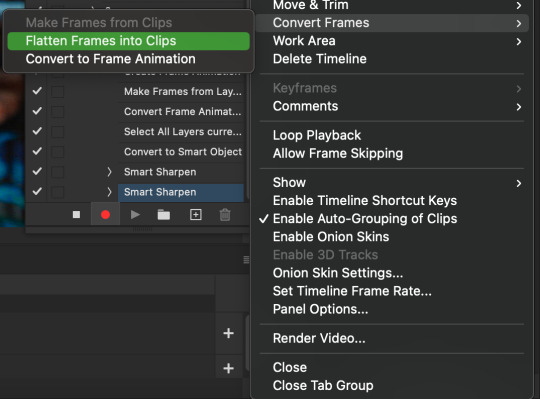

9. now we convert back to frame animation w either the bottom left button or our magic top right command center!

10. make frames from layers

11. select all frames w our magic command button
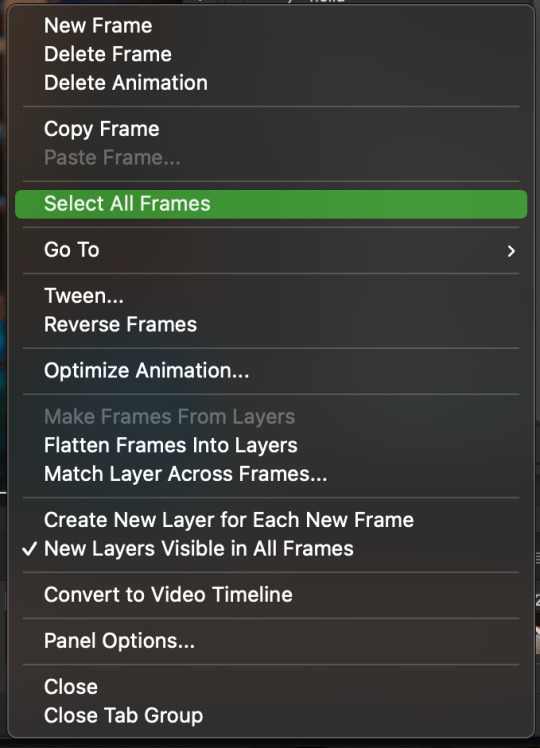
12. set the animation delay to 0.05 THAT IS THE BEST ONE ALWAYS ALWAYS ALWAYS only use 0.06 when the character is moving really fast in the video itself and it makes the gif itself look awkward BUT NEVER GO ABOVE 0.06 it’ll look slow and laggy and we don’t want that and don’t go below 0.05 bc then it’ll be tooo fast and we don’t want that either!


13. now delete the very first frame on the timeline bc it is an oversharpened duplicate of the second frame! end the recording w this button!

this is what your action should look like expanded! if you made mistakes on the way and it shows up you can just click the specific step and press the trash can on the action tab to delete in from the order!!
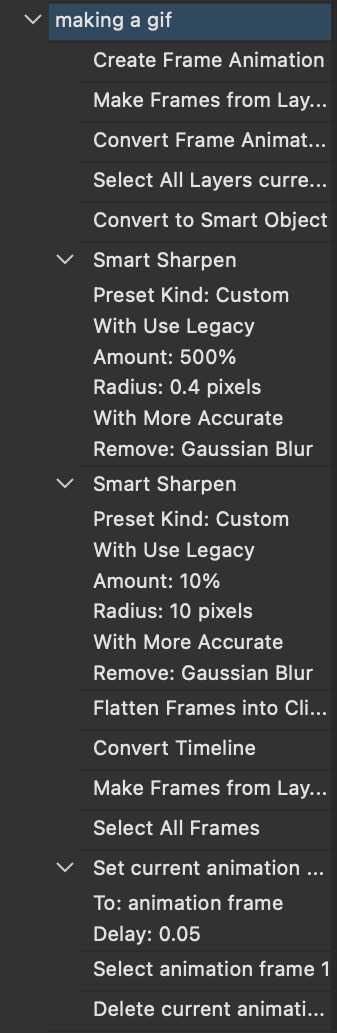
NOW AFTER LOADING YOUR FRAMES AND CROPPING THE EDGES OF YOUR FRAMES IF YOU NEED TO JUST PLAY THE ACTION AND THEN YOUR GIF WILL BE MADE FOR YOU!!!!
now i delete some unnecessary frames in the beginning and end and this is what my gif looks like (the size was 46 mb and the limit is 10 mb so the dimensions of the gif are 540 x 405 to get it to 5 mb BUT I HAVEN’T CROPPED IT YET SO THIS IS ME CROPPING JUST TO SHOW YOU WHAT IT LOOKS LIKE)

CROPPING THE GIF
in my opinion if you want your gif to look hd you shouldn’t crop before you sharpen!! i believe that if you crop before you sharpen you don’t allow photoshop to sharpen all the pixels whereas if you crop beforehand there is less to work with!!
dimensions is all up to you!! just make sure to go by tumblr rules!! 540 is the max width and if you want to make two gifs per row then my suggested width is 268 and for three gifs per row my suggested is 177 px! Just have the right width and the length can be whatever you want!!
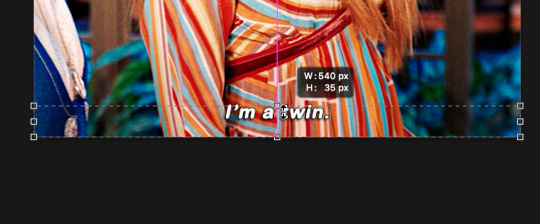
now i’m going to crop my gif to 540 by 590!!

NOW THIS IS WHAT MY GIF LOOKS LIKE!
COLOURING BASICS
let me show you the best adjustment tools in my opinion and a brief explanation for what they do!!
brightness/contrast: pretty simple increase/decrease the brightness/contrast BUT one of my techniques for when i first start colouring a gif is i select all my frames and do nothing to the settings of the adjustment but i set the layer to screen LIKE THIS

curves: ik others use curves to change brightness/contrast w the squiggly thing BUT i like it to set a white point and black point, this is also a technique i use when i first start colouring a gif when screen doesn’t look good for me SO you use white point to select a pixel on the gif to set as the lightest color on the gif (setting the white point) and you use black point to select a pixel on the gif to set as the darkest colour on the gif (setting the black point) usually the white point makes it TOO bright and that’s why we use the black point to counter it and same goes for when i use screen with brightness/contrast, it gets too bright so i use black point to counter it below is the button for white point and the button for black point, respectively they are shaped as color picker tools


vibrance: generally, i never use this except for color p*rn sets but they work really well in making colors seem more strong
hue/saturation: like vibrance, i never use this except for color p*rn sets but this adjustment is to help change the colors or hue of a color for example: turn blue into purple or turn a blue into a little lighter shade of blue
color balance: I ALWAYS USE THIS!! except for in black and white gifs BUT THIS IS MY GO TO AND IF I DON’T USE IT MY GIFS ARE JUST BLAND i feel like color balance is what essentially balances the colors on your gif and adds dimension to it, it makes your gif go from looking way too yellow to a more golden neutral look and it is an essential adjustment in my opinion
channel mixer: i rarely use channel mixer BUT it is so so useful when you are working w a dark scene just play w the settings and all of a sudden all the blue in a dark scene will be a little more yellow and red and your scene will kind of just look brighter and more visible
selective color: THIS IS ALSO AN ESSENTIAL this helps SPECIFIC colors pop you’re working on a scene where there is too much red on someones face you use this tool to remove the magentaness from the yellow section OR when you feel someones face is TOO yellow and needs more blush you add more magenta in the yellow section of selective color
gradiant map: gradiant map is perfect when you’re lazy if you feel like your gif looks more neutral and you want some red in it but you don’t want to mess with any other adjustments just set a red to black gradiant on soft overlay with a very low opacity and BOOM slightly red but not too much red added!
NOW TO COLOR THE GIF!
today i have decided to start with a brightness layer set on screen
and this is what we got!

now that’s a little to bright and washed out in my opinion SOOOO to counteract it, i’m going to use my black point tool in curves and i’m going to select this point on the gif (it’s better to choose smth in the background and not smth that’s paid attention to such as monica’s hair or either of their eyelashes)

now my gif looks like this! the base color is complete!

now i think i need to balance all this yellow and red! SOOOO WE GONNA USE COLOR BALANCE!!
i think the best way to use color balance is to keep swinging the balancer until you see what you like and then keep going midtones i think i want more red and i don’t want a cyan midtone and then for shadows i think i want more cyan to counter the redness of the gif but highlights i don’t touch that much NOW HERE ARE MY SETTINGS SO YOU CAN SEE

and this is what my gif looks like

now you can stop here if you want but in my opinion i think the gif looks a lil too dead still SO IMMA USE SELECTIVE COLOR
i think there needs to be a lot lot more RED so i amp up the yellow magenta and black in the red! but i also think the yellows need to be LESS RED so i remove magenta from the yellow! and bc there’s some cyan and blue bc of monica and the flowers in the background im going to make the cyans more cyan and the blues a lil more black! i’m going to remove some yellows from the magenta!! and i add more black to the neutrals and black!! i think it’s always important to add more black to neutral and black bc it adds more depth to the gif by not just making it a bunch of bright colors and having dark colors to contrast to!! my settings are below!

and the result!
now let’s see everything together!

and the before and after!

I HOPE MY COLOURING EXPLANATION MADE SENSE!! if not you can always ask me more questions i don’t mind!!
ADDING SUBTITLES
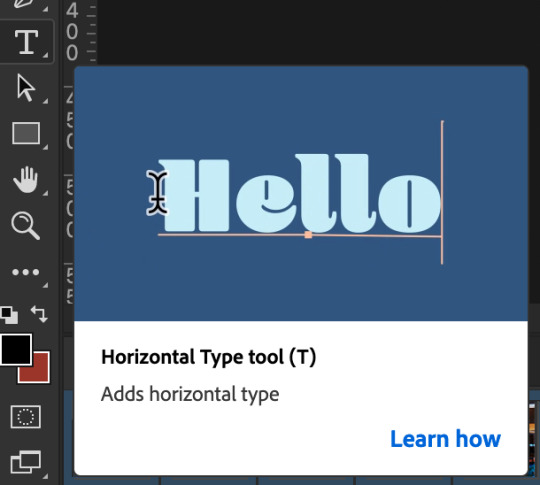
we want to grab the text tool!
make a text box from anywhere in the middle from the left to right edge. this is so we can make sure our text is centered and will be in the same place for when we have sets w more than one gif w text!

type your text out and make sure you highlight the whole text so that all the settings apply to EACH character! you can find the alignments (for center) in the paragraph tab!

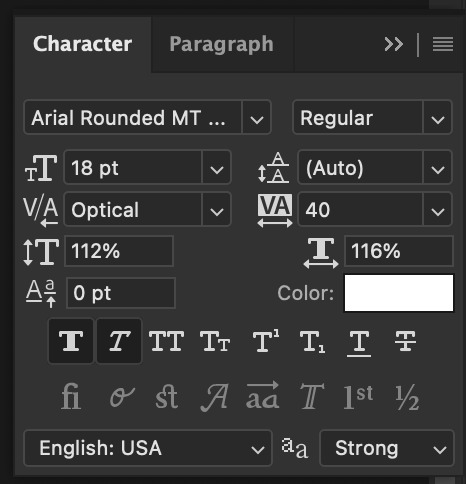
now lets right click on the text layer and go to blending options! add stroke and drop shadow!
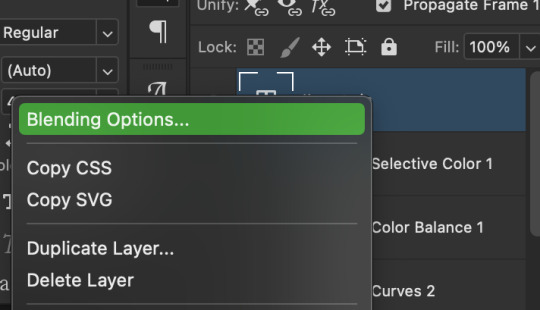


now drag it to the desired height you would like and make sure to keep it in mind for when you have more than one subtitled gif in a set!
NOW TO MAKE SURE THE TEXT STAYS IN PLACE AND THE BLENDING STAYS YOU HAVE TO CONVERT TO SMART OBJECT!!

if you want to only have the text applied to certain frames instead of all frames, select the frames you don’t want by clicking the first frame in ur don’t want section ON THE TIMELINE and WHILST HOLDING SHIFT click the last frame of ur don’t want section and then toggle the eye switch next to the text layer
now you see the text

now you don’t

tip: use opacity to fade the text in and out!
the text is going to be on all my frames so i don’t need to toggle the eye but i just wanted to show you just in case!!
now here’s my FINAL RESULT

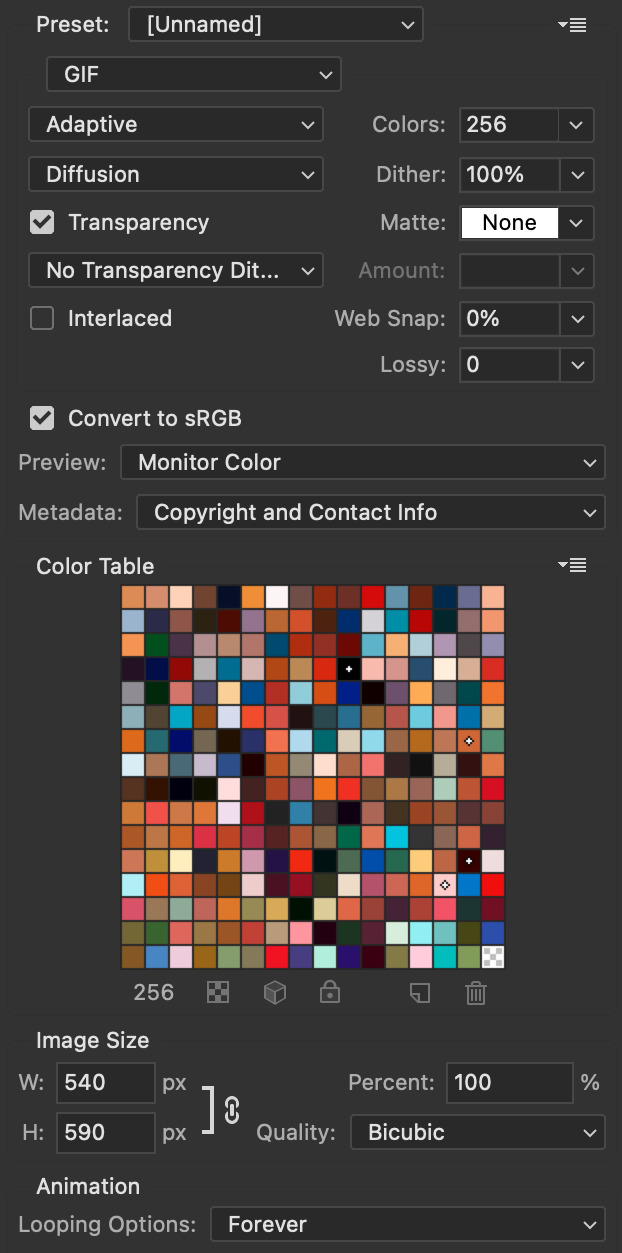
save for web (file -> export -> save for web)
your gifs have to always be under 10 mb! so, if your WAYYY overboard YOU HAVE TO DELETE FRAMES! or you can divide the gif in two and have two gifs instead of one! however, if you plan on going the deleting frames route MAKE SURE YOU DELETE FROM THE BEGINNING OR END OF YOUR SELECTION i promise you that most of us won’t notice that your characters dialogue is being cut off BUT WE WILL NOTICE IF FRAMES ARE BEING SKIPPED so, don’t delete frames in the middle of ur gif!! idc how little you do it IT WILL RUIN YOUR GIF AND I SAY THIS FROM EXPERIENCE i would delete every fifth frame to cut down my gifs and that may seem like not that big of a deal BUT IT IS my gif looked choppy and poor so it is way better to cut from the end/beginning of the gif
ANOTHER LAST PIECE OF ADVICE in the bottom left of when the save for web menu shows up THERE’S A PREVIEW BUTTON click on it! it’ll show you your gif on your default browser and show you what it’ll look like once uploaded! this is perfect to check the speed of ur gif and the colouring and to notice if there’s a problem with your subtitles or maybe there’s an obvious jump in frames you never noticed before!! i always use preview bc the built-in photoshop viewer of ur gif shows the colors differently and the speed is NEVER ACURRATE!
I USED THESE SAVE SETTINGS!! many say to use selective pattern but i DISAGREE and i think these save settings are the ✨ best ✨
OK NOW THAT IS THE END OF THIS VERY LONG GIF TUTORIAL!! I HOPE THIS IS WHAT YOU WANTED!! IF YOU HAVE ANY QUESTIONS DON’T BE AFRAID TO ASK I SINCERELY DON’T MIND!! JUST DON’T BE RUDE OR ANYTHING BC PPL HAVE BEEN RECENTLY :(
I WISH YOU ALL THE LUCK AND FUN IN YOUR GIFFING ADVENTURES !!
#tutorials#asks#sourceblog#allresources#completeresources#itsphotoshop#dailyresources#resourcemarket#chaoticresources#onlyresources#hisources#sibylresources#dailypsd
424 notes
·
View notes
Note
how do u make ur gifs?
Hi, anon! I use photoshop. (there are vids on yt that show you how to get it for free)
I'm gonna use this gifset as example.
This is turned out to be a long post, so I'm gonna add the cut.
1. I cut and export - can be done with any video editor - from the ep (always give preference for the highest quality you can find) the scene(s) I wanna gif. Then, import the video to photoshop to create layers. Photoshop > File > Import > Video Frames to Layers

2. After you select the video, this window will open. I like "from beginning to end" option and after just delete the layers that you don't want.

3. Select "OK" to create the frames.

here I already deleted the ones I didn't want.
If the timeline and layers panel doesn't appear, click on "window" at the top.
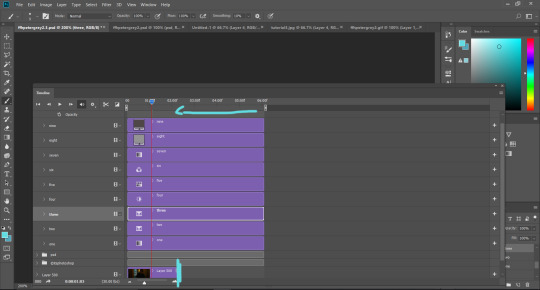
4. Set the velocity. important: you have to select all frames!

(click on the symbol next to the numbers to appear the options ⬇️)
Here, it's very much the preference of each editor. Personally, I like above 0.06.
5. With the velocity set, select all layers and all frames to convert to video timeline and convert to smart filters.

⬇️

⬇️
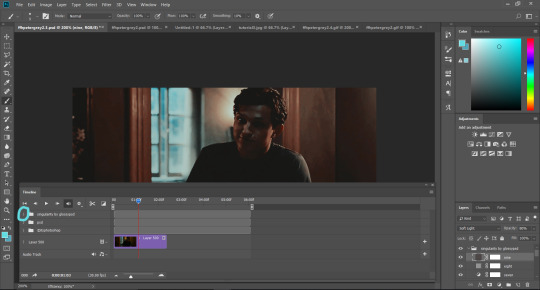
6. Now, it's time for coloring, cutting - tool circled in black - (if you want and/or need to) and sharpen. Let the creativity flow!
What I do is:
- resize the image (Image > Image size) setting -> w: 600 pixels and leave the proportion tool on so photoshop automatically adjusts the height
- crop it - tool circled in black - to a size I like.
- color it - tools circled in blue. I come up with my own PSDs (just messing around with the colors). I have 2-4 psd of my own that I use for base.
- sharpen Filter > Sharpen > Smart Sharpen (my fav setting is amount: 400; radius: 0.2 - 1.0 - I'll be adjusting these first two settings until I find one I like - ; reduce noise: 10; remove: lens blur)
- and then, resize again for export (Image > Image size). In this part, I try to find the max size - adjusting only width and leaving the proportion tool on so photoshop automatically adjusts the height - I can export without passing 10 MB that is the tumblr limit or you can put 540x. Always paying attention to not pass the limit.
7. Done!
That's it! :) I know it can sound confusing, but it's just at the beginning. Feel free to send me a ask again if you still have a question! <3 Really, please, I'd love to help you!
Oh and when I wanted to learn how to make collage (like the ones that you can find in the mega link "+" in this post), I watched this tutorial.
#anon#gifs#gifset#resources#i would screen record my process of gif making#but idk how to#:(#i always download the 1080p versions of the eps#tbl and cm#you can try find in scenepacks accs on ig#and on logolessdesires on twitter#or if you want the links to download 1080p eps for tbl and cm DM me
13 notes
·
View notes
Note
Hi! I hope I'm not bothering you, but I love your mood board edits and was wondering if you could explain how you go about making/colouring them? I see lots of places to find gifs but turning them into a set is so hard. Thank you in advance!
hi! first of all thank you so much and second of all it’s not a bother at all! i am happy to give some of my own tips even if my explanation probably isn’t super helpful. i won’t give like a ps tutorial but below the cut (since i included example gifs, it’s VERY long) is my process for my latest jily aesthetic:
i keep track of all my ideas/sets in a spreadsheet (which i won’t show bc there’s a lot of info i’d have to blur/black out) but i always have a list of what scenes i need to gif/what gifs i’m editing and where i’m getting them from. i also include a couple extra ideas in case the gifs i have planned end up being too hard to color or don’t fit in the set. i’ve found it’s best/easiest to start w the list bc there is literally nothing worse than spending hours on a set and then not being able to complete it.
as for actually finding the material, i have a pretty healthy number of scene packs saved in my giffing folder, esp. for things i know i will gif frequently. most of the time i will peruse youtube, vimeo, and instagram for any aesthetic scenes. i also have a lot of gif packs saved specifically for the purpose of making mbs (usually i mix my own gifs w gif packs), if you msg me i’m happy to direct you to some gif packs i use regularly or you can check my #resources tag. a couple tips for finding material:
always opt for download when possible, i used to screen record and the difference when i switched to downloading was astronomical. (it’s easy to lose quality and esp if you’re on mac, quicktime duplicates frames so either you have to manually delete those extras or you get sort of choppy gifs when you load them into ps.)
always use 1080p or better, 720p will work in a pinch for 268px or 177px gifs since you can make up some of that resolution loss with sharpening, but don’t go any lower than that, just love yourself.
for pale sets, look for the right colors. i tend to look for scenes w high color contrast especially if it features poc so it’s easier to color without whitewashing, ie if the subject is a person then i look for light colored or blue/green/violet/white backgrounds. it’ll make your life wayyyyy easier. this also means if you’re making a set try to find scenes with already similar lighting bc you won’t have to work so hard to make it look cohesive.
here’s a quick rundown of what i do before coloring:
import all frames and save all the files in a folder together!!
play around with frame delay so all the gifs are moving at about the same speed, usually keep it between 0.03-0.05s
crop and resize gifs (i use 268x145 most of the time)
convert to timeline
when it comes to coloring it can be really hit or miss, i’ve recently gotten back into my groove but i was having sooo much trouble earlier this year. in general, don’t stress yourself out!! sometimes it’s easier to just find a new scene/gif (hence my list of extras!) than to try too hard to fit a gif into your set. i color all my gifs by scratch (ie no psds) but i tend to follow the same pattern, i’ll explain using these gifs/psd as an example since then i can also explain how to fix white-washing:

first off when you’re coloring gifs with poc always always always make a layer mask so you can compare the edited and unedited skin tones directly! i use the marquee tool to make a selection in the middle of the character’s face, select the folder of my adjustment layers, and hit ‘add vector mask’ (the third button from the left on the layers panel, it’s a white rectangle with a circle in it).
i almost always begin by using hue/saturation layers to highlight and delete certain colors. here i highlighted red and raised the lightness on yellow by a lot since it’s a very yellow scene. then i use a combination of brightness/contrast, levels, and curves layers to brighten the scene. here’s what i have now:
i add a gradient map set to black/white, change the blending to exclusion, and lower the opacity to between 5-10% (depending on the scene) to lighten the contrast further:

then i add back a little depth with selective color in neutrals and blacks:
now i have two main goals: 1. add contrast between the background and the subject, and 2. brighten the scene into a pale gif. to do this, i use color balance to tweak the color of the background, taking out the yellows. this step works best if there’s at least some shade difference between your subject and background, otherwise isolating the two will be impossible. here’s what i have after adding color balance:

i use hue/saturation to selectively highlight the background color. in this case i chose to adjust magenta and used the color picker (the first eyedropper on the left) to identify the exact shade i wanted to lighten. now i have a fairly neutral background and a colorful subject, which gives a sort of pale effect:
and now i use a curves layer and a selective color (white) layer to brighten further:

before i go further, i start fixing white-washing. keep in mind that some variance is normal since you are naturally changing the lighting of the scene; this gif shows it rlly clearly bc of how yellow and dim the lighting is, so some lightening is to be expected. however, both because the vector mask shows a lot of whitening and because i’ve giffed dev patel before and have a general idea of what he looks like in this type of lighting, i know what needs to be fixed, so i go back in under the psd/adjustment layers with a combination of selective color (red and neutral) and hue/saturation layers to darken his skin again:

now that some more contrast has been added in, i can go back to working on the psd and use curves and selective color to play around with the background again:

i use another hue/saturation layer and a black/white gradient to tone down oversaturation:


usually i leave those layers on top, so if i want to make any adjustments (like lightening the background more), i go in under those two. in this case i tweaked the whites and reduced the contrast a little to get this:
again, you can see his skin tone has changed from the original, but variation is to be expected given how much brighter the room is, the fact that i took out a lot of yellow lighting, and the brightening effect of the computer screen in front of him. some other things to keep in mind when coloring:
when you add layers to correct white-washing, you’re likely to end up with overly red/orange skin tones (red-washing). this can be fixed by upping cyans in the reds, desaturating/darkening the reds, or adding b/w or desaturation later on.
when in doubt, it’s better to be darker than lighter (the issue with white-washing is that it promotes colorism, and there is nothing inherently wrong with a darker skin tone) but really. just put in the effort to color poc correctly.
when changing the lighting a lot it helps to look at pictures of the subject in natural/bright lighting, since you get a better idea of what their normal skin tone is.
don’t try to squeeze all your selective color layers into one. you’ll get less grainy gifs if you separate them out and work one by one.
TURN OFF NIGHT SHIFT/NIGHT MODE! yes i KNOW it’s bad for your eyes (especially if you’re like me and gif at night, when the lighting outside isn’t changing every 20 seconds) but your gifs will look VERY different under f.lux or night mode compared to daytime screens. especially if you’re giffing at different times of day, blue light filters can really change the way your coloring appears. best to keep it consistent.
my sharpening settings vary depending on what i’m giffing but in general i do two layers of smart sharpen (500% with radius between 0.2-0.4, 10% with radius at 10px) and then gaussian blur at 2.5px and adjust the opacity so it’s somewhere between 15-20%. i try to strike a balance between smoothing out the graininess from selective color, and sharpening details like clothes and hair. here’s what i ended up with for the gif above:

then i rinse and repeat for the rest of the gifs in the set! i tend to start with the gifs that i know will be hardest to color, which is usually the darker ones (coloring is limited by how much i can brighten the scene) and those that include poc (again, limited by how much i can brighten and adjust the scene’s lighting without white-washing). then i check set cohesion as i go, using those first few gifs as benchmarks. once i have all 8 (or 9 or 10) gifs, i play around with composition and try to balance and vary the subject, colors, and composition of gifs next to each other. i go back and make a couple of adjustments here and there according to what i observe and what i think might improve the overall appearance.
and that’s pretty much it! i hope this was helpful, if you have other questions feel free to message me and i’d be happy to help/troubleshoot. happy giffing!
#Anonymous#*#resources#answered#sorry this was sO long but i hope it helped on the coloring end#tbh i exceeded my own expectations with the dev gif lol#yeahps#completeresources#chaoticresources#tutorial#coloring tutorial
55 notes
·
View notes
Text
how to apply psds and adjust colouring for gifs
*** DISCLAIMER: i am only a basic user of photoshop and have been using it for less than a year. i rely on other creators’ psds and adjust the colouring within them. this tutorial is for beginners to learn how to apply psds to gifs and to adjust the colouring to their liking.***
how to get gifs to go from this:
to this:

please see these resources on how to gif if you do not know already or need more information: X X X
i use photoshop cc extended 2018 (downloaded from here)!
1. after you have converted your frames into a smart object as one layer within your timeline and smart sharpened it, open up a psd file you would like to use. for this example, i’m using itsphotoshop’s base psd.


2. next, drag your the psd folder (under layers) over to your gif’s window and onto the gif itself. see how i do it in this video. the psd folder will now appear in the layer section of your gif.

3. let’s take a closer look at the gif and zoom in a little.
my gif’s brighter, but not enough. i’m going to use another psd and drag it onto the gif. this time, i’m using selenapastel’s psd #156.
4. an improvement, but it still looks too dark and i’m not feeling the yellowish vibe... i’m going to add another psd to this - using glossypsd’s singularity psd.
now it lacks yellow because it’s heavy on grays and it’s darker than i wanted. there’s also something else...

right when peter shrugs his shoulders, it’s as if the lights dimmed. something is up with the psd’s colouring within the folder. also, there’s a flash of gray at the end, meaning the psd went over the gif itself.
5. go back to your gif. we’re going to zoom out of the timeline. slide it to the left until you can see all the psds and gif layer’s stop points.


and now we see that the psd files overrun the gif layer. how do we fix this???
6. click on the arrow beside the psd file you want to adjust (in this case, the singularity psd). you will now see a breakdown of all the layers in the psd file.

that glitch when peter shrugged his shoulders was because the gray layers didn’t start from the beginning. drag the beginning of the files to the start of the gif.
7. if you scroll down or increase the size of your timeline box, you notice the overrun of all the files within singularity psd over the gif layer.
we gotta fix the overrun of the psd files by shortening it to the end of the gif layer. drag each individually to the left until it reaches the end of the gif.
once i finished shortening them all, all the other psds shortened as well since the singularity psd was the problematic child in this situation - but we good now!
8. now back to colouring! i won’t adjust the base psd and the second psd that i used (i like them as is), but i’ll adjust the singularity psd. what i do when i adjust is turn on/off the layer visibility of the layers under the layers section on the bottom right hand corner (they look like eyes).
9. i turned off the first layer, which is a gradient map, and it brightens the gif without it. i like it, so i will decide to delete the layer.

to delete the layer, you can either press delete on your keyboard or right click the layer and click ‘delete layer’. i try to delete unnecessary layers as much as possible to keep it under the 3mb limit (the more layers and editing, the more space and data it will take).
i keep doing this until i end up with the layers labelled as five, seven, eight, and nine.
sidenote: you can also play with the opacity of the layers and psds. notice how the preset opacity of this layer was at 14%.

as an example, if i adjust it to 100%, it’l look like this:

aaAaaAand i’m keeping the opacity at 14%!!
10. so, we’re here:

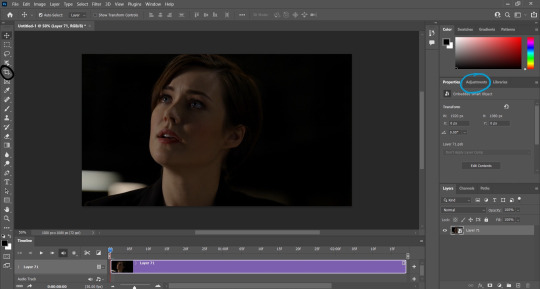
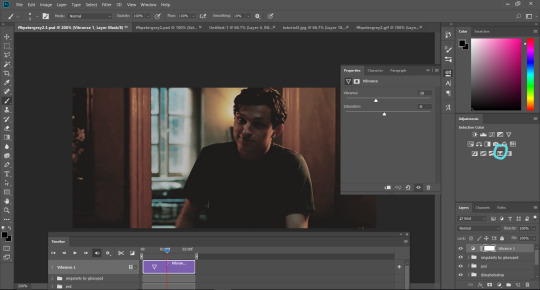
but i want a softer look to it. i’m going to use the adjustments (above the layers box). i’m a basic beginner hoe, so i tend to use vibrance, brightness/contrast, and selective colouring. other ones i use are levels, curves, and exposure, but i won’t be using them for this tutorial.
vibrance:
click on ‘vibrance’ (the upside down triangle). often with adjustments in general, i just drag the arrows to my liking. i’m going to drag the vibrance level down to see what it’s like.

this is starting to become what i envisioned - a more softer look to it! i adjust the vibrance and saturation and end up with -28 vibrance and -8 for saturation.
selective colour:
click on ‘selective colour’ (second last icon on the third row; looks like four triangles in one rectangle).
because this scene/gif is mostly yellow and brown colours, especially for what i want to adjust, i will adjust the yellows and the reds. play with the adjustments in any order and you’ll begin to see what you like.
for the reds, i ended up here:

for the yellows:

brightness/contrast:
we’re almost done! click on ‘brightness/contrast’ (first icon in the first row with the sun).
i want the gif a little brighter and adjust the contrast a bit:

i think we’re good to go!
11. to export it as a gif, go under ‘file’ > ‘export’ > ‘save for web legacy’!
12. wait for it to finish exporting. when it’s finally finished, make sure to have the settings that you want.
these are my default settings:

ensure it’s GIF and that the animation looping is on ‘forever’. for my gif settings, i prefer to use selective pattern with transparency on (these settings depend on preference).
oH NO!!! my gif is over 3mb!!! do not fret!!! we will fix that in a moment. just save the gif once your settings are good!
13. find the saved gif file in your computer and drag the file into photoshop. it will open it with all the frames displayed like so:
14. delete the frames you don’t want to make it less than 3mb! a rule of thumb is that for each frame, it’s about 0.1mb. my gif is around 5mb right now, so i’ll have to delete around 20 frames (1 frame = 0.1mb * 10 = 1mb and we have to get rid of 2mb so 0.1 * 20 = 2mb).
to delete frames, click on the beginning frame of what you want to delete, hold down the shift key, and then click on the ending frame of the section you want to get rid of. press the trash button.
continue this process until you have the gif under 3mb. to see if it’s under 3mb, export the gif to see how much mb it will be!

15. last, but not least, your gif may be at a speed you don’t want. highlight all the frames by clicking on the first frame, holding down the shift key, and clicking on the last frame of the gif.
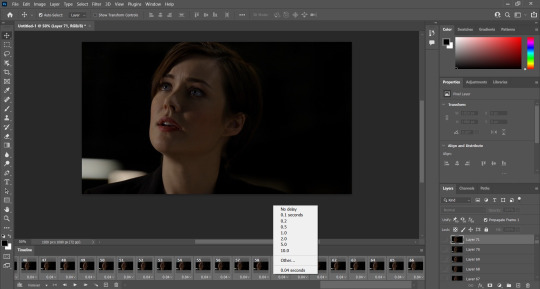
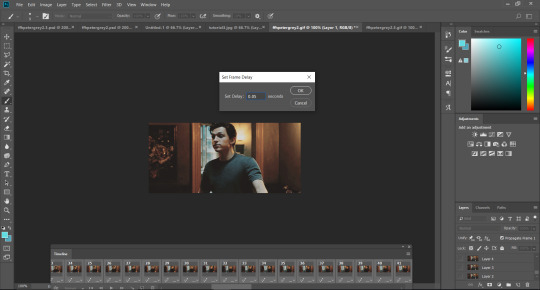
then, click the arrow on the bottom right hand corner of any frame and select ‘other’ for the frame delay.

the gif was originally at 0.03 frame delay. the optimal frame delay time is 0.05, but it depends on the quality of the video and what your preference is. generally, it ranges from 0.04-0.08. i decide to go with 0.05!
lastly, export the gif and voila!
upon completion of this tutorial, i realize some of the pictures may be unclear, so let me know if you have any questions!! feel free to message or send me an ask! also check out my resources side blog!
again, i want to reiterate that i am NOT an expert with photoshop, so i may not be able to answer all your questions. if i can’t, i’ll try my best to find an answer and if not, there are many great gifmakers on here who are willing to help!
237 notes
·
View notes
Text
a somewhat comprehensive performance guide for the sims 3
what it says on the tin. i’m sticking everything under the cut to avoid clogging everyone’s dash because, hoo boy, this is a looong post
welcome to my kitchen, and hopefully i can help you get your game to run a bit better!
first, if you haven’t already, make sure to launch your game (i recommend just bg so it loads quickly) and check if you need to change your graphics settings. if you’re on windows and would like to play your game in windowed fullscreen:
download and install this program (it’s safe, i promise)
open the program and you should get a notification that it’s running in your tray
with ts3 open (in it’s windowed mode), click on your tray and right click on the program’s icon, then select Add window
go back to ts3′s window and press F3 on your keyboard. you should get a notification that ts3 has been added to the program’s list, and you’re done!
you’ll also need an fps limiter to prevent the game from frying your video card. i use this one, set at 60fps. alternatively, you can download MATY’s fps limiter and place it in your game’s bin. (The Sims 3/Game/Bin)
is your game crashing on startup? check your DEP settings or try using 3booter.
some tips to help your game run better
have as few programs as possible running while ts3 is open.
run a 4gb patch on your game. download this, run the .exe, select the game’s executable (The Sims 3/Game/Bin/TS3W.exe for patch 1.69 or TS3.exe for patch 1.67), and click open. you’ll get a pop up saying it’s patched. please note that your computer needs to have over 2gb of RAM for this! (most do, but do check how much RAM you have!)
if you’d rather increase how much RAM the game uses yourself, follow this tutorial.
download razer game booster. this frees up some memory on your computer to increase performance.
check how much virtual memory your pc is using. follow this tutorial.
delete cache files. the game will generate new ones every time you open the game, so make sure to delete the following files before running the game: CASPartCache, compositorCache, scriptCache, simCompositorCache, socialCache. these files are found in Documents/Electronic Arts/The Sims 3.
if you’re on pc, delete your WoldCaches folder. not everyone will have this folder, and the game may also regenerate the folder. (mine didn’t regenerate the folder, but it’s happened to others) DO NOT do this if you’re on mac!!!!
disable your FeaturedItems folder. this prevents the game from generating a fuckton of store thumbnails you’ll never look at. follow this tutorial or just set the folder to be read only.
turn off the following in your game settings: shop mode, interactive loading screens, and online features. i also recommend turning off story progression and memories and using mods to handle these instead.
edit your GraphicsRules.sgr. this will help your game load textures faster. (it also helps how fast your sims change their clothes!) do it yourself by following these tutorials ( 1 + 2 ) or download avian’s graphics fix (v1.69) (v1.67). i recommend doing the latter more than doing it yourself!
modding your game: a quick crash course
yeah, i know most people know how to download and install custom content + mods, but this is still good to give a read for managing your sims 3 cc!
first, you’ll need a mods folder because ts3 won’t generate one by itself. i recommend you download this framework and follow MTS’ guide to setting it up. it comes with a nifty little no intro video mod!
use the compressorizer redux. you can extract it wherever you’d like, just make sure to keep all its files in the same folder. this program is pretty self-explanatory, it compresses .package and .sims3pack files. to use it, click Add Files to List, select the folder with your files (you can do this multiple times), and click GO! now, just let it do its thing! it may take a while to process everything if you have big files, but you’ll get a pop up saying how many MBs you saved when it’s done. you can also use decrapify mode on .sims3packs (useful for store content!)
i recommend downloading Delphy’s Sims3Pack Extractor. i avoid using the game launcher to manage my cc at all costs, and this tool is useful for extracting .package files from .sims3pack files. follow this tutorial to use it!
Delphy’s Dashboard Tool is also useful for finding any broken, duplicate, or conflicting cc. i don’t recommend using the fix all problems option, do it yourself instead to make sure you don’t delete anything you want to keep.
renaming cc files can also help with lag. follow this tutorial!
you can also merge your package files to help with lag and load times using this tutorial. i don’t do this personally, but my mods folder is pretty small too.
note: the game launcher can only load 500 .sims3pack files at a time. only use the launcher to install absolutely necessary items!
to help reduce lag and load times, you can delete everything in your DCBackup folder (Documents/Electronic Arts/The Sims 3/DCBackup) EXCEPT for ccmerged.package. DO NOT delete ccmerged, it has all the cc installed through the launcher. (ps. you can safely use the compressorizer to compress your ccmerged file!)
final tip: try to control the amount of cc you have installed. i’ve noticed that the game takes a lot longer to load when my mods folder starts to reach a Gb. my mods folder is currently 368Mb, and it takes around 5 minutes to load any saves.
helpful mods for your game
the ETERNAL must have: nraas’ mastercontroller. you’ll need this to run all nraas mods! also be sure to grab overwatch and errortrap while you’re at it! these catch and clean any errors that happen in your game. i also recommend register and traffic.
no (or fewer) auto memories is SUPER useful for controlling memories in the game and helps with game performance. it’s super customizable!
ellacharmed’s world fixes. not really a traditional mod, but this helps with routing and camera control! note: don’t use these on preexisting saves! some lots have been moved and there will be little gaps in the world with preexisting saves.
routing fixes for schools + other lots. be sure to use nraas to reset your school lot after installing!
interaction on sloped terrain. this is mostly just a sanity saver, but very useful!
finally, i recommend grabbing awesome mod. it has a bunch of fixes and is very customizable!
reducing save game bloat
a.k.a. the steps i go through to make sure that my game loads relatively fast and runs with minimal lag.
if i’ve taken any screenshots the last time i played the game, i move those out of ts3′s screenshots folder and into a separate folder.
i delete all generated cache files. see the tips section above for more info
i run kuree’s save cleaner on the save i’m planning on playing. if the latest version (2.1) doesn’t open/work, try using v1.1 instead. you can also do this manually, though i don’t recommend it for the sake of your sanity.
every couple of in-game weeks in a save i run a total reset on the world i’m playing in. this is done through nraas mastercontroller. click on your city hall from map view>nraas>mastercontroller>total reset
tip: to help prevent your saves from corrupting, use save as and keep multiple versions of your save. for example, i have 3 versions of my lepacy save. this way, if a save does corrupt, you have a backup!
misc. ways to reduce lag
don’t run the game with all packs enabled. it’s going to murder your game. only run with packs you know you’ll use. you can also refer to this masterpost for bgc items if you only want certain items from a pack.
don’t keep tons of stuff in your sim’s inventory. use the fridge to keep fish and harvestables instead.
if your sim has the collection helper LTR in their inventory, make sure you have it set to none when you’re not using it.
i recommend downloading simborg’s CAS hiders, ILTS’ CAS Rehaul, and/or sweetdevil-sims’ CAS hiders to reduce CAS load times.
change CAS’ catalogs to show in compact form using nraas mastercontroller. select a sim>nraas>mastercontroller>settings>CAS and look for show in compact form options and set each to true
nona’s no limos mod can help nraas overwatch’s nightly clean up
make sure to turn off any build/buy cheats you activated when you go back into live mode. (even if it’s just to save)
if you’re using CAS a lot in a play session, it’s a good idea to quit to desktop and reload the game every once in a while
try to avoid saving presets and CASt swatches
disconnect from the internet. i don’t do this often because i usually have spotify or carl’s sims 3 guide open alongside ts3.
good resources to refer to
the sims wiki’s game guide to improving performace
nraas’ tips for better game performance
this thread @ MTS
optimization guide @ games4theworld
this post by darkfridaysims
that’s all folks!
if you’d like to know what cc and mods i’m using, here’s my resources page. thanks for reading all this, and if you need any clarification or have anything to add onto this, definitely hmu!
edits
*ps that i won’t be tagging people i credit so i don’t risk clogging their activity, i’ll still include a link to their blog!
the fps and 4Gb patch aren’t needed, it was fixed in a patch! (thank you, create-a-sim!)
#ofc feel free to rb this!#i took me 6 hrs to get this all together so i'd really appreciate it!#sdjkadh how do i tag this#the sims 3#sims 3#ts3#tutorial#tips#reference#sr
688 notes
·
View notes
Text
9 Board Game YouTubers I Follow & Why (plus a few others)
In the literal dim and distant past when I started boardgaming (honestly, the biggest threat was tallow wax on your board), the internet was still accessed by whatever IP address you could remember off the top of your head (there’s no place like 127.0.0.1 as they sayI) - and the only TikTok was the clock ticking, waiting for half of Louise Nurding’s left leg to download only to realise it was Anne Widdecombe and you’d hit the wrong link on a BB. Boardgames had some quiet and shady corners of the internet, in those same Bulletin Boards, there was one for HeroQuest and Space Crusade when they came out. But sadly, if you wanted to see a boardgame being played or learn the rules, you either had to go round to your friend Tim’s house where he had a new chits-for-days wargame going, or sit down and actually read the rulebook yourself. As a result, I bought some interesting games in my time, including a game called Operation Overlord - a mighty chit-tastic WW2 N African campaign monster that I bought in desperation from the Games Workshop in Manchester on the first morning that it opened in 1979 (?) as we were so far back in the queue that there wasn’t a space marine to be had for miles. But now, we have a plethora of kindly folk available on our blistering shiny Windows NT 486sx machines to inform and delight us in full 8-bit glory. Everything from reviews, buying guides, rules tutorials and even painting & crafting guides, we can be bathing in just about whatever aspect of board or wargaming we so desire in an effort to stave off the clattering realisation that it’s been over 3 months since we spent any quality time with another breathing soul outside our houses. The question gets frequently asked on boardgame FaceAche forums “What YouTube channels are worth my time and why?” so in an effort to throw my own towel into that controversial ring, here’s my pick of probably 9ish, maybe more by the end, but let’s start with 9 in no particular order..... 1) 3 MINUTE BOARDGAMES

One of the first board games ‘er across the table (TM) and I bought together was a copy of Gloom from a little games and comic shop halfway round the world in Hamilton NZ, Mark 1 Comics. As we were achingly close to moving to NZ a few years ago, we’ve kept up with many aspects of what might have been our life over there, so it was a delight to discover Jarrod (and now Stephanie) on YouTube, a friendly and familiar accent reviewing board games. But it’s not just the NZ vibe that I love, Jarrod does a great job of cutting thru the hyperbole and bloat often associated with trying to keep YouTube vids ‘long for the algorithm’ (ugh) and just gives very pragmatic reasons for a game either joining or leaving his collection. He has a great approach, and it’s nice to see him finally on camera instead of the disembodied voice. Great reviewer, and Stephanie is utterly hilarious. 2) THE BROTHERS MURPH

Mike & Nick are two of the most engaging brothers on YouTube let alone just in the boardgaming community. Their series on thrift shop finds has dredged up some hilarious and often tragic specimens from the grand days of Palitoy, MB and Parker Games. They are also masters at ‘speed reviewing’ often piling reviews of 50 or 60 games into the same number of minutes. I think I favour the ‘don’t outstay your welcome’ approach to YouTube in general, and the Brothers Murph are at great ease with this philosophy and yet they take on simple party games thru to the heaviest euros with the same distillation equipment, and yet their reviews are never trivial or throw away. We had the chance to chat to Nick at Airecon this year and he was a lovely guy, slightly blown away by the fact that people liked his channel. He’s also an awesome artist too.
3) ACTUALOL

There are many reviewers on the web who have cost me a fair amount of money, the worst being Zee Garcia, however, a close second is Jon Purkiss aka Actualol. Jon has a terrifying gift for finding games, and especially ridiculously affordable games, that I buy on spec and then end up absolutely loving. Jon has a light and breezy style which is instantly engaging - I also really want his comfy chair (surely in exchange for a nice review on here Jon???). His videos are tidy and concise and yet still convey a deep enthusiasm and joy for games. His reviews very clearly portray what the setting of the game is and what you’ll be doing, without getting embroilled in the rules. He always has great footage of the game on the table (please reviewers - look at the ratio of your face to the game you’re talking about - less than 10% game and i’m walkin’) and often favours the less pricey end of the market which suits me fine. Brilliant games I love thanks to Jon include: Second Chance, Magic Maze and Ninja Academy
4) OUR FAMILY PLAYS GAMES

There’s not much to be said about Mik & Starla Fitch that cannot be gained from watching a mere 3-4 minutes of their channel. For sheer exuberance aimed squarely at a love for bringing families together via our glorious hobby, you cannot top these guys. If you are ever - EVER - feeling slightly lacklustre about gaming or losing your mojo for whatever reason - heck if you are just feeling slightly down, treat yourself to 10 minutes in the company of these two excellent human beings. Their reviews and playthru’s have all the humanity you need in a game and after five minutes you are thinking “Is the US too far to go just for a gaming evening?” We’d both utterly love to sit across the table from these lovely people and just play, and I can’t say that about every reviewer, I’ll be honest. Their reviews are often centred around unloved classics (watch their vid dedicated to why they love Catan as an example - you’ll be clicking Buy Now before your know it) and also some great quirky unknowns that I’m trying to hunt down even now. They’ve just had a brilliant couple of boosts from both a spot of Good Morning America recently, and becoming reviewers for the mighty Dice Tower. I’m immensely grateful for a tweet by Rodney Smith for pointing me in their direction, my social media is a much brighter place with the Fitch family in it.
5) RAHDO RUNS THROUGH

“Heeeeey Everybody”. One of the first board game reviewers I ever caught on YouTube was the inimitable Richard Ham aka Rahdo. And I’m so glad I did. I would genuinely never sit down and try and learn a game from one of Rahdo’s playthrus, they are what I imagine being in a wind tunnel full of 50 tonnes of feathers is like. BUT and this is crucial - if I want an idea of what a game is going to feel like to play, there is no finer deliverer of the remote game experience than Mr Richard Ham. His unique ability to explain how a game is going to work, turn by turn; the decisions you will make; the things you’ll have to consider; the short and long term goals; are all brilliantly covered in one of Rahdo’s videos. His ability to make different choices for his ‘ghost partner’ Jen (who does exist in real life, we have bought jewelry off her, she’s lovely) also adds a real dynamism to the games, showcasing the flexibility in a design for different play strategies. Rahdo tends towards 2 player games and usually at the heavier end of the scale, but if there’s a game you are thinking of buying, check Mr Ham out first!
6) WATCH IT PLAYED

It’s often been said that Canadians are some of the politest folk on the planet, but when it comes to ranking Canadians, well, I’m sure they’d be too humble to rank each other so I’ll have to. Rodney Smith is the loveliest man in the world. There, end of article. But it’s true. We’ve been watching Rodney since we first got confused about the rules for Mice & Mystics (which we still got wrong but that wasn’t Rodney’s fault) and his ever chirpy, ever positive approach to his rules rundowns is utterly remarkable and frankly, enviable. And it’s his attention to detail and clarity for explaining rules that have rightly made Rodney one of the most important resources in the gaming hobby. If you have ever struggled over a rulebook and haven’t raced to Watch It Played, I will guarantee you will have spent far longer on that rulebook and lost way more hair than you ever needed to. We had the great honour of playing Rajas of the Ganges with Rodney at Airecon in 2019, and I mugged up on the rules sooo much. Regular imbibers of this rag will know my sloth for reading rulebooks is legendary but fortunately ‘er across the table (TM) loves them. But, for the 3 days running up to our trip to Harrogate, I did nothing but read that rulebook - this was THE Rodney Smith, you can’t get a rule wrong with Rodney. But of course, nerves kicked in and I could barely remember the rules of Snap, but the nicest man in the world could not have been nicer. Really, quantum mechanics has proved it. He was just the same man off the computer telly. Funny, engaging, warm and happy to chat as well as play (which I was also really nervous about doing!), if you don’t watch Rodney, are you really internetting?
7) TABLETOP MINIONS

“Pachow” From boardgames to wargames. As well as my slight addiction to cardboard, my other opiate overlord is 28mm plastic miniatures. Specifically those involved in tabletop skirmish games like Malifaux, 7TV, Fallout Wasteland Warfare, GuildBall and a smattering of others. Though recently more focused on the frankly insane amount of content being released by Games Workshop, Tabletop Minions is presented by the splendid Uncle Atom. (In fact, I identify his content so much as Uncle Atom’s stuff that I honestly had to double check the name of the channel for this article!). My plastic habit uncle (sounds so wrong, but so true) has possibly the gentlest delivery of anyone on the internet. It’s not so much content, as therapy. I know the net is awash with AMSR channels at the mo, but if you don’t want to listen to some overmonetized southern californian with some bubble wrap and a large capsule condenser mic, just hop over to TTM and listen to the Uncle for 5 minutes. He’s like a soothing bubble bath of content about painting figures, philosophy of the hobby, general art & design principles, and great life advice. He also wears a fez.
8) GIRL PAINTING

“Hello Tchoobies!” I painted my first 28mm figure when i was about 12ish - it was, ironically, a space marine of some sort - the old clunky Ral Partha ones. It looked terrible, but each model got a bit better till I stopped for some reason a few years later. When I got into Malifaux a few years ago (ie decades, several of them, later), I knew I was going to have to get back into painting; heaps of grey plastic does not a skirmish game make. (Little did I know I would have to revisit my microscopy days either when assembling damn Bayou Gremlins!) Two channels were recommended to me, the Esoteric Order of Gamers (more later) and Girl Painting. EOG put me on the path to believing I could paint again, but Alexandra at Girl Painting actually made me believe I could learn to do it well. GP’s approach to painting figures, terrain and vehicles is based on solid art theory. Her explanation of colour relationships and the colour wheel is something I can quote to this day. All of the techniques that I lean on so heavily in day to day painting both for table and display I learnt from Girl Painting. Correct use of washes, wet blending, non-metallic metals, shading, drybrushing, highlighting, model reading, all of it from studying intently, often with a brush actually in my hand while watching the channel. I cannot recommend GP enough if you want to put paint to plastic. Whatever your ability, you will learn something from this hidden gem of a channel.
9) ESOTERIC ORDER OF GAMERS
Another dang fine antipodean and another slightly unusual channel. I have a terrible, terrible memory when it comes to rules. In our early days, we also had a a lot of games with seemingly very over-bloated rulebooks - FFG games basically. I suddenly realised what I wanted was to lift the lid of a box and find in the lid, a summary of the important stuff i needed to remember about the game. Apparently I was not the only one. In 2013 a chap known as Universal Head started publishing an amazing series of rules summaries which condensed down some of the bloatiest rulesbooks down to often one or 2 pages of A4. It was a (pardon the pun) gamechanger for me. I can’t count the number of games in our collection that have a friendly sheet of A4 now as the first thing you see when you open the box. They are brilliant. And he’s still doing it to this day. I would argue that the more useful leg to his activities is the website rather than YouTube channel, but his channel does have the aforementioned brilliant figure painting tutorials, unboxing videos and some crafting stuff. The website is definitely the place for the rules summaries and also a fantastic resource for build-it-yourself foamcore box inserts. Though Folded Space have now made box inserts pretty affordable, there’s still no feeling like the satisfaction of building your own, and I would argue that some of EoG’s designs actually make more sense than some of the Folded Space ones anyway. AND THE OTHER ONES (Who probably don’t really need the exposure, but hey, only 11 people probably read this so......) Why aren’t these on the list above? Just because I wanted to highlight some of the more marginal channels above or more specialist rather than the pure reviewers. SHUT UP & SIT DOWN Possibly my favourite channel on YouTube, whose name sounds more like a menacing Yorkshire greeting than a boardgame channel. SU&SD seem to be a real Marmite issue on the board game communities. And I genuinely don’t understand it. Yes, their reviews are often really funny but honestly, if that’s all you take away then you are missing some amazingly detailed and thought provoking work. Quinns and crew’s reviews are some of the most measured and balanced reviews in the gameyverse. Their reasoning for the conclusions they come to are incredibly well thought through and often very surprising based on the tone of the rest of the review. They have steered me to some games I would never have looked twice at and steered me away from some very shiny games that I might have blown a lot of money on otherwise. Flagposting great alternatives is also a signature of their reviews, and that again has often lead me to some fantastic games. We don’t always agree (their recent review of 10 Oink Games was savage imho) but we always disagree for the right reasons. Again, I would argue their website is actually a better overall resource, especially their podcasts which are superb, but all their content is fantastic.
in a highly similar vein I would add NO PUN INCLUDED. Efka & Elaine produce some of the most thoughtful and intelligent boardgame review content today, and often for some of the deepest and most complex games. The joy of boardgaming is that it is highly subjective and there are lots of times when NPI like/dislike a game that I do/don’t, but they are engaging and warm enough as presenters to hit you with a gentle subtext that says “It’s ok - I know we like this game, we get that you don’t, it doesn’t make any of us bad people, just people y’know, have a sandwich with us” Efka criticising a game reminds me of when Dennis Healey once described an argument with Geoffrey Howe as being ‘savaged by a dead sheep’, though not in the cynical manner of the original. The criticism is loaded with that crucial dose of ‘hear me out’ that is sadly lacking in 90% of all other reviewers out there. Efka & Elaine are no GoggleBox reviewers, they are the real deal - they genuinely understand how games work and why. The sheer moral turmoil that Efka expressed over the cultural issues in Rising Sun was some of the most thoughtful YouTube content I have ever seen. I just wanted to do a little shout out to Johannes & Sunniva at BOARD GAMING RAMBLINGS - I don’t have as much to say as they are relatively new on my radar, but I have really enjoyed their content so far and find them to be like one of those adorable gaming couples that you might see every once in a while at your gaming group and have a blast with, and then not see for months and go “Awh - I really miss Johannes & Sunniva - where’d they go?” that feeling, you know the one. Adorable, with a hint of the esoteric. Also, a quick but important mention to the other titan of boardgame rules explanation that is Paul Grogan of GAMING RULES!. Like Rodney Smith, Paul is meticulous about rules explanation and is really clear and simple to follow, even for very heavy games, which Paul tends to do more of than Rodney, which is probably why I end up watching Paul slightly less, but certainly not for any less quality. Paul has such a reputation in the industry that he now works closely with many designers and publishers to help craft the best rulebooks around as a consultant. So that’s it - congrats for making it through folks. Didn’t think it was going to run this long, but turns out.... I quite like a lot of the YouTubers I watch - who knew? Until next time... happy gaming y’all.
2 notes
·
View notes
Text
How Do I Make Gifs? - A Photoshop CC Giffing Tutorial
(for @elektrawwf, and anyone else interested in how I make gifs I guess, lol)
So, I feel like I should preface this by saying that I'm certainly no expert on this, nor am I a Professional Giffer™, but I’ve been making gifs for a few years now, and have developed a pretty standard system for doing so. Hopefully it works for you like it’s worked for me! :)
Basic Tutorial Steps:
Step 1 - Recording the scene you want to gif
Step 2 - Importing, deleting, and cropping your gif frames
Step 3 - Adding adjustment layers
Step 4 - Resizing your gif and setting the frame delay
Step 5 - Converting and sharpening your gif
Step 6 - Trimming and saving your gif
BONUS STEP - Adding text (OPTIONAL)
-
Programs Used/Needed:
- QuickTime Player
- Photoshop CC 2018
-
The finished gif that I’ll be making:
This tutorial is VERY screenshot-heavy, so the rest of it will be below the cut. Happy giffing!
STEP 1 - Recording the scene you want to gif.
All gifs start as videos. I use the Screen Recording feature on QuickTime Player to create videos of whatever scenes I want to gif. If you have a Mac, you can find QuickTime in the Applications folder:
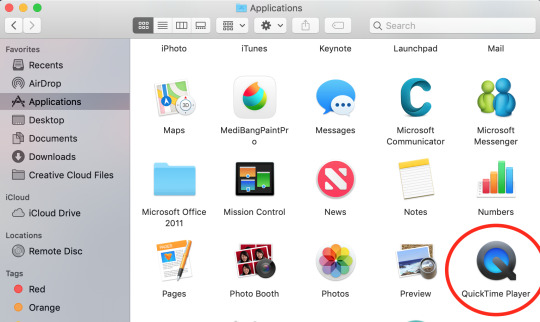
Right click, then select New Screen Recording.
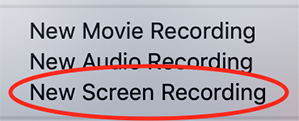
You can then play the scene you want to gif on your computer, and your screen with the video on it will be recorded. Hit the stop button when you want to end the recording, and then save the video.
It’s best to not record more than a minute or two at a time - basically, just record the exact scene that you’re looking for - because the longer the video is, the harder it’ll be to select the portion of it that you need for giffing.
You can technically screen-record any type of video, but I (and most giffers) vastly prefer videos that are 1080p, which is the best kind of HD. That’s why I usually don’t gif things unless I can find them either on Netflix, Youtube (in HD) or the CW site (or NBC, CBS, whatever). There are definitely other (less legal) ways to get your hands on HD videos, but I’m just not super comfortable using those lol.
That being said, 720p videos are usually okay for smaller (268px-wide) gifs - they’re just less ideal (I wouldn’t really recommend using them to make 540px-wide gifs, but you can still technically do it).
STEP 2 - Importing, deleting, and cropping your gif frames.
Now that you have your video, you have to import it into Photoshop. Once you open Photoshop, you need to go to File > Import, then select Video Frames to Layers.
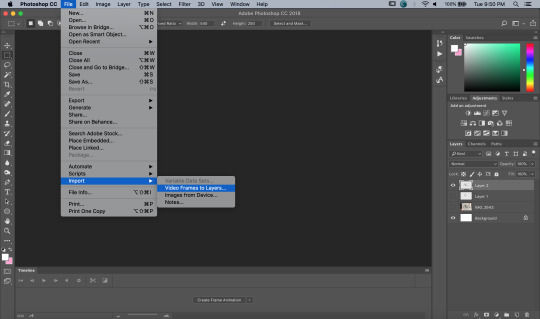
A window will pop up, where you can set the amount of frames that you want Photoshop to import, and select the exact section of the video that you want to import. Here are my settings:
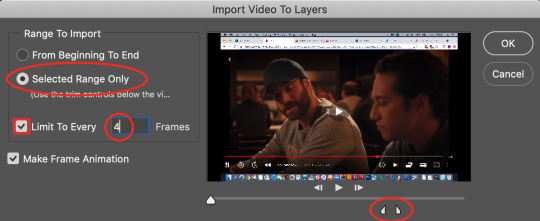
The two little toggles below the video are meant to be dragged around, and you use them to section out the specific Range of the video that you want to turn into a gif. Once you have all of this set up to your liking, hit OK.
-
NOTE: The selection of Limit To Every 4 Frames is more my personal preference than anything else. If you want Really Smooth Gifs, then you can uncheck that box and simply import every single frame in your Selected Range. This is what High Quality Giffers always say to do. Unfortunately, while those gifs do end up really smooth, they also end up being really short, which I don’t particularly like.
So basically, I’m personally willing to sacrifice some smoothness in favor of an increased gif length, but you do NOT have to do that if you don’t want to. Choose whichever option you like best - these Steps work no matter which one you do. (We’ll come back to this later though, once we get to setting the frame delay in Step 4).
-
Okay, back to the tutorial.
Once the scene is imported, you can delete any extraneous frames at the beginning and end of the frame animation Timeline, which can be found at the bottom of the screen.
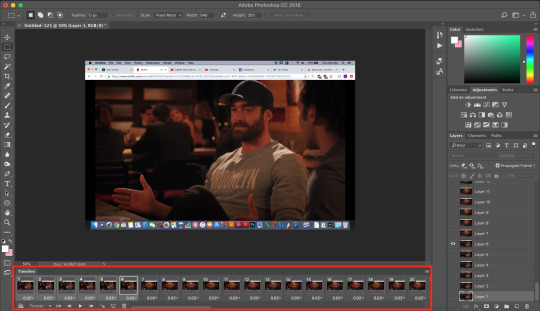
As you can see, I have the first 6 frames selected. Those are the ones I ended up deleting (among some others at the end of the Timeline).
You can also go to the Layers panel on the right, and delete the corresponding layers from there, once you’ve deleted the frames. This isn’t technically necessary, but it might help free up some computing space if you’re deleting a lot of frames.

Next, you need to click the Selection Tool in the top left corner of the screen. Then, set your selection preferences (circled below) as follows:

Style: Fixed Ratio
Width: 540
Height: 250
This is specifically the ratio to set for a 540 x 250px sized gif, which are the dimensions of the example gif I’m making. If you want to place two gifs beside each other in a gifset, each gif needs to be 268px wide. (The heights can be whatever you want them to be.)
Use the Selection Tool to select the area that you want to be your gif, and then go to Image > Crop.

STEP 3 - Adding adjustment layers.
Now it’s time to make your gif look pretty™. For this part, you’ll be using the Adjustments panel above the Layers panel.
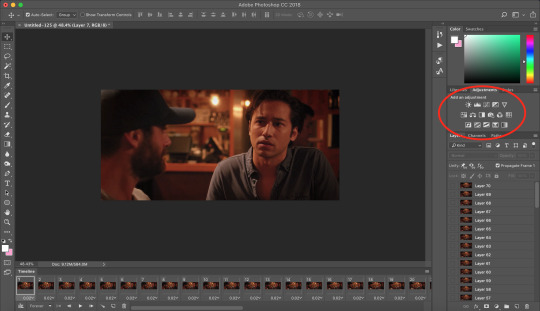
Adjustments will affect all the layers below it, so you want to make sure that your adjustment layers are placed above all of your gif layers.

These are the adjustment layers that I used for this specific gif, but they’re also just generally the same three adjustments that I use for every gif I make. (I also usually add a Hue/Saturation adjustment to my gifs, which I set to +15 Saturation, but since this scene was already so heavily saturated, it didn’t need it.)
Here are the specifications for the Brightness/Contrast and Levels adjustment layers:

Regarding the Curves adjustment layer (pictured below), if you click on the RGB dropdown menu, you can single out specific colors in order to color-correct the gif, which I did here (by removing a lot of extra reds and yellows).
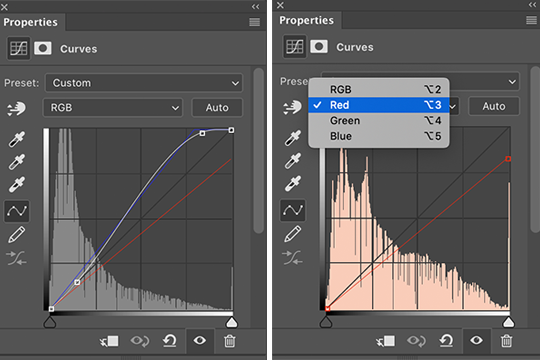
While these are good general adjustment examples, just take note that the values pictured here won’t be exactly the same for every gif, and you need to toggle and play around with them to make every new gif look its best.
Here’s the example scene before any adjustments:
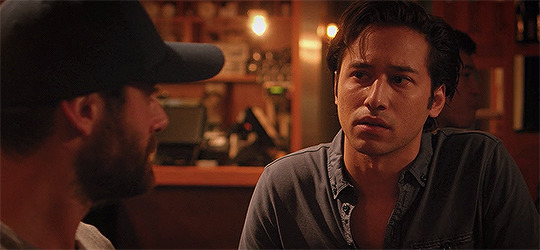
And here’s the scene after my adjustments:
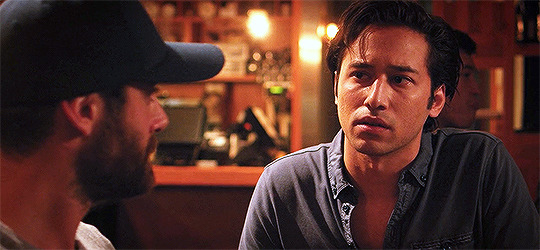
STEP 4 - Resizing your gif and setting the frame delay.
To resize your gif, go to Image > Image Size, and then change the gif’s width (in this example, I change the gif’s width to 540px).
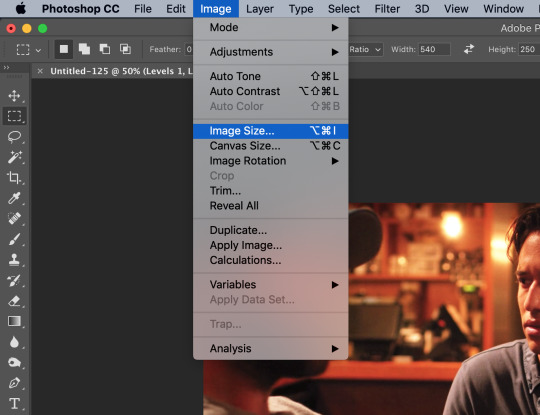

As long as Resample is checked the you’re working with Pixels, the gif should resize properly. Hit OK.
Next, to change the Frame Delay of the gif (basically how fast it goes), look for this button in the right corner of your Timeline, then click it and Select All Frames.

Once all the frames are selected, you can hit one of the little downward arrows next to the 0.02 values, and select Other.
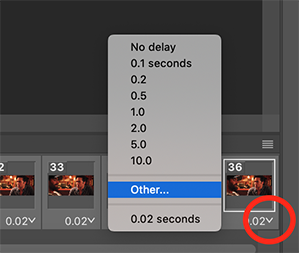
Now you can set your new frame delay. I always set my delay to 0.09 seconds, which produces gifs that are a bit slower than the Professional Gif Standard™. This is due to a combination of personal preference (I just like slower gifs) and an effort to maintain as much smoothness as possible, given how I choose to import my frames.
-
NOTE: Remember the NOTE from Step 2? Now, if you chose to import every frame, rather than “Every 4 Frames” like I do, then you should set your frame delay to 0.04.
Doing so will produce a final gif that looks like this:

Notice how this gif is smoother and faster, but also shorter than my example gif? Yeah. Like I said, whichever style of gif you choose to make is up to your own preference.
STEP 5 - Converting and sharpening your gif.
You never quite realize how blurry a gif really is until you Sharpen it. To do this, you first need to convert your Timeline from a Frame Animation to a solid Timeline. You can do this by making sure all your frames are still selected, and then clicking the Convert to Timeline button in the bottom left corner of the Timeline.

Now your Timeline should look purple, like it does in the picture below.
Next, you need to select all of your layers (MINUS the adjustment layers) on the right side of the screen. Once all of your layers are selected, go to Filter > Convert for Smart Filters.
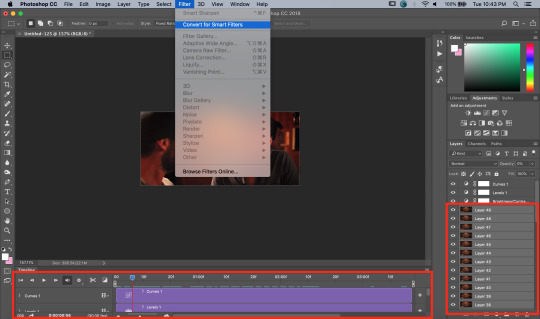
Once your gif layers have been compressed into a Smart Object (see circle below), you can select Filter > Sharpen > Smart Sharpen.

The first time you select Smart Sharpen, you need to set all the parameters for it. But once you do that the first time, you shouldn’t have to set them again. Basically, make sure your window looks exactly like this one:
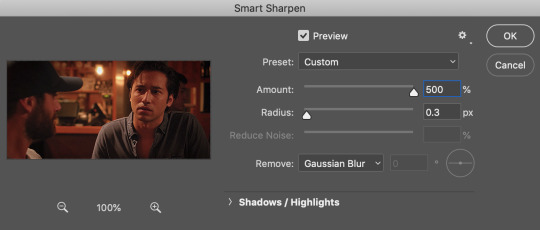
Then hit OK.
You’re going to do this TWICE (so you’re going to end up with TWO Smart Sharpen layers below your Smart Object layer). Then, you need to click the button to the right of the top Smart Sharpen layer, and change the opacity of that layer to 30%. (Otherwise, your gif will be way over-sharpened.)
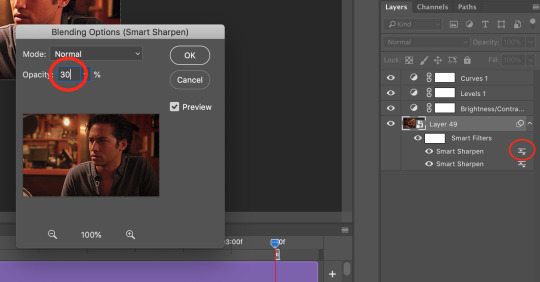
STEP 6 - Trimming and saving your gif.
You’re almost done! It’s time to save your gif.
To save a gif, you must go to File > Export > Save For Web (Legacy).
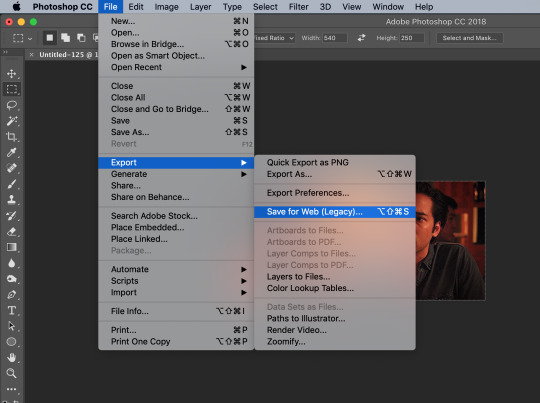
However, this gif has a problem.


This number in the bottom left corner of the Save For Web window tells you the current size of your gif. As you can see, this gif’s size is currently 3.541 MB. That size wouldn’t be a problem if you were intending to upload this gif to Twitter, because Twitter has a gif size limit of 5 MB.
Tumblr, however, only has a size limit of 3 MB. So, to get your gif to work on tumblr, you need to Trim it.
Trimming is the process of changing the length of a gif without actually deleting any part of it permanently. This gives you the freedom to edit your gif and pick the portion of it that you like best.
You can easily trim your gif in the Timeline, by clicking the dragging the Gray Sliders at each end of it (see the arrows below). Wherever you leave the stoppers will become the new beginning and end of the gif. You can make this process more precise by using the Blue Slider (circled below) to choose where you want your stopper to go before you drag it there.

The Timeline pictured here has already been trimmed.
Trimming your gif will often require some trial and error. Whenever you want to check the length of your gif, simply go to Save For Web again and check the amount of MBs in your gif. (Click Cancel if your gif is still too big.)
Once your gif falls below 3 MB, you can finally save it!

The last thing you need to do before saving is change your Looping Options from Once to Forever in the bottom right corner of the window. Then, click Save.
You now officially have a finished gif!
Mine looks like this:
-
BONUS STEP - Adding text (OPTIONAL)
Now, I’ve just shown you how to make and save a gif. But what if you want to add text to that gif? I’ll show yow how to do that too.
First off, you should only add text after the rest of your gif is completely done and ready to be saved (basically, once you’ve already completed Steps 1-5). Then, before you save it, you can click on the Text button on the left side of the screen.
Click on the gif to create a new Text layer, and then type whatever you want. Generally, dialogue captions are placed in the middle of a gif towards the bottom, while other, more artistic types of Text can go wherever you want.
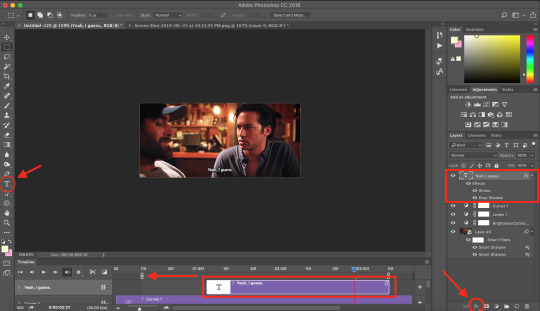
Now that you have a Text layer, you want to make sure of a few things. First, make sure that your Text layer is your TOP layer on the right side of the screen, above all of the Adjustment layers.
Next, you want to make sure that your Text layer spans your entire gif Timeline. Notice how my Text layer (depicted as a purple rectangle in the Timeline) doesn’t reach the Gray Slider on the left? To fix this, simply click and drag the Text layer until it extends past both Gray Sliders.
And finally, I always add Effects to my Text. You can do this by hitting the fx button in the bottom right of your screen. Specifically, I use the Stroke and Drop Shadow effects to make my gif stand out from whatever background it happens to be on.
My Stroke is always set to 1px thick, and my Drop Shadow settings are as follows:

As a final note, if you want your text to look exactly like mine, then you need to use the font Myriad Pro in size 14, which I then italicize and bold. You can also open Window > Characters, and make sure that your preferences look like this:

ALRIGHT. Now that you’ve added your extra text, you can FINALLY go to Step 6 and save your gif.
Now, your finished gif should look like this:

I hope this tutorial was helpful! I tried to be as thorough as possible to avoid any confusion, but if you have any additional questions, you should always feel free to ask me!
Have fun giffing!! :)
#my tutorials#my gifs#idk what else to tag this lol#gif tutorial#personal shit#long post#I'm so sorry to anyone on mobile with no read more
57 notes
·
View notes
Text
GIF-Making Tips and Tricks
Hello guys, today I’d like to try tackling something different from the usual skating… things because the skating discourse recently has got a tad wearisome "how do you make GIFs” is a question I’ve been receiving quite a lot. If you have never attempted nor have any intention of one day tinkering with GIFs, feel free to scroll past this. If you are interested in GIF-making, especially for Tumblr, or are just curious to discover something new, read on.
So there are 3 main steps in this GIF-making process: (1) find the footage (2) edit the footage and (3) convert the edited footage into GIFs. For ease of discussion, I’ll organize my tips and tricks into these 3 buckets as well.
The software I used are:
4K Video Downloader for video download
Adobe After Effects CC for editing
Adobe Photoshop CC for conversion
You can substitute 4K with any other video downloader of your choice, or you can use one of the many web-based tools out there, like this one for example.
If you’re not familiar with After Effects (and you don’t want to have to learn it from scratch), you can use any other video editing app for this part. You can also skip this altogether and do your editing in Photoshop - though I personally would not recommend it. PS is simply not very efficient as a video editing tool.
I’m not sure if there is any viable substitute to Photoshop in the final step. If you know of any app that could replace PS, do let me know in the comments.
STEP 1: FIND THE FOOTAGE
#1: YouTube is your friend.
#2: The video quality plays a big part in deciding the quality of your GIFs, so I’d recommend going for a video of at least 480p, ideally 720p or more - keep an eye out for that HD sign. So let’s say if I want to GIF Yuzu’s SP Otonal at GP Helsinki, I’d go for this version (thanks, @muffinlorando, you are the best).
#3: As a caveat to point #2, if you don’t have a video editor and opt for editing with PS, you might want to pick videos of not more than 30fps. PS is not great at adjusting the frame rate and you really don’t want to end up with a raw import of 60fps, for reasons I will get to soon enough.
STEP 2: EDIT THE FOOTAGE (with AA)
#4: Learn After Effects in 20 minutes. Seriously, that tutorial is awesome. It covers all (or most) of the basics, the explanation is easy to understand and follow along. The only complaint I have about that video is that it is actually 23 minutes and 24 seconds instead of 20 minutes as promised (#fake news???).
#5: Re: the dimensions of your Tumblr GIFs
The maximum width allowed for Tumblr GIFs is 540px and that’s what you want to aim for, especially if you’re making an in-line GIF, i.e., a GIF to be inserted into a text post, like the example above, or this:

If you are making a standard Tumblr gifset with 10 GIFs arranged in two columns, like this, aim for 268px in width for optimal display.
For a gifset with 3 columns, like this. the optimal width is 178px.
Three notes:
I only mention width because it’s the limiting factor, the length of the GIF is entirely up to you.
For full-width GIF, you can make do with something smaller than 540px, but I wouldn’t recommend going below 480px as it’d make the GIF quite grainy/blurry in display. Same for 1/2 and 1/3-width gifs, I would suggest a minimum of 250px and 160px, respectively.
For 1/2 and 1/3- width GIFs, you can go over 268px and 178px if you want your GIFs to look bigger in single view (i.e., when people click on the GIF to view them separately). In my examples, I used 270px for both gifsets. Don’t bother going over 540px with the big GIFs though, Tumblr will force-resize it to 540px.
For reference, most of my full-widh GIFs are 170px to 200px in length, my 1/2-size GIFs are usually in a 4:3 aspect ratio, and my 1/3-size GIFs are 1:1.
#6: Re: the duration and frame rate of your Tumblr GIFs
These are important factors because Tumblr has a size limit of 3Mb on GIFs. If you exceed that limit your GIFs won’t play at all on your blog, so there is a trade-off you need to consider in terms of the GIF’s dimension, duration, frame rate, color quality (which we’ll get to later), and size (in Mb).
My rules of thumbs are:
Frame rate: don’t go lower than 24fps, otherwise your GIF won’t look smooth, but don’t go for something as crazy as 50-60fps either, otherwise you won’t be able to condense it to <3Mb without some serious sacrifice on the color quality.
Duration: don’t go longer than 5-6 seconds for the small GIFs and 3-4 seconds for the 540px stuffs.
#7: Make your footage slightly bigger than the composition. The reason for this is sometimes, in some footage, depending on the broadcast’s quality, there’d be some fuzzy pixels around the edges of the video. If you leave them in they can make your GIF look a bit messy. What I like to do is, first, fit the footage to comp width (Ctrl+Alt+Shift+H), then bring up the Scale property and slightly increase the automatic fit, usually rounding it up to the nearest percentage.
#8: Re: color correcting the footage.
Use an Adjustment Layer to keep the color correction separate from the footage. That way it’s easier to turn it on and off to assess the effect of the correction, and it’s easier to copy that layer to a new composition if you’re making a gifset.
I like to start with Curves to adjust the brightness and contrast to my liking. You can use other effects such as Levels for this. My note here is that you might want to err on the side of brighter and more contrasting for your footage, because when it is converted to GIF, it will lose quite a few colors and the result is often less vibrant than the footage. Here, for example, is what happened to a GIF I made from Mao’s Sochi FS when I was done converting:

To quickly enhance the brightness of a somewhat dark footage, duplicate the footage, change the Mode to Screen, and reduce the Opacity to around 20%.
Use Selective Color to target-correct the color you want to focus on. For example, in this GIF, I dialed up the Cyans / Blues and lightened the Reds / Yellows to accentuate the color of Yuzu’s outfit:

Use Leave Color if you want even more pop, like what I did here to make the red of Nastya’s dress stand out.
Some skating footage can have a yellow tint to it because of the light reflecting off the ice surface. If you don’t like that tint (I don’t), top the adjustment off with a Photo Filter. Pick one of the Cooling Filters and play around with the density until you get the desired look. I used this effect on the Yuzu spread eagle GIF above too.
STEP 3: CONVERT THE FOOTAGE INTO GIF (with PS)
#9: Usually, either of these two settings will give you the best result, i.e., the maximum preservation of colors and depth from your edited footage.
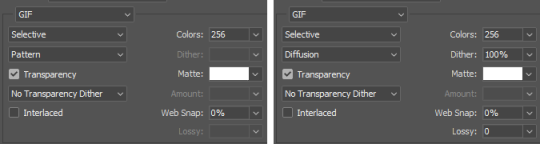
One drawback of these optimal settings is that they can make the GIF quite heavy. In case you have to compromise, I would recommend not going lower than:
Pattern with 128 colors, or
Diffusion with 128 colors and 80% dither
Anything lower than this can make your GIF look very washed-out and/or blurry.
FINALE: BRINGING EVERYTHING TOGETHER
#10: There are certain exceptions to all the rules of thumbs I mentioned so far. Since, as said, making a GIF and wrestling it into Tumblr’s size limit is always a four-way compromise of color integrity, video quality (frame rate), dimension, and duration, there are a few cases when you can make a 10 seconds+ GIF or a huge 540x540 GIF without sacrificing too much in the way of quality. Most of those are when the footage does not have a lot of different colors to begin with. So this one for example is a pretty big GIF (540x250) and yet only ~2.6Mb:

And this one is a full-width GIF that actually lasts 4 seconds (though I did have to reduce the dither a bit to make it <3Mb):
At the end of the day though, I’d say GIFs are for capturing the moments, so I usually would not go for too long of a footage. If you want to point out something that lasts more than 10 seconds, it’s much more convenient to just direct the viewers to the video itself :)
Aaaand, that’s it for the basics. Hope this was useful to at least some of you, If you want to see more posts like these, let me know in the asks / comments. I can also go into more details of how to make fancier GIFs with text overlay:
or layer masking, this sort of stuff:
Happy GIF-making!
304 notes
·
View notes
Text
How To UseCda Recordsdata In Cubase?
CDA file would not include sound. Clicking this hyperlink will begin the installer to download CDA to MP3 Converter free for Windows. Acda file on a music cd usually is 1KB or less. To check the speed of every converter software, we timed how long it took to transform a 625MB WAV file to a 26MB MP3 file. Simply add the files it's essential to convert, select the output machine to play to audio or video and then convert with FFmpeg. The MP3 recordsdata are actually on the CD, and the maximum storage capacity is set by the entire variety of MegaBytes utilized by he MP3 files. It may do almost all the things and convert CDA to mp3 format is not an exception. Any Audio Convertor is a free CDA to MP3 converter. Any Video Converter Ultimate is a professional CDA to MP3 Converter which allows you to extract audio tracks from CD and convert to MP3 format. We examined the entire options of free and for-pay audio converter software program program to ensure we advocate a product that can take care of all of your audio manipulation wants for present and future music codecs. Earlier variations of Windows Media Player will not be acceptable for extracting CD audio for editing in Audacity, as a result of they're unable to extract to WAV.

three. Any Audio Converter- Any audio converter is multitasking software, it is easy to useand highly effective assist for your pc. ITunes is the free audio converter and media player, developed by Apple, to fulfill calls for of music administration. The steps beneath aspect the way in which to convert an audio disc to MP3 information using Home windows Media Participant. Half 1: Convert CDA Recordsdata to MP3 on Mac and Residence home windows with iTunes. 1) Do I've to transform to another format all my CDA recordsdata on my karoke audio cd to place in a Ipod or jukebox. HD Video Converter Manufacturing unit Pro can help all sizzling audio formats like MP3, WAV, FLAC, ALAC, AAC, AC3, and many others. EAC may find metadata on your music from 4 completely different sources (full with album artwork), rename information robotically, and normalize audio as it's processed. CDA files might be performed solely from a CD-rom. And, you will note all CDA file in your exhausting drive is about 44 bytes (proper-click on the CDA file and select "Properties"). No, thecda file is useless with out the CD. In the event you get the unique audio CD, you should utilize any CD ripping software, including dBpoweramp, to rip the CD to the format you need. Note: We advocate set Bit Fee at 128 or decrease quantity if you'll burn MP3 files to CD and use it in your automotive. Commonplace CDs have a diameter of one hundred twenty mm and can hold up to eighty minutes of uncompressed audio (seven hundred MB of data). If in case you have iTunes 7 or eight, the MP3 is created by proper-click on or control-click over the tracks(s) to be extracted. Choose the tracks you want to save in your laptop by checking the check-boxes next to them. Eject the CD. As quickly as your CD finishes changing, it's possible you'll eject it. At this stage, you may view the MP3 recordsdata by clicking the These days Added tab within the upper-left corner of the web page after which clicking the CD's album.

The trial model of AudioConverter Studio will rip solely 10 tracks without delay, however the process could be repeated as many occasions as you want. After that go to your media library and then click on the Rip CD button current on the upper proper side of the window. Honestly, I'm not a Linux consumer, and I've no software for ripping CD's to MP3's. The favored online cd to mp3 converter free video and music sharing websites like YouTube, VEVO, Vimeo, SoundCloud, Metacafe etc present a huge numbers of music and music movies, but they do not present the option to obtain the videos or extract the audio immediately. Format Factory is greatest converter software program from CDA to MP3 and different codecs. Different useful features embody mp3 tag enhancing, integrated audio player, file identify templates, album paintings, advanced ripping capabilities, get cd information and far more. It helps a number of codecs for instance-, AIFF, ALAC, CAF, FLAC, , M4B, MP3, MP4, OGG, , , and so on. Can I really convert iTunes M4P files to MP3? You can additionally turn to free on-line AC3 audio to video converter to transform AC3 audio information to video in MP4 or other video codecs earlier than you might burn AC3 audio information to DVD content material. Convert your MP3 recordsdata to AudioBook data. Though audio information are much less inclined to data breach than image or document information, there's nonetheless a chance that a copy of your file might be saved elsewhere. The information will introduce three options to convert CDA to MP3. There are greater than 50 audio file sorts in use today, and one of the best converter software programs can work with all of them. The CDA (fast for compact disc audio") file format is an audio format that's used to allow songs to be played on commonplace CD avid gamers.

Designed to open CDA recordsdata on Windows XP, Vista & 7 with out the necessity of CDA codec packs. I recently found a straightforward and free strategy to extract audio from and videos and DVDS. CDA info are shortcut files installed on audio CDs. Select MP3 as an alternative of WMA from the Format drop-down menu and nudge the audio quality over a tad from 128 to 256 and even 320 for higher sound. It helps you to convert cda recordsdata to mp3 totally free. Here can be tutorial about learn how to convert CDA to MP3 format.Người dùng có thể chỉnh các file đầu vào, thực hiện kéo thả các file cda vào giao diện và thực hiện chuyển đổi tất cả các file này sang dạng mp3 một cách chính xác. This text will give a complete understanding on CDA file, together with three surefire methods for converting CDA recordsdata to MP3. CD rippers convert the uncooked digital data on music CDs into information a computer can read. IConverter is a free mobile app for iPhone and iPad It has a wide selection of audio enter and output file types in addition to its exhaustive record of supported document and video file types.
1 note
·
View note
Text
Working With MIDI Information Ableton
The time required to entry and start the Wav, Mp3 and Mid files of the participant could depend on the variety of recordsdata current throughout the present itemizing, and likewise on the settings of the PLAYER AUTO LOAD function. Power MIDI to MP3 additionally is straightforward-to-use MID Converter designed to transform midi recordsdata easily with simply mouse click on. Candy MIDI Participant is a MIDI participant for iOS (iPhone and iPad), but it surely plays only seventy five p.c of the file; you may pay for full performance. Android customers can open MID files with the Enjoyable Enjoyable MIDI Participant or MIDI Voyager Karaoke Participant app. MIDI was invented in order that electronic or digital musical devices may communicate with each other and in order that one instrument can control one other. For example, a MIDI-suitable sequencer can trigger beats produced by a drum sound module Analog synthesizers that haven't any digital part and were built previous to MIDI's improvement will be retrofit with kits that convert MIDI messages into analog management voltages. 10 :277 When a be aware is performed on a MIDI instrument, midi 2 mp3 converter youtube it generates a digital signal that can be utilized to trigger a note on another instrument. 2 :20 The aptitude for remote control allows full-sized instruments to be replaced with smaller sound modules, and permits musicians to combine instruments to achieve Read A great deal more fuller sound, or to create combos of synthesized instrument sounds, reminiscent of acoustic piano and strings. 26 MIDI also enables different instrument parameters (volume, effects, and many others.) to be managed remotely. Select the output folder clicking on Change" after which click on on Save As New File" to transform MIDI to MP3. MP3 is a recording file which your pc play like a tape where MIDI is piece of music which is able to learn by laptop and play on a digital piano.MP3 is without doubt one of the widely used file format. Now, click on on the button labeled Convert" to get the downloaded file converted. You'll get an e-mail from Convert Cat after a couple of moments. Just click on it to obtain the transformed MIDI file. I wanted an app that may play backing tracks on my iPad and this one does it superbly. I additionally like the truth that I can put charts with lyrics and chords during which means no more loose leaf binders with pages falling out. I started out with the Lite model which allows you to attempt a full featured model of the app (10 songs) earlier than you commit to purchasing the big model which is sort of costly compared to most apps for the iPad. Now that I have it, I believe the money was nicely-spent. Principally you may't import Midi music straight into Audacity. Midi isn't an audio format like WAV or MP3 - quite it is sort of a set of directions: play this note for therefore lengthy, then this other notice for therefore long and so forth. (just like the difference between a recipe and a meal). So what yo should do i s to play it it some sogtware that may play MIDI - whereas on the identical time recoirding it in Audacity. Step 2Click "File" > "Export Audio", after which an "Export Audio" window will pop up. From "Save as sort" tab, select "Different uncompressed information". Now you can set format options. Choose SDS(Midi Pattern Dump Standard) from "Header" tab. Choose encoding in accordance with your need. Click on "Save" button. With online converters your midi music might sound utterly completely different or turned into single piano sound so in order for you exact copy of your midi tasks then think about using the Audacity speaker recording operate. Additionally to report desktop audio that is how you can do it. Execs: It does midi to wave conversion as it says. It additionally does multiple midi recordsdata conversion in a single job (form of batch). Not many choices though, so it's simply the tool if you wish to convert midi to wave straight. Text to Speech Converter - Convert any textual content, document or Net page into an audio e book or voice. Expression nuances equivalent to pitch bend, tremolo, brightness, vibrato and portamento are preserved after intelliScore converts WAV to MIDI on instrument tracks that include one word at a time. I user Reaper to report and play again MIDI from a keyboard. In my case, I put the MIDI via a virtual instrument in Reaper. as you do convert midi to wav that method. To transform MIDI files to FLAC format you'll need FLAC encoder, you may get it here (FLAC win32 bundle). Unzip the file "" from the archive into program folder. 03. You'll be able to click on the button Convert" to begin MIDI to MP3 to do it one after the other. You probably have multiple file to convert, you'll be able to easily use Convert All" button. At the completion of the conversion, you'll be able to go to the tab Converted" and discover the extracted files.
The sounds are NOT in the MIDI file. However we commonly affiliate tacky sounds with MIDI files because of the Roland GS Sound Set utilized by the Home windows SW Synth (which dates back to 1996). Earlier than begin changing, you may choose the Remove observe four″ box to create a mp3 file with out the melody monitor. When making an attempt to import MIDI information from NI Maschine into Live, please word that it wants some preparation in Maschine. You could find extra information in this video tutorial. In an effort to instantly file MIDI from Maschine into Reside, please watch this video. Add your MP3 file by clicking the grey button, or drag & drop it to the MP3 to MIDI converter, or midi 2 mp3 converter youtube sort the URL immediately. It is value noting that the add file size ought to be less than 50 MB. Hamster is a free audio converter that installs quickly, has a minimal interface, and isn't onerous to use. Convert MIDI format to MP3 format. MIDI is digital music whereas MP3 is stream music.
1 note
·
View note
Photo
Hello! As requested, here is a tutorial on how I make my gifs. I would like to preface this by saying there are many ways to make gifs, and there’s no right or wrong answer imo. This is just how I personally go about doing so!
I will be using PS CC 2017, but as long as you have the video timeline option, it shouldn’t matter too much; on any version of PS, you should be able to adapt anything I mention here! You will also need some kind of screen recording software. I’ll talk a little more about that under the cut.
To start, you need the source material you will be making the gifs from! I get mine from snahp(.)it (avoiding links so tumblr hopefully doesn’t banish this from the tags lmao) and I always opt for either 1080p or 2160p. Not all laptops will support 2160p as it’s 4K, but either works great! You just want your gifs to be the best quality possible.
Next is where the screen recording comes in. I don’t use the screencapping method to make my gifs (where you use a program to cap a clip and then load those caps into a stack in PS). This isn’t for any particular reason… it’s just how my friends, (who very kindly taught me to gif), had always done it, so it’s now how I do it too. Personally, I find the quality to be just as good as the screencapping method, and have never noticed a difference between the two.
As I have a PC, I use the software built into it for screen-recording. If you go here: theverge(.)com/2020/4/21/21222533/record-screen-pc-windows-laptop-xbox-game-bar-how-to – you can see how to use the XBOX screenrecorder to record from files you have d*wnloaded. This also works on some streaming sites, but I think it depends on what browser you use. Personally, I recommend Firefox, as that seems to bypass a lot of the blocking and ads that occur when trying to do this sort of thing.
For MAC users, I have been told handbrake works well, as it converts MKV files to MP4, which can then be used to make gifs. You only need to convert part of the file to MP4 depending on how much you want to gif, and this also bypasses the screenrecording stage, as you can edit MP4 clips on Quicktime. I am told you can split them into smaller clips by going to edit > trim and it saves the new clip!
I have also used anyvideoconverter for small clips, but I can’t say what it does to the quality of your video, or how big of a file it lets you put in! With the XBOX screenrecorder, it doesn’t matter what type of video files you get, as the recording will save to MP4 anyway.
LOADING YOUR FRAMES
Now, go ahead and record whatever clips you want to gif. Make sure you have the video timeline open, by going to window > timeline. Then, go to file > import > video frames to layers.
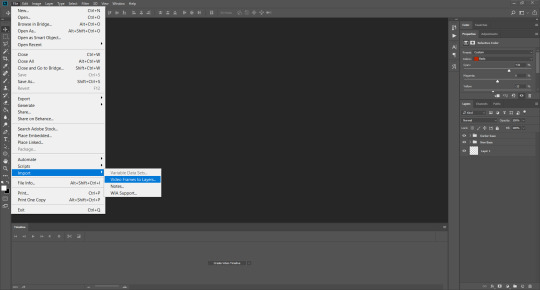
Next, select and open your clip from where it has saved (with the XBOX recorder, it saves in video > captures). You should see a little window pop up, where you can move the sliders back and forth to clip your recording to whichever part(s) you specifically want to gif. I recommend trying not to load a lot of frames into photoshop at once, but I would be a hypocrite to say that, since I do it a lot lmao. Just be patient if you do!
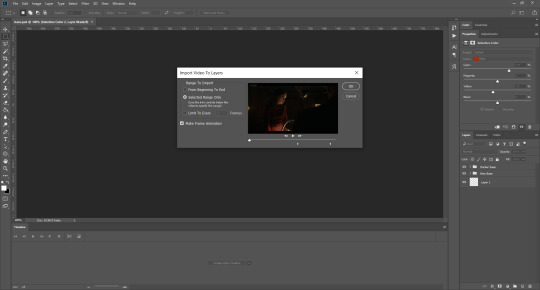
Once you have chosen the length, click okay. Never, EVER, I repeat NEVER click the button that says “limit to every __ frames”. This really ruins the flow and quality of your gif—it’s better to have shorter, but smoother gifs, I promise. And with tumblr’s new 10 MB limit, it shouldn’t be a problem anyway!
Then, your frames should open up. What we want to do is make them into a smart object, so we can edit all the layers at the same time. To do this, click the small button in the left-hand corner. ALWAYS click this first. If you don’t, it will only convert the first frame to a smart object and the gif won’t work.
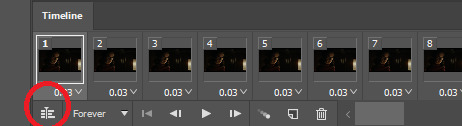
Give it a second to sort itself out, then, on the right-hand side, select all your frames at once using the shift key.
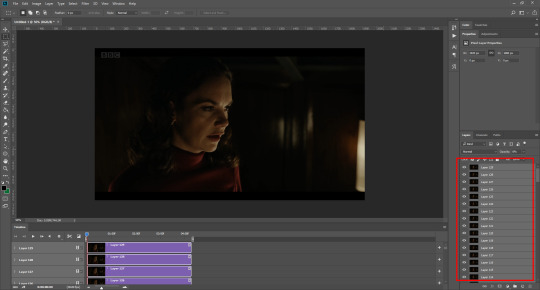
Then, go to filter > convert for smart filters. This might take a minute. Don’t click anything else in case PS gets angry lmao, just leave it for a second and it’ll do its thing. The more frames you have, the longer it takes! Now we have our gif, but it needs to be cropped, sharpened and coloured!
CROPPING
You want to start by selecting the rectangular marquee tool on the left-hand side, then drag it across by clicking and highlighting the area you would like to crop your gif to, like so:
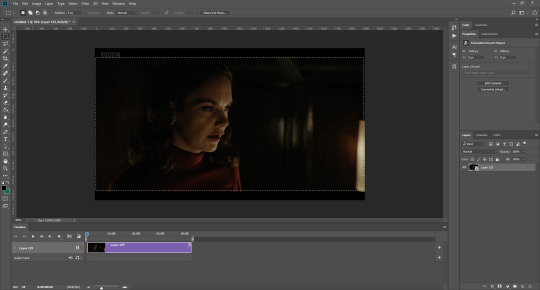
What I tend to do is select everything inside the black lines you sometimes get around your gif (this depends on what file you d*wnload), and also the tiniest bit inside the sides. This is because I’ve found if you crop it right up to the edge, you get a tiny bit of transparency on the sides of your gifs, which I’d rather avoid.
Once you have your desired selection, go to image > crop. Now, the dimensions for tumblr are 540px width, so all your gifs have to be that width. However, the length is up to you. I really like big gifs, so sometimes I even make a full square, or even longer. It’s entirely up to you, and what kind of set you want to make.
For the purposes of this gif, I will stick to what I usually go for, 540px by 350 px. This will mean you’ll have to crop some width off, but that’s okay, since Marisa isn’t central anyway. The cropping is always trial and error for me, as sometimes people move out of the frame within in the gif. The best thing to do is just try it, and then move the slider in the timeline window at the bottom to see if the person stays inside the gif, and if not, adjust accordingly.
Next, go to image > image size:
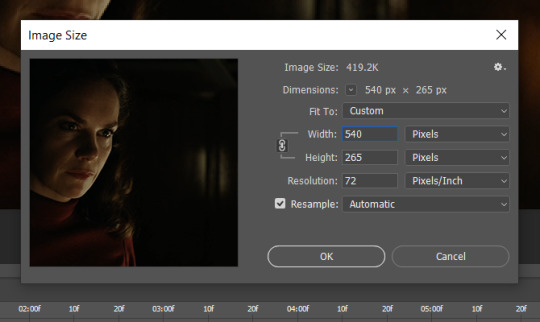
In this box, if I put the width as 540, the gif is a smaller height than I want, as it keeps to the dimensions of the gif when you load it into PS. That’s okay, just put the height you want instead, and we’ll crop off the excess.
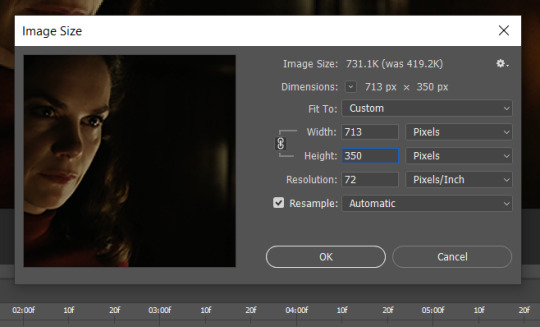
Then click OK. Using the rectangular marquee tool again, we need to remove the excess width. Part of the reason I like this version of PS is that it tells you the width of your selection as you do it, but you can always use the ruler as a guide, and check the size of your image by going to image > image size again.
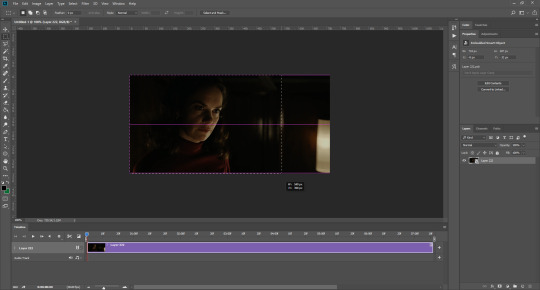
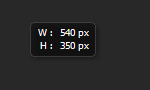
Again, use image > crop, and your gif should now be the correct size!
You can also use the crop tool in the timeline window to crop the length of your gif:
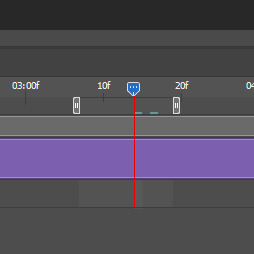
However, I tend to wait until later on to do this (which will be explained further down!)
SHARPENING
Next you want to go to filter > sharpen > smart sharpen.
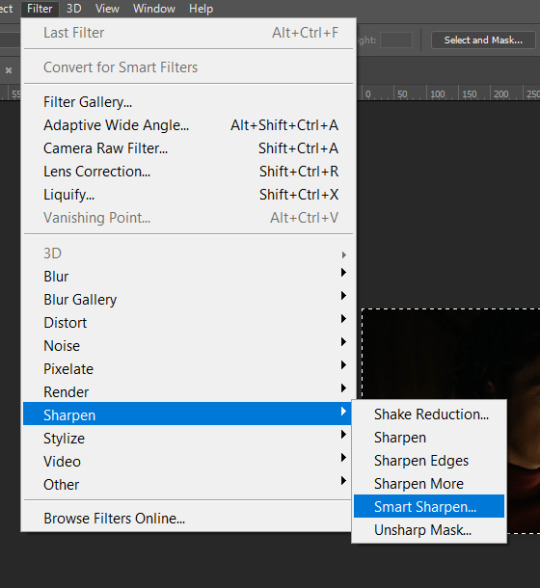
These are my settings. However, 0.4px is very sharp, too much so, but that’s easily fixed.
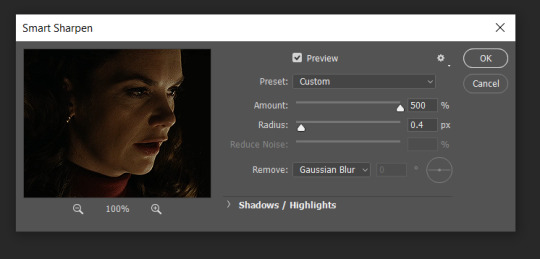
Go to filter > blur > Gaussian blur and then set it to 1.0.
Now on the right-hand side, we need to reduce the blur, so double click the little adjustment button, and change the opacity of the blur. I usually go for 20-30%!
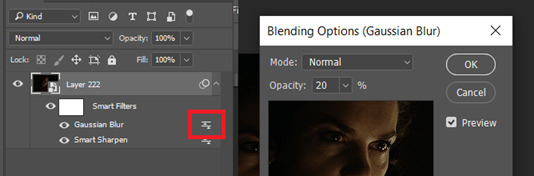
Then click OK, and that’s your sharpening done!
COLOURING
I picked this scene on purpose as it’s dark, so good for showing how to colour a gif. I have a base psd which consists of some very basic adjustments, but it mostly exists so I don’t forget what adjustment layers I like to use. I adjust them every time I make a gif, essentially colouring each gif from scratch.
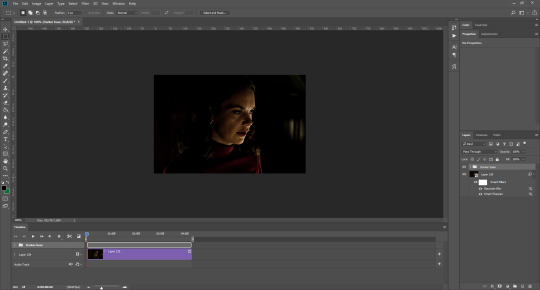
In this case, the psd actually makes it darker. So, what I will do is turn each layer off, and adjust as I go. A lot of people say using lots of adjustment layers ruins the quality of your gif… I have never found this to be true, as long as you are gentle with them. If you whack the brightness right up to the top, it’s going to ruin your gif no matter if you use 1 adjustment layer or 100. I would just say use your common sense, and adjust a little at a time!
I start with a simple black to white gradient map set to soft light, because I think it helps you see depth once you add some brightness to it. I usually do this on about 10%, or more if needed. It’s probably unnecessary, I just like how it looks!

Then, I move onto using curves and levels. This is where things can diverge depending on who you’re colouring. If this person is white, it doesn’t matter too much. If they’re not white, you don’t want to white wash them. My best advice is to play around with it. By adding vibrance and other (usually the red) selective colour settings later, you can ensure you don’t change the person’s skin tone from what it originally was. You can also use layer masks at varying opacities (various shades of grey), on your curves and levels, to remove some brightening so that you’re not changing anyone’s skin colour. Just brighten slowly and check in with yourself honestly about how your gif looks.
Some people don’t like using levels, or curves. It’s completely up to you. I tend to use both because levels are good for bringing depth, even if not brightening (though I like to use them for that as well).
One thing you can do is use the white point of the gif to make PS adjust the curves itself, however I like to drag the sliders myself and see what it looks like. Just make sure it’s not too bright, as we will be using further layers to brighten more, after.

Next is levels. The slider on the left controls the black point, the one in the middle controls the midtones, and the one on the right controls the white points. The black brings depth, the midtones adjust the overall brightness, and the white points produce stronger highlights. Again, you’ll get a feel for how this works as you practice. Just don’t use the white point excessively, especially if your characters are not white.
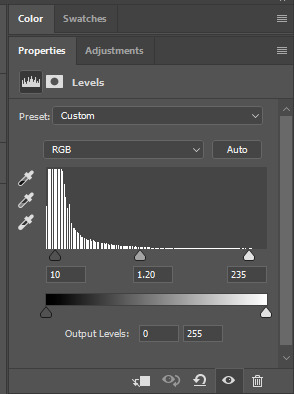
Then I add vibrance (+20!), because we’ve removed a lot of it when lightening the gif. Next is exposure, which I find brings out the highlight and shadow areas more effectively:

Then colour balance! This helps with scenes that might be a certain colour, i.e. too blue, too green, too red, etc. Moving the sliders in the opposite direction of the colour your gif is will counteract it. The best thing to do when accounting for different colours, is to make a new layer every time you change colour, so that you don’t get confused. I always add a new layer for colour balance and selective colour if I want to change more than one thing. So one for red, one for yellow, one for pink, etc.
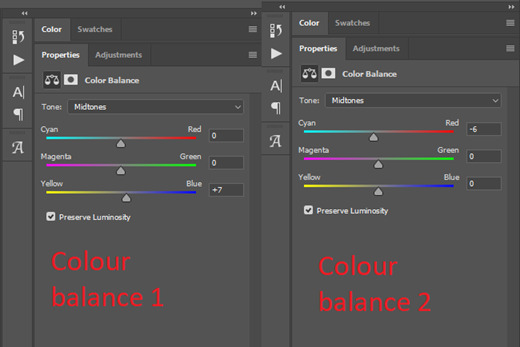
A layer of brightness just to make the gif pop, and because the scene is extra dark, I added a very gentle extra curves layer:
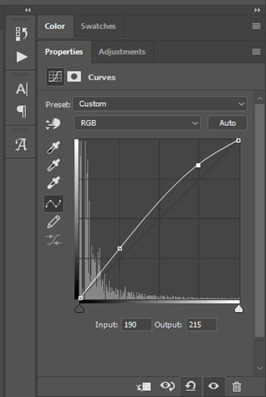
SAVING YOUR GIF
Time to save the gif. You can go ahead and file > export > save for web (legacy) now, but then you’ll have to reopen the gif to reset the frame rate from 0.07, to 0.05. Instead of doing that, I use a modified action. The original was made by the very talented @elenafisher! So I do not take credit for that at all. You can find the original here: elenafisher(.)tumblr(.)com/post/190817437374/gif-sharpening-action-2-preview-download and in my resources tag. Please reblog it if you’re going to use this!
To use an action, first make sure you have actions turned on in window > actions. To load in your action, go to the little lines circled, and then load the action from your downloads:
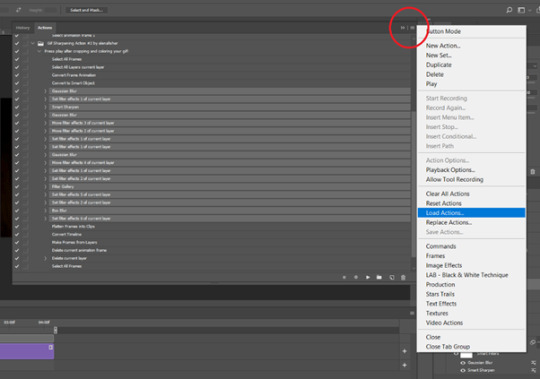
Obviously if you don’t want to sharpen your gifs yourself, you can use the action as it is, and it will give you a beautiful glowing effect. If you’d just like to use it to flatten your gif into frames like I do, make sure to take out all the items I have highlighted:
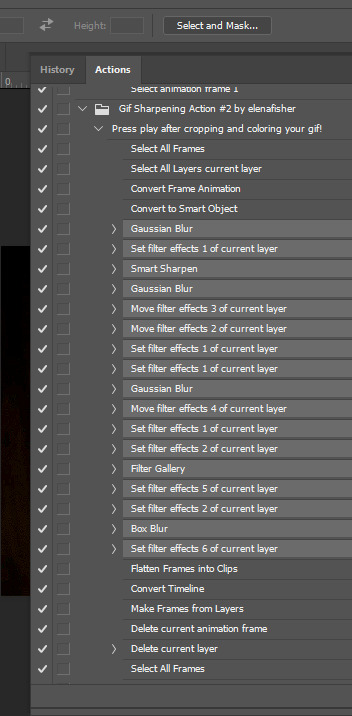
Until it looks like this!
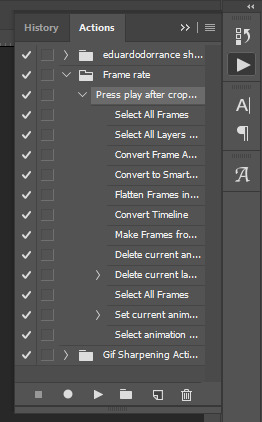
Make sure you have the layer under the file name highlighted, and then click the play button at the bottom! (If you get a screen saying select all frames cannot be found, don’t worry, just click continue!) You can delete the layer that does that if you want, I just keep it in case I realise I’ve forgotten to do something, because you can click cancel and edit your gif before you flatten it. Of course you can undo the steps to get back to the smart object version of your gif, it just takes longer!
And now your gif is in frames and set to 0.05 already, so you don’t have to change the speed! All you need to do now before saving is change the gif cycle to “forever” in the bottom left-hand corner:
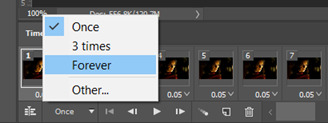
Then to save the gif go to file > export > save for web (legacy). Sometimes, the gif is bigger than the tumblr 10MB limit. You’ll be able to see this in the bottom left-hand corner of the gif save settings. If this is the case, I like to preview the gif, to see whether it would be best to cut frames off of the beginning or the end, or both. When you’ve decided, you can select the frames at the bottom, and in the right-hand side panel, and delete them both using the little bins/trash icons.
I keep checking and deleting frames until I get the gif under 10 MB! Just don’t delete frames from the middle, as then you’ll have the same issue as if you selected “every other frame” when making the gif: it won’t flow!
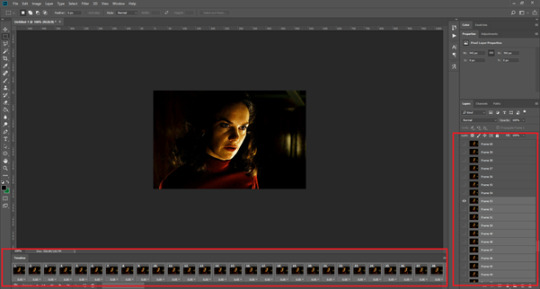
Lastly, these are my save settings:
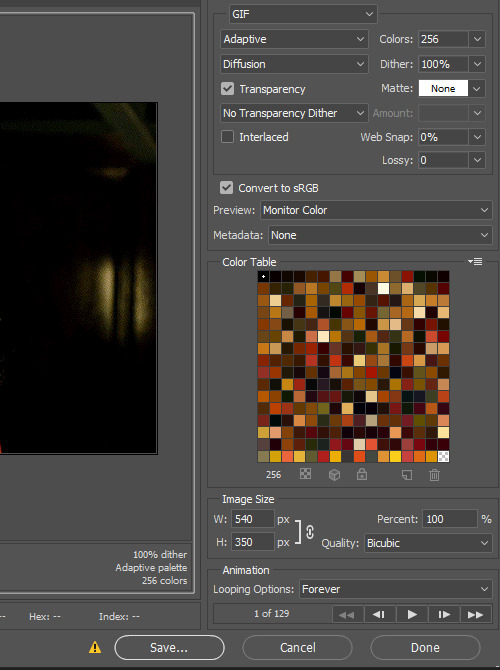
So that’s it! That’s how I make all my gifs. Blending I do when the gifs are in the grouped, smart filter stage, whereas text I add on during the framing section above! Really hope this is helpful, please feel free to ask any questions you may have! 💖
#gif tutorial#tutorial*#completeresources#yeahps#chaoticresources#allresources#mikesmom#usergeo#userava#usertix#usersmile#usertom#if you'd like me to cover anything more advanced just shout#i wanted to show how i add text too but tumblr wouldn't let me add any more pics#but people can let me know if that's something you'd want!
521 notes
·
View notes