#how tos
Explore tagged Tumblr posts
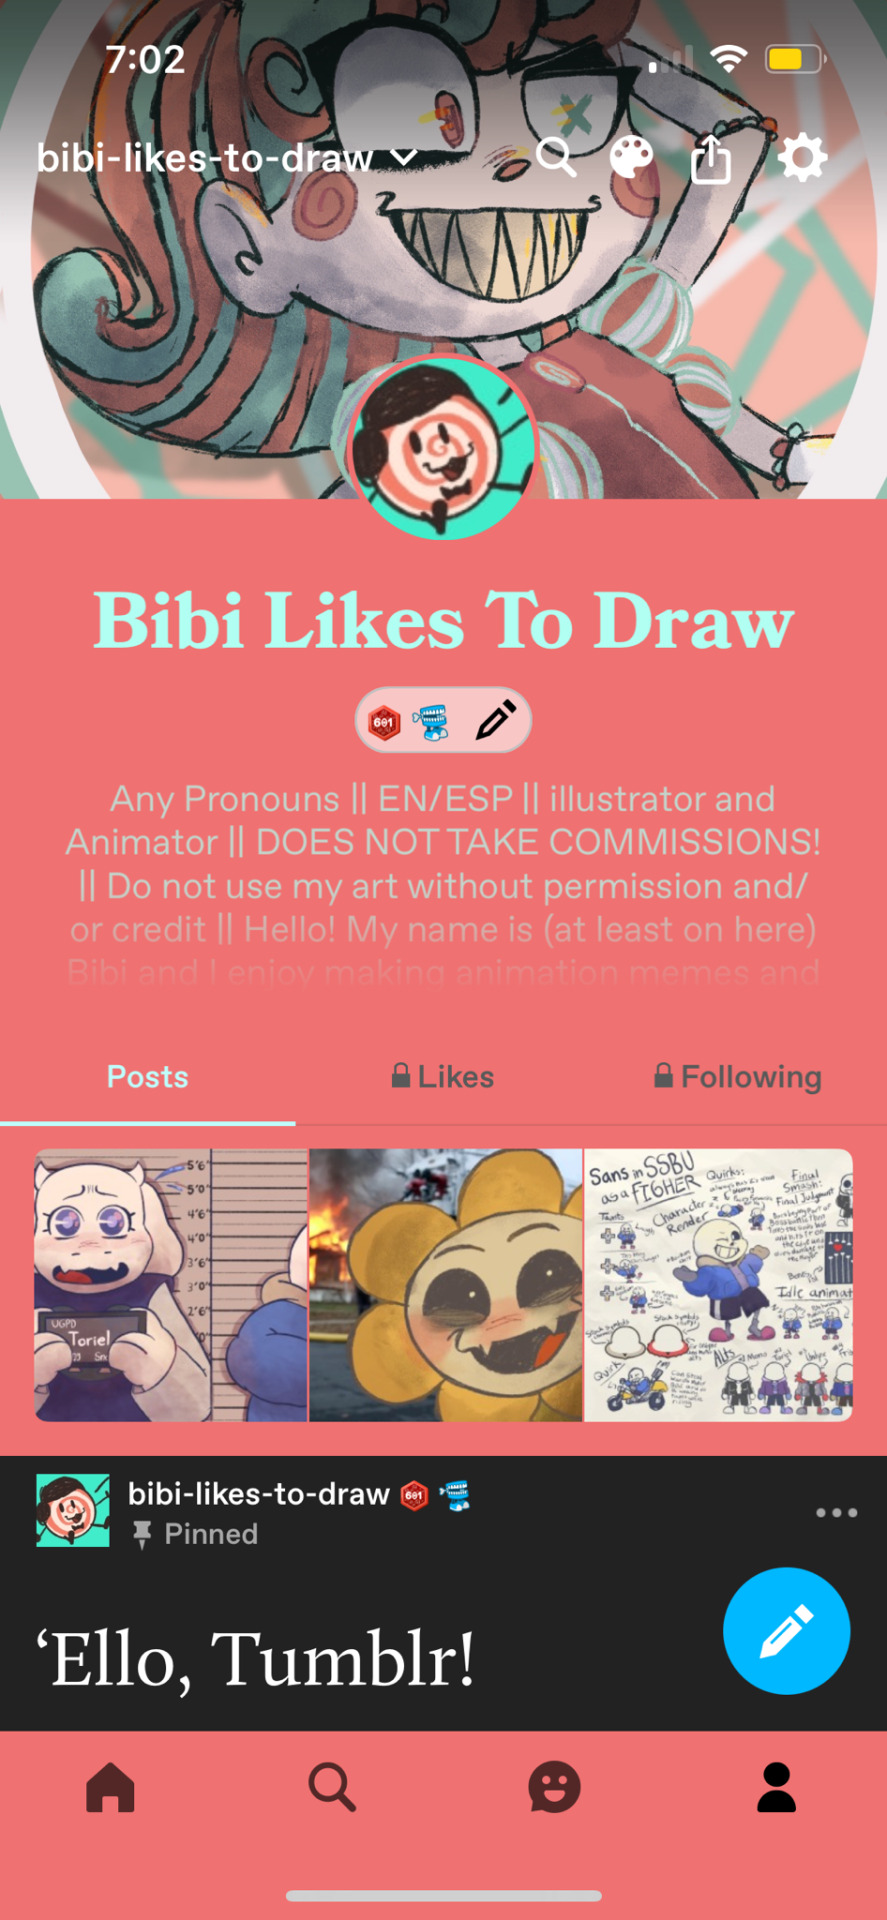
Visit Tumblr Blog
Explore Tumblr blogs with no restrictions, modern design and the best experience.
Last Seen Tumblr Blogs


Fun Fact
Tumblr has 411 employees.
Note
Hi I absolutely love your art and everything you make! I’m obsessed and it’s brought me so much joy.
Could you please tell me what software you use to draw and how you get the fuzzy texture effect? Thank you!!
Thank you so much! I use Clip Studio Paint! As for the fuzzy effect, I assume it's the one I use for literally everything from backgrounds, to sprites and objects in Mushroom Oasis' game art haha.
It's actually a Black and White Static brush on very low opacity with the Overlay blending mode! My friend taught it to me years ago, and I've been obsessed with applying it to everything since tbh haha.
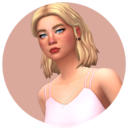
I'll use a Vida sprite to explain:
Here's what the brush looks like when on a bigger size. It's about 300px on the canvas I'm using:

Here's what it should look like when I wanna apply the effect:

Notice how if you look really closely, the pattern is duplicating. That's because I made the brush really small, made one big blob and copy-pasted it over and over on the canvas until I end up with one big block. Don't worry about it because it's hardly noticeable when applied to an image.
You can adjust the size to however you'd like, but I prefer it soft and subtle.
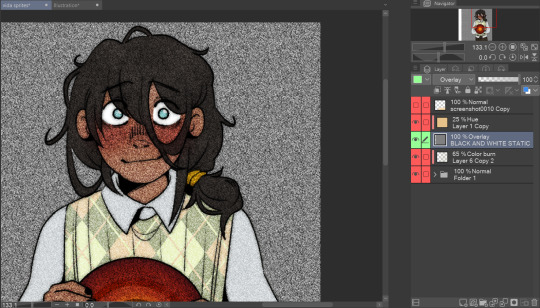
Next is application; here's a finished Vida sprite without the static effect. I've highlighted the Black and White Static layer in green so you can ignore the rest. It's currently toggled off.

With it on, you can already see the applied effect with Overlay.
Then it's just a matter of clipping it and lowering it to the desired opacity! My go to is between 20-30% but feel free to experiment!
The final result is a fine fuzzy texture, and it does affect the colors just a bit, but it's usually no problem for me and I personally like how subdued and muted softly it looks at the end.
It's been a few months since you've sent this ask, but I hope it helps!
#cheea chatter bts#ive been answering some renpy tutos here and there#maybe i should start tagging these how tos for people who'd like to know!#ill call the tag:#how tos#id like to think of them as beginner friendly so use them as you wish!
156 notes
·
View notes
Text
What are Exchange Letters?
If you are looking into Fandom Exchanges, chances are you have seen "Letters" mentioned.
Sometimes called a Dear Creator letter, exchange letters are optional, but incredibly helpful, documents to have on hand when signing up for a fanwork exchange. Letters include more in-depth information about the type of gift you would like to receive than typically goes in the AO3 "Prompt" box. Broadly speaking, letters should contain everything your gift-giver would need to know in order to create art or fic you would enjoy. This may include, but is not limited to: general likes and preferences, Do Not Wants (DNWs), ship- or character-specific interests, and OC information. Whether you're writing your first letter or revising your current one, read on to learn more about exchange letters!

Some information in this post has been adapted from the guide created by @enigmalea for @arlathanxchange. Check out their other tutorials for AO3 here!
Do you need a letter?
Not unless the event specifically requires them. Plenty of fans participate in exchanges without a Letter. If you decide not to put together a Letter, it's still a good idea to keep in mind the fact that someone will want to make a gift that you enjoy during this exchange - so leaving good prompts, likes, and DNWs in your official requests is still important!
What should an exchange letter include?
General likes and preferences
If someone is creating a gift for you, they'll need to know what you like! This can include relationship types (romantic, platonic, poly, etc.), tropes (angst, enemies to lovers, only one bed, found family, etc.), AUs, kinks, and art preferences, among other things. If you're not sure where to start, scroll through your AO3 bookmarks/history and think about the Additional Tags you see repeated often, or the ones you use to filter when deciding what to read.
Fandom-specific likes and preferences & ship- or character-specific interests
If the exchange is for a specific fandom/ship/character, you may wish to include specific elements that draw you to that theme! For Dragon Age, this may include things like mage/templar dynamics, Antivan Crows, Elvhenan AUs, Qunari cultures and customs... the possibilities are endless. If you're not sure where to start, check your AO3 tags as described above. You may also consider the types of PCs you like to play, your favorite NPCs, and what draws you to those storylines.
Do Not Wants (DNWs)
In most exchanges, unlike general likes & preferences, Do Not Wants are a hard line for creators. This means that anything you list as a DNW must be avoided by the creator. Think about any squicks you avoid, triggers you might have, tags or ships you exclude when searching, or things that just make you hit the back button and not read a fic. More specifically, you can include things like specific points of view, tenses, styles of writing, general tropes (fluff, angst, smut, etc.), or more specific tropes (whump, D/S dynamics, modern AU, etc.). As with likes and preferences, you can also list fandom, ship, or character-specific DNWs (MCIT, Fen'harel vallaslin, mage/templar relationships, etc.). It is best to avoid being overly broad with your DNWs. Listing things such as "bad people", "hardcore BDSM", and "non-vanilla sex" are confusing for creators to follow and difficult for moderators to enforce. What does bad mean to you? Hardcore? Vanilla? Everyone draws the line on these things in different places - it is best not to assume, even if you think the line is "obvious". It is also best to avoid DNWs that add an unfair burden on your creator. This may include DNWs that force them to create for a specific prompt (DNW: art other than the pose/setting listed), force them to create a crossover work in a single-fandom exchange, or make your gift impossible to create (DNW: Anders mentioned by name in my Handers request). That being said, most exchanges understand that it is near impossible to create an exhaustive DNW list, especially if you're new to exchanges. Most events accept a broad "DNW: kinks other than requested", which allows you to request specific things you know you enjoy, but avoid landmines of squicks you might not even be aware of.
Information about your original characters
If the exchange you're participating in allows original characters, you may wish to include information about your OCs, as a reference for your creator. Since the AO3 prompt box is limited in both space and formatting options, your letter can be a good place to include more detailed backstory & personality information, what they're like in the relationship(s) requested, and reference images or links to reference images of your OC's appearance.
Where can I host my exchange letter?
Google Docs
Google docs is a popular option for hosting letters, particularly if you want to include a lot of text or images, but are not familiar with code. You can easily create a table of contents, link to other docs and external sites, add images, make lists and tables, and generally format your letter in an easy-to-follow manner. If you use Google docs, make sure to update the Sharing settings so that anyone with the link can view the document (not comment or edit), otherwise your creator won't be able to see any of your information!
Tumblr
You can also create your letter as a regular tumblr post or page. This is good option for limited or shorter letters - if you are going in depth, or your lists of likes and DNWs are longer, the length of your post may get unwieldy. Be careful if you use a page (yoururl.tumblr.com/pagename), rather than a post (created via the "Create" button). Mobile users are frequently redirected to blog homepages when attempting to access a page, and may not be able to view a letter hosted there.
Dreamwidth/Wordpress/Other Blogging Site
Although not as widely used or as popular for fandom uses as tumblr, Dreamwidth, Wordpress, and other blogging sites are viable options for letter hosting! If you already have a presence on those sites, or if you prefer to avoid the other hosting options for whatever reason, these may be the choice for you.
Free Webhosts - No/Low Coding Required
Google Sites - free as long as you have a gmail account. Includes basic templates that make it quick and simple to build a site for your letter info. Wix or Weebly - has a site builder with templates, but allows you to do some coding if you'd like. Free, but will force a banner on your site unless you upgrade to a paid plan.
Free Webhosts - Coding Required
Neocities - an homage to the old school geocities. They offer a large amount of space and allow all content, including adult content. Netlify and Vercel - free webhosting with other benefits like automatic deployment from Github. More complicated than is necessary for an exchange letter alone, especially if you're just starting out, but these are a great resource for anyone with coding knowledge who wants to build a website.
Note: Per AO3 terms of service, exchange letters are NOT allowed to be posted as separate works on AO3. Although, you are permitted to list general likes/preferences in your profile, space and formatting options are relatively limited, and generally surpassed by one of the other options above.
15 notes
·
View notes
Text
USEFUL TIPS FOR ANYONE USING NEOCITIES
So, I saw this super awesome post called BEGINNERS GUIDE TO BLUESKY and it more or less inspired me to make a post of my own pertaining to the the likes of Neocities.
What is Neocities?
Long story short, it is an open-source web hosting service that is both F2U (1 GB storage/200 GB bandwidth) and P2U (50 GB storage/3000 GB bandwidth). It's kinda sorta a spiritual successor to the now defunct GeoCities.
Why Use Neocities?
HELPFUL LINKS
Neocities has a full on Tutorials Page to help people wanting to learning how to code. Though I will say that I'm a bit surprised they don't have W3 Schools on there.
CREATIVE FREEDOM
If you Browse on Neocities, you will see how vastly different all of the websites look. That being said, you have an enormous amount of creative freedom when it comes to making your website. You can build it from scratch or look up some pre-made templates from websites such as templatemo, HTML5 Templates, TEMPLATED, template4all, and many more.
Now it is important to note that Neocities doesn't allow certain things such as jQuery, PHP, Python, SQL, etc. In fact, the only things allowed on Neocities are HTML, CSS, and JavaScript! Though I do think it is important to note that you can turn your website into a blog using Zonelets, have a Guestbook/Comments Section with Guestbooks, embed your Bluesky feed with Embed Bsky, embed your Twitter/X feed with Twitter Publish, and much more!
What Do People Use Neocities For?
Some people use it for blogging & portfolio & educational purposes. Some people use it to share their writings & artwork & music. Some people use it to help people with finding neat things. Some people use it for shits and giggles. There are legitimately a number of reasons people use it and you know what? That's 100% a-okay!
Are Any Programs Required To Use Neocities?
Technically, no. The reason I say this is because Neocities has a built-in HTML Editor. However, I don't like using it unless if I absolutely have to (which is next to never). Instead, I use Brackets. It's very user-friendly and it legit lets you know if there's a goof somewhere in your code. Legit 10 out of 10 recommend. Though I will say that some people use Notepad++.
#pvposeur's tutorial#pvposeur's tutorials#pvposeur's how tos#pvposeur's how to#pvposeur's psa#pvposeur's public service announcements#pvposeur's public service announcement#tutorial#tutorials#how to#how tos#psa#public service announcements#public service announcement#neocities#free to reblog
3 notes
·
View notes
Text
I’ve been thinking a lot recently about how much I wish we were taught in school how to interact with people online (and just how to use the internet in general) and then I remembered that I can type.
So, without further ado, I present…
How to Argue with People on the Internet
A (sort of) comprehensive guide on discussing everything from world peace to your blorbos
Forewordwarning: This is a long (but hopefully useful and entertaining) post. You have been warned.
SECTION I: The Decision
I have read SO many posts that essentially say “want to stop getting annoyed and fighting strangers? Just don’t! Simply do not!” and if that works for you? Fantastic! That is commendable and I salute you for it and I’m only a little bit jealous. (Okay, maybe more than a little bit jealous.) But if you’re like me—an absolute yapper, that is— you will likely find yourself in quite a few situations where you simply must yap. The urge is too strong. The stupidity of this collection of pixels on your screen that may or may not be the vessel for another human somewhere in the world is too much and you just have to tell them so. I understand. I will not tell you to hold back. I will, however, advise that before engaging with any individuals, you follow a few simple steps that I like to call “RAT”— otherwise known as Rest, Analyze, and Type.
Let’s say, for a moment, that you’ve just run into a comment hating on your favorite character in your favorite TV show. Yes, that one. You want to reply—but wait—you’ve just remembered to use RAT first! You intelligent human, you.
First, you REST. You take a moment to bookmark the comment (whether mentally or literally is up to you) and you step away from your phone (or you do what I do and look at that one youtube video of a parrot asking Alexa to fart 939472 times, you know the one) and you wait. Is this comment something you’re willing to take time out of your day to handle? There’s absolutely nothing wrong with deciding that it is, in fact, worth it— but it’s important to consider it first. You won’t ever have time to talk about the things you’re actually passionate about if you reply to every comment that bothers you. (Trust me— I’ve been there.)
Now, if you’ve decided to continue, reopen the comment and ANALYZE. This can mean many different things depending on the situation: is this comment generated by an AI? Is this person expressing a genuine opinion, or are they a troll? Have other people argued with them? If so, how did they respond? These are all important questions to ask, but it’s okay if you don’t know the answers to all of them. Just get the best information you can; you can always come back to this step later.
Finally, it’s time to TYPE. Let those words fly, friend! You tell ‘em!
SECTION II: Debating vs Fighting
So, you’ve RATted it up, and now you’ve decided it’s time to yap. But how to go about this? Should you be aggressive? Appeal to the enemy? What to do? Don’t worry, I’ve got another acronym for you! It’s time to take MOUSE into account: Motive, Openness, Understanding, Success, and Education.
First, think about your own MOTIVE. What do you want to accomplish? Do you want to change the other person’s mind? Are you unconcerned with changing their mind, instead going in with the intention to change the minds of others who might be reading through the conversation? Do you not care about changing anyone’s mind and simply want to discuss the topic at hand? All of these are valid, but they’re all very different. Deciding what your goal is prior to replying is one of the most important things about debating, whether it’s over the internet or face-to-face.
Once you’ve got that cleared up, it’s time to consider your OPENNESS and UNDERSTANDING. How open are you to potentially having your mind changed? Can you see a piece of truth in the other side of the argument? Do you understand where the commenter is coming from, or are they just being ridiculous? It’s okay to have opinions you aren’t open to changing on a whim— everyone has core beliefs that shape who they are as people. But sometimes looking at the other side through a lens of open-mindedness and a desire to understand is the most effective thing you can do. Give it a try— the worst thing that happens is the other person being just as bad as you thought they were.
Next, it’s time to address SUCCESS. What would succeeding look like here? This is similar to MOTIVE, but now we’re looking at the potential completion of the debate. What is the outcome you’re striving for?
Finally, EDUCATION. Is this a fact-based topic you want to educate people about, or is it purely opinion-driven? Either is fine, but if it’s fact-based, you should brush up on the facts of the situation— you don’t want to be caught in a lie and potentially humiliated, I hope. Also, misinformation on the internet is a huge issue. But mostly the humiliation thing.
Section III: Tips and Tricks
My last acronym contains an assortment of tips and tricks for internet usage and communication: Consent, Anonymity, Privacy, Yapping, Blocking, Apps, Reason, and Ability (CAPYBARA).
One of the most important things in life and on the internet is CONSENT. Now, this doesn’t mean you have to ask permission to voice your opinions— just that you should take into consideration the actual, living person on the other side of the screen. (Unless you’re arguing with an AI, in which case I suppose it probably doesn’t care much one way or the other). Ask before you DM people unless they state that their DMs are open. If someone blocks you, DO NOT make another account to harass them (yes, even if they’re really terrible). Consent online may look different than it does in real life, but it still follows the same ground rule: when in doubt, ASK.
ANONYMITY is another important thing to consider when you’re surfing among the virtual tides. Remember that even if someone displays their real name and picture on a website, you still don’t know them. They could be someone entirely different from the persona they’ve put up on the internet, and that’s okay. We all act differently depending on the situations and settings we’re in, and that’s dialed waaaay up when social media allows us to literally customize ourselves into what we want other people to see. That doesn’t mean you shouldn’t treat people as if they’re real, but it does mean that you should take everything with a grain of salt— especially if someone is being an absolute jerk.
Okay, PRIVACY is the one section in here that anyone under a certain age probably did learn in class— along with its annoying younger cousin, PIRACY (you wouldn’t steal a CAR, would you?) You probably know by now that you shouldn’t share personal data online, so I won’t go into this one too much in this post. There are a billion textbooks about it, and as important as it is, it’s not something I’m really qualified to cover. Just don’t do anything stupid and you should be fine.
YAPPING— everyone’s favorite thing to do on the internet! For the most part, this is a reminder that you should have fun. If you feel like you can’t yap about your interests in the space you’re in, maybe you should relocate— whether that’s to a different app, a different blog, or even just to a different comment section is up to you. You should feel free to voice your opinions and talk about the things you love (within reason—don’t get yourself on an FBI watchlist—but you get the idea).
BLOCKING is one of the most underrated features on many social media apps. There is absolutely nothing wrong with blocking someone and moving on. It doesn’t make you a coward; it makes you someone who values your own time and safety. You are never obligated to argue with someone just because they said so. And—this is one of my favorite internet secrets—you can block people you agree with. If someone’s posts are well-meaning and useful, but they upset you or make you uncomfortable? You can still block them, or mute/restrict them if the app you’re using allows it. You are not a bad person for not wanting to see things that upset you in your day-to-day life. You can support good causes without reading about tragedies every morning. Digging yourself into a depressive hole isn’t going to help anything. Please, please use the block button. It’s there for a reason.
APPS are another variable you should consider when catering your online experience. For instance, you can make a nuanced post on Tumblr and more realistically expect reasonable replies because you aren’t confined to a tiny amount of characters. Trying to express the same point on Twitter, however, likely risks people getting extremely angry at you due to the nature of the app not allowing nuanced conversations. That’s not to say Tumblr is necessarily superior— just that they’re different areas with different setups. The reason Twitter is so no-nuance a lot of the time isn’t just due to the people— the app is deliberately set up so that users can’t make multiple points in one post. This also attracts people who don’t want to have nuanced conversations, which feeds the cycle. This is an (extremely oversimplified) explanation of why most social media apps feel so separate from each other, even if you follow all the same people. You should know your audience—but you should also know your stage.
It’s important to have a certain amount of REASON and common sense when you’re talking to someone about the skrunkly little guys in your favorite movie. It’s not that you can’t be passionate—I once essentially made an entire powerpoint presentation about why I think my opinion about a fictional cat person is the correct one—but you need to remember that not everything is the same level of seriousness. Expressing an opinion about whether Team Rocket are actually villains is not the same thing as expressing an opinion about the upcoming US election. (Though I think Team Rocket could potentially do an okay job, to be honest. Meowth 2024?) You can 100% have intense, long discussions about fictional characters, but it’s never worth genuinely harming your own mental health or attacking someone else because of an opinion that ultimately doesn’t hurt anyone. It’s okay to agree to disagree.
Lastly, remember that a lot of this is not intuitive. Your ABILITY to make smart decisions online is a skill that takes time to develop (as is evidenced by 99% of past me’s Twitter posts) and it’s important to give yourself grace. As much as the internet hates to admit it, we all make mistakes. Just own up to those mistakes and move on. It’s okay to delete a post you made because you don’t agree with it anymore. It’s okay to come back to an argument and apologize for going too far. It’s okay to not be perfect. Accept the consequences of your own actions and move forward.
#i hope this is helpful#advice#internet#media literacy#yapping#professional yapper#controversy#internet drama#arguing#tips and tricks#tips and advice#tips and strategies#how tos#social media#debate#online safety#internet safety#education#safety#guidance#fyi#text post#yapyapyap#communities#fandom#online privacy#data privacy#pro tip#*demon noises* P R O T I P 👹👻💀😈#milesrambles
18 notes
·
View notes
Text
Ok, so my cousin’s boyfriend sent me this photo and I believe more artists on tumblr need to know about this setting. If you haven’t already, do it! It may not be fool proof but I would still recommend you do it. Any protection is from AI is valuable!
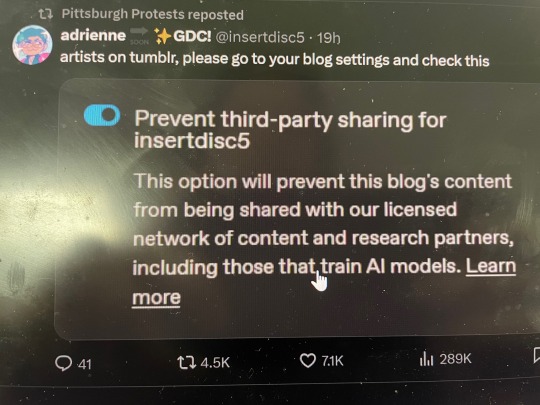
and just in case you are a new artist on here or just do not know how, I have intrusions and on how to turn this setting on both desktop and mobile below the cut!
First, go to the blog you want to change this setting for

Then, go to blog settings. On mobile, you’ll see the gear icon on the top right corner of your screen. For desktop, click the blog settings text on the right side of the screen.

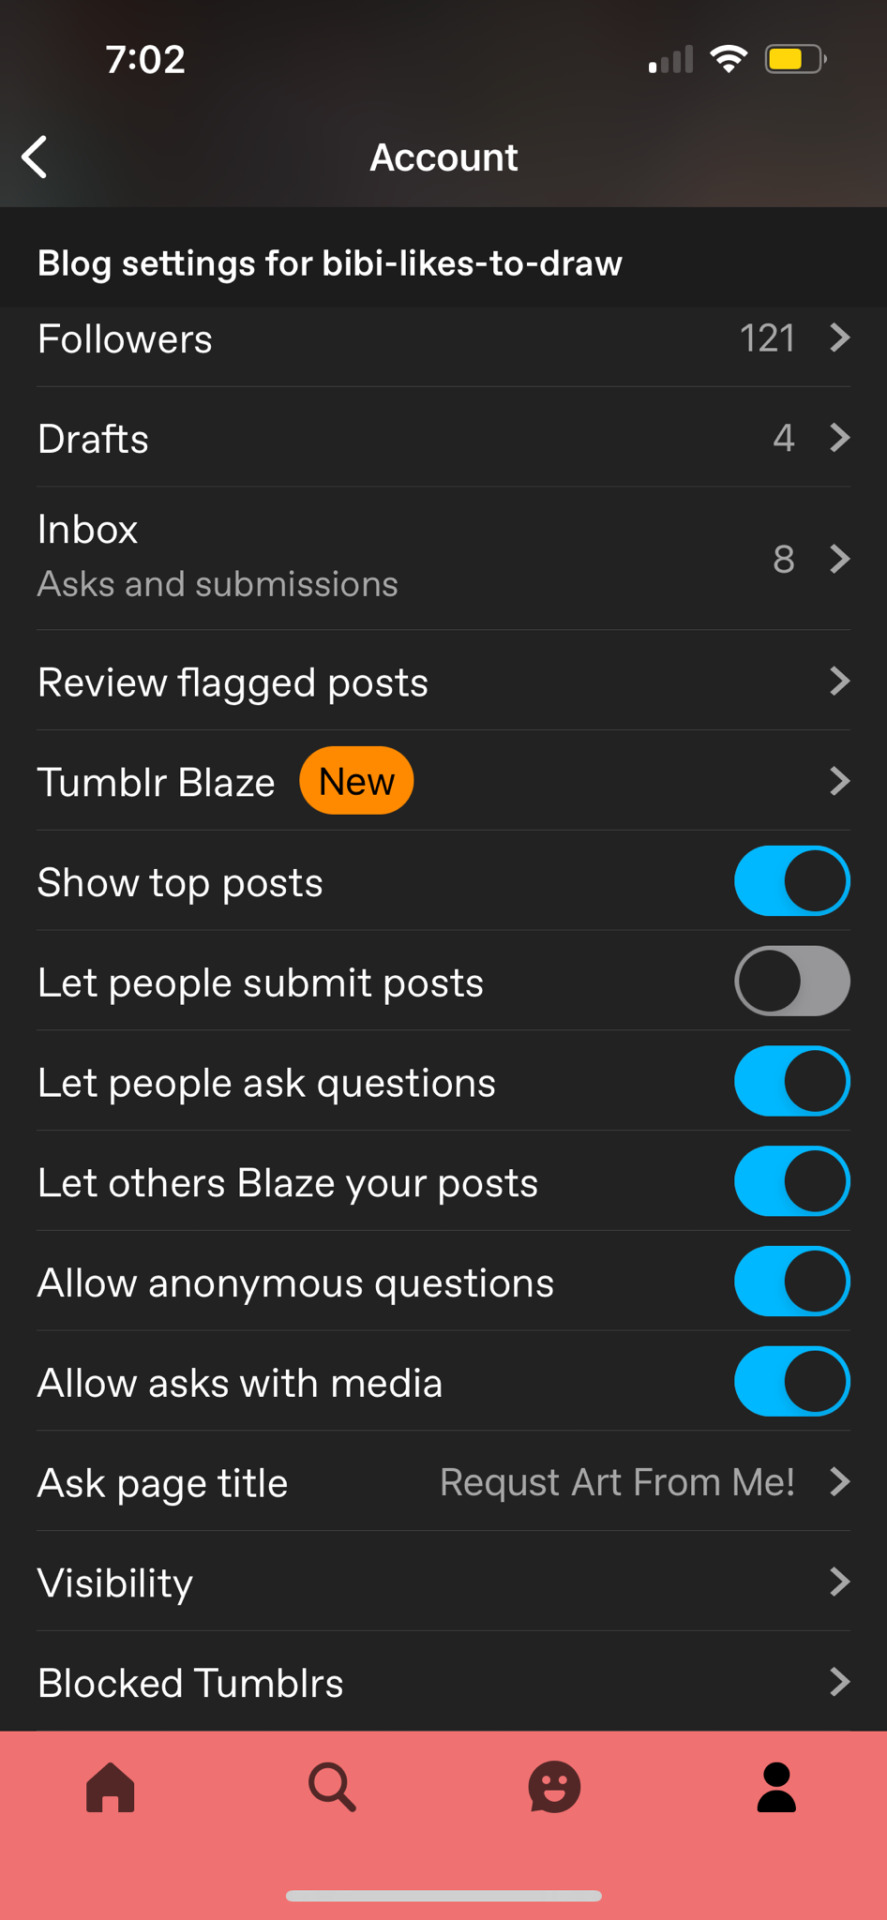
After this, you will go to the visibility section of your settings and turn on prevent third-party sharing for [your blog]. For desktop just scroll down and you’ll see it as the last setting you see under visibility. For mobile, just tap visibility and you will see it as the last setting.

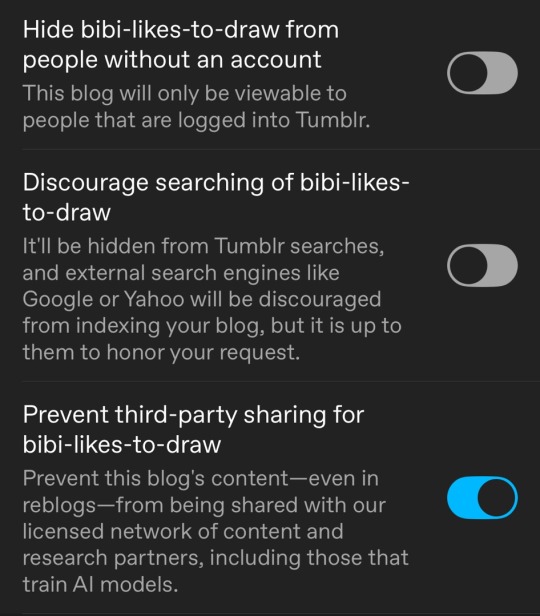
That’s it! Go protect your art!
#art#ai#ai art#ai artwork#anti ai#blog stuff#how tos#anti ai art#suck we gotta do things like this#but the more you know#right?#instructions#idk what else to tag
13 notes
·
View notes
Note
just quick question...
WHERE THE FUCK DO YOU KEEP GETTING YOUR VA'S
I have not been able to find one tryout post on this page.
And I really (and I mean EXTREMELY wanna) try out for any future oc's you might make.
-confused anon
I use a couple of methods actually!
One- I go to yt and I look up voice reels/ voice actors/ ECT. And a lot of the time, some videos such as
youtube
Or
youtube
Videos like "the many voices of [VA NAME]" are super helpful. Videos (like the ones done by the Ytber RainyCat) are complications of characters voiced by one person, so I take those and go from there.
Another way is I take a character I really like, like Skipper from Barbie life in the Dream house and I find her VA, who is Kristin Day. I then take that and apply it to my characters, her voice being the one for Parker.
I hope this helped you confused anon!
9 notes
·
View notes
Text
hello! so another tutorial - this time on grid and auto resizing images inside it with an emphasis on responsiveness and making that easier on you. basically, this tutorial should be named team no math, but we're call this the grid images tutorial.
here is the codepen you can work off of for this one. here is a link to the generator i was playing with. here is credit for the images i grabbed to show this with.
i did have someone message that i don't speak very eloquently and i want to apologize. i try to explain in a way that anyone can understand and i also speak in a train of consciousness, unprepared way so please don't think i am uncaring in that, i'm just trying to show some small tips and tricks in a straightforward, won't take up much time way. i will try to speak with a little more thought and less filler words, but i can't promise to be perfect in that since this is over video versus text.
anyway, the template i'm using as an example is free to use as a base, without credit, same with all the others in my tutorials so far, so long as you are using it to actually make your own. i would like to say with this one please don't use it with no significant changes and try to claim it as your own. throw some credit in your guidebook or something, i don't mind, just throw a bone on that one because at that point it is solely my template. but even then, you're free to use it with credit.
anyway, go wild, i hope this helps you learn, adds a new trick to your repertoire, or just overall helps alleviate some of the pressures of coding off of someone. have a great day, rpc!
#coding#how to#how tos#guide#guides#tutorials#tutorial#jcink coding#jcink rp#grid#image resizing#mine
19 notes
·
View notes
Text
It seems people like the mini comic book of @ajtal 's comic "The Staircase" so here is the file for you guys!!! And how to make them!! I will make a video tutorial for it later!!

Supplies: A printer (you can use the local library's printer), a small glue stick, and scissors.
Step 1: Print out the full page. (Please don't crop the page to only show the book. It is supposed to be mini. But if you want it like a small handheld book go ahead. I can't stop you.)
Step 2: Cut the full length of the pages. Like this:
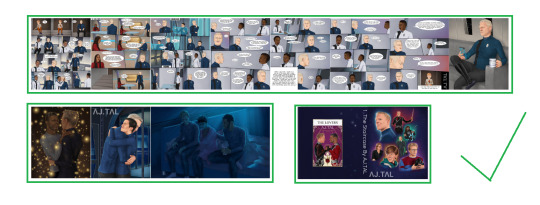
and NOT like this:
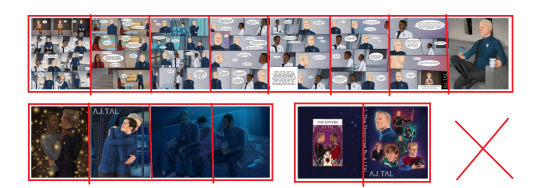
Step 3: After you cut them out, start folding the pages across the purple lines. Once all folded it should look like an accordion! Make sure that the edges of the book pages are on the inside! You don't want to glue it wrong!

Step 4: Its time to start gluing! Don't glue the edges of the pages yet! If the page has a red X on it DON'T glue it! If there is a blue line connecting two pages use you're glue stick to glue those to pages together! In this step do not glue anything to the cover.
Step 5: After you glue all the middle pages together we will glue the edges! If the image is marked out in red it means you don't have to glue anything. The two pictures that have a blue X glue together WITH THE WHITE BACKS ARE TOGETHER NOT THE ART.

Step 6: You will now have one big paper accordion, so it's time to glue the pages to the cover! Please glue the BACK orange panel to the front of the book, which also has an orange X. Please glue the BACK blue panel to the back of the book, Which also has an blue X. The back of the panels is white please don't glue the the art by mistake.

Hopefully, this helps!!! If it did not I will make a video on how to do this later tonight!! That might help out more!!
#star trek#star trek discovery#adira tal#paul stamets#hugh culber#michael burnham#miniature#mini comic#miniature comic#miniature comic book#tutorial#how tos
2 notes
·
View notes
Text
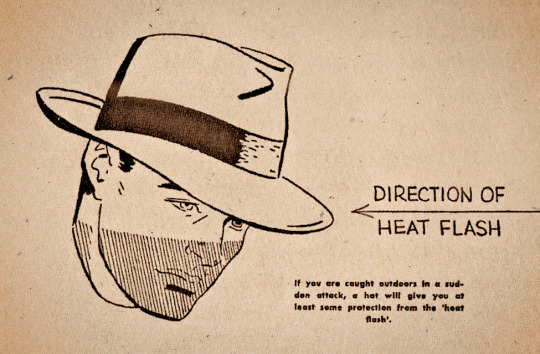
If you are caught outdoors in a sudden attack, a hat will give you at least some protection from the “heat flash.”
#vintage illustration#how tos#how-tos#nuclear war#survival techniques#atomic bomb#civil defense#the 50s#the 60s#the cold war#cold war america#cold war
16 notes
·
View notes
Text
For Stephen Northey, an environmental advocate in Melbourne, tree planting and urban revegetation has allowed him to help restore degraded local ecosystems and foster a much-needed connection with his local area.
The community leader spearheaded a campaign to save Edgars Creek, a tributary that runs through the basalt plains linking Epping, Thomastown and Reservoir to Merri Creek in Melbourne’s northern suburbs.
“Seventeen years ago, the Edgar’s Creek corridor was a wasteland of noxious weeds,” he says.
“Yet hiding there was a beautiful watercourse flowing along a natural rocky course with pockets of remnant vegetation still surviving. I thought the place deserved better so I organised a meeting in the neighbourhood house to garner interest and a community group was formed.”
From an initial meeting, locals undertook thousands of hours of volunteer work using only indigenous plants grown from seeds collected from the catchment. Indigenous bushland and a wetland habitat was successfully reintroduced over the industrial wasteland, preventing the area from being sold to developers after a concerted community campaign.
“Care, vision and inclusion were key success factors, as was access to knowledge about how healthy ecosystems function at a local scale,” he says. Aside from the deep satisfaction of restoring a natural environment, the project transformed the lives of those who participated, says Northey, especially during Covid lockdowns.
"People want to be custodians for their local environment. Friends groups can help facilitate and encourage that desire; that need. In fact, more than ever we need opportunities to connect with our planet and each other,” he says.
5 notes
·
View notes
Note
Small Spoilers of Astronought!
Hey Cheea! I just played Astronought and I LOVED IT. I'm from Spain so when I read how Atom called us "Luna Nova" I basically combusted. AND THE LYRICS OF MOON WALTZ IN THE END? Beautiful. I love the way you write your Visual Novels too, they really inspire me to write more about my own stories, so thank you a lot!
Also, a tiny question, when beggining to work on your own Visual Novels, did you follow any kind of tutorial on the internet? If so, what did you do to begin learning how to... code, and everything? It seems so weird to me and I wanted to work on one myself!
Thank you lots and sorry if my english is a little off... still learning!
Ahh thank you so much!! It's always an honor to know I've inspired someone out there with my silly little games 😭! I hate to say that I didn't really follow tutorials when I started Mushroom Oasis, but there's plenty out there for you to get started!
Channels I'd always go back to and recommend are Zeil Learnings and Visual Novel Design. Perfect for beginners!
If you really wanna know my own personal anecdote as to how I started, I genuinely yappa yappa about it below:
I've mentioned before that when working on Lift Your Spirits back in 2022, I wasn't alone just yet. My roles were only as the writer and artist while two others worked on the coding as you can see in the credits!
For context, arrnubs is my alternate online moniker.
At some point during the project, the others got busy with assignments (while I was on semester break) and I got too impatient to wait for them to update the script and sounds in Ren'Py. I didn't wanna pester them so I got nosy and took a peek in the script.rpy file and added them in myself haha, so I got to see how they did the base coding, in a way.
From there I started working on Mushroom Oasis on my own a year or so later, referencing the LYS script.rpy more than a few times. I just started on a whim because the YanGameJam was happening around the time I had another semester break in 2023, and finished the first half of Day 1 in two weeks.
People liked it a lot, so I kept working on it!
That's why if you look in the code, it's actually very basic!! compared to how other devs code their games. It's just me looking at someone else's first attempt at Ren'Py and just assumed it's the only way to do it haha.
I'll probably want to re-work how I do my games in the future, but for now I'll keep to the same format.
If you really wanna see something positive from me yapping away about this, don't let inexperience and lack of skill stop you.
I absolutely winged it and here I am haha. As long as you have the passion to commit, it'll work out in the end, plus you keep picking up more Ren'Py tricks along the way!
#astronought vn#bts#cheea chatter#jar of fireflies#sorry to be cheesy and yappy on main </3#but i thought id give the full story and be able to refer back to it here if anyone in the future asks#how tos
147 notes
·
View notes
Text
Starting a Theme/Appreciation Event
A theme week (aka “appreciation week”) invites fans to celebrate a specific topic over a dedicated period of time, which may or may not be a week. Fandom creatives will either highlight existing works that fit the theme of the event or make new art and fic for this purpose. Read more about themed events here.

Themed events are usually run through a dedicated tumblr sideblog. The organizer may come up with prompts for each day of the event and release them ahead of time, but the prompts are usually optional. The organizer commits to monitoring either the event hashtag, or the blog mentions, and reblogging works that are posted by other tumblr users related to the theme.
The organizer must plan the event in advance and make sure there is widespread awareness among their target pool of participants. This usually requires posting prompts early, making a simple graphic or banner, and advertising the upcoming event through friends and fandom groups.
Here is a framework to help build a new Themed Event!
1. Choose your Theme
Theme weeks come in a wide variety of subjects! They may be focused on a single character or relationship, or they may celebrate a broad topic, trope, or franchise entry.
Examples of subjects include:
A specific character ("Dorian" "Cullen" "Morrigan")
An interpretation of a character's sexuality ("Ace Cole" "Sub Solas" "WLW Cassandra")
A type of player character ("Mahariel" "Mage Hawke" "Templar Inquisitor")
A genre ("Romance" "Whump" "Fluff")
A culture or background ("Dalish" "City Elf" "Circle Mage" "Antivan" "Elvhenan" "Templar" "Tranquil")
A ship ("Zevwarden" "Solavellan" "Handers")
❓❓What if the subject already has an event that surrounds it❓❓
Whether there is already a Solavellan-centric exchange, or a Dorian Appreciation Month, we encourage fans to make more. It is nice to try to schedule around other events and avoid overlap, but sometimes this can't be helped. We here at @dragonagefanevents say the more fan events, the merrier! We aren’t in competition with each other: we are catering to our niche interests, schedules, and communities within this fandom. How you portray your advertising and comport yourself may invite criticism, but as always, how you comport yourself is up to you.
2. Choose your Timeline
The majority of theme weeks take place over the course of a week, or a month. Things to consider as you choose your timeline:
How long will you commit to monitoring & reblogging submissions?
How many prompts will you come up with?
How active is the targeted niche of fandom?
How much hype can you build beforehand?
How long are you capable of maintaining the hype?
You may wish to make a poll to figure out what timeline works best for your target participant pool!
3. Choose your Prompts
Most themed weeks/months put out prompts. These are short and vague, to allow the most interpretation and inspiration, and sometimes they are one word.
While prompts are optional, it is recommended that you do have prompts available. Many people will want to create something new for your event and appreciate guidelines or touchstones. It is really fun to see what so many different people will make based on the same prompt.
Appreciation weeks/months without prompts often see lower participation. People often feel uncomfortable promoting old work for a new, current fandom event, and there is an expectation that these events are for prompts! People want to make new things. Many events also do not promote old works! Therefore it can be difficult to advertise your event without prompts to go off of.
Consider: there is a whole genre of tumblr blogs out there (fyeah blogs, or characterappreciation blogs) dedicated to simply reblogging any content about that theme/character/ship/etc. What separates those blogs from a themed event is the prompts and the act of new creation.
Here are some example prompt lists:
▸ Sera Week 2024 ▸ 14 Days of DA Lovers ▸ Dalish Week 2022 ▸ 30 Days of Dorian
4. Put together a Brand
A brand is something that is easily recognized and quickly conveys a concept. Artistic, colorful, labor-intensive? Not necessarily.
Some easy ways to build a brand:
a consistent name that's easy to remember
a hashtag that is logically connected to the name
a consistent visual scheme that can be quickly associated with your name
▸ A Good Name
A good name is short, to the point, and says what you are: "30DaysofDorian" "SubSolasWeek" "SeraAppreciationWeek" - these all do the trick.
If you plan on running your event repeatedly, these kinds of names are enough. If it's just a one-off, consider adding the year to your name, such as "RylenAppreciationWeek2024." Think about it. If you are looking to organize an event these days, chances are fandom in 2015 ran one with that name once and there's a blog camping out on that name forevermore, inactive and dead. Do your fellow fans a favor and make it clear what year you are running the event so that if it's ever abandoned, they can pick up the torch with clarity.
▸ Graphics
1-3 colors; choose 1-2 fonts, in bold and normal font weight; choose, at most, 1 detailed image/screencap/motif. If you go overboard visually, it is easy to become cluttered.
It's nice to make a banner, either for your own blog header, or to also be used by people posting their works. Keep in mind the basic principles of graphic design, which you can always look up; the most basic rules related to typography are summarized in the image below (source).
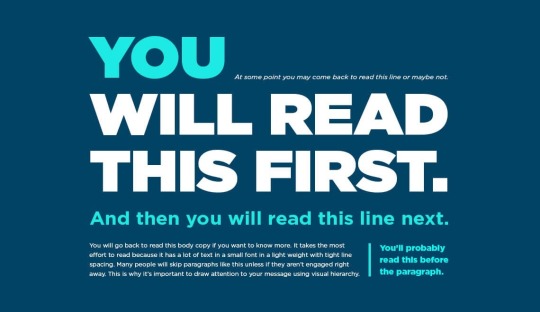
In your banner it should be clear: The Theme and The Timeframe
Your prompts should be available as plaintext in a post, but in order to actually catch people's attention as they scroll, it is best practice to make a simple graphic that contains your prompts. If you have a week of prompts, 7 prompts can easily fit on one graphic. If you have a whole month, it's recommended to split into more than one. The concern is that cramming 30 prompts into one graphic on tumblr will render them very small to people just scrolling by; if you break them up into two or three images, then (depending on some savvy organization in the post body itself) the prompts will all be visible at once at a good size.
Make sure your font is legible! It may be tempting to use a fancy swirly archaic font, but your goal is swift legibility for people scrolling by, and these decorative fonts never succeed.
If you are laying text over an image, it's a good idea to fade the background image out a bit. This can be done by changing the opacity, or by laying a semitransparent layer of color (or black or white) on top of the image, below your text. Contrast between your font and the background is important for legibility.
5. Begin Advertising
With your blog, name, hashtag, prompts, timeline, and graphics ready to go, it is time to start building hype. While it's fun for some people to make things on the fly in response to those prompts during that timeframe, you will get the best participation if you give people a chance to start creating things ahead of time. For a theme week, at least a month head start is usually adequate for interested parties. For a theme month with 30 days of prompts, at least two months leeway (minimum) will make sure you get participation. More time of course lets people make more, and more involved, work for your appreciation event.
▸ Make your blog known.
Start reblogging fan content related to your theme! For example, a Dorian theme event might go through and reblog fanart, gif sets, fanfiction and fan meta about Dorian. As you reblog from people in fandom, they will see your blog name and come take a look.
▸ Share the date and prompts.
Make a post with a clear title stating what the event is, your eye-catching but clean graphic, and the written version of those prompts + a description of the event. You may want to paraphrase an explanation from this post to educate new fans who may not know about theme weeks/months and creation events.
When you tag your posts, make sure you use very relevant tags. Tag spamming is frowned upon (tagging every single dragon age character, for example, when your event is focused on vivienne only, is annoying when you pop up in the main tag for those other characters). Only the first handful of tags on your post will catalogue it in the main tag on tumblr for discovery. Choose wisely! #dragon age #dragon age (origins, 2, or inquisition) #character name are always good places to start, as well as #dragon age fanfiction #dragon age fanart
Reblog your posts often! Self-reblogs are encouraged and widely tolerated in order to get word out there. Everyone understands. If you post once and never reblog it, you are failing to put your information in front of the eyes who may not have been awake when you posted it, or those who have a particularly cluttered dashboard. Self-reblog!! It's allowed!
▸ Make your rules clear.
You may want to combine this with your prompt post, or you may wish to keep them separate. Either way, be very clear about what content warnings you require (some events will not reblog NSFW, some will as long as it's tagged), whether you allow old works to be -re-advertised or not, and any other restrictions or requirements you fancy. Make sure that you are clear about what period of time you will be monitoring mentions/tags for new works to reblog, and when you will stop.
6. Run your Event
When the day arrives, make a kickoff post! What you include in this post is up to you. Generally hosts will reiterate the directions of how to mention/tag the works in order to catch your attention, and either link to or include the prompts themselves.
From then on, for the duration of the event, make sure to check the blog mentions, as well as the general tumblr tag you encouraged people to use for the event. Reblog the new works as consistently as you can.
7. Wrap Up
Congratulations! The final day has ended and your event is complete. You will want to thank participants. You will want to link to easy ways to peruse the new works - usually something like "check out https://myappreciationblog.tumblr.com/tagged/appreciationweek2024 " or something similar. If you opened an AO3 collection for themed works, make sure to link that. Basically, if anyone is late to the party, make it easier for them to enjoy the buffet you helped organize.
Pat yourself on the back for an event well-run. You may choose to run more in the future, keep the blog as a simple appreciation space, or retire from running events for a while. Whether your event was exploding with new works or resulted in only a handful, it doesn't matter. You made a little space on tumblr to appreciate this theme, and it didn't exist before. :) And that's what this is all about.
31 notes
·
View notes
Text
As someone who writes fanfics for a wide variety of fandoms, I needed to find some sort of way to be able to help people with being able to simplify what fandom they are wanting to read fanfics for on my website. And with the help of W3schools and their beautiful tutorial on How To Filter Elements, I can now officially do so.
I uploaded the HTML (+ Script) Code and CSS Code onto Pastebin for anyone who wants to use it for one reason or another. Not credit or anything is required and you can edit/change it all to your heart's content. It's also mobile/tablet, so that is definitely a bonus!
#pvposeur's tutorials#pvposeur's tutorial#pvposeur's how to#pvposeur's how tos#pvposeur's tips#pvposeur's tip#tutorials#tutorial#how to#how tos#tips#tip#w3schools#how to filter elements#filter elements#coding tutorials#coding tutorial#fanfiction#fanfics#fanfic#neocities#free to reboig
2 notes
·
View notes
Text
How to create a Live Tile on Windows 11 (Tutorials) (Codes)
Learn how to create custom live tiles for your blogs and websites for use on Windows 8, Windows 10 and Windows 11.
#warrenwoodhouse#bookmark#bookmarks#link#links#.lnk#.url#tutorials#tutorial#html tutorial#html tutorials#html#2024#codes#how tos#how to#howtos#howto
3 notes
·
View notes
Text
Today, I’d really like to make a post about why best practice needle lace setup is recommended for modern lacemakers because I also want to make a series of videos experimenting with different setups (but it will take a long, long time to get all the materials). I always find instructions easier to understand and follow when people tell me *why* it’s important I follow them, so let me know if that’s interesting or helpful to anyone.
6 notes
·
View notes
Text
does anybody have any recommendations for videos on yt on how to draw more like alive hair ? or more like vibrant and interesting hair ? but not photo realistic
2 notes
·
View notes