#keyboard shortcut for strikethrough
Explore tagged Tumblr posts
Visit Tumblr Blog
Explore Tumblr blogs with no restrictions, modern design and the best experience.
Last Seen Tumblr Blogs


Fun Fact
Tumblr’s reach among the 26-to-35-year-olds in the US is 11%.
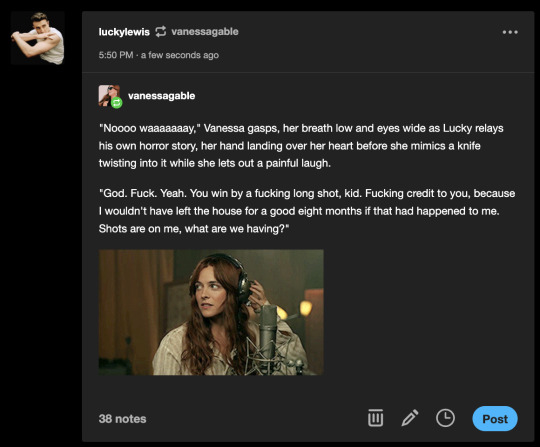
Text
why is the keyboard shortcut for strikethroughs not standardized
like you have bold (ctrl+b), italics (ctrl+i), and underline (ctrl+u), that's a given on pretty much everything you type into, but when it comes to strikethrough it varies wildly depending on what you're using. on tumblr it's something like ctrl+shift+6, on gdocs its like alt+shift+5,
and i just found out that apparently for microsoft word the method varies completely depending on whether it's on a PC or on a mac, and apparently for whatever reason it's easier on a mac (cmd+shift+x), which... hello??? on PC you have to do like 3 different button presses
don't even get me started on superscripts & subscripts. if i need a superscript for a math thing i'm doing x^2 instead because it's faster fuck you
4 notes
·
View notes
Text
Creating Eye-Catching Presentations: Glowing Text Effects in Google Slides
Branded Google Slides design of high quality: Key Questions Explained
1.Can you Strikethrough in Google Slides?
Yes, you can apply strikethrough formatting in Google Slides. To do this, select the text you want to strike through, then go to the menu bar and click on "Format." From there, choose "Text" and select "Strikethrough." Alternatively, you can use the keyboard shortcut by pressing "Alt + Shift + 5" on Windows or "Command + Shift + X" on Mac. This will cross out the selected text.
2. Are Google Slides 16:9 or 4:3?
Google Slides default presentation format is 16:9, which is the widescreen aspect ratio. However, users can change the slide size to 4:3 or other custom dimensions by going to the "File" menu, selecting "Page setup," and choosing the desired format from the dropdown menu.
3. How do you make text look like it's glowing in Google Slides?
To make text look like it's glowing in Google Slides, follow these steps:
1. Select the text box containing your text.
2. Click on the “Text color” icon in the toolbar.
3. Choose “Custom” to open the color picker.
4. Select a bright color for the text.
5. Click on the “Format options” (three dots) in the toolbar, then choose “Drop shadow.”
6. Enable the drop shadow, adjust the color to a lighter or contrasting hue, and increase the transparency and blur to create a glowing effect.
Experiment with settings until you achieve the desired glow.
4. How do I link slides in Google Slides?
To link slides in Google Slides, select the text or object you want to use as a link. Right-click and choose “Link” or click the link icon in the toolbar. In the dialog box, select “Slides in this presentation” and choose the slide you want to link to. Click “Apply” to create the link. Now, when you click the linked text or object during the presentation, it will take you to the designated slide.
5. How do I make Google Slides 1080p?
To create a Google Slides presentation in 1080p, set the slide dimensions to match the 16:9 aspect ratio, which is optimal for HD. Go to "File" > "Page setup" > "Custom," then enter dimensions: 1920 pixels wide by 1080 pixels high. This ensures your slides fit the 1080p resolution when displayed. For exporting, choose "File" > "Download" > "PNG image" or "JPEG image" to maintain the quality. However, note that Google Slides doesn't inherently support 1080p video exports; convert the presentation into a video format using third-party software if needed.

Visit: VS Website See: VS Portfolio
0 notes
Text
scrivener has a keyboard shortcut for strikethrough text. i love it.
0 notes
Text
How To Strikethrough In Excel | Keyboard Shortcut
How To Strikethrough In Excel | Keyboard Shortcut
To apply strikethrough in a cell in Excel, you need to press the shortcut key “Control + 5”. This keyboard shortcut words from a single cell, non-continues cells, a range of cells, or even for the partial value from a cell. Control+5 How to apply strikethrough on a partial text in a cell? Edit the cell using the F2 key or double click with mouse. Select the partial value using the mouse or the…

View On WordPress
#excel#excel keyboard shortcuts#excel shortcut#excel shortcut keys#excel shortcuts#how to strikethrough text in excel#keyboard shortcut#keyboard shortcut for strikethrough#keyboard shortcuts#learn excel#shortcut keys in excel#strikethrough#strikethrough excel#strikethrough in excel#strikethrough in excel 2016 shortcut#strikethrough in excel cell#strikethrough in excel shortcut in telugu#strikethrough keyboard shortcuts in ms office#strikethrough shortcut
0 notes
Text
consider this a speed-run of all things beta that may be causing legacy users issues. if there's anything else that needs explaining, i'll update this post! let's go beloveds. 🤭
🟠 BEFORE YOU SWITCH TO BETA.
if you've been previously using new xkit, you will need to download xkit rewritten. that can be found:
here for google chrome users.
here for mozailla firefox users.
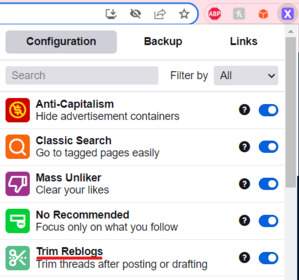
once you've installed it, you can install whatever add ons are your preference from new xkit. the one that you'll need to install and enable to cut posts on beta is called trim reblogs and it looks like this:

🔴 SWITCHING TO BETA.
switching is pretty straightforward for any former legacy users and you only have to do it once.
step 1: new text post.
step 2: a pop up for the new editor will show in the top right corner. click lets go!

step 3: press let's go again.
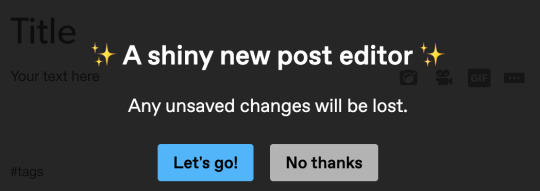
step 4: voila, shiny new editor.
🟡 USING BETA.
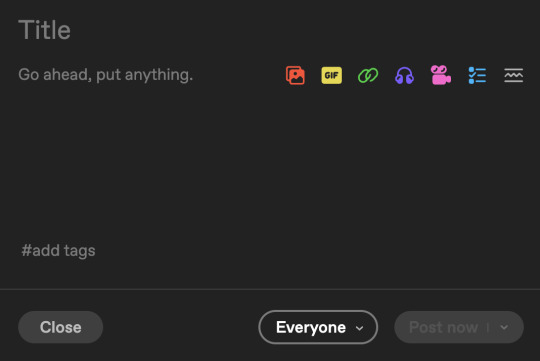
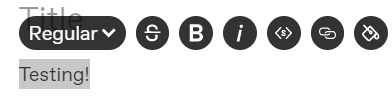
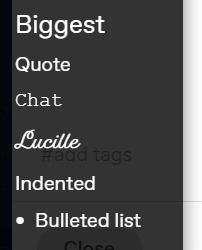
for the most part, beta has condensed features of legacy to be more intuitive, which means you need to remember less keyboard shortcuts. once you've written anything in the editor itself, highlighting it will bring up this dropdown.
the list of functions in the vertical dropdown are for the following:
regular is tumblr's standard font.
bigger is, you guessed it, bigger.
i think u can figure what biggest is KSJGSHJ
quote is for if you want any part of your post to look like the quote function.
chat will turn your font into the chat format (typically used for text/sms threads!)
indented will put your paragraphs into a blockquote for those that prefer them.
bulleted list is how you create a bulletpoint list like this one you're reading.
numbered list is same as above but with (spoilers!) numbers. 😎
the list that goes horizontally is for the following:
s with a strikethrough allows you to strike through text.
b is for bolding (the keyboard shortcut still works for this).
i is for italicizing (the keyboard shortcut still works for this).
<s> is for small text (the keyboard shortcut no longer works)
the link symbol is for adding or removing links (will be utilicized further in the gif url section of this tutorial)
and the paint can symbol is for changing the font colour if that's something you want to do.

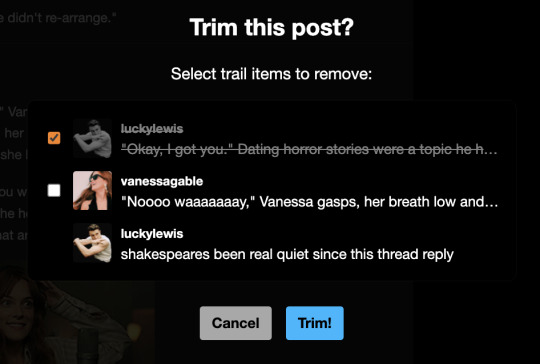
🟢 CUTTING POSTS WITH BETA.
for any of y'all that are like stark, we don't care ab this, we just wanna cut our damn posts. firstly, feel that. secondly, it needed it's own section so let's goooooo. once you get used to cutting posts on beta it becomes seamless.
there's two ways to do it.
the first one is: after drafting a reply.
the process for that is as follows:
step 1: draft your reply.

step 2: once the reply is drafted, locate the scissors symbol in the bottom row of functions.

step 3: click it and trim the post you want to be rid of, in this case for me it's my previous reply.
step 4: click trim! and hey presto, you have a cut post that's all pretty and ready for you to reply.
the second one is: after posting a reply.
step 1: go to reblog the post.

step 2: write a reply (a better one than this one SHGSHJ) and click reblog.

step 3: i know, i know, it looks like a triple reply but it only will for a second. just like step one, locate the scissors, click it, trim! your previous post and then it will be cut.


🟣 REMOVING THE URL FROM UNDER YOUR GIF IF YOU COPY AND PASTE ONE.
step 1: paste in your gif.
step 2: click the link button in the bottom left of the gif.

step 3: highlight or backspace and delete the url, click done.
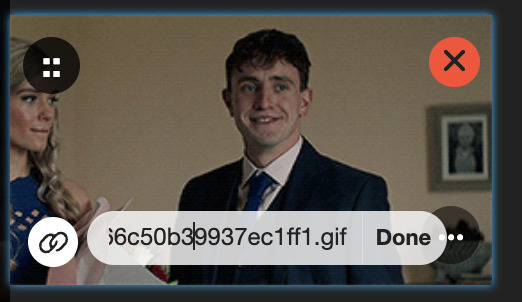
step 4: no url under your gif.

⚪️ MISC ADDITIONS.
this is the button for read mores, for all u spicy legends.

this is to upload an image.

this is to post a song.

NEW FUNCTIONS BETA OFFERS:
editing tags: you no longer have to delete every tag that follows if you made a typo in one. siiiick.
auto saving drafts: a life saver (especially for this post!!) tumblr auto saves your post to your drafts as you type into it.
ANY OTHER Q'S:
feel free to hit me up and i'll help you if i can for anything specific!
this post will be updated with anything i forgot about.
17 notes
·
View notes
Text
An Introduction to the Beta Editor
Hello all! I’ve gotten some feedback that the tutorials on using the new Beta editor and xKit Rewritten has been confusing a few people, so I wanted to make my own! I’ll try to cover everything below, but if something isn’t clear or you need extra help, let me know please! This post is gonna be pretty long, but I sectioned it up so hopefully you can find what you need with ease.

Step 1. Switching to Beta
You very well may be able to skip this part, because all new blogs are automatically switched to the newer editor. But if you’re still using an older blog, don’t worry, it’s easy! There should be a big purple button in the corner, pretty hard to miss. Should look like this!
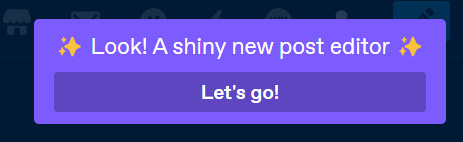
Go ahead and hit “Let’s go!” and, well... let’s go!
Step 2. Getting to Know Beta
The Beta editor is very, very different from what we’re all used to. But really, it’s kind of intuitive in a lot of ways. You have to know a lot less shortcuts. Whenever you highlight your text, you’ll see this little guy pop up:
Now, from left to right, here’s what we’re looking at: strikethrough, bold, italics, small text, link in text, and colored text. Most of your keyboard shortcuts should still work (I can’t speak for all computers, but the shortcut for small text no longer works for me with the Beta editor), but we also have handy-dandy buttons now, too! We also have the 'Regular' drop down menu, which opens this:
This one is pretty self explanatory, and it shows what the text will look like if you select that option.
Step 3. Finer Details
I’m still personally getting used to a lot of the smaller details that come with the Beta editor, but here are some that I’ve learned! Hopefully I’ll be adding to this list when more troubleshooting comes into my realm of knowledge.
Auto-Readmores: For whatever reason, Tumblr has taken to cropping any posts over a certain length by itself? Annoying, but this is something you can toggle on/off in your Dashboard Settings!
Editing Tags: This isn’t something that needs to be fixed, but it was big news to me! Instead of having to delete your tag completely when you’ve made a typo, you can just edit your post and edit the tag! Handy!
Links on Gifs: This isn’t a bad thing, it’s just new, different, and weird. But if you dislike it, there is a way to stop it from happening! It’s just a manual task. When you copy and paste a gif into your reply, you’ll see three little images on it. We’re going to click on the circled one below.
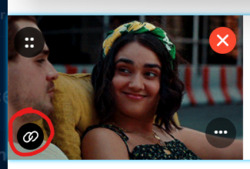
That’ll open up a link box, with a link to your gif. Just backspace that, hit the ‘Done’ button, and boom! No more link at the bottom of your gif!
Step 4. xKit Rewritten
I know what a lot of people’s main concern is: cropping replies. This is how we get to that point. The first step is going to be to download the newest iteration of xKit. You do not have to uninstall your old one to do this, they coexist on purpose! New xKit and xKit Rewritten have different features, so I’ve found it best to have both and utilize all the features!
xKit rewritten is a Chrome extension, and it can be found at this link! Just follow the instructions on that page to install it. Once it’s all good and installed, it’ll be found next to your other extensions, or by the URL bar on your browser window. Looks like this!
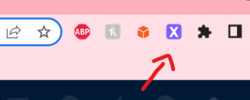
Now you have xKit Rewritten!
Step 5. Cropping Replies
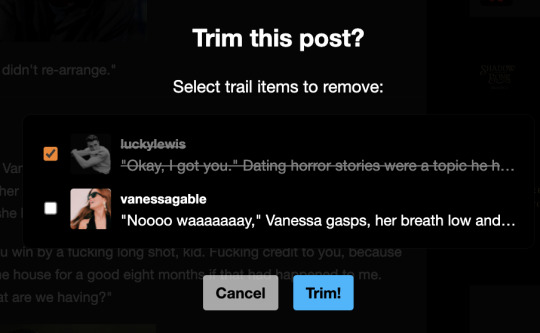
Alright, this is where the money is. Just like with regular xKit, you have to toggle on the setting that allows you to cut replies down. Once you click on that purple X icon, you’ll see a drop down with lots of options. I’ve underlined the one we’re looking for right now, "Trim Reblogs."
Once you toggle that little switch on, you can go ahead and start replying. If you’re replying to a starter, then there is no need to worry about this feature. You have nothing to crop, so don’t worry! But if you’re replying to an active thread, here’s what you’re gonna do. Type out your reply, format it however you want, and then draft it. Then we’re gonna go into our drafts.
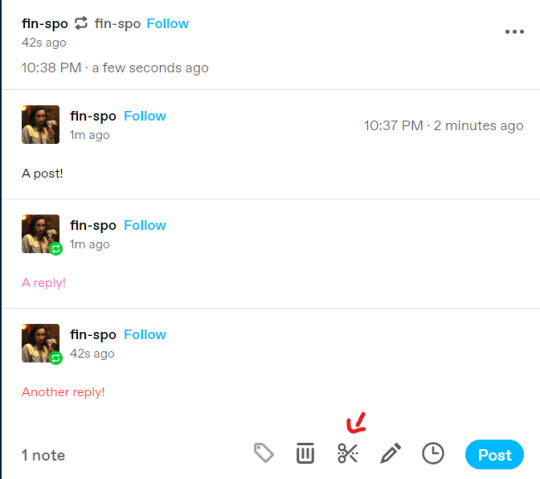
Here’s my thread with three tiers to it! The standard is two replies per post, and that’s what a lot of people like to stick to. So let’s make that happen! If you’ll notice at the bottom of that draft, there’s a scissor icon. I drew an arrow to it in the photo above. We’re gonna click on that.

And that icon brings this up! You’ll see it says “Select trail items to remove,” and it shows the trails separately. “Trails” are each individual reblog, and of course, we only want two of those, not three. This is really easy to fix! We’re just gonna select that top “trail,” aka the first reply in the thread, and hit the “Trim!” button.
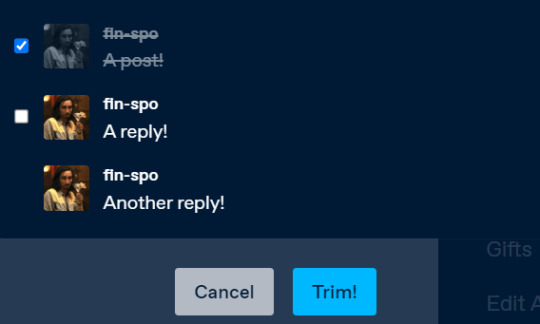
And once we’ve done that, the first “trail” is gone! You just have the two more recent replies on the post, and you’re good to reblog it!

The one caveat of this is that you can no longer edit parts of other people’s replies, so you can’t format the posts to your heart’s content like we’re used to. A downside for sure, but so far, this isn’t something there’s a fix for. Hopefully in the future, xKit will figure that out for us!
Step 6. That’s All!
Once you have all that down, you’re a master of the Beta editor and a master of xKit Rewritten! Tumblr staff has mentioned phasing out the Legacy editor all together in the future, so it appears this will be our new reality. It is worth it to mention that the Beta editor is still, well, in beta, so it is subject to change. If it does and we get even more features or work-arounds, I’ll be sure to come back and edit this post! Until then, if you have any questions, please let me know! I am here to help!
xoxo, Kirby
13 notes
·
View notes
Text


These are for text styles,inserting images or gifs,strikethrough and such. it's on your dashboard under keyboard shortcuts when you click the little icon.

Thought this would help a brother(or sister!) out!
YALL ARE AWESOME!!!
ha, fonts
13 notes
·
View notes
Note
how do u do the small font in general when you want to reply or make a new post
so anon!!! i’ll give you a little tutorial on how to do small font on both desktop and mobile.
How to get small font in a post/reply on tumblr desktop
It doesn’t involve much but it’s knowing the shortcuts on how to do it. so the first thing you need to do is make a post, write what you want like below (example below is one of a reply i’ve just started to write so you can ignore the content.)

Then all you need to do once you’ve finished writing your reply, you need to highlight all of your reply (like shown below) and once you’ve done that you will need to press ctrl + shift + - buttons on your keyboard at the same time. And you should have small font!! (shown in the second image below)


How to get small font in a post/reply on tumblr mobile
It’s the same principle as doing it on desktop. You write your post, highlight the text you want to make small and once highlighted, the options to make it bold, italic, stike through and change colour should appear. There is now a option (after strikethrough) that says <s> which makes your text small! Please see below! :)

Hope that helped you Anon!!! If you have any more questions, please do not hesitate to ask me!
#tumblr help#roleplay tutorial#small font#tj helps !!!!#🐍 ░ ( * I’LL KEEP THIS ONE IN MY POCKET. & / RESOURCES. )#tumblr resources#Anonymous#this is rebloggable if people want to#/shrugs/#just incase people didn't know about mobile small font because i certainly didnt until today
9 notes
·
View notes
Text
PSA: how to format asks with the “update”.
Now you just have to slowly edit asks on the dash after you’ve initially posted them and then formatting will work, using keyboard shortcuts like:
ctrl + b for bold
ctrl + i for italic
ctrl + shift + - for small
ctrl + . for sup
ctrl + , for sub
ctrl + shift + x for..
preformatted text
ctrl + u for underline
ctrl+ shift + 6 for strikethrough

That should work for you all.. for now. Everything you see in this little thing (pictured ↑ above) can still be used as you’re editing anyway, so you can still use lists. Going into html mode is fine, but you can’t just post in code you’ve already formatted, if that makes sense.
Play it by ear, I guess, I can explain bits better if you throw me an ask.
This has to be done on the dash as if you do it in drafts the text will un-format again, god knows why.
2K notes
·
View notes
Text
40 KEYBOARD SHORTCUT BUTTON TRICKS TO WORK FASTER ON LAPTOP
Hello there welcome to mytutorialguide.com in this post you will learn 40 Keyboard Shortcut Button Tricks to Work Faster on Your Laptop you may be working for hours on your windows computerand laptop and you are feeling you need to know more shortcut keyboard button to make your life easier, well here we are After reading this post you will be able to use your pc, laptop, a computer at much…
View On WordPress
#keyboard shortcut#keyboard shortcut for bullet point#keyboard shortcut for paste#keyboard shortcut for print#keyboard shortcut for strikethrough#keyboard shortcuts#keyboard shortcuts chromebook#keyboard shortcuts iphone#keyboard shortcuts mac#keyboard shortcuts windows#keyboard shortcuts windows 10
0 notes
Text
EditorsKit 1.6 and 1.7 Add Tools for Writers, Drag and Drop Block Export/Import
Recent EditorsKit releases have introduced a set of new tools that some writers may have found missing from Gutenberg. The plugin’s creator, Jeffrey Carandang, said version 1.6 was targeted at improving the writing flow for writers, bloggers, and content creators.
Gutenberg has decent support for copying and pasting Markdown. It will automatically convert links, blockquotes, code snippets, and other formatting into the proper Gutenberg blocks. However, the editor does not offer full support for users who who want to write with Markdown.
EditorsKit 1.6 adds basic markdown capabilities for things like bold, italic and ~strikethrough~ and these can also be used alongside other available editor markdowns and their keyboard shortcuts. These are integrated directly into the RichText editor so you don’t have to use a dedicated Markdown plugin with a custom block, like WP Githuber MD, or Jetpack’s Markdown module.
EditorsKit 1.6 is now available Comes with Gutenberg Editor Markdown Support, Clear Formatting, Subscript & Superscript Formats, Toggle Title and more. Here's a quick preview on how these features were integrated on WordPress Gutenberg block editor pic.twitter.com/apB4uMjuqg
— Jeffrey Carandang (@phpbits) June 4, 2019
Version 1.6 introduced an expanded “clear formatting” option as a response to requests Carandang received on the plugin’s Facebook community and Slack. It clears formatting on specific text, removes formatting on selected text, and clears all paragraph and heading block formatting using the “Clear Block Formatting” option in the block settings. This version also added subscript, superscript, and uppercase text formats, along with a title visibility toggle that removes titles from the frontend on a per-post basis.
While these tools may provide features that some users find to be critically missing from Gutenberg, for many others they simply add to the clutter of the block toolbar and the overall interface. Gutenberg is still sorely in need of a distraction-free UI that will enable users to ditch dedicated writing apps and embrace WordPress as their go-to app for writing.
EditorsKit seems best suited as a playground for features that may or may not have widespread appeal. For example, the most recent 1.7 release enables exporting and importing blocks without the requirement of first converting them to reusable blocks. Users can click on the “block settings” icon and export as JSON on a per-block basis. It’s also possible to select multiple blocks and export them in one file.
Importing blocks back into the editor is as easy as dragging and dropping the .json file. It automatically generates the blocks in an almost magical way an does not require users to navigate to the separate admin dashboard for managing reusable blocks.
Carandang is working on making the import/export work with media attachments. He is also currently working with the Gutenberg team and other contributors to bring the plugin’s Text and Highlight colors feature to the core editor.
😉SiliconWebX | 🌐WPTavern
1 note
·
View note
Text
SO APPARENTLY THERE’S THIS INFORMATION
Keyboard shortcuts
NAVIGATION
Scroll down J
Scroll up K
Back to the top .
Like a post L
Share a post S
View a post's notes N
Open a post's blog enter
Follow a recommended blog F
Reject a recommended blog X
Search Tumblr /
Switch between your blogs Z+ tab
POSTING
Compose a new post Z+ C
Fast reblog a post alt+ R
Add a post to your queue alt+ E
COMPOSING
Bold ctrl+ B
Italic ctrl+ I
Headline ctrl+ shift+ 2
Link ctrl+ K
Strikethrough ctrl+ shift+ 6
Ordered list ctrl+ shift+ 7
Unordered list ctrl+ shift+ 8
Blockquote ctrl+ shift+ 9
Remove formatting ctrl+ shift+ 0
Preformatted text ctrl+ shift+ X
Superscript ctrl+ .
Subscript ctrl+ ,
Small ctrl+ shift+ -
Insert photo ctrl+ shift+ P
Insert video ctrl+ shift+ M
Insert horizontal line ctrl+ shift+ L
Insert read-more link ctrl+ shift+ K
Insert GIF (oops i must not have copied that part?? but i don’t even know how i opened the little thing that said all of this so idk)
235 notes
·
View notes
Text
i honestly don’t think I would Ever be able to migrate from Microsoft Word.
(First of all, I have an install of v. 2003 still on my New(ish) Windows 10 Laptop, in this the year of our lord 2019. Obviously, I’m not planning to give up that ghost.)
But secondly? My CUSTOM SHORTCUTS! I have keyboard shortcuts for strikethrough, closing documents, Save As, Paste Special, and I just added a line to a file, pasting it in unformatted, closed it, exited, and got back to Tumbling in 10 seconds or less.
(I didn’t time, because I didn’t realize how DAMN FAST that would be? Until I was back on my dashboard and like “holy shit that was FAST”)
1 note
·
View note
Text
Novlr
I am a simple man. I see a gradient, I upvote. Or whatever the vocal equivalent of an upvote is.
NOVLR HAS AN AUTOMATIC EASY TO UNDERSTAND TUTORIAL. I REPEAT, IT HAS A TUTORIAL.
Okay so the appearance is really nice on my eyes. There's three skins to choose from and they're all easy to look at.
You can easily change your font size, indent all your paragraphs, and number all your chapters. When you're typing, if you highlight your text you get a 'toolbar', where you can bold, italicize, underline, strikethrough, make a bullet list, or align your text. You can customize this easily on the right side of the screen/page, adding or removing any of these if you need them.
It also has an option for 'curly quotes', but I couldn't find what those do.
At the bottom of the screen there are some icons - the first, a keyboard, shows the shortcuts you can use on Novlr. The second, a magnifying glass, is a proofreader. I can't figure out what the one next to it does, and the one after that, the bell, moves you to your dashboard and starts you on an in-app chat with a support member.
I found I did have issues with some features not working. Again, 'curly quotes', and while 'focus mode' worked for a bit, when I went to try it again nothing happened. I tried closing out and going back in, but it still didn't work.
The bottom left side of the screen shows how many words you have in the chapter, and if you hit the button next to it it shows you previous versions of the chapter.
Novlr works offline! As someone who loses internet a lot, that's great! It keeps going, and just backs up once you regain it. You can also back it up to Google Drive or Dropbox.
When you first open Novlr, under the Notes tab (visible on the left, under your 'Chapters') there's a well set-up guide for using Novlr! I love this.

They also have a recommended guide for setting up your characters!


On your dashboard you can view your goals, streaks, words written that day, week, year, and total. Your words written can also be viewed on a graph - and it also shows words deleted! So when you edit it's not just a blank spot.
There's also a writing course you can take/listen to, with the writing program integrated in so you can write along!
You can publish straight to ebook when you're done, and put your Title, Subtitle, Author's Name, and even plug in your cover art. If you publish straight to Amazon, this is really useful!
Novlr analyzes your productivity, and tells you when you like to write - morning, for example, and tells you which authors like to write then as well! It tells you what day you're most productive, when you last wrote, how many minutes and hours you've written this day, week, and year. It also breaks down how many words you've written if they were evenly split over how many days you've written on writing days, and then on all days, then tells you how many days it would take you to write War and Peace at your current pace.
It also tells you how many pages your book would be at the current page and font size for Dr. Seuss, Pride & Prejudice, and Great Expectations. This isn't necessary, but it's fun!
Overall, as a writing program I'd rate Novlr as an 8/10. It'd get higher if it weren't for the glitches! As a plotter, 1/10. You can only really throw notes down, no true plotting. So 7/10
0 notes
Text
Fonts for microsoft ppt for mac

#FONTS FOR MICROSOFT PPT FOR MAC HOW TO#
#FONTS FOR MICROSOFT PPT FOR MAC FOR MAC#
#FONTS FOR MICROSOFT PPT FOR MAC PDF#
#FONTS FOR MICROSOFT PPT FOR MAC SOFTWARE#
#FONTS FOR MICROSOFT PPT FOR MAC ZIP#
Unfortunately, there is no shortcut to select the text effect once you are in the Font dialog box.
Use your cursor to select the text effect you would like to apply.
Hold down Command + D and the Font dialog box will appear.
Select within your Word Document the text that you want to strikethrough.
#FONTS FOR MICROSOFT PPT FOR MAC HOW TO#
With that in mind, let’s take a look at how to embed fonts in PowerPoint for Mac. Use your Font dialog box as a strikethrough shortcut (Mac only) Microsoft Office changed that in the Office 2016 Package, so PowerPoint 2016 can correctly display the fonts that have been embedded in the file. Under Font Embedding, select the Embed fonts in the file option. A dialog box will open, and then ubder the Output and Sharing option, click on Save. Open the PowerPoint file that you want to embed fonts, and then go to the menu to select Preferences.
#FONTS FOR MICROSOFT PPT FOR MAC FOR MAC#
These versions support embed fonts, while Word 2019 and Excel 2019 for Mac do not support embedded fonts. To learn how to superscript and subscript in Word, Excel and PowerPoint (including their keyboard shortcuts), read our guide here. This guide is for the PowerPoint for Office 365 for Mac and PowerPoint 2019 for Mac. Note: PowerPoint and Word both have a dedicate superscript and subscript shortcuts. Ctrl + Spacebar reverts your text formatting back to the default formatting of your document. To remove a strikethrough in Word, simply select the text and either use the shortcut again to remove it or hit Ctrl + Spacebar to remove all formatting.
Inside the Font dialog box, hit Alt + K to select the Strikethrough.
Hit Ctrl + D to open the Font dialog box.
Select the text you want to strikethrough.
Use your Font dialog box shortcuts in Word to cross out text (PC only) Scripts to automatically harvest results are strictly prohibited due to performance reasons and will result in your IP being banned from this website.3. Legal notice: You may not, under any circumstances, resell or reproduce any information for commercial use without the express prior written consent of. Calibri is a modern sans-serif font that comes in several weights. Now that we’ve covered how to choose the right fonts for your presentation, here are the 10 best fonts to use for your PPT presentations in 2021: 1. A visit to any site or page from our web site via these links is done entirely at your own risk. The 10 Best Fonts to Use for PowerPoint PPT Presentations in 2021. provides links to third party sites only as a convenience and the inclusion of such links on our site does not imply 's endorsement of either the site, the organization operating such site, or any products or services of that organization. MAC Users: These fonts can easily be converted for use on a Macintosh with a utility such as TTConverter (Thanks to George for that one). To view some of the supporting documents you will require MS Word, PowerPoint and Excel.
#FONTS FOR MICROSOFT PPT FOR MAC ZIP#
Note: We try to keep all external and related links up-to-date, however we are not responsible for the content of any site linked, further links on sites linked, or any changes or updates to the the information found on these sites. The total size of the APP-6a package is about 1.67Mb and takes the form of a self-extracting ZIP file.
#FONTS FOR MICROSOFT PPT FOR MAC SOFTWARE#
Ppt to xps Find converter to ppt file type:įile types | Find file converter | Software | Articles | FAQs | Privacy policy | About us | RSS Other office suites, that can open the *.ppt files (, StarOffice, Ashampoo Office), can usually also save them to another document format.
#FONTS FOR MICROSOFT PPT FOR MAC PDF#
ppt files to another document formats such as OpenDocument, PDF or XPS. The best fonts for PowerPoint are Times New Roman, Garamond, and Georgia. In this article, we will be discovering the best font for PowerPoint, learn how to change the default font in PowerPoint, and later how to embed fonts into PowerPoint. Microsoft developed free viewer of PPT Microsoft Office PowerPoint Presentation files, that is called PowerPoint Viewer. The best font for PowerPoint, color scheme, and the number of slides. The *.ppt files can also be open by another applications such as, StarrOffice or Ashampoo Office. How to open Microsoft Office and OpenOffice documentsįile types supported in Microsoft PowerPoint 2010 Help how to open:Ī ppt file can be opened and edited in its default application Microsoft PowerPoint, part of Microsoft Office suite. Microsoft Office PowerPoint 2007 and later saves presentations in the OpenXML format instead and is using the pptx file extension. You can also choose fonts, colors, and background styles. They are often built from one of many templates included with the Microsoft Office PowerPoint software, but may also be created from scratch. Download Microsoft Powerpoint 2016 for Mac to prepare stunning presentations, save them on cloud, and share with other people. The ppt files may include formatted text, bullet points, images, movies, sound effects, or music. The ppt files are used for editable slide shows, which are very often used for presentations. The PPT is Microsoft PowerPoint proprietary file format, it is also known as the Binary Interchange File Format (BIFF). The ppt file extension is associated with Microsoft PowerPoint, a worldwide most popular powerful tool you can use to create and edit dynamic and great-looking presentations.
0 notes
Text
Chemical equation maker

#Chemical equation maker mac
Move an equation within the flow of text: Select the equation and drag it to a new position in the body text, header, footer, or footnote. To change the look of the equation or to edit it, double-click the equation to open it in MathType, then double-click the controls at the bottom of the window.ĭrag the equation to reposition it on the page.Īfter you add an equation inline with text, you can modify it.Įdit an equation: Double-click the equation, make your changes, then click Update. If you added the equation to the page, it appears at the center of the screen and can be dragged to a new position on the page. To edit the equation, double-click the equation to open the MathType window. If you added the equation inline, it appears at the insertion point and is the same size and color as the surrounding text. To save your equation, choose File > Close and Return to Pages (from the File menu at the top of your screen), then click Yes in the dialog that appears. To enter the equation, click symbols and type in the MathType window.įor instructions on using the MathType tools, see MathType Help. Otherwise, click Use MathType in the dialog that appears. If you set MathType as your default equation editor, MathType opens automatically (after you enter an equation the first time). You can also click the page thumbnail in Page Thumbnails view. Place the equation so it can be moved freely: Click the corner of the page to make sure nothing is selected. Tip: To set MathType as the default equation editor, choose Pages > Preferences (from the Pages menu at the top of your screen), click General, then select the checkbox next to “Insert equations with MathType.” Drag the equation to reposition it on the page. If you added the equation to the page, it appears at the center of the screen and has a default size and color that you can change in the Format sidebar. If you change the size and color of the surrounding text, the size and color of the equation also change. If you added the equation inline, it appears at the insertion point in your document and is the same size and color as the surrounding text. Click Use Pages.Įnter an equation in the field using LaTeX commands or MathML elements.įor information on using supported LaTeX commands or MathML elements and attributes, see the Apple Support article About LaTeX and MathML support. If you have MathType installed, a dialog appears, asking whether to use Pages to create the equation. You can also choose Insert > Equation (from the Insert menu at the top of your screen). You can also select the page thumbnail in Page Thumbnails view.Ĭlick in the toolbar, then choose Equation. Place the equation so it can be moved freely: Click in the corner of the page to make sure nothing is selected. Place the equation inline with text: Place the insertion point in some text, a text box or shape, or a table cell, or select the text you want the equation to replace.
If you can’t remove something from a document.
Restore an earlier version of a document.
Save a large document as a package file.
Export to Word, PDF, or another file format.
Change the look of chart text and labels.
Add a legend, gridlines, and other markings.
Change a chart from one type to another.
Calculate values using data in table cells.
Select tables, cells, rows, and columns.
Fill shapes and text boxes with color or an image.
Set pagination and line and page breaks.
Format hyphens, dashes, and quotation marks.
Format Chinese, Japanese, or Korean text.
Use a keyboard shortcut to apply a text style.
Create, rename, or delete a paragraph style.
Bold, italic, underline, and strikethrough.
Populate and create customized documents.
#Chemical equation maker mac
Add, change, or delete a source file in Pages on Mac.Select text and place the insertion point.Use VoiceOver to preview comments and track changes.View formatting symbols and layout guides.Intro to images, charts, and other objects.
0 notes