#openshift demo
Explore tagged Tumblr posts
Visit Tumblr Blog
Explore Tumblr blogs with no restrictions, modern design and the best experience.
Last Seen Tumblr Blogs


Fun Fact
12.7% of mobile users access Tumblr.
Text
Unlocking Business Agility with Red Hat Ansible Automation Platform and Red Hat OpenShift
In today’s fast-paced digital world, businesses need tools that enable agility, scalability, and efficiency. Two standout solutions leading the charge in IT automation and containerization are Red Hat Ansible Automation Platform and Red Hat OpenShift. These tools empower organizations to streamline operations, automate repetitive tasks, and deploy applications faster. Let’s dive into what makes these platforms essential for modern IT environments.
Red Hat Ansible Automation Platform: Simplify IT Automation
The Red Hat Ansible Automation Platform is a robust, enterprise-grade solution that brings simplicity to complex IT environments. By enabling businesses to automate repetitive tasks, it not only saves time but also reduces the likelihood of human error. Here's how it transforms IT operations:
Unified Automation Framework: Centralize and streamline IT workflows across multiple teams and environments.
Agentless Architecture: Ansible’s agentless design eliminates the need for additional software installation on target machines, reducing overhead.
Scalability: From small-scale automation to large, complex deployments, Ansible adapts seamlessly.
Customizable Playbooks: Create reusable, human-readable playbooks to automate tasks such as configuration management, application deployment, and network provisioning.
With Ansible, businesses can focus on innovation rather than mundane tasks, paving the way for enhanced productivity.
Red Hat OpenShift: The Future of Application Development
Red Hat OpenShift is a Kubernetes-powered platform that simplifies application development and deployment. As businesses embrace cloud-native architectures, OpenShift provides the tools to build, run, and manage applications across hybrid and multi-cloud environments. Here’s why OpenShift is a game-changer:
Integrated Kubernetes: A fully managed Kubernetes environment ensures seamless container orchestration.
Developer-Centric Tools: Integrated CI/CD pipelines and developer workflows accelerate the path from code to production.
Hybrid Cloud Support: Deploy and manage applications consistently across on-premises, public, and private clouds.
Enhanced Security: Built-in security features, such as role-based access control (RBAC) and vulnerability scanning, provide peace of mind.
By adopting OpenShift, organizations can innovate faster while maintaining control and security.
The Power of Combining Ansible and OpenShift
When used together, Ansible Automation Platform and OpenShift create a synergistic effect that enhances operational efficiency and accelerates digital transformation. Here’s how:
Automated Deployments: Use Ansible to automate the provisioning and management of OpenShift clusters.
Consistent Configurations: Ensure uniform configurations across development, testing, and production environments.
Streamlined DevOps: Simplify complex DevOps workflows by integrating Ansible’s automation capabilities with OpenShift’s container orchestration.
This combination allows businesses to deploy applications faster, scale effortlessly, and reduce time-to-market.
Why Businesses Choose Red Hat
Red Hat’s commitment to open-source innovation and enterprise-grade solutions makes it a trusted partner for organizations worldwide. By leveraging tools like Ansible Automation Platform and OpenShift, businesses can achieve:
Greater agility in responding to market demands
Reduced operational costs through automation
Enhanced collaboration between development and operations teams
Get Started Today
Ready to transform your IT operations and accelerate innovation? Explore how Red Hat Ansible Automation Platform and Red Hat OpenShift can revolutionize your business. Contact us to learn more or schedule a demo.
For more details www.hawkstack.com
#redhatcourses#information technology#containerorchestration#kubernetes#container#docker#linux#containersecurity#dockerswarm
0 notes
Text
Red Hat OpenShift Services - Techzert
Red Hat OpenShift on IBM Cloud Services. TechZert offer services flexible deployment, seamless Kubernetes updates and upgrades and converge payments processing onto a single platform, Regular maintenance of all components etc. Book a demo now!
0 notes
Video
youtube
Create openshift online account to access openshift clusterOpenshift 4 is latest devops technology which can benefit the enterprise in a lot of ways. Build development and deployment can be automated using Openshift 4 platform. Features for autoscaling , microservices architecture and lot more features. So please like watch subscribe my channel for the latest videos. #openshift # openshift4 #containerization #cloud #online #container #kubernetes #docker #automation #redhatopenshift #openshifttutorial #openshiftonline red hat openshift 4 container platform, create openshift online account, how to deploy docker image in openshift, openshift online account access openshift cluster openshift 4 red hat openshift, red hat openshift container platform, redhat openshift 4 container platform, red hat openshift, Login to openshift cluster in different ways openshift 4 red hat openshift, what is openshift online, openshift 4, redhat openshift online, Introduction to openshift online cluster overview of openshift cluster red hat openshift https://www.youtube.com/channel/UCnIp4tLcBJ0XbtKbE2ITrwA?sub_confirmation=1&app=desktop About: 00:00 Create openshift online account to access openshift cluster | openshift online account How to create openshift online account to access openshift cluster | openshift4 | red hat openshift create openshift online account - Red Hat OpenShift 4 Container Platform: Download OpenShift 4 client how to create openshift online account to access openshift cluster | openshift4 | red hat openshift. Red Hat OpenShift is an open source container application platform based on the Kubernetes container orchestrator for enterprise application development and deployment In this course we will learn about creating an openshift online account to access openshift cluster for free where we can create build and deploy the projects over the cloud and to improve openshift4 fundamentals. Openshift/ Openshift4 a cloud based container to build deploy test our application on cloud. In the next videos we will explore Openshift4 in detail. https://www.facebook.com/codecraftshop/ https://t.me/codecraftshop/ Please do like and subscribe to my you tube channel "CODECRAFTSHOP" Follow us on facebook | instagram | twitter at @CODECRAFTSHOP . -~-~~-~~~-~~-~- Please watch: "Install hyperv on windows 10 - how to install, setup & enable hyper v on windows hyper-v" https://www.youtube.com/watch?v=KooTCqf07wk -~-~~-~~~-~~-~-
#openshift#red hat openshift#openshift tutorial#openshift online#what is openshift#openshift 4#red hat openshift clusters#openshift container platform#red hat openshift 4 container platform#openshift for beginners#openshift architecture#openshift to an absolute beginner#redhat openshift online#openshift demo#what is openshift online#redhat openshift 4 container platform#openshift online account access openshift cluster openshift 4 red hat openshift
0 notes
Photo

Red Hat OpenShift AI Demo https://www.youtube.com/watch?v=YUsuNQS7gg0
0 notes
Link
Free Demo Session on OpenStack, Ceph, SDN, Docker, Kuberenetes
1 note
·
View note
Text
In this guide we will perform an installation of Red Hat OpenShift Container Platform 4.11 on KVM Virtual Machines. OpenShift is a powerful, platform agnostic, enterprise-grade Kubernetes distribution focused on developer experience and application security. The project is developed and owned by Red Hat Software company. OpenShift Container Platform is built around containers orchestrated and managed by Kubernetes on a foundation of Red Hat Enterprise Linux. The OpenShift platform offers automated installation, upgrades, and lifecycle management throughout the container stack – from the operating system, Kubernetes and cluster services, to deployed applications. Operating system that will be used on both the Control plan and Worker machines is Red Hat CoreOS (RHCOS). The RHCOS OS includes the kubelet, which is the Kubernetes node agent, and the CRI-O container runtime optimized for Kubernetes workloads. In my installation the deployment is performed on a single node KVM compute server. This is not a production setup with high availability and should only be used for proof-of-concept and demo related purposes. Red Hat’s recommendation on each cluster virtual machine minimum hardware requirements is as shown in the table below: Virtual Machine Operating System vCPU Virtual RAM Storage Bootstrap RHCOS 4 16 GB 120 GB Control plane RHCOS 4 16 GB 120 GB Compute RHCOS 2 8 GB 120 GB But the preferred requirements for each cluster virtual machine are: Virtual Machine Operating System vCPU Virtual RAM Storage Bootstrap RHCOS 4 16 GB 120 GB Control plane RHCOS 8 16 GB 120 GB Compute RHCOS 6 8 GB 120 GB The shared hardware requirements information for the virtual machines is not accurate since it depends on the workloads and desired cluster size when running in Production. Sizing can be done as deemed fit. My Lab environment variables OpenShift 4 Cluster base domain: example.com ( to be substituted accordingly) OpenShift 4 Cluster name: ocp4 ( to be substituted accordingly) OpenShift KVM network bridge: openshift4 OpenShift Network Block: 192.168.100.0/24 OpenShift Network gateway address: 192.168.100.1 Bastion / Helper node IP Address (Runs DHCP, Apache httpd, HAProxy, PXE, DNS) – 192.168.100.254 NTP server used: time.google.com Used Mac Addresses and IP Addresses: Machine Name Mac Address (Generate yours and use) DHCP Reserved IP Address bootstrap.ocp4.example.com 52:54:00:a4:db:5f 192.168.100.10 master01.ocp4.example.com 52:54:00:8b:a1:17 192.168.100.11 master02.ocp4.example.com 52:54:00:ea:8b:9d 192.168.100.12 master03.ocp4.example.com 52:54:00:f8:87:c7 192.168.100.13 worker01.ocp4.example.com 52:54:00:31:4a:39 192.168.100.21 worker02.ocp4.example.com 52:54:00:6a:37:32 192.168.100.22 worker03.ocp4.example.com 52:54:00:95:d4:ed 192.168.100.23 Step 1: Setup KVM Infrastructure (On Hypervisor Node) Install KVM in your hypervisor node using any of the guides in below links: Install KVM Hypervisor on Ubuntu How To Install KVM Hypervisor on Debian Install KVM on RHEL 8 / CentOS 8 / Rocky Linux After installation verify your server CPU has support for Intel VT or AMD-V Virtualization extensions: cat /proc/cpuinfo | egrep "vmx|svm" Creating Virtual Network (optional, you can use existing network) Create a new virtual network configuration file vim virt-net.xml File contents: openshift4 Create a virtual network using this file file created; modify if need be: $ sudo virsh net-define --file virt-net.xml Network openshift4 defined from virt-net.xml Set the network to autostart on boot $ sudo virsh net-autostart openshift4 Network openshift4 marked as autostarted $ sudo virsh net-start openshift4 Network openshift4 started Confirm that the bridge is available and active:
$ brctl show bridge name bridge id STP enabled interfaces openshift4 8000.5254002b479a yes virbr0 8000.525400ad641d yes Step 2: Create Bastion / Helper Virtual Machine Create a Virtual Machine that will host some key services from officially provided virt-builder images. The virtual machine will be used to run the following services: DNS Server (Bind) Apache httpd web server HAProxy Load balancer DHCP & PXE/TFTP services It will also be our bastion server for deploying and managing OpenShift platform (oc, openshift-install, kubectl, ansible) Let’s first display available OS templates with command below: $ virt-builder -l I’ll create a VM image from fedora-36 template; you can also choose a CentOS template(8 or 7): sudo virt-builder fedora-36 --format qcow2 \ --size 20G -o /var/lib/libvirt/images/ocp-bastion-server.qcow2 \ --root-password password:StrongRootPassw0rd Where: fedora-36 is the template used to create a new virtual machine /var/lib/libvirt/images/ocp-bastion-server.qcow2 is the path to VM qcow2 image StrongRootPassw0rd is the root user password VM image creation progress will be visible in your screen [ 1.0] Downloading: http://builder.libguestfs.org/fedora-36.xz ########################################################################################################################################################### 100.0% [ 15.3] Planning how to build this image [ 15.3] Uncompressing [ 18.2] Resizing (using virt-resize) to expand the disk to 20.0G [ 39.7] Opening the new disk [ 44.1] Setting a random seed [ 44.1] Setting passwords [ 45.1] Finishing off Output file: /var/lib/libvirt/images/ocp-bastion-server.qcow2 Output size: 20.0G Output format: qcow2 Total usable space: 20.0G Free space: 19.0G (94%) Now create a Virtual Machine to be used as DNS and DHCP server with virt-install Using Linux bridge: sudo virt-install \ --name ocp-bastion-server \ --ram 4096 \ --vcpus 2 \ --disk path=/var/lib/libvirt/images/ocp-bastion-server.qcow2 \ --os-type linux \ --os-variant rhel8.0 \ --network bridge=openshift4 \ --graphics none \ --serial pty \ --console pty \ --boot hd \ --import Using openVSwitch bridge: Ref How To Use Open vSwitch Bridge on KVM Virtual Machines sudo virt-install \ --name ocp-bastion-server \ --ram 4096 \ --disk path=/var/lib/libvirt/images/ocp-bastion-server.qcow2 \ --vcpus 2 \ --os-type linux \ --os-variant rhel8.0 \ --network=bridge:openshift4,model=virtio,virtualport_type=openvswitch \ --graphics none \ --serial pty \ --console pty \ --boot hd \ --import When your VM is created and running login as root user and password set initially: Fedora 36 (Thirty Six) Kernel 5.xx.fc36.x86_64 on an x86_64 (ttyS0) fedora login: root Password: StrongRootPassw0rd You can reset root password after installation if that’s your desired action: [root@fedora ~]# passwd Changing password for user root. New password: Retype new password: passwd: all authentication tokens updated successfully. If the server didn’t get IP address from DHCP server you can set static IP manually on the primary interface: # ip link show 1: lo: mtu 65536 qdisc noqueue state UNKNOWN mode DEFAULT group default qlen 1000 link/loopback 00:00:00:00:00:00 brd 00:00:00:00:00:00 2: enp1s0: mtu 1500 qdisc fq_codel state UP mode DEFAULT group default qlen 1000 link/ether 52:54:00:21:fb:33 brd ff:ff:ff:ff:ff:ff # vi /etc/sysconfig/network-scripts/ifcfg-enp1s0 NAME="enp1s0" # Set network name, usually same as device name DEVICE="enp1s0" # Set your interface name as shown while running ip link show command ONBOOT="yes" NETBOOT="yes" BOOTPROTO="none" TYPE="Ethernet" PROXY_METHOD="none" BROWSER_ONLY="no" DEFROUTE="yes" IPADDR=192.168.100.254 # Set your VM IP address
PREFIX=27 # Set Netmask Prefix GATEWAY=192.168.100.1 # Set network gateway IP address DNS1=8.8.8.8 # Set first DNS server to be used DNS2=8.8.4.4 # Set secondary DNS server to be used # Once configured bring up the interface using ifup command # ifup enp1s0 Connection successfully activated (D-Bus active path: /org/freedesktop/NetworkManager/ActiveConnection/7) Test external connectivity from the VM: # ping -c 2 8.8.8.8 PING 8.8.8.8 (8.8.8.8) 56(84) bytes of data. 64 bytes from 8.8.8.8: icmp_seq=1 ttl=117 time=4.98 ms 64 bytes from 8.8.8.8: icmp_seq=2 ttl=117 time=5.14 ms --- 8.8.8.8 ping statistics --- 2 packets transmitted, 2 received, 0% packet loss, time 1001ms rtt min/avg/max/mdev = 4.981/5.061/5.142/0.080 ms # ping -c 2 google.com PING google.com (172.217.18.110) 56(84) bytes of data. 64 bytes from zrh04s05-in-f110.1e100.net (172.217.18.110): icmp_seq=1 ttl=118 time=4.97 ms 64 bytes from fra16s42-in-f14.1e100.net (172.217.18.110): icmp_seq=2 ttl=118 time=5.05 ms --- google.com ping statistics --- 2 packets transmitted, 2 received, 0% packet loss, time 1002ms rtt min/avg/max/mdev = 4.971/5.008/5.045/0.037 ms Perform OS upgrade before deploying other services. sudo dnf -y upgrade sudo dnf -y install git vim wget curl bash-completion tree tar libselinux-python3 firewalld Reboot the server after the upgrade is done. sudo reboot Confirm you can access the VM through virsh console or ssh $ sudo virsh list Id Name State ------------------------------------- 1 ocp-bastion-server running $ sudo virsh console ocp-bastion-server Connected to domain 'ocp-bastion-server' Escape character is ^] (Ctrl + ]) fedora login: Enable domain autostart: sudo virsh autostart ocp-bastion-server Step 3: Install Ansible and Configure variables on Bastion / Helper node Install Ansible configuration management tool on the Bastion machine # Fedora sudo dnf -y install git ansible vim wget curl bash-completion tree tar libselinux-python3 # CentOS 8 / Rocky Linux 8 sudo yum -y install epel-release sudo yum -y install git ansible vim wget curl bash-completion tree tar libselinux-python3 # CentOS 7 sudo yum -y install epel-release sudo yum -y install git ansible vim wget curl bash-completion tree tar libselinux-python We have a Github repository with all the tasks and templates used in this guide. Clone the project to ~/ocp4_ansible directory. cd ~/ git clone https://github.com/jmutai/ocp4_ansible.git cd ~/ocp4_ansible You can view the directory structure using tree command: $ tree . ├── ansible.cfg ├── files │ └── set-dns-serial.sh ├── handlers │ └── main.yml ├── inventory ├── LICENSE ├── README.md ├── tasks │ ├── configure_bind_dns.yml │ ├── configure_dhcpd.yml │ ├── configure_haproxy_lb.yml │ └── configure_tftp_pxe.yml ├── templates │ ├── default.j2 │ ├── dhcpd.conf.j2 │ ├── dhcpd-uefi.conf.j2 │ ├── haproxy.cfg.j2 │ ├── named.conf.j2 │ ├── pxe-bootstrap.j2 │ ├── pxe-master.j2 │ ├── pxe-worker.j2 │ ├── reverse.j2 │ └── zonefile.j2 └── vars └── main.yml 5 directories, 21 files Edit ansible configuration file and modify to suit your use. $ vim ansible.cfg [defaults] inventory = inventory command_warnings = False filter_plugins = filter_plugins host_key_checking = False deprecation_warnings=False retry_files = false When not executing ansible as root user you can addprivilege_escalation section. [privilege_escalation] become = true become_method = sudo become_user = root become_ask_pass = false If running on the localhost the inventory can be set as below: $ vim inventory [vmhost] localhost ansible_connection=local These are service handlers created and will be referenced in bastion setup process tasks. $ vim handlers/main.yml --- - name: restart tftp service: name: tftp state: restarted - name: restart bind service:
name: named state: restarted - name: restart haproxy service: name: haproxy state: restarted - name: restart dhcpd service: name: dhcpd state: restarted - name: restart httpd service: name: httpd state: restarted Modify the default variables file inside vars folder: vim vars/main.yml Define all the variables required correctly. Be careful not to have wrong values which will cause issues at the time of OpenShift installation. --- ppc64le: false uefi: false disk: vda #disk where you are installing RHCOS on the masters/workers helper: name: "bastion" #hostname for your helper node ipaddr: "192.168.100.254" #current IP address of the helper networkifacename: "ens3" #interface of the helper node,ACTUAL name of the interface, NOT the NetworkManager name dns: domain: "example.com" #DNS server domain. Should match baseDomain inside the install-config.yaml file. clusterid: "ocp4" #needs to match what you will for metadata.name inside the install-config.yaml file forwarder1: "8.8.8.8" #DNS forwarder forwarder2: "1.1.1.1" #second DNS forwarder lb_ipaddr: " helper.ipaddr " #Load balancer IP, it is optional, the default value is helper.ipaddr dhcp: router: "192.168.100.1" #default gateway of the network assigned to the masters/workers bcast: "192.168.100.255" #broadcast address for your network netmask: "255.255.255.0" #netmask that gets assigned to your masters/workers poolstart: "192.168.100.10" #First address in your dhcp address pool poolend: "192.168.100.50" #Last address in your dhcp address pool ipid: "192.168.100.0" #ip network id for the range netmaskid: "255.255.255.0" #networkmask id for the range. ntp: "time.google.com" #ntp server address dns: "" #domain name server, it is optional, the default value is set to helper.ipaddr bootstrap: name: "bootstrap" #hostname (WITHOUT the fqdn) of the bootstrap node ipaddr: "192.168.100.10" #IP address that you want set for bootstrap node macaddr: "52:54:00:a4:db:5f" #The mac address for dhcp reservation masters: - name: "master01" #hostname (WITHOUT the fqdn) of the master node (x of 3) ipaddr: "192.168.100.11" #The IP address (x of 3) that you want set macaddr: "52:54:00:8b:a1:17" #The mac address for dhcp reservation - name: "master02" ipaddr: "192.168.100.12" macaddr: "52:54:00:ea:8b:9d" - name: "master03" ipaddr: "192.168.100.13" macaddr: "52:54:00:f8:87:c7" workers: - name: "worker01" #hostname (WITHOUT the fqdn) of the worker node you want to set ipaddr: "192.168.100.21" #The IP address that you want set (1st node) macaddr: "52:54:00:31:4a:39" #The mac address for dhcp reservation (1st node) - name: "worker02" ipaddr: "192.168.100.22" macaddr: "52:54:00:6a:37:32" - name: "worker03" ipaddr: "192.168.100.23" macaddr: "52:54:00:95:d4:ed" Generating unique mac addresses for bootstrap, worker and master nodes You can generate all required mac addresses using the command below: date +%s | md5sum | head -c 6 | sed -e 's/\([0-9A-Fa-f]\2\\)/\1:/g' -e 's/\(.*\):$/\1/' | sed -e 's/^/52:54:00:/' Step 4: Install and Configure DHCP serveron Bastion / Helper node Install dhcp-server rpm package using dnf or yum package manager. sudo yum -y install dhcp-server Enable dhcpd service to start on system boot $ sudo systemctl enable dhcpd Created symlink /etc/systemd/system/multi-user.target.wants/dhcpd.service → /usr/lib/systemd/system/dhcpd.service.
Backup current dhcpd configuration file. If the server is not new you can modify existing configuration sudo mv /etc/dhcp/dhcpd.conf /etc/dhcp/dhcpd.conf.bak Task to configure dhcp server on the bastion server: $ vim tasks/configure_dhcpd.yml --- # Setup OCP4 DHCP Server on Helper Node - hosts: all vars_files: - ../vars/main.yml handlers: - import_tasks: ../handlers/main.yml tasks: - name: Write out dhcp file template: src: ../templates/dhcpd.conf.j2 dest: /etc/dhcp/dhcpd.conf notify: - restart dhcpd when: not uefi - name: Write out dhcp file (UEFI) template: src: ../templates/dhcpd-uefi.conf.j2 dest: /etc/dhcp/dhcpd.conf notify: - restart dhcpd when: uefi Configure DHCP server using ansible, defined variables and templates shared. $ ansible-playbook tasks/configure_dhcpd.yml PLAY [all] ******************************************************************************************************************************************************* TASK [Gathering Facts] ******************************************************************************************************************************************* ok: [localhost] TASK [Write out dhcp file] *************************************************************************************************************************************** changed: [localhost] TASK [Write out dhcp file (UEFI)] ******************************************************************************************************************************** skipping: [localhost] RUNNING HANDLER [restart dhcpd] ********************************************************************************************************************************** changed: [localhost] PLAY RECAP ******************************************************************************************************************************************************* localhost : ok=3 changed=2 unreachable=0 failed=0 skipped=1 rescued=0 ignored=0 Confirm that dhcpd service is in running state: $ systemctl status dhcpd ● dhcpd.service - DHCPv4 Server Daemon Loaded: loaded (/usr/lib/systemd/system/dhcpd.service; enabled; vendor preset: disabled) Active: active (running) since Tue 2021-08-17 19:35:06 EDT; 2min 42s ago Docs: man:dhcpd(8) man:dhcpd.conf(5) Main PID: 24958 (dhcpd) Status: "Dispatching packets..." Tasks: 1 (limit: 4668) Memory: 9.7M CPU: 17ms CGroup: /system.slice/dhcpd.service └─24958 /usr/sbin/dhcpd -f -cf /etc/dhcp/dhcpd.conf -user dhcpd -group dhcpd --no-pid ... You can as well check generated configuration file: $ cat /etc/dhcp/dhcpd.conf Step 4: Configure OCP Zone on Bind DNS Serveron Bastion / Helper node We can now begin the installation of DNS and DHCP server packages required to run OpenShift Container Platform on KVM. sudo yum -y install bind bind-utils Enable the service to start at system boot up sudo systemctl enable named Install DNS Serialnumber generator script: $ sudo vim /usr/local/bin/set-dns-serial.sh #!/bin/bash dnsserialfile=/usr/local/src/dnsserial-DO_NOT_DELETE_BEFORE_ASKING_CHRISTIAN.txt zonefile=/var/named/zonefile.db if [ -f zonefile ] ; then echo $[ $(grep serial $zonefile | tr -d "\t"" ""\n" | cut -d';' -f 1) + 1 ] | tee $dnsserialfile else if [ ! -f $dnsserialfile ] || [ ! -s $dnsserialfile ]; then echo $(date +%Y%m%d00) | tee $dnsserialfile else echo $[ $(< $dnsserialfile) + 1 ] | tee $dnsserialfile fi fi ## ##-30- Make the script executable: sudo chmod a+x /usr/local/bin/set-dns-serial.sh This is the DNS Configuration task to be used: $ vim tasks/configure_bind_dns.yml --- # Configure OCP4 DNS Server on Helper Node - hosts: all vars_files: - ../vars/main.yml handlers: - import_tasks: ../handlers/main.yml tasks: - name: Setup named configuration files
block: - name: Write out named file template: src: ../templates/named.conf.j2 dest: /etc/named.conf notify: - restart bind - name: Set zone serial number shell: "/usr/local/bin/set-dns-serial.sh" register: dymanicserialnumber - name: Setting serial number as a fact set_fact: serialnumber: " dymanicserialnumber.stdout " - name: Write out " lower " zone file template: src: ../templates/zonefile.j2 dest: /var/named/zonefile.db mode: '0644' notify: - restart bind - name: Write out reverse zone file template: src: ../templates/reverse.j2 dest: /var/named/reverse.db mode: '0644' notify: - restart bind Run ansible playbook to configure bind dns server for OpenShift deployment. $ ansible-playbook tasks/configure_bind_dns.yml ansible-playbook tasks/configure_bind_dns.yml PLAY [all] ******************************************************************************************************************************************************* TASK [Gathering Facts] ******************************************************************************************************************************************* ok: [localhost] TASK [Write out named file] ************************************************************************************************************************************** changed: [localhost] TASK [Set zone serial number] ************************************************************************************************************************************ changed: [localhost] TASK [Setting serial number as a fact] *************************************************************************************************************************** changed: [localhost] TASK [Write out "example.com" zone file] ********************************************************************************************************************** changed: [localhost] TASK [Write out reverse zone file] ******************************************************************************************************************************* changed: [localhost] RUNNING HANDLER [restart bind] *********************************************************************************************************************************** changed: [localhost] PLAY RECAP ******************************************************************************************************************************************************* localhost : ok=7 changed=6 unreachable=0 failed=0 skipped=0 rescued=0 ignored=0 Forward DNS zone file is created under /var/named/zonefile.db and reverse DNS lookup file is /var/named/reverse.db Check if the service is in running status: $ systemctl status named ● named.service - Berkeley Internet Name Domain (DNS) Loaded: loaded (/usr/lib/systemd/system/named.service; disabled; vendor preset: disabled) Active: active (running) since Wed 2021-08-11 16:19:38 EDT; 4s ago Process: 1340 ExecStartPre=/bin/bash -c if [ ! "$DISABLE_ZONE_CHECKING" == "yes" ]; then /usr/sbin/named-checkconf -z "$NAMEDCONF"; else echo "Checking of zo> Process: 1342 ExecStart=/usr/sbin/named -u named -c $NAMEDCONF $OPTIONS (code=exited, status=0/SUCCESS) Main PID: 1344 (named) Tasks: 6 (limit: 4668) Memory: 26.3M CPU: 53ms CGroup: /system.slice/named.service └─1344 /usr/sbin/named -u named -c /etc/named.conf Aug 11 16:19:38 fedora named[1344]: network unreachable resolving './NS/IN': 2001:500:1::53#53 Aug 11 16:19:38 fedora named[1344]: network unreachable resolving './NS/IN': 2001:500:200::b#53 Aug 11 16:19:38 fedora named[1344]: network unreachable resolving './NS/IN': 2001:500:9f::42#53 Aug 11 16:19:38 fedora named[1344]: network unreachable resolving './NS/IN': 2001:7fe::53#53
Aug 11 16:19:38 fedora named[1344]: network unreachable resolving './NS/IN': 2001:503:c27::2:30#53 Aug 11 16:19:38 fedora named[1344]: zone 1.0.0.0.0.0.0.0.0.0.0.0.0.0.0.0.0.0.0.0.0.0.0.0.0.0.0.0.0.0.0.0.ip6.arpa/IN: loaded serial 0 Aug 11 16:19:38 fedora named[1344]: all zones loaded Aug 11 16:19:38 fedora named[1344]: managed-keys-zone: Initializing automatic trust anchor management for zone '.'; DNSKEY ID 20326 is now trusted, waiving the n> Aug 11 16:19:38 fedora named[1344]: running Aug 11 16:19:38 fedora systemd[1]: Started Berkeley Internet Name Domain (DNS). To test our DNS server we just execute: $ dig @127.0.0.1 -t srv _etcd-server-ssl._tcp.ocp4.example.com ; DiG 9.16.19-RH @127.0.0.1 -t srv _etcd-server-ssl._tcp.ocp4.example.com ; (1 server found) ;; global options: +cmd ;; Got answer: ;; ->>HEADER (item='name': 'master01', 'ipaddr': '192.168.100.11', 'macaddr': '52:54:00:8b:a1:17') changed: [localhost] => (item='name': 'master02', 'ipaddr': '192.168.100.12', 'macaddr': '52:54:00:ea:8b:9d') changed: [localhost] => (item='name': 'master03', 'ipaddr': '192.168.100.13', 'macaddr': '52:54:00:f8:87:c7') TASK [Set the worker specific tftp files] ************************************************************************************************************************ changed: [localhost] => (item='name': 'worker01', 'ipaddr': '192.168.100.21', 'macaddr': '52:54:00:31:4a:39') changed: [localhost] => (item='name': 'worker02', 'ipaddr': '192.168.100.22', 'macaddr': '52:54:00:6a:37:32') changed: [localhost] => (item='name': 'worker03', 'ipaddr': '192.168.100.23', 'macaddr': '52:54:00:95:d4:ed') RUNNING HANDLER [restart tftp] *********************************************************************************************************************************** changed: [localhost] PLAY RECAP ******************************************************************************************************************************************************* localhost : ok=5 changed=4 unreachable=0 failed=0 skipped=0 rescued=0 ignored=0 Headless environment considerations With the consideration of the fact that we’re working in a headless environment, minimal setup of KVM without graphical interface. We need to ensure CoreOS booted VM will automatically choose the correct image and ignition file for the OS installation. PXE Boot files are created inside the directory /var/lib/tftpboot/pxelinux.cfg NOTE: Each of the file created should have a 01- before the MAC Address. See below example of bootstrap node. Bootstrap node Mac Address: 52:54:00:a4:db:5f The file created will be cat /var/lib/tftpboot/pxelinux.cfg/01-52-54-00-a4-db-5f With contents: default menu.c32 prompt 1 timeout 9 ONTIMEOUT 1 menu title ######## PXE Boot Menu ######## label 1 menu label ^1) Install Bootstrap Node menu default kernel rhcos/kernel append initrd=rhcos/initramfs.img nomodeset rd.neednet=1 console=tty0 console=ttyS0 ip=dhcp coreos.inst=yes coreos.inst.install_dev=vda coreos.live.rootfs_url=http://192.168.100.254:8080/rhcos/rootfs.img coreos.inst.ignition_url=http://192.168.100.254:8080/ignition/bootstrap.ign Master nodes The file for each master has contents similar to this: default menu.c32 prompt 1 timeout 9 ONTIMEOUT 1 menu title ######## PXE Boot Menu ######## label 1 menu label ^1) Install Master Node menu default kernel rhcos/kernel append initrd=rhcos/initramfs.img nomodeset rd.neednet=1 console=tty0 console=ttyS0 ip=dhcp coreos.inst=yes coreos.inst.install_dev=vda coreos.live.rootfs_url=http://192.168.100.254:8080/rhcos/rootfs.img coreos.inst.ignition_url=http://192.168.100.254:8080/ignition/master.ign Worker nodes The file for each worker node will looks similar to this: default menu.c32 prompt 1 timeout 9 ONTIMEOUT 1 menu title ######## PXE Boot Menu ######## label 1 menu label ^1) Install Worker Node menu default kernel rhcos/kernel
append initrd=rhcos/initramfs.img nomodeset rd.neednet=1 console=tty0 console=ttyS0 ip=dhcp coreos.inst=yes coreos.inst.install_dev=vda coreos.live.rootfs_url=http://192.168.100.254:8080/rhcos/rootfs.img coreos.inst.ignition_url=http://192.168.100.254:8080/ignition/worker.ign You can list all the files created using the following command: $ ls -1 /var/lib/tftpboot/pxelinux.cfg 01-52:54:00:31:4a:39 01-52:54:00:6a:37:32 01-52:54:00:8b:a1:17 01-52:54:00:95:d4:ed 01-52:54:00:a4:db:5f 01-52:54:00:ea:8b:9d 01-52:54:00:f8:87:c7 Step 6: Configure HAProxy as Load balanceron Bastion / Helper node In this setup we’re using a software load balancer solution – HAProxy. In a Production setup of OpenShift Container Platform a hardware or highly available load balancer solution is required. Install the package sudo yum install -y haproxy Set SEBool to allow haproxy connect any port: sudo setsebool -P haproxy_connect_any 1 Backup the default HAProxy configuration sudo mv /etc/haproxy/haproxy.cfg /etc/haproxy/haproxy.cfg.default Here is HAProxy configuration ansible task: $ vim tasks/configure_haproxy_lb.yml --- # Configure OCP4 HAProxy Load balancer on Helper Node - hosts: all vars_files: - ../vars/main.yml tasks: - name: Write out haproxy config file template: src: ../templates/haproxy.cfg.j2 dest: /etc/haproxy/haproxy.cfg notify: - restart haproxy handlers: - name: restart haproxy ansible.builtin.service: name: haproxy state: restarted Run ansible-playbook using created task to configure HAProxy Load balancer for OpenShift $ ansible-playbook tasks/configure_haproxy_lb.yml PLAY [all] ******************************************************************************************************************************************************* TASK [Gathering Facts] ******************************************************************************************************************************************* ok: [localhost] TASK [Write out haproxy config file] ***************************************************************************************************************************** changed: [localhost] RUNNING HANDLER [restart haproxy] ******************************************************************************************************************************** changed: [localhost] PLAY RECAP ******************************************************************************************************************************************************* localhost : ok=3 changed=2 unreachable=0 failed=0 skipped=0 rescued=0 ignored=0 Open the file for editing sudo vim /etc/haproxy/haproxy.cfg Configuration file is place in the file /etc/haproxy/haproxy.cfg Configure SElinux for HAProxy to use the custom ports configured. sudo semanage port -a 6443 -t http_port_t -p tcp sudo semanage port -a 22623 -t http_port_t -p tcp sudo semanage port -a 32700 -t http_port_t -p tcp Open ports on the firewall sudo firewall-cmd --add-service=http,https --permanent sudo firewall-cmd --add-port=6443,22623/tcp --permanent sudo firewall-cmd --reload Step 7: Install OpenShift installer and CLI binaryon Bastion / Helper node Download and install the OpenShift installer and client OpenShift Client binary: # Linux wget https://mirror.openshift.com/pub/openshift-v4/clients/ocp/latest/openshift-client-linux.tar.gz tar xvf openshift-client-linux.tar.gz sudo mv oc kubectl /usr/local/bin rm -f README.md LICENSE openshift-client-linux.tar.gz # macOS wget https://mirror.openshift.com/pub/openshift-v4/clients/ocp/latest/openshift-client-mac.tar.gz tar xvf openshift-client-mac.tar.gz sudo mv oc kubectl /usr/local/bin rm -f README.md LICENSE openshift-client-mac.tar.gz OpenShift installer binary: # Linux wget https://mirror.openshift.com/pub/openshift-v4/clients/ocp/latest/openshift-install-linux.tar.gz tar xvf openshift-install-linux.tar.gz
sudo mv openshift-install /usr/local/bin rm -f README.md LICENSE openshift-install-linux.tar.gz # macOS wget https://mirror.openshift.com/pub/openshift-v4/clients/ocp/latest/openshift-install-mac.tar.gz tar xvf openshift-install-mac.tar.gz sudo mv openshift-install /usr/local/bin rm -f README.md LICENSE openshift-install-mac.tar.gz Check if you can run binaries: $ openshift-install version openshift-install 4.10.18 built from commit 25b4d09c94dc4bdc0c79d8668369aeb4026b52a4 release image quay.io/openshift-release-dev/ocp-release@sha256:195de2a5ef3af1083620a62a45ea61ac1233ffa27bbce7b30609a69775aeca19 release architecture amd64 $ oc version Client Version: 4.10.18 $ kubectl version --client Client Version: version.InfoMajor:"1", Minor:"23", GitVersion:"v1.23.0", GitCommit:"878f5a8fe0d04ea70c5e5de11fa9cc7a49afb86e", GitTreeState:"clean", BuildDate:"2022-06-01T00:19:52Z", GoVersion:"go1.17.5", Compiler:"gc", Platform:"linux/amd64" Create SSH Key Pairs Now we need to create a SSH key pair to access to use later to access the CoreOS nodes ssh-keygen -t rsa -N "" -f ~/.ssh/id_rsa Step 8: Generate ignition fileson Bastion / Helper node We need to create the ignition files used for the installation of CoreOS machines Download Pull Secret We can store our pull secret in ~/.openshift directory: mkdir ~/.openshift Visit cloud.redhat.com and download your pull secret and save it under ~/.openshift/pull-secret $ vim ~/.openshift/pull-secret Create ocp4 directory mkdir -p ~/ocp4 cd ~/ We can now create OpenShift installation yaml file install-config-base.yaml: cat
0 notes
Text
1st OpenShift Platinum Tech Demo
1st OpenShift Platinum Tech Demo
The demo demonstrates a DevOps approach to build and deploy a cloud-native application based on Red Hat OpenShift microservices on Linux on IBM Z, communicating with a core banking system running on z/OS, CICS, and Db2 using APIs and z/OS Connect EE.
IBM Get Social Hub
0 notes
Text
Juniper Cloud Professional (JNCIP-Cloud JN0-610) Exam JN0-610 Practice Test | Killtest 2021
Be Ready To Pass JN0-610 Exam By Using Killtest JN0-610 Test Questions
If you rely on Juniper Cloud Professional (JNCIP-Cloud JN0-610) Exam JN0-610 Practice Test for learning, then Killtest is best for you just because of their accuracy in IT certifications training material. You may want to pass the JNCIP-Cloud JN0-610 exam, it helps in getting the jobs that you always wanted in the networking field. The new Juniper Cloud Professional (JNCIP-Cloud JN0-610) Exam JN0-610 Practice Test, ranging from stylish note Juniper JN0-610 to a tablet, leverage premium Juniper JN0-610 practice exam and a purposeful design philosophy to deliver a distinct Killtest look and feel. Killtest Juniper Cloud Professional (JNCIP-Cloud JN0-610) Exam JN0-610 Practice Test will help you pass Juniper JN0-610 exam. There is a chance for you to save money and make sure that you do this just once and pass.
Promote Your Career With Juniper JN0-610 PDF Questions - Killtest Online
At Killtest, all the necessary JN0-610 exam questions and answers in Juniper Cloud Professional (JNCIP-Cloud JN0-610) Exam JN0-610 Practice Test are available which will ensure your success in JN0-610 Cloud - Professional (JNCIP-Cloud). Killtest Juniper Cloud Professional (JNCIP-Cloud JN0-610) Exam JN0-610 Practice Test are experts and certified professionals who prepared many years of experience in preparing JN0-610 exam. Candidates can prepare for JN0-610 exam by taking Juniper Cloud Professional (JNCIP-Cloud JN0-610) Exam JN0-610 Practice Test. We Killtest all know that succeeding in JN0-610 Exam is essential in the IT industry. JN0-610 Exam which is developed by the highly certified experts' team is according to the latest Killtest Juniper Cloud Professional (JNCIP-Cloud JN0-610) Exam JN0-610 Practice Test. We at Killtest JN0-610 exam are IT experand are highly experienced in the field of Juniper Cloud Professional (JNCIP-Cloud JN0-610) Exam JN0-610 Practice Test as our team is continuously working for the more accomplished JN0-610 study materials and JN0-610 test questions.
Reliable JN0-610 Exam Questions 2021 | Pass JN0-610 Exam With Guaranteed Guide
The Juniper JN0-610 certification exam would provide validity to the abilities of the individual and also they are chosen by the employers during the procedure of recruitment and also selection. The version of Juniper Cloud Professional (JNCIP-Cloud JN0-610) Exam JN0-610 Practice Test includes updated JN0-610 questions and answers to monitor the learners in the best possible method. Juniper Cloud Professional (JNCIP-Cloud JN0-610) Exam JN0-610 Practice Test own the many self-learning and self-assessment features. You can self-evaluate your presentation with the statistical approach report, which highlights your weak areas, and advises in which area you need to put struggles. Killtest Certified products are prepared by IT professionals and industrious experts who have implemented their real life experience in Juniper Cloud Professional (JNCIP-Cloud JN0-610) Exam JN0-610 Practice Test in order to provide candidate with the best JN0-610 product available in the market.
Read JN0-610 Free Demo Questions First
Which two roles does Contrail Enterprise Multicloud place on IP Fabric devices in a Unicast edge-routed environment? (Choose two.)
A. The spines are Layer 2 VXLAN gateways.
B. The spines are Layer 3 VXLAN gateways.
C. The leaves are Layer 3 VXLAN gateways.
D. The leaves are Layer 2 VXLAN gateways.
Answer: A,B
You are deploying resources within Microsoft Azure integrated with Contrail.
Which set of components must be defined in this scenario?
A. region, VPC, security groups, EC2 instance details
B. region, VNET, security groups, EC2 instance details
C. region, resource group, VPC, security groups, instance details
D. region, resource group, VNET, security groups, instance details
Answer: A
Which statement is correct about Contrail Enterprise Multicloud (CEM)?
A. CEM can only manage network overlay functions.
B. CEM can only be used to connect private clouds together.
C. CEM can connect any type of cloud environment.
D. CEM can only connect to BMS and VM resource workloads.
Answer: B
What is a core component of an AWS cloud environment?
A. a resource group
B. a VPC
C. a VNET
D. a vRouter
Answer: A
An OpenShift cluster operator wants to verify the health of the cluster network infrastructure.
In this scenario, which method should the operator use to accomplish this task?
A. Issue the oc get daemonset -n contrail-system command on the master node.
B. Issue the contrail-status command on the master node.
C. Issue the contrail-status command on the infrastructure node.
D. Issue the oc get pods -n contrail-system command on the master node.
Answer: A
How To PASS JN0-610 Exam? - JN0-610 Training Materials Online For Good Preparation
Pay Killtest a visit now and find out more about Juniper Cloud Professional (JNCIP-Cloud JN0-610) Exam JN0-610 Practice Test. The JN0-610 study materials have been designed and prepared by experts who are well aware of the examination patterns and the most likely questions. Killtest JN0-610 study guide is a way to prepare for JN0-610 comprehensively and accurately without wasting time here and there. Killtest Juniper Cloud Professional (JNCIP-Cloud JN0-610) Exam JN0-610 Practice Test have been prepared with great care and vigilance, keeping in view the demands of the aspirants for Juniper certification. It is the fruit of long toil of our skilled and experienced IT professionals who have a thorough knowledge of the requirements of Cloud - Professional (JNCIP-Cloud) certification.
JN0-610 Exam Questions Online - 100% Passing Guarantee + 100% Money Back
Do not waste materials the assessment charges upon additional suppliers method, Killtest is the better source to be able to score higher than the required Juniper JN0-610 move score. Each of Killtest specialists result from some other part of the industry and therefore are the majority of skilled and also certified to own possibility to write the Juniper Cloud Professional (JNCIP-Cloud JN0-610) Exam JN0-610 Practice Test for us. Each of Killtest on-site on the internet training specialists generates all the JNCIP-Cloud JN0-610 test questions. Employ their cost-free brain places to help advance your own vocation and then guide individuals who appear powering a person by simply developing a completely new Juniper Cloud Professional (JNCIP-Cloud JN0-610) Exam JN0-610 Practice Test with the information you will find most effective as being a effective and also passing Juniper JN0-610 exam university student.

0 notes
Text
KubeVirt Status 0x7E1 (2017)
Where do we stand with KubeVirt at the end of the year? (This virtual machine management add-on for Kubernetes)
We gained some speed again, but before going into what we are doing right now; let's take a look at the past year.
Retro
The year started with publishing KubeVirt. The first few months flew by, and we were mainly driven by demoing and PoCing parts of KubeVirt. Quickly we were able to launch machines, and to even live migrate them.
We had the chance to speak about KubeVirt at a couple of conferences: FOSDEM 2017, devconf.cz 2017, KubeCon EU 2017, FrOSCon 2017. And our work was mainly around sorting out technical details, and understanding how things could work - in many areas. with many open ends.
At that time we had settled with CRD based solution, but aiming at a User API Server (to be used with API server aggregation), a single libvirt in a pod nicluding extensions to move the qemu processes into VM pods, and storage based on PVCs and iSSCI leveraging qemu's built-in drivers. And we were also struggling with a nice deployment. To name just a few of the big items we were looking at.
Low-level changes and storage
Around the middle of the year we were seeing all the features which we would like to consume - RAW block storage for volumes, device manager, resource classes (now delayed) - to go into Kubernetes 1.9. But at the same time we started to notice, that our current implementation was not suited to consume those features. The problem we were facing was that the VM processes lived in a single libvirtd pod, and were only living in te cgroups of the VM pods in order to allow Kubernets to see the VM resource consumption. But because the VMs were in a singlel ibvirt pod from a namespace perspective, we weren't bale to use any feature which was namespace related. I.e. raw block storage for volumes is a pretty big thing for us, as it will allow us to directly attach a raw block device to a VM. However, the block devices are exposed to pods, to the VM pods (the pods we spawn for every VM) - and up to now our VMs did not see the mount namespace of a pod, thus it's not possible to consume raw block devices. It's similar for the device manager work. It will allow us to bring devices to pods, but we are not able to consume them, because our VM proccesses live in the libvirt pod.
And it was even worse, we spent a significant amount of time on finding workarounds in order to allow VM processes to see the pods' namespaces in order to consume the features.
All of this due to the fact that we wanted to use libvirtd as intended: A single instance per host with a host wide view.
Why we do this initially - using libvirtd? Well, there were different opinions about this within the team. In the end we stuck to it, because there are some benefits over direct qemu, mainly API stability and support when it comes to things like live migrations. Further more - if we did use qemu directly, we would probably come up with something similar to libvirt - and that is not where we want to focus on (the node level virtualization).
We engaged internally and publicly with the libvirtd team and tried to understand how a future could look. The bottom line is that the libvirtd team - or parts of it - acknowledged the fact that the landscape if evolving, and that libvirtd want's to be part of this change - also in it's own interest to stay relevant. And this happened pretty recently, but it's an improtant change which will allow us to consume Kubernetes features much better. And should free time because we will spend much less time on finding workarounds.
API layer
The API layer was also exciting.
We spend a vast amount of time writing our own user API server to be used with API server aggregation. We went with this because it would have provided us with the full controll over our entity types and http endpoints, which was relevant in order to provide access to serial and graphical consoles of a VM.
We worked this based on the assumption that Kubernetes will provide anything to make it easy to integrate and run those custom API servers.
But in the end these assumptions were not met. The biggest blocker was that Kubernetes does not provide a convenient way to store an custom APIs data. Instead it is left to the API server to provide it's own mechanism to store it's data (state). This sounds small, but is annoying. This gap increases the burden on the operator to decide where to store data, it could eventually add dependencies for a custom etcd instance, or adds a dependency for PV in the cluster. In the end all of this might be there, but it wasis a goal of KubeVirt to be an easy to deploy add-on to Kubernetes. Taking care of these pretty cluster specific data storage problems took us to much off track.
Rigth now we are re-focusing on CRDs. We are looking at using jsonscheme for validation which landed pretty recently. And we try to get rid of our subresources to remove the need of a custom API server.
Network
Networking was also an issue where we spend a lot of time on. It still is a difficult topic.
Traditionally (this word is used intentionally) VMs are connected in a layer 2 or layer 3 fashion. However, as we (will really) run VMs in a pod, there are several ways of how we can connect a VM to a Kubernetes network
Layer 2 - Is not in Kubernetes
Layer 3 - We'd hijack the pod's IP and leave it to the VM
Layer 4 - This is how applications behave within a pod - If we make VMs work this way, then we are most compatible, but restrict the functionality of a VM
Besides of this - VMs often have multiple interfaces - and Kubernetes does not have a concept for this.
Thus it's a mix of technical and conceptual problems by itself. It becomes even more complex if you consider that the traditional layer 2 and 3 connectivity helped to solve problems, but in the cloud native worlds the same problems might be solved in a different way and in a different place. Thus here it is a challenge to understand what problems were solved, and how could they be solved today, in order to understand if feature slike layer 2 connectivity are really needed.
Forward
As you see, or read, we've spent a lot of time on reseraching, PoCing, and failing. Today it looks different, and I'm positive for the future.
libvirt changes, this will allow us to consume Kubernetes features much more easily
Our deployment is much better today - this shall allow us to move to other clusters (Tectonic, OpenShift, …)
We are not at an end with how networking will look, but we are implemeting something which is pretty compatible (missing link)
We care about storage and see that we tie much better into the Kubernetes storage world
The API is getting refactored and is looking much more Kube-ish now
We focus on CRDs and can simplify other things
People are starting to add a Cockpit UI to KubeVirt: https://www.youtube.com/watch?v=nT2EA6wYkKI (this UI will get a KubeVirt backend)
And a ManageIQ provider: https://www.youtube.com/watch?v=6Z_kGj9_s6Q
On a broader front:
We have a informal virtualization WG in order to discuss issues accross the board with other projects - and give users guidance! Also on slack
This post got longer than expected and it is still missing a lot of details, but you see we are moving on, as we still see the need of giving users a good way to migrate the workloads from today to tomorrow.
There are probably also some mistakes, feel free to give me a ping or ignore then in a friendly fashion.
1 note
·
View note
Text
Kubernetes 1.16 released
Finally it’s the weekend. Peace and quiet to indulge yourself in a new Kubernetes release! Many others have beat me to it, great overviews are available from various sources.
The most exciting thing for me in Kubernetes 1.16 is the graduation of many alpha CSI features to beta. This is removes the friction of tinkering with the feature gates on either the kubelet or API server which is pet peeve of mine and makes me moan out loud when I found out something doesn't work because of it.
TL;DR
All these features have already been demonstrated with the HPE CSI Driver for Kubernetes, it starts about 7 minutes in, I’ve fast forwarded it for you.
At the Helm
Let’s showcase these graduated features with the newly released HPE CSI Driver for Kubernetes. Be warned, issues ahead. Helm is not quite there yet on Kubernetes 1.16, a fix to deploy Tiller on your cluster is available here. Next issue up is that the HPE CSI Driver Helm chart is not yet compatible with Kubernetes 1.16. I’m graciously and temporarily hosting a copy on my GitHub account.
Create a values.yaml file:
backend: 192.168.1.10 # This is your Nimble array username: admin password: admin servicePort: "8080" serviceName: nimble-csp-svc fsType: xfs accessProtocol: "iscsi" storageClass: create: false
Helm your way on your Kubernetes 1.16 cluster:
helm repo add hpe https://drajen.github.io/co-deployments-116 helm install --name hpe-csi hpe/hpe-csi-driver --namespace kube-system -f values.yaml
In my examples repo I’ve dumped a few declarations that I used to walk through these features. When I'm referencing a YAML file name, this is where to find it.
VolumePVCDataSource
This is a very useful capability when you’re interested in creating a clone of an existing PVC in the current state. I’m surprised to see this feature mature to beta before VolumeSnapshotDataSource which has been around for much longer.
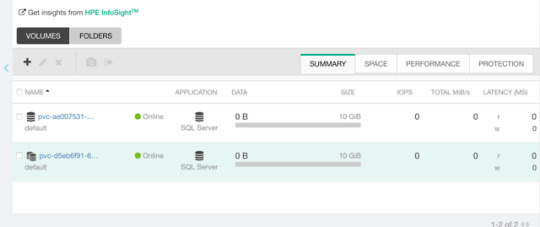
Assuming you have an existing PVC named “my-pvc”:
apiVersion: v1 kind: PersistentVolumeClaim metadata: name: my-pvc-clone spec: accessModes: - ReadWriteOnce resources: requests: storage: 32Gi dataSource: kind: PersistentVolumeClaim name: my-pvc storageClassName: my-storageclass
Let’s cuddle:
$ kubectl create -f pvc.yaml persistentvolumeclaim/my-pvc created $ kubectl create -f pvc-clone.yaml persistentvolumeclaim/my-pvc-clone created $ kubectl get pvc NAME STATUS VOLUME CAPACITY STORAGECLASS AGE my-pvc Bound pvc-ae0075... 10Gi my-storageclass 34s my-pvc-clone Bound pvc-d5eb6f... 10Gi my-storageclass 14s
On the Nimble array, we can indeed observe we have a clone of the dataSource.
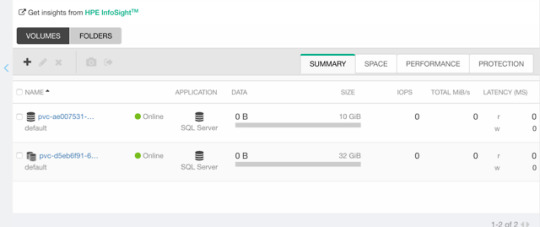
ExpandCSIVolumes and ExpandInUsePersistentVolumes
This is indeed a very welcome addition to be promoted. Among the top complaints from users. This is stupid easy to use. Simply edit or patch your existing PVC to expand your PV.
$ kubectl patch pvc/my-pvc-clone -p '{"spec": {"resources": {"requests": {"storage": "32Gi"}}}}' persistentvolumeclaim/my-pvc-clone patched $ kubectl get pv NAME CAPACITY CLAIM STORAGECLASS AGE pvc-d5eb6... 32Gi default/my-pvc-clone my-storageclass 9m25s
Yes, you can expand clones, no problem.
CSIInlineVolume
On of my favorite features of our legacy FlexVolume is the ability to create Inline Ephemeral Clones for CI/CD pipelines. Creating a point in time copy of a volume, do some work and/or tests on it and dispose of it. Leave no trace behind.
If this is something you’d like to walk through, there’s a few prerequisite steps here. The Helm chart does not create the CSIDriver custom resource definition (CRD). It need to be applied first:
apiVersion: storage.k8s.io/v1beta1 kind: CSIDriver metadata: name: csi.hpe.com spec: podInfoOnMount: true volumeLifecycleModes: - Persistent - Ephemeral
Next, the current behavior (subject to change) is that you need a secret for the CSI driver in the namespace you’re deploying to. This is a oneliner to copy from “kube-system” to your current namespace.
$ kubectl get -nkube-system secret/nimble-secret -o yaml | \ sed -e 's/namespace: kube-system//' | \ kubectl create -f-
Now, assuming we have deployed a MariaDB and have that running elsewhere. This example clones the actual Nimble volume. In essence, the volume may reside on a different Kubernetes cluster or hosted on a bare-metal server or virtual machine.
For clarity, the Deployment I’m cloning this volume from is using a secret, I’m using that same secret hosted in dep.yaml.
apiVersion: v1 kind: Pod metadata: name: mariadb-ephemeral spec: spec: containers: - image: mariadb:latest name: mariadb env: - name: MYSQL_ROOT_PASSWORD valueFrom: secretKeyRef: name: mariadb key: password ports: - containerPort: 3306 name: mariadb volumeMounts: - name: mariadb-persistent-storage mountPath: /var/lib/mysql volumes: - name: mariadb-persistent-storage csi: driver: csi.hpe.com nodePublishSecretRef: name: nimble-secret volumeAttributes: cloneOf: pvc-ae007531-e315-4b81-b708-99778fa1ba87
The magic sauce here is of course the .volumes.csi stanza where you specify the driver and your volumeAttributes. Any Nimble StorageClass parameter is supported in volumeAttributes.
Once, cuddled, you can observe the volume on the Nimble array.
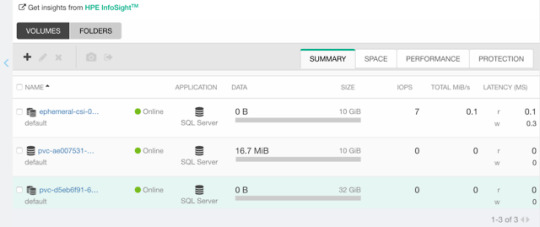
CSIBlockVolume
I’ve visited this feature before in my Frankenstein post where I cobbled together a corosync and pacemaker cluster running as a workload on Kubernetes backed by a ReadWriteMany block device.
A tad bit more mellow example is the same example we used for the OpenShift demos in the CSI driver beta video (fast forwarded).
Creating a block volume is very simple (if the driver supports it). By default volumes are created with the attribue volumeMode: Filesystem. Simply switch this to Block:
apiVersion: v1 kind: PersistentVolumeClaim metadata: name: my-pvc-block spec: accessModes: - ReadWriteOnce resources: requests: storage: 32Gi volumeMode: Block storageClassName: my-storageclass
Once cuddled, you may reference the PVC as any other PVC, but pay attention to the .spec.containers stanza:
apiVersion: v1 kind: Pod metadata: name: my-pod spec: containers: - name: ioping image: hpestorage/ioping command: [ "ioping" ] args: [ "/dev/xvda" ] volumeDevices: - name: data devicePath: /dev/xvda volumes: - name: data persistentVolumeClaim: claimName: my-pvc-block
Normally you would specify volumeMounts and mountPath for a PVC created with volumeMode: Filesystem.
Running this particular Pod using ioping would indeed indicate that we connected a block device:
kubectl logs my-pod -f 4 KiB <<< /dev/xvda (block device 32 GiB): request=1 time=3.71 ms (warmup) 4 KiB <<< /dev/xvda (block device 32 GiB): request=2 time=1.73 ms 4 KiB <<< /dev/xvda (block device 32 GiB): request=3 time=1.32 ms 4 KiB <<< /dev/xvda (block device 32 GiB): request=4 time=1.06 ms ^C
For competitors who landed on this blog in awe looking for Nimble weaknesses, the response time you see above is a Nimble Virtual Array running on my five year old laptop.
So, that was “it” for our graduated storage features! I'm looking forward to Kubernetes 1.17 already.
Release mascot!
I’m a sucker for logos and mascots. Congrats to the Kubernetes 1.16 release team.

0 notes
Link
Get Flat 95% Discount On OpenShift for the Absolute Beginners - Hands-on. Get started with #OpenShift quickly with #lectures, demos, quizzes and hands-on #coding exercises right in your browser #BESTSELLER .Apply Coupon Code "UPRJKMSMEDOSHFT10" to avail discount.
0 notes
Text
OpenShift for the Absolute Beginners - Hands-on

Description
Study the basics and primary ideas of OpenShift that you will want to construct a easy OpenShift cluster and get began with deploying and managing Utility. Deploy OpenShift with Minishift Perceive Tasks, Customers Perceive Builds, Construct Triggers, Picture streams, Deployments Perceive Community, Companies and Routes Configure integration between OpenShift and GitLab SCM Deploy a pattern Multi-services software on OpenShift A a lot required talent for anybody in DevOps and Cloud Studying the basics of OpenShift places data of a strong PaaS providing at your fingertips. OpenShift is the following era Utility Internet hosting platform by Crimson Hat. Content material and Overview This course introduces OpenShift to an Absolute Newbie utilizing actually easy and simple to grasp lectures. Lectures are adopted by demos exhibiting setup and get began with OpenShift. The coding workout routines that accompany this course will enable you observe OpenShift configuration records data in YAML. You'll be growing OpenShift Configuration Information for various use instances proper in your browser. The coding workout routines will validate your instructions and Configuration Information and guarantee you've written them accurately. And eventually we have now assignments to place your abilities to check. You'll be given a problem to unravel utilizing the talents you gained throughout this course. It is a nice strategy to acquire an actual life venture expertise and work with the opposite college students locally to develop an OpenShift deployment and get suggestions on your work. The task will push you to analysis and develop your personal OpenShift Clusters. Read the full article
0 notes
Video
youtube
Deploy jenkins on openshift cluster - deploy jenkins on openshift | openshift#deploy #jenkins #openshift #deployjenkinsonopenshift #jenkinsonopenshift deploy jenkins on openshift,deploy jenkins x on openshift,install jenkins on openshift,deploying jenkins on openshift part 2,deploy jenkins on openshift origin,deploy jenkins on openshift cluster,demo jenkins ci cd on openshift,how to deploy jenkins in openshift,jenkins pipeline tutorial for beginners,openshift,jenkins,fedora,cloud,deployments,pipeline,openshift origin,redhat,container platform,redhat container platform,docker,container https://www.youtube.com/channel/UCnIp4tLcBJ0XbtKbE2ITrwA?sub_confirmation=1&app=desktop About: 00:00 Deploy Jenkins on Openshift cluster - deploy jenkins on openshift - Install Jenkins on Openshift In this course we will learn about deploy jenkins on openshift cluster. How to access jenkins installed on openshift cluster. deploy jenkins on openshift cluster - Red Hat is the world's leading provider of enterprise open source solutions, including high-performing Linux, cloud, container, and Kubernetes technologies. deploy jenkins on openshift origin - Continuous Integration (CI) is a development practice that requires developers to integrate code into a shared repository several times a day Openshift/ Openshift4 a cloud based container to build deploy test our application on cloud. In the next videos we will explore Openshift4 in detail. https://www.facebook.com/codecraftshop/ https://t.me/codecraftshop/ Please do like and subscribe to my you tube channel "CODECRAFTSHOP" Follow us on facebook | instagram | twitter at @CODECRAFTSHOP .
#deploy jenkins on openshift#deploy jenkins x on openshift#install jenkins on openshift#deploying jenkins on openshift part 2#deploy jenkins on openshift origin#deploy jenkins on openshift cluster#demo jenkins ci cd on openshift#how to deploy jenkins in openshift#jenkins pipeline tutorial for beginners#openshift#jenkins#fedora#cloud#deployments#pipeline#openshift origin#redhat#container platform#redhat container platform#docker#container
0 notes
Text
I now have Harbor image registry configured.. How can I pull images from Harbor registry on Kubernetes / OpenShift with a pull secret?. Harbor is a CNCF certified project which aids in storage of OCI images and Helm charts. As Harbor provides authentication system and RBAC, you’ll likely have to add a pull secret for a user or robot account in your Kubernetes or OpenShift Cluster. Step 1: Login to Harbor on Workstation with docker / podman Start by logging in to your Harbor registry from Docker CLI or Podman CLI. If your registry is on a custom port, e.g 5000, then your URL will be like myregistry.example.com:5000. If your Harbor registry is not secure. Add it to the list of insecure registries. --- Podman --- $ sudo vim /etc/containers/registries.conf ... [registries.insecure] registries = ['myregistry.example.com'] --- Docker --- $ sudo vim /etc/docker/daemon.json "insecure-registries" : ["myregistry.example.com"] $ sudo systemctl restart docker $ docker info Docker Login: $ docker login myregistry.example.com Username: jkmutai Password: Login Succeeded! Podman Login: $ docker login myregistry.example.com Username: jkmutai Password: Login Succeeded! Docker will store your registry access information under ~/.docker/config.json. $ cat ~/.docker/config.json While Podman stores then under /run/user/UserID/containers/auth.json $ cat /run/user/`id -u`/containers/auth.json You may need to copy the access credentials in json format to the server with kubectl or oc command. Step 2: Add Harbor registry Secret to Kubernetes / OpenShift Next we need to add the access details for Harbor registry as secret in Kubernetes/OpenShift. kubectl create secret generic harbor-registry-secret \ --from-file=.dockerconfigjson=./harbor-k8s.json \ --type=kubernetes.io/dockerconfigjson \ -n demo Where: ./harbor-k8s.json is the path to your Docker/Podman json file. Change it accordingly. demo is the name of the namespace where the secret is to be created Confirm secret creation: $ oc get secrets harbor-registry-secret NAME TYPE DATA AGE harbor-registry-secret kubernetes.io/dockerconfigjson 1 30s If you ever want to decrypt added secret to confirm values, you can use the command: kubectl get secret harbor-registry-secret \ --output="jsonpath=.data.\.dockerconfigjson" | base64 --decode Step 3: Confirm you can deploy Application from image in Harbor registry Upload an image to Harbor registry – You’ll need to first create a project in harbor. $ podman pull docker.io/jmutai/kuard-amd64:blue $ podman tag docker.io/jmutai/kuard-amd64:blue myregistry.example.com/myproject/kuard-amd64:blue $ docker push myregistry.example.com/myproject/kuard-amd64:blue Getting image source signatures Copying blob bcf2f368fe23 done Copying blob 656e9c47289e done Copying config 1db936caa6 done Writing manifest to image destination Storing signatures Where: myregistry.example.com is harbor registry URL myproject is the project the added user has access to Create a Pod deployment manifest for Kubernetes. $ vim kuard-pod-health.yaml --- apiVersion: v1 kind: Pod metadata: name: kuard spec: imagePullSecrets: - name: harbor-registry-secret containers: - name: kuard image: myregistry.example.com/myproject/kuard-amd64:blue ports: - containerPort: 8080 name: http protocol: TCP resources: requests: cpu: "500m" memory: "128Mi" limits: cpu: "500m" memory: "256Mi" Create a Pod. $ kubectl apply -f kuard-pod-health.yaml -n pod/kuard created Confirm deployment was successful. $ kubectl get pod -n NAME READY STATUS RESTARTS AGE kuard 1/1 Running 0 2m18s If the pod is not created, check events to understand why. $ kubectl
0 notes
Text
2018-04-06 06 LINUX now
LINUX
Linux Academy Blog
Introducing the Identity and Access Management (IAM) Deep Dive
Spring Content Releases – Week 1 Livestream Recaps
Announcing Google App Engine Deep Dive
Employee Spotlight: Favian Ramirez, Business Development Representative
Say hello to our new Practice Exams system!
Linux Insider
Bluestar Gives Arch Linux a Celestial Glow
Mozilla Trumpets Altered Reality Browser
Microsoft Offers New Tool to Grow Linux in Windows
New Firefox Extension Builds a Wall Around Facebook
Neptune 5: A Practically Perfect Plasma-Based Distro
Linux Journal
Tackling L33t-Speak
Subutai Blockchain Router v2.0, NixOS New Release, Slimbook Curve and More
VIDEO: When Linux Demos Go Wrong
How Wizards and Muggles Break Free from the Matrix
Richard Stallman's Privacy Proposal, Valve's Commitment to Linux, New WordPress Update and More
Linux Magazine
Solomon Hykes Leaves Docker
Red Hat Celebrates 25th Anniversary with a New Code Portal
Gnome 3.28 Released
Install Firefox in a Snap on Linux
OpenStack Queens Released
Linux Today
Hands-On with System76's New Installer for Ubuntu-Based Pop!_OS Linux 18.04
Is the term DevSecOps necessary?
Timekpr-revived - Control The Computer Usage Of User Accounts
Fedora 28 beta is ready for you to test
How to resolve Failed to mount CD error in Zypper
Linux.com
Linux Kernel Developer: Steven Rostedt
Cybersecurity Vendor Selection: What Needs to Be in a Good Policy
5 Things to Know Before Adopting Microservice and Container Architectures
Why You Should Use Column-Indentation to Improve Your Code’s Readability
Learn Advanced SSH Commands with the New Cheat Sheet
Reddit Linux
vi editor Quick Reference
Weekly Command: processing JSON with jq
ddgr DuckDuckGo from the terminal v1.4 released!
Reasonably accurate
Red Hat's big cloud success is apparently from OpenShift...not RHEL
Riba Linux
How to install Antergos 18.4 "KDE"
Antergos 18.4 "KDE" overview | For Everyone
SimbiOS 18.0 (Ocean) - Cinnamon | Meet SimbiOS.
How to install Archman Xfce 18.03
Archman Xfce 18.03 overview
Slashdot Linux
Google Turns To Users To Improve Its AI Chops Outside the US
Humans Produce New Brain Cells Throughout Their Lives, Say Researchers
Online Gaming Could Be Stalled by Net Neutrality Repeal, ESA Tells Court
Facebook Was in Talks With Top Hospitals Until Last Month To Share Data of Most Vulnerable Patients
Malware Attack on Vendor To Blame for Delta and Sears Data Breach Affecting 'Hundreds of Thousands' of Customers
Softpedia
LibreOffice 6.0.3
Fedora 27 / 28 Beta
OpenBSD 6.3
RaspArch 180402
4MLinux 24.1 / 25.0 Beta
Tecmint
GraphicsMagick – A Powerful Image Processing CLI Tool for Linux
Manage Your Passwords with RoboForm Everywhere: 5-Year Subscriptions
Gerbera – A UPnP Media Server That Let’s You Stream Media on Home Network
Android Studio – A Powerful IDE for Building Apps for All Android Devices
System Tar and Restore – A Versatile System Backup Script for Linux
nixCraft
OpenBSD 6.3 released ( Download of the day )
Book review: Ed Mastery
Linux/Unix desktop fun: sl – a mirror version of ls
Raspberry PI 3 model B+ Released: Complete specs and pricing
Debian Linux 9.4 released and here is how to upgrade it
0 notes
Text
Integrating Mule ESB, Docker, and OpenShift S2I, Part 1 [Video]
ICYDK: Today we will be going through a demo tutorial where I will be creating a Mulesoft ESB image with Docker and OpenShift S2I. This is the first part of the series and I will be covering all steps in details in few more video tutorials. Four your reference, all the code is available on my GitHub repo. https://goo.gl/TMVh4D #DataIntegration #ML
0 notes