#program used: adobe illustrator
Explore tagged Tumblr posts
Visit Tumblr Blog
Explore Tumblr blogs with no restrictions, modern design and the best experience.
Last Seen Tumblr Blogs


Fun Fact
Total funding amounts to $125.3M.
Text


ANOTHER ART ASSIGNEMTN
88 notes
·
View notes
Text


Brief interruption of my DOAI brainrot for some classwork I'm decently proud of
6 notes
·
View notes
Text
I am just so, so, so pissed right now.
Two days ago, when I opened Photoshop, it suddenly showed me an error message that the timeout for activating had run out, or whatever, because it was already installed on two computers.
Which makes fuck-no sense. I have actually installed this on... at least four computers, since they tended to die over the years. But never before has it shown me an error message. And there's no reason for it to do so now, since I installed it on this computer well over a year ago, so... why now.
And I can't even do anything about it, since Adobe fucking gatekeeps its support.
If you go to the Adobe website and want to talk to support, you only get the dystopian experience of talking to a chat bot that will tell you that you can only talk to a real human person if you have a subscription.
Bitch, I paid over 600 Euro for this fucking Master Collection, that should have been enough to let me talk to a real person. I should not need to additionally make any subscription, not even the "free trial", to get to talk to actual support.
And that's just the thing. I paid for this shit, I paid ridiculously much money to have these stupid-ass programs on my computer and for no reason whatsoever it's now giving me an error message but despite being a paying customer, I do not get customer service.
The most fucked up thing about it all is that... you can't seem to even buy licenses anymore? There seem to only be subscriptions and... if I only get to use this for a month and then have to pay again the following month, then I did not buy this. Nevermind how fucking overpriced these subscriptions are.
I just want to keep using the Photoshop, InDesign and Illustrator that I already paid for, what the actual, ever-loving fuck.
#Adobe#Adobe Illustrator#Adobe Photoshop#Photoshop#Adobe InDesign#Customer Service#no fr this is beyond dystopian#you are told by a chat bot#that you will ONLY get to talk to a real person#if you get a subscription. even though you ARE a paying customer#what the fuck what the fuck what the actual fuuuck#you shouldn't need that AT ALL because you might have#problems INSTALLING it already? and need support?#how are you gatekeeping Real People from your customers#I just want to go back to using my programs you ASSHAT of a business
4 notes
·
View notes
Text
💛 The Home for Wayward OCs: Jylliana (part 3)💛
I really love this Timelapse. You can see when I just get how to do the shading
#illustration#Jylliana#jemjammer#jem jammer#aasimar#dnd#dnd character#others’ ocs#digital art#Timelapse#adobe fresco#this is one of uhhhh five pieces for the album cover that I used another program for
2 notes
·
View notes
Text
Yes to all of it. We oldies remember the days when we actually owned the programs we used instead of renting them off of the websites. Because that's what it is...we are forced to rent and keep paying rent on shit like Adobe Photoshop/Illustrator (and even our own damn simple functionality of connecting our computers to the internet. I was horrified to find that I couldn't just connect without the fucking cloud shit saving every little thing that I did ("OneDrive" SUCKS SO MUCH!).) As if we don't pay enough rent as renters, or even homeowners who RENT the fucking equipment in order to get internet service (with the fucking rental fee for the fucking modem).
This is fucking greed
It's FUCKING GREED.
My 81yo father is a graphic artist (as well as a microbiologist and botanist) and he's complaining that his Photoshop doesn't work now. I told him that he needs to download the legacy CS2 (or 5 or whatever it is) and use that for free since the Adobe mfs are charging people rent now. CS2 is what I use. I OWNED THE DISK. Anyone can find the program online somewhere, find an old password crack, and get in.
When I was dirt poor and just getting my first computer out here on the West Coast, it came with a shitty Adobe program that was LIKE Photoshop; not as extensive (PhotoDesign? I forget what it's called now), but it still had layers...it was kind of like MSPaint but with layers and 50% more functionality. It was somewhere between Paint and Photoshop, but it worked just fine bc I could create the same things that I could if I had PS.
I wrote some pretty raunchy ABC Daytime Soap fic back in 1999 (the sex in there would put everything in Afterburn to shame). And I mean stuff that WOULD get me on the antis Wanted Posters. I used that shitty program to make the headers (yes, my fic had headers BACK THEN). I don't remember what website hosted them but it was one that accepted adult-oriented NSFW things/fic...it was an NSFW web host, if I recall I was formatting and FTP'ing it all and had a little website. I was even chatting with Catherine Hickland about getting her own website up and running because I was such a fan boy and back then it wasn't too weird to communicate directly with celebrities (I emailed Kate Mulgrew in 1997 because I found her Paramount address somehow, and she freaking responded to me 💀). Cat had no idea I was writing dark smut though, thank the gods. But anyway, I made all my headers, buttons, character bios, etc. with the free program that came with the printer and the headers looked no different in quality than the headers I make today. 1999 or 2024, just give me a simple program with layers and fonts and I'll make it work.
Ignorance is a product of laziness, not limitation. (Thanks, Cairo.)
Download legacy programs that you can get to work. Use them, and stop paying rent to The Man.
It should be illegal to require that any device or software connect to the internet just to run. I shouldn't need to log in with microsoft to open any of their programs on my local computer. All games should be playable without access to an online server. All media you pay for should be downloadable to local disk as a raw file and if they don't like that because they know you'll share it and upload it, tough shit. They took your money already, they'll live.
#on technology#corporate greed#greed#adobe greed#adobe photoshop#adobe illustrator#computer programs#old school#run with us rebels#i just realized HOW much lost fic of mine there is out there#i wrote all my children and one life to live smut from hell#those are lost now as are my x-files fics#good luck finding either bc i don't even have the hard copies anymore or hard drive copies of the soap stuff
53K notes
·
View notes
Text
as of march 12th clip studio is on sale celebrating their version 4 release. it's an incredibly powerful drawing program you will NOT regret getting, especially if you want to ditch adobe. the sale ends in 5 days so if you were looking into getting it, now's the time
and since i see this brought up often when i make these posts:
for pc and mac users, there's a perpetual license option; you do NOT have to get a subscription to use clip studio unless you're on an ipad
you can forever own the version of the program you buy; if a future version has things you want, you will be able to upgrade for a discount
future update releases won't make your current version unusable. you simply won't have the features any new release will include. for example, i will not be upgrading from ver 3 to ver 4 because i'm not interested in the new features
pro is for illustrations, character art, concept work; ex has handy tools for comics, webtoons and animation. both can make use of their 3d assets
10K notes
·
View notes
Text
I fucking DESPISE Adobe oh my god
I already never really liked how literally any of the programs made by Adobe work; they’re not that intuitive, don’t control very well, and the fact you have to pay for some of the features as a subscription is stupid.
What’s WORSE is that if you want to uninstall anything you have to do it through the creative cloud. This is stupid.
You have to uninstall ALL the programs before you can uninstall creative cloud. This is stupid.
If your account gets jank somehow and you cannot log in. You cannot uninstall anything. This is stupid.
This whole thing is stupid and I want this awful fucking collection of programs off my pc. I hate them, I don’t use them, I only had them for college and then I still didn’t even use them in college.
#I had to contact people with the company in an attempt to fix this#so I can uninstall these damn programs#but har har! jokes on me! they’re having issues and can’t help!#I don’t blame the employees tho. this isn’t their fault#but it is ungodly frustrating and the person/people that designed it this way needs a stern talking to#maybe a good backhanded slap#but that’s my current rage and frustration talking#for fucks sake using adobe programs is the entire reason I said fuck it#and will not be pursuing a career in illustration/animation/photography/etc.#despite the fact that was my dream for actual years and the only thing I can think of actively enjoy doing long term#a nibbles actual post
0 notes
Text
love that photoshop yells at me every time i open it about how my graphics card is too outdated :) when it’s the most recent update from last month :))))))
#i have to use ps for my freelance stuff#i can use other adobe programs like illustrator just fine???#but ps is like. NOPE! we're gonna make it hella slow and impossible to use now :) buy a new computer :))))#don't mind me
0 notes
Text

ART ASSIGNMENT FOR SCHOOL
29 notes
·
View notes
Text

finally got that illustration project done! we had to make a movie poster of a piece of media we like (so obviously ISAT) and we had to do it in adobe illustrator (which is a program a procreate user like me struggled to use)
anyways this is another reminder to play in stars and time, it’s genuinely one of the best games I’ve ever played and it has the best ace rep in any piece of media I’ve seen
2K notes
·
View notes
Text
Random question because I'm curious
#pink posts#i got bored 🙏🙏 and curious#polls#tumblr polls#also in case anyone's curious. i mostly use medibang
403 notes
·
View notes
Note
What program and brushpack do you generally use ? Especially for the blurry/paint effect that a lot of your illustrations have ? Love your art, especially your use of colors :) 💥
Hello! I mainly use Adobe Photoshop and Kyle T. Webster's brushes, they should come with Photoshop or you can find them here :) I do maybe 80% of all my illustrations with a modified version of his Gouache Blair brush. But for that blurry/painterly effect I think you can achieve that in any software with similar brushes to the following:
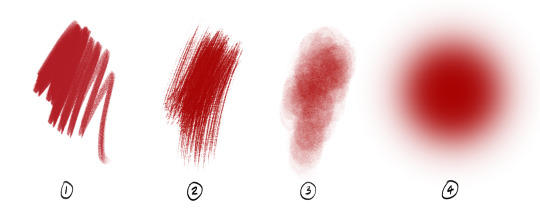
An all-purpose, slightly textured brush that has good opacity control so that you can both paint and sketch with it. This is my go-to for linework/hatching and layering colors
A textured bristly brush, less easy to mix colors with but quickly produces texture
A textured soft brush for both blending and airbrushing
A regular airbrush, for glows and gradients but also for if I want to paint something precise without any texture. I also use this to lay down initial colors quickly
For my recent illustrations I mainly used these! I believe #2 is Rough Round Bristle in the Kyle/default brushes and #3 miiight be one of the smudging brushes.
Here I used #1 for all the lines and rendering in her face and hair, including the small crosshatchy bits. You can see #2 in the background and some edges, #3 in the glowy effect on her hair, and I'd used the airbrush to lay down the first rough colors!

200 notes
·
View notes
Text
Hey, does anyone know of an online, free equivalent to InDesign and Illustrator? Sort of like PhotoPea is for Photoshop? I'm starting to do more art stuff at work, but we can't install programs on the computers (because government), and we can't get an official Adobe subscription (because eFFiciENcY), so I'm looking for free online alternatives. I know generally free alternatives for both, but the ones I know all involve downloading the program so they won't work. Don't want to use my personal laptop for work stuff (and even if I did, I'm pretty sure if I tried to run any Adobe programs on it the thing would explode).
114 notes
·
View notes
Note
hii! i absolutely love your work. i've been getting into trying to make borders myself, and i was wondering if you had any tips on where to find good pngs or do you create everything yourself? i feel like my luck so far hasn't been great but maybe i just don't know how to search for it correctly!
Hello, nonnie! I'm so glad you enjoy my work; thank you for your kind words. ( ˶ˆᗜˆ˵ ) And oh my gosh, it's so nice to see a new GFX creator in the making! One of us, one of us, one us. ~ Welcome to the wonderful world of editing, hehe!
I've compiled a list of websites that I use for my graphics, but please do let me know if you need anything else and I'll be happy to assist!
For general assets, as well as inspiration, I generally use these websites: behance (which is pretty much the industry standard when it comes to graphic design in general, they have cool studios or experienced designers that post their works and/or assets), booth (an independent japanese resources hub with many free and paid assets), huanban (an independent chinese resources hub, same proposal as booth), abdz (mostly focused on typography and branding), dribble (more focused on web applications and design) and envato (templates).
Since I'm colourblind, I'm not always confident about how to compose colours together. So whenever I'm in doubt, I use coolors (to get palettes from images and browse through palette ideas) and colorhunt (which gives ideas for palette themes and motifs).
I love typography a whole bunch, but sometimes it's hard to find that one right font for your project. Whenever I need to look for something else, I always run to these websites: google fonts (when I'm on a budget and want to use 100% free fonts, including for commercial use), 1001fonts (to quickly find fonts based on themes, it has a great tag system), dafont (a big classic huge dabatase of custom fonts), befonts (for more industry standard-leaning fonts) and kerismaker (for those magazine looks). When I want to identify a font used on an image and where I can download/purchase it, I use myfonts and font squirrel. They even give you similar options for free, too!
Suppose I'm specifically searching for illustrations/PNGs I can use on my upcoming project. In that case, I'll either go to flat icons (for websites, applications or presentations), vertex (for 3d icons and/or general vectors), graphic burger (for logo making), cleanpng (for I want a tree PNG and do not want to clean it myself, for example), pngtree (same idea as the previous one, you just search for a word and will see all PNGs related to it) and pngall (self explanatory).
Regarding backgrounds, textures, and photography in general, I rely on websites like pixabay, vecteezy, 3d ocean, morguefile, freepik and isorepublic. They have high-quality photos and videos that you can use on your projects. However, if I specifically need mockups or patterns, I turn to unblast, pacage and ava.
Besides those, you can always search for things on Deviantart and Twitter! Though I do not use those much, I think Instagram and Threads also have pages dedicated to sharing resources. Discord can be a nice place to search for graphic design servers, too.
However, if I cannot find specific resources for a commission/project for whatever reason, then I will make them myself. Be it through photography, drawing or anything else I can get my little hands on.
For the more technical/applications side, the programs I use for my graphics and edits are Adobe PhotoShop 2020, Adobe After Effects 2020, Adobe Illustrator 2020, Clip Studio Paint (for when I need to draw or polish something for specific projects/commissions), and HandBrake (for when I need to make screencaps). My drawing tablet is an oldie, Wacom One.
Hopefully, this can be a nice starting point for you! Please feel free to reblog and/or like this post if you'd like to save it for whatever purpose. ~ I hope you enjoy this journey ahead, and if you need anything else, let me know! You got this! ദ്ദി ˉ͈̀꒳ˉ͈́ )✧
#♡: answered! *#graphic resources#gfx resources#roleplay resources#rph#rp resources#editing resources#carrd resources#editing
108 notes
·
View notes
Text
Writing Notes: Book Cover

“Don’t judge a book by it’s cover!” We’ve all heard the phrase and we all know that’s impossible. Because the cover of a book is the first thing a potential reader sees—it should stop them in their tracks. It’s a very powerful marketing tool; having a well-designed book cover is crucial.
Tips for Making a Great Book Cover Design
Using more than two to three typefaces on a cover is discouraged, as it can look really messy.
Keep things simple. Your cover will be in a sea of other covers so try to keep your design from getting muddy and make sure it stands out.
Show your designs to people who have a design eye and/or you trust. It’s great to get feedback.
If you hire a professional designer, write a brief and send them info. Be really clear on what you want. Designers usually do a certain number of design rounds included in the agreed upon fee and any extra rounds of design will be extra.
If you hire a professional designer, they will likely have ideas about printing and may have connections to printers. They are a resource so don’t forget to ask questions.
Don’t forget: a book cover is an important part of selling any book. Whether you decide to do it yourself or collaborate with a professional, pay special attention to this part of the process, as a great cover goes a long way.
6-Step Guide: Professional Book Cover
STEP ONE Generate Ideas. Look around at book covers you like. Go to a bookshop and peruse what’s currently happening in book cover design. Take notes of what elements you like on the cover image. A certain typeface? Color? Do you prefer an image or an illustration or something purely typographic on the cover? Another option is to create a mood board. You can use a platform like Pinterest or Evernote, or create a folder on your desktop, and pull book cover inspiration from the web. While you’re gathering inspiration, keep in mind what genre your book is and what kind of book design feels appropriate.
STEP TWO Find a Designer (Who Could Be You!). Do you have design skills? If so, your next step is to begin layouts and mock-ups of the covers. You should use whatever software program you are comfortable with. Most professional book cover designers use a program from the Adobe Creative Suite:
InDesign. InDesign is a multi-page design platform but can also be used for single page design.
Photoshop. Used to manipulate and experiment with photography.
Illustrator. Illustrator is a vector-based program, which means you can create graphic art that can be scaled up or down without loss of quality.
Photoshop and Illustrator. These can also be used together as you can bring your Photoshop file into Illustrator to set the type after you have worked with your cover image.
If you don’t have design skills, now is a great time to hire a book cover designer. The first step is to figure out what kind of budget you have for this. A designer’s fee will range depending on their expertise. Get a figure in mind and then write a design brief which should include the book specs:
Size
Print-run
Intended audience
Where and how the book will be published
Anticipated publish date
You should also include a summary of what the book is about and what you are looking for in a cover. Also share the inspiration you’ve gathered with the designer.
If you don’t have design skills but want to create the cover without the help of a professional, there are a few software programs you can use, such as Canva or 100 Covers, design tools that allow you to DIY the cover (for free or a fee).
STEP THREE Decide on the Dimensions. If you’re self-publishing and printing with a local printer you can work with them to make sure your book dimensions will fit on their printer (remember a book prints front, back, and spine in one sheet of paper). It’s also a good idea to find examples of books whose size you like and feels good to hold. Use that as a jumping off point for your book.
Book Cover Dimensions List. If you are printing for a specific market, from print to ebook, here is a handy list:
Amazon Kindle Direct Publishing File Format: JPEG or TIFF Cover Size (Recommended): 2560x1600 pixels Cover Size Requirements: between 1000x625 pixels and 10,000x10,000 pixels (one side must be at least 1000)
Apple iBooks File Format: JPEG or PNG Cover Size (Recommended): 1400x1873 or 1600x2400 pixels Cover Size Requirements: at least 1400 pixels wide
Barnes & Noble File Format: JPEG or PNG Cover Size (Recommended): Rectangle height and width, at least 1400 pixels Cover Size Requirements: Min. 750 pixels height and width
Kobo Books File Format: JPEG or PNG Cover Size (Recommended): 1600x2400 pixels Cover Size Requirements: Min. 1400 pixels width
Smashwords File Format: JPEG or PNG Cover Size (Recommended): 1600x2400 pixels Cover Size Requirements: Min. 1400 pixels width Draft2Digital
File Format: JPEG Cover Size (Recommended): 1600x2400 pixels Cover Size Requirements: Tall rectangle
STEP FOUR Choose Your Style
Photo-based cover. If you’re creating an photo-based book cover, you’ll need to source stock imagery. There are lots of great resources online to find stock imagery including ShutterStock, Getty Images, and Adobe Stock. (Keep in mind: most photography archives require payment to use their images. Always investigate the copyright of images you’re interested in using.) Look for images that convey or allude to your book’s genre. You can use programs like Photoshop to manipulate your image, making it black and white instead of color or cropping it in a certain way.
Illustration-based cover. If you’re considering a more graphic approach to your cover, Illustrator is the tool to use. You can bring hand-drawn drawings into it and outline them to create scale-able, high-res illustrations which you can manipulate within the program. You can also create shapes, patterns, experiment with typography within illustrator and play with color, transparency, size and much more.
Typography-based cover. Finally, many successful book covers use typography as the main graphic device. This takes some skill and knowledge of typefaces, the historical context of a typeface, and how to manipulate it thoughtfully. That said, using type as a graphic can be very impactful.
STEP FIVE Pick a Typeface (Font). No matter what kind of cover you are designing, you are going to need the title of the book and the author’s name on the cover. As mentioned above, picking an appropriate typeface is very important. You want to pick something that feels right for your book—is it a sans serif or serif? A heavy weight or lighter weight? You want to make sure it’s not something with a lot of baggage, like Comic Sans or Papyrus. It is a good idea to actually do a little research on when, where, and who your typeface was designed by to give you context and feel out if it will be right for your book. You might also consider using up to two different typefaces, one for the title and one for your name. A serif and sans-serif mix can give a bit of contrast and visual interest. There are some typefaces that pair really well together. Check out the website TypeWolf to get ideas of what fonts pair well together.
STEP SIX Test, Tweak, and Repeat. Once you have a few versions of your cover, print them out on your home printer and take a look with a critical eye. Does the type size feel chunky? Too bold? Too small? How does your image look? Is it cropped right? Are the lines of your illustrations too thin and not showing up? Go back and refine your design and then repeat! Don’t forget to look at your book cover as a small thumbnail as well. People are on their mobile phones and you want to make sure your cover still stands out and is impactful.
Book Cover - serves as your first impression with potential readers—and though book covers don’t always look the same, they do tend to contain the same essential elements.
Design standards may be different in the world of traditional publishing than they are in self publishing, and book cover templates for physical paper books may differ from those of ebooks—but they all serve the same purpose.
Some Functions of a Book Cover
A book’s cover provides essential information. At its most elemental, a good cover includes a book’s title, the author’s name, the publisher, and the price.
A good cover offers clues about your book’s content and tone. Your cover design indicates whether your book is a work of high-minded literary fiction, a pulpy page turner, or a compelling work of non-fiction.
A front cover reveals a book’s genre. You can usually tell if you’re holding a thriller, a memoir, a sci-fi epic, or a nineteenth century classic just by looking at a book’s cover art and typography.
A back cover offers broader context. It may feature quotes from reviewers and fellow authors. Softcover books may contain a plot summary or author biography on the back; those summaries and bios are typically moved to the inner flaps of a hardcover book.
How to Hire a Professional Book Cover Designer
Book covers are marketing materials, and a well-designed professional cover can make your book stand out among the competition. If you want someone with expertise in the realm of cover design to work on your book, you may want to hire a professional book cover designer. Here are some steps to consider when hiring creatives to design your book cover:
Hire a cover artist. A cover artist produces the cover art and imagery that will appear on your book cover, either on their own or with heavy input from an author or publisher.
Hire a graphic designer. Certain graphic designers specialize in layout; they incorporate cover art that you provide them—whether that’s an original illustration, photograph, or even a stock image—into the overall design of the cover.
Find a cover designer online. Reedsy is one of a number of online resources for independent authors, self-publishers, and anyone connected to the world of books. Many professional book designers list their services on Reedsy.
Use your personal network. Seek out writers’ groups, either locally or on Facebook. In these groups, people share professional referrals and help support one another when a member has a new book in the works. A group of like-minded individuals can be an invaluable resource when creating your own book cover for the first time.
When to Call a Pro:
You have a budget (a designer’s fee will vary depending on experience and location).
You have enough time to work with the designer.
You have a clear idea of what you want or at least what you don’t want.
You don’t have any design skills.
You don’t want to invest in the design software.
Your book isn’t selling.
How to Design a Book Cover Yourself
If you don’t have the budget for a pro designer or just have a DIY itch you want to scratch, it is easier than ever to design your own book cover. While it may not be quite as rudimentary as when you covered your textbooks in a brown paper bag back in fifth grade, modern technology has made cover image design accessible to anyone with a computer. Here are some tips:
Use a template. There are numerous websites that offer book cover templates and step-by-step tutorials covering basic cover design skills. Some even have a free book cover creator tool, along with cover ideas, design tips, pre-made design templates, and digital cover image tools.
Use standard design software. Book covers can also be made using standard home computing software including Photoshop, Microsoft Word, and even (with a little sweat equity) Google Docs. This is particularly easy if you are importing a pre-made cover image from another source.
Make a prototype. The process for assembling a book is straightforward and satisfying. If you want to test out how your book will appear in print, you can learn to bind a copy yourself.
When to DIY:
You don’t have any budget for design.
You have design skills to do it yourself.
You have the design software.
You have a template and know exactly what you want.
You have people with an eye for design that can guide you.
How to Make a Hardcover Book
So you’re ready to bind your own book. Here’s what you’ll need:
Content, of course.
Uncoated printer paper for book pages
Decorative paper for endpapers, such as wrapping paper or cardstock
Davey board (aka bookbinder’s board), thin chipboard, or cardboard for the book covers
Craft knife
Polyvinyl acetate (PVA) glue such as Elmer’s glue
Hot glue gun and glue sticks
Ruler or straight edge
A long stapler
Thin fabric or book cloth for cover
Binder clips
Thick decorative paper (optional, for dust jacket)
Paper trimmer (optional, for trimming book pages)
Paintbrush (optional, for spreading glue)
There’s more than one way to bind a book, and you’ll find tons of great tutorials online for making homemade books, including Japanese bookbinding and perfect bound softcover books. The most popular style of hardcover book binding is called case binding, which is traditionally done by stitching pages together with thread. Here is how to make a hardcover book step-by-step—no sewing or special materials required:
Assemble the content. The number of pages and the type of paper you work with depends on whether you’re binding a novel, a full-color photo book, or a sketchbook. Familiarize yourself with the format by taking some hardcover books down from your bookshelf and observing how they were made.
Format your pages. If you’re creating a blank book, you can skip this step. If you’re printing a book with text, you'll need to format the text so that you can print it into a book. You can get help with this at a copy shop, or you can download book design software and print at home. Eventually, you’ll end up with a PDF with a page count. This page count has to be divisible by four so that your book can be bound as folios made up of eight sheets of paper (32 pages) each. You may need to add some blank pages at the end of the book to keep your page count correct for the folios.
Print and fold. Once all of your pages are printed, fold pages in half and stack eight within each other, making sure the pages are in the correct order. Staple the folios together in the folds, alternating the location of the staples so that you don’t end up with a bulge in the spine.
Bind your folios together. Arrange all of the folios in the correct order and flatten them between heavy books. Once your folios are flat, it’s time to glue them together. Hold the folios together with binder clips and use a glue gun to glue the folios together along the stapled edge. This will become your book’s spine. Be careful not to overdo it on the glue: Use just enough to keep the folios together. Before the glue cools, use a thin piece of fabric to cover the spine only.
Even out the pages. Carefully trim the edges of the pages with a paper trimmer or craft knife, if needed.
Make the hardcovers. Cut two pieces of cardboard for the front and back covers of your book. For the spine, cut a piece of cardboard that is the same height as the front and back covers, with a width equal to the thickness of the spine plus the front and back covers.
Attach the hardcovers. Paint the cardboard (both covers and the spine piece) with a thin layer of PVA glue and attach to the cloth you’ll use to cover your book, leaving a space between the covers and the spine equal to one and a half times the thickness of the cardboard. Let dry.
Assemble the book. Use PVA glue to attach the fabric-lined spine of your bound folios to the cardboard spine. Keep the book propped up between other books while you wait for it to dry.
Attach the endpapers. Trim the paper lining so that it’s twice the size of the first page and fold it in half. Paint glue onto the inside of the front cover and the front page, and attach paper lining. Repeat with the back cover.
Make the dust jacket. If you’d like to cover your book with a dust jacket, measure a piece of thick decorative paper as tall as your book and as wide as the entire book, plus a few extra inches to fold over the edge of the cover. Fold the dust jacket over the bound book. Lay another heavy book on top of it to help the dust jacket keep its shape. This is the place to add a cover design, if you’d like.
Sources: 1 2 3 4 ⚜ More: Notes & References ⚜ Writing Resources PDFs
#books#book cover#writing tips#writeblr#booklr#literature#writers on tumblr#writing reference#dark academia#spilled ink#writing prompt#creative writing#bookblr#writing inspiration#writing ideas#writing advice#on writing#light academia#writing resources
118 notes
·
View notes
Note
Ozz! I'm trying to get into drawing, but I'm absolutely horrid at it and have no idea where to begin. Do you have any tips for beginners? Also, what program do you use? I've heard Krita is good, have you heard of it?
Also, also, remember to hydrate properly and get a good amount of sleep and do lots of self-care! <33 we love you and your content; you make the world a brighter place ^^
~ 🐇
If you want to start from the very bottom, there's a website where the first lesson is drawing a line, quite literally. It builds your confidence with basic shapes, then moves on to more complex topics like textures, shapes in space, construction of real life objects and so on.
I've had it in my bookmarks for...gosh, years now. I should definitely pick it up again, haha.
I also follow Alphonso Dunn on YouTube, he has hundreds of art tutorials and exercises.
As for software, I briefly used Krita years ago and it was nice! It had a very easy interface and the brushes worked well if you wanted to reproduce traditional art. The only reason I didn't stick to it was because I already had PaintTool SAI and Photoshop at the time. When I got my first graphic tablet, I started with Paint.NET, though it was very simplistic.
The general consensus online seems to be Krita for painting or MediBang if you're into drawing anime. In terms of paid software, I think Clip Studio Paint is very popular and has a lot of resources, from brushes to 3D models. Photoshop is classic, but it can be overwhelming if you're new to digital art.
I personally use Procreate because it came with my iPad and it has a very simple menu. Some professional illustrators say it lacks the advanced options you'd find in other programs, and I do agree it may not be enough if you want to go beyond merely drawing. To add text and make small edits, I'll put the doodle through Photoshop, for example.
Free software: Krita, MediBang, Gimp, KRESKA.art (no installation required)
Paid software: PaintTool SAI, Adobe Photoshop, Procreate, Clip Studio Paint
If anyone has more suggestions or tips, feel free to drop them in the comments!
88 notes
·
View notes