#sims 4 cc guide
Explore tagged Tumblr posts
Visit Tumblr Blog
Explore Tumblr blogs with no restrictions, modern design and the best experience.
Last Seen Tumblr Blogs


Fun Fact
Users from the US are the majority of Tumblr visitors.
Text
A guide for making a horse stencil (but it also works for cats and dogs, technically).
Edited 16/10/2023: Updated to add more info on hash ID generation and better practice.
If you've read my previous guide on making custom brushes, you'll find that it's relatively similar.
If you're brand spanking new to making any mods, this will probably take you through every single step, because I have an issue with being over-detailed.
Things you'll need:
Sims 4 Studio
GIMP
Notepad
Tools in S4S we'll be using:
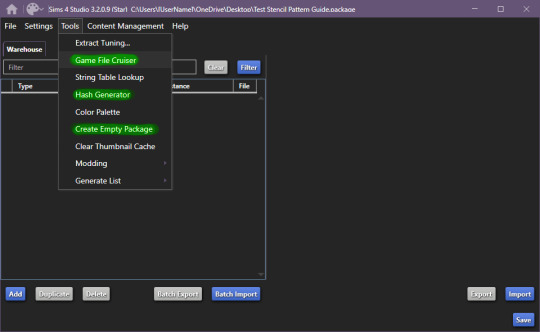
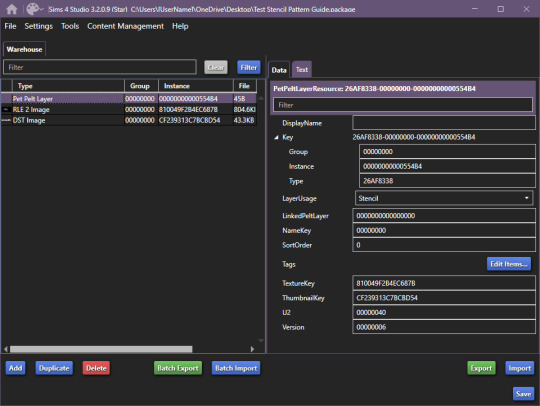
Begin by making a new, empty package file, after that, open up the game file cruiser.
Find the "Pet Pelt Layer" and tick the box, after that, in the search box below the file types, write in "EP14", as this will hide cat and dog stencils that will show up.
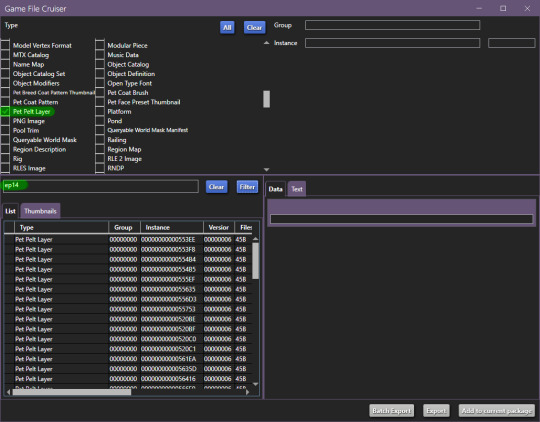
From here, it's important that we find the right one to work with, it has to be tagged as "Stencil", in this case, it'll be the 3rd from the top of the list or - 00000000000554B4
You can definitely work with just the first one which is a pattern if you want to, but if you're completely new to modding, it will be much easier with the one I've linked. If you do choose the pattern route, remember to change it from pattern to stencil and ThumbnailKey is responsible for the thumbnail you'll see in game.
Now, grab your trusty notepad and make note of these ID's:

In our case it's:
810049F2B4EC687B
CF239313C7BCBD54
Once you've made note of these ID's, make sure you add the file to your current package. You can also skip writing down the ID's and just view them from your package editor screen, but I find it helps keep the workflow more compact, however it is up to you.
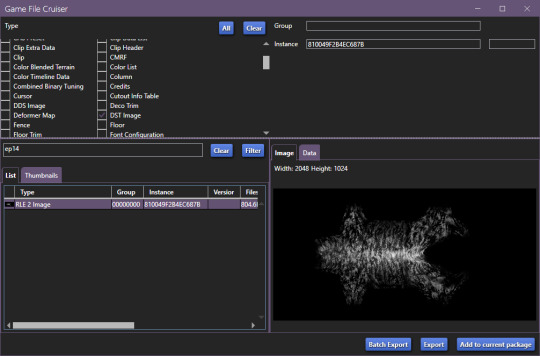
Now, go back to your filetype list and select "DST Image" and "RLE 2 Image":
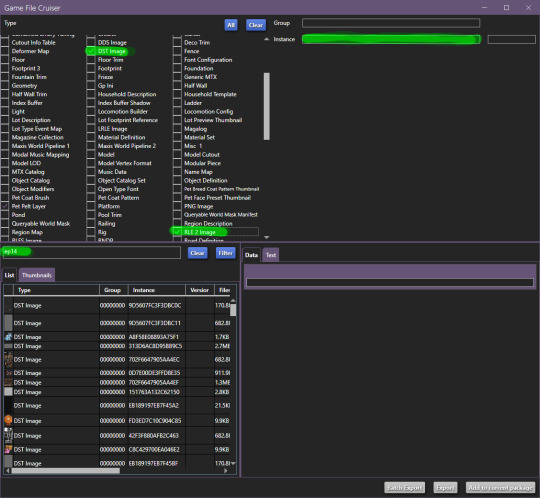
Additionally, make sure you still have "EP14" in the search bar, for the next part we'll be using the instance search bar, as marked on top right.
Enter your first ID -
Add to package and do the same with the second ID.
Now, your new package file should look like this:
Once you're at this point, it's relatively easy sailing.
Start by going to Tools > Hash Generator and generate 3 ID's:
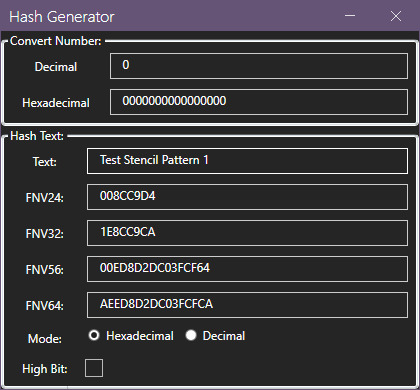
Edited 16/10/2023: When generating your hash ID's, please use your creator name ie.: "[YourCreatorName/Blogname]TutorialCustomFurCoat1", this will give you a more unique hash code than hoping to be as descriptive as possible when generating the hashes (in this case instance ID's). PS. You should still be descriptive.
Thanks to Mizore Yukii for this advice, from Creator's Musings.
I do it this way, descriptor + numbers, but you can do it whatever way you want to.
After that, we'll assign your newly generated ID's.
These are the ID's I generated:
AEED8D2DC03FCFCA
AEED8D2DC03FCFC9
AEED8D2DC03FCFC8
Respectively, my first ID will be used on the Pet Pelt Layer, Second ID will be used on the RLE 2 Image and 3rd ID will be used for the DDS image:
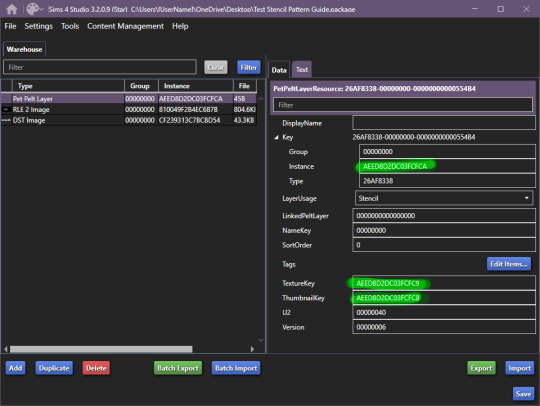


The package you're working on should now look something like this:

After this, you should save your package (so you don't lose your progress, I had a bluescreen happen and I'm still mad, so don't make my mistakes, it's easy to fix, just takes too much time).
Once you've saved your package, we can begin exporting/importing images.
For editing, I recommend actually grabbing the horse skin file. I've uploaded it to SimFileShare, it comes in two flavours .dds and .png, .png will be easier to work with, since it won't have the same layers are .dds.
Anyway, back on track we go:
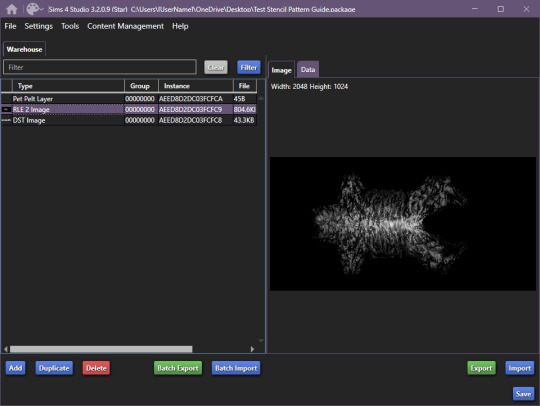
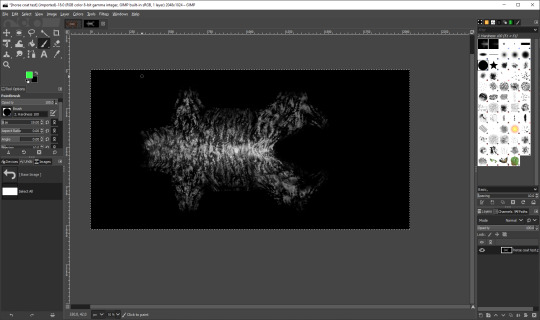
Export the RLE2 image, it'll be saved as a .png, keep that in mind for later.
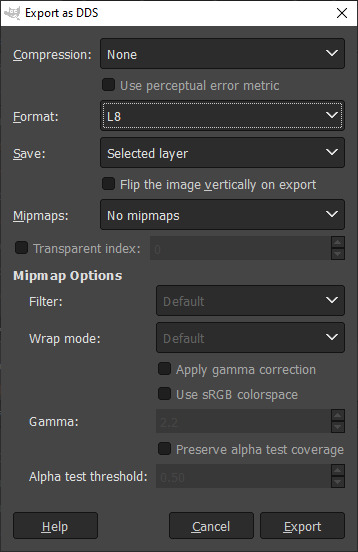
Once you're happy with your results, get to exporting your image.
IMPORTANT: remember to export the file in L8 format.
Once you're done with that, go ahead and import your picture into the package:

Repeat the same steps for the DST image, and you're done. Now, save your file and load it into the game:
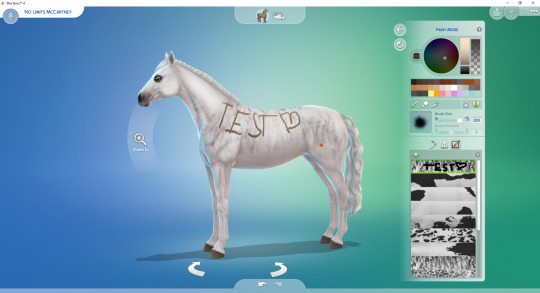
And you're all set and done.
If you have any questions, let me know.
#Sims 4 Horses#Sims 4 Horses CC#Sims 4 Horse Ranch#sims 4 equestrian#Sims 4 CC#Sims 4 CC Guide#Sims 4 CC Resources#ts4 tutorial#ts4 guide#ts4 cc#The SIms 4 Horse CC#The Sims 4 Horses#The Sims 4 Horse Ranch#The Sims 4 Equestrian#The Sims 4 cc
89 notes
·
View notes
Photo

Organize Sims 4 Mods Folder
Drowning in a sea of loose mods and CC? Get your Sims 4 Mods folder in order, and banish game lag, freezes, and missing content for good. Dive into our step-by-step guide to streamline your Sims experience. Check it out and chat with us in the comments! Read More At MustHaveMods.com
#sims 4 mods folder#organizing sims 4 mods#ts4 custom content#organize sims 4 cc#sims 4 cc management#sims 4 content management#sims 4 cc organization#sims 4 mods organization#keep sims 4 organized#ts4 mods folder organization#sims 4 mods folder tips#ts4 custom content management#sims 4 cc sorting#ts4 mods folder guide#sims 4 cc guide
2 notes
·
View notes
Text

Quick Guide: Stay Safe While Downloading Sims 4 CC & Mods
I just published a quick guide to help you download Sims 4 CC & mods safely. ⚠️ From trusted sources to spotting red flags. Keep your game clean and secure! 😊
Read it now
#avoid malware in sims 4 mods#how to avoid malware sims 4 mods#how to download mods safely sims 4#patreon sims 4 cc download#safe sims 4 cc creators#safe sims 4 download sites#sims 4 cc best practices#sims 4 cc community guide#sims 4 cc download checklist#sims 4 cc education#sims 4 cc folder structure#sims 4 cc mod manager#sims 4 cc mod security tips#sims 4 cc mods support guide#sims 4 cc protection#sims 4 cc safe download#sims 4 cc safe hosting platforms#sims 4 cc safety guide#sims 4 cc safety tutorial#sims 4 cc virus warning#sims 4 cc zip file tips#sims 4 custom content security#sims 4 custom content tips#sims 4 mod folder organization#sims 4 mod malware prevention#sims 4 mod safety#sims 4 mod safety checklist#sims 4 modding guide#sims 4 mods antivirus#sims 4 script mod warning
291 notes
·
View notes
Text
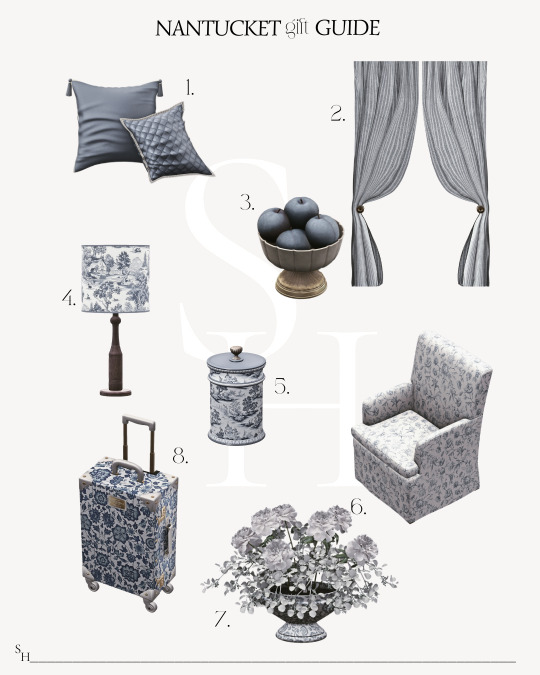
𝚂𝚑𝚘𝚙 𝚝𝚑𝚎 𝙶𝚒𝚏𝚝´𝚜
𝟏.𝑳𝒐𝒓𝒓𝒂𝒏𝒊𝒂 𝑽𝒊𝒍𝒏𝒖𝒆 𝑷𝒊𝒍𝒍𝒐𝒘𝒔 𝟐.𝑨𝒄𝒂𝒅𝒆𝒎𝒊𝒂 𝑪𝒖𝒓𝒕𝒂𝒊𝒏𝒔 𝟑.𝑷𝒍𝒖𝒎 𝑩𝒐𝒘𝒍 𝟒.𝑻𝒐𝒊𝒍𝒆 𝑻𝒂𝒃𝒍𝒆𝒍𝒂𝒎𝒑 𝟓.𝑻𝒐𝒊𝒍𝒆 𝑪𝒂𝒏𝒅𝒍𝒆 𝟔.𝑭𝒂𝒓𝒎𝒉𝒐𝒖𝒔𝒆 𝑫𝒊𝒏𝒊𝒏𝒈 𝒄𝒉𝒂𝒊𝒓 𝟕.𝑭𝒍𝒐𝒓𝒆𝒏𝒕𝒊𝒏𝒆 𝑪𝒆𝒓𝒂𝒎𝒊𝒗 𝑽𝒂𝒔𝒆 𝟖.𝑶𝒓𝒚𝒏 𝑺𝒖𝒊𝒕𝒄𝒂𝒔𝒆
𝙽𝚊𝚗𝚝𝚞𝚌𝚔𝚎𝚝 𝙶𝚒𝚏𝚝𝚜 𝙱𝚢
@sims4luxury @kerriganhouse @ bambisims
#the huntington#SH Luxury Gift Guide#ts4 cc finds#ts4 aesthetic#the sims interior#gift guide#ts4#ts4 interior#simspiration#sims4 cc#sims 4 community#ts4 inspo#sims interior#sims 4 aesthetic#cc finds#the sims cc#sims4 cc finds#the sims 4#sims#sims 4#sims 4 cc#maxis match#ts4 alpha#simblr#simblog#ts4 simblr#the huntington interior
267 notes
·
View notes
Text
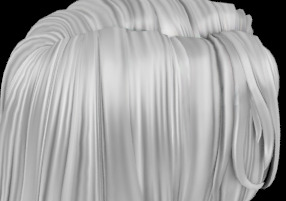
Hair texture tutorial.
Hello!
While I'm doing a new hairstyle, I wanted to share one topic that has been on my mind for a long time. I finally figured out a more or less easy way to create textures, and I really, really want to share it. I'm not going to explain the basics, so I expect that you already understand basic concepts like uv, and are familiar with baking ui in blender and know shader nodes basics (please, enable node wrangler...)
Also you'll need this add-ons for better uv manipulation and uv-packing
FIRST STEP - UV
To begin with, we need a hair model, preferably one you’ve created yourself. However, game hairstyles also partially fit these requirements, since they're colored in a similar way. I’m basically trying to replicate something close to the Maxis pipeline using the tools and methods I have.
The model should be unwrapped and shouldn’t have overlapping UV islands. If you used hair curves, your UVs are probably already rectangular. Just rotate and resize them as you normally would when applying game textures.
You can place some UV islands in the head’s texture space, where the hairstyle overlaps the mesh. You can also check the game textures for reference. There’s usually plenty of space used by the hair textures, not just that tiny rectangle in the top-left corner.
This is how my UV looks like:
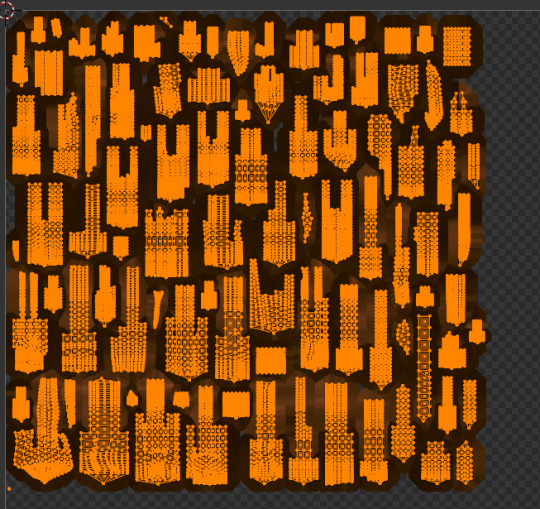
To achieve this result, you can use free add-ons for uv packing such as UV-packer.
I prefer hand modeling over using curves, so my UVs look a bit different. I used the UV manipulation add-on I mentioned earlier to get them this way, but that’s not the topic for today.
IMPORTANT: All UV islands should be as straight as possible and oriented vertically. Otherwise, this method won’t work. This is crucial because the noise texture stretches vertically to imitate hair strands. It’s too time-consuming to handpaint them, and honestly, no one really does that.
SECOND STEP - Material setup
I - Go to the Shading tab. We’ll set up a small procedural node material.
If you’re not familiar with the shader editor or how nodes work, I recommend watching a few blender tutorials on the basics first. Othervise my instructions may be confusing for you.
You’ll need two nodes to start with: Ambient Occlusion and Noise Texture. Above, you can see an example of what you should get using this setup.
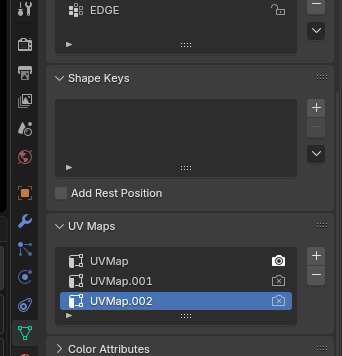
Use a UV Map node with your hair UVs. Usually, it’s called uv_0, or just UVMap if you haven’t renamed it yet. (I have multiple UV sets in my project because I was experimenting a bit.)
To get the correct mapping for the noise texture, connect the UV Map node to a Mapping node, and make sure you stretch the texture along the Y axis. This is exactly why your UV islands need to be aligned vertically, so the strands flow in the right direction.
I usually set the Noise Texture scale to 100–200 to get a nice strand-like effect.
Plug the Ambient Occlusion node into a Color Ramp to reverse the colors and adjust the contrast. Do the same with the Noise Texture. I recommend it to tone down the strong contrast a bit.
If you have the Node Wrangler add-on enabled (which I highly recommend), you can press Ctrl+Shift and click on a node to preview its output.
Use the result from the Ambient Occlusion Color Ramp as the Factor (think of it like a mask in Photoshop) in a MixRGB (color mix) node. Then, plug the result from the Noise Texture Color Ramp into the A socket, and set the blend mode to Multiply (again, just like in Photoshop).
You can control how dark the ambient occlusion appears by adjusting the color in the B socket of the color mix node.
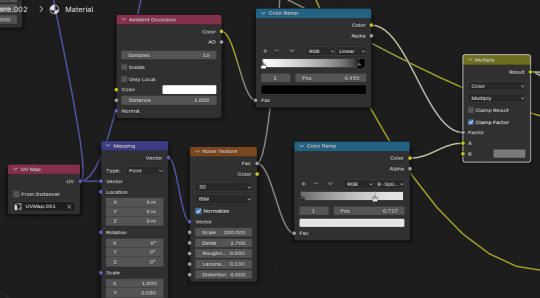
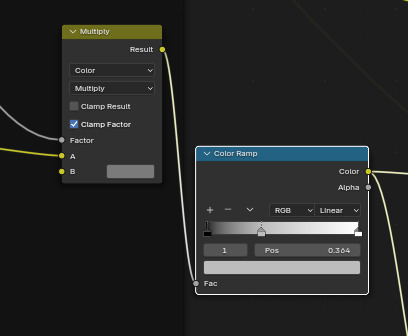
After, I plug result into color ramp again to adjust contrast.
II (optional) - gradient.
Though not necessary, I do it to add a little variation to tones. You may skip it.
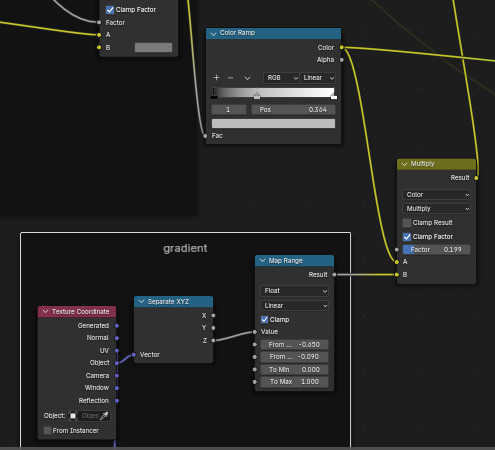

It makes little difference - but don't make mixing factor too high or it will be too dark later.
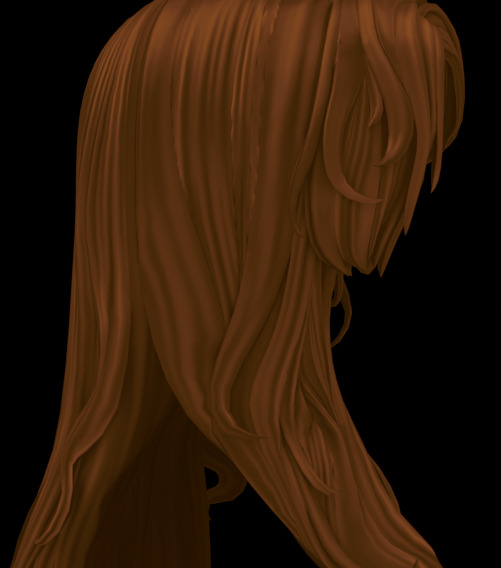
III - Principled BSDF and lighting setup for baking.
Although stretched noise texture with occlusion works wonders, hair wouldn't be hair if it didn't have shine. This “shine”, although it can be painted, is in most cases just baked-in highlights.
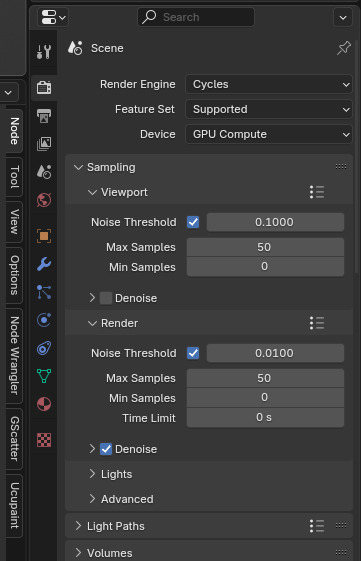
First, change the render engine to cycles and set following options:
You don't need too high amount of samples.
You'll need a little scene setup. If you have any lights, delete them.
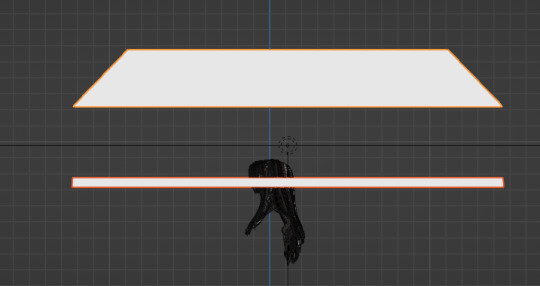
Then, create two cylinders and delete top and bottom side. in the modeling make something like in the screenshot. Sometimes one cylinder above is enough.
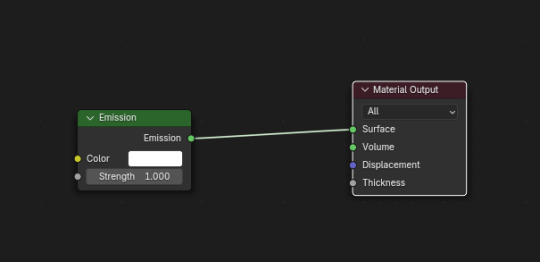
Create material for them and use simple emission node. This cylinders are necessary for that gloss effect hair does have.
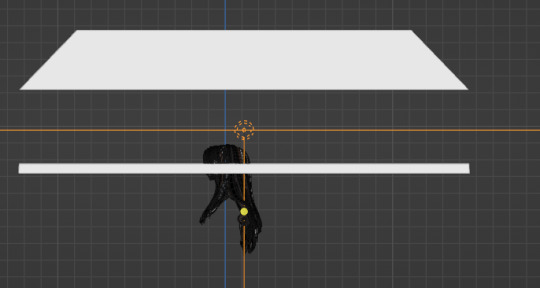
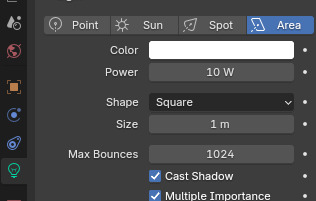
Create area light and scale. Put it above head - and set power around 10, not too strong.
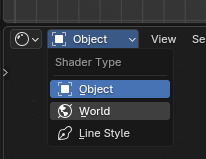
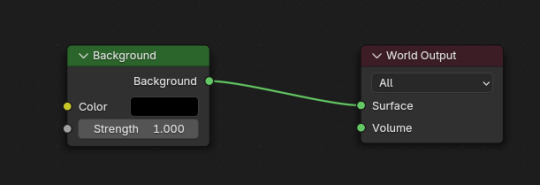
In left top corner of shader editor switch to the world. Set it to black.
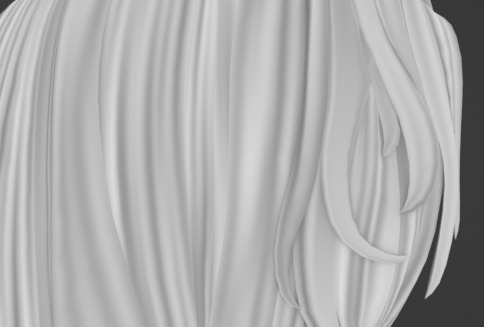
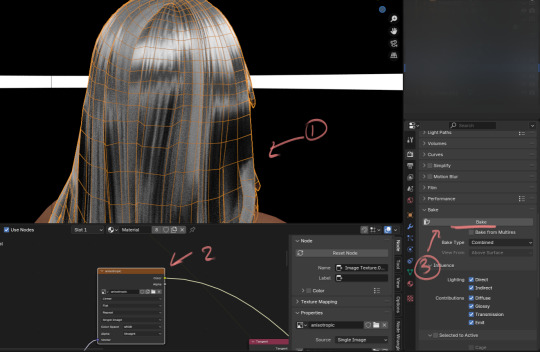
Go back into object shader editing. Select your hair in edit mode. Create Principled bsdf and empty image texture ( 1024*2048 or 2x bigger). Remember noise texture? Create bump node and plug it into height. Copy the values below to make effect subtle. Plug bump node to normal.
In principled bsdf, set metallic 1, roughness around 0.4. Open specular tab and put anisotroptic to 1. Create tangent node, change to Uv map, choose your map and plut tangent node into tangent.
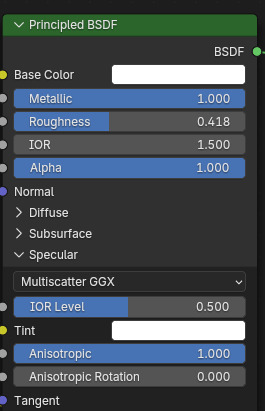
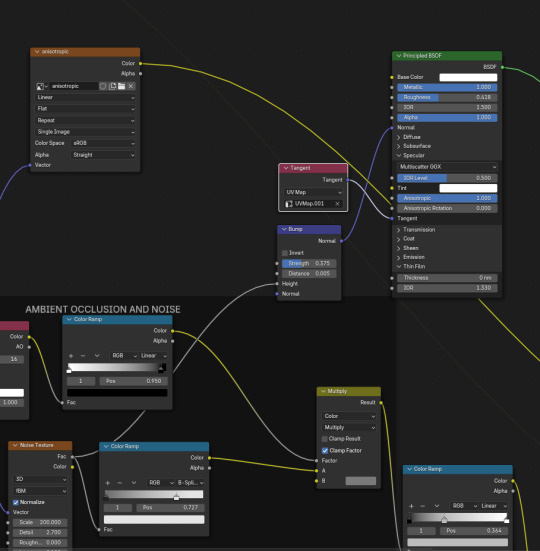
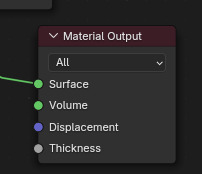
Don't forget to plug principled bsdf into Material output node!!
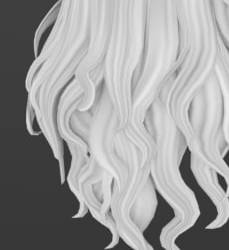
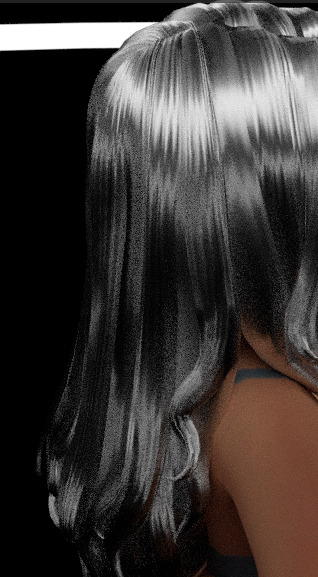
Phew, setup is done! Go into render preview and enjoy results!

It should look like this:
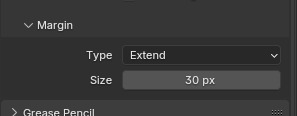
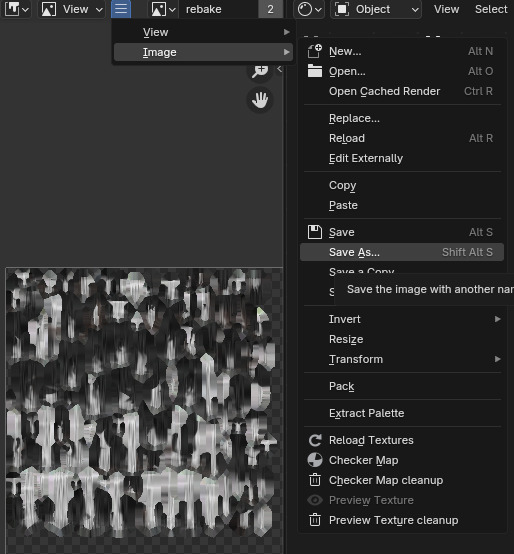
Now we have to bake this. it's easy - go into render tab again, scroll down and open bake menu. Open margin menu and set 8 px at least - or more (just cut later to hair area). Change magrin type to extend.
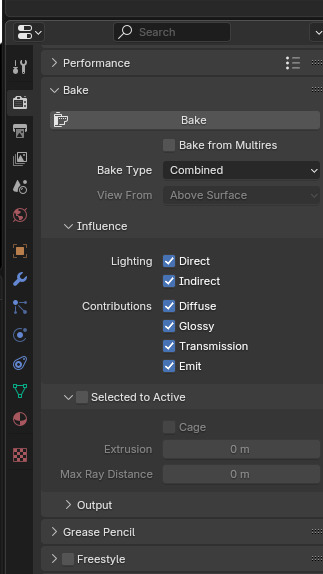
Now, select your object - and select Uv map you're baking to. In shader tab, select blank texture you had created before. Go into render tab again, and in the baking menu press bake. Now wait - and voila!

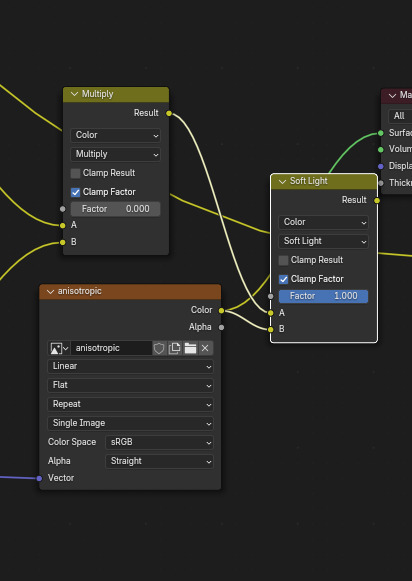
Now go back into the shader editor and plug the texture into the color mixing node into B. Plug into A procedural texture we're done before. Set mode to Soft light.
Now, since you know how to bake I won't explain it over again - create new blank texture with same resolution and bake result to it.
Save the texture and color it in any graphic editor you have with gradient maps. You may adjust texture contrast we're created before, but that's all.
You're done!
Here, in part 2, I will explain how to color this grayscale texture.
102 notes
·
View notes
Text
this guide is specifically for my friend mel <3 but of course anyone is free to reference it x
𖡡 you've downloaded the game, played around a little bit, and now you're looking to add mods and custom content (cc) into your game
────୨ৎ────
this game is basically nothing without mod and cc creators, so all credit and love to them ♡
step 01: setting up your mods folder
open file explorer, go to documents, and find the folder labeled electronic arts. then click on the sims 4.
you'll see a folder labeled mods - pin it to quick access [this will make accessing it easier]
step 02: downloading mods and cc
you can find cc and mods so many ways!! tumblr, youtube, pinterest, instagram, etc. there are a lot of blogs on tumblr specifically for cc finds too
make sure you're downloading things from a reliable source. for example - a creator's patreon/tumblr or website, simfileshare.net [often linked as sfs], google docs, curseforge, itch.io, and *unanimously hated* thesimsresource.com → the sims resource is hated because of all of the fucking ads lmaooo
you'll be downloading package files and zip files. you'll find them in your downloads in file explorer
step 03: installing mods and cc
navigate to downloads in file explorer
package files can be simply dragged into the mods folder
zip files need to be extracted, then you can drag and drop the unzipped folder into your mods folder → whatever you put into your mods folder can only be one extra folder deep or it won't show up in your game
when it comes to mods [not cc], creators will often have instructions for you. follow those exactly
step 04: mods + game updates
sometimes mods break when there's a game update. it's just a very annoying part of the game at this point lol
some mods will have a pop-up in the game letting you know it needs to be updated. but if it doesn't and you notice something is fucked up, you can google 'broken mods' and usually someone else will be having the same problem and can let you know to update it
if a mod is broken, remove it from your mods folder and go download the new version from the creator → a lot of mod creators update very quickly [like the same day or within a couple days] but sometimes they don't. just be patient and check for updates periodically
recommended: the sims 4 mod manager // dl here → the mod manager will allow you to see and deactivate or remove mods and cc from your game [it's automatically connected to your mods folder and can be helpful when you can't find broken mods or cc]
gameplay mods i recommend
mccc by @deaderpoolmc // dl here ✧ gives a you a lot of control of your game
tool by @twistedmexi // dl here ✧ place and size things however you want
better build/buy by @twistedmexi // dl here ✧ gives you easier access to things in build/buy that you'd normally have to use cheats for
relationship and pregnancy overhaul by lumpinou // dl here ✧ more realistic gameplay [this one is essential!!]
lgbtqia+ by lumpinou // dl here ✧ gender identity, gender affirmation and transition, self-discovery, coming out, dating apps and lot traits [i love this mod so much!!]
healthcare redux by adeepindigo // dl here ✧ adds illness, injury, chronic conditions, allergies, medical emergencies, etc
childbirth mod by @pandasamacc // dl here ✧ good for family gameplay
snbills by @simrealist // dl here ✧ bank accounts
also want to mention milk thistle & sunblind by @softerhaze ✧ the lighting with these mods is *essential* pls check them out!!
create-a-sim [cas] mods i recommend
cas backgrounds // you can download mine here but i also love vyxated ✧ these are just extra fun!! you can find a lot on tumblr or youtube to download. it's a super easy drag and drop into your mods folder. but when you want to change it, make sure you remove the current one or it won't work!!
gentle cas lighting by northerin siberia winds // dl here ✧ replaces the ea lighting in cas with a softer glow and shadows
any cas lighting by helgatisha // dl here ✧ i like the colors they have!!
custom content [let's make your sims hot!!]
cc creators i love: @kumikya @dogsill @aladdin-the-simmer @arethabee @imvikai @jius-sims @northernsiberiawinds @oakiyo @its-adrienpastel @daylifesims @twisted-cat @madlensims @miikocc @obscurus-sims @evoxyr @powluna @pralinesims @simandy @sentate @simstrouble @christopher067 @aharris00finds @bluecravingcc @crypticsim @gorillax3-cc @gegesimmer @frzrbunny @greenllamas @lisatrait @joshseoh @liyahsim @thatonegreenleaf @trillyke @waterlily0210 @clumsyalienn @johnnysimmer @lamatisse
────୨ৎ────
anyways mel, i really enjoyed making this for you and i hope you enjoy the game!! <3
#sims4guide#sims 4#the sims 4#ts4#gameplay mods#cas mods#create a sim mods#sims 4 mods#sims 4 cc#sims 4 guide#cas#simblr#cc finds#sims 4 game mods#sims 4 beginners guide#ts4 beginner guide#mod tutorial#cc tutorial#sims 4 cc creators#sims 4 mod creators#where can i find sims 4 cc#the sims community#sims community#create a sim#cas lighting#cas backgrounds#lumpinou mods#pandasama mods#adeepindigo mods#mccc
37 notes
·
View notes
Text
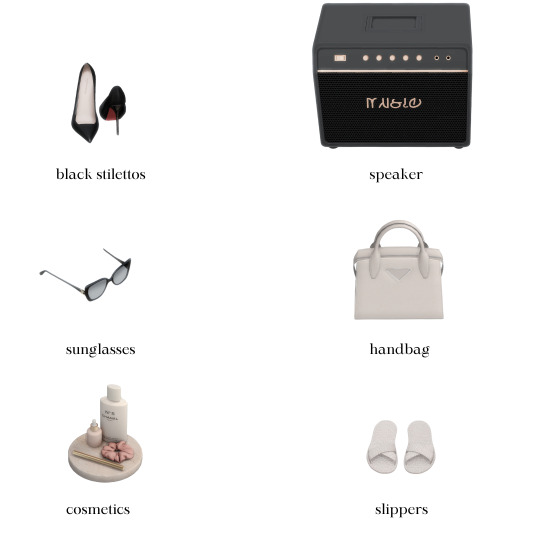

holiday gift guide: luxury edition
♡ black stilettos
♡ simlish orcaella speaker
♡ chanel sunglasses
♡ prada handbag
♡ cosmetics
♡ house slippers
part three of my holiday gift guide. as always, thank you so much to all of the amazing and talented cc creators! @xplatinumxluxexsimsx @wondymoondesign @syboubou @pinkbox-anye @sundays-sims
#simsplymaddy#cc recs#the sims 4 cc finds#the sims 4#ts4#ts4 simblr#ts4 maxis cc#ts4cc#the sims community#sims 4#ts4 screenshots#sims 4 cc#sims 4 simblr#the sims cc#sims#sims 4 gift guide#sims 4 christmas#sims 4 holiday#the sims 4 cc#the sims 4 simblr#new simblr#cc finds#ts4 maxis mix
188 notes
·
View notes
Text
Ultimate skin details guide!!!


Letters are italic slanted = I use it on almost every sim I make
Skin overlays:
Northern siberia winds Soft rose skinblend A
Obscurus skin overlay N25 A and B
Billy skinblend by Vikai
MsBlue Abriana skin v1
MsBlue Abriana skin v2
DFJ kellyhb5 Afterglow skin
Gunthermunch sorceress skinblend
Pralinesims skin Lychee (overlay) F
Googoo overlay by sims3melancholic
Madmono Knight non default
GPME gold overlay face skin v1
GPME gold skintones s1
Papillon skin non default
Huckleberry skinblend simbience
Other:
RemusSirion lips 147 teeth for lipsticks merged
Glitchsyndrome chisamiblush
Squeamishsims booboo blush
Edited booboo blush on another layer
GPME gold hairline G7
GPME gold hairline G6
Obscurus hairline n1
Obscurusxmelancholix nosemask Irle overlay
Obscurus nosemask overlay set N2
PS mouthcorners N01
PS mouthcorners N02
PS mouthcorners N03
GPME gold eyelids G1
GPME gold eyelid CC01
Catchlights overlays 2t4 Pyxis
GPME gold eyes G11
Freckles and moles:
PS freckles N09
Cerberus freckles
MSQSims freckles NB02
Hollowsprings honeyfreckles
GPME gold moleset 1
Cosimetic N59 mole
Lashes:
All lashes by Kijiko
All lashes by MMsims
Enjoy!
Lii <3
Thank you to all the CC creators:
@northernsiberiawinds @obscurus-sims @imvikai MsBlue on tsr @dangerouslyfreejellyfish @gunthermunch @pralinesims @sims3melancholic @goppolsme @viiavi @simbience @remussirion @squeamishsims @squea @glitchsyndrome @pyxiidis @msqsimscreations @hollowsprings @cosimetic @kijiko-sims @mmsims
#simblr#sims 4#sims 4 cc#sims4#the sims 4#sims 4 custom content#sims 4 simblr#sims community#the sims community#ts4#sims skin#Sims skindetails#sims download#simmer#sims custom content#sims skin details#sims cc#the sims cc#sims 4 cas#sims4cc#Sims cc guide#the sims 4 custom content#sims 4 download#sims 4 maxis match#sims alpha#sims alpha cc#sims alpha skin#the sims 4 community#tsr#the sims
25 notes
·
View notes
Text

detectar mods conflictivos sims 4 | tips, escanea y elimina virus
esta es una guía definitiva de como detectar mods conflictivos, además les compartiré algunos tips para evitar errores en los sims 4 y podrás eliminar los mods dañados de tu juego.
· ver tutorial
*thanks to @twistedmexi for creating the mods*
#the sims 4#los sims 4#sims 4#the sims#sims#ts4#ts4 cc#simmer#simblr#ts4cc#tianaberrie#sims 4 aesthetic#sims 4 mods#sims 4 tutorial#sims 4 guide#mods sims 4#the sims 4 aesthetic#ts4 aesthetic#aesthetic#cottagecore#aesthetic mods#top mods sims 4#ts4 mods#sims 4 better exceptions#sims 4 modguard#twistedmexi#better exceptions
74 notes
·
View notes
Text
🎨 Why My Presets Are Worth the Investment 🎨
Hey everyone! 💛 I’m thrilled to see how much you love my Presets—and I’d love to share why I’ve chosen to offer them as paid creations while keeping them accessible and fair for you all.
✨ What You’re Getting:
Unique Presets, crafted to stand out from generic filters, with meticulous attention to detail.
Constant Updates, ensuring full compatibility with ReShade and GShade as they evolve.
No Subscriptions Needed: Pay once on my Patreon (for individual presets or a full bundle) and keep them forever—no hidden fees!
🔒 Why Paid? Each preset represents hours of work, testing, and fine-tuning—they’re not just “filters” but a tailored experience for your game. Sadly, renaming a file is all it takes to steal creative work… so this helps protect my effort while letting me keep improving them for you.
💡 Ready to Elevate Your Game? No forced memberships! Find all my presets in my Patreon shop, with the freedom to pick only what you love. It’s a way to support my work without waste—and for me to keep delivering quality content for you.
Huge thanks to everyone who supports and values creativity! 🚀
#The Sims 4#TS4 CC#Sims 4 Mods#ReShade TS4#GShade#PC Gaming#Life Simulation Games#Digital Art#Game Aesthetics#Visual Effects#Color Grading#Virtual Photography#Creative Coding#Tutorial#How To Sims#ReShade Guide#Tech Tutorial#Modding Tutorial#Step by Step#Aesthetic Gaming#Cozy Games#Vintage Games#Dreamy Graphics#Cyberpunk Aesthetic#Fantasy Vibes#Before & After#Satisfying Edit#You Should Know#Pro Tip#Creative Process
3 notes
·
View notes
Text
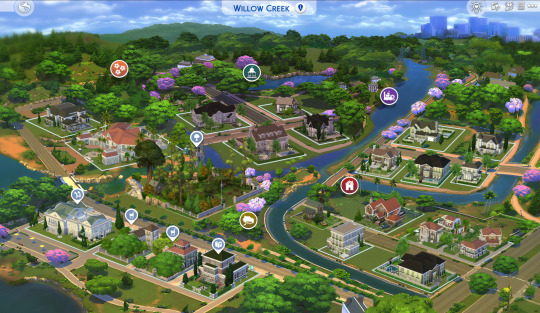
World Map Replacement EASY 4 step walkthrough (PC & Mac)
The Sims 4 Maps are definitely on the minimalistic side, but luckily for us some magic fairies (aka cc creators) made maps replacements that we can freely use.
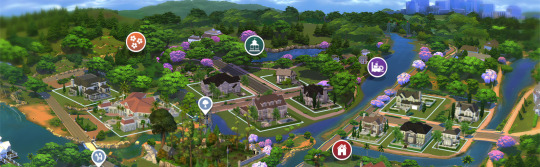
My personal favorite & the one you see featured on this blog, creator 20th Century Plumbob, made for us some amazing map replacements that are mindful of the actual environment features we have in game, and gifts us with a way more immersive experience. The best thing is that this creator keeps updating the maps, so if you have many Sims packs and want consistency you can have it!
Installing them is super super simple, here's what you have to do:
1 - Download the desired world map (here's the basegame ones: Willow Creek | Newcrest | Oasis Spring )
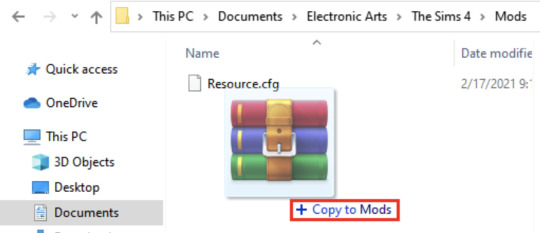
2 - Find the ".package" file in your download folder. These files can't and shouldn't be unzipped.

3 - Locate the Mods folder [ Documents/Electronic Arts/The Sims 4/Mods ] Copy the files inside the Mods folder.
on PC using File Explorer
on MAC using Finder
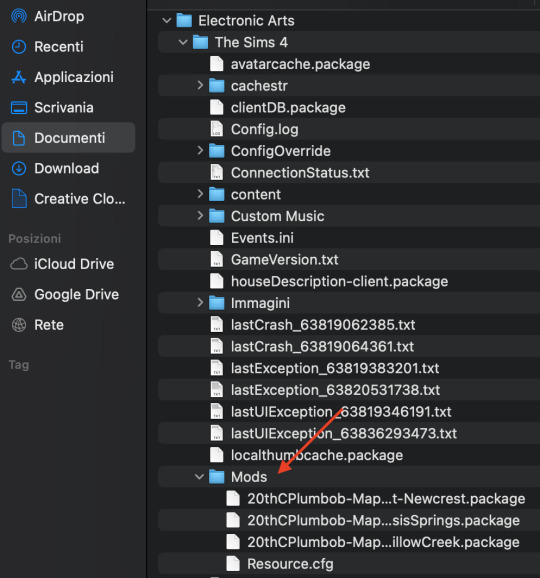
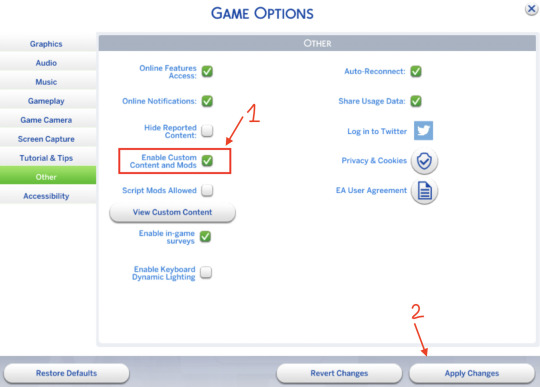
4 - Open your game and enable custom content. [ Game options/Other/Enable Custom Content and Mods ] Restart the game if necessary You're done!
Another honorable mention - that also includes all worlds - are Dershayan Fan Art maps, that are perfect for more aesthetic oriented gameplays and also features some season-specific map replacements. https://dershayan.de/mods-cc/fanart-maps/ https://www.patreon.com/dershayan
☆ Happy simming ☆ Dag Dag
#sims 4#sism 4 cc#sims 4 simblr#sims 4 build#the sims 4#ts4#ts4 simblr#ts4 build#ts4 screenshots#ts4 base game#sims 4 base game#sims 4 cheats#sims 4 guide#sims 4 map replacement
36 notes
·
View notes
Text
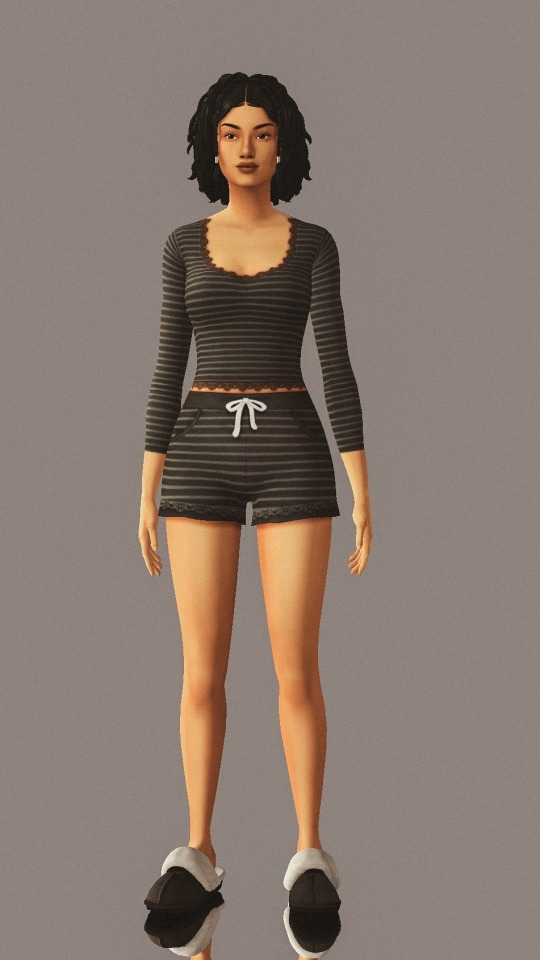
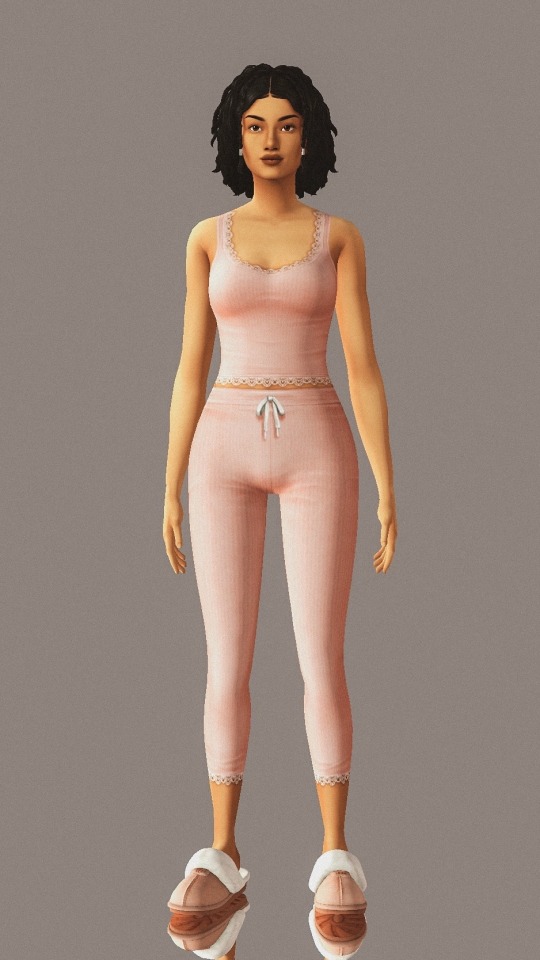
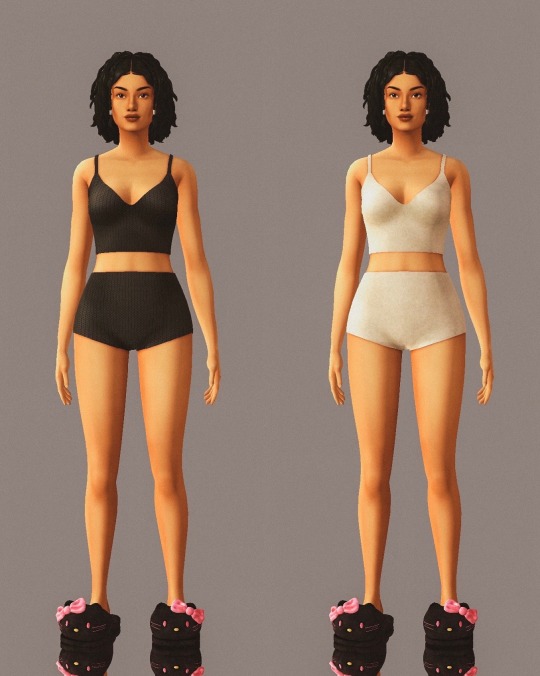
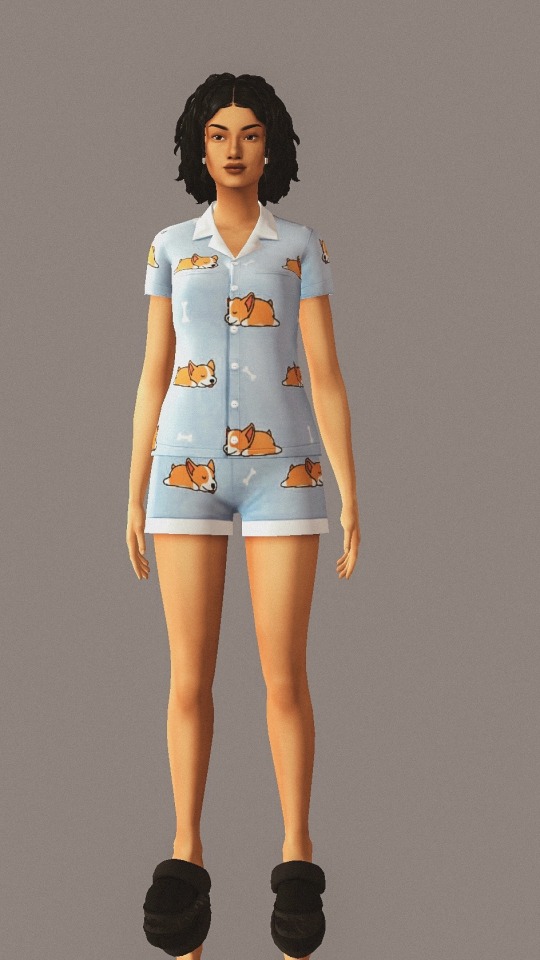
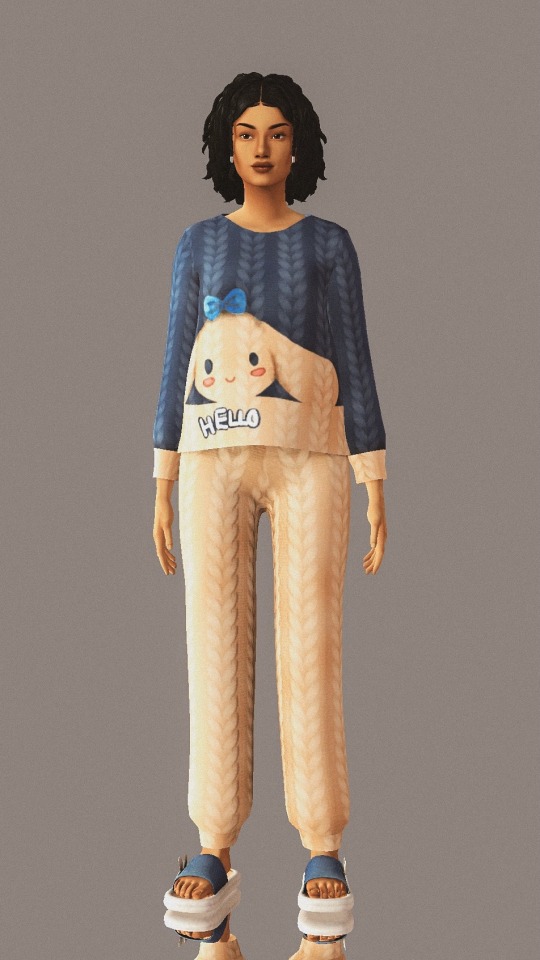

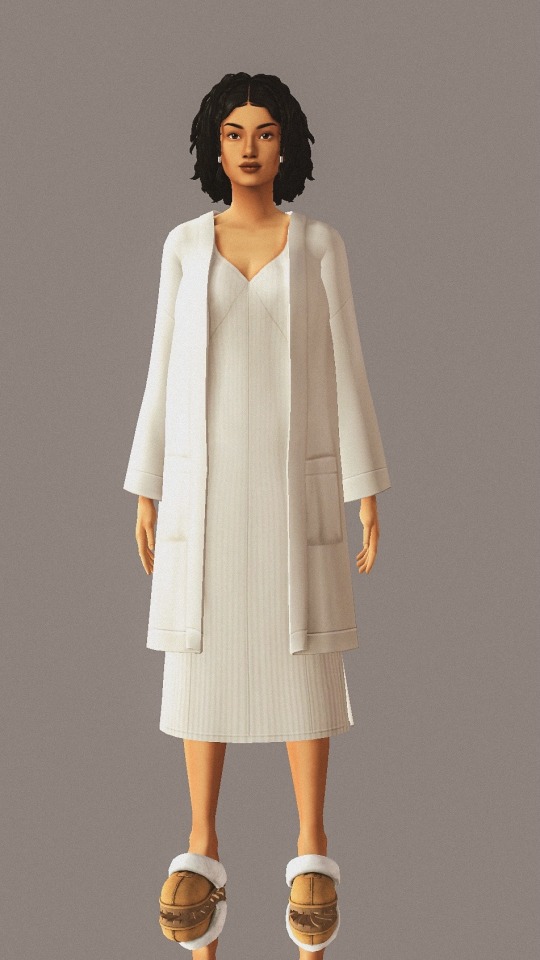
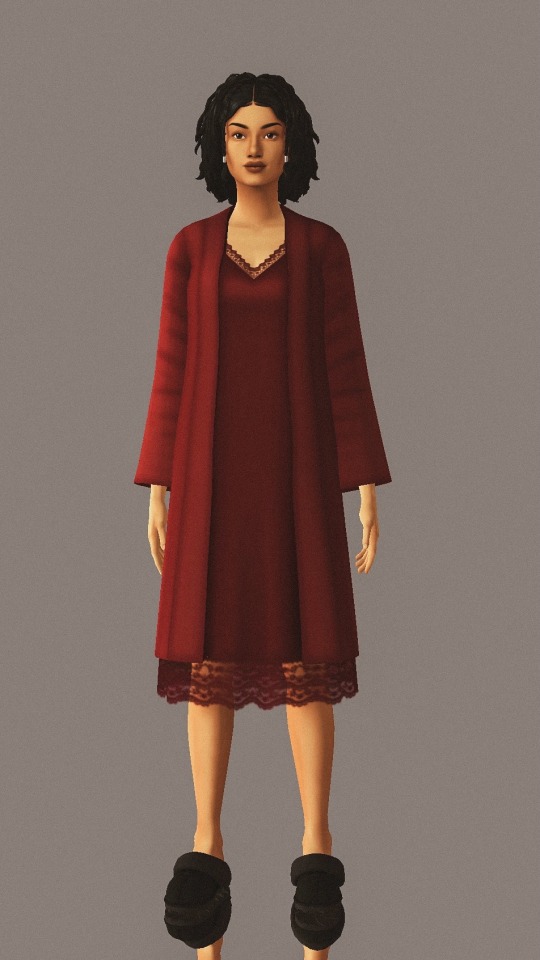
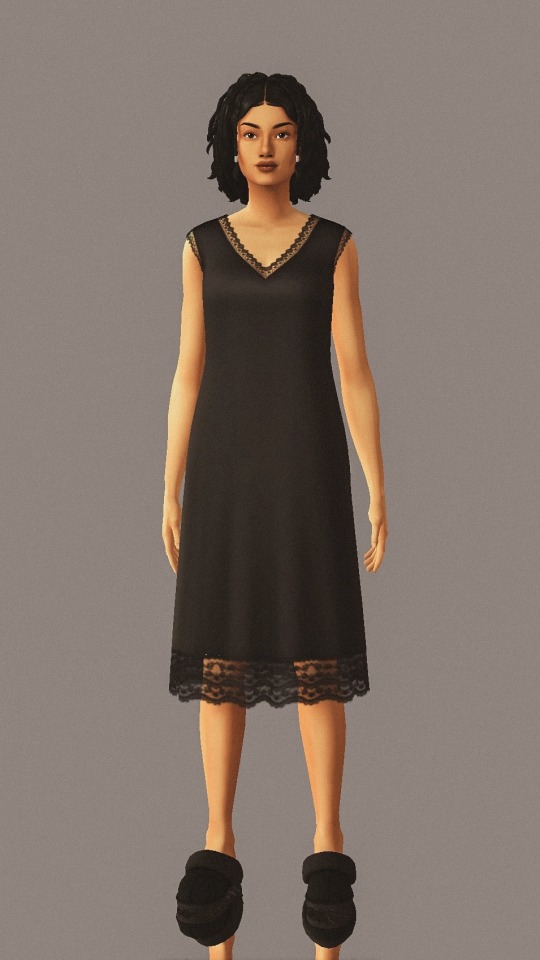
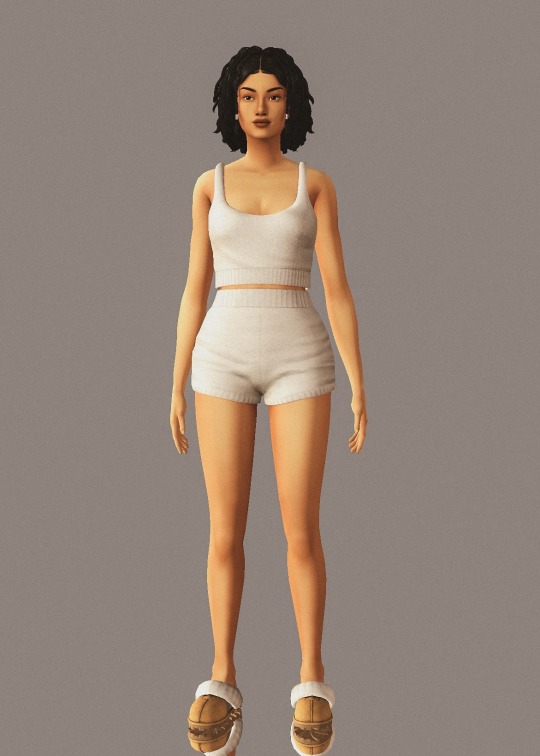
[Cont] 21 of my favorite sims 4 sleep cc wear💤
1-2. Victorious serpent sleepwear
3. Knit and Fleece two piece set
4. Dream lovers pj
5. Midnight set
6. Molly outfit
7. Loungewear and cardigan
8. 1920’s night gown
9. 1920’s night gown and robe
10. Teddy bear set
#CC Guides#simblr#ts4 cc#ts4 clothes#sims 4#sims 4 cc#sims 4 maxis cc#sims 4 maxis match#cc finds#ts4
41 notes
·
View notes
Text
the sims 4 and mods
have you ever found yourself asking "how do i install mods? why arent my mods working?" ill (try to) tell you!
the sims 4 is one of the easiest games to mod, in my opinion, but that doesnt mean it'll be easy for everyone! if youre confused and having issues, this is for you!
also by me: sims 4 troubleshooting guide
by u/saveverris on reddit: a helpful guide to using and updating mods
GUIDE STARTS HERE
if you are a visual learner, this guide is not for you; however, there are several videos you can watch! i recommended googling it. i havent watched any modding videos in years, so i have none to share, but there are several!
"how do i install mods? why arent they showing up in my game? what am i doing wrong?"
first and foremost, when it comes to installing mods, always download recently updated mods. scrpit files & mods that change/add gameplay elements always need to updated for the recent patch. scarlets realms mod list can be helpful for this. for cc (custom clothes/furniture), having the most recent version is still important, but if you want to download cc from, lets say 2022, it should still work fine. typically if a file is broken, it will show up as a broken texture in game or not show up at all when you use it. sometimes, it will prevent your game from running, normally you will recieve an error upon opening the game when this happens.
secondly, always download your mods from a trusted source. i exclusively get mine from patreon, but creators may host theirs on the sims recourse, their own websites, etc. basic internet safety, just be smart with what and where you download.
☆☆☆
how to install mods. im used to windows, so sorry if something is inaccurate for mac.
if you are on mac, the path for your mods should be this: Documents/Electronic Arts/The Sims 4/Mods (macOS)
if you are on windows, the path for your mods should be this: C:\Users\[user]\Documents\Electronic Arts\The Sims 4\Mods
i will be using one mod as an example, adeepindigo's healthcare redux / hcrx (is what ill call it for short). you dont have to download it, but its a very common mod that requires certain packs and utility mods, which is why im using it as an example. other common mods include mc command center by deadpool, ui extensions and more columns in cas by weerbesu, basemental by basemental, wicked whims and wonderful whims by turbo driver, relationship & pregnancy overhaul and lgbtqia by lumpinou, and tool mod and better build buy by twisted mexi.
go to the mods page. locate the mod you want and read its description. make sure the mod you want to download doesnt need any other mods or any specific game packs for it to work. (for healthcare redux, it requires get to work, and has many optional packs. it also requires general pie menus and lumpinous mood pack, you need both for the mod to work at all. this is similar for other mods).
download your mod of choice, mine is hcrx, always make sure the mod has been updated in recent months (if its a gameplay mod). an outdated mod can corrupt your save. i exclusively download my mods from patreon or modders website. (for hcrx, adeepindigo has it on their patreon)
once youve downloaded all you need, move your mod from your downloads into either a. your mods folder, or b. a folder made just so you can unzip and organize your mods. if you do that, make sure to add the files into your mods folder when youre done! (i always do this to make sure i have everything i need before adding it to my mods. some people have trouble with mods if they unzip it directly into their mods folder, im not entirely sure why, but unzipping it into another folder should prevent that from happening)
your folder, whether it be your mods folder or another one, should now have 3 things: lumpinous mood pack, general pie menus, and adeepindigos hcrx zipped folder. the mood pack and general pie menues should both be package files, you can move them directly into your mods folder now.
in the folder of your choice unzip the folder using 7zip. right click the folder > extract > extract here. a new folder or multiple files should appear. you can place this folder/these files directly into your mods folder. make sure the script file is only one folder deep. the folder your script files are in should look like this: The Sims 4/Mods/[folder name here] or The Sims 4/Mods. again, any deeper and the mods will not work
once youve added your mods into your folder, open your game. if you havent already enable mods & script files in your game, go to your settings and enable them! after that, close and relaunch your game.
mods should now be installed and working!
the most common problem people encounter from my experience are mods that are outdated or noncompatible- a lot of mods conflict with one another because they share the same tuning- if a mod is conflicting with another mod it may not show up in your game. remember, your mods should always be unzipped! a zipped folder will not work!
☆☆☆
for custom content, see here
go to your site of choice. i reccomend patreon. sentate & serenity for clothes. theyre patreon creators and have a lot of amazing choices. there are several creators to choose from, some on tsr, some on tumblr, some of sfs, etc. (always choose from a trusted creator and a trusted site! if downloading from sfs, sim file share, please be vigilant! some popular creators have had their account hacked. please be careful!)
download the cc you want. clothes/hair/makeup/skin/furniture/etc. make sure you dont need a required mesh, or game pack. a mesh is what gives the clothes or furniture its shape. without the mesh, the clothing will be broken and unusable. most creators make new meshes. a game pack (ep, gp, stuff pack, kits) are dlc EA releases. some clothing may require one of those packs for its mesh. creators almost always list what pack or mesh is needed if it isnt included in their download. ive never seen anyone not list it!
open your downloads folder, you will see various files that end in .package. these are aptly named package files. you can place them directly in your mods folder without any extra work.
you may see zipped files, right click these files to unzip them. after youve unzipped them, you will see more package files. they may be inside of other folders. move these package files into your mods folder as well.
open your game, you should get a pop up that shows what mods are in your game, if your mods are enabled correctly. if you do not get that notification, check you have your mods enabled in the settings. if they are enabled and are still not showing up, double check where youve put your mods. make sure its in your mods folder!
go to create a sim or build buy, your custom content (cc) should be there! i always suggest checking that the cc youve installed is working correctly!
if something youve installed isnt working correctly, remove it! broken cc can occasionally cause a lot of problems in your game! i suggest using better exceptions, but there are other ways to find broken cc!
ps.. if youre still unsure of how deep your mods can go into your mods folder, heres a guide
for script files, it will always need to be one of these two: the sims 4\mods (files go into the mods folder directly) or the sims 4\mods\[folder name] (files go no more than one folder deep)
for package files, it can be anything from the sims 4\mods (files go directly into the mods folder) to the sims 4\mods\[folder name 1]\[folder name 2]\[folder name 3]\[folder name 4]\[folder name 5] (files can go no more than 5 folders deep)
☆☆☆
now.. for the age old question, "why are my mods not working?"
heres the simple answers:
you did not install them correctly
mods are not enabled in your game
download the meshes, delete bad files, update, reinstall, and enable your mods! that should fix them!
your mods are outdated and thus broken.
for cc, if your sim is showing up with a question mark texture or something similar, then you are missing a mesh. this applies for bb as well. download the mesh or delete the cc.
for bb cc, if the item doesnt place and/or disappears after you place it, you have bad cc. delete it or find a way to repair it.
one of the most common questions i see is about ui. if your ui is broken, its because one of your ui mods are broken. if you dont know what mod it is, check for ui cheats or better build buy. any mods that change your ui will be the cause. if you have an updated mod but an outdated game, then you need to update your game. the tldr is that your mods are broken. if the broken ui or other game issues persist then check the previously linked troubleshooting guide. goodluck!
important note:
if youre still having trouble, the guides i added above can help! especially the second one! be careful!

when the sims 4 is updated, mods break. i have multiple suggestions on what to do when the game updates and mods break:
do not update your game. turn off automatic updates and wait for the mods to be updated before you update your game. this way, you can play with your old mods while you wait.
if you do update your game, do not enable mods right away. have a back-up non-modded save to play while you wait.
if you update and reenable your mods out of habit, or accidentally select your modded save, do not save your game. disable mods until theyre updated and see the second suggestion.
dont play! this is what some people prefer to do, i personally dont do it but hey! its a perfectly acceptable thing to do!
do whatever you want, really! the beauty of the sims is that its a life sim you control. of course, i strongly suggest 1-3, but you can do whatever you want. take out certain broken mods, disable them all together, etc! its your game, just have fun!
remember, the sims is a buggy game! back up your saves and have fun!!
#sims 4#simblog#simblr#simblur#sims#sims 4 simblr#sims 4 cc#sims 4 mods#ts4 cc#ts4 mods#ts4 simmer#ts4 guide#sims 4 guide#the sims#sims2k#sims2k modding guide
1 note
·
View note
Text
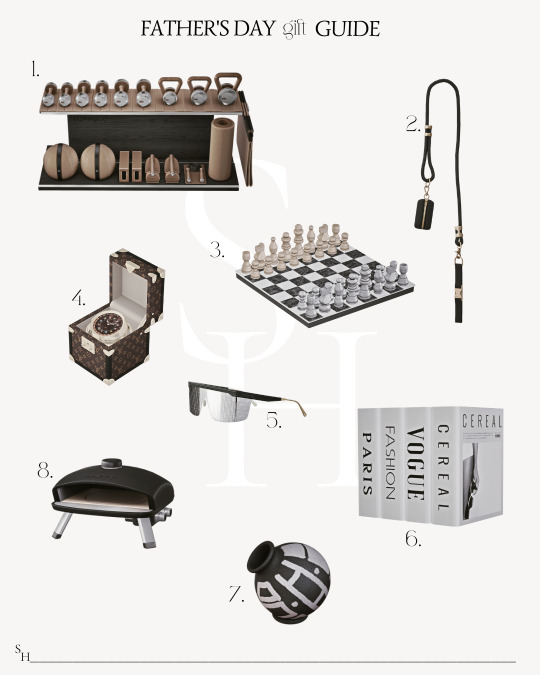
𝚂𝚑𝚘𝚙 𝚝𝚑𝚎 𝙶𝚒𝚏𝚝´𝚜
𝟏.𝑨𝑵𝑨™ 𝑪𝑶𝑴𝑩𝑶 𝑺𝒆𝒕 𝑾𝒊𝒕𝒉 𝑮𝒚𝒎 𝑬𝒒𝒖𝒊𝒑𝒎𝒆𝒏𝒕 𝟐. 𝑻𝒐𝒎 𝑭𝒐𝒓𝒅 𝑫𝒐𝒈 𝒍𝒆𝒂𝒔𝒉 𝟑.𝑨𝒓𝒉𝒂𝒖𝒔 𝒔𝒕𝒐𝒏𝒆 𝑪𝒉𝒆𝒔𝒔 𝑺𝒆𝒕 𝟒.𝑳𝒖𝒊𝒔 𝑽𝒖𝒊𝒕𝒕𝒐𝒏 𝑻𝒓𝒖𝒏𝒌 𝑻𝒂𝒃𝒍𝒆 𝑪𝒍𝒐𝒄𝒌 𝟓.𝑫𝒊𝒐𝒓 𝑪𝒍𝒖𝒃 𝑴𝟏 𝑺𝒖𝒏𝒈𝒍𝒂𝒔𝒔𝒆𝒔 𝟔.𝑻𝒂𝒃𝒍𝒆 𝑭𝒂𝒔𝒉𝒊𝒐𝒏 𝑩𝒐𝒐𝒌𝒔 𝟕.𝑴𝒂𝒏𝒉𝒂𝒕𝒕𝒂𝒏 𝑽𝒂𝒔𝒆 𝟖. 𝑴𝒂𝒍𝒊𝒃𝒖 𝑷𝒐𝒓𝒕𝒂𝒃𝒍𝒆 𝑷𝒊𝒛𝒛𝒂 𝑶𝒗𝒆𝒏
𝙵𝚊𝚝𝚑𝚎𝚛'𝚜 𝙳𝚊𝚢 𝙶𝚒𝚏𝚝𝚜 𝙱𝚢
@cowbuild @bergdorfverse @leosims4cc @bambi ✿
#the huntington#SH Luxury Gift Guide#ts4 aesthetic#gift guide#ts4#ts4 cc finds#ts4 interior#ts4 cc#sims 4 cc#the sims interior#simspiration#simblog#simblr#the huntington interior#the sims 4#the sims community#the sims screenshots#sims 4 aesthetic#cc finds#sims4 cc finds#the sims cc#sims 4#ts4 simblr#sims4 cc
175 notes
·
View notes
Text
On putting together a custom fur thickness setting (works great for clipped fur)
16/10/2023: Updated to add more info for generating hash codes.
Another day, another guide, I found some time to put together this guide for y'alls.
Essentially, we'll be creating or own custom fur overlay. It's not really complex, just as the previous ones, bit annoying to put everything together neatly.
As always, we'll be using:
Sims 4 Studio
Whatever editing software you want, if you're editing just the fur texture, for others, I'm not sure, but very likely whatever software you want will work. I'm going to use GIMP.
Notepad at your own discretion.
As with my previous guides, we'll be using the following Sims 4 Studio tools:
Game File Cruiser
Hash Generator
Create a new, empty package to work with and let's get going.
Step 1:
Open up game file cruiser, just as in my previous guides, ep14 in the left search bar, leave the top right search bars empty for the time being, then go ahead and find CAS Preset box and tick it.

This is pretty straightforward - the files are nicely labelled, and we'll grab the second fur file and add it to our package.
From there, we'll need to scroll down in the list and click "Edit Items" on the Sculpts tag, copy the instance ID and then find it in the game file cruiser and add it to our package. Don't worry that it says "EYES" there, it's not relevant.


Now your package file will have 2 items in it - a CAS Preset and a Sculpt File.
Now, we'll want to add the following instance ID's from the Sculpt file to our package:

You'll have to copy each ID, find it in the game file cruiser and add it to your package file.
I recommend essentially copying an ID, then throwing it in the Instance field search, making sure the bottom search bar has ep14 in it, just in case and then selecting all file types and doing it that way. It'll be quicker.
Your package will look like this:

Now, we'll need to grab thumbnails, so we can create a custom thumbnail for the file, for when it shows up in-game.
We're going to copy the CAS Preset ID and put it in the Game File Viewer, instance field, make sure ep14 is enabled (It's just good practice when wanting to work with specific files).

Select both files (hold down ctrl and left-click on both) and press "Add to Package".
Now, it's time to add IDs to everything, in my previous guides, I've tried to take people step-by-step through the process of adding ID's, but I figure it's a lengthy process, so I'll provide a visual guide for what goes where.

These three MUST have the same ID, for the thumbnails to appear in-game.
And now the more annoying/difficult part:

Edited 16/10/2023: When generating your hash ID's, please use your creator name ie.: "[YourCreatorName/Blogname]TutorialCustomFurCoat1", this will give you a more unique hash code than hoping to be as descriptive as possible when generating the hashes (in this case instance ID's).
Thanks to Mizore Yukii for this advice, from Creator's Musings.
If you're added your files in order like this, it can be easy, but if you've accidentally sorted the files, or added them in a different order, it can definitely be confusing.
In case your files aren't in order, just compare the ID's and make sure to check twice and do it one by one, so you can use the method of elimination, if you're lost/confused.
To change ID's on images, press the "Data" tab and replace the instance ID as follows:

Once you've created all new instance ID's, we've got a few things left to do.
You'll want to copy the ID of "Sculpt" and then open "CAS Preset" and go down to "Sculpts" and replace the ID there:

Then press save and now you can begin editing your image files. You can essentially edit every image file, but if you're not familiar with bump maps, etc., I'd recommend just sticking to editing the "fur" texture for the first time.
This is the file you'll want to export for the "fur" texture edit:

Once you're happy with your coat, mine is here:

Export it as a PNG file, no compression, nothing, just let it export as is.
Then import the file into your new package file:

Save your package and now go ahead and edit your thumbnails, start by exporting both of them and then just do whatever you want and then import those two into the package:

Now, go ahead, save your package and have a look ingame:

And you're done.
#Sims 4 Horses#Sims 4 Equestrian#Sims 4 Equestrian CC#Sims 4 Horses CC#Sims 4 Horses Guide#Sims 4 Horses Custom Fur#Sims 4 Guide#Sims 4 Resources
17 notes
·
View notes