#sketchbook tutorial
Explore tagged Tumblr posts
Visit Tumblr Blog
Explore Tumblr blogs with no restrictions, modern design and the best experience.
Last Seen Tumblr Blogs


Fun Fact
12.7% of mobile users access Tumblr.
Text
putting the water, into watercolor artist
Still can't quite believe it's real, but I'm releasing my own artbook! The Art of Kelogsloops: from Sketch to Finish releases May 21st!
More details about the release here: The Campaign
#brbchasingdreams
#brbchasingdreams#artist#art#watercolor#watercolor artist#artbook#art book#artists on tumblr#my art#original art#sketchbook#sketch#art style#tutorial#resource#book
772 notes
·
View notes
Text
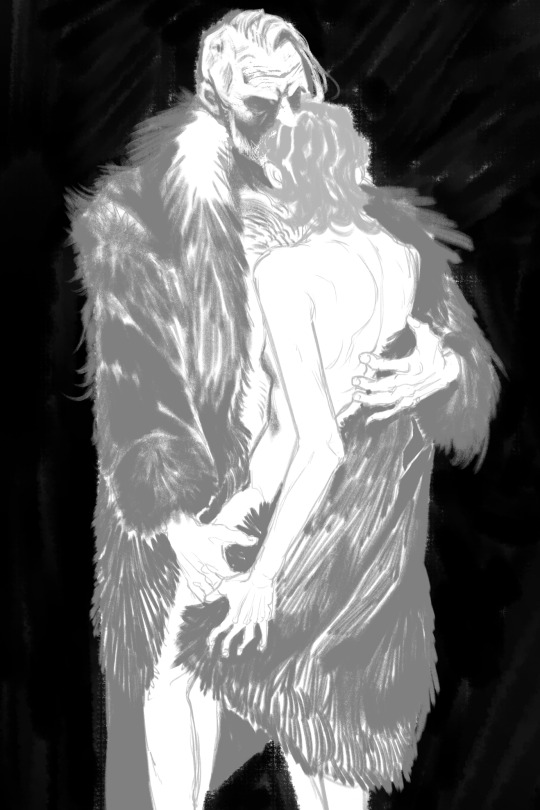
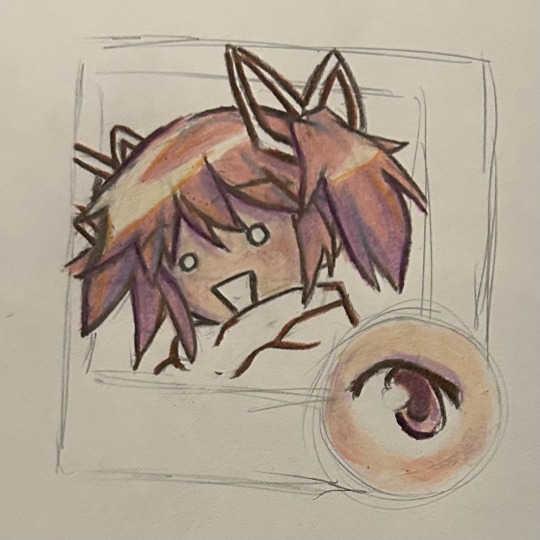
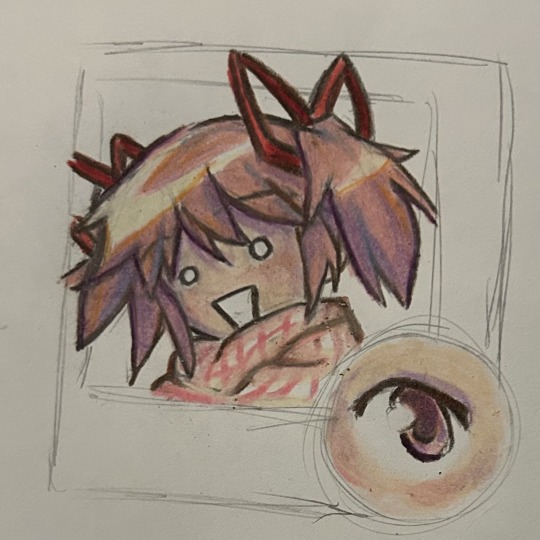
a bit of what I drew today !!! ♥️♥️♥️
I have this HUGE art book called “la pintura en el barroco” and I’m doing a project where I draw portraits of every single painting in it ! My biggest struggle is with portraits of this size (hence why I’m practicing🥲) and honestly I really really like how this one turned out🫶 I was focusing on the little shades that make up his face shape, trying to make it soft since he has a lot of fat yet defined, trying to show his age…it was such a fun challenge though & im excited to do more😇🙏
#apparently the sickness I’ve had since last week is Covid :’) but luckily this isn’t destroying me like it did last year#and my second wattpad account was deleted bahahahahahaahahahahahahahah I didn’t even post anything that wasn’t g rated or did anything that#that could cause me to be banned#so atp I feel like someone was reporting me or idk😆😆 some personal vendetta I am not privy to#SO ALL OF MY WRITING IS HERE AND AO3 ONLY !!!! 😇😇😇😇😇😇😇😇#and one last thing is I would be so sad if tumblr was really going away🥲🥲 I haven’t been invited to any discords#SO I WOULD LOSE ALL OF YOU AND I LOVE YOU ALL SO MUXH😭😭😭😭😭😭#so I just hope and pray that it’s all rumors#art#art process#art tutorial#pencil illustration#pencil#sketchbook
65 notes
·
View notes
Text
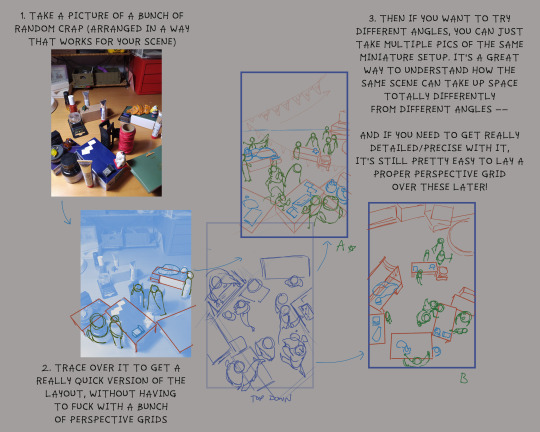
snagging from this week's wip pile for a quick shortcut/hack! i've seen ppl using still life photos as basically a random landscape generator before, but i'll also often do this if i just. don't feel like finding or taking actual to-scale reference of a scene i need to figure out
it's not totally effortless -- sometimes i find it p difficult to gauge how one of these little dioramas will Actually translate once you've traced over/simplified it, and i end up having to go back and try a few different arrangements. but i will do anything to skip a grid dude
#tips#tutorials#resources#i don't remember which of those tags i actually use#oh well!#process#sketchbook#wip
364 notes
·
View notes
Text

A friend of mine introduced me to a new art program yesterday and it is my new favourite thing, so I had to draw at least one Feanorian to properly test it out :D:D:D
#maglor#feanorians#silmarillion#the silmarillion#silm art#silmaril#hehehe#this is either a nightmare or the silmaril decided maglor's hands were that dirty it had to float away~#>:D#or it could be symbolism or smth.#take your pick#:D#I absolutely love this art program btw.#it's called sketchbook#and it is way better than krita#kinda reminds me of a bunch of stuff I liked about photoshop#specifically with blend modes doing WHAT THEY ARE SUPPOSED TO and it doesn't have weird 'bloom' effects where they SHOULDN'T BE-#and I just like the lineart brush options so much more#Krita didn't even taper the brush. if you wanted brush sensitivity you had to look up an entire tutorial on how to add it >:(#there are some lil annoying bits about this program too (changing brush size - and choosing colours for example)#but like.#I'm still figuring it out so I might be able to just program some shortcuts or smth#Ye#all in all I prefer this program#:)#but it's been less than 24 hours so I'll probably have a more grounded view of it by the end of the week#:):):)
49 notes
·
View notes
Note
what do you use to scan your drawings? I've been thinking about trying it out, but the scanner I have rn isn't good quality.
heya :D!! for most of the art i post, i’ve just been using my phone to take pics of my art and process :D
i use an iphone and just the photo app to edit it, and i make sure the pic is taken in even lighting. i draw at night nowadays, so i take pics under (reflected) fluorescent lighting-best if theres no shadow casting over your art though it can work out still with some effort xD

drawing with a pen makes it much easier to process drawings, heres the settings i use if you want a “cleaner” look:


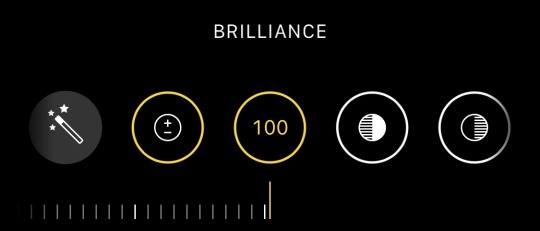

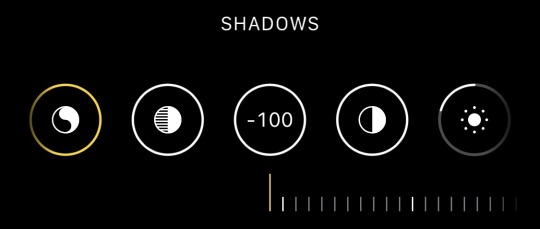


Sometimes the details of the ink get lost in the process of editing to make sure to play around with it till you get something to your liking♥️
I can also share another setting i’ve been using lately too. While it’s a little rougher and you can see the drawings behind the paper, i like how the linework pops out a little more, and showing the paper’s colour makes it a little easier on the eyes

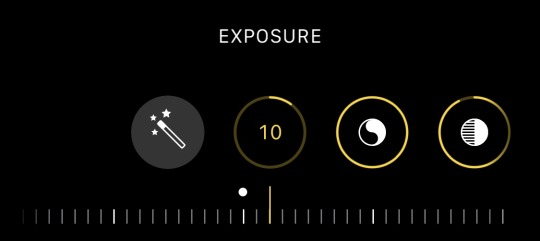


these settings would need much more fine tuning on your end though, so play ard with it!
if you use a different device, experiment with its settings too, its a lot of trial and error but its worth it once you find the settings you like. hope this answers your question and that it helps :D, let me know if you have other questions too💖
#tutorial#ask#text#for the toa sketchbook im doing i use photoshop but idk if ppl will even like the end quality yet but if yall do i can share the presets to
40 notes
·
View notes
Text
character spread tutorial that nobody asked for [chunky sketchbook edition]
so! you want to make a chunky sketchbook? here are some tips from my end as i make a spread for a swap variant from crest’s multiverse :D
firstly, you want to layer LIKE A MADMAN. grab random things you have lying around your house and paste them in there. receipts, candy packaging, anything works! i like to use receipts, index cards, and colored paper that matches with the theme of what i’m doing, but that’s not really mandatory at all, do as you will!

here are the things i’m using for background— washi tape, blue cardstock, a receipt and some sticky notes :)
a lot of people that i see make tutorials say to add stuff like puffy stickers and trash and don’t get me wrong, this does help!! but my key to getting my sketchbook as it is is merely layers upon layers of paper. trust me when i say that all you need is some thick poster board or cardstock, or even cardboard to make a chunky book.
another note, GET A TAPE RUNNER!!! these things work better than most glues i’ve used in the past and they work WONDERS for scrapbooking. they kind of look like white out, and function as it does, as well!

i use the elmers tape runner, but there are plenty of other ones that work just as well. i painted this one!
your spread should look a bit like this as you start it.

of course, decorate it as you will, it doesn’t have to be identical to mine. i will be adding i move along so don’t stress about random things popping up on mine CACKLES
secondly, make your art on separate pieces of paper than what you’re using. once again, layer like a madman babe TRUST ME!!!!!
bonus points if it’s thicker paper :)
also not a requirement but i like making the drawings i put in these spreads only as sketches and then coloring them once they’re glued in. it’s just my preference and not required at all but i find it entertaining and more pleasurable ^^

here are some of the sketches i have for this spread :)
and here are some colored in!

the last thing here is i would add little details and finalize any sort of other additions you’d like to add like washi tape, decorative stickers, text, stars, etc.

and this is what mine looks like completed!!
of course there are plenty of other ways you could have done this, you could have made it multicolor, you could have added more yellow or grey or whatnot, and every way would have been valid! it’s art— the only limit is your imagination 🫶
i would recommend looking up tutorials for interactives as well to add texture and life to your work!
hope this helps!
#nash’s dibujos#tutorials#swap!sans#utmv stuffs!!#chunky sketchbook#traditional art#sketchbook#art tutorials#nashdoesstuff#i’ll make a tag for this swap eventually anywaysssss
40 notes
·
View notes
Text

It's Snoopy's birthdayyyyy! ✨🎂 Hope he likes pistachio cake.
You can find the timelapse of this on my Tiktok and IG @joydawood!
#snoopy#peanuts comics#peanuts#birthday#charlie brown#art#sketch#sketchbook#drawing#illustration#characterdesign#artist#artists on tumblr#illustrators on tumblr#theartofjoydawood#cute art#childrens illustration#illustrator#celebrate#art tutorial
97 notes
·
View notes
Note
do you have a process for drawing dragon faces? their expressions are so fun and lifelike to look at :]
Sure I do!! I don't think about it too much consciously nowadays but I definitely have a process. Mostly it's informed by previous experience doing human expressions? Specifically a loooot of anime style characters, but I also use the same basic layout for pretty much every character I draw from dragons to ponies; only thing that changes is the proportions and whether or not I need to add a snoot.
I threw together my best shot at a guide, hope it helps~!!
(I am aware that my chicken scratch is very messy and accessibility is a good idea so I'm gonna throw plaintext of what I wrote beneath the cut)
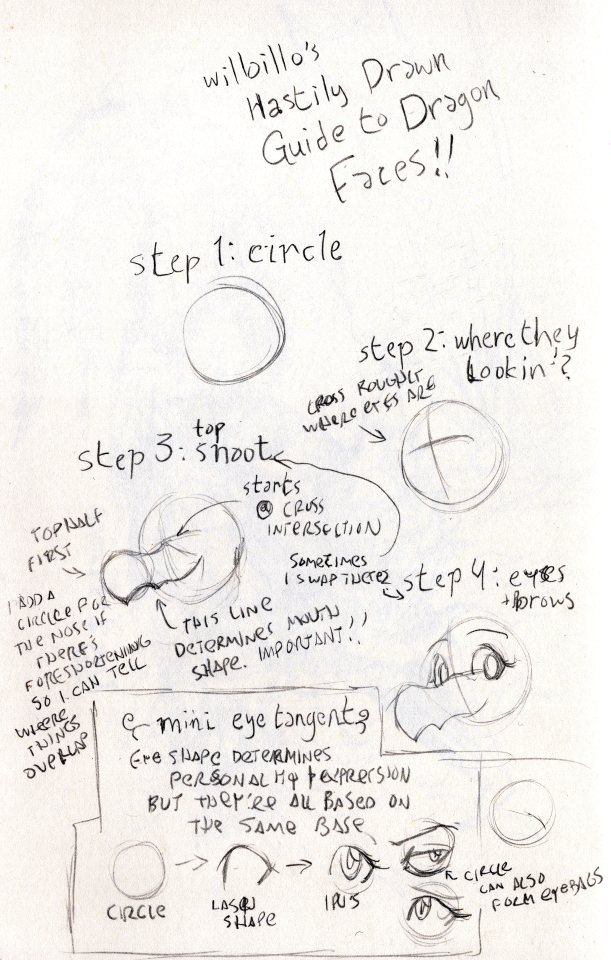
Willoillo's Hastily Drawn Guide to Dragon Faces!!
Step 1: Circle [image ID: a sketchy circle]
Step 2: Where they lookin'? [Image ID: the same circle, but with a cross drawn on it. the lines that make up the cross are curved slightly to show dimension.]
Cross roughly where the eyes are
Step 3: Top Snoot [Image ID: The same circle with the cross, but now with a collection of curved lines making up the top half of a dragon's snout attached. The mouthline is curved upwards to show a smile.]
top half first
I add a circle for the tip of the nose if there's foreshortening so I can tell where things will overlap
this line determines mouth shape. Important!!
Step 4: Eyes + Brows [Image ID: The circle with the snout, now with a pair of eyes and raised brows looking at the viewer.]
Sometimes I swap steps 3 & 4
Mini Eye Tangent [Image ID: a series of three drawings showing how to build an eye shape, starting with a circle, then adding a top and bottom lash to create a specific shape, and finally showing the eye with an iris looking at the viewer. Next to it are other eyes with different shapes and expressions, with the circle behind them shown to show how they were built from the same template. One of the eyes has a heavy eye bag drawn, following the shape of the circle behind it.]
Eye shape determines personality and expression but they're all based on the same base
Start with a circle, then do the lash shape, and finally the iris
The circle can also from wrinkles/eyebags
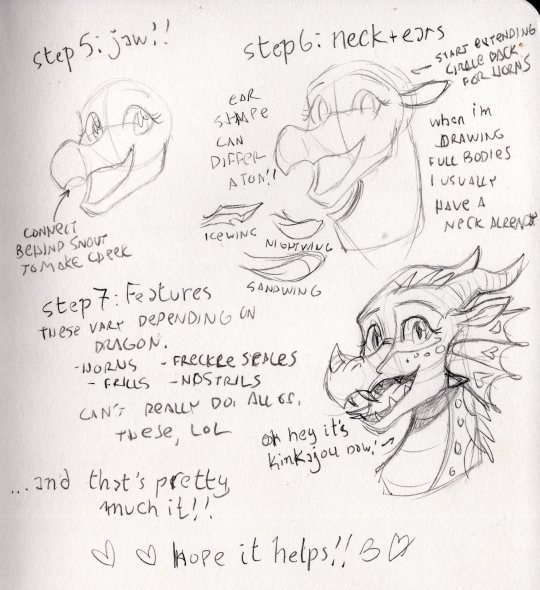
Step 5: Jaw!! [Image ID: The same dragon, but now with a lower jaw. The line for the back jaw is drawn visible through the snout to show how it connects to the face on the other side.]
Connect the back jaw behind the snout to make the cheek
Step 6: Neck + Ears [Image ID: Same as previous, but now with a curved neck added connected to the circle, as well as leaf shaped ears. An additional circular sketch has been extended behind the original circle past where the ear is connected.]
Start extending our circle back to make room for horns
When I'm drawing full bodies I usually have a neck already in place
Ear shape can differ a ton!! [Image ID: examples of how I draw different ear shapes for icewings, nightwings and sandwings; the icewing ear is sharp and jagged, the sandwing ear is long like a rabbits, and the nightwing ear is twisted like a goat's.]
Step 7: Features [Image ID: A finished sketch of Kinkajou from the Wings of Fire series with a happy expression. An arrow is pointing to her with the line 'oh look it's kinkajou now' written next to it.]
These vary depending on dragon.
Horns, frills, freckle scales, nostrils
Can't really show all of these, lol
... And that's pretty much it!! Hope it helps!!
#illustrators on tumblr#willoillo#artists on tumblr#art#illustration#drawing tutorial#lillo answers#wings of fire#wof art#wof#dragon#dragon art#pencil sketch#sketch#sketchbook
65 notes
·
View notes
Note
Hiii your artstyle feels very loose and fun!! Are there any specific influences or ways you go about it that you think contribute to that? :O
aw thank you so much!! I actually think my style could be looser haha but it definitely used to be more stiff and I think that mostly comes with practice and building line confidence over the years!!
i have been trying to incorporate more quickly-drawn lines of action into my sketches, and if i don't feel like a sketch is going how i want to just restart sooner instead of trying to fix the current sketch.
I also kinda have 2 sketch phases now, 1 very quick just for very loose lines of action+shapes, and 2 an 'actual' sketch that i can be more loose about (ie less worried about proportions or posing) because i already got a good base from sketch 1

and maybe its cause ive been drawing more traditionally in my sketchbook, for whatever reason i sketch more quickly/easily in there and i think its transferring over to helping me draw looser digitally too! :]


#my hope is that my art doesn't look stiff so im glad to hear you think it feels loose and fun!! :')#ough also drawing S shapes. S shapes my beloved idk they're just the loosest kinda line you can draw imo lol#helps ur hand get familiar with uisng that v free flow motion n attitude i thinks#strawberry-seal77#ask#ppmpost#art tutorial#?#sketchbook#scribbles#traditional#sweet
30 notes
·
View notes
Text

sketches on motion blurs/speed lines and radial blurs inspired by manga. Additional sketches also include arnim zola first draft poses to capture the personality of his character.
#digital art#art reference#art tutorial#art help#fanart#arnim zola#msm 2017#procreate#procreate art#manga art#anime and manga#sketchbook art
9 notes
·
View notes
Text

The sketch, blocking, and full rendered black n white version of the most recent painting
#i should post progress pics more#i pretty much always work off a reference image or photo collage to block in shapes#i cant eyeball proportions and remember anatomy that well#so i just dont!#im most happy rendering so i put my effort in there instead :)#art#illustration#black and white#drawing#artists on tumblr#digital art#ocs#sketchbook#dungeons and dragons#dnd#art tutorial#fathom#uriah#malcolm#wip
74 notes
·
View notes
Text


Sketchbook 2015-2020
I’ve put together a 100-page artbook full of pieces from 2015-2020, showcasing all the pencil & ink process steps and details all together, all in one place. It’s free for any viewing, study, practice, and inspiration! Enjoy! https://allisonchinart.gumroad.com/l/freesketchbook
#artists on tumblr#art#ink#sketchbook#nature#concept art#art process#drawing#fan art#black and white art#ink drawing#pencil art#tutorial#art book#art books#illustrations#fanart#art collections
71 notes
·
View notes
Text

In the ancient lore of creation, it is said that the universe is woven from the fabric of four primordial elements, and whosoever masters these shall hold sway over all that exists. Yet, within the arcane craft of artistry, a parallel mystery dwells—four sacred elements that the artist must command to shape their vision into being.
The first, and most fundamental, is the tool of the artisan's hand, be it wrought of wood or imbued with the glow of modern alchemy. This is the essence of Earth, the solid foundation upon which all creation rests.
But beyond this foundation lie the three dimensions, each a veil to be lifted. The first dimension, the Point, whispers of the artist’s very soul—a revelation of their style, unique as a star’s own light. The second dimension flows like Water, bearing the language of form and geometry, squares, circles and triangles. The third, aflame with the power of Fire, is the realm of depth and volume, the art of bringing the flat plane to life in radiant three-dimensionality.
When these four elements are united, they call forth the fifth: the Spirit, that which breathes light and life into creation. It is the essence of the finished work, resonating with the soul of the beholder, as if echoing the music of the spheres.
In my own humble endeavor, I have sought to delve into this mystery, studying the human head from myriad angles to grasp the secrets of the three dimensions. May this effort serve as a guide to those who seek to walk this path and uncover the truths hidden within the artful labyrinth.
#head#drawing#head drawing#face drawing#how to draw heads#face#sketch#sketchbook#tutorial#art tutorial#drawing tutorial#how to draw faces
15 notes
·
View notes
Text


I said I wasn't going to color this but awh it's like my own personalized color book if I think about it
#ok i was saying. tried to watch coloring ans oainting tutorials several times but they dont make much sense to me. like idgi#im gonna follow my heart... also hate the accidental pink overlay on larkies hair :< we arevery blue coded. but just this once#anyhow this doesnt get any less embarrassing sobss#જ⁀➴sketchbook.
9 notes
·
View notes
Text

youtube
Sketchbook? Digital? BOTH? 👀☝🏼
#albabbgg#albabg#artists on tumblr#art#fantasy art#mystical art#character design#mixed media#sketchbook#procreate#illustration#youtube artist#youtube art channel#art tutorial#game art#comic art#Youtube
38 notes
·
View notes
Note
So, your Madoka Kaname drawing looks amazing, and as a traditional artist, I was trying to observe to see if I could learn from your drawing.
One thing that stuck out to me was the shading and outlines.
How do you shade so well? How do you know which colors to use, and where to use them? Same question goes for outlines, too.
hihihihiii!! first of all thank u so much, im rlly flattered that u were so impressed 🫶🫶 im honestly really surprised how much attention my drawing got gyuh
anyways!! the picture i referenced was from the crash fever x pmmm crossover, so it’s by no means completely original. here’s the side by side comparison of the (cropped) og image vs in my sketchbook!!
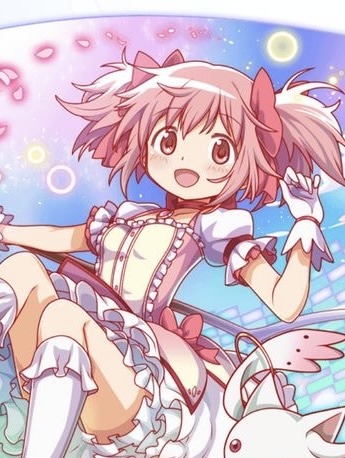
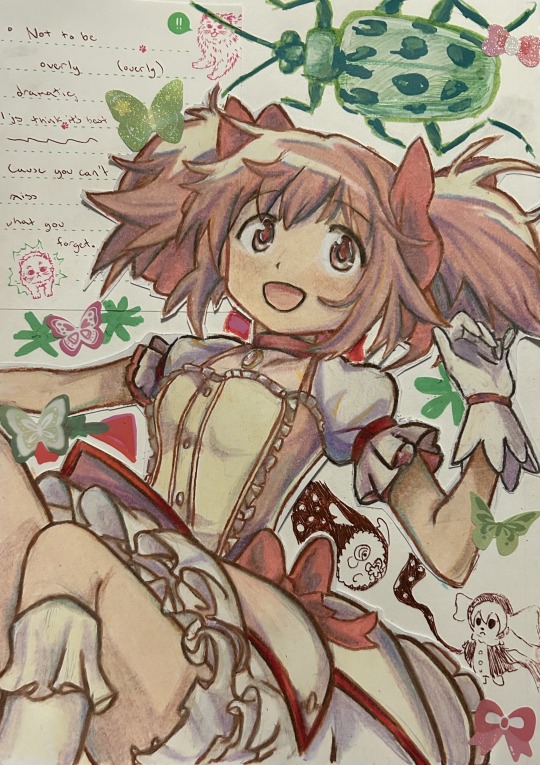
so, most of the actual shading decisions and placements are from the original work. however, i had to change up the colors a bit because of the selection i had. (please note that my version is also darker because of lighting and iphone picture quality 😭😭)
also, for most of my drawings i follow the call of the wind (make guesses) and fufill the prophecies (keep adding more colors until it looks okay)
that being said, below the cut is a full coloring walkthrough if you’re still interested!!
please note that this is much smaller scale and done in less time (took an hour instead of two days 😨) so the quality will be a bit less!!
alright. so let’s say we wanna draw this image, but we tweaked it a bit because drawing BOTH eyes was too much of a hassle.
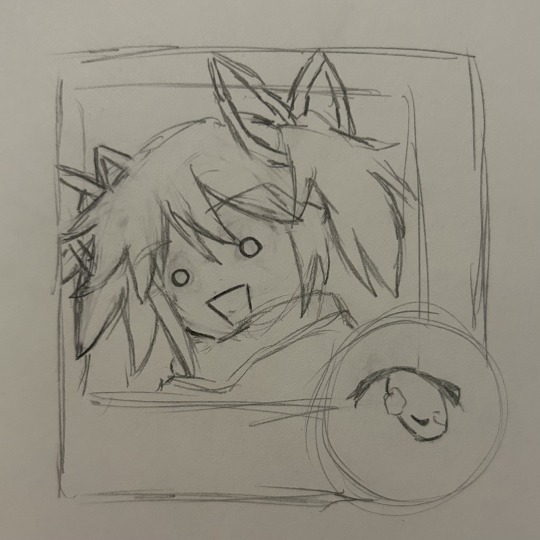
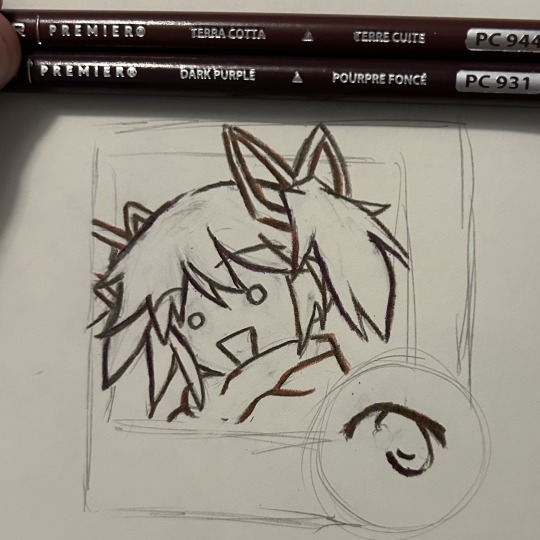
after you clean your sketch, the best thing to do is open with an outline that’s not QUITE black but close to it.

now, i have a rule. PLEASE PLEASE PLEASE remember this rule: you can use ANY color. for your outline, shading, whatever. it doesn’t have to match the reference.
if you are using this as a genuine tutorial, please know that i change colors every fucking time i draw. i change mediums too. this is only the process i used for my madoka drawing (as best as i can remember)
cuz, like my art teacher said, you have this thing called artistic license, which means you have the right to change whatever the FUCK you want if you think it makes your drawing better. make her purple, give her one ponytail, whatever. as long as you can make it work, have fun!!
anyways. next, go over that outline with other dark colors of different hues. there’s no rhyme or reason, it’s just fun.
after, place your highlights on the hair. i used cream instead of the pastel pink in the original because i like cream better and it adds more hues.

usually, i start with the darkest value instead for shading as it’s more vibrant, but madoka doesn’t have any really standout dark tones. it’s okay though i love her
then, you gotta go in with base colors. simple pink and peach yada yada
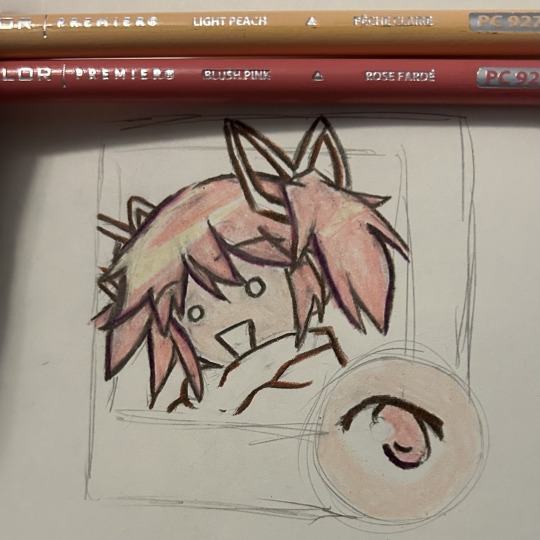
listen, quick reminder: YOUR BASE COLORS DON’T MATTER AS LONG AS YOU CAN STILL ADD ONTO THEM!!!
just pick a light base close to the original. don’t agonize over it. apply lightly and gently in circular motions, and you’ll be okay!!
next, we adjust the tone of the hair. i wanted a cooler toned pink, so i added amethyst. i also added a bit to the stray eye.
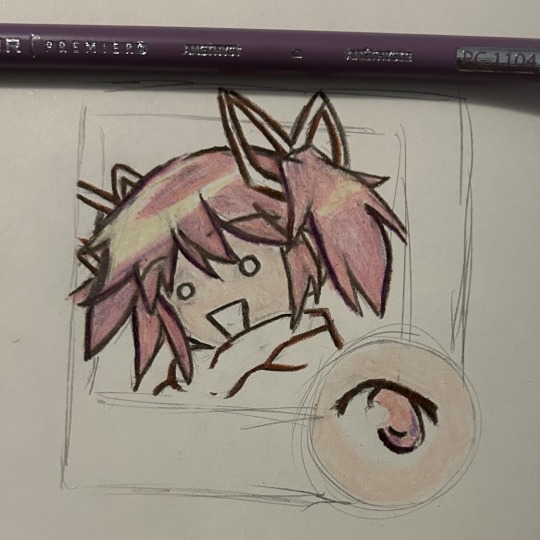
after, adjust your tone more as needed. again, any color goes. the means justify the ends, and if you end up adding some blue or yellow or whatever then good!! go bonkers with it. i used vermillion.

next, add shading blocks (referenced from the original image!) in a color that’s light enough to blend in more but dark enough to see (amethyst is my favorite for this, and i use it a lot!!) you can also add extra shading in some areas to give it some personality.
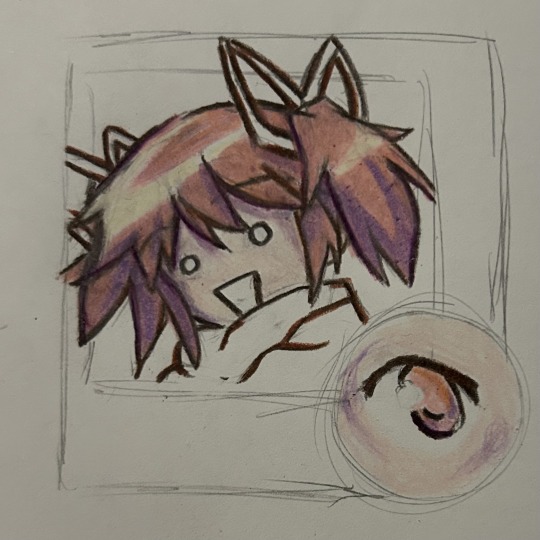
after THAT, blend in your shading a bit more with your base colors. by this point you should be pressing down a lot to get the pigment you want. i think for her skin i added beige instead of peach in this step, but that’s also what i did for the above drawing.
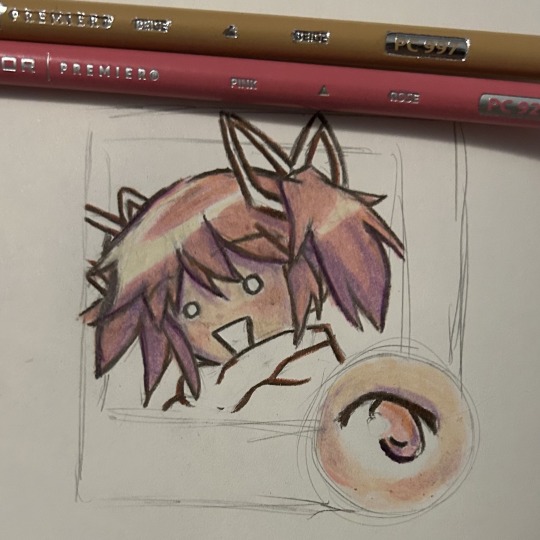
the purpose of this is to mute your colors a bit so they fit together more. however, if you want it to pop, you don’t have to add another base color!!
i also went over the outlines with the base color to lighten them and even out the drawing. i do that with almost every step, as needed. follow your heart on that one
also, i gave her a little bit of blush in that step. just because.
ok, so now is the fun part. for the hair and any accessories/clothes/things of the same texture, add random streaks of random colors.
yeah, go ahead, add orange, blue, yellow, whatever. it’s best if it’s of the same value (aka darkness) so it fits in with the base color, but it can be anything!!
you don’t have to do this, but it’s fun.
also, i shaded the eye too offscreen. same process, because pmmm’s style has a very flat texture on characters. thus, it’s okay to use the same shading technique.
now, we can do the same with accessories!! these are simpler and i honestly got too lazy to even reference for the scarf because the hair was the main focus.
finally, add little details, clean up anything you don’t like, and do whatever you want with it!!
that’s all i do for shading, and i hope it helped a bit. i mainly work with pen and paint markers, but the process is the same aside from tweaking parts.
just remember:
its your art do whatever the fuck you want
LAYER LAYER LAYER fix anything by adding new things
it doesnt have to be perfect yada yada
fun color = fun drawing
it doesnt have to look like the picture because thats boring and you wont learn if you try and carbon copy everything you see
like and subscribe
#also PLEAAASE check out my more original art if you like this drawing#i post my full sketchbook pages where i use a lot nmore mediums and draw original stuff like. bugs!!#pleaseee sorry for self promo but i love attention#drawing tutorial#drawing#my art#sketch#puella magi madoka magica#madoka magica#madoka kaname#madoka magica fanart#prismacolor#idk what do i tag. bro
34 notes
·
View notes