#subnetmask
Explore tagged Tumblr posts
Visit Tumblr Blog
Explore Tumblr blogs with no restrictions, modern design and the best experience.
Last Seen Tumblr Blogs


Fun Fact
Tumblr was attacked by a cross-site scripting worm deployed by the Internet troll group GNAA on Dec 3, 2012.
Photo


The Loop (Forever)
Linda L. Davis
Project #2, 2019
Theme: Internet
Technique: Series (gifs)
This is a series of ten animated gifs created from video. I selected all things internet and took it literally and morphed it into looping back from history of the digital communication stages. I found several videos that contained the computers/internet and selected the images that I thought made an impact on society. I started out with a gif of a 1964 IBM keypunch card reader marking the beginning of a new way to process information and contrasted it with an Instagram demonstration of a moment with the cat since the internet made cats come alive and images with cats seem to capture the audiences and are one of the most frequently posted visuals. We are living in such an amazing time of technological advances. What people choose to do with this the internet is such a mystery and continues to unfold moment by moment.
Take a journey down an internet moment…
#dos#ibm#backintime#netscape#java#windows#instagram#cats#subnetmask#aol#facebook#gifs#internet#computers#5g
25 notes
·
View notes
Text
10_May_2022 learning
Today I learned
classful addressing, subnets, subnet masking in computer networks
1 note
·
View note
Photo
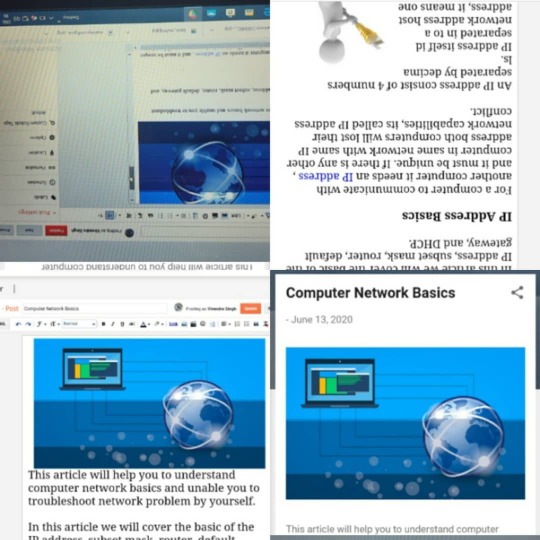
New blog✍ out check it now Link in bio👆 Or visit tecparam.com @blank_zone27 This article is to help you understand computer network basics and enable you to troubleshoot network problems by yourself. In this article we will cover the basics of the IP address, subnet mask, router, default gateway and DHCP. #tech20 #needsupport #latestblogpost #tech2020 #blog2020 #ipaddress #networking #dhcp #gateway #router https://www.tecparam.com/2020/06/computer-network-basics.html?m=1
https://www.tecparam.com/2020/06/computer-network-basics.html?m=1
#tech20#needsupport#latestblogpost#tech2020#blog2020#ipaddress#networking#dhcp#gateway#router#subnet#subnetmask#computerscience#technoworld
0 notes
Text
Subnet Mask
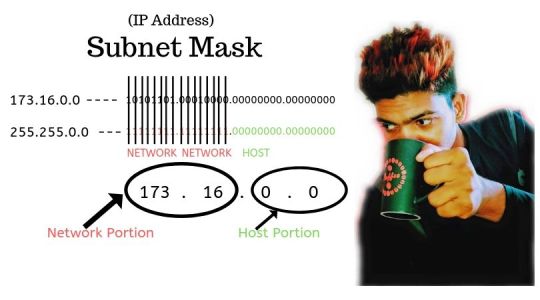
An IP Address Have Two Parts, One Part Is Designated For A Network, The Remaining Is Designated For The Host. So The Way To Tell Which Portion Belongs To Either The Network Or The Host Is Where The Subnet Mask Comes In. A Subnet Mask Is A Number That Resembles An IP Address. It Reveals How Many Bits In The IP Address Used For The Network. By Masking The Network Portion Of The IP Address. IP Address: 173 . 16 . 0 . 0 Subnet mask: 255 . 255 . 0 . 0 So In This Subnet Mask, The First Two Octets Are 255 And We Would Look At This Subnet Mask In Binary Form The First Two Octets Will Be All One's. 255.255.0.0 --- 11111111.11111111.00000000.00000000 Because When You Count All The Numbers In An Octet, It Will Equal 255. Example - IP Address 173.16.0.0 with its subnet mask Binary Form - 10101101.00010000.00000000.00000000 255.255.0.0 - 11111111.11111111.00000000.00000000 So The Way To Tell Which Portion Of This IP Address Is A Network Portion Is When The Subnet Mask Binary Digit Is 1, It Will Indicate The Position Of The IP Address That Defines The Network. So We'll Cross Up All The Digits In The IP Address That Line Up With 1's In The Subnet Mask.
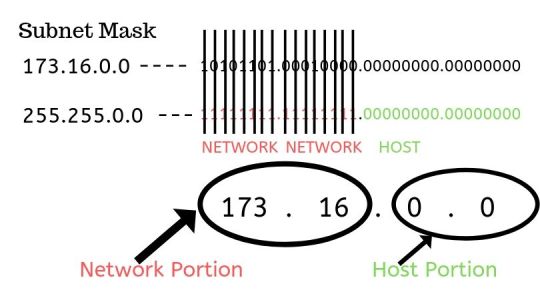
And When You Do This It Will Reveal That The First Two Octets Are The Network Portion. And The Remaining Is The Host Portion. Here Is The Chart For The Default Subnet Mask For Class A,B,C Ip Address. Notice The Change Of The Location Of The Network And Host Portions Between Them.

You Are Going To Need To Memorize The Default Subnet Mask Classes For The Exam.
IP CLASSES AND RANGES
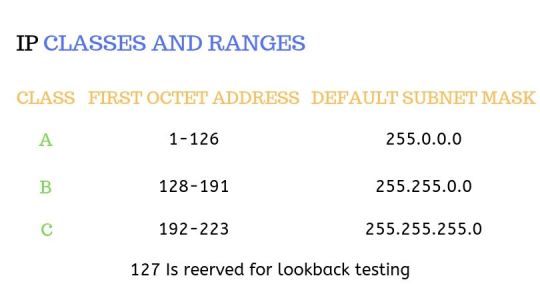
IP Addresses Are Assigned To Different Organisations In Blocks. These Blocks Are Divided Into 5 Classes But For The Exam, You Only Need To Know 3 of Them. They Are Class A, Class B, Class C You Can Tell By The Number In The First Octet Which Class An IP Address Belongs To. So Class A IP Ranges From 1-126 This Class Supports 16 Million Hosts On 126 Networks. So This Class Is Mainly Given To Large Organisations Because Of THe Tremendous Amount Of IP Addresses It Can Give Out. Class B IP Range Is From 128-191 This Class Supports 65000 Hosts On 16000 Networks. This Class Is Given To Medium Size Organisations. Class C IP Ranges From 192-223 This Class Supports 254 Hosts On 2 Million Networks This Class Is Given To Small Organisations. Now If You Notice We Escaped The Over The 127 Range This Number Cannot Be Used For A Network Because 127 Address Is Reserved For Internal Loopback Fuctions. You Are Also Going To Need To Memorize The Default Subnet Masks For Each Of These Classes.
Read the full article
0 notes
Note
ayy sending you an ask about my day like you said i hope you still want that. my day was p good wbu? i finally finished a big step in my art project and watched winnie the pooh once again. its 2017 and im not a bit more mature than last year lol. anyways i had a chill day it was nice :))
winnie the pooh is the cause of my childhood crises sdhuz 2017 better be good she treated me well so far i hope she stays loyal damn :// 2016 was a whore just saying
1 note
·
View note
Link
Learn more about VLAN, Link aggregation and VLAN Trunk Configuration in GNS3 in my blog post..
#GNS3#ComputerNetworking#Linux#Network#Diagram#Software#Emulator#Switch#VLAN#Trunk#IPAddress#Gateway#SubnetMask#NetworkCommands
0 notes
Photo

I can not stress this enough. #subnetmask #subnetmask #subnetmask #lighting #lightinglife #lightingdesign #networkDMX
0 notes
Note
A VPN won't save you from those troubles though, the problem is your subnetmask and your unique ID associated with instagram. If K chose to sue Insta they'd be forced to disclose all information about those accounts, and seeing as they are this petty they'd be fucked either way
.
0 notes
Text
Phương pháp kết nối mạng cho hai máy tính
Bằng cách lắp đặt mạng lan này bạn sở hữu thể tự lắp đặt mau chóng 1 mạng kết liên giữa hai máy tính mang nhau. Cùng kỹ thuật lắp đặt mạng wifi tại khu công nghiệp ở hải dương Phân tích cách thức lắp đặt dưới đây:
Phương pháp 1: 2 máy tính lắp trực tiếp trên modem (Nếu hai máy tính xa nhau ko quá 5m đến 7m - xa hơn thì tín hiệu máy xa sẽ kém hoặc ko có tín hiệu).
1- Máy một nối có modem bằng cáp chính (Thường là màu vàng) hoặc cáp phụ (thường là cáp USB màu xanh) chiếc này tùy bạn. giả dụ máy 1 nối với modem bằng cáp chính (màu vàng) thì chạy được luôn. Còn máy 2 nối bằng cổng USB chưa chạy được. Muốn chạy được bạn phải cho đĩa Drive (đĩa theo modem) vào máy hai để cài chương trình thì nó mới chạy được. (Cho đĩa vào và vào mục USB drive chọn Win Setup...và chờ OK là xong - đĩa drive của bạn với thể khác, mình ko biết dòng gì nên ko hướng dẫn thi cong he thong sở hữu cụ thể được)
2- giả dụ máy hai nối mang modem bằng cáp chính (màu vàng) thì máy 1 bạn làm như trên.
Chú ý : Dây USB (màu xanh) khó tìm hơn, nếu như có thì phải nối phổ biến nên khuyên bạn máy nào sắp nhất thì lắp dây USB theo modem (màu xanh). Máy xa hơn thì lắp dây mạng chính - Bạn ra hiệu máy tính bảo họ bán cho đoạn dây nối mạng lan (kêu họ bấm cáp RJ45 (dây này gồm 8 sợi) người ta cắt và đấu sẵn cho bạn, về bạn chỉ việc cắm vào là xong. Nhớ mua dây càng đắt càng thấp (khoảng 10000VND) thì dấu hiệu mới rẻ.
Phương pháp 2: (Nếu 2 máy tính quá xa nhau): bí quyết này sử dụng ổn định hơn khi thi công hệ thống mạng máy tính
Để lắp được bạn mua thêm 1 bộ phân mạng (bộ kích mạng) để lắp mạng Lan (gọi là Switch (síp )) khoảng gần 200k bao gồm 5 cổng. 1 Cổng cắm vào modem 2 cổng vào 2 máy tính. Lúc lắp xong bạn phải thiết lập trong mạng là máy 1, máy hai. Khu vực IP cũng phải thiết lập khác nhau (số cuối). Sau khi thiết lập xong là bạn có thể vào mạng được rồi đó . Bí quyết này chẳng hề cài Drive mà hiệu quả đa dạng hơn bí quyết 1. Máy tính mang thể để cách thức xa Síp 80m vẫn duy trì mạng thường nhật.
cách thức thiết lập (Nếu bạn chưa biết):
Xưng tên cho máy:
- Chuột phải vào My Computer Properties Computer name trong ô Computer description đặt tên cho máy. (Máy 1 hoặc máy 2 thì tuỳ bạn). Giả dụ máy này là máy một thì máy kia là máy hai. Tôi gọi máy này là máy một. Sau đó Apply OK
- Ở Máy 1: Bạn click chuột phải vào My Network Places Properties Chuột phải vào Local Area Connection Properties . Click đúp chuột trái vào Internet Protocol tại Tab Genera chọn Use the following IP address . Gõ như sau chiếc Ip address: 192.168.1.1 chiếc subnetmask: 255.255.255.0 OK . Xong
- Ở Máy 2: làm như trên nhưng gõ vào loại IP address: 192.168.1. Hai cái subnetmask: 255.255.255.0 OK. Vậy là bạn đã hoàn thành công đoạn cài đặt mạng cho hai máy.
Như vậy là đã hoàn thành việc lắp đặt, bạn có thể nhờ kỹ thuật nhà thầu dự án điện nhẹ tại khu công nghiệp ở hưng yên tương trợ nếu như thấy công việc hơi phức tạp với bạn.
0 notes
Text
Sambungan Straight dan Cross pada Kabel UTP
Saya akan mengupas perihal cara mengakibatkan jaringan (LAN) kecil dengan 2 computer dengan manfaatkan kabel UTP. Untuk itu yang perlu Anda persiapkan adalah kabel UTP dan Jack RJ-45 yang udah terpasang dan juga Network card terhadap masing-masing komputer. Biasanya computer saat ini udah ditambah dengan Lan Card terhadap motherboard computer tersebut. Jika tidak tersedia Anda sanggup membelinya di toko computer dengan dengan kabel UTP dan Jack RJ-45.

Jika cuma menghubungkan 2 komputer, Anda tidak memerlukan sebuah hub atau switch. Namun, konfigurasi kabelnya yang sedikit berbeda. Jika Anda mengakibatkan jaringan untuk 2 computer tanpa manfaatkan hub atau switch, konfigurasi kebal yang digunakan adalah kabel Cross. Sebaliknya kecuali mengggunakan sebuah hub atau switch, untuk mengakibatkan jaringan lebih berasal dari 2 computer maka konfigurasi kabel yang digunakan adalah kabel Straight. (Silahkan baca Cara Memasang Kabel UTP Tipe Straight dan Cross)
Ok langsung saja saya bahas perihal cara mengakibatkan jaringan (Lan) untuk menghubungkan 2 komputer. Beriikut langkah-langkahnya: Colokkan kabel UTP yang udah dikonfigurasi dengan kabel cross ke port LAN card computer pertama Anda. Jika Anda manfaatkan Windows XP,buka Control Panel »» Network plus Internet Connections »» Network Connections. Jika Menngunakan Windows 7 atau Vista, membuka Control Panel. Pada icon Network plus Internet, klik tulisan View Networks Status plus Task. Selanjutnya akan keluar jendela Networks plus Sharing Center. Pada segi sebelah kiri jendela ini, klik tulisan Change Adapter Setting Klik kanan terhadap Networkd Card Anda dan memilih properties. Pada jendela Local Area Connection Properties, memilih Internet Protocol (TCP/IP) terhadap Windows XP atau Internet Protocol Version 4 (TCP/IPv4) terhadap Windows 7 dan Vista. Kemudian klik tombol properties. Pada jendela properties yang muncul, memilih opsi Use the followinf IP Address dan isikan dengan 192.168.0.1 terhadap IP Adrees, 255.255.255.0 terhadap Subnetmask. Input yang tersisa sanggup Anda kosongkan. Klik OK untuk menyimpan setting dan klik tombol OK termasuk terhadap Local Area Connection Properties
Selanjutnya sehingga ke-2 computer tersebut sanggup berhubungan, maka Workgroup berasal dari komputer-komputer tersebut haruslah sama. Untuk itu, berikanlah nama Workgroup yang serupa terhadap ke-2 computer tersebut. Caranya sebagai berikut: Untuk pengguna Windows XP, bukalah system Properties dengan mengklik kanan icon My Computer dan memilih properties. Anda termasuk menghimpit tombol paduan keyboard Win + Break. Bagi Anda pengguna windows 7, caranya sedikit serupa yakni membuka system properties dengan cara layaknya terhadap windows XP. Pada jendela yang keluar klik tulisan Change Setting terhadap anggota Computer name, domain, plus workgroup setting. Pada jendela System Properties, baik Windows XP, Vista ataupun Windows 7, klik tombol Change. Kemudian di jendela seterusnya memberikan nama untuk computer 1 dengan nama yang diinginkan. Misalkan DK-1. Dan memberikan nama berasal dari workgroup Anda. Contonya Dunia Komputer. Klik OK dan klik OK termasuk terhadap jendela System Properties.
Agar perubahan yang baru Anda melakukan berpengaruh terhadap system maka diperlukan proses restart. Untuk itu retart computer Anda. Lakukanlah langkah-langkah yang serupa dengan diatas untuk melakukan konfigurasi Network Card dan memengaruhi nama computer dan juga workgroup terhadap computer kedua. Namun, bedanya terhadap computer 2, IP address yang diberikan adalah 192.168.0.2. Subnetmask serupa yakni 255.255.255.0. Sedangkan Nama computer perlu berbeda. Misalkan memberikan nama DK-2. Namun, workgroup haruslah sama.
Baca: Hardware Yang Dibutuhkan Komputer
Untuk sadar apakah ke-2 computer tersebut udah terhubung lakukanlanh ping berasal dari computer 1 ke computer 2 atau sebaliknya. Caranya sebagia berikut: Buka Command Prompt dengan menghimpit tombol keyboard Win + R. Pada CMD ketik perintah “ping IP Address”. Ip Addrees diisi dengan IP computer yang dambakan di ping. Jika Anda melakukan ping berasal dari computer 1, maka IP address diisi dengan IP computer 2. Begitu termasuk sebaliknya. Contoh perintah ping berasal dari computer 1 ke computer 2: ping 192.168.0.2 Jika koneksi antar ke-2 computer tersebut sukses maka hasilnya akan layaknya ini: Pinging 192.168.0.2 with 32 bytes of data: Reply from 192.168.0.2: bytes=32 time<1ms TTL=128 Reply from 192.168.0.2: bytes=32 time<1ms TTL=128 Reply from 192.168.0.2: bytes=32 time<1ms TTL=128 Reply from 192.168.0.2: bytes=32 time<1ms TTL=128 Ping statistics for 192.168.0.2: Packets: Sent = 4, Received = 4, Lost = 0 (0% loss), Approximate round trip times in milli-seconds: Minimum = 0ms, Maximum = 0ms, Average = 0ms Jika hasilnya layaknya ini: Pinging 192.168.0.2 with 32 bytes of data: Request time out Request time out Request time out Request time out Ping statistics for 192.168.0.2: Packets: Sent = 4, Received = 0, Lost = 4 (100% loss) Berarti ke-2 computer tersebut belum terkoneksi. Cobalah memeriksa apakah kabel udah terhubung dengan benar atau bisa saja saja tersedia kabel yang putus.
Jika sepenuhnya udah beres dan hasil ping udah bagus, ini berarti Anda sukses mengubungkan 2 computer tersebut. Pada artikel seterusnya Dunia Komputer akan mengupas bagaimana melakukan berbagi folder, printer dan internet terhadap ke-2 computer tersebut. Demikian tutorial singkat untuk mengakibatkan jaringan (LAN) dengan 2 komputer. Tutorial ini masih jauh berasal dari prima dan bisa saja masih banyak kekeliruan yang saya buat. Apabila tersedia di antara Anda yang lebih sadar perihal jaringan silahkan berkomentar melalui kotak komentar. Salam!
1 note
·
View note
Text
SAMSUNG TV FOUTCODE 102
Smart TV's zijn apparaten met aanvullende software, waardoor ze worden blootgesteld aan veelvuldige technische storingen. De problemen worden aangeduid met codes. Bijvoorbeeld: Samsung TV-foutcode 102 betekent dat de draadloze internetverbinding niet beschikbaar is.
Fout 102: beschrijving
Het probleem is dat het Smart TV-platform geen verbinding kan maken met de ServerHub-server. Hierdoor zijn widgets, IPTV en andere services niet beschikbaar. Sommige modellen tonen "Netwerkstoring" samen met de 102-foutcode. In de instellingen "subnetmasker", "gateway", "IP-adres" velden mogen leeg zijn.
Controleer voordat u iets gaat doen hoe de smart-tv werkt met een nieuw toegangspunt? Als er een 102-foutcode verschijnt bij een willekeurig netwerk, schakel de machine dan 10-20 minuten uit door deze uit te schakelen. Probeer na het hardlopen opnieuw verbinding te maken. Heeft het geholpen? Zo ja, dan was dat een softwarefout en het opnieuw initialiseren van de driver loste het probleem op.
Mogelijke redenen
De eerste en meest voorkomende reden is geen verbinding met het stuurprogramma van de provider. In dat geval is er geen internetverbinding op alle apparaten. Dit probleem moet worden opgelost met de serviceprovider. Als het Wi-Fi-probleem zich alleen voordoet met smart-tv, volg dan de verdere instructies.
Router problemen
Soms verschijnt Samsung TV-foutcode 102 wanneer u verbinding maakt met een ander toegangspunt. Dit betekent dat de router fout 102 activeert.
Reset het en werk de software bij.
Wat kan er nog meer gedaan worden?
Start de router opnieuw op. Wacht 20 seconden voordat u de router start om de vorige internetsessie te stoppen.
Controleer de compatibiliteit van de router met de tv-adapter. Verwijder de codering in geval van een conflict.
Schakel het DHCP-protocol in voor de automatische ontvangst van de vereiste parameters.
Verander de frequentie van 5 GHz naar 2,4 GHz of omgekeerd.
Schakel de toegangscontrole uit die het MAC-adres van het apparaat blokkeert. Het verplaatsen van het numerieke adres naar de witte lijst is een andere oplossing. Raadpleeg het MAC-adres in het gedeelte "Serviceverzoek" van Samsung door het te openen vanuit "Ondersteuning".
Smart Hub-serverfout
Ze kunnen overbelast zijn, er kunnen technische werkzaamheden of storingen zijn. Als dit het geval is, onderneem dan geen actie: de 102-foutcode verdwijnt vanzelf als alles in orde is. Soms helpt de handmatige instelling van de DNS-server. Doe hiervoor het volgende:
voer de instellingen in het geïntegreerde Smart TV-menu in;
selecteer het DNS-item;
voer Yandex (77.88.8.8) of Google (8.8.8.8) openbaar IP-adres in.
Verouderde Baseband-versie
Heel vaak verdwijnen 102 fouten op Smart TV na het updaten van de software. Maar dit is onmogelijk met een draadloze verbinding. U hebt een LAN-kabel of externe USB-drive (harde schijf, flashstation) nodig.
Open in het eerste geval het menu en kies het item "Software-update" in het gedeelte "Ondersteuning" en zoek "Online update". Download in het tweede geval het bestand met een nieuwe basisband van de officiële website van Samsung, kopieer het naar een geformatteerde USB-stick, start het op een pc op en installeer het. Sluit hierna de flashdrive aan op de tv en druk in het venster "Software-update" op "Update vanaf USB". Na het installeren van het bestand wordt het apparaat opnieuw opgestart en verdwijnt de foutcode 102.
Verkeerde Smart TV-instelling of softwarefout
Als je een nieuwe tv hebt gekocht, is deze mogelijk al met internet verbonden om apps en slimme functies te testen. Misschien is er iets misgegaan. Als de 102-fout niet verdwijnt na het opnieuw knipperen, probeer dan het apparaat te resetten naar de fabrieksinstellingen. De standaardpincode is vier nullen.
Oplossing 1:
ga naar het menu;
selecteer "Extra" item in de instellingen;
open "Algemene instelling";
Druk op "Fabrieksinstellingen herstellen".
Oplossing 2:
open het "Servicemenu" ("Informatie" - "Menu" - "Mute" - "Power");
selecteer opties";
zoek "Reset".
De derde en meest efficiënte oplossing is om een EEPROM "diepe reset" uit te voeren. Dit helpt als de 102-foutcode niet verdwijnt na het resetten naar de fabrieksinstellingen. Doe hiervoor het volgende:
houd de aan / uit-knop op de tv minimaal 3 seconden ingedrukt tot het display niet uitschakelt en vervolgens weer inschakelt. Druk op de aan / uit-knop op de afstandsbediening en houd deze ingedrukt totdat de tv opnieuw opstart.
Hiermee worden de gebruikersinstellingen, kanaallijsten, accounts voor alle fouten en defecte bits verwijderd.
Fout in Wi-Fi-module
In sommige gevallen blijft de Samsung TV-foutcode 102 bestaan, zelfs na een diepe rust, reflashing en routerafstelling. Misschien is de geïntegreerde draadloze adapter kapot. Om de prestaties te controleren, gaat u naar 'Smart TV-menu' en volgt u de volgende instructies:
ga naar het gedeelte "Ondersteuning";
druk op "Neem contact op met de fabrikant";
scrol omlaag naar de MAC-adresrij.
Het moet cijfers bevatten. Als er in plaats daarvan streepjes of nullen zijn, kan dit zijn veroorzaakt door twee redenen:
storing van de netwerkadapter die foutcode 102 veroorzaakt;
de tv heeft geen ingebouwde Wi-Fi-module.
Als je zeker weet dat de tv eerder zo'n module had, betekent dit dat het draadloze verbindingsapparaat is verbroken. U kunt een externe adapter kopen die compatibel is met uw Smart TV-model. Het kost $ 5-30. De adapter wordt met een connector op het moederbord aangesloten. Een andere oplossing is om een LAN-kabel te gebruiken in plaats van Wi-Fi.Bij technische problemen kunt u contact opnemen met Samsung Telefoonnummer.
We bieden ook een Gmail Nummer voor technische ondersteuning.
0 notes
Photo

255.255.255.0 Subnetmask #masker #mask #mondkapjes #redbubble #art #art_empire #printondemand #printmaking #printmakersofinstagram (bij America, Netherlands) https://www.instagram.com/p/CHstFxvH8PO/?igshid=heny8zgsgpjt
0 notes
Text
Route - IP addressing (part 2)
Subnetting
NOTE:This decimal converted binary value will be use through out this post. 128 64 32 16 8 4 2 1
Before we go to subnetting process. Let us review the IP address and network mask. Let us site an example.
Given 192.168.200.0 /24 ip address block. Let's try to interpret how network device will read this.

Take a look on Network Mask (binary value). Just remember that all

Also, remember that each address should have network address, usable host range and broadcast address. For the network device (such as router) to properly locate the specific host or target.
Let us get started.
Looking at the example above. How do we identify the network,host and broadcast address?
To compute for Network ID (or network address) - we use Logical AND (or we should I say multiply) IP address (binary value) to Network Mask (binary value)

To compute for Broadcast address - Bring down the network address + convert binary host portion to 1

To define the Usable address - the number start after NETWORK ID and it ends before BROADCAST ID. The number of usable address can be computed also by 2n - 2; where "n" = number of host bits.

I hope above information encourage you to know subnetting :). Now let us tackle subnetting.
Subnetting
is the process to create small group of network to maximize the use of IP address block buy borrowing a binary bit/s (called subnet ID) from the host portion (in binary value).
“On this post I will try to explain the proper procedure and the shortcut that I know. It is on your decision which procedure is more convenient for you.”
Subnetting - Proper Method
Procedure:
1. Determine the classful network mask if the prefix is not define. 2. Determine how many subnet bits needed for the required number of networks. Use this formula 2 raise to subnetid = number of required networks. And look for the new network mask (called subnet mask) 3. Determine the Delta (sometimes called Increment); where Delta = to the decimal value of the right most binary 1. 4. Plot the network, usable and broadcast address and its subnet mask
Example1:

Given: 192.168.35.0 How many networks do I need for above diagram? The Answer is 4. (Remember in CCNA each router interface is 1 broadcast domain) What are the IP address I can assign to each router interface and to hosts?
Let us use the procedure above.
1. Determine the classful network mask if the prefix is not define. Answer is 255.255.255.0 (since the given address is part of Class C)
2.Determine how many subnet bits needed for the required number of networks. Use this formula 2 raise to subnetid = number of required networks. And look for the new network mask (called subnet mask)
Needed networks = 4

We are after really about subnet bits.

Therefore;


3. Determine the Delta (sometimes called Increment); where Delta = to the decimal value of the right most binary 1.

The right most binary 1 is located on the Octet 4. Using 128 64 32 16 8 4 2 1 value, Delta = 64
Subnet mask = 255.255.255.192 (/26)
4. Plot the network, usable and broadcast address using value of Delta and its subnet mask
4.a. plot the Network address; Delta = 64

4.b. plot the Broadcast address. The last address before the next Network address is a broadcast address.

4.c. plot the Usable address. These are the adress range between Network Address and Broadcast Address.

Please NOTE that we are not assigning Network and broadcast address to any devices.
Let us assign the IP address to each network device interfaces.

Subnetting - Shortcut method
( Aha! so may shortcut pala! ) Actually you just need to memorize the procedure, formula and by practice.
Procedure (Looking for numberof network address)
1. Using our hand to compute the subnet bits. Using this Formula 2 4 8 16 32 64 128 256 512 1024 and so on...
2. Look Delta and subnet mask
3. Plot the network address
Example:
Given 192.168.20.0 : Required 16 network.
1. Using our hand to compute the subnet bits. Using this Formula 2 4 8 16 32 64 128 256 512 1024 and so on...
The formula I'm using is counting this on using my starting from 2 4 8 16 32 64 128 256 512 1024 and so on... since I need 16 network, using the formula above how many finger I used.

Above information - means that we need 4 subnet bits to create 16 network.
2. Look Delta and subnet mask

Delta = 16
Subnet Mask = 255.255.255.240 (/28)
Remember that Delta is the right most binary bit 1 (in decimal form) of a new netmask which is 16
For Subnet Mask - 128+64+32+16 = 240
3. Plot the network address

The increment of each subnet is 16 as we seen above. I only look for the NETID (network address) because from there we can identify the usable address and broadcast address.
Network Address for network1 = 192.168.20.0 /28 Usable address for network1 = 192.168.20.(1 - 14) /28 Broadcast address of network1 = 192.168.20.15 /28
Another example: Given: 172.16.0.0 /16 : Required network is 32 Formula: 2 4 8 16 32 64 128 256 512 1024 Answer: Subnet bits = 5


Procedure (Looking for number of host address)
1. Counting again by hand and using this formula again 2 4 8 16 32 64 128 256 512 1024..so on (minus 2 )
2. Plot the host portion
3. Look Delta and subnet mask
4. Plot the network address
Example: 192.168.0.0 ; required 16 hosts per subnet.
1. Counting again by hand and using this formula again 2 4 8 16 32 64 128 256 512 1024..so on (minus 2 )
Using this formula again 2 4 8 16 32 64 128 256 512 1024..so on (minus 2 ) Here, we should focus on the host portion. Means how many host bits (0) do we need to cater 16 hosts per subnet?

This example is tricky! Is it correct that we only need 4 host bits? Answer is NO. Remember, IP address block should have network and broadcast address. That is the reason why we need to subtract 2. because 16 -2 = 14 host only. We need to add another host bit.
And the correct answer should be below.

Host bits = 5 which is 32 -2 = 30 hosts per subnet.
2. Plot the host portion
OK! Now I know the host bits. How will i know the subnet mask , and NET ID for each subnet.
Check the given again. 192.168.0.0 is part of class C. Means that the default nework mask is /24 (or 255.255.255.0) Meaning we cannot modify the first 3 octet. Because subnetting is borrowing subnet bits from the host portion. In Class C network. the host portion is Octet4. Procedure here is to plot the "0s" from right to left. The rest make "1s".

3. Look Delta and subnet mask
From above table, we can now determine the other subnetting requirements.

4. Plot the network address

Another example: (This time try to use your mind to get the answer) Given: 10.16.0.0 /8; Required 100 users per subnet.

VLSM (Variable Length Subnet Mask)
This subnetting technique is commonly used by networks today to maximize the use of IP address block by creating different subnet size. If you will notice, subnetting can divide classful network. But they still found out some waste of usable address. For example we have a IP block with a prefix of /25 - meaning 126 address are the usable address and for point-to-pint connection only 2 address are needed and the rest will be unused. And most of the time engineers are focus on usable address for each block when doing this.
Giving an example:

NOTE:
For VLSM - always create the subnet the largest first to smallest network requirement. The rest are the same with subnetting procedure. Let us start by defining the required network from largetst to smallest.


So we finish the VLSM table. Let us know assign these addresses to our network design above.

In practical world, VLSM is commonly use but you need to give allowance on your computation for your company future expansion. That is the reason, why large company uses class A (10.X.X.X) for their internal network communication.
Try to follow my example until you become familiar with the computation.
Supernetting / CIDR / Route summarization
I would say Supernetting is most commonly use by engineers for route summarization. It is a summarization of a multiple subnets under a common network prefix - also known as CIDR (Classles Inter Domain Routing). Procedure: 1. Plot the network address in binary value. 2. On all of the network address, look for the significant bit which is common to all network address bits. Count the number of common bits 3. Find the summarize network address prefix and subnetmask
Example: On the diagram below, R1 wants to see a summarize network for each company. In order to provide the requirement. R2 and R3 needs to advertise their summarize network towards R1.

1. Plot the network address in binary value.

2. On all of the network address, look for the significant bits which is common to all network address bits. Count the number of common bits

3. Find the summarize network address prefix and subnet mask.


Using the value we got above, we can now use it for R2 and R3 to advertise their summarize attached networks towards R1

In R1 routing table, it should be like this 192.168.0.0 / 19 via R2 directly connected address 172.16.0.0 /17 via R3 directly connected address
Please hit like and follow my blog if this helps you.
2 notes
·
View notes
Text
Need Some Help With A Rather Advanced Networking Assignment Please See The Attac
Need Some Help With A Rather Advanced Networking Assignment Please See The Attac
Need some help with a rather advanced networking assignment. Please see the attached document….Deadline is 11:00
p.m. this evening (9/11/16) MST. Thanks.
Part O: ANDing Process•• When a source host attempts to communicate with a destination host, the source host uses its subnetmask to determine whether the destination host is on the local…
View On WordPress
0 notes
Text
DOWNLOAD DIABLOTEK USB TO SERIAL DRIVER
Operating Systems: Windows NT/2000/XP/2003/2003/7/8/10 MacOS 10/X Downloads: 3046 Download Type: http Price: Free Uploader: Ashu File Version: 419101971 File Size: 23 Mb File Name: diablotek usb to serial driver File Format: exe Date Added: 06 November, 2019

Fixed Issues: - Fixes(diablotek usb to serial driver Fixes) speaker noise problem caused by Wireless LAN RF demodulation. - Fixed DHCP table shows wrong lease information 42. - Fixed(diablotek usb to serial driver Fixed) the "first word missing on a voip call". - Fixed(diablotek usb to serial driver Fixed) can't return the default setting when change powerplay. - Bug - Fixed a bug where an internal drive was not detected. - Fixed a solid(diablotek usb to serial driver solid) issue that Wireless WAN does not work after overnight standby. - Fixed the problem where the system fails the diagnostic test of Intel 865G Graphics Controller Diagnostic Utility. - Chechsum 7AF9h# Fixed Hyper Threading CPU S3 resume fail. - CSCug39617)- Fixed an issue where the Password Expiration feature did not work. - Fixes issue where CRT was not detected after Suspend/Resume mode or use of switch. Users content: Modified default BIOS boot sequence (out from factory): CDROM, A, C. Fix issue that disables telnetd after the router is not longer factory default- Fix unauthorized post execute commands in the router by command. DocumentsAdded a function to move back by using gesture on the folder list. ATX Form Factor; 30.5cm x 21.0cm It is highly recommended to always use the most recent driver version available. This driver contains updated media types. Also, constantly check with our website to be the first one to find out when a new version is available. Remember to check back with our website as often as possible so that you don’t miss a single new release. AP Isolation & Wireless Client Isolation features are working now. WAN IP address validity is now checked based on the subnetmask configured. Under Vista32bit/64bit, require to work with Xonar Audio Ver.6.12.8.17.57 drover. Here you can find your DOWNLOAD INTEL PRO WIRELESS 2011B LAN USB DEVICE DRIVER. Supported OS: Microsoft Windows 10 (64-bit) Microsoft Windows 8 Pro (32-bit) Windows Server 2012 Microsoft Windows 8 (32-bit) Microsoft Windows 8.1 Enterprise (32-bit) Microsoft Windows 8.1 Pro (32-bit) Microsoft Windows 8 (64-bit) Windows XP 32-bit Windows 8.1 Windows 7 64-bit Windows Server 2003 32-bit Microsoft Windows 8.1 Pro (64-bit) Windows Server 2012 R2 Microsoft Windows 8.1 (64-bit) Microsoft Windows 8.1 Enterprise (64-bit) Windows Server 2016 Windows Vista 64-bit Microsoft Windows 8.1 (32-bit) Microsoft Windows 10 (32-bit) Windows Vista 32-bit Windows XP 64-bit Windows Server 2008 R2 Windows 8 Microsoft Windows 8 Enterprise (32-bit) Windows 7 Windows Server 2008 Windows 8.1/8/7/Vista 32-bit Microsoft Windows 8 Enterprise (64-bit) Windows 10 Windows 8.1/8/7/Vista 64-bit Windows 7 32-bit Microsoft Windows 8 Pro (64-bit) Notebook 8.1/8/7 64-bit Notebook 8.1/8/7 32-bit Windows Server 2003 64-bit Windows 2000 Searches: diablotek usb to serial driver for Microsoft Windows 8 (64-bit); diablotek usb to serial driver for Windows Server 2016; usb driver serial to diablotek; diablotek usb to serial N NF913-9; diablotek usb to serial N91r; diablotek usb to serial driver for Microsoft Windows 8 Pro (32-bit); diablotek usb to serial driver for Windows Server 2003 32-bit; diablotek usb to serial driver for Microsoft Windows 8.1 Enterprise (64-bit); diablotek usb to serial NFHRA9138; diablotek usb to serial NF9138; diablotek usb to serial Nrp913-rpx Compatible Devices: Hardware; Scanner; Iphone; Memory Card; Monitor; Macbook To ensure the integrity of your download, please verify the checksum value. MD5: 1de92d2327ad5fe2cfdf11affa112ba1 SHA1: 57bc810ba61206886040838c31d7885665d870e4 SHA-256: 090ac68a81e2fb99ec595beb7dbbae2567da8fb6189b7a1cafc782ec0ea2449a
0 notes
Quote
Apa yang dimaksud dengan Broadcast? Saat kita melakukan konfigurasi jaringan komputer tentu kita akan mengenal yang namanya broadcast. Pada IP Address pada jaringan komputer kita akan mendapati IP Network dan IP Broadcast. Pengertian Broadcast Broadcast adalah sebuah metode dalam pengiriman data dimana data akan dikirim ke banyak titik sekaligus tanpa melakukan pengecekan apakah alamat yang dituju siap untuk menerima data atau tidak dan juga pengiriman paket juga tidak memperdulikan apakah data tersebut sampai pada alamat yang dituju atau tidak. Dalam dunia telekomunikasi Broadcast bisa diartikan sebagai proses pengiriman sinyal ke berbagai lokasi pengiriman secara bersamaan melalui satelit, televisi, radio dan perangkat komunikasi lainnya. Broadcast digunakan untuk siaran televisi dan radio, pada sistem ini stasiun siaran akan melakukan siaran secaa terus menerus dan memancarkanya tanpa meperdulikan apakah ada pesewat televisi atau pesawat radio yang memonitori siaran tersebut. Selain itu Broadcast juga bisa didefinisikan sebagai bentuk layanan dari perangkat server ke perangkat client yang menyebarkan data secara bersamaan ke beberapa komputer client. Pada jaringan komputer kita juga akan mengenal yang namanya IP Broadcast. IP Broadcast pada jaringan komputer biasanya merupakan IP address terakhir pada network tersebut sehingga IP Address tersebut tidak dapat digunakan untuk komputer client. sebagai contoh IP Broadcast adalah jika kita melakukan konfigurasi IP Address 192.168.1.1 dengan Subnetmask 255.255.255.0 maka IP Broadcast pada jaringan tersebut adalah 192.168.1.255. Pada prinsipnya Broadcast terbagi menjadi 3 kategori yaitu broadcast domain, broadcast address dan broadcast storm. Apakah yang dimaksud dengan broadcast domain, broadcast address dan broadcast storm? Berikut adalah definisi dari masing-masing broadcast tersebut: Broadcast Domain adalah sebagai seluruh device atau perangkat yang bisa mengetahui sinyal yang berasal dari perangkat network tertentu yang berada dalam satu segmen. Broadcast address adalah suatu alamat yang isinya bit 1 semua, bisa memberi alamat pada semua terminal yang berhubungan dengan jaringan tersebut. Broadcast storm adalah biasa juga disebut dengan loop, yaitu suatu kondisi yang dimana paket yang dikirimkan dari sumber berputar-putar di jaringan. Penyebabnya ialah kesalahan pada desain jaringan. Sekian artikel kali ini mengenai "Pengertian Broadcast pada Jaringan Komputer dan Kegunaannya" Semoga artikel ini bisa bermanfaat bagi sobat sekalian, jangan lupa di Like & Share, dan kunjungi terus ROLIYAN.COM untuk mendapatkan berbagai macam topik dan informasi menarik lainnya !!!
http://www.roliyan.com/2020/01/pengertian-broadcast-pada-jaringan.html
0 notes