#tag embed html
Explore tagged Tumblr posts
Visit Tumblr Blog
Explore Tumblr blogs with no restrictions, modern design and the best experience.
Last Seen Tumblr Blogs


Fun Fact
Tumblr has been banned in Indonesia for providing people with access to pornographic content.
Text
========================================================
[tutorial: build your own neocities/nekoweb page]
========================================================
a beginner's guide for making your very own home on the indie web—retro, personal, weird, and 100% yours.
this ain’t an average wix, squarespace, or tiktok aesthetic.
we’re talking full html/css with soul and attitude.
[ prerequisites ]
------------------
> an idea
> basic text editor (vscode, notepad++, or even notepad)
> account on https://neocities.org or https://nekoweb.org
> some gifs or tiles you love (dig deep or make your own)
> optional: image host or gif repo (or self-host everything)
[ feeling overwhelmed? read this. ]
-----------------------------------
you do *not* need to know everything.
html is not a mountain. it's a garden.
you plant one tag. then another. then a style. then a button.
you can build your site piece by piece.
and every piece is a portal to somewhere personal.
you are allowed to make broken pages.
you are allowed to use templates.
you are allowed to start over as many times as you want.
this is *your* world. you control the weird.
[ step 1: create an account ]
-----------------------------
> neocities: https://neocities.org
> nekoweb: https://nekoweb.org
register a name, log in, and enter your file manager.
this is where you upload your files and see your site live.
[ step 2: your first file - index.html ]
----------------------------------------
make a new file: `index.html`
basic starter:
<html>
<head>
<title>my weird little corner</title>
<link rel="stylesheet" href="style.css">
</head>
<body>
<h1>welcome to the void</h1>
<p>this is my page. it’s strange. like me.</p>
<img src="mygif.gif">
</body>
</html>
> upload to the dashboard
> boom. you’re live at
https://yoursite.neocities.org
or https://nekoweb.org/u/yoursite
[ step 3: add a style sheet - style.css ]
-----------------------------------------
create a file called `style.css` and upload it.
here’s some nostalgic magic:
body {
background: url('tile.gif');
color: lime;
font-family: "Courier New", monospace;
text-shadow: 1px 1px 0 black;
}
img {
image-rendering: pixelated;
}
marquee {
font-size: 20px;
color: magenta;
}
link it in your html and the vibes activate.
[ step 4: decorate it like a haunted usb ]
------------------------------------------
> use <marquee> for chaos scrolls
> embed gifs from https://gifcities.org/
> steal buttons from https://cyber.dabamos.de/88x31/
> set up a guestbook at https://www.smartgb.com/
> loop audio with <audio autoplay loop>
> add fake errors, 90s web lore, random link lists
[ step 5: resources, themes, and comfort ]
------------------------------------------
> templates & layouts: https://numbpilled-themes.tumblr.com
> glitchy gifs & buttons: https://glitchcat.neocities.org/resources
> layout builder: https://sadgrl.online/projects/layout-builder/
> free tiled backgrounds: https://backgrounds.neocities.org/
> beginner html intro: https://www.w3schools.com/html/
> pixel fonts & cyber assets: https://fontstruct.com/
remember:
you don't need to know js. you don't need to be a coder.
you just need a mood, a direction, a dream.
the html will follow.
[ bonus concept: shrine pages ]
-------------------------------
> a page just for one character you love
> a room to house digital fragments of your identity
> embed quotes, music, images like altars
> call it shrine.html and link it from your homepage
[ closing mantra ]
------------------
you are not here to be optimized.
you are not a brand.
you are a ghost inside the machine,
carving your initials into the silicon void.
welcome to Your website.
========================================================
#webcore#old web graphics#neocities#web graphics#carrd graphics#carrd resources#rentry decor#rentry graphics#carrd moodboard#carrd inspo#neopets#indie#indie web#early web#webdevelopment#web development#web resources#web design#old internet#old web#oldweb#nekoweb#transparent gif#tiny pixels#pixel gif#moodboard#tutorial#html page#html theme#htmlcoding
491 notes
·
View notes
Note
Hi!! I wanted to say that I loved reading about your journey of creating a personal website. I'm still unsure between Vercel and Netlify. I have a small question to ask. See, one of the reasons I want to make a website is to archive drawings and journal/sketchbook. Would you have any tips for creating an area on my website just for the diary/journal, which has tags, files for each entry, etc.?
Bello!

Really happy to hear about your interest in websites! I want everyone to make their own site so I don't have to log into social media and get instant tummyaches ♥
Vercel vs Netlify: I think I settled on Vercel for absolutely no reason whatsoever. I just made a site on Netlify, then tested on Vercel, and now I have like 5 websites on Vercel so I just kept using it LOL. I'm sure a more tech-savvy person would know the difference - I think they have certain integrations with specific programs.
Creating a diary or journal with tags:
There's a couple of different ways you can do that, with different levels of work needed.
you got me yapping again:
This sadgrl tutorial might be outdated and may or may not work, but explains the process better than I can.
Easiest: make a journal on Dreamwidth, or another blogging site (wordpress??) that allows easy tags and RSS feed, and embed that RSS feed onto your site.
This requires almost no HTML set-up, and the easiest to organize tags, but you don't truly have the data on your own site since it's just embedded.
When I snuck into a web design class at college, this was one of the methods that the professor used for a blog within a portfolio site LOL.
Shit like wordpress is what a LOT of ~professional~ sites do for their blog section. They code it separately from the main site haha. It's the most popular thing, but not necessarily the best. And wait til you read on what the CEO of wordpress has been having meltdowns about... he owns tumblr too!
It's made with a tutorial for Neocities if that's what you use.
Medium: Set up zonelets.
It will require some HTML and JS editing, but will help automate making headers/footers for each page of a blog.
I've never used it myself, but I see other people speak highly of it.
HARD FOR ME CUZ I'M A GORILLA: I believe a lot of professional web devs will slap your face with their coding cock until you use a static site generator (SSG) to make your site.
You will need some coding knowledge to set up the tagging system since it doesn't come with it enabled by default. But it's made explicitly to be an alternative to big Static Site Generators which are...
It requires some more intimidating knowledge, because it's a lot of scripts that turn files that are not HTML/CSS/JS into plain HTML.
Also you have to use the command line, and that doesn't come with buttons that tell you what you can do. You have to copy/paste all that shit or memorize the code to 'dev build astro' and it all looks silly.
I've used Eleventy, and now am using Astro. Other people use Hugo or Jekyll or some other stuff with crazy names like Glup Shitto. I hate all these sites cuz none of the words mean anything to me. This is a common theme for me and tech. I don't know what NODES or CONTENT or ISLANDS are!!!
I had the most success attempting to learn how to use a SSG by downloading a template and altering it with github + VScodium. Here's the template page for Astro. You click on a theme you like, and it takes you to its github page. (If you don't want to use evil Microsoft stuff sorry. Skip this entire section.) Follow the instructions on the page for "forking" the glup shitto. When it tells you to run commands, I run those commands through the terminal window in VScodium. These tutorials never tell you what these commands do cuz they assume you already know. Usually those commands automatically install the files you need onto your computer, and create the final files.
You can see my wip here for a "tag system" that SHOULD show members of a web listing haha but I don't know what I'm doing and I have a reading disorder AND don't know cumputer good.
THEORETICALLY this will be the simplest and easiest way to maintain tags and files, because after you set it up you just have to write the "content" of the blog page. And you don't have to set up the header/footer ever again. I see the vision, and potential, but I am not there yet when it takes me 5 hours a day to figure out what any of the words in the documentation mean and I don't want to ask an actual tech person cuz they will be like 'obviously just press the Blip on the Repository and then Suck My Ass in the command line".
(side note I haven't updated fujofans in like a year cuz I'm struggling with this part to make updating easier).
Con: the final HTML/CSS code is really ugly if it's "minified", and a lot of themes use """"""professional"""""" CSS libraries like Bootstrap and Tailwind that I honestly think are ugly cuz that's what every fuckin' tech website uses to style their pages and make them look Professional and Minimalist with stupid code like style="500-w dark-gray-balls D-cup-bra" on every single element. Even Toyhouse uses Bootstrap. Eugh!
But maybe you're smarter than me and can wrangle these things better!
That was really long. Woops. I hope you can slug through this wall of text and find something helpful. Feel free to email me if you have any more specific questions. I may or may not be helpful.
If someone else sees this and has better suggestions for making BLOGS, please chime in. I'm begging you.
64 notes
·
View notes
Text
Random AO3 Tips
I have a list of resources on my pinned post, but I don't really have a place for the simple miscellaneous tips and tricks, so here's this!
I didn't know most of these existed for probably far too long, so this post is mostly to spread awareness for new users or those who may not have heard of them before <3
I'll update this post if I learn of any other handy tricks. If you know any, let me know and I'll add it here :D
Basic HTML codes for A/Ns and etc
Note: Screenshots of the HTML "codes" at work are shown under the cut!
Center Text <center>TEXT</center> Clickable Link <a href="LINK">TEXT</a> Hideable Information <details> <summary>SHOWN</summary> HIDDEN </details> Insert Image from Link < img src="LINK" alt="IMAGE DESCRIPTION" width="100%" align="center" />
Italicize/Slant Text <i>TEXT</i> Line Breaks <br>TEXT</br> Paragraphs <p>TEXT</p> Strikethrough Text <strike>TEXT</strike> Underline Text <u>TEXT</u>
Single-post AO3 Guides
short guide on how to tag your own fics
short guide on how to title your fics/stories
how to embed images and links on AO3 [via Rich Text]
how to sign up for AO3-based exchanges (ft. @trafficteamsupportexchange)


Note: This is for formatting with HTML for the work, and for the authors notes where you Rich Text doesn't exist/work. Rich Text, on the other hand, should transfer most of these from whatever document resource you're using, but I've personally had issues with strikethrough not transferring from Google Docs copy-pasted to AO3 Rich Text, so just double check those areas!
#rain's tips#ao3 help#html#html coding#ao3 html#ao3 guide#ao3#archive of our own#ao3 writers#ao3 author#how do i even tag this
40 notes
·
View notes
Text
Making a personal website
Why do it?
Having a website is a great creative outlet, and gives you way more control over your space than social media. You are in full control of the content you host on your site, and, if you ever need to migrate to a new host for it, you won’t have to worry about losing a bunch of stuff (for the most part)
Make a page that's just a bunch of pictures of wizards! Turn it into an ARG! Use it as a portfolio! Make it dedicated to your OC Verse(s)! The world's your oyster! HTML and CSS may seem like a lot at first but it's honestly not very hard to learn!
You don't need to be an expert to have a good looking website!
Sections:
Where to Host + File Hosting
Actually Making a Website
What to write your code IN
Keeping Your Site Accessible
Preventing Scrapping with a robots.txt
Etiquette and Useful Terms
Where to Host
There are a few places around the net you can find, but for a personal, fully customizable site you’ll want to avoid commercial places like Squarespace. Squarespace is aimed at people who don’t want to make a site from scratch and are specifically looking at something professional for a portfolio or business. You won't have the rights to the code!
Neocities is the biggest name in the indie web space right now, but Nekoweb has gained some attention lately. You can even use both as a mirror of one another, and if you ever need to move hosts, you can download all your files from either of them.
Differences Between Neocities and Nekoweb:
Neocities offers 1 GB of storage
Nekoweb offers 50MB of storage (half of neocities)
Nekoweb does NOT restrict what file types you can host
Neocities restricts file types to non-supporters. Most files are fine, you'll probably only run into issue with video or audio files (but those eat up a lot of space anyway...) Full list here
IMO Neocities is also just more beginner friendly
NOTE: nekoweb has a robots.txt on their server by default, neocities does not but AFAIK new sites will be given a robots.txt for which they can set the allowed/disallowed themselves. There has been some misinfo about this: this is not neocities giving your data to ai, this is really just the default state of the internet, unfortunately. Either way, you can set up a robots.txt yourself to say whatever you want!
Alternate File Hosting
It’s best to host everything you can on the same host as your site, but if you're limited in space or type, you can host it somewhere else.
Make sure to use something dedicated to hosting files, otherwise your links may end up breaking (so don't use discord). I use file garden, which I have liked, though it's slow sometimes. I know others around neocities who have used catbox.moe… but those links always break for me, for some reason.
If you don’t mind hosting on youtube or soundcloud, there are ways you can embed those players onto your site as well!
I host audio and my art gallery on file garden; everything else is directly on my site and it only takes up 2.5% of my 1 GB of space!
Nekoweb and Neocities aren't meant to be used as file hosts, so don't try to use your neocities as "extra storage" for your nekoweb site, or visa versa.
The Actual “Making a Website” Part
For designing your website, I recommend to browse around personal sites on neocities and nekoweb for inspiration before drawing something out. If you don’t want to design a site yourself, there are plenty of templates, including the classic sadgrl.online site generator (and this guide to tweaking it).
Neocities Guides for Absolute Beginners (if you've never used any html, this is a good starting place)
Making a layout from start to finish (if you know what an html tag is, this should be fine for you; it's what I used!)
Making your website responsive (I swear it’s so easy to make your website mobile accessible unless you’re doing something totally crazy with it)
Sadgrls other guides
The Mozilla and W3Schools documentation are useful resources, but may be confusing to you at first. I myself learned basic HTML, CSS, and Javascript ages ago on Khan Academy, but as Khan Academy started using AI at some point, I have no idea how those hold up.
Take it in pieces, you’ll get a hang of it!
Relative Links
You don't need to link your full URL to link an image; you can link files relatively. For example, if I have a page in my main directory, and an image in folder titled "images" within that directory, I can just link it like this: "/images/image.png" You may or may not need the slash in the beginning, depending on your host. For neocities, I typically don't.
But what if you have a page in a folder and want to access a link in the main directory? Just add two dots for each folder you want to move backwards from: "../image.png" (1 folder backwards) "../../image.png" (2 folders backwards)
Avoid using relative links on your "not_found.html" page, because that page displays anytime a user tries to access a page that doesn't exist, and it will attempt to retrieve links from whatever the user typed into the bar. eg, if a user typed in "your-url/folder/page", it will treat relative links as though it is in that folder.
What to Write Your Code IN
If you make a file for all your website files and organize it in the same way as it is on your website host, you can open your html files in your browser offline and preview how they work and function.
Codepen is a great free code editor for html, css, and js specifically, which also allows a live preview of your site.
I've tried Dreamweaver and it's super buggy (and definitely not worth the price). I know some people use Visual Code Studio but I've never tried it myself.
Keeping Your Site Accessible
Many websites on the indie web right now, are unfortunately, accessibility nightmares… But, it’s actually not that hard to make your website more accessible without sacrificing your artistic intent
Semantic tags are tags that don’t have a specified style but help screen readers interpret content. You should also be careful not to use tags for something other than their intended purpose. Here’s a guide to semantic tags.
Alt text can describe elements to screen readers, but for decorative content like dividers, it's unnecessary. To let a screen reader just pass over them, set the alt property to an empty string ("")
Alt text furthermore should be descriptive but concise. Focus on the most important details and meaning/purpose of the image, not all the little details. Descriptions should also be objective, not subjective.
Color Contrast: text with low contrast against the background may be difficult or even impossible for some people to read. You can check color contrast using firefox’s developer tools, or through this website.
Flashing imagery and bright colors should, at the very least, be warned against. There is a way to use Javascript to freeze gifs, but it’s a bit complicated
Many people make their index page list content warnings so people can prepare themselves ahead of time, or turn back if content on the site may be harmful to them.
These are just the major things I’ve run into myself, but I’m still learning how to make my pages more accessible. For more info on things you can do to make your site more accessible check out these resources.
Prevent Scraping with a Robots.txt
This is not a foolproof method, in fact, bad actors will scrap your files anyway. All a “robots.txt” does is politely request that robots don’t scrap your site for anything… It’s up to the programmers to make their robots LISTEN. Here’s an article that has a blocklist for a bunch of the major bots.
I know this may be demoralizing, but unfortunately the only way you can “protect” your files against ai is to never share them. But, ai can never replace the way you feel about your work or the desire other people have to connect with it. AI can only ever produce a stale, easily digestible imitation… Basically, I know it's scary right now, but keep making your stuff. Do what you can to protect it…. But please don’t let ai stop your spirit!
Etiquette and Useful Terms
88x31 buttons were a staple of the old web, so many people make buttons for their site so other people can link to it!
Hotlinking refers to linking a file from someone else’s site to your own. This isn’t a big problem for big websites like tumblr or twitter, but hotlinking a file from someone’s personal site uses THEIR bandwidth anytime someone loads YOUR site and is frowned upon. This is only applicable to FILES on someone’s page, just linking to their page is fine!
i had an example but tumblr thought it was actual code...
Most browsers allow you to look at the source code for a website by right clicking and choosing "view source". This is a great way to learn how people do certain things... but they may not take kindly if you copy their code. Use it as a guide; don't copy huge chunks of code unless they have said it's okay to.
A webring is a collection of websites with some shared trait/topic that link to each other so that it forms a ring (i.e: Website 1 <--> Website 2 <--> Website 3 <--> Website 1). Web listings and web cliques are similar concepts; it’s basically like joining a club.
An RSS feed is basically like a “following” tab…but for the whole internet (well…any site that has an RSS feed). That way, people who don’t have a neocities or nekoweb (or other) account can get updated whenever your site does. To subscribe to an RSS feed, you’ll need a feed reader, which you can find as an extension for whatever browser you use. As for making a RSS feed, here’s a simple guide.
Javascript’s pretty complicated and I just look up what I want to know and learn from there so I'm not confident to give you help. But, I had to learn that scripts are very picky about where you declare them. If they aren't working, try moving them around.
I'm not an expert, so apologies if I've said anything wrong/confusing. These are resources I found useful or WISH I had when I started. Happy coding!
14 notes
·
View notes
Text
Embedding an Image on Ao3
You cannot host images on Ao3, so you ned to host it off-site, on a format that allows image hosting, such as Tumblr (make sure your post is private, so as not to leak your art), or Squidge.org. Once you have the image url, you can embed it on Ao3.
Embedding an Image in Rich Text
When you have the Rich Text option selected, you will have a bar across the top of the text box with a number of options. To insert an image, put your cursor in the text where you would like the image to appear and select the “Insert/edit image” button (pictured below).

That will bring up a dialogue box where you can include the image URL and some more metadata.

If you would like your image to have alt text (useful for screen readers and accessibility!), all you need to do is write an image description in the image description box.
It’s a good idea to size your image, or it will automatically display at full size, which can run off the edge of the screen. You can either choose to specify an amount of pixels (640 pixels will fit on most computer screens comfortably), or you can put in a percentage. Specifying “max-width 85%” (or 90%, whichever) will automatically size your image to 85% of the screen viewing it, which will make it mobile-accessible.
It's important to note that you need the IMAGE URL, and not the url of a page hosting the image. You can find this by right-clicking on an image and selecting "Copy Image Address".

Image page URLs often start looking like a normal url and might have a "share" as part of the url, like this.
https://antimony-medusa.tumblr.com/private/782903563243470848/tumblr_pqlYRjtCA8qyKsyFI?source=share
The above url will not work to embed.
However, an image URL will often be much more numbers-and-letters-based, and might have a date or the word "media" in it.
https://64.media.tumblr.com/a6b02fe154d74fba37919a27fe507a4d/4afa6d2300b1317f-b2/s1280x1920/91c5ceb5297a9fb0c522eb61ccc4ca7b6c957bf1.pnj
This url would embed.
Embedding an image in HTML
In order to insert an image into your fic using the HTML option, you will need to know the code to insert an image in HTML code. The HTML code to insert an image is straightforward:
<img src="[URL]" alt="[image description]">
Replace [URL] with the URL of the image you want to insert. AO3 does not host images, so your image must be hosted off-site.
If you would like your image to have alt text (useful for screen readers and accessibility!), all you need to do is write an image description instead of [image description] in the code above.
If you would like to set your image to size to your screen, the HTML for that is
<img src=[URL]" alt="[Image Description]" width="max-width 85%" />
Once your image is embedded, you can preview your work to make sure it all works and is sized appropriately, and then you can tag and title it like you would any other work on Ao3 (including the tags "art" or "collage" can be useful), and include the tags you're claiming in your author's note, and then post to your team's collection!
16 notes
·
View notes
Text
BatB Week podfic instructions and tips

Thanks to everyone who signed up for the podfic exchange! If you signed up as a reader, you should have gotten a message with info on who you matched with. Send a DM if you missed the message.
(If you didn’t sign up, there is still time! We still need one more podficcer! The form to sign up is here.)
I don’t personally do voice/audio work, but I’ve pulled together some quick tips and instructions for recording, editing, and posting podfics below the cut. If someone else has better/more suggestions, please add on!
Recording and editing
Need audio recording/editing software? You don't need anything fancy; you can record it on whatever voice recording software comes installed on your phone (I have Samsung Voice Recorder, for instance), or use one of these free, beginner-friendly audio editors: Lexis Audio Editor (Android, iOS, Windows), Audacity (Windows, Mac, Linux), GarageBand (Mac), Audiotool (online).
Nastasia Marquez has a great tutorial on how to record and edit voiceovers for beginners in Audacity. It's very easy to follow along and gets straight to the point.
When recording, watch out for plosives and sibilances (e.g. your "pps," "sss," and "shh") as they can easily hinder the quality of your recording by being aggressive to the ear. It’s hard to give tips since everyone will be working with different devices, but my suggestion would be to put some space between your mouth and the microphone, or have your device inside a sock. You can learn more on them and how to deal with them here.
A good way to get clean audio is to record under a blanket. It’s silly, but it’s as close to a padded studio as you can get for free. It reduces echo and makes the audio sound much better no matter the mic you use.
Don't be afraid to record in short batches! There’s no need to do it in long unbroken takes. Piece it together later.
Posting the audio file
Once you have your finished audio file, you have to upload it somewhere, because AO3 can host the link to it, but not the audio file itself. It seems like Internet Archive is popular for hosting podfic audio files. You can also host it on Google Drive, YouTube, Mediafire, or Spotify.
Posting the podfic to AO3
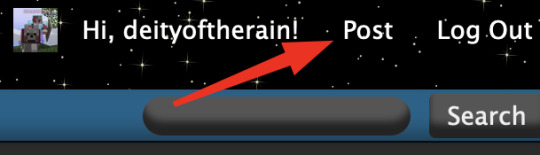
Go to ‘Post > New work’ just like you would for posting any fic to AO3.
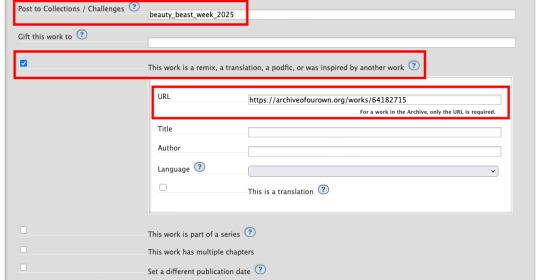
In the ‘Post to Collections / Challenges’ field, enter “beauty_beast_week_2025” (see first screenshot below).
Check the box that reads ‘This work is a remix, a translation, a podfic, or was inspired by another work’ and include the URL to the original fic (see first screenshot below). This not only gives credit to and notifies the author, but it adds a link to your podfic from their fic (when they approve it) so that your podfic gets more hits and kudos.
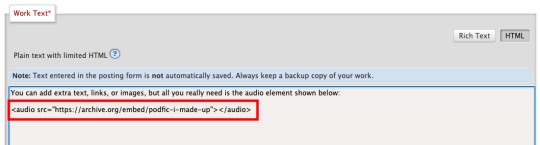
In the body of the post, insert the HTML to embed the audio file (see second screenshot below). It’s easy: AO3 has a simple guide to copy and paste from here.
If you’d like, you can add more content to the body of the post, like the event banner or some text, but it’s not necessary.
Here are some examples of BatB podfics so you can see how they’ve set things up: The Great Wide Somewhere, Mutual Care, and The Beast Within
Posting to the event
Important: tag the @beauty-beast-week account within the body of your Tumblr post itself by typing the @ symbol, typing beauty-beast-week, and then selecting that account name from the autocomplete menu that appears. This is the only way to be sure we see your post so we can reblog it from this account and include it in our master list posts.
Other than that, make sure you post to Tumblr on the day of the prompt you're using and include in your post:
Tag the @beauty-beast-week account within the body of the post (yes, I’m repeating myself)
Which fic your podfic is for, and link to it
Which day/prompt your podfic is for, in the body or tags
The event hashtag #batbweek and/or #batbweek 2025
Any other appropriate hashtags (characters, ship, NSFW and content warnings)
Optional: The event banner (save from the top of this post) or the day's banner (in the full event instructions that will come later)
Heads up authors! Check your AO3 email during the event!
If your work was adapted into a podfic for the exchange, check your email and follow the link to approve linking back the podfic to your original work so more people can discover the podfic version!

Send an ask or DM if you have any problems or questions!
7 notes
·
View notes
Text
HTML Tags and Elements You Must Know
HTML, or Hypertext Markup Language, is the backbone of web development. Whether you're a beginner or an experienced developer, understanding HTML tags and elements is crucial for creating structured and accessible web content. This guide will explore essential HTML tags, including headings, paragraphs, images, links, lists, and tables, complete with examples to help you grasp their usage effectively.
HTML Code
Headings
Headings are used to define the structure and hierarchy of content on a web page. They range from <h1> to <h6>, with <h1> being the highest level of importance and <h6> the lowest.
Example:
<h1>Main Heading</h1> <h2>Subheading</h2> <h3>Sub-subheading</h3>
Headings help search engines understand the structure of your content and improve accessibility for screen readers.
Paragraphs
Paragraphs are used to separate blocks of text, making content more readable. The <p> tag is utilized for creating paragraphs.
Example:
<p>This is a paragraph of text that provides information to the reader.</p>
Using paragraphs effectively can greatly enhance the flow and readability of your content.
Images
Images are a vital part of web content, providing visual interest and information. The <img> tag is used to embed images, and it requires at least the src and alt attributes.
Example:
<img src="image.jpg" alt="Description of image">
The alt attribute is crucial for accessibility, as it describes the image to users who cannot see it.
Links
Links connect web pages and provide a way for users to navigate through content. The <a> tag is used to create hyperlinks.
Example:
<a href="https://www.example.com">Visit Example</a>
The href attribute specifies the URL of the page the link goes to. Including descriptive text within the link improves accessibility and user experience.
HTML Code
Lists
Lists are a great way to organize information. HTML supports ordered lists (<ol>) and unordered lists (<ul>), with list items marked by the <li> tag.
Ordered List Example:
<ol> <li>First Item</li> <li>Second Item</li> <li>Third Item</li> </ol>
Unordered List Example:
<ul> <li>Bullet Item One</li> <li>Bullet Item Two</li> <li>Bullet Item Three</li> </ul>
Ordered lists are ideal for step-by-step instructions, while unordered lists are perfect for bullet points.
Tables
Tables are used to display data in a structured format. They consist of the <table>, <tr>, <th>, and <td> tags.
Example:
<table> <tr> <th>Name</th> <th>Age</th> </tr> <tr> <td>John Doe</td> <td>30</td> </tr> <tr> <td>Jane Smith</td> <td>25</td> </tr> </table>
Tables are useful for organizing data but should be used sparingly as they can be less mobile-friendly than other elements.
HTML Code
Conclusion
Understanding these essential HTML tags and elements is the first step toward creating well-structured, accessible, and visually appealing webpages. Incorporating headings, paragraphs, images, links, lists, and tables into your HTML documents will significantly enhance your ability to communicate content effectively.
FAQs
1. What is the purpose of the alt attribute in an <img> tag?
The alt attribute provides a text alternative for images, improving accessibility for users who cannot see the image, such as those using screen readers.
2. Can headers be used for styling purposes in HTML?
While headers can affect the appearance of text, they should primarily be used for content hierarchy and structure. Styling should be handled with CSS.
3. Are tables still relevant in modern web design?
Yes, tables are relevant for displaying structured data but should be used judiciously, especially in responsive designs, where other layout techniques might be more appropriate.
4. How do you create a link that opens in a new tab?
To open a link in a new tab, use the target="_blank" attribute within the <a> tag.
5. What is the difference between ordered and unordered lists?
Ordered lists (<ol>) display items in a sequential order, often numbered, while unordered lists (<ul>) use bullet points without implying a specific sequence.
#HTMLBasics#LearnHTML#WebDevelopment#HTMLTags#FrontEndDevelopment#WebDesign#HTMLForBeginners#CodeNewbie#HTMLTutorial#AssignmentHelp#WebDevTips#AssignmentOnClick#machinelearning#techforstudents#aiforstudents#assignmentwriting#assignment service#assignmentexperts#assignment help#assignment
3 notes
·
View notes
Text
Tumblr Growth - Its tough trying to face the world from inside Tumblr.
I used a service called Make | Automation Software | Connect Apps & Design Workflows | Make to push my Youtube videos (All of them that I could on a free plan) to Tumblr - ive been also forming connections and commenting and being part of the community. I had issues where it would post the link to the video, well the ID and I had to manually push the you tube url video = [VideoID] but it didnt embed so I have been editing them one by one to properly embed them and tag them. Its paying off slowly, also pushing thebritbeardo.tumblr.com to the world, frustrated that tumblr is blocking bing bot and @tumblrsupport in a reddit thread said speak to Bing, Bing does not control robots.txt for my site so I kindly asked and will continue to ask tumblr support to remove the block to bingbot, I have sent screenshots from bing webmaster tools. Also, Google is not properly indexing britbeardo.tumblr.com because its not the canonical URL and no matter the tags I put in the html it seems that there is a tumblr controlled canonical url that is set to tumblr.com/accountname. All the canonical testers tell me this.
It seems they are really focusing on users using internal tumblr network and not reaching out to potentially new tumblr users. Its a shame as if you configure Tumblr correctly, follow the right people its actually a much better social environment that Facebook or X, Threads, Masterdon etc. I use them all pretty much and found Tumblr to be a breath of fresh air except for these few frustrations.
@TumblrSupport please allow users more control of blocked search engines in the robots.txt, even if its a check box for allow Yandex, Allow BingBot etc. And give us control of the canonical URL, if I put a Tag in my HTML to override please honor my request to use account.tumblr.com I considered buying a domain but in still concerned that using a domain will cause me to still blocked by bingbot and not have control of the canonical settings.

3 notes
·
View notes
Note
For the fic questions! 12. favorite character to write about this year 15. something you learned this year 23. fics you wanted to write but didn’t
Thank you bloooo!
12, Favorite character to write about this year.
It is always Link lol I have a brand, though I enjoyed taking a Steward constructs POV, too.
15. Something you learned this year
Hmmmmmmmmm I taught myself how to embed and link images on AO3 as well as the html tag for a line break that won’t disrupt a screen reader.
23. Fics you wanted to write but didn’t.
I have sort of roughed out a series of TOTK fics about the new monsters. There are currently 2 posted on AO3, one was written in 2023 and one this year. In particular, I wanted to finish the one about gloom spawn, and a start of the story piece, but there are bits I need to think on more so they didn’t happen.
Year end fic asks
6 notes
·
View notes
Text
Ao3 has GOT to fucking fix their audio tag stuff. Just spent 2 fucking hours trying to do something neat but literally NONE of the HTML was working correctly. (And I while I'm not an expert on coding by any means, I've built some smaller websites. And at least on there the fucking <audio> tags work how they're supposed to.)
Didn't matter where i hosted, didn't matter what I did. I even tried to get a fucking basic normal fucking link to open a new tab without the reader having to worry about holding down CTRL while clicking and that shit didn't work.
And no i didn't want to use soundcloud's <iframe> embed because it makes the page look like shit. And i cant use the mini player option because i refuse to pay for it.
Fucking fuming rn

2 notes
·
View notes
Note
Hey so raaaaandom question but I've seen you talk a lot about podfics recently and I think it's super cool, and have considered doing one or two myself—can I ask howwww that works? Like do you put it on YouTube or something and then link it on ao3? 💜
I'm going to make a series of posts about it in the near future (once my multi-day headache goes away and I get caught up on homework) but basically you
1. Choose a fic and get permission to record it (or do your own)
2. Record it (I use audacity recording software cuz its free)
3. Edit it
4. Upload it on archive.org as a hosting site (it is a designated media archival site)
5. Copy-paste the "share" embed link for the audio file from archive.org into the html of the ao3 fic textbox.
6. Make sure that the fic has the appropriate podfic tags: "podfics and other podficced works" and "podfic length: [time]"
7. Post on ao3
8. Advertise on tumblr
16 notes
·
View notes
Text
How to Embed Images and Links on AO3
Note: I have a site skin so the colors might look different. Just follow along with the red arrows! Also, this is a tutorial used on the computer, and I assume mobile posting would be different.
First, open archiveofourown.org and log in if you haven't already. If you don't have an AO3 account, sign up for one as soon as possible because it takes about a week for them to verify you and give you access to your new account.

Next, select "Post" in the top right hand corner like you would typically. Set up everything you desire as you normally would until you reach "Work Text*".
Note: If you need further help, I have an AO3 Tag Guide, a Story Title Guide, a List of Random AO3 Shortcuts, and a How to Post a Work on AO3 with Step-by-Step Explanations Guide for your convenience! I also have a Foundations Writing Lesson post for any beginners or for people who would appreciate a review <333
Once there, click on "Rich Text" in the top right of that section, and then select the image icon or the link icon, depending on which you are intending to make.
Note: Check under the cut for more in-depth instructions slash a continuation of this guide! There is an Image Icon Route and a Link Icon Route.
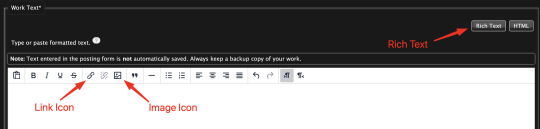
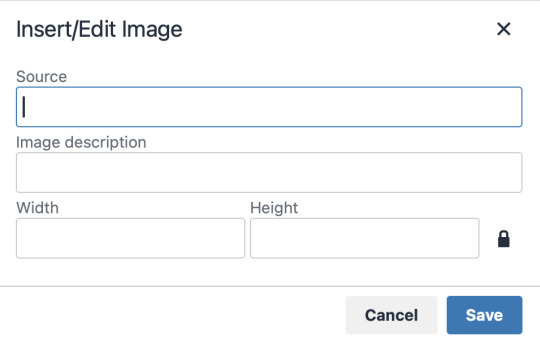
Image Icon Route
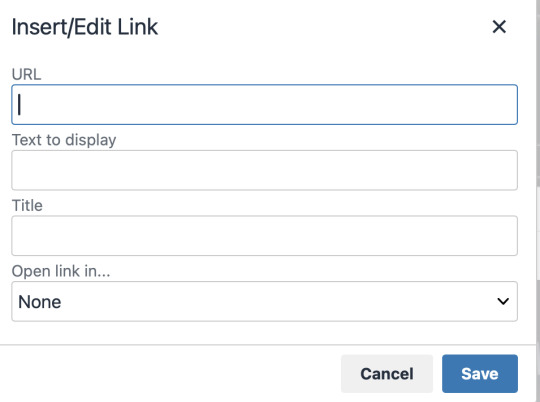
Once you click on the Image Icon, the screen similar to below should pop-up:
*Link Icon Route detour start here
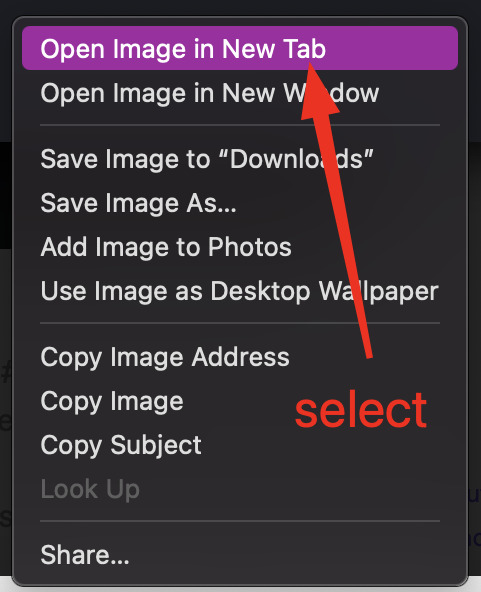
The source is the link to the image you're wanting to add to your work. AO3 doesn't host images itself, but you can use an image hosting site such as postimages.org or even Tumblr itself. If you want to use Tumblr, post a draft with the desired image or locate a post with the desired image. Once you've done that, right click the desired image and Open Image in New Tab (or whatever your computer's equivalent is).
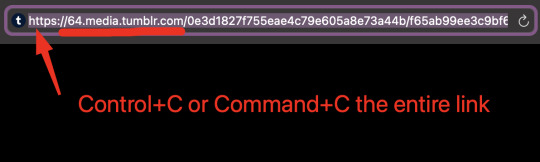
You should have a tab open that starts with "https://64.media.tumblr.com" followed by a bunch of numbers and letters. I want you to copy that link and post it in the source box.
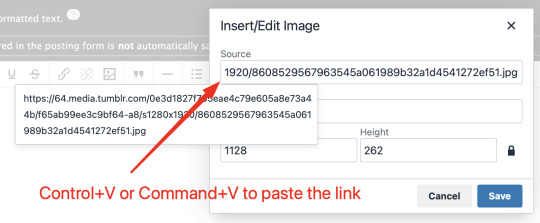
*Link Icon Route detour ends here
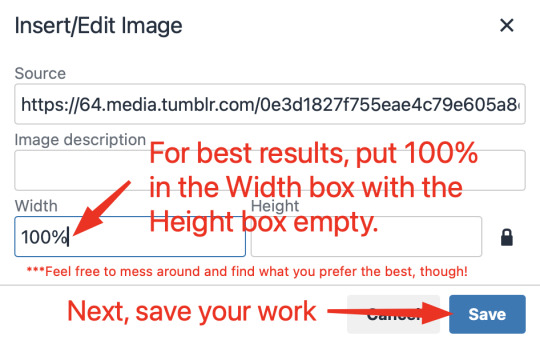
Now that the image link is in place, adjust your Width/Height boxes if desired. Feel free to add an image description as well. For best result, I suggest doing 100% in the Width box with nothing in Height, but this is ultimately a personal decision. Feel free to mess around with the proportions using the work drafts and find what's best for you!
If you prefer, you can also use < img src="LINK" alt="IMAGE DESCRIPTION" width="100%" align="center" /> aka < + img src="https://64.media.tumblr.com/0e3d1827f755eae4c79e605a8e73a44b/f65ab99ee3c9bf64-a8/s1280x1920/8608529567963545a061989b32a1d4541272ef51.jpg" alt="" width="100%" align="center" /> for this example (*excluding the plus sign at the start) to insert an image using HTML instead of Rich Text. It'll look like this:

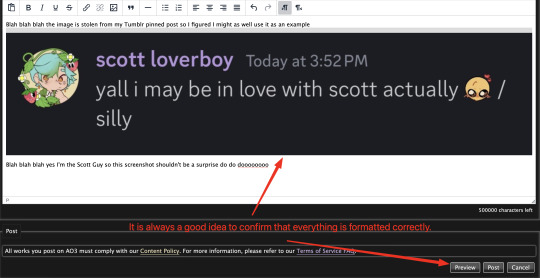
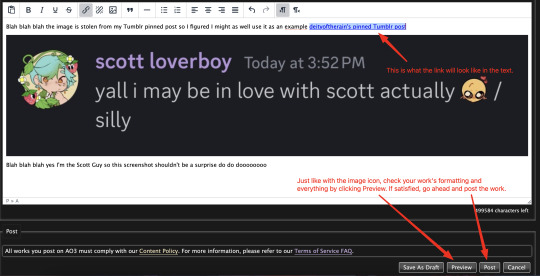
It is always a good idea to double-check and confirm that everything is how you want it. Previewing your work also allows you to create a draft.

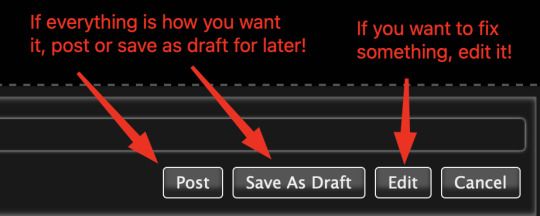
If you're unhappy with something, edit the work to fix it! If you're happy with how everything looks, go ahead and post it! You're finished here! You've successfully posted a work with an image embedded! Well done; good job :D
Link Icon Route
Once you click on the Link Icon, the screen similar to below should pop-up:
Go copy (Control+C or Command+C) the link to whatever it is you want to insert into the body of the work.
Note: If you're wanting to link specifically to an image and not a post containing that image, scroll up to the link icon route detour colored purple.
Once you got that, paste (Control+V or Command+V) the link into the URL box. If you want something other than the link to display, change the text in the "Text to display" box.
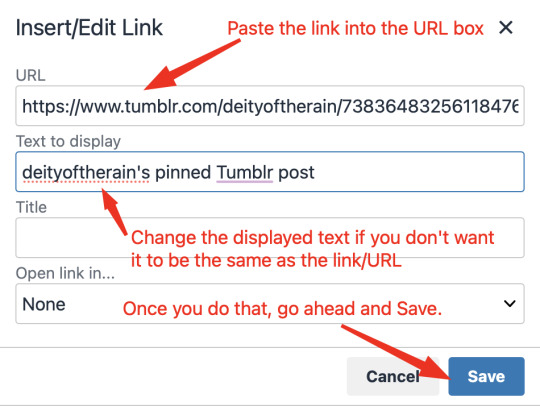
Save your work, check the formatting and everything else like we did in the Image Icon Route section. If everything is how you want it, then congratulations! You have successfully added a link embedded to your work!
If you have any questions or comments, feel free to comment and I'll respond! If this guide was helpful to you, please like and reblog! I appreciate it <333
#rain’s tips#ao3 author#ao3 help#ao3 writers#ao3#archive of our own#embedded#images#links#ao3 link#ao3 images#ao3 guide#idk how to tag this#idk what tags to use#writing help#guide
17 notes
·
View notes
Text
well, changing the cohost colors to Tumblr Blue has made it less terrible for me to look at


but this is so crazy...
[ For now, if you want to upload an image to cohost and embed it within your post—rather than at the top of your post—there are a few steps necessary:
attach the image to your post as if you were going to include it at the top.
save the post as a draft to finish uploading the image.
go to your drafts page and retrieve the URL for the image from that draft that you want to embed in your post. you can do this by right-clicking and opening the image in a new tab or inspecting the HTML element with the image.
edit the draft and use this URL for the image to embed it into your post, either with the markdown image syntax (see above) or an HTML image tag (see below.) remember to set the alt text with a written description!
remove the image attachment from the top of the post.
be sure not to delete the draft! for privacy and data protection reasons, images not attached to posts are eligible for deletion at a later date. in the future, we intend to replace this method of embedding images with one that does not require you to keep these drafts around—but we're not there yet! ]
the livejournal/dreamwidth way of having to upload images to a gallery and then putting the url into the post but with extra having endless drafts??
11 notes
·
View notes
Text
Learn HTML and CSS: A Comprehensive Guide for Beginners
Introduction to HTML and CSS
HTML (HyperText Markup Language) and CSS (Cascading Style Sheets) are the core technologies for creating web pages. HTML provides the structure of the page, while CSS defines its style and layout. This guide aims to equip beginners with the essential knowledge to start building and designing web pages.
Why Learn HTML and CSS?
HTML and CSS are fundamental skills for web development. Whether you're looking to create personal websites, start a career in web development, or enhance your current skill set, understanding these technologies is crucial. They form the basis for more advanced languages and frameworks like JavaScript, React, and Angular.
Getting Started with HTML and CSS
To get started, you need a text editor and a web browser. Popular text editors include Visual Studio Code, Sublime Text, and Atom. Browsers like Google Chrome, Firefox, and Safari are excellent for viewing and testing your web pages.
Basic HTML Structure
HTML documents have a basic structure composed of various elements and tags. Here’s a simple example:
html
Copy code
<!DOCTYPE html>
<html>
<head>
<title>My First Web Page</title>
<link rel="stylesheet" type="text/css" href="styles.css">
</head>
<body>
<h1>Welcome to My Web Page</h1>
<p>This is a paragraph of text on my web page.</p>
</body>
</html>
: Declares the document type and HTML version.
: The root element of an HTML page.
: Contains meta-information about the document.
: Connects the HTML to an external CSS file.
: Contains the content of the web page.
Essential HTML Tags
HTML uses various tags to define different parts of a web page:
to : Headings of different levels.
: Paragraph of text.
: Anchor tag for hyperlinks.
: Embeds images.
: Defines divisions or sections.
: Inline container for text.
Creating Your First HTML Page
Follow these steps to create a simple HTML page:
Open your text editor.
Write the basic HTML structure as shown above.
Add a heading with the tag.
Add a paragraph with the tag.
Save the file with a .html extension (e.g., index.html).
Open the file in your web browser to view your web page.
Introduction to CSS
CSS is used to style and layout HTML elements. It can be included within the HTML file using the <style> tag or in a separate .css file linked with the <link> tag.
Basic CSS Syntax
CSS consists of selectors and declarations. Here’s an example:
css
Copy code
h1 {
color: blue;
font-size: 24px;
}
Selector (h1): Specifies the HTML element to be styled.
Declaration Block: Contains one or more declarations, each consisting of a property and a value.
Styling HTML with CSS
To style your HTML elements, you can use different selectors:
Element Selector: Styles all instances of an element.
Class Selector: Styles elements with a specific class.
ID Selector: Styles a single element with a specific ID.
Example:
html
Copy code
<!DOCTYPE html>
<html>
<head>
<title>Styled Page</title>
<link rel="stylesheet" type="text/css" href="styles.css">
</head>
<body>
<h1 class="main-heading">Hello, World!</h1>
<p id="intro">This is an introduction paragraph.</p>
</body>
</html>
In the styles.css file:
css
Copy code
.main-heading {
color: green;
text-align: center;
}
#intro {
font-size: 18px;
color: grey;
}
CSS Layout Techniques
CSS provides several layout techniques to design complex web pages:
Box Model: Defines the structure of an element’s content, padding, border, and margin.
Flexbox: A layout model for arranging items within a container, making it easier to design flexible responsive layouts.
Grid Layout: A two-dimensional layout system for more complex layouts.
Example of Flexbox:
css
Copy code
.container {
display: flex;
justify-content: space-around;
}
.item {
width: 100px;
height: 100px;
background-color: lightblue;
}
Best Practices for Writing HTML and CSS
Semantic HTML: Use HTML tags that describe their meaning clearly (e.g., , , ).
Clean Code: Indent nested elements and use comments for better readability.
Validation: Use tools like the W3C Markup Validation Service to ensure your HTML and CSS are error-free and standards-compliant.
Accessibility: Make sure your website is accessible to all users, including those with disabilities, by using proper HTML tags and attributes.
Free Resources to Learn HTML and CSS
W3Schools: Comprehensive tutorials and references.
MDN Web Docs: Detailed documentation and guides for HTML, CSS, and JavaScript.
Codecademy: Interactive courses on web development.
FreeCodeCamp: Extensive curriculum covering HTML, CSS, and more.
Khan Academy: Lessons on computer programming and web development.
FAQs about Learning HTML and CSS
Q: What is HTML and CSS? A: HTML (HyperText Markup Language) structures web pages, while CSS (Cascading Style Sheets) styles and layouts the web pages.
Q: Why should I learn HTML and CSS? A: Learning HTML and CSS is essential for creating websites, understanding web development frameworks, and progressing to more advanced programming languages.
Q: Do I need prior experience to learn HTML and CSS? A: No prior experience is required. HTML and CSS are beginner-friendly and easy to learn.
Q: How long does it take to learn HTML and CSS? A: The time varies depending on your learning pace. With consistent practice, you can grasp the basics in a few weeks.
Q: Can I create a website using only HTML and CSS? A: Yes, you can create a basic website. For more complex functionality, you'll need to learn JavaScript.
Q: What tools do I need to start learning HTML and CSS? A: You need a text editor (e.g., Visual Studio Code, Sublime Text) and a web browser (e.g., Google Chrome, Firefox).
Q: Are there free resources available to learn HTML and CSS? A: Yes, there are many free resources available online, including W3Schools, MDN Web Docs, Codecademy, FreeCodeCamp, and Khan Academy.
#how to learn html and css#html & css course#html & css tutorial#html and css#html course#html css tutorial#html learn#html learn website#learn html#learn html and css#html and css course#html and css full course#html and css online course#how to learn html and css for beginners
4 notes
·
View notes
Text
Let's understand HTML

Cover these topics to complete your HTML journey.
HTML (HyperText Markup Language) is the standard language used to create web pages. Here's a comprehensive list of key topics in HTML:
1. Basics of HTML
Introduction to HTML
HTML Document Structure
HTML Tags and Elements
HTML Attributes
HTML Comments
HTML Doctype
2. HTML Text Formatting
Headings (<h1> to <h6>)
Paragraphs (<p>)
Line Breaks (<br>)
Horizontal Lines (<hr>)
Bold Text (<b>, <strong>)
Italic Text (<i>, <em>)
Underlined Text (<u>)
Superscript (<sup>) and Subscript (<sub>)
3. HTML Links
Hyperlinks (<a>)
Target Attribute
Creating Email Links
4. HTML Lists
Ordered Lists (<ol>)
Unordered Lists (<ul>)
Description Lists (<dl>)
Nesting Lists
5. HTML Tables
Table (<table>)
Table Rows (<tr>)
Table Data (<td>)
Table Headings (<th>)
Table Caption (<caption>)
Merging Cells (rowspan, colspan)
Table Borders and Styling
6. HTML Forms
Form (<form>)
Input Types (<input>)
Text Fields (<input type="text">)
Password Fields (<input type="password">)
Radio Buttons (<input type="radio">)
Checkboxes (<input type="checkbox">)
Drop-down Lists (<select>)
Textarea (<textarea>)
Buttons (<button>, <input type="submit">)
Labels (<label>)
Form Action and Method Attributes
7. HTML Media
Images (<img>)
Image Maps
Audio (<audio>)
Video (<video>)
Embedding Media (<embed>)
Object Element (<object>)
Iframes (<iframe>)
8. HTML Semantic Elements
Header (<header>)
Footer (<footer>)
Article (<article>)
Section (<section>)
Aside (<aside>)
Nav (<nav>)
Main (<main>)
Figure (<figure>), Figcaption (<figcaption>)
9. HTML5 New Elements
Canvas (<canvas>)
SVG (<svg>)
Data Attributes
Output Element (<output>)
Progress (<progress>)
Meter (<meter>)
Details (<details>)
Summary (<summary>)
10. HTML Graphics
Scalable Vector Graphics (SVG)
Canvas
Inline SVG
Path Element
11. HTML APIs
Geolocation API
Drag and Drop API
Web Storage API (localStorage and sessionStorage)
Web Workers
History API
12. HTML Entities
Character Entities
Symbol Entities
13. HTML Meta Information
Meta Tags (<meta>)
Setting Character Set (<meta charset="UTF-8">)
Responsive Web Design Meta Tag
SEO-related Meta Tags
14. HTML Best Practices
Accessibility (ARIA roles and attributes)
Semantic HTML
SEO (Search Engine Optimization) Basics
Mobile-Friendly HTML
15. HTML Integration with CSS and JavaScript
Linking CSS (<link>, <style>)
Adding JavaScript (<script>)
Inline CSS and JavaScript
External CSS and JavaScript Files
16. Advanced HTML Concepts
HTML Templates (<template>)
Custom Data Attributes (data-*)
HTML Imports (Deprecated in favor of JavaScript modules)
Web Components
These topics cover the breadth of HTML and will give you a strong foundation for web development.
Full course link for free: https://shorturl.at/igVyr
2 notes
·
View notes
Text
Exploring the Basics of HTML: A Journey into Web Development with an Online Compiler for HTML
In the vast universe of web development, HTML (Hypertext Markup Language) is the essential building block that transforms creative ideas into interactive web experiences. HTML provides the structural foundation for web content, allowing web developers to create well-organized and readable web pages. In this article, we will embark on a journey into the basics of HTML, exploring its core elements and their functions. Additionally, we will introduce you to a valuable resource: the Online Compiler for HTML, a tool that empowers aspiring web developers to experiment, test, and refine their HTML skills in a practical and user-friendly online environment.

HTML: The Language of the Web
HTML is the language of the web, serving as a markup language that defines the structure of web content. Its fundamental elements, or tags, are used to identify and format various aspects of a web page. Let's dive into some of the basic elements that form the foundation of HTML:
1. HTML Document Structure: An HTML document starts with the <!DOCTYPE html> declaration, which defines the document type. It is followed by the <html> element, which encapsulates the entire document. The document is divided into two main sections: the <head> and the <body>. The <head> contains metadata and information about the document, such as the page title, while the <body> contains the visible content.
2. Headings: Headings are essential for structuring content and providing hierarchy to text. HTML offers six levels of headings, from <h1> (the highest level) to <h6> (the lowest level). Headings help create a clear and organized content structure.
3. Paragraphs: To create paragraphs of text, the <p> element is used. This element defines blocks of text separated by blank lines and is a fundamental tool for organizing and formatting content.
4. Lists: HTML allows for the creation of both ordered (numbered) and unordered (bulleted) lists. Ordered lists are created with the <ol> element and list items with <li>. Unordered lists are created with the <ul> element, also with list items using `<li>.
5. Links: Hyperlinks are a crucial feature of the web. HTML provides the <a> (anchor) element for creating links. The href attribute within the <a> element specifies the URL of the page or resource to which the link should navigate.
6. Images: To embed images in a web page, HTML employs the <img> element. The src attribute within the <img> element points to the image file's location.
Introducing the Online Compiler for HTML
To practice and experiment with these basic HTML elements, there's a valuable resource at your disposal: the Online Compiler for HTML. This user-friendly online tool allows aspiring web developers to write, modify, and test HTML code in a practical environment. What sets it apart is its real-time rendering feature, enabling users to see immediate results as they make changes to their HTML code. It's an ideal platform for beginners and experienced developers alike to fine-tune their HTML skills and explore the language's capabilities.
Conclusion: The Journey Begins
Understanding the basics of HTML is the first step in your journey into the world of web development. HTML's fundamental elements serve as the building blocks upon which you'll construct your web pages. With the assistance of the Online Compiler for HTML, you have a practical and interactive resource to help you explore and master the language. As you become more proficient in HTML, you'll gain the ability to structure content, create links, and embed images, laying the foundation for the websites and web applications of the future. The journey into web development has just begun, and HTML is your trusty guide.
#coding#programming#webdevelopment#online learning#programming languages#html5#html#html website#webdev
5 notes
·
View notes