#the software used in editing programs to remove background noise (i think)
Explore tagged Tumblr posts
Visit Tumblr Blog
Explore Tumblr blogs with no restrictions, modern design and the best experience.
Last Seen Tumblr Blogs


Fun Fact
Tumblr Inc. is funded by 13 investors.
Text
It is genuinely a weird feeling to have been tracking AI development since 2014 and seeing all the people just find out about it in the past 4 years because the same people that will call you a horrible degenerate for going anywhere near AI are literally the same people who praise Tiktok for its algorithm and they don't even know. They don't even *know* what the algorithm is.
#personal post#i looked it up and now algorithm aren't 'technically ai' anymore#because the type of ai we think if now is different from the type of ai they use in algorithms#but... ai is also just a marketing term anyway#what we call ai Isnt even ai officially because its not intelligent. objectively.#its dumb as fuck ngl. lol#thats not what intelligent means here but anyway#but yeah the tiktok algorithm the YouTube algorithm#literally anything that has the word algorithm in it#the software used in editing programs to remove background noise (i think)#the software on photoshop that edits out background but not in the “remove all pixels 50% related to this color pixel” way but the#“determine what is not a person” here way#thats all ai (im pretty sure)#and they dont even know.#because they weren't an insane kid like me who liked to watch algorithm videos and math videos on YouTube#do you know how many fucking chatbots ive talked to???#ive put too much info about how that shit works into my head its stupid#but yeah i watched the fucking blobs build a civilization get on my fucking level#no one is going to get that reference. literally no one.
3 notes
·
View notes
Note
Hi i may be mistaken but i think you mentioned doing readingd for audio books. Do you mind talking about how you started?
Ooh, it's been a few years since I did audio work lol. It's fun, but it can be incredibly strenuous, and unless you're like a /name/ in the voice acting world it's not going to be Rent Money.
Like with most things in my life, I just happened to be in the right place at the right time. A friend of a friend was looking to expand their press's audio book library and I offered to help. I didn't get paid for my first book, but I was also able to borrow recording equipment and editing software from my prof, so it didn't cost me anything but a little time and effort. Then colleagues and people from other arts programs started asking me to voice their work. I've been reading books aloud for forever to help with my ADHD processing, so I do have a particular tone and cadence that I can keep mostly consistent, and I think that attracted people lol.
MAONO 192KHZ/24Bit is my personal mic, but there are great options for cheaper. I've seen people get decent results even just with their phone mic. The editing software I use is called Reaper. It has a learning curve, but I adore it because you can clip audio without losing whatever you cut off altogether, and the background noise remover is very good. I hate audacity so much. The most challenging part of recording in my experience is finding a place that is quiet lol.
ACX, fivvr, upwork, and direct connections to small indie presses are how a lot of independent narrators make money. If you're just testing the waters, it might also be worth it to sign up to voice act for a game jam project, or some other community-based art project. Having samples of real work you've done is a good first step to actually getting paid lol.
#sorry if this isn't what u were looking for JSJDJDJC#I literally just stumble blithely through life#and things happen to me#saga speaks
9 notes
·
View notes
Text
So, you want to start a D&D Podcast
Awesome! Share your art! This is going to be my little guide of recommendations as someone who used to work in radio and has been involved with a couple of radio plays and online play readings.
Step one: You are good enough.
The first step is to not get discouraged. You may not be the next Critical Role or The Adventure Zone, but you will have a podcast project. The first priority should be a philosophy of sharing rather than ambition of success. Even if you don’t amass a following, you will be sharing a piece of yourself, and that is always something to be admired.
Step two: Set clear expectations with your players.
Making a podcast of a d&d campaign is harder than running a home game. There are a lot of things that you have to take into account during a recording session that aren’t that important in your everyday game.
This is a performance. Players need to be focused on you and the game.
Eating makes sounds that can be picked up by the microphones.
Your levels may be overwhelmed by the dice, consider using dice pads.
You and your players have to be understood, and it has to be clear when they are in character and out of character.
No matter how much you think you won’t, you will have to edit some sections.
If players are talking over each other or having outside of game conversations, it will be picked up by the microphone and it will disturb the flow of the game.
Step three: The equipment and software.
As I said in the previous section, you and your players have to be heard and understood. To that end, you will need to have the right equipment to make that happen. Here is what you will need:
A microphone. Do some research on what microphone to get. It will have to be better than one that is connected on a set of headphones, but you don’t necessarily have to break the bank for a good one.
Audacity open source audio editing software.
This is the program I used to edit all of my pre-recorded radio segments and I still use it when I have to edit any kind of audio. It has a bit of a learning curve, but once you get used to it it has almost unlimited potential.
(it is also super useful for untraceably pirating music)
A room with minimal background noise.
Ideally, you will want a soundproofed room with no windows, but that is not possible for most people. Record some sample audio in different rooms in your house and see what works best. You’ll be able to tell the difference.
A padded dice box or a dice mat.
You do not want to be rolling your dice straight on a table next to a microphone, it will be loud and will be jarring to people listening to the recording.
Step four: Get used to your voice on recording.
We all hate our voices on recording. I had a recurring segment on a local radio station for four years and I deeply hated the way I sounded. It is just something you need to get used to. If you are going to use a character voice, rehearse it. Troubleshoot it in the recording software. See if you can get it to sound the way you want it to. If you are dming, you have your work cut out for you. I would recommend pre-writing introductions and very important pieces of description because once you are on recording, you will forget everything you wanted to say WAY more often.
Step five: Editing
You’ve gotten your first session out of the way! Yay! You might be tempted to just upload it and be done, but that is not going to be the best decision. Here are a few things to do to make the quality just a little bit better.
Get a background noise profile.
Open the audio file in audacity and open the effects tab.
It will ask you to get a noise profile, select a section of the audio where no one is speaking. (Ideally a period of around 10 seconds where everyone is quiet.)
The program will isolate the sounds present in that 10 seconds and do its best to remove those sounds from the whole sound profile.
Normalize.
If a few of your players are slightly quieter than your louder players, there is a tool in the effects window called “Normalize.”
This will take all of the audio in the file and standardize it at a volume you choose (measured in decibels). It will boost quieter voices and bring down the volume of louder voices while keeping things like shouting distinct. Be careful, but it is fairly easy to understand.
Compress.
This effect will reduce clipping (I will explain later). It brings any very loud sounds into a safer range for the ear and brings very quiet sounds up to be audible.
Beware of clipping.
If the spikes on the audio file’s waveform go above a certain point, we call this clipping. It will distort the audio in the final product and be uncomfortable to listen to. You can sometimes fix it by using the amplify tool or the normalization and compression tools, but it is better to set a lower input level on your microphone to avoid it and amplify your volume in the editing process. It is easier to add more volume than to take away too much.
Background music.
If you are using background music, make sure it is licensed for you to use. Royalty free or self-produced music is usually best. If you drag new audio files into audacity, you can create new layers and adjust positioning by adding in silence or by manipulating the start time and end time of your background music. There is also a fade in/fade out function that you can access by selecting a piece of audio in one layer and then going into the effects tab.
Step six: Recaps and Rules
For a produced show, you should start every session with a recap both for anyone tuning in to your podcast and to remind the players of their given circumstances. Take notes during the session if you can, or listen back to the previous episode to study before your next one. This is a good way to get used to your voice, remind yourself of the voices you have given NPCs, and remember where in your story you are.
When you are running a game on stream, you will not have time to stop the game and look up a rule, so get used to problem solving as a dm. Make reminder cards, spell cards, have statblocks ready, and if you do not have a rule in front of you, make a ruling. If you are uploading a prerecorded game, you have a bit more leeway, but it depends on how much time you want to spend editing. My advice would be to get used to making rulings on the fly and confirming them later.
Step seven: General Performance tips
Players:
Stay engaged.
Not paying attention and missing the fact that it is your turn, or not understanding how your sheet works is similar to an actor forgetting their lines and stopping on stage.
Don’t fudge your dice rolls.
I know. It is tempting. No one can see them and if you got a nat 20 here it would be SO POETIC. But seriously, don’t.
Listen to your DM and try to limit off topic conversations.
Make your voice for your character distinct from your own.
DMs:
Be prepared.
Have your statblocks ready, bring any visual aids you need, have your notes opened, have a compendium of spells available, have an initiative tracker, have enough dice, know what the shape of the session will be.
Don’t bring your sourcebooks.
This seems weird, but it is a recommendation I can’t stress enough. If you have it with you, I guarantee you will flip through it to check rules and such. Don’t.
Practice your timing on certain levels of narration.
Try to figure out some fun ways to add tension through how you narrate.
Watch a LOT of liveplay d&d and study what you like about the dms.
I would recommend Dimension 20, Naddpod, Critical Role, The Adventure Zone, or any other piece of media you can find.
Now go out there and get started! Message me and I will try to tune in to whatever you produce!
#d&d#d&d podcast#dm tips#podcaster tips#dungeon master#d&d player#player character#dimension20#critical role#the adventure zone#naddpod#cr#d20#taz#soysaucednd#dm advice#player advice#podcasting
80 notes
·
View notes
Text
Soundgoodizer Audacity

Reaper audio recording software is awesome, and is what I recommend to everyone. I use it every day. And I also seem to learn something new about it every day. It has an incredible noise reduction tool built right in that I just discovered recently.
Free 5-part series
Download the free Audacity audio editor for Windows, Mac or Linux from our download partner, FossHub: Download Audacity for Windows, Mac or Linux; Audacity is free of charge. No registration or hardware purchase required. Audacity on Windows is only available as a 32-bit application that may be used on 32-bit or 64-bit systems. Is a free exciter and enhancer VST plugin developed by Red Shine Sound. Compatible OS(s): Windows.
This is a 5-post series, each one on a separate topic for setting up your home recording studio.
How to Set Up a Home Recording Studio
Soundgoodizer Soundgoodizer is a stereo 'maximizer-enhancer' plugin based on the Maximus soundprocess engine. Soundgoodizer has been fully endorsed by famous people with really big egos ears - It's shiny, it's good!
Here is a link to Soundgoodizer Equivalent for other DAWs, discovered in a thread on here earlier. Plus bonus points for the site being strangely translated and quite funny to read!
The reason I didn't know about it sooner is primarily due to the fact that reducing recorded noise is not its only or primary function. It just happens to do it REALLY well, and non-destructively (if that's not a word already, I hereby create it). The tool is called ReaFIR. I know! Who'd have thought to look for noise reduction editing chops under a moniker like that?
Review of What Noise Reduction Does
First though, let's do a quick review of what noise reduction does for us in the world of recording. There is almost always a bit of background noise in recorded audio. It is especially noticeable in recordings of just one thing, like a single voice.
The noise usually comes from a combination of stuff happening in the space/room where the recording takes place, and the electronics of the microphone and other gear involved. Recordings sound much better if you can reduce the noise, and that is what noise reduction tools are designed to do.
The typical method is to use an effect in an audio editor called 'Noise Reduction.' See my article How To Get Rid Of Background Noise In Audacity for how that normally works.
But since the noise and the voice are both together in the same recording, it isn't a perfect process. What noise reduction tools try to do is filter and removing as much noise as it can without also removing too much of the voice.
In order to do this, the software has to know what noise looks like so it can separate it from the signal (voice). So you have to highlight a section of the recording where there is ONLY noise, and no voice, and feed that sample to the noise reduction tool. Once it has the noise profile, it can do its thing.
My favorite recording program, Reaper, is a digital audio workstation (DAW), which is a fancy way of saying full-featured multi-track recording program. For more information on why I love Reaper so much, see my article, Why Reaper Rocks As A DAW.
But for some reason, Reaper doesn't have an effect called 'Noise Reduction.' So how do you reduce noise in Reaper?
Enter ReaFIR
Reaper names its effect plugins by using 'Rea' as a prefix (for Reaper), and then the name of the function after it. So ReaFIR means Reaper FIR. So what does FIR mean? It stands for Finite Impulse Response. If you would really like to geek out on what it really means, including all the scary math involved, you can read about it at the Finite Impulse Response Wikipedia page. But the simpler definition for ReaFIR itself from the Reaper manual is:
ReaFIR is a EQ and dynamics plug-in that includes an FFT spectrum analysis window. Amongst other things it can be used as a precision EQ, a gate, a fast attack/release precision compressor, a noise reduction tool.
Obviously it is that last thing we're interested in. In the video below, I walk you through how to use ReaFIR to reduce the hiss noise that happened when I recorded a short voice over. BTW, this video was recorded several years ago (why it says from the 'upcoming' course). That course, The Newbies Guide To Audio Recording Awesomeness - Part 2, has now been around since 2012 and had been updated may times since.
Soundgoodizer Plugin Audacity
How Does It Work?
So see it in action in the video above. But here is is a written summary of how it works. Once you have recorded some audio onto a track, click the FX button in the track control panel. Then select VST: ReaFIR from the Cockos collection of FX plug-ins.
Next, go ahead and click the “OK” button and then close the ReaFIR window by clicking on the red X in the upper right corner.
Now just highlight/select a section of the voice-over audio that has no voice actually saying anything. In other words, pick a small area that was only noise.
Then click on the Toggle Repeat button (down by the Play and Stop buttons). This is important because it will prevent any of the actual voice signal being played when sampling the noise for ReaFIR. With that area still highlighted, click on the FX button again to open the ReaFIR window.
In the Mode window of the ReaFIR tool, select Subtract, and put a tick into the Automatically build noise profile box. Now hit the Space bar on your keyboard (which will play the audio, which is just the noise at this point). You'll hear it for a second and then it will be gone. That's ReaFIR getting rid of the noise. Now hit the Space bar again to stop playback.
The next part is very important! Uncheck the box that says Automatically build noise profile. Otherwise ReaFIR will try to grab your voice and anything else on the track, and treat it as noise. Once you've done that, go ahead and close the ReaFIR window. Now all you have to do is click on the Toggle Repeat button again to turn it off, and listen to the entire track.
Voila! The noise is gone and only the voice remains. Pretty darned cool huh? And I think the result is better than a lot of tools dedicated to removing noise. I didn't hear much, if any, of the weirdness that sometimes happens after noise reduction.
The audio takes on a kind of swirly, under-water-y artifact sometimes. But I didn't hear that in this example. However, there noise we got rid of was a low-level and consistent hiss type of noise.
Soundgoodizer Cost
The louder the noise and the more varied the noise (if it contains lots of frequencies and intermittent clicks, pops, etc.), the more likely you are to have that swirly artifact left over after noise reduction.
So now you know about the secret noise reduction tool at your disposal if you use Reaper. Use it wisely.
1 note
·
View note
Text
gif tutorial
alright so i was asked for a tutorial on how i make my gifs, so here it is!! this one will focus mostly on how i make my live game gifs for baseball or hockey. as far as what i use, i use either obs studio or the xbox screenrecord function on my laptop for recording game clips. then i use photoshop, currently ps cc 2017, to actually make my gifs.

how i made this gif from this gifset. this will be split into parts to make it easier if you only want to know about certain elements of the process!
screen recording:
i’m going to focus on obs studio, as it’s what i use more often, and as far as i know, anyone can download it, but i have no idea what’s up with the xbox software i use, lmao.
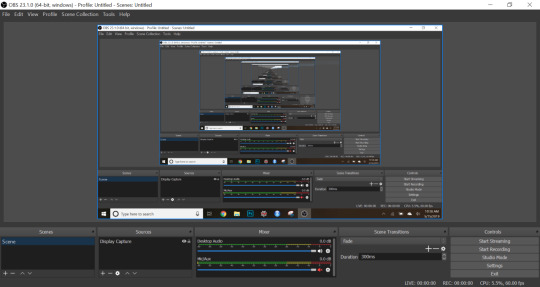
this is what it looks like when i open it. currently, i use the display capture setting as my source, and i will show you how to add that, along with some other settings i use and shortcuts.
alright so at the bottom of the window, there’s the source panel, it looks like this:
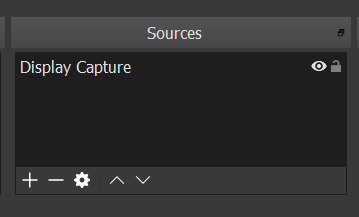
i already have a source added, the display capture. this means that it will record whatever i’m displaying on my screen currently, which is how i like it, as it makes it easy to know what i’m recording. i’ve never messed around with it much, to see what the other options do, because i’m lazy and this does what i need.
to add the source, click on the little plus icon at the bottom of the sources panel. a menu will pop up, and you can select any capture option, and as you can see above, i use display capture.
moving to the right, there’s the audio panel:
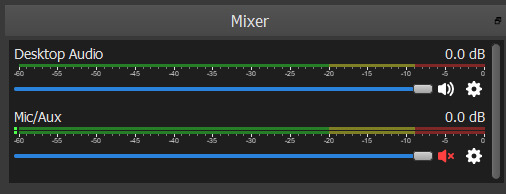
my personal preference is to keep the desktop audio on, and turn the mic/aux audio off. this way if i need the clip later, especially if it’s a video of something especially cute or whatever, i’ll have it and be able to use it. if you have the mic/aux on, it will record whatever sounds you’re making on top of the desktop audio, leading to weird noises mixed in with the video audio.
and finally, moving to the right again, there’s the controls panel:
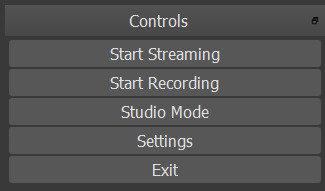
this is pretty self explanatory, here is where you can start/stop a recording, access the settings, or exit the program. i don’t use these start/stop buttons, but that’s because of a shortcut i will show in a second.
this is pretty much everything i deal with on the main page. there’s a ton of other options/information/things, but i haven’t messed around with them too much, so i’m not sure what a lot of them do.
next i’ll show the setting i change/use. this is what the setting page looks like when you open it using the button on the control panel:
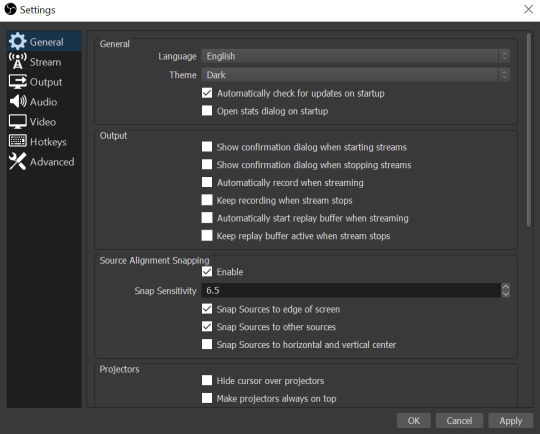
now i ignore most of the tabs on the left, because i’m only using obs for screenrecording, and not for livestreaming. i do change things under ‘output’ and ‘hotkeys’.
output:
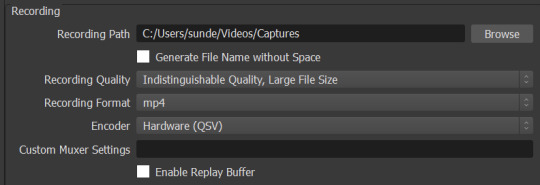
here i’ve changed the recording path to go to a specific folder rather than the general one it will send it to. during the hockey season, when i’m possibly making gifs for 3 games at a time i change that folder to one for whatever the date is. during baseball season, i’m less likely to be doing as much so i put it in a general folder that i sort out later.
i don’t remember what the automatic settings are for recording format, but i believe i had to change it to mp4, which is what i need/use for my method of making gifs.
hotkeys:
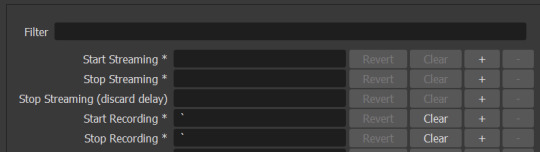
this is just a little short cut, but i added these hotkeys so i can start and stop recordings without needing to flip to the software, as long as it’s going in the background. i chose this key because it’s one i don’t need in my everyday life, thus minimizing the risk that i’ll ever accidentally record anything i don’t need, which isn’t a big deal, but can be annoying.
advanced:

this isn’t really a setting change, but this is how i have my filenames formatted, at least until i manually change this if i want to, but i believe its the default and it’s honestly really helpful to keep the videos straight when you’re a disorganized mess like me.
i think that’s everything for the screenrecording part of the process. if you have any questions, just ask!
photoshop:
alright so i use the import frames to layers method to make gifs, it’s just how i learned initially, so i’m pretty stuck in my ways.
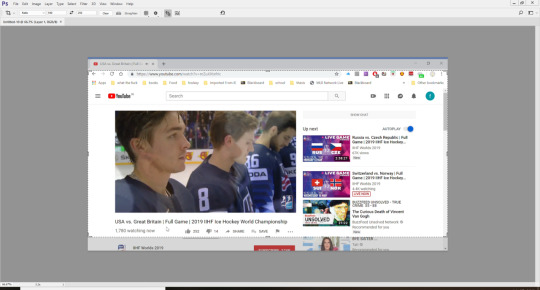
opening ps:
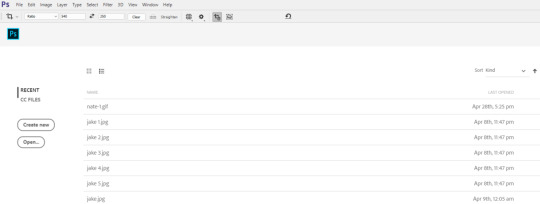
this is what my screen looks like when i open photoshop. i have mine set to the lighter setting bc i like how it looks brighter, but its just a personal preference.
importing clips:
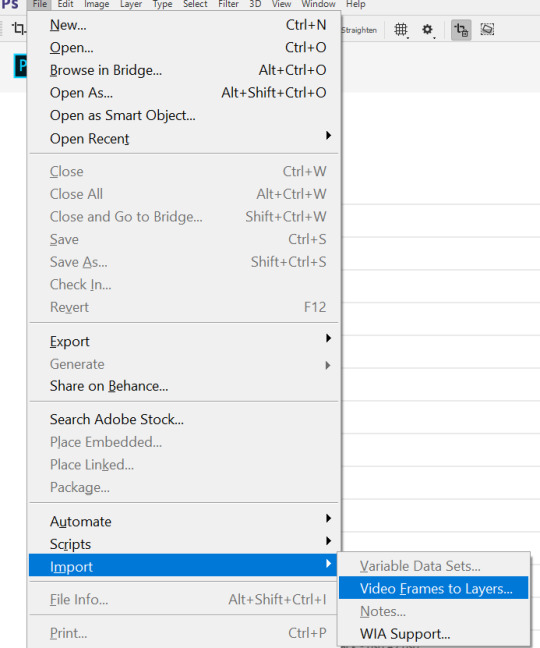
select import and then video frames to layers. it will open your files.
selecting video:
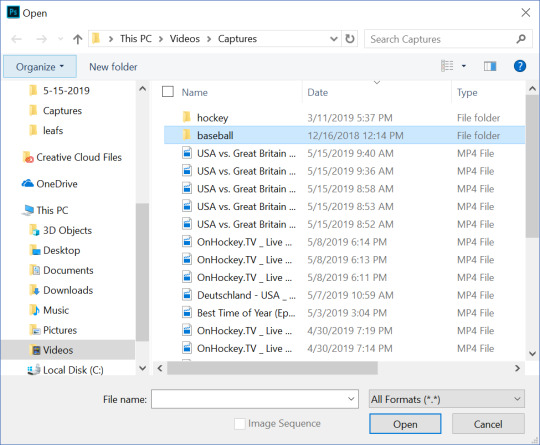
alright, so you can see the mess of videos i have, unsorted right now, lmao. anyway navigate to and select the video you want, and hit open.
selecting frames:
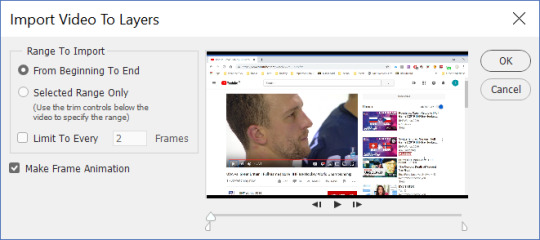
this window will pop up after it loads, and here is where you select the frames you want to include in the gif. in order to do so, you slide the two sliders to frame either side of the clip. as far as the limit to every ___ frames, i try to not use it, or i use every 2 frames, just depending on the clip.
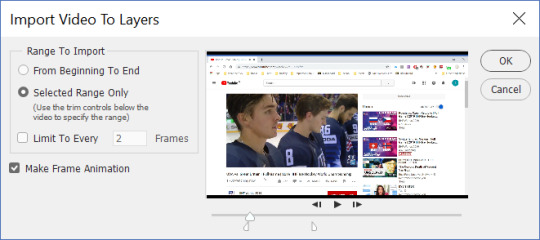
now i have the clip i want, so i hit ok, and let ps do its thing.
process:
alright so after the frames are loaded, there’s multiple things i do to prepare my gifs. i have to crop them, remove extra frames (delete with the little trash can at the bottom left), change the time delay, and then do the actual editing of the gif. also, i use the motion preset layout, which can be found on the drop down menu in the top right corner.
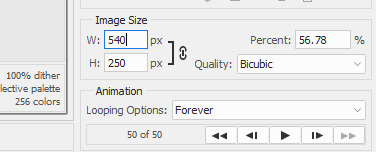
cropping:

these are the dimensions i use for most of my gifs. i range between 250-300 depending on the video, but 540 is almost always there, due to tumblr’s dimensions for photos/gifs. 268 x 268 is what i use for square gifs.
the cropping button is found on the left side menu, and it looks like that little symbol on the far left of the picture above.
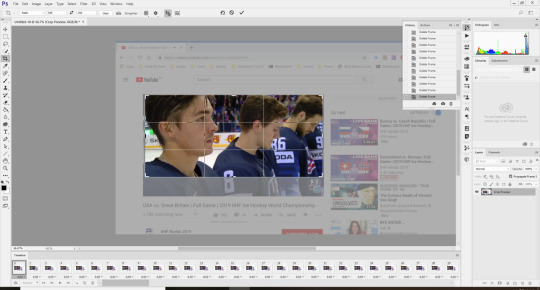
once i have the area i want selected, i doubleclick and it crops the frames.
time delay:
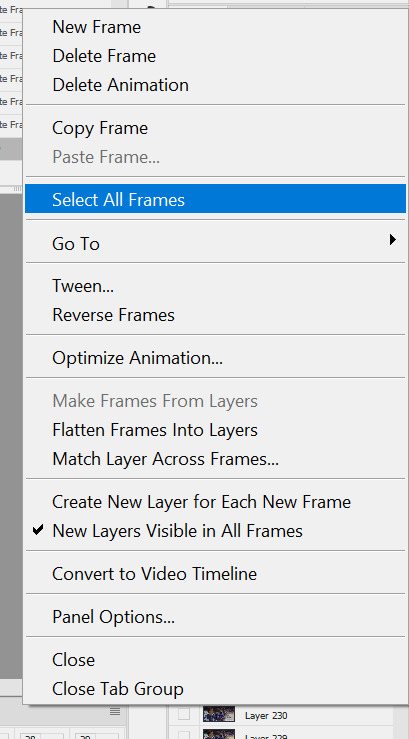
to change the time delay, click the little symbol you can kind of see in the photo above, with the four or so lines. it’s above the frames along the bottom of the screen, at the right. when the menu pops up, click select all frames, so you can change the timing for all the frames. once all the frames are selected, click one of the little carrots next to the numbers at the bottom of the frames, as seen in the picture below.
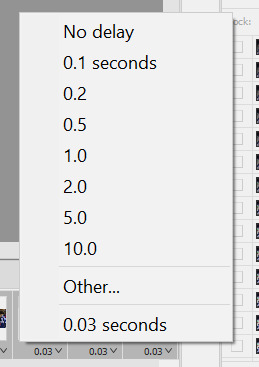
now you choose the time delay you want. when im not skipping any frames, i run between 0.05 to 0.06. if i am skipping, it’s between 0.08 to 0.1. just kind of play with it, til you find what works for you.
editing:
i always sharpen my gifs, it’s the best way to make your gifs look as nice as possible. to do so i use a sharpening action, found here. there is also a tutorial here for loading and using the action, which is much better than anything i could say, so use that!! i literally ALWAYS use this action/method, i love it so much. also, that blog is a goldmine for gif/edit help.
coloring:
alright, honestly im not going to be any help here, im so bad at coloring. at this point i have the same kind of things i do depending on where the game im makes gifs for is, since 81 and 41 games(ish) are in the same place for my teams during their seasons and then i just kind of make it up as i go. for actual help, i recommend the blog w the tutorial from above, just looking around there, or messing around in photoshop itself.
exporting:
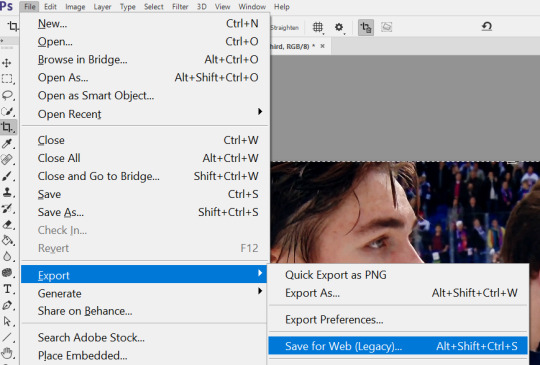
follow these steps to save for tumblr. once the window opens and is ready, change the width to 540 for the best results for tumblr.
make sure the gif is under 3mb, otherwise tumblr won’t play it and it will look like a photo. then just post! and be happy!! send any questions my way, always happy to help :-)
#here it is!#its so long dksfjsdkljf#hope it helps!#im always here to answer questions too!!#danhalen#tutorials#a
16 notes
·
View notes
Text
Merge Songs Online, Combine Mp3
From the album Effluxion, out February 22, 2019 on Merge Information. Free HD Video Converter Manufacturing facility is a well-revered music joiner app that's in style for its straight-forward operation, compact interface, high-effectivity and useful options. Therefore, it's highly really helpful for you. Free download the software program and set up it in your COMPUTER. Then observe the instruction under to merge any audio information. Other fields is likely to be off and have to be merged, but it's nonetheless the identical album. Merge data with completely different time, where the time distinction is smaller than 1 hour. When you'll want to create a special lyric for as ringtone or be part of MP3 recordsdata for free, you might want a MP3 joiner to mix them together. There are thousands of MP3 combiner programs around the world. A lot of the programs are greater than to merge MP3, WAV, WMV and other audio formats as a single audio monitor. With a purpose to choose up the specified program, Merge MP3s the article listed the top 10 free MP3 Mergers you must know. Simply choose the desired program in keeping with your requirements. In case you have any question related to merging MP3 information, you'll be able to feel free to let me know within the comments. Many enterprise audiobooks present motivational and advertising and marketing tactics that can assist you to enhance your business. Whether or not you downloaded the audiobook from the Net or transferred the unique CD to your laptop, the audiobook most likely contains quite a few audio information. By merging the tracks collectively, you may create a single, consolidated audiobook file that will play continuously. To hitch the audiobook information, use a program corresponding to iTunes, Free MP3 Joiner or Merge MP3. After you mix the tracks, you'll be able to transfer the only audiobook file to your iPod or MP3 participant and take heed to it on the go. Aside from making a voice over & adding background rating, enhancing pace, changing audio files, and so forth. you may as well split and merge audio recordsdata especially your MP3 tracks. What's outstanding about Wondershare Filmora is that it is compatibility with many of the audio formats and likewise the fact that it helps edit any sort of video and audio information. I'd use GPS Babel - you can obtain it free right here: It's a terrific, easy GUI that will take any number of GPX file (or any other sorts which might be associate with random GPS collections) and merge them into one GPX, or some other format you wish to output. You can too select whether or not you want just Waypoints, Routes and Tracks, or every part. Mp3 Merger can be utilized for a variety of purposes. You'll be able to merge two mp3 information together in various codecs. You'll be able to merge quick mp3 information captured by a voice recorder. If you happen to used the recorder to report lectures, you'll be able to merge mp3 files into one file to cover the entire recording out of the various completely different fragments. Finally, chances are you'll just wish to scale back file muddle and merge audio tracks in a variety of codecs together into a single super-combine. One factor to notice about this program is you could only merge all txt information included within a single folder. So you would possibly need to maneuver the separate txt documents you are going to join into one folder beforehand. Then click on Browse Folders and select the folder that features the text files that you must merge mp3s collectively. To listen on my cellphone I will copy the per-discmp3s to my Nexus 6 and use BeyondPod to load the directory as a "virtual feed". This has the great bonus of remembering the last listened position, simply as for a podcast. I wish there were a great way to place this into my Google Music account so that I may stream the information from the cloud, but I have not discovered any strategy to get "resume from final place" from this. You most likely can tryout this freeware should you want to merge various mp3 recordsdata merely. The app supports better than 300 audio codecs, robotically changing them to mp3 for quicker and easier operation. It is among the many most uncomplicated purposes that imply you possibly can lower any audio file on-line. Bên cạnh đó, Merge MP3 còn cung cấp tính năng sắp xếp các file Mp3 được ghép nối theo trình tự của tên hay thời gian, kích cỡ … tùy thuộc vào lựa chọn của người sử dụng. Điều này thuận tiện cho người dùng trong việc quản lý và theo dõi file Mp3 của mình. Like mp3DirectCut, Mp3Splt can work on an audio file with out having to decompress it first, leading to a quick workflow and no influence to audio high quality. This app is means simple though: you merely resolve a begin and finish time, then export that alternative as a separate audio file. The ensuing file may also be minimize up again into its component parts using the mp3splt device - mp3wrap provides info to the IDv3 remark to permit this. Merge database, and REMOVE second duplicated document. I collaborated with Maggie Fost, Merge Report's artwork director, to develop a new website platform for the established indie music label headquartered in Durham, NC.
For Windows customers, I recommend utilizing iTunes to import the CDs as grouped tracks, and in MP3 format, and then utilizing MP3 to iPod Audio E-book Converter to merge the tracks into a single audiobook. I am woefully behind on penning this up, however I think it's simpler than utilizing MarkAble, which adds plenty of complexity, with out including a lot in the way in which of flexibility. Within the Conflicts part, select the Overwrite Target Worth possibility for any source report subject that ought to overwrite the target report field. If this selection is cleared, the target discipline's value is retained in the merged file.How you can mix tracks inside Audacity is a very common query and a good skill to have. When utilizing Audacity merge tracks will be achieved a couple of different ways and relying on what your needs are a sure kind of merge may be better for you.I will provide you with a fast Audacity tutorial on three alternative ways to do an Audacity merge tracks process. When creating an audio CD the most effective source format to use is a WAV file (MP3s are always compressed from CD audio quality to some extent). Changing a 44.1 kHz WAV file to CDA introduces no noise, distortion or coloration to the sound.
1 note
·
View note
Note
I'm helping my (internet) friends make an object show, and I'm unfortunately not that confident about it, as we're all under 18 and don't have the money to really afford good quality mics or animation software. I'm wondering if you have any tips for people on a budget trying to make an object show for the first time?
Working under a tight budget is tough, that’s undeniable. I think the important thing to keep in mind is that having expensive utilities available does not guarantee success in the first place, it simply makes the process easier. Having the best equipment and software in the world isn’t going to do all that much for people who aren’t familiar with the basics in the first place. If you are incredibly passionate about this work, I would consider investing your money into equipment over time, but for the time-being take your time in that department and really focus in on proving that, as artists, you can make do with what you have.
I am far more interested in consuming media that is bare-bones in its visual and audio presentation but has masterful storytelling than the reverse, and I think much more of your potential audience will agree than the average person assumes. Know your story. Know your characters. Whether or not you will have full control over when your characters come and go (per your decision), it is imperative that you treat each and every installment as its own distinct collection of story and character arcs. If you set up your show in a manner in which you can play every detail out ahead of time, even better! Within an episode, an arc of episodes, or a full season/series you are able to construct interesting narratives in which characters are given obstacles: physical, emotional or otherwise. Especially in an object show you are given a set of obstacles, be it through challenges or the emotional burden of competition. On a budget or not, this is the heart of your show. No matter how the technical presentation comes across you can garner and audience through excellent storytelling. Anyone can do it with practice. ESPECIALLY you!
As for the technical department, itself, let’s talk audio. Back in early 2009 I picked up a ‘lil $10 Logitech microphone at Target and got started on my first voice performance (as Lakitu found here) and I wouldn’t say it’s all that bad. A little bad. Tiny bit. But it worked! Plug in a cheap mic, download Audacity for free, and you’re already well on your way. Audacity isn’t top-of-the-line, but as far as free programs go it works really well, and is probably your lowest priority for upgrading beyond if you choose to bump up your equipment/software. The focus here comes down to putting in a strong, meaningful performance as your character, working around your mic limitations through setup and Audacity editing, and being open to re-recording. It happens!
I’m going to skip over talking vocal performances for the time being (I can always return to that upon request) and stick the practical here. With any microphone set up you’re going to want to do as much as you can to keep your accosting integrity in good standing. What I mean by that, firstly, is recording in a location that absorbs noise. Typically being in echo-y locations, we’re trained to ignore our own voices reverberating (unless it is to an intense extent), so sometimes noticing whether a voice echoes in a recording takes a lot of focus. It’s often not as intense as an echo you’d hear in, say, a cave, just ever so slight to break the illusion of a character being right there on screen and not someone speaking through a microphone. This is solved low-budget quite simply in recording in tight spaces with as much sound-absorbing material as possible. The best option would be hanging up clothes, blankets, or simply recording in a closet- so long as it’s safe. (The higher-budget alternative is buying acoustic foam or utilizing, specifically, a sound booth.) Watch your recording program, find your balance of recording as loudly and clearly as you can while also not getting too close to your audio peaking (the little soundy wave bois not hitting the top/bottom of your recording strip pal). The audio can be made louder or softer later, but peaking is much tougher to fix back up.
It also helps to have any sort of make-shift pop filter you can get together. They’re foam or a screen that you can typically buy cheap that will catch some of the plosives and other weird noises your mouth makes without you noticing before they hit the microphone, which is very helpful in the longterm. And, if you don’t feel like buying them, I know Adam used a sock for a while early on and it worked just fine. Just throw that boi right over the microphone and listen back to how the quality changes. If it’s roughly the same, you’re in the clear for your early, low-budget project.
There’s also plenty that can be done in Audacity to set your audio apart from the rest. I’d say top priority is dealing with background noise. I’m not speaking to parents chatting or the house’s floorboards mysteriously creaking in the background (because that should not be heard whatsoever in your area of recording, listen back to a dialogue-less track of your audio to make sure none of that is coming through), here I am talking to the consistent track of buzzzzz or variation that will come across in any cheaper microphone. The world makes noise, some you can’t hear, and your microphone eats it up. It’ll be in the back of your recording track, and getting rid of it goes a long way. Here the simplest means of going about fixing that is to, at the very start or end of your recording session, record a solid fifteen seconds of background noise without aaaaany noises on your part. Listen back, grab just the few seconds of bg noise that has the most consistent sound without your breathing or other interference, go to effects and hit “noise reduction” (or “noise removal” in other versions), hit “get noise profile,” now highlight eeeeeverything you’ve recorded, go back to “noise removal,” start by setting your noise reduction to around 10-15, and hit “okay.” Listen back and see if that did the job, you may need to make the number a bit higher (I try my best to avoid the 20s). The job here is to use as little of it as possible to get the job done, as the more you use the more of a chance it has at diminishing the quality of your recording. You can also use “equalization” in this process, lowering or boosting very specific frequencies, if you are willing to experiment and get a feel for it. Some others use “compression” to get a much fuller-sounding voice, although if anything I keep this to a minimum and save it more-so for non-narrative pieces where a single voice needs to be dominant.
In the case of audio peaking, clipping, or any plosives/pops/background sounds coming through, you have to be comfortable with re-recording. Going back into your recording spot for a minute goes a long way for a product that you’ll be putting up alone for a forever. This also goes for potentially going in for a strong performance, but that is more subjective and up to a standard you must set, yourself. After that it is your job to bring all the audio from all characters together and balance all of them out neatly volume-wise, pace the recordings out, add in sound effects and music as necessary and balance them out too (a common mistake is making music too loud for the audience to understand what the characters are saying because the sound editor already knows what the characters are saying, so there’s a disconnect). With enough time you will have an excellent audio skeleton for your animation, even with a low budget.
I’ll be honest in that I am much less experienced in animation than I am in audio so I cannot offer all the advice in the world, but here’s what I can say. With the technology available today you are able to create a lot of striking imagery. Whether you use a cheap animation program (do people still use Anime Studio?), Powerpoint, or a more typical program acquired through illegal means (which I would not say here that I condone, but I am aware it happens and people do what people do), there is no stopping you from coming up with unique visuals. I think in the object show community people get pretty caught up in keeping up standard animation conventions, simply making smooth motions and a good frame-rate and making sure everything looks “professional.” That is a luxury, and especially when you are starting out it is far from necessary.
What you want when you are starting out are visuals that are striking. Creative. Memorable. You’re working in animation, the most fluid and fun medium out there! You can spend all day getting bogged down in the basics of movement, which can be important down the line, but what is unique to you is the style that you bring to the table. Make characters do what only animated characters can do. Make characters pose in ways that people can think back on in wonder. As an object show, think of challenges that make characters do the absurd or push them to physical limits. Inanimate Insanity does not get to hit on this often but it is something I value in animation. You can impress people with or without the best animation program in town, it’s just more trying. But far more rewarding.
So much of the magic of object show community is that it works as a training grounds. Create create create! This is the time to do the weird and meaningful things that you might not have an opportunity to create far down the line when responsibilities get in the way. It doesn’t matter in the slightest if your work is perfect, so long as you are creating something and getting it out there and, above all, expressing yourself- I am impressed.
I know that most of this has been more to general show production and not more specifically to object show production, but I think it is important to note that it does work the same as any other show. People will always appreciate good, strong stories, as well as the bare minimum put into your audio and visuals. Effort means the world.
You got this.
39 notes
·
View notes
Text
Free Video Editing Software For Mac 2015

Are you looking for the best free video editing software for Mac? You want it to help you create great videos for fun, entertainment, invitation, advertising or education? Well apart from the cool video footage, the selection of a correct tool is key to the success of a video. We’ve listed both the best free and premium video editing software programs for Mac users in this guide. Whether you are a beginner or a professional, you will find one that works for you.
Free Video Editing Software For Mac 2015 User
Free Video Editing Program For Mac
Best Video Editing Software Imac
Best Video Editing Software Mac
Free Video Editing Program Mac
Best Free Video Editing Software for Mac
iMovie
iMovie is what most people will think to use when they want a free video editing software for Mac. You don’t need to pay a penny for it. It is completely free to use with almost all of the features that we need for processing our video. There are tons of effects, transitions, sound effects, and text styles to help you make your own stylish videos. One of the best features is that its movie trailer themes offers you a lot of options to create amazing cinema-like trailers in just several minutes. The interface is really easy to use and intuitive. So you can start editing your video and quickly get the hang of the program.
ShotCut
Some video editors are free, but there's usually some kind of catch or disadvantage to these programs. (Image credit: Shotcut) Free vs paid video editing software. There are some free video editing solutions out there. Programs such as DaVinci Resolve and Shotcut are free downloads, and iMovie comes preloaded on every new Mac computer. Read about the best video editing apps for Mac here: Best video editing software for Mac myTuner Radio If you like to listen to radio stations try out the myTuner Radio app. Save your favourite.
ShotCut is a great video editing software for Mac, which can be used on Windows or Linux as well. Its interface isn’t really super intuitive but it is not hard to pick up where all of the tools are located. So you should be a little patient if you want to get great results with this program. It contains all the tools you know from Windows Movie Maker, plus a lot of extras. ShotCut’s biggest advantage is its video and audio filters, which can be fully customized, layered, and combined in all kinds of interesting ways. However, you cannot preview the effects before applying them. And although there are excellent export file formats, it has no profiles for different devices.
HitFilm Express
HitFilm Express is another free video editing software for Mac, which has professional tools but without the high price tag. Due to its unique set of features, you need to spend some time before you get the hang of it. There are various tutorials to help you master it using this program. HitFilm Express is not a tool to be used just to help you just cut off unwanted footages, adding color effects, or exporting to a new format, but one that has a full editing suite, such as audio and video filters, compositing tools, layers and masking, green screen effects, and 3D support. Its website puts emphasis on creating Hollywood-style movies, so it is also one of the best tools for YouTubers and vloggers.
Lightworks
Lightworks is another one of the best video editing software for Mac which is packed with pro-level tools. Its interface is a little different from other video editors you may have tried. So don’t expect to master it overnight but it worth the time and effort once you get used to it. Lightworks is very suitable for home users who want an advanced tool for post-production. It has advanced real-time effects, a color correction tool, a precise trimming tool, blurs and masks, which all help to make your video shine.
Best Full-featured Video Editing Software for Mac
If you are looking for a video editing software for Mac that has professional-quality tools but is beginner-friendly, BeeCut is a reliable option to try. It is compatible with both Mac and Windows. If you are going to be jumping between different systems, you can learn one piece of editing software and move around, back and forth. The interface is fairly intuitive and easy to use, but there are also a number of text tutorials on its website, as well as video tutorials on YouTube. So you can really get up to speed quickly. The only downside is the free version will leave a watermark on the video.
Main features:
Supports multiple video aspect ratios – 16:9, 4:3, 9:16, 1:1, and 3:4.
Supports almost all kinds of video formats, audio formats, and image formats.
Includes a complete classic video editing toolkit like trim, cut, split, and more.
Advanced video editing tools like Mosaic, Freeze frame, zoom, PIP, etc.
Double tracks for PIPs, Texts, Music, Filters and Overlays.
Provides hundreds of cool filters, texts, transitions, borders, overlays and animated elements.
Export video in popular formats or for different devices in HD quality.
Related posts:
Mac computers are aimed for professional graphic designing, video editing, and imaging needs. Most of the professionals use premium grade video editors and graphic designing software on their Mac computers to complete their projects.
However, the sad truth is that these professional video editors are really costly. You might have to give up thousands of dollars to buy a video editor for Mac loaded with premium features. These premium video editors are used in movies and TV shows.

If you want to edit your raw videos or working on a project and looking for a free video editing software for Mac then you are at the right place. I have created a list of 10 best free video editing software for Mac computers. These free video editors might not match with the features of premium video editors but they are equipped with the necessary tools and features of basic video editing.
Best Free Video Editing Software for Mac Computers
Some free video editors in this list are quite efficient and provide advanced video editing features while some of these free video editors for Mac provide basic features but are ideal for the newbies. Many contain premium features of video editing. Anyway, I am giving you the list of best free video editing software for Mac and you decide which one is best for you. These are worth a shot for free.
1. Shotcut Video Editor
Shotcut is an open source, cross platform video editing software. It is available for free for Linux, Mac and Windows 10/8/7. This software contains many impressive video editing features.
Shotcut video editor supports almost all the popular video, audio and image formats. There is a broad range of video effects, transitions, filters and compositions that you can use to edit videos in Mac computers. Although, the interface is quite friendly but users completely new to video editing might face a little difficulty. However, there are easy video editing tutorials on YouTube for help.
This one is a feature-rich video editing tool. There are various blending modes for a professional touch to your videos. You can set the color, contrast, brightness, overlays, add different audio effects, bass, treble, delays, etc. The best part I like about it is the highly configurable timeline. So, if you are looking for a free video editing software for Mac then I’d suggest giving Shotcut video editor your first try.
How to Use Shotcut Video editor to edit videos – Shotcut Tutorial
2. Movavi Video Editor
Another simple video editing software. Movavi video editor is available for both Windows and Mac users. You can download the free version of this software from the website. Most users love this tool for its simple and easy to use interface.
Import any video to the software’s timeline and start editing. You can improve the quality, remove noise, add background music or audio, titles, subtitles, font size, color, contrast, saturation, choose aspect ratio, etc. The video editor supports a wide range of formats. There are a lot of creative effects like filters, transitions, animated fades, trim or crop unwanted parts of the video, rotate & adjust, stabilize, preset tunes, etc.
What else? You can create an interesting photo slideshow and reverse a video. Here is a simple tutorial explaining how to work with Movavi video editor.
How to Edit Videos using Movai video editor on Mac | Tutorial
3. AVS Video Editor
The next efficient video editor in the list. AVS video editor is paid video editing software but it provides an unlimited free trial version which is enough for basic video editing requirements.
All popular audio, video and image formats are supported. You can flip, rotate, trim unwanted parts, cut and stabilize your video. There are multiple blending modes, delay, add subtitles, various menu styles, brightness, contrast, etc. There are more than 600 transitions and special effects to choose from. You can get an overview of each project from the storyboard.
This video editor fits the beginners or novice most. Transform your raw camera footage to a finished video easily. The software allows you to output the video to various online video sharing platforms like YouTube, Vimeo, etc.
How to use AVS Video editor | Tutorial
4. Da Vinci Resolve Video Editor for Mac
Da Vinci Resolve video editor is a powerful video editing software for Mac. It has been praised by many professionals and esteemed publications. You can turn to its multi-cam editing mode if you are working with footages from multiple cameras. I have used this video editor for a few of my video editing projects so I personally like it very much. It is quite handy.
The video editing software provides faster speed. You can edit your videos extremely quickly. Although the paid version of this software has more high-end features but even a professional can get most of his video editing work done through the free version. It contains all the basic and many premium grade video editing features.
You can edit the edited videos to YouTube, Vimeo, Dailymotion, etc.
How to use Da Vinci Resolve Video Editing software for Mac | Tutorial
5. Final cut Pro Video Editor for Mac
Final cut pro is a video editing software from Apple. This software is not free and costs about $300. So, what’s it doing in this list? Because, it offers a free trial for 30 days. Final cut pro is one of the best video editing software so if you are working on an important video editing project then you can avail the features for 30 days for free.
This video editing software fits well for the novice and for the professional video editors. It is loaded with basic and advanced video editing features. You can quickly import media to its magnetic timeline, add 3D titles, apply masks, color grading, color balance, effective previews and rendering, smooth transitions, jumps and cuts, effects, stabilization, etc.
This software is actively used by the video editors of movies and TV series.
How to Download and Use Final Cut Pro Free Trial
https://www.youtube.com/watch?v=hsadGq4hWYo
6. OpenShot Video Editor
Another great open source, cross-platform video editing software. OpenShot video editor is available for Windows, Linux and Mac users. The software is rich in features like unlimited audio/video tracks, multiple formats support, various transitions and special effects, stabilization, titles, subtitles, audio features, etc.
The interface is simple yet powerful. The advanced timeline makes it easier to drag, drop, zoom and snap. You can do trimming, rotation, snapping, cutting, scaling, masking, overlays, and add watermarks. This video editor has got multiple updates. The latest update was in August 2016.
How to use OpenShot Video Editor | Tutorial
7. Lightworks Video Editor
Lightworks video editor is a comprehensive non-linear video editing software. Video editing and trimming is relatively easier. It has been used by some movies like Pulp fiction, Heat, etc. for the video editing requirements in the past.
The video editing software is highly customizable and you can really get what you want out of it. Though its free but it contains many premium grade features. However, I found that it has restrictions in terms of project sharing. You can only share a video of up to 1080p in Vimeo and up to 720p output to YouTube.
How to use Lightworks Video Editor | Tutorial
8. Blender Video Editor
Free Video Editing Software For Mac 2015 User
Blender is a free to use, open source 3D creation tool. It providing efficient non-linear video editing features too. Blender is powerful but it takes a little time in getting used to.
By default, the software will show up 3D modelling mode. You will need to change the mode to video editing from menu. It contains all the basic video editing tools that other video editors have. Download it for free from the official website.
How to use Blender Video Editor | Tutorial
9. Avidemux Video Editor
Avidemux is another efficient video editing tool for Mac. Actually, it’s a free cross-platform video editor. It’s not a high end video editor but suits perfectly for basic video editing requirements. The interface is very simple and easy to use.
Free Video Editing Program For Mac
Below is a brief tutorial of Avidemux interface and working. You can get much out of it.
How to use Avidemux Video Editor | Tutorial
10. Jahshaka (CineFX)
Best Video Editing Software Imac
The last but not the least, Jahshaka video editor, my friends. This software provides many different tools to create amazing digital content. You can do video editing, 2D annd 3D animation, stabilization, flash animation, color correction, keying, tracking, composting, etc. There are many audio and video effects.
The developers keep on adding new features with every release.
Best Video Editing Software Mac
How to use Jahshaka (CineFX) Video Editor
These were some of the best video editing software for Mac users. You can get these software for free. These are best for those who are new to video editing or want to do some basic editing for short movie. The professional video editors like Adobe Premiere or Final Cut Pro cost are costly and you might not want to invest your money in these.
Free Video Editing Program Mac
However, if you want to try the professional premium video editing software for Mac then try the trial version first as most of them offer a trial version for a few weeks or month. Which one do you think is the best video editor for Mac?
0 notes
Text
How to start podcast in 2020-21? | Listnr Co.

If you’re a blogger, trying to establish a brand, you should definitely launch your own podcast series. If you don’t have one, you’re missing out a large audience. Did you know that around 73 million Americans identify as regular podcast listeners? Even if you’re not a person who writes a lot but love to talk about your passion or field of expertise on and on and if you think that might help people in their life, you can definitely start a podcast series instead of blogging.
I know it’s quite intimidating for the beginners and so here we’re to help you! We’ll be discussing everything from how to start a podcast? and Essential components/ equipment to start a podcast. Then, of course, your audience wants to find you so we’ll be looking into some of the best podcast hosting platforms.
Things to do before starting a podcast:Figuring out the niche:
Keep this in mind, the niche which you’re about to choose must excite you as well as the audience. Think from the audience perspective, do they really need to hear your podcast, if yes, is there a strong why behind it? The topic/ niche should be quite demanding. The easy way to gain an audience by choosing the right niche. For example, if you think a topic has a huge audience and not much competition, go for it.
Deciding the name of your podcast:
The name of the podcast something should be related to your niche. So make sure whether a domain name (should be the name of your podcast) is available or not. Then check for the social media pages as well.
Establishing a style:
The main styles of podcasting:
Solo: In the solo Podcast, you’ll share your thoughts and ideas and won’t have other people/guests in your podcast series.
Having a Guest: Here you’ll be interviewing some great people of your niche to listen and share their perspective to the world.
Essential Equipment for the podcast:
You will be surprised to know that many people give up listening to a podcast series just because of the bad audio quality — fuzzy, too quiet, or even too loud. So you have to make sure the sound quality is good and you have to know some basic audio editing skills (Don’t worry when you have the right software, it’s easy).
This also means you’ll need a decent microphone. You don’t need to afford an expensive mic — especially right at the start. Even most modern microphones can work if you’re a beginner, or you can spend a little on a USB mic that plugs into your computer. Let’s look into these in detail later. Keep reading!
Basic software programs to start a podcast:Software for recording:
For recording, you’ll need software that serves two main purposes:
Recording the audio
Editing it into a proper episode.
Some of the best software programs are:
Skype: Easy to record, there are still people using skype to record their podcast even after they succeeded in their field.
Zoom: A lot of people use Zoom as it’s a free conferencing program, also it’s quick and convenient for the guests to join.
Zencastr: Zencastr is highly recommended, it has both free and paid options. It records each person’s audio on its track which makes it so much easier while editing, and it also exports the audio in studio-standard quality, removing some of the little noises that might happen while recording.
Listnr: Probably the easiest way to start a Podcast, ever. Listnr helps you Start a Podcast just by entering your Script into its Editor and Voila! You have your Podcast in under 5 minutes!
Audacity: No matter if you are windows or mac user, Audacity is cross-platform and is completely free. You can record and edit from there. You can add music, background, can mix 2–3–4 voices whatever channels of voices you have. Also, you can make you sound professional by adding effects to it.
Getting music:
Integrating music into the introduction of each podcast episode helps to set your content apart and adds a bit of flair to it. These are usually short voice-overs with music that are available, that introduces the podcast, the host, or the tagline of your podcast. You can record it yourself or choose any royalty-free music available on the Internet.
Export your MP3:
You need to publish the podcasts on a hosting service in an MP3 format, especially on platforms where they have bandwidth restrictions. Since some podcast hosts charge extra if you are posting a bigger file. Hence, during the export process, you should keep your MP3 files as small as possible without compromising the quality.
After exporting the MP3, you need to tag it with metadata, such as your podcast name, logo, description, and website URL. This will make sure that your audience gets all of the information that they need about your podcast.
Launching and promotion:
Once you have episodes ready to go and have published them on your hosting account, you have to promote your podcast regularly on your social media pages. You do a pre-promotion or post promotion with a teaser or you can even add some behind the scenes to get the audience interested. Post at least once a day, not just promoting your podcast but some other valuable content related to your niche. By this way, you’re letting people know that you are working very hard to help people with your free valuable content.
Submit to directories:
After you publish your podcast, you have to select a podcast directory where listeners discover, listen, and subscribe to your podcasts. You need to post an RSS feed link that you get from the podcast host to the directory of your choice. You can select one or multiple podcast directories depending on your strategy, but make sure to choose them wisely.
Here are some of the best options for directories:
iTunes
Spotify
Google Play Music
Stitcher
Blubrry
SoundCloud
Pocketcasts
Essential Equipment to start a Podcast:
It really depends on your budget when it comes to purchasing all the equipment, but whatever level you’re currently at, be it beginners or professional, here’s a handy list of essential equipment you need to start a podcast.
Microphones:
Don’t go for your computer’s built-in microphone as the audio quality will be bad. The easiest way to get started is to use a USB microphone. To have the option to record top notch sound, you’ll need a different simple or USB amplifier. Most tenderfoot podcasters go for USB mics as it permits them to just fit their amplifier straight into their PC and begin recording. It starts from $100.
Pop Filter:
Another urgent hardware that will assist you with catching extraordinary sounding vocals is a pop channel or windscreen. Its fundamental intention is to limit or forestall “plosives, for example, your P’s and T’s, by retaining those incredible impacts of air before the sound arrives at your receiver. Usually you can get the pop filters for 10 to 50 dollars.
Mic Stand:
However, it is crucial to understand that you can’t host a podcast while holding the microphone in your hands. Even if you are trying, it may add more noise to your audio. To set up your amplifier and pop channel together, you’ll need a solid mic stand. However, that is not by any means the only utilization of a mic stand; it will likewise assist you with situating your mouthpiece appropriately so you don’t need to twist forward or downwards to have the option to talk into the receiver. Mic stands are available from $20.
Shock Mount:
It is designed to protect a microphone from shocks and vibrations. Most mics used in home recording studio setups are overly sensitive to such disturbances. This, in turn, can affect the bass of your sound. Therefore, it is recommended to use one to retain the tone and texture of your voice. It starts from $50.
While some mics come with one, others don’t. The best option is to buy a dedicated option from the mic’s manufacturing company. However, check the mic’s diameter and ensure that it fits perfectly.
Headphones:
Headphones fill in as your sound screen, which is the reason you’ll regularly discover podcasters (and in any event, recording specialists) with Headphones while recording. It could be peculiar hearing your own voice from the outset, however, it’s the most ideal approach to check for any covering clamour and lopsided mic sound levels. And so, you don’t need to do retakes. It ranges from $50 to $150.
Headphone Amplifier:
Each speaker on your show will require an earphone screen, so you’ll require a multi-channel earphone intensifier that can oblige more than one earphone jack and boost the full solid quality capability of every one of your earphones. A headphone amplifier costs around $500.
Audio Interface:
A sound interface fundamentally fills in as the extension that changes over the amplifier’s sound signs into advanced so you can “send” them to your computer for playback, blending, and transfer.
As recently referenced, some USB mouthpieces can be stopped straightforwardly into your PC. Some podcasters like to utilize the wizardry of a sound interface in keeping up the nature of the first sound, rather than depending on the PC’s sound card for the basic sound change.
Mixer:
Like a sound interface, a mixer improves your sound by giving you more power over sound levels, sources of info, yields, and the sky’s the limit from there. Most computerized sound workstations (DAWs) will permit you to mix and ace different sound channels on your PC. However, besides some podcasters’ inclination to do it physically, once in a while there are no decision, particularly when you will have far off (bring in) visitors. A mixer costs around $150.
Cables:
Contingent upon your picked web recording design, there might be occasions when you have to do talks with the outside of the studio. For this situation, we highly suggest that you utilize a dependable, compact sound recorder to catch and spare your sound to a micro SD card.
Sound Proofing Materials:
Similarly, as with a chronicle studio, you’ll have to give your room some acoustic therapy. The degree will rely upon how much reverberation or reverb is available, beside the measure of outer commotion originating from outside the room, assuming any.
In any event, you’ll have to apply acoustic boards on the dividers (and perhaps on the roof). Become familiar with room soundproofing to comprehend what your room needs to change into a soundproof recording studio. Sound proofing materials starts from 100 dollars.
Audio Editing Software (DAW):
Enough about the room and your equipment. Whenever you’ve indicated your outer gear, remember to decide the chronicle programming that you will use on your PC. Your decision relies upon your PC’s working framework; however, you can discover a great deal of free, cross-stage programming programs (like Adobe Audition) that you can use with your PC and Mac.
Before you begin recording, set aside the effort to find the absolute best webcast recording programming and their highlights to discover which one best suits your sound altering needs and expertise level. If you’d like to out source this job, you’ve to pay around 500 dollars per month for weekly shows.
Podcast Host:
The last significant advance of the podcasting work cycle is getting your webcast on iTunes or other facilitating administrations (after you’ve recorded and altered it). This is the place where you will ideally begin getting heard and picking up prevalence, particularly in case you’re intending to bring in some money from your digital broadcasts.
There are loads of other mainstream digital broadcast stages are available besides iTunes and SoundCloud. While it assists with presenting your show to those with the biggest audience, you’ll have to pick the correct one for your niche to effectively arrive at your ideal segment — so pick admirably! The hosting usually costs around $20/ month.
Best Podcast Hosting Sites:
There are several options to consider when it comes to podcast hosting, below are the best podcast hosting companies.
Spotify:
Spotify is the best music, podcast, and video streaming application available on mobile or tablet. It has free as well as paid options, the free accounts remain available to listeners by invitation to manage the growth. The launch also opened paid subscriptions to everyone. Spotify gives your ability to seamlessly access and controls your favourite music and podcasts. You can even make and share playlists. It is becoming an increasingly important player in the world of podcasting.
Buzzsprout:
Buzzsprout is one of the easy ways of hosting, promoting, tracking your podcast. It helped many people to start their own podcast. You can upload up to two hours of audio per month, but all those episodes are only hosted for 90 days. It is a fantastic platform for a beginner as it offers a simple dashboard that shows your listener data, number of impressions, location demographics — and many others.
Blubrry:
Blubrry is the podcast hosting with WordPress integration using the PowerPress plugin. This platform gives advanced statistics for your podcast and other audio files. Podcast Hosting by Blubrry is highly optimized for those who are using WordPress with PowerPress and it is quite simple to use. You can access your account from your online dashboard from a mobile device. It can also manage advertising deals for organizations.
Spreaker:
Spreaker Studio was the first podcasting application which supported Chrome. It presents a unique listening experience, podcasters can create, analyze, distribute and monetize professional sounding audio. This platform enables anyone to participate in and interact with the community of audio creators and listeners.
Listnr:
Here you’ll find a cool solution to all your podcast issues. Listnr helps users start a Podcast in 50+ voices without recording anything. Yes, it converts your blog posts or any text for Voice-overs or podcasts.
Bonus — Listnr has a Lifetime Deal (till December 1st) where you can get a lifetime deal of Listnr just for $59 and the product will be all yours, you don’t need to pay for a monthly subscription.
If you’re hesitating to buy the whole package for the lifetime, there is a 30 Day Refund policy as well for you to get to know the platform.
These are the features that are available in the Lifetime deal package of Listnr:
45,000 Words Per Month
200 GB Storage
Unlimited Podcast Hosting
Distribute on iTunes, Spotify, Google Podcasts and many more using RSS Feed.
1 User Account
17+ Languages with 70+ Voices (more coming soon)
Unlimited Embeddings
Podbean:
With the help of Podbean, you can create professional podcasts in very less time without any knowledge of programming. This platform tracks your podcast’s performance and understands your audience better. You can record, publish and manage podcasts right from the app. It helps you to earn money with paid subscriptions or fees.
Patreon:
Patreon is a simple Podcast platform that helps you to build a community around your content. This platform helps you by creating RSS feed, exclusively for the users. Patreon allows the user to set several subscriber levels, with other crowdfunding platforms, the more you give, the more you receive from them.
Anchor:
Anchor is known for its free podcast platform. Anchor helps you to create, distribute, and monetize your podcast from any device, for free. Anchor podcast is accessible to everyone, it has no storage limits and no trial period. The platform has a built-in ad platform, which offers easy editing.
Libsyn:
Libsyn is one of the oldest and largest podcast media hosts, it is a Blubrry alternative and it provides podcast hosting to connect with your audience wherever they are. Libsyn podcast hosting plans are flexible, easy to change, transfer, and are packed with trusted features. It also has some cost-effective plans to meet your needs.
Transistor:
It is one of the newest hosting and analytics platforms. It helps you to store your MP3 files, and generates your RSS feed, host your podcast’s website, and helps to distribute your show to the world. It’s user-friendly migration, uploads and directory listing are very simple to use.
Which platform you’re about to use to start your podcast? Let us know in the comments!
With 💗
— Team Listnr
0 notes
Text
Limbo Trailer Final Update
So after a lot of difficulty due to various reasons I finally managed to get into the Foley Suite at uni yesterday and spent all day recording all of the sound effects that would be supporting the voice lines.
While we were in the Foley Suite we came up with some pretty inventive ideas for recreating sounds that would usually not be doable, for example, I used a piece of metal and ran it along a corrugated rubber tube to create the sound of the buzz saw revving up.
Here is how I created some of the more difficult sounds:
Running/Jumping on Grass - Tapping feet in a pile of cassette film tape.
Boulder Rolling - Chair wheel rolling on hollow wood.
Boulder Smash - Dropping one cinder block onto another.
Buzz Saw - Running a metal bracket along a vacuum cleaner tube.
Cart Crash - Dropping the padded end of a metal desk leg onto some wood.
Climbing Metal Ladder - Tapping 2 fingers on a hollow metal pole.
Creaky Light Sound (Unused) - Rocking a rusty scooter back and forth.
Lever - Twisting a typewriter mechanism.
Tyre Bounce - Hitting the vacuum cleaner tube with some wood.
Metal Scraping - Dragging a hollow metal pole along a sandstone tile.
The other sounds for example jumping sounds on wooden floor were made by doing exactly that.
When I got home I realised that I had no sounds that could be used for the scene with the water. I initially had planned to do this by getting 3rd party sounds from an online sound bank, but after seeing some of my friends using their phones to record some sounds in the Foley Suite I realised that the sound quality wasn’t actually as bad as I had first thought, so, I filled up my bath tub with a shallow layer of water and used that to walk/run in to create splashing footsteps sounds. I also then recorded the sounds of the water draining away to create the effect of water flowing. I had to play around quite a bit in audacity to remove some of the background noise which comes with using a phone microphone to record but that was fine and didn’t take much time at all.
There were some sounds however that would have just been impossible for me to record myself, for example I had planned to record some glass smashing sounds in the Foley Suite but after thinking about it more I decided that I wasn’t confident that it would be safe. The mosquito buzzing sound was also way too difficult to create as there was no way I was going to find a mosquito by chance and have my recorder ready to go. Also the electric shorting out sound is too distinct of a sound and I didn’t think I had the ability to recreate this to give the same effect as the real thing would, therefore these sounds were taken from online.
I was really trying my best to not use sounds from online as much as I could, seeing as my project is predominately voice lines, however I can not create my own music that would fit this so perfectly so I borrowed the bicycle track from Pokémon Alpha Sapphire (and referenced of course!) to create the happy journey feel to the trailer.
Speaking of references I had planned to do some more research into how you correctly state them but after asking some of my course-mates last night I understood it quite quickly. Although I was having trouble finding the initial author of the Pokémon track I used so I just referenced the company that made the game.
When it came to editing the actual sounds I had some previous experience with audacity thanks to using the program in Secondary school, A-level music tech, and also just some personal projects and messing around at home. However there were some things that I had to use youtube tutorials and guides for, for example cutting out background noise and echo from sounds.
For that I used this video - https://www.youtube.com/watch?v=10FFKl_0GSA
I needed to know how to cut out these sounds because the microphone which I was using to record my voice lines at home, as much as I love it, picks up so much background noise from random things so It had to be done or else I would have a tonne of static sounds in the background of my voice lines and the quality would have just been overall poor.
Luckily for me I have a friend who is doing a uni course which involves video editing using Adobe Premiere Pro, so any questions I had about using the software was a simple task of just asking her what I should do or how I should do something, this saved me so much time and hassle of trying to find specific answers on youtube or google (Thanks Mai). However I did have trouble adding in the still image of the references at the end of the trailer and she wasn’t available to help me, so, I managed to find this video for that
https://www.youtube.com/watch?v=4SPzZMcRG1k
For help and reference for writing the script I looked at quite a few examples. At first I had planned to tell a story using the premise of the boy in the trailer talking alot about his journey, however after initially trying this I realised that the trailer itself cuts between scenes very fast and suddenly so this format didn’t really feel good for what I wanted, so, instead I went for some quick lines where they boy explains what is happening to him at that specific point in his journey and this seemed to fit much better to the flow of the trailer. After realising that I needed short quirky lines I looked at games like “The Stanley Parable” which does a great job of telling a story using narration about what a character is thinking at that time.
I also watched a lot of comedians that use one liners as their style for some inspiration because of the fast delivery. Milton Jones and Steven Wright were some of my personal favorites for this and I tried to have some of their style help me with my project. However after initial tries I had decided that my script didn’t even need to be comedy, even if it had some comedic value, because I had shifted to more of an adventure theme.
Overall I think the project was a success and also a nice challenge to take on. Looking back I would have actually liked to try and create the classic old school disney theme that I had initially planned to do when we were handed the brief, but I am proud with what I managed to create and the sound recording was actually really enjoyable, whether it was actually recording the sounds themselves, or thinking of ways to create more abstract sounds. Had I had oppurtunities I would have liked to recorded some more complex sounds in the Foley Suite, but, like I said in my earlier blog posts I had some unfortunate reasons for not being able to, however these would have just been a silver lining for me personally.
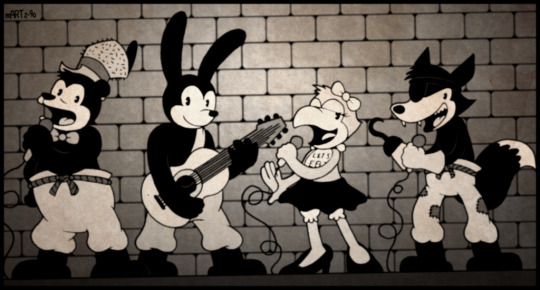
1 note
·
View note
Text
Using Software
The use of software is important to any industry because it enables programs to work effectively. It is important for experienced, well trained employees to use the specific software as they will have spent a lot of time learning about each software, how it works and will know the quickest and easiest ways to most effectively run the software. A lot of software training for most industries will be taught through a related University degree or through work experience/learning on the job.
Types of sound job roles and their software; Audio editing, Adobe Audition CC - is a professional audio editing software used to edit, mix, create and combine sounds into files/tracks. The app, (like most Adobe software) is updated every year, with any new features made added with no extra charge. Adobe Audition is used by audio editors for single-track making and multi-track mixing for the recording and layering of sounds. Adobe Audition offers a lot of features and added tools, that can be used for sample recording and file sounds. One of my favourite features about Adobe Audition is the layout change, which can be used to suit the task that is being worked on. The different types of layouts include; audio to video editing, radio production, and multi-monitor setups. The software also offers noise reduction which removes unwanted background noise such as pops and clicks from the file. https://www.adobe.com/uk/products/audition.html Audio recording, Pro Tools Audio Recording and Editing Software - Pro Tools is a digital audio software used for creating, developing and releasing sound recordings/sound tracks. You can plug instruments into the software and create sound tracks or download voice recordings and create sound tracks/files. There are also built in tools for instruments to add sounds and layers in. Pro Tools I am relatively experienced with, after having used it during my first year at University for my ‘Sound for Moving Image’ coursework. https://www.avid.com/pro-tools Music editing, Logic Pro X - Logic Pro X is a music editing software that is very similar to Pro Tools, they are both used for sound based editing/creating, however, the main difference in Logic Pro X is more music based - better for musicians/song writers, and Pro Tools is more of an audio based recording software. Logic Pro X offers a lot more musical instruments built in to it and is a lot more precise/easier to layer sounds together. Logic Pro X I am a lot more experienced in as I also used it in part of my first and second year coursework of my University degree. I personally prefer Logic Pro X because of the precision layering and more variety in instruments offered. https://www.apple.com/uk/logic-pro/ Music production, Ableton Live - is a professional music based software designed to use instruments for live performances as well as composing, recording, arranging and mixing tracks. This software is mainly used in the professional sound industry to combine and pick audio samples and MIDI sequences (sound clips), which are then arranged to be played to a live audience. One of the main benefits of this software is not only can it control what sounds are played and when, but it also enables the control of stage lighting (colours, timing, how long that light is on for, etc) and visual effects (what visual effect is best used and when). https://www.makeuseof.com/tag/ableton-live-tutorial/
Audio engineer software; “Any seasoned producer will tell you that choosing the best audio engineering software is more than comparing data points like pricing or percentage of usage – it’s a personal choice. Better yet, it’s a personal journey.” https://audioassemble.com/best-music-production-software/
Sound is important in the film industry because it can tell the audience information about the characters, scenery's, and movement. Certain combinations of sound and visuals can tell the mind what neither sense can do alone. Sound is also important because it can help portray and emphasise what we see. Below are a list of software's that I have researched and found professional audio engineers will use on a daily basis, I have included how the software works and how experience of the software is gained. Logic Pro X - Logic Pro X is a professional music production software used for apple Macs, it allows access to any software instrument and allows multi tracking (technology that enables a computer based surface to recognise the touch of more than one point of contact) to perfectly control each performance and mix made. The Logic Pro X software works well for industry based music producers and will enable them to compose, record, arrange, edit, and mix music/sound effects. Logic Pro X has built in instruments and allows recordings to be added so works well for performance recordings. Experience in this software is learnt through the industry - such as work experience or learning whilst working, or is learnt through a degree, primarily sound or technology based. I have experience in this software which was learnt through my sound units in University, specifically in first year. I could improve my experience in this software by creating more sound projects, now that I understand this software and how it works I will be able to find making projects easier and will increase my understanding of the software.
Audacity - Audacity is a free audio software that allows businesses to create their own sound productions. Audacity allows you to upload sound recordings and edit it with high-quality software instruments. Audacity can be used to create a number of audio editing and recording tasks - such as making ringtones, tracks and records to go onto computers or CD's. Experience in this software is usually self taught as this is one of the easier sound based software's that can be used in the industry. I unfortunately do not have experience in this software at the moment however, I would be keen to create my own personal sound based projects using this software. By creating my own projects I hope to gain experience and more understanding of how the software works and what it is most effective to use for.
FL Studio - FL Studio is a costly music software that allows users to load and use instruments and music based samples. The software allows people to play their tracks live or manually. FL Studio works well for recording and mixing tracks and play the whole mix back through adding effects. FL Studio includes multi-track recording, time stretching, and pitch shifting.The software also comes with a mixer that brings features like effects in which can be added to the tracks. Experience in this software is usually taught during work experience or is learnt through the job you have been hired to do, by assisting a more senior industry worker. I personally do not have experience in this studio and due to the high start off pricing of $99 for a license, I don’t think I will be learning much about this software for a while.
Reaper - Reaper is another audio editing software, although it costs $60 for a license, it seems more affordable than some of the other software options available such as FL Studio. The software comes with tracking, 64 multi-channel support and direct recording for audio, mono and stereo files. and has a remarkable multi-channel support with 64 channels in each track. It also brings the ability to directly record audio to mono and stereo. A feature I really like about this software is that the layout of the software is all customise-able, so you can set the software up individually to suit each person. Experience in this software could be self taught if you have a strong passion for sound and are willing to pay a start off license fee of $60. However, this software could also be taught during a sound/technology based degree and can be taught on the job through experience. I do not have experience in this software, however would be interested in buying a license for this software to gain more audio based knowledge.
Pro Tools Audio Recording and Editing Software - Pro Tools is a digital audio workstation for Microsoft Windows and macOS, the software can be used for a wide range of sound recording and sound production purposes. The software allows users to place sounds such as effects, music and recordings, into videos and edit them as well as create virtual sounds using instruments provided. Experience for this software can be taught whilst as University or learnt whilst completing work experience or a full time job, learning from others. I do have experience in this software and used it as part of my first year Sound coursework, this coursework however was a group project so I can’t take credit for all the work produced.
0 notes
Text
Copy and paste objects in photos with the photo editor for PC
New photo editor for PC for experts to powerful crop a picture
Get this photo editor download for trainees and experienced with many useful functions or powerful photo editor for Computer to comfortable color mode or comfortable saturate images. Improve a photo is easy with the cool brand-new photo editor for PC for Computer. Download here free the photo editor for PC for prompt and simple edit a picture.
It is difficult to buy an excellent smart device photograph what was taken with a flashing light. Most of the moment, photographs take an image appearance overexposed, negatively modifying brightness and also making things look rinsed. Actually, also the cellular phone zoom is rumored to become some imperfections. Make the most of the origin of all-natural lightning you can locate, even in the night. That gives you an opportunity to attempt shadows, just as in the picture below, or create a shape with other surrounding sources of shining, just like sunshine and also bordering buildings. When you have actually make the picture, have fun with the exposure device in the favorite photo modifying program to made the image somewhat shinier. Photo editor for PC does possess a few of the functionalities is actually properly known for, which comes very helpful when you've decided on you've like to attempt your hand on one thing much more better than photo transparency as well as cutting out a part from the background. Photo editor for PC can likewise bring in freeze frames coming from online video clips, in addition to distinct files. And also when you're really feeling a little bit photo editor windows 10 idle or it is simply plain oblivious about how to utilize several of the tools, an assistant can assistance you to change the essentials just as lighting, concentration, color, and sharpening of photos. For those who like their photos in wide scale versions, the software program function assists you flawlessly assembled photographs to establish a gorgeous picture. And when it is actually a chance to print off your digital photography capabilities, you can easily select one of the photograph plan templates to immediately imprint them in a specific measurement. Download now this photo editor for PC download for amateurs and professionals with a lot of cool functions or practical photo editor for Computer to soften photos or uncomplicated batch processing. Intelligent cut photos with a photo editor for PC for pros to draw in a photo. Download photo editor for PC for professionals and edit a picture software to colorize a photo or photo correction.
Photo editor for PC
This photo editor is best for enthusiastic pupils with a large amount of attend their workflow to determine the too technical functions that will terrify extremely very first time image editing individuals. It likewise happen prepared along with a three-sixty scenic view program. Probably the shiniest treasure in the bundle would certainly be actually the lovely skin layer end result, which eliminates red locations as well as evens out your complexion. As there is actually no auto color solution option fairly necessary to solution the poor lighting up very most digital cameras file, there are actually still the general features of change color depth. Among the most well-known misconstrued parts of digital photography is what occurs after you make the photo shot in reality modifying your photos. We will cover some concepts for modifying your photos, from the fundamentals like noise reduction or brightening change, with much more complicated activities. The crop technique enables you to transform the dimension of your picture, as well as additionally to transform the element ratio. As an example, you can cut out a photo from a rectangle-shaped shape to a square form. There are lots of factors you would intend to cropping, including for publishing in various styles and also aspect proportions. Compared to the initial, I have cropped the image with photo editor to remove the lightning part of the left-hand side of the photo and also recomposed making use of the policy of quarters. This makes the darkness bolt more the emphasis of the shot. When taking the picture, you could question why I didn't just make up appropriately. So in this case, I was working on an extensive presence photo shot without needing a camera stand, so had actually the video camera stabilized on the side of the pier for security. That significantly limited my capacity to flawlessly frame the moment, so I simply photoshoot bigger, knowing I had to be able to crop the shot suitably as a result of the reality. In this both situations, cropping is extremely simple as well as it is simply involves you selecting the cropping technique and afterwards choosing the location you wish to maintain with your PC mouse. After that you use the changes as well as your new cropped picture is ready to go. Get more info to blur images with this photo editor free download and new photo editor for amateurs to functional soften photos. Improve a photo is uncomplicated with the photo editor. Free download photo editor for professionals and software to edit a photo to invert pictures and insert objects into photos.
Easy photo editor for PC
Discover more to cut an image with the photo editor free download or powerful photo editor for Computer to colorize photos. Photo editor to simple photos colorkey and very simple rotate images. Get this photo editor for PC for speedy and simple rotate an image. When the horizon contour in a pic is certainly not degree, a particular of my individual casual nuisances in digital photography is. Often if we are actually caught up in the moment, this fundamental guideline is failed to remember but fortunately is such editing and enhancing your images with the photo editor to make them degree is also really basic.
Balancing the camera on the side of the boat dock meant that the photo was uneven this is especially noticeable to the eye whenever the photo has a plainly defined horizon line, just like the lake.
The focusing tool becomes part of the cropping tool, as well as you can just turn the picture to suit. The grate will certainly appear to assist you get the arrangement correct whenever you utilize the photo editor for PC. Level a photo is a really simple job that will get just a couple of minutes, causing a much more aesthetically charming photograph.
Often while we take a photograph, parts of the image might wind up being actually darker than we really want. I describe the brighter areas of the image as darkness, and also the intense spots of the image as highlights. Compare is actually concerning accentuating the contrast in between the light as well as dark components of the picture. Boosting the comparison of a photograph can significantly enhance the aesthetic impact in which has, by making the limits between those dark as well as light areas more clear.
Color or texture change is one other vital component of the photo editor for PC. We can adjust photograph color or texture in all type of methods, starting with transforming the total charm of the image just like exactly how yellow or blue it looks, to separately transforming the tone and saturation of particular colorings inside of a photograph. I simply just intend to go over a few very basic color adjustments you may make use of to help to make your pictures simply a little a lot more visually amazing. The quickest solution to regulate the shade related to a photo is definitely with the color tone gadget of the photo editor for PC. That modifies the visual aspect related to every single color scheme in an image to generate it basically saturated.
Similar to lots of styles, the trick is to get a great balance excessive shading the pictures often tends to seem instead abnormal. Hue pictures may be actually pretty efficient, as well as certainly light and also black is a fantastic selection for all sort of situations, specifically, construction, and particular panorama views.
Free download photo editor for PC
Enhance a picture and image manipulation is useful with the photo editor for PC and edit a picture software free download
Smart photo editor for PC for amateurs to uncomplicated brighten photos. Additional info about sharpen a photo is easy with the photo editor. In some cases there certainly can be a thing within a photograph that you truly do just not intend to be there, like an annoying beauty spot on a person's nose. That is simple to erase in almost all the significant photo editor.
It is generally easy to erase any kind of objects directly out of an image however the photo editor for PC works great on unique, tiny things that are usually been around by the same color or textures. This is since the recover device needs to replace the location you desire to get rid of with something else, as well as this functions ideal when it has an area close by that looks comparable. For instance, bright spot on a face is bordered by a great deal of similarly tinted skin, so the recover tool can easily calculate what to replace the dark point based on the bordering area. That is actually for the photo editor has to change out the spot you desire to erase together with another thing besides, and also that does work ideal whenever it gets an area close by that seems very same.
Photo editor has ended up being really complicated and also effective and it is feasible to manipulate images therefore they end up being totally different out of the original. There are lots of photo editor and also plenty of means of creating the same or comparable final results.
The intent very most for many images I post procedure is definitely to help make all of them look as natural as feasible. I think this is an excellent position to start, even in case you intend to go on and produce even more unique looking photographs.
Tone array inside a photo is generally one of the primary priorities. Your eyes are able to typically see a wider range of hue than the cam can record. The meaning of picture editing is the act of modifying a photograph, put simply. However this is simplifying a problem that is more or less problematic.
You can generally implement basic picture editing methods like soften photo fairly easily and also quickly but complicated strategies and also electronic editing and enhancing may need photo editor and also more practice. Photo editor is a gadget which you can easily utilize to manipulate and also increase pictures. Since images come with a raising variety of uses, increased services are experiencing ways to reutilize images and utilize them on different media.
0 notes
Text
Sound + Vision: Flexible Learning Week
This week is Flexible Learning Week, also known as a reading week, which means we don’t have our usually scheduled classes, so there was no Sound + Vision session this week. Instead, we had the week free to work on our projects and to get our soundtracks and animated posters finished for Formative Assessment which would be happening in Week 6.
Soundtrack Development:
Before going any further with my visuals, I decided to return to my soundtrack and get it to a relatively complete state early on, just so that I could have extra time to experiment with it as I don’t have a lot of experience within sound design. For my soundtrack, I was originally using Audacity for audio editing, but I felt that Audacity was a bit simple and wouldn’t be able to do what I was aiming for, so I downloaded Audition, which is Adobe’s audio editing suite, and played around with it for a bit in order to learn the basics of the program.
Once I’d figured out everything, I brought my fire kindling/stick break sound into Audition, and began to edit it. I knew that I wanted to use this sound as the foundation of my soundtrack, so initially I just tried to make some corrections and adjustments to the sound to make it a bit better. My first priority was getting rid of the wind blowing noise present in the background of the clip. To do this, I used the ‘DeNoise’ effect, editing the effect to shift the sound’s focus to higher frequencies, which is where the noise of the actual sticks breaking was, and to reduce the amount of noise by 90%. Reducing the noise by 100% made the ‘crackling’ sound dulled down and muted, so I dropped this value by 10% to ensure that the crackling still had some impact. I then duplicated the sound clip, and slightly overlaid the beginning and end of each clip, to form a longer sound clip. I did this just to give myself a bit more flexibility when I’m building my soundtrack, incase there are parts of it which might require the sound to be longer than the three or four seconds it originally was.
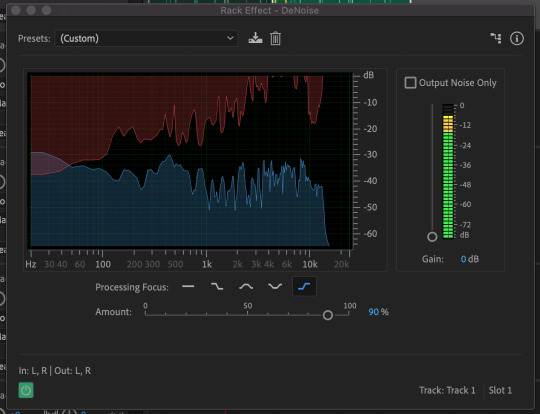
Using DeNoise to remove background noise from my soundtrack
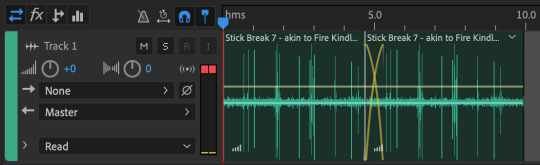
Duplicating and overlapping the sound-clip to create a cohesive, longer sound
https://clyp.it/r0rl5xx2?token=556242b858db38e11e3a25f000463f6b
Link to hear my base sound clip
With my base sound clip cleaned up, I set about creating my soundtrack. I spent a lot of time playing around with this, because I was still learning to use the Audition software as I was editing the soundtrack. I first experimented with a number of different compositions and effects, trying out different effects on each sound clip and layering them in different ways, but nothing felt quite right. Eventually though, I started getting some satisfactory results. I didn’t realise at first, but Audition actually has presets you can use that will apply a number of effects with customised settings on to your sound clips, in order to achieve certain sound effects. I began experimenting with these, and once I applied the “Weaponized Effects” preset onto my sound clip, it started to produce some interesting effects. The preset had made my sound clip sound very percussive, almost like a chime or one of those music boxes that you turn with a crank, which I thought was quite fascinating. It still wasn’t perfect though, I made some tweaks to the preset by removing the Echo effect, adding in the Multiband Compressor effect to reduce the harshness of the sound once the preset had been applied, as well as making tweaks to the Notch Filter effect by using and editing different presets within the effect itself.
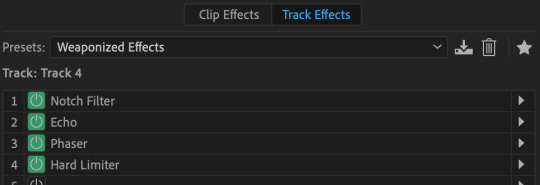
Weaponized Effects Preset, with all it’s underlying effects

Weaponized Effects Preset after I had made some tweaks to the underlying effects
Through experimentation, I had found that the Notch Filter effect was able to change the tone of my sound clips, meaning that I could assign different ‘tones’ to individual layers in order to build a musical composition. Notch Filter also had some presets within the effect itself, and by using these and applying different presets to each audio track, I was finally able to produce something that sounded like a real soundtrack. Using these different Notch Filter presets, I began to build my soundtrack using four different audio tracks. Audio Track 1 utilised the E Minor Chord Notch Filter preset, Track 2 used the A’s and E’s preset, Track 3 used the Minor Thirds from C preset, and Track 5 used the DeEsser preset (Track 4 was used for experimentation and thus is empty).
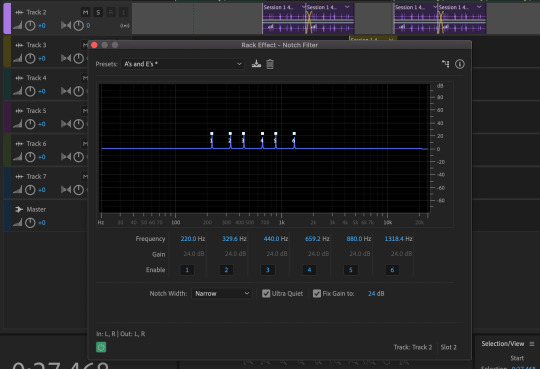
Using the Notch Filter effect on different audio tracks
The structure of my soundtrack consists of these four different audio tracks. By arranging the clips in a certain way within the composition, I’ve built the soundtrack to start off very subdued, then to slowly build through repetition and changing the notes, then the soundtrack reaches a climax where multiple notes are played at the same time to provide a stronger sound, before it slowly retreats again to a single note, and then finally sounding subdued once again. I’m really really chuffed with how this version of the soundtrack turned out, I think it sounds brilliant, especially for my first time using the Audition software. I think I’ve made it a bit too long at 51 seconds long, but I can always come back and trim the soundtrack down at a later date. For now though, this works perfectly.
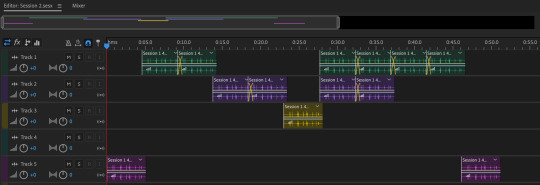
MEADOWS Soundtrack Draft 2
https://clyp.it/pyukqnuf?token=e32910c383693199894670549ebacc34
Link to hear MEADOWS Soundtrack Draft 2
Animated Poster Developments:
After wrapping up my soundtrack, I went back to developing my animated poster in order to complete it for our formative assessment next week. I was pretty happy with where the animation was at this point, so for this round of developments I focused on adding text to the poster.
In my original animated poster sketch, I had planned to implement large-scale type into the poster, which I still very much wanted to do, but now I’ve also decided that I want the type to interact with the animation in some way, rather than just having the type sitting behind the animation. But I don’t want to animate the text itself, as I feel that it will create too much of a clash within the poster. As a compromise, I’ve decided to place some effects on to the type to give it translucent, distorting properties, much like glass. In order to give the text this glass look, I used the Caustic effect, and added extrusion depth to the type using the Cinema 4D renderer. After tweaking the settings of the Caustic effect for a while, I had a outcome that I was happy with. You’ll notice in the video below that as the animation moves underneath the type, it becomes slightly distorted as a result of the effects of the type. I also added an orange stroke to the type just to make it a bit easier to see on the poster, but as you can see below, I had a problem with this.
Up to this point, I had been using Adobe Media Encoder to render all of my video clips from After Effects, but unfortunately for some unknown reason, whenever I rendered the below clip through AME, the orange stroke on the type had turned black. I couldn’t figure out what was causing this, I tried changing settings in the composition, the effects themselves, and in AME, but the problem still persisted. Eventually I worked out that if I rendered the composition with After Effects itself, it rendered the colour of the type stroke correctly, so I started rendering all of my clips exclusively through AE. Draft 5 was rendered through AME before I discovered a solution for the issue, Draft 6 and thereafter were all rendered through AE.
vimeo
MEADOWS Animated Poster Draft 5 (with AME rendering error on text stroke)
vimeo
MEADOWS Animated Poster Draft 6 (AME render error on text stroke fixed)
I was really really happy with the poster at this point, and felt that it was all coming together. I just needed to add a bit more information on to the poster regarding the festival, when it would be taking place, where it was located etc. I first tried out adding more of the translucent bubble type to the poster just to see how it interacts with the animation when it covers the entire composition. I wrote “MEADOWS 2020 COMING SOON”, and watched the animation play, and I was really happy with what I saw.
vimeo
MEADOWS Animated Poster Draft 7
I then changed the translucent bubble type to read “MEADOWS 22nd–24th MAY 2020″; I used a fictional date for the festival that could change, but I think suits my visual direction thus far, the colours all have a very spring/summery feel and I thought it was important to have the timing of the festival reflected in the direction of the branding. I also added some smaller type above and below the main blob in the center of the poster. This type is purely just to inform the viewer in the clearest way possible, giving the name, date, location, and social/website info.
vimeo
MEADOWS Animated Poster Draft 8 (Final) [Moving]
MEADOWS Animated Poster Draft 8 (Final) [Still]
With this 8th draft, I felt that the poster was finally complete. I could have probably made some miniscule improvements to it here and there still, but I was extremely happy with my final outcome. I’d spent so much time on it, and it was very rewarding to have it finally completed. Finishing this off has given me a lot of renewed excitement for developing the trailer and instagram posts, and I hope that they turn out as great as this did. A very productive, successful week all in all leading up to formative.
0 notes
Text
Grapvidty Studio PRO Review and huge bonus
Grapvidty Studio Pro is easy advertising and marketing toolkit for local service, a brand-new collection from Grapvidty MX that offered by Videoowide, specifically for regional company "video clip & visuals" design templates.
Official site: http://www.socialleadfreak.com/grapvidty-studio-pro-review/
# 4: Buy a Top Quality Microphone Typically the much more pricey the mic, the far better the high quality. While there are some complimentary alternatives, if you're mosting likely to be spending your time in video, we recommend placing some cash right into a great microphone. Poor audio top quality is unforgiving. Free If you're utilizing your mobile phone to tape video clip, the microphone should provide good audio as long as you stand near the phone and movie in a peaceful room with no history sound or wind. Commonly the built-in microphones in many computer and laptops don't generate great-quality sound yet do not hesitate to evaluate this.
Little Spending plan For a moderate budget, consider the Rode smartLav+ Lavalier Microphone for iPhone and also Smartphones ($ 79). It works great with a smartphone for videotaping superb audio. It's specifically useful if you're filming outside or standing a brief distance from your phone. Additionally, if you obtain a splitter, you could have two microphones for doing meetings. Idea: Do not affix a lavalier microphone as well near your head. You'll be shocked by just how much it picks up. Bigger Budget The Blue Yeti USB microphone ($ 129) is utilized by numerous vloggers as well as podcasters, and it's an excellent option if you have a larger budget plan. It's the one we utilize when tape-recording videos and also doing podcast meetings. Plus, it's called Blue Yeti; just how amazing is that?
3. Adobe Premiere Clip Adobe Premiere Clip is an additional among our best video clip applications that originates from a big-name modifying tool. Unlike the complete desktop computer version, this application has even more streamlined functions. It still accomplishes its objective in order to help individuals "create, edit, and also share" video clips.
They have 2 modifying designs that you could choose from when you get going. Their automatic editing alternative will rapidly create a clip based on your uploaded video clip, where you customize the rate of the video, the songs, and the order of clips. Their freeform modifying allows you trim the video clip, sequence Grapvidty Studio Pro Review, as well as modify it by hand.
Like various other devices on this list, you could include the music of your choice from your library, and you can share the video with the app's neighborhood if you want to.
Adobe Best Clip is a totally free app, as well as I believe it's effective without having to upgrade to any of the paid strategies if you're looking for an application that will help you edit conveniently and quickly.
1. FilmoraGo Filmora is recognized for its amazing video clip modifying software application, so it's no surprise that their video clip editing and enhancing application FilmoraGo maintains that high criterion.
This app allows you to cut a video clip, produce subtitles and also message, accelerate the material, add filters, as well as add overlays.
You could include songs to the video, which will certainly play behind-the-scenes. You can likewise add different themes, like a Charlie Chaplin motif, which adds pertinent aesthetic results and, sometimes, songs.
FilmoraGo is free, but has in-app purchases you could choose from. It's available for both iOS and also Android, as well as it's quickly one of the best video clip editing applications available. 2. Magisto Magisto is a simple modifying application. Their objective is to transform photos and also video clips into tales in simply a couple of secs. This app could boost your videos in a few quick clicks.
When you choose a photo or video, you'll pick an "modifying design," with alternatives consisting of real estate, memories, writer, dancing, and also more.
Each will feature music suggestions, however you could add your own songs from your collection or obtain songs for business use. It combines these attributes with your video clip in order to help you achieve the result that you were going for, offering your video an additional included touch.
Magisto is free for both iphone as well as Android customers, though they have an organisation plan that allows you to reorder film scenes.
Bear in mind the Yeti is extremely delicate as well as will grab the tiniest noise, resonance, knock on the table, footprints, and so forth. To decrease those, you could intend to consider a package that includes the mic, desktop computer arm stand, as well as pop filter ($ 159). If you do not intend to fork out for the arm stand and also pop filter, position the Blue Yeti on a really thick publication and beware not to touch on the table or move much while recording; you'll be stunned by just how much you do! # 5: Establish a Professional-looking Background A good history can establish the scene as well as tone for your Grapvidty Studio Pro Review. Is it enjoyable and also friendly? Business as well as specialist? Or does it just make you look amateur? Getting the best configuration is necessary. Free The most inexpensive background is to merely use exactly what you have. Typically a nice bookcase will suffice. In the background of our videos, we show a cabinet, honors, as well as some emoji balloons to include a little fun. That's it; nothing special. It looks great as well as didn't cost a thing (fine, we forked out a few dollars on the balloons). Little Spending plan Discovering a good background for video shoots could be challenging, specifically if you function from house. In this case, think about buying a backdrop like the 6-1/2 ′ x 10 ′ Slow Dolphin Textile Video Clip Workshop Backdrop Kit ($ 58).
Titles That Zing I've been seeing a great deal of attention paid to producing title results in the applications over the previous year. Apple Final Cut Pro X has actually included 3D title production, which is pretty spiffy, letting you squeeze out 2D titles and also revolve them on three axes. Corel VideoStudio in its most recent version likewise includes 3D Titling, though not as powerful as Apple's. PowerDirector's Title Designer uses openness, slope color, border, blur degree, and representation in titles; Magix has remarkable title templates, total with animations. Best Elements uses an awesome title result in which your video fills the message characters. Seek an application that allows you edit titles in WYSIWYG (just what you see is what you obtain) setting, so that you could type, style, and also time it right over the video sneak peek. Gathering Speed Video clip editing is among one of the most computing-intensive activities around, so you'll want the best laptop computer or desktop computer you can afford if you're significant about cutting your own films. The majority of applications aid speed up the editing and enhancing procedure by developing a proxy documents of lower resolution, so that typical editing as well as previewing aren't decreased by the massive full-resolution documents. Especially intensive is the procedure of making your completed item into a standard video clip data that will by playable on the target tool of option, be that an HDTV, a laptop, or a mobile phone. Most of the software program can make use of your computer's graphics processor to speed this up. Be sure to inspect the efficiency section in each review linked below to see just how rapid or slow down the application is. In rendering rate screening, Peak as well as CyberLink have been my perennial champs. Various other actions of performance consist of start-up time as well as easy stability. Once more, video clip modifying is a challenging activity for any kind of computer system, entailing numerous parts. In the past, video clip modifying programs took longer compared to the majority of other apps to start up, and unexpected shutdowns were regrettably typical, even in top apps from top developers such as Adobe and Apple. In my testing this time around, nonetheless, program crashes were infrequent across the board. The security scenario has actually considerably improved, yet the Grapvidty Studio Pro of the procedure, which boosts as even more effective effects are included, indicates crashes will likely never ever be totally removed.
Bigger Spending plan For a larger spending plan, a double-sized pop-up banner, perhaps with some branding on it, would appropriate for a background. The cost of these banners varies greatly, depending upon the quality/size/finish and printing charges. You ought to have the ability to get a decent banner for $100-$ 300. # 6: Select Video Clip Editing Software Program There are lots of excellent video editing and enhancing choices available at numerous cost factors, yet HitFilm is just one of the most effective worths for the money. Here's a run-through of some popular modifying software choices in order of cost-free to most pricey. iMovie Offered only for the Mac, iMovie (totally free) is simple to utilize as well as includes a great deal of useful attributes. It's optimal for novices.
Windows Motion Picture Maker Windows Film Manufacturer (complimentary) is very fundamental as well as easy to use, and also previously came basic with Windows PCs. Nonetheless, Windows has actually currently terminated it so it isn't really a great future-proof selection. HitFilm HitFilm is our leading suggestion, as well as it's offered at numerous price levels for both COMPUTER and also Mac. At the highest possible end, the flexibility and functions are geared towards filmmakers. Nevertheless, the complimentary version is excellent for newbies and more savvy video pros. It has more attributes compared to iMovie and also is just as easy to make use of. To get the totally free version, you need to tweet/post about HitFilm, which is rather clever.
Free Video Clip Modifying Software
If you don't wish to invest a great deal of cash and effort right into your video clip editing ventures, there are a couple of totally free alternatives. Of course, if you use a Mac, the superb iMovie has it. For COMPUTER customers, Windows 10's Photos application (since the Autumn Makers Update) allows you sign up with, cut, as well as include background songs, 3D animated results, and titles to video clip.
There are also some free video clip applications on the Windows Shop, including Film Minutes, PowerDirector Mobile, Film Maker, and Magix Motion Picture Edit Touch. Some of these are fairly basic, but the Magix application is rather capable, with clip joining, shifts, and effects, in a very touch-friendly user interface. Free video editing and enhancing software application usually has legal and also technological limitations, nevertheless. Some extensively used codecs call for licensing costs for the software manufacturer, meaning they cannot supply totally free software application that can handle these standard documents styles. That said, the remarkable open-source Shotcut does a great deal of the exact same things that the paid applications in this roundup do, including points like chroma-keying and picture-in-picture. Shotcut is totally open resource and complimentary, while one more free alternative, Lightworks has actually paid options that eliminate a 720p result resolution limit. Keep in mind likewise that both Grapvidty Studio Pro and also Lightworks work on Linux as well as Windows and Mac. What About Apple? Though Mac users don't have the large number of software options readily available for PCs, Apple followers interested in editing video are well offered, by four products in particular. At the beginning, the remarkably capable and enjoyable-to-use iMovie comes cost-free with every Mac offered since at the very least 2011. iMovie only uses 2 video tracks, yet does excellent job with chroma-keying, and also its Trailers feature makes it very easy to produce slick, Hollywood-style productions.
TechSmith Camtasia Camtasia ($ 199) is an easy device that's easy to pick up. It's fairly flexible as well as could do display recordings. You could obtain it for Windows and Mac. Apple Final Cut Pro Last Cut Pro ($ 299) is Apple's upgrade from iMovie for Mac customers. It's effective, flexible, as well as fast to use. Adobe Premier Pro Adobe Best Pro ($ 19.99/ month) is offered for Mac, Windows, and also mobile at an affordable price tag each month if you're doing great deals of videos. It's one of the most functional option in this list, but it may be much more robust than you require if you're simply starting. Suggestion: Look into this website if you intend to compare a few of these software application alternatives. # 7: Pick Graphic Design Software Program You'll also require software program to develop thumbnail graphics for your video clips as well as YouTube network art. Canva has the updated dimensions, guidelines, as well as themes you'll have to develop these graphics. It's free to utilize (with the exception of premium photos/graphics).
In the midrange, there's Adobe Premiere Elements, which is cross-platform in between Macs and also PCs, and provides a great deal even more attributes as well as great deals of help with creating impacts. Professionals and prosumer have powerful, though costly choices in Last Cut Pro X and Adobe Best Pro. Final Cut is a deceptively simple application that resembles iMovie in its interface and also ease of use, but it provides massively deep capabilities, as well as numerous third-party apps incorporate with it for much more power. It likewise makes outstanding use of the Touch Bar on the current MacBook Pro, as received image over. Premiere Pro makes use of a much more conventional timeline as well as includes a large environment of friend apps and also plug-ins. It also excels in cooperation functions. Sound Editing We still reside in the days of talkies, so you intend to be able to edit the audio in your digital relocations in addition to the photos. A lot of the products consisted of right here supply tinned background music, and several, such as Pinnacle Studio, can also customize the soundtrack to the exact size of your flick. Every one of these programs can separate sound and also video tracks, and the majority of can tidy up background sound and add environmental audio results such as music hall reverb. A number of the products have actually recently included an auto-ducking function, which lowers history music during dialog-- a guaranteed pro-level plus.
Tags: Grapvidty Studio PRO, Grapvidty Studio PRO Review, Grapvidty Studio PRO Bonus, Grapvidty Studio PRO OTO, Grapvidty Studio PRO Reviews, Grapvidty Studio PRO Bonuses, Grapvidty Studio PRO Review and bonus, Grapvidty Studio PRO Reviews And Bonuses
#Grapvidty Studio PRO#Grapvidty Studio PRO review#Grapvidty Studio PRO reviews#Grapvidty Studio PRO bonus#Grapvidty Studio PRO discount
0 notes
Text
How to know if your phone is hacked or leaking data?

Smartphones are all fun due to the vast freedom we enjoy on them, It is easy to use and has a wide range of features.But the most important thing is that our smartphones have become the secret keepers of our personal and professional life. Whether it be personal photos, videos, contacts, financial information or business emails and files, you cannot risk losing or leaking any information to an outsider at any cost.If you're worried about having your phone spied on, you're not alone! Millions of people have voiced their concerns regarding privacy over the past few years. It's scary to think that people can spy on your phone, your data, your activity without you being aware of it, but luckily, there are many ways to find out if your phone has been hacked or leaking data. Most people take this lightly, but this is a very serious problem of the current times, Because if your phone is hacked or leaking data than it can be used against you as an ultimate weapon.You should watch this video in which Edward Snowden answers the similar question. he said you DON'T, but if you keep eyes on the phone behavior and battery you can find out that is your phone is hacked or leaking data. Why will Anyone hack Your phone? Because our smartphones have become the secret keepers of our personal and professional life. Whether it be personal photos, videos, contacts, financial information or business emails and files, they keep all of our data. so if anyone wants our data then our smartphone will be the first target.There are many reasons for hacking, tapping, and spying but I am not including all of them in this scenario Hacking is supposed to mean unauthorized access to devices and networks.Now, If someone has hacked your phone or an app is forcing your phone to leak data, then there could be three possible reasons behind it. He/She/Hacker/App or agency wants your personal files (Personal photos, videos, documents etc). He/She/Hacker/App or agency wants your passwords ( Banks, Profiles, Social, Websites etc). He/She/Hacker/App or agency just wants to play with your mind or collecting regular data for their database, Promotions, spams and offers. Now in all three cases The Hacker or App need Internet Connection of your Smartphone.so your data can be transferred to any server. So if really, your phone is hacked or leaking data, You can find out about it, with the tips given below.
How to know if your phone is hacked or leaking data?
Now if you want to really know all the methods and tips to know if your phone has been hacked and leaking data.You have to keep eyes on your Phone Behavior, Data Usage, Battery, Background Noise, Texts, Calls, and Emails to find out the answer. How? Just read the below part of this post and ask questions to yourself and you will find out the answer to your question " is My Phone has been hacked or leaking data?" We have prepared and collected these "list of symptoms of data leakage and phone hacking" and their respective reasons from many sources and after a deep research. So here are the symptoms of the phone being hacked or leaking data. 1. Odd Phone Behavior All phones can do strange things from time to time but if this is happening on a regular basis it could be a sign that your phone is being accessed by hidden software.Look for any changes in your phone's behavior. Your phone constantly feels warm without any activity. Smartphone Spy apps could be running in the background. it suddenly lights up when not in use or makes random beeping noises. Android Spy software could be running and waiting for intervals where they can do all the stuff without getting noticed. Your phone regularly shut down by itself, even when the battery is charged. Some spy apps can be quite buggy and are known to cause this. 2. Compare and Analyse Increased data Usage Reports Some best spy Apps usage low data so will be almost impossible to spot, but some poor programs will show significant data use. Your normal or monthly data usage increase dramatically. Spy apps use extra data to send the information collected from your phone, Check Data usage of the complete os. And compare with app data usage and how much you actually used. There can be a single spy app or several spy apps, you can find them by comparing separate app data usage. Look out for any unexplained increase in your monthly data usage. 3. Battery Draining Spy apps programs will run your battery down very quickly, however, the more modern programs are designed to make less demand on the battery and are harder to spot so look out for any sudden changes in your Smartphone battery life. Your Smartphone needs charging more often. Continous data transfer and tracking.Malicious app their because that apps use an excess amount of battery and internet. Your Smartphone battery is draining more quickly than usual. Tracking app could be running in the background. 4. Background Noise or Sound Background Noise can be a result of a bad connection but If it is happening more than normal it could be another sign of your phone is hacked or leaking data. Is there any sound like clicking, beeping or voices in the background or from speakers? Some call listening and recording features can cause these noise as they access your phone like a conference call. Does Your phone calls have been filled with strange noises or echoing lately? somebody might be listening in. You may also Like: How to Block Microsoft to collect data on Windows 10 What is Flashing and How to Flash Android Smartphone 5. Receiving Unusual Texts, Calls, and Emails After receiving your data Your information will be used in many types of bad work and spamming.So you might start getting text messages, Emails and Calls from people in your contact complaining about they received unpleasant unsupported or unknown email/message/ text from your number or Email. Receiving strange text messages and Emails containing random numbers, symbols or characters. The remote control feature of spy software works by sending secret coded text messages to your phone and in some cases, these can be seen. 6. Use Apps to check where your data is being sent

viaProtect Android and iOS users can use viaProtect. The app is free and can scan and reveal the data being sent out in the background without your knowledge. Now check for any strange activity. OS Monitor Another software is OS Monitor, it is for Android only. This app provides you with details of which app is connecting to which server and what are the IP addresses of the servers. 7. Check your internet connection signals Close all running app. Switch on the data and leave your phone for few seconds, now check the internet signal. There should be no incoming or outgoing signal visible in the network/internet status signals. Now if the outgoing signal is visible, even after closing all apps and leaving your phone for few second, Your device is Leaking data. 8. Check Permission Control You can check Permissions for any app so you will find which app is using more than required permissions to work. For Example, A simple Music player doesn't need location access to work. Why a single player game required permission to write and edit Phone contacts? Why a gallery app needs location and Wifi switching Permissions? 9. Device Administration and App Management Basically, check the apps with notification access and device administration activated.If there is any suspicious app on the list of device administration activated. They can cause data leakage. Go to your Smartphone's app management and watch for any new app installed on your phone that you can't recognize and after getting some research, uninstall it.
Tips to stop Data leakage and Unhack your phone?
I hope you all will be a little bit concerned about safety and privacy till now through this post, you will clearly know till now that is your phone is hacked or is there any app is leaking data. To Reduce the Privacy risks and stop the data leakage problem. Most of the time you will find out that there will be an app that is doing all the bad stuff to your phones like huge battery and internet usage, Background activity, Unnecessary permissions, and required Device administrator permission without any need.So if you found that app Uninstall it. otherwise, these apps can be really dangerous in near future. For Extra cure and protection, We have prepared a list of Tips to stop Data leakage and Unhack your phone. Remove all the Bloatware and unnecessary apps on your Smartphone. Watch for any new app installed on your phone that you can't recognize and after getting some research, uninstall it. Check these 42 spyware apps and Match all the listed apps with installed Apps on Your Phones and if Any of the listed spyware apps are installed on your Smartphone. Uninstall them. Change all passwords which are saved in Smartphone and its Browser, using any Alternative Browser and device to decrease your chance of getting hacked again. Do not use the Smartphone having all the above symptoms for login into Banking or for Online Shopping Transaction. Upgrade and update the Smartphone OS on your Smartphones. Because developers remove known bugs and errors in latest updates. Check and take command of Permission Control setting of your Android Smartphone and only give required permissions to an app. Take a backup of your phone data and formate (factory reset/ hard reset) your Smartphone. Never install apps from (3rd party websites or) outside play store. Apps on the play store are a little bit more secure. Use an App locker and security app to tighten the security of your smartphone. You may also Like: How to Download Torrents Anonymously on Android How To Erase Data From Android Smartphone Permanently Conclusion: As I already said Most of the time you will find out that there will be an app or and malware app that is doing all the bad stuff to your phone and your data.So after reading this post "How to know if your phone is hacked or leaking data?" if you found an app, which is doing all the bad stuff Uninstall it. otherwise, these apps can be really dangerous in near future for you and your phone.I hope yo9u will find some important tips and knowledge in this post. And I also hope that this post will help you to fight back about the spying apps and services which are really hungry for your data and personal information.You can also share your views and advise regarding this post and topic using the comment section.Thank you for visiting our blog Keep sharing and keep visiting Andro Root. Read the full article
0 notes
Photo

Much Improved BUT Requires Multiple Readings and Studying for Mastery About me: My (decades-ago) undergraduate degree (plus Masters coursework) is Electrical Engineering -- where I was introduced to filter theory and z-transforms/difference equations. I like this edition much better than Dr. Ehlers' older "Rocket Science for Traders" and "Cybernetic Analysis for Stocks and Futures". However, it took me an introductory reading plus several follow-up readings/studyings before I felt I personally owned the concepts mentioned on pages x and xi (more important since I don't have TradeStation). For my purposes, there's chapters that could be in an appendix (since they don't seem to make a major contribution to the author's most-recommended versions of the software (e.g., Chapters 9, 10, 14 and perhaps 13). I think the flow of the book could be a lot better. In summary, if you're attracted to Dr. Ehlers work, then I recommend this book. I also found getting the white papers or original article publications to be useful since there's no color graphs (for heat maps, etc.) in the book. If you have TradeStation, then you're in an better place than I am -- you can just download the code using the access card that comes with the book. Go to Amazon
Signal processing techniques especially for stock trading This is a good introduction to applying signal processing methods to stock trading with many clever techniques. However, the reader should _already_ be familiar with basic signal processing. A senior-level undergraduate EE course in signal processing will meet this prerequisite. Go to Amazon
Fantastic some unique and brilliant concepts Im not an engineer or mathematician, I initially struggled with some of the concepts, however I did persevere and am so glad I did. This book is fantastic some unique and brilliant concepts. Having the easylanguage code made it possible for me to understand what John was doing, the code is pretty easy to read. I now feel I have a much deeper understanding of Technical Analysis. I have recently had the privilege of meeting John while attending his workshop, John has got to be one of the smartest people I have ever met. Go to Amazon
Pretty indicators...but valid? As I come from an audio engineering background, I am really intrigued by the author's repurposing of signal processing concepts as applied to trading. Unfortunately the author never actually gets around to showing whether this has any basis in reality. Go to Amazon
John does a great job borrowing and building filters which allow us to ... Having been trained in Electrical Engineering and Signals and Systems Theory, John does a great job borrowing and building filters which allow us to create non-lagging indicators to help market analysis. The only complaint I have is that usually he does a little better job on developing the theory. Non-the-less, these are mathematically accurate indicators which perform as advertised and are a great asset in the hands of someone who knows how to use them. Go to Amazon
Very original, clearly written and utterly BRILLIANT!! In this book John Ehlers updates and significantly extends his prior research and insights on cycle analysis and stock market analysis using Digital Signal Processing (DSP) tools and concepts. Ehlers has spent many years doing very original research on cycle indicators for the market, notably the development of MESA (Maximum Entropy Spectral Analysis) to measure market cycles. Ehlers translates very complex material into understandable and usable indicators which are well illustrated in the book. Despite the sophistication of the tools and techniques, Ehler's writing is extremely clear, yet concise, as he builds successively useful analysis tools. Go to Amazon
Clear signals are possible with the right signal processing behind them. This is an enlightening book. And the code examples work. If you want to try some indicators that remove much of the 'noise' of the market, then this book is one you'll want to have. A bit 'mathy' in places, but you don't have to slog through it to make great use of the programming examples. Go to Amazon
Great book. Great book....great free code. Warning: this book assumes you are an advanced trader and/or trading systems developer. Also...some of the indicators from Ehlers previous works are not included here as Ehlers only includes the indicators that matter - in his judgment. The book takes some time to get through...but is quite insightful for the technically adept reader. Go to Amazon
5 star book This one is by far my favorite. All the code runs well and is quite ... Good stuff in putting digital signal processing into practice - but missing statistical evidences on the real value Very good book! I love this book!
0 notes