#unreal engine hitbox
Explore tagged Tumblr posts
Visit Tumblr Blog
Explore Tumblr blogs with no restrictions, modern design and the best experience.
Last Seen Tumblr Blogs


Fun Fact
Tumblr has been banned in Indonesia for providing people with access to pornographic content.
Text
Hitboxes are one of the most vital objects in our game. Let’s give them a solid upgrade!
youtube
#shawnthebro#ue4#unreal#stb#tutorial#youtube#unrealengine#unrealtutorial#unrealengine4#programming#ue5#unreal engine#unreal engine 4#unreal engine 5#ue#learn UE#learn unreal#hitboxes#hitbox#hit box#hit boxes#unreal hitbox#unreal engine hitbox#c++#code#blueprints#blueprint#bps#BP#coding
0 notes
Note
Could you try to make a... Game?
Redot is FOSS, try to do smth really simple, like allowing the player to make a decision like you do in this AU. Maybe you'll figure this out because I'm dumb, I couldn't.
I’ve tried making games in the past the problem is I’m allergic to coding, no matter how hard I try to learn no matter how fun the results of that hard work can be, I always get bored and lose interest. The longest I went trying to learn coding was like a week and to be fair I did… sorta make a game I used gamemaker, and like the groundwork for the concept of one most the core gameplay mechanics of the game I wanted to make were functional pickupable upgrades a dash, multiple jumps, a weapon swap mechanic, a grenade button, a melee attack button and even a downward aerial attack you could use to bounce off enemies like in Hollow Knight, I tried adding a wall jump too but that ones significantly harder to code was super buggy. Then I decided to swap to Unreal Engine and lost interest. Maybe I screwed myself over swapping engines but Gamemaker is a fairly simple game engine you can do a lot with it but I was kind of wanting some of the features a more powerful engine like Unreal could provide. Although Unreal had some advantages that made some things significantly easier like sprites you make in unreal automatically get assigned hitboxes where as in gamemaker you have to code the hit box and how your player character and every entity interacts with that hit box just a tiresome repeat of coding.
7 notes
·
View notes
Text
Project - AI Destruction (and the new map)
youtube
With the help of one of these videos I was able to make my AI tank shatter into little pieces when they were shot
There are some tweaks I want to make to how it looks but that goes beyond my knowledge of unreal engine, and it would take too much time to try and figure out when I could take that time to work on the game.
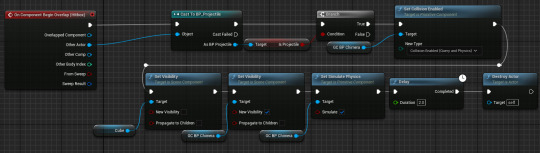
the blueprint basically says to hide everything about the tank and show the destructible mesh as soon as the player projectile comes in contact with the tanks hitbox, combined with projectile physics allows for the shatter to look the way it does, the polycount issue I had with the initial model I used is an issue here but I have nowhere near the amount of experience to replicate old game techniques in new software so its not something I am incredibly bothered about.
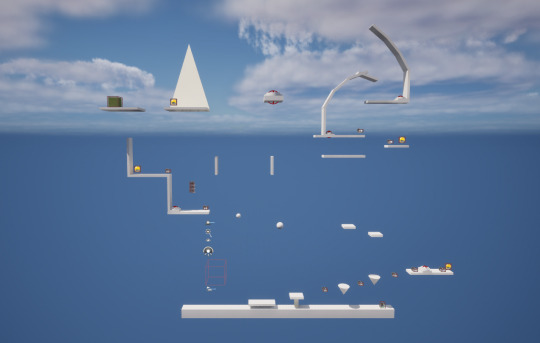
Since there isn't much to say about it, and the fact its seen in the gif, I have made a simple map for the game, its flat and open, with 2d triangles replicating mountains.
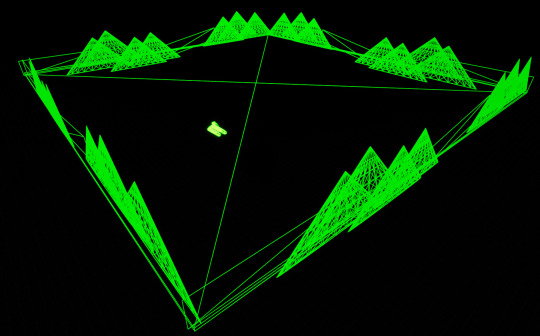
its small at the moment because it has no need to be absolutely massive, because the bigger the map the more time I will have to invest into making it as best as I can, which I still need to do even with this simplistic map.
0 notes
Text
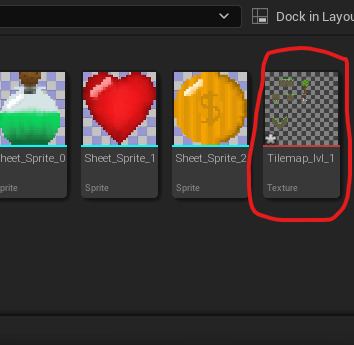
I added my tile map into unreal
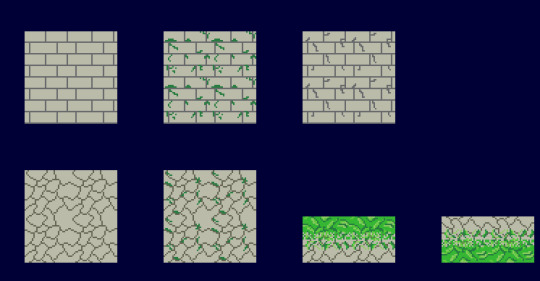
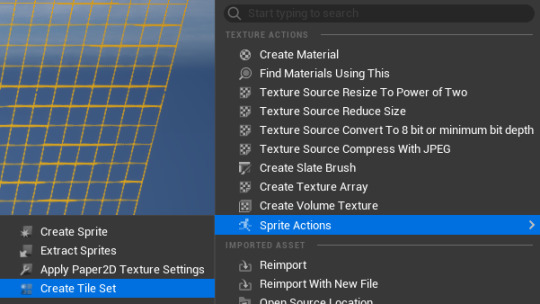
First i put the tile map file into unreal engine and then i gave it a paper2D texture
After i added the 2D texture i then pressed create tile set
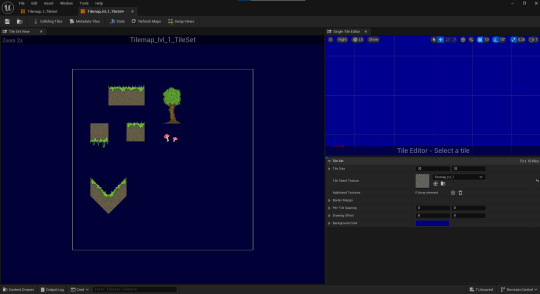
This then allows me to add hitboxes to my tile map to allow the player to stand on them
I then started to add hitboxes to all the blocks i would want the player to walk on
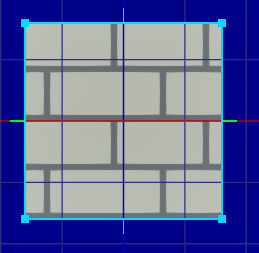

In my tile map i created multiple of the same block to allow some of those blocks to have hitboxes and some to not
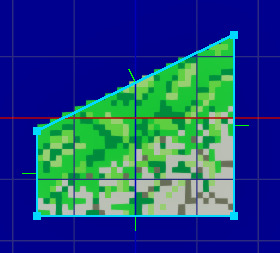
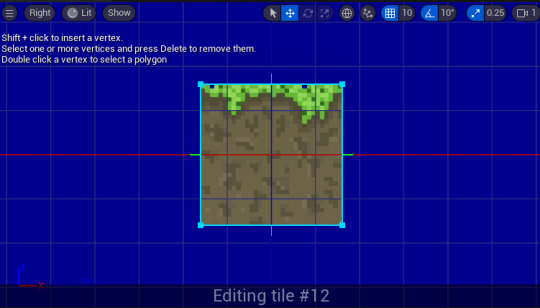
I then started to work on the ramps i created
to add hitboxes to these i had to create a normal square hitbox and then delete a corner to get the right shape for the ramp

After i added all the hitboxes to the blocks i then moved onto creating my level
0 notes
Text
Week 5
This week 5 lecture revealed key insights about GDevelop’s strengths and limitations for game development. I learned that it’s ideal for small-scale, 2D projects like platformers or puzzles but struggles with complex genres (RPGs, FPS). The emphasis on iterative design stood out—focusing on a core mechanic (e.g., randomized attacks using variables) and refining it through playtesting is more effective than overambitious scopes.
Technically, I discovered three variable types:
Object variables (e.g., enemy health),
Scene/global variables (e.g., score),
Arrays (for dynamic lists like difficulty settings).
The lecture also covered clever 2D tricks, like parallax scrolling for depth and isometric faux-3D using layered sprites. For combat, hitbox/hurtbox systems ensure responsive melee mechanics, while Physics 2.0 (experimental) allows tweaking friction, bounce, and gravity.
A key takeaway was design discipline: use GDevelop’s simplicity to prototype quickly, but transition to engines like Unity/Unreal for advanced projects. The lecture’s examples—like randomizing attack animations or camera-follow systems—showed how small details elevate gameplay without complex code.
0 notes
Text
GDevelop Learning Progress
As a part of IGB120 and Civitisludge's development, I have been learning the free games development software GDevelop. Coming from softwares such as Unreal Engine 5 and Unity, its has been fairly simple to pick up on GDevelop's functionality. Some main hurdles in my learning was the built in Piskel sprite editor, which has been extremely helpful when editing sprites on the go.

As well as this, learning how GDevelop handles collisions and hitboxes for both characters and platforms has been very interesting. The almost "set and forget" mentality with the behaviors system has streamlined the process of making a rudimentary level for Civitisludge.
0 notes
Text
Idea 1: Casual real-time strategy game


This idea was formed from a game I play a lot on my phone called The Battle Cats, wherein you attack an enemy base in real time by summoning units with different stats attributed to them (range, health, damage, cost).
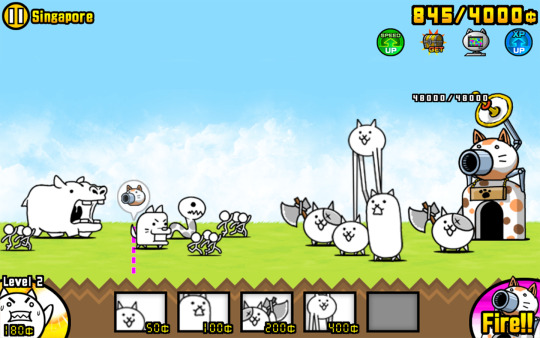
It's an incredibly simple game, something which I initially called hyper-casual, and this interested me because I was still invested into the game despite the simplicity. I wasn't really 100% sure about the exact definition of hyper-casual though, so I wanted to do some more research before deciding that this was 100% what my idea would be:
What Are Hyper Casual Games? Explained (And the 15 Best Ones) - whatNerd
I learned this term comes from games like Flappy Bird, Crossy Road and other games that are easy-to-play and you can multitask with. So The Battle Cats isn't exactly hyper-casual, but still not hardcore.
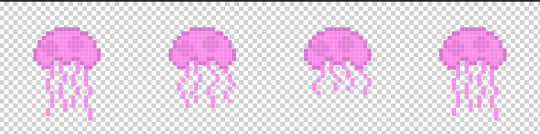
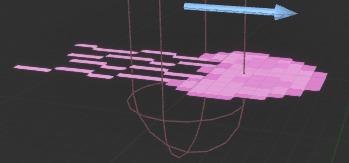
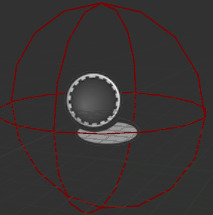
Despite this, I would really like to create something like The Battle Cats, but using the mediums I am familiar with: 3D environments instead of 2D, and using Unreal Engine instead of a mobile game engine. I want to create something like this because it touches an area of programming (one of my specialisms) I'm not well versed in but would like to explore- AI systems and behavior trees. The images above detail my initial plan for what an AI system could be although further research into AI tutorials and documentation is needed before I would be able to land on a concrete plan.
I would also change the theme of game (compared to The Battle Cats) to focus on giving a power fantasy to the player. This idea was inspired by my research into big spectacles and feeling of awe. I would like the theme of the game to involve the things I previously mentioned- those moments that make you feel awesome or go "ahhh". I would try to accomplish this with the designs and attacks of the units- I want to experiment with Niagara systems to create visual effects that give off these feelings. I would also like the units themselves to give off this feeling with their scales and designs, but this would require a heavy focus on art/3D modelling, which is both not one of my chosen specialisms, and not something I want to focus on for this project. It's important that I considered this though, because now that I've decided on a general idea of character designs it can affect other decisions I make. I talked about Extra Credits previously, and they actually have a video about properly conveying the fantasy you want to the player:
youtube
And it would be something I looked into further if I chose to go with this idea.
Additionally, since this idea was inspired by The Battle Cats, I may find it helpful to look at Battle Cats Ultimate, which is an emulator of the game that I believe allows you to see some behind-the-scenes stuff, like unit hitboxes, ranges and other logic:
GitHub - battlecatsultimate/BCU-java-PC: battle cats ultimate, a fan-made battle cats emulator.
This would be a nice start into my technical research and deciding how I will implement systems that imitate this game.
Overall, This idea would allow me to test my programming specialism by exploring things like NPC AI and behavior trees, which is something I believe I would enjoy investigating. However, to fully realize this game and create a presentable vertical slice I may need to go outside of my specialisms and create models and animations for the units the player can spawn. This is risky because I may not be able to create the models that I want in the limited time that I have, so it's an important consideration.
0 notes
Text
Enemies
To start I created the sprites of my character. Then I made an animation for it and imported it into unreal engine and made a flipbook for it. Lastly, I simply inserted it into the viewport of the enemy.
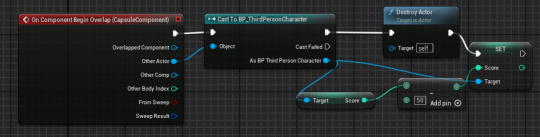
Next, I created a new actor called patrol point which was simply a sphere collision. Then I went back in to the enemies event graph and remade a simple system that made it so when the hitbox enters the patrol point hitbox it would do a 180 and mover back the other way infinitely.
Finally, I made a system so that when the player interacts or touches the enemy they lost some score this way I can add more challenge to my levels as this allows me to make fish you have to touch and not touch.
0 notes
Text
Animating my Chest
I set my animation to be 30 fps to match unreal engines fps
I first selected the parts of my chest that i want animating and created a set key


i then repeated this for every tentacle for the mimic chest
I then added set keys at the end of the animation where the animation had started to created a loop on the animation

this allows for my animation to repeat so i can have the animation playing even if the player isn't in the hitbox.
I then added a parent to the animation

So now when i select one of the tentacles it selected all of them.
my animation didn't work as the tentacles didn't parent to the box and then when i did parent them they would be scaled incorrectly and not with my chest
0 notes
Text
Converting 2/2.5D hitboxes to 3D requires minor changes to our system. Let’s fully support it before integrating it into our game!
youtube
#shawnthebro#ue4#unreal#stb#tutorial#youtube#unrealengine#unrealtutorial#unrealengine4#programming#ue5#unreal engine tutorials#unreal c++#unreal bps#unreal blueprint#unreal blueprints#blueprints#coding#code#3d fighter#the fighter#the fighting game#fighting game#fighting game unreal#ue4 fighter#ue5 fighter#hitboxes#hitbox#hit box#hit boxes
0 notes
Text
Unreal Engine: sliding
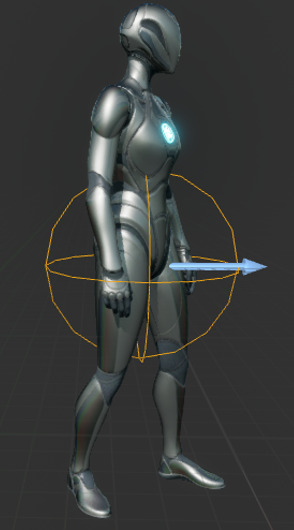
This feature turned out to be a lot more complicated than I thought. For reference, my player is using the default Character blueprint, so there's things that are hard for me to change. For example- I can't change the rotation of the default CapsuleComponent, which would have been my first approach.
Because of this, I had an idea of giving my player 2 collision capsules, like this:
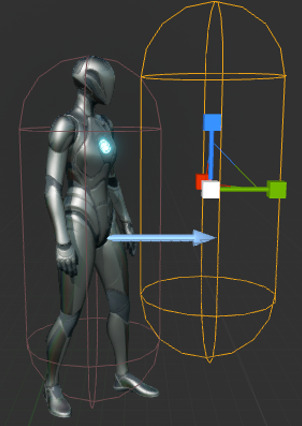
I would then toggle the collision of these capsules based on what state the player was in. This was great in theory, but when I disabled the collision of the default CapsuleCollision, the player stopped:
youtube
I looked on the internet for anything related to this issue, but I couldn't find anything except people saying how the default CapsuleComponent really didn't like to be edited.
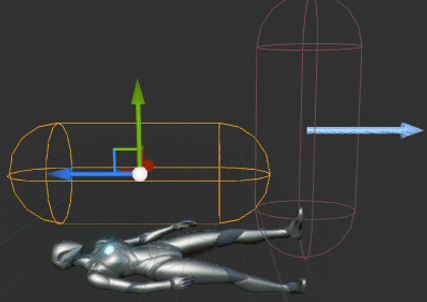
After a lot of brainstorming I landed on my working approach, setting the half height of the capsule. This made it look like this:
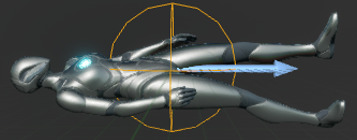
Obviously this doesn't look right at all, but gravity in the CharacterMovement will pull the player down and make them "slide" along the floor. I would love to increase the radius of this capusle so it actually covered the player properly, but:
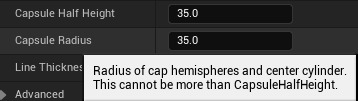
So no luck there. Suddenly increasing the width of the player's hitbox might make for some seeming unfair deaths where you don't gauge the distance correctly, so this isn't something crucial to fix.
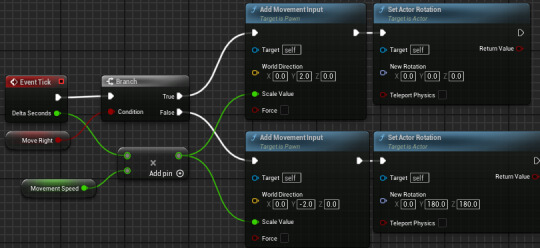
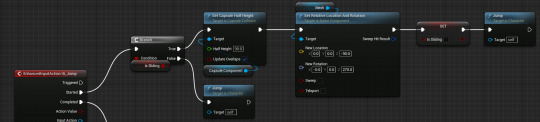
Now that I could get into a sliding hitbox, I wrote the code to allow the player to slide:
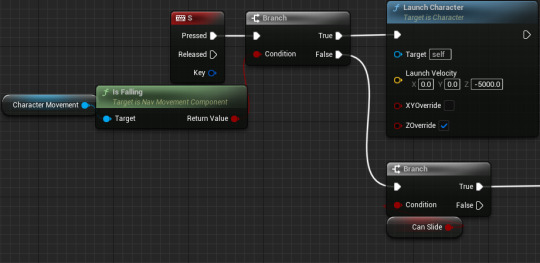
I like having it on the same key as the downward dash like in Subway Surfers, as it reduces the total amount of keys the player needs to learn and because both of these moves "go down" in a way, so it makes sense. The CanSlide variable is also there for when I lock it behind my rougelike mechanics.

This is what puts my testing into actual runtime changes. It's a lot of nodes but not too bad- it just sets the capsule height and player rotation to what I tested in the viewport.
Then there's obviously the question of "what happens if the player slides then jumps?" The only realistic answer to this I could think of was to cancel the slide state and then start a normal jump. This was the blueprint change I had to make:
And this is the result of it all:
youtube
Obviously, there's no specific animation for this, but that isn't something I want to focus on for this project. I'm happy with the visuals as they are now- it's clear enough that your collision has changed and you are sliding.
There's also a bug where the player is stuck in the floor. My biggest problem with fixing this is that it seems to be random so replicating it to work on a fix is really difficult.
Aside from that issue, I'm really happy with my process of overcoming the problem I faced while implementing this feature and the final result.
0 notes
Text
Adding the Tile Map
What is a Tile Map?
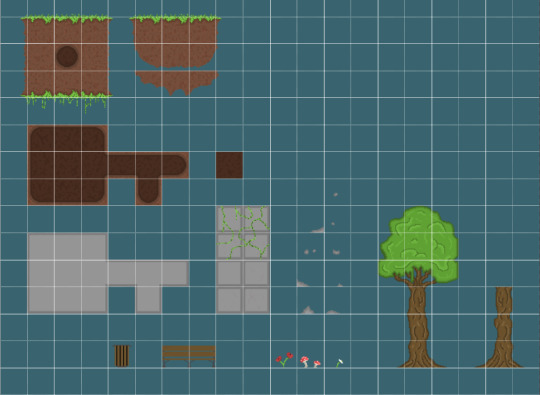
A tile map is a technique of designing a 2D game, which involves creating the game's world, levels or details out of small images called tiles.
I've made my tile map in photoshop, using a grid to get the correct measurements of 32x32 for each tile, which is the scale I made my character.
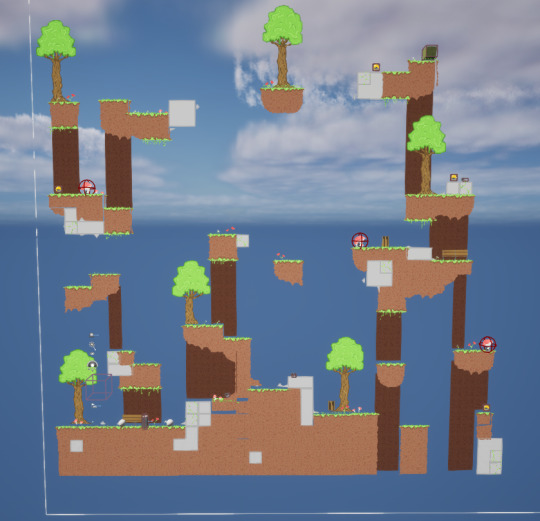
This is my level before I started making my tile map. I wanted top change things about it, so when creating my tile map I kept in mind different platforms and obstacles.
I've made some platforms and a couple other details in my tile map, but I haven't completed it yet. However, I need to add a base design for my level, so I'm going to update it after I have added all the current details and designs I have into my level.
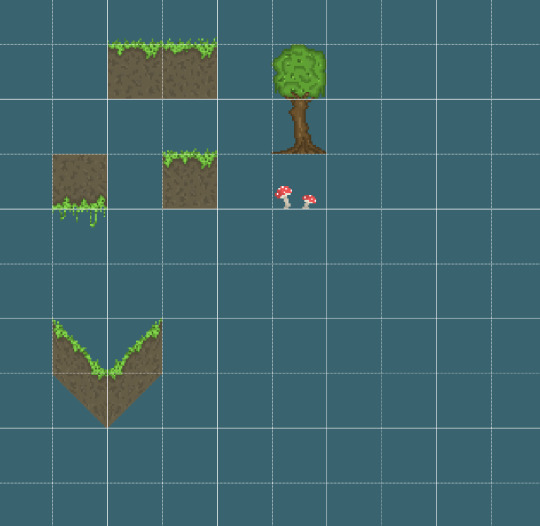
These are the only things I have right now, and I think they are alright, but I wanted to achieve a nature style that didn't look like another games. However, that is difficult as I'm restricted to pixel art only.
Now I need to add this into my level and make it so they are the main platforms and are across the whole level. So the first thing I did was export this as a PNG, so there isn't a background on it when imported in my level, and then saved it in my files. From there, I opened up my project in Unreal Engine and opened up the content drawer, and then imported my tile map in.
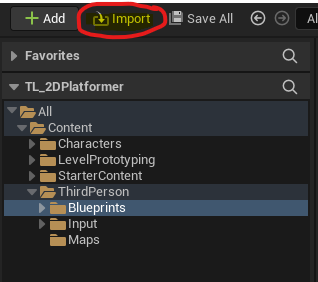
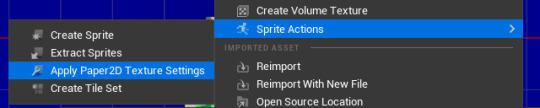
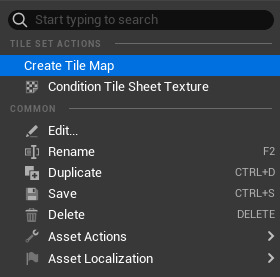
Once my tile map was in the content drawer, I right clicked on it, pressed on sprite actions and applied paper 2D texture settings to it, this was to make sure it had a PNG background instead of a white one. After I applied that, I right clicked on it again, went back into sprite actions and then created a tile set.
This would then create tile set in the content drawer that I could click on and it would open up a page that would allow me to apply hitboxes onto the objects that I made.
This page had a few options of collisions I could add, such as box, polygon and circle. These options are enough for what I was making and were easy to use, as you just click on an object and click add box, and it would add a collision.

So I started to add a few hitboxes on my objects in prep for adding them into my level.
Before I added this tile set into my level though, I had enough time to add more to it in photoshop, so I decided to add a lot. I added rocks, stone blocks, caves, flowers, benches etc. I wanted to achieve a level that was like a park with a calm atmosphere, which is why I added these things that are commonly found in parks. I also changed the colours around a bit, most recognizably in the soil, making it more brown.
After I had finished my tile map and I imported it into the the content drawer, I right clicked on it and I clicked on the option, create tile set. This then opened up a page that would let , me design my level by adding in the blocks in my tile map. So now that I've fully finished a level 1 tile map, and its the only level that I'll have time to do before this project is over and our work will be assessed. So I added it into my game, just using the same method as I did for my one before.
I did change my map around quite a lot, but I'm happier with this version and I think it was a better choice to have the first level simple, as that's what most sides scroller games would be like.
0 notes
Text
Major Project
UPDATE 12
LEVEL ONE - ENDLESS RUNNER
Creating a collision and death system for an endless runner game is crucial for delivering a challenging and engaging experience. Here’s a breakdown of how I developed these systems for my forest trail-themed game
I started by implementing collision detection using Unreal Engine’s built-in physics and collision components. Each obstacle in the forest trail has a collision box that interacts with the player character’s hitbox. By setting up collision channels and response types, I ensured that the game accurately detects when the player character collides with obstacles.
When a collision occurs, the game triggers an event using Unreal’s Blueprint system. This event initiates a response, such as player death.
0 notes
Text
2nd Year Anniversary: Happy Little Experiments
Remember this?

It's hard to believe an entire year has flown by and yet, I don't really have much to show for it, huh? At least, in terms of completed projects... nada. Zilch.
It seems like I've simply rested on my laurels, haven't I? Well, not quite...
A Nagging Feeling
While I was making the Bayonetta 3 combo video, I kept finding myself thinking, "Hey, what if this move was backported to a previous game?" or "Man, this hit reaction state was so cool. What if we could port it forward?". And as I kept working on this project, the list of musings kept growing bigger and bigger.
After the combo video was released, it was clear that the completion of this project had left me a bit empty. I found that it was difficult for other games to keep my attention because Bayonetta 3, despite some of its faults, had set an incredibly high bar for mechanical satisfaction that only one other game has ever surpassed (hint, it's also another Platinum title :D ).
For some time, I was contemplating what I should do next. Another combo video? Maybe creating the high level guides that I had briefly talked about? What about the violin covers? I kept going back and forth, and yet, I always came back to my list of "what ifs". There was this nagging feeling, a sort of itch that was just out of reach that desperately needed to be scratched.
I simply concluded, "eh, why not? Let's learn how to make a game because it's seems fun."
Giving Unreal Engine a Shot
Those of you that have been following my Twitter may have noticed an uptick of Unreal related tweets around March 2024. That's when I had a few personal breakthroughs and was absolutely excited to share any and all progress, no matter how inconsequentially basic.
You see, I had actually began experimenting with game engines around July 2023. After the Unity debacle in September, I made the switch to Unreal but I found it an absolute behemoth of a program to parse. In addition, I made the mistake of following a book that also taught C++ for Unreal, leaving me incredibly frustrated and lost. All I could think was "god, I really hate programming."
However, around March, I decided to sit down and just start from scratch. Forget finishing that silly book, just try to do something simple like... making a door open without writing a single line of code.
I Don't Actually Hate Programming...
youtube
...as long as it's Blueprints.
You see, this visual scripting system is actually a godsend. Forget about header files. Forget about trying to figure out the exact syntax. Forget about what feels like arbitrary words that somehow makes the computer do things. Instead, just take these coloured blocks, connect them with little wires, and hey, it spits out the same exact result as the hieroglyphics you've been trying to learn!
And holy ****, it actually makes sense! This node based scripting system allowed me to perfectly visualize and execute any idea that I had in my head. It's so freakin' convenient!
Only two weeks later, I was able to craft a basic initial framework for a dial combo system, similar to the one found in Bayonetta 2 & 3.
youtube
By then, I was locked in. Seriously. As soon as 5 PM rolled around, for two months straight, I would begin experimenting with charged attack inputs, delay combos, and a little system for evaluating left stick inputs to enable command attacks. By May, I was even brave enough to begin experimenting with hitboxes.
youtube
There's still so much more work to do but I was absolutely over the moon. Unreal Engine satisfied that same mechanical desire that I had felt when playing Bayonetta 3 but I still hungered for more...
A Self-Imposed Challenge
In June, I decided to challenge myself by recreating a specific mechanic from a game within a month. I needed a bit of a breather, as I knew that working on the stylish action system required a lot of interconnected subsystems that was beginning to feel overwhelming. So, I decided to work on recreating part of the painting system from Splatoon.
In the first week, I researched Render Targets and learned how to draw a simple shape into the RT. This simply uses the "Find Collision UV" node from a trace hit, then draws the painting material to the Render Target at the hit UV coordinate.
youtube
In the second week, I decided to go a little further and apply an entire Render Target to a custom mesh. This required creating a second UV channel with custom UVs so that the paint could be "continuous". However, one issue is that if an UV island wasn't scaled properly, the paint blob would become distorted.
youtube
In the third week, I took the plunge into the Material Graph so that I could figure out how to restrict painting surfaces. There was a lot to learn since creating the necessary functions to manipulate colour was a bit of a foreign concept to me. In the end, I was able to successfully figure out a solution that restricts a paintable wall with a mask.
youtube
In the final week, a Tricolour painting system that was much closer to Splatoon! While I'm still using the somewhat questionable custom UV channel albeit with more uniform UV islands, I can have multiple static meshes that share the same Render Target! Team Alpha, Bravo, and Charlie paint into their respective R, G, or B channels of the Render Target, which is then processed into a material to transform these into the appropriate colours defined in a Material Parameter Collection.
youtube
While there's still work to do in figuring out how to turn this into an interactive game element, I'm fairly proud of my work in this month long exercise. I learned a lot about the Material Graph and have even begun researching into how to bring all of this stuff that lives on the GPU, back to the CPU in a performant manner.
What's Next for Year 3?
For the time being, that little nagging feeling of mine has led me to realize that I'm really happy and satisfied as I slowly tinker away in Unreal Engine. It does mean I'll have to sacrifice some of my video ideas but I think that's okay.
I'm not really that old but I'm also not getting any younger. While I did enjoy making the combo videos and violin cover, they end up feeling so ephemeral that I think my time is much better spent on something that can have a more lasting impact.
So, as long as these little experiments continue to satisfy my curiosity and engineering spirit, that's what I'll stick to for the foreseeable future. And who knows, maybe if things pan out, you'll be able to play and experience the results of my experiments a year from now! Wish me luck!
While I wished I could've done more for my channel, I still hope you'll continue to support me in the future. Thank you so much for all of you who have stuck around!
Best wishes!
chrysaora 🎐
0 notes
Text
Unreal Engine: adding boundaries to my map
I needed to add borders to my map that would block my player, but allow enemies through so my player couldn't walk off screen and fall off the map.
I thought I could use custom collision presets to achieve this effect, but I couldn't get a plane static mesh to ignore my enemies. After realizing this wouldn't work, I tried a different approach.
I made my character's collision slightly taller than the enemies, and created a railing along the map that only the player would hit:


After aligning the railing correctly, this worked flawlessly. The taller hitbox doesn't affect gameplay either, as nothing will be dependent on height. Overall I'm really happy with this solution!
0 notes
Text
Unreal Engine: making my player character
The criteria I had for my player character was:
Be a ship
Have fluid 8-directional X/Z movement
Have an accurate hitbox
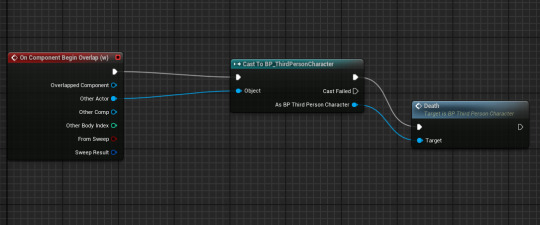
After some experimentation with the default BP_ThirdPersonCharacter Unreal engine gives you, I decided that using it wouldn't be effective as it had very limited flying controls in it's CharacterMovement component:
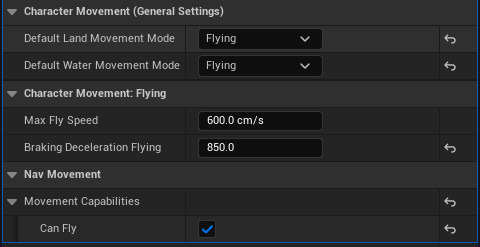
The movement also wasn't very fluid- it felt like the player was on ice and I could only change the player's deceleration to try and fix it.
If that wasn't bad enough, when I tried to add the Player's ship to the character, it went completely invisible and I couldn't revert it- this also meant I couldn't get any videos of me using the default character.
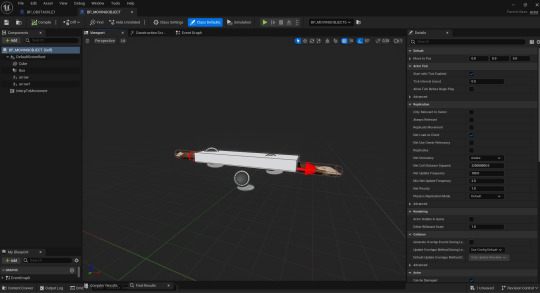
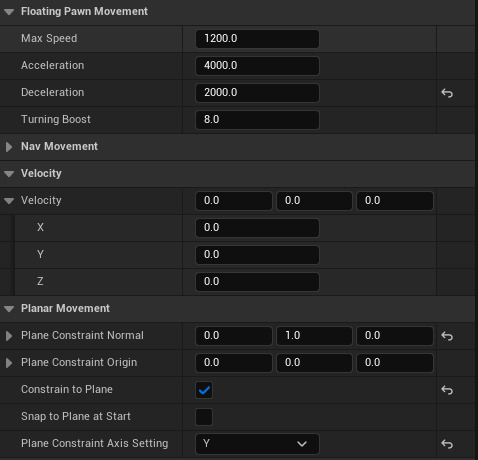
Because of these reasons, I decided to make a new pawn actor that would be the player. This allowed me to use the FloatingPawnMovement component which has much more customizability:
Something I did keep from the original character was the movement code:
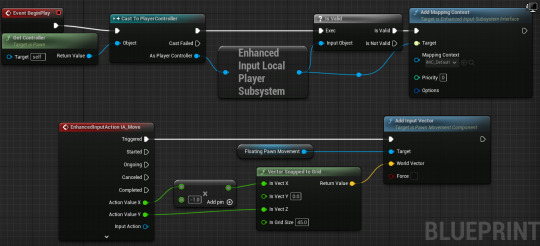
This was much simpler than making a whole new movement system. It also allowed me to keep the 8-directional movement I had made before.
The only thing left to do was adding the static mesh and camera into the viewport. When adding a camera it's also good practice to add a SpringArm to it for more adjustability:
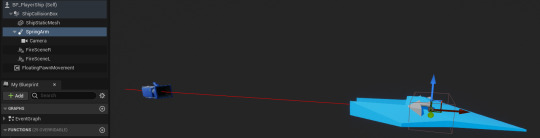
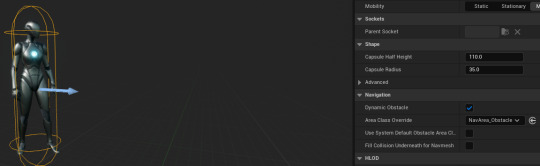
The only problem I have with this new character is the hitbox. Due to the shape of the ship, it's hard to find perfect collision. It's also important to have the hitbox be in favor of the player to reduce the amount of unfair hits they take.
This was the final hitbox I decided on:
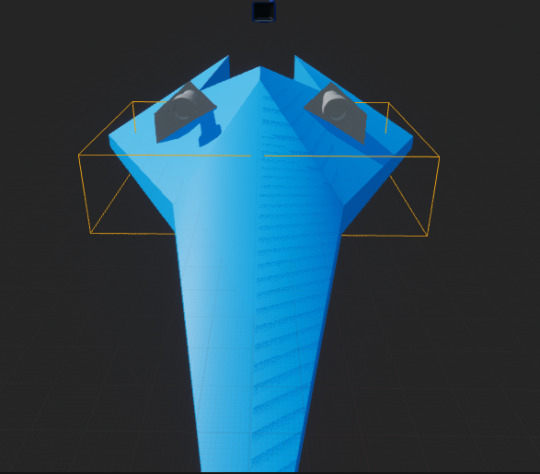
It's not perfect, but it's the best I could do with the box collision.
This is the final result:
youtube
I am personally very happy with this result, but I will have other people playtest the movement to make sure it feels right/intuitive for the player.
1 note
·
View note