#very nice interface
Explore tagged Tumblr posts
Visit Tumblr Blog
Explore Tumblr blogs with no restrictions, modern design and the best experience.
Last Seen Tumblr Blogs


Fun Fact
The most popular pages on Tumblr are about Minecraft, GIFs, and David J. Peterson.
Text
Lillie
#pokemon#lillie pokemon#I made this one in#infinite painter#on the phone from start to finish; lately I often start in infinite painter and then move to laptop - I didn't even jump over with this one#I will put together an in-depth review of infinite painter at another time but for now:#~3 months of using it - nothing but good things to say: has the most refined blending capabilities of any software I've tried#to the point it makes me wish I could use it on laptop as well#very handsome brushes for both drawing and painting but of course especially painting#very nice interface#and the most in-depth manual I've ever seen#it took me a while to learn how to use it well but at this point I can recommend it
17 notes
·
View notes
Text
my most toxic trait is that i have like 343546 dumb unfinished interactive fiction/renpy projects, bc i love making little conversation trees and planning out reactivity and things, but then i can't manage doing the art/writing/coding all at once, bc i become Unreasonably Perfectionist on all sides and it takes way too long to finish anything ahah...
so, much like the ancient magisters, i am wistfully pining away with hubris, while looking at the unattainable golden city (the concept of an extremely high effort da fan game that would require at least 10 of me to have enough time and energy to work on it effectively)
#;-;#i do recommend everyone try fiddling around with choicescript/twine/renpy#it is very fun just on its own#woe. conversation flowcharts be upon ye.#ui is just terrible though. i hate it so much. every time i looked up a tutorial it did psychological damage to me#there was one really nice and comfy unity plugin called fungus that was SO chill and had a visual interface#but it got abandoned alas...
21 notes
·
View notes
Note
Everyday I log into Twitter and see multiple people asking “where’s this screenshot from, what’s this clip from?” And it will be content from 2019-2022!!! What has happened to phannie culture. Finding Dan and Phil and not watching every video posted starting from 2009, Reading forum posts from 2013? Do we not care about lore anymore? Where’d the obsession that comes from finding dnp randomly one day and you’re life never being the same. Like if they actually watched phils content they actually know the answers to the questions!!!!!!
i'm not gonna mock people for not knowing something but yeah in the past couple of years there has seemed to be an uptick in people asking others to find the things for them instead of doing any kind of research
not to be an old™️ but i think it's a generational thing and the product of people who are now in their early 20s not having to learn the same online research skills we did? or maybe it's also because social media changed the way they're used to receiving info (as in it's fed to them directly without looking)
but no i agree back in the day if you joined a new fandom or wanted to learn you did your own digging and looked up forums/videos/used basic deductive reasoning. it'll be interesting to see how fandom landscapes progress
#anon ask#i also was reading something recently about how school chromebooks have ruined gen z's ability to properly search?#like it was a widespread epidemic for people who grew up using chromebooks because of their interface?#it generally doesn't annoy me unless it's something that could very easily be searched#or it's like a brand new video that everyones talking about live and someone asks where to find it#but also its nice that theres not the same shame we had in asking back then?
38 notes
·
View notes
Text
im learning guitar online rn thru justin guitar and one of the more interesting ongoing things he keeps mentioning is his stupid APP. "if you're not using my beginner song course app..." "in my beginner song course app..."
his app costs money, and as much as i respect the hustle (he's a genuinely good teacher and offers ALL his lessons for free) im too broke dawg don't even try me 😭
bro's gonna make me feel a sort of FOMO just because i'm too broke to get the "full" experience of play-along songs or whatever. the features do genuinely sound great and maybe if i had income i would buy it BUT IM BROKE!! YOU DONT HAVE TO DIG IT IN THAT I DON'T HAVE THE APP!!!! i'm rawdogging from his website (which i already made an acc for) like leave me alone i ain't downloading an app for like a 30 day trial just to be forced to cop out once i reach the expiry date
like brotha pls don't make my FOMO heavier than it already is because you dedicate a WHOLE video to this app only to keep bringing it up
i'm a young adult with no income justin leave me aloneeeeeeeeeee
#posts#don't get me wrong tho i love thw guy#genuinely good lesson structuring (perfect for autistics like me who can't do anything without structure)#and i'm actually LEARNING something!! best part is: free#website? free. practice timers? FREE.#it's a nicely built website and has a very intuitive and workable interface#and also justin is chill#bro talks everything from chords to holding the instrument to picks.... bro covers EVERY base#it's actual peak#i don't know im progressing too quickly at the modules but i'm trying to insert info in brain ya know?
2 notes
·
View notes
Text
Spent the past week working on a small visual puzzle game, "Synthesis", for my LÖVE Jam 2024 entry!
The theme was "interface" so I couldn't help making something - I wanted to make a bit of an abstract puzzle game where the player isn't taught any controls and has to learn through trial and error You can try it out here!

Definitely had a few moments where I worried about it not being fun, and there were a few older module designs that were not really skill based and instead you'd just spam through the options, which was frustrating

But managed to come up with something that I think is a nice balance of getting the player to experiment and showing certains hints so you don't get too annoyed
It was also my first time doing music for a game so.... enjoy that!

Thanks to the LÖVE community for putting on a lovely jam, and be sure to check out all the other entries when the jam finishes tomorrow!
#wasnt planning on doing anything for the jam this year#but then they announced the theme as “interface”#which is like#very much my jam#was nice to take a break from the APICO stuff too as thats been grinding me down#hope you enjoy!#love2d#pixel art#game development#game jam
9 notes
·
View notes
Text
had to repair the armscye of my big wool coat again. and the fabric around the buttonholes is wearing down to nothing... :( I've reinforced the one, but eventually it's gonna need patches on all of them.
I keep meaning to make a pattern of the coat so I can make a modified one that'll fit me better, but that's like. a whole day project. and I keep forgetting. 🤦♂️
#also that much heavy wool fabric (nevermind the lining and interfacing and buttons) is literally hundreds of dollars. so I'm not like...#in any big hurry. I have wool scraps for patches when it comes to that.#it's a very nice warm coat but it's deffo made for someone with uh. less wide hip bones. and shoulders. lmao#but it was ~thirty dollars~ 20 years ago and I haven't completely killed it yet!
2 notes
·
View notes
Text
YIPPIEEEEE IVE FINALLY FINISHED MY TOTEBAG WITH SNAIL EMBROIDERY ITS SO CUTE
#salisha speaks#it took sooo long bc i forgot abt it entirely for like a montj#but it came out so nice!!!#its actually very like sturdy. which i love#i added interfacing to the outside fabric and it has a canvas lining#AND POCKETS 💅🏼#i really love how the embroidery came out :)
2 notes
·
View notes
Text
actually sent in feedback over the removal of the avatars because I got the update and like. it is noticably a colder experience. where are my friends. where has your faces gone.
#the interface redesign was miserable but not the worst because it actually reminded me of the way tumblr used to be way back when#remember when our tracked tags were on the right?#but this is just...#anyway I sent in some very polite feedback#I suggest you do the same#BE POLITE THEY'RE DOING THEIR JOBS YOU GET FURTHER BEING NICE THAN BEING RUDE#tumblr
5 notes
·
View notes
Text
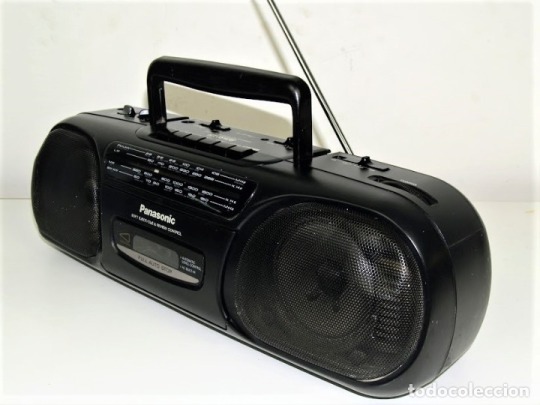
A radio with a cassette-player. Like this, but bright green.
*things such as video game systems are not included in this poll
**your own, not a family/shared computer
reblog for reach/bigger sample size!!
#it was nice. didn't bring it with me when i moved out however. so it's been gone since way back.#after this it was... a cd-player of about the same size. then a pocket-sized cd-player. then... hmm...#i think it was my first phone (16 years old) which was an ''mp3 player model'' bcs my parents knew me very well#and knew that i'd not bother with bringing the phone with me unless i could use it for something (like playing music)#i briefly wondered if i'd forgotten one. but then i remembered that the pocket-cd player had an mp3-interface#and that's the one that i ended up rigging up with speakers in my room (with the shitty wires)#personal stuff
22K notes
·
View notes
Text
Finally switched to YouTube Music instead of Spotify. Uh. Why is this better in basically every way?
#not forced into an app. there's music there that's not been posted on spotify#interface is really clean and nice#its not as 'polished' as spotify but its soooo easy to navigate#even if its a little plain#only complaint is that the like/dislike buttons are very small on mobile#i suspect this issue would be fixed in the app but i like listening ad free
1 note
·
View note
Text
I cannot stress enough that all those things in sewing pattern instructions that seem pointless are actually very important
Yes, how you fold your fabric before putting down the pattern pieces and cutting matters, because it influences how the fabric drapes, and ignoring that can cause fit issues in ways you wouldn't expect
Yes, cutting an entire separate piece to sew to the edge to finish it is going to be better than turning the edge and stitching it on its own, because there are geometry issues in play that make it actually harder to just fold a curve to the inside.
Yes, cutting clips or notches into the seam allowance around curves should always be done, because those geometry issues will work on the seam allowances and keep the curve from laying flat (remember, clip when the curve goes in, notch when the curve goes out)
Yes, interfacing may seem completely superfluous and frustrating and an extra step to work with, but it adds rigidity and stability to areas that need it (especially under buttons)
Yes, using a fun quilting cotton print for lining looks nice, but the point of lining isn't to make the inside pretty as much as it is to make the inside slip smoothly over the layer under it, and quilting cotton is going to instead be prone to grabbing everything under it, so you really should use those annoyingly slippery lining fabrics
Yes, in general, you should use the kind of fabric the pattern tells you to use, because there have been centuries, if not millennia, of people throughout the entire world figuring out what fabric best suits what kind of garment, for reasons beyond aesthetics
I know that a lot of people new to sewing see these things and feel like they're things that just aren't necessary, because they skip them when they sew and the item ends up just fine. And if you don't mind the idea of your clothes looking homemade, then it is fine. But...if you're consistently skipping these things and end up unhappy with how homemade your items look, please consider that that result is at least partly because you're not following the entire directions
"Sewing" involves so much more than just the stitches
12K notes
·
View notes
Text
im like addicted to downloading so my vocal synth hobby is great for me but sometimes i dont always organize it all properly until later which organization is also fun for me so its good but even though usually im pretty consistent with saving links or at least a reference to the author sometimes i'll find some like utau voicebank or something installed and have no earthly idea where it came from. who are you harune shiba. who are you EDIT: I FOUND HIM utau wiki lists him as harne shiva instead JKFdkfdafds
#im going through the character txt files to edit their names so theyre easier to sort through in openutau interface#and i found this fucking guy. i feel like i remember finding him on one of the utau wikis. but the internet is not helping#his voice is nice tho. a CV bank with a few programming glitches. he didnt actually have a charactertxt#so i had to make one myself LOL but theyre easy fixes and its a nice bank. now where on earth did i find him#usually i bookmark pages i get utauloids from but i guess i forgot?? who are you. who are you#he has a little flower in his hair. very cute#edit: me reading the hiragana pronunciation in the readme as hiragana was my downfall.#luckily searching with bing or duckduckgo helped#IT USED TO BE that ddg sucked with foreign languages and i would always have to use google#but recently its switched and now i need to use nongoogle search engines to find stuff in kana
0 notes
Text
grocery lists | a blue lock smau - part i — feat. itoshi sae

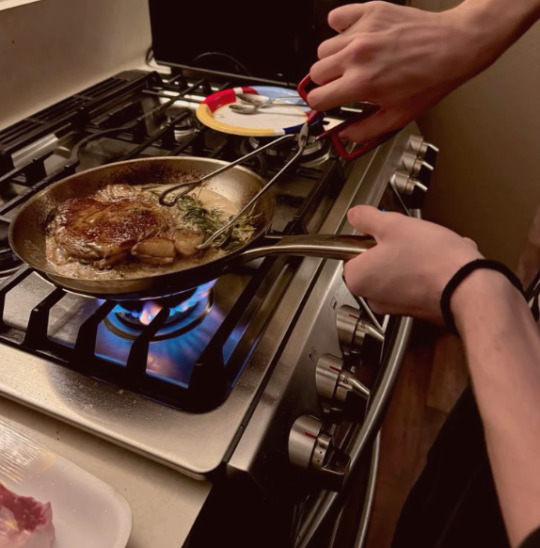
synopsis — when the empty number you've been using to list your groceries finally gets a recipient, your territory gets disturbed in an unusual way. cw : gn!reader, no pronouns used, smau, mentions of food, a sorry attempt at crack, fluff, sae is a lightmode user, short writing portion at the end a/n : baby's first smau! plz be nice or ill cry very hard thankyuo... this is also inspired by this meme < PREV NEXT > series taglist

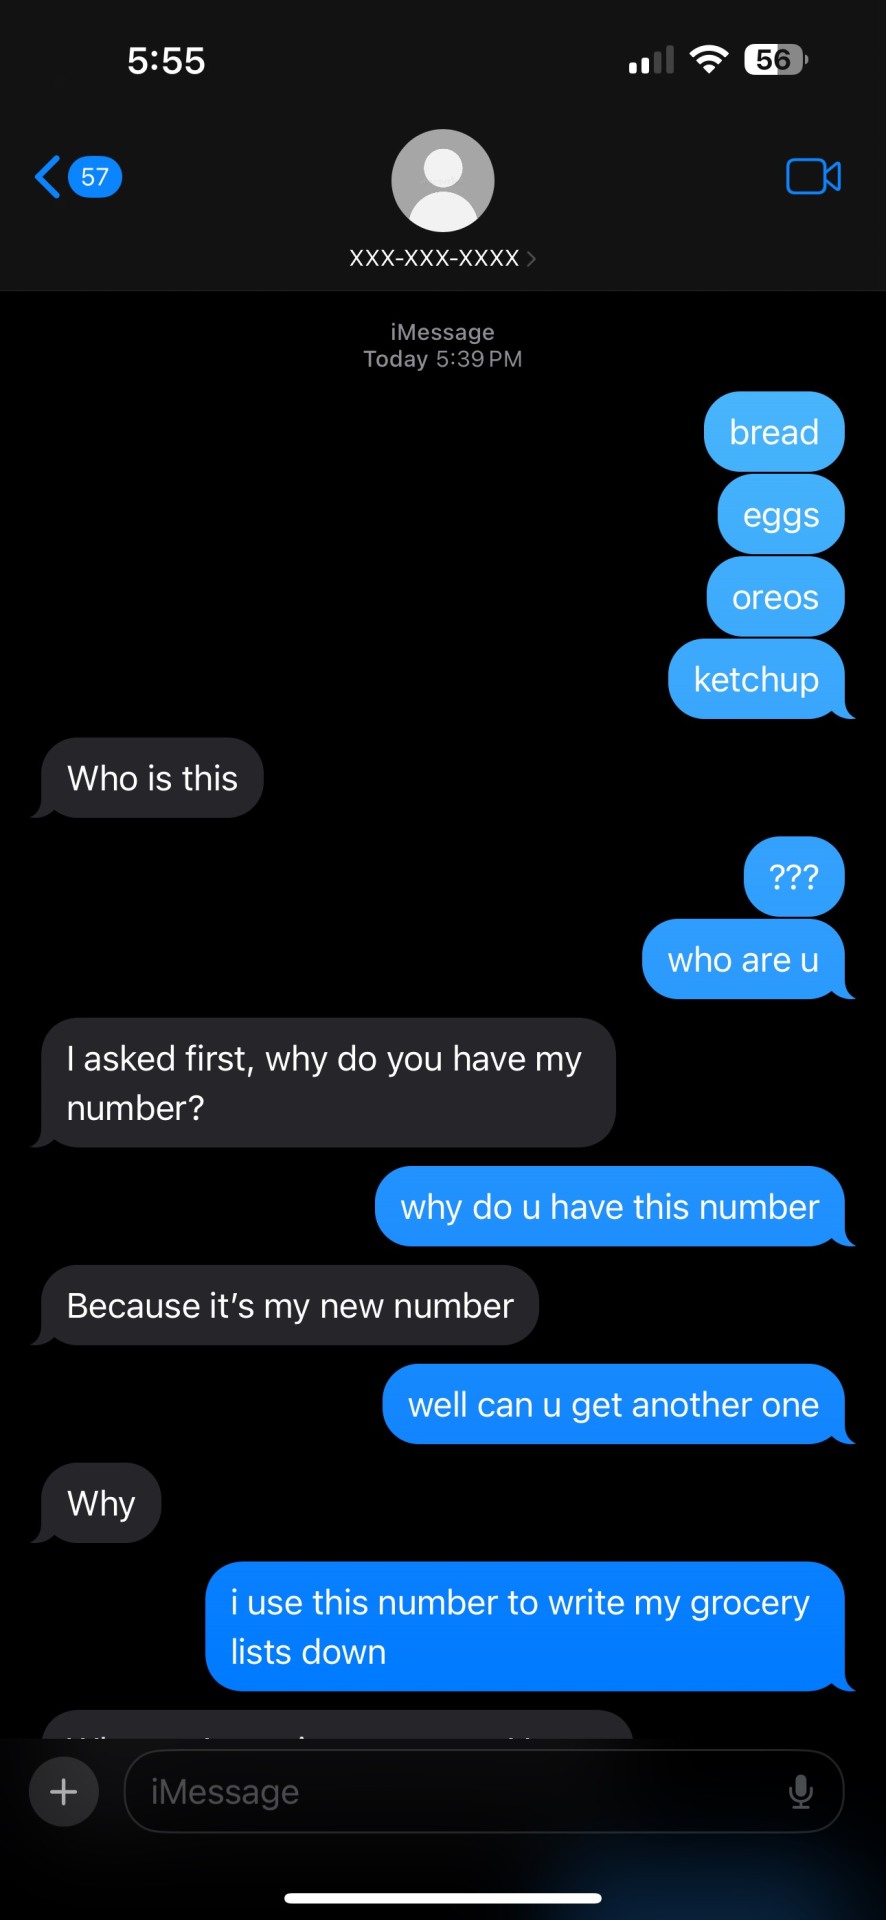
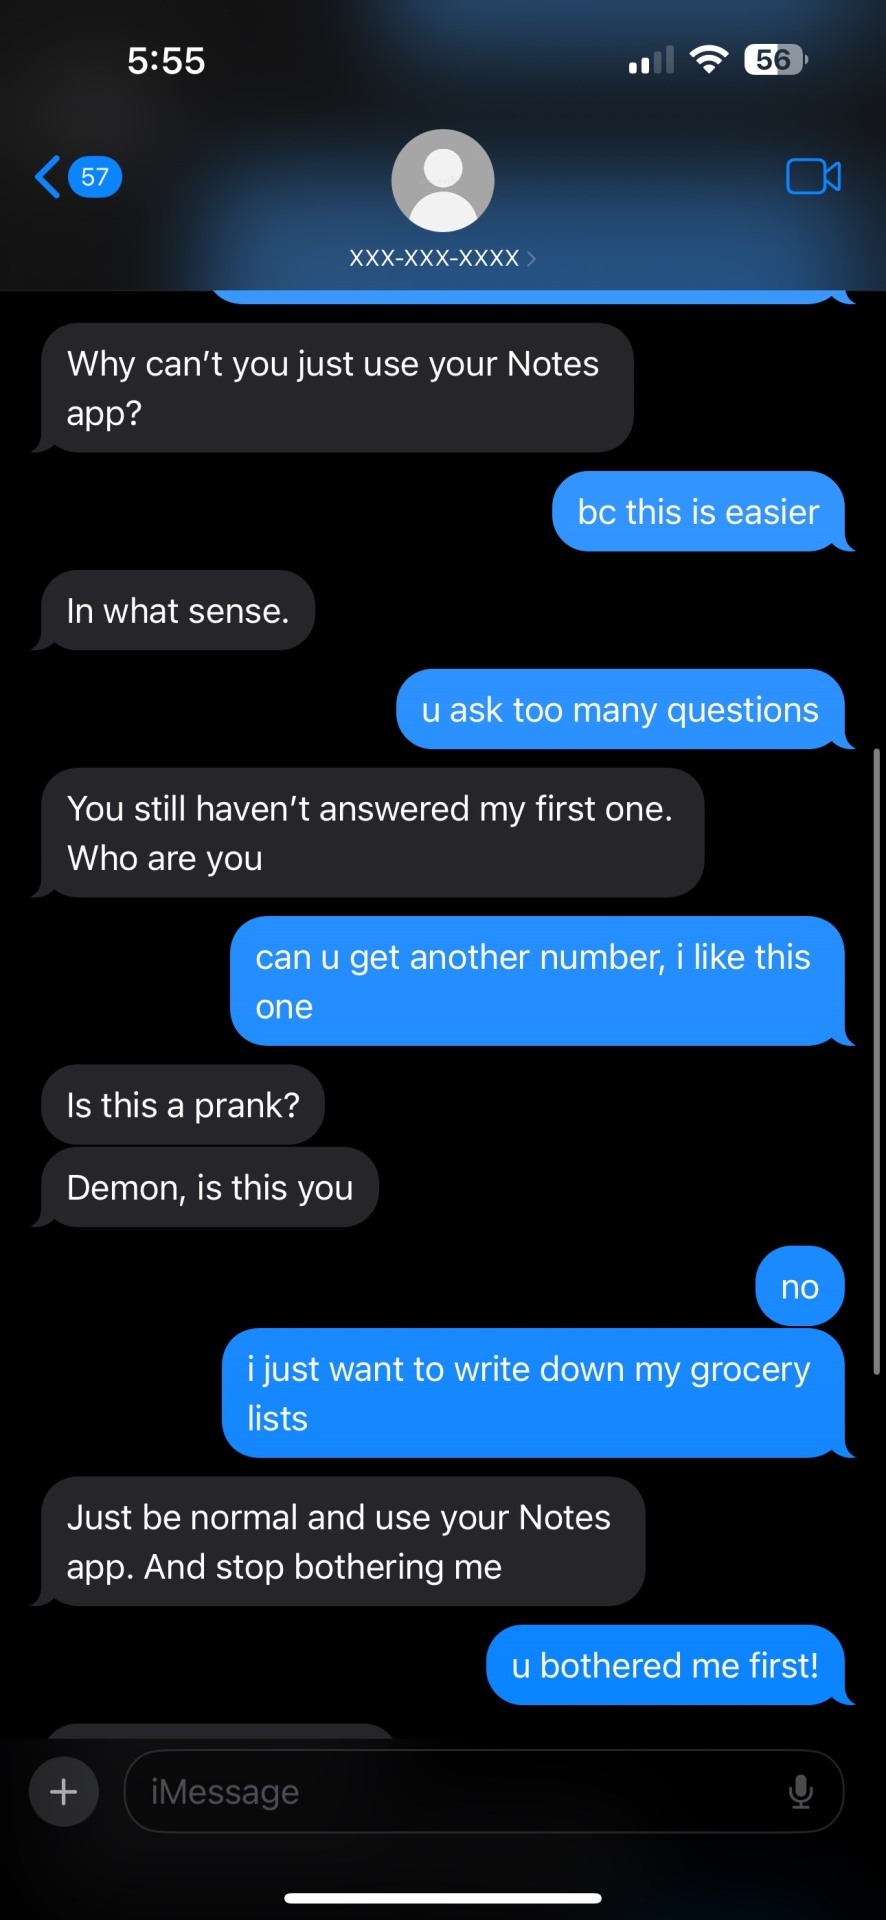
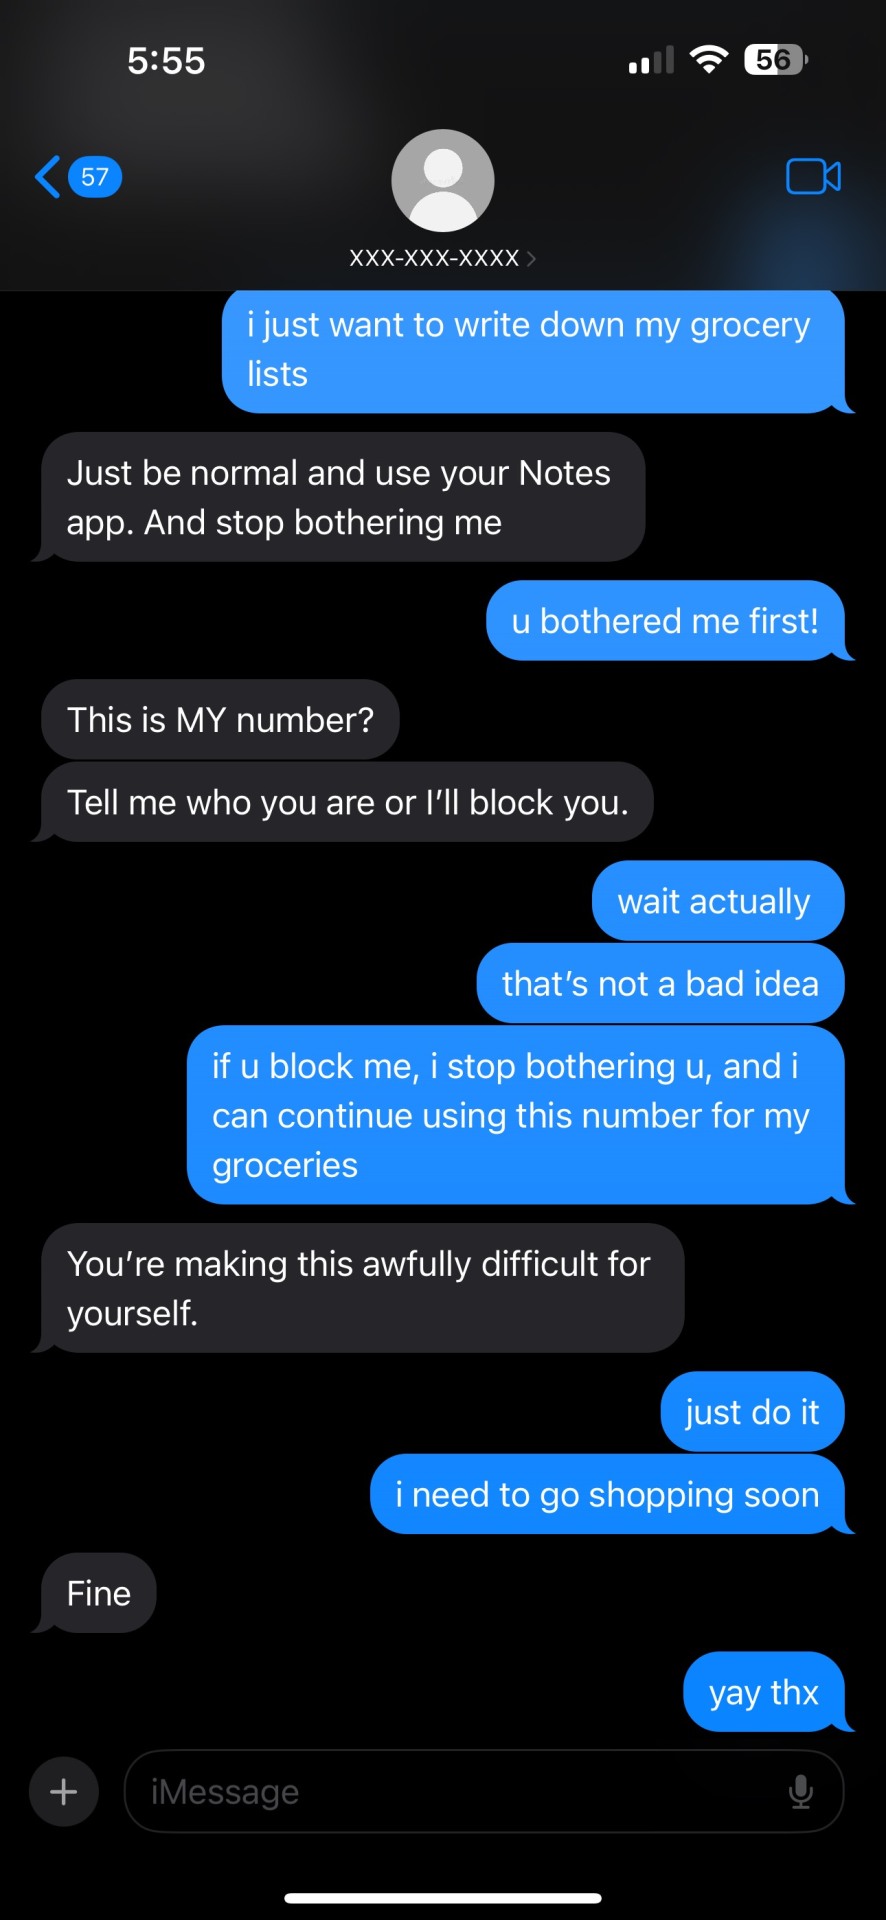


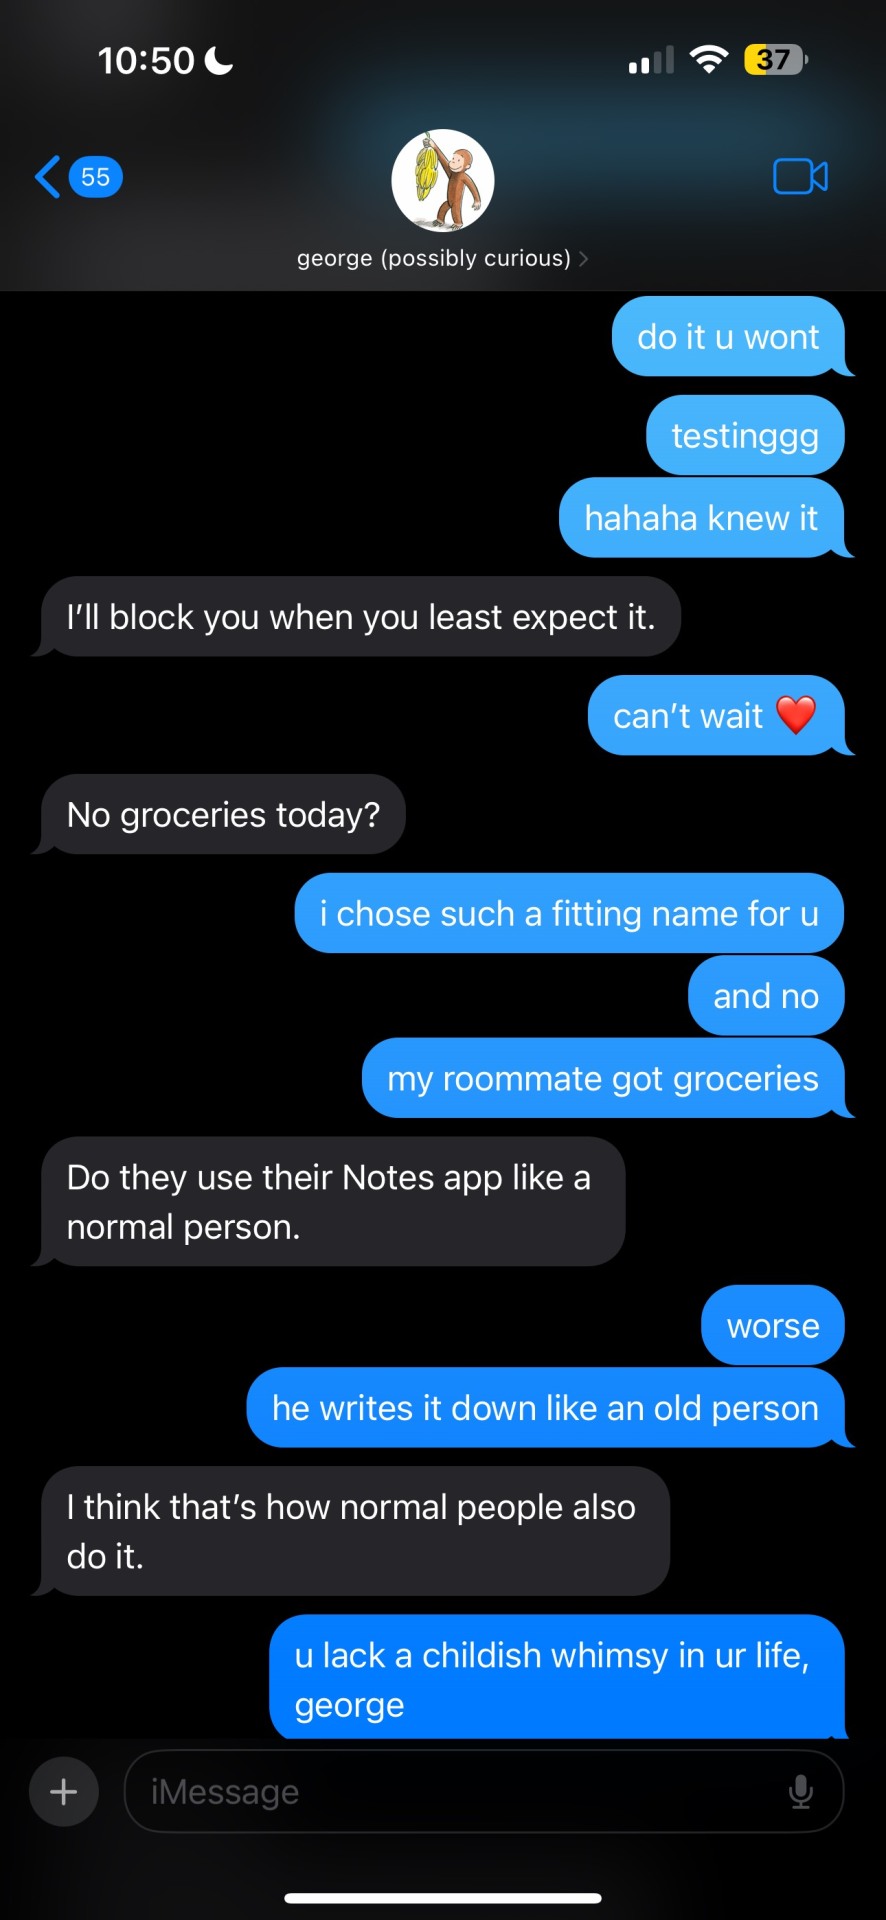
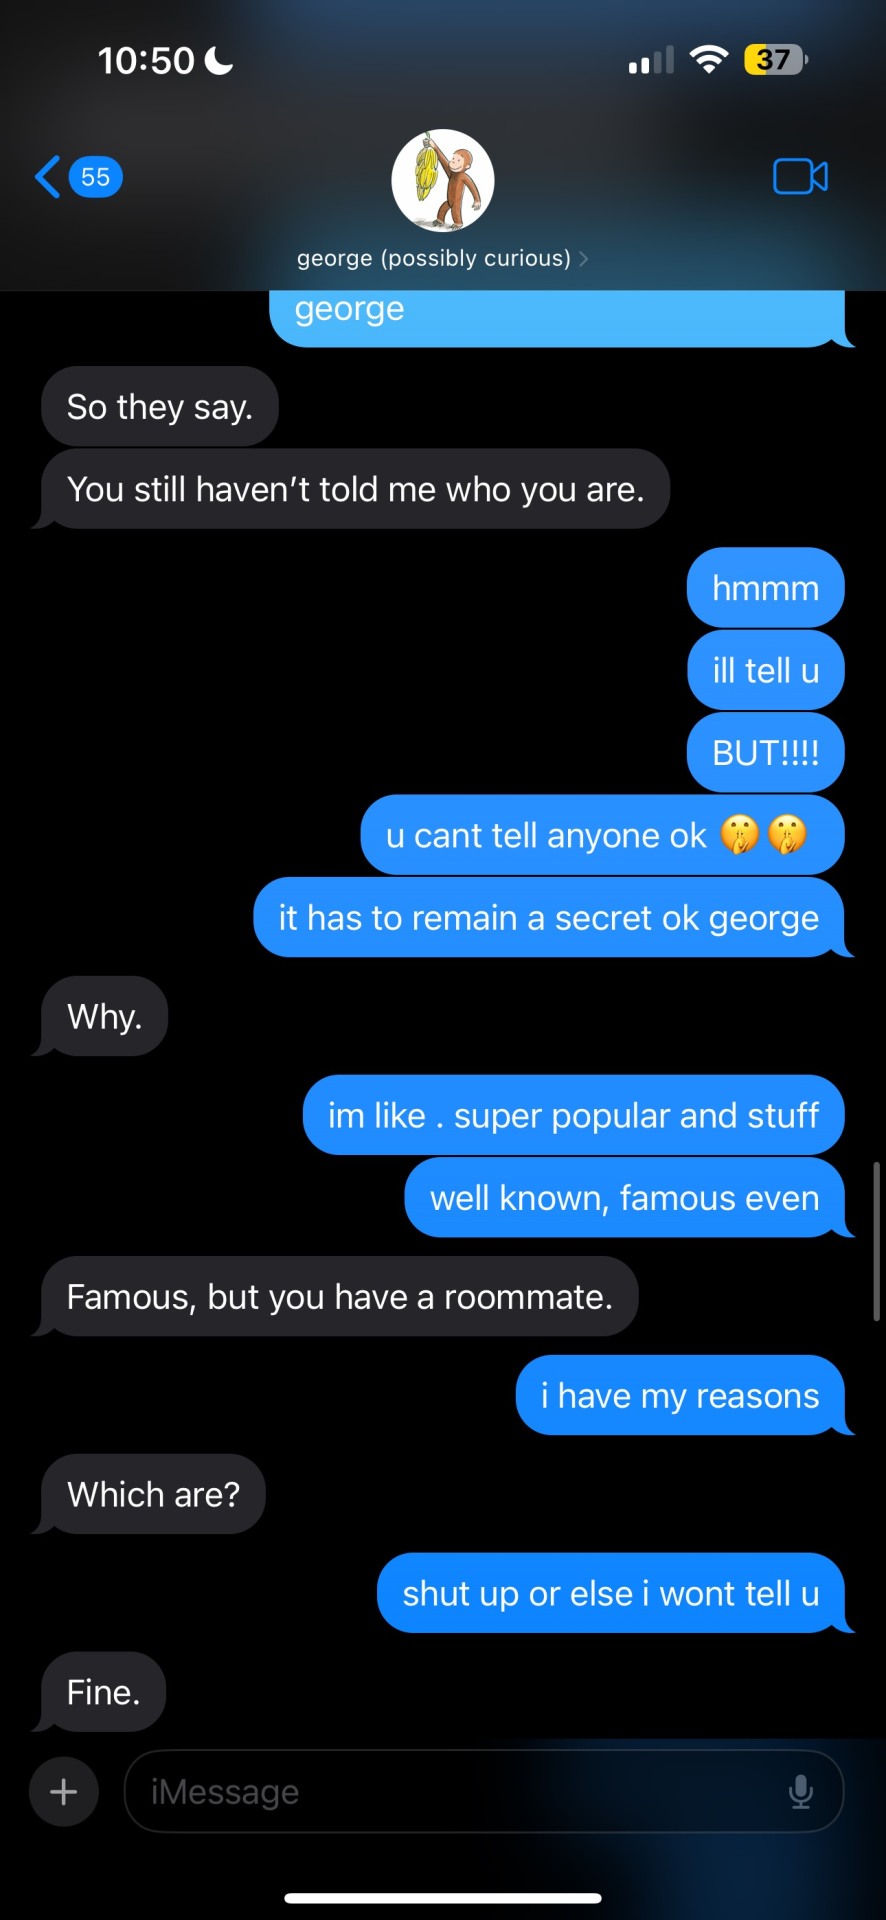

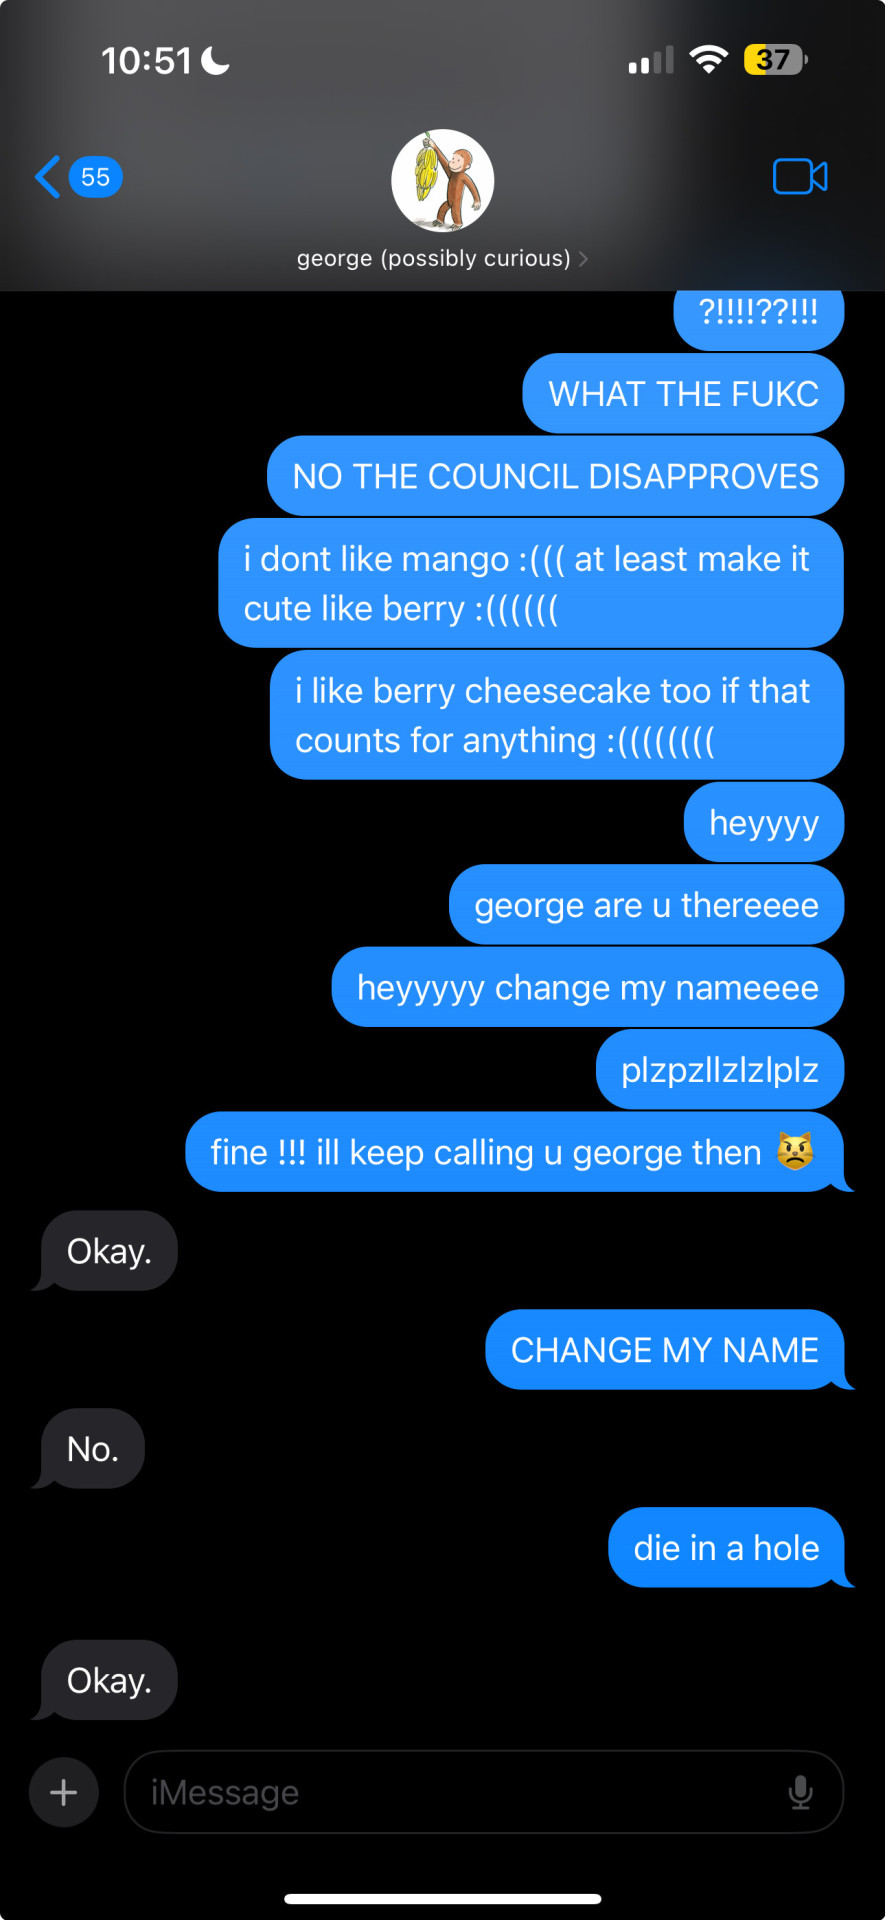
"'Mango'... how stupid," you mutter under your breath, eyes glaring with irritation burning as you stare at the given contact name the stranger has given you.
Your roommate scoffs out a laugh, "Yeah, like Re Al's Itoshi Sae was a much better option."
The click of your tongue resonates through your shared living room.
"Shut up. It's not my fault—I blanked out and his poster was right in front of me," you mutter as you glance at the large framed poster of said player, where it sits almost intimidatingly on the wall near the TV in a row filled with other framed players of your roommate's admiration. "I thought I told you to take that down and put it in your room. He's not even your favorite player."
Yoichi shrugs and scoops himself up another piece of your cheesecake despite your protests, a piece of mango juice dribbling down his chin. "Yeah, I know. But I need to get to his level, so I put that there as motivation."
You frown, pulling the plastic casing of the cake away from him before he can steal another bite. "It's ugly. He's ugly, put it somewhere else."
"You and I both know that last bit is a lie," he grins and wiggles his brows. "I saw the way you were staring at him when we watched the Barcha versus Re Al match. You only paid attention when he was on screen."
"Because who has a hairstyle like that!?" you squawk, your body betraying you and sneaking a heat upon your cheeks.
"Hm," Yoichi studies you with his intentful eyes, his smile only growing with intrigue. That peeved you about your roommate—how he was able to know people before they even knew themselves—and you were not an outlier to such a habit. "Alright. Say what you will."
A haggard groan leaves you, this meld of frustration and annoyance boiling over in your mind. You snatch the cheesecake container from the table despite Yoichi's protests with a huff, going to glare at Itoshi Sae's poster once again before you excuse yourself to the isolation of your room.
< PREV NEXT >
a/n : part one of what i think is most likely a three part mini series? idk i didn't want to cram everything into one singular post and also,,, this was a pain in my ass to do bc also a lot of smau-maker interfaces were frustrating to work thru lol so i resorted to the og method
but regardless, thank you so much for reading and i hope you enjoyed (☆▽☆) ! reblogs and comments are always appreciated and never unnoticed <3!
(also sorry if u dont like mango cheesecake …. but i rly like it so… heh)
#✍︎ ; alice in writingland#blue lock#bllk#blue lock smau#blue lock x reader#blue lock fluff#blue lock x you#itoshi sae#sae itoshi#sae itoshi x reader#itoshi sae x reader#sae x reader#itoshi sae x you#divider c: @diviniyae
2K notes
·
View notes
Text

i had the realization that because of how i hc cybertronian anatomy, jacking off would just kinda look like...this
(hcs below if youre curious)
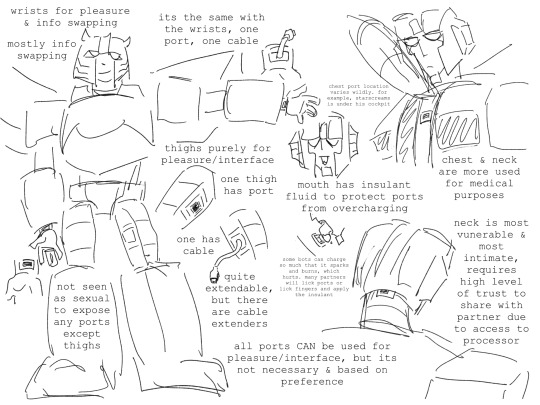
ive been trying to iron it out more since port placement and cable placement and the general functions of them will be important for some fics later, but for now this is pretty much the basics. few little extra bullet points tho!
-wrist cables are not very extendable at all, theyre quite short as opposed to the thigh cables, which can extend longer
-a common practice between partners would be to plug in each others cables at the same time, but some people prefer it one at a time or only use their cable/port
-chest and neck do not have cables, only ports. you Can put wrist/thigh cables in those ports, but their original function is for diagnostic scans or downloading medical code patches
-using the neck port early on is considered pretty kinky, chest port might get a brow raise but its not unheard of, and pretending to exchange information with wrist ports while actually interfacing is a whole genre of erotica
-neck port is the only one that gives the cable-user a view into the other mechs processor. they cant do anything with it like a mnemosurgeon could, and its mostly emotions and vague impressions of images, but its still considered incredibly intimate
-for mechs that dont have mouths, there is false insulant fluid available
im pretty sure none of this is super original or anything, but its nice to have a guidline for myself + something to link back to whenever i actually post those fics
2K notes
·
View notes
Text
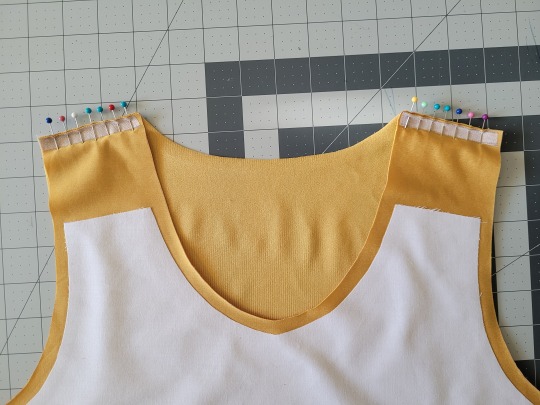
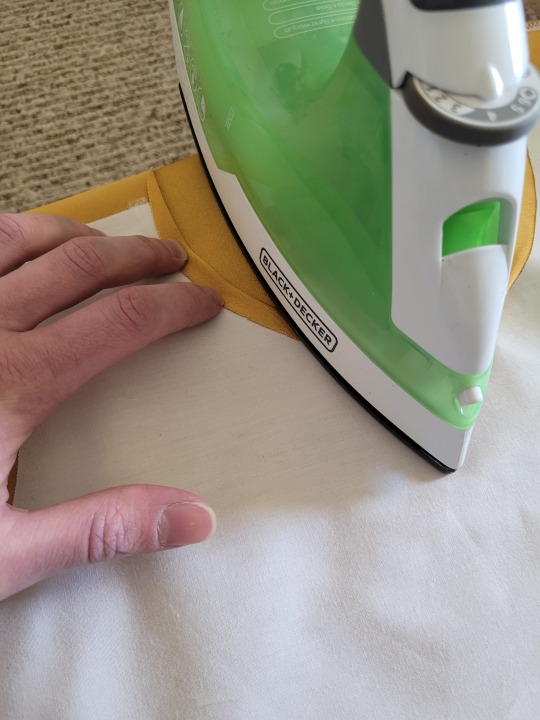
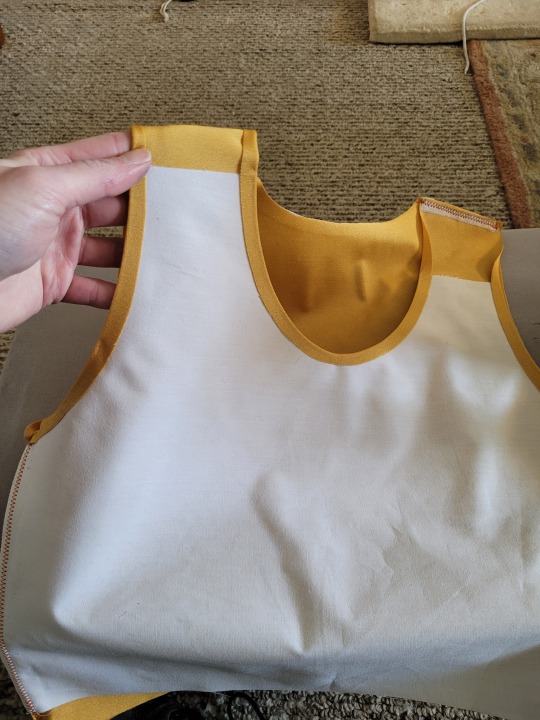
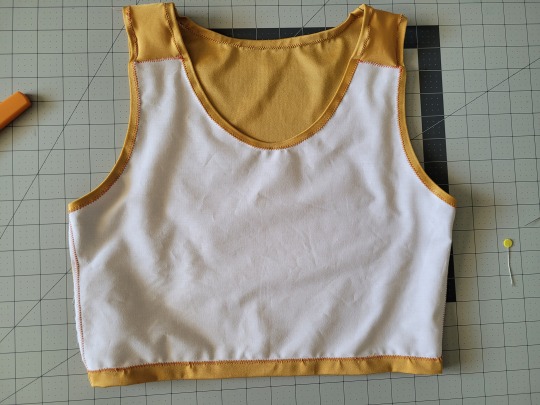
How to Make Your Own Binder that Fits Well and Looks Good
A while back I was in need of some new binders and thought hey, I bet I can make one way cheaper than buying it from somewhere (especially cus some of the ones I’ve bought in the past didn’t really fit right). Except when I started looking for a binder patterns online, I was very surprised that I really… couldn’t find many that looked very nice lol. Most of them had really wrinkled necklines, or didn't bind well, or just overall looked weird. A lot of the patterns also required a serger, which I don't have.
So I just said fuck it and made my own pattern! And it ended up being relatively easy! And the binders fit REALLY WELL and are comfortable to wear, even for long periods. The neckline doesn't show under shirts with loose collars, and the bottom hem doesn't gap or stick out. Here's me wearing one:
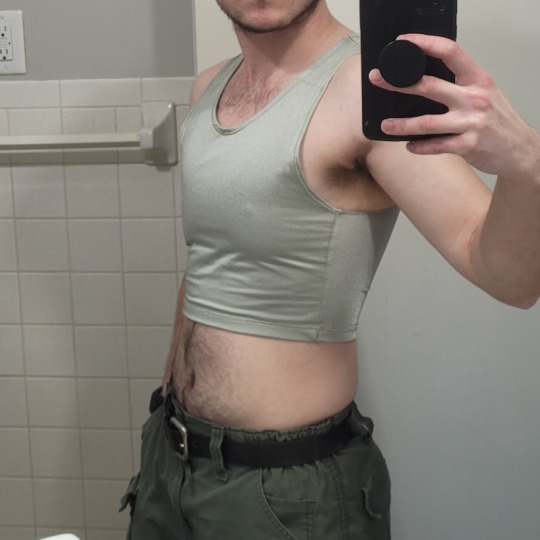
(plus I was able to make myself 5 of them for a total of like ~$50.)
So I figured I could throw together a guide to help out anyone else who wanted to make their own binder but was dissatisfied with the patterns available!
Disclaimer: This tutorial is going to assume a baseline level of sewing experience, and also will require access to a sewing machine. It is not a complicated pattern, but it will most likely require some tweaking and adjustments after you make the first one. Don’t be afraid to make alterations to make it fit better!
This tutorial is for a gc2b-style half-tank binder. It could be altered to be a full-tank binder, but all instructions will be for the half-tank design.
Materials needed:
Stretchy fabric, probably listed as 'athletic fabric' (I use this kind from Joann’s. Most athletic stretch fabrics should work, look for around 80% nylon/20% spandex blends)
Stiff fabric (I use this shirting cotton because I like how lightweight it is. If you want something a little stiffer with more structure, you can use a cotton or cotton/poly blend twill like this. gc2b binders use twill for theirs.)
Lightweight fusible interfacing (I use this kind) (get FUSIBLE not sew-in)
Fusible webbing like Pellon Wonder-Web (this is technically optional but it WILL make your life easier when you’re sewing - just make sure to get the kind with the paper backing!!!)
“But kiwisoap thats 4 whole kinds of materials, surely I don’t need that many!” Ok sure, you can probably get by without the fusible web and interfacing, but consider: they are both dirt cheap (im talking like $1-2/yard), they will make it much easier to sew the final product, and will give you an overall better-looking result. This tutorial is written with the assumption that you’ll use them.
"How much fabric will I need?" Measure the circumference of your chest below your armpits. Add 6 inches just to be safe. This is the yardage of stretch fabric you’ll need, and should give you enough material to make at least 3 binders without much excess left over. You will need around half as much stiff fabric.
Other supplies:
Big Paper (for drawing the pattern)
Flexible measuring tape
Sewing machine
Iron
Pins
Step 1: Measuring
You will need 4 main measurements for this pattern.

A) Measure the circumference of your chest just below your armpits, then divide the number in half. This will be the widest part of the pattern.
B) Measure from the top of your shoulder down to where you want the binder to end. For most folks, this will usually be around the natural waist (narrowest part of the torso), about 3-6 inches above the belly button. This will be the overall height of the pattern.
C) Measure the distance from below your armpit to where you want the binder to end. This will determine where the arm hole starts.
D) Measure the circumference of your waist where you want the binder to end, then divide the number in half.
So for example, after dividing A and D in half, my measurements are 17", 15", 7", and 14.5".
Next:
Subtract one inch from measurement A - This will help provide some compression. You might need to take it in even further depending on how it fits, but one inch is a safe starting point. I take mine in around 1.5 inches.
Subtract half an inch from measurement D. This will help prevent the bottom edge of the binder from gapping. Again, you may need to take it in more or less, depending on your own body.
Add 1.5 inches to measurement B and one inch to measurement C. This is to account for the hems and armhole placement.
This makes my final measurements
A = 16"
B = 16.5"
C = 8"
D = 13.5"
From here on out, we are only going to be working with the measurements that we have added/subtracted to, NOT the ones we initially took.
Step 2: Drawing the Pattern
You will need a piece of paper large enough to accommodate the entire pattern. This may involve taping multiple pieces together, or using a piece of newsprint, etc.
I recommend folding the paper in half to ensure that you get a symmetrical pattern. However, this means you will need to divide measurements A and D in half again, or else you’ll end up with a pattern that’s twice as wide as it should be!
Also note: the pattern is drawn with the seam allowance built in! You don’t need to add any seam allowance.
To draw the pattern:
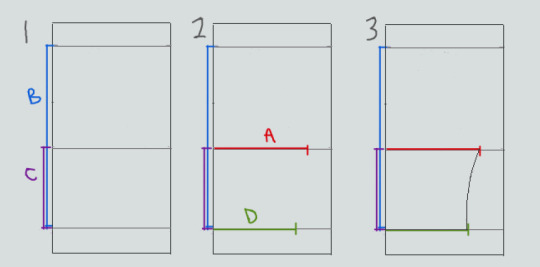

Begin with your folded paper. Measure and mark B and C on the paper, and draw a line extending across the paper. These will be your guidelines.
Measure and mark A and D along the middle and bottom guidelines, respectively. Remember, the paper is folded, so you only use half of the measurement for A and D.
Draw a loose curve connecting the endpoints of A and D. If needed, you can also just draw a straight line between the two.
Mark the opening for the neck hole. Depending on your size, it will measure around 6-8 inches across at the top (remember to divide this in half for the folded paper) and about 5-6.5 inches deep. (mine is 6.5" across and 5.5" deep) Draw a curve to connect the two points. This part will take some tweaking and adjusting to get it to look right lol.
Measure the width of the strap - this should be somewhere between 2.5 - 4 inches wide. They will end up about 1/2” to 3/4” narrower once you sew them. Draw the line at a slight angle, as shown.
Connect the endpoint of the strap to the endpoint of line A with a curve like in the diagram.
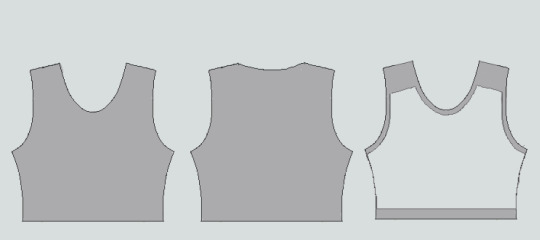
This will be the pattern for the front piece.
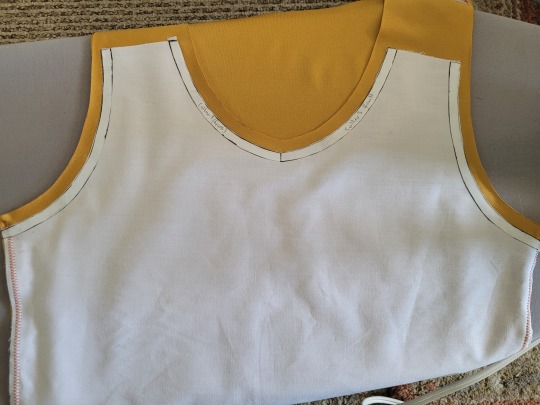
To make the back piece, trace the front pattern, but make a very shallow curve for the neckline instead of a steep one, as shown:
The last piece is the stiff front panel. This is what provides the flattening effect of the binder. To make the pattern, trace the front pattern again. Trim 3/8” in on the sleeves and neckline, and 3/4” to 1” along the bottom. This gives a flatter hem. Then trim the straps shorter by a few inches. This helps the binder lay flatter along the shoulders.
When you're done, you should have 3 pattern pieces that look approximately like this (stiff panel shown overlaid on the stretch fabric to show how it fits together).
NOTE: If you want more compression or just want to make it a bit sturdier, you can add a second panel of stretch fabric to the back piece. Just use the bottom half of the back pattern (from the widest part down to the bottom hem) to cut out another piece of stretch fabric. Attach it to the back piece with a strip of fusible webbing and a zig-zag stitch along the top.
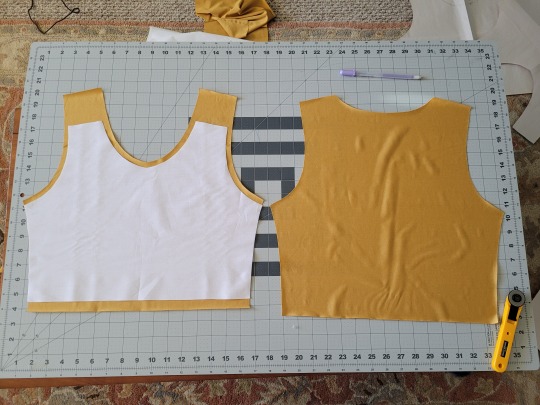
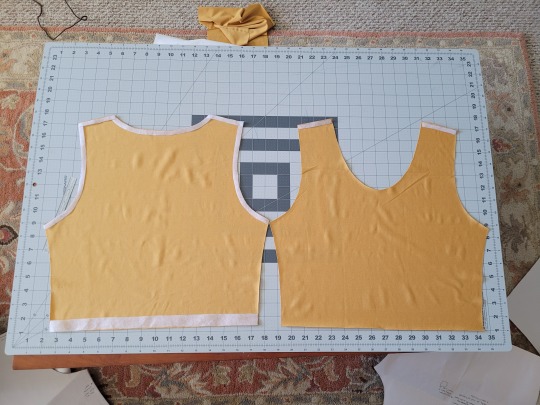
Step 3: Putting It All Together
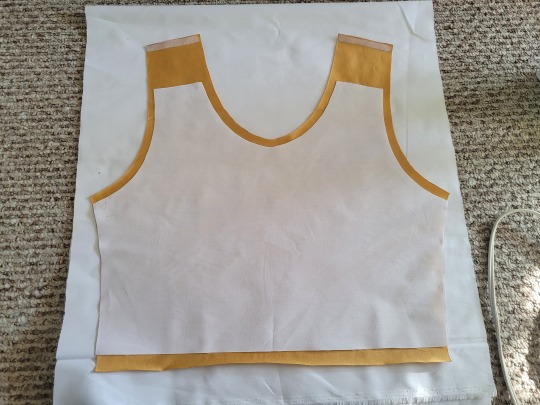
Once you’ve made the patterns and cut out the pieces of fabric, you should have something that looks like this:
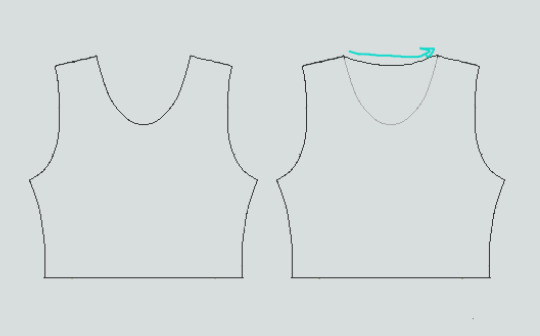
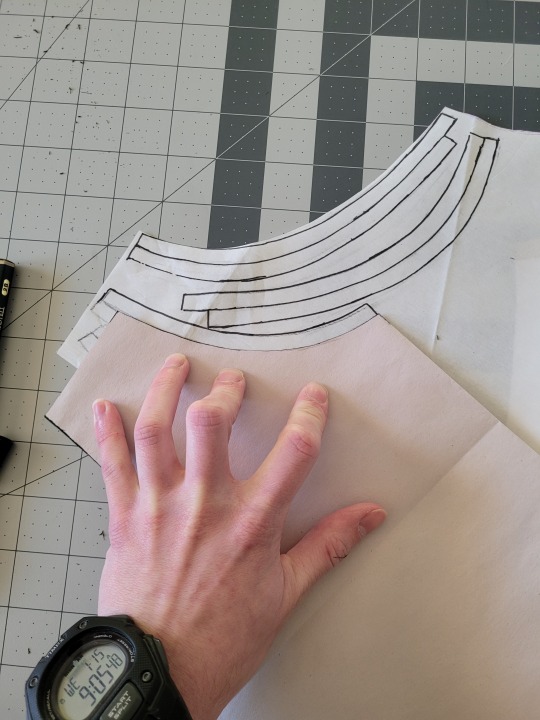
The next step is adding interfacing and fusible webbing. Use your pattern to cut out 3/8" strips to fit on the top of the straps for both pieces, and to the neckline, sleeves, and bottom hem of the back piece, as shown:
If you want to add it to the bottom hem of the front piece, it will help keep that hem flat when sewing it down later, but it's not essential.
If you choose to also use fusible webbing (WHICH I RECOMMEND), you will apply it to the stiff front panel similarly to how the interfacing was applied, ~3/8” strips along the neckline, sleeves, and top of the straps. Cut out two strips for the neckline and sleeves, because we'll use those later too.
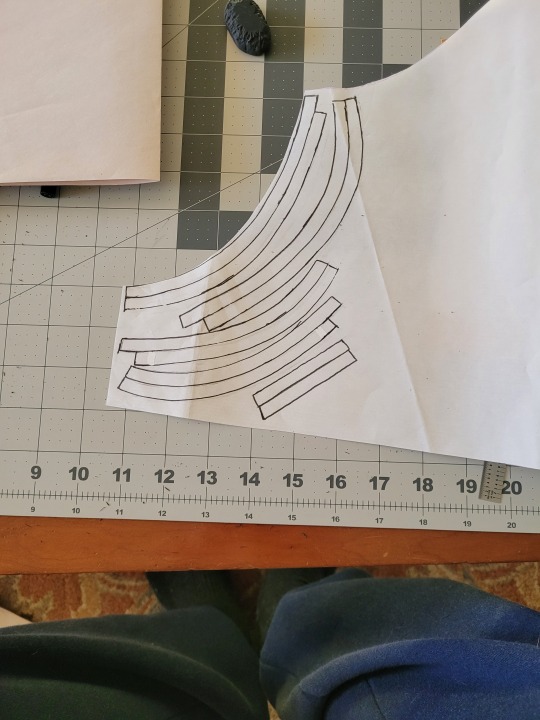
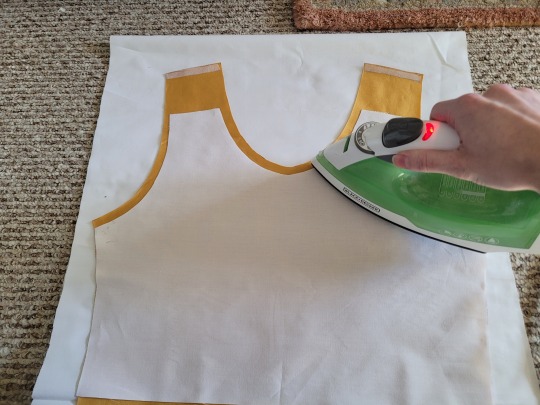
Iron the strips onto the front panel as shown:

Once it's on, just peel off the paper, position it webbing-side down on the stretch fabric, and iron it to fuse the two pieces together so everything stays in place while you sew. THIS MAKES IT WAY EASIER TO SEW.
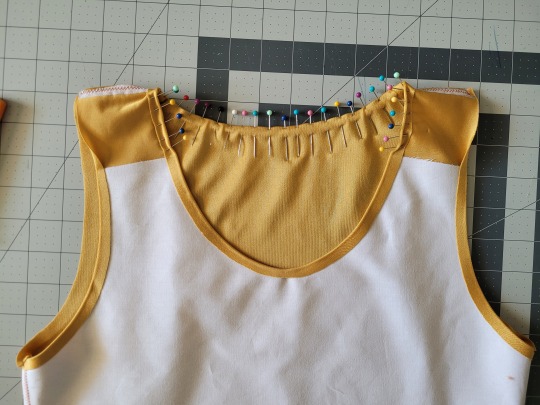
After the stiff front panel is fused to the stretch fabric, you’ll sew the straps of the front and back pieces together, then join the pieces along the sides. Pin the hell out of it to keep everything in place -this type of material is VERY prone to puckering.
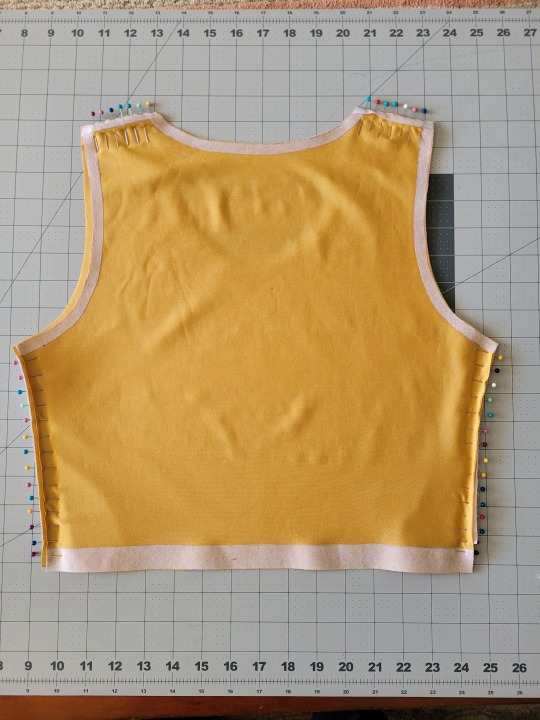
When sewing, USE A ZIGZAG STITCH. A straight stitch will NOT WORK for stretch fabric. I adjust mine to 1.3mm long and 3.5mm wide which has worked well. If your machine doesn’t let you adjust stitch length or width, well. That sucks, I don’t really have any advice.
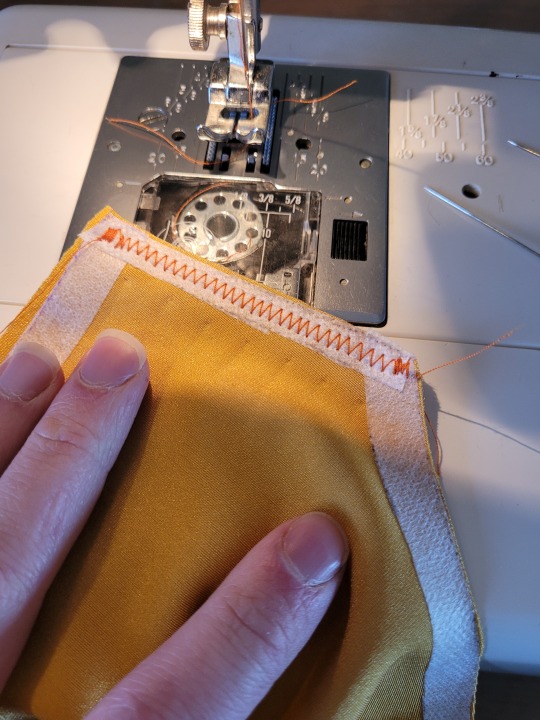
After you sew the front and back pieces together, you can add more fusible webbing to the front panel to help hold the hem down flat and prevent it from puckering while you sew it. Just add the strip, peel the paper off, then fold the hem over and iron it down. This part isn’t really necessary, but it does make the hems look nicer. If nothing else, I would recommend adding it to the neckline.
After that, you just fold & pin all the hems and sew them up with a zigzag stitch, then go over the raw edge at the top of the stiff panel (where we cut the straps shorter).
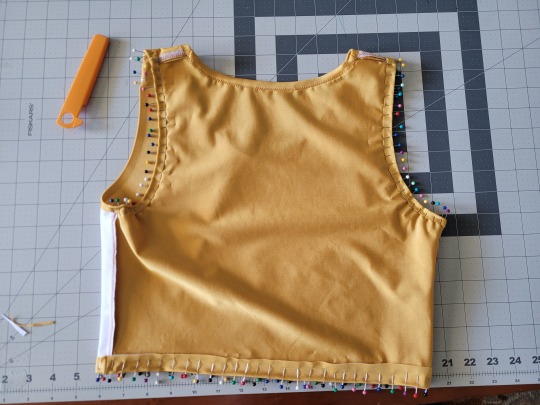
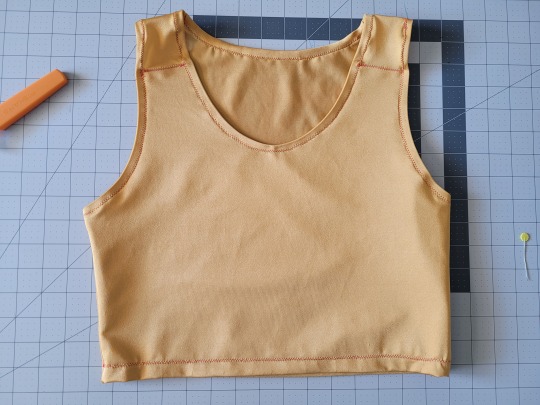
And that’s it! You’re done! And now you can make your own binders whenever you want!
And hey! If you used this tutorial and wanna throw me a dollar or two on ko-fi, I wouldn't complain.
2K notes
·
View notes
Text
📚 A List Of Useful Websites When Making An RPG 📚
My timeloop RPG In Stars and Time is done! Which means I can clear all my ISAT gamedev related bookmarks. But I figured I would show them here, in case they can be useful to someone. These range from "useful to write a story/characters/world" to "these are SUPER rpgmaker focused and will help with the terrible math that comes with making a game".
This is what I used to make my RPG game, but it could be useful for writers, game devs of all genres, DMs, artists, what have you. YIPPEE
Writing (Names)
Behind The Name - Why don't you have this bookmarked already. Search for names and their meanings from all over the world!
Medieval Names Archive - Medieval names. Useful. For ME
City and Town Name Generator - Create "fake" names for cities, generated from datasets from any country you desire! I used those for the couple city names in ISAT. I say "fake" in quotes because some of them do end up being actual city names, especially for french generated ones. Don't forget to double check you're not 1. just taking a real city name or 2. using a word that's like, Very Bad, especially if you don't know the country you're taking inspiration from! Don't want to end up with Poopaville, USA
Writing (Words)
Onym - A website full of websites that are full of words. And by that I mean dictionaries, thesauruses, translators, glossaries, ways to mix up words, and way more. HIGHLY recommend checking this website out!!!
Moby Thesaurus - My thesaurus of choice!
Rhyme Zone - Find words that rhyme with others. Perfect for poets, lyricists, punmasters.
In Different Languages - Search for a word, have it translated in MANY different languages in one page.
ASSETS
In general, I will say: just look up what you want on itch.io. There are SO MANY assets for you to buy on itch.io. You want a font? You want a background? You want a sound effect? You want a plugin? A pixel base? An attack animation? A cool UI?!?!?! JUST GO ON ITCH.IO!!!!!!
Visual Assets (General)
Creative Market - Shop for all kinds of assets, from fonts to mockups to templates to brushes to WHATEVER YOU WANT
Velvetyne - Cool and weird fonts
Chevy Ray's Pixel Fonts - They're good fonts.
Contrast Checker - Stop making your text white when your background is lime green no one can read that shit babe!!!!!!
Visual Assets (Game Focused)
Interface In Game - Screenshots of UI (User Interfaces) from SO MANY GAMES. Shows you everything and you can just look at what every single menu in a game looks like. You can also sort them by game genre! GREAT reference!
Game UI Database - Same as above!
Sound Assets
Zapsplat, Freesound - There are many sound effect websites out there but those are the ones I saved. Royalty free!
Shapeforms - Paid packs for music and sounds and stuff.
Other
CloudConvert - Convert files into other files. MAKE THAT .AVI A .MOV
EZGifs - Make those gifs bigger. Smaller. Optimize them. Take a video and make it a gif. The Sky Is The Limit
Marketing
Press Kitty - Did not end up needing this- this will help with creating a press kit! Useful for ANY indie dev. Yes, even if you're making a tiny game, you should have a press kit. You never know!!!
presskit() - Same as above, but a different one.
Itch.io Page Image Guide and Templates - Make your project pages on itch.io look nice.
MOOMANiBE's IGF post - If you're making indie games, you might wanna try and submit your game to the Independent Game Festival at some point. Here are some tips on how, and why you should.
Game Design (General)
An insightful thread where game developers discuss hidden mechanics designed to make games feel more interesting - Title says it all. Check those comments too.
Game Design (RPGs)
Yanfly "Let's Make a Game" Comics - INCREDIBLY useful tips on how to make RPGs, going from dungeons to towns to enemy stats!!!!
Attack Patterns - A nice post on enemy attack patterns, and what attacks you should give your enemies to make them challenging (but not TOO challenging!) A very good starting point.
How To Balance An RPG - Twitter thread on how to balance player stats VS enemy stats.
Nobody Cares About It But It’s The Only Thing That Matters: Pacing And Level Design In JRPGs - a Good Post.
Game Design (Visual Novels)
Feniks Renpy Tutorials - They're good tutorials.
I played over 100 visual novels in one month and here’s my advice to devs. - General VN advice. Also highly recommend this whole blog for help on marketing your games.
I hope that was useful! If it was. Maybe. You'd like to buy me a coffee. Or maybe you could check out my comics and games. Or just my new critically acclaimed game In Stars and Time. If you want. Ok bye
#reference#tutorial#writing#rpgmaker#renpy#video games#game design#i had this in my drafts for a while so you get it now. sorry its so long#long post
8K notes
·
View notes