#yay colouring tutorial
Explore tagged Tumblr posts
Visit Tumblr Blog
Explore Tumblr blogs with no restrictions, modern design and the best experience.
Last Seen Tumblr Blogs


Fun Fact
Celebrities use Tumblr as well.
Note
your gifs! how do you color them? epecially with like an almost desaturated look and strong blacks but with red lips?
hiya!! yes this is a very good question and I dont know if I have all the right answers to them BUT I do have a method I use.
I'm guessing this is refering to my recent lewis gifs so I'm gonna use those to explain my process!
so here's my how I get from this to this. chaotic explanation for gifs w low saturation below !!

context: this is a lil diff then mb other situations and so far from perfect bc black skin is a lot more complex to colour and get right when its lowly saturated bc u r always on the verge of either whitewashing or getting the undertones wrong so this is far from perfect but its the most recent recording I have of low saturated colouring.
ok lets go!
so first off I expect you to understand the basics of gifmaking so I'm not covering any of that, just colouring. cool? cool.
okay, firstly, when I get a gifset I first just look at the basics I'm working w,

in this case you can see its understurated as all hell, its night and there's a strong blue light which changes so many things.
so first thing I like doing for any gifsets but especially low saturated is to grab my curves and then grab the best white I can find which in this case. are his teeth!
so, I'm grabbing the little white dropper tool and clicking on his teeth, this makes it that photoshop tries to whitebalance the whole pic in one go

then I adjust the contrast and some of the layers a bit to make it a lil bit better, it still kinda sucks but u can see some life get into his face here yk.
then my next step most of the time is colour balance and exposure, colour balance neutralizes it more, when smth is THIS blue I throw a bunch of reds on it, bc lewi's skin has a lot of yellow undertones I try not to go to crazy w yellow and use a lil blue to neutralize it.

then I throw on exposure to bring the contrast back in. to which I tend to throw another layer of colour balance on top. there's a lot of colour balance happening whe you try n bring lowly saturated stuff back to life

then for my personal style w the lips/blush situation I go into hue saturation, slide the slider alllll the way to the end of the red and into the purple and up that saturation so u get this (and another layer of color balance to neutralize ofc)

then for lewis because he has a dark complexion I'm going into hue/saturation again and deepening his skintone just a lil bit by grabbing all the reds til yellow, upping the saturation and lowering the lightness, this is a technique that comes from this amazing tutorial that I stick to a LOT when it comes to lewis

then we go into selective colour, this is where style, opinion and a lot of undertone knowledge comes in. I like upping the blue when a gif has such a colour light blasted on a face and to get the skintones to match someone's actual skintone I sometimes look up posts from the person's instagram and use that as reference to make sure I dont mess it up toooo bad.
but a LOT of selective colour is vibes and seeing what looks good. and, another layer of colour balance.

then for the last layer, I tend to just add a little bit of the hue/saturation to deepen his tone and up the blue in this case w lil bit of brightness/contrast.

it doesnt look like it changes a lot but it has its just working out lil kinks yk
and then ur done!!! after 20 thousand layers of colour balance u got a semi normal coloured gif!! everyone cheer!!

6 notes
·
View notes
Text
Needle Felt Siffrin Build Log: (oct 6 - nov 20, 2024)


Credits goes wholely to @insertdisc5 for creating ISAT and siffrin's design! I am just here to attempt to make cool fanart (and get more people to play isat.. my devious plans are going great so far :3) As always, this isn't a tutorial- it is just a log about how i go about approaching a sculpture and I hope this collection of resources can help others make their own sifs!!
PSA: this has some spoilers for endgame CGs/sprites on my references image board ( also might see it in the backgrounds of my process pics). And bc this is needle felting, you will see some sharp needles! beware!
my inspiration was the intro cutscene where Sif eats the star, so my main goal was to adhere to the style of ISAT as closely as possible while transfering it to 3D space. And I knew i also wanted to try making the cloak for stopmotion purposes, so my process was tailored towards having control over the fabric with wire inlaid within the cloak (more on that later).
I ended up not sticking eyebrows on top of siffrin's bangs lol but anyways, first order of business is Gather Reference! v important. pureref is free and an awesome program. I also do some sketches to visualize the pose and important details i wanted to include in the sculpt.
behold the isat wiki gallery page! tawnysoup wrote an awesome ISAT style guide that absolutely rings true in 3d space too!! adrienne made a sif hair guide here!! (sorry i couldnt find the original link, but it's on the wiki). It says ref komaeda hair so that's what i looked at, along with other adjacent hairstyles! I also like doing drawovers on in progress photos to previs shapes n stuff to get a better idea of the end result.
Also if you're like me and struggle with translating stuff into 3D space, take a look at how people make 3d models and figurines! sketchfab is also a great resource! I looked at the link botw model by Christoph Schoch here for hair ref. (I used Maya, but there's a blender version too ! you can pose characters too if your model has been rigged!)


Face:
Started off blocking out the main shapes of eyelids and iris, and then filling in the colour details in the iris and the star highlights before moving onto adding thin black outlines and eyelashes. I didn't take many in-progress photos cause i kept ripping stuff out to redo them many many times, sorry!! This eye took about 3 hrs bc i just wasn't happy with it!! Sometimes it do be the vibe to give up, go to bed and see how it looks in the morning (more often than naught, it looks fine and it was the "dont trust yourself after 9pm" speaking)

The Mouth:
Couldn't decide if i even wanted to add a mouth as per usual with all my humanoid sculptures.. but i did some drawover tests first to see what expression i liked and to try to visualize it from multiple angles. (I was also testing the placement of stars on the hat brim here)

And then I redid the mouth like 3 times cause the angle just wasn't right (this went on for about the course of a week yay!)
Hair: woe baldfrin be upon ye


I made the hair strands individually first, and then since Sif has some of the hair at the back dyed black, i covered some of the tips with black wool (manually) (I think it would go much faster if i just took a marker to it, but hahaha i love pain and detailing!! )
And then the rest of it was positioning strands with sewing pins layer by layer, always looking at it from different multiple angles- sometimes tailoring the angle or swoop of individual hair flippies. At one point I thought the back looked too cluttered, but the hat covers a lot of it anyways!! yay for hiding mistakes! (imo this is a similar process to how cosplayers style wigs, but on a smaller scale and the same level of time consuming)
As always, look to your reference for guides, and I always do a whole bunch of drawovers over in progress photos to ascertain what was working and what wasn't.
Hat:
A trick to get a super pointy tip, make another tip seperately while keeping the connection point unfelted, and then combine the two to make super pointy hat!! (this also helps if you made the hat too short and need it to be taller. ask me how i know)

The embroidery on the hat brim was done in a hoop and then invisible stitched to the felted top portion. Technically you don't need a hoop but it helps keep the fabric tension, so you avoid puckers in your embroidery. You can also use iron-on stabilizer if your fabric is loose weave or particularly thin. this is the tutorial i used for the stars embroidery! particularly the fly stitch one, french knots, and the criss-cross stitches. highly recommend needlenthread for embroidery stitches and techniques! i learned all my embroidery from this single site alone.

For fabric, I think I used a polycotton i had in my stash,, unsure of the actual fiber content bc i bought it a long time ago. I used DMC Satin floss which was nice and subtle shiny but frayed a lot so it was kind of a pain to stitch with... but keep a short thread length and perservere through it!! After the embroidery was done, I folded up the raw edges and invisible sewed it to the top portion of the hat.
General shape:
Ok general structure of the body is this: wire armature body covered with black wool -> cloak lining & wire cage -> edge of lining is invisibly sewn to the main cloak at the hem -> head

Don't be afraid to mess around with the pattern, it's essentially a pizza with a slice taken out of it to form a steep cone shape!! Use draft paper before cutting into felt to save material! (i think i made like 3 cloaks before i was happy with the shape lol).
You can also hide the seam of the cloak and collars by gently messing up the fibers of the felt with your fingers or a felting needle btw! you can also sandpaper the seams according to Sarah Spaceman in this vid (highly recommend them for their in depth cosplay/crafting builds holy smokes), though since sif cloak is at such a smol scale, I just blended the seam with my felting needle.
For the lining wire cage section, I sewed in wire around the cloak, so the main rotation point is at the top neck area under the collar. These paddles are used to keep whatever pose I need the cloak to be in for stopmotion purposes. Then after the wire is done, I invisibly sewed the lining to the cloak at the hem (same technique as the hat brim to the lining there).
In hindsight, I should've used a thinner fabric for the lining, but i only had sheer white in my stash so had to go with double felt, thus resulting in a really bulky lining but oh well!

Heels:
started with the general boot shape, then tacking on the diamond shape heel stack and also diamond shape sole bc we're committed to the bit here. I skewer the boot onto the armature which also conveniently hides the connection point into the base to keep the whole thing upright and also I can rotate the boot to tweak the angle if needed.

Pins:
I kinda just trial and error'd jewellery wire with pliers into the pin shapes. They're itty bitty!! had a whole bunch of fails before i got two nice ones. A hot tip is to use needle nose pliers and wrap the wire around the tip to get a smooth circle shape!

Base:
I smoothed out the edge of a circular wood base with a dremel, and then used wood stainer to get the black colour. It ended up kinda looking like I took a sharpie to it, but whatever.... now i have a whole ass can of black wood stainer........ I then made a rough mountain of black wool and stuck the feet armature in. And now he's standing!!

Normally at this point when I'm done felting everything, to get a smooth finish, I'd take a small pair of scissors and carefully snip away any flyaway fibers, but this time, I just left them fluffy cause i think that's what sif would do :3c
Photoshoot:
Normally I do shoots using daylight but it was winter so the sun was nonexistent. So I broke out the home lighting setup aka dollarstore posterboard for a nice smooth background, and then hit it with the overhead Fill, side Fill 2, and Rim light, and use white paper/posterboard for bounce light if one side feels too dark. But if things are overexposed, you can move the light sources away until the harshness dims down. I'm using a Olympus mirrorless camera (handed down to me by my sibling so i dont remember the model exactly), which can connect to my phone as a remote so I can avoid shaking the camera when i take photos. Pretty nifty for stopmotion purposes! (yes my camera stand is a stack of notebooks, a tissuebox and some eva foam under the lens, don't judge me)


Stopmotion animation:
I'm still figuring stopmo out on my part, but my process was straight ahead animation ... move the cloak a cm, take a pic.... move another cm, click.... and repeat until i get a version I was happy with. My ref was the cloak animation from Gris (beautiful game btw). The 2d star animation was also done straight ahead using procreate, exported in png with a transparent background, and finally stitched together with the stopmotion footage in photoshop.

My turnarounds are also stopmotion! also secret hack, the turntable is a fidget spinner sticky tacked to a cake platter.
And i think that's all! i mainly wanted to share how I go about thinking about taking a 2d concept and moving it to 3D. I also didn't go in depth into how to actually do the needle felting bc I don't think I''d be very helpful I'm a very good teacher by telling yall to just keep stabbing until it looks right (i'm self taught for this hobby),,, if anyone wants it though, i can share a bunch of tutorials and other felters' process that helped me learn more needle felting!
Hopefully this was helpful to someone! Feel free to send asks if ya got any questions or if anything needs clarification! Or show me your works! I love seeing other people's crafts :3
here have a cookie for making it this far 🥐
#in stars and time#siffrin#isat#isat siffrin#isat fanart#needle felt#soft sculpture#know that i am devouring all the nice words yall leave in the tags/comments of my posts :holding back tears:#I hesitate to call this a tutorial bc this is just how i fumble my way through crafting anything lmao#the only reason I know how long I worked on a project are timestamps on wip photos and however long the day's video essay or letsplay is#sorry time is immaterial when i get into crafting mode#reason why this log is so late is bc after i finish a project i'm perpetually hit with the ray of 'i dont ever want to look at this again'#hence why photos never get edited#AND THIS POST SAT IN MY DRAFTS FOR 2 MONTHS DUE TO BLOODBORNE BRAINROT SORRY#done is better than perfect!!!#sorry i dont control the braincell#sorry for using a million exclaimation points! i am not good at this.. conveying my anxiety in written form!!! my toxic trait
1K notes
·
View notes
Text
𝘥𝘰𝘭𝘭𝘪𝘯𝘨 𝘱𝘢𝘱𝘢 𝘶𝘱!

itoshi sae
when papa sae denied little natsuki—saying that she's too young for skincare—only makes her pout as she runs out of the bathroom.
"natsuki?" he halted when he saw his princess infront of your mirror, your beauty products scattered, even on the floor and when natsuki turns around, her papa's eyes go wide.
if not papa's skincare, then there's ma's makeup that would make her prettier than she already is.
"'m pretty now!" she says, holding up your lipstick, "papa i wanna make you look pretty too!"
"natsuki, come here," he says as he pulls a damp tissue, crouching down to her level as he starts wiping the makeup off of her face, completely unaware of what's going on in her mischievous little mind.
she smears the lipstick that she held on his cheek, "natsu—!"
"papa blushy blushy!" she giggles, "i wanna do more!"
he sighs. how can he say no to his princess? he really can't.
"what's..." they both froze, "...what's going on?"
little natsuki let's out a sheepish giggle while sae exhales, explaining everything.
you couldn't hold back your laugher, "you look good, sae," more laugher as your stomach start to hurt, making him glare at you.
"natsuki, you don't need makeup," you say as you hold your princess in your arms, "you're already so pretty," you look at sae, "but maybe we can help you if you wanna do skincare with papa so bad."
her eyes brightened, "yay!" she squealed.
later that day, sae ordered the best 3-4 step skincare that's child friendly.
itoshi rin
sakura rushed to her papa who was sitting on the couch who was scrolling through his phone, "papa," she calls.
he raises his eyebrow, seeing her hide something behind her back, "what is it, sakura?"
she giggles, giving him a smile(she doesn't even have all teeth yet she looks so adorable T_T), she reveals an eyeliner.
"sakura," he calls sternly, "what did ma tell you about touching her purse?"
she pouts, "jus wanna make papa pretty," she looks up at him with her pretty doe eyes, "pleaseeeee?" oh and who was rin to say no to her?
"there there..." sakura focuses, her tongue sticking out as she applies the eyeliner crookedly, "aaaaand there! all done! all pretty!" she shows him a little hand mirror, making him huff.
"papa do mine too! wanna look pretty too!"
rin clicks his tongue, telling his princess that she's already pretty. beautiful even, while applying eyeliner carefully.
click! click! click!
both rin and sakura look at the doorway where you stood, taking pictures of him.
"delete."
"no!"
rin had to pin you down after chasing you and even so, he didn't delete those pictures.
isagi yoichi
"papa hold still," yuki scolded, making you chuckle as her papa sheepishly says 'sorry princess.'
he waited patiently as yuki applies obnoxious amount of blush on his face while you record the whole process.
for a final touch, she picks up the brown eyeliner, tapping so many spots on his nose as cheeks as freckles.
"done!" she cheered.
then it was yoichi's time to put makeup on her, and sadly, he was very poor at it but you were there to guide and even if he messes up, yuki wouldn't mind one bit.
"there you go," yoichi leans back to look at her, "my princess."
"ok, one...two...three!" you click the picture of both of them smiling ear to ear and yoichi didn't mind you posting it on your socials.
#FrecklesAndFun
liked by bachirathecoolestxx and others...
kuronaaaaaaa: isagi isagi pretty pretty
hiori_yo_official: tutorial when?
bachirathecoolestxx: wowwwww 😍😍🔥🔥😝😝😝😻😻👍👍🤞🤞💥💥
michael kaiser
little anne was legit crying because her ma said that she couldn't get a red liner tattoo like her papa so obviously, her papa had to improvise somehow.
michael took anne's paintbrush, dipped it in water and the red colour as he applied it under her eyes.
"there. all done," he says and anne looks into the hand mirror to she her pretty little face.
"papa."
"yes princess?"
your mischievous daughter grins, taking another paintbrush, dipping it into the paint as she cheekily painted two round circles on her papa's cheeks and one big one on his nose.
he laughs, "what are you doing, princess?"
"making you look pretty!" she concentrates, "aaand finished!"
"do i look pretty?"
"...papa," she holds his hand as she says this, "you look like a clown."
the both of them hear laugher from the hallway. they turn to see as you stood there, arms crossed at you observed them.
"your papa already looks like a clown, he doesn't need makeup for that."
taglist: @anuverse @luciddre @kongkhoi @illyria2004 @passw-0-rd @x3nafix [open]
#bllk#bllk x reader#bllk x y/n#bllk x you#blue lock#bluelock x reader#bluelock x you#blue lock x reader#bluelock x y/n#bluelock#blue lock x y/n#blue lock x you#sae x reader#rin x reader#isagi x reader#kaiser x reader#sae x you#sae x y/n#rin x you#rin x y/n#isagi x you#isagi x y/n#kaiser x you#kaiser x y/n#itoshi sae#itoshi rin#isagi yoichi#michael kaiser#vmlnrzmp4#jiyaverse:bllk papas
401 notes
·
View notes
Text

i told my friend i would find him some beginner’s giffing tutorials, but all the one’s i could find were either years out of date, used a method that made me go “huh”, or incorporated ready-made actions. all perfectly fine, but if i’m sending someone a tutorial i’d rather it be one for a method i understand enough to help with.
so, here is a beginner’s guide to giffing, as told by cleo, a neurotic, detailed, and organization happy individual. there will be many pictures.
this tutorial will strictly cover the gif making portion of the process, from getting your screencaps to importing in photoshop, resizing/cropping, and sharpening. i was going to briefly go over colouring, but tumblr only allows 30 images and i ran out of space, so i'll have to do a separate colouring tutorial (which also means i can go into more detail, yay).
downloading the videos, whether direct downloads or t*rrents, is also another tutorial. but make sure you’re using at least 1080p, and the bigger the file the better. a single episode of a ~45 minute show should ideally be 2gb at minimum. a full length movie should ideally be at least 5gb. imo 2160p/4k files are not really necessary; the quality increase is negligible, and it takes a lot longer to screencap them. if you do use 2160p/4k files, try and make sure it is not HDR, as those videos are often washed out and require a different screencapping program to fix.
Programs
I am using a cracked version photoshop 2022, but whichever version you use should be pretty much the same
Actions. not a program but a function inside photoshop, where you essentially record a series of steps, and then you can simple play that action when needed and those steps will repeat, which saves considerable time when giffing. I will note which parts of the tutorial are best saved as actions, and explain how to create actions at the end.
For screencapping i use kmplayer it’s free and very simple to use
not at all a necessary program, but i use freecommander instead of the regular windows file explorer as i find the dual panels very helpful when moving the frames around
Screencapping
there are many programs you can use to get the screencaps from a video, a lot are basically the same, some are better suited for particular video file types. kmplayer is a very simple program to use, but afaik the capture function only works on mkv. files (the only other file type i’ve tried is mp4, which plays but does not capture)
once you open your video file in kmplayer, we’re going to open the advanced capture window, found under capture→advanced capture, or alt+v
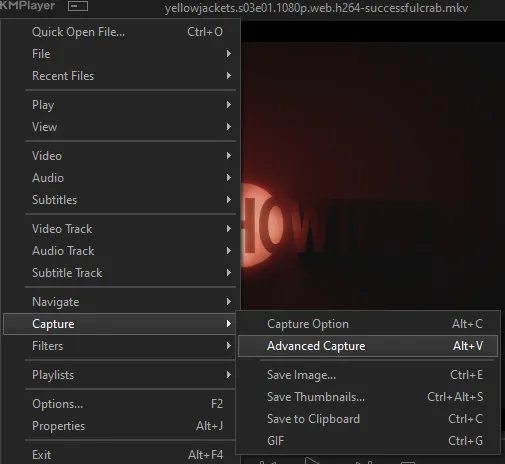
the window should look like this
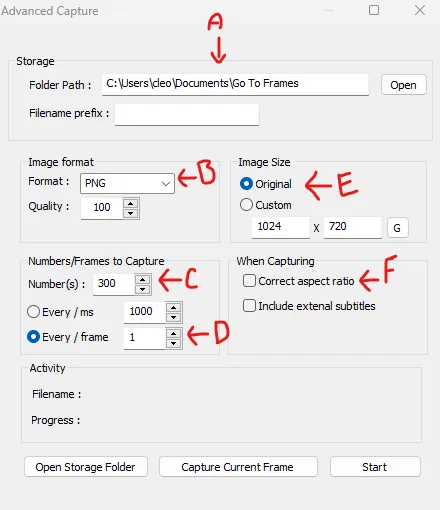
A-this is where all your screencaps will save to. i recommend making a specific folder for all your screencaps
B-make sure this is set to png for best quality
C-this is the number of screencaps you want to take, guesstimate how many you will need, keeping in mind that most videos are approx. 25 frames per second, and you should always cap a bit more than you think just in case
D-make sure “every/frame” is selected and set to 1
E-make sure “original” is selected, resizing will be done in photoshop
F-make sure “correct aspect ratio” is unselected
go to the part of the video you want to gif, and pause it just slightly before that part starts, then select ‘start’. the screencaps will start to save to the file, no need to play the video, and will automatically stop once it has capped the number of frames you have chosen
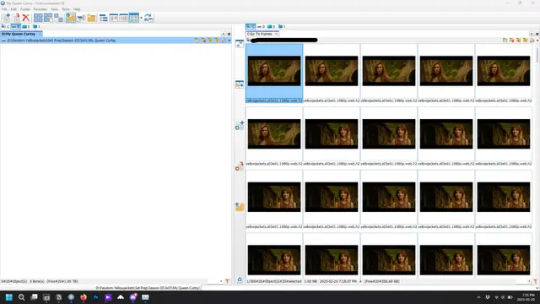
and here is how they look inside freecommander. i have already made a folder for this gifset, which is on the left. now you’re going to make a folder for each individual gif. i’ve decided this one will have four gifs, so create four folders (i just label them gif 01, gif 02, etc) and then move the frames for each gif into their respective folder
while you can always delete frames once the gif is made if it’s too big, i prefer to make sure i have the correct number of frames before i start. the gif limit on tumblr is 10mb, so it’s good to look at the scene/shots you’re giffing and decide approx. what dimensions your gif will be. full size gifs have a width of 540px and your choice of height. if you go for a square gif (540x540) you can usually fit 40-50 frames. if you’re planning for a smaller height (such as 540x400) you can usually fit more around 50-60 frames.
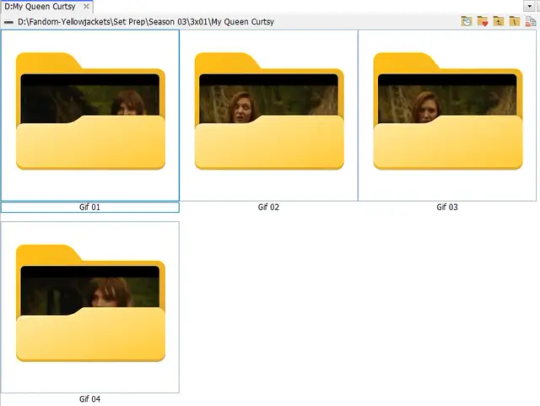
and here are the caps inside the folders. another reason i like freecommander is it’s ability to “multi-rename” files. the default file explorer can do so as well, but you have to do each folder individually and you can’t customize the new names as much. either way, i prefer to rename the files to each gif just to scratch my organization itch.
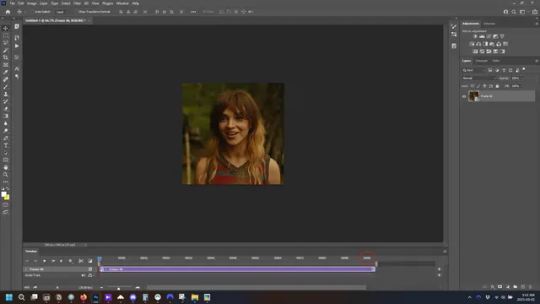
Introduction to Photoshop
NOTE: i have changed many of my keyboard shortcuts in photoshop to ones i prefer, so any you see listed in the menus of these screenshots are likely not the original shortcuts. you can see and change them yourself under edit→keyboard shortcuts

quick run-down of the photoshop interface. i have adjusted placement of some things from the default so this isn’t exactly how your photoshop will look when you open it, but everything is labelled, either on top or by hovering over the element. once you’re more familiar and have your process down i would recommend adjusting the workspace to suit your process.
A-your main tools and colour selector. almost all the tools have either several tools in one, or have alternate options which can be accessed by right-clicking the tool. you can also hover over each tool to get a pop-up with a quick explanation of the tool
B-additional “windows” such as history, properties, actions etc. can be opened from the window menu at the top and moved around with click-and-drag. history and properties should already be there by default, but probably on the right hand side instead. each window opens and closes with a click
C-the timeline window where the gif is made. the white square is a single frame of a gif, and on the row below is the play controls. this will not be there by default and will need to be opened from the window menu
D-adjustment layers for colouring
E-layers box. this is where the screencaps will show, along with adjustment layers, text layers, etc.
Opening Screencaps in Photoshop
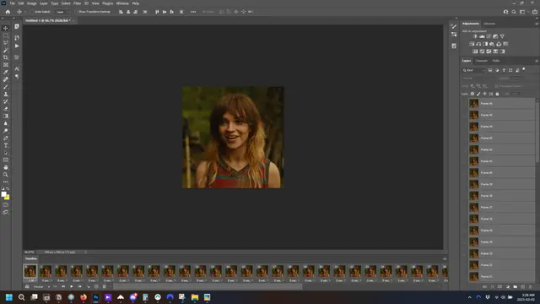
go to file → open navigate to the folder for your first gif, select the first screencap, and check the image sequencing, and click open

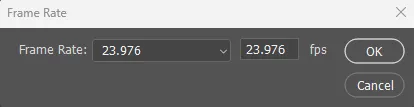
a window will open labelled frame rate. set it to 23.976 and select ok
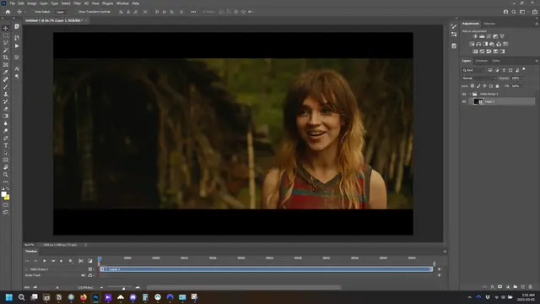
the screencaps will open in the timeline view, seen as the blue panel line at the bottom, and the screencaps are combined into video layer in the layer panel on the right.
Creating Frames
technically, you could go right into your cropping/resizing and sharpening from here, however if you do that directly then you have to keep the screencaps in the folders you have, otherwise if you save and re-open the gif it won’t move.
this next part should be made into an action.
at the top right of the timeline window, click four vertical lines to open the menu and select convert frames → flatten frames into clips. depending on how long the gif is, this can take a minute.

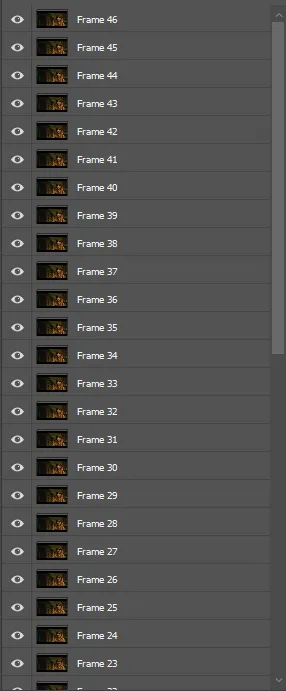
the layers panel should now look like this, each frame of the gif is now its own layer.
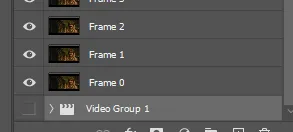
the very bottom layer will be the video group. this can be deleted as we’ve made the frames from it
in same timeline menu as before, right under “flatten frames into clips”, select “convert to frame animation” and the screen should now look like this. this will be the end of this action.
Cropping and Resizing
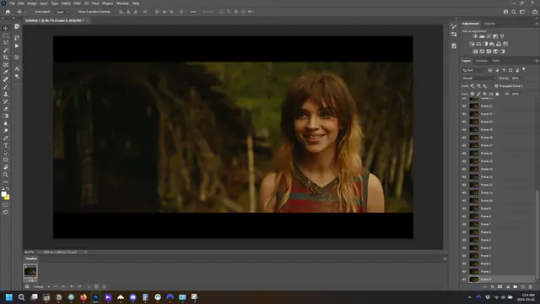
with widescreen footage, sometimes it’s just shorter than 1080p, but most of the time it will have the black bars on the top and bottom, and frustratingly, they’re not always the same size. it’s good to save the most common sizes as actions.
to find the size of the actual screen you turn on the rulers under view→rulers and check the height. then open your canvas size dialogue box under image→canvas size and change the height, making sure pixels are selected in the dropdown. yellowjackets is what i call “xtra wide” which is 800px. “normal” widescreen is 960px.
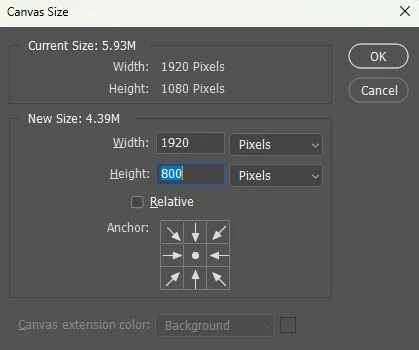
next we’re going to resize the caps. i also make actions for this, one for each potential gif size. open the image size dialogue box under image→image size and change the height of the image to your desired height plus 4 pixels. these extra pixels are to prevent a line at the top and/or bottom of your completed gif. now re-open the canvas size box, change the width to 540px, and the height to the desired, removing those 4 extra pixels. i have set this one to 540x540. this is where you would end the resizing action.
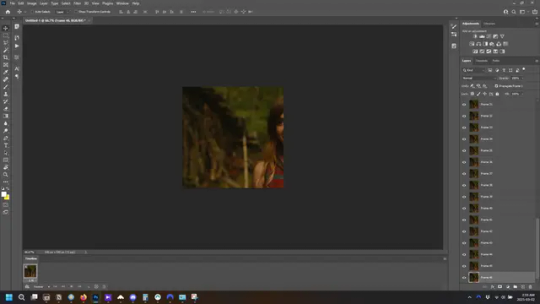
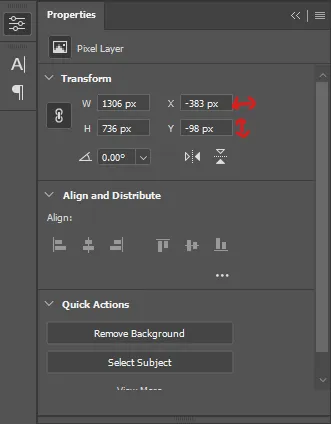
and as you can see she is off-screen. select the top layer, hold down shift and select the bottom layer to select them all, and with the move tool (the very top one) activated, click and drag to move it left to right as needed to centre the figure/s. as you move it a box will appear telling you how far you are moving it in any direction. make sure you are only moving it left or right, not up or down. to be certain of that, open the properties tab.
the y axis is your up/down, x is left/right. for this gif the y needs to stay at -98. you can also manually change the x axis number instead of dragging the image. also helpful for making sure multiple gifs of the same shot are all positioned the same.
the layer are currently ordered with the 1st at the top and the last at the bottom. with all layers still selected, go to layers→arrange→reverse. the last layer will be on top now. if there is movement in your gif, check if you need to alter the position again to make sure the movement properly centred. but once you are satisfied with the position, the layers should be in “reverse” position, of last layer on top. this is to ensure that the gif plays forwards.
Converting Gif
this should also be made into an action, going through sharpening process
in the timeline menu, select “make frames from layers”
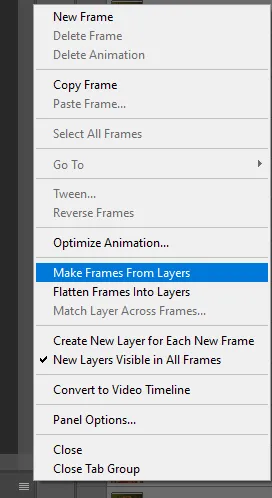
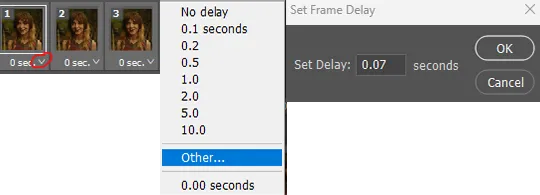
the frames are now populated in animation window. in timeline, click select all frames. go to any of the frames on the bottom and click the little arrow beneath it, select other, and enter 0.07 seconds. this is not a necessary step, as we will have to adjust the frame rate at the end, most likely to 0.05, but if we don’t change the frame rate here, then when we play the gif while working on it to check how it looks, it will play very fast.
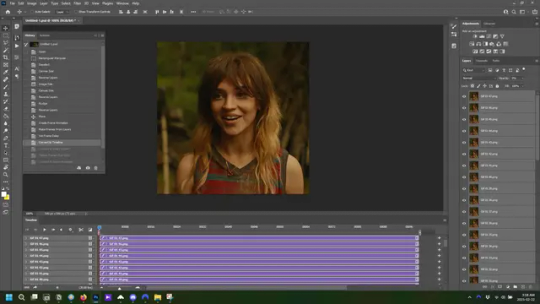
in the same menu at the right of the timeline box, select “convert to video timeline”
then, making sure all layers in the panel on the right are selected, go to filter→convert for smart filters. this turns all the layers into a single smart object.
but if you look where i’ve circled, it says the gif is 99 frames long*, when in fact there are only 47. if you are making regular “scene” gifs, basic colouring and maybe a caption, this is fine and does not need to be fixed, it will play at the same speed. if you want to change it to display (approx.**) the correct number of frames, go to the timeline menu on the right, select “set timeline frame rate” and change it from 30 to 15
*if it does not list a frame number by 4 digits but instead says 5f, 10f, 15f, etc. go to the timeline menu on the right, select panel options, and change timeline units to “frame number”
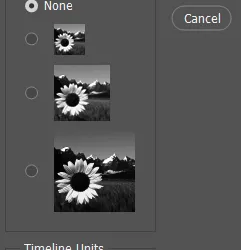
**the reason why this is only approximate is because the actual frame rate is not a a whole number, so when changing the frame rate it isn’t a 1:1, and 47 frames becomes 50 frames. the extra frames are removed at the very end, but if you are not doing any edits that require working frame by frame, there’s no need to change the frame rate here at all
Sharpening
this is, as it sounds, making the gif look sharper. to start go to filter→sharpen→smart sharpen and this window opens. play around with the dials to see what each ones does. the below settings are good for most high quality footage.
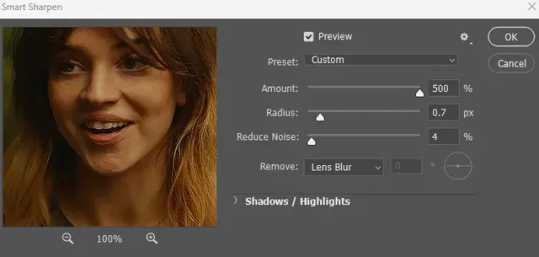
Amount-basically, how sharp do you want it
Radius-hard to explain, but this essentially sets how deep the lines of the sharpness are
Reduce Noise-smooths the pixels
once you click okay your single layer should look like this.
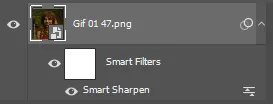
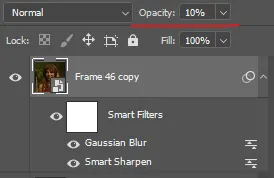
you’re going to then right click the layer and select duplicate layer. with the top layer selected, go to filters→blur→gaussian blur and set the radius to 1.0 pixels.
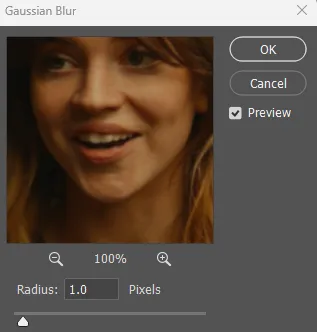
then change the opacity of the top layer to 10%. this is to essentially soften the sharpening a bit, as if it’s too sharp it can make the colouring wonky. this opacity level can also be changed depending on need.
finally, select both layers, right click, and click “group from layers”. your gif is now fully made and sharpened.
Colouring
yeah. ran out of image space. but this is where you would do your colouring and add a caption or any other text.
Converting & Exporting
when all your colouring is done, you’re ready to start saving your gif. you can do it directly from your current file, but that means essentially losing your colouring, as all those layers will be merged together. i am someone who likes to save my psd’s (photoshop files), at least until i’ve posted the gifs, in case i need to fix something in the colouring. if you’d like to keep yours as well, open the history tab and select the first icon at the bottom “create new document from current state”. this will open a copy of the file in a new tab. save the original file and you can close it, continuing all work on the copy file.

select your all your layers, convert them into a smart object from filter->convert for smart filters, then follow the same steps from Creating Frames above. once you're back in frame animation, select Create Frames From Layers, and once again set the frame animation speed.
most people set the speed to 0.05. i personally set it to 0.05 or 0.06 depending on the length of the gif. check how it looks at 0.05, if it seems too fast, try 0.06.
now to save. go to file->export->save for web (legacy). the number is the lower left corner is your gif size, it needs to be under 10mb or else you'll have to delete some frames.

the right panel is your save options. the preset dropdown has some built-in settings, but you won't use them because (at least on my version) the presets only go up to 128 colours, instead of the full 256. the 3 i've highlighted in green are the only one's you'll adjust as needed. the settings below i use for i'd say 90% of my gifs. i'll sometimes change the adaptive dropdown to one of the other options, ocaissionaly the diffusion, and rarely the no transparency dither, but play around with them and see how they change the look of the gif.

when you're satisfied with the look of your gif, click save at the bottom right of the window.
voilà! you now have a gif.
Actions
this is your actions panel. the triangle on the left side is the button to open it. remember, if it's not already there, go to windows->actions to open it.
the buttons on the bottom, left to right, are stop recording, record action, play action, new folder, new action, and delete.

as you can see, i have different folders for my resizing, sharpening, captions, saving, and my 1 step (temporary) actions. to run an action is very simple; click the action, and click play.
to create an action, click the new action button, a box will pop up, give the action a name, and click record. the record button at the bottom of the action window will turn red. now perform all the steps you want it to record, and click stop recording. keep in mind it will record every single thing you do, including in other open files, so if the action you plan to record will have a lot of steps, it might help to write them down first.
to modify an action, select the step in the action above where you'd like the new step to be, hit record, perform the step, stop recording. select the step you'd like to delete, and click the delete button.
steps within the actions can be clicked and dragged, both within that action and moved to other actions. actions can also be moved between folders.
271 notes
·
View notes
Note
I love the way you do shading and coloring! Could you do a tutorial on it sometime? I love your art :0)
I’ll do you one better, here’s my poorly explained art ritual right now! (Gave me another excuse to draw King Candy, thank you for that.)


I mainly just fumble around and hope for the best. Usually I pull colours from references, but I just eyeballed it for this. Choosing the shading is pretty straightforward, move the hue and the darkness around and experiment. Like dark pink for the red bow tie, orange for the yellows, ect. Then use the smudge tool and pray. I used pink on a multiply layer for Candy’s stupid rosy cheeks. Last I make a new layer above the line art one—and using a similar technique as the shading—I choose a darker colour for the outline but only colour in some of it, leaving some of the line art’s original colour. Mainly due to laziness, but it looks good so yay!!! I have no idea I this was helpful or not, but if it wasn’t at least you get the royal fruitcake and his pea.
#Poorly made tutorial#THANJ YOU BTW👨❤️💋👨👨❤️💋👨👨❤️💋👨#giggling and twirling my hair#art#fanart#king candy#wir king candy#wreck it ralph#wir fanart#sour bill#I want to spin sour bill on my finger like a basketball
96 notes
·
View notes
Text
My version of the wardrobe template! yay!! I had a LOT of fun doing this and feel like I could elaborate a bit more on each of those.
It's already linked up here, but here's once again a > link to the post.< Anyway! More about these designs below!
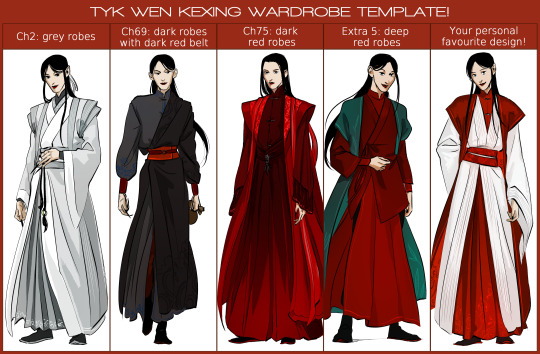
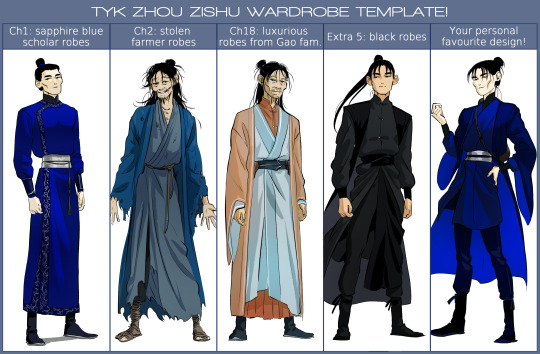
So first, for WKX's template! - Chapter 2: Grey robes I had already made my design of those for the full TYK lineup I made a while back. I really, really like those, and took inspiration from some of the robes SHL!WKX wears in the show for the shapes. - Chapter 69: dark robes with dark red belt I expected to like that style for him, but not that much! I had seen a tutorial on how asymetrical hanfus were worn by archers in the past and that inspired me, purely on a fashion level of course. I like how intimidating he looks with those and enjoy the touches of blue in the inner layer of the robes. - Chapter 75: dark red robes The GVM robes! which I also designed a while back when researching for the illustrations of the Mt Fengya battle scenes that I wanted to make. I reworked them just a little bit and got rid of some details that I didn't like anymore. I tremendously pleated skirts for WKX so I went at it once again. I also used shifts in hues to make it look like it could have been drenched in blood. - Extra 5: deep red robes For the reminder (since apparently some people are not aware of extra 5's existance), this extra is set 5 years post-canon. I wanted WKX to wear something that looked comfortable for traveling but also practical and fashionable. The teal jacket is of course another nod at SHL since the red and teal combo was an absolute banger. Let's say I didn't want WKX to just sport an all-red look. Furthermore, the teal really works to adorn the red hues. - My personal favourite I actually don't really know whether those are my actual personal favourites, but I've come to LOVE WKX dressed in red and white thanks to @kwehxing's designs. I think it really suits him and on top of that it avoids the question "is this Hua Cheng" LMAO--okay jokes aside, I combined most of the shapes that I really like for WKX (wider shoulders, wide sleeves, and long robes with pleated inner robes) and I find him very elegant like this. Now, for ZZS! - Chapter 1: sapphire blue scholar robes Those had already been designed before as well! They're my go to generic TC!ZZS robes, haha. I was a bit extra with the blue colour here, but oh well. I'm quite obsessed with the silver brocade cynching his waist, haha. - Chapter 2: stolen farmer robes A classic as well as far as I'm concerned--of course, inspired by his hobo fit in SHL because it was quite efficient. I'm forever fond of my scruffy hobo!Xu and his toes poking from his sandals. - Chapter 18: luxurious robes from the Gao family Those were a new design! Which I had a lot of fun coming up with. Putting ZZS in a different colour scheme was also really nice. For those who don't remember, ZZS feels quite ridiculous when he sees himself in a mirror wearing those fancy robes while being so emaciated and still sporting his hobo mask. I wanted to give this "out of place" feeling; and also work on a very "wuxia" style for the robes, since this is jianghu and they were provided by Gao Chong. - Extra 5: black robes I'm incredibly fond of this design. I worked quite a bit on it, since I wasn't sure of where I wanted to go. My main guidelines were: practical and cool. I really like ZZS having a lot of room to move so ideally not too much fabric in the way, and I think he also needs arm braces to be rid of annoying sleeves. Of course, him looking much healthier and having a dynamic ponytail really works to "complete the look", and I find that he looks really cool there haha. - My personal favourite This one has been refined over the months, but it's definitely, overall, my favourite look for him in terms of shapes and construction. I like that the robes are short, I like the more fashionable jacket. I'm especially into the "pants tucked into the boots" silhouette, as well as the little ribbons keeping them tight around the ankles. I'd say that this leg shape + short robes + a bun (or sometimes a ponytail) is THE ZZS design combo for me, haha. It looks practical and fun and adventurous, just how I like it.
To conclude the whole post, I had more fun doing this than I even expected, and needless to say that I'm very excited to see other versions of them following this template. It was a good opportunity to try and project what the characters look like throughout the book, and a fun design exercise as well. I actually don't really like doing character design usually, but for characters I'm obsessed with, it's of course a much nicer experience. Anyway, thank you for reading!
414 notes
·
View notes
Text
"You kept me like a secret, but I kept you like an oath" - lyrics from 'All too well' by Taylor Swift

Yay, I went on another side quest.
I wanted to draw something that vibed with those song lyrics and I stumbled upon a tutorial for a whimsical scene with a stained glass window.
In the tutorial the procreate drawing assistant was used to create a mandala with random shapes that would become the window, and it looked really pretty. But it didn't feel right to me in the context of my own drawing, I am by no means a history expert but I want to at least maintain the accuracy I am capable of so I did some research on medieval church windows and basically created my own Althred-themed version.
I'm pretty happy with how it came out, especially with the lighting and the colours.
And the bois look so pretty.
#the last kingdom#fanart#tlk fandom#alfred of wessex#another artistic side quest#stained glass windows and Taylor Swift lyrics#and two dramatic beans#whatever happens in this church stays in that church#uhtred of bebbanburg#alfred x uhtred
69 notes
·
View notes
Note
talk about your ocs please im actually insterested in it
Hi anon!! Sorry for just seeing this, but I’ve got some stuff! Yay! (A bunch of stuff)
——

This is what Miyu looked like prior to being dollified- a lot less cutie core and stuff.
——

Caleb and Quincy aren’t too keen on each other! I thought it would be funny as their backgrounds are somewhat similar- Being around farms a lot growing up (Caleb’s church was connected to a farm and Quincy’s uncle is a farmer), both having family members in the medical field and as result both have quite a bit of medical knowledge, both having extremely sick fathers, and both being leaders in one way or another. They aren’t like Yori and Haru where they want each other DEAD .. they’re usually just awkward around each other.
— —

Kryan and Keiko were the first Dr ocs I ever made! Kyran being my first ever, being made somewhere in October of 2023, and Keiko being made a month or two later. (I’ve never actually changed their designs! The most I’ve done is change Kyrans shirt colour- and even then I bounce between black and a cream colour)
— —

This is somewhat of a concept of what the camp looks like. A mini little island surrounded by one bigger (MUCH bigger) island. In the simulation/killing games, the bridge isn’t there- in fact Kyran builds another one after chapter one so they can walk around. But when they first arrive it’s not there. Parts of the bigger island are blocked off and aren’t revealed until the chapters are over. On the main island is usual stuff- cabins, canteen hall, sports room (I don’t know if those are thing in camps but they are here), trees, etc. just average camp stuff. The trail room is actually underneath the cafeteria, using an elevator (in danganronpa fashion) to get down there. It makes the cast feel very uneasy the next morning after the trial, knowing that a few feet down a friend was brutally executed just the night before.
— —
During the simulation, Zaien was trapped in a room with no way out for quite some time, hence why they didn’t come to save the others however they could sooner. When they DID manage to escape, it took them almost a month to be able to find a way to communicate with Kenji. Which was stupid, since Kenji went absolutely bonkers. But they instead found a way to communicate with Quincy and warn him since warning Kenji didn’t really work out.
— —
Some mini facts:
Yasuyuki, Kyran, Kellise and Haru all collectively have no idea who their fathers are. Literally none.
The company Kenji is an apprentice at his own families company. They’re known for making electrical appliances. They’re very well known, like apple level well known appliances. Despite making electronic devices, his family is very traditional. He himself is very traditional as well, but that’s only because he genuinely doesn’t know any different.
When Kenji first met the others, he did research for ages to try and ‘fit in’ via YouTube tutorials. He spoke somewhat like “yo yo yo my fellow teens, how’s it hangin’!” That sort of stuff. He felt embarrassed, the others felt embarrassed for him. He also said something very controversial accidentally and has always had to watch what he said ever since.
Kyrans cat is in the killing game. She’s usually in his backpack just chilling there- though she appears occasionally. (If it was an actual game, one of the secret Easter eggs or scene or whatever they are is actually one of the entire cast pampering her as Kyran tries not to cry in the corner).
Zaien was originally gonna be Hajimes sibling or another form of Izuru Kamakura (because of his red eyes or wtv) but I quickly changed my mind after realising that there’s already a sibling connection between Mitzuki and Sonia.
——
SORRY IF THAT’S A LOT!! I have a LOT of stuff :]
#massive yap session#danganronpa#danganronpa au#danganronpa oc#ocs#fanganronpa#kenji nakamura#online art#art#sketch#artists on tumblr#dr scraps of despair#djzart#djyapz#djanzwerz
5 notes
·
View notes
Text
Fields of Mistria Log 1

I've been wanting to play this game ever since I saw so many of my friends get into it, and since it had its first update and was on winter sale... time to finally have some fun with it! 💜
I expect good things from this because the style looks adorable, I've seen many little pictures and people have been only giving praise about the characters and such too. Let's go, yippee!

Wow. Just. Already, I'm so happy. the interface is so cute. This is the first game I've ever played with so many pronoun options. I'm happy.

I look fucking cute what the hell. the farm is a mess and it's so cute. everything is so cute. this artstyle is so gorgeous and the whole vibe is amazing, I'm gonna cry! I love how the grass has little flowers in it and even just the sound effects of the watering can make me happy.
Greeting all of the characters already has me excited to speak more to all of them! In some games there's really only a select few that make me curious at first glance and I have trouble remembering who's who, but all of them are memorable and unique here and I want to immediately talk to almost all of them again.
I got completely lost in this game as soon as I had the time to properly focus on it and it's so cute. Genuinely can't decide who I like the most so far!

The way lil Henrietta hopped on the chair to sit next to us I'm gonna cry. Sidenote, the tutorials are all so clear and easy to understand, it's great!

AND YOU CAN PET THE FARM ANIMALS ON HAYDEN'S FARM TOO AAAA!!

This fucking guy I swear. When I first saw him say that I laughed my ass off. Also right now we're going with Scaramouche but I'm absolutely thrilled to see you can just change your pronouns and name whenever the fuck you want. March is hilarious to me because I want to immediately punch him in the face but he obviously likes you even if he acts like an absolute dick. Peak.
Working on the town projects is genuinely a lot of fun so far! I love Eiland and Adeline and I think the pacing of this game is really great. I genuinely love how everything is balanced so far, exploration, building and time-wise - Friday Night at the Inn is always super cute and fun and I love the Saturday Market. I've also been laughing my ass off whenever I talk to Juniper, Dozy is THE CUTEST!!!! and I just adore that you can have a daily bowl of soup at the inn. That's the kind of thing that's super useful when you start out and stays cosy comfy even as you grow and don't need it that much anymore.

OMG YAY YIPPEE! STINGRAY!
This is another thing I really like! All of the plants and flowers and forageables are really lovely? The icons are so cute and I just love all of the stuff you can grab. Like yes, I want to fish up stingrays, pick dandelions and tulips, dive for sea grapes and sea lettuce, and catch A FUCKING TRANS COLOURED FLOWER CROWN BEETLE!

They make the most basic little things so sweet and then come up with such unique lil critters and items too! And oooh, I cant wait to be able to cook more.

Strawberry shortcake from the siblings!! 💜💜💜

What a view! The whole town clean-up scene was honestly so sweet. Everyone coming together was so cute, and this felt so rewarding! Now I can pick lemons and enjoy the view. What a treat!
Spring is already over. I got a little black calf and am saving towards a coop now! Once my farm actually looks like something I'll show pictures lol. Either way, I'm loving this game so far! I can tell I'm going to pour tons of hours into this for real.
It's absolutely incredible that this is only in early access and there is so much more to come. I can't remember the last time I bought a game in EA and had so much fun with it, wow! I heard there's limitations on heart events and that they're planning to add much more to the game before its full release, but this already feels very "full" I dare say.
I think the last time I was this excited about a farming sim was back when stardew valley was released, and I played that since the day it was out. SDV will always have a special place in my heart (I say with almost 800 play hours) and I'll play it forever, but this feels like it might even surpass that for me. I'm super stoked!
4 notes
·
View notes
Text
Day 1 of the Jolly Holly QAL!
Jolly Holly QAL This is the opening tutorial for the Jolly Holly Quilt Along. Yay! We’re starting preparing the crumb quilted piece we’ll need for the tree block. The crumb-quilted piece should be in whatever color you fancy. I went for the classic green, but the other colours are just as cool. So let’s figure out how to do some crumb quilting! The initial section of this tutorial will guide…
2 notes
·
View notes
Text
Thing grows! (and now i ramble about it!)
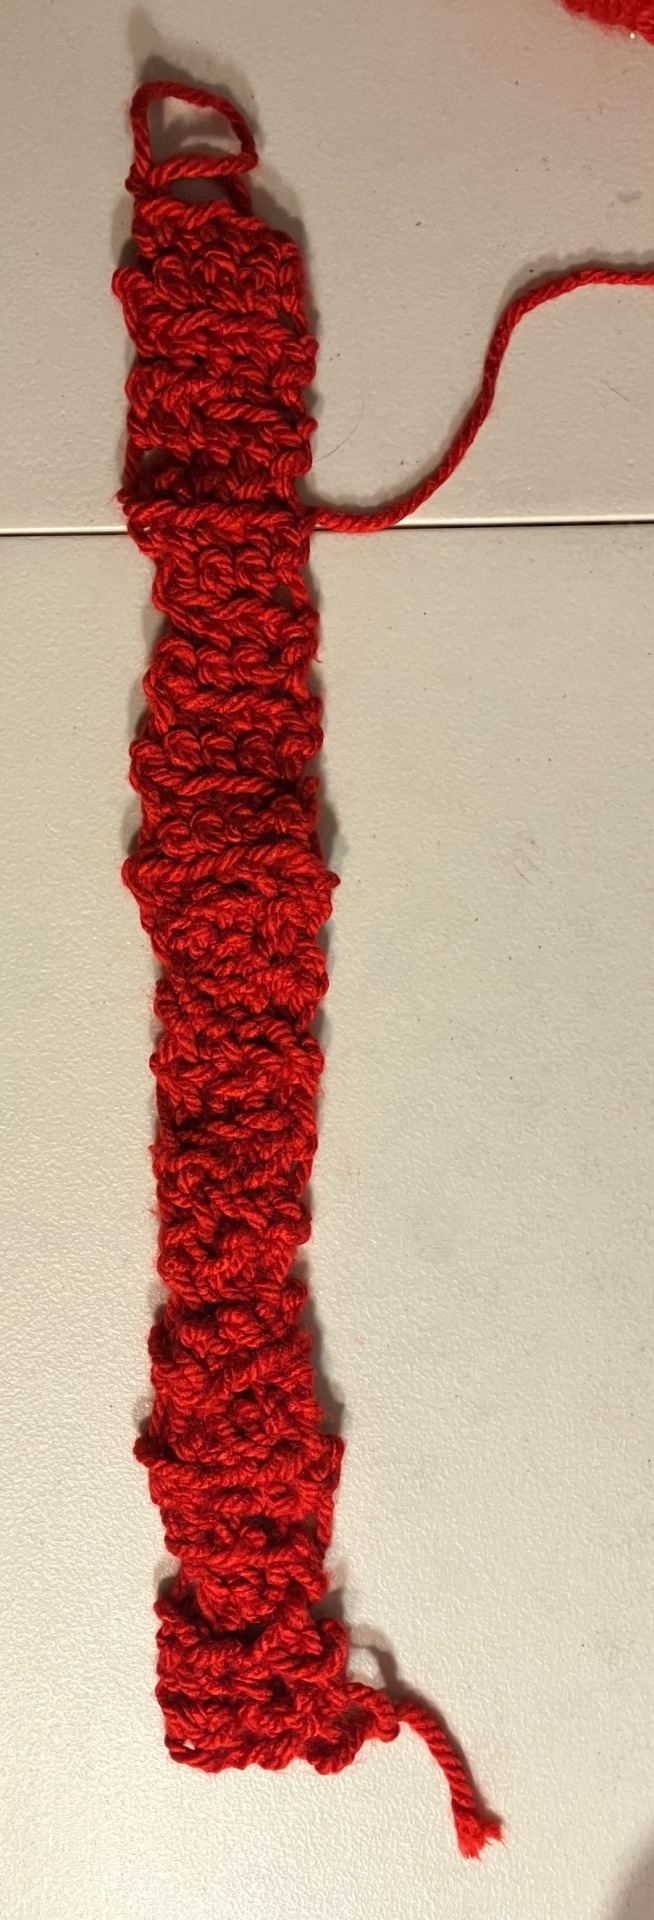
Thing!!! (yes scrolling down the entirety of Thing is completely necessary even if I had the power to change the formatting.) (also excuse the hideous looking surface of my desk, i keep having to find longer places to lay out Thing!)
Yes I am very excited!!! Crochet is fun!!!
Actually having a crochet hook also really helps. Once I sort of got the hang of using it, everything got both easier and neater! When i wasnt nearly dropping the slippery yarn, Thing, hook combo.
Making some discoveries: apparently there is meant to be a chain stitch before you turn the corner for the next row, did not know that until several rows ago.
I did know that the first stitch is meant to be skipped, but still working out which one that is.
Somehow Thing shrunk narrower at some point but i fixed it by using one of the random end loops as a Loopy Loop. Or at least it is now about what i reckon it should be?
Thing is growing fast, but then it is chunky yarn and only 5(?) stitches wide. (started as 5 chains if i remember correctly? might have somehow turned into 4 at some point? i believe its 5 now?)
Next mystery to tackle is whether im meant to be turning the whole thing over at the end of each row because or else everything is kinda backwards? Or im doing something weird?
Behold and be entertained by my insanity!!! As i learn to crochet, while making commentary about it!
Going to try to watch some tutorials more in depth tomorrow when I can hopefully pay attention for more than two seconds.
I have deemed Thing experimental so im having a good time just going along and making Thing.
So im chill instead of horrified by all the mistakes and ??? stuff im doing. Probably with more that i dont even realise at this point!! But its still growing so I am succeeding somewhere and I am Learning stuff!!

Crochet hooks other than my fingers!! 4mm and 10mm because its Big Enough For Thing!! And they are both purple!
Decided to get ones with more chunky handles instead of thin metal ones, because they were definitely better to hold and thats pretty important with my dodgy hypermobile joints or else Ow.
Still think i might need to modify them a bit, maybe by wrapping them in something. Because theyre still not 100% there. And/or with some more splinting and/or taping up my fingers and thumb. Need to look into it more. Hmm.
I was also very tempted by pretty yarn in the shop. So soft, and colours!! But that is for Later!
But I am having fun and making Thing!! Yay for yarn witchcraft!!
(also does anyone wish to be tagged for the very random Journey of Thing?)
8 notes
·
View notes
Note
Hiiii! I love your makeup sm, can we pls get a tutorial 💕
hihihi tysm sm anon !!!! i’m writing this on the bus so sorry if i’m rumbling and sound rushed 😭😭 (it ended being a lot of writing so i put a more thingy if you really want to read it LMFAO)
so before i even do my makeup i always do my skincare which is just double cleansing, witch hazel and moisturiser :) whenever i do this my base always ends up smooth (i have a lot of acne scars which always makes my makeup look cakey 😭)
i do my eyebrows first with pomade & powder, tbh brands don’t really matter in my defence cus literally all of my makeup is shein glam and shit i stole 😭😭😭😭😭.
i feel like eyebrows are what pulls together your makeup besides lashes so research what style of brows suit you!! i then carve them out bc i luv instagram 2016 brows theyre my baeeeeee, you can use whatever brand you want but because i have heavy yellow undertones i just used a colour corrector palette and make my own shade lol if anyone relates to me buy this lol. when carving under your brows use a concealer shade and for the top use ur foundation shade :) then after blend it so it looks more seamless and you barely have to use a lot of foundation on ur forehead
BASE ROUTINE IS SO CRUCIAL ILL TRY AND BE VV SPECIFIC WITH THIS!!!!!
you don’t need to invest in a really good primer, i use the elf dupe of the milk hydrogrip primer and vaseline and das it!!!! also, let your skincare sink into ur skin first or it’ll just slide everywhere bae
use whatever foundation you want, if u want recs my faves were the elf foundation in sand or the hydrating foundation on shein.. also in sand, again i don’t use any high end products bc #broke nd bc you can get a good base with cheaper products. put your foundation on the back of your hand nd then apply with you fingers since you have more control on where to put it (people say don’t do this but if you want that full glam beat look start from the perimeter of your face so it doesn’t look.. faded? idk lol) and use a DAMP beauty blender to blend, soak it under a tap so it gets very soft and then dry it so it’s damp you know 😝 and then blending inwards into your t-zone, making sure not to touch ur brows and under eyes (it’ll make it look more cakey when adding concealer on top of foundation). and after you think you’ve blended, BLEND MORE!!!!! get a setting spray or a spray bottle and mist your face then blend more just in case, plus it makes ur base more smoother no i do not know why but it works
for concealer this is where i’d recommend using a colour corrector rather than concealer imo, i use a mix of a peach and yellow colour corrector for my concealer but again if u like what u use, use it 😭. i like a bright undereye so i apply a lot but u don’t have to ofc, place it below your waterline so you can blend up. as placement goes i do tiny triangles because i’m mentally since in 2016 lol, then after let it set a little for more coverage ig. if you want a full coverage undereye i suggest blending the concealer up into your waterline as well again idk why i did it by accident once and i’ve never turned back lmfao
people say to let your makeup dry on its own before setting it but with this much product you really can’t and i crease really easily so 😭😭. i use banana powder and a mix of translucent powder and mix them together on a puff (dab a little on the back of your hand before applying) apply the powder under your eyes first, i bake but u don’t have to, then your forehead, then chin and buff the rest on the rest of your face then mist setting spray n then yay base is nearly down queen ✊✊
for the rest of your base it’s really up to how you like it, for me i’m really into browns and not so much blushy tones so i use a mauve blush since it blends really well into bronzer, be light handed and patient with your powders, it can look really muddy if you just slap it on. use very fluffy brushes, it’s easier to blend and harder to make it look muddy and sharp (unless u like that lol)
eyes r really simple all i do is use my bronzer and slap is on my eyes and place a creamy eyeshadow on the lids, tight line my lash line with a pencil liner then mascara and lashes LOL easy peasy lemon squeezy. here are the lashes i swear by (i had the blue ones in the these pics <3)
nd for lips i just wipe off any product i had on my lip and line it with a really cool toned brown lip liner (i hate warm brown lip shades…..😡) and blend the inner part into my laps and slap on clear gloss AND YUH DONE YAY!!!!!!!
so sorry for the realllllly long answer, i like to mumbo jumbo abt makeup hehehehehahhshshsa
2 notes
·
View notes
Text
NaClYoHo Dump Post! Days 9 &10
Wow! The last 5 days just flew past me. Because I had a big doctor's appointment on Thursday, Wednesday and Friday were set aside to rest for that in the hopes that I would be able to stay conscious for the whole appointment (it worked! yay!!!).
Most of days 9 and 10 were for organizing doctor's appointment and health thoughts, as I have to make some big decisions in how to return to work/when/in what capacity, and about next steps: imaging, referral to a specialty clinic, and all the other things that come with managing unknown chronic illness.
Husbff noticed that I was stressed out and brought home grocery store flowers in my favourite colour - all of them! So I arranged those on Thursday and it really lifted my mood.
Having to be careful about expending energy on housework meant that I had to sit still even when I wanted to do more productive things, so I started a NaClYoHo decorative project. I'm using up some thrifted string from my craft stash to make a rainbow tassel garland following this tutorial:
youtube
I'm excited to post some progress pics once I get around to taking them.
Somehow I also managed to stay on top of the dishes and laundry, which I'm glad about.
#naclyoho#salty pirates month#national clean your home month#disabled and doing my best#Youtube#arts and crafts#yay thrift stores!!#I really miss thrifting. :( thank goodness for online second hand shopping
6 notes
·
View notes
Text
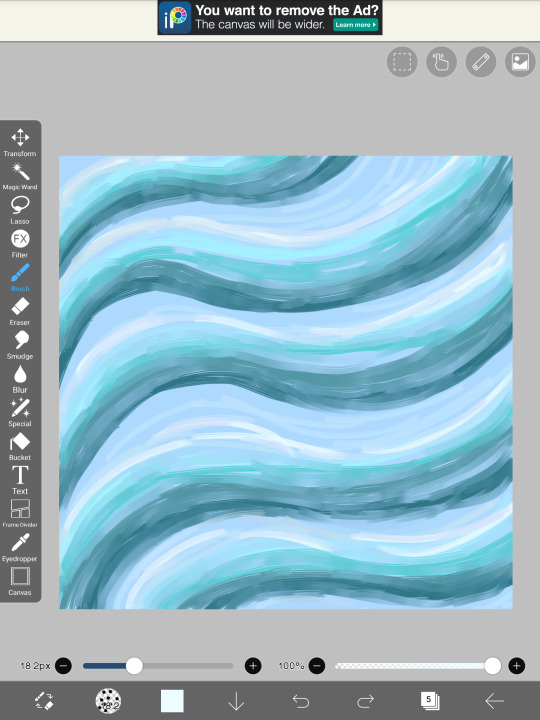
Easy marbled pattern tutorial (which is actually just a technique I made up after playing around with random tools).
I use IbisPaint so some tools might be different for your program.
Start with drawing some lines in different colours. They don't need to be perfectly even, actually a bit of randomness is better - I used a watercolour brush here. Use colours from a palette if you're not sure what colours fit well together.
Apply some distortions/transformations. Use as many as you like to get the effect you want. I used a twirl and then a wave.


The wave creates white spaces, so I needed to zoom in to get rid of them.

If you aren't happy with any part of the picture, you can manually paint over it at this point. I used the smudge tool so that it's not so pronounced where I edited it.

Yay! Congrats! Pretty paint swirls achieved!
#marbled pattern#art tutorial#this is my first tutorial ive posted pls be kind#someones probably discovered this before#but when i did a quick google all of them seem to be more complex#and this doesnt require much artistic technique
3 notes
·
View notes
Text
Setting Up Menu screens in Unreal
This morning I did some research on YouTube to find a tutorial series for Unreal 5 on setting up a basic menu screen system with customisability options etc. Below are the 3 Parts to the tutorial series I found and followed:
youtube
youtube
youtube
After following along with these videos I felt like I knew what I could and needed to do next when it came to making these menus. I firstly started by adding more buttons to the options menu as I wanted a few extra different types of graphics settings that could be adjusted.

Here I have added things I felt were missing from the videos which are a necessity to an options menu:
Framerate Locks
Screen Modes
An Epic Graphics setting option
A back button (returns to menu screen)
And a Save settings button
I firstly started with the framerate options and created all of them and coded them so that when the button was pressed it would change the framerate in the user game settings. After testing this I discovered Two Issues. The first issue was that for some reason the game was running in slow motion when playing it as a Standalone game and the Second was that the framerate was not changing. I decided to firstly look into the framerate and saw there was an option to just enable Vsync which should do my job for me. After swapping out the set framerates with Vsync because THAT worked for some reason, I then went to google to find out why the game was running in a slow motion like state. To my annoyance, I found on reddit that it was due to me changing the editor to a fixed framerate a lot earlier in the project which makes unreal slow everything else down in order to meet that framerate.
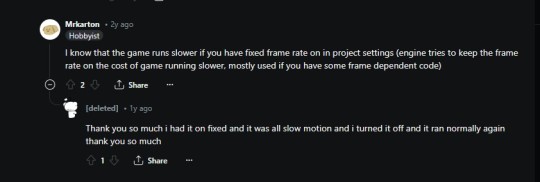
So to solve this problem I switched the framerate back to smooth mode instead of fixed. This then created a new issue for me which was that VSYNC no longer worked (Yay... :/). SO I then decided to test if the framerate lock option now worked by adding another button, which it did. So after all of that I had to remake all my individual framerate buttons again and set them as options.

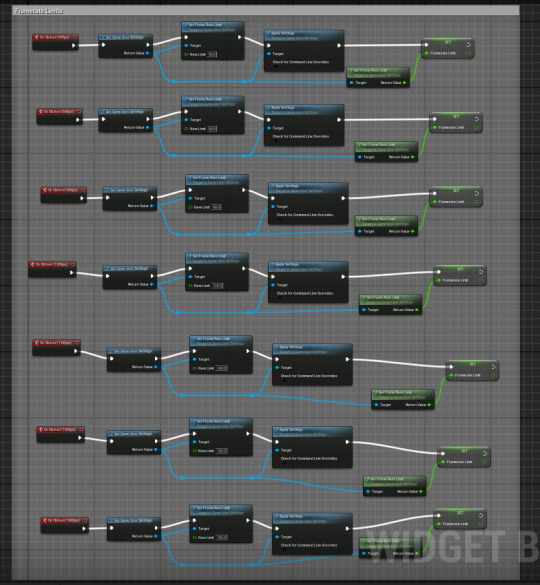
In terms of the other options they were far easier to find as all I had to do was search for them off of the game user settings with no external settings having to be changed.
After getting the graphics menu setup I had to create a way for the main menu and options menu to switch between each other without overlapping. To do this I made it so that when a button to enter either menu is pressed it will remove itself and add the other menu you're trying to access back to the viewport.

Now that I had a functioning main menu along with options menu I felt that the main menu needed a game title logo and a background of some sort. I started by making the logo for the game and researched for some Ai logo creators. I found a website I liked, put the title of my game in and it made me a logo.
After that I pulled the logo into paint.net and started adding my own touches to it trying to include some hints of tic tacs within the logo. Here is what that looks like:

I really liked how the logo looked with its colour scheme and simplicity.
Next I decided to have some blurred background gameplay footage looping while you're sitting in the menu screen as I had previously seen one of my friends do that on the last project and I really liked the idea of doing that for this one. I followed the same method shown in an earlier blog post of turning a media file into a widget and then made it so that It plays when you're only in the main menu.
Now the only thing I had left to do was make a pause screen for the game. I followed along with the YouTube Video closely. I changed a couple of the options for the pause screen adding a 'return to menu' button and a 'retry' button as I felt these were also missing from the tutorial. The code was really simple with that being it would open up either the main menu level or the current level you're playing again.
Background Audio
The last short thing I want to talk about was that I decided to get some copyright free background audio to have in my game from YouTube. I used the same channel as my last project because I really liked the music they produced. I have a more upbeat happy song for the menu screen and a faster paced intense song for when you're playing the game.
Here are the two songs:
Gameplay Music -
youtube
Menu Music -
youtube
_
Here is a video showing off all of the menus and background music in game:
youtube
0 notes
Text
step by step tutorial on what to do if you feel the urge to be annoying and go on a coke rant on a post you disagree w:

go to your tumblr dashboard and find this button. The one w a text on it that says "create" ...click it!

You'll get a whole list of fun options to choose from! colours! yay! You see the one that is white, to the far left? click it!

Realized that you can block ppl on here
Bye
17 notes
·
View notes