
Don't wanna be here? Send us removal request.
Statistics
We looked inside some of the posts by adornedwithlight and here's what we found interesting.
Average Info
Notes Per Post
2K
Likes Per Post
1K
Reblog Per Post
258
Reply Per Post
11
Time Between Posts
2 days
Number of Posts By Type
Text
17
Last Seen Tumblr Blogs


Fun Fact
There were a total of 171.5 billion posts on Tumblr in 2019.
Text

Adornedwithlight is now @cursed-carmine
6 notes
·
View notes
Text


‿︵‿︵ʚɞ『 Requests: CLOSED 』ʚɞ‿︵‿︵
Hi! I'm Luma and this is my blog for dividers and custom themes for anyone who would like to make their posts and blogs look pretty ☀️
Please reblog and credit me when using my dividers!!
⋇⋆✧⋆⋇ 𝐃𝐢𝐯𝐢𝐝𝐞𝐫𝐬 ⋇⋆✧⋆⋇
𝑅𝑢𝑙𝑒𝑠:
Do not repost, reupload, recolor or alter my dividers or claim them as your own please. If you'd like a different color feel free to ask me for it
You may request (custom) dividers using the ask button and telling me what you'd like for me to create
Minors may interact with this blog but not my main blog
Credit @adornedwithlight in your post, tags or somewhere in your pinned post when using my dividers.
Breaking my rules results in getting blocked.
131 notes
·
View notes
Text
My color palette
In case you'd like to match the dividers to your theme or vice versa. Here's the Hex codes and order in which I post my dividers!
Also beneath the pictures you'll find the hex codes to copy along with the color name 💫
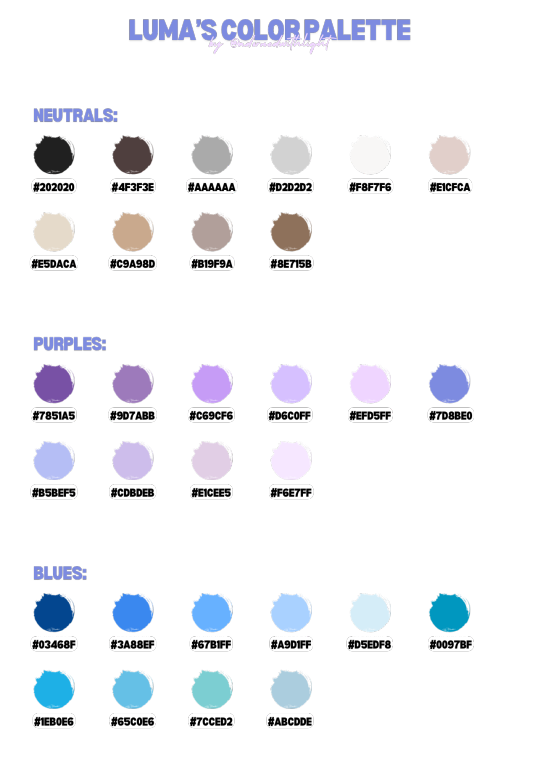
Neutrals:
#202020 -> Charcoal
#4F3F3E -> Dim Grey
#AAAAAA -> Silver
#D2D2D2 -> Gainsboro
#F8F7F6 -> Seashell
#E1CFCA -> Linen
#E5DACA -> Wheat
#C9A98D -> Tan
#B19F9A -> Khaki
#8E715B -> Sienna
Purples:
#7851A5 -> Purple Majesty
#9D7ABB -> Wisteria
#C69CF6 -> Lavender
#D6C0FF -> Periwinkle
#EFD5FF -> Thistle
#7D8BE0 -> Cornflower
#B5BEF5 -> Powder blue
#CDBDEB -> Heliotrope
#E1CEE5 -> Pale Lavender
#F6E7FF -> Amethyst
Blues:
#03468F -> Navy Blue
#3A88EF -> Cornflower Blue
#67B1FF -> Sky Blue
#A9D1FF -> Pale Aqua
#D5EDF8 -> Powder blue
#0097BF -> Teal
#1EB0E6 -> Turquoise
#65C0E6 -> Light Turquoise
#7CCED2 -> Aquamarine
#ABCDDE -> Light blue
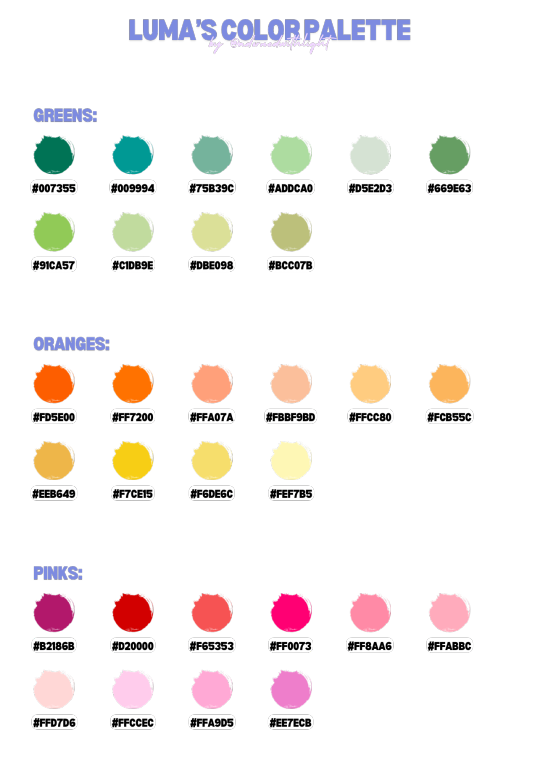
Greens:
#007355 -> Dark Turquoise
#009994 -> Turquoise
#75B39C -> Seafoam
#ADDCA0 -> Pale Green
#D5E2D3 -> Mint Cream
#669E63 -> Olive
#91CA57 -> Lime Green
#C1DB9E -> Mint
#DBE098 -> Pastel Green
#BCC07B -> Olive Green
Oranges:
#FD5E00 -> Pumpkin
#FF7200 -> Carrot
#FFA07A -> Light Salmon
#FBBF9B -> Peach
#FFCC80 -> Macaroni And Cheese
#FCB55C -> Apricot
#EEB649 -> Saffron
#F7CE15 -> Sunflower
#F6DE6C -> Lemon Chiffon
#FEF7B5 -> Cream
Pinks:
#B2186B -> Plum
#D20000 -> Crimson
#F65353 -> Salmon
#FF0073 -> Magenta
#FF8AA6 -> Light Raspberry
#FFABBC -> Light pink
#FFD7D6 -> Blush
#FFCCEC -> Pink Lace
#FFA9D5 -> Orchid
#EE7ECB -> Fuchsia
56 notes
·
View notes
Text
💫 HTML for pretty colors tutorial 💫
Hello sweet beans! Since my last tutorials have been yeeted into oblivion with deactivating my previous blog @/benkeibear I figured I repost them onto here! (Mind you, my old blogs are ahead)
I'm lowkey shocked to see blogs gatekeeping this knowledge but yeah. Make your blog pretty! Match your text to dividers or just have it as colorful as you'd like!
First of all, you can not do this on the mobile app! You need to either use a laptop or your phone / tablet's internet browser (in my case safari)
You start by logging into your account and either you make a post or you edit a post. I recommend making the post on the app first because editing is certainly faster & easier!
This is our starting point! For the fancy fonts you can use messletters


1. I will now log into tumblr on my web browser and click on "edit this post".
2. You then have to click on the little gear icon in the top right corner to change the settings on your post.
3. There you have to click on "rich text" to change it to "HTML"

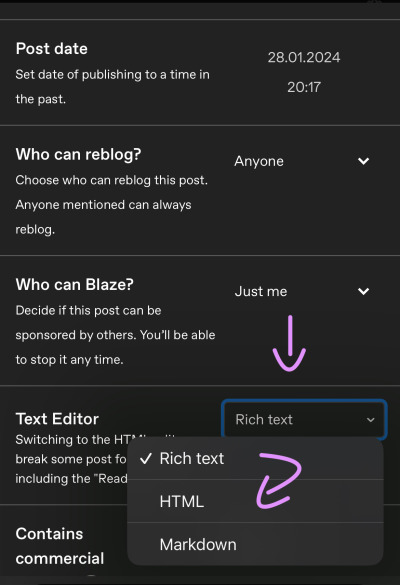
Your post should now look like this:

A quick rundown on html.
You always start with a letter or code in brackets. to end what you're doing it's </>. The slash signals the end.
P= paragraph <p> and to end </p>
I= italics <i> and to end </i>
b= bold <b> and to end </b>
Now tumblr will automatically do this for you if you made a text bold/in italics on your mobile post but to keep this tutorial simple i left that out here. You can always edit your text in the app after! Just not the color.
And as you see, the fancy text is now in coding. But we get to that later!
To colorize your text it's easiest to just use this website as it gives you lots of options!
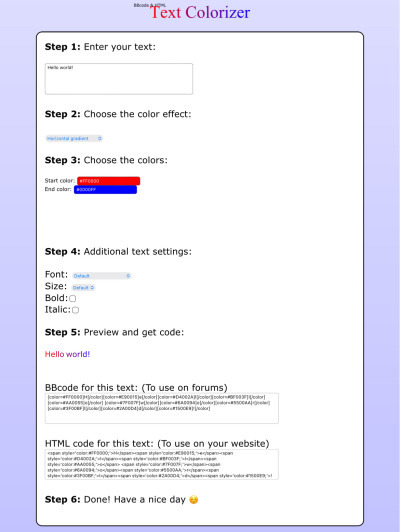
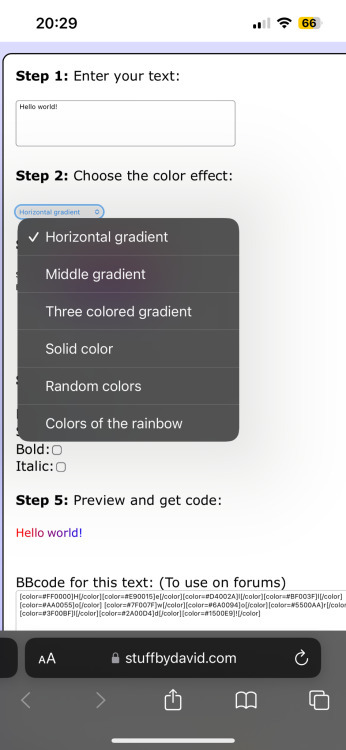
1. First i will be choosing the option of "solid color" and you can then put in the hex code of your desired color into the color box.
2. In the top box you will have to put the text you will color - for this tutorial it's "Testing"
3. Then you copy the box HTML code and paste it into tumblr where your word(s) are. Do not remove the <p> and </p> in front and after your word/ sentence!
4. For the sake of this tutorial I marked the html code for colors in pink and the words in blue
Your code will now look like this:

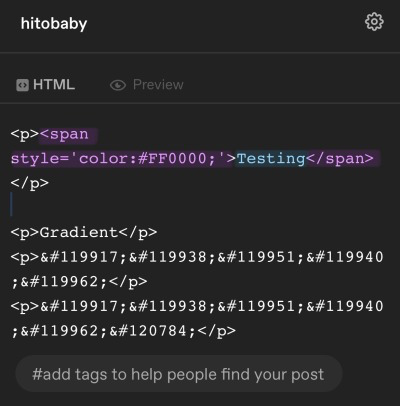
For the gradient you can simply choose horizontal gradient or three colored gradient on the website above and copy/paste the html text.
Mind you that every single letter will get its own color code now so the word gradient suddenly looks very long in html.
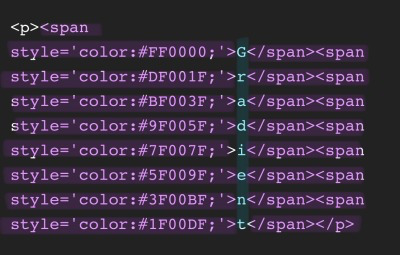

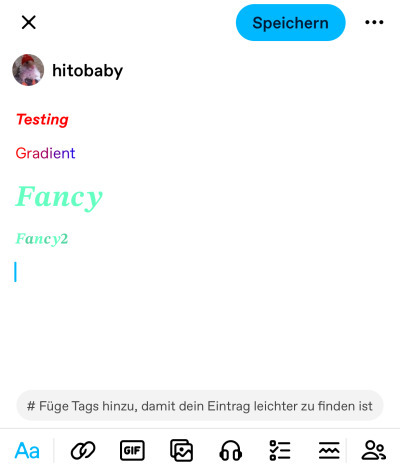
If you save the post it will now look like this!
Important to know is that you can color the fancy text only solid as the website can not color it as it is and putting the letter codes in the box above does not work either.
To color the fancy letters you simply copy the color code instead of the whole text - which looks like this:

Don't forget to add </span> behind the word/the codes you're coloring to signal that this is where the color stops! If you forget to add it, nothing will be colored.
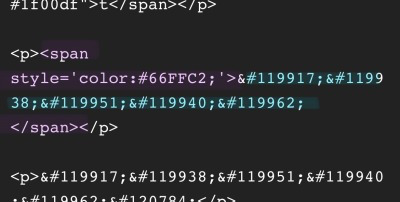
If you decide you still want to have the fancy lettering in multiple colors you have to color letter code by letter code manually like this:
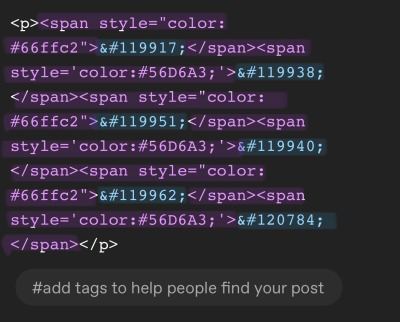

(I made a very poor choice on 2 different greens but oh well)
If you'd like to change your text, you can always do that on the mobile app like you usually would. You just can't change the color unless it's into a default color. But you can still change the size or make it bold for example.

Anyhoot, this is the whole magic behind html. It's a lot and might be very complicated at first but you will eventually get the hang of it! Took me weeks and hours until someone sat me down and went through it step by step.
If you have any questions or something doesn't work as you thought it would please don't hesitate to reach out - I'm always happy to help!
#dividers by adornedwithlight#blog resources#tumblr tutorial#html tutorial#gradient text tutorial#gradient text
189 notes
·
View notes
Text
Hello sweet beans! Since my last tutorials have been yeeted into oblivion with deactivating my previous blog @/benkeibear I figured I repost them onto here!
💫 gradient line divider tutorial 💫
This tutorial uses my simple line divider tutorial as a base. Please familiarize yourself with it first since this is just additional steps!
I use various apps and sites for gradients. The apps I mainly use Canva or Gradient+ occasionally I use GradientDaze (for when I don't have specific colors in mind)

As websites I can recommend browsing through uiGradients or Webkima if you'd like animated gradients.
I'm a little oldschool and don't use photoshop but there's plenty tutorials on how to animate gradients there on YouTube!
Starting with Canva:
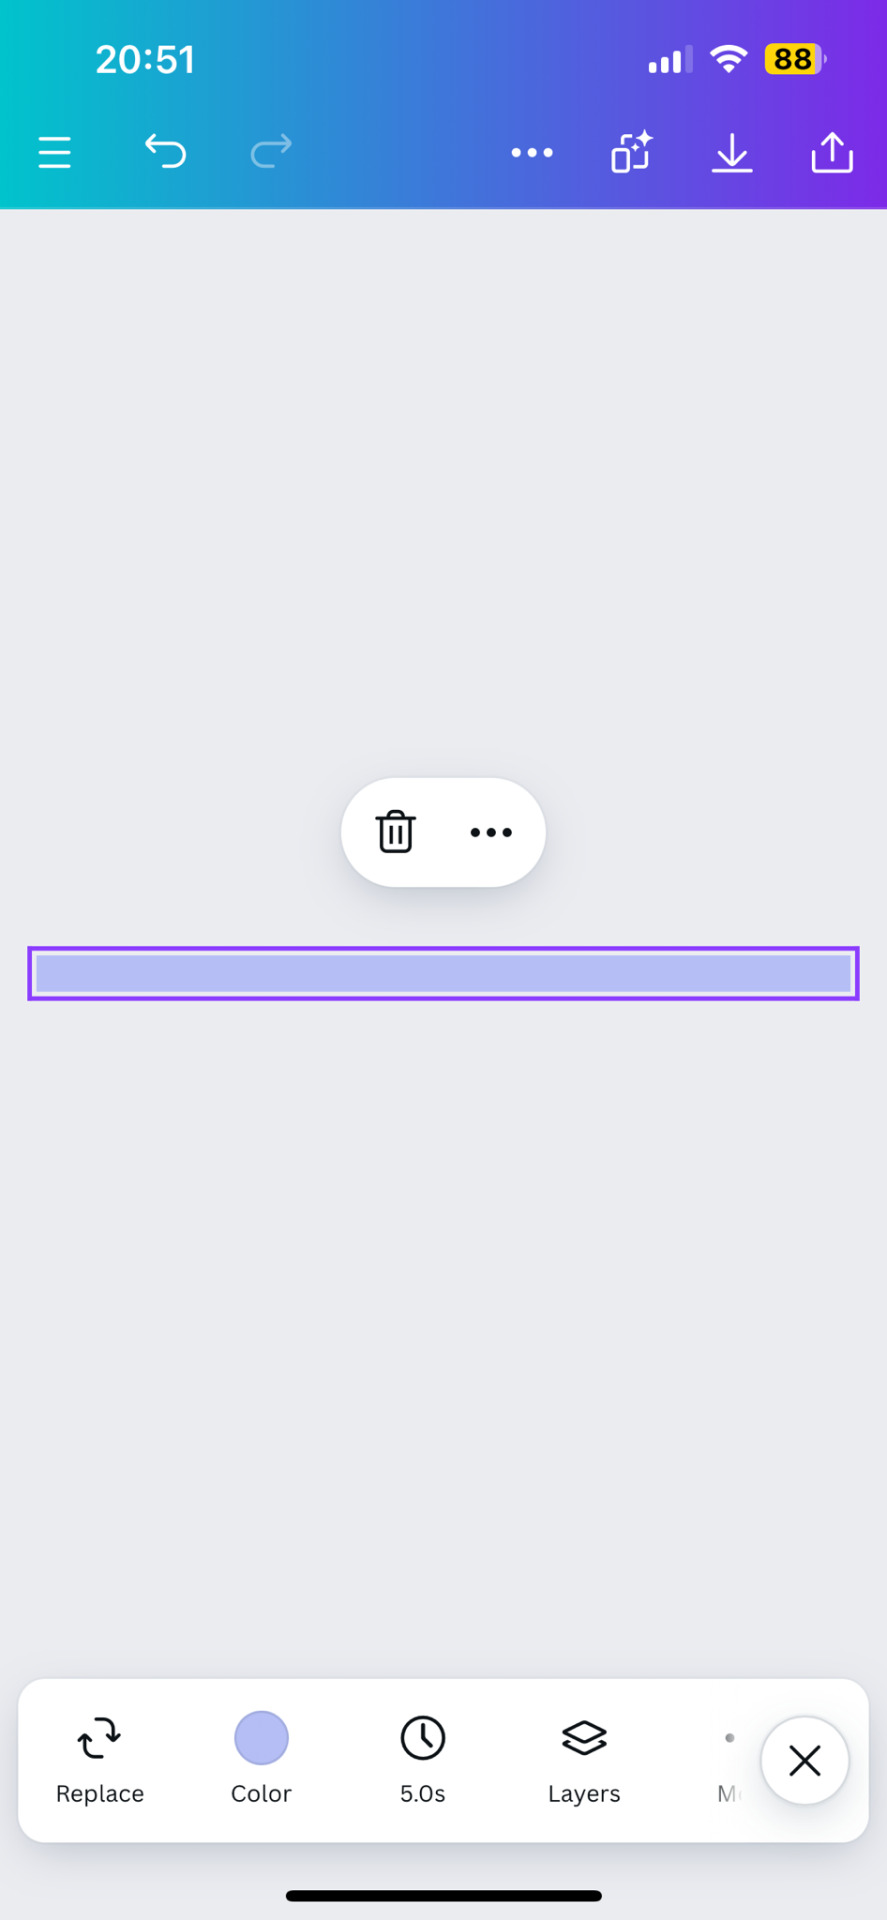
1. You first open your divider template. Mine is as in the previous tutorial the simple 1000x40.
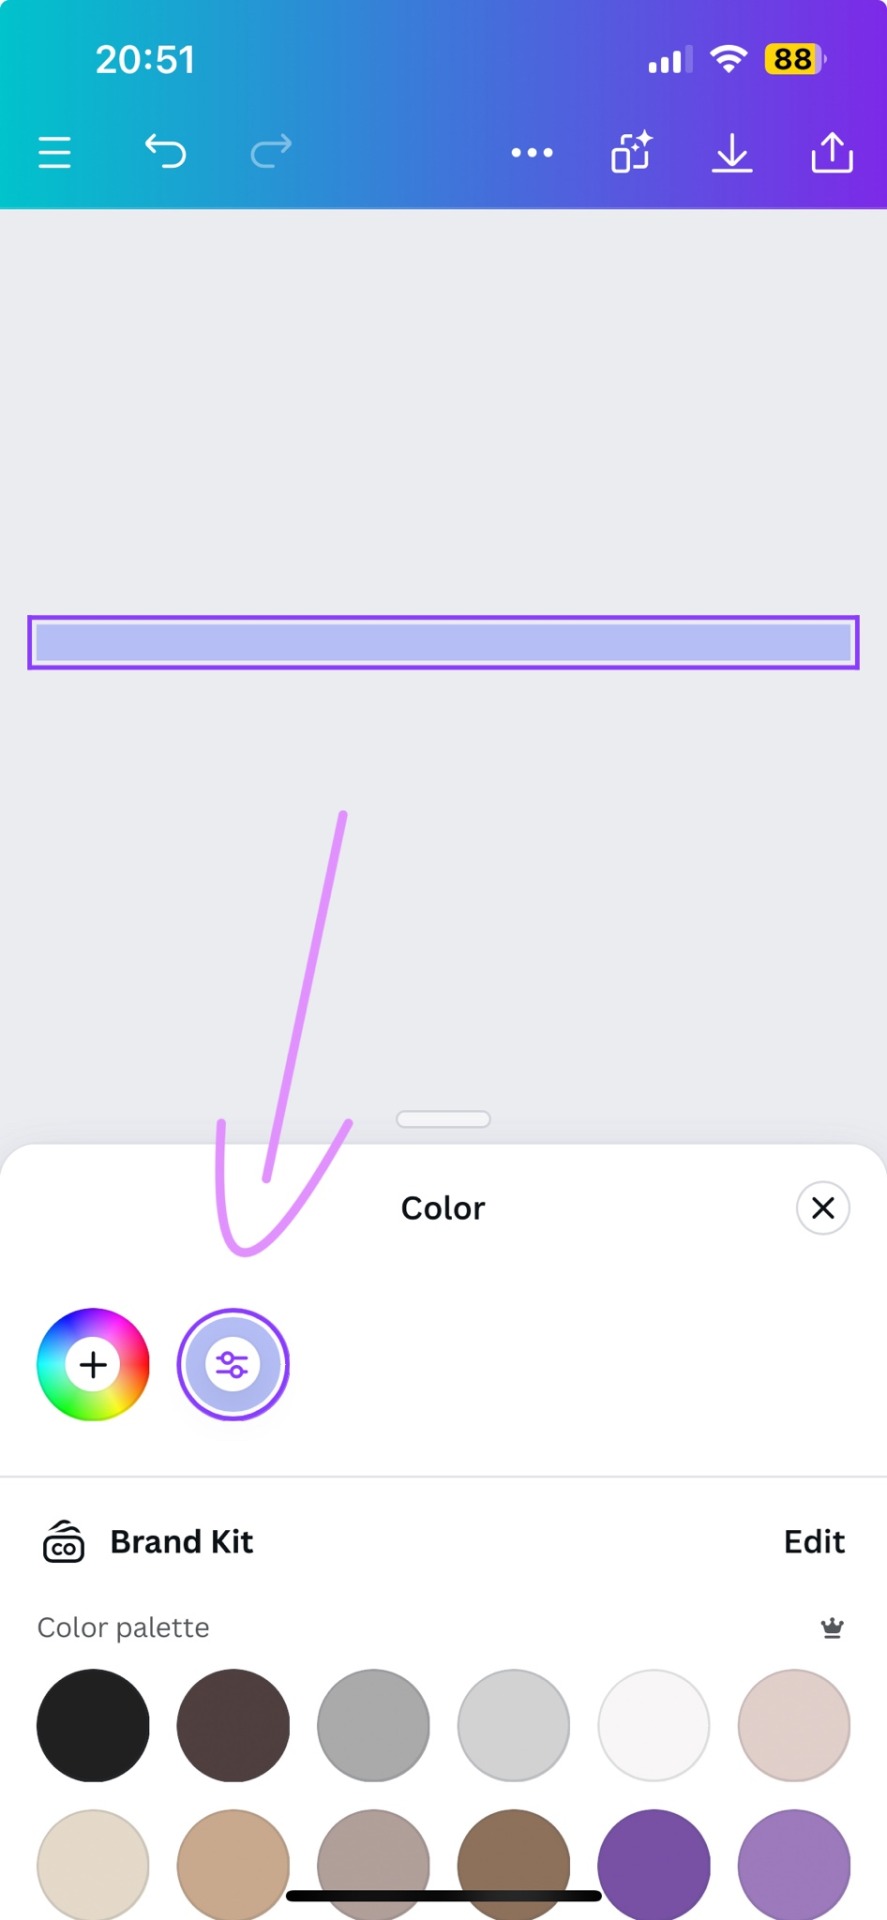
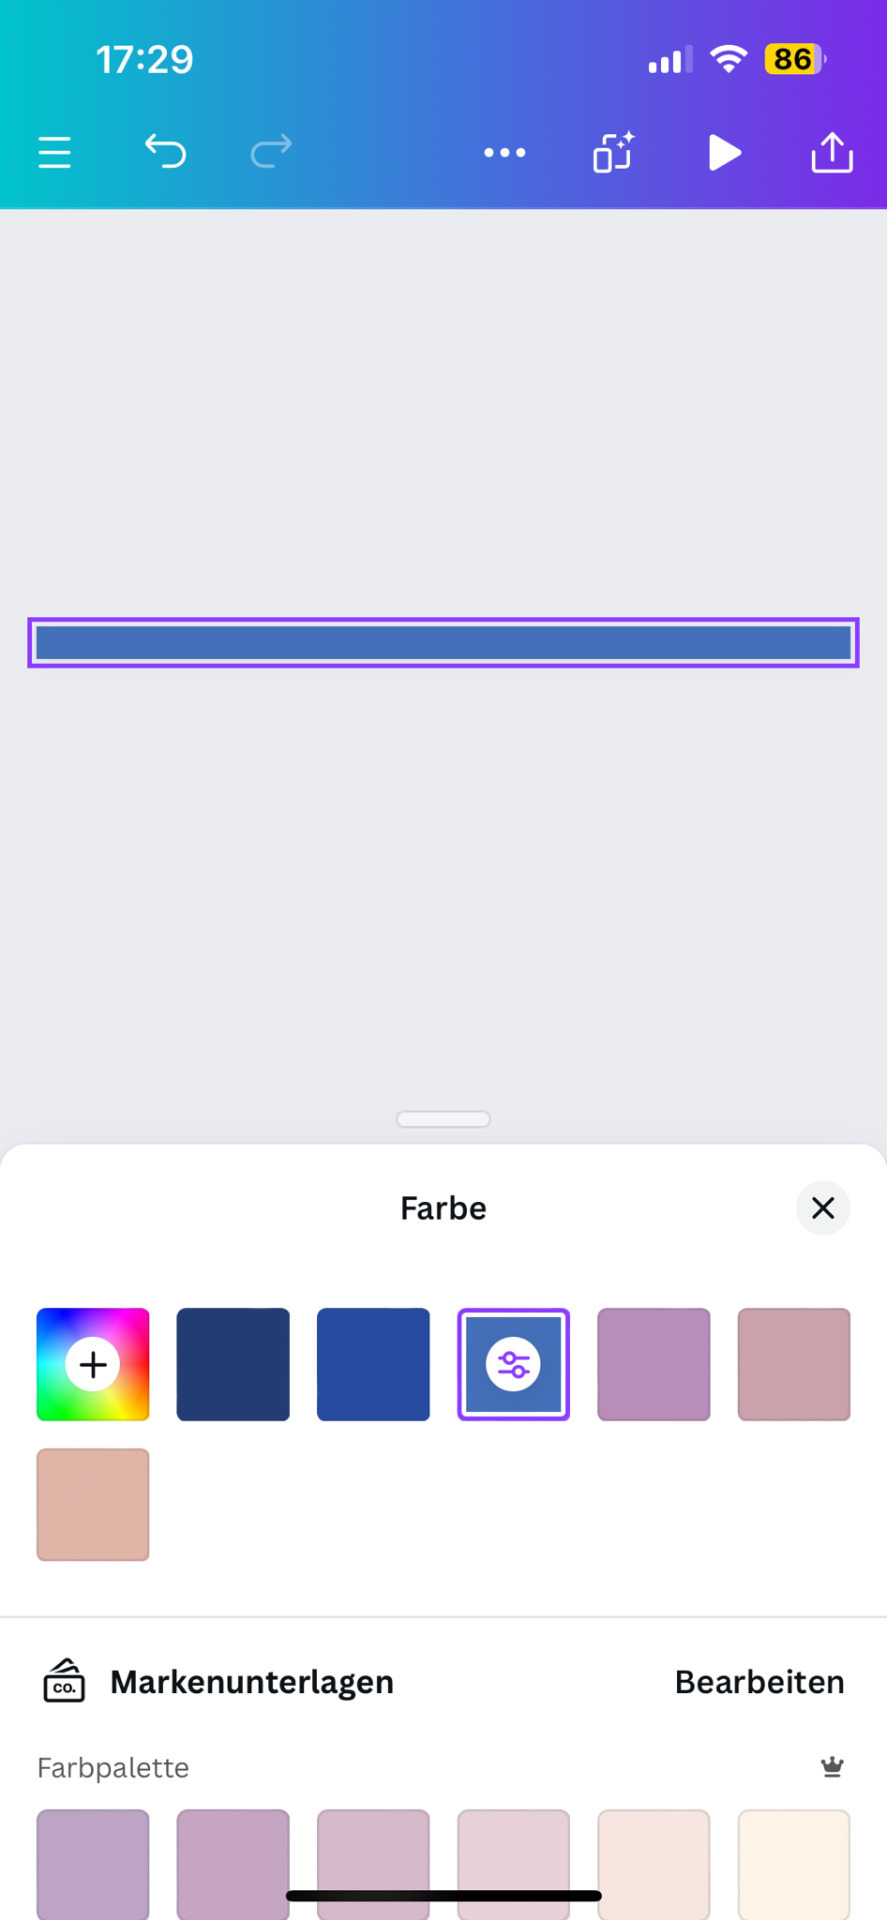
2. Next you will click on the color button and choose a color like the little arrow shows
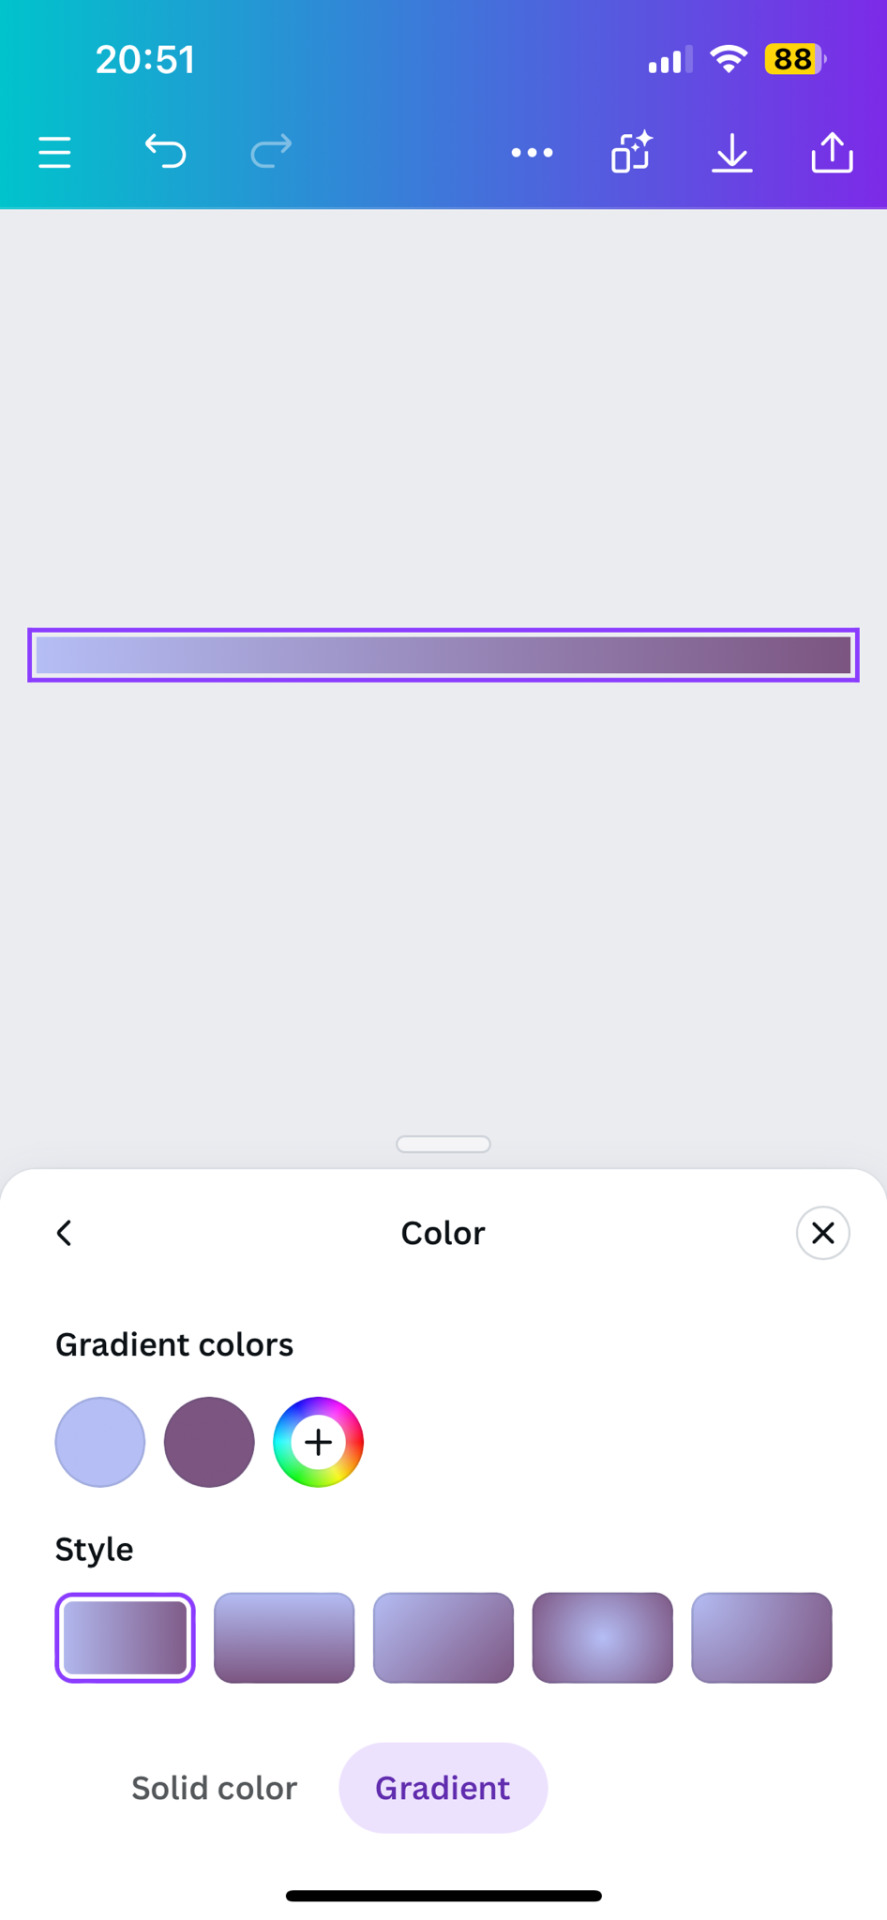
3. Then you select "Gradient" and Canva will give you a second color option. You can change both colors here or add many more if you'd like more colors. Here you can also choose what kind of gradient you want
Just play around here and continue to resize the images you saved as explained in the previous tutorial via ezgif or any other way you found for yourself.
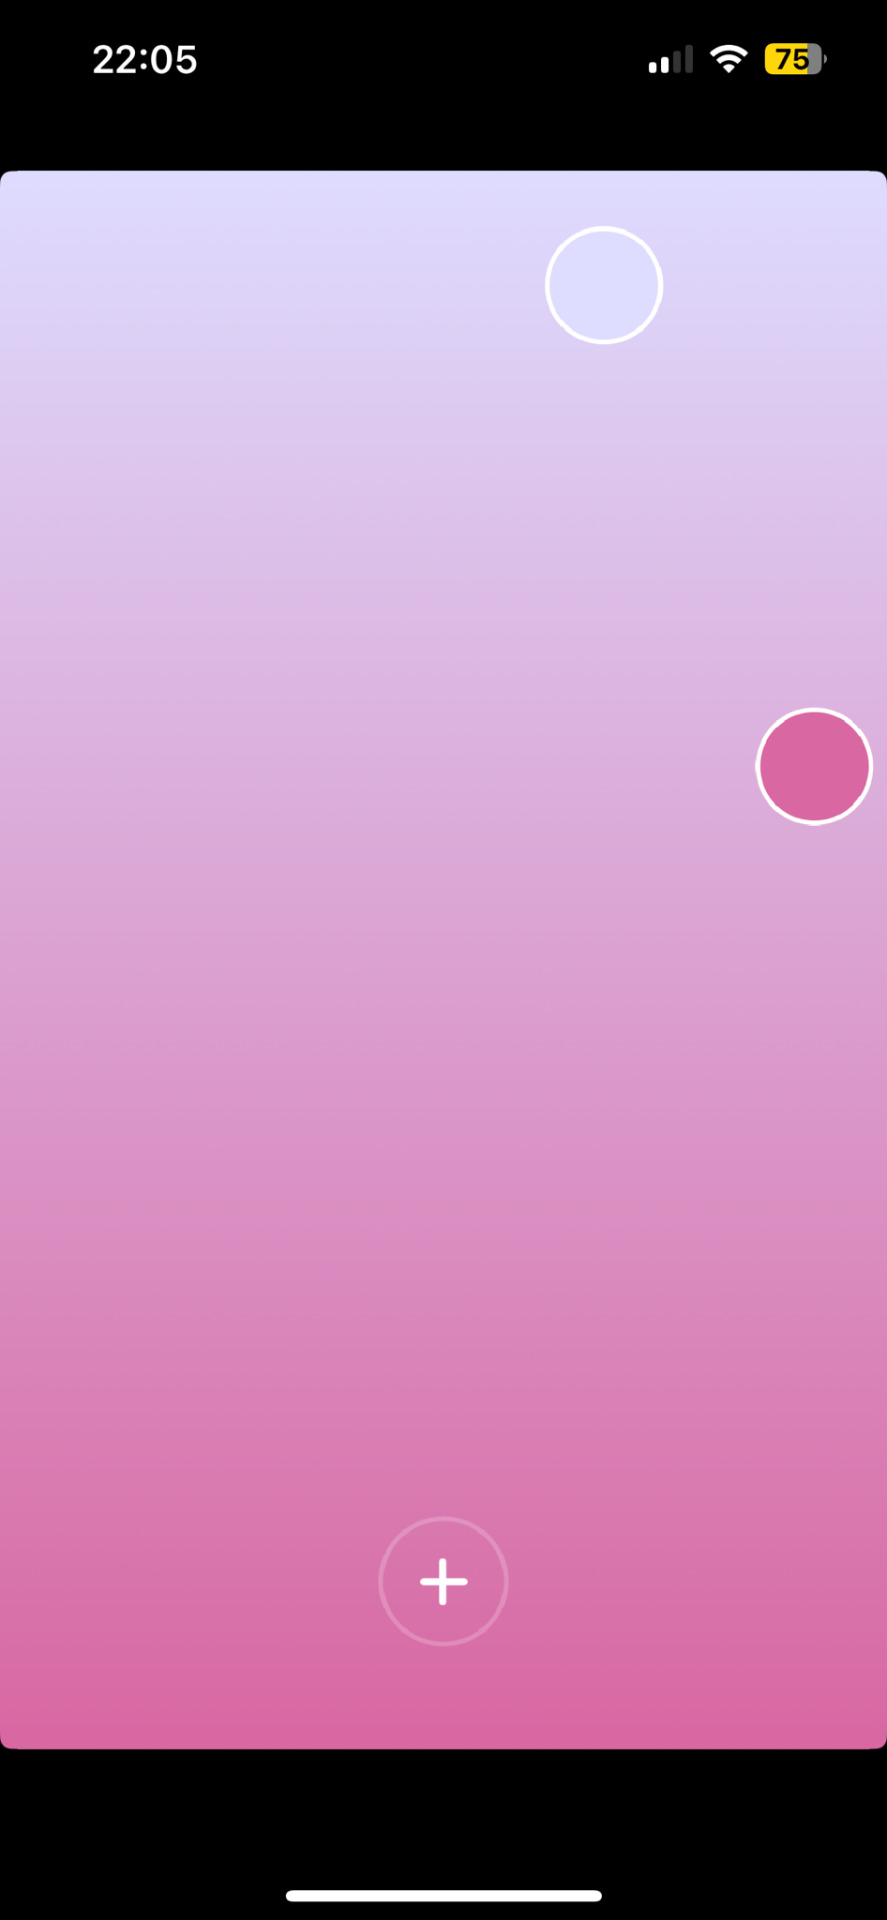
Next we have Gradient+
This app is built pretty simple and there's not much to explain. You choose your two colors by tapping on the colored circle at the"Color A" and "Color B" and continue further down to navigate where color A starts and color B ends.


For the classic gradient you use the settings as above.
The app also offers radial and angular gradients so you can just play around with what you like!
Make the gradient big by tapping the expansion arrows and take a screenshot - then you may resize your divider.
The last app is GradientDaze
Again, a very simple app but this time you can't enter hex codes. Instead you can move 2 circles around on a little color card and find pretty gradients you like
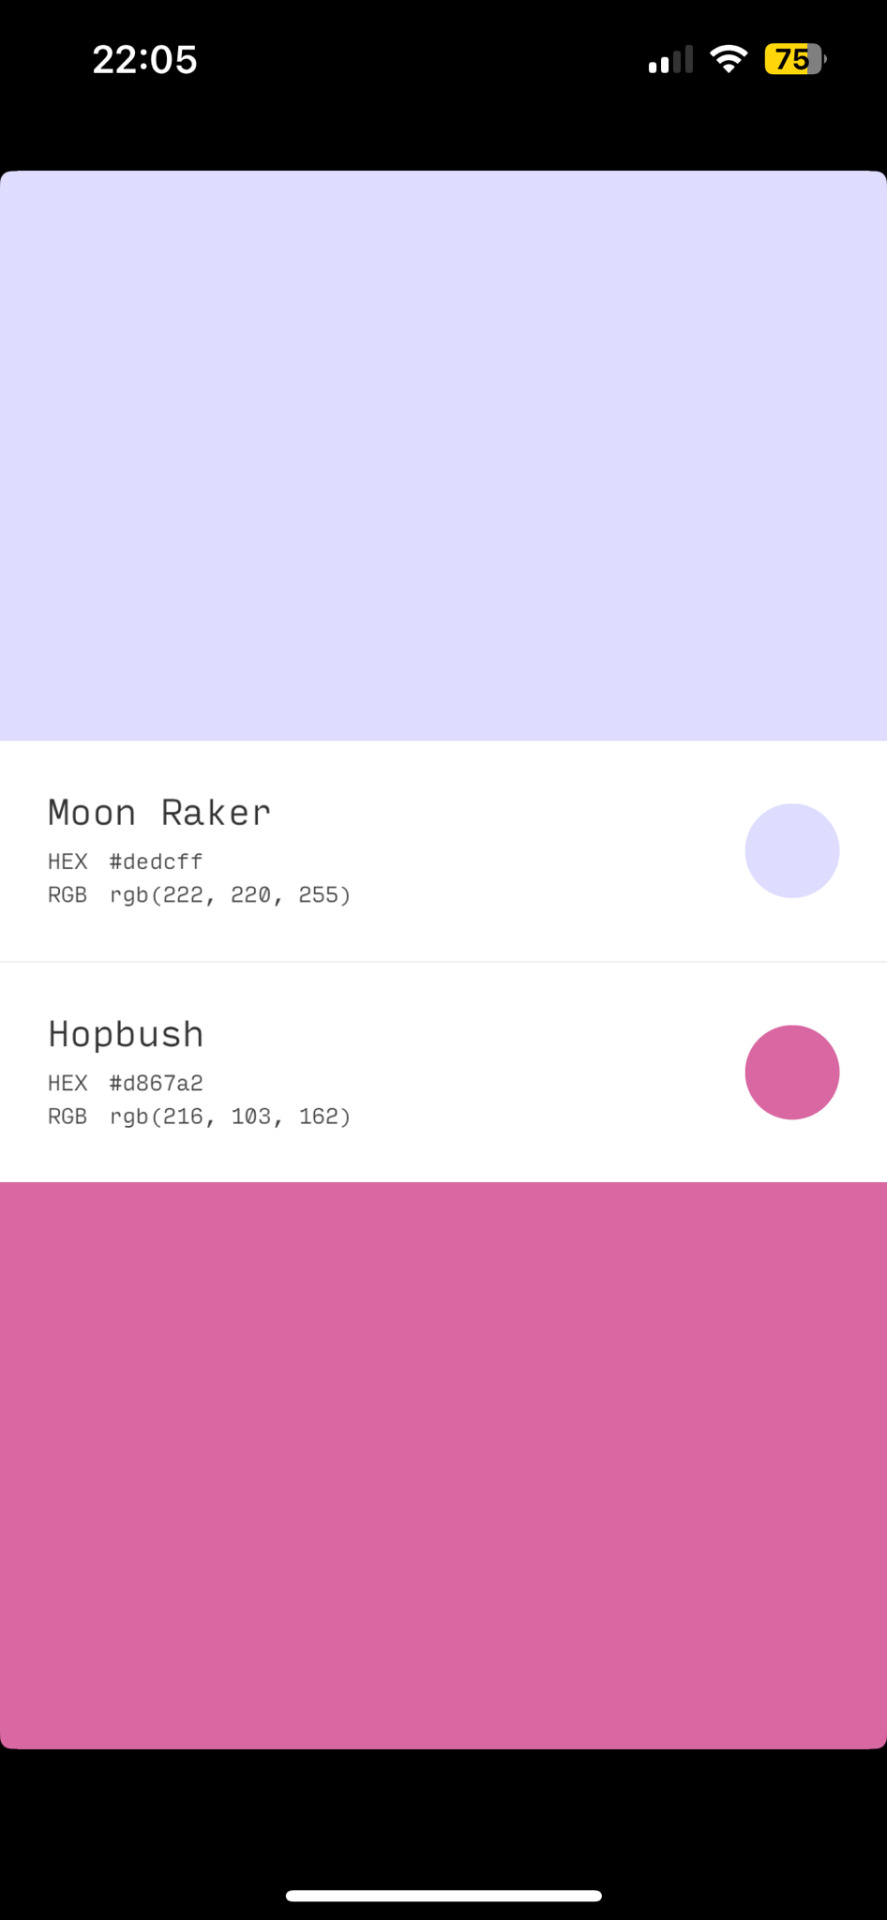
If you found two colors you like, you can click on the little + and then on "info" to see the color names and hex codes. In the menu after clicking + you also have the option to save the gradient
Once saved you can resize your dividers.
Onto the web pages.
At uiGradients you can browse through popular gradients users have made. Once you find one you like you can use the hex codes to make a gradient divider for example in Canva or you take a screenshot and resize it.
Using Webkima for animated dividers is a little inconvenient because you need to record your screen and make a gif out of if (you can do this at ezgif where you can immediately resize your animated gradient)
On Webkima you can choose up to three colors, the direction and speed at which the colors move. Personally I haven't used this yet except for a few custom dividers since it takes quite some time for one divider.

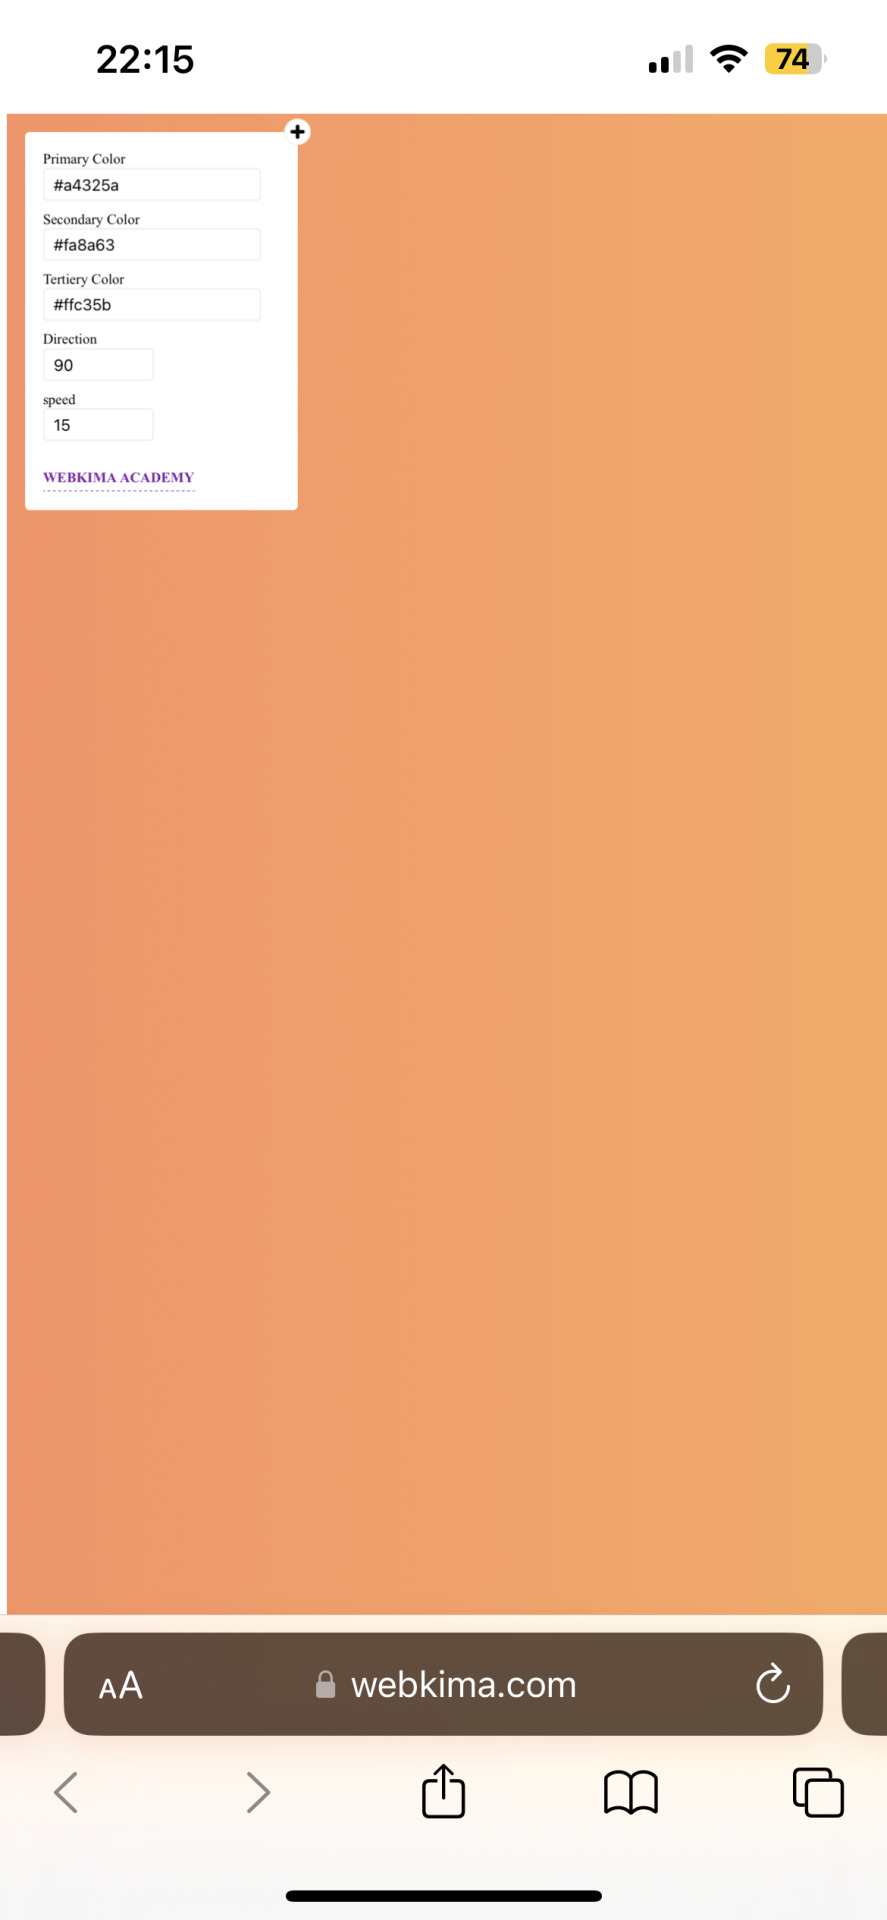
(Left: uiGradients / Right: Webkima)
Using these apps / sites is optional and I'm sure there's plenty other options out there but these are the ones I personally use and find easy to navigate, especially canva since you can do all this in the free version.
If you have any questions or something doesn't work as you thought it would please don't hesitate to reach out - I'm always happy to help!
79 notes
·
View notes
Text
Hello sweet beans! Since my last tutorials have been yeeted into oblivion with deactivating my previous blog @/benkeibear I figured I repost them onto here!
💫 Simple line divider tutorial 💫
So to start off, you don't need much and it looks more confusing than it actually is!
You need an app that lets you color a space - for example Picsart, canva, procreate, photoshop, or you simply google a color and screenshot it.
(Left: Canva. Right: Picsart)
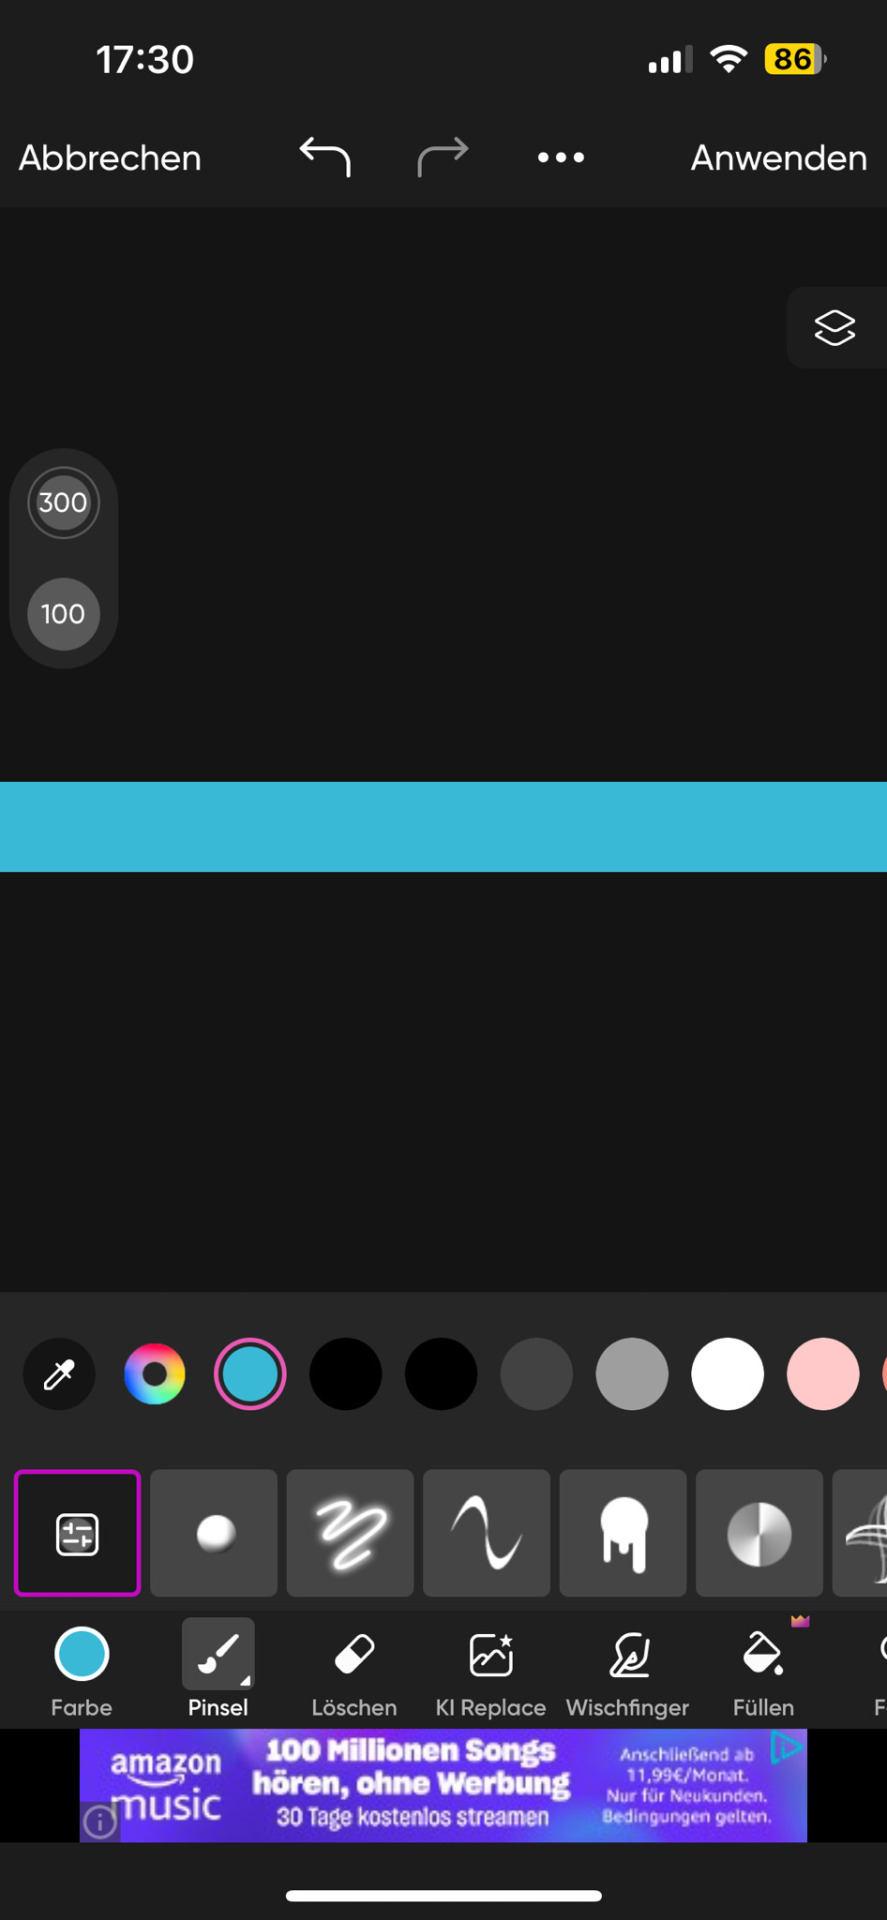
It doesn't matter which dimensions you use here but l use my standard of 1000x40 pixels which I use for my thick - non line- dividers.
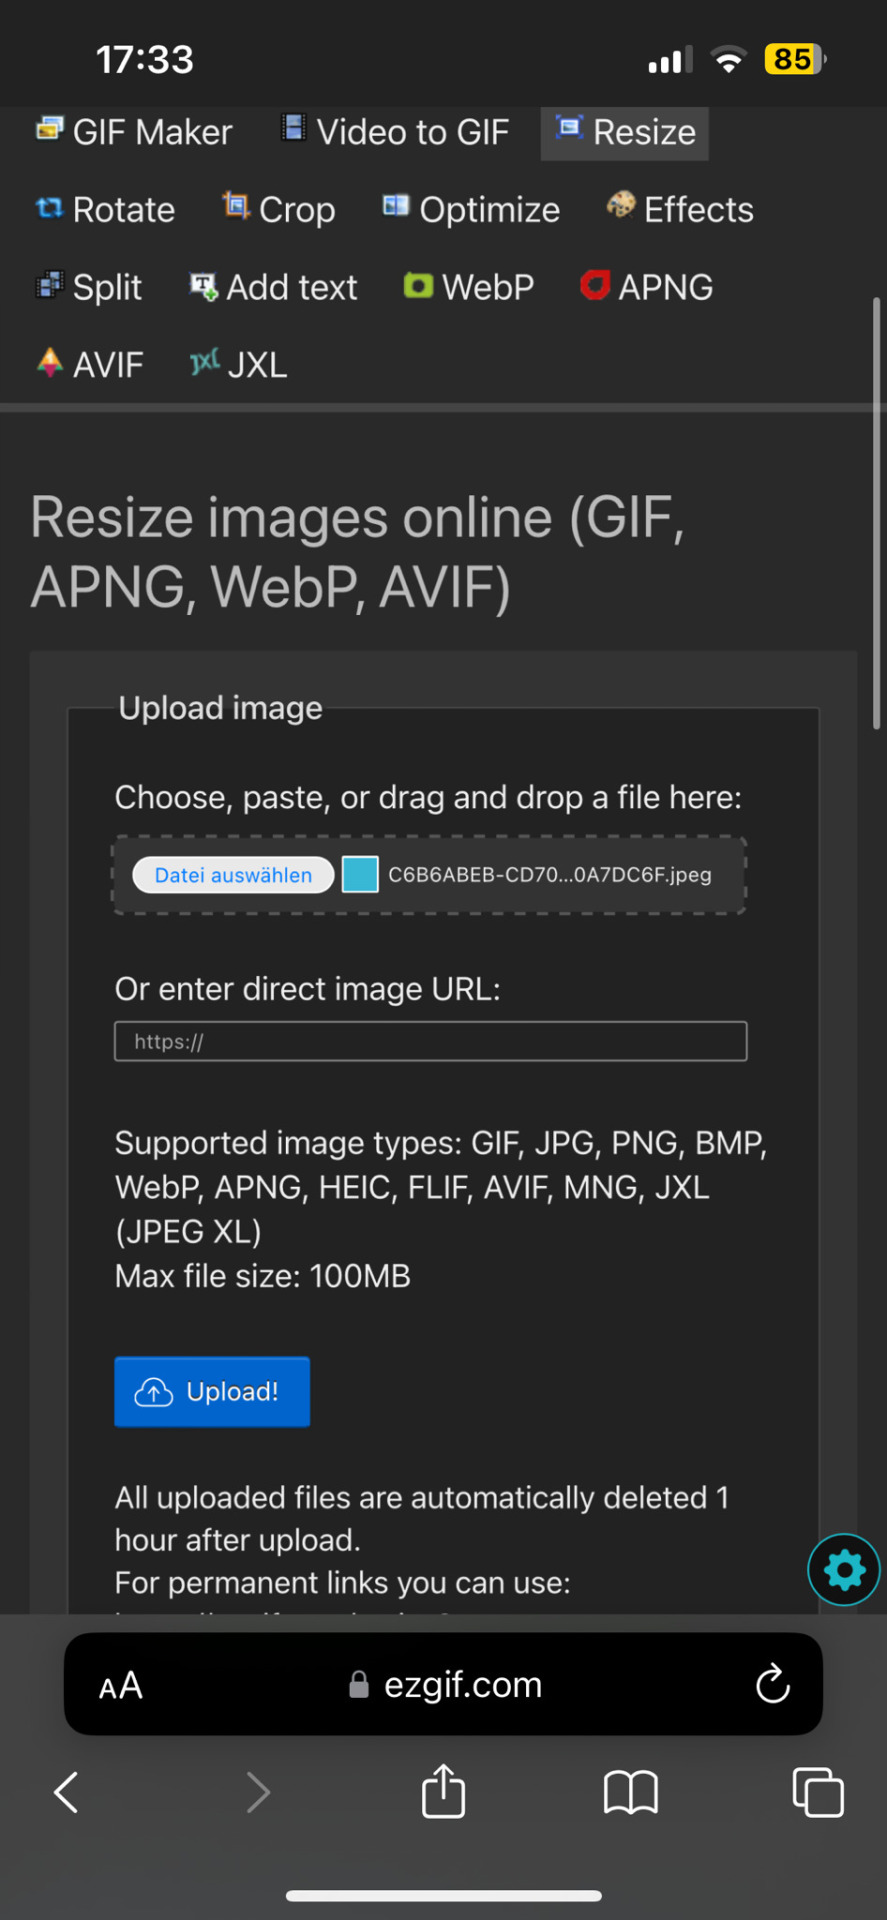
You need to save this picture and use a site that lets you resize it. For example ezgif. This is a site i use for various things like making gifs and also removing background from images and gifs.
Here you will upload the picture and choose the size you want it to be cropped to. Personally I have my width for simple lines at 1000 but the height will depend on its purpose. (Size variations further down)

You can then simply save and use the resized image to your liking. You made it too thick? No problem.
Simply change the height and click on "resize image!" again. Don't be afraid to play around and try out different sizes!
The sizes i use for the thick lines are 1000×12 and for the thin ones 1000x6!
Size examples:
1000×40

1000×30

1000×20

1000×12

1000×6

1000x3

If you have any questions or something doesn't work as you thought it would please don't hesitate to reach out - I'm always happy to help!
For gradient tutorial click here
92 notes
·
View notes
Text
Gif divider: Pokémon
Please like, reblog and credit when you use my dividers!
Don't see your fave? Comment or send an ask!


121 notes
·
View notes
Text
Gif divider: Pokémon
Please like, reblog and credit when you use my dividers!
Don't see your fave? Comment or send an ask!


256 notes
·
View notes
Text
Pride dividers: Transgender
Please like, reblog and credit when you use my dividers!


74 notes
·
View notes
Text
Pride dividers: Non-binary
Please like, reblog and credit when you use my dividers!


34 notes
·
View notes
Text
Pride dividers: Lesbian
Please like, reblog and credit when you use my dividers!


68 notes
·
View notes
Text
Pride dividers: Gay
Please like, reblog and credit when you use my dividers!


35 notes
·
View notes
Text
Pride dividers: Asexual
Please like, reblog and credit when you use my dividers!


61 notes
·
View notes
Text
Pride dividers: Pansexual
Please like, reblog and credit when you use my dividers!


39 notes
·
View notes
Text
Pride dividers: Bisexual
Please like, reblog and credit when you use my dividers!


97 notes
·
View notes
Text
Pride dividers: Rainbow
Please like, reblog and credit when you use my dividers!


133 notes
·
View notes
Text
Pinks: About me Layout (Moon)
Please like, reblog and credit when you use my dividers!
For alternative text / colors please send an ask


31 notes
·
View notes