
Statistics
We looked inside some of the posts by ayeon0307 and here's what we found interesting.
Average Info
Notes Per Post
0
Likes Per Post
0
Reblog Per Post
0
Reply Per Post
0
Time Between Posts
4 days
Number of Posts By Type
Text
17
Last Seen Tumblr Blogs


Fun Fact
In Q3 of 2020, 31% of US users access the Tumblr app daily.
Text
Prototype Final
20th October Fri
Context and Action
The worst has come to the worst. As I mentioned in week 9, the final prototype product is still on shipping. Therefore, I had to make a decision. The elements that are currently lacking are the acrylic magnets and acrylic clips, which were made using acrylic. For this reason, I decided to work similarly in the design fab lab, cutting the acrylic and colouring it myself.
Laser cutting: 3/5 - Creating the laser cutting file took less time since I had previously created the size and design, but the laser cutting required a lot of time, and the colouring after the laser cutting required extra work.

-> Laser cutting files and new design print files

-> The process of laser cutting and the final product of laser cutting
It was very mentally exhausting, and I had to work hard every day. I tried different ways to create the package details, especially for the new acrylic size. I considered using paper, felt, boxes and cork. I experienced more than 10 failures in this process.
Nevertheless, in the end, I was able to complete the final prototype in time. The use of cork created a sense of unity throughout, and the precise laser-cutting technology allowed me to produce a higher-quality final prototype.

-> Final prototype high-quality photo shots
Result
In conclusion, I am satisfied. I am also grateful to the people around me who helped me mentally and physically because this week's efforts resulted in a final prototype that I am satisfied with. In particular, I was able to complete the final prototype within Week 12 so that I could focus on other documentation schedules.
I have learnt from this experience how to deal with emergencies and the importance of having a BACK-UP PLAN. I have learnt that even though I have considered enough time to complete the project, I need to have a 2nd plan in the future in case something unexpected happens due to external issues like this situation.
Learning
This situation was an important lesson and education for me. However, if I were to work on a similar project, I would challenge my original plan again. I will plan a new back-up plan as I proceed with my original plan so that I can complete the perfect project on time. In addition, I will change the way I plan my backup plan to plan ahead when there may be external influences to avoid a similar experience next time. I will also consider the worst-case scenario every time and consider and analyse as many different directions as I can plan for myself.
0 notes
Text
Visual Summary
15th October Sun
Following on from last week's focus on documentation, I spent a long, confusing week.
Documentation is both the hardest and most fun part of my work. The documentation process gives me the opportunity to reflect on the past 10 weeks, identify the strengths and weaknesses of the project, and organise all the new skills and information I have learned as a designer. In particular, this capstone project has allowed me to analyse in detail the use of frameworks and toolkits.
Haūtu Waka Framework: 4/5 - I had used Haūtu Waka as a project timeline before, but through this capstone project, I was able to analyse Haūtu Waka in detail and learn about the appropriate direction and project progression for each phase. Compared to Double Diamond, which has detailed activity recommendations for each phase, Haūtu Waka has the advantage of allowing designers to choose their own activities and progress.
The Collective Action Toolkit: 2/5 - In fact, the toolkit itself is quite detailed and consists of a variety of activities that can be done by the general public. At the beginning of the project, The Collective Action Toolkit (hereinafter CAT) would be helpful because it would allow me to get input from understanding a wide range of people. However, as I progressed through the project, I realised that it would have been more beneficial for the capstone project research to use a tool that required a higher level of understanding rather than an easily accessible tool like CAT.

-> From the Miro Board, It's not a clear photo, but this is more showing the colour theme and orientation
To continue my own branding style, I moved my work from the Miro board to Adobe InDesign to start working on the details. Maintaining my own style is important because, in the end, all of my future work will be consistent and showcase the project's branding.
InDesign: 4/5 - It's more time-consuming than a Miro board because of the more demanding and detailed edits it requires, but the fine-tuned editing allows me to express the design I want and tie in my own branding.

-> Visual Summary Design (front and back cover)
Result
The visual summary has been roughly designed and organised. As originally planned, I used the Miro board to create the rough design and InDesign to complete the detailed work. I used the A4 format from the beginning of the project to prepare for the visual summary. However, it is expected that it will take more time than I thought because many things need to be modified, and many new pages need to be created.
I decided that it would be inefficient to use two programs, Miro board and InDesign, so for future work, I will use InDesign directly and only use the necessary items from the previous Miro board.
Learning
I always go through several stages to produce a final piece of work that is advanced, but it's not the best way to go when I'm working within a limited time frame like this project, so I realised that I needed to develop my ability to work quickly and produce great results in a timely manner. Working as a designer in society, I started to think seriously about how to compromise and understand that I can't always be guaranteed enough time, and I can't always maintain the style and method that I want.
0 notes
Text
Journey and Video
8th October Sun
Context and Action
This week's goal was to sketch out a rough visual summary structure and design. I began week 10 by designing the visual summary based on the content list I created last week. Through stream leader Ayla's studio lecture and visual summary examples from last year's Design 301 students, I came up with a total journey content list of 51 pages, and six pages needed to be designed.
Ideation Sketch - I have always ideated through pencil sketches as they are the easiest way to provide design ideas. I've tried digital sketching, but there are limitations of expression and comparison.
I still don't have any other ideation method other than pencil sketching, so I would love the opportunity to share and discuss my ideation process with other student designers in the future.

-> From the Miro board, Updated visual summary table of content
The video task is currently having the biggest impact on my mental health. :D I started with the determination to complete the video script, as the previous week had yet to produce any significant results.
Script Chart - This was my first time writing down scenes and scripts in a chart format, but it turns out the result was that a short video was great. In fact, I actually introduced this method to other students besides my partner and friends, and many of them found the charted script convenient to use.
However, creating the script below took a lot of trial and error. First, I created a storyboard using sticky notes. This was a way to use the characteristics of Miro boards, but it was time-consuming and complicated to create a detailed storyboard.
Six-Scene Storyboard - I used a short six-scene storyboard before creating a full-fledged script. Where I created a short storyboard with just six scenes that outlined the purpose of the video and the important scenes that must be included without nailing down the details and sentences. This took the stress out of creating a detailed story and allowed me to reflect on the 'purpose' and 'importance' of my project.

-> From the Miro board, Video script and storyboard
Result
In conclusion, I achieved my goal for this week. Which was to create a video storyboard. :D It was time-consuming because I had to go through five reflections to complete it, which was different from how I had initially planned to proceed. Nevertheless, I have had new video skills because I was able to find a new approach to creating a script. My interest in making videos on my own has increased, and I am excited about the video I will be making next week based on the script and storyboard I created.
Learning
Some of the most memorable things I've learned are the steps to create a script chart and a video with a new way of scripting. It's definitely a tool I'll be using the next time I make a video. However, it does require time management skills as it's a multiple process. Make sure I set aside enough time so that it doesn't affect my creativity and allow for enough reflection each time.
0 notes
Text
DES302 Blog#2 Reflection
3th October Tue
A new comment always makes me nervous, but I'll start Reflection #2 with the happiness of knowing that Reflection #1 was sufficient and that I got a good grade.
For this reflection, I received a similar comment to the previous one. Until the #1 reflection, I used Gibbs' Reflective Cycle. Gibbs' Reflective Cycle is a reflection tool comprising six detailed sections, so it was easy for me to follow as I was unfamiliar with blogging reflection. However, after #1 reflection, I was writing in a new way to find my own new blogging style.
"Using a model from the Reflector's handbook will help you articulate effective reflections in your report" (Nick, 2023)
However, since Nick recommended using the Reflector's handbook, I thought using a new reflection toolkit would be a novel challenge. After comparing five different reflection tools, excluding Gibbs' Reflective Cycle, I was intrigued by 'The CARL framework of reflection (hereafter CARL)'.

-> The CARL framework of reflection (The University of Edinburgh. 2018) (2)
CARL tool: 4/5: The CARL toolkit was the only one that didn't directly mention emotional expression. Writing blogs has allowed me to become more comfortable and natural with expressing myself and my emotions through this semester, so I wanted to use a toolkit to help me develop new areas. While writing my blogs, I realised that my weakest area was how I 'analysed' them. The advantage of CARL was that I could naturally describe and analyse my experience through Context, Action, and Results. The biggest advantage was that the toolkit was easy to understand, even with my limited English skills. :D
"The goal of reflective writing for design is to give you strategies to improve as a designer" (Nick, 2023)
This part of Nick's comment struck me the most, as I actually looked back at my own blog after reading the comments and realised that my reflection on myself as a designer was comparatively less than my reflection on the project. By focusing on the project for such a long period of time, I didn't reflect enough on my personal development and reflection as a designer.
I hope this reflection will serve as a foundation for me to reflect and develop my own designer thoughts and abilities.
Reference
(1) Nick Konings. (2023). Comment. Canvas. https://canvas.auckland.ac.nz/courses/86939/assignments/334212/submissions/303462#rubric
(2) The University of Edinburgh. (2018). The CARL framework of reflection. The University of Edinburgh. https://www.ed.ac.uk/reflection/reflectors-toolkit/reflecting-on-experience/carl
0 notes
Text
Journey and Video
30th September Sat
As mentioned in the previous presentation reflection, the prototype is not complete but is currently being worked on by the manufacturers. I was confident that I would be able to complete the project within the time limit, but since the assignment submission due date is about a month away, I decided to start documentation.
Before diving in, I created a new timeline to work efficiently through the various documentation. That's right, I love making a planner and a timeline.

-> From the Miro board, New timeline for documentation and submissions.
Timeline: 5/5 - As a designer, it's important to be able to adapt quickly to constant change and given circumstances, and scheduling is the most effective way for me to do that. It's the fastest and most efficient way to analyse a given conditions and find the most suitable way to move forward.
This week, I've been working on visual summaries (a.k.a. Journeys) and videos, and while that sounds like a lot, I've actually been doing more research than actual work.
Research: 2/5 - Research is a never-ending task. The more you research, the more you discover new information and ideas, but sometimes it can lead you astray. When I was researching video information and content, I was easily influenced by the plethora of information and different video styles out there, especially since video is an industry I'm not familiar with, and I wasn't sure of my personal style or the direction I wanted to take.
Deciding on the table of contents took the longest of all the tasks. It's probably because I'm a planner, especially regarding video content, since it's my first time working on video by myself. However, the 'story structure' mentioned in the Design 301 lecture helped me a lot. I followed the story structure and added the necessary additional elements of the project to complete the video content.

-> Story structure example (University of Auckland. 2023) (1)

-> From the Miro board, Journey content and Video contents
Story Structure: 4/5 - Nowadays, it has become more difficult to find information on basic elements as much as pursuing unique, special and new styles. In particular, while doing research on video, it was easy to find unusual and interesting video compositions, but it was rather difficult to find video compositions that were faithful to the basics. Therefore, the story structure recommended in the Design 301 course was a tool with sufficient development potential. It's a project-agnostic tool that everyone can apply to their own projects, and it's a tool that I would like to use for my own personal projects, not just university projects.
Conclusion
Hopefully, this will be my last week of relaxation. I have lost focus in recent weeks, but this planning has made me realise the imperilment of submission dates.
I think it's also an opportunity to not be satisfied with my current table of contents but to seek advice from a partner or tutor to help me explore how it could be improved, what I should include more of, and to be bold enough to cut out what I don't need.
Action Plan
In fact, this week has been a lot of research and not a lot of actual work. That's because the prototype I worked on over the break was really tough, but now I need to get back to deep workflow. I want to push myself, take proper breaks, and work forcefully until the end.
In particular, next week will be aimed at really getting started on Journey and Video, and in the case of Video in particular, finalising shots and scripts.
Reference
(1) University of Auckland. (2023). Story structure. Week 7 storytelling with Video. https://canvas.auckland.ac.nz/courses/90485/files/11619846?module_item_id=1945660
0 notes
Text
Presentation Reflection
19th September (Tue)
Like the other blogs, I would also like to start my reflection with a description. From this blog, I still feel uncomfortable speaking for myself in the blog, but I hope this writing can form my own style of writing.
So, I started with the toolkit activity 'Four Square Story' from The Collective Action Toolkit by Frog. This activity is thinking about how my project would affect people by drawing a story. Since this presentation was not formal, there was no limitation to how to present my project and prototype. Therefore, this activity could help me to find out the way.

-> Four Square Story from Frog’s The collective action toolkit. (David Sherwin, 2023) (1)

-> Four Square Story activity
Coming up with a story wasn't easy - I didn't have a target market, and I didn't have a clear idea of the impact I wanted to have, so I had to go through a process of reflection on all of my previous works to come up with a story in four boxes.
Four Square Story: 4/5 - It really helped me to find a way to present my idea and a great chance to redefine my project's target audience.
The toolkit itself is very helpful, but my project is still greedy. My project wants to reach a wide range of people with a simple configuration now. Why don't I let go of my ambition and accept the limitations of my project? The ambition is following me for the whole project process. I still want new ideas to cover my weaknesses and hope to include more products in my finalised toolkit. I know that time constraints and the determination to accept your own limitations are also important parts of being a designer.
-> Presentation instruction
I was planning to give a presentation without any supporting materials, but English is my second language, so I created a toolkit supplement for the presentation for, the situation that I forget everything about my toolkit. I wanted to improve the understanding of the paper prototype by instruction.
Prototype: 3/5 - The paper prototype didn't show enough promise. Especially inside the box, when I started my presentation, all the products were mixed up because I needed to organise them better. Also, I included the explanation of 'how to use' with only writing, which was a disadvantage since there was a short period and the audience had a short time to understand my toolkit and writing wasn't really helping them to understand.

-> Presentation
To conclude, the presentation was disastrous: I read my hastily prepared script with a shaky voice and ended up with a very disappointing presentation. The reason for my nervousness was my lack of preparation. My head was scrambled, and I ended up skipping the Whare Tapa Whaa I had prepared.
Presentation: 1/5 - It's always a matter of being generous with myself. I'm disappointed in myself for not preparing enough for an informal presentation, especially considering the treaty partners and Whare Tapa Whaa.
Conclusion
Disappointed. In particular, watching other students present their projects was very inspiring. Knowing that I didn't put my best foot forward in the presentation made me feel useless, but it also gave me an alert about the final presentation.
My project is heading in the right direction on the prototype side, but I have to work on the details. The presentation made me realise that my project needs to have the responsibility of being a Treaty partner and the relevance of Whare Tapa Whaa, which is the first thing I should have considered as a student in the community stream.
Action Plan
The biggest issue remains the consideration of treaty partners and the analysis of the Whare Tapa Whaa model. I will further research the Treaty of Waitangi and the Whare Tapa Whaa model. I believe that I am still lacking as a designer in understanding New Zealand and that I need to become more aware of myself as a treaty partner.
Reference
(1) David Sherwin. (2023). frog’s Collective Action Toolkit. DAVID SHERWIN. https://www.davidsherwin.com/collective-action-toolkit
0 notes
Text
Final Prototype Process
17th September (Sun)
From this blog, I'm trying a new style of writing.
The creative work I've been doing over the last two weeks on the holidays has been frustrating in the process of reflection. However, on the other side, the reflection I've been doing with the members of the stream has helped me to see where I'm lacking in various aspects of the project.
Reflection: 5/5 - The process of reflection with new people always brings new ideas and perspectives. This time, through an argument with a partner I hadn't spoken to before, I realised that I had yet to consider the business and sustainability aspects of the project.
However, this despair was only part of the story; the self-reflection that followed determined that the current paper prototype was not a commercially viable design to create to the final. I can assure myself that this was because I was unsatisfied with myself and my design. So, I had to build on a newly developed design based on the previous design.
Hand Sketch: 3/5 - After all, the originals are always right, aren't they? Hand sketching allowed me to come up with a much wider range of designs than I could have done using a typewriter or digital resources, and I appreciated the psychological effect of taking my mind off the project's stress and spending some quality time with a pencil.
-> From the Miro board, Reflection and new idea sketches.
"Effort does not betray."
A favourite mum quote from my childhood. This is what I love about design: In the end, when practice pays off, I feel happiness. The continuous reflection and evolution have produced distinct results.
Process: 2/5 - Of course, the results were good, but it was an ineffective approach and process. The inefficient design approach resulted in a lot of wasted time and material and a lot of depression.

-> From the Miro board, 3rd Design, new elements and package design.

-> Outcome shot of the final paper prototype.
Conclusion
Constant reflection and evolution are clearly shown in the results. Although there was some waste, using more time and materials than anticipated, in the end, I was able to satisfactorily complete the prototype, which is the most important factor of my project.
However, I think it's also important for a designer to consider limitations, and in the case of this assignment, time management is crucial as it's a long-term project. On the other hand, I think this experience will help me in the future. Through iterative creation and reflection, I learned the importance of time management and how to run an efficient project.
Action Plan
I plan to proceed with a final prototype with the finalised design. Also, next week, I will start considering the other submissions for Assignment 3. I'm starting to feel a sense of urgency about the other items - it's not too late, but it's a good time to start.
0 notes
Text
DES302 Blog#1 Reflection
12nd September (Tue)
Now that the grades for my Blog #1 submission for Design 302 are in, I'll do some self-reflection.
Firstly, the overall comments were about tagging and navigation, and I was judged to need more creativity. However, after discussing this with Nick, we decided that more advanced tagging and navigation were unlikely to be possible due to the technical limitations of Tumblr. Therefore, I was able to get extra points from them.

-> New comments from Nick, Thank you :D
So, I looked for ways to improve on the 'Creativity' section, where I lost points.

-> Lost point from Creativity criteria
Firstly, I had the opportunity to read and analyse the blog of Wayne, a student on the same course who had an interesting blog in which he was critical and pessimistic of himself and questioned himself. I found it most interesting how he reflected on himself by quoting his partner or various people's comments and reflections.

-> Wayne's Blog (1)
The second blog I analysed was my partner Erika's blog, which is also a blog where she asks herself questions and comes up with her own answers. What I found most interesting about her blog was the overall design and the colour of the fonts. She chose to use yellow for the title font to set it apart from other body writing and make it more accessible.

-> Erika's Blog (2)
Finally, I analysed the blog posts of Brit, a designer who writes a blog called Brit dot Design(2023). One of her most interesting posts, 'Nouveau finds for autumn', felt like she was speaking to her audience on a friendly level - it felt like a natural tea-time conversation, and I felt like I am there with her.

-> Brit's Blog (3)
By analysing the blogs of three designers, I set the creative direction for my own blog.
Firstly, I will ask myself questions and have a conversation with my audience. My blog is more report-like than other bloggers, so I want to make the process of asking myself questions and answering them conversational with my readers.
Second is the emotional and entertainment factor. Similar to the first point, to develop the boring part of my blog like a report, I will talk about my momentary feelings and include stories or personal stories that I found interesting while working on the project so that I don't get bored when reading long posts.
And last, use different colours. Currently, the writing on my blog is all black, but I would like to use the colours of my project theme to make my blog more enjoyable for my readers.
This reflection and development of my blog will make my posts more enjoyable for myself and my readers.
Reference
(1) Wayne Poon. (2023). Week 6: Pen at Work. Akvan's Workshop. https://sites.google.com/view/waynepoon/projects/uoa_work/year_3/des_302_blog?authuser=0#h.hmk2hfmmb735
(2) Erika Mortera. (2023). Reflection on Myself and my Project. EM Design. https://emor928-design.tumblr.com/post/726762037511962624/180823-week-5
(3) Brit Arnesen. (2022). NOUVEAU FINDS FOR FALL. Brit dot Design. https://www.britdotdesign.com/post/nouveau-finds-for-fall
0 notes
Text
Final Prototype Plan & Material Research
9th September (Sat)
Description
The final prototype plan went the same way as the initial prototype plan. First, I listed the contents of the toolkit and devised a way to produce each product. I chose to handcraft most of the products by printing them on coated paper.
Once I've chosen how I want to produce all of my content, I've distributed the workload across Weeks 7 and 8, the final prototyping period. My goal is to have the full print and files for the maker completed in Week 7, with the rest of the craft work completed in the early part of Week 8, with time to reflect and move on to other productions.

-> From the Miro board, Final prototype material plans and weekly schedule.
My material research went in two directions. Firstly, for the items I am making myself, I research the materials I am going to use on various websites and compare prices to find the most affordable and readily available materials. Secondly, I research fabricators for acrylic items, but most New Zealand fabricators have a minimum quantity of 50 or 100 pieces, so I research out from New Zealand.

-> From the Miro board, Material researching. All the image links are provided on the Miro board. (1)
Feelings
The final prototype was something I was looking forward to, so planning went smoothly. In particular, I had decided whether I wanted to make each item myself or have it made by a company, and since I had used a company many times before, I decided on the final method relatively quickly.
I feel like I'm finally at the end of the project's prototype phase. There are still a lot of things to reflect on, and a lot of things that need to be developed design-wise.
As I listed the components I needed for the final prototype, I realised that I needed a lot more ideas and designs than I had previously designed, which made me feel overwhelmed and stressed by the amount of work I was putting in front of myself.
Evaluation
Project process 3/5 - While planning the final prototype, I realised that there are many toolkit components that are still lacking to proceed with the actual final. I think I should proceed directly with the design of the planned items.
Time management 5/5 - I completed the project within the planned timeframe. I completed the material research in the short term because I continuously researched various materials and contacted manufacturers since Week 6.
Project outcome 4/5 - I completed my research on materials and suppliers for the toolkit, but I wish I had found materials that were more affordable and easily accessible within New Zealand.
Analysis
The final prototype planning allowed me to create a systematic progression plan for my project. In particular, planning gives me the opportunity to reflect on my project and identify gaps. In this case, I realised that my previous designs and progress needed to be improved. This clarified my plan for the future and helped me see where and how the project could evolve.
However, planning is not always right because planning must be accompanied by time, and planning alone does not anticipate all of the future. For example, despite my initial prototype planning, there were still a lot of changes in my final plan. Therefore, it is necessary to constantly reflect on yourself and work without a plan.
Conclusion
I learnt the two sides of planning. I think planning is important; it is the foundation of a project and allows me to be prepared for different situations. However, sticking to a plan was a fatal flaw for me. As I worked on my new plan, I found gaps in my project that I had yet to notice.
This happened because I only trusted my plan. To avoid this in my final prototype, I will review the previous plan and build a new one each time I move forward with the project to avoid repeating my previous mistakes.
Action Plan
I'm happy with my prototype plans and material research, but I've been investigating if there are other ways to print acrylic other than from overseas manufacturers, and Fablab has suggested one.
The idea is to buy clear, thin, printable acrylic paper from Gordon Harris that can be printed on a university printer, print it, and then use a laser cutter to make a thicker acrylic block to hold the two materials together with resin. This is obviously a material that is readily available in New Zealand and would save on delivery fees and time. However, as it is something I am not familiar with, the time and labour involved in making it makes sense to use a manufacturer. Nevertheless, I would like to try the method recommended by Fablab, as it is interesting.
Next Plan
Continue to evolve the design of the prototype to reflect the initial prototype.
Work on the final prototype files for print-out and send to manufacturers
At the end of next week, I'm planning to start a video storyboard for A3
Reference
(1) Image Link provided in the Miro board
0 notes
Text
Initial Prototype
7th September (Thu)
Description
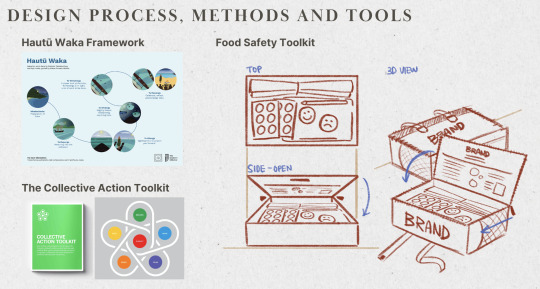
This week I aimed to build an initial prototype in order to start building the final prototype in Week 7. I based my creation on the Prototype it tool from The collective action toolkit, so I started by sorting out my materials list.

-> Prototype it tool from frog’s The collective action toolkit. (David Sherwin, 2023) (1)
Since my idea is a physical toolkit idea, the actual size was important to me, so I made various sizes and measured them in the fridge to come up with the ideal size before I started working on the specific idea. In the case of the food card, I actually made it and found that my first idea was too small, so I made a new size.
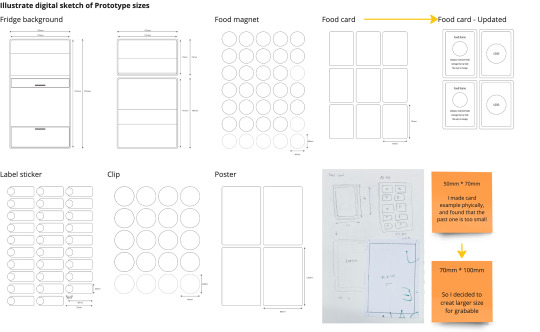
-> Illustrate digital sketch of Prototype sizes
I created the pixel icons as previously planned but reflected on them midway through the process. I realised that I didn't have enough time to complete the pixel art style and that the project positionality wasn't fully involved and reflected, so I went with a 2nd initial prototype.

-> From the Miro board, 1st initial prototype ideas
Prior to the 2nd initial prototype, I reworked the existing logo and fonts as the pixel art style had been abandoned. I decided to use the Goodkitty font for the logo, with Montana as a sub, and keep the existing font, Acumin Variable Concept, for the body font.
-> From the Miro board, new logo ideas
The lack of positionality meant that my project didn't have enough Māori elements since my project is based on indigenous culture. Therefore, I researched various Māori patterns and chose Pātikitiki, which I felt was the best fit for my project topic. Pātakitaki is a pattern that means 'hospitality' and 'availability of food'.

-> Pātikitiki pattern from Kōwhaiwhai for beginners (2021)
This is the 2nd initial prototype design, incorporating new ideas from the 1st initial prototype reflection. I put the Māori pattern, Pātikitiki, on hold because I had not yet received direct permission or checked with indigenities.
-> From the Miro board, 2nd initial prototype ideas
I later printed a 2nd prototype design to create a physical prototype. I printed my design on coated paper and glued it to thicker paper so that it would resemble the actual product. For the magnet products, I glued pieces of magnet sheet to the thick paper.

-> Prototype hero shots
Feelings
As with the previous logo design process, I feel the most stressed when I'm working on a creative design. This time, I found a lot of errors and shortcomings in the 1st prototype design, which caused me some confusion. However, through critical reflection, I was able to figure out the problems and create a more advanced design.
The 2nd initial prototype design is still lacking, but I am getting closer to the ideal physical prototype model of the project as I see the toolkit components evolving little by little.
Evaluation
Project process 5/5 - I am satisfied with the current direction of the project and the percentage of progress above 50%.
Time management 2/5 - I thought I had enough time to prepare, one week, but it was a short period of time to organise the design ideas. I completed the prototype in insufficient time, which resulted in unsatisfactory work.
Project result 3/5 - I completed the prototype I had planned but did not complete a satisfactory design. The design needs more research and development.
Analysis
The toolkit 'Prototype it' was the only tool in The collective action toolkit(David, 2023) that was related to prototypes. However, despite being the only tool, the explanation and understanding of prototypes needed to be improved. This is because The collective action toolkit is a toolkit for group projects. The point where 'Prototype it' differs from the other tools is the idea-sharing session in a group at the end of the tool. However, considering the project's ethical situation, I could not share ideas and reflect with others, so I generated the maximum effect through multiple reflections on my own.
Conclusion
Creative activities always took time away from me. I realised again while designing this project that design is a continuous process of reflection. I had two initial ideations, but there were six design changes, including hand sketching.
Also, if I were to reflect on myself, I need to develop better time management skills. I need to set a time limit and distribute my time appropriately by learning to give up when the creative design process is not progressing within the limited time and reflecting back.
Action Plan
If I were to go through the initial prototype process again, I would set aside more time than I do now. While my improved time allocation skills are important, I believe that if I had more time, I would have been able to reflect on the design and complete it sooner.
Next Plan
Final prototype planning and material research
From my initial prototype reflection, I will continue to develop the design of the prototype.
Reference
(1) David Sherwin. (2023). frog’s Collective Action Toolkit. DAVID SHERWIN. https://www.davidsherwin.com/collective-action-toolkit
(2) Bridget Blair. (2021). Kōwhaiwhai for beginners. Arts Online. https://artsonline.tki.org.nz/Planning-tools/Teacher-Resource-Exchange/Kowhaiwhai-for-beginners
0 notes
Text
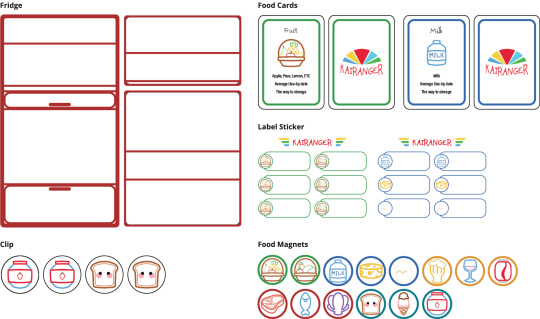
Final Idea
2nd September (Sat)
Description
The final idea had a total of seven components. They consisted of new ideas from Developing ideas and ideation.
Package
Fridge background magnet
Food magnet
Food cards
Label stickers
Clips
Flexible lid
Infographic poster

-> From the Miro board, the brief digital sketch of the final idea.
Before making the initial prototype, I made notes on how I wanted each item in the toolkit to be made. For the initial prototype, I wanted to make the prototype as high quality as possible with a small budget, so I decided to work with illustrations to create the design and colour print all the products. For the colour-printed products, I planned to put them on 200gsm thick paper to make them look more like the real thing. Finally, I decided to implement magnetic products using magnetic sheets that are readily available in the market.

-> From the Miro board, the brief digital sketch of the final idea.
For my plan, I researched the cheapest and most readily available materials in New Zealand. All products were researched to be available for $50 or less, but I plan to do my own market research to find more affordable materials.

-> From the Miro board, the brief digital sketch of the final idea. All the image links are provided on the Miro board. (1)
Feelings
For the initial prototype material research, I was very pleased with how quickly it went, especially as the materials I had planned to use were items that were readily available in New Zealand and affordable.
Once I had the prototype plans in place, I was happy to see the overall feel and flow of the toolkit. It's always fun to see a project that I've been researching and planning for the entire semester take shape and produce the desired outcome, especially as a designer. Seeing my imagination become a reality is a great source of joy and motivation for me.
Evaluation
Project process 4/5 - I accomplished the important processes of deciding on a final idea, prototyping methods, and material research. However, I was disappointed that the toolkit I chose, The collective action toolkit, did not have detailed tools that I could use to create a prototype.
Time management 5/5 - I ended up starting a week earlier than the prototype timeline I had planned at the beginning of the semester, but it's always good to give yourself more time than you think you need.
Project result 5/5 - I was able to get the prototype materials within my limited budget.
Analysis
The reason I was able to select the content so quickly when deciding on the final idea was that I went through three iterations of ideation - initial idea, developed idea, and final idea - so I knew the strengths and weaknesses of the ideas and had already decided which ones would work best for the toolkit. It's important to do this because it's time-consuming, but it leads to the most satisfying results.
I was also considering prototype materials at the same time as I started ideating, so I chose materials that were readily available in New Zealand and could be found within my budget.
Conclusion
I learnt the importance of iteration and reflection again in this project, especially when deciding on an idea. When working with a group of people, you can decide on an idea that takes into account different communities through meetings and exchanging ideas, but there are limitations when it comes to a solo project.
For this project, there were also limitations of time and ethical issues to consider, so I realised that I needed to humble myself and improve through at least two rounds of reflection.
Action Plan
As I finalised the idea and started prototyping, my biggest complaint was that The collective action toolkit only had one toolkit for prototyping, so if I were to prototype again, I would look into toolkits for branding and prototyping.

-> Prototype it from frog’s The collective action toolkit. (David Sherwin, 2023)
Next Plan
In break week 2, finalise the size and design of the ideas that will be built.
Initial paper prototype outcome and hero shots.
Material research and final prototype plan for Week 7 after the break.
Reference
(1) Image Link provided in the Miro board
(2) David Sherwin. (2023). frog’s Collective Action Toolkit. DAVID SHERWIN. https://www.davidsherwin.com/collective-action-toolkit
0 notes
Text
Branding
31st August (Thu)
Description
To get started, I outlined the essential elements and processes of branding. My branding process started by identifying and analysing my brand's positionality, vision, and values. This is a process of reflection and reiteration of previous ideas. It allowed me to re-learn and understand my toolkit's purpose before I started creatively branding it.

-> From the Miro board, My positionality and Project Partners' Positionality (1), (2)
Along with positionality, I also listed the values of the toolkit. I've analysed the values of previous projects, but this time, I analysed the values of the toolkit itself and the values I wanted the users of the toolkit to feel.

-> From the Miro board,
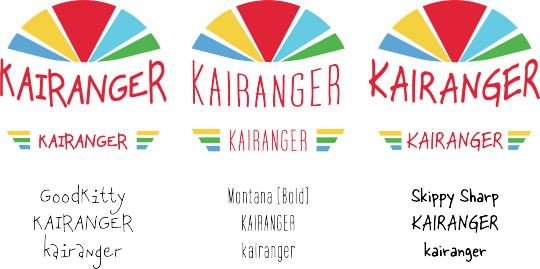
The first stage of branding was to "name" the toolkit. Based on the positionality and values of the project and the toolkit, I came up with a list of inspired words, combining them in different ways or coming up with new ones, and finally settling on a brand name.
Kairanger
The name of my toolkit, Kairanger, is a combination of the Maori words for food, Kai, and arrange. The literal meaning of Kairanger is "to organise food", but another meaning is "to protect food". I took advantage of the fact that ~ranger is often attached to many superheroes' names to imply that I wanted my toolkit to be a food protector. It also fits the value of my toolkit because it's a word that is easily pronounceable and accessible to people of all ages and nationalities.
The second stage of branding was to choose a colour to represent the brand. I stuck with the colour theme that I had previously chosen in my research in Week 3. This is because a variety of colours will attract the attention of users, especially my target audience of intermediate and college students.
The third piece of branding is the font style, which reflects the style of the toolkit. While exploring different fonts, I chose a game-like pixel style, which is good for targeting teens. By choosing a pixelated font for the main font, I could unify all the styles with a pixelated feel to make the brand more cohesive and showcase the playful nature of the toolkit.
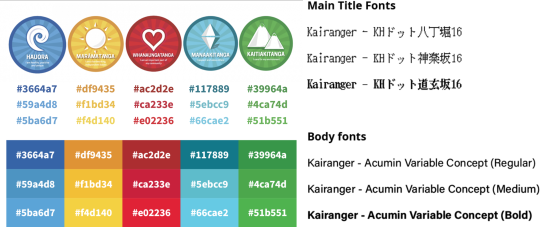
-> From the Miro board, colour theme and typography
Fourth, I created a tagline for the brand. Some might not think a tagline is important, but it can be used as many elements of my toolkit and brand. I wanted to come up with a simple and easy tagline for people to remember. I also wanted to include the parts of the name of the brand so that users could easily reach the brand name from the tagline.
Keep your Kai. Keep it kind.
The tagline, which translates to 'store your food with kindness', is a reminder to protect your food with the toolkit and also harkens back to my project's kawa, Manaakitanga, kindness. I also included Kai in the tagline as a reminder of the toolkit's name.
The final stage is Logo design. After going through many designs, I chose two final designs. Both designs are pixel art style and use five colours from the colour theme.
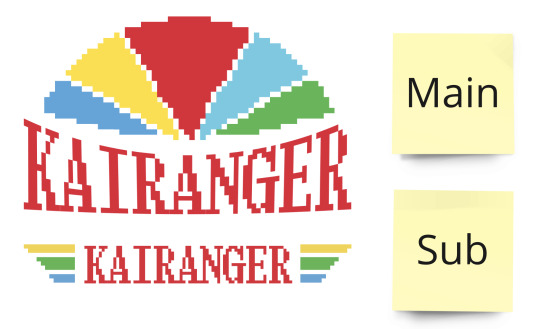
-> Kairanger logo, 2 types
Feelings
I always find the branding process enjoyable because it gives me the opportunity to explore and research different designs. In particular, the colour theme and font research process before creating the logo was my favourite part of branding. I love being creative because it's something that can easily cause me stress, but it's also something that allows me to express myself at my best. I think I love the creative process because every time I create a new design, it's stressful because I'm not sure what I want, but I'm happy when I reach a point where I have the design I want after many struggles.
Evaluation
Project process 5/5 - I researched how branding works first, so I knew what to expect.
Time management 1/5 - I should have taken into account that a task requiring creativity can go far beyond the planned time, and I spent a lot of time working on the logo in particular, which delayed my plans.
Project result 5/5 - I now have a clear direction for my brand and am able to present a clear branding.
Analysis
I did some research on branding before I started. Therefore, I could create the essentials I needed to design my brand. My toolkit, The collective action toolkit, didn't have a tool for creating a brand, so researching what branding consists of was essential. Through my research, I learnt that if you prioritise analysing your project before creating a brand, you'll have a better chance of creating a brand name and logo. This allowed me to generate a variety of brand name ideas and challenge myself with different logo designs.
However, it took me a long time to decide on a logo design because I was so caught up in researching and comparing different logos that I lost sight of my own brand.
Conclusion
Working on my solo project, I learnt about the process of branding - a simplified version of the process, but one that is absolutely essential.
As I mentioned before, I needed a lot of time to decide on a logo design, and I think this is because I was researching a lot of logos and lost sight of what made me unique, so I think it's important to have a solid design direction so that you don't lose sight of your own design after research.
Action Plan
If I were to do it again, I would start by defining the style of my brand using a detailed branding process, as this will give me a clear design style for the project when deciding on a logo design.
I would also create a design mood board of the direction I want to go in before creating the logo so I have a base to work from.
Next Plan
For the rest of Break 1, I'll finally finalise the toolkit idea and contents.
Research materials and plan for an initial paper prototype
Reference
(1) Plant and Food Research. (2023). Our strategy. Plant and Food Research. https://www.plantandfood.com/en-nz/our-strategy
(2) Plant and Food Research. (2023). Partnering with Māori. Plant and Food Research. https://www.plantandfood.com/en-nz/partnering-with-maori
0 notes
Text
Idea Develop
27th August (Sun)
Description
I used the 'Grow an idea' tool from The collective action toolkit to develop my idea, which is a process of combining different ideas together or adding new ideas to create a more developed idea.

-> Grow and idea tool from frog's The collective action toolkit. (David Sherwin, 2023)
I used the toolkit to develop each of my previous ideas, 'Label stickers' and 'Containers', by asking myself questions.

-> From the Miro board, Grow an idea process
These are the newly developed ideas.
Food sticker
Removable fridge design backgrounds and magnets
Flexible lid
Clip
In particular, I thought that 'Removable fridge design backgrounds and magnets' had the potential to be developed into the main idea of the toolkit. I also thought that clips would enrich the toolkit and be an easy-to-use item for users. Therefore, I developed both ideas into clear ideas through digital sketches.

-> From the Miro board, Idea digital sketches.
Feelings
I was very stressed in Week 5 and Week 6 because I had yet to settle on the main idea for the toolkit for a long time. Therefore, I feel relieved when the 'fridge & food magnet' idea comes out. Especially because I think it's an item that can be used by a lot of people in general, and it's an easily accessible product because a lot of people actually stick magnets on their fridges.

-> Fridge magnet collection example (Alifia, 2022)
I decided that the magnet idea was satisfactory as the main idea because I thought it would be easy to understand for users who don't know the process of the toolkit, and I thought it would be accessible to people of different ages.
Evaluation
Project process 3/5 - I need to reflect on whether my current process is sufficient, especially after sketching and digital sketching.
Time management 3/5 - I am doing a good job of following the timeline, but I need to make time for other tasks afterwards.
Project result 4/5 - I am satisfied because the main configuration of the toolkit has been decided, and the direction and usage are clear. However, the design style has yet to be decided, so more style research is needed.
Analysis
I was unsatisfied with my previous ideas and thought they needed to be better to be a toolkit. Therefore, I was able to create an improved idea because I looked at my ideas with a critical eye and asked questions. Also, because the Grow an Idea toolkit is a toolkit with multiple people, they only have done one process. However, I was able to come up with a more advanced idea by running the same process twice.
Also, I wrote down all the arrows and my thoughts so that other people who do not know all the processes of the project can understand the workflow. However, there is a lack of image references because I wrote down all the processes in sentences and words. The development process could be more readable because it is all in writing.
Conclusion
I learnt that taking the time to develop an idea multiple times can lead to the desired outcome. I was also able to create new and improved ideas by combining my own and external ideas instead of stopping at one idea.
It's also important to critically examine one's own ideas. Critical evaluation helps me understand and broaden my views to different communities that I am not involved with.
Action Plan
I will use images or sketches to represent my progress, so that people who don't know the project can easily understand it without reading. If I had more time, I would repeat the Grow an idea process four times to develop all my ideas or come up with new ones.
In particular, I would like to practice reflecting critically on external ideas in order to develop my skills in critically reflecting on my own ideas.
Next Plan
During the break, finalise the branding of the toolkit
Finalise the ideas developed in week 6 and decide on the toolkit's contents.
Reference
(1) David Sherwin. (2023). frog's Collective Action Toolkit. DAVID SHERWIN. https://www.davidsherwin.com/collective-action-toolkit
(2) Alifia. (2022). Around the world with fridge magnets. Story of Souls. https://www.storyofsouls.com/around-the-world-with-fridge-magnets/
0 notes
Text
Tangata tiriti and Whare Tapa Whaa
25th August (Fri)
Description
Before starting Week 6, I created a new timeline to keep the project productive for the next three weeks. Since I was studying two design classes at the same time, I distributed the work as evenly as possible so that the project could follow the previous timeline. The new timeline has the advantage of allowing me to write down my daily schedule so that I can see my daily goals at a glance.
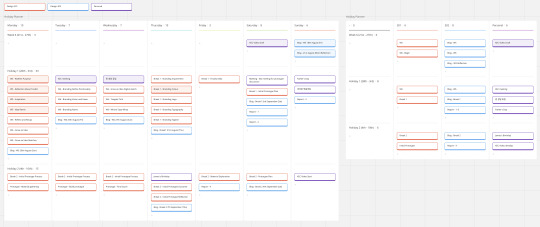
-> From the Miro board, Week6 to Break daily and weekly timeline
Before I started to develop my ideas, I did two activities that I needed to consider as a community stream.
Firstly, I reflected on my own project as a Tangata Tiriti (Treaty partner) and thought about what the Treaty meant to my project. I considered the 3 P's and analysed how protection, partnership and participation (2) were being upheld in my project.
The second activity involved researching the Māori health model, Whare Tapa Whaa, analysing my project through the four components of Whare Tapa Whaa, and analysing how my project impacts the well-being of the Māori community.
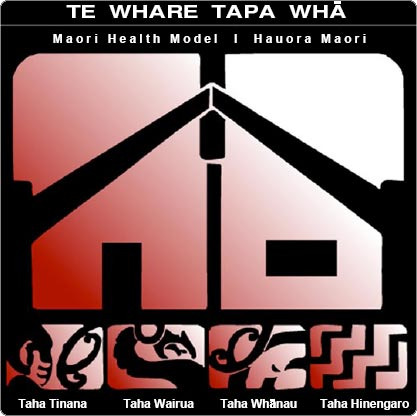
-> Te Whare Tapa Whaa; Māori health well-being model(3)
Feelings
The timeline is always a great way to see at a glance what stage I'm at in a project and to see what parts of the project could be improved. I enjoy creating timelines and to-do lists. Writing a daily to-do list and checking off what I've done at the end of the day helps me keep track of the progress of my projects and makes me proud of myself. Writing a to-do list also helps me keep track of my mental health, as it reassures me that I'm doing a good job.
This week, I took it relatively slow, but I think proper rest is essential when working on a long-term project. As the Whare Tapa Whaa model shows, both physical and mental health is essential to good health, so I think overworking and not being able to judge my limits can lead to burnout, so by taking a break now that I'm halfway through the project, I'll be able to work harder in the future.
Evaluation
Project process 3/5 - Although the main project flow hasn't progressed, I've been able to work on issues that I need to consider as a designer while working on the project.
Time management 5/5 - Thanks to my new timeline and detailed daily to-do list, I feel like I'm managing my time well enough even after taking a break.
Project result 5/5 - It was a great opportunity to better understand my project and learn about Tangata Tiriti and the Whare Tapa Whaa model.
Analysis
I think a detailed timeline works well for me because it allows me to see the process at a glance. As a designer constantly thinking about the future of the project and the process, it's nice to see at a glance what stage I'm at and where I need to move forward without having to check every time.
However, I think the downside of a detailed timeline is that it's easy to get stressed out, and it also has the limitation of not adding new timeline methods or new processes because once you've adapted to a less detailed timeline, you're stuck with it.
Conclusion
Through the Community stream activities, I was able to better understand and reflect on my project. As a designer, I think it's important to have a good understanding of one's positionality and the context and place of the project, so this was important for me because it allowed me to learn about the Aotearoa and Māori backgrounds of my project.
However, detailed timelines aren't for everyone - not all designers can understand them, and everyone has their own style - as an example, they work without a plan. This allows them to try different processes and make new discoveries that they hadn't thought of before, and I like to learn from their methods. I want to have more freedom in the background of a project and design without creating my own limitations.
Action Plan
Now that I've realised the usefulness of a daily to-do list, I think I'll plan a more detailed timeline if I'm working on another project, but I'll be careful not to limit my creativity and process, and I'll set aside some unplanned time to let my project unfold.
Next Plan
For the rest of Week 6, I'll work on developing the initial ideas and find more creative ideas that I can add to the final.
Start branding by finding the positionality and recap my aim and the vision of the prototype toolkit.
Reference
Ayla. (2023). Te Tiriti o Waitangi. Design 201
(2) Debbie Robertson. (2021). Te Tiriti o Waitangi - The Treaty of Waitangi. Papanui Primary School. https://hail.to/papanui-primary-school/publication/AGYREXN/article/uTWRISl#:~:text=The%20three%20%E2%80%9CP's%E2%80%9D%2C%20as,under%20the%20Treaty%20of%20Waitangi.
(3) Mental Health Foundation of New Zealand. (2023). Te Whare Tapa Whā. MHAW. https://mhaw.nz/explore/te-whare-tapa-wha/
0 notes
Text
DES302 Presentation Reflection
23rd August (Wed)
Description
This past Monday, I gave a Project Proposal Presentation to my Design 302 class. The purpose of the presentation was to present an updated project proposal for the project we were working on in Design 301. The goal of the presentation was to succinctly communicate the background, problem, and visions of the project and present the project's current progress in a short amount of time. I prepared 7 slides, including a cover and closing page, and a pre-written script of about 5 minutes.
I created my presentation using Canva, using the exact same design as my week 4 presentation for Design 301, but I made sure to include all of the information in 5 slides, so I wrote down the main bullet points and replaced writing with the images.
The presentation went as planned, lasting about 5 minutes, and I was able to verbally explain everything I had written down in the script.
-> Captures of the second page of presentation slides: I used icons and short words for brief descriptions.
And today, I got my grade and comments on my presentation.

-> (1) The comment from tutor Nick. Thank you for the comment.
Through the comments, I realised I had forgotten to attribute the text and images used on each slide as I created them. As a third-year design student, I was embarrassed at myself for forgetting to reference, but this has made me realise that I will never leave out references in my final project presentation.
-> There needed to be more in-slide referencing for the photos used.
Feelings
I was very nervous when I gave the presentation, and there were a lot of changes from my previous proposal report as I worked on the project. There were a lot of changes from my Design 301 presentation in week 4 as well, but I had very little time to familiarise myself with the new presentation information and project.
However, I did a good job with my presentation because I wrote down my script in advance and spent a lot of time trying to familiarise myself with it as much as possible. After my presentation, I felt very proud of myself because I did my presentation without looking at the script as much, but on the other hand, if I had more time, I wish I could have given a smooth presentation without the script.
In particular, I used a lot of Māori in my project and presentation, so I was careful to pronounce the words correctly and supplemented my English explanations to ensure that everyone in the audience understood. I hope that through my presentation, other students will become more familiar with the Māori language and feel a connection to New Zealand and Māori culture when defining their positionality as UOA students.
Evaluation
Project process 5/5 - I recorded all my previous talks, scripts, slides, and other materials I used on my Miro board. This saved me a lot of time when preparing for this presentation, and I was able to improve on my previous presentation.
Time management 5/5 - I prepared my presentation in the allotted time allotted and am happy with the progress of my current project.
Project result 4/5 - It's a shame that I lost points for referencing, but I'm sure this will help me to improve my presentation slides for the final presentation.
Analysis
I think this presentation was more concise than the previous one, but I got high marks because I prepared clear explanations and evidence. I presented the possibilities of my project to the best of my ability within the time limit, and because I prepared as much as I could, I made eye contact with the audience and kept their attention. As such, the most important thing in a presentation is concise delivery and making the audience interested.
However, my main criticism of my presentation was my pronunciation. As English and Māori are my second languages, it took me a lot of time and effort to achieve a natural and authentic pronunciation, but I was still disappointed that I made some pronunciation mistakes during my presentation. In order to make my presentation more natural and professional, in my next presentation, I will practice more by extending the duration of the presentation and substituting other words to explain when I have difficulty in pronunciation.
Conclusion
Through this presentation, I was able to learn some essential tips for my final project, especially what I am weak in when giving a presentation. As English is my second language, I think I need to put more effort into my speaking and pronunciation, and I need to develop to be able to make eye contact and present professionally without being nervous in front of a large audience.
I am also glad that I was able to re-learn the important fact that I should cite sources in my texts and images through my tutor's comments.
Action Plan
If I were to give this presentation again, I would reference my text and images, I would use less writing and make my slides easier to read by using more images and icons.
-> Captures of page 6 of presentation slides
Next Plan
Week 6 is for developing ideas and starting to finalise the final idea. I'll do more research based on the current ideas and find better ideas that I can add to my toolkit.
I'm aiming to start the report and finish the blog post by the beginning of week 6 for the Blog Update 1 submission.
Reference
Structure of Blog Reflection: The University of Edinburgh. (2020). Gibbs’ Reflective Cycle. The University of Edinburgh. https://www.ed.ac.uk/reflection/reflectors-toolkit/reflecting-on-experience/gibbs-reflective-cycle
(1) Nick Konings. (2023). Comment. Canvas. https://canvas.auckland.ac.nz/courses/86939/assignments/333761/submissions/303462#rubric
0 notes
Text
Redefine and Idea Remix
20th August (Sun)
Description
So, through Jam Session and ideation, I found that creating a perfect toolkit for ALL CONSUMERS in Aotearoa is challenging for me in this project research limitation and time limitation. So, I decided to redefine my project's limitations and how can I narrow the project's purpose.
Difficulties that I faced from the ideation stage
Age-range
Cultural difficulty
Food product diversity
I reorientated the project around the three main challenges. As a result, the target market for the newly defined project is intermediate to college New Zealand students. The food will be based on the categories of 'Countdown' and 'New World', which are local markets in New Zealand,
Based on the redefined project, I conducted an 'Idea Remix activity', where I mixed and matched the initial ideas selected during the previous ideation process to come up with ideas that could be developed.

-> From the Miro board, the Idea Remix activity
Due to the change in direction of the project, I created an inspirational mood board to explore my own design style and goals while researching the package design, which was a major influence on the project prototype.
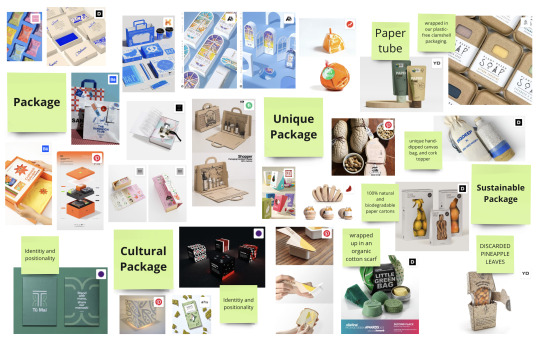
-> From the Miro board, Inspiration mood board. All the image links are provided on the Miro board.(1)
Feelings
While working on the Redefine project, I realised I was working on an extensive one. At first, it took a lot of work to think that I had to redetermine and research information about the project. However, because I had previously researched various aspects of the project, the process of redefining the project details was not complicated, and it was good because it gave me a chance to reflect on the project again.
Evaluation
Project process 3/5 - I've gotten a bit behind in the process of revisiting the project, but it's not too late yet. I believe this will lead to a project with a solid foundation.
Time management 3/5 - I didn't work on it for a while because I thought I needed to redefine the project, so I had to do all the work on the weekend.
Project result 5/5 - Now that the project brief and the target market are clearer, I'm looking forward to developing the prototype.
Analysis
I had to redefine my project because I was thinking too broadly about the goals of my project from the beginning. Most of the projects I've worked on as a designer have been aimed at a specific community or a definite audience, which I realised during the redefinition process helped me to create a definite design style as I went through the process.
Conversely, the redefine process was easier for me because I had done extensive research when I was doing the background research for my previous projects. This wide-ranging research allowed me to determine what my project needed most right now, allowing me to make the best choices.
Conclusion
As I went through the redefine for the first time, I learnt that redefining and recapitulation are important in addition to periodic reflection. reflection mostly reflects and investigates a part of the project or a specific element of the project, so I don't think about the whole project comparatively. Therefore, it is necessary to doubt and reflect on one's project at least 2 times, depending on the progress of the project.
It is necessary to have the ability to doubt and reflect on your own project. Of course, I should have faith in my own project, but sometimes, I need to further develop the ability to reflect, which is to judge my own project from a third party's point of view in a sober manner. And I currently have a lack of reflection, so I want to develop it.
Action Plan
This made me realise the importance of reflection, especially the need for periodic reflection on the project as a whole. I think I better understand the process of clarifying a project before development by doing define after the discover phase in the Double diamond process model, the most basic process model of design.
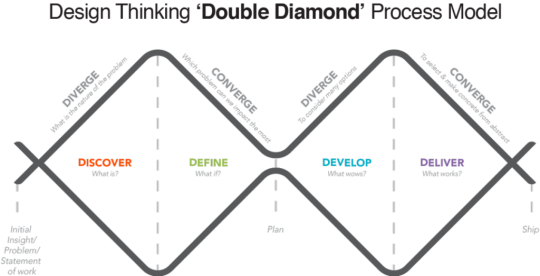
-> Developed by the Design Council, Double Diamond is a design thinking process. (2)
However, in comparison, the Hautū Waka framework I use encourages me to spend the majority of the project in the Te Whiwhinga phase after researching and exploring the Te Whāinga phase. I believe it is essential to reflect on the project as a whole at the same time as researching in the Te Whāinga phase, and when I undertake my next project, I will reflect on this project and include redefining and recapitulating activities in the project process.
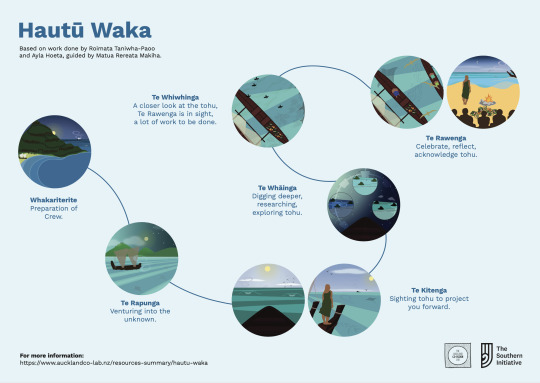
-> Hautū Waka framework from Auckland Co-design Lab. (3)
Next Plan
In Week 6, I will begin developing the idea - building on my ideas, hoping for better ideas, and creating something closer to the final.
I will start branding the project before starting the final design for the toolkit.
Reference
(1) Image Link provided in the image
(2) Redspark. (2022). Double Diamond: o que é e como usar?. Redspark. https://www.redspark.io/double-diamond-o-que-e-e-como-usar/
(3) The Lab Team. (2022). Practice Foundations: Hautū Waka. The Auckland Co-design Lab. https://www.aucklandco-lab.nz/resources-summary/hautu-waka
0 notes
Text
Idea Exploration
18th August (Fri)
Description
In Week 5, I started organising my ideas in earnest. The goal of Week 5 was to identify and evaluate ideas to use as components of my prototype toolkit and to determine the best ideas to include in the toolkit.
Firstly, I used brainstorming to generate a range of toolkit ideas, which were divided into three main categories: literature, physical and digital. Firstly, literature is something that users can read to learn about food safety and how to use the toolkit. Next, physical is how users can learn and practice food safety through hands-on use. Finally, digital is how users can be directed to a website or application through a link or QR code in the toolkit. My idea was to include as many physical ways as possible in the toolkit so that users could learn about food safety while having fun and experiencing it firsthand.
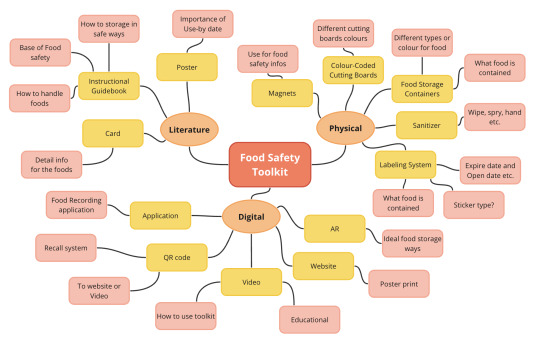
-> From the Miro board, Brainstorming ideas
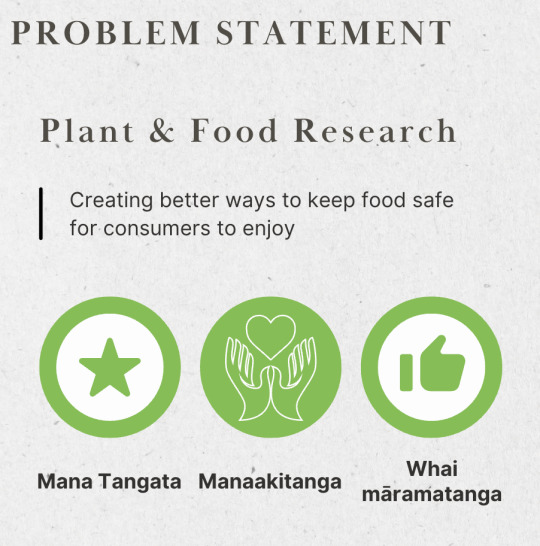
After organising many ideas, I chose the ones that were suitable for the toolkit and evaluated them for 'Possibility' and 'Creativity'. Possibility is the likelihood that an idea can be made into a working prototype. It is an evaluation criterion that takes into account time, materials, and realisation, and I chose it as an evaluation criterion to select the most promising ideas for a project that needs to be completed within a limited time. Another evaluation criterion, creativity, was selected by my project values and the values of my project partners. One of my project partner's values, Whai māramatanga, means 'We always look for a better way' (1) and one of my project values, Ngā akoranga, means learning (2). I chose 'creativity' as my evaluation criterion because it was the best option for this project and I wanted to make up new ideas, so I wanted to develop the ideas that already existed as much as possible, and also conceive of ideas that didn't exist.
-> From the Miro board, the Idea evaluation chart
Once I had an idea for the toolkit items, I started to think about how I wanted to package the toolkit. The current idea is to create a reusable bag similar to what users are most familiar with when it comes to food delivery.
-> Digital sketch of initial idea prototype 2D and 3D sketch
Feelings
When I started ideating, the project was getting difficult. I thought I had a lot of ideas, but when I tried to consider different situations and conditions, I couldn't come up with a clear idea, which was very difficult and exhausting.
However, when I see each idea developing and becoming clearer, I am hopeful that the project is moving in the direction I want it to go.
In fact, I'm starting to feel a little burned out from constantly pushing the project to the timeline, so I'm planning on using Week 6 as a light break to get back into the swing of things after this week's ideation.
Evaluation
Project process 4/5 - I'm feeling unsure and anxious about how the project is going at the moment, so I will create a more detailed timeline for the next week 6 and the holiday.
Time management 5/5 - I'm respecting and following the timeline.
Project result 3/5 - I'm not terribly satisfied because I didn't get the creative idea I was hoping for, but I can see the results of my efforts, and the project is moving forward.
Analysis
The idea generation was relatively quick, which was possible because I had a clear vision and aim for the project. because I was clear about what I wanted to achieve, I could brainstorm a toolkit with physical products, which led to many different ideas.
However, I still haven't arrived at the idea that I definitely want, and I think that most of the current ideas are advancements of the products and toolkits that already exist. However, I want my ideas to be creative and I want my PHYSICAL ideas to be fun and enjoyable for the users. Therefore, I will not limit my ideas, but will continue to add to them, and I will conduct research in other directions that are not connected to the ideas that currently exist.
I also realise that my ideas cannot cover all users. It was not easy to create a prototype that would be inclusive and understandable to all users of all ages, genders, races, etc. Therefore, my next step will be to redefine the project and create a clear direction.
Conclusion
Ideation is a time-consuming and research-intensive process, and it can also be physically demanding, which is why it's important to allocate a lot of time to ideation and to research more broadly in relevant areas so that you can come up with new and fresh ideas based on a wide range of information.
Action Plan
I had a relatively smooth start to my project ideation, but if I were to do it again, I would start by redefining the project's purpose.
Next Plan
Redefine the purpose of the project.
Idea remix
Reference
(1) Plant and Food Research. (2023). Our strategy. Plant and Food Research. https://www.plantandfood.com/en-nz/our-strategy
(2) John C Moorfield. (2023). Te Aka Māori Dictionary. Te Aka Māori Dictionary. https://maoridictionary.co.nz/
0 notes